nginx学习
Nginx
Nginx简介
产品出现瓶颈?
项目刚刚上线的时候,并发量小,用户使用的少,所以在低并发的情况下,一个jar包启动应用就够了,然后内部tomcat返回内容给用户。
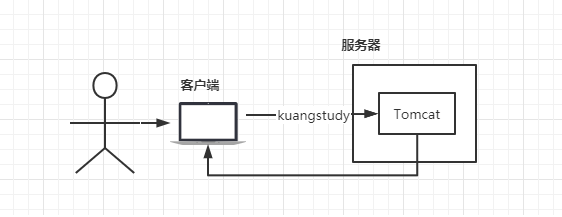
但是慢慢的,使用我们平台的用户越来越多了,并发量慢慢增大了,这时候一台服务器满足不了我们的需求了。

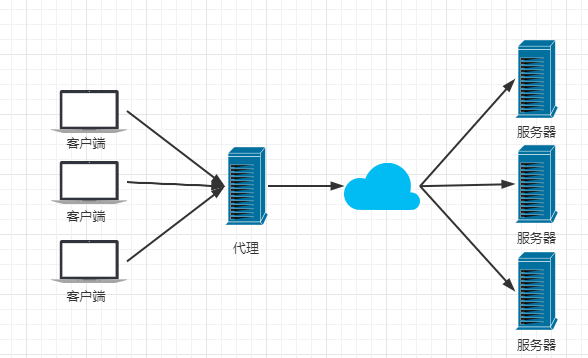
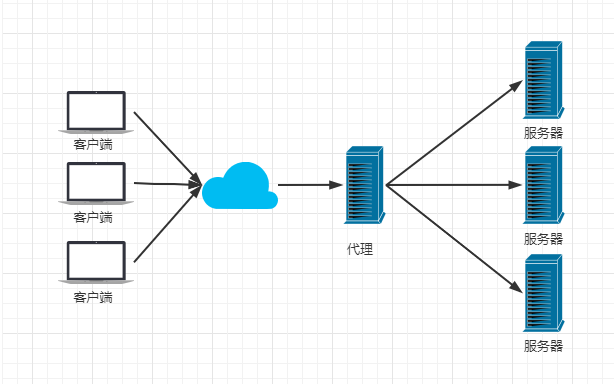
于是我们横向扩展,又增加了服务器。这个时候几个项目启动在不同的服务器上,用户要访问,就需要增加一个代理服务器了,通过代理服务器来帮我们转发和处理请求。
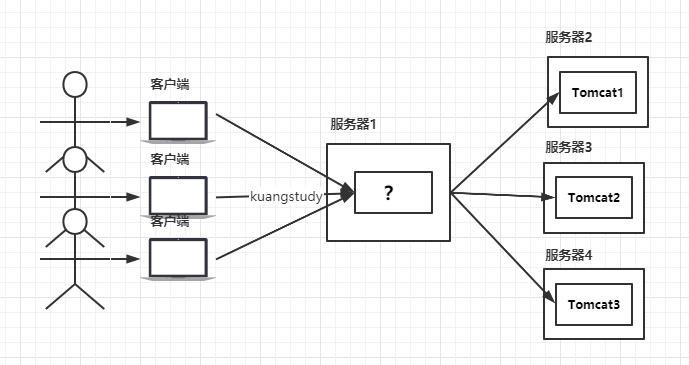
我们希望这个代理服务器可以帮助我们接收用户的请求,然后将用户的请求按照规则帮我们转发到不同的服务器节点之上。这个过程用户是无感知的,用户并不知道是哪个服务器返回的结果,我们还希望他可以按照服务器的性能提供不同的权重选择。保证最佳体验!所以我们使用了Nginx。
什么是nginx
Nginx (engine x) 是一个高性能的HTTP和反向代理web服务器,同时也提供了IMAP/POP3/SMTP服务。Nginx是由伊戈尔·赛索耶夫为俄罗斯访问量第二的Rambler.ru站点(俄文:Рамблер)开发的,第一个公开版本0.1.0发布于2004年10月4日。2011年6月1日,nginx 1.0.4发布。
其特点是占有内存少,并发能力强,事实上nginx的并发能力在同类型的网页服务器中表现较好,中国大陆使用nginx网站用户有:百度、京东、新浪、网易、腾讯、淘宝等。在全球活跃的网站中有12.18%的使用比率,大约为2220万个网站。
Nginx 是一个安装非常的简单、配置文件非常简洁(还能够支持perl语法)、Bug非常少的服务。Nginx 启动特别容易,并且几乎可以做到7*24不间断运行,即使运行数个月也不需要重新启动。你还能够不间断服务的情况下进行软件版本的升级。
Nginx代码完全用C语言从头写成。官方数据测试表明能够支持高达 50,000 个并发连接数的响应。
Nginx主要功能
正向代理与反向代理
正向代理(客户端的代理 服务器不知道真正的访问者)
反向代理(服务器端的代理 客户端不知道真正是哪个服务器进行服务)
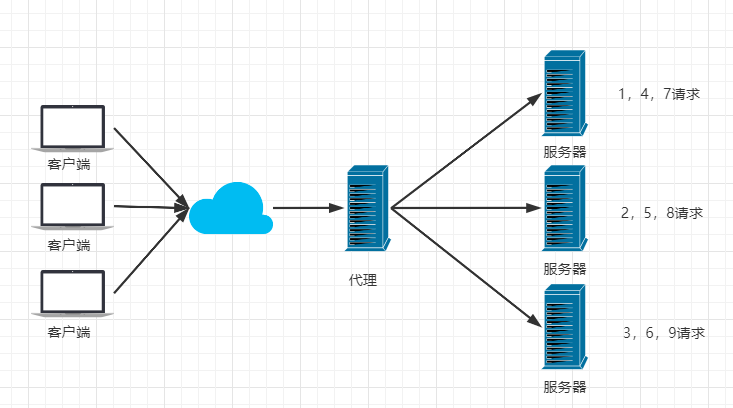
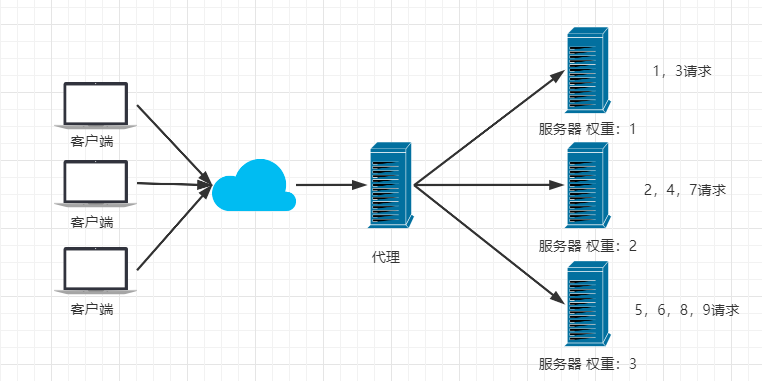
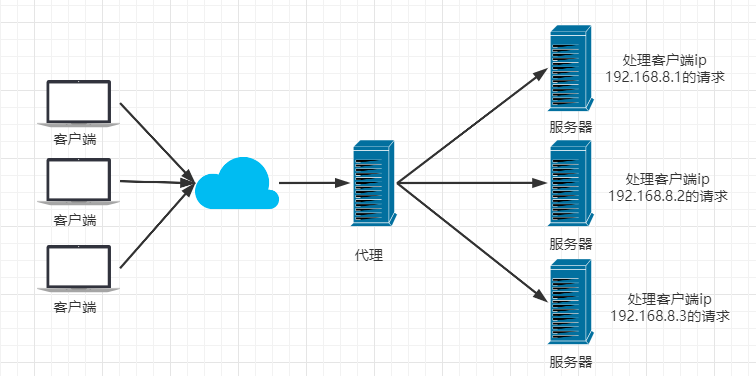
负载均衡理解
Nginx提供的负载均衡策略有2种:内置策略和扩展策略。内置策略为轮询,加权轮询,Ip hash。扩展策略,就天马行空,只有你想不到的没有他做不到的。
轮询
加权轮询
iphash对客户端请求的ip进行hash操作,然后根据hash结果将同一个客户端ip的请求分发给同一台服务器进行处理,可以解决session不共享的问题。
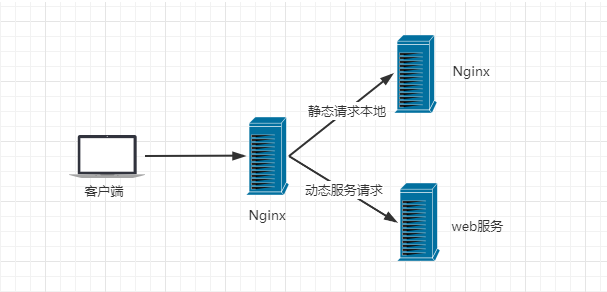
动静分离
动静分离,在我们的软件开发中,有些请求是需要后台处理的,有些请求是不需要经过后台处理的(如:css、html、jpg、js等等文件),这些不需要经过后台处理的文件称为静态文件。让动态网站里的动态网页根据一定规则把不变的资源和经常变的资源区分开来,动静资源做好了拆分以后,我们就可以根据静态资源的特点将其做缓存操作。提高资源响应的速度。
目前,通过使用Nginx大大提高了我们网站的响应速度,优化了用户体验,让网站的健壮性更上一层楼!
Redis作Session共享
Docker安装Nginx
docker nginx官方镜像给出的操作手册
[]: https://hub.docker.com/_/nginx
How to use this image
Hosting some simple static content
$ docker run --name some-nginx -v /some/content:/usr/share/nginx/html:ro -d nginx
Alternatively, a simple Dockerfile can be used to generate a new image that includes the necessary content (which is a much cleaner solution than the bind mount above):

FROM nginx
COPY static-html-directory /usr/share/nginx/html
Place this file in the same directory as your directory of content ("static-html-directory"), run docker build -t some-content-nginx ., then start your container:

$ docker run --name some-nginx -d some-content-nginx
Exposing external port
$ docker run --name some-nginx -d -p 8080:80 some-content-nginx
Then you can hit http://localhost:8080 or http://host-ip:8080 in your browser.

Complex configuration
$ docker run --name my-custom-nginx-container -v /host/path/nginx.conf:/etc/nginx/nginx.conf:ro -d nginx
For information on the syntax of the nginx configuration files, see the official documentation (specifically the Beginner's Guide).

If you wish to adapt the default configuration, use something like the following to copy it from a running nginx container:

$ docker run --name tmp-nginx-container -d nginx
$ docker cp tmp-nginx-container:/etc/nginx/nginx.conf /host/path/nginx.conf
$ docker rm -f tmp-nginx-container
This can also be accomplished more cleanly using a simple Dockerfile (in /host/path/):

FROM nginx
COPY nginx.conf /etc/nginx/nginx.conf
If you add a custom CMD in the Dockerfile, be sure to include -g daemon off; in the CMD in order for nginx to stay in the foreground, so that Docker can track the process properly (otherwise your container will stop immediately after starting)!

Then build the image with docker build -t custom-nginx . and run it as follows:

$ docker run --name my-custom-nginx-container -d custom-nginx
Using environment variables in nginx configuration (new in 1.19)
Out-of-the-box, nginx doesn't support environment variables inside most configuration blocks. But this image has a function, which will extract environment variables before nginx starts.

Here is an example using docker-compose.yml:

web:
  image: nginx
  volumes:
   - ./templates:/etc/nginx/templates
  ports:
   - "8080:80"
  environment:
   - NGINX_HOST=foobar.com
   - NGINX_PORT=80
By default, this function reads template files in /etc/nginx/templates/*.template and outputs the result of executing envsubst to /etc/nginx/conf.d.

So if you place templates/default.conf.template file, which contains variable references like this:

listen       ${NGINX_PORT};
outputs to /etc/nginx/conf.d/default.conf like this:

listen       80;
This behavior can be changed via the following environment variables:

NGINX_ENVSUBST_TEMPLATE_DIR
A directory which contains template files (default: /etc/nginx/templates)
When this directory doesn't exist, this function will do nothing about template processing.
NGINX_ENVSUBST_TEMPLATE_SUFFIX
A suffix of template files (default: .template)
This function only processes the files whose name ends with this suffix.
NGINX_ENVSUBST_OUTPUT_DIR
A directory where the result of executing envsubst is output (default: /etc/nginx/conf.d)
The output filename is the template filename with the suffix removed.
ex.) /etc/nginx/templates/default.conf.template will be output with the filename /etc/nginx/conf.d/default.conf.
This directory must be writable by the user running a container.
Running nginx in read-only mode
To run nginx in read-only mode, you will need to mount a Docker volume to every location where nginx writes information. The default nginx configuration requires write access to /var/cache and /var/run. This can be easily accomplished by running nginx as follows:

$ docker run -d -p 80:80 --read-only -v $(pwd)/nginx-cache:/var/cache/nginx -v $(pwd)/nginx-pid:/var/run nginx
If you have a more advanced configuration that requires nginx to write to other locations, simply add more volume mounts to those locations.

Running nginx in debug mode
Images since version 1.9.8 come with nginx-debug binary that produces verbose output when using higher log levels. It can be used with simple CMD substitution:

$ docker run --name my-nginx -v /host/path/nginx.conf:/etc/nginx/nginx.conf:ro -d nginx nginx-debug -g 'daemon off;'
Similar configuration in docker-compose.yml may look like this:

web:
  image: nginx
  volumes:
    - ./nginx.conf:/etc/nginx/nginx.conf:ro
  command: [nginx-debug, '-g', 'daemon off;']
Entrypoint quiet logs
Since version 1.19.0, a verbose entrypoint was added. It provides information on what's happening during container startup. You can silence this output by setting environment variable NGINX_ENTRYPOINT_QUIET_LOGS:

$ docker run -d -e NGINX_ENTRYPOINT_QUIET_LOGS=1 nginx
User and group id
Since 1.17.0, both alpine- and debian-based images variants use the same user and group ids to drop the privileges for worker processes:

$ id
uid=101(nginx) gid=101(nginx) groups=101(nginx)
Running nginx as a non-root user
It is possible to run the image as a less privileged arbitrary UID/GID. This, however, requires modification of nginx configuration to use directories writeable by that specific UID/GID pair:

$ docker run -d -v $PWD/nginx.conf:/etc/nginx/nginx.conf nginx
where nginx.conf in the current directory should have the following directives re-defined:

pid        /tmp/nginx.pid;
And in the http context:

http {
    client_body_temp_path /tmp/client_temp;
    proxy_temp_path       /tmp/proxy_temp_path;
    fastcgi_temp_path     /tmp/fastcgi_temp;
    uwsgi_temp_path       /tmp/uwsgi_temp;
    scgi_temp_path        /tmp/scgi_temp;
...
}
Alternatively, check out the official Docker NGINX unprivileged image.
启动nginx
docker run -d -p 8080:80 --name nginx_test -v nginx_html:/usr/share/nginx/html -v nginx_conf:/etc/nginx nginx:latest
# -d是后台启动
# -p 端口进行映射 本地端口:容器端口
# --name 是为容器起名字
# -v 挂载卷 将/usr/share/nginx/html、/etc/nginx分别挂载到本地
========================================================================================
beginner@beginner-virtual-machine:~$ docker run -d -p 8080:80 --name nginx_test -v nginx_html:/usr/share/nginx/html -v nginx_conf:/etc/nginx nginx:latest
4dad52000e6fd55cba432fffac7b7c9de702bbdb7d3f165afc93a6ad5b58202a
beginner@beginner-virtual-machine:~$ docker ps
CONTAINER ID   IMAGE          COMMAND                  CREATED          STATUS          PORTS                                                                                      NAMES
4dad52000e6f   nginx:latest   "/docker-entrypoint.…"   16 seconds ago   Up 15 seconds   0.0.0.0:8080->80/tcp, :::8080->80/tcp                                                     nginx_test
beginner@beginner-virtual-machine:~$
安装完成,启动成功
Nginx常用命令
由于环境不同这里讲解docker中的环境
docker自动启动nginx
nginx -s stop  停止  强制停止
nginx -s quit  安全退出 一项一项逐步停止
nginx -s reload  重新加载配置文件
ps aux|grep nginx  查看nginx进程
nginx的配置文件已经挂载到了本地主机
beginner@beginner-virtual-machine:~$ docker volume inspect nginx_conf
[
    {
        "CreatedAt": "2022-01-12T09:48:32+08:00",
        "Driver": "local",
        "Labels": null,
        "Mountpoint": "/var/lib/docker/volumes/nginx_conf/_data",
        "Name": "nginx_conf",
        "Options": null,
        "Scope": "local"
    }
]
可以自行进去更改
Nginx配置
Nginx.conf
nginx.conf结构
-- 全局配置
-- events配置
-- http
--- http配置
--- upstream 负载均衡配置
--- server
--- server
下面是默认配置
# 全局配置
===================================================================================
user  nginx;
worker_processes  auto;

error_log  /var/log/nginx/error.log notice;
pid        /var/run/nginx.pid;
===================================================================================
# 最大连接数
events {
    worker_connections  1024;
}

===================================================================================
http {
    include       /etc/nginx/mime.types;
    default_type  application/octet-stream;

    log_format  main  '$remote_addr - $remote_user [$time_local] "$request" '
                      '$status $body_bytes_sent "$http_referer" '
                      '"$http_user_agent" "$http_x_forwarded_for"';

    access_log  /var/log/nginx/access.log  main;

    sendfile        on;
    #tcp_nopush     on;

    keepalive_timeout  65;

    #gzip  on;

    include /etc/nginx/conf.d/*.conf;
}
注意nginx.conf的第32行中include 了一个文件下面就时需要导入的文件内容
/etc/nginx/conf.d/default.conf
server {
    listen       80;
    listen  [::]:80;
    server_name  localhost;

    #access_log  /var/log/nginx/host.access.log  main;

    location / {
        root   /usr/share/nginx/html;
        index  index.html index.htm;
    }

    #error_page  404              /404.html;

    # redirect server error pages to the static page /50x.html
    #
    error_page   500 502 503 504  /50x.html;
    location = /50x.html {
        root   /usr/share/nginx/html;
    }

    # proxy the PHP scripts to Apache listening on 127.0.0.1:80
    #
    #location ~ \.php$ {
    #    proxy_pass   http://127.0.0.1;
    #}

    # pass the PHP scripts to FastCGI server listening on 127.0.0.1:9000
    #
    #location ~ \.php$ {
    #    root           html;
    #    fastcgi_pass   127.0.0.1:9000;
    #    fastcgi_index  index.php;
    #    fastcgi_param  SCRIPT_FILENAME  /scripts$fastcgi_script_name;
    #    include        fastcgi_params;
    #}

    # deny access to .htaccess files, if Apache's document root
    # concurs with nginx's one
    #
    #location ~ /\.ht {
    #    deny  all;
    #}
}
在Nginx.conf 在第13行增加
upstream  自定义名称A{
	server ip地址:端口 weight=2
	server ip地址:端口 weight=1
}
# 这是负载均衡的配置 使用这个负载均衡会将访问分散扫下面两个服务器进行处理 weight值越大 nginx会分配越多的任务
在/etc/nginx/conf.d/default.conf 第8行的位置
location / {
    root   /usr/share/nginx/html;
    index  index.html index.htm;
    proxy_pass http://自定义名称A
}
# 当访问http://自定义名称A 就会交给负载均衡去处理
现在的请求情况:
浏览器访问80端口----->被nginx监听到--->代理到自定义名称A---->负载均衡处理---->某个server处理请求
这样就实现了反向代理 与负载均衡
https://www.kuangstudy.com/ "笔记来自B站狂神说"
https://space.bilibili.com/95256449/video "B站狂神视频主页"

 浙公网安备 33010602011771号