springboot实现自定义拦截器
为了更容易理解,我们通过一个代码例子来演示。
例子:
我们现在要访问http://localhost:8080/main.html页面,这个页面需要登录之后才能够浏览,没登录不能浏览。
那么现在问题来了。如何判断用户有没有登录呢?
很简单,我们可以在用户登录成功的时候,将用户的用户名写到session中,这样我们只要检查session中用户名是不是空就能得知用户有没有登录了。
下边这个是一个很简单的登录验证,当我们输入的用户名不为空,且密码为123456时就登录成功了,登录后跳转到http://localhost:8080/main.html页面。所以我们可以在重定向到目标页面之前将用户名放到session中(代码标红处)。
@Controller
public class LoginController {
    @PostMapping("/user/login")
    public String login(@RequestParam("username") String username,
                        @RequestParam("password") String password,
                        Map<String,Object> map,
                        HttpSession session){
        if (!StringUtils.isEmpty(username) && "123456".equals(password)){
            session.setAttribute("loginUser",username);
            return "redirect:/main.html";
        }else {
            map.put("msg","用户名或密码错误");
            return "login";
        }
    }
}
接下来我们要编写一个拦截器,判断用户有没有登录(判断session中loginUser是否为空)
编写自定义拦截器:
1.实现HandlerInterceptor接口。
2.重写接口中的默认方法。(jdk1.8)
public class LoginHandlerInterceptor implements HandlerInterceptor {
    @Override
    public boolean preHandle(HttpServletRequest request, HttpServletResponse response, Object handler) throws Exception {
        Object user = request.getSession().getAttribute("loginUser");
        if (user == null){
            //未登录,转发到登录页面
            request.getRequestDispatcher("/index.html").forward(request,response);
            return false;

        }else{
            //已登录
            return true;
        }
    }
}
3.注册拦截器(将拦截器放到ioc容器中)
@Configuration
public class MyMvcConfig implements WebMvcConfigurer{
    @Override
    public void addInterceptors(InterceptorRegistry registry) {
        InterceptorRegistration interceptor = registry.addInterceptor(new LoginHandlerInterceptor());
        interceptor.addPathPatterns("/**");
        interceptor.excludePathPatterns("/");
        interceptor.excludePathPatterns("/index.html");
        interceptor.excludePathPatterns("/user/login");
        interceptor.excludePathPatterns("/asserts/**");
        interceptor.excludePathPatterns("/webjars/**");
    }
}
代码讲解:
addPathPatterns方法指定要拦截那些请求, /**代表所有请求都拦截
excludePathPatterns方法指定排除掉哪些请求不拦截。
不能拦截的请求有:
访问登录页面的请求:"/"和"/index.html"
处理登录的请求:"/user/login"
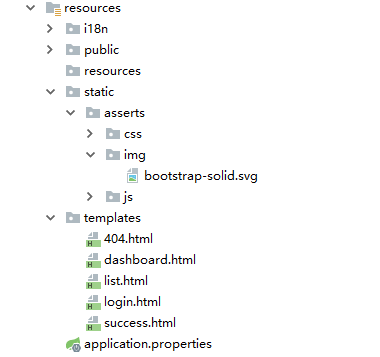
访问静态资源:"/asserts/**" 和 "/webjars/**"
其中asserts是静态资源文件夹static下的包:

完。


 浙公网安备 33010602011771号