小程序 wepy 总结
此篇文章仅仅是对自身项目的一个总结,并对一些遇到的问题给出解决方法
一,安装
二,使用
wepy的文档已经写的很清晰了,遇到的问题大多在issues和wiki中也能找到,具体就不概述了,只是简单总结一下
1. 项目目录

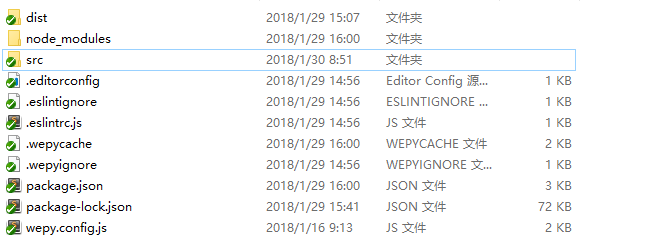
根据wepy创建的项目,出来的目录应该是这样的,其他的我们不用考究。src里编写我们的项目代码,cmd中npm run dev(本人windwos党),项目会自动在dist文件中生成wxml等等,开发者工具中选中dist文件即可
2.开发目录

这是我src中的目录,其中components中放的是组件,pages中放的是页面,static中放的是公共文件
三,开发前问题
1.开发者工具中需关掉项目设置中的前三个选项,根据个人情况选择关闭最后一个选项

真机调试非https需打开调试模式
2.referer
小程序固定referer为https://servicewechat.com,在项目中调用不通接口的时候,去问下后端小伙子们这里有没有让你通过
四,开发
1.分享
我们只做了分享个人与群,相应业务码为1007,1008.
在app.wpy中onshow或onlaunch获取scene,具体请自行移步小程序开发文档。从分享中的进入页面,可以在app.wpy设置globaldata,在相应页面拿this.$parent.globaldata,用来判断是否分享出来页面
多嘴一句,为何要这么做,因为分享出来的子页面是没有回退按钮的
2.一些个人封装的方法,写的一般,别怼我
 1 import wepy from 'wepy'
 2
 3 //公共参数
 4 const defaultData = {
 5   deviceTime: new Date().toLocaleString() + new Date().getMilliseconds(),
 6   updateVersion: 'V2.0'
 7 }
 8
 9 const wxRequest = async (_url, data, fn, errfn) => {
10   data = data || {}
11
12   const _data = Object.assign({}, defaultData, data)
13   try {
14     await wepy.request({
15       method: 'POST',
16       header: {
17         'Content-Type': 'application/x-www-form-urlencoded'
18       },
19       url: _url,
20       data: _data
21     }).then((response) => {
22       if (response.data.code === '0') {
23         fn && fn(response.data)
24       } else {
25         errfn&& errfn()
26       }
27     })
28   } catch (e) {
29     console.log(e)
30   }
31 }
32 export {
33   wxRequest
34 }
请求数据方法:页面import,wxRequest(传参)
/**
 * 提示与加载工具类
 */

export default class Tips {
  constructor() {
    this.isLoading = false;
  }
  /**
   * 弹出提示框
   */

  static success(title, duration = 500) {
    setTimeout(() => {
      wx.showToast({
        title: title,
        icon: "success",
        mask: true,
        duration: duration
      });
    }, 300);
    if (duration > 0) {
      return new Promise((resolve, reject) => {
        setTimeout(() => {
          resolve();
        }, duration);
      });
    }
  }

  /**
   * 弹出确认窗口
   */
  static confirm(text, fn, title = "提示") {
    return new Promise((resolve, reject) => {
      wx.showModal({
        title: title,
        content: text,
        showCancel: true,
        success: res => {
          if (res.confirm) {
            fn()
          } else if (res.cancel) {

          }
        },
        fail: res => {

        }
      });
    });
  }

  static toast(title, onHide, icon = "success") {
    setTimeout(() => {
      wx.showToast({
        title: title,
        icon: icon,
        mask: true,
        duration: 2000
      });
    }, 300);

    // 隐藏结束回调
    if (onHide) {
      setTimeout(() => {
        onHide();
      }, 500);
    }
  }

  /**
   * 警告框
   */
  static alert(title) {
    wx.showToast({
      title: title,
      image: "../images/alert.png",
      mask: true,
      duration: 1500
    });
  }

  /**
   * 错误框
   */

  static error(title, onHide) {
    wx.showToast({
      title: title,
      image: "../images/error.png",
      mask: true,
      duration: 500
    });
    // 隐藏结束回调
    if (onHide) {
      setTimeout(() => {
        onHide();
      }, 500);
    }
  }

  /**
   * 弹出加载提示
   */
  static loading(title = "加载中") {
    if (Tips.isLoading) {
      return;
    }
    Tips.isLoading = true;
    wx.showLoading({
      title: title,
      mask: true
    });
  }

  /**
   * 加载完毕
   */
  static loaded() {
    if (Tips.isLoading) {
      Tips.isLoading = false;
      wx.hideLoading();
    }
  }

  static share(title, url, desc) {
    return {
      title: title,
      path: url,
      desc: desc,
      success: function(res) {
        Tips.toast("分享成功");
      }
    };
  }
}

/**
 * 静态变量,是否加载中
 */
Tips.isLoading = false;
弹框方法:import引入,tip.xxx即可
3.富文本解析
小程序本身并没有富文本解析,这里调用了插件wxparse,可是照它的方法在wepy中使用有有些笨重,而且还有点问题,这里提供自己借鉴前辈方法后封装的插件------传送门
你的star是对我最大的鼓励
此次写这个比较仓促,欢迎大家发现有什么问题留言给我,谢谢...
posted on 2018-02-02 18:11 bling_bling 阅读(3329) 评论(0) 编辑 收藏 举报


