大数据基础之Ambari(2)通过Ambari部署ElasticSearch(ELK)
ambari2.7.3(hdp3.1) 安装 elasticsearch6.3.2
ambari的hdp中原生不支持elasticsearch安装,下面介绍如何通过mpack方式使ambari支持elasticsearch安装:
一 安装Service
1 下载
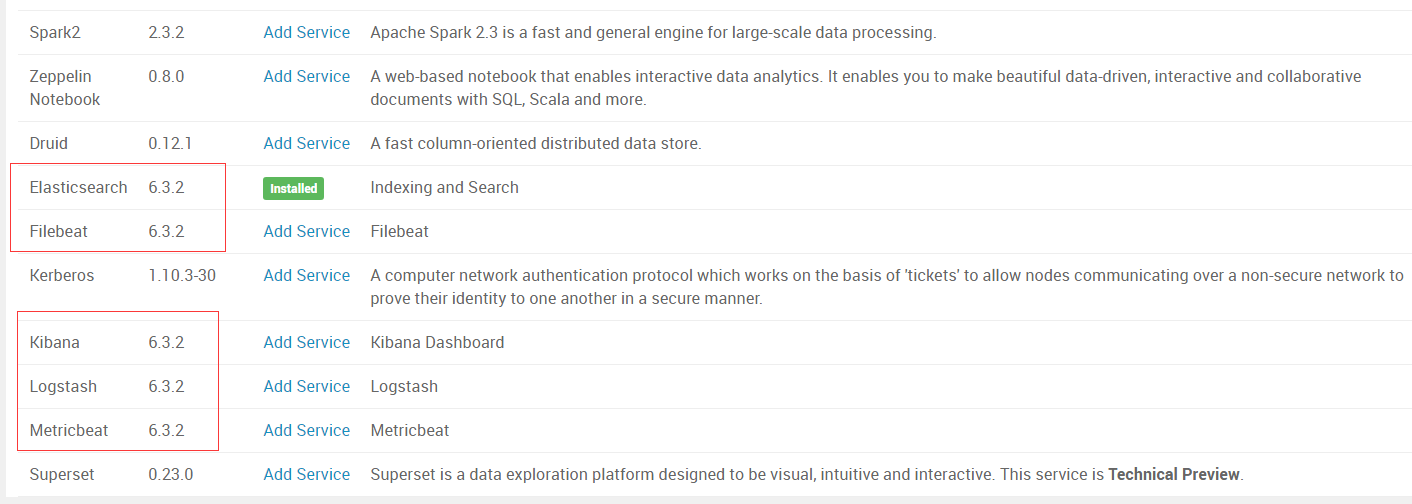
Mpack include version 6.3.2 of ElasticSearch, Logstash, Kibana, FileBeat, and MetricBeat
# wget https://community.hortonworks.com/storage/attachments/87416-elasticsearch-mpack-2600-9.tar.gz
2 安装mpack
# ambari-server install-mpack --mpack=/path/to/87416-elasticsearch-mpack-2600-9.tar.gz --verbose
3 重启ambari-server
# ambari-server restart
访问ambari页面发现services中并没有elasticsearch,检查mpack.json发现问题:
/var/lib/ambari-server/resources/mpacks/elasticsearch-ambari.mpack-6.3.2/mpack.json
{
"service_name" : "ELASTICSEARCH",
"service_version" : "6.3.2",
"applicable_stacks" : [
{
"stack_name" : "HDP",
"stack_version" : "2.3"
},
{
"stack_name" : "HDP",
"stack_version" : "2.4"
},
{
"stack_name" : "HDP",
"stack_version" : "2.5"
},
{
"stack_name" : "HDP",
"stack_version" : "2.6"
}
]
}
applicable_stacks表明service只应用到hdp2.3-2.6版本,没有3.1,手工加上;
mpack详细结构详见:https://cwiki.apache.org/confluence/display/AMBARI/Management+Packs
要注意直接修改mpack.json然后重启ambari-server不管用,需要重新install mpack:
1 卸载
ambari-server uninstall-mpack --mpack-name=elasticsearch-ambari.mpack
2 修改mpack.json并重新打包
elasticsearch_mpack-2.6.0.0-9.tar.gz
3 安装mpack(同上)
4 重启ambari-server(同上)
这时就可以在页面上看到ElasticSearch, Logstash, Kibana, FileBeat, and MetricBeat

二 部署ElasticSearch
下面开始部署ElasticSearch,发现报错:
Traceback (most recent call last):
File "/var/lib/ambari-agent/cache/stack-hooks/before-ANY/scripts/hook.py", line 38, in <module>
BeforeAnyHook().execute()
File "/usr/lib/ambari-agent/lib/resource_management/libraries/script/script.py", line 352, in execute
method(env)
File "/var/lib/ambari-agent/cache/stack-hooks/before-ANY/scripts/hook.py", line 31, in hook
setup_users()
File "/var/lib/ambari-agent/cache/stack-hooks/before-ANY/scripts/shared_initialization.py", line 50, in setup_users
groups = params.user_to_groups_dict[user],
KeyError: u'elasticsearch'
Error: Error: Unable to run the custom hook script ['/usr/bin/python', '/var/lib/ambari-agent/cache/stack-hooks/before-ANY/scripts/hook.py', 'ANY', '/var/lib/ambari-agent/data/command-303.json', '/var/lib/ambari-agent/cache/stack-hooks/before-ANY', '/var/lib/ambari-agent/data/structured-out-303.json', 'INFO', '/var/lib/ambari-agent/tmp', 'PROTOCOL_TLSv1_2', '']
跟进报错的代码:
/var/lib/ambari-agent/cache/stack-hooks/before-ANY/scripts/shared_initialization.py
     35   should_create_users_and_groups = False
     36   if params.host_sys_prepped:
     37     should_create_users_and_groups = not params.sysprep_skip_create_users_and_groups
     38   else:
     39     should_create_users_and_groups = not params.ignore_groupsusers_create
     40
     41   if should_create_users_and_groups:
     42     for group in params.group_list:
     43       Group(group,
     44       )
     45
     46     for user in params.user_list:
     47       User(user,
     48            uid = get_uid(user) if params.override_uid == "true" else None,
     49            gid = params.user_to_gid_dict[user],
     50            groups = params.user_to_groups_dict[user],
     51            fetch_nonlocal_groups = params.fetch_nonlocal_groups,
     52            )
这时需要将配置ignore_groupsusers_create打开,查看和修改配置有两种方式:
1 命令行
# cd /var/lib/ambari-server/resources/scripts
# python configs.py -u admin -p admin -n $cluster_name -l $ambari_server -t 8080 -a get -c cluster-env |grep -i ignore_groupsusers_create
"ignore_groupsusers_create": "false",
# python configs.py -u admin -p admin -n $cluster_name -l $ambari_server -t 8080 -a set -c cluster-env -k ignore_groupsusers_create -v true
详细参数详见
# python configs.py --help
2 rest api
curl --user admin:admin -i -H 'X-Requested-By: ambari' -X GET "http://ambari.server:8080/api/v1/clusters/$cluster_name/configurations?type=cluster-env"
从返回的items中找到tag,然后再请求(增加tag参数):
curl --user admin:admin -i -H 'X-Requested-By: ambari' -X GET "http://ambari.server:8080/api/v1/clusters/$cluster_name/configurations?type=cluster-env&tag=$tag"
返回结果中包含所有的property
"properties" : {
"agent_mounts_ignore_list" : "",
"alerts_repeat_tolerance" : "1",
"enable_external_ranger" : "false",
"fetch_nonlocal_groups" : "true",
"hide_yarn_memory_widget" : "false",
"ignore_bad_mounts" : "false",
"ignore_groupsusers_create" : "false",
修改需要先将上面的配置保存到一个文件,比如/tmp/configurations.tmp,然后修改,然后再调用接口:
curl --user admin:admin -i -H 'X-Requested-By: ambari' -X PUT -d @/tmp/configurations.tmp http://ambari.server:8080/api/v1/clusters/$cluster_name
然后再部署即可;
三 启动ElasticSearch
启动elasticsearch,报错:
1)
File "/usr/lib/ambari-agent/lib/resource_management/libraries/script/config_dictionary.py", line 73, in __getattr__
raise Fail("Configuration parameter '" + self.name + "' was not found in configurations dictionary!")
resource_management.core.exceptions.Fail: Configuration parameter 'java_home' was not found in configurations dictionary!
需要返回ambari的elasticsearch config页面,将java_home修改为实际的java home路径:
# JAVA_HOME must be provided here for OS that use systemd service launch
JAVA_HOME={{java64_home}}
2)
File "/var/lib/ambari-agent/cache/common-services/ELASTICSEARCH/6.3.2/package/templates/elasticsearch.slave.yaml.j2", line 85, in top-level template code
gateway.expected_data_nodes: {{ expected_data_nodes }}
File "/usr/lib/ambari-agent/lib/resource_management/libraries/script/config_dictionary.py", line 73, in __getattr__
raise Fail("Configuration parameter '" + self.name + "' was not found in configurations dictionary!")
resource_management.core.exceptions.Fail: Configuration parameter 'hostname' was not found in configurations dictionary!
查看报错的文件
/var/lib/ambari-agent/cache/common-services/ELASTICSEARCH/6.3.2/package/templates/elasticsearch.slave.yaml.j2
/var/lib/ambari-agent/cache/common-services/ELASTICSEARCH/6.3.2/package/templates/elasticsearch.master.yaml.j2
发现报错的这行,是因为hostname没有赋值导致,直接去掉这行
node.name: {{ hostname }}
在ambari-server端对应的模板文件为:
# grep hostname /var/lib/ambari-server/resources/common-services/ELASTICSEARCH/6.3.2/package/templates/elasticsearch*
/var/lib/ambari-server/resources/common-services/ELASTICSEARCH/6.3.2/package/templates/elasticsearch.master.yaml.j2:node.name: {{ hostname }}
/var/lib/ambari-server/resources/common-services/ELASTICSEARCH/6.3.2/package/templates/elasticsearch.master.yaml.j2.5.6.2: name: {{hostname}}
/var/lib/ambari-server/resources/common-services/ELASTICSEARCH/6.3.2/package/templates/elasticsearch.slave.yaml.j2:node.name: {{ hostname }}
/var/lib/ambari-server/resources/common-services/ELASTICSEARCH/6.3.2/package/templates/elasticsearch.slave.yaml.j2.5.6.2: name: {{hostname}}
然后可以启动成功:

参考:
https://community.hortonworks.com/articles/215078/how-to-install-elk-stack-632-in-ambari.html
https://community.hortonworks.com/questions/212871/add-custom-service-via-ambari-error.html
https://community.hortonworks.com/articles/63557/how-to-edit-the-cluster-envxml-entries-using-ambar.html
---------------------------------------------------------------- 结束啦,我是大魔王先生的分割线 :) ----------------------------------------------------------------
- 由于大魔王先生能力有限,文中可能存在错误,欢迎指正、补充!
- 感谢您的阅读,如果文章对您有用,那么请为大魔王先生轻轻点个赞,ありがとう


