WPF-MVVM模式-表现层的UI框架【学习笔记】
参考学习:https://www.bilibili.com/video/BV1LW41197LV?from=search&seid=12286516498324341778&spm_id_from=333.337.0.0
一,MVVM模式:表现层的UI框架
二,Winform和WPF开发思维的区别
Winform:开发思维点:界面(先拖控件,然后基于控件写逻辑)
MVVM模式开发 :Model,数据驱动(界面与业务逻辑分离,更改控件了,业务代码不用改)
三,MVVM的理解
Model:模型,对象的抽象结果
View:界面,只是布局,通过DataContext(上下文)来绑定对应的ViewModel。
ViewModel:连接View和Model,借助Command来负责界面的跳转和调用Model中方法来操作Model的数据。
数据对应着ViewMode中的Property,执行的命令对应着ViewModel中的Command。
ViewModel与View的沟通:
传递数据--数据属性
传递操作--命令属性
Binding:如果某个对象的某个属性 借助 DataBinging 关联在了界面上的某个元素上面,当属性值变化的时候,实际上Binding就是在侦听着PropertyChangedEventHandler这个事件,一旦这个事件发生了,就把属性变化后的值送到界面上。
四,数据绑定
数据绑定要达到的效果:
【1】界面View修改,Model自动更新
【2】Model修改,界面View自动更新
五,项目演示:旧的winform方式做项目
【5.1】第一次需求
1,功能要求:
功能1:点击Add按钮,计算2个Textbox文本框的数值相加。
功能2:点击Save按钮,保存到一个文件。

2,根据客户需求写界面代码:
    <Grid>
        <Grid.RowDefinitions>
            <RowDefinition Height="Auto"></RowDefinition>
            <RowDefinition Height="*"></RowDefinition>
        </Grid.RowDefinitions>
        <Button x:Name="Save" Content="Save" Click="Save_OnClick"></Button>
        <Grid Grid.Row="1">
            <Grid.ColumnDefinitions>
                <ColumnDefinition Width="22*"/>
                <ColumnDefinition Width="169*"/>
                <ColumnDefinition Width="326*"/>
            </Grid.ColumnDefinitions>
            <Grid.RowDefinitions>
                <RowDefinition Height="Auto"></RowDefinition>
                <RowDefinition Height="Auto"></RowDefinition>
                <RowDefinition Height="Auto"></RowDefinition>
                <RowDefinition Height="*"></RowDefinition>
            </Grid.RowDefinitions>
            <TextBox x:Name="tb1" Grid.Row="0" Background="LightBlue" FontSize="24" Margin="4" Grid.ColumnSpan="3"></TextBox>
            <TextBox x:Name="tb2" Grid.Row="1" Background="LightBlue" FontSize="24" Margin="4" Grid.ColumnSpan="3"></TextBox>
            <TextBox x:Name="tb3" Grid.Row="2" Background="LightBlue" FontSize="24" Margin="4" Grid.ColumnSpan="3"></TextBox>
            <Button x:Name="addButton" Grid.Row="3" Content="Add" Width="120" Height="80" Click="AddButton_OnClick" Grid.Column="2" Margin="7,50,199,50"></Button>
        </Grid>
    </Grid>
3,根据客户需求写逻辑代码:
 private void AddButton_OnClick(object sender, RoutedEventArgs e)
        {
            double d1 = double.Parse(this.tb1.Text);
            double d2 = double.Parse(this.tb2.Text);
            double result = d1 + d2;
            this.tb3.Text = result.ToString();
        }

        private void Save_OnClick(object sender, RoutedEventArgs e)
        {
            SaveFileDialog dlg=new SaveFileDialog();
            dlg.ShowDialog();
        }
【5.2】客户要改需求了,第二次需求
1,客户要界面,更改需求:
功能1:点击Add按钮,计算2个文本框的数值相加。
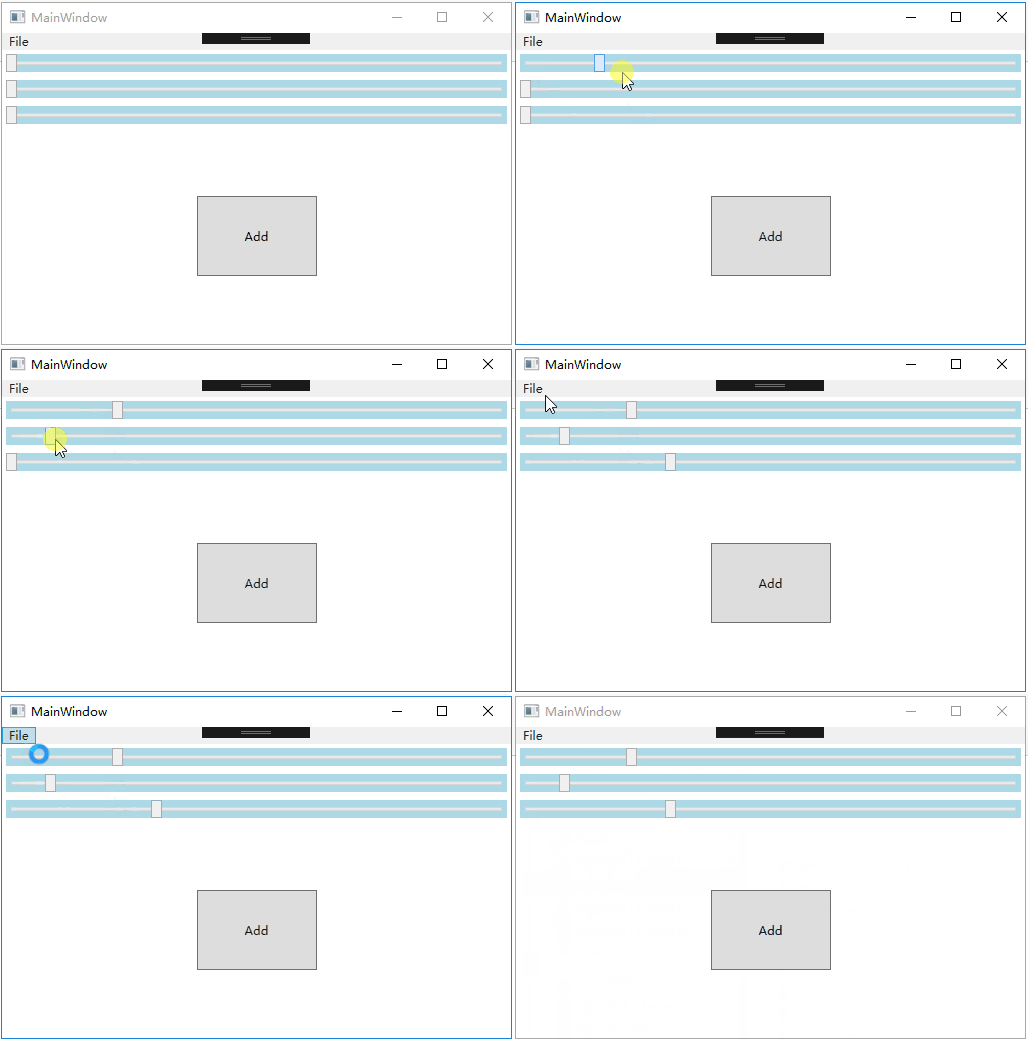
功能1改为:通过拉Slider进度条的方式代替文本框的方式。
切换了控件以后,这是出现的问题:
问题1:需要把Slider的名称改为之前TextBox的名称,而且Slider没有Text属性,
问题2:TextBox的Text属性类型是string,Slider的Value属性类型是double
功能2:点击Save按钮,保存到一个文件。
功能2改为:通过菜单方式保存

2,通过新需求更改界面
    <Grid>
        <Grid.RowDefinitions>
            <RowDefinition Height="Auto"></RowDefinition>
            <RowDefinition Height="*"></RowDefinition>
        </Grid.RowDefinitions>
        <Menu>
            <MenuItem Header="File">
                <MenuItem Header="Save" x:Name="saveMenuItem" Click="SaveMenuItem_OnClick"></MenuItem>
            </MenuItem>
        </Menu>
        <Grid Grid.Row="1">
            <Grid.RowDefinitions>
                <RowDefinition Height="Auto"></RowDefinition>
                <RowDefinition Height="Auto"></RowDefinition>
                <RowDefinition Height="Auto"></RowDefinition>
                <RowDefinition Height="*"></RowDefinition>
            </Grid.RowDefinitions>
            <Slider x:Name="slider1" Grid.Row="0" Background="LightBlue" Minimum="0" Maximum="100" Margin="4" ></Slider>
            <Slider x:Name="slider2" Grid.Row="1" Background="LightBlue" Minimum="0" Maximum="100" Margin="4" ></Slider>
            <Slider x:Name="slider3" Grid.Row="2" Background="LightBlue" Minimum="0" Maximum="100" Margin="4" ></Slider>
            <Button x:Name="addButton2" Grid.Row="3" Content="Add" Width="120" Height="80" Click="AddButton_OnClick2" Grid.Column="2"></Button>
        </Grid>
    </Grid>
3,通过新需求,更改逻辑
注意:这是控件名称变了,之前写好的都报错了,要把之前的代码全部都删除,全部重新写逻辑
新需求的逻辑代码:
        private void AddButton_OnClick2(object sender, RoutedEventArgs e)
        {
            this.slider3.Value = this.slider1.Value + this.slider2.Value;
        }

        private void SaveMenuItem_OnClick(object sender, RoutedEventArgs e)
        {
            SaveFileDialog dlg = new SaveFileDialog();
            dlg.ShowDialog();
        }
【5.3】如果后期客户又要改界面,逻辑代码又要重新删除,重新编写,到时候项目大了,会非常的耗损时间精力。
六,MVVM模式演示上面的功能修改
【6.1】准备工作:新建1个Common文件夹
1,添加1个数据属性相关的基类:NotifyBase
using System;
using System.Collections.Generic;
using System.Linq;
using System.Text;
using System.Threading.Tasks;

//手动添加以下引用
using System.ComponentModel;
using System.Runtime.CompilerServices;

namespace WPF_MVVM设计模式.Common
{
    /// <summary>
    /// (数据属性相关的)通知属性的基类:在wpf中将控件绑定到对象的属性时, 当对象的属性发生改变时必须通知控件作出相应的改变, 所以此对象需要实现 INotifyPropertyChanged 接口
    /// </summary>
    public class NotifyBase : INotifyPropertyChanged
    {
        //INotifyPropertyChanged 接口成员。触发事件,相当于发布一个变更通知
        public event PropertyChangedEventHandler PropertyChanged;

        /// <summary>
        /// 属性发生改变的时候调用该方法发出通知,在Model中每个属性的set中调用这个方法
        /// </summary>
        /// <param name="propertyName"></param>
        public void DoNotify([CallerMemberName]string propertyName = "")
        {
            PropertyChanged?.Invoke(this, new PropertyChangedEventArgs(propertyName));//参数:proPertyName,告诉Binding是哪个属性值发生改变了

            //参数为空,就是广播
            //PropertyChanged?.Invoke(this, new PropertyChangedEventArgs(""));
        }
    }
}
2,添加1个命令属性相关的基类CommandBase
using System;
using System.Collections.Generic;
using System.Linq;
using System.Text;
using System.Threading.Tasks;

//手动添加以下引用
using System.Windows.Input;

namespace WPF_MVVM设计模式.Common
{
    /// <summary>
    /// 命令属性的基类
    /// </summary>
    public class CommandBase : ICommand
    {
        /// <summary>
        /// 当命令能不能执行的这个状态发生改变的时候,你有机会通知一下命令的调用者,告诉他状态
        /// </summary>
        public event EventHandler CanExecuteChanged;

        /// <summary>
        /// 帮助命令的呼叫者来判断这个命令能不能执行
        /// </summary>
        /// <param name="parameter"></param>
        /// <returns></returns>
        public bool CanExecute(object parameter)
        {
            //如果返回True,被绑定的按钮控件可以操作 IsEnabled=true;
            //如果返回False,被绑定的按钮控件不可以操作 IsEnabled=false;
            return DoCanExecute?.Invoke(parameter) == true;

            #region 上面的代码等于以下

            //if (DoCanExecute == null) return false;
            //return this.DoCanExecute(parameter);

            #endregion

            #region 让命令保持能执行的写法,一直true

            //if (DoCanExecute == null) return true;
            //return this.DoCanExecute(parameter);

            #endregion
        }

        /// <summary>
        /// 相当于Clicked的执行内容,当命令执行的时候,你想做什么事情
        /// </summary>
        /// <param name="parameter"></param>
        public void Execute(object parameter)
        {
            DoExcute?.Invoke(parameter);

            #region 上面的代码等于以下

            //if (DoExcute == null) return;
            //this.DoExcute(parameter);

            #endregion
        }

        public Action<object> DoExcute { get; set; }

        /// <summary>
        /// 返回True,按钮控件才可以操作
        /// </summary>
        public Func<object, bool> DoCanExecute { get; set; }
    }
}
【6.2】分析:
1,数据属性:3个值
2,命令属性:保存按钮和计算按钮
using System;
using System.Collections.Generic;
using System.Diagnostics.Contracts;
using System.Linq;
using System.Text;
using System.Threading.Tasks;
using Microsoft.Win32;
using WPF_MVVM设计模式.Common;

namespace WPF_MVVM设计模式.ViewModels
{
    class MainWindowViewModel:NotifyBase
    {
        #region 数据属性

        private double input1;

        public double Input1
        {
            get { return input1; }
            set { input1 = value; this.DoNotify("Input1"); }
        }

        private double input2;

        public double Input2
        {
            get { return input2; }
            set { input2 = value; this.DoNotify("Input2"); }
        }

        private double result;

        public double Result
        {
            get { return result; }
            set { result = value; this.DoNotify("Result"); }
        }

        #endregion


        #region 命令属性

        public CommandBase AddCommand { get; set; }
        public CommandBase SaveCommand { get; set; }

        private void Add(object parameter)
        {
            this.Result = this.Input1 + this.Input2;
        }

        private void Save(object parameter)
        {
            SaveFileDialog dlg=new SaveFileDialog();
            dlg.ShowDialog();
        }

        public MainWindowViewModel()
        {
            this.AddCommand=new CommandBase();
            this.AddCommand.DoExcute=new Action<object>(this.Add);
            //这代码不写,关闭按钮不能用,因为DoCanExecute返回True,按钮控件才可以操作。
            this.AddCommand.DoCanExecute = new Func<object, bool>((o) => { return true; });

            this.SaveCommand=new CommandBase();
            this.SaveCommand.DoExcute = new Action<object>(this.Save);
        }
        #endregion

    }
}
【6.3】第一次需求
界面:
    <Grid>
        <Grid.RowDefinitions>
            <RowDefinition Height="Auto"></RowDefinition>
            <RowDefinition Height="*"></RowDefinition>
        </Grid.RowDefinitions>
        <Button x:Name="Save" Content="Save" Command="{Binding SaveCommand}" ></Button>
        <Grid Grid.Row="1">
            <Grid.ColumnDefinitions>
                <ColumnDefinition Width="22*"/>
                <ColumnDefinition Width="169*"/>
                <ColumnDefinition Width="326*"/>
            </Grid.ColumnDefinitions>
            <Grid.RowDefinitions>
                <RowDefinition Height="Auto"></RowDefinition>
                <RowDefinition Height="Auto"></RowDefinition>
                <RowDefinition Height="Auto"></RowDefinition>
                <RowDefinition Height="*"></RowDefinition>
            </Grid.RowDefinitions>
            <TextBox x:Name="tb1" Grid.Row="0" Background="LightBlue" FontSize="24" Margin="4" Grid.ColumnSpan="3" Text="{Binding Input1}"></TextBox>
            <TextBox x:Name="tb2" Grid.Row="1" Background="LightBlue" FontSize="24" Margin="4" Grid.ColumnSpan="3" Text="{Binding Input2}"></TextBox>
            <TextBox x:Name="tb3" Grid.Row="2" Background="LightBlue" FontSize="24" Margin="4" Grid.ColumnSpan="3" Text="{Binding Result}"></TextBox>
            <Button x:Name="addButton" Grid.Row="3" Content="Add" Width="120" Height="80"  Grid.Column="2" Margin="7,50,199,50" Command="{Binding AddCommand}"></Button>
        </Grid>
    </Grid>
【6.4】MVVM更改第二次需求:
只用改界面,Binding数据属性和命令属性就可以了,逻辑完全不用动了。
    <Grid>
        <Grid.RowDefinitions>
            <RowDefinition Height="Auto"></RowDefinition>
            <RowDefinition Height="*"></RowDefinition>
        </Grid.RowDefinitions>
        <Menu>
            <MenuItem Header="File">
                <MenuItem Header="Save" x:Name="saveMenuItem" Command="{Binding SaveCommand}"></MenuItem>
            </MenuItem>
        </Menu>
        <Grid Grid.Row="1">
            <Grid.RowDefinitions>
                <RowDefinition Height="Auto"></RowDefinition>
                <RowDefinition Height="Auto"></RowDefinition>
                <RowDefinition Height="Auto"></RowDefinition>
                <RowDefinition Height="*"></RowDefinition>
            </Grid.RowDefinitions>
            <Slider x:Name="slider1" Grid.Row="0" Background="LightBlue" Minimum="0" Maximum="100" Margin="4" Value="{Binding Input1}" ></Slider>
            <Slider x:Name="slider2" Grid.Row="1" Background="LightBlue" Minimum="0" Maximum="100" Margin="4" Value="{Binding Input2}" ></Slider>
            <Slider x:Name="slider3" Grid.Row="2" Background="LightBlue" Minimum="0" Maximum="100" Margin="4" Value="{Binding Result}" ></Slider>
            <Button x:Name="addButton2" Grid.Row="3" Content="Add" Width="120" Height="80" Grid.Column="2" Command="{Binding AddCommand}"></Button>
        </Grid>
    </Grid>


