

【线程同步】线程同步(互斥锁和信号量)
目录
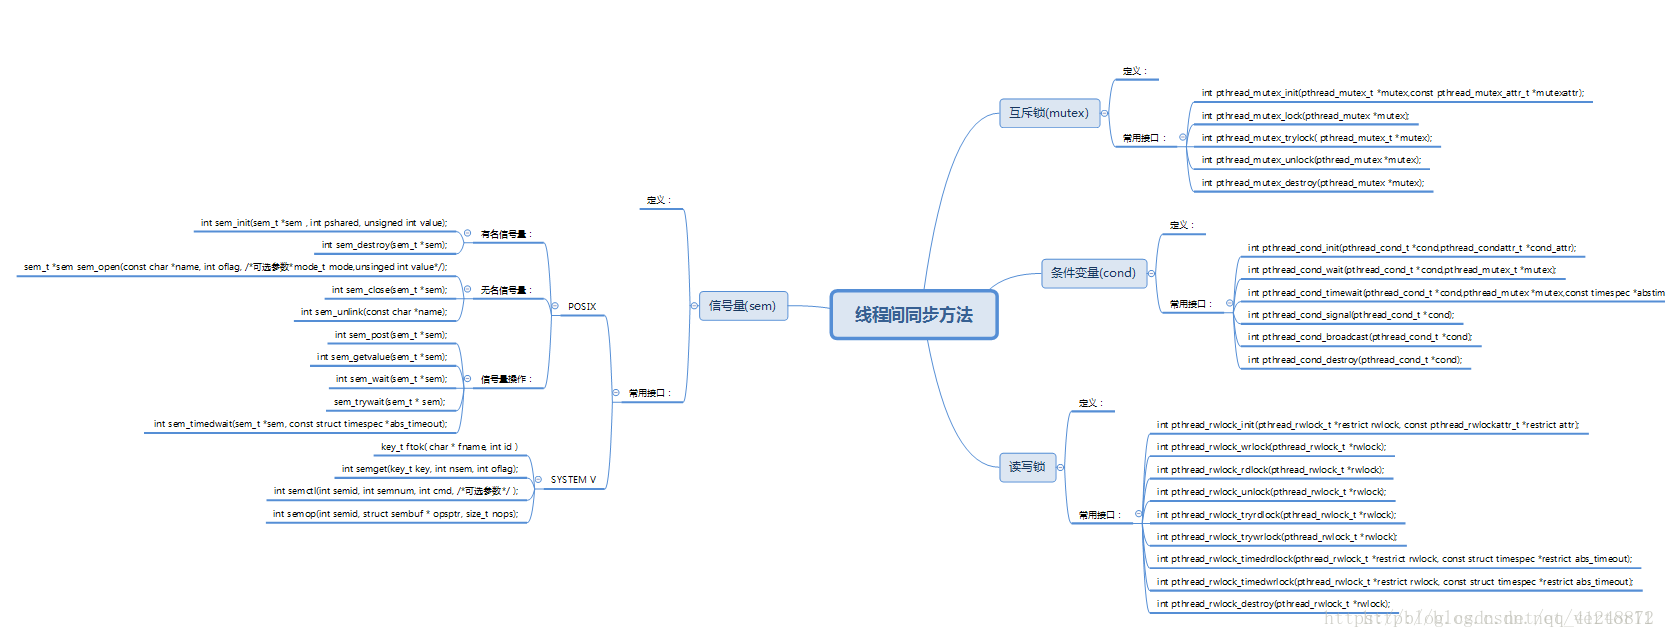
linux下提供了多种方式来处理线程同步,最常用的是互斥锁、条件变量和信号量。(临界区)
1)互斥锁(mutex)
{临界区和互斥量(互斥锁)的区别https://blog.csdn.net/bandaoyu/article/details/8399809
1. Mutexes 操作要比 Critical Section 费时的多。
2. Mutexes 可以跨进程使用,Critical Section 则只能在同一进程中使用。
3. 等待一个 Mutex 时,你可以指定"结束等待"的时间长度,而 Critical Section 则不行。
}
通过锁机制实现线程间的同步。同一时刻只允许一个线程执行一个关键部分的代码。
int pthread_mutex_init(pthread_mutex_t *mutex,const pthread_mutex_attr_t *mutexattr);

int pthread_mutex_lock(pthread_mutex *mutex);

int pthread_mutex_destroy(pthread_mutex *mutex);

int pthread_mutex_unlock(pthread_mutex *
(1)先初始化锁init()或静态赋值pthread_mutex_t mutex=PTHREAD_MUTEX_INITIALIER
attr_t有:
PTHREAD_MUTEX_TIMED_NP:其余线程等待队列
PTHREAD_MUTEX_RECURSIVE_NP:嵌套锁,允许线程多次加锁,不同线程,解锁后重新竞争
PTHREAD_MUTEX_ERRORCHECK_NP:检错,与一同,线程请求已用锁,返回EDEADLK;
PTHREAD_MUTEX_ADAPTIVE_NP:适应锁,解锁后重新竞争
(2)加锁,lock,trylock:lock阻塞等待锁,trylock立即返回EBUSY
(3)解锁,unlock需满足是加锁状态,且由加锁线程解锁
(4)清除锁,destroy(此时锁必需unlock,否则返回EBUSY,//Linux下互斥锁不占用内存资源
示例代码
    #include <cstdio>
    #include <cstdlib>
    #include <unistd.h>
    #include <pthread.h>
    #include "iostream"

    using namespace std;

    pthread_mutex_t mutex = PTHREAD_MUTEX_INITIALIZER;
    int tmp;

    void* thread(void *arg)
    {
        cout << "thread id is " << pthread_self() << endl;
        pthread_mutex_lock(&mutex);
        tmp = 12;
        cout << "Now a is " << tmp << endl;
        pthread_mutex_unlock(&mutex);
        return NULL;
    }

    int main()
    {
        pthread_t id;
        cout << "main thread id is " << pthread_self() << endl;
        tmp = 3;
        cout << "In main func tmp = " << tmp << endl;
        if (!pthread_create(&id, NULL, thread, NULL))
        {
            cout << "Create thread success!" << endl;
        }
        else
        {
            cout << "Create thread failed!" << endl;
        }
        pthread_join(id, NULL);
        pthread_mutex_destroy(&mutex);
        return 0;
    }
编译: g++ -o thread testthread.cpp -lpthread
说明:pthread库不是Linux系统默认的库,连接时需要使用静态库libpthread.a,所以在使用pthread_create()创建线程,以及调用pthread_atfork()函数建立fork处理程序时,需要链接该库。在编译中要加 -lpthread参数。
2)条件变量(cond)
利用线程间共享的全局变量进行同步的一种机制。条件变量上的基本操作有:触发条件(当条件变为 true 时);等待条件,挂起线程直到其他线程触发条件。
int pthread_cond_init(pthread_cond_t *cond,pthread_condattr_t *cond_attr);

int pthread_cond_wait(pthread_cond_t *cond,pthread_mutex_t *mutex);

int pthread_cond_timewait(pthread_cond_t *cond,pthread_mutex *mutex,const timespec *abstime);

int pthread_cond_destroy(pthread_cond_t *cond);

int pthread_cond_signal(pthread_cond_t *cond);

int pthread_cond_broadcast(pthread_cond_t *cond);  //解除所有线程的阻塞
(1)初始化
init()或者pthread_cond_t cond=PTHREAD_COND_INITIALIER(前者为动态初始化,后者为静态初始化);属性置为NULL
(2)等待条件成立
pthread_wait pthread_cond_wait 或pthread_timewait pthread_cond_timewait;wait()释放锁,并阻塞等待条件变量为真,timewait()设置等待时间,仍未signal,返回ETIMEOUT(加锁保证只有一个线程wait)
(3)激活条件变量:
pthread_cond_signal或pthread_cond_broadcast(激活所有等待线程)
(4)清除条件变量:
destroy;无线程等待,否则返回EBUSY
对于
int pthread_cond_wait(pthread_cond_t *cond, pthread_mutex_t *mutex);

int pthread_cond_timedwait(pthread_cond_t *cond, pthread_mutex_t *mutex, const struct timespec *abstime);一定要在mutex的锁定区域内使用。
如果要正确的使用pthread_mutex_lock与pthread_mutex_unlock,请参考
pthread_cleanup_push和pthread_cleanup_pop宏,它能够在线程被cancel的时候正确的释放mutex!
另外,posix1标准说,pthread_cond_signal与pthread_cond_broadcast无需考虑调用线程是否是mutex的拥有者,也就是说,可以在lock与unlock以外的区域调用。如果我们对调用行为不关心,那么请在lock区域之外调用吧。
说明:
(1)pthread_cond_wait 自动解锁互斥量(如同执行了pthread_unlock_mutex),并等待条件变量触发。这时线程挂起,不占用CPU时间,直到条件变量被触发(变量为ture)。在调用 pthread_cond_wait之前,应用程序必须加锁互斥量。pthread_cond_wait函数返回前,自动重新对互斥量加锁(如同执行了pthread_lock_mutex)。
(2)互斥量的解锁和在条件变量上挂起都是自动进行的。因此,在条件变量被触发前,如果所有的线程都要对互斥量加锁,这种机制可保证在线程加锁互斥量和进入等待条件变量期间,条件变量不被触发。条件变量要和互斥量相联结,以避免出现条件竞争——个线程预备等待一个条件变量,当它在真正进入等待之前,另一个线程恰好触发了该条件(条件满足信号有可能在测试条件和调用pthread_cond_wait函数(block)之间被发出,从而造成无限制的等待)。
(3)pthread_cond_timedwait 和 pthread_cond_wait 一样,自动解锁互斥量及等待条件变量,但它还限定了等待时间。如果在abstime指定的时间内cond未触发,互斥量mutex被重新加锁,且pthread_cond_timedwait返回错误 ETIMEDOUT。abstime 参数指定一个绝对时间,时间原点与 time 和 gettimeofday相同:abstime = 0 表示 1970年1月1日00:00:00 GMT。
(4)pthread_cond_destroy 销毁一个条件变量,释放它拥有的资源。进入 pthread_cond_destroy 之前,必须没有在该条件变量上等待的线程。
(5)条件变量函数不是异步信号安全的,不应当在信号处理程序中进行调用。特别要注意,如果在信号处理程序中调用 pthread_cond_signal 或pthread_cond_boardcast 函数,可能导致调用线程死锁。
示例程序1

    #include <stdio.h>
    #include <pthread.h>
    #include "stdlib.h"
    #include "unistd.h"
    pthread_mutex_t mutex;
    pthread_cond_t cond;
    void hander(void *arg)
    {
        free(arg);
        (void)pthread_mutex_unlock(&mutex);
    }
    void *thread1(void *arg)
    {
         pthread_cleanup_push(hander, &mutex);
         while(1)
         {
             printf("thread1 is running\n");
             pthread_mutex_lock(&mutex);      //_cond_wait一定要在mutex的锁定区域内使用,所以加锁
             pthread_cond_wait(&cond,&mutex); //wait自动解锁等待条件,并在返回时重新加锁
             printf("thread1 applied the condition\n");
             pthread_mutex_unlock(&mutex);
             sleep(4);
         }
         pthread_cleanup_pop(0);
    }
    void *thread2(void *arg)
    {
        while(1)
        {
            printf("thread2 is running\n");
            pthread_mutex_lock(&mutex);
            pthread_cond_wait(&cond,&mutex);
            printf("thread2 applied the condition\n");
            pthread_mutex_unlock(&mutex);
            sleep(1);
        }
    }
    int main()
    {
         pthread_t thid1,thid2;
         printf("condition variable study!\n");
         pthread_mutex_init(&mutex,NULL);
         pthread_cond_init(&cond,NULL);
         pthread_create(&thid1,NULL,thread1,NULL);
         pthread_create(&thid2,NULL,thread2,NULL);
         sleep(1);
         do
         {
             pthread_cond_signal(&cond);
         }while(1);
         sleep(20);
         pthread_exit(0);
         return 0;
    }
示例程序2:
    #include <pthread.h>
    #include <unistd.h>
    #include "stdio.h"
    #include "stdlib.h"
    static pthread_mutex_t mtx = PTHREAD_MUTEX_INITIALIZER;
    static pthread_cond_t cond = PTHREAD_COND_INITIALIZER;
    struct node
    {
         int n_number;
         struct node *n_next;
    } *head = NULL;
    /*[thread_func]*/
    static void cleanup_handler(void *arg)
    {
         printf("Cleanup handler of second thread./n");
         free(arg);
         (void)pthread_mutex_unlock(&mtx);
    }
    static void *thread_func(void *arg)
    {
         struct node *p = NULL;
         pthread_cleanup_push(cleanup_handler, p);
         while (1)
         {
             //这个mutex主要是用来保证pthread_cond_wait的并发性
             pthread_mutex_lock(&mtx);
             while (head == NULL)
             {
             //这个while要特别说明一下,单个pthread_cond_wait功能很完善,为何
             //这里要有一个while (head == NULL)呢?因为pthread_cond_wait里的线
             //程可能会被意外唤醒,如果这个时候head != NULL,则不是我们想要的情况。
             //这个时候,应该让线程继续进入pthread_cond_wait
             // pthread_cond_wait会先解除之前的pthread_mutex_lock锁定的mtx,
             //然后阻塞在等待对列里休眠,直到再次被唤醒(大多数情况下是等待的条件成立
             //而被唤醒,唤醒后,该进程会先锁定先pthread_mutex_lock(&mtx);,再读取资源
             //用这个流程是比较清楚的/*block-->unlock-->wait() return-->lock*/
             pthread_cond_wait(&cond, &mtx);
             p = head;
             head = head->n_next;
             printf("Got %d from front of queue/n", p->n_number);
             free(p);
              }
              pthread_mutex_unlock(&mtx); //临界区数据操作完毕,释放互斥锁
         }
         pthread_cleanup_pop(0);
         return 0;
    }
    int main(void)
    {
         pthread_t tid;
         int i;
         struct node *p;
         //子线程会一直等待资源,类似生产者和消费者,但是这里的消费者可以是多个消费者,而
         //不仅仅支持普通的单个消费者,这个模型虽然简单,但是很强大
         pthread_create(&tid, NULL, thread_func, NULL);
         sleep(1);
         for (i = 0; i < 10; i++)
         {
             p = (struct node*)malloc(sizeof(struct node));
             p->n_number = i;
             pthread_mutex_lock(&mtx); //需要操作head这个临界资源,先加锁,
             p->n_next = head;
             head = p;
             pthread_cond_signal(&cond);
             pthread_mutex_unlock(&mtx); //解锁
             sleep(1);
         }
         printf("thread 1 wanna end the line.So cancel thread 2./n");

         //关于pthread_cancel,有一点额外的说明,它是从外部终止子线程,子线程会在最近的取消点,退出
         //线程,而在我们的代码里,最近的取消点肯定就是pthread_cond_wait()了。
         pthread_cancel(tid);
         pthread_join(tid, NULL);
         printf("All done -- exiting/n");
         return 0;
    }
3)信号量
线程间信号量用法
如同进程一样,线程也可以通过信号量来实现通信,虽然是轻量级的。
信号量函数的名字都以"sem_"打头。线程使用的基本信号量函数有四个。
#include <semaphore.h>
int sem_init (sem_t *sem , int pshared, unsigned int value);
这是对由sem指定的信号量进行初始化,设置好它的共享选项pshared(linux 只支持为0,即表示它是当前进程的局部信号量),然后给它一个初始值value。
两个原子操作函数:
int sem_wait(sem_t *sem);

int sem_post(sem_t *sem);
这两个函数都要用一个由sem_init调用初始化的信号量对象的指针做参数。
sem_post:给信号量的值加1;
sem_wait:给信号量减1;对一个值为0的信号量调用sem_wait,这个函数将会等待直到有其它线程使它不再是0为止。
int sem_destroy(sem_t *sem);
这个函数的作用是再我们用完信号量后都它进行清理。归还自己占有的一切资源。
示例代码:
#include <stdlib.h>
#include <stdio.h>
#include <unistd.h>
#include <pthread.h>
#include <semaphore.h>
#include <errno.h>

#define return_if_fail(p) if((p) == 0){printf ("[%s]:func error!/n", __func__);return;}

typedef struct _PrivInfo
{
    sem_t s1;
    sem_t s2;
    time_t end_time;
} PrivInfo;

static void info_init (PrivInfo *thiz);
static void info_destroy (PrivInfo *thiz);
static void *pthread_func_1 (PrivInfo *thiz);
static void *pthread_func_2 (PrivInfo *thiz);

int main (int argc, char **argv)
{
    pthread_t pt_1 = 0;
    pthread_t pt_2 = 0;
    int ret = 0;
    PrivInfo *thiz = NULL;

    thiz = (PrivInfo * )malloc (sizeof (PrivInfo));
    if (thiz == NULL)
    {
        printf ("[%s]: Failed to malloc priv./n");
        return -1;
    }

    info_init (thiz);

    ret = pthread_create (&pt_1, NULL, (void *)pthread_func_1, thiz);
    if (ret != 0)
    {
        perror ("pthread_1_create:");
    }

    ret = pthread_create (&pt_2, NULL, (void *)pthread_func_2, thiz);
    if (ret != 0)
    {
        perror ("pthread_2_create:");
    }

    pthread_join (pt_1, NULL);
    pthread_join (pt_2, NULL);

    info_destroy (thiz);

    return 0;
}

static void info_init (PrivInfo *thiz)
{
    return_if_fail (thiz != NULL);

    thiz->end_time = time(NULL) + 10;

    sem_init (&thiz->s1, 0, 1);
    sem_init (&thiz->s2, 0, 0);

    return;
}

static void info_destroy (PrivInfo *thiz)
{
    return_if_fail (thiz != NULL);

    sem_destroy (&thiz->s1);
    sem_destroy (&thiz->s2);

    free (thiz);
    thiz = NULL;

    return;
}

static void *pthread_func_1 (PrivInfo *thiz)
{
    return_if_fail (thiz != NULL);

    while (time(NULL) < thiz->end_time)
    {
        sem_wait (&thiz->s2);
        printf ("pthread1: pthread1 get the lock./n");

        sem_post (&thiz->s1);
        printf ("pthread1: pthread1 unlock/n");

        sleep (1);
    }

    return;
}

static void *pthread_func_2 (PrivInfo *thiz)
{
    return_if_fail (thiz != NULL);

    while (time (NULL) < thiz->end_time)
    {
        sem_wait (&thiz->s1);
        printf ("pthread2: pthread2 get the unlock./n");

        sem_post (&thiz->s2);
        printf ("pthread2: pthread2 unlock./n");

        sleep (1);
    }

    return;
}

通过执行结果后,可以看出,会先执行线程二的函数,然后再执行线程一的函数。它们两就实现了同步。在上大学的时候,虽然对这些概念知道,可都没有实践过,所以有时候时间一久就会模糊甚至忘记,到了工作如果还保持这么一种状态,那就太可怕了。虽然现在外面的技术在不断的变化更新,可是不管怎么变,其核心技术还是依旧的,所以我们必须要打好自己的基础,再学习其他新的知识,那时候再学新的知识也会觉得比较简单的。信号量代码摘自linux多线程学习(六)——信号量实现同步。_阿堂的专栏-CSDN博客_信号量如何实现同步
sem_t sem;
定义一个信号量变量。使用时需首先使用sem_init()函数初始化。
在多线程编程中,想让某个线程阻塞等待,减少cpu占用,在该需要运行时才运行。使用信号量一个A线程sem_wait(),阻塞等待;一个B线程在需要运行A线程时sem_post(),解除A线程阻塞。
下面是简单demo:
#include <stdint.h>
#include <semaphore.h>
#include <stdio.h>
#include <stdlib.h>
#include <pthread.h>
#include <unistd.h>
sem_t sem;
void *testfunc(void *arg)
{
while(1)
{
sem_wait(&sem);
//do something....
printf("hello world...\n");
}
}
int main()
{
pthread_t ps;
sem_init(&sem, 0, 0);
pthread_create(&ps,NULL,testfunc,NULL);
while(1)
{
//每隔一秒sem_post 信号量sem加1 子线程sem_wait解除等待 打印hello world
sem_post(&sem);
sleep(1);
}
return 0;
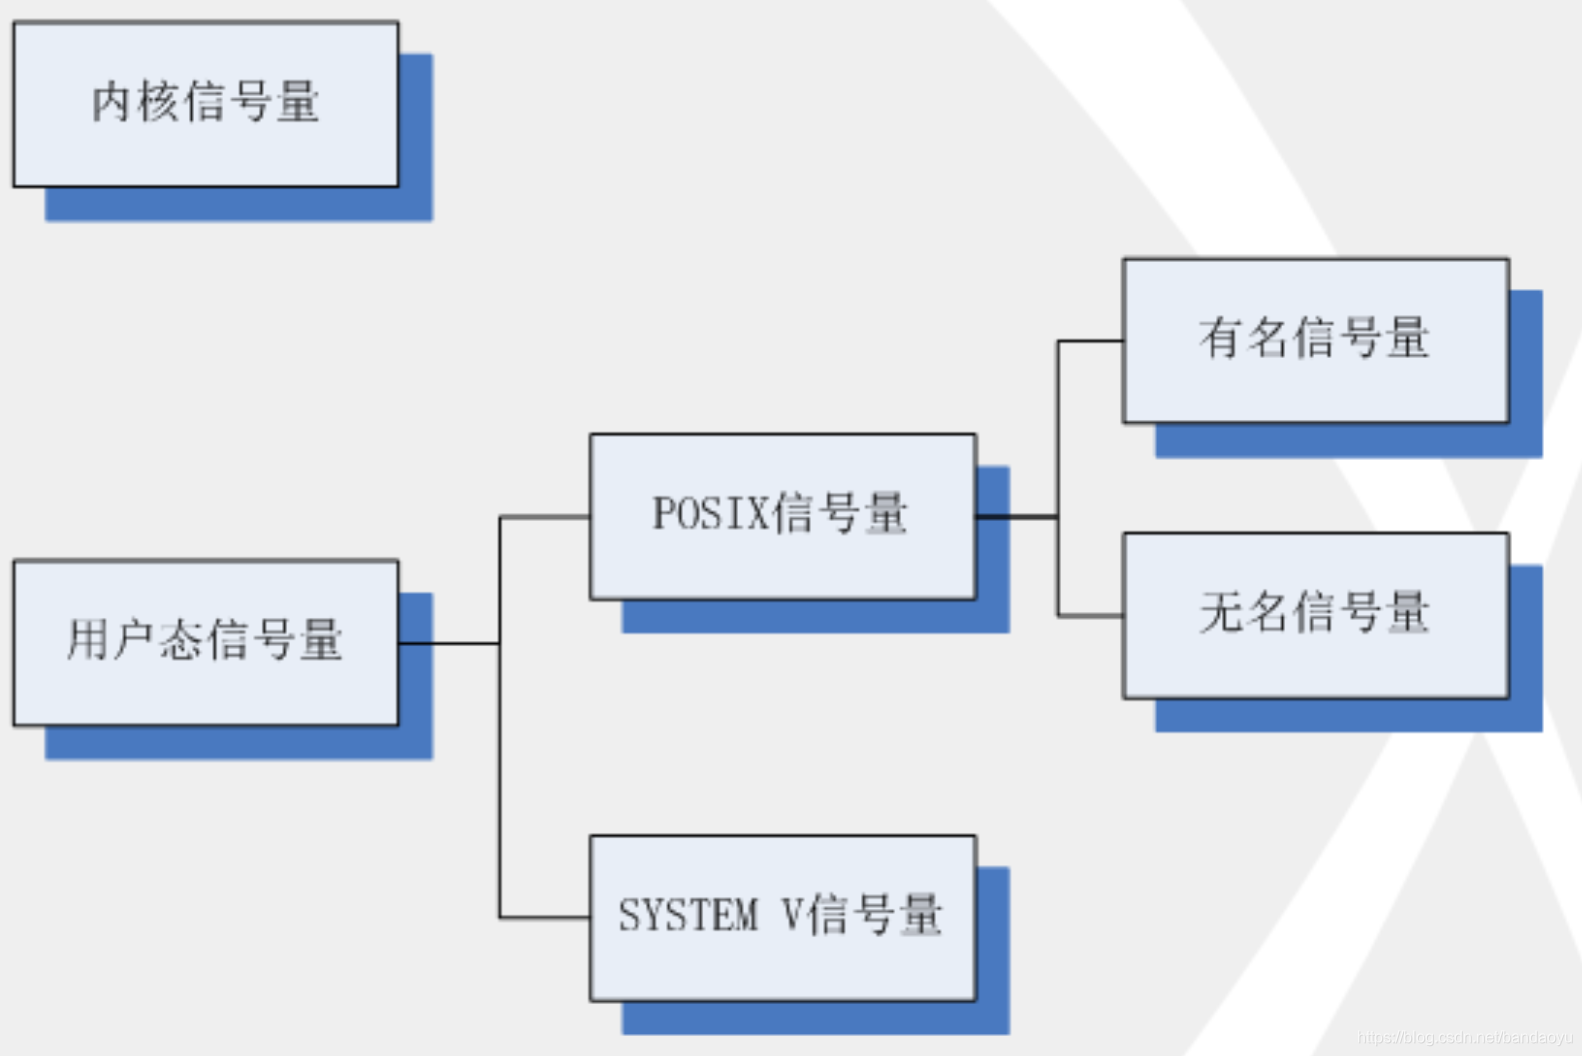
}信号量的种类
首先分为内核信号量和用户态信号量。
1、按用途:进程信号量、线程信号量
2、 用户态有三种
1、posix 有名信号灯
2、posix 基于内存的信号灯(无名信号灯 ) //这个是线程用的信号量 因为无名管道就是在父子线程之间的 它也一样
3、System V信号灯(IPC对象)
用户态信号量又分为posix信号量和system v信号量。(system v比较复杂,头文件为#include <sys/sem.h>;posix信号量比较简单,#include <semaphore.h>)然后posix信号量又分为有名和无名信号量。
- 进程间使用的信号灯:
1、posix 有名信号灯 使用频率不高,不做介绍
2、System V信号灯 它是一个集合一个或者多个信号灯的集合 它用于进程之间的同步控制
利用PV原语进行操作 它的函数有 :
创建信号灯:
int semget(key_t key, int num_sems, int sem_flags);参数:
key ftok()函数得到
int nsems 有几个信号灯
semflg 权限 例如: IPC_CREAT | 0644
操作信号灯:
int semop(int sem_id, struct sembuf *sem_opa, size_t num_sem_ops);参数:
semid semget()的返回值
struct sembuf {
unsigned short sem_num; /* semaphore number */ 编号
short sem_op; /* semaphore operation */ p操作和V操作
short sem_flg; /* operation flags */一般给0
};
nops 要操作的信号灯的个数
对信号灯的控制
int semctl(int semid,int semnum,int cmd,/*union semun arg*/);参数:
semid semget返回值
semnum 控制几个信号灯
cmd IPC_RMID 删除信号灯集 SETVAL设置信号灯的值 GETVAL 获取信号灯的值
union semun arg //<linux/sem.h>中有定义
union semun {
int val; /* Value for SETVAL */
struct semid_ds *buf; /* Buffer for IPC_STAT, IPC_SET */
unsigned short *array; /* Array for GETALL, SETALL */
struct seminfo *__buf; /* Buffer for IPC_INFO
(Linux-specific) */
};
进程间信号量用法:
Linux进程间通信(五):信号量 semget()、semop()、semctl() - 52php - 博客园
- 线程信号量(posix)
初始化sem

 int sem_init(sem_t *sem,int pshared,unsigned int value);

P操作

 int sem_wait(sem_t * sem);   //阻塞

 int sem_trywait(sem_t * sem);    //非阻塞

V操作

int sem_post(sem_t * sem);

 销毁sem

int sem_destroy(sem_t *sem);
sem_init函数
sem_init函数是Posix信号量操作中的函数。sem_init() 初始化一个定位在 sem 的匿名信号量。value 参数指定信号量的初始值。 pshared 参数指明信号量是由进程内线程共享,还是由进程之间共享。如果 pshared 的值为 0,那么信号量将被进程内的线程共享,并且应该放置在这个进程的所有线程都可见的地址上(如全局变量,或者堆上动态分配的变量)。
如果 pshared 是非零值,那么信号量将在进程之间共享,并且应该定位共享内存区域(见 shm_open(3)、mmap(2) 和 shmget(2))。因为通过 fork(2) 创建的孩子继承其父亲的内存映射,因此它也可以见到这个信号量。所有可以访问共享内存区域的进程都可以用 sem_post(3)、sem_wait(3) 等等操作信号量。初始化一个已经初始的信号量其结果未定义。
返回值
sem_init() 成功时返回 0;错误时,返回 -1,并把 errno 设置为合适的值。
用下面一组函数(系统调用)来实现。
原文链接:https://blog.csdn.net/tomstrong_369/article/details/54312909
信号量和互斥量的区别
信号量不一定是锁定某一个资源,而是流程上的概念,而线程互斥量则是“锁住某一资源”的概念,在锁定期间内,其他线程无法对被保护的数据进行操作。在有些情况下两者可以互换。
mutex干的活儿和semaphore干的活儿不要混起来。
在这里,我模拟一个最典型的使用semaphore的场景:a源自一个线程,b源自另一个线程,计算c = a + b也是一个线程。(即一共三个线程)显然,第三个线程必须等第一、二个线程执行完毕它才能执行。在这个时候,我们就需要调度线程了:让第一、二个线程执行完毕后,再执行第三个线程。此时,就需要用semaphore了。
int a, b, c;
void geta()
{
    a = calculatea();
    semaphore_increase();
}

void getb()
{
    b = calculateb();
    semaphore_increase();
}


void getc()
{
    semaphore_decrease();
    semaphore_decrease();
    c = a + b;
}

t1 = thread_create(geta);
t2 = thread_create(getb);
t3 = thread_create(getc);
thread_join(t3);

// semaphore的机制我在这里就不讲了,百度一下你就知道。
// semaphore_increase对应sem_post
// semaphore_decrease对应sem_wait简而言之,锁是服务于共享资源的;而semaphore是服务于多个线程间的执行的逻辑顺序的。
参考:
【2】 29、深入理解计算机系统笔记,并发编程(concurrent)(1) - 浪里飞 - 博客园
【3】 线程函数介绍
http://www.unix.org/version2/whatsnew/threadsref.html
【4】 Linux Tutorial: POSIX Threads
【5】 线程常用函数简介
【6】 条件变量
Linux 线程同步---条件变量_hiflower的专栏-CSDN博客
【7】条件变量函数说明
pthread_cond_wait()用法分析_hairetz的专栏-CSDN博客
本文来自博文:


【推荐】国内首个AI IDE,深度理解中文开发场景,立即下载体验Trae
【推荐】编程新体验,更懂你的AI,立即体验豆包MarsCode编程助手
【推荐】抖音旗下AI助手豆包,你的智能百科全书,全免费不限次数
【推荐】轻量又高性能的 SSH 工具 IShell:AI 加持,快人一步
· 全程不用写代码,我用AI程序员写了一个飞机大战
· MongoDB 8.0这个新功能碉堡了,比商业数据库还牛
· 记一次.NET内存居高不下排查解决与启示
· DeepSeek 开源周回顾「GitHub 热点速览」
· 白话解读 Dapr 1.15:你的「微服务管家」又秀新绝活了