
利用PXE实现自动化系统部署
pxe启动工作原理
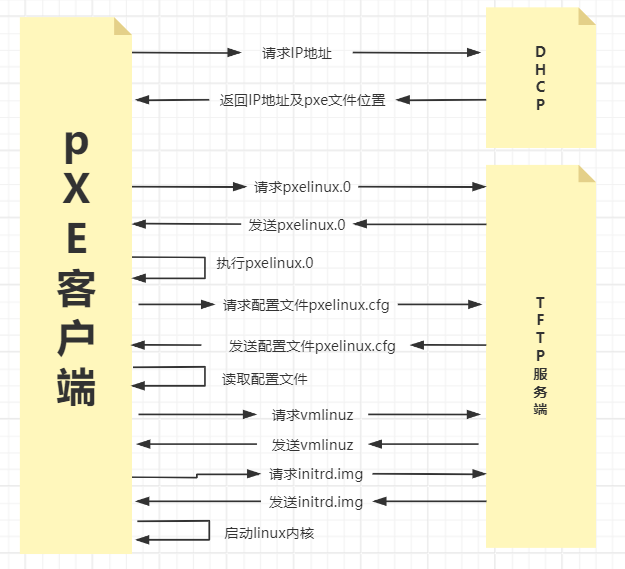
- client向pxe Server上的DHCP发送IP地址请求信息,DHCP检测client是否合法(检测client的合法MAC地址),如果合法则返回client的IP地址,同时将启动的pxelinux.0和TFTP服务器地址信息一并传给client
- client向TFTP服务器发送获取pxelinux.0信息,TFTP收到消息后,向client发送pxelinux.0大小信息,试探client是否满意,当TFTP收到client发回的同意大小信息后,正式向client发送pxelinux.0
- client执行接收到的pxelinux.0文件,并利用此文件启动
- client向TFTP服务器发送请求针对本机的配置信息文件(在TFTP服务器的pxelinux.cfg目录下),TFTP服务器将启动菜单配置文件发回client,client根据启动菜单配置文件执行后续操作
- client根据启动菜单配置文件里的信息,向TFTP发送Linux和initrd文件请求信息,TFTP接收到消息后将内核和initrd文件发送给client
- client向TFTP发送根文件请求信息,TFTP接收到消息之后返回给Linux根文件系统
- client启动Linux内核,加载相关的内核参数
- client通过内核参数下载kickstart文件,并根据kickstart文件里的安装信息下载文件进行自动化安装
- CentOS 8,7,6 不同版本的kickstart文件格式不尽相同,不可混用
- %addon, %packages, %onerror, %pre 、 %post 必须以%end结束,否则安装失败
范例:CentOS 8 的最小化安装kickstart文件
ignoredisk --only-use=sda
zerombr
text
reboot
clearpart --all --initlabel
selinux --disabled
firewall --disabled
url --url=http://10.0.0.8/centos/8/os/x86_64/
keyboard --vckeymap=us --xlayouts='us'
lang en_US.UTF-8
network  --bootproto=dhcp --device=ens160 --ipv6=auto --activate
network  --hostname=centos8.magedu.com
rootpw --iscrypted $6$nOPs5JTMlP4mhQeW$R/o62B6SXAh3RR.zrZ3U0X4xYX9/u5nSLrR/vqCB6kdO2XFfMk2a4yAgrHJQpXK/e4jzRb0jiLBv2nFMXaBjB/
firstboot --enable
services --disabled="chronyd"
timezone Asia/Shanghai --isUtc --nontp
user --name=wang --password=$6$oUfb/02CWfLb5l8f$sgEZeR7c7DpqfpmFDH6huSmDbW1XQNR4qKl2EPns.gOXqlnAIgv9pTogtFVaDtEpMOC.SWXKYqxfVtd9MCwxb1 --iscrypted --gecos="wang"
part / --fstype="xfs" --ondisk=sda --size=102400
part /data --fstype="xfs" --ondisk=sda --size=51200
part swap --fstype="swap" --ondisk=sda --size=2048
part /boot --fstype="ext4" --ondisk=sda --size=1024
%packages
@^minimal-environment
kexec-tools
%end
%addon com_redhat_kdump --enable --reserve-mb='auto'
%end
%anaconda
pwpolicy root --minlen=6 --minquality=1 --notstrict --nochanges --notempty
pwpolicy user --minlen=6 --minquality=1 --notstrict --nochanges --emptyok
pwpolicy luks --minlen=6 --minquality=1 --notstrict --nochanges --notempty
%end
范例:CentOS 7 的最小化安装kickstart文件
install
xconfig  --startxonboot
keyboard --vckeymap=us --xlayouts='us'
rootpw --iscrypted $1$bpNEv8S5$lK.CjNkf.YCpFPHskSNiN0
url --url="http://10.0.0.8/centos/7/os/x86_64"
lang en_US
auth  --useshadow  --passalgo=sha512
text
firstboot --enable
selinux --disabled
skipx
services --disabled="chronyd"
ignoredisk --only-use=sda
firewall --disabled
network  --bootproto=dhcp --device=ens33
reboot
timezone Asia/Shanghai --nontp
bootloader --append="crashkernel=auto" --location=mbr --boot-drive=sda
zerombr
clearpart --all --initlabel
part swap --fstype="swap" --ondisk=sda --size=3072
part / --fstype="xfs" --ondisk=sda --size=51200
part /boot --fstype="xfs" --ondisk=sda --size=1024
part /data --fstype="xfs" --ondisk=sda --size=30720
%post
useradd wang
%end

%packages
@^minimal
vim-enhanced
%end
范例:CentOS 6 的最小化安装kickstart文件
install
text
reboot
url --url=http://10.0.0.8/centos/6/os/x86_64/
lang en_US.UTF-8
keyboard us
network --onboot yes --device eth0 --bootproto dhcp  --noipv6
rootpw  --iscrypted $6$b6C5mM/BwOMBoK8H$cYZFrHoNlOL0iDsxOTRhwnWJ3yfFmf7mRJBOxEqGoI56UMrT8J7qlrGwX7tSnOf7wKxYR2hAvAREILDgOgsFe1
firewall --disabled
authconfig --enableshadow --passalgo=sha512
selinux --disabled
timezone Asia/Shanghai
bootloader --location=mbr --driveorder=sda --append="crashkernel=auto rhgb quiet"
zerombr
clearpart --all --initlabel
part /boot --fstype=ext4 --size=1024
part / --fstype=ext4 --size=50000
part /data --fstype=ext4 --size=30000
part swap --size=2048

%packages
@core
@server-policy
@workstation-policy
autofs
vim-enhanced
%end

%post
useradd wang
echo magedu | passwd --stdin wang &> /dev/null
mkdir  /etc/yum.repos.d/bak
mv /etc/yum.repos.d/* /etc/yum.repos.d/bak
cat > /etc/yum.repos.d/base.repo <<EOF
[base]
name=base
baseurl=file:///misc/cd
gpgcheck=0
EOF
%end


【推荐】国内首个AI IDE,深度理解中文开发场景,立即下载体验Trae
【推荐】编程新体验,更懂你的AI,立即体验豆包MarsCode编程助手
【推荐】抖音旗下AI助手豆包,你的智能百科全书,全免费不限次数
【推荐】轻量又高性能的 SSH 工具 IShell:AI 加持,快人一步
· 分享一个免费、快速、无限量使用的满血 DeepSeek R1 模型,支持深度思考和联网搜索!
· 基于 Docker 搭建 FRP 内网穿透开源项目(很简单哒)
· ollama系列01:轻松3步本地部署deepseek,普通电脑可用
· 按钮权限的设计及实现
· 25岁的心里话