

MyBatis
MyBatis简介
特性:
1.MyBatis是支持定制化SQL、存储过程以及高级映射的优秀的持久层框架
2.MyBatis避免了几乎所有的JDBC代码和手动设置参数以及获取结果集
3.MyBatis可以使用简单的XML或注解用于配置和原始映射,将接口和Java的POJO(Plain Old Java Objects,普通的Java对象)映射称数据库中的记录
4.MyBatis是一个半自动的ORM(Object Relation Mapping )框架
与其他持久化技术层对比
JDBC
1.SQL夹杂在Java代码中耦合度高,导致硬编码内伤
2.维护不易且实际开发需求中SQL有变化,频繁修改的情况多见
3.代码冗长,开发效率低
Hibernate和JPA
1.操作简单,开发效率高
2.程序中长难复杂的SQL需要绕过框架
3.内部自己生成的SQL,不容易做特殊优化
4.基于全映射的全自动框架,大量字段的POJO进行部分映射时比较困难
5.反射操作太多导致数据库性能下降
MyBatis
1.轻量级,性能出色
2.SQL和Java编码分开,功能边界清晰。Java代码专注业务,SQL语句专注数据
3.开发效率稍逊Hibernate
搭建MyBatis
打包

<?xml version="1.0" encoding="UTF-8"?>
<project xmlns="http://maven.apache.org/POM/4.0.0"
         xmlns:xsi="http://www.w3.org/2001/XMLSchema-instance"
         xsi:schemaLocation="http://maven.apache.org/POM/4.0.0 http://maven.apache.org/xsd/maven-4.0.0.xsd">
    <modelVersion>4.0.0</modelVersion>

    <groupId>com.atguigu.mybatis</groupId>
    <artifactId>MyBatis_demo1</artifactId>
    <version>1.0-SNAPSHOT</version>
    <packaging>jar</packaging>

    <dependencies>
        <!-- Mybatis核心 -->
        <dependency>
            <groupId>org.mybatis</groupId>
            <artifactId>mybatis</artifactId>
            <version>3.5.7</version>
        </dependency>

        <!-- junit测试 -->
        <dependency>
            <groupId>junit</groupId>
            <artifactId>junit</artifactId>
            <version>4.12</version>
            <scope>test</scope>
        </dependency>

        <!-- MySQL驱动 -->
        <dependency>
            <groupId>mysql</groupId>
            <artifactId>mysql-connector-java</artifactId>
            <version>5.1.3</version>
        </dependency>

        <!-- log4j日志 -->
        <dependency>
            <groupId>log4j</groupId>
            <artifactId>log4j</artifactId>
            <version>1.2.17</version>
        </dependency>

    </dependencies>


</project>
配置核心文件
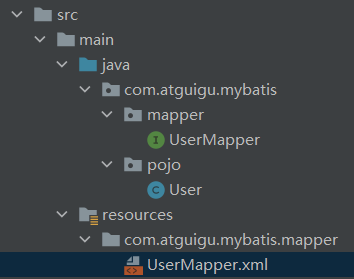
mybatis-config.xml 核心配置文件主要用于配置连接数据库的环境以及Mybatis的全局配置信息;核心配置文件存放的位置是src/main/resources 目录下
<?xml version="1.0" encoding="UTF-8" ?>
<!DOCTYPE configuration
        PUBLIC "-//mybatis.org//DTD Config 3.0//EN"
        "http://mybatis.org/dtd/mybatis-3-config.dtd">
<configuration>
    <!--
        MyBatis核心配置文件中,标签的顺序:
        properties?,settings?,typeAliases?,typeHandlers?,
        objectFactory?,objectWrapperFactory?,reflectorFactory?,
        plugins?,environments?,databaseIdProvider?,mappers?
    -->

    <!--引入properties文件-->
    <properties resource="jdbc.properties" />

    <!--设置类型别名-->
    <typeAliases>
        <!--
            typeAlias:设置某个类型的别名
            属性:
                type:设置需要设置别名的类型
                alias:设置某个类型的别名,若不设置该属性,那么该类型拥有默认的别名,即类名且不区分大小写
        -->
        <!--<typeAlias type="com.atguigu.mybatis.pojo.User"></typeAlias>-->
        <!--以包为单位,将包下所有的类型设置默认的类型别名,即类名且不区分大小写-->
        <package name="com.atguigu.mybatis.pojo"/>
    </typeAliases>

    <!--
        environments:配置多个连接数据库的环境
        属性:
            default:设置默认使用的环境的id
    -->
    <environments default="development">
        <!--
            environment:配置某个具体的环境
            属性:
                id:表示连接数据库的环境的唯一标识,不能重复
        -->
        <environment id="development">
            <!--
                transactionManager:设置事务管理方式
                属性:
                    type="JDBC|MANAGED"
                    JDBC:表示当前环境中,执行SQL时,使用的是JDBC中原生的事务管理方式,事务的提交或回滚需要手动处理
                    MANAGED:被管理,例如Spring
            -->
            <transactionManager type="JDBC"/>
            <!--
                dataSource:配置数据源
                属性:
                    type:设置数据源的类型
                    type="POOLED|UNPOOLED|JNDI"
                    POOLED:表示使用数据库连接池缓存数据库连接
                    UNPOOLED:表示不使用数据库连接池
                    JNDI:表示使用上下文中的数据源
            -->
            <dataSource type="POOLED">
                <!--设置连接数据库的驱动-->
                <property name="driver" value="${jdbc.driver}"/>
                <!--设置连接数据库的连接地址-->
                <property name="url" value="${jdbc.url}"/>
                <!--设置连接数据库的用户名-->
                <property name="username" value="${jdbc.username}"/>
                <!--设置连接数据库的密码-->
                <property name="password" value="${jdbc.password}"/>
            </dataSource>
        </environment>

        <environment id="test">
            <transactionManager type="JDBC"/>
            <dataSource type="POOLED">
                <property name="driver" value="com.mysql.jdbc.Driver"/>
                <property name="url" value="jdbc:mysql://localhost:3306/mybatis"/>
                <property name="username" value="root"/>
                <property name="password" value="123456"/>
            </dataSource>
        </environment>
    </environments>
    <!--引入映射文件-->
    <mappers>
        <!--<mapper resource="mappers/UserMapper.xml"/>-->
        <!--
            以包为单位引入映射文件
            要求:
            1、mapper接口所在的包要和映射文件所在的包一致
            2、mapper接口要和映射文件的名字一致
        -->
        <package name="com.atguigu.mybatis.mapper"/>
    </mappers>
</configuration>
创建mapper接口
Mybatis中的mapper接口相当于以前的dao,但是区别在于,mapper仅仅是接口,我们不需要提供实现类。 Mybatis有面向接口编程的功能,每当我们调用接口中的方法,Mybatis自己匹配一个SQL语句,并且去执行
public interface UserMapper {
    /**
     * MyBatis面向接口编程的两个一致:
     * 1、映射文件的namespace要和mapper接口的全类名保持一致
     * 2、映射文件中SQL语句的id要和mapper接口中的方法名一致
     *
     * 表--实体类--mapper接口--映射文件
     */
    /**
     * 添加用户信息
     */
    int insertUser();
    /**
     * 修改用户信息
     */
    void updateUser();
    /**
     * 删除用户信息
     */
    void deleteUser();
    /**
     * 根据id查询用户信息
     */
    User getUserById();

    /**
     * 查询所有的用户信息
     */
    List<User> getAllUser();
}
创建实体类 User
创建Mybatis的映射文件
ORM(object relationship mapping)对象关系映射
对象:Java的实体类对象 关系:关系型数据库 映射:两者之间对应的关系
| Java概念 | 数据库慨念 |
| 类 | 表 |
| 属性 | 字段/列 |
| 对象 | 记录/行 |
1.映射文件的命名规则:
表对应的实体类的类名 + Mapper.xml
例:表 t_user,映射的实体类为User,对应的映射文件为UserMapper.xml
因此一个映射文件对应一个实体类,对应一张表的操作;Mybatis映射文件用于编写SQL,访问以及操作表中的数据。
2.MyBatis中可以面向接口操作数据,要保证两个一致
(1)mapper接口的全类名和映射文件的命名空间(namespace)保持一致
(2)mapper接口中方法的方法名和映射文件中编写SQL的标签id属性保持一致
MyBatis获取参数值的两种方式
$与#的区别
 <!--User getUserByUsername(String username);-->
    <select id="getUserByUsername" resultType="User">
        <!--select * from t_user where username = #{username}-->
        select * from t_user where username = '${username}'
    </select>
1.mapper接口方法的参数为单个的字面量类型
2.mapper接口方法的参数为多个时
<!--User checkLogin(String username, String password);-->
    <select id="checkLogin" resultType="User">
        <!--select * from t_user where username = #{arg0} and password = #{arg1}-->
        select * from t_user where username = '${param1}' and password = '${param2}'
    </select>
3.若mapper接口方法的参数有多个时,可以手动将这些参数放在一个map中存储
<!--User checkLoginByMap(Map<String, Object> map);-->
    <select id="checkLoginByMap" resultType="User">
        select * from t_user where username = #{username} and password = #{password}
    </select>
4.mapper接口方法的参数是实体类类型的参数
<!--int insertUser(User user);-->
    <insert id="insertUser">
        insert into t_user values(null,#{username},#{password},#{age},#{sex},#{email})
    </insert>
5.命名参数,使用@Param注解
使用这个注解自动创建map对象,以@Param括号里面的值为键 , 以传进来的参数为 值。体会与2.、3.的不同。相当于注解完成了手动创建map集合的过程。
<!--User checkLoginByParam(@Param("username") String username, @Param("password") String password);-->
    <select id="checkLoginByParam" resultType="User">
        select * from t_user where username = #{username} and password = #{password}
    </select>
MyBatis的各种查询功能
1.查询一个实体类对象
<!--User getUserById(@Param("id") Integer id);-->
    <select id="getUserById" resultType="User">
        select * from t_user where id = #{id}
    </select>
2.查询一个list集合
<!--List<User> getAllUser();-->
    <select id="getAllUser" resultType="User">
        select * from t_user
    </select>
3.查询单个数据
<!--Integer getCount();查询总记录数-->
    <select id="getCount" resultType="_int">
        select count(*) from t_user
    </select>
4.查询一条数据为map集合
<!--Map<String, Object> getUserByIdToMap(@Param("id") Integer id);-->
    <select id="getUserByIdToMap" resultType="map">
        select * from t_user where id = #{id}
    </select>
查询出来的map集合
如 {password=123456,sex=man,id=3,age=23,email=123456@qq.com,username=admin}
key为属性名 value为实际值
5.查询多条数据为map集合
<!--Map<String, Object> getAllUserToMap();-->
    <select id="getAllUserToMap" resultType="map">
        select * from t_user
    </select>
/**
     * 查询所有用户信息为map集合
     */
    //List<Map<String, Object>> getAllUserToMap();
    @MapKey("id")
    Map<String, Object> getAllUserToMap();
@MapKey 以id为键,转换的map集合为值
特殊SQL的执行
模糊查询
模糊查询 where xxx like %xxx%
<!--List<User> getUserByLike(@Param("username") String username);根据用户名模糊查询-->
    <select id="getUserByLike" resultType="User">
        <!--select * from t_user where username like '%${username}%'-->
        <!--select * from t_user where username like concat('%',#{username},'%')-->
        select * from t_user where username like "%"#{username}"%"
    </select>
这里的问题来自于 # 会自动加 ‘’ $要手动加 ‘’
批量删除
delete from t_user where id in (1,2,3) 删除id等于1或者2或者3的行,in表示or
<!--int deleteMore(@Param("ids") String ids);批量删除-->
    <delete id="deleteMore">
        delete from t_user where id in (${ids})
    </delete>
动态设置表名
由于可能存在一张表存了大量的数据,有时候可以会把一张表拆分成几个表,所以有时候需要动态查询表名来进行相关的操作
/**
     * 查询指定表中的数据
     */
    List<User> getUserByTableName(@Param("tableName") String tableName);
<!--List<User> getUserByTableName(@Param("tableName") String tableName);-->
    <select id="getUserByTableName" resultType="User">
        select * from ${tableName}
    </select>
添加功能获取自增的主键
/*** 添加用户信息
* @param user *
* @return *
useGeneratedKeys:设置使用自增的主键 */
keyProperty:因为增删改有统一的返回值是受影响的行数,因此只能将获取的自增的主键放在传输的参数
user对象的某个属性中 */

int insertUser(User user);
<!--
        void insertUser(User user);
        useGeneratedKeys:设置当前标签中的sql使用了自增的主键
        keyProperty:将自增的主键的值赋值给传输到映射文件中参数的某个属性
    -->
    <insert id="insertUser" useGeneratedKeys="true" keyProperty="id">
        insert into t_user values(null,#{username},#{password},#{age},#{sex},#{email})
    </insert>
自定义映射resultMap
MyBatis 是如何将 sql 执行结果封装为目标对象并返回的?都有哪些映射形式?
答:第一种是使用 <resultMap> 标签,逐一定义列名和对象属性名之间的映射关系。第二种是使用 sql 列的别名功能,将列别名书写为对象属性名,比如 T_NAME AS NAME,对象属性名一般是 name,小写,但是列名不区分大小写,MyBatis 会忽略列名大小写,智能找到与之对应对象属性名,你甚至可以写成 T_NAME AS NaMe,MyBatis 一样可以正常工作。
有了列名与属性名的映射关系后,MyBatis 通过反射创建对象,同时使用反射给对象的属性逐一赋值并返回,那些找不到映射关系的属性,是无法完成赋值的。
resultMap处理字段和属性的映射关系
多对一映射处理
一对多映射处理
动态SQL
MyBatis动态sql可以让我们在xml映射文件内,以标签的形式编写动态sql,完成逻辑判断和动态拼接sql的功能。其执行原理为,使用OGNL从sql参数对象中计算表达式的值,根据表达式的值动态拼接sql,以此来完成动态sql的功能。
MyBatis框架的动态SQL技术是一种根据特定条件动态拼接SQL语句功能,它存在的意义是为了解决拼接SQL语句字符串时的痛点问题。
if
<select id="getEmpByConditionOne" resultType="Emp">
        select * from t_emp where 1=1
        <if test="empName != null and empName != ''">
            emp_name = #{empName}
        </if>
        <if test="age != null and age != ''">
            and age = #{age}
        </if>
        <if test="sex != null and sex != ''">
            and sex = #{sex}
        </if>
        <if test="email != null and email != ''">
            and email = #{email}
        </if>
    </select>
如果if都成立SQL语句为 : select * from t_emp where 1=1 and emp_name= #{empName} and age = #{age} and sex = #{sex} and email = #{email}
where
<select id="getEmpByConditionTwo" resultType="Emp">
        select * from t_emp
        <where>
            <if test="empName != null and empName != ''">
                emp_name = #{empName}
            </if>
            <if test="age != null and age != ''">
                and age = #{age}
            </if>
            <if test="sex != null and sex != ''">
                or sex = #{sex}
            </if>
            <if test="email != null and email != ''">
                and email = #{email}
            </if>
        </where>
    </select>
trim
<select id="getEmpByCondition" resultType="Emp">
        select <include refid="empColumns"></include> from t_emp
        <trim prefix="where" suffixOverrides="and|or">
            <if test="empName != null and empName != ''">
                emp_name = #{empName} and
            </if>
            <if test="age != null and age != ''">
                age = #{age} or
            </if>
            <if test="sex != null and sex != ''">
                sex = #{sex} and
            </if>
            <if test="email != null and email != ''">
                email = #{email}
            </if>
        </trim>
    </select>
choose、when、otherwise
<select id="getEmpByChoose" resultType="Emp">
        select * from t_emp
        <where>
            <choose>
                <when test="empName != null and empName != ''">
                    emp_name = #{empName}
                </when>
                <when test="age != null and age != ''">
                    age = #{age}
                </when>
                <when test="sex != null and sex != ''">
                    sex = #{sex}
                </when>
                <when test="email != null and email != ''">
                    email = #{email}
                </when>
                <otherwise>
                    did = 1
                </otherwise>
            </choose>
        </where>
    </select>
foreach
 <!--int insertMoreByList(@Param("emps") List<Emp> emps);-->
    <insert id="insertMoreByList">
        insert into t_emp values
        <foreach collection="emps" item="emp" separator=",">
            (null,#{emp.empName},#{emp.age},#{emp.sex},#{emp.email},null)
        </foreach>
    </insert>

    <!--int deleteMoreByArray(@Param("eids") Integer[] eids);-->
    <delete id="deleteMoreByArray">
        delete from t_emp where
        <foreach collection="eids" item="eid" separator="or">
            eid = #{eid}
        </foreach>
        <!--
            delete from t_emp where eid in
            <foreach collection="eids" item="eid" separator="," open="(" close=")">
                #{eid}
            </foreach>
        -->
    </delete>
SQL片段
<sql id="empColumns"> eid,ename,age,sex,did </sql>
select <include refid="empColumns"></include> from t_emp
Mybatis缓存
public class SqlSessionUtils {
    public static SqlSession getSqlSession(){
        SqlSession sqlSession = null;
        try {
            InputStream is = Resources.getResourceAsStream("mybatis-config.xml");
            SqlSessionFactory sqlSessionFactory = new SqlSessionFactoryBuilder().build(is);
            sqlSession = sqlSessionFactory.openSession(true);
        } catch (IOException e) {
            e.printStackTrace();
        }
        return sqlSession;
    }
}
Mybatis的一级缓存
Mybatis的二级缓存
二级缓存的相关配置
Mybatis缓存查询的顺序
MyBatis仅支持association关联对象和collection关联集合对象的延迟加载,association指的就是一对一,collection指的就是一对多查询。在MyBatis配置文件中,可以配置是否启用延迟加载 lazyLoadingEnabled=true|false。
原理:使用CGLIB创建目标对象的代理对象,当调用目标方法时,进入拦截器方法,比如调用 a.getB().getName(),拦截器invoke()方法发现a.getB()是null值,那么就会单独发送事先保存好的查询关联B对象的sql,把B查询上来,然后调用a.setB(b),于是a的对象b属性就有值了,接着完成a.getB().getName()方法的调用。这就是延迟加载的基本原理。


【推荐】国内首个AI IDE,深度理解中文开发场景,立即下载体验Trae
【推荐】编程新体验,更懂你的AI,立即体验豆包MarsCode编程助手
【推荐】抖音旗下AI助手豆包,你的智能百科全书,全免费不限次数
【推荐】轻量又高性能的 SSH 工具 IShell:AI 加持,快人一步
· 阿里最新开源QwQ-32B,效果媲美deepseek-r1满血版,部署成本又又又降低了!
· AI编程工具终极对决:字节Trae VS Cursor,谁才是开发者新宠?
· 开源Multi-agent AI智能体框架aevatar.ai,欢迎大家贡献代码
· Manus重磅发布:全球首款通用AI代理技术深度解析与实战指南
· 被坑几百块钱后,我竟然真的恢复了删除的微信聊天记录!