WPF MVVM模式简介
WPF是Windows Presentation Foundation的缩写,它是一种用于创建桌面应用程序的用户界面框架。WPF支持多种开发模式,其中一种叫做MVVM(Model-View-ViewModel)。
什么是MVVM?
MVVM是一种软件架构模式,它将应用程序分为三个层次:Model(模型),View(视图)和ViewModel(视图模型)。Model表示应用程序的数据和业务逻辑,View表示应用程序的用户界面,ViewModel表示View和Model之间的桥梁,它负责处理View的数据绑定和用户交互。
为什么要使用MVVM?
使用MVVM有以下几个好处:
- 降低了View和Model之间的耦合度,使得它们可以独立地开发和测试。
- 提高了代码的可重用性和可维护性,因为ViewModel可以在不同的View之间共享。
- 简化了单元测试,因为ViewModel不依赖于具体的UI控件。
- 支持双向数据绑定,使得View可以自动更新Model的变化,反之亦然。
- 利用了WPF提供的强大特性,如命令、依赖属性、数据注解等。
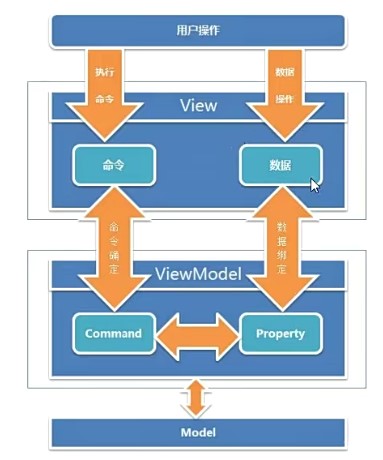
下图我们可以直观的理解MVVM谁急模式:

View: 使用XAML呈现给用户的界面,负责与用户交互,接收用户输入,把数据展现给用户。
Model: 事物的抽象,开发过程中涉及到的事物都可以抽象为Model,例如姓名、年龄、性别、地址等属性.不包含方法,也不需要实现INotifyPropertyChanged接口.
ViewModel: 负责收集需要绑定的数据和命令,聚合Model对象,通过View类的DataContext属性绑定到View。同时也可以处理一些UI逻辑。
如何实现MVVM?
实现MVVM需要遵循以下几个步骤:
- 创建一个Model类,定义应用程序所需的数据和业务逻辑。
- 创建一个ViewModel类,继承自INotifyPropertyChanged接口,并实现属性变更通知。在ViewModel中定义与Model相关联的属性,并提供相应的命令来执行用户操作。
- 创建一个View类(通常是一个XAML文件),定义应用程序的用户界面。在View中使用数据绑定来连接ViewModel中的属性和命令,并设置相关的样式和行为。
- 在App.xaml或其他合适的地方创建一个ViewModel实例,并将其作为View中DataContext属性值。
- 示例代码:
// Model class
public class User
{
    public string Name { get; set; }
    public int Age { get; set; }
}

// ViewModel class
using System;
using System.Collections.Generic;
using System.ComponentModel;
using System.Linq;
using System.Text;
using System.Threading.Tasks;
using System.Windows.Input;
using System.Windows;

namespace WpfApp1
{
    public class UserInfoViewModel : INotifyPropertyChanged
    {
        private User user;

        public UserInfoViewModel()
        {
            user = new User();
            SaveCommand = new RelayCommand(Save);
            CancelCommand = new RelayCommand(Cancel);
        }

        public string UserName
        {
            get { return user.Name; }
            set
            {
                user.Name = value;
                OnPropertyChanged("UserName");
            }
        }

        public int UserAge
        {
            get { return user.Age; }
            set
            {
                user.Age = value;
                OnPropertyChanged("UserAge");
            }
        }

        public string UserInfo
        {
            get { return $"Name:{UserName} Age:{UserAge}"; }
        }

        public ICommand SaveCommand { get; private set; }
        public ICommand CancelCommand { get; private set; }

        private void Save(object parameter)
        {
            // Save user data to database or service
            MessageBox.Show("User data saved!");

            OnPropertyChanged("UserInfo");
        }

        private void Cancel(object parameter)
        {
            // Close dialog window without saving data
            var window = parameter as Window;
            if (window != null)
                window.Close();

        }

        public event PropertyChangedEventHandler PropertyChanged;

        protected void OnPropertyChanged(string propertyName)
        {
            if (PropertyChanged != null)
                PropertyChanged(this, new PropertyChangedEventArgs(propertyName));
        }
    }
}

//Command class
public class RelayCommand : ICommand
{
    public RelayCommand(Action<object> action)
    {
        DoExecute = action;
    }

    public event EventHandler? CanExecuteChanged;
    public Func<object, bool>? CanExecution { set; get; }
    public Action<object>? DoExecute { set; get; }

    public bool CanExecute(object? parameter)
    {
        if (CanExecution != null)
        {
            CanExecute(parameter);
        }
        return true;
    }

    public void Execute(object? parameter)
    {
        DoExecute!.Invoke(parameter!);
    }
}
// View class (XAML file)

<Window x:Class="WpfApp1.MainWindow"
        xmlns="http://schemas.microsoft.com/winfx/2006/xaml/presentation"
        xmlns:x="http://schemas.microsoft.com/winfx/2006/xaml"
        Title="MainWindow" Height="220" Width="300">
    <Grid>
        <Grid.RowDefinitions>
            <RowDefinition Height="Auto"/>
            <RowDefinition Height="Auto"/>
            <RowDefinition Height="Auto"/>
            <RowDefinition Height="*"/>
        </Grid.RowDefinitions>
        <Grid.ColumnDefinitions>
            <ColumnDefinition Width="Auto"/>
            <ColumnDefinition Width="*"/>
        </Grid.ColumnDefinitions>

        <!-- Labels and textboxes for user name and age -->

        <Label Content="Name:" Grid.Row="0" Grid.Column="0" Margin="10"/>
        <TextBox Text="{Binding UserName}" Grid.Row="0" Grid.Column="1" Margin="10"/>

        <Label Content="Age:" Grid.Row="1" Grid.Column="0" Margin="10"/>
        <TextBox Text="{Binding UserAge}" Grid.Row="1" Grid.Column="1" Margin="10"/>

        <Label Content="{Binding UserInfo}" Grid.Row="2" Grid.Column="1" Margin="10"/>
        <!-- Buttons for save and cancel commands -->

        <StackPanel Orientation= "Horizontal" HorizontalAlignment= "Right"
                    Grid.Row= "3" Grid.ColumnSpan= "2">
            <Button Content= "Save" Command="{Binding SaveCommand}"
                    CommandParameter="{Binding RelativeSource={RelativeSource FindAncestor,
                  AncestorType={x:Type Window}}}" Margin= "10"/>
            <Button Content= "Cancel" Command="{Binding CancelCommand}"
                    CommandParameter="{Binding RelativeSource={RelativeSource FindAncestor,
                  AncestorType={x:Type Window}}}" Margin= "10"/>
        </StackPanel>

    </Grid>
</Window>
// View code-behind file

using System.Windows;

namespace WpfApp1
{
   /// Interaction logic for UserInfoView.xaml

   public partial class MainWindow : Window
   {
      public MainWindow()
      {
         InitializeComponent();

         // Set the ViewModel as the DataContext of the View

         this.DataContext = new UserInfoViewModel();
      }
   }
}
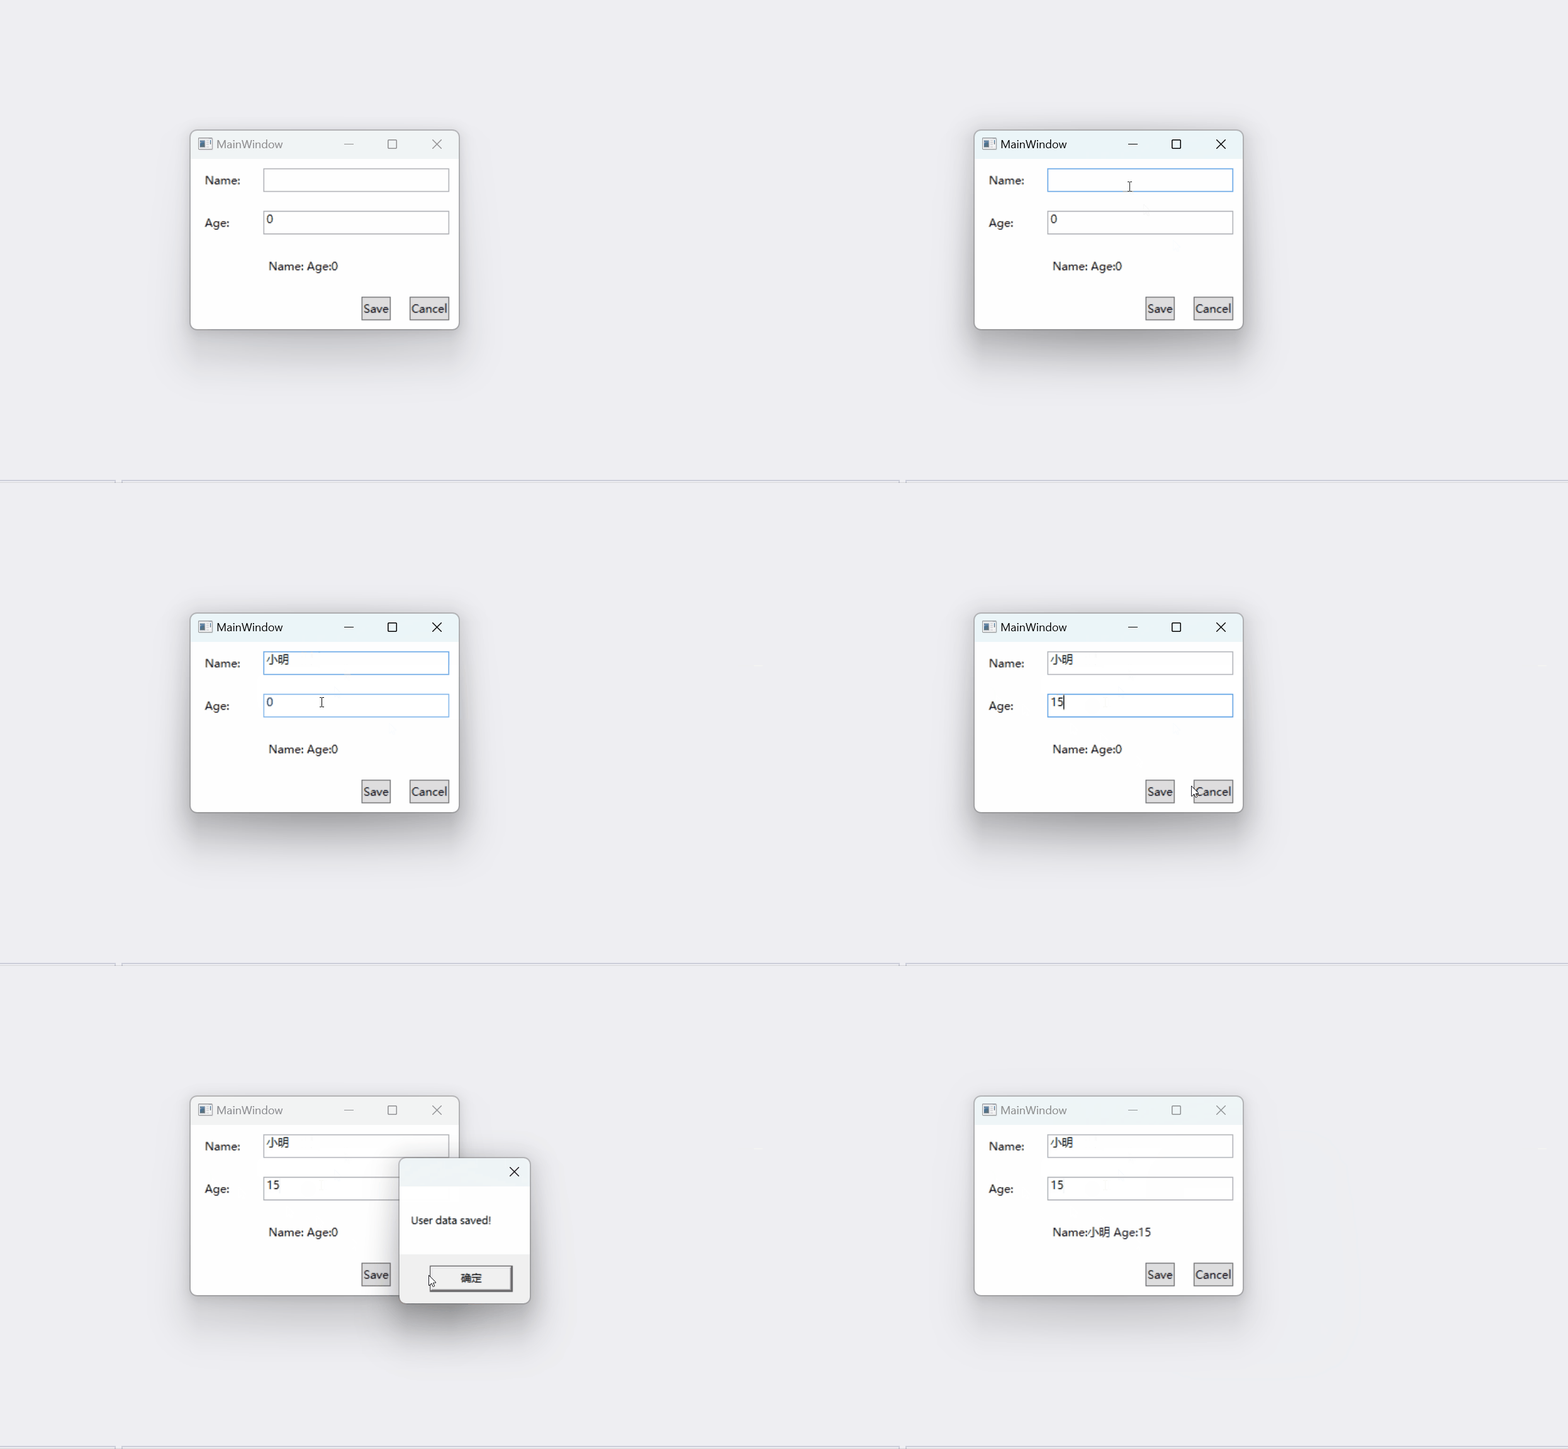
运行结果如下:

代码位置:
https://github.com/DXG88/WpfApp1.git
有哪些MVVM框架?
虽然可以手动实现MVVM模式,但是也有许多第三方库提供了更方便和高效地使用MVVM模式。以下是一些常见且流行的MVVM框架:
- Prism: 一个由微软支持的MVVM框架,提供了一系列服务和特性,如导航、模块化、事件聚合、命令、依赖注入等。
- MVVM Light: 一个轻量级的MVVM框架,提供了一些基础类和组件,如ViewModelBase, RelayCommand, Messenger等。
- Caliburn.Micro: 一个基于约定而非配置的MVVM框架,提供了一些高级特性,如屏幕激活/关闭生命周期管理、自动绑定、窗口管理器等。
作者:百宝门-董校刚


