UVM中打印信息的控制+内存分配算法+C语言fork()函数+使用uvm自带的reg做默认值检查+uvm_resource_db+ral手动更新+vim操作
UVM中打印信息的控制
非uvm平台控制的module中的uvm info使用*号通配,而找不到对应的uvm_top,起始点不是harness/top。使用ID可以匹配到对应的信息。
https://blog.csdn.net/Bonnie_89/article/details/128897812
使用uvm_set_action,将某ID和某严重性的行为重载
// +uvm_set_action=<comp>,<id>,<severity>,<action[|action]> // +uvm_set_action=uvm_test_top.env0.*,_ALL_,UVM_ERROR,UVM_NO_ACTION
行为有以下表示:
UVM_NO_ACTION - No action is taken UVM_DISPLAY - Sends the report to the standard output UVM_LOG - Sends the report to the file(s) for this (severity,id) pair UVM_COUNT - Counts the number of reports with the COUNT attribute. When this value reaches max_quit_count, the simulation terminates UVM_EXIT - Terminates the simulation immediately. UVM_CALL_HOOK - Callback the report hook methods UVM_STOP - Causes ~$stop~ to be executed, putting the simulation into interactive mode. UVM_RM_RECORD - Sends the report to the recorder
默认的行为:
set_severity_action(UVM_INFO, UVM_DISPLAY); set_severity_action(UVM_WARNING, UVM_DISPLAY); set_severity_action(UVM_ERROR, UVM_DISPLAY | UVM_COUNT); set_severity_action(UVM_FATAL, UVM_DISPLAY | UVM_EXIT);
uvm_set_verbosity设置冗余度,可以使用某个phase,或时间
~+uvm_set_verbosity=<comp>,<id>,<verbosity>,<phase>~ ~+uvm_set_verbosity=<comp>,<id>,<verbosity>,time,<time>~ <sim command> +uvm_set_verbosity=uvm_test_top.env0.agent1.*,_ALL_,UVM_FULL,time,800
phase不需要加_phase后缀,在uvm_runtime_phases.svh中,其定义的phase名称也是没有加_phase的。
class uvm_pre_shutdown_phase extends uvm_task_phase; virtual task exec_task(uvm_component comp, uvm_phase phase); comp.pre_shutdown_phase(phase); endtask local static uvm_pre_shutdown_phase m_inst; static const string type_name = "uvm_pre_shutdown_phase"; // Function: get // Returns the singleton phase handle static function uvm_pre_shutdown_phase get(); if(m_inst == null) m_inst = new; return m_inst; endfunction protected function new(string name="pre_shutdown"); super.new(name); endfunction virtual function string get_type_name(); return type_name; endfunction endclass
重载严重度 uvm_set_severity
+uvm_set_severity=<comp>,<id>,<current severity>,<new severity>
内存分配算法
伙伴(Buddy)分配算法
伙伴分配算法的原理就是:将所有的空闲页框分组为 11 个块链表,每个块链表分别包含大小为 1,2,4,8,16,32,64,128,256,512 和 1024 个连续页的页块。最大可以申请 1024 个连续页,对应 4MB 大小的连续内存。假设需要申请 4 个页,但是长度为 4 个连续页块链表没有空闲的页块,伙伴系统会从连续 8 个框块的链表获取一个,并将其拆分为两个连续 4 个页块,取其中一个,另外一个放入连续 4 个页块的空闲链表中。释放的时候会检查,释放的这几个页前后的页框是否空闲,能否组成下一级长度的块。
https://bbs.huaweicloud.com/blogs/291867
cat /proc/buddyinfo #查看buddy分配结果
Slab 算法
将内核中经常使用的对象放到高速缓存中,并且由系统保持为初始的可利用状态。比如进程描述符,内核中会频繁对此数据进行申请和释放。Slab 内存分配器是对伙伴分配算法的补充,Slab 分配器为每一种对象建立高速缓存,通过将内存按使用对象不同再划分成不同大小的空间,应用于内核对象的缓存,内核对该对象的分配和释放均是在这块高速缓存中操作。每个kmem_cache 通常是一段连续的内存块,包含了三种类型的 slabs 链表:
● slabs_full:完全分配的 slab 链表
● slabs_partial:部分分配的 slab 链表
● slabs_empty:没有被分配对象的 slab 链表
cat /proc/slabinfo #查看slab内存信息
内核态和用户态
在内核态申请内存比在用户态申请内存要更为直接,它没有采用用户态那种延迟分配(通过缺页机制来反馈)内存技术。一旦有内核函数申请内存,那么就必须立刻满足该申请内存的请求,并且这个请求一定是正确合理的。相反,对于用户态申请内存的请求,内核总是尽量延后分配物理内存,用户进程总是先获得一个虚拟内存区的使用权,最终通过缺页异常获得一块真正的物理内存。
内核态分配函数kmalloc 和 vmalloc
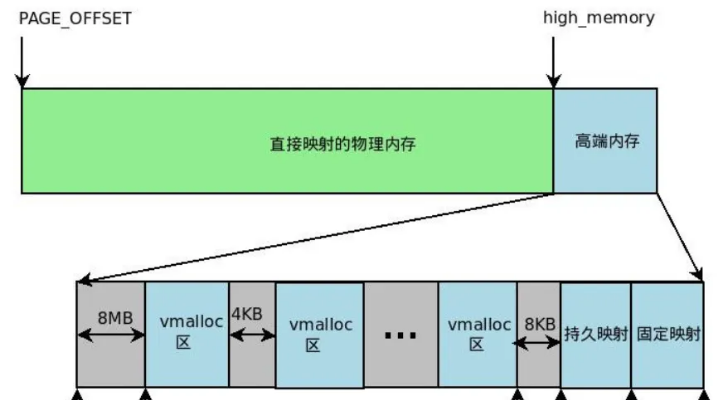
kmalloc 和 vmalloc 分别用于分配不同映射区的虚拟内存。vmalloc 分配的虚拟地址区间,位于 vmalloc_start 与 vmalloc_end 之间的动态内存映射区。一般用分配大块内存,释放内存对应于 vfree,分配的虚拟内存地址连续,物理地址上不一定连续。kmalloc() 所申请内存的线性地址与物理地址都是连续的。

用户态内存分配
用户态内存分配函数:
● alloca 是向栈申请内存,因此无需释放。
● malloc 所分配的内存空间未被初始化,调用 malloc 函数时,它沿 free_chuck_list 连接表寻找一个大到足以满足用户请求所需要的内存块。
● calloc 会将所分配的内存空间中的每一位都初始化为零。
● realloc 扩展现有内存空间大小。
○ 如果当前连续内存块足够 realloc 的话,只是将 p 所指向的空间扩大,并返回 p 的指针地址。这个时候 q 和 p 指向的地址是一样的。
○ 如果当前连续内存块不够长度,再找一个足够长的地方,分配一块新的内存,q,并将 p 指向的内容 copy 到 q,返回 q。并将 p 所指向的内存空间删除。
用户进程内存分配示例
#include <stdlib.h> #include <stdio.h> #include <string.h> #include <unistd.h> int main(void) { char *s; unsigned long int i; s = strdup("test_memory"); if (NULL == s) { fprintf(stderr, "Can't allocate mem with malloc.\n"); return EXIT_FAILURE; } i = 0; while (s) { printf("[%lu] %s (%p)\n", i, s, (void *)s); sleep(1); i++; } return EXIT_SUCCESS; }
在 Linux 操作系统中,可以通过 /proc/[pid]/mem 访问和修改进程的内存页,可以通过 /proc/[pid]/maps 看到进程当前已映射的内存区域。
cat /proc/18539/maps #查看栈空间起始地址
修改栈空间,以修改其它程序运行。
修改程序运行在内核态,而执行程序需要运行在用户态。
#!/usr/bin/env python3 ''' Locates and replaces the first occurrence of a string in the heap of a process Usage: ./read_write_heap.py PID search_string replace_by_string Where: - PID is the pid of the target process - search_string is the ASCII string you are looking to overwrite - replace_by_string is the ASCII string you want to replace search_string with ''' import sys def print_usage_and_exit(): print('Usage: {} pid search write'.format(sys.argv[0])) sys.exit(1) # check usage if len(sys.argv) != 4: print_usage_and_exit() # get the pid from args pid = int(sys.argv[1]) if pid <= 0: print_usage_and_exit() search_string = str(sys.argv[2]) if search_string == "": print_usage_and_exit() write_string = str(sys.argv[3]) if search_string == "": print_usage_and_exit() # open the maps and mem files of the process maps_filename = "/proc/{}/maps".format(pid) print("[*] maps: {}".format(maps_filename)) mem_filename = "/proc/{}/mem".format(pid) print("[*] mem: {}".format(mem_filename)) # try opening the maps file try: maps_file = open('/proc/{}/maps'.format(pid), 'r') except IOError as e: print("[ERROR] Can not open file {}:".format(maps_filename)) print(" I/O error({}): {}".format(e.errno, e.strerror)) sys.exit(1) for line in maps_file: sline = line.split(' ') # check if we found the heap if sline[-1][:-1] != "[heap]": continue print("[*] Found [heap]:") # parse line addr = sline[0] perm = sline[1] offset = sline[2] device = sline[3] inode = sline[4] pathname = sline[-1][:-1] print("\tpathname = {}".format(pathname)) print("\taddresses = {}".format(addr)) print("\tpermisions = {}".format(perm)) print("\toffset = {}".format(offset)) print("\tinode = {}".format(inode)) # check if there is read and write permission if perm[0] != 'r' or perm[1] != 'w': print("[*] {} does not have read/write permission".format(pathname)) maps_file.close() exit(0) # get start and end of the heap in the virtual memory addr = addr.split("-") if len(addr) != 2: # never trust anyone, not even your OS :) print("[*] Wrong addr format") maps_file.close() exit(1) addr_start = int(addr[0], 16) addr_end = int(addr[1], 16) print("\tAddr start [{:x}] | end [{:x}]".format(addr_start, addr_end)) # open and read mem try: mem_file = open(mem_filename, 'rb+') except IOError as e: print("[ERROR] Can not open file {}:".format(mem_filename)) print(" I/O error({}): {}".format(e.errno, e.strerror)) maps_file.close() exit(1) # read heap mem_file.seek(addr_start) heap = mem_file.read(addr_end - addr_start) # find string try: i = heap.index(bytes(search_string, "ASCII")) except Exception: print("Can't find '{}'".format(search_string)) maps_file.close() mem_file.close() exit(0) print("[*] Found '{}' at {:x}".format(search_string, i)) # write the new string print("[*] Writing '{}' at {:x}".format(write_string, addr_start + i)) mem_file.seek(addr_start + i) mem_file.write(bytes(write_string, "ASCII")) # close files maps_file.close() mem_file.close() # there is only one heap in our example break
C语言fork()函数
1)在父进程中,fork返回新创建子进程的进程ID;
2)在子进程中,fork返回0;
3)如果出现错误,fork返回一个负值;
/*linux下:*/ #include <stdio.h> #include <unistd.h> int main() { pid_t pid; pid = fork(); if(pid == 0) //返回子进程 { printf("child pid: %d\n", getpid()); } else { printf("pid: %d\n", pid);//父进程中返回子进程的pid printf("father pid: %d\n", getpid()); } }
输出:父子进程在第8行之后同时执行。
pid: 5989 father pid: 5988 child pid: 5989
使用uvm自带的reg做默认值检查
继承uvm_reg_hw_reset_seq,然后在pre_body中设定model即可。
此外还有读写函数uvm_reg_bit_bash_seq。
https://blog.csdn.net/weixin_39662684/article/details/110133060
uvm_resource_db
https://www.cnblogs.com/csjt/p/15556969.html
uvm_resource_db虽然也是一种用来共享数据的类,但是层次关系在该类中没有作用; 与uvm_config_db相比,尽管uvm_resource_db也有内建的数据库,可以通过字符串或类型来索引配置数据,但缺点是层次的缺失和因此带来的自顶向下的配置覆盖关系的缺失.
(2.1) uvm_resource_db采用的是”last write wins”,即对同一配置,最后的写入有效;
(2.2) uvm_config_db采用的是”parent wins + last write wins”(假设在env中已经有配置,而test的级别高于env).
(3) uvm_config_db与uvm_resource_db共享同一套database; 因此可能会出现通过uvm_config_db::set()往database中存入信息,但用uvm_resource_db::read_by_name()从database中读取信息;
uvm_resource_db#(type)::set("scope", "name", value, accessor); //path=scope+name, default value of accessor is null; uvm_resource_db#(int)::set("test", "loop_cnt", 10, this);
https://www.cnblogs.com/csjt/p/15556136.html
使用.get_full_name()的方法对REG::设定值,以忽略测试的位置。设定的Lable根据UVM源码获取,如:(最低粒度是uvm_reg,无法将单独的域区分开)
uvm_resource_db#(bit)::set( {"REG::",rm.reg.get_full_name()}, "NO_REG_BIT_BASH_TEST", 1, this )
ral手动更新
对ral的map设置set_auto_predict(0)
编写更新函数,读取时候使用get_mirrored_value
写入的时候使用predict,
https://east1203.github.io/2020/06/06/Verification/UVM/UVM——关于RAL的一些方法/
vim操作
<>:g/^/m 0 # vim倒序 % # 匹配的括号前后切换 ^ # 移动到行首非空字符位置
Le vent se lève! . . . il faut tenter de vivre!
Le vent se lève! . . . il faut tenter de vivre!


【推荐】国内首个AI IDE,深度理解中文开发场景,立即下载体验Trae
【推荐】编程新体验,更懂你的AI,立即体验豆包MarsCode编程助手
【推荐】抖音旗下AI助手豆包,你的智能百科全书,全免费不限次数
【推荐】轻量又高性能的 SSH 工具 IShell:AI 加持,快人一步