FTP服务器与客户端的安装与配置
FTP服务器安装与配置
1. 切换到root用户: su root
2. 查看系统中是否安装了vsftpd,可以通过执行命令 : rpm -qa | grep vsftpd
3. 如果没有安装 vsftpd,则安装 : yum -y install vsftpd
4. 创建ftp用户,比如ftp_test。命令: useradd -s /sbin/nologin -d /home/ftp_test ftp_test
5. 设置ftp_test用户密码。命令: passwd ftp_test 执行之后输入2次密码确认就设置好了密码。
6. vim /etc/vsftpd/user_list ,最后一行添加刚才添加的用户名: ftp_test
7.更改配置文档 vim /etc/vsftpd/vsftpd.conf 将内容全部替换如下:
local_enable=YES
write_enable=YES
local_umask=022
dirmessage_enable=YES
xferlog_enable=YES
connect_from_port_20=YES
xferlog_std_format=YES
idle_session_timeout=600
data_connection_timeout=120
ascii_upload_enable=YES
ascii_download_enable=YES
ftpd_banner=Welcome to lightnear FTP service.
chroot_local_user=YES
ls_recurse_enable=YES
listen=YES
pam_service_name=vsftpd
userlist_enable=YES
userlist_deny=NO
local_root=/home/ftp_test
tcp_wrappers=YES
use_localtime=YES
allow_writeable_chroot=YES
8. 更改ftp目录权限 chmod -R 777 /home/ftp_test
8. 启动vsftp服务,命令: systemctl start vsftpd.service
9. 查看ftp服务的状态,命令: systemctl status vsftpd.service
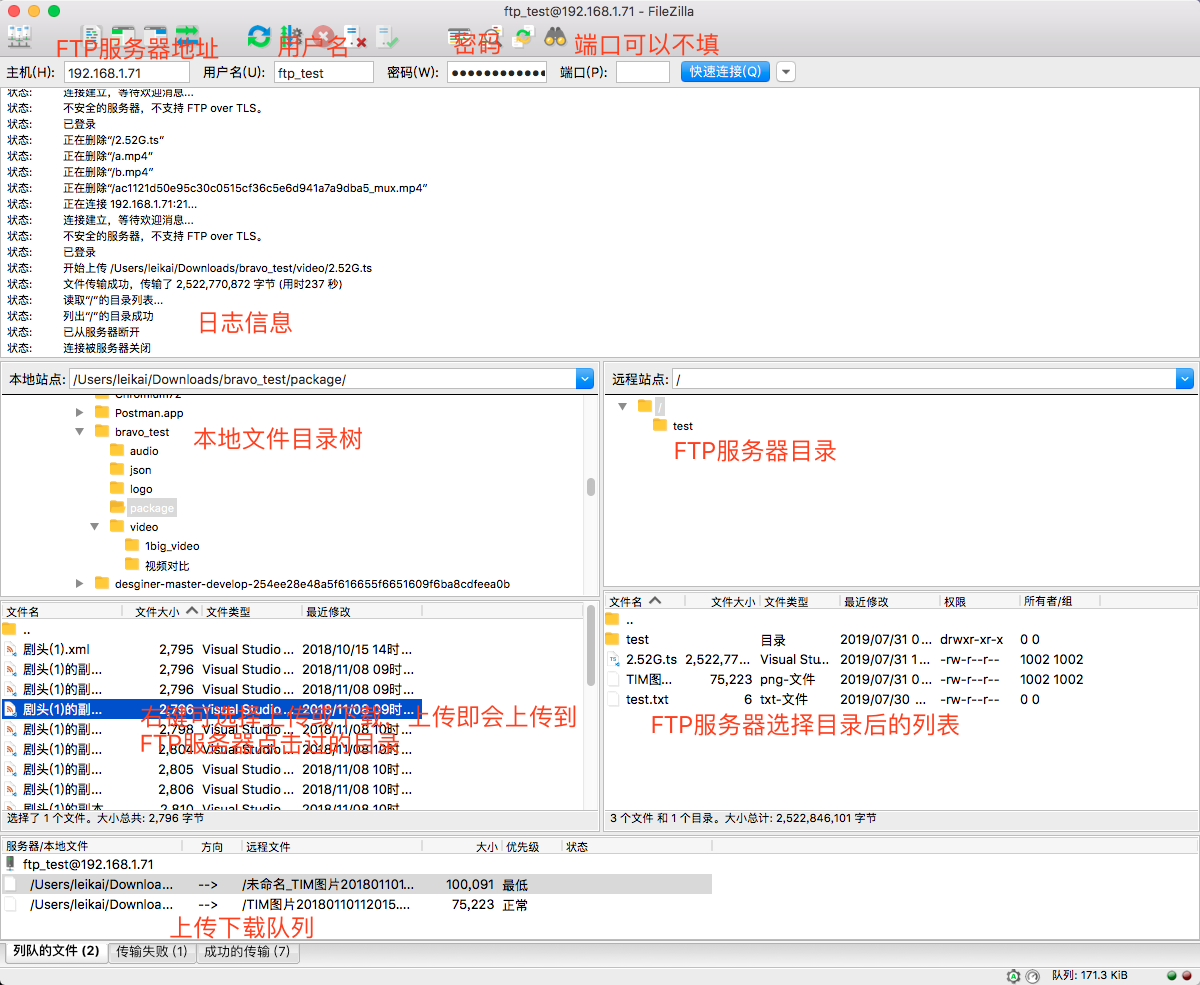
FTP客户端安装
推荐filefilla客户端,官网地址https://filezilla-project.org/

FTP服务器配置文档说明:
anonymous_enable = NO 取消FTP匿名登录,默认是YES,修改成NO,表示不允许匿名用户登录。
userlist_enable=YES
userlist_deny=NO userlist_deny=NO /这个列表里的人不拒绝,其他人拒绝(包括匿名)
local_root=/home/ftp_test local_root=定义本地用户的根目录。当本地用户登录时,将被更换到此目录下。
chroot_local_users= YES 将本地用户锁定在主目中。
allow_writeable_chroot=YES 从2.3.5之后,vsftpd增强了安全检查,如果用户被限定在了其主目录下,则该用户的主目录不能再具有写权限了!如果检查发现还有写权限,就会报该错误。
要修复这个错误,可以用命令chmod a-w /home/user去除用户主目录的写权限,注意把目录替换成你自己的。
如果希望某个用户可以访问根目录,把用户名加入/etc/vsftpd/chroot_list不存在就创建这个文件,一行一个用户名。
注意:
1. 目录尽量不要选择根目录下,这里是/home/ftp_test,并且ftp_test这个目录不要手动创建,否则权限会有问题,执行命令的时候会自动创建,如果是选择根目录,需要用手动创建,目录读写权限改为777
3. 如果连接不上,很可能是防火墙阻止了,尝试关闭防火墙
systemctl stop firewalld.service #停止firewall
systemctl disable firewalld.service #禁止firewall开机启动
firewall-cmd --state #查看默认防火墙状态(关闭后显示notrunning,开启后显示running)
如果出现远程文件夹无法显示的情况,请使用主动模式连接,在你的ftp工具上设置。
3. 本文ftp服务器环境为CentOS7.2,ftp客户端环境为MacOS.
参考文档:
https://www.cnblogs.com/xianhan/p/9534669.html
https://www.cnblogs.com/mrcln/p/6189665.html


 浙公网安备 33010602011771号