Unity中的雾效
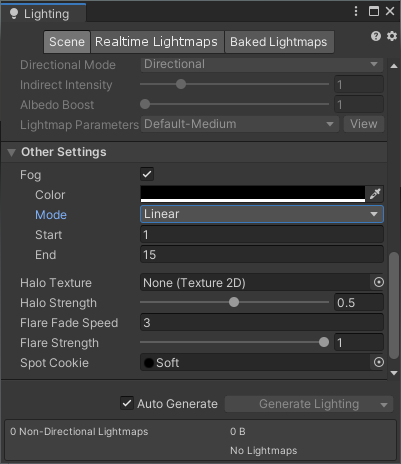
Unity原生是支持雾效的,可以通过Window/Rendering/Lighting Settings设置:

Unity支持3种模式的雾效,Linear,Exponential,Exponential Squared。
Linear模式对应的雾效系数公式如下:
其中,E为雾效的结束距离,S为开始距离,c为当前点的雾效坐标。
Exponential模式对应的雾效系数公式如下:
其中,d为雾效的密度系数。
Exponential Squared模式对应的雾效系数公式如下:
在前向渲染中,我们可以根据雾效系数的值,对雾效颜色和计算出的pixel color进行插值,得到最终的颜色:
float4 ApplyFog (float4 color, Interpolators i) {
	float viewDistance = length(_WorldSpaceCameraPos - i.worldPos.xyz);
	#if FOG_DEPTH
		viewDistance = UNITY_Z_0_FAR_FROM_CLIPSPACE(i.worldPos.w);
	#endif
	UNITY_CALC_FOG_FACTOR_RAW(viewDistance);
	float3 fogColor = 0;
	#if defined(FORWARD_BASE_PASS)
		fogColor = unity_FogColor.rgb;
	#endif
	color.rgb = lerp(fogColor, color.rgb, saturate(unityFogFactor));
	return color;
}
有两种方式可以计算当前点的雾效坐标,一是计算当前点到相机位置的距离,二是计算当前点在相机空间中的深度z,Unity提供了UNITY_Z_0_FAR_FROM_CLIPSPACE这个API进行计算,它接受一个齐次剪裁空间下的z作为参数:
#if defined(UNITY_REVERSED_Z)
    #if UNITY_REVERSED_Z == 1
        //D3d with reversed Z => z clip range is [near, 0] -> remapping to [0, far]
        //max is required to protect ourselves from near plane not being correct/meaningfull in case of oblique matrices.
        #define UNITY_Z_0_FAR_FROM_CLIPSPACE(coord) max(((1.0-(coord)/_ProjectionParams.y)*_ProjectionParams.z),0)
    #else
        //GL with reversed z => z clip range is [near, -far] -> should remap in theory but dont do it in practice to save some perf (range is close enough)
        #define UNITY_Z_0_FAR_FROM_CLIPSPACE(coord) max(-(coord), 0)
    #endif
#elif UNITY_UV_STARTS_AT_TOP
    //D3d without reversed z => z clip range is [0, far] -> nothing to do
    #define UNITY_Z_0_FAR_FROM_CLIPSPACE(coord) (coord)
#else
    //Opengl => z clip range is [-near, far] -> should remap in theory but dont do it in practice to save some perf (range is close enough)
    #define UNITY_Z_0_FAR_FROM_CLIPSPACE(coord) (coord)
#endif
该函数其实就是根据API的不同,是否启用REVERSE_Z,将clip空间下的z归一化到[0, f]范围内。这里的f为远裁剪面,_ProjectionParams是一个4维向量,它的y分量表示近剪裁面n,z分量表示远剪裁面f。
得到雾效坐标之后,可以代入Unity提供的APIUNITY_CALC_FOG_FACTOR_RAW计算雾效的系数:
#if defined(FOG_LINEAR)
    // factor = (end-z)/(end-start) = z * (-1/(end-start)) + (end/(end-start))
    #define UNITY_CALC_FOG_FACTOR_RAW(coord) float unityFogFactor = (coord) * unity_FogParams.z + unity_FogParams.w
#elif defined(FOG_EXP)
    // factor = exp(-density*z)
    #define UNITY_CALC_FOG_FACTOR_RAW(coord) float unityFogFactor = unity_FogParams.y * (coord); unityFogFactor = exp2(-unityFogFactor)
#elif defined(FOG_EXP2)
    // factor = exp(-(density*z)^2)
    #define UNITY_CALC_FOG_FACTOR_RAW(coord) float unityFogFactor = unity_FogParams.x * (coord); unityFogFactor = exp2(-unityFogFactor*unityFogFactor)
#else
    #define UNITY_CALC_FOG_FACTOR_RAW(coord) float unityFogFactor = 0.0
#endif
unity_FogParams是一个4维向量,保存了Light Setting中的fog相关参数:
    // x = density / sqrt(ln(2)), useful for Exp2 mode
    // y = density / ln(2), useful for Exp mode
    // z = -1/(end-start), useful for Linear mode
    // w = end/(end-start), useful for Linear mode
    float4 unity_FogParams;
计算出雾效系数之后,需要根据当前是否是forward base pass,来考虑是否叠加雾效的颜色。这是因为当有多个光源时,forward pass会执行多次,而实际上我们只需要叠加一次雾效的颜色即可。
而在延迟渲染路径中,要使用雾效则有点麻烦。由于G-Buffer中保存的是场景的几何信息,并非是经过光照计算后的信息,因此无法在geometry pass阶段使用类似前向渲染路径的策略。我们需要通过后处理,将最终输出的颜色和雾效进行叠加计算。后处理使用的shader参考如下:
Shader "Custom/Deferred Fog" {

	Properties {
		_MainTex ("Source", 2D) = "white" {}
	}

	SubShader {
		Cull Off
		ZTest Always
		ZWrite Off

		Pass {
			CGPROGRAM

			#pragma vertex VertexProgram
			#pragma fragment FragmentProgram

			#pragma multi_compile_fog

			#define FOG_DISTANCE
//			#define FOG_SKYBOX

			#include "UnityCG.cginc"

			sampler2D _MainTex, _CameraDepthTexture;

			float3 _FrustumCorners[4];

			struct VertexData {
				float4 vertex : POSITION;
				float2 uv : TEXCOORD0;
			};

			struct Interpolators {
				float4 pos : SV_POSITION;
				float2 uv : TEXCOORD0;

				#if defined(FOG_DISTANCE)
					float3 ray : TEXCOORD1;
				#endif
			};

			Interpolators VertexProgram (VertexData v) {
				Interpolators i;
				i.pos = UnityObjectToClipPos(v.vertex);
				i.uv = v.uv;
				#if defined(FOG_DISTANCE)
					i.ray = _FrustumCorners[v.uv.x + 2 * v.uv.y];
				#endif
				return i;
			}

			float4 FragmentProgram (Interpolators i) : SV_Target {
				float depth = SAMPLE_DEPTH_TEXTURE(_CameraDepthTexture, i.uv);
				depth = Linear01Depth(depth);

				float viewDistance =
					depth * _ProjectionParams.z - _ProjectionParams.y;
				#if defined(FOG_DISTANCE)
					viewDistance = length(i.ray * depth);
				#endif

				UNITY_CALC_FOG_FACTOR_RAW(viewDistance);
				unityFogFactor = saturate(unityFogFactor);
				#if !defined(FOG_SKYBOX)
					if (depth > 0.9999) {
						unityFogFactor = 1;
					}
				#endif
				#if !defined(FOG_LINEAR) && !defined(FOG_EXP) && !defined(FOG_EXP2)
					unityFogFactor = 1;
				#endif

				float3 sourceColor = tex2D(_MainTex, i.uv).rgb;
				float3 foggedColor =
					lerp(unity_FogColor.rgb, sourceColor, unityFogFactor);
				return float4(foggedColor, 1);
			}

			ENDCG
		}
	}
}
实现思路与前向渲染类似,只是后处理时,我们的顶点信息实际上只有quad的4个顶点,并不足以计算出当前pixel到相机位置的距离。因此这里还借用了_FrustumCorners参数,它传递的是相机的视锥体信息,通过quad的4个顶点插值出quad的每个pixel到相机位置的射线,乘以当前pixel在相机空间的01深度,就可以算出当前pixel对应的物体到相机位置的距离。另外有一点值得一提的是,为了避免后处理时把雾效颜色混合进skybox,可以人为设定,当相机空间的深度接近远剪裁面时,忽略掉雾效的影响。
Reference
[1] Fog


