安装MVAPICH2及infiniband(IB)网卡驱动
一、安装MVAPICH2
1、下载解压安装
下载链接:http://mvapich.cse.ohio-state.edu/downloads/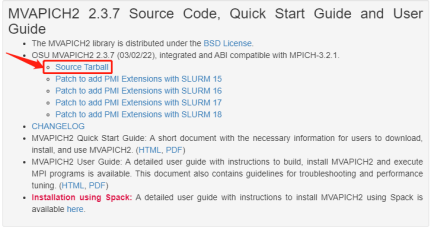
解压编译安装
1 2 3 4 5 | mkdir /home/xujb/mvapich2tar -xzvf mvapich2-2.3.7.tar.gzcd mvapich2-2.3.7/./configure --prefix=/home/xujb/mvapich2make && make install |
2、配置mvapich2环境变量
1 | vim ~/.bashrc |
1 2 | export MPICH=/home/xujb/mvapich2export PATH=$MPICH/bin:$PATH |
1 | source ~/.bashrcs |
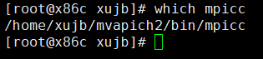
可以通过输入which mpicc检查mvapich2是否已经在当前系统中安装。
3、解决错误
错误1:configure: error: newly created file is older th an distributed files!
Check your system
(我的服务器上不了外网:ping www.baidu.com出错)
先查看一下系统时间和硬件时间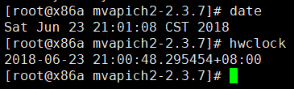
【按提示应该是文件时间问题,新创建的时间既然比现在的文件时间晚,系统时间问题】
解决:
hwclock --set --date="月/日/年 小时:分钟:秒钟"
hwclock --hctosys
比如:hwclock --set --date="05/25/2022 13:33:22"
hwclock --hctosys是让系统时间同上面设置的硬件时间同步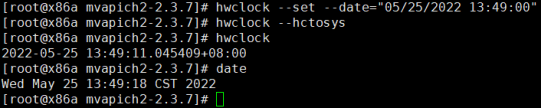
hwclock --systohc设置硬件时钟与系统时钟同步
错误2:configure: error: 'infiniband/verbs.h not found. Did you specify --with-ib-include=?'
说明infiniband驱动有问题,然后需要安装IB驱动。
(安装IB驱动请往下看)
错误3:checking whether gfortran allows mismatched arguments... no
onfigure: error: The Fortran compiler /usr/local/bin/gfortran will not compile files that call
gcc版本过高
请使用低于gcc10.1.0版本的gcc编译安装,或者选择 --disable-fortran选项忽略
1 | ./configure CC=/usr/bin/gcc CXX=/usr/bin/g++ FC=/usr/bin/gfortran |
(/usr/bin是系统原本自带的,/usr/local/bin是后来安装的高版本的)

二、安装IB网卡驱动
1、准备步骤
(1)查看centos版本
1 | cat /etc/issue或者cat /etc/redhat-release或者lsb_release -a |

(2)查看linux版本
1 | cat /proc/version或uname -a或uname -r |

(3)确定插在服务器节点上的IB网卡的信息以及是否插入成功
1 | lspci |grep Mell |

如果返回如上信息,说明IB网卡插入成功,此外,返回的信息中,ConnectX-3说明了IB网卡的信息。特别说明,ConnectX-3、ConnectX-4、ConnectX-5、ConnectX-6的驱动有所不同,例如,ConnectX-3可能不支持最新版本的驱动,因此需要知道该信息!
2、下载驱动并安装
结合Linux版本、IB网卡版本,选择合适的IB网卡驱动(特别注意版本问题)
下载地址:https://developer.nvidia.com/networking/infiniband-software
解压安装:
1 2 3 | tar -zxvf MLNX_OFED_LINUX-5.6-1.0.3.3-rhel8.2-x86_64.tgzcd MLNX_OFED_LINUX-5.6-1.0.3.3-rhel8.2-x86_64/./mlnxofedinstall |
(安装程序会检查系统库,如果缺少库会直接提示使用yum install ‘缺少的库’安装,根据提示安装即可,-q参数静默安装)--force
安装完毕,加载驱动
1 | /etc/init.d/openibd restart (systemctl start openibd) |

1 | /etc/init.d/opensmd restart |
![]()
重启服务器:reboot
3、检查并配置IB网络
(1)检查IB网卡状态:ibstat
(2)查询IB设备信息
ibv_devices #显示系统中目前所有设备 查看本主机的infiniband设备
ibnodes #查看网络中的infiniband设备
(3)配置网络
首先,使用命令ifconfig查看是否存在ib0网卡:
在/etc/sysconfig/network-scripts目录下,可以看到ifcfg-ib0文件,配置方法修改这个文件
(如果没有的话在nmtui中自己添加ib0的网)
也可以使用nmtui设置ib0网络的ip地址,
注意:不要使ib网的IP地址和以太网的IP地址一样
4、用MPI验证IB网络
1 2 3 4 5 6 7 8 9 10 11 12 13 14 15 16 17 18 | vim hw.c#include <stdio.h>#include "mpi.h"int main(int argc, char **argv){ int myrank,nprocs,len; MPI_Status status; //状态信息 char Processorname[20]; MPI_Init(&argc,&argv); //初始化MPI并行环境 MPI_Comm_size(MPI_COMM_WORLD, &nprocs); //nprocs返回进程个数 MPI_Comm_rank(MPI_COMM_WORLD,&myrank); //myrank返回进程号(从0开始) MPI_Get_processor_name(Processorname, &len); //返回机器名字和名字长度 printf("Hello world! Process %d of %d on %s.\n",myrank,nprocs,Processorname); MPI_Finalize(); //终止MPI处理} |
1 2 | mpicc -o hw hw.cmpiexec -f hosts -iface ib0 -np 5 ./hw |
-f表示指定文件,我这个hosts文件表示在三台服务器上运行;-face表示指定哪个网络运行
5、卸载IB驱动
1 2 | cd MLNX_OFED_LINUX-5.6-1.0.3.3-rhel8.2-x86_64/./uninstall.sh |
卸载完成后重启主机
6、其它安装方式
yum安装
如果ib网卡不识别,或着识别后配置后无法启用,安装ib驱动
1 2 3 4 | yum install -y infiniband-diagsyum install -y opensmsystemctl start opensmsystemctl enable opensm |
后期编译mvapich时需要ib库
1 2 3 | yum install -y libibverbsyum install -y libibverbs-develyum install -y libibmad-devel |
再网络配置
。
本文作者:惊小呆
本文链接:https://www.cnblogs.com/babyclass/p/16348219.html
版权声明:本作品采用知识共享署名-非商业性使用-禁止演绎 2.5 中国大陆许可协议进行许可。


【推荐】国内首个AI IDE,深度理解中文开发场景,立即下载体验Trae
【推荐】编程新体验,更懂你的AI,立即体验豆包MarsCode编程助手
【推荐】抖音旗下AI助手豆包,你的智能百科全书,全免费不限次数
【推荐】轻量又高性能的 SSH 工具 IShell:AI 加持,快人一步