spring boot(一)
1.创建项目
使用IntelliJ IDEA
file -> New -> Project-> Spring Initializr -> 选择默认的 url -> Next
可以修改一下项目的信息 -> Next
选上web


输入项目名,选好位置->Finish
默认创建好的目录结构

说明:
DemoApplication: 一个带有 main() 方法的类,用于启动应用程序
DemoApplicationTests:一个空的 Junit 测试了,它加载了一个使用 Spring Boot 字典配置功能的 Spring 应用程序上下文
application.properties:一个空的 properties 文件,可以根据需要添加配置属性
pom.xml: Maven 构建说明文件
2.完成Hello
在com.example.demo新建java class Name为 HelloController
package com.example.demo;
import org.springframework.web.bind.annotation.RequestMapping;
import org.springframework.web.bind.annotation.RestController;
@RestController
public class HelloController {
    @RequestMapping("/hello")
    public String hello() {
        return "Hello Spring Boot!";
    }
}
3.启动Spring Boot
Run-Edit Configurations

回到 SpringbootApplication 这个类中,然后右键点击运行
如果出现
The Tomcat connector configured to listen on port 8080 failed to start
查看 netstat -aon|findstr "8080"
查看是哪个进程或者程序占用了端口 tasklist|findstr "11076"
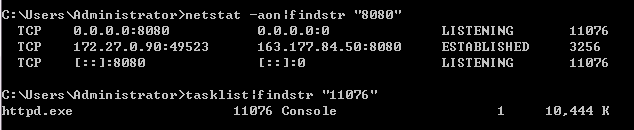
apache占用了
关闭
重新运行

打开浏览器

4.说明
(1)Spring Boot 项目通常有一个名为 *Application 的入口类,入口类里有一个 main 方法, 这个 main 方法其实就是一个标准的 Javay 应用的入口方法。
(2)入口类文件中的 @SpringBootApplication 是 Spring Boot 的核心注解,它是一个组合注解,该注解组合了: @Configuration、@EnableAutoConfiguration、@ComponentScan
(3)Spring Boot 使用一个全局的配置文件 application.properties 放置在src/main/resources目录
server.port=8089
server.servlet.context-path=/test
重新启动
浏览器输入http://localhost:8089/test/hello

说明:@Value 来获取配置属性
application.properties
server.port=8089
server.servlet.context-path=/test
name=baby
age=18
content=name:${name},age:${age}
package com.example.demo;

import org.springframework.beans.factory.annotation.Value;
import org.springframework.web.bind.annotation.RequestMapping;
import org.springframework.web.bind.annotation.RestController;

@RestController
public class HelloController {
    @Value("${name}")
    private String name;
    @Value("${age}")
    private Integer age;
    @Value("${content}")
    private String content;
    @RequestMapping("/hello")
    public String hello() {
        //return "Hello Spring Boot!";
        return name+" said:  "+content;
    }
}

5.Spring Boot 热部署
pom.xml 添加一个依赖
<dependency>
            <groupId>org.springframework.boot</groupId>
            <artifactId>spring-boot-devtools</artifactId>
            <optional>true</optional>
            <scope>true</scope>
</dependency>
修改plugs
<plugin>

      <groupId>org.springframework.boot</groupId>
      <artifactId>spring-boot-maven-plugin</artifactId>
      <configuration>
             <fork>true</fork>
      </configuration>
</plugin>
设置idea
ctrl+alt+s

Ctrl+Shift+Alt+ /


重新编译
修改任意代码,控制台就会自动重启
6.支持Jsp
视图支持是 Thymeleaf 模板引擎
(1)修改 pom.xml,增加对jsp的支持
       <dependency>
            <groupId>javax.servlet</groupId>
            <artifactId>javax.servlet-api</artifactId>
            <scope>provided</scope>
        </dependency>
        <dependency>
            <groupId>javax.servlet</groupId>
            <artifactId>jstl</artifactId>
        </dependency>
        <dependency>
            <groupId>org.apache.tomcat.embed</groupId>
            <artifactId>tomcat-embed-jasper</artifactId>
            <scope>provided</scope>
        </dependency>
(2)配置试图重定向 JSP 文件的位置
修改application.properties
spring.mvc.view.prefix=/WEB-INF/views/
spring.mvc.view.suffix=.jsp
(3)新建class文件JspController
package com.example.demo;

import org.springframework.stereotype.Controller;
import org.springframework.ui.Model;
import org.springframework.web.bind.annotation.RequestMapping;

import java.text.DateFormat;
import java.util.Date;

/**
 * Created by Auser on 2018/6/12.
 */
@Controller
public class JspController {
    @RequestMapping("/jsptpl")
    public String jsptpl(Model m){
        System.out.println("jsp");
        m.addAttribute("now", DateFormat.getDateTimeInstance().format(new Date()));
        return "jsptpl";
    }
}
(4)新建jsptpl.jsp 文件
在src/main目录下依次创建 webapp/WEB-INF/views 下创建一个 jsptpl.jsp 文件
<%@ page contentType="text/html;charset=UTF-8" language="java" %>
<html>
<head>
    <title>Title</title>
</head>
<body>
    Hi,this is Jsp tpl.现在的时间是  ${now}
</body>
</html>
注:
右键 -> 新建时没有发现jsp文件,此时
file -> project structure

对应的目录

配置完成后,就可以创建jsp文件了

此时直接起动,会出现404错误,使用 spring-boot:run 运行项目可以解决


补充:
(1)依赖范围
就是用来控制依赖和三种classpath(编译classpath,测试classpath、运行classpath)的关系,Maven有如下几种依赖范围:
- compile:编译依赖范围。如果没有指定,就会默认使用该依赖范围。使用此依赖范围的Maven依赖,对于编译、测试、运行三种classpath都有效。典型的例子是spring-code,在编译、测试和运行的时候都需要使用该依赖。
- test: 测试依赖范围。使用次依赖范围的Maven依赖,只对于测试classpath有效,在编译主代码或者运行项目的使用时将无法使用此依赖。典型的例子是Jnuit,它只有在编译测试代码及运行测试的时候才需要。
- provided:已提供依赖范围。使用此依赖范围的Maven依赖,对于编译和测试classpath有效,但在运行时候无效。典型的例子是servlet-api,编译和测试项目的时候需要该依赖,但在运行项目的时候,由于容器以及提供,就不需要Maven重复地引入一遍。
(2)全局的配置文件
可以是 application.properties 或 application.yml
这个文件会被发布在classpath中,并且被SpringBoot自动读取
推荐使用application.yml,因为它提供了结构化及其嵌套的格式(可以将原来的application.properties重命名为application.yml,修改文件内容)
刚开始失败了,所以例子中用的application.properties
yml格式对缩进有严格的要求 详见
application.yml
server:
    port: 8089
    servlet:
      context-path: /test
name:
    baby
age:
    18
content:
    name:${name},age:${age}
application.properties
server.port=8089
server.servlet.context-path=/test
name=baby
age=18
content=name:${name},age:${age}

 浙公网安备 33010602011771号