webpack笔记
webpack 在 src 文件夹中找到我们的文件,并成功处理过它Webpack的工作方式是:
把项目当做一个整体,通过一个给定的主文件(如:index.js),Webpack将从这个文件开始找到你的项目的所有依赖文件,使用loaders处理它们,最好打包为一个浏览器可识别的JavaScript文件
安装nodejs
1.开始
本地安装webpack
mkdir webpack-demo
cd webpack-demo
npm init -y
npm install --save-dev webpack
创建以下目录结构
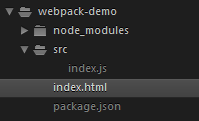
index.js
function component() {
  var element = document.createElement('div');

  // Lodash(目前通过一个 script 脚本引入)对于执行这一行是必需的
  element.innerHTML = _.join(['Hello', 'webpack'], ' ');

  return element;
}

document.body.appendChild(component());
index.html
<html>
  <head>
    <title>Getting Started</title>
    <script src="https://unpkg.com/lodash@4.16.6"></script>
  </head>
  <body>
    <script src="./src/index.js"></script>
  </body>
</html>
index.js 文件执行之前,还依赖于页面中引入的 lodash
这种方式去管理 JavaScript 项目会有一些问题:
- 无法立即体现,脚本的执行依赖于外部扩展库(external library)。
- 如果依赖不存在,或者引入顺序错误,应用程序将无法正常运行。
- 如果依赖被引入但是并没有使用,浏览器将被迫下载无用代码。
使用webpack
修改目录结构
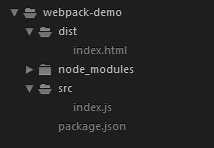
src——源 代码是用于书写和编辑的代码
dist——分发 代码是构建过程产生的代码最小化和优化后的“输出”目录,最终将在浏览器中加载
修改index.html
<html>
      <head>
        <title>Getting Started</title>
      </head>
      <body>
         <script src="bundle.js"></script>
      </body>
</html>
修改index.js
import _ from 'lodash';
function component() {
  var element = document.createElement('div');

  // Lodash(目前通过一个 script 脚本引入)对于执行这一行是必需的
  element.innerHTML = _.join(['Hello', 'webpack'], ' ');

  return element;
}

document.body.appendChild(component());
安装lodash
npm install --save lodash
执行 webpack
webpack src/index.js dist/bundle.js
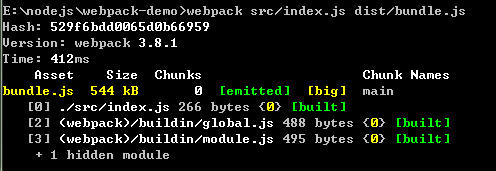
创建配置文件webpack.config.js
const path = require('path');

module.exports = {
  entry: './src/index.js',
  output: {
    filename: 'bundle.js',
    path: path.resolve(__dirname, 'dist')
  }
};
构建命令改为
webpack --config webpack.config.js
修改 package.json
{
  "name": "webpack-demo",
  "version": "1.0.0",
  "description": "",
  "main": "index.js",
  "scripts": {
    "test": "echo \"Error: no test specified\" && exit 1",
    "build": "webpack"
  },
  "keywords": [],
  "author": "",
  "license": "ISC",
  "devDependencies": {
    "css-loader": "^0.28.7",
    "style-loader": "^0.19.0",
    "webpack": "^3.8.1"
  },
  "dependencies": {
    "lodash": "^4.17.4"
  }
}
构建命令改为
npm run build
2.管理资源
修改index.html
<html>
      <head>
        <title>Asset Management</title>
      </head>
      <body>
         <script src="bundle.js"></script>
      </body>
</html>
(1)css
从 JavaScript 模块中 import 一个 CSS 文件,需要在 module 配置中安装并添加 style-loader 和 css-loader
npm install --save-dev style-loader css-loader
修改webpack.config.js
const path = require('path');

module.exports = {
      entry: './src/index.js',
      output: {
        filename: 'bundle.js',
        path: path.resolve(__dirname, 'dist')
      },
      module: {
          rules: [
            {
                  test: /\.css$/,
                  use: [
                'style-loader',
                'css-loader'
                  ]
            }
          ]
    }
};
新建src/style.css
.hello {
  color: red;
}
修改src/index.js
import _ from 'lodash';
import './style.css';
function component() {
  var element = document.createElement('div');

  // Lodash(目前通过一个 script 脚本引入)对于执行这一行是必需的
  element.innerHTML = _.join(['Hello', 'webpack'], ' ');
  element.classList.add('hello');
  return element;
}

document.body.appendChild(component());
重新构建
npm run build
在浏览器中打开 index.html

(2)图片
使用 file-loader
npm install --save-dev file-loader
src下添加 bg.jpg,icon.png
修改webpack.config.js
const path = require('path');

module.exports = {
      entry: './src/index.js',
      output: {
        filename: 'bundle.js',
        path: path.resolve(__dirname, 'dist')
      },
      module: {
          rules: [
            {
                  test: /\.css$/,
                  use: [
                'style-loader',
                'css-loader'
                  ]
            },
            {
                test: /\.(png|svg|jpg|gif)$/,
                use: [
                      'file-loader'
                ]
            }
          ]
    }
};
修改index.js
import _ from 'lodash';
import './style.css';
import Icon from './icon.png';
function component() {
      var element = document.createElement('div');

      // Lodash(目前通过一个 script 脚本引入)对于执行这一行是必需的
      element.innerHTML = _.join(['Hello', 'webpack'], ' ');
      element.classList.add('hello');
      // 将图像添加到我们现有的 div。
    var myIcon = new Image();
    myIcon.src = Icon;
    element.appendChild(myIcon);
  return element;
}

document.body.appendChild(component());
修改style.css
body{
    margin:0;
    padding: 0;
}
.hello {
  color: red;
  background: url('./bg.jpg');
}
重新构建并打开index.html
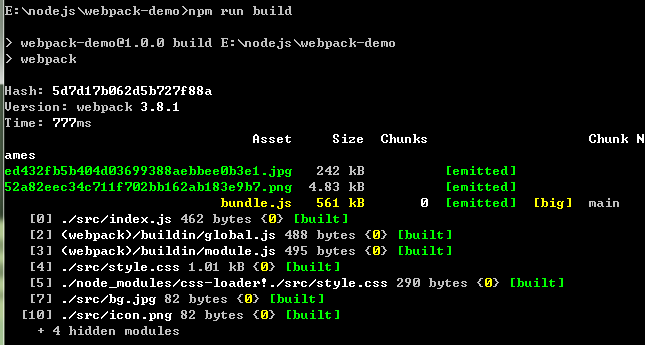

dist下的文件

webpack 在 src 文件夹中找到了文件,并成功处理了
A.压缩 image-webpack-loader
npm install image-webpack-loader --save-dev
修改webpack.config.js
const path = require('path');

module.exports = {
      entry: './src/index.js',
      output: {
        filename: 'bundle.js',
        path: path.resolve(__dirname, 'dist')
      },
      module: {
          rules: [
            {
                  test: /\.css$/,
                  use: [
                'style-loader',
                'css-loader'
                  ]
            },
            {
                test: /\.(png|svg|jpg|gif)$/i,
                use: [
                      'file-loader',
                      {
                          loader: 'image-webpack-loader',
                          options: {
                              //Compress JPEG images
                            mozjpeg: {
                                  progressive: true,
                                  quality: 65
                            },
                            // Compress PNG images
                            optipng: {
                                  enabled: false,
                               },
                               //Compress SVG images
                            pngquant: {
                                  quality: '65-90',
                                  speed: 4
                            },
                            // Compress GIF images
                            gifsicle: {
                                  interlaced: false,
                            },
                            //  Compress JPG & PNG images into WEBP
                            webp: {
                                  quality: 75
                            }
                          }
                    }
                ]
            }
          ]
    }
};
B.优化url-loader
npm install --save-dev url-loader
(3)加载字体
src下添加文件
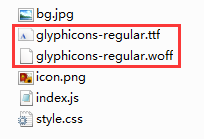
修改webpack.config.js
const path = require('path');

module.exports = {
      entry: './src/index.js',
      output: {
        filename: 'bundle.js',
        path: path.resolve(__dirname, 'dist')
      },
      module: {
          rules: [
            {
                  test: /\.css$/,
                  use: [
                'style-loader',
                'css-loader'
                  ]
            },
            {
                test: /\.(png|svg|jpg|gif)$/,
                use: [
                      'file-loader'
                    ]
            },
            {
                 test: /\.(woff|woff2|eot|ttf|otf)$/,
                use: [
                       'file-loader'
                 ]
           }
          ]
    }
};
修改src/style.css
@font-face {
    font-family: 'MyFont';
    src:  url('./glyphicons-regular.ttf') format('ttf'),
          url('./glyphicons-regular.woff') format('woff');
       font-weight: 600;
       font-style: normal;
}
body{
    margin:0;
    padding: 0;
}
.hello {
      color: red;
   font-family: 'MyFont';
      background: url('./bg.jpg');
}
重新构建,查看index.html
(4)加载数据
可以加载的有用资源还有数据,如json,CSV、TSV 和 XML
JSON支持 是内置的,CSV 需要 csv-loader,XML 需要 xml-loader
安装依赖
npm install --save-dev csv-loader xml-loader
在src添加data.xml
<?xml version="1.0" encoding="UTF-8"?>
<note>
  <to>Mary</to>
  <from>John</from>
  <heading>Reminder</heading>
  <body>Call Cindy on Tuesday</body>
</note>
修改webpack.config.js
const path = require('path');

module.exports = {
      entry: './src/index.js',
      output: {
        filename: 'bundle.js',
        path: path.resolve(__dirname, 'dist')
      },
      module: {
          rules: [
            {
                  test: /\.css$/,
                  use: [
                'style-loader',
                'css-loader'
                  ]
            },
            {
                test: /\.(png|svg|jpg|gif)$/,
                use: [
                      'file-loader'
                    ]
            },
            {
                 test: /\.(woff|woff2|eot|ttf|otf)$/,
                use: [
                       'file-loader'
                 ]
               },
               {
                 test: /\.(csv|tsv)$/,
                 use: [
                       'csv-loader'
                 ]
              },
               {
                 test: /\.xml$/,
                 use: [
                       'xml-loader'
                 ]
               }
          ]
    }
};
修改index.js
import _ from 'lodash';
import './style.css';
import Icon from './icon.png';
import Data from './data.xml';
function component() {
      var element = document.createElement('div');

      // Lodash(目前通过一个 script 脚本引入)对于执行这一行是必需的
      element.innerHTML = _.join(['Hello', 'webpack'], ' ');
      element.classList.add('hello');
      // 将图像添加到我们现有的 div。
    var myIcon = new Image();
    myIcon.src = Icon;
    element.appendChild(myIcon);
    console.log(Data);
  return element;
}

document.body.appendChild(component());
3.管理输出
回退到1初始的代码
(1)准备
src下添加print.js
export default function printMe() {
  console.log('I get called from print.js!');
}
修改index.js
import _ from 'lodash';
import printMe from './print.js';
function component() {
      var element = document.createElement('div');
      var btn = document.createElement('button');

      // Lodash(目前通过一个 script 脚本引入)对于执行这一行是必需的
      element.innerHTML = _.join(['Hello', 'webpack'], ' ');

      btn.innerHTML = 'Click me and check the console!';
    btn.onclick = printMe;

    element.appendChild(btn);

  return element;
}

document.body.appendChild(component());
修改index.html
<html>
  <head>
    <title>Output Management</title>
    <script src="./print.bundle.js"></script>
  </head>
  <body>
    <script src="./app.bundle.js"></script>
  </body>
</html>
修改webpack.config.js
const path = require('path');

module.exports = {
      entry: {
          app: './src/index.js',
          print: './src/print.js'
      },
      output: {
        filename: '[name].bundle.js',
        path: path.resolve(__dirname, 'dist')
    }
};
重新构建
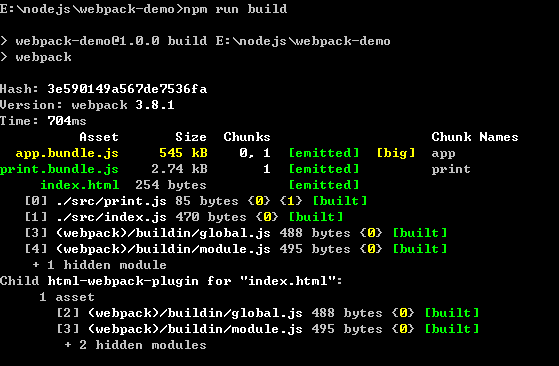
webpack 生成 print.bundle.js 和 app.bundle.js 文件
(2)设定 HtmlWebpackPlugin
安装
npm install --save-dev html-webpack-plugin
修改webpack.config.js
const path = require('path');
const HtmlWebpackPlugin = require('html-webpack-plugin');

module.exports = {
      entry: {
          app: './src/index.js',
          print: './src/print.js'
      },
      plugins: [
        new HtmlWebpackPlugin({
               title: 'Output Management'
        })
    ],
      output: {
        filename: '[name].bundle.js',
        path: path.resolve(__dirname, 'dist')
    }
};
重新构建后,会生成新的dist/index.html
(3)清理dist文件夹
在每次构建前清理 /dist 文件夹,使用插件clean-webpack-plugin
安装
npm install clean-webpack-plugin --save-dev
修改webpack.config.js
const path = require('path');
const HtmlWebpackPlugin = require('html-webpack-plugin');
const CleanWebpackPlugin = require('clean-webpack-plugin');

module.exports = {
      entry: {
          app: './src/index.js',
          print: './src/print.js'
      },
      plugins: [
          new CleanWebpackPlugin(['dist']),
        new HtmlWebpackPlugin({
               title: 'Output Management'
        })
    ],
      output: {
        filename: '[name].bundle.js',
        path: path.resolve(__dirname, 'dist')
    }
};
执行 npm run build,/dist下只有构建后生成的文件
4.开发
(1)source map
使用 inline-source-map
修改webpack.config.js
const path = require('path');
const HtmlWebpackPlugin = require('html-webpack-plugin');
const CleanWebpackPlugin = require('clean-webpack-plugin');

module.exports = {
      entry: {
          app: './src/index.js',
          print: './src/print.js'
      },
      devtool: 'inline-source-map',
      plugins: [
          new CleanWebpackPlugin(['dist']),
        new HtmlWebpackPlugin({
               title: 'Output Management'
        })
    ],
      output: {
        filename: '[name].bundle.js',
        path: path.resolve(__dirname, 'dist')
    }
};
(2)在代码发生变化后自动编译代码
A.webpack's Watch Mode
修改package.json
{
  "name": "webpack-demo",
  "version": "1.0.0",
  "description": "",
  "main": "index.js",
  "scripts": {
    "test": "echo \"Error: no test specified\" && exit 1",
    "watch": "webpack --watch",
    "build": "webpack"
  },
  "keywords": [],
  "author": "",
  "license": "ISC",
  "devDependencies": {
    "clean-webpack-plugin": "^0.1.17",
    "css-loader": "^0.28.7",
    "csv-loader": "^2.1.1",
    "file-loader": "^1.1.5",
    "html-webpack-plugin": "^2.30.1",
    "image-webpack-loader": "^3.4.2",
    "style-loader": "^0.19.0",
    "webpack": "^3.8.1",
    "xml-loader": "^1.2.1"
  },
  "dependencies": {
    "lodash": "^4.17.4"
  }
}
运行
npm run watch
会看到 webpack 编译代码,然而却不会退出命令行,因为 script 脚本还在观察文件
修改文件并保存后,会自动重新编译修改后的模块,但是还需要手动刷新浏览器
B.webpack-dev-server
是一个简单的 web 服务器,并且能够实时重新加载(live reloading)
安装
npm install --save-dev webpack-dev-server
webpack-dev-server,在 localhost:8080 下建立服务,将 dist 目录下的文件作为可访问文件
修改webpack.config.js
const path = require('path');
const HtmlWebpackPlugin = require('html-webpack-plugin');
const CleanWebpackPlugin = require('clean-webpack-plugin');

module.exports = {
      entry: {
          app: './src/index.js',
          print: './src/print.js'
      },
      devtool: 'inline-source-map',
      devServer: {
         contentBase: './dist'
    },
      plugins: [
          new CleanWebpackPlugin(['dist']),
        new HtmlWebpackPlugin({
               title: 'Output Management'
        })
    ],
      output: {
        filename: '[name].bundle.js',
        path: path.resolve(__dirname, 'dist')
    }
};
修改package.json
{
  "name": "webpack-demo",
  "version": "1.0.0",
  "description": "",
  "main": "index.js",
  "scripts": {
    "test": "echo \"Error: no test specified\" && exit 1",
    "watch": "webpack --watch",
    "start": "webpack-dev-server --open",
    "build": "webpack"
  },
  "keywords": [],
  "author": "",
  "license": "ISC",
  "devDependencies": {
    "clean-webpack-plugin": "^0.1.17",
    "css-loader": "^0.28.7",
    "csv-loader": "^2.1.1",
    "file-loader": "^1.1.5",
    "html-webpack-plugin": "^2.30.1",
    "image-webpack-loader": "^3.4.2",
    "style-loader": "^0.19.0",
    "webpack": "^3.8.1",
    "webpack-dev-server": "^2.9.3",
    "xml-loader": "^1.2.1"
  },
  "dependencies": {
    "lodash": "^4.17.4"
  }
}
执行
npm start
浏览器自动加载页面。如果现在修改和保存任意源文件,web 服务器就会自动重新加载编译后的代码
C.webpack-dev-middleware
安装
npm install --save-dev express webpack-dev-middleware
修改webpack.config.js
添加publicPath
const path = require('path');
const HtmlWebpackPlugin = require('html-webpack-plugin');
const CleanWebpackPlugin = require('clean-webpack-plugin');

module.exports = {
      entry: {
          app: './src/index.js',
          print: './src/print.js'
      },
      devtool: 'inline-source-map',
      devServer: {
         contentBase: './dist'
    },
      plugins: [
          new CleanWebpackPlugin(['dist']),
        new HtmlWebpackPlugin({
               title: 'Output Management'
        })
    ],
      output: {
        filename: '[name].bundle.js',
        path: path.resolve(__dirname, 'dist'),
        publicPath: '/'
    }
};
新建server.js
const express = require('express');
const webpack = require('webpack');
const webpackDevMiddleware = require('webpack-dev-middleware');

const app = express();
const config = require('./webpack.config.js');
const compiler = webpack(config);

// Tell express to use the webpack-dev-middleware and use the webpack.config.js
// configuration file as a base.
app.use(webpackDevMiddleware(compiler, {
  publicPath: config.output.publicPath
}));

// Serve the files on port 3000.
app.listen(3000, function () {
  console.log('Example app listening on port 3000!\n');
});
修改package.json
{
  "name": "webpack-demo",
  "version": "1.0.0",
  "description": "",
  "main": "index.js",
  "scripts": {
    "test": "echo \"Error: no test specified\" && exit 1",
    "watch": "webpack --watch",
    "start": "webpack-dev-server --open",
    "server": "node server.js",
    "build": "webpack"
  },
  "keywords": [],
  "author": "",
  "license": "ISC",
  "devDependencies": {
    "clean-webpack-plugin": "^0.1.17",
    "css-loader": "^0.28.7",
    "csv-loader": "^2.1.1",
    "express": "^4.16.2",
    "file-loader": "^1.1.5",
    "html-webpack-plugin": "^2.30.1",
    "image-webpack-loader": "^3.4.2",
    "style-loader": "^0.19.0",
    "webpack": "^3.8.1",
    "webpack-dev-middleware": "^1.12.0",
    "webpack-dev-server": "^2.9.3",
    "xml-loader": "^1.2.1"
  },
  "dependencies": {
    "lodash": "^4.17.4"
  }
}
运行
npm run server
打开浏览器http://localhost:3000
5.模块热替换
(1)HMR 修改js
修改webpack.config.js
const path = require('path');
const HtmlWebpackPlugin = require('html-webpack-plugin');
const CleanWebpackPlugin = require('clean-webpack-plugin');
const webpack = require('webpack');

module.exports = {
      entry: {
          app: './src/index.js'
      },
      devtool: 'inline-source-map',
      devServer: {
         contentBase: './dist',
         hot: true
    },
      plugins: [
          new CleanWebpackPlugin(['dist']),
        new HtmlWebpackPlugin({
               title: 'Output Management'
        }),
        new webpack.HotModuleReplacementPlugin()
    ],
      output: {
        filename: '[name].bundle.js',
        path: path.resolve(__dirname, 'dist'),
        publicPath: '/'
    }
};
修改 index.js 文件,以便当 print.js 内部发生变更时可以告诉 webpack 接受更新的模块
import _ from 'lodash';
import printMe from './print.js';
function component() {
      var element = document.createElement('div');
      var btn = document.createElement('button');

      // Lodash(目前通过一个 script 脚本引入)对于执行这一行是必需的
      element.innerHTML = _.join(['Hello', 'webpack'], ' ');

      btn.innerHTML = 'Click me and check the console!';
    btn.onclick = printMe;

    element.appendChild(btn);

  return element;
}

document.body.appendChild(component());
if (module.hot) {
    module.hot.accept('./print.js', function() {
         console.log('Accepting the updated printMe module!');
        printMe();
    })
}
但是按钮仍然绑定在旧的 printMe 函数上
修改index.js
import _ from 'lodash';
import printMe from './print.js';
function component() {
      var element = document.createElement('div');
      var btn = document.createElement('button');

      // Lodash(目前通过一个 script 脚本引入)对于执行这一行是必需的
      element.innerHTML = _.join(['Hello', 'webpack'], ' ');

      btn.innerHTML = 'Click me and check the console!';
    btn.onclick = printMe;

    element.appendChild(btn);

  return element;
}

let element = component(); // 当 print.js 改变导致页面重新渲染时,重新获取渲染的元素
document.body.appendChild(element);
if (module.hot) {
    module.hot.accept('./print.js', function() {
         console.log('Accepting the updated printMe module!');
         document.body.removeChild(element);
        element = component(); // 重新渲染页面后,component 更新 click 事件处理
        document.body.appendChild(element);
    })
}
(2)HMR 修改css
添加style.css
body {
  background: red;
}
修改webpack.config.js
const path = require('path');
const HtmlWebpackPlugin = require('html-webpack-plugin');
const CleanWebpackPlugin = require('clean-webpack-plugin');
const webpack = require('webpack');

module.exports = {
      entry: {
          app: './src/index.js'
      },
      devtool: 'inline-source-map',
      devServer: {
         contentBase: './dist',
         hot: true
    },
    module: {
        rules: [
            {
                 test: /\.css$/,
                use: ['style-loader', 'css-loader']
             }
        ]
    },
      plugins: [
          new CleanWebpackPlugin(['dist']),
        new HtmlWebpackPlugin({
               title: 'Output Management'
        }),
        new webpack.HotModuleReplacementPlugin()
    ],
      output: {
        filename: '[name].bundle.js',
        path: path.resolve(__dirname, 'dist'),
        publicPath: '/'
    }
};
修改index.js
import _ from 'lodash';
import printMe from './print.js';
import './style.css';
function component() {
      var element = document.createElement('div');
      var btn = document.createElement('button');

      // Lodash(目前通过一个 script 脚本引入)对于执行这一行是必需的
      element.innerHTML = _.join(['Hello', 'webpack'], ' ');

      btn.innerHTML = 'Click me and check the console!';
    btn.onclick = printMe;

    element.appendChild(btn);

  return element;
}

let element = component(); // 当 print.js 改变导致页面重新渲染时,重新获取渲染的元素
document.body.appendChild(element);
if (module.hot) {
    module.hot.accept('./print.js', function() {
         console.log('Accepting the updated printMe module!');
         document.body.removeChild(element);
        element = component(); // 重新渲染页面后,component 更新 click 事件处理
        document.body.appendChild(element);
    })
}
修改样式后可以立即看到页面的背景颜色随之更改,而无需完全刷新
6.Tree Shaking
用于描述移除 JavaScript 上下文中的未引用代码(dead-code)
添加src/math.js
修改index.js,为了简单,将 lodash 删除
import { cube } from './math.js';
function component() {
      var element = document.createElement('pre');

      element.innerHTML = [
         'Hello webpack!',
         '5 cubed is equal to ' + cube(5)
       ].join('\n\n');

  return element;
}

document.body.appendChild(component());
运行脚本npm run build
检查dist/app.bundle.js
/***/ }),
/* 1 */
/***/ (function(module, __webpack_exports__, __webpack_require__) {

"use strict";
/* unused harmony export square */
/* harmony export (immutable) */ __webpack_exports__["a"] = cube;
function square(x) {
  return x * x;
}

function cube(x) {
  return x * x * x;
}
精简输出
UglifyJSPlugin--能够删除未引用代码(dead code)的压缩工具
安装
npm i --save-dev uglifyjs-webpack-plugin
修改webpack.config.js
const path = require('path');
const UglifyJSPlugin = require('uglifyjs-webpack-plugin');
const HtmlWebpackPlugin = require('html-webpack-plugin');
const CleanWebpackPlugin = require('clean-webpack-plugin');

module.exports = {
      entry: {
          app: './src/index.js'
      },
      plugins: [
          new CleanWebpackPlugin(['dist']),
        new HtmlWebpackPlugin({
               title: 'Output Management'
        }),
          new UglifyJSPlugin()
    ],
      output: {
        filename: 'bundle.js',
        path: path.resolve(__dirname, 'dist')
    }
};
运行
npm run build
bundle.js被精简过了
7.生产环境
(1)生产环境和开发环境的配置分离
安装
npm install --save-dev webpack-merge
修改目录结构为
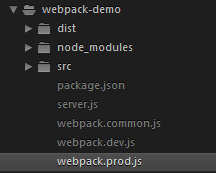
webpack.common.js
const path = require('path');
const HtmlWebpackPlugin = require('html-webpack-plugin');
const CleanWebpackPlugin = require('clean-webpack-plugin');

module.exports = {
      entry: {
          app: './src/index.js'
      },
      plugins: [
          new CleanWebpackPlugin(['dist']),
        new HtmlWebpackPlugin({
               title: 'Output Management'
        })
    ],
      output: {
        filename: '[name].bundle.js',
        path: path.resolve(__dirname, 'dist')
    }
};
webpack.dev.js
const merge = require('webpack-merge');
const common = require('./webpack.common.js');

module.exports = merge(common, {
    devtool: 'inline-source-map',
    devServer: {
        contentBase: './dist'
    }
});
webpack.prod.js
const merge = require('webpack-merge');
const UglifyJSPlugin = require('uglifyjs-webpack-plugin');
const common = require('./webpack.common.js');

module.exports = merge(common, {
     plugins: [
        new UglifyJSPlugin()
       ]
});
修改package.json,把 scripts 重新指向到新配置
{
  "name": "webpack-demo",
  "version": "1.0.0",
  "description": "",
  "main": "index.js",
  "scripts": {
    "test": "echo \"Error: no test specified\" && exit 1",
    "start": "webpack-dev-server --open --config webpack.dev.js",
    "build": "webpack --config webpack.prod.js"
  },
  "keywords": [],
  "author": "",
  "license": "ISC",
  "devDependencies": {
    "clean-webpack-plugin": "^0.1.17",
    "css-loader": "^0.28.7",
    "csv-loader": "^2.1.1",
    "express": "^4.16.2",
    "file-loader": "^1.1.5",
    "html-webpack-plugin": "^2.30.1",
    "image-webpack-loader": "^3.4.2",
    "style-loader": "^0.19.0",
    "uglifyjs-webpack-plugin": "^1.0.1",
    "webpack": "^3.8.1",
    "webpack-dev-middleware": "^1.12.0",
    "webpack-dev-server": "^2.9.3",
    "webpack-merge": "^4.1.0",
    "xml-loader": "^1.2.1"
  },
  "dependencies": {
    "lodash": "^4.17.4"
  }
}
npm start 定义为开发环境脚本
npm run build 定义为生产环境脚本
(2)source-map
在开发环境中用到的 inline-source-map
在生产环境中使用source-map
修改webpack.prod.js
const merge = require('webpack-merge');
const UglifyJSPlugin = require('uglifyjs-webpack-plugin');
const common = require('./webpack.common.js');

module.exports = merge(common, {
    devtool: 'source-map',
     plugins: [
        new UglifyJSPlugin({
               sourceMap: true
         })
       ]
});
(3)指定环境变量
修改webpack.prod.js
const merge = require('webpack-merge');
const UglifyJSPlugin = require('uglifyjs-webpack-plugin');
const common = require('./webpack.common.js');
const webpack = require('webpack');

module.exports = merge(common, {
    devtool: 'source-map',
     plugins: [
        new UglifyJSPlugin({
               sourceMap: true
         }),
         new webpack.DefinePlugin({
               'process.env': {
             'NODE_ENV': JSON.stringify('production')
               }
         })
       ]
});
修改index.js
import { cube } from './math.js';
if (process.env.NODE_ENV !== 'production') {
    console.log('Looks like we are in development mode!');
}else{
    console.log('Looks like we are in production mode!');
}
function component() {
      var element = document.createElement('pre');

      element.innerHTML = [
         'Hello webpack!',
         '5 cubed is equal to ' + cube(5)
       ].join('\n\n');

  return element;
}

document.body.appendChild(component());
8.代码分离
把代码分离到不同的 bundle 中,然后可以按需加载或并行加载这些文件。
代码分离可以用于获取更小的 bundle,以及控制资源加载优先级,如果使用合理,会极大影响加载时间
分离的方法
- 入口起点:使用
entry配置手动地分离代码。 - 防止重复:使用
CommonsChunkPlugin去重和分离 chunk。 - 动态导入:通过模块的内联函数调用来分离代码
(1)入口起点
目录结构
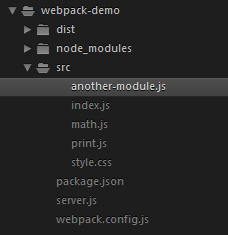
another-module.js
import _ from 'lodash';

console.log(
  _.join(['Another', 'module', 'loaded!'], ' ')
);
webpack.config.js
const path = require('path');
const HtmlWebpackPlugin = require('html-webpack-plugin');

module.exports = {
      entry: {
          index: './src/index.js',
      another: './src/another-module.js'
      },
      plugins: [
        new HtmlWebpackPlugin({
               title: 'Code Splitting'
        })
    ],
      output: {
        filename: '[name].bundle.js',
        path: path.resolve(__dirname, 'dist')
    }
};

如果入口 chunks 之间包含重复的模块,那些重复模块都会被引入到各个 bundle 中
(2)防止重复
webpack.config.js
const path = require('path');
const webpack = require('webpack');
const HtmlWebpackPlugin = require('html-webpack-plugin');

module.exports = {
      entry: {
          index: './src/index.js',
      another: './src/another-module.js'
      },
      plugins: [
        new HtmlWebpackPlugin({
               title: 'Code Splitting'
        }),
      new webpack.optimize.CommonsChunkPlugin({
        name: 'common' // 指定公共 bundle 的名称。
      })
    ],
      output: {
        filename: '[name].bundle.js',
        path: path.resolve(__dirname, 'dist')
    }
};

(3)动态导入


【推荐】国内首个AI IDE,深度理解中文开发场景,立即下载体验Trae
【推荐】编程新体验,更懂你的AI,立即体验豆包MarsCode编程助手
【推荐】抖音旗下AI助手豆包,你的智能百科全书,全免费不限次数
【推荐】轻量又高性能的 SSH 工具 IShell:AI 加持,快人一步
· Linux系列:如何用heaptrack跟踪.NET程序的非托管内存泄露
· 开发者必知的日志记录最佳实践
· SQL Server 2025 AI相关能力初探
· Linux系列:如何用 C#调用 C方法造成内存泄露
· AI与.NET技术实操系列(二):开始使用ML.NET
· 无需6万激活码!GitHub神秘组织3小时极速复刻Manus,手把手教你使用OpenManus搭建本
· C#/.NET/.NET Core优秀项目和框架2025年2月简报
· Manus爆火,是硬核还是营销?
· 终于写完轮子一部分:tcp代理 了,记录一下
· 【杭电多校比赛记录】2025“钉耙编程”中国大学生算法设计春季联赛(1)