R语言学习笔记-单一决策树
决策树比较简单明晰,但存在不稳定的风险,数据的微小变化会导致最佳决策树结构的巨大变化,且决策树可能会变得比较复杂。
其算法原理参见https://zhuanlan.zhihu.com/p/148010749。笔记中主要以R语言中iris数据集描述实现步骤。
data("iris")
#导入iris数据集
set.seed(1926)
#设置种子,便于复现操作结果 +1S
之后需要将数据分为两部分,训练集与测试集,可以用多种写法实现。这些写法的本质上都是sample函数
方法一:
train.data <-sample(nrow(iris),0.7*nrow(iris),replace = F)
train <-iris[train.data,]
test <-iris[-train.data,]
写法二:
formula <- sample(2, nrow(iris),
                   replace=TRUE,
                   prob=c(0.7, 0.3)
                    )
 train <- iris[formula==1,]
 test <- iris[formula==2,]
写法三:
smple.size <- floor(0.7*nrow(data)) )
train.ind <- sample(seq_len(nrow(data)), smple.size)
train <- data[train.ind, ]
test <- data[-train.ind, ]
写法四:
rank_num <- sample(1:150,105)
train <- iris[rank_num,]
test <- iris[-rank_num,]
接下来进行单一决策树分析,常用的包有tree,rpart,party等。
package "party"
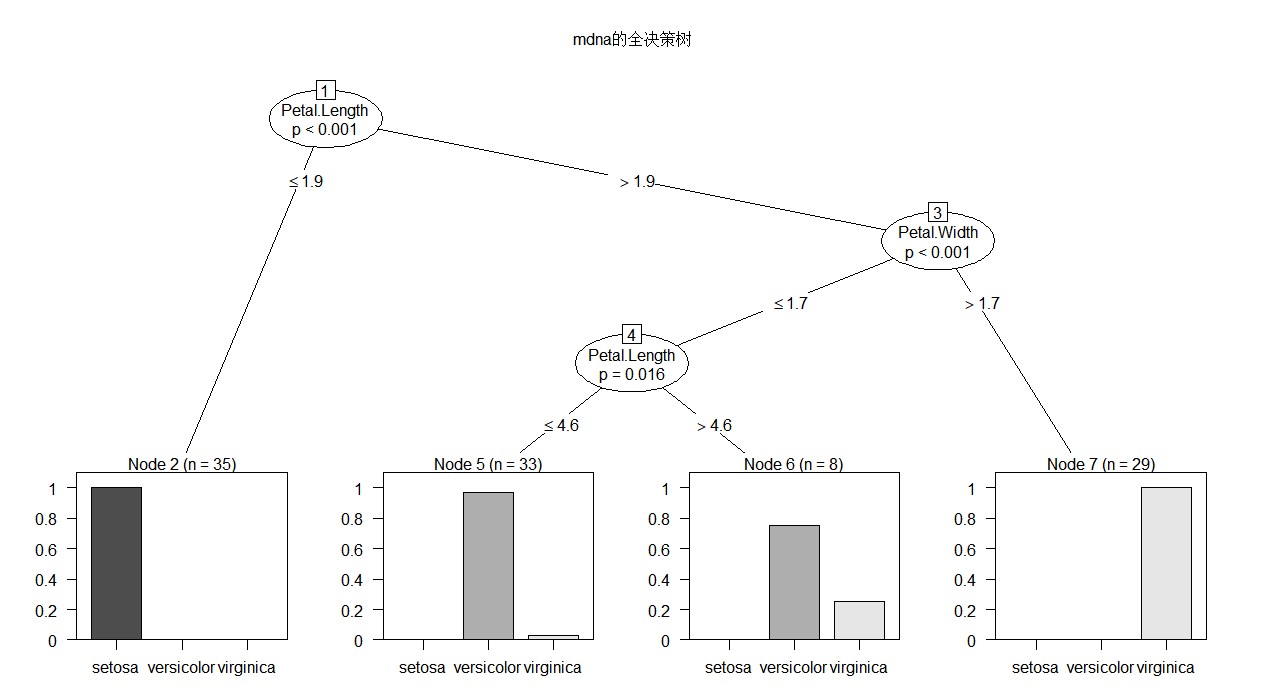
library(party)
mdna.tree <- ctree(Species ~ Sepal.Length+Sepal.Width+Petal.Length+Petal.Width, data = train)
mdna.tree
 #可以看看具体的分析
plot(mdna.tree,  type = "simple",main = "mdna的简单决策树")
#也可以自己画图,上面的是简单树装图
plot(mdna.tree,main = "mdna的全决策树")
#全面树状图
	 Conditional inference tree with 4 terminal nodes

Response:  Species
Inputs:  Sepal.Length, Sepal.Width, Petal.Length, Petal.Width
Number of observations:  105

1) Petal.Length <= 1.9; criterion = 1, statistic = 98.207
  2)*  weights = 35
1) Petal.Length > 1.9
  3) Petal.Width <= 1.7; criterion = 1, statistic = 50.335
    4) Petal.Length <= 4.6; criterion = 0.984, statistic = 8.319
      5)*  weights = 33
    4) Petal.Length > 4.6
      6)*  weights = 8
  3) Petal.Width > 1.7
    7)*  weights = 29

package "rpart"
library('rpart')
library('rpart.plot')
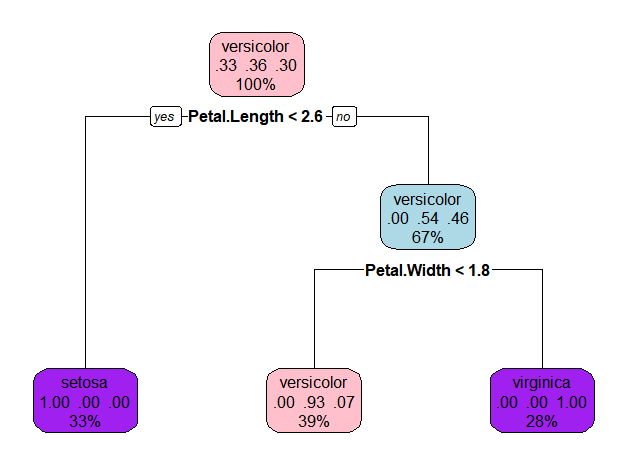
model.2<- rpart(formula =Species~.,data=train ,method='class')
model.2
rpart.plot(model.2)
n= 105

node), split, n, loss, yval, (yprob)
* denotes terminal node

1) root 105 67 versicolor (0.33333333 0.36190476 0.30476190)
2) Petal.Length< 2.6 35 0 setosa (1.00000000 0.00000000 0.00000000) *
3) Petal.Length>=2.6 70 32 versicolor (0.00000000 0.54285714 0.45714286)
6) Petal.Width< 1.75 41 3 versicolor (0.00000000 0.92682927 0.07317073) *
7) Petal.Width>=1.75 29 0 virginica (0.00000000 0.00000000 1.00000000) *
rpart包提供了复杂度损失修剪的修剪方法,printcp会告诉分裂到每一层,cp是多少,平均相对误差是多少
printcp(model.2)
Classification tree:
rpart(formula = Species ~ ., data = train, method = "class")

Variables actually used in tree construction:
[1] Petal.Length Petal.Width

Root node error: 67/105 = 0.6381

n= 105

       CP nsplit rel error   xerror     xstd
1 0.52239      0  1.000000 1.268657 0.060056
2 0.43284      1  0.477612 0.582090 0.073898
3 0.01000      2  0.044776 0.074627 0.032570
#一般使用1-SE法则选出最优cp值:找到xerror最小的行,得到误差阈值为该行的xerror+xstd
##找到所有xerror小于这个阈值的行,取其中最大值的上限为prune的阈值
###根据我们的结果,来看最小的交叉验证误差为0.074,刚好是最后一个节点,不需要剪枝
####需要剪枝的案例https://danzhuibing.github.io/r_decision_tree.html
剪枝的代码
# model.prune <- prune(cfit, cp=0.03)
#cp值为示例

换个颜色
rpart.plot(model.2, box.col=c("pink", "purple","lightblue"))
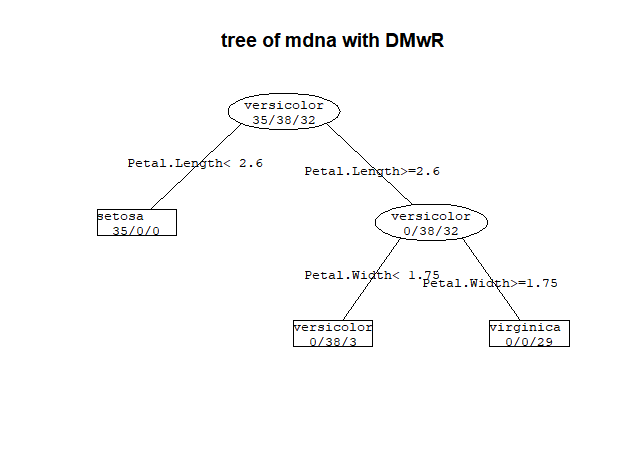
这个图也可以用DMwR绘制
library(DMwR)
prettyTree(model.2,main='tree of mdna with DMwR')
package 'tree'
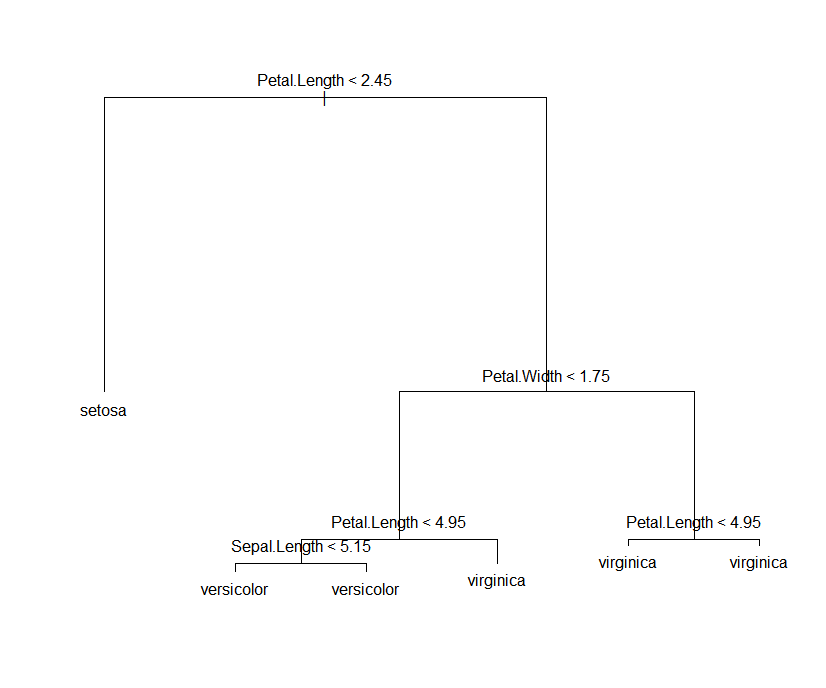
library(tree)
model.3<- tree(Species ~ Sepal.Width +
                 Sepal.Length +
                 Petal.Length +
                 Petal.Width,
                data = iris
                 )
summary(model.3)
plot(model.3)
text(model.3)
结果:
Classification tree:
tree(formula = Species ~ Sepal.Width + Sepal.Length + Petal.Length +
Petal.Width, data = iris)
Variables actually used in tree construction:
[1] "Petal.Length" "Petal.Width" "Sepal.Length"
Number of terminal nodes: 6
Residual mean deviance: 0.1253 = 18.05 / 144
Misclassification error rate: 0.02667 = 4 / 150
最后使用测试集进行检验,一般使用predict函数
predict <- predict(model.2,newdata=test,type='class')
result.2<-table(test$Species,predict)
sum(diag(result.2))/sum(result.2)
结果是
[1] 0.9333333
即93.3%的准确率
这个矩阵的样子如下,对角线上的值代表预测正确的值,用对角线除以总数,就可以得到正确率了。
table(test$Species,predict)
            predict
             setosa versicolor virginica
  setosa         15          0         0
  versicolor      0         11         1
  virginica       0          2        16
【一般用不到】如果列名不正常,可以使用如下代码apply每行的列名为最大值对应列名
a <- predict(model.2,newdata=test,type='class')
b <- apply(a, 1, function(t) colnames(a)[which.max(t)])

 浙公网安备 33010602011771号