前端项目的webpack常用优化方案
本文主要介绍 webpack5 项目的打包优化方案
打包优化#
速度分析:要进行打包速度的优化,首先我们需要搞明白哪一些流程的在打包执行过程中耗时较长。
这里我们可以借助 speed-measure-webpack-plugin 插件,它分析 webpack 的总打包耗时以及每个 plugin 和 loader 的打包耗时,从而让我们对打包时间较长的部分进行针对性优化。
通过以下命令安装插件:
yarn add speed-measure-webpack-plugin -D
在 webpack.config.js 中添加如下配置
// ...
const SpeedMeasurePlugin = require('speed-measure-webpack-plugin');
const smp = new SpeedMeasurePlugin();

module.exports = smp.wrap({
  // ...
  plugins: [
    // ...
  ],
  module: {
    // ...
  }
});
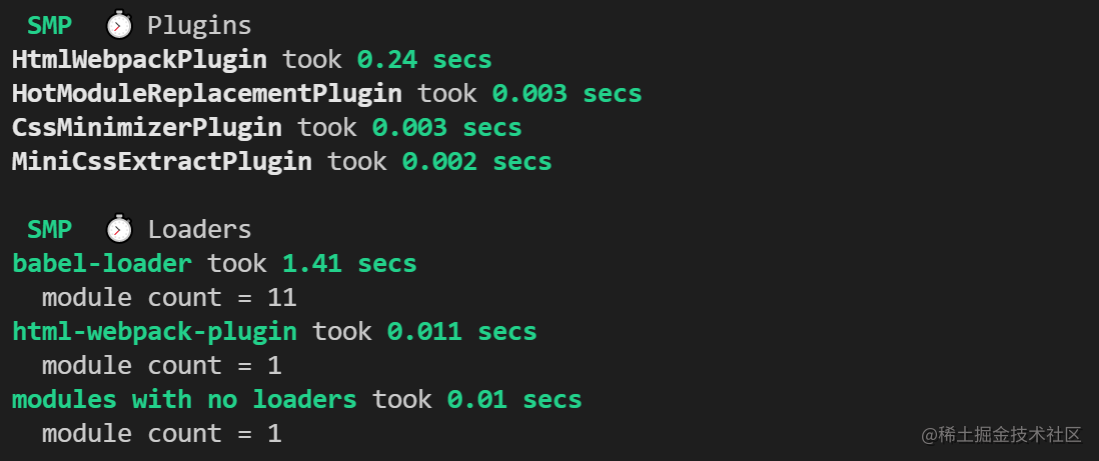
执行 webpack 打包命令后,如下图可以看到各个 loader 和 plugin 的打包耗时:
cdn 分包#
对于项目中我们用的一些比较大和比较多的包,例如 react 和 react-dom,我们可以通过 cdn 的形式引入它们,然后将 react、react-dom 从打包列表中排除,这样可以减少打包所需的时间。
排除部分库的打包需要借助 html-webpack-externals-plugin 插件,执行如下命令安装:
yarn add html-webpack-externals-plugin -D
以 react 和 react-dom 为例,在 webpack 中添加如下配置:
const HtmlWebpackExternalsPlugin = require('html-webpack-externals-plugin');

module.exports = {
  // ...
  plugins: [
    new HtmlWebpackExternalsPlugin({
      externals: [
        {
          module: 'react',
          entry: 'https://unpkg.com/react@17.0.2/umd/react.production.min.js',
          global: 'React',
        },
        {
          module: 'react-dom',
          entry:
            'https://unpkg.com/react-dom@17.0.2/umd/react-dom.production.min.js',
          global: 'ReactDOM',
        },
      ],
    }),
  ],
};
效果对比如下:
多进程构建#
对于耗时较长的模块,同时开启多个 nodejs 进程进行构建,可以有效地提升打包的速度。可以采取的一些方式有:
- thread-loader
- HappyPack(作者已经不维护)
- parallel-webpack
下面以官方提供的 thread-loader 为例,执行以下命令安装 thread-loader:
yarn add thread-loader -D
在 webpack.config.js 中添加如下配置:
module.exports = {
  module: {
    rules: [
      {
        test: /.js$/,
        include: path.resolve('src'),
        use: [
          "thread-loader",
          // 耗时的 loader (例如 babel-loader)
        ],
      },
    ],
  },
};
使用时,需将此 loader 放置在其他 loader 之前,放置在此 loader 之后的 loader 会在一个独立的 worker 池中运行。
每个 worker 都是一个独立的 node.js 进程,其开销大约为 600ms 左右。同时会限制跨进程的数据交换。所以请仅在耗时的操作中使用此 loader!(一般只在大型项目中的 ts、js 文件使用)
并行压缩#
一些插件内置了 parallel 参数(如 terser-webpack-plugin, css-minimizer-webpack-plugin, html-minimizer-webpack-plugin),开启后可以进行并行压缩。
webpack5版本内置了 terser-webpack-plugin 的配置,如果是 v4 或者更低版本,执行以下命令安装 terser-webpack-plugin :
yarn add terser-webpack-plugin -D
在 webpack.config.js 进行如下配置:
const TerserPlugin = require("terser-webpack-plugin");

module.exports = {
  optimization: {
    minimize: true,
    minimizer: [new TerserPlugin()],
  },
};
预编译资源模块#
通过预编译资源模块,可以代替 cdn 分包的方式,解决每个模块都得引用一个 script 的缺陷。
还是以 react 和 react-dom 为例,新建一个 webpack.dll.js 文件,用于预编译资源的打包,例如要对 react 和 react-dom 进行预编译,配置如下:
const path = require('path');
const webpack = require('webpack');

module.exports = {
  mode: 'production',
  entry: {
    library: ['react', 'react-dom'],
  },
  output: {
    filename: 'react-library.dll.js',
    path: path.resolve(__dirname, './dll'),
    library: '[name]_[hash]', // 对应的包映射名
  },
  plugins: [
    new webpack.DllPlugin({
      context: __dirname,
      name: '[name]_[hash]', // 引用的包映射名
      path: path.join(__dirname, './dll/react-library.json'),
    }),
  ],
};
在 package.json 中新增一条如下命令:
{
  // ...
  "scripts": {
    // ...
    "build:dll": "webpack --config ./webpack.dll.js"
  },
  // ...
}
执行 npm run build:dll 后,会在 /build/library 目录下生成如下内容,library.js 中打包了 react 和 react-dom 的内容,library.json 中添加了对它的引用:
然后在 webpack.config.js 中新增如下内容:
const webpack = require('webpack');
const AddAssetHtmlPlugin = require('add-asset-html-webpack-plugin');

module.exports = {
  plugins: [
    new webpack.DllReferencePlugin({
      context: __dirname,
      manifest: require('./dll/react-library.json'),
    }),
    // 打包后的 .dll.js 文件需要引入到 html中,可以通过 add-asset-html-webpack-plugin 插件自动引入
    new AddAssetHtmlPlugin({
      filepath: require.resolve('./dll/react-library.dll.js'),
      publicPath: '',
    }),
  ],
};
效果对比如下:
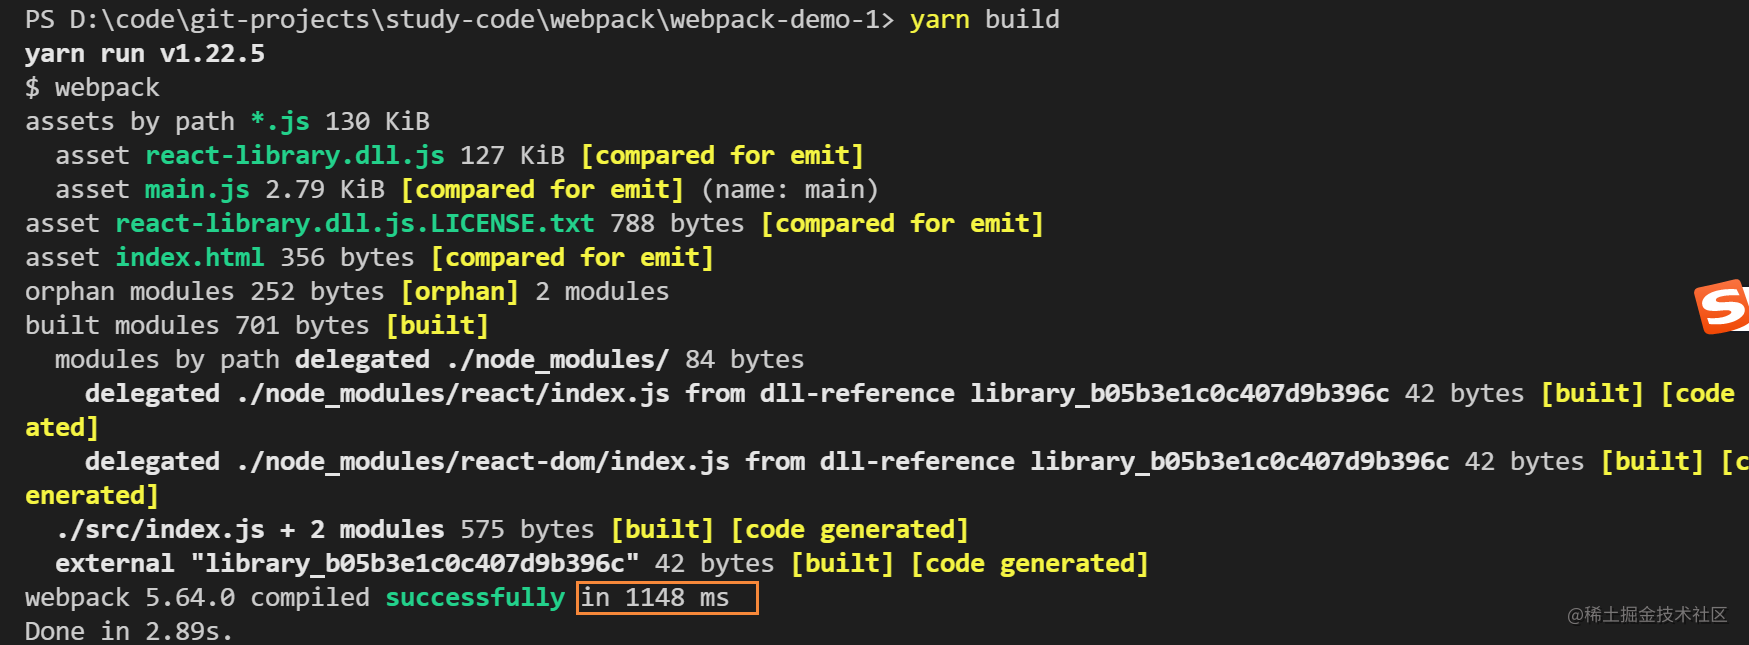
使用 dll 预编译资源之前,打包效果如下,总打包耗时 1964ms,且需要打包 react: 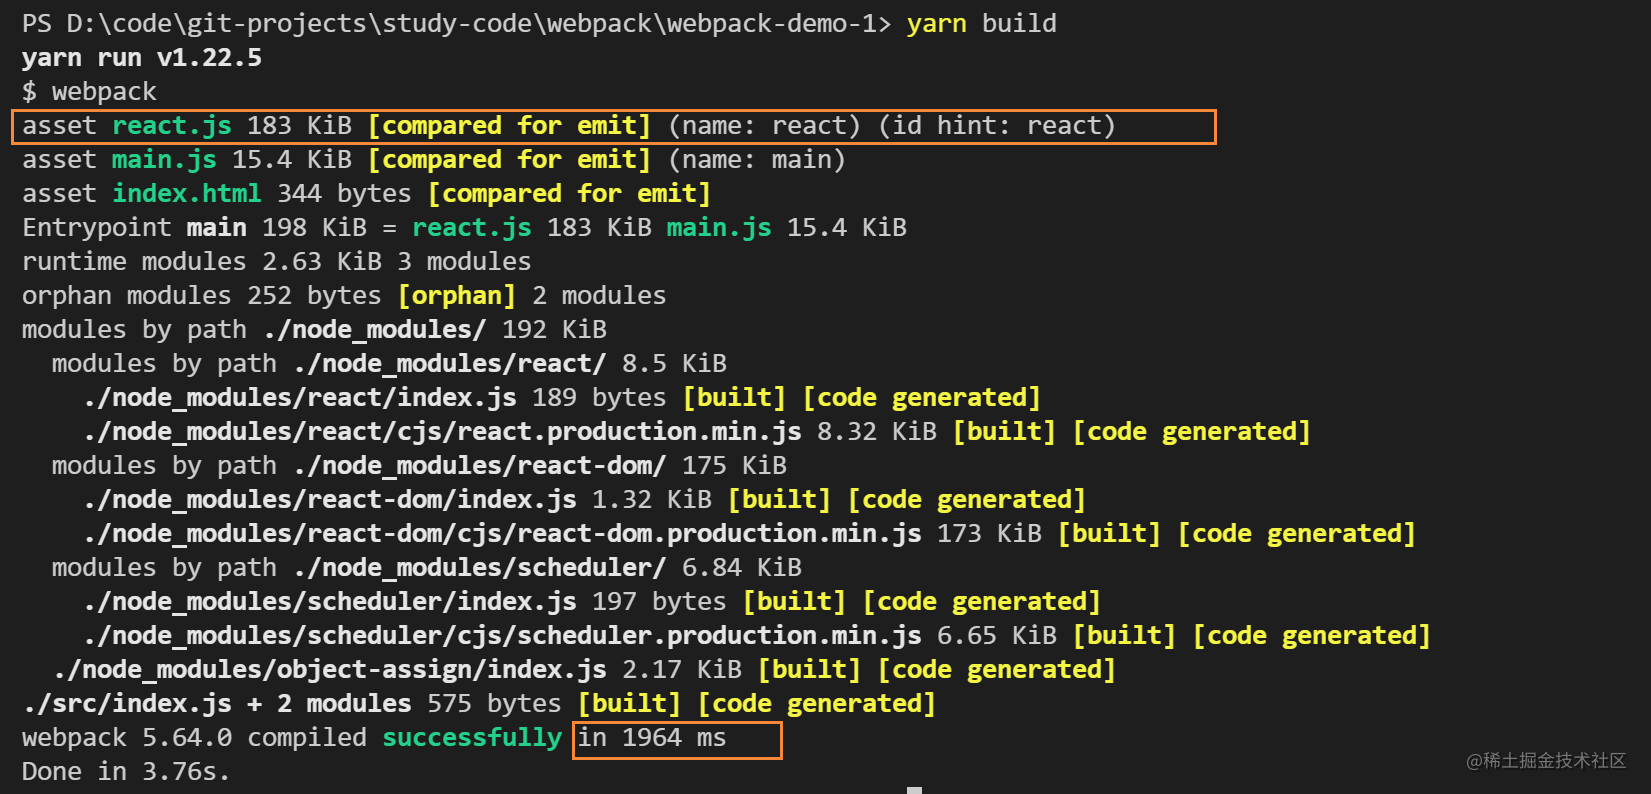 使用 dll 预编译资源之后,打包效果如下,总打包耗时 1148ms,不需要打包 react:
使用缓存#
通过使用缓存,能够有效提升打包速度。缓存主要有以下几种方案:
- 使用 webpack5 内置的 cache 模块
- cache-loader(webpack5内置了 cache 模块后可弃用 cache-loader)
内置的 cache 模块#
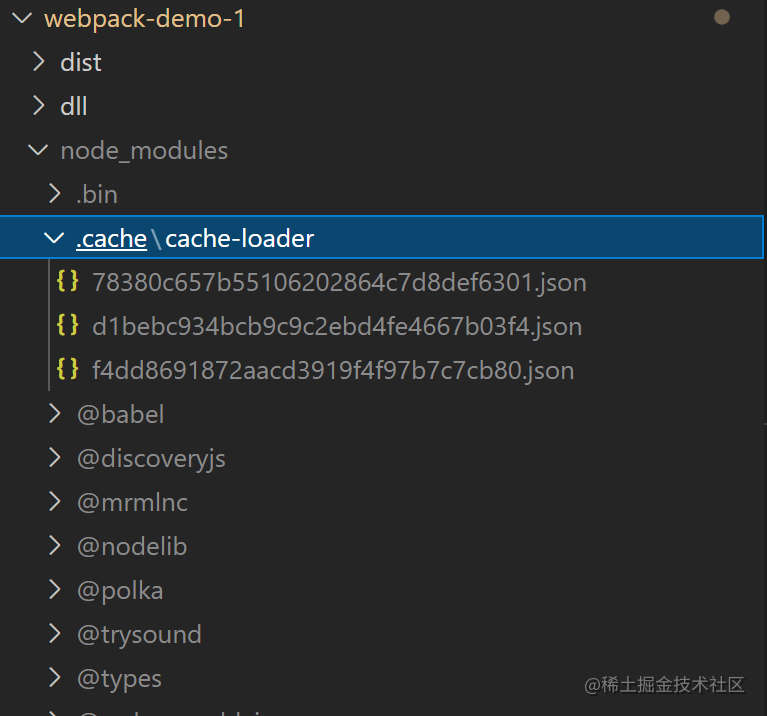
webpack5 内置了 cache 模块,缓存生成的 webpack 模块和 chunk,来改善构建速度。它在开发环境下会默认设置为 type: 'memory' 而在生产环境中被禁用。cache: { type: 'memory' } 与 cache: true 作用一样,可以通过设置 cache: { type: 'filesystem' } 来开放更多配置项。
例如在 webpack.config.js 中作如下配置:
module.exports = {
  cache: {
    type: 'filesystem',
  },
};
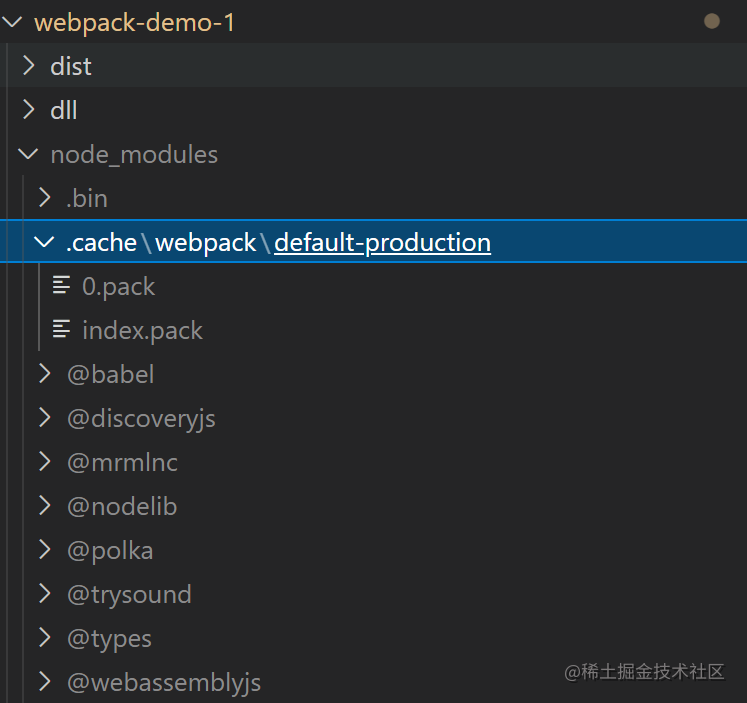
会在 node_modules 目录下生成一个 .cache 目录缓存文件内容,且二次打包速度显著提升:
cache-loader#
在一些性能开销较大的 loader 之前添加 cache-loader,能将结果缓存到磁盘里。保存和读取这些缓存文件会有一些时间开销,所以请只对性能开销较大的 loader 使用。
执行如下命令安装 cache-loader:
npm install cache-loader -D
在 webpack.config.js 对应的开销大的 loader 前加上 cache-loader:
module.exports = {
  module: {
    rules: [
      {
        test: /\.js$/,
        use: [
          'cache-loader',
          'babel-loader'
        ]
      }
    ]
  }
}
同样会在 node_modules 目录下生成一个 .cache 目录缓存文件内容,且二次打包速度显著提升:
缩小构建范围#
通过合理配置 rules 中的文件查找范围,可以减少打包的范围,从而提升打包速度。
在 webpack.config.js 中新增如下配置:
module.exports = {
  // ...
  module: {
    rules: [
      {
        test: /\.js$/,
        use: ['babel-loader'],
        exclude: /node_modules/,
      },
    ],
  },
};
效果对比如下:
配置前,编译总耗时 1867ms:  配置后,编译总耗时 1227ms:
加快文件查找速度#
通过合理配置 webpack 的 resolve 模块,可以加快文件的查找速度,例如可以对如下的选项进行配置:
- resolve.modules 减少模块搜索层级,指定当前 node_modules,慎用。
- resovle.mainFields 指定包的入口文件。
- resolve.extension 对于没有指定后缀的引用,指定解析的文件后缀查找顺序
- 合理使用 alias,指定第三方依赖的查找路径
对 webpack.config.js 作如下配置:
module.exports = {
  resolve: {
    alias: {
      react: path.resolve(__dirname, './node_modules/react/dist/react.min.js'),
    },
    modules: [path.resolve(__dirname, './node_modules')],
    extensions: ['.js', '.jsx', '.json'],
    mainFields: ['main'],
  },
};
打包体积优化#
体积分析#
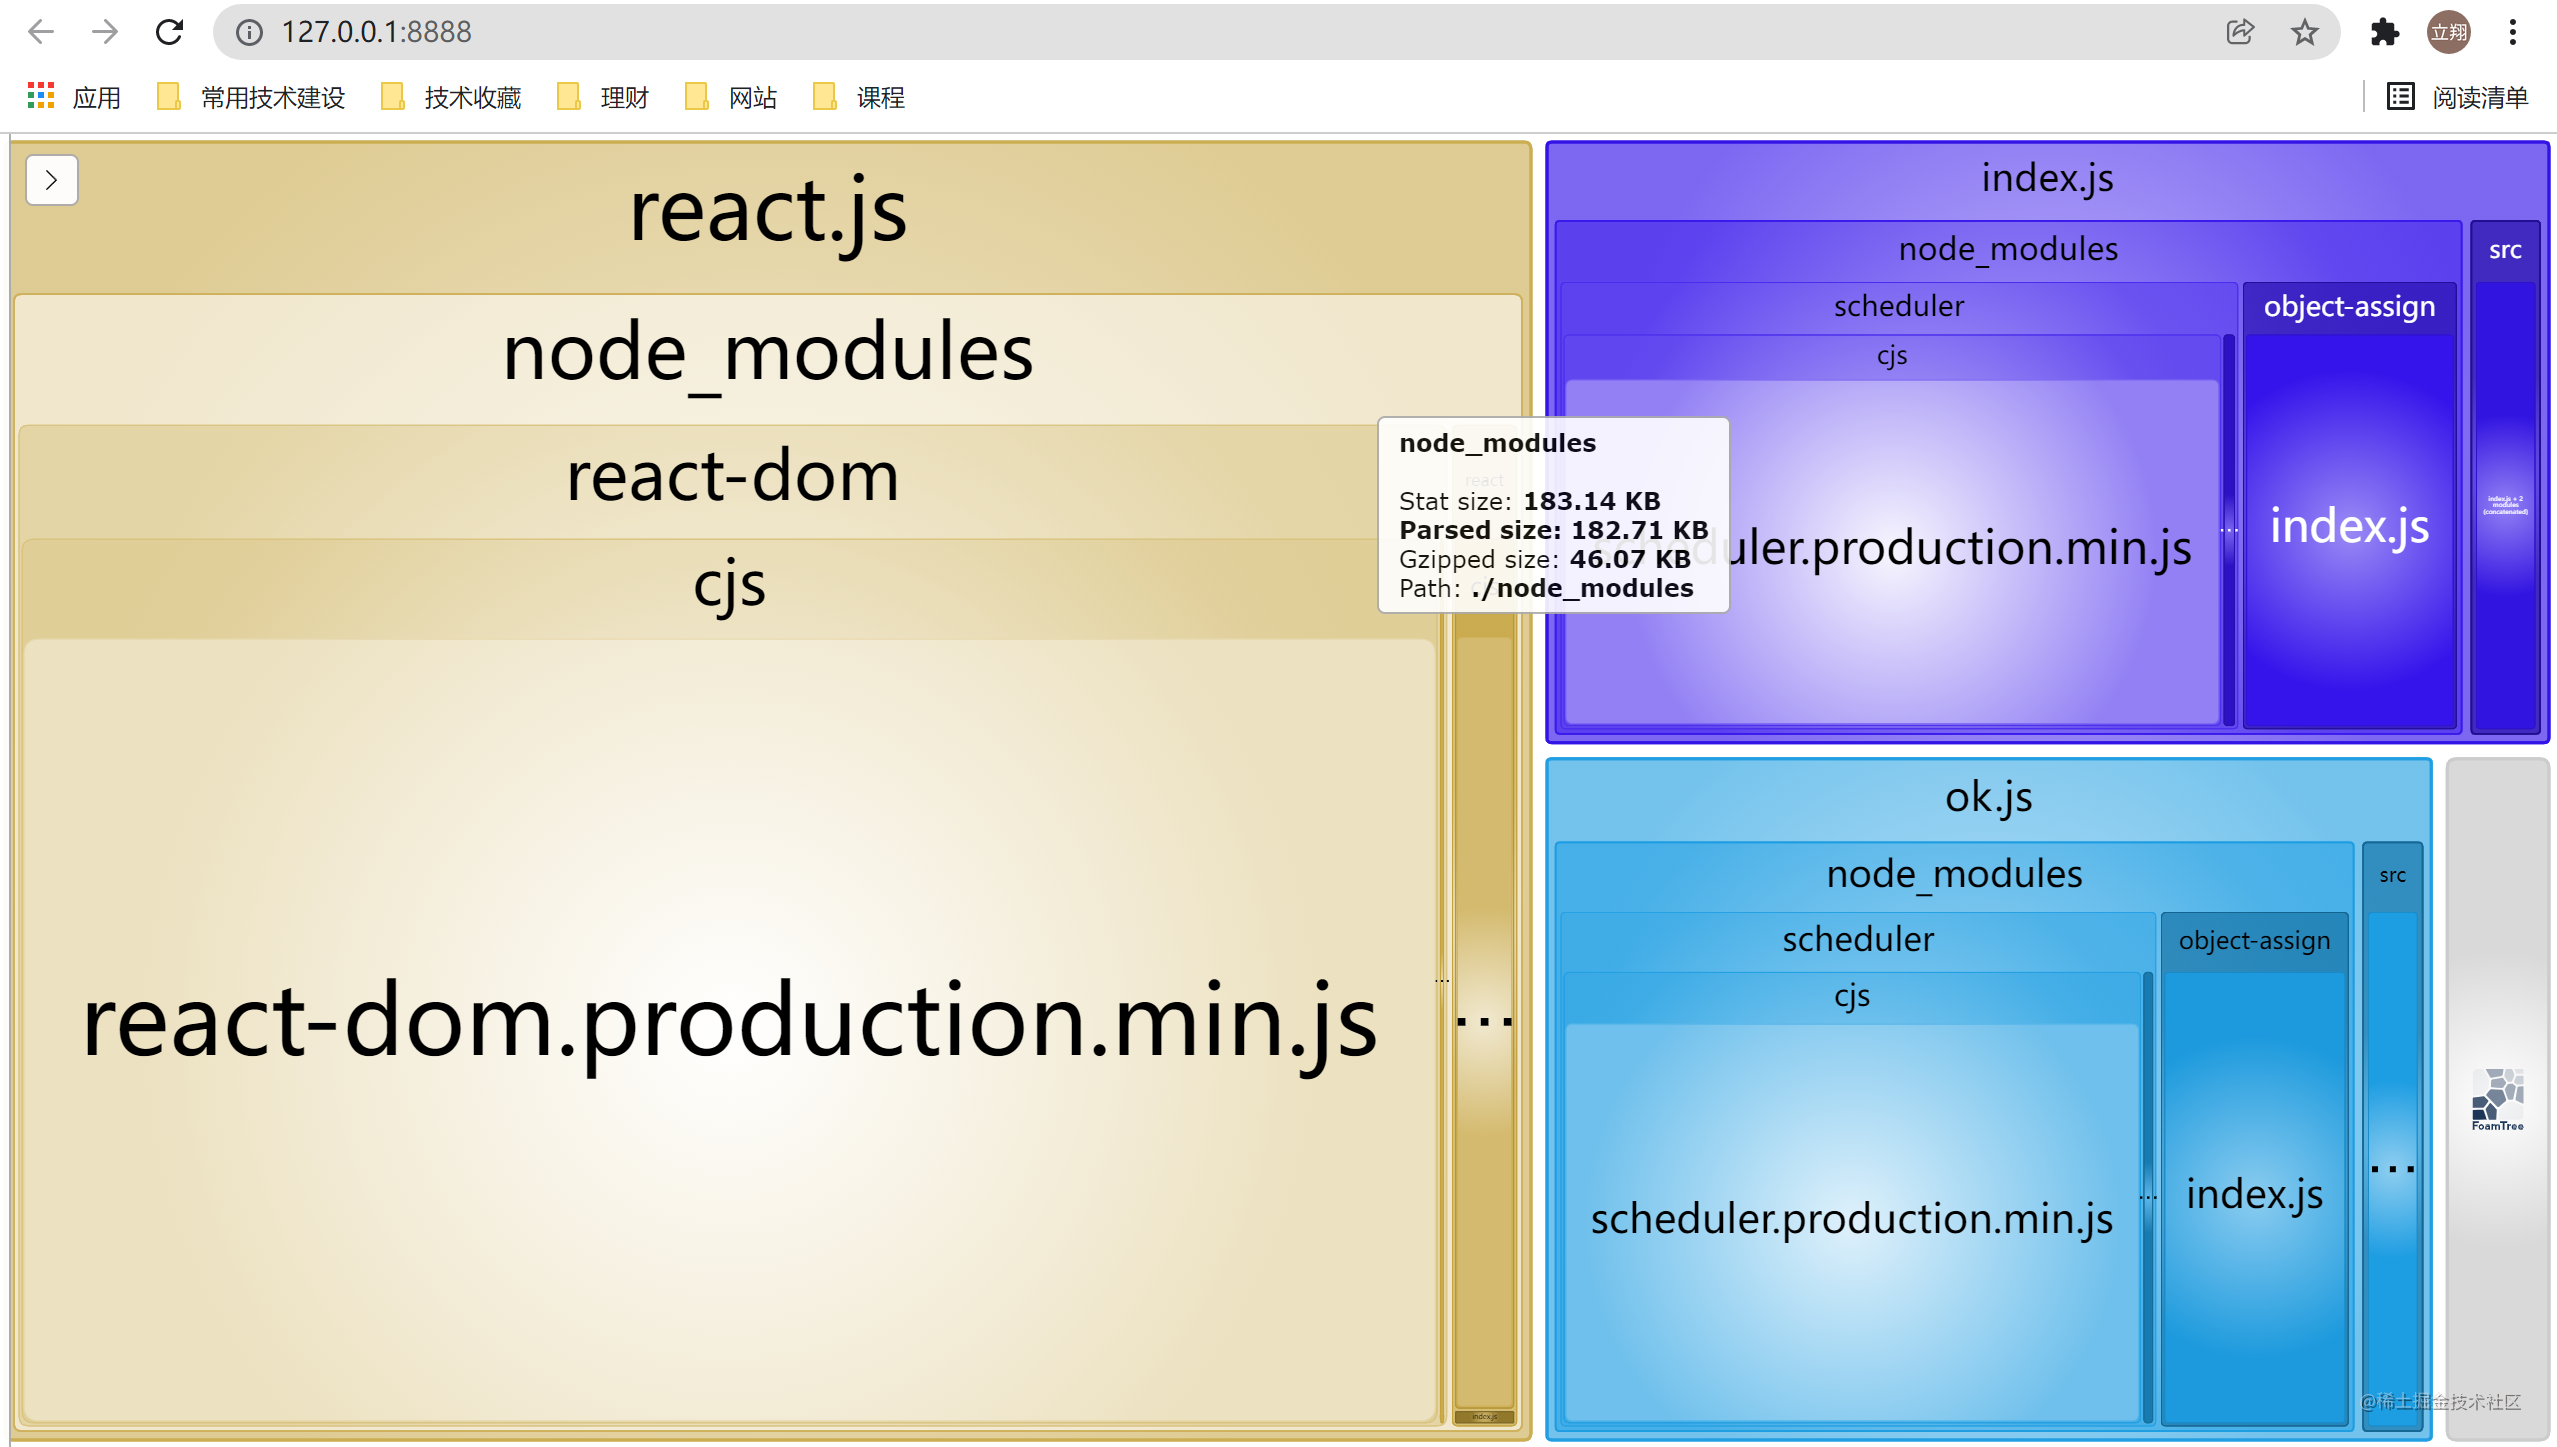
同速度优化一样,我们要对体积进行优化,也需要了解打包时各个模块的体积大小。这里借助 webpack-bundle-analyzer 插件,它可以分析打包的总体积、各个组件的体积以及引入的第三方依赖的体积。
执行如下命令安装 webpack-bundle-analyzer:
yarn add webpack-bundle-analyzer -D
在 webpack.config.js 中添加如下配置:
const { BundleAnalyzerPlugin } = require('webpack-bundle-analyzer');

module.exports = {
  // ...
  plugins: [
    new BundleAnalyzerPlugin()
  ],
};
然后执行 webpack 打包命令,会在 localhost:8888 页面看到打包后的体积分析:
提取公共模块#
假如我们现在有一个 MPA(多页面应用) 的 react 项目,每个页面的入口文件及其依赖的组件中都会引入一份 react 和 react-dom ,那最终打包后的每个页面中同样也会有一份以上两个包的代码。我们可以将这两个包单独抽离出来,最终在每个打包后的页面入口文件中引入,从而减少打包后的总体积。
在 webpack.config.js 中添加如下配置:
module.exports = {
  optimization: {
    splitChunks: {
      minSize: 20000,
      cacheGroups: {
        react: {
          test: /(react|react-dom)/,
          name: 'vendors',
          chunks: 'all',
        },
      },
    },
  }
};
效果对比:
压缩代码#
html 压缩#
安装 html-webpack-plugin 插件,生产环境下默认会开启 html 压缩:
npm install html-webpack-plugin
webpack.config.js 做如下配置:
module.exports = {
  // ...
  plugins: [
    new HtmlWebpackPlugin({
      template: path.join(__dirname, '../', 'public/index.html'),
    }),
  ],
};
css 压缩#
css-minimizer-webpack-plugin 插件可以压缩 css 文件代码,但由于压缩的是 css 代码,所以还需要依赖 mini-css-extract-plugin 将 css 代码单独抽离:
const MiniCssExtractPlugin = require("mini-css-extract-plugin");
const CssMinimizerPlugin = require("css-minimizer-webpack-plugin");

module.exports = {
  plugins: [
    new MiniCssExtractPlugin({
      filename: "[name].css",
      chunkFilename: "[id].css",
    }),
  ],
  module: {
    rules: [
      {
        test: /\.css$/,
        use: [MiniCssExtractPlugin.loader, "css-loader"],
      },
    ],
  },
  optimization: {
    minimizer: [
      // webpack5 可以使用 '...' 访问 minimizer 数组的默认值
      '...',
      new CssMinimizerPlugin(),
    ],
  },
};
js 压缩#
生产环境下会默认开启 js 的压缩,无需单独配置。
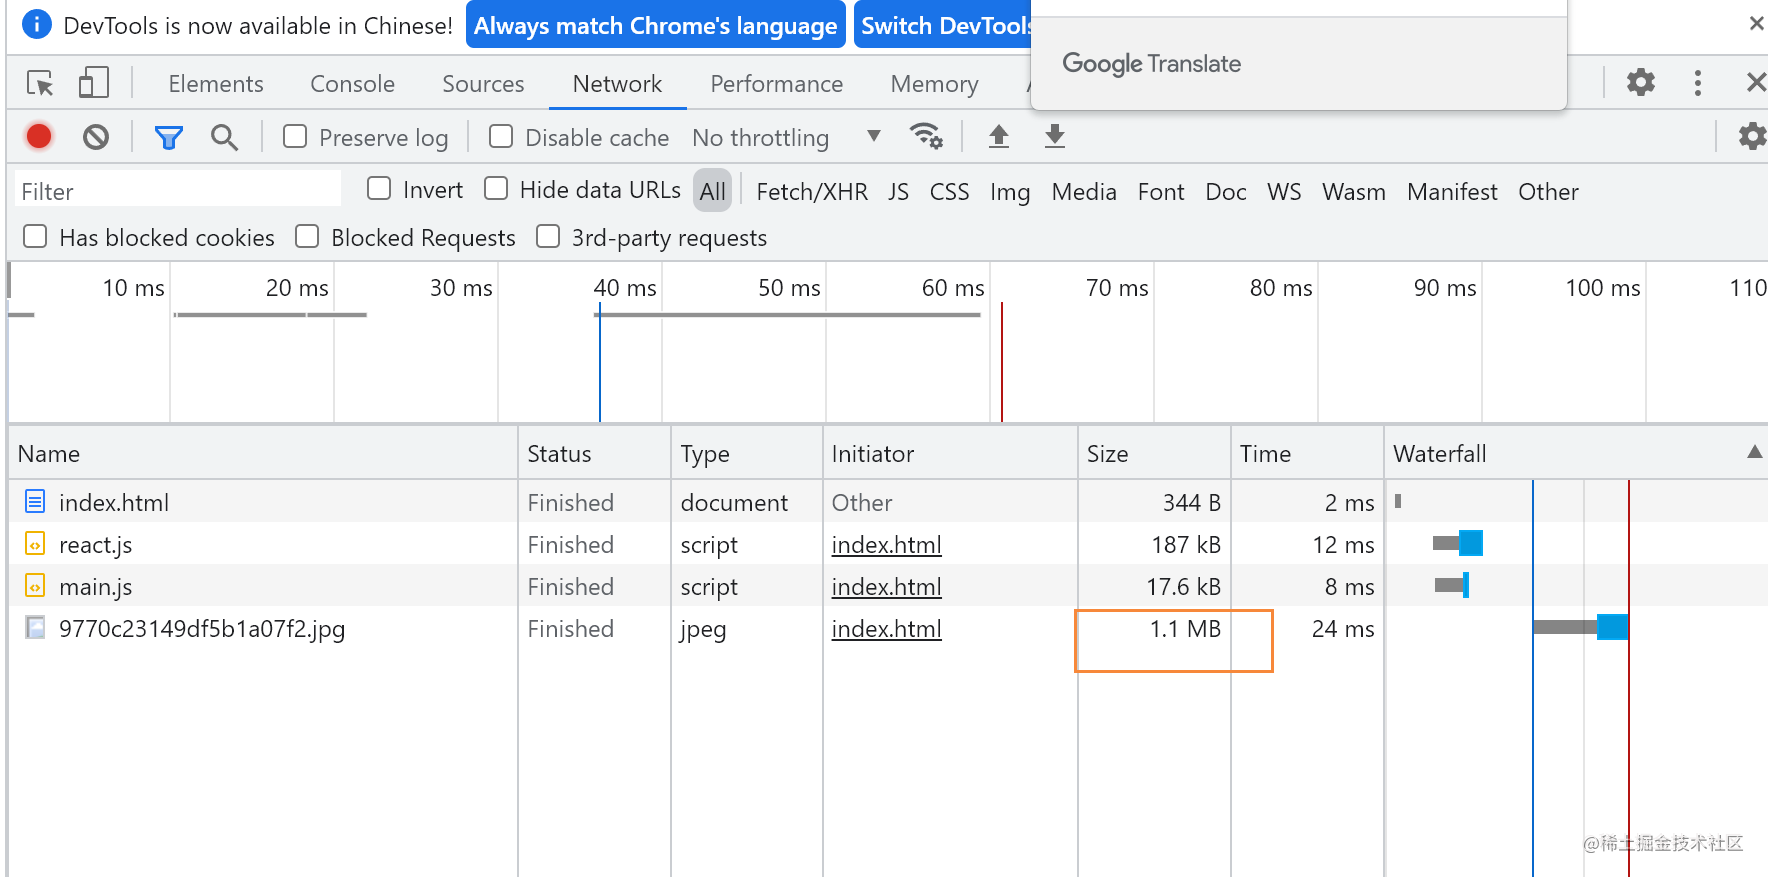
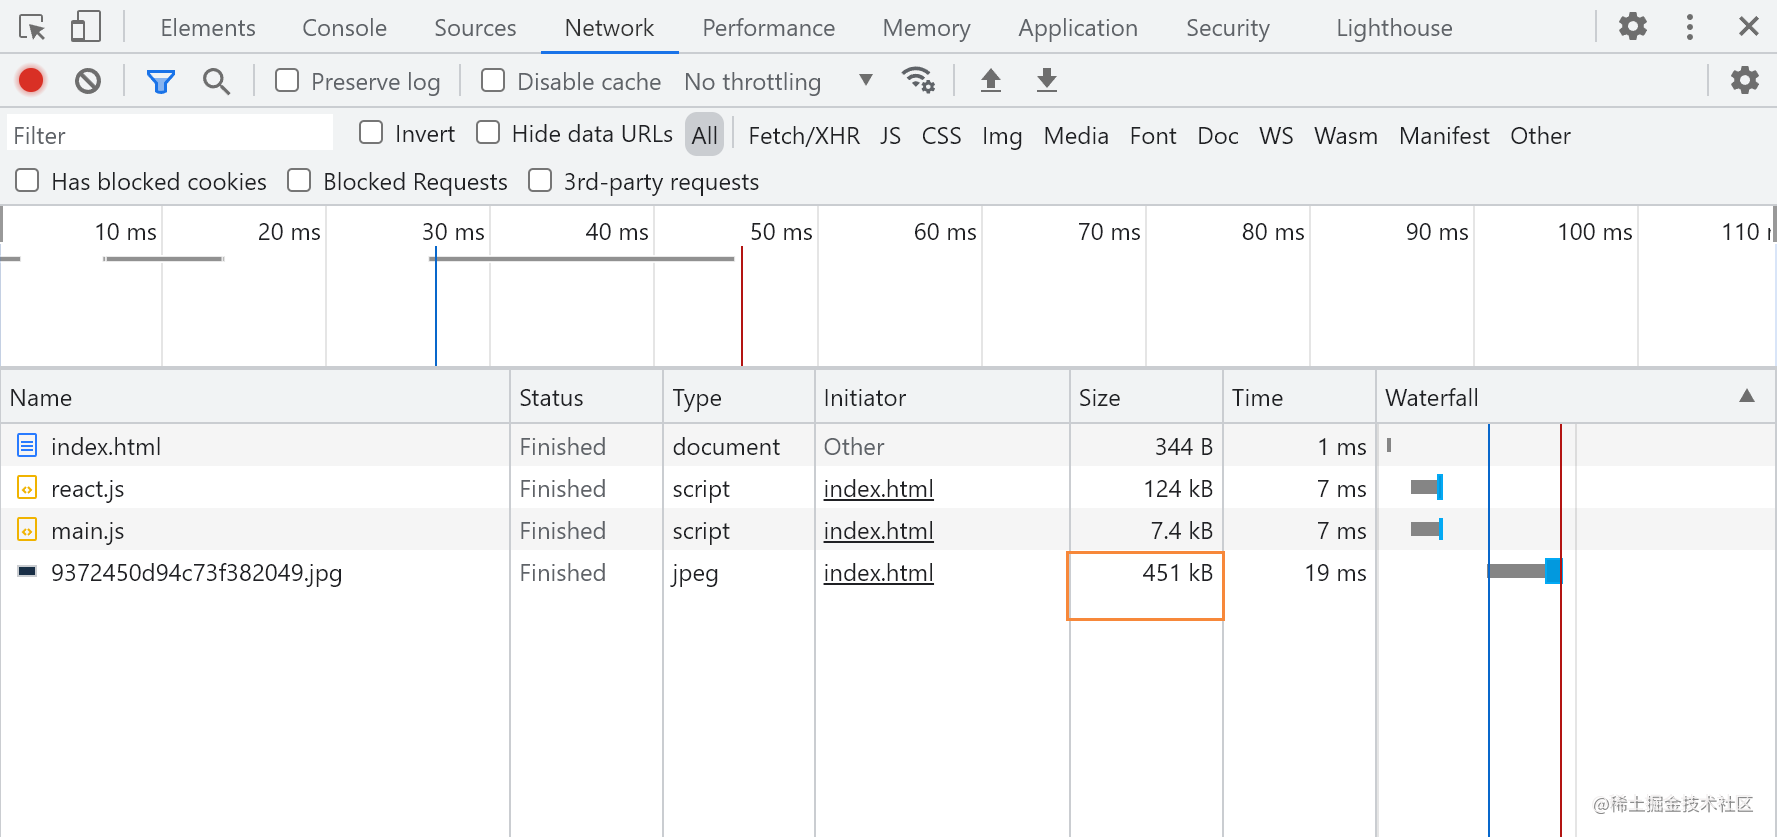
图片压缩#
使用 image-minimizer-webpack-plugin 配合 imagemin 可以在打包时实现图片的压缩。
执行如下命令安装 image-minimizer-webpack-plugin 配合 imagemin :
npm install image-minimizer-webpack-plugin imagemin imagemin-gifsicle imagemin-jpegtran imagemin-optipng imagemin-svgo --save-dev
在 webpack.config.js 中新增如下配置:
const ImageMinimizerPlugin = require("image-minimizer-webpack-plugin");
const { extendDefaultPlugins } = require("svgo");

module.exports = {
  module: {
    rules: [
      {
        test: /\.(jpe?g|png|gif|svg)$/i,
        type: "asset",
      },
    ],
  },
  optimization: {
    minimizer: [
      "...",
      new ImageMinimizerPlugin({
        minimizer: {
          implementation: ImageMinimizerPlugin.imageminMinify,
          options: {
            // Lossless optimization with custom option
            // Feel free to experiment with options for better result for you
            plugins: [
              ["gifsicle", { interlaced: true }],
              ["jpegtran", { progressive: true }],
              ["optipng", { optimizationLevel: 5 }],
              // Svgo configuration here https://github.com/svg/svgo#configuration
              [
                "svgo",
                {
                  plugins: extendDefaultPlugins([
                    {
                      name: "removeViewBox",
                      active: false,
                    },
                    {
                      name: "addAttributesToSVGElement",
                      params: {
                        attributes: [{ xmlns: "http://www.w3.org/2000/svg" }],
                      },
                    },
                  ]),
                },
              ],
            ],
          },
        },
      }),
    ],
  },
};
效果对比如下:
移除无用的 css#
通过 purgecss-webpack-plugin,可以识别没有用到的 class,将其从 css 文件中 treeShaking 掉,需要配合 mini-css-extract-plugin 一起使用。
执行如下命令安装 purgecss-webpack-plugin:
npm install purgecss-webpack-plugin -D
在 webpack.config.js 文件中做如下配置:
const path = require('path')
const glob = require('glob')
const MiniCssExtractPlugin = require('mini-css-extract-plugin')
const PurgecssPlugin = require('purgecss-webpack-plugin')

const PATHS = {
  src: path.join(__dirname, 'src')
}

module.exports = {
  module: {
    rules: [
      {
        test: /.css$/,
        use: [
          MiniCssExtractPlugin.loader,
          "css-loader"
        ]
      }
    ]
  },
  plugins: [
    new MiniCssExtractPlugin({
      filename: "[name].css",
    }),
    new PurgecssPlugin({
      paths: glob.sync(`${PATHS.src}/**/*`,  { nodir: true }),
    }),
  ]
}
在 css 文件中添加一段未用到的 css 代码:
div {
  font-size: 44px;
  display: flex;
}
// 此段为用到:
.unuse-css {
  font-size: 20px;
}
使用 purgecss-webpack-plugin 之前,打包结果如下:  使用
使用 purgecss-webpack-plugin 之后,打包结果如下,无用代码已经移除: 
polyfill service#
我们在项目使用了 es6+ 语法时,往往需要引入 polyfill 去兼容不同浏览器。目前我们常采用的方案一般是 babel-polyfill 或者 babel-plugin-transform-runtime,然而在部分不同的浏览器上,它们一般都会与冗余,从而导致项目一些不必要的体积增大。
以下是几种常见 polyfill 方案的对比:
| 方案 | 优点 | 缺点 |
|---|---|---|
| babel-polyfill | 功能全面 | 体积太大超过200kb,难以抽离 |
| babel-plugin-transform-runtime | 只polyfill用到的类或者方法,体积相对较小 | 不能polyfill原型上的方法,不适合复杂业务 |
| 团队维护自己的polyfill | 定制化高,体积小 | 维护成本太高 |
| polyfill service | 只返回需要的polyfill,体积最小 | 部分奇葩浏览器的UA不识别,走优雅降级方案返回全部polyfill |
这里我们可以采用 polyfill service 方案,它能够识别 User Agent,下发不同的 polyfill,做到按需加载需要的 polyfill,从而优化我们项目的体积。
去 polyfill.io/ 查看最新的 polyfill service 的 url,例如目前是:
https://polyfill.io/v3/polyfill.min.js
直接在项目的 html 中通过 script 引入即可:
<script src="https://polyfill.io/v3/polyfill.min.js"></script>
作者:axl234
出处:https://www.cnblogs.com/axl234/p/15883058.html
版权:本作品采用「署名-非商业性使用-相同方式共享 4.0 国际」许可协议进行许可。







【推荐】国内首个AI IDE,深度理解中文开发场景,立即下载体验Trae
【推荐】编程新体验,更懂你的AI,立即体验豆包MarsCode编程助手
【推荐】抖音旗下AI助手豆包,你的智能百科全书,全免费不限次数
【推荐】轻量又高性能的 SSH 工具 IShell:AI 加持,快人一步
· 被坑几百块钱后,我竟然真的恢复了删除的微信聊天记录!
· 没有Manus邀请码?试试免邀请码的MGX或者开源的OpenManus吧
· 【自荐】一款简洁、开源的在线白板工具 Drawnix
· 园子的第一款AI主题卫衣上架——"HELLO! HOW CAN I ASSIST YOU TODAY
· Docker 太简单,K8s 太复杂?w7panel 让容器管理更轻松!
2016-02-11 React JSX语法说明