Make Docker Image On Ubuntu17.10
1、拉取基础镜像
docker pull ubuntu
2、查看镜像
docker images

3、启动一个容器
docker run -it ubuntu
4、查找运行的容器ID
docker ps
5、根据容器ID,进入容器,例如:docker exec -i -t 42bc7b76ac82 bash
docker exec -i -t <CONTAINER ID> bash
上面3、4、5 可以合并为一个命令执行,达到同样的效果:
docker run -it ubuntu /bin/bash
6、安装curl
docker 的 ubuntu 镜像中没有curl 命令,安装.net core 会用到,所以先安装 curl
apt-get update
apt-get install curl
7、查看docker images 镜像的版本,我这里使用的是ubuntu:latest 镜像
cat /etc/issue
输出如下:
Ubuntu 16.04.3 LTS \n \l
8、在官网上找到对应版本的安装步骤
Ubuntu 16.04 and Linux Mint 18
curl https://packages.microsoft.com/keys/microsoft.asc | gpg --dearmor > microsoft.gpg
sudo mv microsoft.gpg /etc/apt/trusted.gpg.d/microsoft.gpg
sudo sh -c 'echo "deb [arch=amd64] https://packages.microsoft.com/repos/microsoft-ubuntu-xenial-prod xenial main" > /etc/apt/sources.list.d/dotnetdev.list'
进入容器默认是root 用户,要去掉sudo,执行上面命令,执行成功后,继续执行update
apt-get update
发现会报错,错误信息如下:
E: The method driver /usr/lib/apt/methods/https could not be found.
N: Is the package apt-transport-https installed?
E: Failed to fetch https://packages.microsoft.com/repos/microsoft-ubuntu-xenial-prod/dists/xenial/InRelease
E: Some index files failed to download. They have been ignored, or old ones used instead.
信息提示很明确,需要安装 apt-transport-https
apt-get install apt-transport-https
再次执行 update
apt-get update
安装.net core
apt-get install dotnet-dev-1.1.4
如果使用的是其他版本的SDK 开发的程序,请在官网上找对应的安装步骤,特别说明,上述步骤对应 ubuntu16.4 .net core 1.1.4 ,我尝试了安装1.1.2 的sdk,但失败了,懒得折腾就安装了1.X的最后一个版本。
由于有一个老程序使用的是1.1.2 的runtime ,所以需要修改程序的runtime 属性,才可以正常运行。
友情提示:应广大童鞋要求,这里提供一下1.1.2 runtime ,安装命令:
参考官网地址:https://github.com/dotnet/core/blob/master/release-notes/download-archives/1.0.4-sdk-download.md
Ubuntu 16.04 and Linux Mint 18
sudo sh -c 'echo "deb [arch=amd64] https://apt-mo.trafficmanager.net/repos/dotnet-release/ xenial main" > /etc/apt/sources.list.d/dotnetdev.list'
sudo apt-key adv --keyserver hkp://keyserver.ubuntu.com:80 --recv-keys 417A0893
sudo apt-get update
sudo apt-get install dotnet-dev-1.0.4
如果安装的是1.0.5 sdk,对应的runtime 为1.1.2 ,则无需执行下面的第14步(修改应用程序的RuntimeFrameworkVersion)
9、安装 Git
apt-get install git
10、查看 Git 版本
git --version
输出如下:
git version 2.7.4
默认安装的git版本太低,需要升级,请查看ubuntu16.0.4 update git
11、下载微软示例源码
git clone https://github.com/Microsoft/PartsUnlimited.git
12、这个示例代码用到nodejs 6.11.0 ,所以需要安装nodejs
在网站上看到如下信息,大概意思就是,默认安装的版本比较低,是4.2.6 ,想安装6.11.0,需要用其他方式,一个是PPA ,另一个就是NVM ,本人更喜欢NVM ,下面会使用NVM 作为安装方式。
Ubuntu 16.04 contains a version of Node.js in its default repositories that can be used to easily provide a consistent experience across multiple systems. At the time of writing, the version in the repositories is v4.2.6. This will not be the latest version, but it should be quite stable, and should be sufficient for quick experimentation with the language.
不解释了,直接上命令:
apt-get update
apt-get install build-essential libssl-dev
curl -sL https://raw.githubusercontent.com/creationix/nvm/v0.33.6/install.sh -o install_nvm.sh
bash install_nvm.sh
source ~/.profile
nvm ls-remote
nvm install 6.11.0
安装完成后,查看node 版本:
node -v
13、进入源码目录,进行编译
cd /opt/PartsUnlimited/src/PartsUnlimitedWebsite/
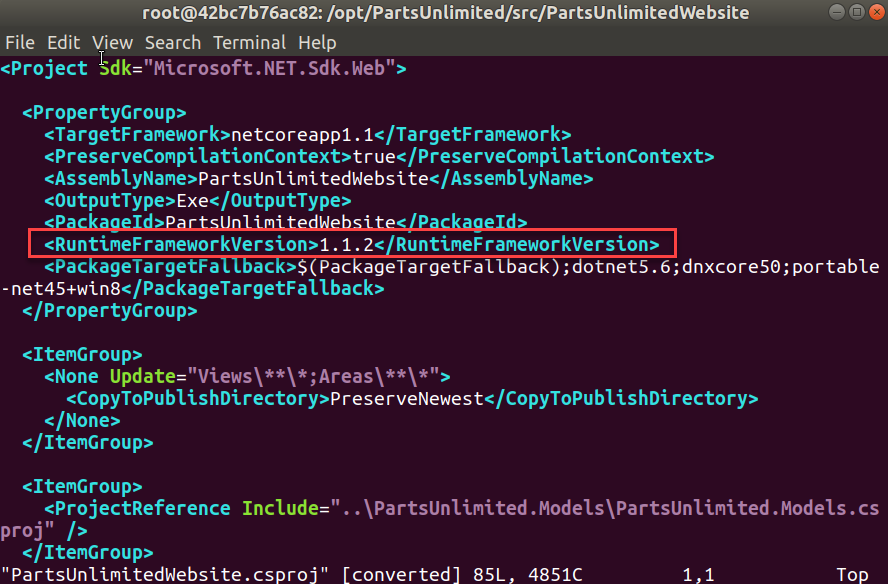
14、修改程序运行的runtime 属性,系统自带的vi ,是阉割版的vim-command ,使用非常的不习惯,所以,我先安装了vim,再修改文件。
安装vim:
apt-get install vim
修改文件:
vim PartsUnlimitedWebsite.csproj

将1.1.2 修改为1.1.4
15、还原程序
dotnet restore
16、编译
dotnet build
控制台输出如下信息:

需要安装grunt
npm install grunt -g
特别注意:使用nvm安装node 后,需要设置node 路径,
whereis node
查询出node路径:
/home/azureuser/.nvm/versions/node/v6.11.0/bin/node
执行下面命令,进行设置:
sudo ln -s /home/azureuser/.nvm/versions/node/v6.11.0/bin/node /usr/bin/node
再次执行:
whereis node
显示如下:
node: /usr/bin/node /home/azureuser/.nvm/versions/node/v6.11.0/bin/node
同样的方式设置npm:
sudo ln -s /home/azureuser/.nvm/versions/node/v6.11.0/bin/npm /usr/bin/npm
同样的方式设置grunt:
sudo ln -s /home/azureuser/.nvm/versions/node/v6.11.0/bin/grunt /usr/bin/grunt
17、再次执行编译命令:
dotnet build
出现以下错误:
The command "grunt" exited with code 3.
执行下面命令来解决:
npm rebuild node-sass
再次执行编译命令,完美通过。

