Spring事务
一、Spring事务管理
Spring 支持编程式事务管理以及声明式事务管理两种方式。
- 编程式事务管理是侵入性事务管理,编程式事务每次实现都要单独实现,但业务量大功能复杂时,使用编程式事务无疑是痛苦的,所以并不推荐使用。
- 声明式事务属于无侵入式,不会影响业务逻辑的实现,只需要在配置文件中做相关的事务规则声明或者通过注解的方式,便可以将事务规则应用到业务逻辑中。声明式事务管理建立在AOP之上,其本质是对方法前后进行拦截,然后在目标方法开始之前创建或者加入一个事务,执行完目标方法之后根据执行的情况提交或者回滚。显然声明式事务管理要优于编程式事务管理,这正是Spring倡导的非侵入式的编程方式。(必须掌握)
Spring事务的本质其实就是数据库对事务的支持,使用JDBC的事务管理机制就是利用 java.sql.Connection 对象完成对事务的提交
在企业级应用中,多用户访问数据库是常见的场景,这就是所谓的事务的并发。事务并发所可能存在的问题:
- 脏读:一个事务读到另一个事务未提交的更新数据。
- 不可重复读:一个事务两次读同一行数据,可是这两次读到的数据不一样。
- 幻读:一个事务执行两次查询,但第二次查询比第一次查询多出了一些数据行。
- 丢失更新:撤消一个事务时,把其它事务已提交的更新的数据覆盖了。
Spring诞生之后,我们再也无需去处理获得连接、关闭连接、事务提交和回滚等这些操作,使得我们把更多的精力放在处理业务上。Spring并不直接管理事务,而是提供了多种事务管理器,他们将事务管理的职责委托给Hibernate或者JTA等持久化机制所提供的相关平台框架的事务来实现。 Spring事务管理器的接口是 org.springframework.transaction.PlatformTransactionManager,通过这个接口,Spring为各个平台如JDBC、Hibernate等都提供了对应的事务管理器,但是具体的实现由各个平台自己实现。
事务管理器接口 PlatformTransactionManager 通过 getTransaction(TransactionDefinition definition) 方法来得到事务,这个方法里面的参数是 TransactionDefinition 类,这个类就定义了一些基本的事务属性。事务属性包含了5个方面
- 是否为只读?
- 传播行为
- 隔离规则
- 回滚规则
- 事务超时
二、事务演示环境准备
1.创建一张表,用来模拟转账的案例

CREATE TABLE `account` (
  `uid` int(10) NOT NULL AUTO_INCREMENT,
  `name` varchar(255) DEFAULT NULL,
  `balance` float(255,0) DEFAULT NULL,
  PRIMARY KEY (`uid`)
) ENGINE=InnoDB AUTO_INCREMENT=3 DEFAULT CHARSET=utf8mb4 COLLATE=utf8mb4_0900_ai_ci;
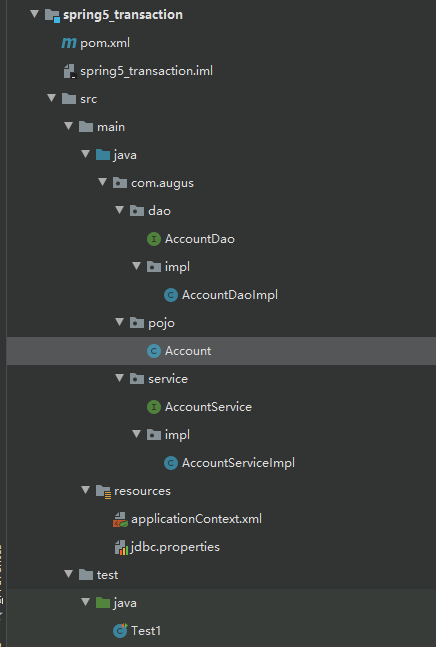
2.项目结构如下图
3.导入依赖和JdbcTemplate相同
<dependencies>
        <!--引入德鲁伊连接池-->
        <!-- https://mvnrepository.com/artifact/com.alibaba/druid -->
        <dependency>
            <groupId>com.alibaba</groupId>
            <artifactId>druid</artifactId>
            <version>1.2.8</version>
        </dependency>

        <!--引入MySQL连接依赖-->
        <!-- https://mvnrepository.com/artifact/mysql/mysql-connector-java -->
        <dependency>
            <groupId>mysql</groupId>
            <artifactId>mysql-connector-java</artifactId>
            <version>8.0.28</version>
        </dependency>

        <!-- https://mvnrepository.com/artifact/org.springframework/spring-context -->
        <dependency>
            <groupId>org.springframework</groupId>
            <artifactId>spring-context</artifactId>
            <version>5.3.22</version>
        </dependency>

        <!--spring切面 的包-->
        <!-- https://mvnrepository.com/artifact/org.springframework/spring-aspects -->
        <dependency>
            <groupId>org.springframework</groupId>
            <artifactId>spring-aspects</artifactId>
            <version>5.3.18</version>
        </dependency>

        <!--springJDBC包-->
        <!-- https://mvnrepository.com/artifact/org.springframework/spring-jdbc -->
        <dependency>
            <groupId>org.springframework</groupId>
            <artifactId>spring-jdbc</artifactId>
            <version>5.3.18</version>
        </dependency>

        <!--spring事务控制包-->
        <!-- https://mvnrepository.com/artifact/org.springframework/spring-tx -->
        <dependency>
            <groupId>org.springframework</groupId>
            <artifactId>spring-tx</artifactId>
            <version>5.3.18</version>
        </dependency>

        <!--spring-orm映射依赖包-->
        <!-- https://mvnrepository.com/artifact/org.springframework/spring-orm -->
        <dependency>
            <groupId>org.springframework</groupId>
            <artifactId>spring-orm</artifactId>
            <version>5.3.18</version>
        </dependency>

        <!--织入包  spring-aspects 已经导入该包,这里可以不导入-->
        <!--<dependency>
            <groupId>org.aspectj</groupId>
            <artifactId>aspectjweaver</artifactId>
            <version>1.9.7</version>
        </dependency>-->

        <!--aop联盟包-->
        <dependency>
            <groupId>aopalliance</groupId>
            <artifactId>aopalliance</artifactId>
            <version>1.0</version>
        </dependency>

        <!--Apache Commons日志包-->
        <!-- https://mvnrepository.com/artifact/commons-logging/commons-logging -->
        <dependency>
            <groupId>commons-logging</groupId>
            <artifactId>commons-logging</artifactId>
            <version>1.2</version>
        </dependency>

        <!--导入lombok-->
        <!-- https://mvnrepository.com/artifact/org.projectlombok/lombok -->
        <dependency>
            <groupId>org.projectlombok</groupId>
            <artifactId>lombok</artifactId>
            <version>1.18.22</version>
            <scope>provided</scope>
        </dependency>

        <!-- https://mvnrepository.com/artifact/junit/junit -->
        <dependency>
            <groupId>junit</groupId>
            <artifactId>junit</artifactId>
            <version>4.13.2</version>
            <scope>test</scope>
        </dependency>

    </dependencies>
    <build>
        <resources>
            <resource>
                <directory>src/main/java</directory>
                <includes>
                    <include>**/*.xml</include>
                </includes>
            </resource>
            <resource>
                <directory>src/main/resources</directory>
                <includes>
                    <include>**/*.xml</include>
                    <include>**/*.properties</include>
                </includes>
            </resource>
        </resources>
        <plugins>
            <plugin>
                <groupId>org.apache.maven.plugins</groupId>
                <artifactId>maven-compiler-plugin</artifactId>
                <configuration>
                    <source>6</source>
                    <target>6</target>
                </configuration>
            </plugin>
        </plugins>
    </build>
4.准备配置文件applicationContext.xml,内容如下:
<?xml version="1.0" encoding="UTF-8"?>
<beans xmlns="http://www.springframework.org/schema/beans"
       xmlns:xsi="http://www.w3.org/2001/XMLSchema-instance"
       xmlns:context="http://www.springframework.org/schema/context"
       xsi:schemaLocation="
       http://www.springframework.org/schema/beans
       http://www.springframework.org/schema/beans/spring-beans.xsd

       http://www.springframework.org/schema/context
       http://www.springframework.org/schema/context/spring-context.xsd
">
    <!--开启包扫描-->
    <context:component-scan base-package="com.augus"></context:component-scan>

    <!--读取配置文件-->
    <context:property-placeholder location="classpath:jdbc.properties"></context:property-placeholder>

    <!--配置德鲁伊连接池-->
    <bean id="druidDataSource" class="com.alibaba.druid.pool.DruidDataSource">
        <property name="username" value="${jdbc_username}"></property>
        <property name="password" value="${jdbc_password}"></property>
        <property name="url" value="${jdbc_url}"></property>
        <property name="driverClassName" value="${jdbc_driver}"></property>
    </bean>

    <!--配置JDBCTemplate,并向里面注入druidDataSource-->
    <bean id="jdbcTemplate" class="org.springframework.jdbc.core.JdbcTemplate">
        <!--通过set方法注入连接池-->
        <property name="dataSource" ref="druidDataSource"></property>
    </bean>
</beans>
5.准备步骤一中创建的表所对应的实体类
package com.augus.pojo;

import lombok.AllArgsConstructor;
import lombok.Data;
import lombok.NoArgsConstructor;

import java.io.Serializable;

@AllArgsConstructor
@NoArgsConstructor
@Data
public class Account implements Serializable {
    private Integer uid;
    private String name;
    private Double balance;
}
6.准备dao层接口和实现类
package com.augus.dao;

public interface AccountDao {
    //转账
    int transfer(int id, Double money);
}
package com.augus.dao.impl;

import com.augus.dao.AccountDao;
import org.springframework.beans.factory.annotation.Autowired;
import org.springframework.jdbc.core.JdbcTemplate;
import org.springframework.stereotype.Repository;

@Repository
public class AccountDaoImpl implements AccountDao {
    @Autowired
    private JdbcTemplate jdbcTemplate;

    @Override
    public int transfer(int id, Double money) {
        String sql = "update account set balance = balance + ? where uid =?";
        return jdbcTemplate.update(sql,money,id);
    }
}
7.准备service层接口和实现类
package com.augus.service;

public interface AccountService {
    //转账
    int transfer(int from, int to, Double money);
}
package com.augus.service.impl;

import com.augus.dao.AccountDao;
import com.augus.service.AccountService;
import org.springframework.beans.factory.annotation.Autowired;
import org.springframework.stereotype.Service;

@Service
public class AccountServiceImpl implements AccountService {

    @Autowired
    private AccountDao accountDao;

    @Override
    public int transfer(int from, int to, Double money) {
        //统计执行的次数
        int rows = 0;

        //将dao层的方法调用两次,一个加一个减少
        rows += accountDao.transfer(from, -money); //这里是减少的意思
        rows += accountDao.transfer(to,money);
        return rows;
    }
}
8.测试代码
import com.augus.service.AccountService;
import org.junit.Test;
import org.springframework.context.support.ClassPathXmlApplicationContext;

public class Test1 {
    @Test
    public void testTransaction(){
        ClassPathXmlApplicationContext context = new ClassPathXmlApplicationContext("applicationContext.xml");
        //获取对象
        AccountService accountService = context.getBean(AccountService.class);
        //调用方法
        int rs = accountService.transfer(1, 2, 500.0);
        System.out.println(rs);
    }

}
三、声明式事务管理( 基于注解方式实现 )
1.注解方式实现事务控制需要在applicationContext.xml配置
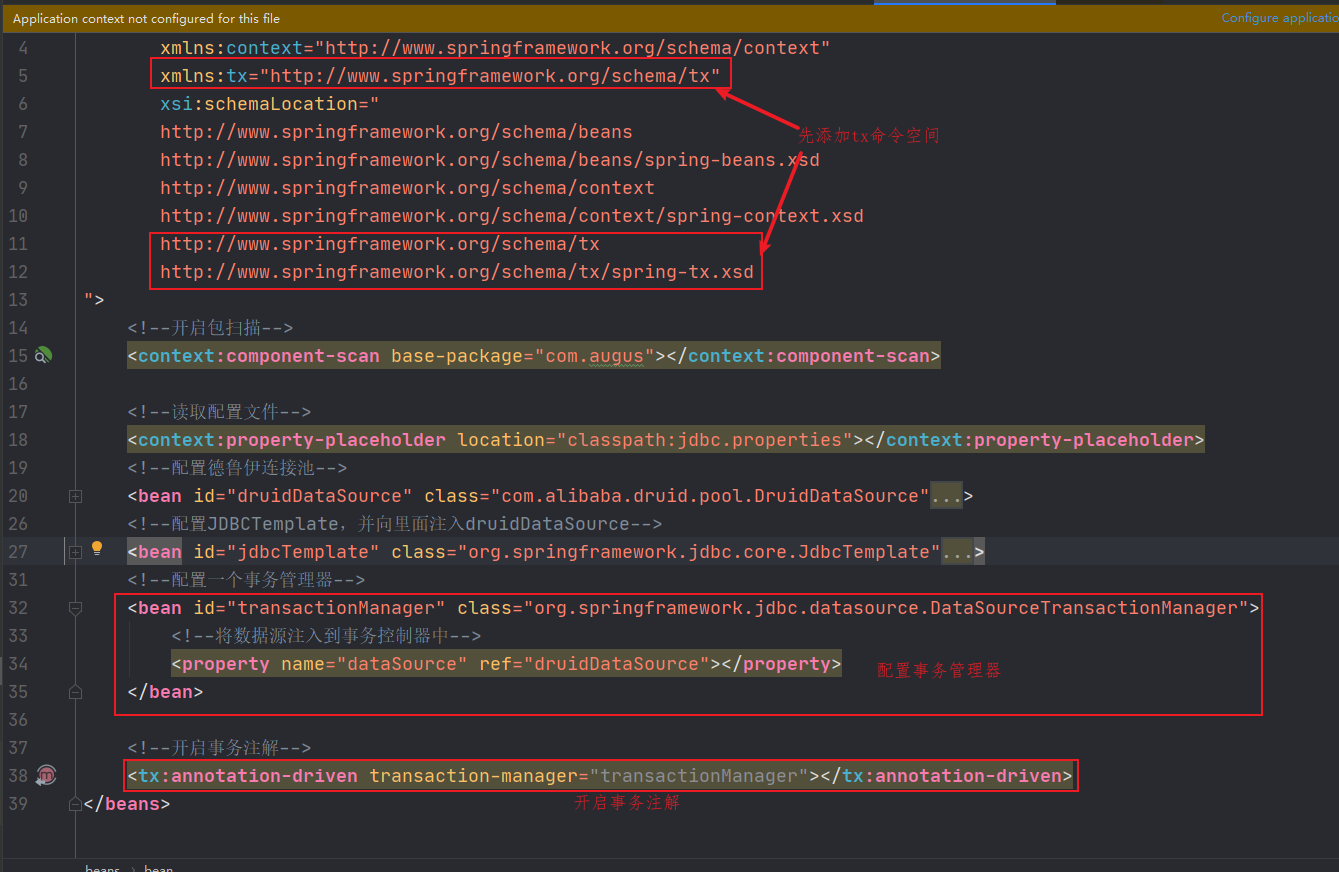
<?xml version="1.0" encoding="UTF-8"?>
<beans xmlns="http://www.springframework.org/schema/beans"
       xmlns:xsi="http://www.w3.org/2001/XMLSchema-instance"
       xmlns:context="http://www.springframework.org/schema/context"
       xmlns:tx="http://www.springframework.org/schema/tx"
       xsi:schemaLocation="
       http://www.springframework.org/schema/beans
       http://www.springframework.org/schema/beans/spring-beans.xsd

       http://www.springframework.org/schema/context
       http://www.springframework.org/schema/context/spring-context.xsd

       http://www.springframework.org/schema/tx
       http://www.springframework.org/schema/tx/spring-tx.xsd
">
    <!--开启包扫描-->
    <context:component-scan base-package="com.augus"></context:component-scan>

    <!--读取配置文件-->
    <context:property-placeholder location="classpath:jdbc.properties"></context:property-placeholder>

    <!--配置德鲁伊连接池-->
    <bean id="druidDataSource" class="com.alibaba.druid.pool.DruidDataSource">
        <property name="username" value="${jdbc_username}"></property>
        <property name="password" value="${jdbc_password}"></property>
        <property name="url" value="${jdbc_url}"></property>
        <property name="driverClassName" value="${jdbc_driver}"></property>
    </bean>

    <!--配置JDBCTemplate,并向里面注入druidDataSource-->
    <bean id="jdbcTemplate" class="org.springframework.jdbc.core.JdbcTemplate">
        <!--通过set方法注入连接池-->
        <property name="dataSource" ref="druidDataSource"></property>
    </bean>

    <!--配置一个事务管理器-->
    <bean id="transactionManager" class="org.springframework.jdbc.datasource.DataSourceTransactionManager">
        <!--将数据源注入到事务控制器中-->
        <property name="dataSource" ref="druidDataSource"></property>
    </bean>

    <!--开启事务注解-->
    <tx:annotation-driven transaction-manager="transactionManager"></tx:annotation-driven>
</beans>
2.在Service层中添加事务的注解
package com.augus.service.impl;

import com.augus.dao.AccountDao;
import com.augus.service.AccountService;
import org.springframework.beans.factory.annotation.Autowired;
import org.springframework.stereotype.Service;
import org.springframework.transaction.annotation.Transactional;

@Service
//@Transactional //放在类中,会对该类中的所有方法都添加事务控制
public class AccountServiceImpl implements AccountService {

    @Autowired
    private AccountDao accountDao;

    @Override
    @Transactional //放在方法上,表示仅仅对当前方法增加了事务控制
    public int transfer(int from, int to, Double money) {
        //统计执行的次数
        int rows = 0;

        //将dao层的方法调用两次,一个加一个减少
        rows += accountDao.transfer(from, -money); //这里是减少的意思
        //模拟产生异常,这里发生异常,如果没有事务就会出现一个转走了,另一个没收到钱
        int i = 1/0;
        rows += accountDao.transfer(to,money);
        return rows;
    }
}
3.测试代码
还是之前环境准备的测试代码。但是执行会发现,加上事务控制后。如果再有异常,就会回滚事务
import com.augus.service.AccountService;
import org.junit.Test;
import org.springframework.context.support.ClassPathXmlApplicationContext;

public class Test1 {
    @Test
    public void testTransaction(){
        ClassPathXmlApplicationContext context = new ClassPathXmlApplicationContext("applicationContext.xml");
        //获取对象
        AccountService accountService = context.getBean(AccountService.class);
        //调用方法
        int rs = accountService.transfer(1, 2, 500.0);
        System.out.println(rs);
    }

}
四、声明式事务管理( 基于xml方式实现 )
1.applicationContext中,通过AOP实现事务的控制
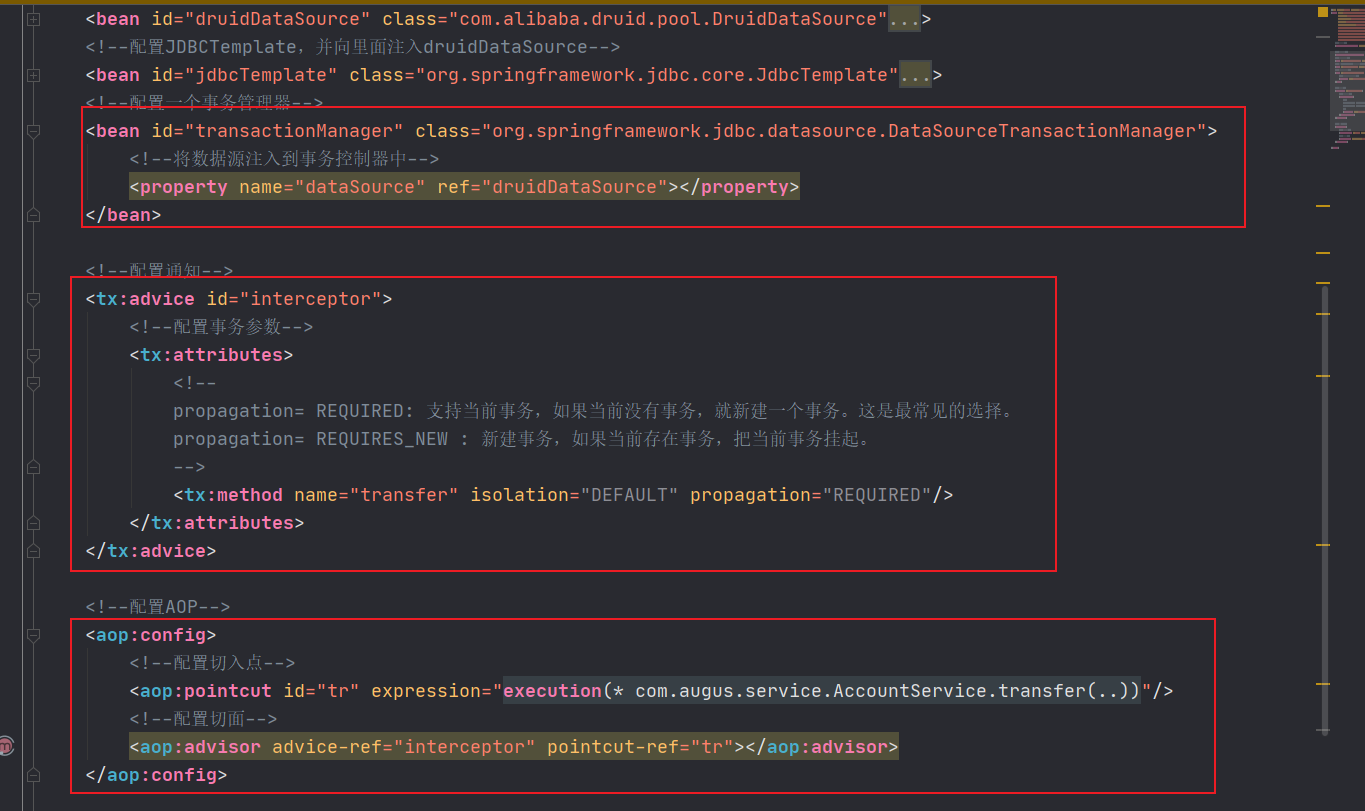
<?xml version="1.0" encoding="UTF-8"?>
<beans xmlns="http://www.springframework.org/schema/beans"
       xmlns:xsi="http://www.w3.org/2001/XMLSchema-instance"
       xmlns:context="http://www.springframework.org/schema/context"
       xmlns:tx="http://www.springframework.org/schema/tx" xmlns:aop="http://www.springframework.org/schema/aop"
       xsi:schemaLocation="http://www.springframework.org/schema/beans
       http://www.springframework.org/schema/beans/spring-beans.xsd
       http://www.springframework.org/schema/context
       http://www.springframework.org/schema/context/spring-context.xsd
       http://www.springframework.org/schema/tx
       http://www.springframework.org/schema/tx/spring-tx.xsd http://www.springframework.org/schema/aop https://www.springframework.org/schema/aop/spring-aop.xsd">
    <!--开启包扫描-->
    <context:component-scan base-package="com.augus"></context:component-scan>

    <!--读取配置文件-->
    <context:property-placeholder location="classpath:jdbc.properties"></context:property-placeholder>
    <!--配置德鲁伊连接池-->
    <bean id="druidDataSource" class="com.alibaba.druid.pool.DruidDataSource">
        <property name="username" value="${jdbc_username}"></property>
        <property name="password" value="${jdbc_password}"></property>
        <property name="url" value="${jdbc_url}"></property>
        <property name="driverClassName" value="${jdbc_driver}"></property>
    </bean>
    <!--配置JDBCTemplate,并向里面注入druidDataSource-->
    <bean id="jdbcTemplate" class="org.springframework.jdbc.core.JdbcTemplate">
        <!--通过set方法注入连接池-->
        <property name="dataSource" ref="druidDataSource"></property>
    </bean>
    <!--配置一个事务管理器-->
    <bean id="transactionManager" class="org.springframework.jdbc.datasource.DataSourceTransactionManager">
        <!--将数据源注入到事务控制器中-->
        <property name="dataSource" ref="druidDataSource"></property>
    </bean>

    <!--配置通知-->
    <tx:advice id="interceptor">
        <!--配置事务参数-->
        <tx:attributes>
            <!--
            propagation= REQUIRED: 支持当前事务,如果当前没有事务,就新建一个事务。这是最常见的选择。
            propagation= REQUIRES_NEW : 新建事务,如果当前存在事务,把当前事务挂起。
            -->
            <tx:method name="transfer" isolation="DEFAULT" propagation="REQUIRED"/>
        </tx:attributes>
    </tx:advice>

    <!--配置AOP-->
    <aop:config>
        <!--配置切入点-->
        <aop:pointcut id="tr" expression="execution(* com.augus.service.AccountService.transfer(..))"/>
        <!--配置切面-->
        <aop:advisor advice-ref="interceptor" pointcut-ref="tr"></aop:advisor>
    </aop:config>

</beans>
2.service层实现类
上面xml方式配置后,service层中实现类就不需要@Transactional注解
package com.augus.service.impl;

import com.augus.dao.AccountDao;
import com.augus.service.AccountService;
import org.springframework.beans.factory.annotation.Autowired;
import org.springframework.stereotype.Service;

@Service
public class AccountServiceImpl implements AccountService {

    @Autowired
    private AccountDao accountDao;

    @Override
    public int transfer(int from, int to, Double money) {
        //统计执行的次数
        int rows = 0;

        //将dao层的方法调用两次,一个加一个减少
        rows += accountDao.transfer(from, -money); //这里是减少的意思
        //模拟产生异常,这里发生异常,如果没有事务就会出现一个转走了,另一个没收到钱
        int i = 1/0;
        rows += accountDao.transfer(to,money);
        return rows;
    }
}
3.测试代码
跟之间一样没有改动,只需要测试,有异常是否会回滚
import com.augus.service.AccountService;
import org.junit.Test;
import org.springframework.context.support.ClassPathXmlApplicationContext;

public class Test1 {
    @Test
    public void testTransaction(){
        ClassPathXmlApplicationContext context = new ClassPathXmlApplicationContext("applicationContext.xml");
        //获取对象
        AccountService accountService = context.getBean(AccountService.class);
        //调用方法
        int rs = accountService.transfer(1, 2, 500.0);
        System.out.println(rs);
    }

}
五、零xml实现事务控制(使用配置类实现事务控制)
1.创建配置类
package com.augus.config;

import com.alibaba.druid.pool.DruidDataSource;
import org.springframework.beans.factory.annotation.Value;
import org.springframework.context.annotation.Bean;
import org.springframework.context.annotation.ComponentScan;
import org.springframework.context.annotation.Configuration;
import org.springframework.context.annotation.PropertySource;
import org.springframework.jdbc.core.JdbcTemplate;
import org.springframework.jdbc.datasource.DataSourceTransactionManager;
import org.springframework.transaction.PlatformTransactionManager;
import org.springframework.transaction.annotation.EnableTransactionManagement;

import javax.sql.DataSource;

@Configuration //配置类标志注解
@ComponentScan(basePackages = "com.augus") //开启spring包扫描
@PropertySource("classpath:jdbc.properties") //读取属性配置文件
@EnableTransactionManagement //开启事务注解
public class SpringConfig {

    //将读取回来赋值给属性
    @Value("${jdbc_driver}")
    private String driver;
    @Value("${jdbc_url}")
    private String url;
    @Value("${jdbc_username}")
    private String username;
    @Value("${jdbc_password}")
    private String password;

    /*创建数据库连接池*/
    @Bean
    public DruidDataSource getDruidDataSource(){
        //创建连接对象
        DruidDataSource druidDataSource = new DruidDataSource();
        //设置属性
        druidDataSource.setDriverClassName(driver);
        druidDataSource.setUrl(url);
        druidDataSource.setUsername(username);
        druidDataSource.setPassword(password);
        return druidDataSource;
    }

    //创建JdbcTemplate对象
    @Bean
    public JdbcTemplate getJdbcTemplate(DataSource dataSource){
        JdbcTemplate jdbcTemplate = new JdbcTemplate();
        //设置数据连接池
        jdbcTemplate.setDataSource(dataSource);
        return jdbcTemplate;
    }

    //创建事务管理器
    @Bean
    public PlatformTransactionManager getPlatformTransactionManager(DataSource dataSource){
        DataSourceTransactionManager dataSourceTransactionManager = new DataSourceTransactionManager();
        //设置连接池
        dataSourceTransactionManager.setDataSource(dataSource);
        return dataSourceTransactionManager;
    }
}
2.service层实现类添加事务注解
package com.augus.service.impl;

import com.augus.dao.AccountDao;
import com.augus.service.AccountService;
import org.springframework.beans.factory.annotation.Autowired;
import org.springframework.stereotype.Service;
import org.springframework.transaction.annotation.Transactional;

@Service
public class AccountServiceImpl implements AccountService {

    @Autowired
    private AccountDao accountDao;

    @Override
    @Transactional //对该方法开启事务
    public int transfer(int from, int to, Double money) {
        //统计执行的次数
        int rows = 0;

        //将dao层的方法调用两次,一个加一个减少
        rows += accountDao.transfer(from, -money); //这里是减少的意思
        //模拟产生异常,这里发生异常,如果没有事务就会出现一个转走了,另一个没收到钱
        int i = 1/0;
        rows += accountDao.transfer(to,money);
        return rows;
    }
}
3.测试代码
import com.augus.config.SpringConfig;
import com.augus.service.AccountService;
import org.junit.Test;
import org.springframework.context.annotation.AnnotationConfigApplicationContext;

public class Test2 {
    @Test
    public void testTransaction(){
        AnnotationConfigApplicationContext context = new AnnotationConfigApplicationContext(SpringConfig.class);
        //获取对象
        AccountService accountService = context.getBean(AccountService.class);
        //调用方法
        int rs = accountService.transfer(1, 2, 500.0);
        System.out.println(rs);
    }

}

 浙公网安备 33010602011771号