一 原理:
主动降噪就是通过反相检测麦克风的声音或噪声来减弱周围环境的噪声让扬声器出来的声音听起来更清晰。主动降噪技术的目标就是通过一个自适应滤波器把不想要的噪声反相从而把噪声约束到固定的范围内。该系统必须要把扬声器到麦克风的二阶误差考虑进去。主动降噪用到的主要原理是:FxLMS(过滤的最小均方差滤波器)。这个算法的会让输入到滤波器的错误信号急速锐减,从而达到降噪的目的。这个错误信号在期望值和FxLMS滤波器输出值之间是有差异的。
我们可以看一下这个算法的模型:
输入参数:
- 参考输入: 就是要消除的噪声
- 错误输入:降噪引入的噪声加扬声器的输出声音
- 适配开关
- 参考滤波输入:二级路径的参考滤波信号,所谓的二级路径就是FxLMS滤波器输出值反馈到FxLMS滤波器的错误输入。
模型的输出:
- 降噪后的结果
可调参数:
- 自适应滤波器长度
- 自适应步长
- 泄漏因子
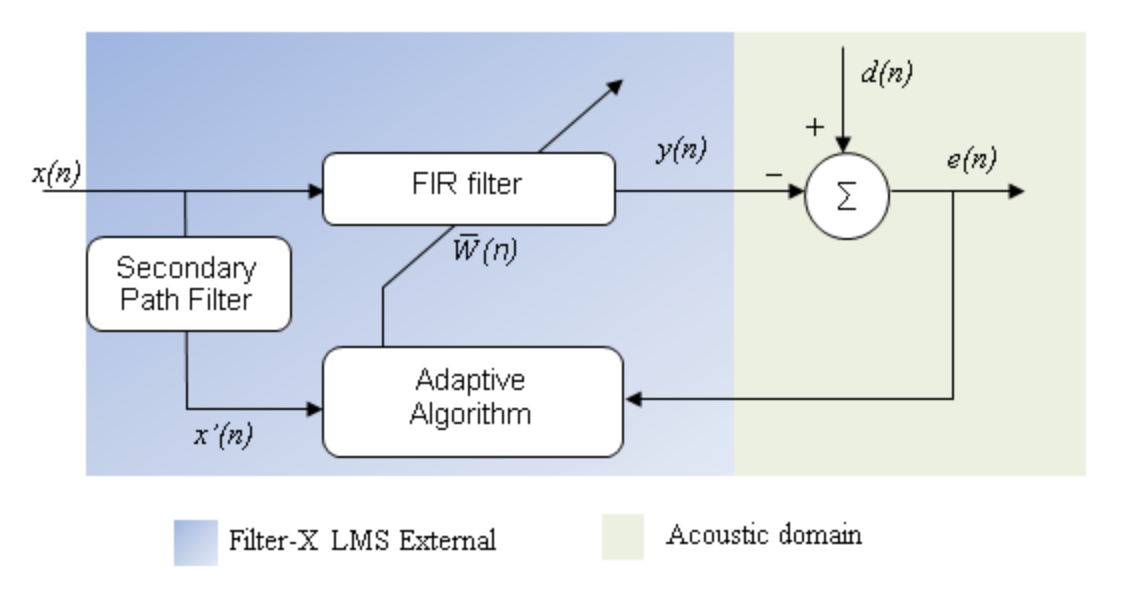
下面的这个图应该能够很好的诠释了这个流程:

输出y(n) 和输入x(n)之间有个适量因子W,W的参数是通过下面公式计算出来的:
W = (1- alpha * Leakage)* W + alpha * error(n) * XFilterd/ energy
这里的因子的含义:
* XFilterd:滤波后的参数输入矢量
* alpha:步长参数
* Leakage:泄漏因子
* error(n): 本帧的错误采样
* energy:滤波后的参考矢量的平方值
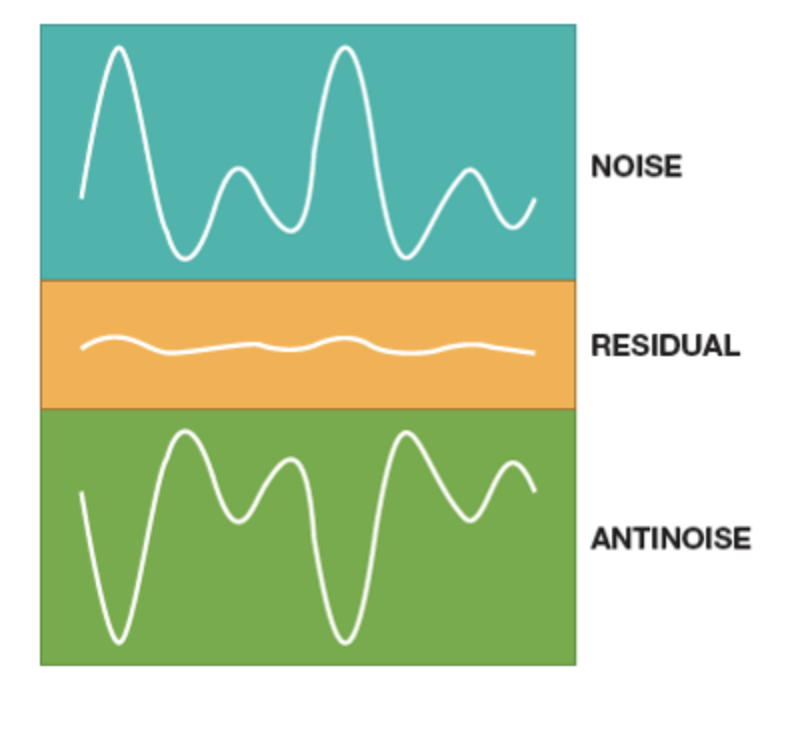
下图是经过LxLMS滤波器后的效果图:第一个是输入噪声,第三个为反相信号,中间的为滤波器的输出信号。

二 仿真:
为了清晰的展现主动降噪的原理,我找到了一份matlab代码,这份代码能够很清晰的说明ANC的效果和作用。及实现原理:代码比较简单,我就不一一赘述了。有兴趣的朋友可以运行一下试试。尝试改一下参数,就知道效果了。
这里使用滤波器长度为44ms的,步长为0.0001的信号来仿真这些信号统计。
下面是源码:
 1 % FIR Filter to be used to model primary propagation path
 2 primaryPathGenerator = dsp.FIRFilter('Numerator',primaryPathCoeffs.');
 3
 4 % Filtered-X LMS adaptive filter to control the noise
 5 L = 350;
 6 muW = 0.0001;
 7 noiseController = dsp.FilteredXLMSFilter('Length',L,'StepSize',muW, ...
 8     'SecondaryPathCoefficients',SecondaryPathCoeffsEst);
 9
10 % Sine wave generator to synthetically create the noise
11 A = [.01 .01 .02 .2 .3 .4 .3 .2 .1 .07 .02 .01];
12 La = length(A);
13 F0 = 60;
14 k = 1:La;
15 F = F0*k;
16 phase = rand(1,La); % Random initial phase
17 sine = audioOscillator('NumTones', La, 'Amplitude',A,'Frequency',F, ...
18     'PhaseOffset',phase,'SamplesPerFrame',512,'SampleRate',Fs);
19
20 % Audio player to play noise before and after cancellation
21 player = audioDeviceWriter('SampleRate',Fs);
22
23 % Spectrum analyzer to show original and attenuated noise
24 scope = dsp.SpectrumAnalyzer('SampleRate',Fs,'OverlapPercent',80, ...
25     'SpectralAverages',20,'PlotAsTwoSidedSpectrum',false, ...
26     'ShowLegend',true, ...
27     'ChannelNames', {'Original noisy signal', 'Attenuated noise'});
28 for m = 1:400
29     % Generate synthetic noise by adding sine waves with random phase
30     x = sine();
31     d = primaryPathGenerator(x) + ...  % Propagate noise through primary path
32         0.1*randn(size(x)); % Add measurement noise
33     if m <= 200
34         % No noise control for first 200 iterations
35         e = d;
36     else
37         % Enable active noise control after 200 iterations
38         xhat = x + 0.1*randn(size(x));
39         [y,e] = noiseController(xhat,d);
40     end
41     player(e);     % Play noise signal
42     scope([d,e]); % Show spectrum of original (Channel 1)
43                      % and attenuated noise (Channel 2)
44 end
45 release(player); % Release audio device
46 release(scope); % Release spectrum analyzer
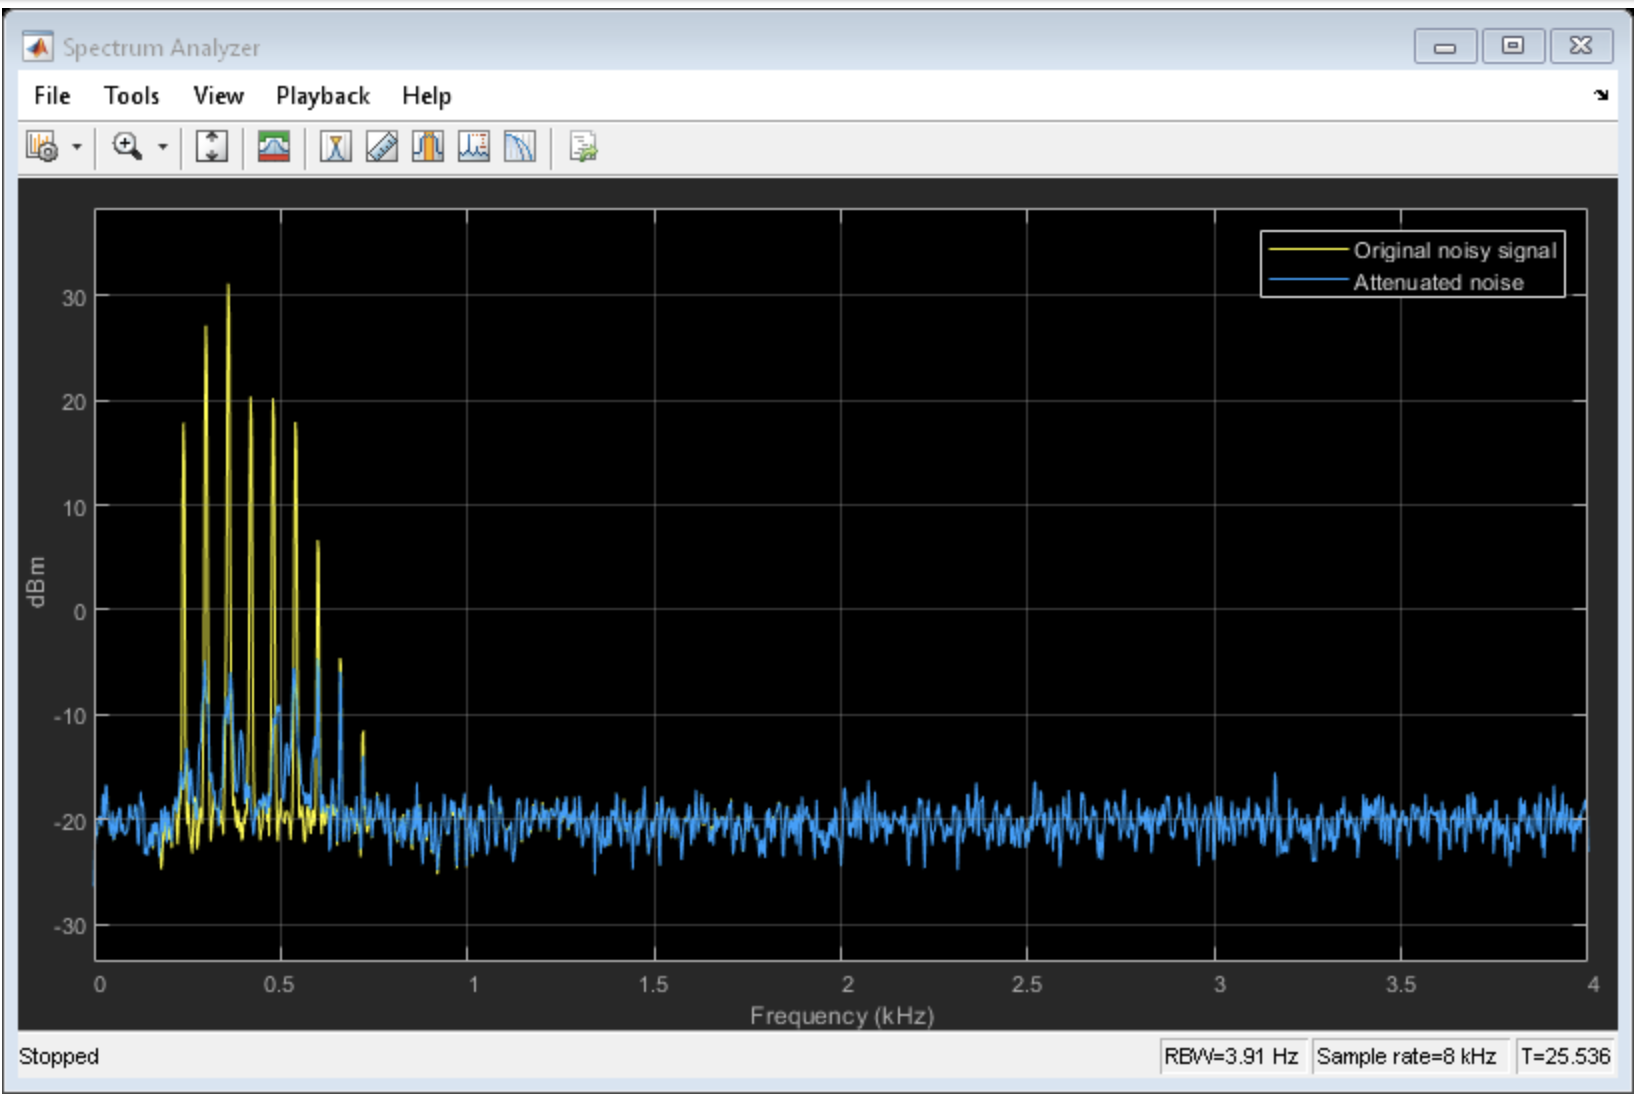
为了区分这种差别,在前200个迭代因子里面不加主动降噪。从参考麦克风里面获取噪声,这些噪声就是典型的机器轰鸣声。
一旦算法开启,仿真里面使用的是5s的算法稳定时间。通过在频域里比较残余误差信号和原始信号的差别,可以看出大多数周期性的信号都已经大面积的衰减了。从下图中可以看出,在不同的频率上,降噪性能的表现是不同的。这就是现实世界中所说的主动降噪技术。

三 参考信息
1 wiki详细的解释了原理:https://en.wikipedia.org/wiki/Active_noise_control
3 概念流程:https://wiki.analog.com/resources/tools-software/sigmastudio/toolbox/filters/filterednlmsfilter


 浙公网安备 33010602011771号