

注解 @Component及@Controller等,@Autowired,@Resource
注解:
对于 DI 使用注解,将不再需要在 Spring 配置文件中声明 bean 实例。Spring 中使用注解, 需要在原有 Spring 运行环境基础上再做一些改变。 需要在 Spring 配置文件中配置组件扫描器,用于在指定的基本包中扫描注解。
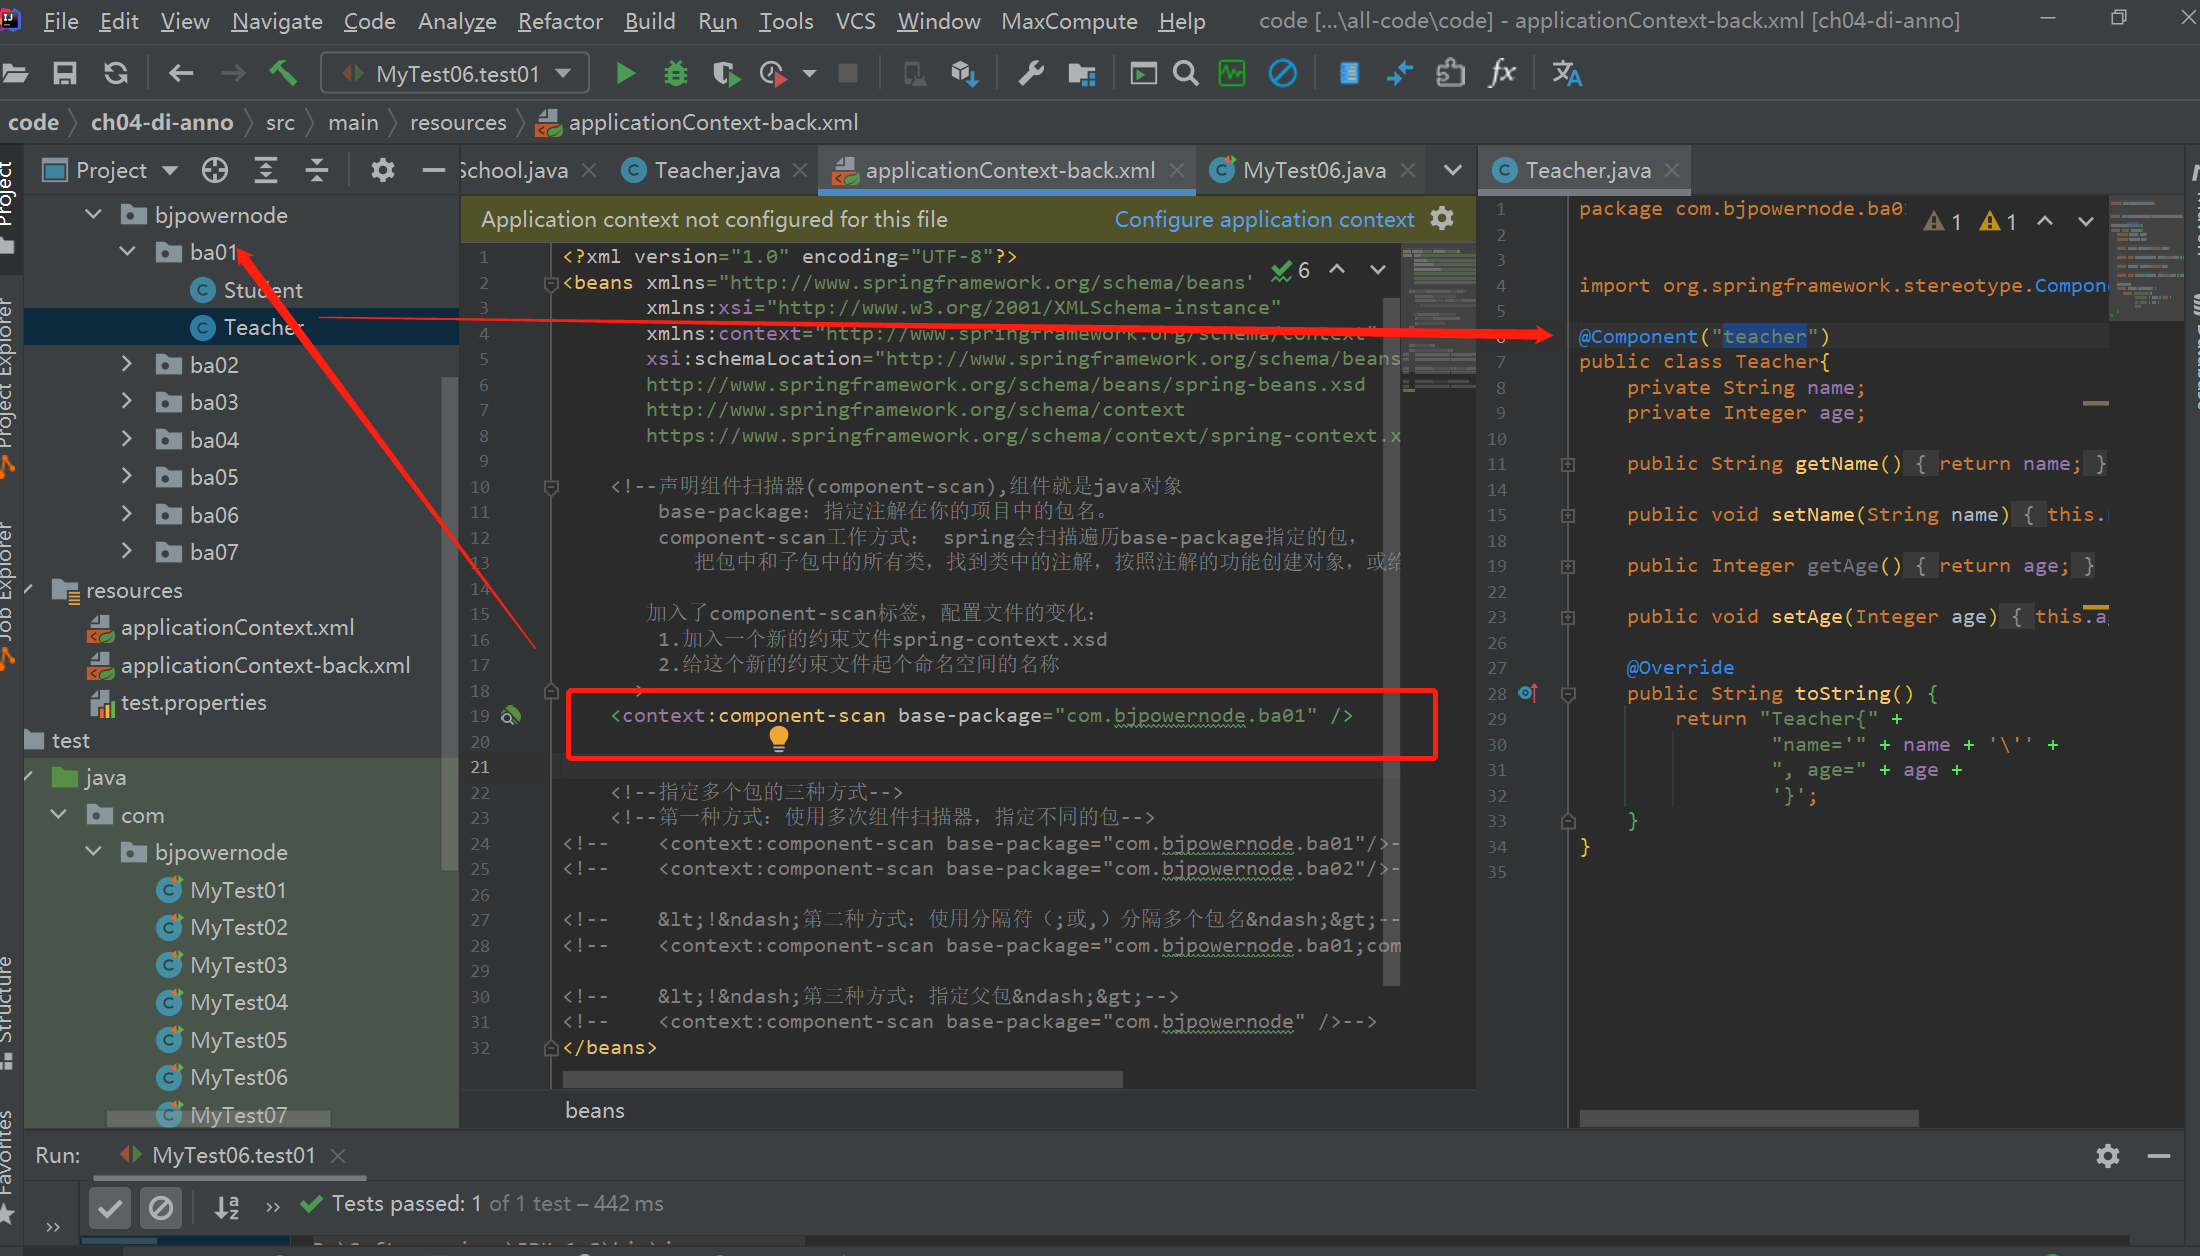
    <!--声明组件扫描器(component-scan),组件就是java对象
        base-package:指定注解在你的项目中的包名。
        component-scan工作方式: spring会扫描遍历base-package指定的包,
           把包中和子包中的所有类,找到类中的注解,按照注解的功能创建对象,或给属性赋值。

       加入了component-scan标签,配置文件的变化:
        1.加入一个新的约束文件spring-context.xsd
        2.给这个新的约束文件起个命名空间的名称
    -->
测试类如下:
package com.bjpowernode;
import com.bjpowernode.ba01.Student;
import com.bjpowernode.ba01.Teacher;
import org.junit.Test;
import org.springframework.context.ApplicationContext;
import org.springframework.context.support.ClassPathXmlApplicationContext;
public class MyTest01 {
@Test
public void test01(){
String config="applicationContext-back.xml";
ApplicationContext ctx = new ClassPathXmlApplicationContext(config);
//从容器中获取对象
Student student = (Student) ctx.getBean("myStudent");
System.out.println("student="+student);
}
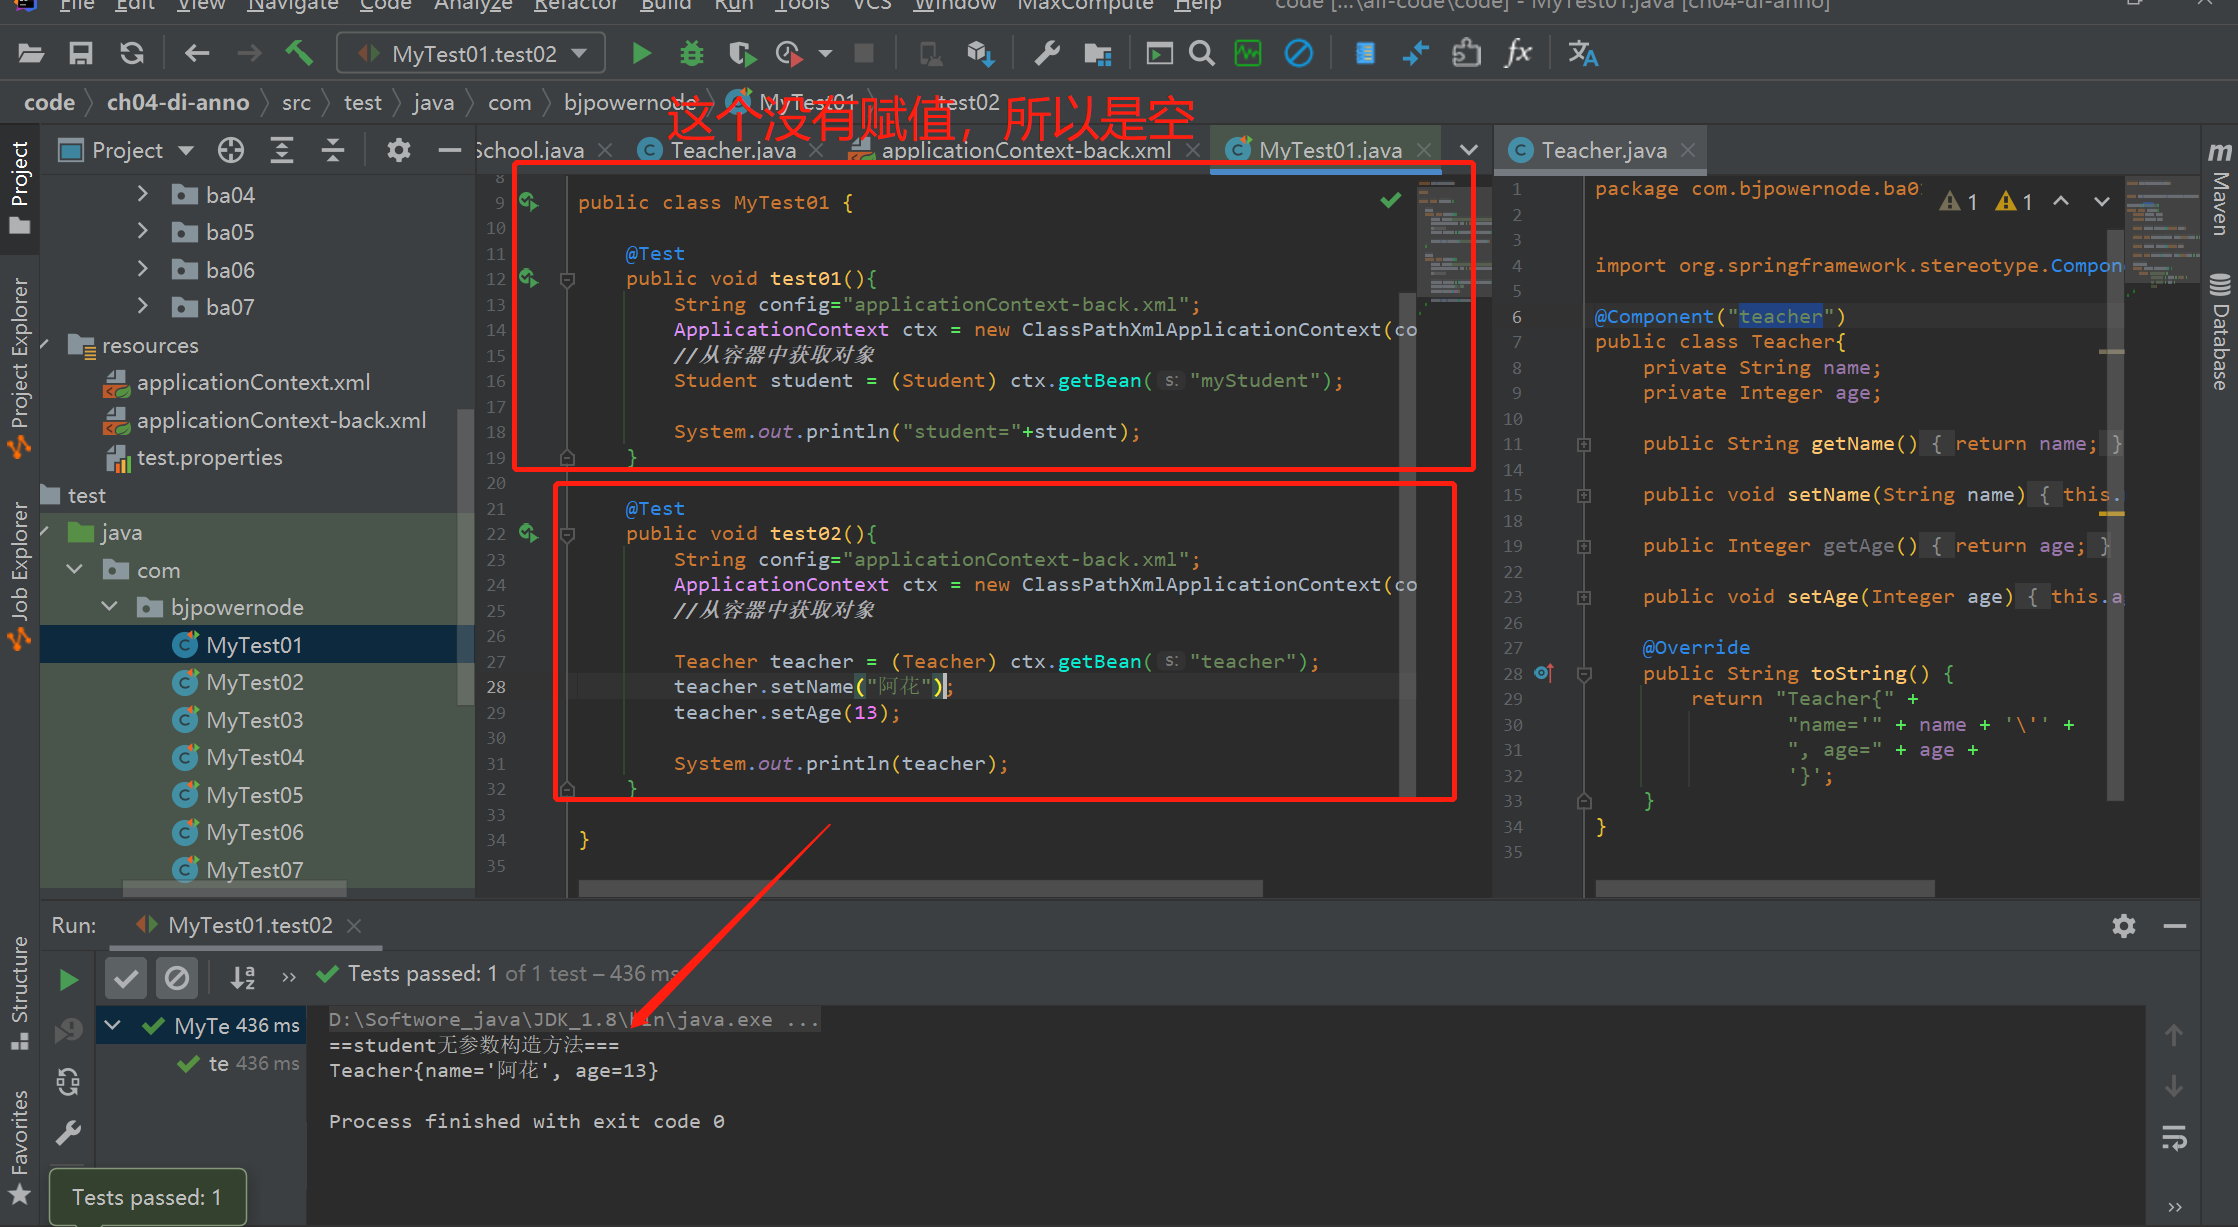
@Test
public void test02(){
String config="applicationContext-back.xml";
ApplicationContext ctx = new ClassPathXmlApplicationContext(config);
//从容器中获取对象
Teacher teacher = (Teacher) ctx.getBean("teacher");
teacher.setName("阿花");
teacher.setAge(13);
System.out.println(teacher);
}
}
1. 注解的三种方式(不能同时用三种)
    指定多个包的三种方式
    第一种方式:使用多次组件扫描器,指定不同的包
    <context:component-scan base-package="com.bjpowernode.ba01"/>
    <context:component-scan base-package="com.bjpowernode.ba02"/>

    <!--第二种方式:使用分隔符(;或,)分隔多个包名-->
    <context:component-scan base-package="com.bjpowernode.ba01;com.bjpowernode.ba02" />

    <!--第三种方式:指定父包-->
    <context:component-scan base-package="com.bjpowernode" />
2. 定义 Bean 的注解@Component(掌握)
需要在类上使用注解@Component,该注解的 value 属性用于指定该 bean 的 id 值。 举例:di01
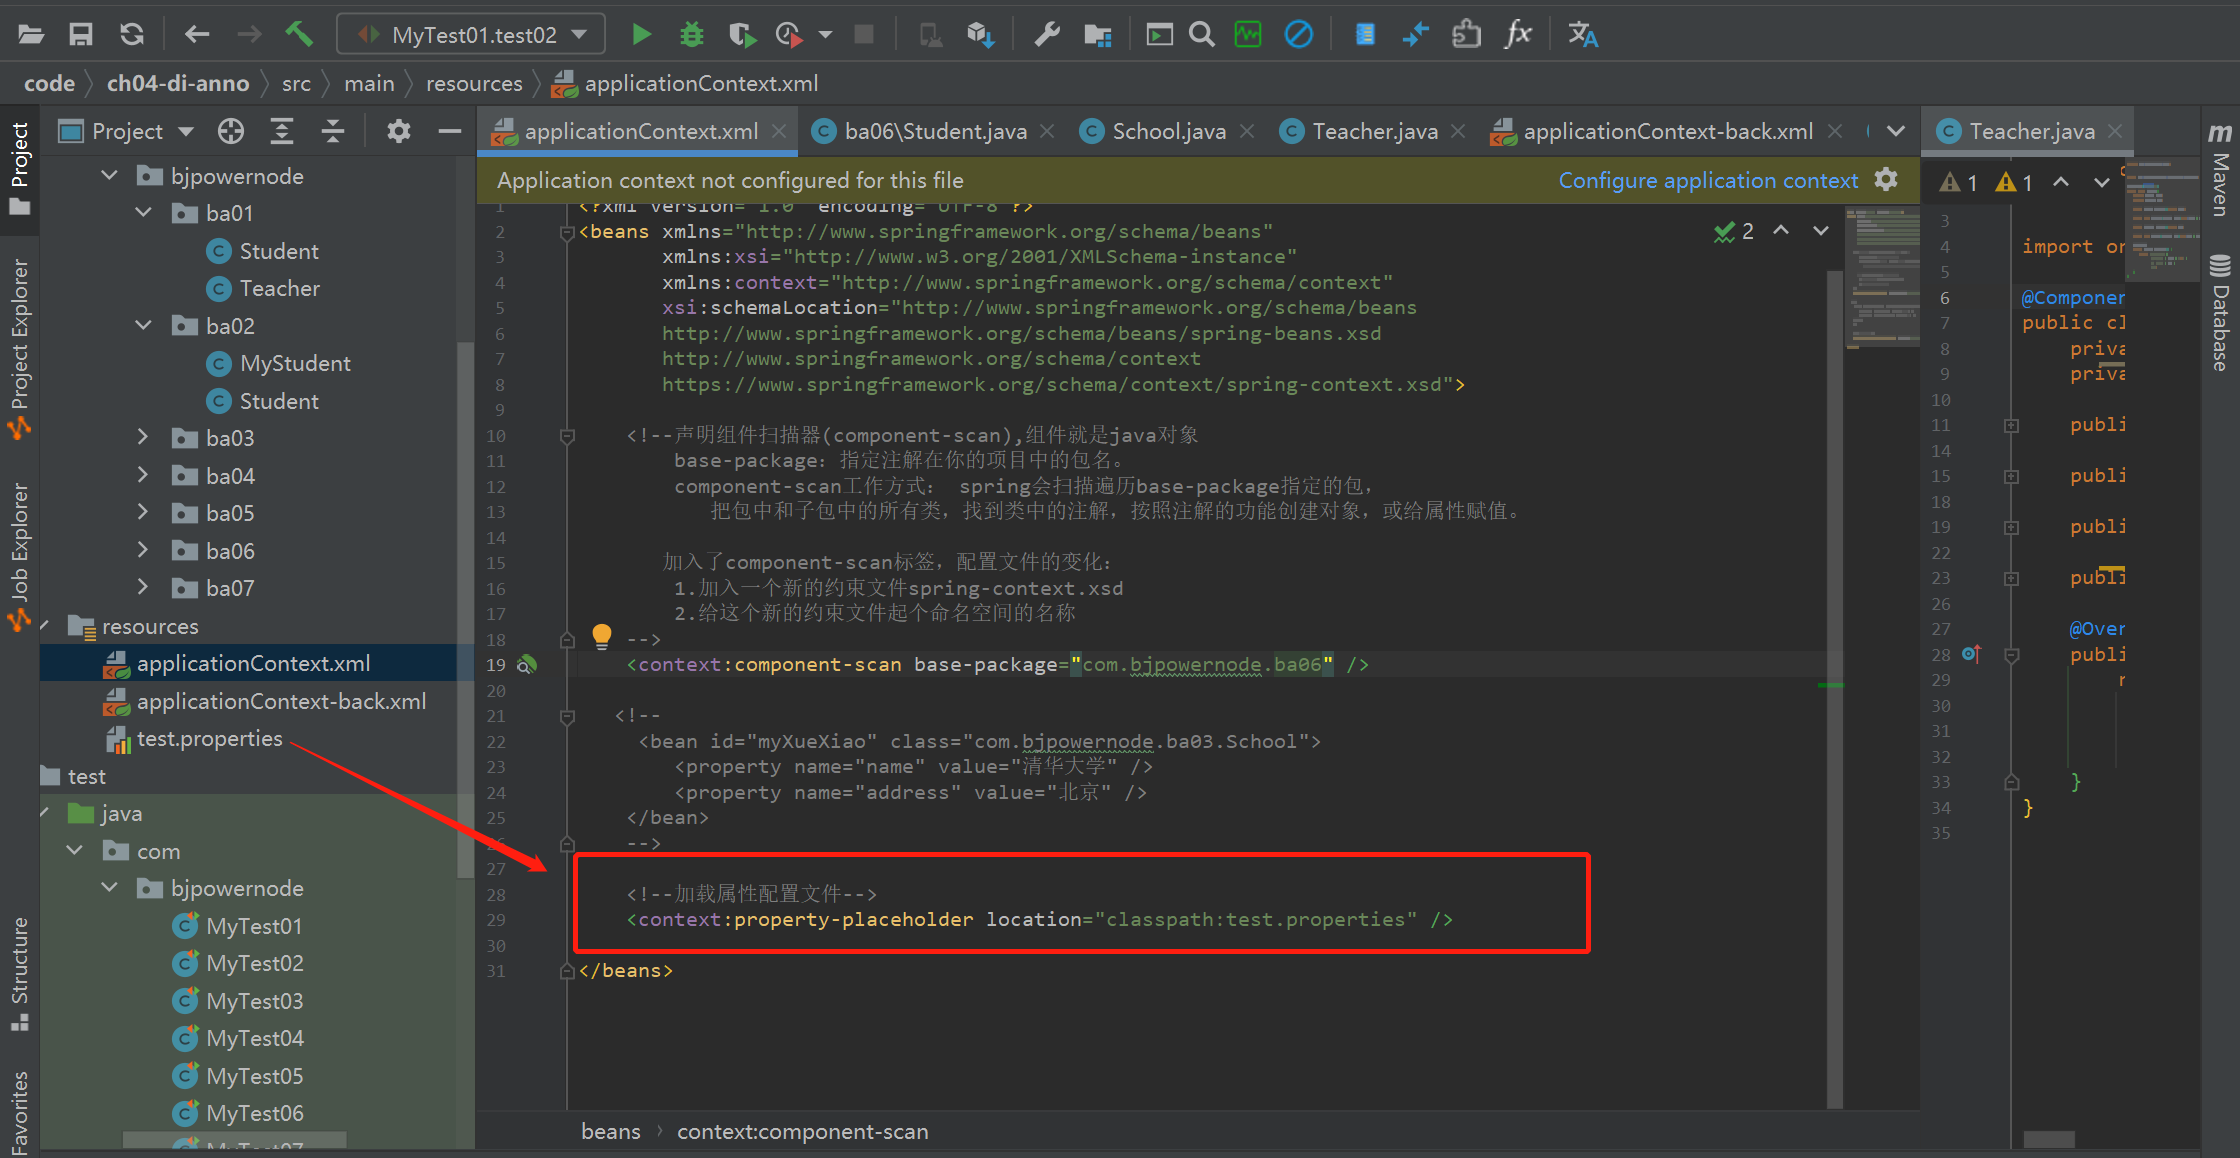
其中test.properties文件内容如下:

然后再applicationContext.xml中引入即可
另外,Spring 还提供了 3 个创建对象的注解:
➢ @Repository 用于对 DAO 实现类进行注解
➢ @Service 用于对 Service 实现类进行注解
➢ @Controller 用于对 Controller 实现类进行注解
这三个注解与
@Component 都可以创建对象,但这三个注解还有其他的含义,@Service 创建业务层对象,业务层对象可以加入事务功能,
@Controller 注解创建的对象可以作为处 理器接收用户的请求。 @Repository,
@Service,
@Controller 是对@Component 注解的细化,标注不同层的对 象。即持久层对象,业务层对象,控制层对象。 @Component 不指定 value 属性,bean 的 id 是类名的首字母小写。
3.byType 自动注入@Autowired(掌握)
需要在引用属性上使用注解@Autowired,该注解默认使用按类型自动装配 Bean 的方式。 使用该注解完成属性注入时,类中无需 setter。当然,若属性有 setter,则也可将其加 到 setter 上。
package com.bjpowernode.ba03;
import org.springframework.beans.factory.annotation.Autowired;
import org.springframework.beans.factory.annotation.Value;
import org.springframework.stereotype.Component;
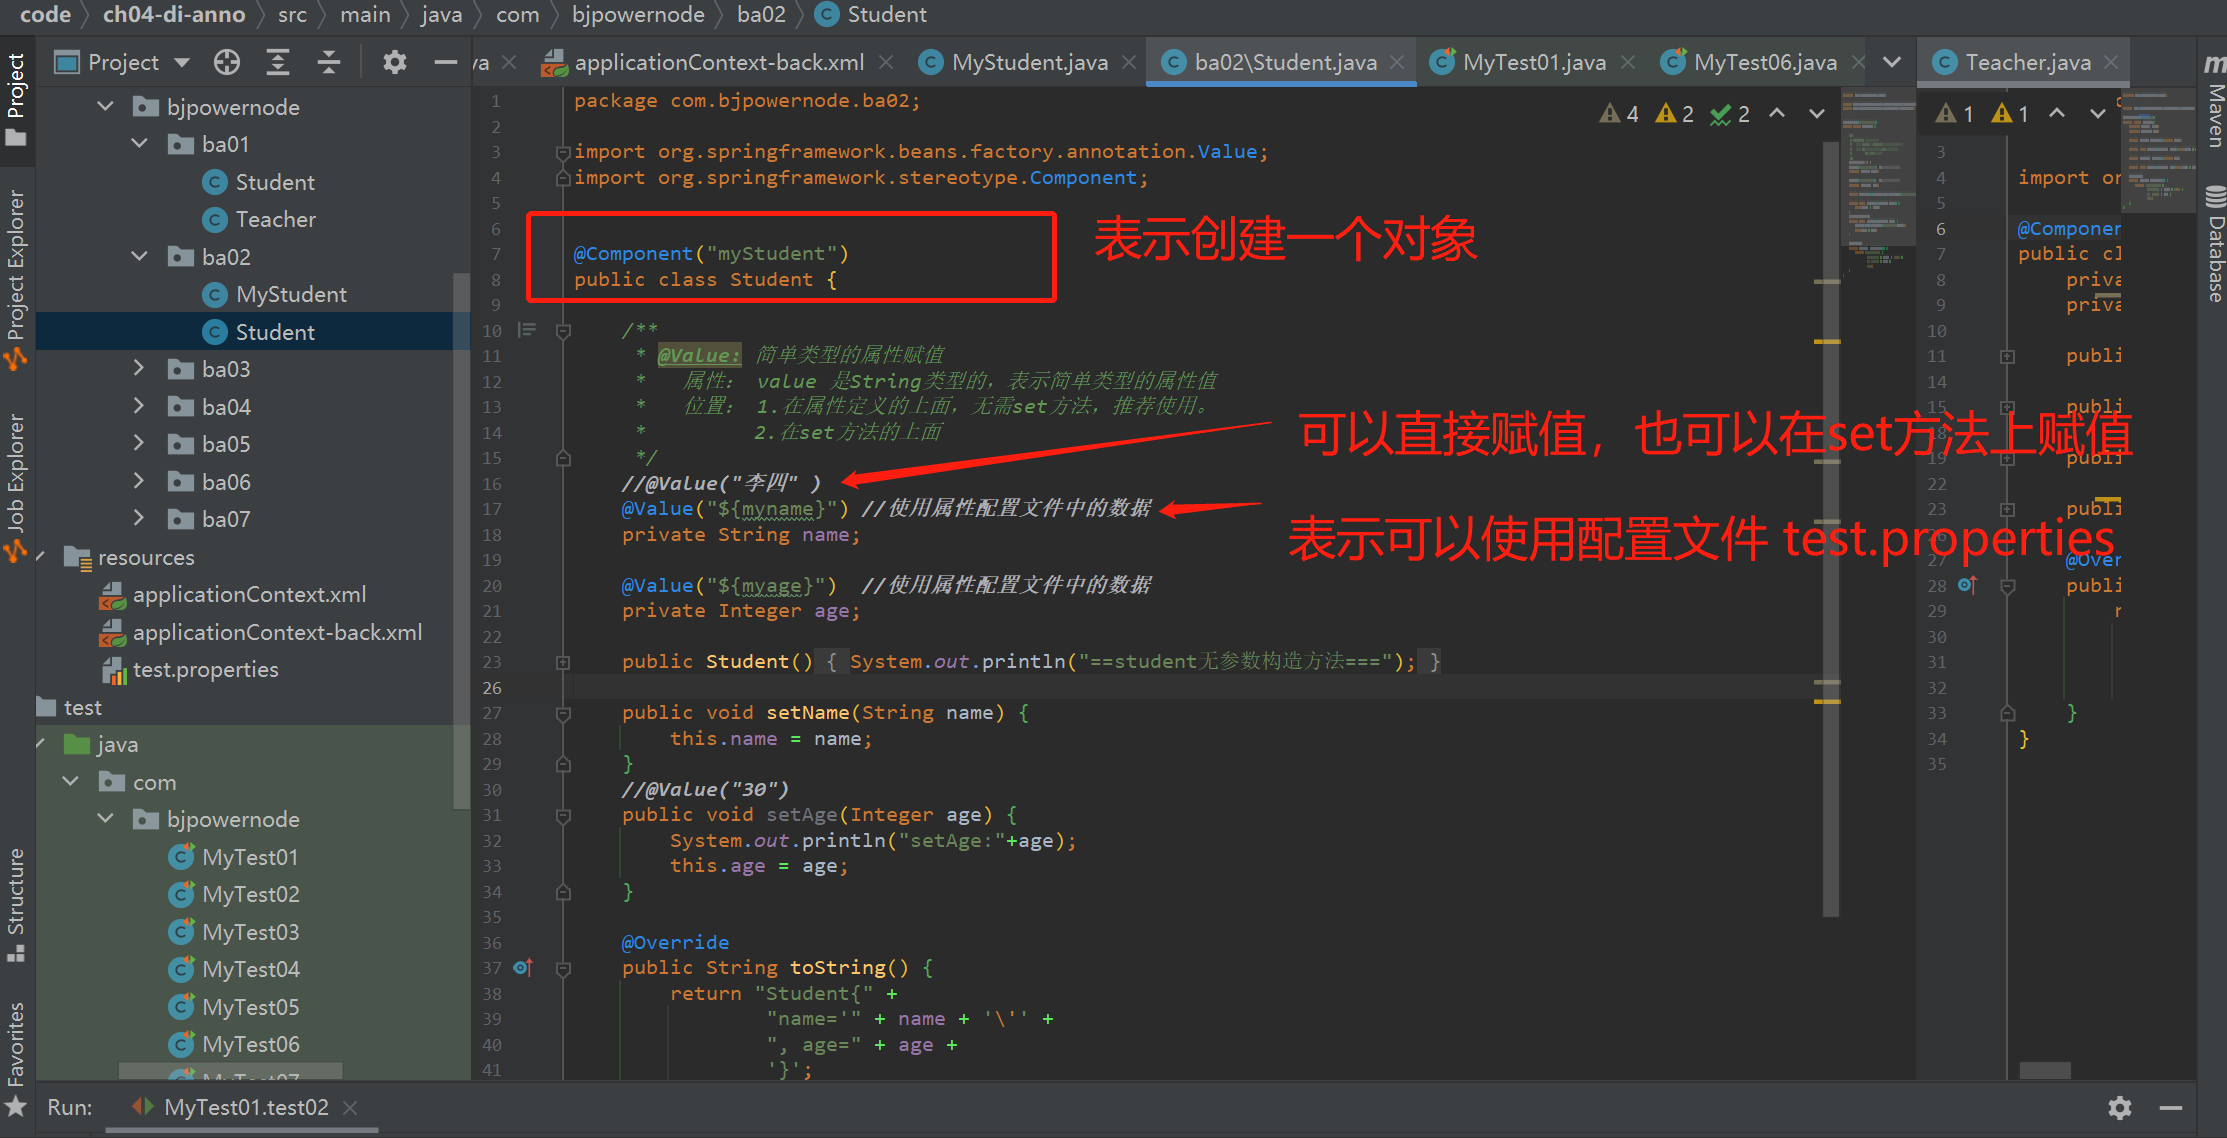
@Component("myStudent")
public class Student {
/**
* @Value: 简单类型的属性赋值
* 属性: value 是String类型的,表示简单类型的属性值
* 位置: 1.在属性定义的上面,无需set方法,推荐使用。
* 2.在set方法的上面
*/
@Value("李四" )
private String name;
private Integer age;
/**
* 引用类型
* @Autowired: spring框架提供的注解,实现引用类型的赋值。
* spring中通过注解给引用类型赋值,使用的是自动注入原理 ,支持byName, byType
* @Autowired:默认使用的是byType自动注入。
*
* 位置:1)在属性定义的上面,无需set方法, 推荐使用
* 2)在set方法的上面
*/
@Autowired
private School school;
public Student() {
System.out.println("==student无参数构造方法===");
}
public void setName(String name) {
this.name = name;
}
@Value("30")
public void setAge(Integer age) {
System.out.println("setAge:"+age);
this.age = age;
}
@Override
public String toString() {
return "Student{" +
"name='" + name + '\'' +
", age=" + age +
", school=" + school +
'}';
}
}
测试类如下:
package com.bjpowernode;

import com.bjpowernode.ba03.Student;
import org.junit.Test;
import org.springframework.context.ApplicationContext;
import org.springframework.context.support.ClassPathXmlApplicationContext;

public class MyTest03 {

    @Test
    public void test01(){
        String config="applicationContext.xml";
        ApplicationContext ctx = new ClassPathXmlApplicationContext(config);
        //从容器中获取对象
        Student student = (Student) ctx.getBean("myStudent");

        System.out.println("student="+student);
    }
}
4.byName 自动注入@Autowired 与@Qualifier(掌握)
1.在属性上面加入@Autowired
2.在属性上面加入@Qualifier(value="bean的id") :表示使用指定名称的bean完成赋值。
package com.bjpowernode.ba04;

import org.springframework.beans.factory.annotation.Autowired;
import org.springframework.beans.factory.annotation.Qualifier;
import org.springframework.beans.factory.annotation.Value;
import org.springframework.stereotype.Component;


@Component("myStudent")
public class Student {

    @Value("李四" )
    private String name;
    private Integer age;

    /**
     * 引用类型
     * @Autowired: spring框架提供的注解,实现引用类型的赋值。
     * spring中通过注解给引用类型赋值,使用的是自动注入原理 ,支持byName, byType
     * @Autowired:默认使用的是byType自动注入。
     *
     *  位置:1)在属性定义的上面,无需set方法, 推荐使用
     *       2)在set方法的上面
     *
     *  如果要使用byName方式,需要做的是:
     *  1.在属性上面加入@Autowired
     *  2.在属性上面加入@Qualifier(value="bean的id") :表示使用指定名称的bean完成赋值。
     */

    //byName自动注入
    @Autowired
    @Qualifier("mySchool")
    private School school;

    public Student() {
        System.out.println("==student无参数构造方法===");
    }

    public void setName(String name) {
        this.name = name;
    }
    @Value("30")
    public void setAge(Integer age) {
        System.out.println("setAge:"+age);
        this.age = age;
    }

    @Override
    public String toString() {
        return "Student{" +
                "name='" + name + '\'' +
                ", age=" + age +
                ", school=" + school +
                '}';
    }
}
测试类如下:
package com.bjpowernode;

import com.bjpowernode.ba04.Student;
import org.junit.Test;
import org.springframework.context.ApplicationContext;
import org.springframework.context.support.ClassPathXmlApplicationContext;

public class MyTest04 {

    @Test
    public void test01(){
        String config="applicationContext.xml";
        ApplicationContext ctx = new ClassPathXmlApplicationContext(config);
        //从容器中获取对象
        Student student = (Student) ctx.getBean("myStudent");

        System.out.println("student="+student);
    }
}
-
@Autowired 还有一个属性 required,默认值为 true,表示当匹配失败后,会终止程序运 行。若将其值设置为 false,则匹配失败,将被忽略,未匹配的属性值为 null。
package com.bjpowernode.ba05;

import org.springframework.beans.factory.annotation.Autowired;
import org.springframework.beans.factory.annotation.Qualifier;
import org.springframework.beans.factory.annotation.Value;
import org.springframework.stereotype.Component;


@Component("myStudent")
public class Student {

    @Value("李四" )
    private String name;
    private Integer age;

    /**
     * 引用类型
     * @Autowired: spring框架提供的注解,实现引用类型的赋值。
     * spring中通过注解给引用类型赋值,使用的是自动注入原理 ,支持byName, byType
     * @Autowired:默认使用的是byType自动注入。
     *
     *   属性:required ,是一个boolean类型的,默认true
     *        required=true:表示引用类型赋值失败,程序报错,并终止执行。
     *        required=false:引用类型如果赋值失败, 程序正常执行,引用类型是null
     *
     *  位置:1)在属性定义的上面,无需set方法, 推荐使用
     *       2)在set方法的上面
     *
     *  如果要使用byName方式,需要做的是:
     *  1.在属性上面加入@Autowired
     *  2.在属性上面加入@Qualifier(value="bean的id") :表示使用指定名称的bean完成赋值。
     */

    //byName自动注入
    @Autowired(required = false)
    @Qualifier("mySchool-1")
    private School school;

    public Student() {
        System.out.println("==student无参数构造方法===");
    }

    public void setName(String name) {
        this.name = name;
    }
    @Value("30")
    public void setAge(Integer age) {
        System.out.println("setAge:"+age);
        this.age = age;
    }

    @Override
    public String toString() {
        return "Student{" +
                "name='" + name + '\'' +
                ", age=" + age +
                ", school=" + school +
                '}';
    }
}
测试类如下:
package com.bjpowernode;

import com.bjpowernode.ba05.Student;
import org.junit.Test;
import org.springframework.context.ApplicationContext;
import org.springframework.context.support.ClassPathXmlApplicationContext;

public class MyTest05 {

    @Test
    public void test01(){
        String config="applicationContext.xml";
        ApplicationContext ctx = new ClassPathXmlApplicationContext(config);
        //从容器中获取对象
        Student student = (Student) ctx.getBean("myStudent");

        System.out.println("student="+student);
    }
}
5.JDK 注解@Resource 自动注入(掌握)(注意是java提供的注解)
Spring提供了对 jdk中@Resource注解的支持。@Resource 注解既可以按名称匹配Bean, 也可以按类型匹配 Bean。默认是按名称注入。使用该注解,要求 JDK 必须是 6 及以上版本。 @Resource 可在属性上,也可在 set 方法上。
@Resource 注解使用方法
* 引用类型
* @Resource: 来自jdk中的注解,spring框架提供了对这个注解的功能支持,可以使用它给引用类型赋值
*            使用的也是自动注入原理,支持byName, byType .默认是byName
*  位置: 1.在属性定义的上面,无需set方法,推荐使用。
*        2.在set方法的上面
package com.bjpowernode.ba06;

import org.springframework.beans.factory.annotation.Autowired;
import org.springframework.beans.factory.annotation.Qualifier;
import org.springframework.beans.factory.annotation.Value;
import org.springframework.stereotype.Component;

import javax.annotation.Resource;


@Component("myStudent")
public class Student {

    @Value("李四" )
    private String name;
    private Integer age;

    /**
     * 引用类型
     * @Resource: 来自jdk中的注解,spring框架提供了对这个注解的功能支持,可以使用它给引用类型赋值
     *            使用的也是自动注入原理,支持byName, byType .默认是byName
     *  位置: 1.在属性定义的上面,无需set方法,推荐使用。
     *        2.在set方法的上面
     */
    //默认是byName: 先使用byName自动注入,如果byName赋值失败,再使用byType
    @Resource
    private School school;

    public Student() {
        System.out.println("==student无参数构造方法===");
    }

    public void setName(String name) {
        this.name = name;
    }
    @Value("30")
    public void setAge(Integer age) {
        System.out.println("setAge:"+age);
        this.age = age;
    }

    @Override
    public String toString() {
        return "Student{" +
                "name='" + name + '\'' +
                ", age=" + age +
                ", school=" + school +
                '}';
    }
}
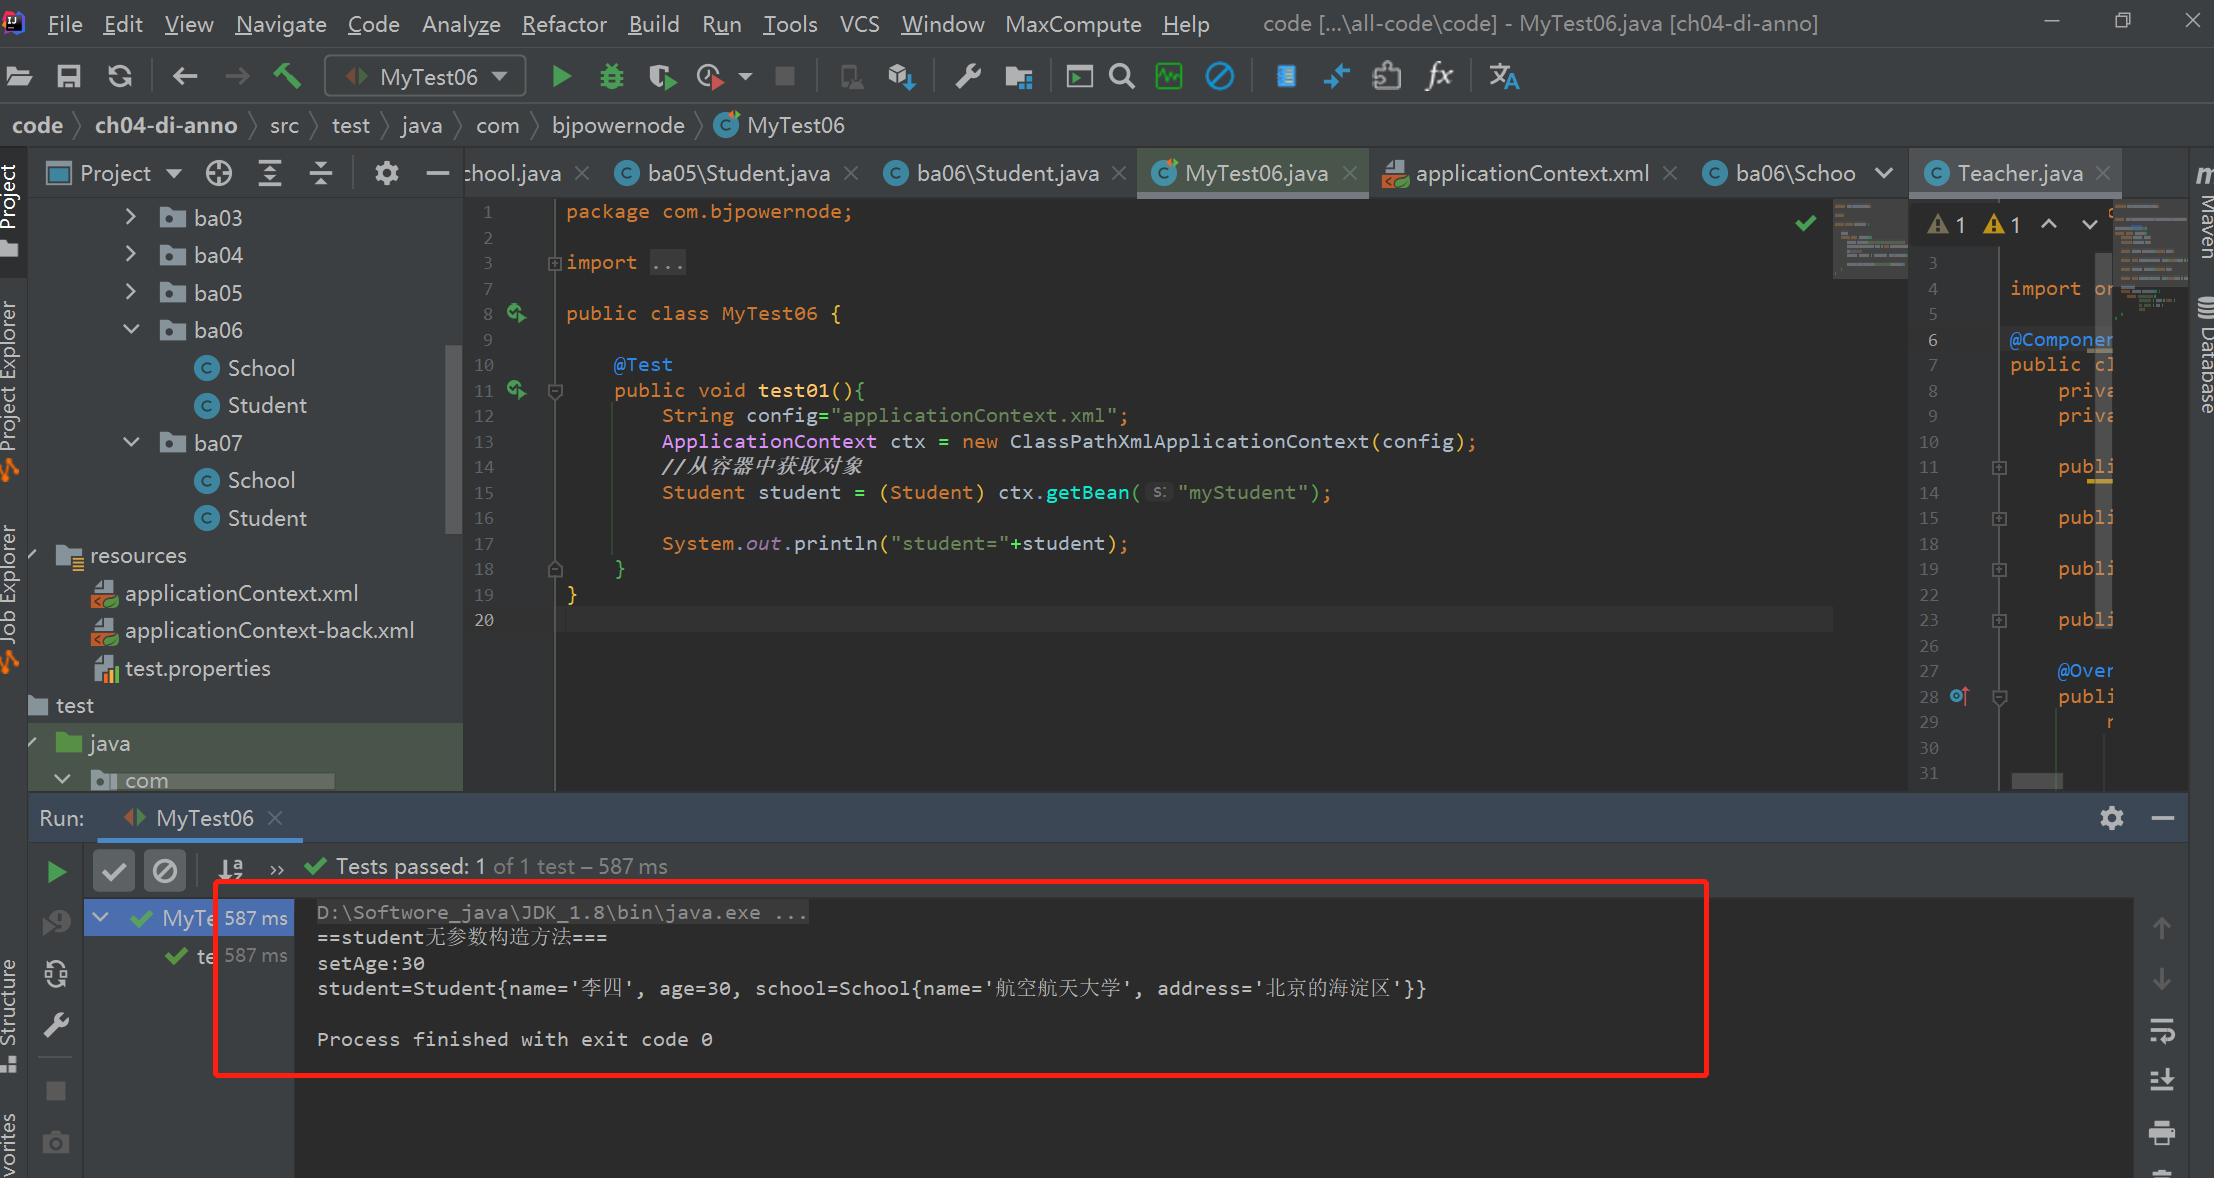
测试结果如下:
@Resource只是使用byName 属性
@Resource只使用byName方式,需要增加一个属性 name
package com.bjpowernode.ba07;

import org.springframework.beans.factory.annotation.Value;
import org.springframework.stereotype.Component;

import javax.annotation.Resource;


@Component("myStudent")
public class Student {

    @Value("李四" )
    private String name;
    private Integer age;

    /**
     * 引用类型
     * @Resource: 来自jdk中的注解,spring框架提供了对这个注解的功能支持,可以使用它给引用类型赋值
     *            使用的也是自动注入原理,支持byName, byType .默认是byName
     *  位置: 1.在属性定义的上面,无需set方法,推荐使用。
     *        2.在set方法的上面
     *
     * @Resource只使用byName方式,需要增加一个属性 name
     * name的值是bean的id(名称)
     */
    //只使用byName
    @Resource(name = "mySchool")
    private School school;

    public Student() {
        System.out.println("==student无参数构造方法===");
    }

    public void setName(String name) {
        this.name = name;
    }
    @Value("30")
    public void setAge(Integer age) {
        System.out.println("setAge:"+age);
        this.age = age;
    }

    @Override
    public String toString() {
        return "Student{" +
                "name='" + name + '\'' +
                ", age=" + age +
                ", school=" + school +
                '}';
    }
}


· 阿里巴巴 QwQ-32B真的超越了 DeepSeek R-1吗?
· 10年+ .NET Coder 心语 ── 封装的思维:从隐藏、稳定开始理解其本质意义
· 【设计模式】告别冗长if-else语句:使用策略模式优化代码结构
· 字符编码:从基础到乱码解决
· 提示词工程——AI应用必不可少的技术