BIO、NIO实战
BIO
BIO:blocking IO,分别写一个服务端和客户端交互的C/S实例。
服务器端:
import java.io.BufferedReader;
import java.io.IOException;
import java.io.InputStreamReader;
import java.net.ServerSocket;
import java.net.Socket;
import java.nio.charset.Charset;

/**
 * Created by atai on 2019/3/19.
 */
public class BIOServer {

    private String host;

    private int port;

    private static Charset charset = Charset.forName("UTF-8");

    public static void main(String[] args) {
        int port = 9010;
        try (ServerSocket ss = new ServerSocket(port)) {
            while (true) {
                Socket s = ss.accept();
                BufferedReader reader = new BufferedReader(new InputStreamReader(s.getInputStream(), charset));

                String mess = null;
                while ((mess = reader.readLine()) != null) {
                    System.out.println(mess);
                }
                s.close();
            }
        } catch (IOException e) {
            e.printStackTrace();
        }
    }
}
客户端:
import java.io.IOException;
import java.io.OutputStream;
import java.net.Socket;
import java.nio.charset.Charset;
import java.util.Scanner;

/**
 * Created by atai on 2019/3/19.
 */
public class BIOClient implements Runnable {

    private String host;

    private int port;

    private Charset charset = Charset.forName("UTF-8");

    public BIOClient(String host, int port) {
        super();
        this.host = host;
        this.port = port;
    }

    @Override
    public void run() {
        try (Socket s = new Socket(host, port); OutputStream out = s.getOutputStream();) {
            Scanner scanner = new Scanner(System.in);
            System.out.println("请输入:");
            String mess = scanner.nextLine();
            out.write(mess.getBytes(charset));
        } catch (IOException e) {
            e.printStackTrace();
        }
    }

    public static void main(String[] args) {
        BIOClient client = new BIOClient("localhost", 9010);
        client.run();
    }
}
启动时,记得先启动服务器代码,才能正常启动客户端代码,不然客户端会报连接异常(不存在可用端口号)。
上面的服务器端代码每次只能同时受理一个客户端请求,其他客户端此时只能等待,为了让服务端支持处理多个客户端请求,可以改造成多线程形式:
public class BIOServerV2 {

    private static Charset charset = Charset.forName("UTF-8");

    public static void main(String[] args) {
        int port = 9010;
        try (ServerSocket ss = new ServerSocket(port)) {
            while (true) {
                new Thread(new SocketProcess(ss.accept())).start();
            }
        } catch (IOException e) {
            e.printStackTrace();
        }
    }

    static class SocketProcess implements Runnable {

        Socket s;

        public SocketProcess(Socket s) {
            super();
            this.s = s;
        }

        @Override
        public void run() {
            try (BufferedReader reader = new BufferedReader(new InputStreamReader(s.getInputStream(), charset))) {
                String mess = null;
                while ((mess = reader.readLine()) != null) {
                    System.out.println(mess);
                }
            } catch (Exception e) {
                e.printStackTrace();
            }
        }
    }
}
1、理解什么是阻塞
2、思考:阻塞对服务端有什么影响?
3、阻塞时,服务端什么也干不了,不能处理其他客户端的连接,如何改进?
4、多线程
5、如果并发请求量很大,比如一万、十万,会有什么问题?
6、32位系统1个线程对象默认最大需要320KB内存,64位系统默认最大需要1M内存,业务对象也需要内存,内存会不足。过多的线程需要OS频繁切换,也会大大影响性能。
7、怎么办?
8、线程池
既然使用线程池可以避免频繁创建、销毁、切换线程,那就写一个使用线程池的服务端实现:
public class BIOServerV3 {

    private static Charset charset = Charset.forName("UTF-8");

    public static void main(String[] args) {
        int port = 9010;
        int threads = 100;
        ExecutorService tpool = Executors.newFixedThreadPool(threads);

        try (ServerSocket ss = new ServerSocket(port)) {
            while (true) {
                Socket s = ss.accept();
                // 丢到线程池中执行
                tpool.execute(new SocketProcess(s));
            }
        } catch (Exception e) {
            e.printStackTrace();
        }
        tpool.shutdown();
    }

    static class SocketProcess implements Runnable {

        Socket s;

        public SocketProcess(Socket s) {
            super();
            this.s = s;
        }

        @Override
        public void run() {
            try (BufferedReader reader = new BufferedReader(new InputStreamReader(s.getInputStream(), charset))) {
                String mess = null;
                while ((mess = reader.readLine()) != null) {
                    System.out.println(mess);
                }
            } catch (Exception e) {
                e.printStackTrace();
            }
        }
    }
}
9、阻塞对线程池的方式有什么影响?
10、阻塞等待接收客户端的数据时,这段时间占着线程,而池中线程数是有限的,并发量大时,将导致没有线程处理请求,请求的响应时间长,甚至拒绝服务。
11、如果能不阻塞,在没有数据时,就去干点别的事情,有数据了才处理数据那该多好。
这个时候,终于等到NIO闪亮登场。
NIO
NIO:new IO,java1.4开始推出的可非阻塞IO,在java.io包中。特点如下:
1、可解决BIO阻塞的不足;
2、但比BIO学习、使用复杂;
3、可以以阻塞、非阻塞两种方式工作;
4、在非阻塞模式下,可以用少量(甚至一个)线程处理大量的IO连接;
5、Java7推出了NIO.2(又称AIO,即异步IO)
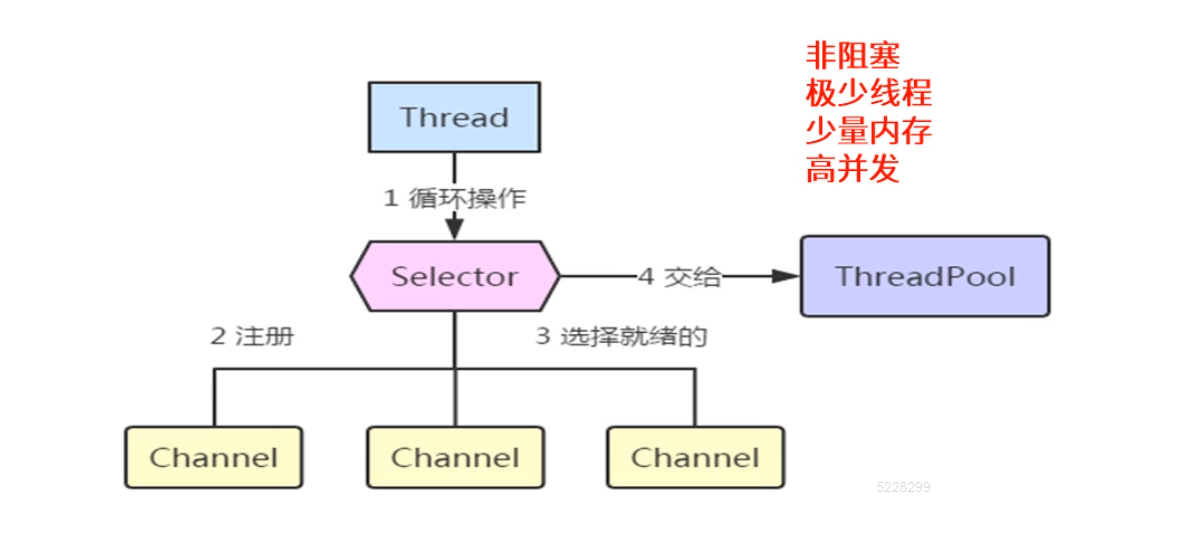
Select选择器:非阻塞模式下,一个选择器可检测多个SelectableChannel,获得为读写等操作准备好的通道,就不需要我们用循环去判断了。
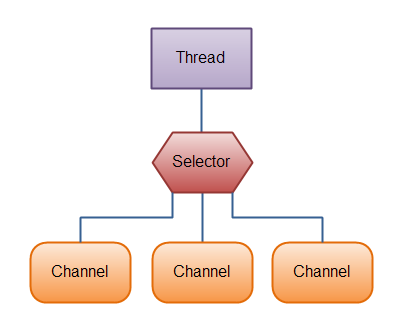
Selector的用法:
1、创建Selector
Selector selector = new Selector.open();
2、将要交给Selector检测的SelectableChannel注册进来
channel.configureBlocking(false); // 注意:一定要设为非阻塞模式
SelectionKey key = channel.register(selector, SelectionKey.OP_READ);
channel.register方法的第二个参数指定要selector帮忙监听的就绪操作:
SelectionKey.OP_CONNECT
SelectionKey.OP_ACCEPT
SelectionKey.OP_READ
SelectionKey.OP_WRITE
3、通过Selector来选择就绪的Channel,有三个select方法
int select()             // 阻塞直到有就绪的Channel
int select(long timeout) // 阻塞最长多久
int selectNow()          // 不阻塞这
这三个方法返回值:就绪的Channel数量
int n = selector.select();
注意:select()方法返回当前的就绪数量。
4、获得就绪的SelectionKey集合(当有就绪的Channel时)
Set<SelectionKey> selectedKey = selector.selectedKeys();
5、处理selectedKeys set(详见后面的服务端代码)
Channel通道:数据的来源或去向目标

1、Channel的实现
FileChannel(只能用于BIO)
DatagramChannel
SocketChannel
SocketChannel
ServerSocketChannel
2、各Channel的API方法
open():创建通道
read(Buffer):从通道中读取数据放入到buffer
write(Buffer):将buffer中的数据写给通道
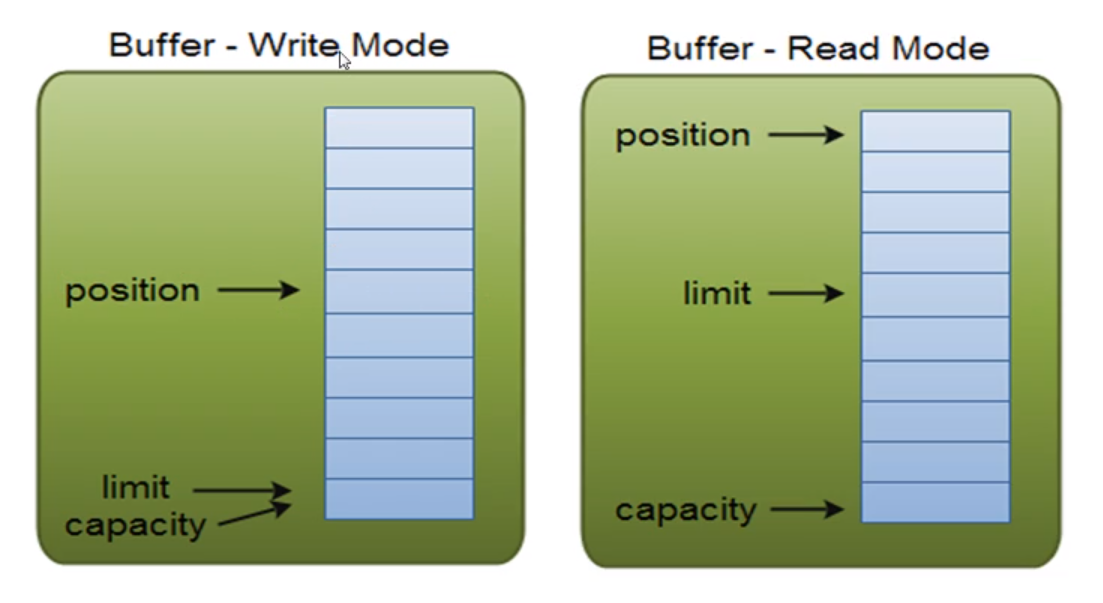
Buffer缓冲区,数据的临时存放区
ByteBuffer、MappedByteBuffer、CharBuffer、DoubleBuffer等
Buffer的基本使用步骤:
1、调用xxxBuffer.allocate(int)创建Buffer
2、调用put方法往Buffer中写数据
3、调用buffer.flip()将buffer转为读模式
4、读取buffer中的数据
5、清理数据buffer.clear(),整理数据buffer.compact()
Buffer的三个重要属性capacity、position、limit
以下是NIO代码的具体实例。
服务器端:
public class NioServer {

    private static Charset charset = Charset.forName("UTF-8");
    private static CharsetDecoder decoder = charset.newDecoder();

    public static void main(String[] args) throws IOException {
        // 创建一个selector
        Selector selector = Selector.open();
        ServerSocketChannel ssc = ServerSocketChannel.open();
        int port = 9200;
        ssc.bind(new InetSocketAddress(port));

        // 2注册到selector
        // 设置非阻塞
        ssc.configureBlocking(false);
        // ssc向selector注册,监听连接到来
        ssc.register(selector, SelectionKey.OP_ACCEPT);
        // 连接的计数
        int connectionCount = 0;
        // 极少量线程
        int threads = 3;
        ExecutorService tpool = Executors.newFixedThreadPool(threads);

        while (true) {
            // 阻塞等待就绪的事件
            int readyChannelCount = selector.select();
            if (readyChannelCount == 0) {
                continue;
            }
            Set<SelectionKey> selectionKeys = selector.selectedKeys();
            Iterator<SelectionKey> keyIterator = selectionKeys.iterator();
            while (keyIterator.hasNext()) {
                SelectionKey key = keyIterator.next();
                if (key.isAcceptable()) {
                    // a connection was accepted by a ServerSocketChannel.
                    ServerSocketChannel ssssc = (ServerSocketChannel) key.channel();
                    // 接收连接
                    SocketChannel cc = ssssc.accept();

                    // 请selectoror帮忙监测数据到了没
                    cc.configureBlocking(false);
                    // 向selector注册
                    cc.register(selector , SelectionKey.OP_READ, ++connectionCount);
                } else if (key.isConnectable()) {
                    // a connection was established with a remote server.
                } else if (key.isReadable()) {
                    // a channel is ready for reading
                    // 交给线程池去处理数据读
                    tpool.execute(new SocketProcess(key));
                    // 取消Selector注册,防止线程池处理不及时,重复选择
                    key.cancel();
                } else if (key.isWritable()) {
                    // a channel is ready for writing
                }
                // 处理后,一定要从selectedKey集合中移除
                keyIterator.remove();
            }
        }
    }

    static class SocketProcess implements Runnable {

        SelectionKey key;

        public SocketProcess(SelectionKey key) {
            super();
            this.key = key;
        }

        @Override
        public void run() {
            try {
                System.out.println("连接" + key.attachment() + " 发来了:" + readFromChannel());
                key.channel().close();
            } catch (Exception e) {
                e.printStackTrace();
            }
        }

        private String readFromChannel() throws IOException {
            SocketChannel sc = (SocketChannel) key.channel();

            int bfsize = 1024;
            ByteBuffer rbf = ByteBuffer.allocateDirect(bfsize);

            // 定义一个更大的buffer
            ByteBuffer bigBf = null;

            // 读的次数
            int count = 0;
            while ((sc.read(rbf) != -1)) {
                count++;
                ByteBuffer temp = ByteBuffer.allocateDirect(bfsize * (count + 1));
                if (bigBf != null) {
                    // 将buffer由写转为读模式
                    bigBf.flip();
                    temp.put(bigBf);
                }
                bigBf = temp;
                // 将这次读到的数据放入大buffer
                rbf.flip();
                bigBf.put(rbf);
                // 为了下次读,清理Buffer
                rbf.clear();
            }

            if (bigBf != null) {
                bigBf.flip();
                try {
                    // 将字节转为字符,返回接收到的字符串
                    return decoder.decode(bigBf).toString();
                } catch (CharacterCodingException e) {
                    e.printStackTrace();
                }
            }

            return null;
        }
    }
}
客户端:
public class NioClient {

    private static Charset charset = Charset.forName("UTF-8");

    public static void main(String[] args) {
        try (SocketChannel sc = SocketChannel.open()) {
            boolean connected = sc.connect(new InetSocketAddress("localhost", 9200));
            System.out.println("connected=" + connected);
            // 写
            Scanner scanner = new Scanner(System.in);
            System.out.println("请输入:");
            String mess = scanner.nextLine();
            ByteBuffer bf = ByteBuffer.wrap(mess.getBytes(charset));

            while (bf.hasRemaining()) {
                int writedCount = sc.write(bf);
            }
        } catch (Exception e) {
            e.printStackTrace();
        }
    }
}


 浙公网安备 33010602011771号