
离线安装Docker、docker-compose、harbor、rancher、jenkins
全文重点参考:https://blog.csdn.net/yuyangchenhao/article/details/117573732
部署环境:
1. centos 7
2. ubuntu 22.04
3. 树莓派(这部分另写)
离线环境下部署。
0. 前期准备
本文使用了上面博客提供的全部文件,可自行下载:
https://pan.baidu.com/s/1Vp8R0Ac8KLHw2KlOiqtK8A
提取码:n46d
其中版本为:
docker :19.03.4 ;
docker-compose : 1.25.0 ;
harbor :V1.9.3;
rancher : 2.4.2 ;
注意,habor安装时有docker最低版本要求,这个版本下 docker 版本至少为17.06.0以上, 同时安装harbor之前需要先安装好docker和docker-compose;
1. 安装 docker
我指定的目录:/home/Downloads,找个地方放就行。
首先要将下载好的 docker-19.03.4.tgz 文件上传到你指定的目录中,在该目录下进行如下操作:
1.1 准备 docker.service 配置文件
#创建docker.service文件
touch docker.service
#vim打开,将下面的内容写入
vim docker.service
或者在别的地方准备好docker.service文件,在上传到指定目录中。
docker.service内容如下:(ps:在我参考的博客中的docker.service有问题,使用如下这个没有问题)
[Unit]
Description=Docker Application Container Engine
Documentation=https://docs.docker.com
After=network-online.target firewalld.service
Wants=network-online.target

[Service]
Type=notify
# the default is not to use systemd for cgroups because the delegate issues still
# exists and systemd currently does not support the cgroup feature set required
# for containers run by docker
ExecStart=/usr/bin/dockerd
ExecReload=/bin/kill -s HUP $MAINPID
# Having non-zero Limit*s causes performance problems due to accounting overhead
# in the kernel. We recommend using cgroups to do container-local accounting.
LimitNOFILE=infinity
LimitNPROC=infinity
LimitCORE=infinity
# Uncomment TasksMax if your systemd version supports it.
# Only systemd 226 and above support this version.
#TasksMax=infinity
TimeoutStartSec=0
# set delegate yes so that systemd does not reset the cgroups of docker containers
Delegate=yes
# kill only the docker process, not all processes in the cgroup
KillMode=process
# restart the docker process if it exits prematurely
Restart=on-failure
StartLimitBurst=3
StartLimitInterval=60s

[Install]
WantedBy=multi-user.target
1.2 安装
为了方便,直接写成脚本形式,当然也可以依次输入命令(忽略echo)
install.sh
#!/bin/sh
echo '解压tar包...'
tar -xvf docker-19.03.4.tgz    # 写实际docker安装包名
echo '将docker目录移到/usr/bin目录下...'
cp docker/* /usr/bin/
echo '将docker.service 移到/etc/systemd/system/ 目录...'
cp docker.service /etc/systemd/system/
echo '添加文件权限...'
chmod +x /etc/systemd/system/docker.service
echo '重新加载配置文件...'
systemctl daemon-reload
echo '启动docker...'
systemctl start docker
echo '设置开机自启...'
systemctl enable docker.service
echo 'docker安装成功...'
docker -v
最终出现如下情况,表示安装成功:
![]()
可能出现的问题:
1. 添加自启动时失败
解决方法:流程重新安装,注意docker.service里是否与本文一致
2. 为了避免每次都有用 sudo命令,可以将用户名加入docker用户组
# 1.创建docker用户组
groupadd docker
# 2.将用户加入docker用户组
usermod -aG docker ${USER}    #写用户名就行
# 3.更新用户组
newgrp docker
# 4.重启docker服务
systemctl restart docker
1.3 卸载
按照如下操作可以卸载docker
uninstall.sh
#!/bin/sh
echo '删除docker.service...'
rm -f /etc/systemd/system/docker.service
echo '删除docker文件...'
rm -rf /usr/bin/docker*
echo '重新加载配置文件'
systemctl daemon-reload
echo '卸载成功...'
2. 安装docker-compose
将下载好的 docker-compose-Linux-x86_64 上传到指定目录。
2.1 安装
依次执行以下命令:
# 1.将安装文件复制到/usr/local/bin/目录下
cp docker-compose-Linux-x86_64 /usr/local/bin/docker-compose

# 2.将该文件赋为可执行文件
chmod +x /usr/local/bin/docker-compose

# 3.创建软链
ln -s /usr/local/bin/docker-compose /usr/bin/docker-compose

# 4.测试是否安装成功
docker-compose -version
出现docker-compose版本号,则安装成功:
![]()
2.2 卸载
卸载只需执行:
rm -rf /usr/local/bin/docker-compose
3. 安装 Harbor 私有仓库
将下载好的 harbor-offline-installer-v1.9.3.tgz 上传到指定目录。
在安装之前要将防火墙和SELINUX关闭,否则在安装过程中会报错:
container init caused \“write /proc/self/attr/keycreate: permission denied\““: unknown
#关闭防火墙
[root@localhost harbor]# systemctl disable --now firewalld
Removed /etc/systemd/system/multi-user.target.wants/firewalld.service.
Removed /etc/systemd/system/dbus-org.fedoraproject.FirewallD1.service.
[root@localhost harbor]# systemctl stop --now firewalld

#关闭SELINUX
[root@localhost harbor]# vim /etc/selinux/config
SELINUX=disabled	// 修改这一行

// 修改完之后重启
[root@localhost harbor]# reboot

#测试
[root@localhost harbor]# setenforce 0
setenforce: SELinux is disabled
3.1 安装
1. 解压
tar zxvf harbor-offline-installer-v1.9.3.tgz2. 修改 harbor.yml 文件
2.1 进入解压harbor-offline-installer-v1.9.3.tgz文件后出现的harbor文件夹
cd /home/Harbot/harbor2.2 修改harbor.yml文件
vim harbor.yml将hostname改成服务器的IP地址,port改成8800(防止与rancher端口冲突即可),可选择性修改harbor_admin_password属性:admin账户密码;测试环境使用http协议,不使用CA证书。
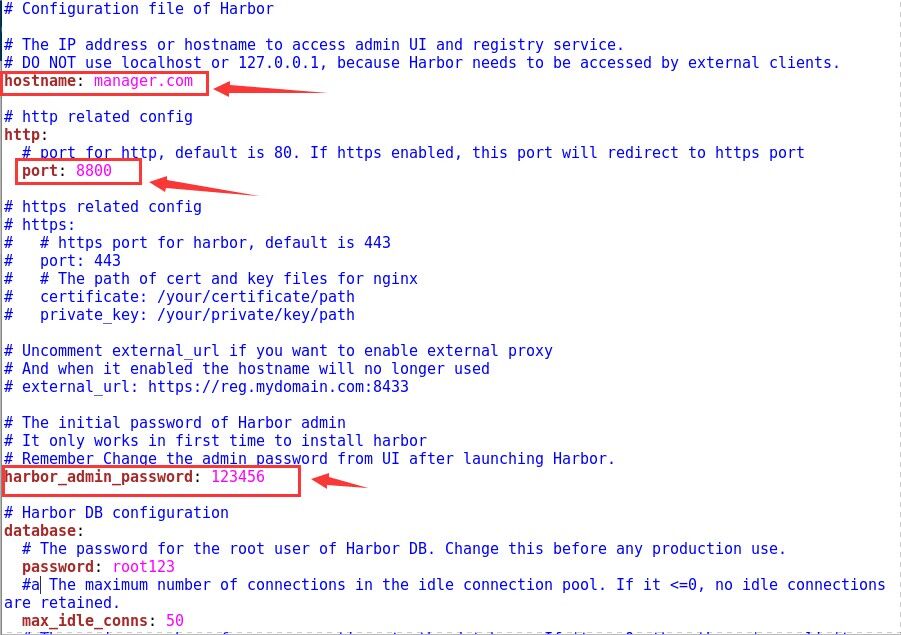
需要注意的是 hostname,这里是自定义的,自己按照格式起一个名。
// 设置主机名
[root@localhost harbor]# hostnamectl set-hostname manager.com
[root@localhost harbor]# bash
[root@node1 harbor]# hostname
manager.com

// 添加主机映射
[root@localhost harbor]# vim /etc/hosts
127.0.0.1   localhost localhost.localdomain localhost4 localhost4.localdomain4
::1         localhost localhost.localdomain localhost6 localhost6.localdomain6
192.168.91.137 manager.com

// 测试能否ping通 manager.com 主机
[root@localhost harbor]# ping manager.com
PING node1.example.com (192.168.91.137) 56(84) bytes of data.
64 bytes from node1.example.com (192.168.91.137): icmp_seq=1 ttl=64 time=0.044 ms
64 bytes from node1.example.com (192.168.91.137): icmp_seq=2 ttl=64 time=0.033 ms参考博客:https://blog.csdn.net/Gf19991225/article/details/121982824
3. 执行 harbor 安装脚本
./install.sh 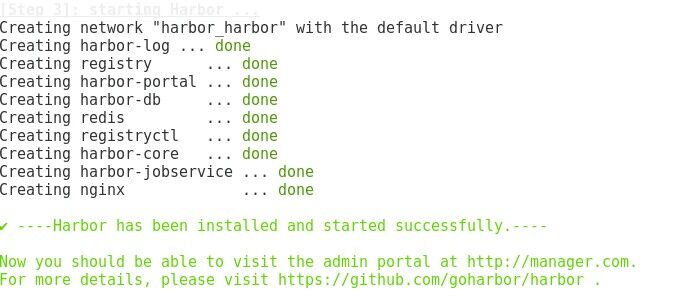
4. 打开浏览器进入 harbor 图形化界面
4.1 登录地址 : http://192.168.222.135 :8800
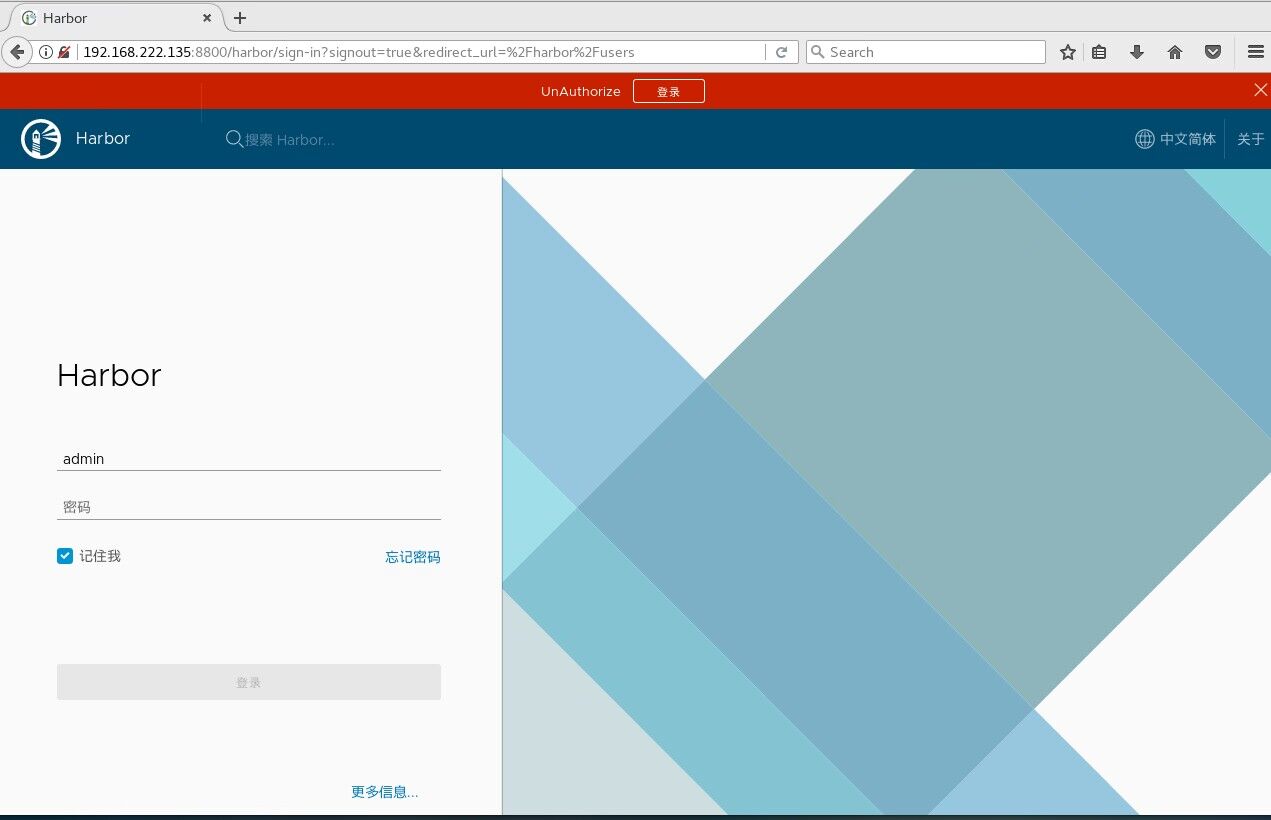
账号:admit
密码:默认是Harbor12345,刚刚如果改了就用自己改的
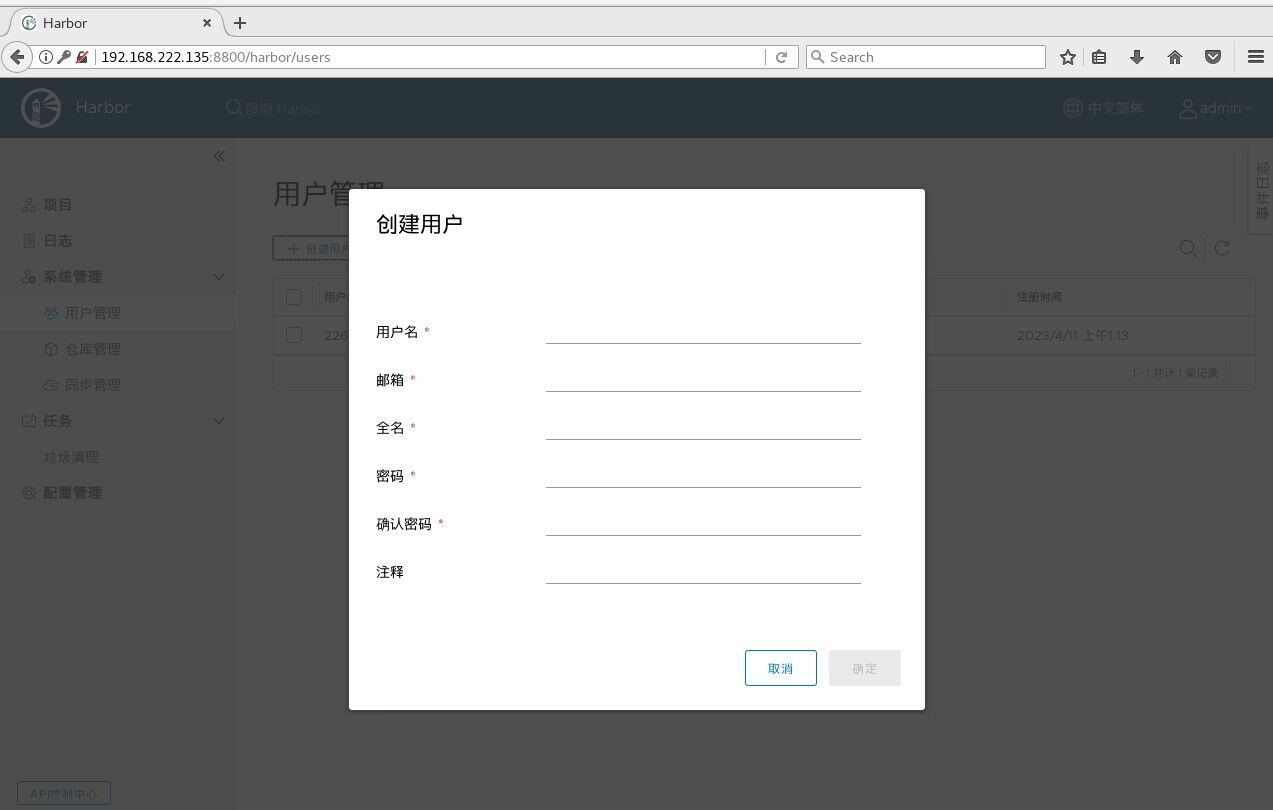
4.2 添加用户
左菜单栏:系统管理 -> 用户管理 -> 创建用户
4.3 设置管理员

4.4 修改 daemon.json 文件
vim /etc/docker/daemon.jsondaemon.json文件中添加如下json(xxx.xxx.xxx.xxx为你的ip地址)
{
    "registry-mirrors":["https://docker.mirrors.ustc.edu.cn"],
    "insecure-registries":["https://xxx.xxx.xxx.xxx:8800"]
}
保存并重启docker
systemctl daemon-reload
systemctl restart docker
docker-compose up -d
进入harbor目录,执行命令刷新harbor配置
cd /home/Downloads/harbor
./prepare
./install.sh
使用命令登录docker
docker login xxx.xxx.xxx.xxx:8800 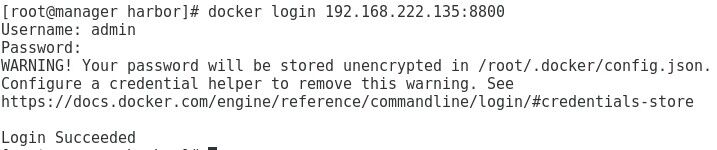
登出命令
docker logout xxx.xxx.xxx.xxx:8800
突然有一天假期结束,时来运转,人生才是真正开始了。

 浙公网安备 33010602011771号