
tf安装
- 首先打开 anaconda prompt
- 新建环境
-
conda create -n tf-gpu python=3.8
- y
-
- 激活创建的环境
- conda activate tf-gpu
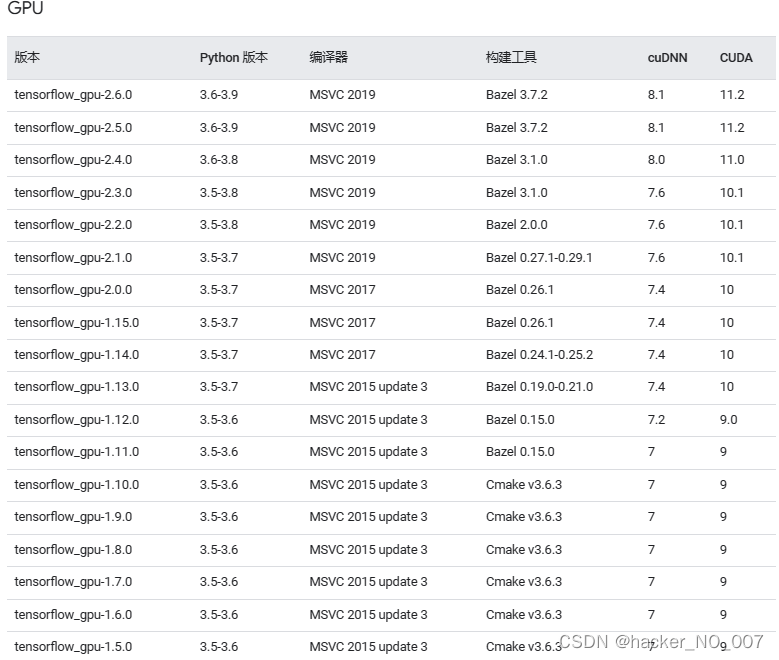
- 选择最终的cuda和cudnn搭配组合
-
conda install cudatoolkit=10.1.243
conda install cudnn=7.6.5
pip install tensorflow-gpu==2.2.0
-
- 使用下面命令检查是否安装完成
-

python

import tensorflow as tf

print(tf.__version__)
print(tf.test.gpu_device_name())
print(tf.config.experimental.set_visible_devices)
print('GPU:', tf.config.list_physical_devices('GPU'))
print('CPU:', tf.config.list_physical_devices(device_type='CPU'))
print(tf.config.list_physical_devices('GPU'))
print(tf.test.is_gpu_available())
# 输出可用的GPU数量
print("Num GPUs Available: ", len(tf.config.experimental.list_physical_devices('GPU')))
# 查询GPU设备
-
- 会存在错误protobuf库需要降级
- 原理同numpy
- 卸载升级
- pip uninstall protobuf
- pip install protobuf==3.20.0
- 错误如下:
File "C:\Tools\Anaconda3\envs\tf-gpu\lib\site-packages\tensorflow\core\framework\resource_handle_pb2.py", line 16, in <module>
    from tensorflow.core.framework import tensor_shape_pb2 as tensorflow_dot_core_dot_framework_dot_tensor__shape__pb2
  File "C:\Tools\Anaconda3\envs\tf-gpu\lib\site-packages\tensorflow\core\framework\tensor_shape_pb2.py", line 36, in <module>
    _descriptor.FieldDescriptor(
  File "C:\Tools\Anaconda3\envs\tf-gpu\lib\site-packages\google\protobuf\descriptor.py", line 561, in __new__
    _message.Message._CheckCalledFromGeneratedFile()
TypeError: Descriptors cannot not be created directly.
If this call came from a _pb2.py file, your generated code is out of date and must be regenerated with protoc >= 3.19.0.
If you cannot immediately regenerate your protos, some other possible workarounds are:
 1. Downgrade the protobuf package to 3.20.x or lower.
 2. Set PROTOCOL_BUFFERS_PYTHON_IMPLEMENTATION=python (but this will use pure-Python parsing and will be much slower).
- numpy会存在不兼容该问题
- http://t.csdnimg.cn/kI7PO
-
# 先卸载安装numpy
pip uninstall numpy

# 然后安装旧版本的
conda install numpy==1.19.2
- 安装过程中存在的大部分问题, 大部分可以通过调整镜像源进行修改
- 参考: http://t.csdnimg.cn/Vytxe
- 参考:http://t.csdnimg.cn/PQHVu
- 如果想使用jupyter notebook打开
-
jupyter notebook中添加Anaconda中的虚拟环境
首先,还是在Anaconda Prompt中打开虚拟环境,忘了怎么进入虚拟环境的翻看上面1.3,进入虚拟环境之后输入下面代码,等待安装完成就行
-
-
pip install ipykernel ipython -i http://pypi.douban.com/simple --trusted-host pypi.douban.com
继续输入下面代码,大概意思就是将内核装填进tensorflow这个虚拟环境中
- 参考: http://t.csdnimg.cn/LnFSJ
-
ipython kernel install --user --name tensorflow
-
-
-


【推荐】国内首个AI IDE,深度理解中文开发场景,立即下载体验Trae
【推荐】编程新体验,更懂你的AI,立即体验豆包MarsCode编程助手
【推荐】抖音旗下AI助手豆包,你的智能百科全书,全免费不限次数
【推荐】轻量又高性能的 SSH 工具 IShell:AI 加持,快人一步
· 震惊!C++程序真的从main开始吗?99%的程序员都答错了
· winform 绘制太阳,地球,月球 运作规律
· 【硬核科普】Trae如何「偷看」你的代码?零基础破解AI编程运行原理
· 上周热点回顾(3.3-3.9)
· 超详细:普通电脑也行Windows部署deepseek R1训练数据并当服务器共享给他人