八、Spring + SpringMVC + MyBatis整合详解
本次整个基于jar进行,各个版本:
Spring4.3.8
SpringMVC4.3.8
MyBatis3.4.2
Tomcat8.0
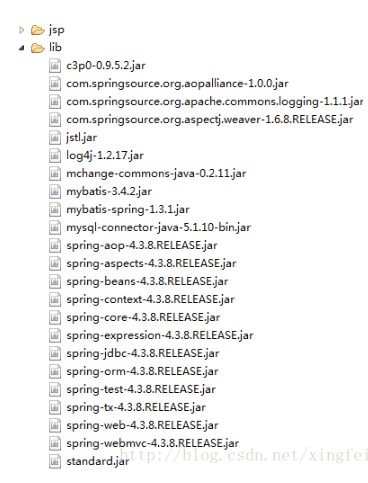
1、jar包引用
2、配置文件
主要用到数据库配置:


jdbc.driverClassName=com.mysql.jdbc.Driver
jdbc.url=jdbc:mysql://localhost:3306/db_ssm?characterEncoding=utf-8
jdbc.username=lx
jdbc.password=lx
jdbc.maxsize=100
jdbc.minsize=5
jdbc.idletime=60
log4j日志配置
#Set root logger level to WARN and append to stdout
log4j.rootLogger=DEBUG,stdout

log4j.appender.stdout=org.apache.log4j.ConsoleAppender
log4j.appender.stdout.layout=org.apache.log4j.PatternLayout

#Pattern to output the caller’s file name and line number.
log4j.appender.stdout.layout.ConversionPattern=%d %5p (%c:%L) - %m%n

#Print only messages of level ERROR or above in the package noModule.
log4j.logger.noMoudle=FATAL
spring的配置
<?xml version=”1.0” encoding=”UTF-8”?>
<beans xmlns=”http://www.springframework.org/schema/beans”
    xmlns:xsi=”http://www.w3.org/2001/XMLSchema-instance”
xmlns:context=”http://www.springframework.org/schema/context”
xmlns:aop=”http://www.springframework.org/schema/aop”
xmlns:tx=”http://www.springframework.org/schema/tx”
xmlns:mybatis=”http://mybatis.org/schema/mybatis-spring”
xsi:schemaLocation=”
    http://www.springframework.org/schema/beans
    http://www.springframework.org/schema/beabs/spring-beans.xsd
    http://www.s[ringframework.org/schema/context
    http://www.springframework.org/schema/context/spring-context.xsd
    http://www.springframework.org/schema/aop
    http://www.springframework.org/schema/aop/spring-aop.xsd
    http://www.springframework.org/schema/tx
    http://www.springframework.org/schema/spring-tx.xsd
    http://mybatis.org/schema/mybatis-spring
    http://mybatis.org/schema/mybatis-spring.xsd”>
<!--Spring + SpringMVC + Mybatis整合-->
<mybatis:scan base-package=”cn.code404.dao”/>
<!--加载数据库的连接配置文件-->
<context:property-placeholder location=”classpath:dbconfig.properties”/>
<!--配置数据库连接池-->
<bean id=”dataSource” class=”com.mchange.v2.c3p0.ComboPooledDataSource” destroy-method=”close”>
    <!--驱动类全称-->
    <property name=”driverClass” value=”${jdbc.driverClassName}”/>
    <!--数据库的url地址-->
    <property name=”jdbcUrl” value=”${jdbc.url}”/>
    <!--用户名-->
    <property name=”user” value=”${jdbc.username}”/>
    <!--密码-->
    <property name=”password” value=”${jdbc.password}”/>
    <!--配置最大的连接数-->
    <property name=”maxPoolSize” value=”${jabc.maxsize}”/>
    <!--配置最小连接数-->
    <property name=”minPoolSize” value=”${jdbc.minsize}”/>
    <!--配置连接最大空闲时间-->
    <property name=”maxIdleTime” value=”${jdbc.idletime}”/>
</bean>
<!--配置Hibernate的SessionFactory-->
<bean id=”sessionFactory” class=”org.mybatis.spring.SqlSessionFactoryBean”>
    <!--配置数据库连接池-->
    <property name=”dataSource” ref=”dataSource”/>
</bean>
<!--事务管理对象-->
<bean id=”txManager” class=”org.springframework.jdbc.datasource.DataSourceTransactionManager”>
    <property name=”dataSource” ref=”dataSource”/>
</bean>

<!--扫描spring的注解类-->
<context:component-scan base-package=”cn.code404”>
    <!--如果外面的basepackage包含了控制器所在的包,那么需要排除-->
    <context:exclude-filter type=”annotation” expression=”org.springframework.stereotype.Controller”/>
</context:component-scan>
<!--aop切面的代理自动生成-->
<aop:aspectj-autoproxy></aop:aspectj-autoproxy>
<!--使用注解的事务-->
<tx:annotation-driven transaction-manager=”txManager”/>
</beans>
springMVC的配置文件
<?xml version=”1.0” encoding=”UTF-8”?>
<beans xmlns=”http://www.springframework.org/schema/beans”
    xmlns:xsi=”http://www.w3.org/2001/XMLSchema-instance”
xmlns:context=”http://www.springframework.org/schema/context”
xmlns:aop=”http://www.springframework.org/schema/aop”
xmlns:mvc=”http://www.springframework.org/schema/mvc”
xsi:schemaLocation=”
    http://www.springframework.org/schema/beans
    http://www.springframework.org/schema/beabs/spring-beans.xsd
    http://www.s[ringframework.org/schema/context
    http://www.springframework.org/schema/context/spring-context.xsd
    http://www.springframework.org/schema/aop
    http://www.springframework.org/schema/aop/spring-aop.xsd
    http://www.springframework.org/schema/mvc
    http://www.springframework.org/schema/spring-mvc.xsd”>
<!--扫描控制器所在的包-->
<context:component-scan base-package=”cn.code404.web.controller”/>
<!--放静态资源-->
<mvc:annotation-driven/>
<mvc:default-servlet-handler/>
<!--视图解析器,可以设置页面的前缀和后缀-->
<bean class=”org.springframework.web.servlet.view.InternalResourceViewResolver”>
    <property name=”prefix” value=”/WEB-INF/jsp/”/>
    <property name=”suffix” value=”.jsp”/>
</bean>
</beans>
还有网站的配置信息
<?xml version=”1.0” encoding=”UTF-8”?>
<web-app xmlns:xsi=”http://www.w3.org/2001/XMLSchema-instance” xmlns=”http://xmlns.jcp.org/xml/ns/javaee" xsi:schemaLocation=”http://xmlns.jcp.org/xml/ns/javaee  http://xmlns.jcp.org/xml/ns/javaee/web-app_3_1.xsd” version=”3.1”>
    <display-name>ZH_SSM</display-name>
    <!--配置Spring框架的信息-->
    <listener>
        <listener-class>org.springframework.web.context.ContextLoaderListener</listener-class>
    </listener>
    <context-param>
        <param-name>contextConfigLocation</param-name>
        <param-value>classpath:applicationContext.xml</param-value>
    </context-param>
    <!--SpringMVC的调度Servlet,前端控制器-->
    <servlet>
    <servlet-name>springmvc</servlet-name>
    <servlet-class>org.springframework.web.servlet.DispatcherServlet</servlet-class>
    <!--初始化参数设置,加载配置文件-->
    <init-param>
    <param-name>contextConfigLocation</param-name>
    <!--配置文件的路径,如果不写,默认加载的路径:WEB-INF/servlet-name-servlet.xml-->
    <param-value>classpath:springMVC.xml</param-value>
    </init-param>
    <!--启动的优先级,值越小越先启动,>0 -->
    <load-on-startup>1</load-on-startup>
    </servlet>
    <!--映射-->
    <servlet-mapping>
    <servlet-name>springmvc</servlet-name>
    <!--url的匹配规则,定义请求什么样的url触发对应的Servlet-->
    <url-pattern>/</url-pattern>
    </servlet-mapping>
</web-app>
3、表的映射类
public class phone{
    private int id;
    private String xh;
    private String pp;
    private double jg;
    private double size;
    public int getId(){
    return id;
}
public void setId(int id){
    this.id=id;
}
public String getXh(){
    return xh;
}
public void setXh(String xh){
    this.xh=xh;
}
public String getPp(){
    return pp;
}
public void setPp(String pp){
    this.pp=pp;
}
public double getJg(){
    return jg;
}
public void setJg(double jg){
    this.jg=jg;
}
public double getSize(){
    return size;
}
public void setSize(double size){
    this.size=size;
}
}
4、dao层的接口
基于注解实现的
public interface PhoneMapper{
    //新增
    @Insert(“insert into tb_phone(xh,pp,jg,size) values(#{xh},#{pp},#{jg},#{size})”)
    @Options(useGeneratedKeys=true,keyProperty=”id”)
    int save(Phone p);

    //查询
    @Select(“select * from tb_phone”)
    @ResultType(Phone.class)
    List<Phone> queryAll();
}
5、service层对应的类
@Service
@Transactional
public class PhoneService{
    @Autowired
    private PhoneMapper dao;
    public boolean save(Phone p){
    return dao.save(p)>0?true:false;
}
public List<Phone> queryAll(){
    return dao.queryAll();
}
}
6、控制器
这里写代码
@Controller
public class PhoneController{
    @Autowired
    private PhoneService service;
    //请求页面
    @RequestMapping(“/{jn}”)
    public String test1(@PathVariable String jn){
    return jn;
}
//新增
@RequestMapping(“/add”)
public String test2(Phone phone,Model model){
    if(!service.save(phone)){
    moder.addAttribute(“msg”,”网络繁忙,稍后再来”);
}
return “phoneadd”;
}
//查询
@RequestMapping(“/query”)
public String test3(Model model){
    model.addAttribute(“list”,service.queryAll());
return “phoneadd”;
}
}
7、页面
<%@page language=”java” contentType=”text/html;charset=UTF-8”
    pageEncoding=”UTF-8”%>
    <%@taglib url=”http://java.sun.com/jsp/jstl/core” prefix=”c”%>
<!DOCTYPE html PUBLIC”-//W3C//DTD HTML 4.01 Transitional//EN” “http://www.w3.org/TR/html4/loose.dtd”>
<html>
<head>
<meta http-equiv=”Content-Type” content=”text/html;charset=UTF-8”>
<title>SSM整合</title>
</head>
<body>
<!--添加-->
<h1>添加手机信息</h1>
<h5>${msg }</h5>
<div>
<form action=”add”>
品牌:<input name=”pp”/><br/>
型号:<input name=”xh”/><br/>
价格:<input name=”jg”/><br/>
尺寸:<input name=”size”/><br/>
<input type=”submit” value=”添加手机”/>
</form>
</div>
<!--查询-->
<h1>查询手机信息<h1>
<h2><a href=”query”>刷新数据</a></h2>
<div>
<table border=”1” width=”80%”>
<tr>
<th>序号</th>
<th>品牌</th>
<th>型号</th>
<th>价格</th>
<th>尺寸</th>
</tr>
<c.if test=”${list.size()==0}”>
<tr>
<td colspan=”5”><h1>暂无数据</h1></td>
</tr>
</c:if>
<c:forEach items=”${list}” var=”p” varStatus=”ys”>
<tr>
<td align=”center”>${p.id }</td>
<td align=”center”>${p.pp }</td>
<td align=”center”>${p.xh }</td>
<td align=”center”>${p.jg }</td>
<td align=”center”>${p/size }</td>
</tr>
</c:forEach>
</table>
</div>
</body>
</html>
8、运行结果页面

https://blog.csdn.net/xingfei_work/article/details/77067513


 浙公网安备 33010602011771号