一、简介
1.gitlab特点
开源: CI/CD是开源GitLab社区版和专有GitLab企业版的一部分。(极狐)
易于学习: 官方具有详细的学习操作文档。
无缝集成: CI/CD是GitLab的一部分,支持从计划到部署,具有出色的用户体验。
可扩展: 可以根据需要添加任意数量的构建节点。
更快的结果: 每个构建可以拆分为多个作业,这些作业可以在多台计算机上并行运行。
针对交付进行了优化: 多个阶段,手动部署, 环境 和 变量。
2.GitLab Runner配置管理
GitLab Runner是一个开源项目,用于运行作业并将结果发送回GitLab。
与GitLabCI结合使用,GitLabCI是GitLab随附的用于协调作业的开源持续集成服务。
GitLab Runner是用Go编写的,可以在Linux,macOS和Windows操作系统上运行。
容器部署需使用最新Docker版本。GitLab Runner需要最少的Docker v1.13.0。
GitLab Runner版本应与GitLab版本同步。(避免版本不一致导致差异化)
可以根据需要配置任意数量的Runner。
类型
shared 共享类型,运行整个平台项目的作业(gitlab)
group 项目组类型,运行特定group下的所有项目的作业(group)
specific项目类型,运行指定的项目作业(project)
状态
locked: 锁定状态,无法运行项目作业
paused: 暂停状态,暂时不会接受新的作业
步骤:
安装gitlab-runner工具
使用gitlab-runner工具向GitLab Server注册Runner节点。
二、安装
1.gitlab安装
## 下载镜像
docker pull gitlab/gitlab-ce:14.0.0-ce.0

## 创建数据目录
mkdir -p /data/cicd/gitlab/{config,logs,data}
chmod 777 -R /data/cicd/gitlab/

## 运行
docker run -d  -p 443:443 -p 80:80 -p 222:22 --name gitlab \
--restart always \
-v /data/cicd/gitlab/config:/etc/gitlab \
-v /data/cicd/gitlab/logs:/var/log/gitlab \
-v /data/cicd/gitlab/data:/var/opt/gitlab \
gitlab/gitlab-ce:14.0.0-ce.0
说明:
- 222端口 ssh协议
- 80端口 http端口
- 443端口 https端口
- 默认密码:/etc/gitlab/initial_root_password
2.修改url
docker exec -it gitlab bash

3.GitLab Runner 安装
包地址:https://docs.gitlab.com/runner/install/linux-repository.html
## 安装runner
rpm -ivh gitlab-runner-14.0.0-1.x86_64.rpm


## 查看进程
[root@zeyang-nuc-service gitlab-runner]# ps aux  | grep -v grep | grep runner
root      694811  0.1  0.1 152232 35720 ?        Ssl  22:04   0:00 /usr/bin/gitlab-runner run --working-directory /home/gitlab-runner --config /etc/gitlab-runner/config.toml --service gitlab-runner --user gitlab-runner
docker方式 安装Runner
docker run -d --name gitlab-runner --restart always \
  -v /var/run/docker.sock:/var/run/docker.sock \
  -v /home/gitlab-runner/config:/etc/gitlab-runner \
  registry.cn-hangzhou.aliyuncs.com/mytest_docker123/gitlab-runner:v14.10.1
三、Runner注册配置使用
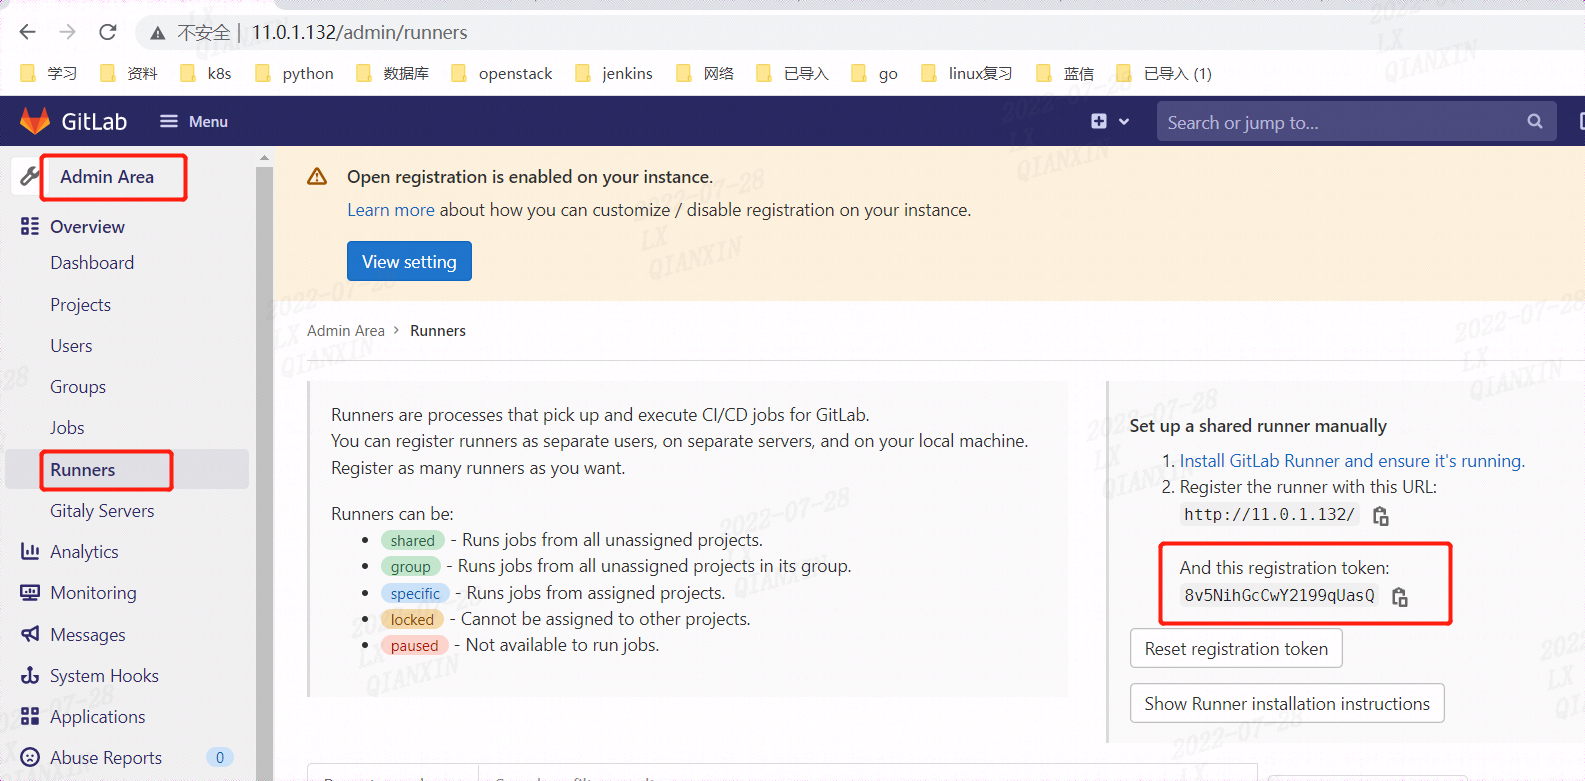
1.获取GitLab地址和Runner 注册token

2.运行注册命令
交互式注册

[root@zeyang-nuc-service gitlab-runner]# gitlab-runner register
Runtime platform                                    arch=amd64 os=linux pid=40969 revision=f188edd7 version=14.9.1
Running in system-mode.
## 输入GitLab实例的URL
Enter the GitLab instance URL (for example, https://gitlab.com/):
http://192.168.1.200

## 输入Runner注册Token
Enter the registration token:
m5ucdGk2_uPJ2K9BP8-d

## 填写该注册Runner的描述信息
Enter a description for the runner:
[zeyang-nuc-service]: build runner

## 为该Runner配置一个标签(后续作业可以通过tag指定在哪个runner上面运行构建)
Enter tags for the runner (comma-separated):
build,go,maven
Enter optional maintenance note for the runner:

Registering runner... succeeded                     runner=m5ucdGk2
## 为Runner选择一个执行器
Enter an executor: docker, parallels, ssh, docker+machine, docker-ssh+machine, custom, docker-ssh, shell, virtualbox, kubernetes:
shell
Runner registered successfully. Feel free to start it, but if it's running already the config should be automatically reloaded!
非交互式注册

gitlab-runner register \
  --non-interactive \
  --url "http://192.168.1.200/" \
  --registration-token "m5ucdGk2_uPJ2K9BP8-d" \
  --executor "shell" \
  --description "buildrunner" \
  --tag-list "build,k8s,go" \
  --run-untagged="true" \
  --locked="false" \
  --access-level="not_protected"
注册成功查看:

3.runner配置文件


查看配置:
cat /etc/gitlab-runner/config.toml
concurrent = 1
check_interval = 0

[session_server]
  session_timeout = 1800

[[runners]]
  name = "runner1"
  url = "http://11.0.1.132/"
  token = "LteUssEUspz-_JSz-oJ_"
  executor = "shell"
  [runners.custom_build_dir]
  [runners.cache]
    [runners.cache.s3]
    [runners.cache.gcs]
    [runners.cache.azure]

[[runners]]
  name = "buildrunner"
  url = "http://11.0.1.132/"
  token = "R2xBdLzuE7KJANzBHWMF"
  executor = "shell"
  [runners.custom_build_dir]
  [runners.cache]
    [runners.cache.s3]
    [runners.cache.gcs]
    [runners.cache.azure]
4.runner常用命令

gitlab-runner register  #默认交互模式下使用,非交互模式添加 --non-interactive
gitlab-runner list      #此命令列出了保存在配置文件中的所有运行程序
gitlab-runner verify    #此命令检查注册的runner是否可以连接,但不验证GitLab服务是否正在使用runner。 --delete 删除
gitlab-runner unregister   #该命令使用GitLab取消已注册的runner。

#使用令牌注销
gitlab-runner unregister --url http://gitlab.example.com/ --token t0k3n

#使用名称注销(同名删除第一个)
gitlab-runner unregister --name test-runner

#注销所有
gitlab-runner unregister --all-runners
四、运行一条流水线
1.创建group

2.创建project

3.新建一个gitCI文件


示例:

before_script:
  - echo "Before script section"
  - echo "For example you might run an update here or install a build dependency"
  - echo "Or perhaps you might print out some debugging details"

after_script:
  - echo "After script section"
  - echo "For example you might do some cleanup here"

build1:
  tags:
    - maven
  stage: build
  script:
    - echo "Do your build here"

test1:
  tags:
    - maven
  stage: test
  script:
    - echo "Do a test here"
    - echo "For example run a test suite"


deploy1:
  tags:
    - maven
  stage: deploy
  script:
    - echo "Do your deploy here"
4.执行CI

修改语句(自带检测语法):

备注:


