OpenWRT(2):uhttpd+LuCI初探
uhttpd是OpenWRT的默认WebServer,通过LuCI OpenWRT提供了统一的配置接口。这里简单了解UCI、Lua、LuCI、luci、uhttpd等基本概念,然后在QEMU环境下启动OpenWRT查看LuCI实例。
1 uhttpd和LuCI的基本概念
UCI(Unified Configuration Interface)是一个OpenWRT服务的集中配置接口。
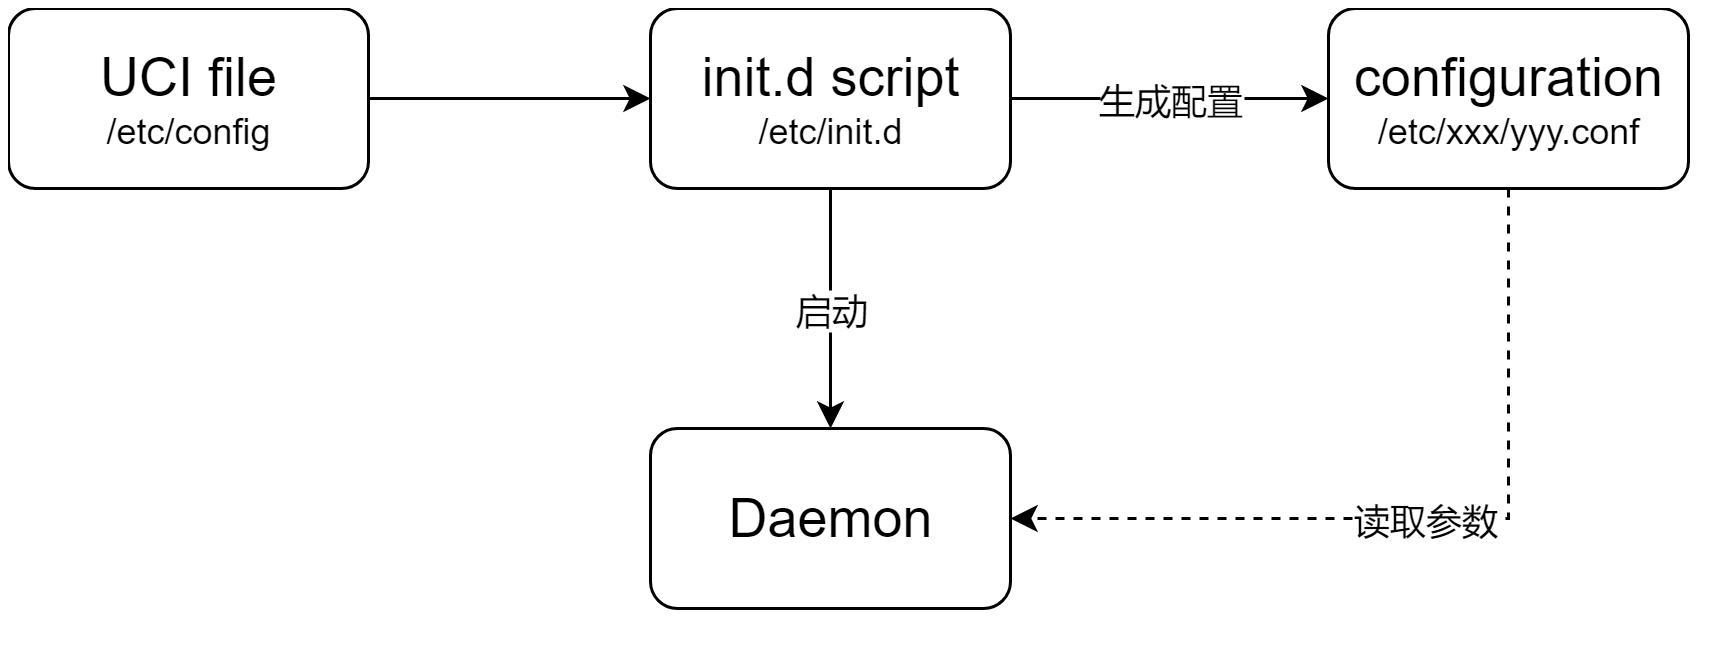
OpenWRT下的功能大多支持UCI,初始化脚本位于/etc/init.d/,UCI配置文件位于/etc/config中。在初始化脚本启动时,读取UCI配置文件,覆盖默认的配置文件,然后启动服务。

更多参考《The UCI system》:详细介绍了常见服务的UCI配置文件、编写语法、命令行工具uci的使用方法、以及一些配置示例。
Lua:小巧的解释性脚本语言。关于Lua《Lua: getting started》。
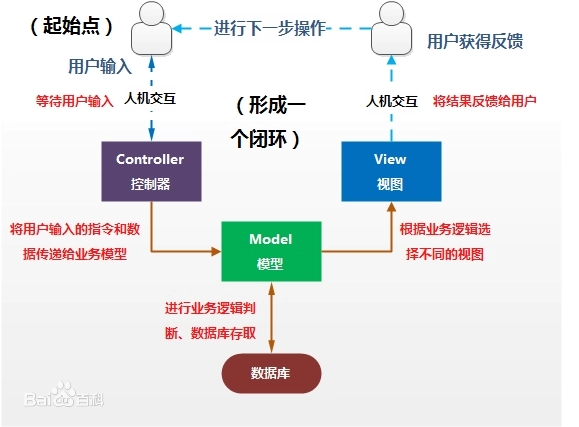
LuCI(Lua UCI)使用Lua语言按照MVC(Model/View/Controller)框架实现的UCI配置文件读取和修改。LuCI相关文档《Documentation · openwrt/luci Wiki · GitHub》。
MVC:Model业务模型;View用户界面;Ctronller控制器。
M模型表示业务规则。被模型返回的数据是中立的,模型与数据格式无关,这样一个模型能为多个视图提供数据,由于应用于模型的代码只需写一次就可以被多个视图重用,所以减少了代码的重复性。
V用户界面,是指用户看到并与之交互的界面。
C控制器是指控制器接收用户的输入并调用模型和视图去完成用户的需求,控制器本身不输出任何东西和做任务处理。它只是接收请求并决定调用哪个模型构件去处理请求,然后再确定用哪个视图来显示返回的数据。

CBI(Configuration Binding Interface)即是LuCI的MVC框架的M部分。
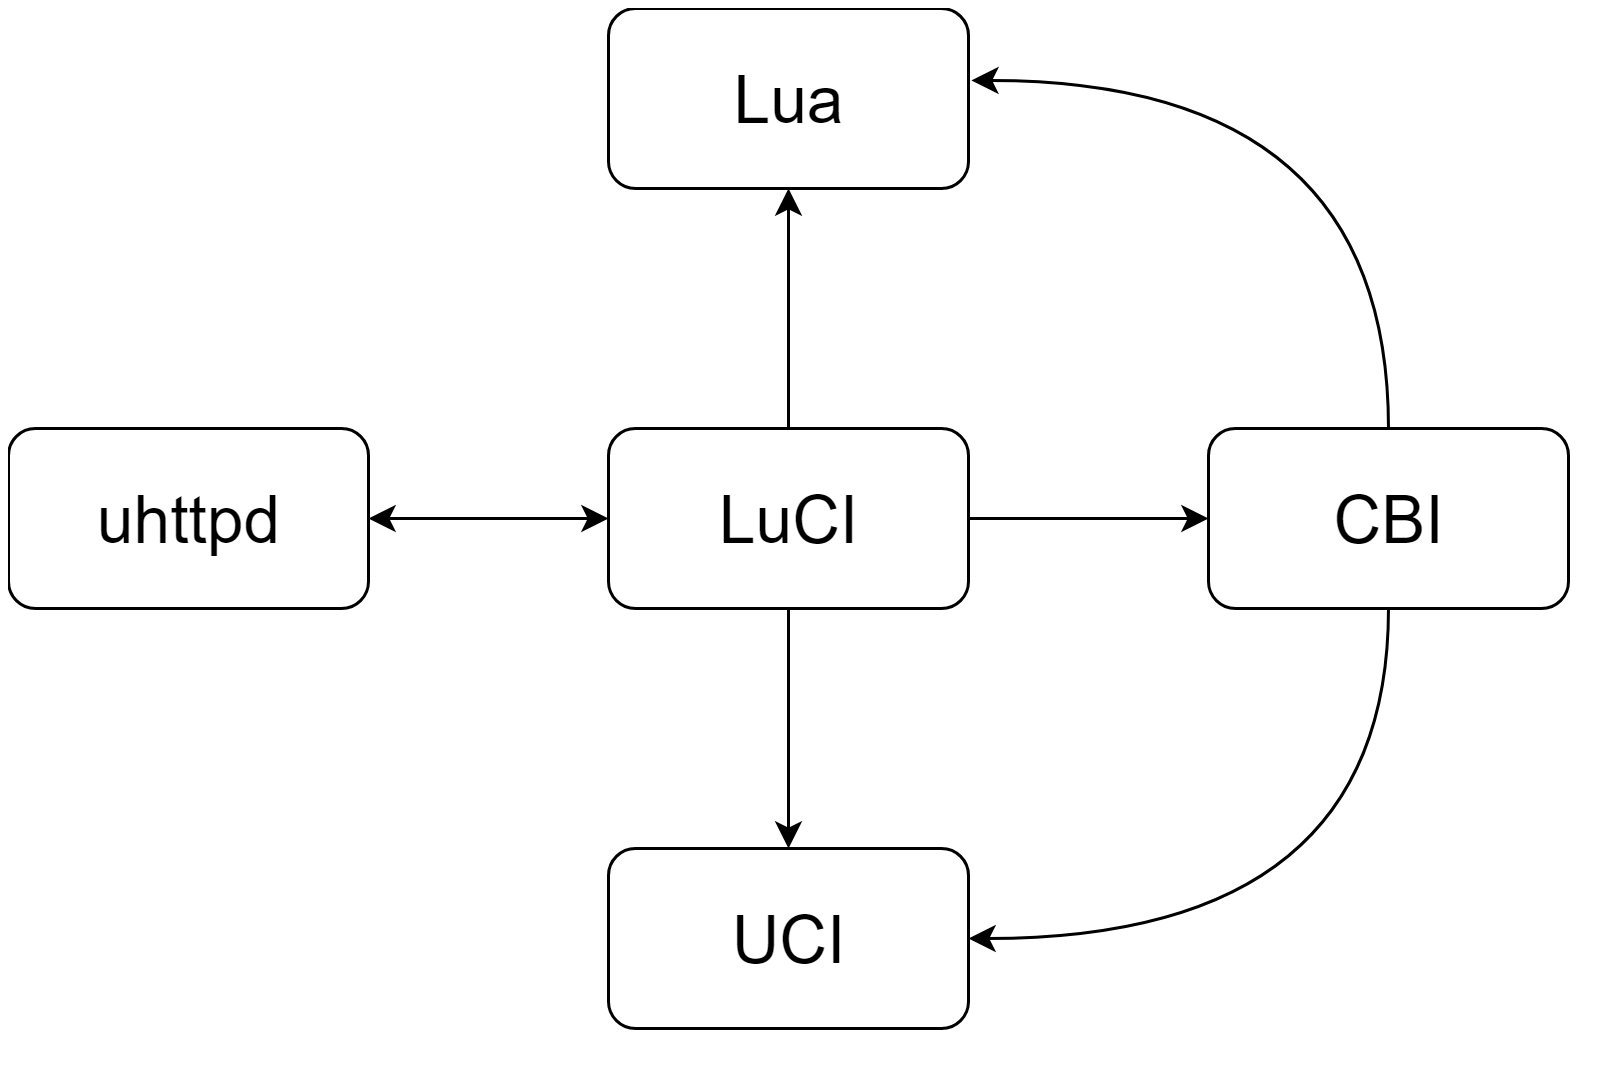
uhttpd/LuCI/UCI/Lua/CBI之间大致关系如下:

2 uhttpd和LuCI配置和使用
2.1 uhttpd和LuCI使能
uHTTPd和LuCI的相关配置如下:
Network
    ->Web Servers/Proxies
    ->uhttpd--uhttpd支持。
    ->Enable Integrated Lua interpreter--Lua脚本语言支持。
    ->uhttpd-mod-lua--uhttpd支持Lua脚本的插件。
LuCI
  ->1. Collections
    luci--LuCI interface with Uhttpd as Webserver (default)
    luci-ssl--LuCI with HTTPS support (WolfSSL as SSL backend)
  ->2. Modules
  ->3. Applications
  ->4. Themes
  ->5. Protocols
  ->6. Libraries
2.2 uhttpd和LuCI编译
配置完成后,更新安装软件包:
./scripts/feeds update -a
./scripts/feeds install -a
然后编译:
make V=s -j8
2.3 uhttpd配置
uhttpd启动的配置文件/etc/config/uhttpd按照UCI规范编写,文件如下:
config uhttpd 'main'
        list listen_http '0.0.0.0:80'--监听端口80。
        list listen_http '[::]:80'
        list listen_https '0.0.0.0:443'--IPv6监听端口为443。
        list listen_https '[::]:443'
        option redirect_https '0'
        option home '/www'--指定存放html的根目录。
        option rfc1918_filter '1'
        option max_requests '3'--最大请求数。
        option max_connections '100'--最大TCP连接数。
        option cert '/etc/uhttpd.crt'--HTTPS的证书路径。
        option key '/etc/uhttpd.key'--HTTPS的私钥路径。
        option cgi_prefix '/cgi-bin'--CGI脚本路径,即/www/cgi-bin。
        list lua_prefix '/cgi-bin/luci=/usr/lib/lua/luci/sgi/uhttpd.lua'--Lua启动脚本路径为/www/cgi-bin/luci,Lua runtime初始化路径为/usr/lib/lua/luci/sgi/uhttpd.lua。
        option script_timeout '60'
        option network_timeout '30'
        option http_keepalive '20'
        option tcp_keepalive '1'
        option ubus_prefix '/ubus'

config cert 'defaults'
        option days '730'
        option key_type 'ec'
        option bits '2048'
        option ec_curve 'P-256'
        option country 'ZZ'
        option state 'Somewhere'
        option location 'Unknown'
        option commonname 'OpenWrt'
更多参考:《[OpenWrt Wiki] uHTTPd Web Server Configuration》。
2.4 uhttpd到LuCI的工作流程
启动脚本/etc/init.d/uhttpd启动uhttpd守护进程。
index.html是uhttpd指定的入口,其将请求转交给/www/cgi-bin/luci处理。
<?xml version="1.0" encoding="utf-8"?>
<!DOCTYPE html PUBLIC "-//W3C//DTD XHTML 1.1//EN" "http://www.w3.org/TR/xhtml11/DTD/xhtml11.dtd">
<html xmlns="http://www.w3.org/1999/xhtml">
    <head>
        <meta http-equiv="Cache-Control" content="no-cache, no-store, must-revalidate" />
        <meta http-equiv="Pragma" content="no-cache" />
                <meta http-equiv="Expires" content="0" />
        <meta http-equiv="refresh" content="0; URL=cgi-bin/luci/" />
        <style type="text/css">
            body { background: white; font-family: arial, helvetica, sans-serif; }
            a { color: black; }

            @media (prefers-color-scheme: dark) {
                body { background: black; }
                a { color: white; }
            }
        </style>
    </head>
    <body>
        <a href="cgi-bin/luci/">LuCI - Lua Configuration Interface</a>
    </body>
</html>
luci脚本默认路径为/usr/lib/lua/luci。luci脚本调用了luci.sgi.cgi.run():
#!/usr/bin/lua
require "luci.cacheloader"
require "luci.sgi.cgi"
luci.dispatcher.indexcache = "/tmp/luci-indexcache"
luci.sgi.cgi.run()--执行/usr/lib/lua/luci/sgi/cgi.lua的run()函数。
所以整体的调用流程是:uhttpd->index.html->www/cgi-bin/luci->cgi.lua。
关于Lua、UCI、LuCI、CBI,以及Web如何与服务交互、如何添加自己的应用等留待有需要再研究。

更多参考文件:《Openwrt:LuCI入门(一)_openwrt luci》《Openwrt:LuCI之CBI(二)_luci cbi 调试》《Openwrt:LuCI之UCI(三)_luci uci ubus》《【玩转开源】BananaPi R2 —— 第四篇 Openwrt Luci 初探》。
3 实例
如下是Windows+VMWare+QEMU+OpenWRT运行实例,关于QEMU运行OpenWRT的说明参考《Ubuntu下OpenWRT环境配置、下载、配置、运行记录》。
3.1 配置主机网络
TAP(Tunneling Access Point)设备是一种工作在数据链路层(OSI模型第二层)的虚拟网络设备。它模拟了一个以太网接口,允许用户态程序与内核网络栈进行交互。TAP设备可以接收和发送以太网帧(Ethernet frames),为应用程序提供一个类似真实网络的环境。在虚拟机、容器等场景中,TAP设备常常被用来为虚拟机或容器分配独立的IP地址和MAC地址,实现网络隔离和通信。
- 创建TAP设备。
- 为TAP配置IP地址。
- 启动TAP设备。
sudo ip tuntap add dev tap0 mode tap
sudo ip address add dev tap0 192.168.2.1/24
sudo ip link set dev tap0 up
ifconfig查看创建结果:
tap0: flags=4099<UP,BROADCAST,MULTICAST>  mtu 1500
        inet 192.168.2.1  netmask 255.255.255.0  broadcast 0.0.0.0
        ether 2a:6a:8a:26:07:9a  txqueuelen 1000  (Ethernet)
        RX packets 0  bytes 0 (0.0 B)
        RX errors 0  dropped 0  overruns 0  frame 0
        TX packets 0  bytes 0 (0.0 B)
        TX errors 0  dropped 0 overruns 0  carrier 0  collisions 0
3.2 QEMU启动镜像
qemu启动命令:
qemu-system-aarch64 -m 1024 -smp 2 -cpu cortex-a53 -M virt -nographic \
-kernel bin/targets/armvirt/64/openwrt-armvirt-64-Image-initramfs \
-drive if=none,file=disk.img,format=raw,id=hd0 -device virtio-blk-device,drive=hd0 \
-net nic -net tap,ifname=tap0,script=no,downscript=no
命令解释如下:
- qemu-system-aarch64:这是QEMU的启动命令,指定了要模拟的系统架构为AArch64。
- -m 1024:这指定了虚拟机的内存大小为1024MB。
- -smp 2:这指定了虚拟机的CPU核心数为2,即对称多处理(Symmetric Multi-Processing)。
- -cpu cortex-a57:这指定了虚拟CPU的型号为Cortex-A57,这是一个ARM架构的CPU。
- -M virt:这指定了QEMU要使用的机器模型为virt,这是一个为虚拟化优化的标准机器模型。
- -nographic:这指定了虚拟机不使用图形界面,即所有输出都将在控制台中显示。
- -kernel bin/targets/armvirt/64/openwrt-armvirt-64-Image-initramfs:这指定了要加载的内核映像文件的路径。在这个例子中,使用的是OpenWrt的ARM虚拟机64位的initramfs映像。
- -drive if=none,file=disk.img,format=raw,id=hd0:这指定了一个虚拟的磁盘驱动器,它最初不连接到任何设备(if=none),使用原始(raw)格式的磁盘映像文件disk.img,并且给它分配了一个ID hd0。
- -device virtio-blk-device,drive=hd0:这指定了一个VirtIO块设备,它将使用上面创建的ID为hd0的磁盘驱动器。
- -net nic:这指定了虚拟机应该有一个网络接口卡(NIC)。
- -net tap,ifname=tap0,script=no,downscript=no:这指定了一个使用TAP设备(tap0)的网络后端,不使用任何脚本来配置网络接口,也不在虚拟机启动时自动启用或禁用网络接口。
3.3 虚拟机配置
虚拟机原网络环境为:
br-lan    Link encap:Ethernet  HWaddr 52:54:00:12:34:56
          inet addr:192.168.1.1  Bcast:192.168.1.255  Mask:255.255.255.0
          inet6 addr: fd6e:582d:edb2::1/60 Scope:Global
          inet6 addr: fe80::5054:ff:fe12:3456/64 Scope:Link
          UP BROADCAST RUNNING MULTICAST  MTU:1500  Metric:1
          RX packets:0 errors:0 dropped:0 overruns:0 frame:0
          TX packets:12 errors:0 dropped:0 overruns:0 carrier:0
          collisions:0 txqueuelen:1000
          RX bytes:0 (0.0 B)  TX bytes:1784 (1.7 KiB)

eth0      Link encap:Ethernet  HWaddr 52:54:00:12:34:56
          UP BROADCAST RUNNING MULTICAST  MTU:1500  Metric:1
          RX packets:1 errors:0 dropped:0 overruns:0 frame:0
          TX packets:20 errors:0 dropped:0 overruns:0 carrier:0
          collisions:0 txqueuelen:1000
          RX bytes:110 (110.0 B)  TX bytes:4386 (4.2 KiB)
虚拟机网络配置:
- 删除从br-lan网桥中删除eth0接口。
- 为eth0添加一个IP地址和子网掩码。
- 启用eth0网络接口。
brctl delif br-lan eth0
ip addr add 192.168.2.2/24 dev eth0
ip link set eth0 up
配置后网络如下:
br-lan    Link encap:Ethernet  HWaddr 52:54:00:12:34:56
          inet addr:192.168.1.1  Bcast:192.168.1.255  Mask:255.255.255.0
          inet6 addr: fd6e:582d:edb2::1/60 Scope:Global
          inet6 addr: fe80::5054:ff:fe12:3456/64 Scope:Link
          UP BROADCAST MULTICAST  MTU:1500  Metric:1
          RX packets:58 errors:0 dropped:0 overruns:0 frame:0
          TX packets:16 errors:0 dropped:0 overruns:0 carrier:0
          collisions:0 txqueuelen:1000
          RX bytes:7185 (7.0 KiB)  TX bytes:2480 (2.4 KiB)

eth0      Link encap:Ethernet  HWaddr 52:54:00:12:34:56
          inet addr:192.168.2.2  Bcast:0.0.0.0  Mask:255.255.255.0
          UP BROADCAST RUNNING MULTICAST  MTU:1500  Metric:1
          RX packets:59 errors:0 dropped:0 overruns:0 frame:0
          TX packets:24 errors:0 dropped:0 overruns:0 carrier:0
          collisions:0 txqueuelen:1000
          RX bytes:8107 (7.9 KiB)  TX bytes:5082 (4.9 KiB)
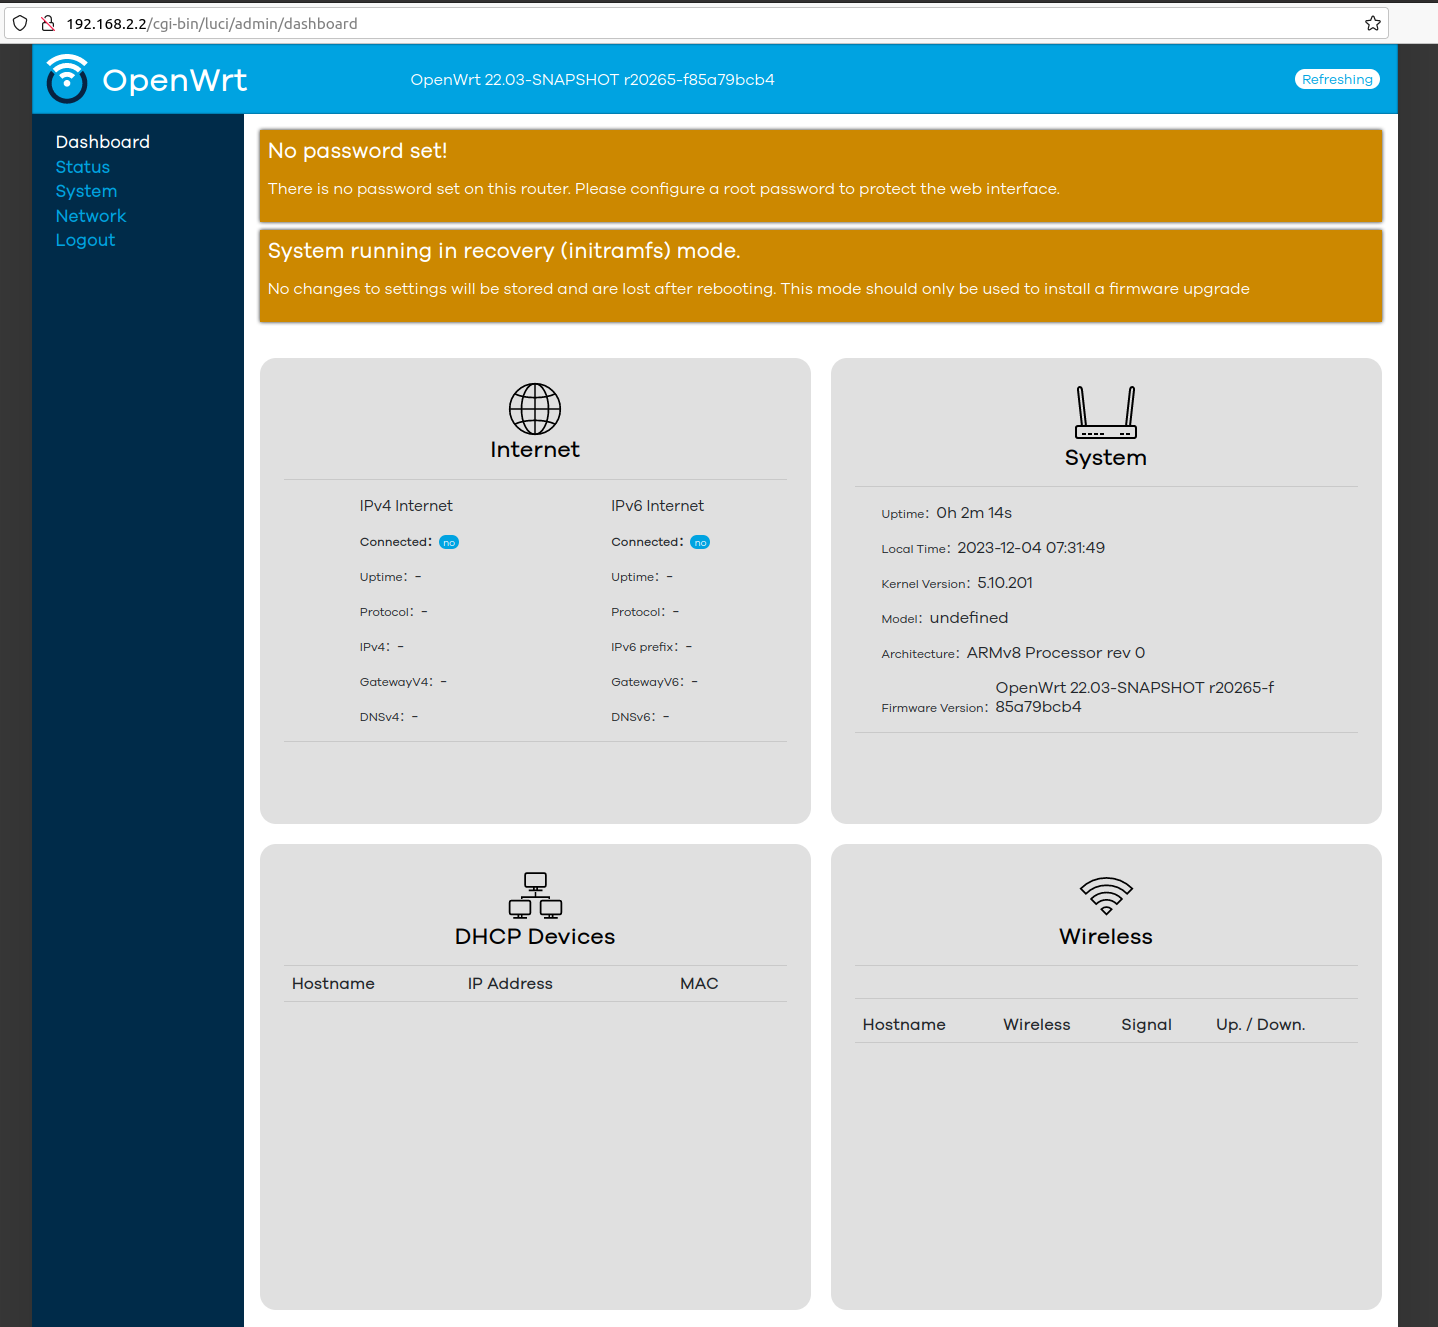
3.4 在主机浏览器访问虚拟机WebUI


 浙公网安备 33010602011771号