自动化运维工具——ansible命令使用(二)
一、Ansible系列命令使用
ansible命令执行过程
- 1 . 加载自己的配置文件 默认/etc/ansible/ansible.cfg
- 2 . 加载自己对应的模块文件,如command
- 3 . 通过ansible将模块或命令生成对应的临时py文件,并将该文件传输至远程服务器的对应执行用户$HOME/.ansible/tmp/ansible-tmp-数字/XXX.PY文件
- 4 . 给文件+x执行
- 5 . 执行并返回结果
- 6 . 删除临时py文件,sleep 0退出
执行状态:
- 绿色:执行成功并且不需要做改变的操作
- 黄色:执行成功并且对目标主机做变更
- 红色:执行失败
1. ansible命令
    ansible <host-pattern> [-m module_name] [-a args]
        -a                       //后面跟参数
        --version            //显示版本
        --m module        //指定模块,默认使用command模块
        -v                       //显示详细过程  -vv  -vvv 显示更详细
        --list-hosts          //显示主机列表,可简写-list
        -k,--ask-pass   //提示连接密码,默认key验证
        -K,--ask-become-pass       //提示输入sudo
        -C,--check          //检查命令,并不执行
        -T,--timeout=TIMEOUT     //执行命令的超时时间,默认10s
        -u,--user=REMOTE_USER    //执行远程操作的 执行的用户
        -b,--become     //代替旧版的sudo切换
示例:
        ansible all  -m command -u yunwei  --become-user=root -a 'ls /root' -b -k -K
                //以yunwei用户 sudo 到root用户 执行 ls /root
-
ansible的host-pattern
//匹配主机的列表
all :表示所有inventory中的所有主机
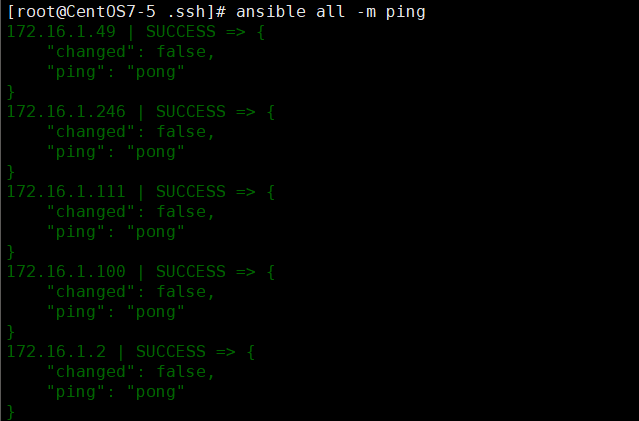
ansible all -m ping //ping一下主机清单中的所有主机是否能正常登陆,但是不是icmp协议的ping命令

ansible all --list-hosts

*:通配符
    ansible "*"   -m ping
    ansible  172.16.1.* -m ping
    ansible  "*Server"  -m  ping
    //或关系:
        ansible "webServer:appServer" -m ping
        ansible "192.168.1.10:192.168.1.20" -m ping
    //逻辑与:
        ansible "webServer:&mysqlServer" –m ping
        在webServer组并且在mysqlServer组中的主机
    //逻辑非:
        ansible webServer:!mysqlServer' –m ping
        在websrvs组,但不在mysqlServer组中的主机
    //综合逻辑:
        ansible 'webServer:mysqlServer:&appServer:!ftpServer' –m ping
    //正则表达式:
        ansible "webServer:&mysqlServer" –m ping
        ansible "~(web|wj).*\.bigboss\.com" –m ping
2. ansible常用模块
1. command 模块,默认模块
在远程主机执行命令,默认模块,可忽略-m选项
ansible mysqlServer -m command -a 'systemctl restart mysqld'

    ansible webServer -m command -a 'echo 123456 |passwd --stdin yunwei'
    ansible webServer -m command -a 'echo "123456" >f1'
    //显示已经执行成功,但是远程主机并没有产生操作


注意command模块不支持 变量$VarName > < | ; & 等,可以使用shell模块实现
2. shell模块 支持通配符
和command模块类似,在远程主机执行命令,支持通配符
    ansible webServer -m shell -a 'echo 123456 |passwd --stdin yunwei'
       //调用bash执行命令
       //类似 cat /tmp/stanley.md | awk -F'|' '{print $1,$2}' &> /tmp/example.txt
       //这些复杂命令,即使使用shell也可能会失败,解决办法:写到脚本时,copy到远程,执行,再把需要的结果拉回执行命令的机器

密码设置成功

3. script模块
把脚本复制到远程节点后,在远程节点本地运行脚本
    ansible webServer -m script -a  restart.sh
    //如果有返回的内容也会返回 stdout;下图我cat 一个文件

4. copy模块
复制文件或目录到远程节点;如果目标存在,默认会覆盖,用此模块应指定先备份。
    ansible webServer -m copy -a "src=/etc/hosts  dest=/root/hosts  owner=root mode=660 backup=yes"

    src  //指定源文件在本地主机的地址,可以是绝对路径,也可以是相对路径。如果路径是一个目录,它将递归复制。在这种情况下,如果路径使用"/"来结尾,则只复制目录里的内容,如果没有使用"/"来结尾,则包含目录在内的整个内容全部复制,类似于rsync。
    dest  //必选项。要将源文件复制到的远程主机的绝对路径,如果源文件是一个目录,那么该路径也必须是个目录
    ownr   //更改文件所有者
    mode   //权限更改
    directory_mode  //递归的设定目录的权限,默认为系统默认权限
    backup   //再覆盖之前将源文件备份,备份文件包含时间信息。backup = yes|no  ,不使用默认不备份
    content   //可以编写 content="xxxxxdfasafsafasfasf" 指定dest文件后,将类似`echo $content   >  $dest  ` 生成指定文件包含指定内容;
5. fetch模块
    从客户端拖去文件到本地主机,与copy相反,只能抓取文件,抓取目录可以先 `tar` 打包
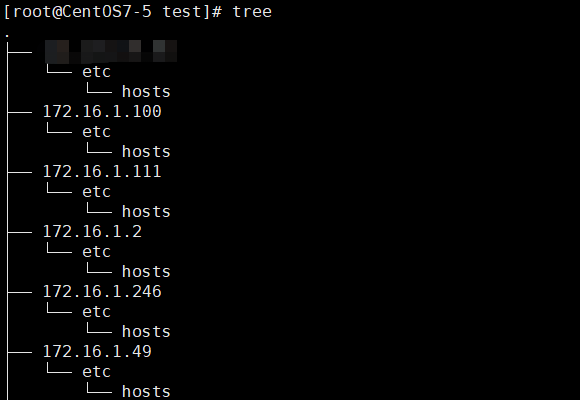
    默认会以主机清单中的主机名为目录存放获取到的文件
    ansible all -m fetch -a 'src=/etc/hosts  dest=/data/test'

172.16.1.2 | CHANGED => {
    "changed": true,
    "checksum": "7335999eb54c15c67566186bdfc46f64e0d5a1aa",
    "dest": "/data/test/172.16.1.2/etc/hosts",
    "md5sum": "54fb6627dbaa37721048e4549db3224d",
    "remote_checksum": "7335999eb54c15c67566186bdfc46f64e0d5a1aa",
    "remote_md5sum": null

6. archive模块
将远程主机的指定文件或目录,打包成指定压缩格式的压缩包,并放到远程主机的指定位置
ansible all -m archive -a 'path=/etc/rpm dest=/root/rpm.tar  format=tar'

    path   //指定要打包的文件路径  (Required必须条件)
    dest   //打包后要放的位置和 命名
    format    // 指定打包压缩的格式  有:bz2 ,gz ,tar,xz,zip
可以anible-doc archive 查看模块帮助
5. cron 计划任务
管理计划任务
//支持时间
day:日(1-31,*,*/2,……)
hour:小时(0-23,*,*/2,……)
minute:分钟(0-59,*,*/2,……)
month:月(1-12,*,*/2,……)
weekday:周(0-7,*,……)

backup:对远程主机上的原任务内容修改之前做备份
cron_file:如果指定该选项,则用该文件替换远程主机的cron.d目录下的用户的任务计划
job:要执行的任务
name:该任务描述,任务名
special_time:指定什么时候执行,参数:reboot,yearly,annually,monthly,weekly,daily,hourly
state:确认该任务计划是创建还是删除  值为absent为删除
user:执行任务的用户

ansible all -m cron -a “minute=*/5  job=‘/usr/sbin/ntpdate 172.16.0.1 &>/dev/null’  name=Synctime” //创建任务
ansible all -m cron -a ‘state=absent  name=Synctime’   //删除任务
6. file模块
设置远程主机的文件属性
//参数属性
    path:必选项,定义文件/目录的路径
    state:操作方法
        directory:如果目录不存在,创建目录
        absent:删除目录、文件或者取消链接文件。相当于rm -rf
        link:创建软链接
        hard:创建硬链接
        file:即使文件不存在,也不会被创建
        touch:如果文件不存在,则会创建一个新的文件,如果文件或目录已存在,则更新时间戳
    src:要被链接的源文件的路径,只应用于state=link的情况
    dest:被链接到的路径,只应用于state=link的情况
    recurse:递归的设置文件的属性,只对目录有效
    owner:定义文件/目录的属主
    mode:定义文件/目录的权限
    group:定义文件/目录的属组
    force:需要在两种情况下强制创建软链接,一种是源文件不存在但之后会建立的情况下;另一种是目标软链接已存在,需要先取消之前的软链,然后创建新的软链,有两个选项:yes|no

ansible all -m file -a 'name=/app/a.txt state=touch'     //创建或者刷新文件
ansible webServer -m file -a "path=/root/a.sh owner=wang mode=755"  //修改文件属性
ansible webServer -m file -a 'src=/app/testfile dest=/app/testfile-link state=link'   //创建软链接
7. hostnam模块
管理远程主机名
ansible webServer -m hostname -a "web.server"
8. yum模块
使用yum包管理器来管理软件包
\\属性参数
    config_file:yum的配置文件
    disable_gpg_check:关闭gpg_check
    disablerepo:不启用某个源
    enablerepo:启用某个源
    name:要进行操作的软件包的名字,也可以传递一个url或者一个本地的rpm包的路径
    state:安装   (`present' or `installed', `latest'), 删除 (`absent' or `removed') . (可选值: present, installed, latest, absent, removed) (默认值 present安装)

ansible webServer -m yum  -a 'name=nginx   state=latest'          //安装nginx
ansible webServer -m yum  -a 'name=mysql   state=absent'       //删除mysql
9. yum_repositoy
配置yum源
reposdir: repo文件存放目录
file:      repo文件名,默认为name的值
name:       唯一的repository ID
gpgkey:设置gpgkey
gpgcheck:设置gpg检查
enabled:设置开启关闭
bandwidth:控制带宽,0为无限
state:状态(present,absent
description:描述

ansible dns -m yum_repository -a  \
    'state=present                        \
    name=epel                             \
    enabled=yes                          \
    gpgcheck=yes                       \
    description="Aliyun EPEL"    \
    baseurl="http://mirrors.aliyun.com/epel/7/$basearch,http://mirrors.aliyuncs.com/centos/$releasever/os/$basearch/" \
    gpgkey="https://mirrors.aliyun.com/epel/RPM-GPG-KEY-EPEL-7Server"'
10.service模块
管理服务
    name:服务名
    state:动作 started,stopped restarted,reloaded
    enabled: yes开机自启,no不启动
    runlevel:运行级别
    pattern:定义一个模式,如果通过status指令来查看服务的状态时,没有响应,就会通过ps指令在进程中根据该模式进行查找,如果匹配到,则认为该服务依然在运行

ansible webServer -m service  -a 'name=nginx state=started'   //一次只能操作一种服务
11.user 模块
管理用户
    name:用户名
    system:yes是系统用户,no不是系统用户
    home:设置家目录
    state:设置 创建用户 还是删除,present 创建,absent删除,remove=yes 删除家目录数据
ansible mysqlServer -m user -a 'name=user1 comment="test user" uid=2048 home=/app/user1 group=root'
ansible srv -m user -a 'name=sysuser1 system=yes home=/app/sysuser1 '
ansible srv -m user -a 'name=user1 state=absent remove=yes'    //删除用户及家目录等数据
12.group模块
添加组,删除组
ansible webServer -m group -a "name=testgroup system=yes"  //创建组
ansible webServer -m group -a "name=testgroup state=absent"   //删除组
13.setup
收集远程主机的信息
    --tree:将所有主机的输出信息保存到/tmp/目录下,以/etc/ansible/hosts里的主机名为文件名
ansible all -m setup -a 'filter=ansible_distribution_version' --tree /tmp/
    filter :过滤关键字
ansible webServer -m setup -a 'filter=ansible_distribution_version'
| 关键字 | 说明 |
|---|---|
| ansible_nodename | 节点名 |
| ansible_fqdn | FQDN名 |
| ansible_hostname | 主机短名称 |
| ansible_domain | 主机域名后缀 |
| ansible_memtotal_mb | 总物理内存 |
| ansible_swaptotal_mb | SWAP总大小 |
| ansible_processor | CPU信息 |
| ansible_processor_cores | CPU核心数量 |
| ansible_processor_vcpus | CPU逻辑核心数量 |
| ansible_all_ipv4_addresses | 有所IPV4地址 |
| ansible_all_ipv6_addresses | 所有IPV6地址 |
| ansible_default_ipv4 | 默认网关的网卡配置信息 |
| ansible_eth2 | 具体某张网卡信息 |
| ansible_dns | DNS设置信 |
| ansible_architecture | 系统架构 |
| ansible_machine | 主机类型 |
| ansible_kernel | 内核版本 |
| ansible_distribution | 发行版本 |
| ansible_distribution_major_version | 操作系统主版本号 |
| ansible_distribution_release | 发行版名称 |
| ansible_distribution_version | 完整版本号 |
| ansible_pkg_mgr | 软件包管理方式 |
| ansible_service_mgr | 进行服务方式 |
| ansible_os_family | 家族系列 |
| ansible_cmdline | 内核启动参数 |
| ansible_selinux | SElinux状态 |
| ansible_env | 当前环境变量参数 |
| ansible_date_time | 时间相关 |
| ansible_python_version | python版本 |
| ansible_lvm | LVM卷相关信息 |
| ansible_mounts | 所有挂载点 |
| ansible_device_links | 所有挂载的设备的UUID和卷标名 |
| ansible_devices | 所有/dev/下的正在使用的设备的信息 |
| ansible_user_dir | 执行用户的家目录 |
| ansible_user_gecos | 执行用户的描述信息 |
| ansible_user_gid | 执行用户的的GID |
| ansible_user_id | 执行用户的的用户名 |
| ansible_user_shell | 执行用户的shell类型 |
| ansible_user_uid | 执行用户的UID |
更多模块了解 查看 https://docs.ansible.com/ansible/latest/modules/list_of_all_modules.html
只有今天

