
【STM32H7】第4章 ThreadX FileX文件系统移植到STM32H7(SD卡)
论坛原始地址(持续更新):http://www.armbbs.cn/forum.php?mod=viewthread&tid=100749
第4章 ThreadX FileX文件系统移植到STM32H7(SD卡)
本章节为大家讲解SD卡的ThreadX FileX文件系统移植。
4.1 初学者重要提示
4.2 SD卡硬件接口设计
4.3 SD卡基础知识
4.4 各种存储卡区别
4.5 关于SD卡内部是否自带擦写均衡
4.6 ThreadX FlieX移植步骤
4.7 ThreadX FlieX应用代码测试
4.8 ThreadX FlieX移植接口文件fx_stm32_sdio_driver.c说明
4.9 实验例程
4.10 总结
4.1 初学者重要提示
1、 SDMMC的相关知识点可以看第3章。
2、 操作SD卡是以扇区(512字节)为单位进行操作。
3、 SD卡联盟强烈强烈建议使用此软件来格式化SD/SDHC/SDXC卡,而不要使用各个操作系统随附的格式化工具。通常,操作系统附带的格式化工具可以格式化包括SD/SDHC/SDXC卡在内的各种存储介质,但是可能无法针对SD/SDHC/SDXC卡进行优化,并且可能导致性能降低。
软件下载:http://www.armbbs.cn/forum.php?mod=viewthread&tid=96181 。
4、 STM32H7的SDMMC也支持eMMC:
- 【普及贴】各个厂家eMMC读写速度,镁光,东芝,三星,ISSI和旺宏
http://www.armbbs.cn/forum.php?mod=viewthread&tid=95954
- H7的8线SDIO DMA驱动eMMC的裸机性能,读43MB/S,写18.8MB/S
http://www.armbbs.cn/forum.php?mod=viewthread&tid=95953
5、 支持128GB,64GB的大容量SD卡,需要大家使能ThreadX FileX的exFAT即可。
4.2 SD卡硬件接口设计
STM32H7驱动SD卡设计如下:
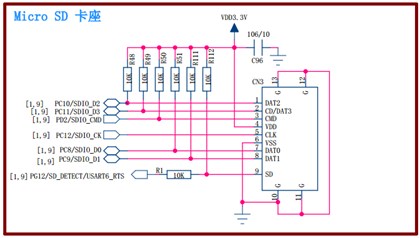
关于这个原理图,要了解到以下几个知识:
- 大家自己设计推荐也接上拉电阻。
- 这里采用SDMMC的4线方式。
4.3 SD卡基础知识
这里将SD卡相关的基础知识为大家做个普及。
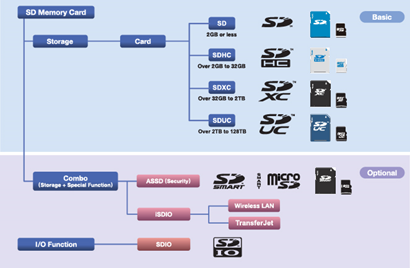
4.3.1 SD卡分类
根据不同容量做的区分,主要包括Full SD,miniSD和microSD。
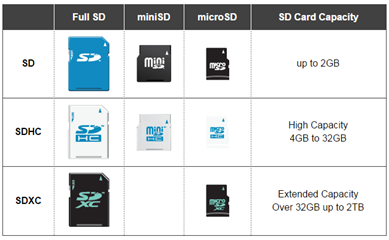
4.3.2 SD卡容量及其使用的文件系统
容量小于2GB(SD卡)使用FAT12或者FAT16,容量在2GB和32GB之间(SDHC卡)使用FAT32,容量大于32GB小于2TB(SDXC卡)使用exFAT。
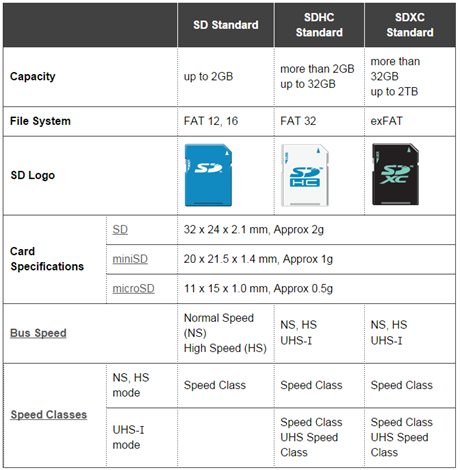
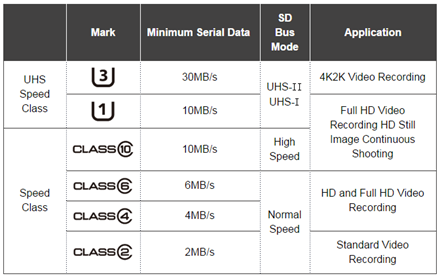
4.3.3 SD卡总线速度和速度等级
SD卡速度:
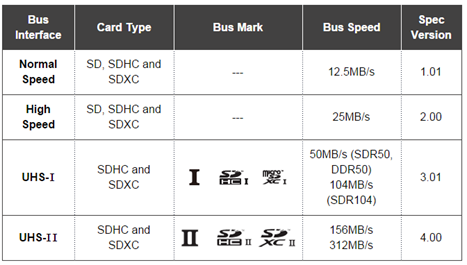
SD卡速度等级:
4.4 各种存储卡区别
市面上的卡种类非常多,容易把人搞糊涂,这里将这些卡种类为大家做个区分:
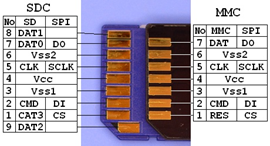
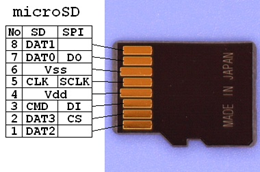
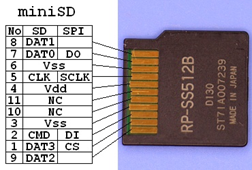
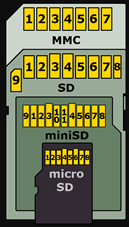
4.4.1 SD卡,miniSD卡,TF卡,MircoSD卡
TF卡是MicroSD卡的另一种叫法,无需做区分。SD卡,miniSD卡,MircoSD卡其实是一种卡,区别是引脚使用上。
4.4.2 SDIO卡
SDIO卡就是使用SDIO外设来接SD卡。
而为什么叫SDIO,根据wiki百科说明,其实就是SD卡接口规范的扩展,带了输入输出功能,这个接口不仅可以接SD卡,还可以接其它外设,如条形码读卡器,WiFi,蓝牙,调制解调器等。
https://en.wikipedia.org/wiki/SD_card#SDIO_cards
对于STM32的SDIO来说,他就是指STM32的一个外设接口,不仅能够来接SD卡,还可以接其它外设。
4.4.3 MMC卡,eMMC
截止2018年,市场上已经没有设备内置MMC卡槽,但eMMC得到了广泛应用https://en.wikipedia.org/wiki/MultiMediaCard 。
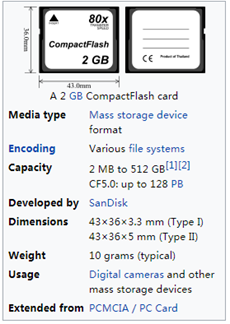
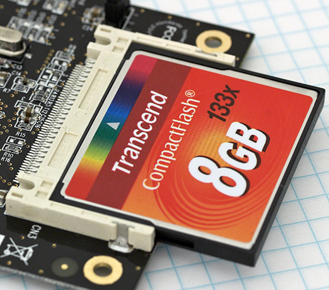
4.4.4 CF卡
CF卡是早期最成功的存储卡格式之一,像MMC/SD卡都是后来才推出的。CF卡仍然很受欢迎卡之一,并得到许多专业设备和高端消费类设备的支持。截至2017年,佳能和尼康都将CompactFlash用于其旗舰数码相机。佳能还选择了CompactFlash作为其专业高清无带摄像机的记录介质。
基础规格:
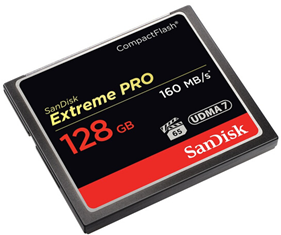
实际效果:
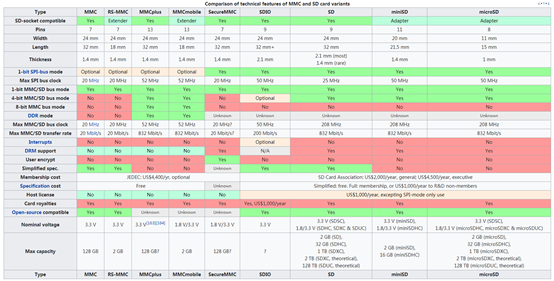
4.4.5 总体区别
来自Wiki:https://en.wikipedia.org/wiki/SD_card#Micro
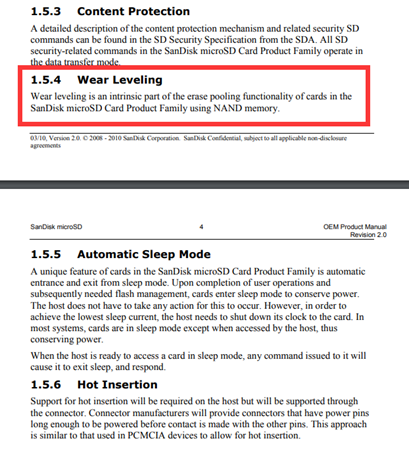
4.5 关于SD卡内部是否自带擦写均衡
根据网上搜的一个闪迪的规格书,里面说是带擦写均衡的:
http://www.armbbs.cn/forum.php?mod=viewthread&tid=102891
4.6 ThreadX FileX移植步骤
ThreadX FileX的移植步骤如下:
4.6.1 第1步,了解整体设计框架
为了方便大家移植,需要大家先对移植好的工程有个整体认识:
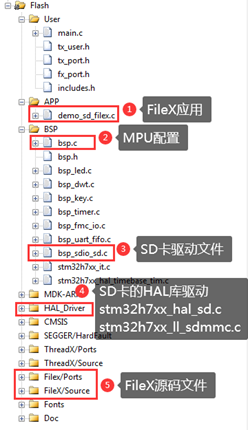
4.6.2 第2步,添加FileX和SDMMC驱动到工程
本教程前面章节配套的例子都可以作为模板使用,在模板的基础上需要添加FileX文件,SDMMC驱动文件和SD卡驱动文件,大家可以直接从本章教程提供的例子里面复制。
- SD卡驱动文件bsp_sdio_sd.c和bsp_sdio_sd.h添加到自己的工程里面,路径不限。
配套例子是放在\User\bsp\src和\User\bsp\inc文件。
- SDMMC驱动文件stm32h7xx_hal_sd.c和stm32h7xx_ll_sdmmc.c
这个是STM32H7的HAL库自带的。
- FileX相关源文件。
大家可以将所有相关文件都复制到自己的工程里面,配套例子是放在\FileX。
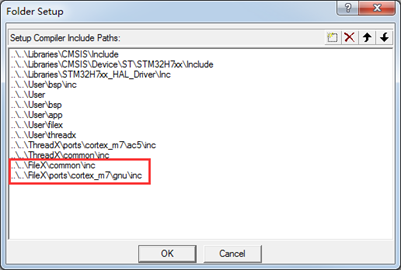
4.6.3 第3步,添加工程路径
当前需要添加的两个FileX路径,大家根据自己添加的源文件位置,添加相关路径即可:
4.6.4 第4步,配置GPIO和时钟
根据大家使用SDMMC1或者SDMMC2配置相应时钟和GPIO,当前V7板子是用的SDMMC1:
__weak void BSP_SD_MspInit(SD_HandleTypeDef *hsd, void *Params)
{
  GPIO_InitTypeDef gpio_init_structure;

  /* Enable SDIO clock */
  __HAL_RCC_SDMMC1_CLK_ENABLE();

  /* Enable GPIOs clock */
  __HAL_RCC_GPIOB_CLK_ENABLE();
  __HAL_RCC_GPIOC_CLK_ENABLE();
  __HAL_RCC_GPIOD_CLK_ENABLE();

  gpio_init_structure.Mode      = GPIO_MODE_AF_PP;
  gpio_init_structure.Pull      = GPIO_NOPULL;
  gpio_init_structure.Speed     = GPIO_SPEED_FREQ_VERY_HIGH;

  /* D0(PC8), D1(PC9), D2(PC10), D3(PC11), CK(PC12), CMD(PD2) */
  /* Common GPIO configuration */
  gpio_init_structure.Alternate = GPIO_AF12_SDIO1;

  /* GPIOC configuration */
  gpio_init_structure.Pin = GPIO_PIN_8 | GPIO_PIN_9 | GPIO_PIN_10 | GPIO_PIN_11 | GPIO_PIN_12;
  HAL_GPIO_Init(GPIOC, &gpio_init_structure);

  /* GPIOD configuration */
  gpio_init_structure.Pin = GPIO_PIN_2;
  HAL_GPIO_Init(GPIOD, &gpio_init_structure);

  __HAL_RCC_SDMMC1_FORCE_RESET();
  __HAL_RCC_SDMMC1_RELEASE_RESET();

  /* NVIC configuration for SDIO interrupts */
  HAL_NVIC_SetPriority(SDMMC1_IRQn, 5, 0);
  HAL_NVIC_EnableIRQ(SDMMC1_IRQn);
}
4.6.5 第5步,MPU配置
为了方便大家移植测试,我们这里直接关闭AXI SRAM的读Cache和写Cache(这样就跟使用STM32F1或者STM32F4系列里面的SRAM一样)。此配置是在bsp.c文件的MPU_Config函数里面实现:
/*
*********************************************************************************************************
*    函 数 名: MPU_Config
*    功能说明: 配置MPU
*    形    参: 无
*    返 回 值: 无
*********************************************************************************************************
*/
static void MPU_Config( void )
{
    MPU_Region_InitTypeDef MPU_InitStruct;

    /* 禁止 MPU */
    HAL_MPU_Disable();

#if 0
       /* 配置AXI SRAM的MPU属性为Write back, Read allocate,Write allocate */
    MPU_InitStruct.Enable           = MPU_REGION_ENABLE;
    MPU_InitStruct.BaseAddress      = 0x24000000;
    MPU_InitStruct.Size             = MPU_REGION_SIZE_512KB;
    MPU_InitStruct.AccessPermission = MPU_REGION_FULL_ACCESS;
    MPU_InitStruct.IsBufferable     = MPU_ACCESS_BUFFERABLE;
    MPU_InitStruct.IsCacheable      = MPU_ACCESS_CACHEABLE;
    MPU_InitStruct.IsShareable      = MPU_ACCESS_NOT_SHAREABLE;
    MPU_InitStruct.Number           = MPU_REGION_NUMBER0;
    MPU_InitStruct.TypeExtField     = MPU_TEX_LEVEL1;
    MPU_InitStruct.SubRegionDisable = 0x00;
    MPU_InitStruct.DisableExec      = MPU_INSTRUCTION_ACCESS_ENABLE;

    HAL_MPU_ConfigRegion(&MPU_InitStruct);

 #else
     /* 当前是采用下面的配置 */
    /* 配置AXI SRAM的MPU属性为NORMAL, NO Read allocate,NO Write allocate */
    MPU_InitStruct.Enable           = MPU_REGION_ENABLE;
    MPU_InitStruct.BaseAddress      = 0x24000000;
    MPU_InitStruct.Size             = MPU_REGION_SIZE_512KB;
    MPU_InitStruct.AccessPermission = MPU_REGION_FULL_ACCESS;
    MPU_InitStruct.IsBufferable     = MPU_ACCESS_NOT_BUFFERABLE;
    MPU_InitStruct.IsCacheable      = MPU_ACCESS_NOT_CACHEABLE;
    MPU_InitStruct.IsShareable      = MPU_ACCESS_NOT_SHAREABLE;
    MPU_InitStruct.Number           = MPU_REGION_NUMBER0;
    MPU_InitStruct.TypeExtField     = MPU_TEX_LEVEL1;
    MPU_InitStruct.SubRegionDisable = 0x00;
    MPU_InitStruct.DisableExec      = MPU_INSTRUCTION_ACCESS_ENABLE;

    HAL_MPU_ConfigRegion(&MPU_InitStruct);
#endif
    /* 配置FMC扩展IO的MPU属性为Device或者Strongly Ordered */
    MPU_InitStruct.Enable           = MPU_REGION_ENABLE;
    MPU_InitStruct.BaseAddress      = 0x60000000;
    MPU_InitStruct.Size             = ARM_MPU_REGION_SIZE_64KB;
    MPU_InitStruct.AccessPermission = MPU_REGION_FULL_ACCESS;
    MPU_InitStruct.IsBufferable     = MPU_ACCESS_BUFFERABLE;
    MPU_InitStruct.IsCacheable      = MPU_ACCESS_NOT_CACHEABLE;
    MPU_InitStruct.IsShareable      = MPU_ACCESS_NOT_SHAREABLE;
    MPU_InitStruct.Number           = MPU_REGION_NUMBER1;
    MPU_InitStruct.TypeExtField     = MPU_TEX_LEVEL0;
    MPU_InitStruct.SubRegionDisable = 0x00;
    MPU_InitStruct.DisableExec      = MPU_INSTRUCTION_ACCESS_ENABLE;

    HAL_MPU_ConfigRegion(&MPU_InitStruct);

    /*使能 MPU */
    HAL_MPU_Enable(MPU_PRIVILEGED_DEFAULT);
}
4.6.6 第6步,FileX的配置文件fx_port.h设置
fx_port.h虽然是个移植的头文件,推荐在直接在这个文件里面做宏定义修改。
移植阶段,这个里面的配置可以不用动,无需任何修改。需要注意的是我们这里开启了exFAT,对应的宏定义:
#define FX_ENABLE_EXFAT
4.6.7 第7步,添加应用代码
这里将FileX大部分操作函数都做了应用,专门整理到了文件demo_sd_filex.c。通过串口命令进行操作,大家可以直接将这个文件添加到自己的工程里面。
另外注意,如果自己的工程里面没有移植我们其它的驱动,可以直接调用FileX的测试函数,比如浏览SD根目录文件,可以直接调用函数ViewRootDir。
4.7 ThreadX FileX应用代码测试
这里将FileX大部分函数都做了测试。注意,所有用到的函数在FileX官网都有详细说明。
4.7.1 初始化FileX
FileX的初始化通过调用函数fx_system_initialize()实现。
4.7.2 挂载SD卡驱动
挂载SD卡功能是通过函数fx_media_open实现,方便用户实现FileX驱动多个磁盘。
代码如下:
status = fx_media_open(&sdio_disk, "STM32_SDIO_DISK", fx_stm32_sd_driver, 0, media_memory, sizeof(media_memory));
4.7.3 SD卡文件浏览
SD卡根目录的文件浏览代码实现如下:
/*
*********************************************************************************************************
*    函 数 名: ViewRootDir
*    功能说明: 显示SD卡根目录下的文件名
*    形    参:无
*    返 回 值: 无
*********************************************************************************************************
*/
extern SD_HandleTypeDef uSdHandle;
static void ViewRootDir(void)
{
    UINT status;
    UINT attributes;
    ULONG size;
    UINT year;
    UINT month;
    UINT day;
    UINT hour;
    UINT minute;
    UINT second;
    UINT cnt;
    ULONG64 available_bytes;


    /* 挂载SD卡 */
status =  fx_media_open(&sdio_disk, "STM32_SDIO_DISK", fx_stm32_sd_driver, 0, media_memory,
 sizeof(media_memory));

    if (status != FX_SUCCESS)
    {
        printf("挂载文件系统失败 -- %d\r\n", status);
        return;
    }


    printf("属性        |  文件大小 | 短文件名 | 长文件名\r\n");
    for (cnt = 0; ;cnt++)
    {
        /* 读取目录项,索引会自动下移 */
        status = fx_directory_next_full_entry_find(&sdio_disk,
                                                    entry_name,
                                                    &attributes,
                                                    &size,
                                                    &year, &month, &day,
                                                    &hour, &minute, &second);

        if (status != FX_SUCCESS || entry_name[0] == 0)
        {
            break;
        }

        if (entry_name[0] == '.')
        {
            continue;
        }

        /* 判断是文件还是子目录 */
        if (attributes & FX_DIRECTORY)
        {
            printf("目录  ");
        }
        else
        {
            printf("文件  ");
        }

        /* 打印文件大小, 最大4G */
        printf(" %10d", (int)size);


        printf("  %s\r\n", (char *)entry_name);    /* 长文件名 */
    }

    /* SD卡剩余容量大小 */
    status = fx_media_extended_space_available(&sdio_disk, &available_bytes);

    if (status == FX_SUCCESS)
    {
        printf("SD卡剩余容量大小 -- %lldMB\r\n", available_bytes/1024/1024);
    }

    /* 卸载SD卡 */
    status =  fx_media_close(&sdio_disk);

    if (status != FX_SUCCESS)
    {
        printf("卸载文件系统卸载失败 -- %d\r\n", status);
    }
}
- fx_media_open可以上电后仅调用一次,我们这里是为了测试方式,使用前挂载,使用完毕后卸载。
- 代码里面加入了SD卡速度信息打印功能,方便大家了解自己的卡类型。通过查询全局结构体变量uSdHandle来实现。
- 文件浏览通过函数fx_directory_next_full_entry_find实现。
4.7.4 SD卡创建txt文件并写入数据
代码实现如下:
/*
*********************************************************************************************************
*    函 数 名: CreateNewFile
*    功能说明: 在SD卡创建一个新文件,文件内容填写“www.armfly.com”
*    形    参:无
*    返 回 值: 无
*********************************************************************************************************
*/
static void CreateNewFile(void)
{
    UINT status;


    /* 挂载SD卡 */
status =  fx_media_open(&sdio_disk, "STM32_SDIO_DISK", fx_stm32_sd_driver, 0, media_memory,
 sizeof(media_memory));

    if (status != FX_SUCCESS)
    {
        printf("挂载文件系统失败 -- %d\r\n", status);
        return;
    }

    /* 创建文件 */
    status =  fx_file_create(&sdio_disk, "armfly.txt");

    /* 检测状态 */
    if (status != FX_SUCCESS)
    {
        /* 失败的话,可以考虑二次创建 */
        if (status != FX_ALREADY_CREATED)
        {
            printf("创建文件失败\r\n");
        }
    }

    /* 打开文件  */
    status =  fx_file_open(&sdio_disk, &fx_file, "armfly.txt", FX_OPEN_FOR_WRITE);

    if (status != FX_SUCCESS)
    {
        printf("打开文件失败\r\n");
    }

    /* 设置到起始位置读取  */
    status =  fx_file_seek(&fx_file, 0);

    if (status != FX_SUCCESS)
    {
        printf("设置读取位置失败\r\n");
    }


    /* 写入字符串到文件  */
    status =  fx_file_write(&fx_file, FsWriteBuf, strlen(FsWriteBuf));

    if (status == FX_SUCCESS)
    {
        printf("armfly.txt 文件写入成功\r\n");
    }
    else
    {
        printf("armfly.txt 文件写入失败 %d\r\n", status);
    }

    /* 关闭文件  */
    status =  fx_file_close(&fx_file);

    /* Check the file close status.  */
    if (status != FX_SUCCESS)
    {
        printf("关闭文件失败\r\n");
    }

    /* 保证文件写入全部生效 */
    status = fx_media_flush(&sdio_disk);

    if (status != FX_SUCCESS)
    {
        printf("flush失败\r\n");
    }

     /* 卸载SD卡 */
    status =  fx_media_close(&sdio_disk);

    if (status != FX_SUCCESS)
    {
        printf("卸载文件系统卸载失败 -- %d\r\n", status);
    }
}
- fx_media_open可以上电后仅调用一次,我们这里是为了测试方式,使用前挂载,使用完毕后卸载。
- 函数fx_file_create用来创建文件。
- 函数fx_file_open用来打开文件。
- 函数fx_file_seek用来设置操作的起始位置。
- 函数fx_file_write用来写入数据。
- 函数fx_file_close用于关闭文件。
- 函数fx_media_flush用于文件写入全部生效。
- 函数fx_media_close用于卸载SD卡。
4.7.5 SD卡文件读取
代码实现如下:
/*
*********************************************************************************************************
*    函 数 名: ReadFileData
*    功能说明: 读取文件armfly.txt前128个字符,并打印到串口
*    形    参:无
*    返 回 值: 无
*********************************************************************************************************
*/
static void ReadFileData(void)
{
    UINT status;
    ULONG bw;


    /* 挂载SD卡 */
status =  fx_media_open(&sdio_disk, "STM32_SDIO_DISK", fx_stm32_sd_driver, 0, media_memory,
 sizeof(media_memory));

    if (status != FX_SUCCESS)
    {
        printf("挂载文件系统失败 -- %d\r\n", status);
        return;
    }


    /* 打开文件  */
    status =  fx_file_open(&sdio_disk, &fx_file, "armfly.txt", FX_OPEN_FOR_READ);

    if (status != FX_SUCCESS)
    {
        printf("打开文件失败\r\n");
    }

    /* 设置到起始位置读取  */
    status =  fx_file_seek(&fx_file, 0);

    if (status != FX_SUCCESS)
    {
        printf("设置读取位置失败\r\n");
    }

    /* 读取文件 */
    status =  fx_file_read(&fx_file, FsReadBuf, sizeof(FsReadBuf), &bw);

    printf("--%sReadLen = %d\r\n", FsReadBuf, (int)bw);

    if ((status != FX_SUCCESS))
    {
        printf("读取失败\r\n");
    }

    /* 关闭文件  */
    status =  fx_file_close(&fx_file);

    if (status != FX_SUCCESS)
    {
        printf("关闭文件失败\r\n");
    }

     /* 卸载SD卡 */
    status =  fx_media_close(&sdio_disk);

    if (status != FX_SUCCESS)
    {
        printf("卸载文件系统卸载失败 -- %d\r\n", status);
    }
}
- fx_media_open可以上电后仅调用一次,我们这里是为了测试方式,使用前挂载,使用完毕后卸载。
- 函数fx_file_create用来创建文件。
- 函数fx_file_open用来打开文件。
- 函数fx_file_seek用来设置操作的起始位置。
- 函数fx_file_read用来读取数据。
- 函数fx_file_close用于关闭文件。
- 函数fx_media_flush用于文件写入全部生效。
- 函数fx_media_close用于卸载SD卡。
4.7.6 SD卡创建文件夹
代码实现如下:
/*
*********************************************************************************************************
*    函 数 名: CreateDir
*    功能说明: 在SD卡根目录创建Dir1和Dir2目录,在Dir1目录下创建子目录Dir1_1
*    形    参:无
*    返 回 值: 无
*********************************************************************************************************
*/
static void CreateDir(void)
{
    UINT status;


    /* 挂载SD卡 */
status =  fx_media_open(&sdio_disk, "STM32_SDIO_DISK", fx_stm32_sd_driver, 0, media_memory,
 sizeof(media_memory));

    if (status != FX_SUCCESS)
    {
        printf("挂载文件系统失败 -- %d\r\n", status);
        return;
    }

    /* 创建目录/Dir1 */
    status = fx_directory_create(&sdio_disk, "Dir1");

    if (status == FX_SUCCESS)
    {
        printf("文件夹Dir1创建成功\r\n");
    }
    else if (status == FX_ALREADY_CREATED)
    {
        printf("Dir1 目录已经存在(%d)\r\n", status);
    }
    else
    {
        printf("fx_directory_create Dir1 失败 (%d)\r\n", status);
        return;
    }

    /* 创建目录/Dir2 */
    status = fx_directory_create(&sdio_disk, "Dir2");

    if (status == FX_SUCCESS)
    {
        printf("文件夹Dir2创建成功\r\n");
    }
    else if (status == FX_ALREADY_CREATED)
    {
        printf("Dir2 目录已经存在(%d)\r\n", status);
    }
    else
    {
        printf("fx_directory_create Dir2 失败 (%d)\r\n", status);
        return;
    }

    /* 创建子目录 /Dir1/Dir1_1       注意:创建子目录Dir1_1时,必须先创建好Dir1 ? */
    status = fx_directory_create(&sdio_disk, "Dir1/Dir1_1");

    if (status == FX_SUCCESS)
    {
        printf("文件夹Dir1/Dir1_1创建成功\r\n");
    }
    else if (status == FX_ALREADY_CREATED)
    {
        printf("Dir1/Dir1_1 目录已经存在(%d)\r\n", status);
    }
    else
    {
        printf("fx_directory_create Dir1/Dir1_1 失败 (%d)\r\n", status);
        return;
    }

    /* 保证文件写入全部生效 */
    status = fx_media_flush(&sdio_disk);

    if (status != FX_SUCCESS)
    {
        printf("flush失败\r\n");
    }

     /* 卸载SD卡 */
    status =  fx_media_close(&sdio_disk);

    if (status != FX_SUCCESS)
    {
        printf("卸载文件系统卸载失败 -- %d\r\n", status);
    }
}
- fx_media_open可以上电后仅调用一次,我们这里是为了测试方式,使用前挂载,使用完毕后卸载。
- 函数fx_directory_create用于创建文件夹。
- 函数fx_media_flush用于文件写入全部生效。
- 函数fx_media_close用于卸载SD卡。
4.7.7 SD卡文件和文件夹删除
代码实现如下:
/*
*********************************************************************************************************
*    函 数 名: DeleteDirFile
*    功能说明: 删除SD卡根目录下的 armfly.txt 文件和 Dir1,Dir2 目录
*    形    参:无
*    返 回 值: 无
*********************************************************************************************************
*/
static void DeleteDirFile(void)
{
    UINT status;
    UINT i;
    char path[50];


    /* 挂载SD卡 */
status =  fx_media_open(&sdio_disk, "STM32_SDIO_DISK", fx_stm32_sd_driver, 0, media_memory,
 sizeof(media_memory));

    if (status != FX_SUCCESS)
    {
        printf("挂载文件系统失败 -- %d\r\n", status);
        return;
    }

    /* 删除目录/Dir1 【因为还存在目录非空(存在子目录),所以这次删除会失败】*/
    status = fx_directory_delete(&sdio_disk, "Dir1");

    if (status == FX_SUCCESS)
    {
        printf("删除目录Dir1成功\r\n");
    }
    else if (status == FX_NOT_FOUND)
    {
        printf("没有发现文件或目录 :%s\r\n", "/Dir1");
    }
    else
    {
        printf("删除Dir1失败(错误代码 = %d) 文件只读或目录非空\r\n", status);
    }


     /* 先删除目录/Dir1/Dir1_1 */
    status = fx_directory_delete(&sdio_disk, "Dir1/Dir1_1");

    if (status == FX_SUCCESS)
    {
        printf("删除目录Dir1/Dir1_1成功\r\n");
    }
    else if (status == FX_NOT_FOUND)
    {
        printf("没有发现文件或目录 :%s\r\n", "Dir1/Dir1_1");
    }
    else
    {
        printf("删除Dir1/Dir1_1失败(错误代码 = %d) 文件只读或目录非空\r\n", status);
    }

    /* 删除目录/Dir1*/
    status = fx_directory_delete(&sdio_disk, "Dir1");

    if (status == FX_SUCCESS)
    {
        printf("删除目录Dir1成功\r\n");
    }
    else if (status == FX_NOT_FOUND)
    {
        printf("没有发现文件或目录 :%s\r\n", "Dir1");
    }
    else
    {
        printf("删除Dir1失败(错误代码 = %d) 文件只读或目录非空\r\n", status);
    }

    /* 删除目录/Dir2*/
    status = fx_directory_delete(&sdio_disk, "Dir2");

    if (status == FX_SUCCESS)
    {
        printf("删除目录Dir2成功\r\n");
    }
    else if (status == FX_NOT_FOUND)
    {
        printf("没有发现文件或目录 :%s\r\n", "Dir2");
    }
    else
    {
        printf("删除Dir2失败(错误代码 = %d) 文件只读或目录非空\r\n", status);
    }

    /* 删除文件 armfly.txt */
    status = fx_file_delete(&sdio_disk, "armfly.txt");

    if (status == FX_SUCCESS)
    {
        printf("删除目录armfly.txt成功\r\n");
    }
    else if (status == FX_NOT_FOUND)
    {
        printf("没有发现文件或目录 :%s\r\n", "armfly.txt");
    }
    else
    {
        printf("删除armfly.txt失败(错误代码 = %d) 文件只读或目录非空\r\n", status);
    }

    /* 删除文件 speed1.txt */
    for (i = 0; i < 20; i++)
    {
        sprintf(path, "Speed%02d.txt", i);/* 每写1次,序号递增 */

        status = fx_file_delete(&sdio_disk, path);

        if (status == FX_SUCCESS)
        {
            printf("删除文件%s成功\r\n", path);
        }
        else if (status == FX_NOT_FOUND)
        {
            printf("没有发现文件:%s\r\n", path);
        }
        else
        {
            printf("删除%s文件失败(错误代码 = %d) 文件只读或目录非空\r\n", path, status);
        }
    }

     /* 卸载SD卡 */
    status =  fx_media_close(&sdio_disk);

    if (status != FX_SUCCESS)
    {
        printf("卸载文件系统卸载失败 -- %d\r\n", status);
    }
}
- fx_media_open可以上电后仅调用一次,我们这里是为了测试方式,使用前挂载,使用完毕后卸载。
- 函数fx_directory_delete用于删除文件夹。
- 函数fx_file_delete用于删除文件。
- 函数fx_media_close用于卸载SD卡。
4.7.8 SD卡读写速度测试
代码实现如下,主要是方便大家测试SD卡的读写性能。
/*
*********************************************************************************************************
*    函 数 名: WriteFileTest
*    功能说明: 测试文件读写速度
*    形    参:无
*    返 回 值: 无
*********************************************************************************************************
*/
static void WriteFileTest(void)
{
    UINT status;
    char path[64];

    ULONG bw;
    uint32_t i,k;
    uint32_t runtime1,runtime2,timelen;
    uint8_t err = 0;
    static uint8_t s_ucTestSn = 0;


    for (i = 0; i < sizeof(g_TestBuf); i++)
    {
        g_TestBuf[i] = (i / 512) + '0';
    }


    /* 挂载SD卡 */
status =  fx_media_open(&sdio_disk, "STM32_SDIO_DISK", fx_stm32_sd_driver, 0, media_memory,
 sizeof(media_memory));

    if (status != FX_SUCCESS)
    {
        printf("挂载文件系统失败 -- %d\r\n", status);
        return;
    }

    /* 打开文件 */
    sprintf(path, "Speed%02d.txt", s_ucTestSn++); /* 每写1次,序号递增 */

    /* 写一串数据 */
    printf("开始写文件%s %dKB ...\r\n", path, TEST_FILE_LEN / 1024);

    /* 创建文件 */
    status =  fx_file_create(&sdio_disk, path);

    /* 检测状态 */
    if (status != FX_SUCCESS)
    {
        /* 失败的话,可以考虑二次创建 */
        if (status != FX_ALREADY_CREATED)
        {
            printf("创建文件失败\r\n");
        }
    }

    /* 打开文件  */
    status =  fx_file_open(&sdio_disk, &fx_file, path, FX_OPEN_FOR_WRITE);

    if (status != FX_SUCCESS)
    {
        printf("打开文件失败\r\n");
    }

    /* 设置到起始位置读取  */
    status =  fx_file_seek(&fx_file, 0);

    if (status != FX_SUCCESS)
    {
        printf("设置读取位置失败\r\n");
    }

    runtime1 = bsp_GetRunTime();    /* 读取系统运行时间 */
    for (i = 0; i < TEST_FILE_LEN / BUF_SIZE; i++)
    {
        /* 写入字符串到文件  */
        status =  fx_file_write(&fx_file, g_TestBuf, sizeof(g_TestBuf));

        if (status == FX_SUCCESS)
        {
            if (((i + 1) % 8) == 0)
            {
                printf(".");
            }
        }
        else
        {
            err = 1;
            printf("%s文件写失败\r\n", path);
            break;
        }
    }
    runtime2 = bsp_GetRunTime();    /* 读取系统运行时间 */

    if (err == 0)
    {
        timelen = (runtime2 - runtime1);
        printf("\r\n  写耗时 : %dms   平均写速度 : %dB/S (%dKB/S)\r\n",
                timelen,
                (TEST_FILE_LEN * 1000) / timelen,
                ((TEST_FILE_LEN / 1024) * 1000) / timelen);
    }

    /* 关闭文件  */
    status =  fx_file_close(&fx_file);

    /* Check the file close status.  */
    if (status != FX_SUCCESS)
    {
        printf("关闭文件失败\r\n");
    }

    /* 保证文件写入全部生效 */
    status = fx_media_flush(&sdio_disk);

    /* Check the file close status.  */
    if (status != FX_SUCCESS)
    {
        printf("fx_media_flush失败\r\n");
    }

    ////////////////////////////////////////////////////////////////////////////////////////////////////
    /* 开始读文件测试 */
    printf("开始读文件 %dKB ...\r\n", TEST_FILE_LEN / 1024);

      /* 打开文件  */
    status =  fx_file_open(&sdio_disk, &fx_file, path, FX_OPEN_FOR_READ);

    if (status != FX_SUCCESS)
    {
        printf("打开文件失败\r\n");
    }

    /* 设置到起始位置读取  */
    status =  fx_file_seek(&fx_file, 0);

    if (status != FX_SUCCESS)
    {
        printf("设置读取位置失败\r\n");
    }

    runtime1 = bsp_GetRunTime();    /* 读取系统运行时间 */
    for (i = 0; i < TEST_FILE_LEN / BUF_SIZE; i++)
    {
        /* 写入字符串到文件  */

        status =  fx_file_read(&fx_file, g_TestBuf, sizeof(g_TestBuf), &bw);
        if (status == FX_SUCCESS)
        {
            if (((i + 1) % 8) == 0)
            {
                printf(".");
            }

            /* 比较写入的数据是否正确,此语句会导致读卡速度结果降低到 3.5MBytes/S */
            for (k = 0; k < sizeof(g_TestBuf); k++)
            {
                if (g_TestBuf[k] != (k / 512) + '0')
                {
                      err = 1;
                    printf("Speed1.txt 文件读成功,但是数据出错\r\n");
                    break;
                }
            }
            if (err == 1)
            {
                break;
            }
        }
        else
        {
               err = 1;
            printf("Speed1.txt 文件读失败\r\n");
            break;
        }
    }
    runtime2 = bsp_GetRunTime();    /* 读取系统运行时间 */

    if (err == 0)
    {
        timelen = (runtime2 - runtime1);
        printf("\r\n  读耗时 : %dms   平均读速度 : %dB/S (%dKB/S)\r\n", timelen,
            (TEST_FILE_LEN * 1000) / timelen, ((TEST_FILE_LEN / 1024) * 1000) / timelen);
    }

     /* 卸载SD卡 */
    status =  fx_media_close(&sdio_disk);

    if (status != FX_SUCCESS)
    {
        printf("卸载文件系统卸载失败 -- %d\r\n", status);
    }

}
- fx_media_open可以上电后仅调用一次,我们这里是为了测试方式,使用前挂载,使用完毕后卸载。
- 为了实现更高性能的测试,大家可以加大宏定义
#define BUF_SIZE (32*1024) /* 每次读写SD卡的最大数据长度 */
设置的缓冲大小,比如设置为64KB进行测试。
4.8 ThreadX FileX移植接口文件fx_stm32_sdio_driver.c说明
这里将FileX的底层接口文件fx_stm32_sdio_driver.c的实现为大家简单做个说明。
4.8.1 磁盘驱动接口函数fx_stm32_sd_driver
代码如下:
/**
  * @brief This function is the entry point to the STM32 SDIO disk driver.     */
 /*        It relies on the STM32 peripheral library from ST.
  * @param None
  * @retval None
  */
VOID  fx_stm32_sd_driver(FX_MEDIA *media_ptr)
{
    int32_t status;
    ULONG       partition_start;
    ULONG       partition_size;

#if (FX_DRIVER_CALLS_BSP_SD_INIT == 0)
    is_initialized = 1; /* the SD  was initialized by the application*/
#endif
//TX_INTERRUPT_SAVE_AREA
   /* before performing any operation, check the status of the SDMMC */
    if (is_initialized == 1)
    {
      if (check_sd_status() != BSP_ERROR_NONE)
      {
          media_ptr->fx_media_driver_status =  FX_IO_ERROR;
          return;
      }
    }

    /* Process the driver request specified in the media control block.  */
    switch(media_ptr->fx_media_driver_request)
    {
        case FX_DRIVER_INIT:
        {
#if (FX_DRIVER_CALLS_BSP_SD_INIT == 1)
            /* Initialize the SD instance */
            if (is_initialized == 0)
            {
                status = BSP_SD_Init();

                if (status == BSP_ERROR_NONE)
                {
                    is_initialized = 1;
#endif
                    /* create a binary semaphore to check the DMA transfer status */
                    if (tx_semaphore_create(&transfer_semaphore, "sdmmc dma transfer semaphore", 0) !=
 TX_SUCCESS)
                    {
                        media_ptr->fx_media_driver_status =  FX_IO_ERROR;
                    }
                    else
                    {
                        media_ptr->fx_media_driver_status =  FX_SUCCESS;
                    }
#if (FX_DRIVER_CALLS_BSP_SD_INIT == 1)
                }
                else
                {
                    media_ptr->fx_media_driver_status =  FX_IO_ERROR;
                }
            }
#endif
            break;
        }

        case FX_DRIVER_UNINIT:
        {
            tx_semaphore_delete(&transfer_semaphore);

#if (FX_DRIVER_CALLS_BSP_SD_INIT == 1)
            BSP_SD_DeInit();
            is_initialized = 0;
#endif
            /* Successful driver request.  */
           media_ptr->fx_media_driver_status = FX_SUCCESS;
           break;
        }

        case FX_DRIVER_READ:
        {
            media_ptr->fx_media_driver_status = FX_IO_ERROR;
            //TX_DISABLE /* disable interrupts */
           if ((ULONG)(media_ptr->fx_media_driver_buffer) & 0x3)
           {
              if (sd_read_data(media_ptr, media_ptr->fx_media_driver_logical_sector +
 media_ptr->fx_media_hidden_sectors,
                                media_ptr->fx_media_driver_sectors, 1) == FX_SUCCESS)
              {
                  media_ptr->fx_media_driver_status = FX_SUCCESS;
              }
           }
           else
           {
               if (sd_read_data(media_ptr, media_ptr->fx_media_driver_logical_sector +
 media_ptr->fx_media_hidden_sectors,
                       media_ptr->fx_media_driver_sectors, 0) == FX_SUCCESS)
               {
                   media_ptr->fx_media_driver_status = FX_SUCCESS;
               }
           }
           //TX_RESTORE /* restore interrupts */

            break;
        }

        case FX_DRIVER_WRITE:
        {
            media_ptr->fx_media_driver_status = FX_IO_ERROR;
            //TX_DISABLE /* disable interrupts */

         /* the buffer is unaligned use a scratch buffer for the write operation */
         if ((ULONG)(media_ptr->fx_media_driver_buffer) & 0x3)
         {
              if (sd_write_data(media_ptr, media_ptr->fx_media_driver_logical_sector +
 media_ptr->fx_media_hidden_sectors,
                   media_ptr->fx_media_driver_sectors, 1) == FX_SUCCESS)
              {
                  media_ptr->fx_media_driver_status = FX_SUCCESS;
              }
           }
           else
           {
               if (sd_write_data(media_ptr, media_ptr->fx_media_driver_logical_sector +
media_ptr->fx_media_hidden_sectors,
                       media_ptr->fx_media_driver_sectors, 0) == FX_SUCCESS)
               {
                   media_ptr->fx_media_driver_status = FX_SUCCESS;
               }
           }
           //TX_RESTORE /* restore interrupts */

            break;
        }

        case FX_DRIVER_FLUSH:
        {
            /* Return driver success.  */
           media_ptr->fx_media_driver_status =  FX_SUCCESS;
            break;
        }

        case FX_DRIVER_ABORT:
        {
            /* Return driver success.  */
           media_ptr->fx_media_driver_status =  FX_SUCCESS;
            break;
        }

        case FX_DRIVER_BOOT_READ:
        {
#if (ENABLE_CACHE_MAINTENANCE == 1)
            SCB_InvalidateDCache_by_Addr((uint32_t*)media_ptr->fx_media_driver_buffer,
 media_ptr->fx_media_driver_sectors * DEFAULT_SECTOR_SIZE);
#endif
            /* the boot sector is the sector 0 */
            status = BSP_SD_ReadBlocks_DMA((uint32_t*)media_ptr->fx_media_driver_buffer, 0, 1);

            if (status != BSP_ERROR_NONE)
            {
                media_ptr->fx_media_driver_status =  FX_IO_ERROR;
                break;
            }

            if(tx_semaphore_get(&transfer_semaphore, DEFAULT_TIMEOUT) != TX_SUCCESS)
            {
                media_ptr->fx_media_driver_status =  FX_IO_ERROR;
                break;
            }

            /* Check if the sector 0 is the actual boot sector, otherwise calculate the offset into it.
            Please note that this should belong to higher level of MW to do this check and it is here
            as a temporary work solution */

            partition_start =  0;

            status =  _fx_partition_offset_calculate(media_ptr -> fx_media_driver_buffer, 0,
                                                                &partition_start, &partition_size);

            /* Check partition read error.  */
            if (status)
            {
                /* Unsuccessful driver request.  */
                media_ptr -> fx_media_driver_status =  FX_IO_ERROR;
                return;
            }

            /* Now determine if there is a partition...   */
            if (partition_start)
            {

                if (check_sd_status() != BSP_ERROR_NONE)
                {
                    media_ptr->fx_media_driver_status =  FX_IO_ERROR;
                    return;
                }

                /*Invalidate cache before DMA read */
#if (ENABLE_CACHE_MAINTENANCE == 1)
            SCB_InvalidateDCache_by_Addr((uint32_t*)media_ptr->fx_media_driver_buffer,
 media_ptr->fx_media_driver_sectors * DEFAULT_SECTOR_SIZE);
#endif

                /* Yes, now lets read the actual boot record.  */
                status = BSP_SD_ReadBlocks_DMA((uint32_t*)media_ptr -> fx_media_driver_buffer,
 partition_start , 1);

                /* Check status of SDIO Read.  */
                if (status != BSP_ERROR_NONE)
                {

                    /* Unsuccessful driver request.  */
                    media_ptr -> fx_media_driver_status =  FX_IO_ERROR;
                    return;
                }

                /* Wait for Rx Transfer completion */
                if(tx_semaphore_get(&transfer_semaphore, DEFAULT_TIMEOUT) != TX_SUCCESS)
                {
                    media_ptr->fx_media_driver_status =  FX_IO_ERROR;
                    break;
                }
            }

            /* Successful driver request.  */
            media_ptr -> fx_media_driver_status =  FX_SUCCESS;
            break;
        }

        case FX_DRIVER_BOOT_WRITE:
        {
#if (ENABLE_CACHE_MAINTENANCE == 1)
            SCB_CleanDCache_by_Addr((uint32_t*)media_ptr->fx_media_driver_buffer,
 media_ptr->fx_media_driver_sectors * DEFAULT_SECTOR_SIZE);
#endif
            status = BSP_SD_WriteBlocks_DMA((uint32_t*)media_ptr->fx_media_driver_buffer, 0, 1);
            if (status == BSP_ERROR_NONE)
            {
                if(tx_semaphore_get(&transfer_semaphore, DEFAULT_TIMEOUT) == TX_SUCCESS)
                {
                    media_ptr->fx_media_driver_status =  FX_SUCCESS;
                }
                else
                {
                    media_ptr->fx_media_driver_status =  FX_IO_ERROR;
                }
            }
            break;
        }

        default:
        {
           media_ptr->fx_media_driver_status =  FX_IO_ERROR;
            break;
        }
    }
}
此函数实现了存储设备初始化,读写等操作,供存储设备挂载函数fx_media_open调用。
- FX_DRIVER_INIT消息
用于实现存储设备初始化。
- FX_DRIVER_UNINIT消息
用于实现存储设备卸载。
- FX_DRIVER_READ消息
用于实现存储设备数据读取操作。
- FX_DRIVER_WRITE消息
用于实现存储设备数据写入操作
- FX_DRIVER_FLUSH消息
刷新操作,用于保证数据全部写入完毕。
- FX_DRIVER_BOOT_READ消息
用于实现boot扇区sector 0数据读取。
- FX_DRIVER_BOOT_WRITE消息
用于实现boot扇区sector 0数据写入。
4.8.2 磁盘状态函数check_sd_status
供接口函数fx_stm32_sd_driver调用,代码如下:
static int32_t check_sd_status()
{
    uint32_t start = tx_time_get();

    while (tx_time_get() - start < DEFAULT_TIMEOUT)
    {
      if (BSP_SD_GetCardState() == SD_TRANSFER_OK)
      {
        return BSP_ERROR_NONE;
      }
    }

    return BSP_ERROR_BUSY;
}
4.8.3 磁盘读函数sd_read_data
供接口函数fx_stm32_sd_driver调用,下面代码中最关键的处理是形参use_scratch_buffer的4字节对齐问题(SDMMC自带的IDMA需要4字节对齐),如果use_scratch_buffer地址是4字节对齐的,不做处理,如果不是对齐,通过复制到一个4字节对齐的缓冲里面做DMA传递。这个是理解下面代码的关键。
/**
  * @brief Read buffer using BSP SD API taking into account the scratch buffer
  * @param FX_MEDIA *media_ptr a pointer the main FileX structure
  * @param ULONG start_sector first sector to start reading from
  * @param UINT num_sectors number of sectors to be read
  * @param UINT use_scratch_buffer to enable scratch buffer usage or not.
  * @retval FX_SUCCESS on success FX_BUFFER_ERROR otherwise
  */

static UINT sd_read_data(FX_MEDIA *media_ptr, ULONG start_sector, UINT num_sectors, UINT use_scratch_buffer)
{
    INT i = 0;
    UINT status;
    if (use_scratch_buffer)
    {
        memset(scratch, '\0', DEFAULT_SECTOR_SIZE);
        for (i = 0; i < num_sectors; i++)
        {
            status = BSP_SD_ReadBlocks_DMA((uint32_t*)scratch, start_sector++, 1);

            if (status != BSP_ERROR_NONE)
            {
                status = FX_IO_ERROR;
                break;
            }

            if(tx_semaphore_get(&transfer_semaphore, DEFAULT_TIMEOUT) != TX_SUCCESS)
            {
                status = FX_BUFFER_ERROR;
                break;
            }
            else
            {
#if (ENABLE_CACHE_MAINTENANCE == 1)
                SCB_InvalidateDCache_by_Addr((uint32_t*)scratch, DEFAULT_SECTOR_SIZE);
#endif
                _fx_utility_memory_copy(scratch, media_ptr->fx_media_driver_buffer, DEFAULT_SECTOR_SIZE);
                media_ptr->fx_media_driver_buffer += DEFAULT_SECTOR_SIZE;
            }
        }

        if (i == num_sectors)
        {
            status = FX_SUCCESS;
        }
    }
    else
    {
        status = BSP_SD_ReadBlocks_DMA((uint32_t*)media_ptr->fx_media_driver_buffer, start_sector,
 num_sectors);

        if (status == BSP_ERROR_NONE)
        {
            if(tx_semaphore_get(&transfer_semaphore, DEFAULT_TIMEOUT) == TX_SUCCESS)
            {
#if (ENABLE_CACHE_MAINTENANCE == 1)
                SCB_InvalidateDCache_by_Addr((uint32_t*)media_ptr->fx_media_driver_buffer,
num_sectors * DEFAULT_SECTOR_SIZE);
#endif
                status = FX_SUCCESS;
            }
            else
            {
                status =  FX_BUFFER_ERROR;
            }
        }
    }

    return status;
}
4.8.4 磁盘写函数sd_write_data
供接口函数fx_stm32_sd_driver调用,下面代码中最关键的处理是形参use_scratch_buffer的4字节对齐问题(SDMMC自带的IDMA需要4字节对齐),如果use_scratch_buffer地址是4字节对齐的,不做处理,如果不是对齐,通过复制到一个4字节对齐的缓冲里面做DMA传递。这个是理解下面代码的关键。
/**
  * @brief write buffer using BSP SD API taking into account the scratch buffer
  * @param FX_MEDIA *media_ptr a pointer the main FileX structure
  * @param ULONG start_sector first sector to start writing from
  * @param UINT num_sectors number of sectors to be written
  * @param UINT use_scratch_buffer to enable scratch buffer usage or not.
  * @retval FX_SUCCESS on success FX_BUFFER_ERROR otherwise
  */

static UINT sd_write_data(FX_MEDIA *media_ptr, ULONG start_sector, UINT num_sectors, UINT use_scratch_buffer)
{
    INT i = 0;
    UINT status;

    if (use_scratch_buffer)
    {
        for (i = 0; i < num_sectors; i++)
        {
            _fx_utility_memory_copy(media_ptr->fx_media_driver_buffer, scratch, DEFAULT_SECTOR_SIZE);
            media_ptr->fx_media_driver_buffer += DEFAULT_SECTOR_SIZE;

#if (ENABLE_CACHE_MAINTENANCE == 1)
            /* Clean the DCache to make the SD DMA see the actual content of the scratch buffer */
            SCB_CleanDCache_by_Addr((uint32_t*)scratch, DEFAULT_SECTOR_SIZE);
#endif
            status = BSP_SD_WriteBlocks_DMA((uint32_t*)scratch, (uint32_t)start_sector++, 1);

            if (status != BSP_ERROR_NONE)
            {
                status = FX_IO_ERROR;
                break;
            }

            if(tx_semaphore_get(&transfer_semaphore, DEFAULT_TIMEOUT) != TX_SUCCESS)
            {
                status = FX_BUFFER_ERROR;
                break;
            }
        }

        if (i == num_sectors)
        {
            status = FX_SUCCESS;
        }
    }
    else
    {
        SCB_CleanDCache_by_Addr((uint32_t*)media_ptr->fx_media_driver_buffer,
num_sectors * DEFAULT_SECTOR_SIZE);
        status = BSP_SD_WriteBlocks_DMA((uint32_t*)media_ptr->fx_media_driver_buffer, start_sector,
 num_sectors);

        if (status == BSP_ERROR_NONE)
        {
            if(tx_semaphore_get(&transfer_semaphore, DEFAULT_TIMEOUT) == TX_SUCCESS)
            {
                status = FX_SUCCESS;
            }
            else
            {
                status = FX_IO_ERROR;
            }
        }
    }

    return status;
}
4.8.5 磁盘中断处理函数SDMMC1_IRQHandler
供接口函数fx_stm32_sd_driver调用,代码如下:
/**
  * @brief BSP Tx Transfer completed callbacks
  * @param Instance the SD instance
  * @retval None
  */
void BSP_SD_WriteCpltCallback()
{
    tx_semaphore_put(&transfer_semaphore);
}

/**
  * @brief BSP Rx Transfer completed callbacks
  * @param Instance the sd instance
  * @retval None
  */
void BSP_SD_ReadCpltCallback()
{
    tx_semaphore_put(&transfer_semaphore);
}
void SDMMC1_IRQHandler(void)
{
    HAL_SD_IRQHandler(&uSdHandle);
}
实际对应的函数在文件sd_diskio_dma.c
4.9 实验例程
配套例子:
V7-2201_ThreadX FileX Template
实验目的:
- 学习SD卡的ThreadX FileX移植实现。
实验内容:
- 上电启动了一个软件定时器,每100ms翻转一次LED2。
- V7开发板的SD卡接口是用的SDMMC1,而这个接口仅支持AXI SRAM区访问。
实验操作:
- 测试前务必将SD卡插入到开发板左上角的卡座中。
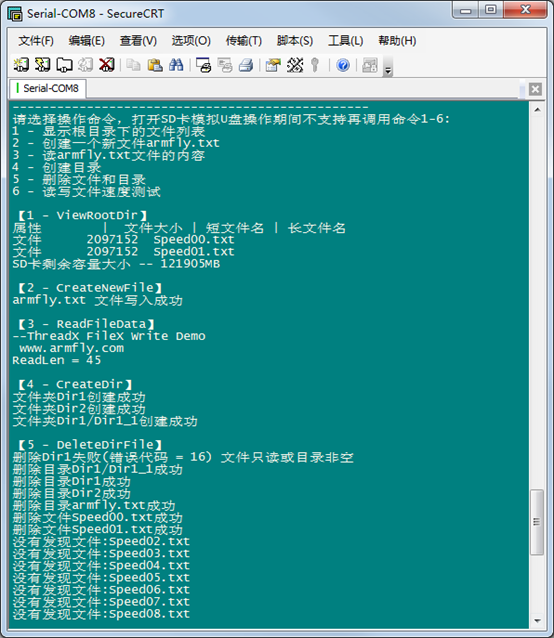
- 支持以下6个功能,用户通过电脑端串口软件发送数字1-6给开发板即可
- printf("1 - 显示根目录下的文件列表\r\n");
- printf("2 - 创建一个新文件armfly.txt\r\n");
- printf("3 - 读armfly.txt文件的内容\r\n");
- printf("4 - 创建目录\r\n");
- printf("5 - 删除文件和目录\r\n");
- printf("6 - 读写文件速度测试\r\n");
上电后串口打印的信息:
波特率 115200,数据位 8,奇偶校验位无,停止位 1
4.10 总结
本章节就为大家讲解这么多,需要大家实现操作一遍来熟练掌握FileX的移植,然后FileX相关的知识点可以到FileX官网查看,资料非常详细。

 浙公网安备 33010602011771号