【FPGA学习】- MIO控制LED实验
实验:对MIO操作点亮PS端LED灯
硬件工作
与《SDK实验篇("Hello World")》中硬件工作相同,不再叙述。
软件工作
点击“launch SDK”,新建一个模板为“hello world”的C语言工程。参考官方给出的模板代码,进行编码工作。
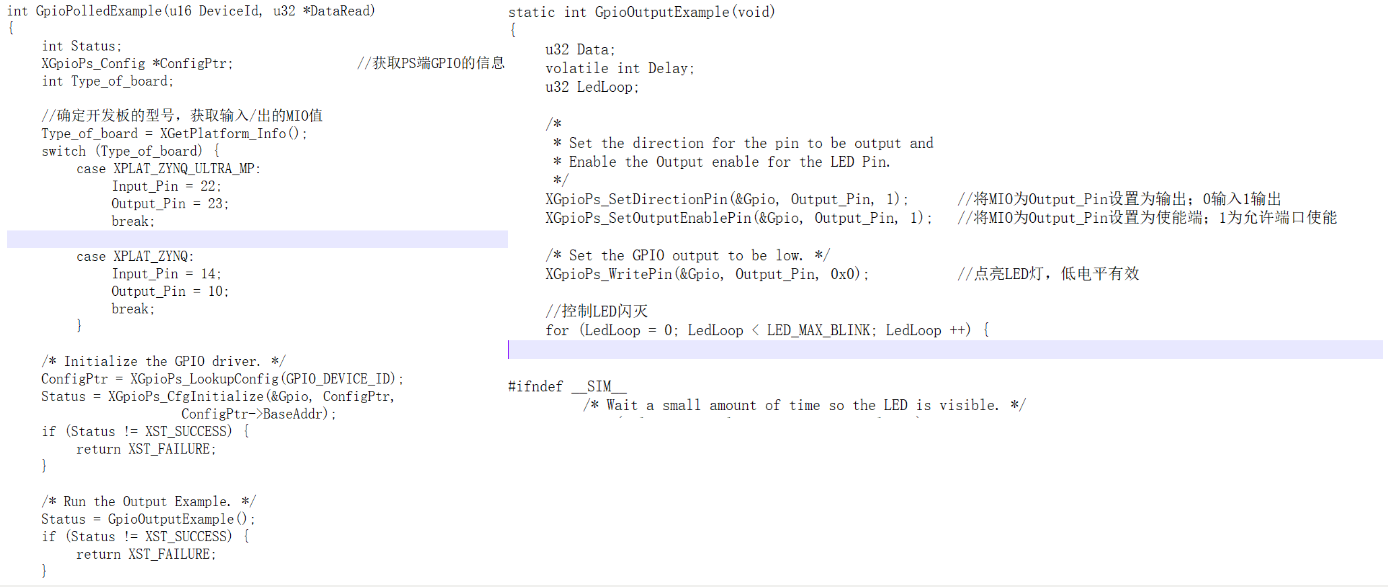
在“system.mss”中导入参考代码gpiops。首先,分析代码。主代码中的流程为获取输入/输出MIO值,初始化GPIO,运行输出代码。输出代码中设置输出端口,使能输出端口,之后点亮LED灯并控制其闪灭。
所以,基于以上代码流程,进行修改代码。代码执行流程如下。

通过查阅相关的开发文档,我们知道在该开发板上PS端的LED的MIO为0和13,所以在代码中不需要获取MIO值。

实现代码。
/***************************** Include Files ********************************/
#include "xparameters.h"
#include "platform.h"
#include "xgpiops.h"
#include "xstatus.h"
#include "xplatform_info.h"
#include <xil_printf.h>
#include "sleep.h"

/************************** Constant Definitions ****************************/
#define GPIO_DEVICE_ID      XPAR_XGPIOPS_0_DEVICE_ID

#define printf            xil_printf    /* Smalller foot-print printf */

/************************** Variable Definitions **************************/
XGpioPs Gpio;    /* The driver instance for GPIO Device. */

/****************************** Main Function *****************************/
int main(void){
    init_platform();        //通过调用init_platform函数配置定时器和建立中断以初始化平台

    int Status;
    XGpioPs_Config *ConfigPtr;

    printf("MIO LED test: \n\r");

    /* Initialize the GPIO driver. */
    ConfigPtr = XGpioPs_LookupConfig(GPIO_DEVICE_ID);
    Status = XGpioPs_CfgInitialize(&Gpio, ConfigPtr,
                    ConfigPtr->BaseAddr);
    if (Status != XST_SUCCESS) {
        return XST_FAILURE;
        }

    /*
     * Set the direction for the pin to be output and
     * Enable the Output enable for the LED Pin.
     */
    XGpioPs_SetDirectionPin(&Gpio, 0, 1);
    XGpioPs_SetDirectionPin(&Gpio, 13, 1);
    XGpioPs_SetOutputEnablePin(&Gpio, 0, 1);
    XGpioPs_SetOutputEnablePin(&Gpio, 13, 1);

  //通过循环函数和sleep函数实现LED灯的闪灭控制。
    while(1){
        /* Set the GPIO output to be low. */
        XGpioPs_WritePin(&Gpio, 0, 0x0);
        XGpioPs_WritePin(&Gpio, 13, 0x0);
        sleep(1);
        /* Set the GPIO output to be high. */
        XGpioPs_WritePin(&Gpio, 0, 0x1);
        XGpioPs_WritePin(&Gpio, 13, 0x1);
        sleep(1);
    }

    cleanup_platform();
    return 0;
}
实验结果。
实验:MIO通过按键来控制PS端LED灯的闪灭。
硬件工作
与《SDK实验篇("Hello World")》中硬件工作相同,不再叙述。
软件工作
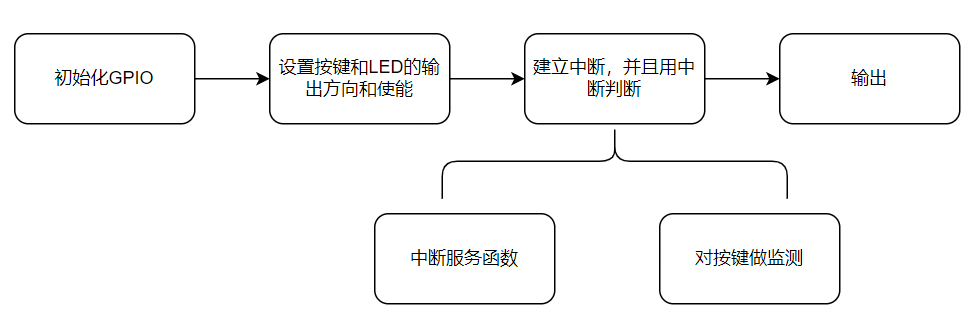
本次实验基于中断实验和MIO控制LED实验。基本的流程大致如下。
实现代码。
/***************************** Include Files ********************************/
#include "xparameters.h"
#include "xgpiops.h"
#include "xscugic.h"
#include "xil_exception.h"
#include "xplatform_info.h"
#include <xil_printf.h>
#include "sleep.h"

/************************** Constant Definitions ****************************/
#define GPIO_DEVICE_ID      XPAR_XGPIOPS_0_DEVICE_ID
#define INTC_DEVICE_ID        XPAR_SCUGIC_SINGLE_DEVICE_ID
#define GPIO_INTERRUPT_ID    XPAR_XGPIOPS_0_INTR

#define printf                xil_printf    /* Smalller foot-print printf */

#define MIO_KEY                50
#define MIO_LED                0

/************************** Function Prototypes ******************************/
static void IntrHandler(void *CallBackRef);
static int SetupInterruptSystem(XScuGic *Intc, XGpioPs *Gpio, u16 GpioIntrId);

/************************** Variable Definitions *****************************/
static XGpioPs Gpio; /* The Instance of the GPIO Driver */

static XScuGic Intc; /* The Instance of the Interrupt Controller Driver */

static u32 Key_Press;
static u32 Key_value;

/*****************************************************************************/
/**
*
* Main function.
*
* @param    None
*
* @return
*        - XST_SUCCESS if the example has completed successfully.
*        - XST_FAILURE if the example has failed.
*
* @note        None
*
******************************************************************************/
int main(void){
    int Status;
    XGpioPs_Config *ConfigPtr;

    printf("GPIO Interrupt Test \r\n");

    /* Initialize the GPIO driver. */
    ConfigPtr = XGpioPs_LookupConfig(GPIO_DEVICE_ID);
    Status = XGpioPs_CfgInitialize(&Gpio, ConfigPtr,
                    ConfigPtr->BaseAddr);
    if (Status != XST_SUCCESS) {
        return XST_FAILURE;
    }

    /*
    * Set the direction for the pin to be input
    */
    XGpioPs_SetDirectionPin(&Gpio, MIO_KEY, 0);

    /*
     * Set the direction for the pin to be output and
     * Enable the Output enable for the LED Pin.
     */
    XGpioPs_SetDirectionPin(&Gpio, MIO_LED, 1);
    XGpioPs_SetOutputEnablePin(&Gpio, MIO_LED, 1);

    /* Set the GPIO output to be low. */
    XGpioPs_WritePin(&Gpio, MIO_LED, 0x0);

    /*
    * Setup the interrupts such that interrupt processing can occur.
    */
    SetupInterruptSystem(&Intc, &Gpio, GPIO_INTERRUPT_ID);

    while(1){
        if(Key_Press){
            usleep(20000);
            if(XGpioPs_ReadPin(&Gpio,  MIO_KEY) == 0){
                Key_value = ~Key_value;
                XGpioPs_WritePin(&Gpio, MIO_LED, Key_value);
            }
            Key_Press = FALSE;
            XGpioPs_IntrClearPin(&Gpio,  MIO_KEY); //清除按键 KEY 中断
            XGpioPs_IntrEnablePin(&Gpio,  MIO_KEY); //使能按键 KEY 中断
        }
    }

    return XST_SUCCESS;
}


/****************************************************************************/
/**
* This function is the user layer callback function for the interrupts of
* the GPIO device. It checks if  the key have been pressed to stop the
* interrupt processing and exit from the project.
*
* @param    CallBackRef is a pointer to the upper layer callback reference.
* @param    Status is the Interrupt status of the GPIO bank.
*
* @return    None.
*
* @note        None.
*
******************************************************************************/
static void IntrHandler(void *CallBackRef)
{
    XGpioPs *Gpio = (XGpioPs *)CallBackRef;

    /* Push the KEY */
    if (XGpioPs_IntrGetStatusPin(Gpio, MIO_KEY)){
        Key_Press = TRUE;
        XGpioPs_IntrDisablePin(Gpio, MIO_KEY); //屏蔽按键 KEY 中断
    }
}

/*****************************************************************************/
/**
*
* This function sets up the interrupt system for the example. It enables falling
* edge interrupts for all the pins of bank 0 in the GPIO device.
*
* @param    GicInstancePtr is a pointer to the XScuGic driver Instance.
* @param    GpioInstancePtr contains a pointer to the instance of the GPIO
*        component which is going to be connected to the interrupt
*        controller.
* @param    GpioIntrId is the interrupt Id and is typically
*        XPAR_<GICPS>_<GPIOPS_instance>_VEC_ID value from
*        xparameters.h.
*
* @return    XST_SUCCESS if successful, otherwise XST_FAILURE.
*
* @note        None.
*
****************************************************************************/
static int SetupInterruptSystem(XScuGic *GicInstancePtr, XGpioPs *Gpio,
                u16 GpioIntrId)
{
    int Status;

    XScuGic_Config *IntcConfig; /* Instance of the interrupt controller */

    Xil_ExceptionInit();

    /*
     * Initialize the interrupt controller driver so that it is ready to
     * use.
     */
    IntcConfig = XScuGic_LookupConfig(INTC_DEVICE_ID);
    if (NULL == IntcConfig) {
        return XST_FAILURE;
    }

    Status = XScuGic_CfgInitialize(GicInstancePtr, IntcConfig,
                    IntcConfig->CpuBaseAddress);
    if (Status != XST_SUCCESS) {
        return XST_FAILURE;
    }


    /*
     * Connect the interrupt controller interrupt handler to the hardware
     * interrupt handling logic in the processor.
     */
    Xil_ExceptionRegisterHandler(XIL_EXCEPTION_ID_INT,
                (Xil_ExceptionHandler)XScuGic_InterruptHandler,
                GicInstancePtr);

    /*
     * Connect the device driver handler that will be called when an
     * interrupt for the device occurs, the handler defined above performs
     * the specific interrupt processing for the device.
     */
    Status = XScuGic_Connect(GicInstancePtr, GpioIntrId,
                (Xil_ExceptionHandler)IntrHandler,
                (void *)Gpio);
    if (Status != XST_SUCCESS) {
        return Status;
    }

    /* Enable the interrupt for the GPIO device. */
    XScuGic_Enable(GicInstancePtr, GpioIntrId);

    XGpioPs_SetIntrTypePin(Gpio, MIO_KEY, XGPIOPS_IRQ_TYPE_EDGE_FALLING);
    XGpioPs_IntrEnablePin(Gpio, MIO_KEY);


    /* Enable interrupts in the Processor. */
    Xil_ExceptionEnableMask(XIL_EXCEPTION_IRQ);

    return XST_SUCCESS;
}
实验结果。

参考资料
[1] Zynq-7000 SoC Technical Reference Manual (UG585),https://docs.xilinx.com/v/u/en-US/ug585-Zynq-7000-TRM
[2] 黑金FPGA开发教程
[3] 正点原子FPGA开发教程

 浙公网安备 33010602011771号