
vue.js3:axios图片上传(vue@3.2.37 / axios@1.1.0)
一,安装axios库
1,相关地址
官网:
https://axios-http.com/
代码地址:
https://github.com/axios/axios
2,安装
liuhongdi@lhdpc:/data/vue/axios$ npm install --save axios
added 5 packages in 3s
3,查看已安装的库的版本:
liuhongdi@lhdpc:/data/vue/imgtouch$ npm list axios
imgtouch@0.1.0 /data/vue/imgtouch
└── axios@1.1.0
说明:刘宏缔的架构森林是一个专注架构的博客,
网站:https://blog.imgtouch.com
本文: https://blog.imgtouch.com/index.php/2023/06/03/vue-js3-axios-tu-pian-shang-chuan-vue-3-2-37-axios-1-1/
对应的源码可以访问这里获取: https://github.com/liuhongdi/
或: https://gitee.com/liuhongdi
说明:作者:刘宏缔 邮箱: 371125307@qq.com
二,js代码
<template>
<div>
  <div style="width:800px;margin: auto;display: flex;flex-direction: column;">
  请选择上传图片:
  <input type="file" id="back" ref="backfile" @change="handleFile" /><br/>
  <div id="imglist" style="width:100%;">
    <div v-for="(item,i) in selFiles" :key="i" style="float:left;margin-left: 20px;margin-top: 20px;height:150px;position:relative;">
      <img :src="item.fileimg"  style="height:150px;"/>
    </div>
  </div>
    <div>
  <input type="button" value="上传" @click="upload" />
    </div>
  </div>
</div>
</template>

<script>
import {ref} from "vue";
import axios from 'axios';

export default {
  name: "ImgUpload",
  setup() {
    //选中的图片文件,保存在数组中
    const selFiles = ref([]);
    //选中图片后的处理
    const handleFile = () => {
      let filePaths = window.event.target.files;
      //清空原有缩略图
      if (filePaths.length === 0) {
        //未选择,则返回
        return
      } else {
        //清空数组中原有图片
        selFiles.value.length = 0;
      }
      //把新选中的图片加入数组
      for( var i=0;i<filePaths.length; i++ ){
        let file = filePaths[i];
        let one = {
          fileimg:URL.createObjectURL(file),  //预览用
          file:file,
        }
        selFiles.value.push(one);
      }
    }

    //上传
    const upload = () => {
      //判断是否选中文件
      if (selFiles.value.length == 0) {
        alert("请在上传前先选中文件!");
        return;
      }
      var file = selFiles.value[0].file;
      if (typeof(file) === "undefined") {
        alert("请在上传前先选中文件!");
        return;
      }
      // 创建一个表单数据
      var data = new FormData();

      //遍历文件并上传
      for( var i=0;i<selFiles.value.length; i++ ){
        let fileOne = selFiles.value[i].file;
        console.log("上传:"+fileOne.name)
        data.append("file",fileOne);
      }

      data.append("userName","laoliu");

      let url = "/api/image/uploadone";
      //axios上传文件
      axios({
        method:"post",
        url:url,
        data:data,
        headers:{'Content-Type': 'multipart/form-data'},
      }).then((res) => {
            //console.log(res.data);
            if (res.data.code == 0) {
              let data = res.data.data;
              console.log(data);
              let userName = data.userName;
              let imageUrl = data.imageurl;
              alert("success:提交的用户名:"+userName+";image:"+imageUrl);
            } else {
              alert("error:"+res.data.msg);
            }
          }
      ).catch(err=>{
        console.log(err);
        alert('网络错误:'+err.message);
      });
    }

     return {
       selFiles,
       handleFile,
       upload,
     }
  }
}
</script>

<style scoped>

</style>
三,php代码:基于thinkphp6
1,创建目录:
liuhongdi@lhdpc:/var/www/html$ sudo mkdir goodsimage
[sudo] liuhongdi 的密码:
liuhongdi@lhdpc:/var/www/html$ sudo chmod 777 goodsimage
2,在.env中添加配置
[GOODSIMAGE]
GOODS_IMAGE_DIR=/var/www/html/goodsImage
GOODS_IMAGE_HOST=http://192.168.219.6/goodsImage
3,配置php
在config目录下,创建images.php
<?php
return [
   "goodsImageDir"=>env('goodsimage.goods_image_dir' ),
   "goodsImageHost"=>env('goodsimage.goods_image_host'),
];
4,php代码:
<?php
namespace app\controller;

use app\BaseController;
use app\result\Result;
use \think\facade\Config as GConfig;

class Image extends BaseController
{
    //接收上传的一个图片文件
    public function uploadOne(){
        $postParams = $this->request->param();
        $file = request()->file('file');
        if ($file === null) {
            return Result::Error(10001,"文件不存在");
        }

        $imageUrl = "";

            //得到图片的源文件路径和目标文件路径
            $basedir = GConfig::get('images.goodsImageDir');
            $subdir = date("Ymd");
            $dir = $basedir."/".$subdir;
            if (!is_dir($dir)) {
                mkdir($dir);
            }
            $filename = uniqid();
            //得到文件名
            $destFile = $dir."/".$filename.".".$file->getOriginalExtension();
            //保存到本地
            $isUpload = move_uploaded_file($file->getPathname(),$destFile);
            //如成功返回图片的url
            if ($isUpload) {
                $savename[] = $subdir."/".$filename.".".$file->getOriginalExtension();
                $host = GConfig::get('images.goodsImageHost');
                $imageUrl = $host."/".$subdir."/".$filename.".".$file->getOriginalExtension();
            }

        return Result::Success(["userName"=>$postParams['userName'],"imageurl"=>$imageUrl]);
    }
}
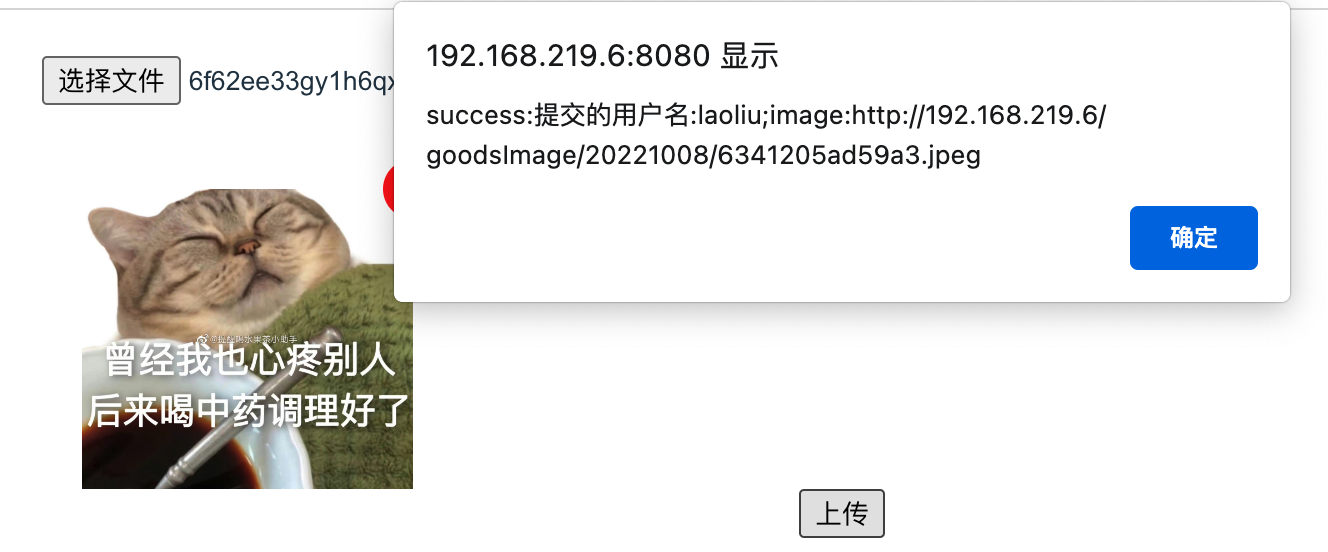
四,测试效果
五,查看vue框架的版本:
liuhongdi@lhdpc:/data/vue/pdf/image2pdf$ npm list vue
image2pdf@0.1.0 /data/vue/pdf/image2pdf
├─┬ @vue/cli-plugin-babel@5.0.8
│ └─┬ @vue/babel-preset-app@5.0.8
│   ├─┬ @vue/babel-preset-jsx@1.3.0
│   │ └── vue@3.2.37 deduped invalid: "2.x" from node_modules/@vue/babel-preset-jsx
│   └── vue@3.2.37 deduped
└─┬ vue@3.2.37
  └─┬ @vue/server-renderer@3.2.37
    └── vue@3.2.37 deduped

 浙公网安备 33010602011771号