spring cloud:通过client访问consul集群(spring cloud hoxton sr8 / spring boot 2.3.4)
一,为什么要搭建consul的client?
1,网上的很多资料,访问consul时用的单机模式,这样是不可以直接在生产环境中使用的
还有一些资料,搭建了consul的集群后,直接访问集群中的某一个ip,
这样不能达到高可用的目的,因为如果当前访问的ip宕机,则到整个consul集群的访问会失效.
2,如何访问consul集群?
第一个方法:一个是集成java代码,直接在配置文件中的host写上集群的多个ip,
当访问的地址有异常则访问其他的ip,
大家可以参考这个项目:
https://segmentfault.com/a/1190000020155983
第二个方法:较常用的方法:
在项目所在机器上以client模式安装运行一个consul的agent,
java代码通过client访问consul的server集群
因为服务提供者会多个实例,所以如果某个实例上的consul client发生故障,
只会有一个服务提供者失败,而不会影响到其他的实例继续提供服务
3,安装consul集群:参见:
说明:刘宏缔的架构森林是一个专注架构的博客,
网站:https://blog.imgtouch.com
本文: https://blog.imgtouch.com/index.php/2023/05/26/spring-cloud-tong-guo-client-fang-wen-consul-ji-qun-spring/
对应的源码可以访问这里获取: https://github.com/liuhongdi/
说明:作者:刘宏缔 邮箱: 371125307@qq.com
二,在linux centos8上搭建consul的client
[root@localhost consul]# mkdir /usr/local/soft/consul
[root@localhost consul]# mv ./consul /usr/local/soft/consul/
[root@localhost consul]# nohup /usr/local/soft/consul/consul agent -data-dir=/data/consul/data -node=client-1 -bind=192.168.1.7 -datacenter=dc1 -ui -client=0.0.0.0 -join=172.17.0.2 > /dev/null 2>&1 &
[root@localhost consul]# /usr/local/soft/consul/consul members
Node      Address           Status  Type    Build  Protocol  DC   Segment
server-2  172.17.0.2:8301   alive   server  1.8.4  2         dc1  <all>
server-3  172.17.0.3:8301   alive   server  1.8.4  2         dc1  <all>
server-4  172.17.0.4:8301   alive   server  1.8.4  2         dc1  <all>
client-1  192.168.1.7:8301  alive   client  1.8.4  2         dc1  <default>
可以看到client-1是以client类型加入到集群中的
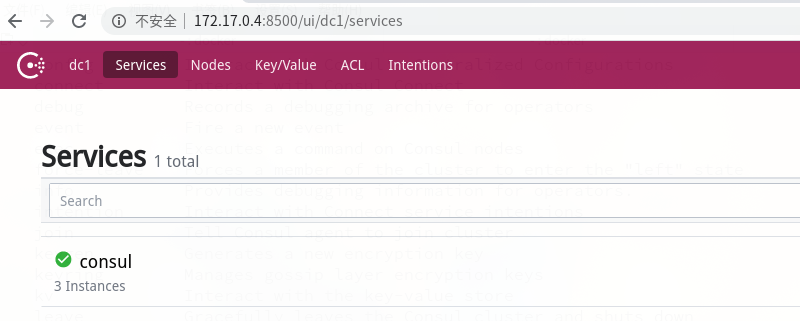
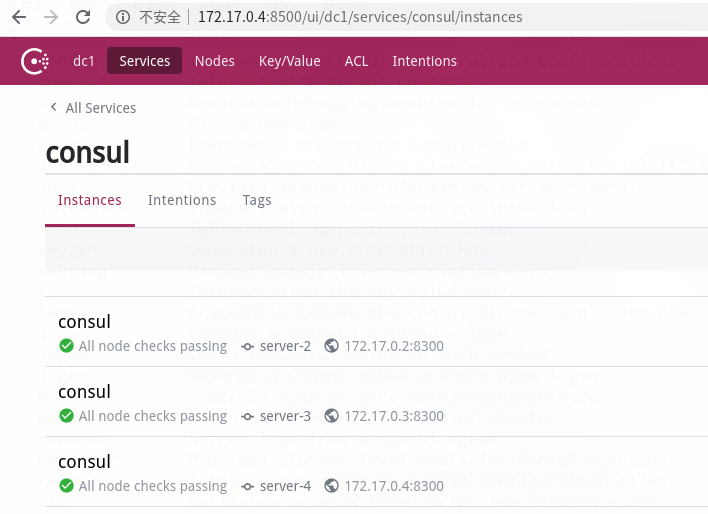

三,演示项目的相关信息
1,项目所在地址
https://github.com/liuhongdi/cloudconsul
2,功能说明:
演示了获取consul集群中的service和实例信息
3,项目结构:如图:

四,配置文件说明
1,pom.xml
        <dependency>
            <groupId>org.springframework.boot</groupId>
            <artifactId>spring-boot-starter-web</artifactId>
        </dependency>

        <dependency>
            <groupId>org.springframework.boot</groupId>
            <artifactId>spring-boot-starter-actuator</artifactId>
        </dependency>

        <dependency>
            <groupId>org.springframework.cloud</groupId>
            <artifactId>spring-cloud-starter-consul-discovery</artifactId>
        </dependency>
2,application.properties
spring.application.name=provider1
server.port=8080
#consul
spring.cloud.consul.host=127.0.0.1
spring.cloud.consul.port=8500
#service name
spring.cloud.consul.discovery.service-name=lhdprovider
provider.name = p1
五, java代码说明
1,DemoApplication.java
@EnableDiscoveryClient
@SpringBootApplication
public class DemoApplication {
    public static void main(String[] args) {
        SpringApplication.run(DemoApplication.class, args);
    }
}
2,HomeController.java
@RestController
@RequestMapping("/home")
public class HomeController {

    @Resource
    private DiscoveryClient discoveryClient;

    @Value("${provider.name}")
    private String name;

    @Value("${server.port}")
    private String port;

    // list services
    @GetMapping("/serviceslist")
    public Object serviceslist() {
        return discoveryClient.getServices();
    }

    // list instances in a service id
    @GetMapping("/instanceslist")
    public Object instanceslist() {
        return discoveryClient.getInstances("consul");
    }

    //test api
    @GetMapping("/hello")
    public String hello() {
        //return discoveryClient.getInstances("consul");
        String res = "name:"+name+";port:"+port;
        return res;
    }
}
六,测试效果
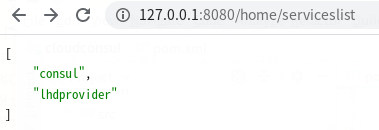
1,得到服务列表:访问:
http://127.0.0.1:8080/home/serviceslist
返回
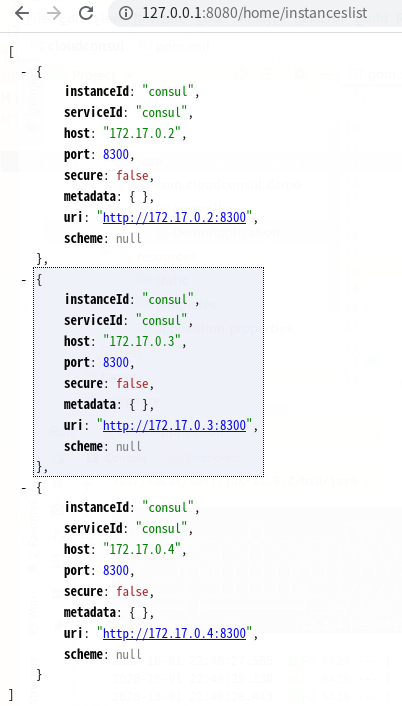
2,得到consul server集群的实例列表
http://127.0.0.1:8080/home/instanceslist
返回:
3,从web ui查看服务列表
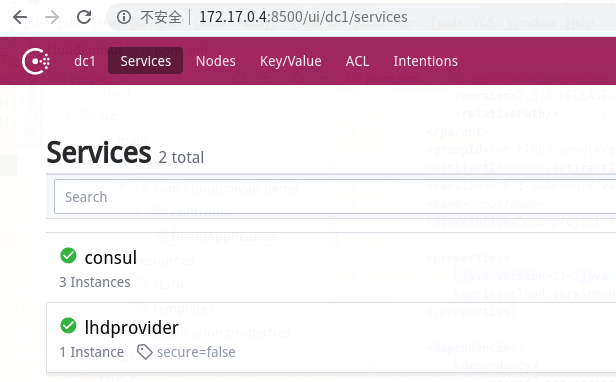
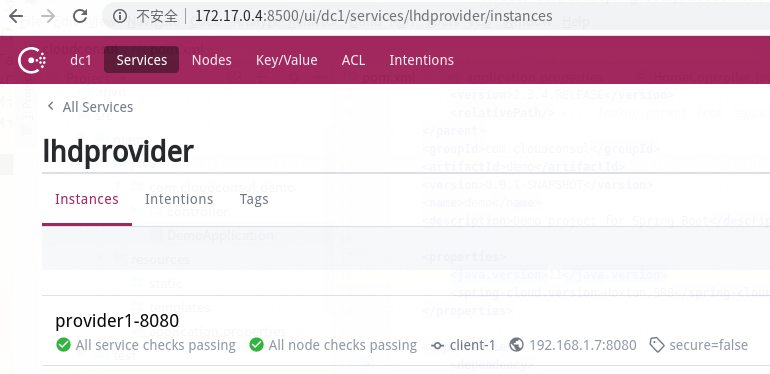
查看lhdprovider中的实例:
七,查看spring boot的版本
  .   ____          _            __ _ _
 /\\ / ___'_ __ _ _(_)_ __  __ _ \ \ \ \
( ( )\___ | '_ | '_| | '_ \/ _` | \ \ \ \
 \\/  ___)| |_)| | | | | || (_| |  ) ) ) )
  '  |____| .__|_| |_|_| |_\__, | / / / /
 =========|_|==============|___/=/_/_/_/
 :: Spring Boot ::        (v2.3.4.RELEASE)


【推荐】国内首个AI IDE,深度理解中文开发场景,立即下载体验Trae
【推荐】编程新体验,更懂你的AI,立即体验豆包MarsCode编程助手
【推荐】抖音旗下AI助手豆包,你的智能百科全书,全免费不限次数
【推荐】轻量又高性能的 SSH 工具 IShell:AI 加持,快人一步
· 开发者必知的日志记录最佳实践
· SQL Server 2025 AI相关能力初探
· Linux系列:如何用 C#调用 C方法造成内存泄露
· AI与.NET技术实操系列(二):开始使用ML.NET
· 记一次.NET内存居高不下排查解决与启示
· 阿里最新开源QwQ-32B,效果媲美deepseek-r1满血版,部署成本又又又降低了!
· 开源Multi-agent AI智能体框架aevatar.ai,欢迎大家贡献代码
· Manus重磅发布:全球首款通用AI代理技术深度解析与实战指南
· 被坑几百块钱后,我竟然真的恢复了删除的微信聊天记录!
· 没有Manus邀请码?试试免邀请码的MGX或者开源的OpenManus吧