spring boot:spring security实现oauth2授权认证(spring boot 2.3.3)
一,oauth2的用途?
1,什么是oauth2?
OAuth2 是一个开放标准,
它允许用户让第三方应用访问该用户在某一网站上存储的私密资源(如头像、照片、视频等),
在这个过程中无须将用户名和密码提供给第三方应用。
实现这一功能是通过提供一个令牌(token),而不是用户名和密码来访问他们存放在特定服务提供者的数据
2,spring 为oauth2提供的官方文档:
https://projects.spring.io/spring-security-oauth/docs/oauth2.html
3,获取令牌的方式主要有四种,分别是:
授权码模式
简单模式
密码模式
客户端模式
我们这里演示的是密码模式
说明:刘宏缔的架构森林是一个专注架构的博客,
网站:https://blog.imgtouch.com
本文: https://blog.imgtouch.com/index.php/2023/05/25/springbootspringsecurity-shi-xian-oauth2-shou-quan-ren-zheng-springboot233/
对应的源码可以访问这里获取: https://github.com/liuhongdi/
说明:作者:刘宏缔 邮箱: 371125307@qq.com
二,演示项目的相关信息
1,项目地址:
https://github.com/liuhongdi/securityoauth2
2,项目功能说明:
演示了得到token,用token访问资源等功能
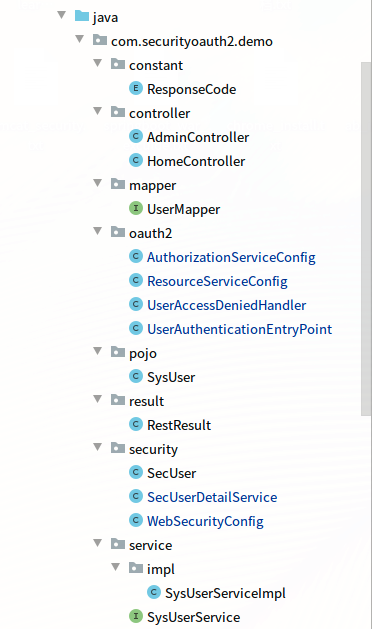
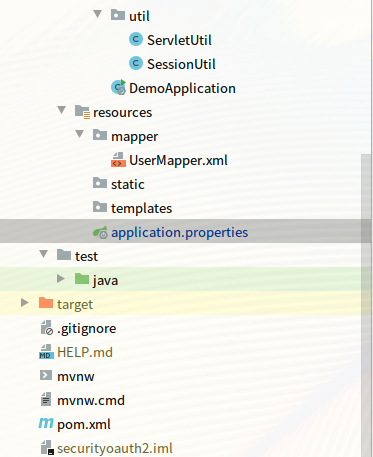
3,项目结构:如图:
三,配置文件说明
1,pom.xml
        <dependency>
            <groupId>org.springframework.boot</groupId>
            <artifactId>spring-boot-starter-web</artifactId>
        </dependency>
        <!--security-->
        <dependency>
            <groupId>org.springframework.boot</groupId>
            <artifactId>spring-boot-starter-security</artifactId>
        </dependency>
        <!--oauth2-->
        <dependency>
            <groupId>org.springframework.security.oauth</groupId>
            <artifactId>spring-security-oauth2</artifactId>
            <version>2.5.0.RELEASE</version>
        </dependency>
        <!--redis-->
        <dependency>
            <groupId>org.springframework.boot</groupId>
            <artifactId>spring-boot-starter-data-redis</artifactId>
        </dependency>
        <!--jaxb-->
        <dependency>
            <groupId>javax.xml.bind</groupId>
            <artifactId>jaxb-api</artifactId>
            <version>2.3.0</version>
        </dependency>
        <dependency>
            <groupId>com.sun.xml.bind</groupId>
            <artifactId>jaxb-impl</artifactId>
            <version>2.3.0</version>
        </dependency>
        <dependency>
            <groupId>com.sun.xml.bind</groupId>
            <artifactId>jaxb-core</artifactId>
            <version>2.3.0</version>
        </dependency>
        <dependency>
            <groupId>javax.activation</groupId>
            <artifactId>activation</artifactId>
            <version>1.1.1</version>
        </dependency>
        <!--mysql mybatis begin-->
        <dependency>
            <groupId>org.mybatis.spring.boot</groupId>
            <artifactId>mybatis-spring-boot-starter</artifactId>
            <version>2.1.3</version>
        </dependency>
        <dependency>
            <groupId>mysql</groupId>
            <artifactId>mysql-connector-java</artifactId>
            <scope>runtime</scope>
        </dependency>
        <!--fastjson begin-->
        <dependency>
            <groupId>com.alibaba</groupId>
            <artifactId>fastjson</artifactId>
            <version>1.2.73</version>
        </dependency>
2,application.properties
#redis
spring.redis.host=127.0.0.1
spring.redis.port=6379
spring.redis.database=0
spring.redis.password=lhddemo

#mysql
spring.datasource.url=jdbc:mysql://localhost:3306/security?characterEncoding=utf8&useSSL=false
spring.datasource.username=root
spring.datasource.password=lhddemo
spring.datasource.driver-class-name=com.mysql.cj.jdbc.Driver

#mybatis
mybatis.mapper-locations=classpath:/mapper/*Mapper.xml
mybatis.type-aliases-package=com.example.demo.mapper

#error
server.error.include-stacktrace=always
#log
logging.level.org.springframework.web=trace
3,数据库:

建表sql:
CREATE TABLE `sys_user` (
 `userId` int(11) NOT NULL AUTO_INCREMENT COMMENT 'id',
 `userName` varchar(100) NOT NULL DEFAULT '' COMMENT '用户名',
 `password` varchar(100) NOT NULL DEFAULT '' COMMENT '密码',
 `nickName` varchar(100) CHARACTER SET utf8mb4 COLLATE utf8mb4_0900_ai_ci NOT NULL DEFAULT '' COMMENT '昵称',
 PRIMARY KEY (`userId`),
 UNIQUE KEY `userName` (`userName`)
) ENGINE=InnoDB AUTO_INCREMENT=0 DEFAULT CHARSET=utf8mb4 COLLATE=utf8mb4_0900_ai_ci COMMENT='用户表'
INSERT INTO `sys_user` (`userId`, `userName`, `password`, `nickName`) VALUES
(1, 'lhd', '$2a$10$yGcOz3ekNI6Ya67tqQueS.raxyTOedGsv5jh2BwtRrI5/K9QEIPGq', '老刘'),
(2, 'admin', '$2a$10$yGcOz3ekNI6Ya67tqQueS.raxyTOedGsv5jh2BwtRrI5/K9QEIPGq', '管理员'),
(3, 'merchant', '$2a$10$yGcOz3ekNI6Ya67tqQueS.raxyTOedGsv5jh2BwtRrI5/K9QEIPGq', '商户老张');
说明:3个密码都是111111,仅供演示使用
CREATE TABLE `sys_user_role` (
 `urId` int(11) NOT NULL AUTO_INCREMENT COMMENT 'id',
 `userId` int(11) NOT NULL DEFAULT '0' COMMENT '用户id',
 `roleName` varchar(20) CHARACTER SET utf8mb4 COLLATE utf8mb4_0900_ai_ci NOT NULL DEFAULT '' COMMENT '角色id',
 PRIMARY KEY (`urId`),
 UNIQUE KEY `userId` (`userId`,`roleName`)
) ENGINE=InnoDB AUTO_INCREMENT=0 DEFAULT CHARSET=utf8mb4 COLLATE=utf8mb4_0900_ai_ci COMMENT='用户角色关联表'
INSERT INTO `sys_user_role` (`urId`, `userId`, `roleName`) VALUES
(1, 2, 'ADMIN'),
(2, 3, 'MERCHANT');
四,java代码说明
1,WebSecurityConfig.java
@Configuration
public class WebSecurityConfig extends WebSecurityConfigurerAdapter {
    private final static BCryptPasswordEncoder ENCODER = new BCryptPasswordEncoder();

    @Resource
    private SecUserDetailService secUserDetailService;     //用户信息类,用来得到UserDetails

    @Bean
    @Override
    protected AuthenticationManager authenticationManager() throws Exception {
        return super.authenticationManager();
    }
    @Bean
    @Override
    protected UserDetailsService userDetailsService() {
        return super.userDetailsService();
    }

    @Bean
    PasswordEncoder passwordEncoder() {
        return new BCryptPasswordEncoder();
    }

    @Override
    protected void configure(HttpSecurity http) throws Exception {
        http.antMatcher("/oauth/**")
                .authorizeRequests()
                .antMatchers("/oauth/**").permitAll()
                .and().csrf().disable();
    }

    @Resource
    public void configureGlobal(AuthenticationManagerBuilder auth) throws Exception {
        auth.userDetailsService(secUserDetailService).passwordEncoder(new PasswordEncoder() {
            @Override
            public String encode(CharSequence charSequence) {
                return ENCODER.encode(charSequence);
            }
            //密码匹配,看输入的密码经过加密与数据库中存放的是否一样
            @Override
            public boolean matches(CharSequence charSequence, String s) {
                return ENCODER.matches(charSequence,s);
            }
        });
    }
}
放开了到授权服务地址的访问
2,AuthorizationServiceConfig.java
@Configuration
@EnableAuthorizationServer
public class AuthorizationServiceConfig extends AuthorizationServerConfigurerAdapter {
    @Resource
    AuthenticationManager authenticationManager;
    @Resource
    RedisConnectionFactory redisConnectionFactory;
    @Resource
    UserDetailsService userDetailsService;

    @Override
    public void configure(ClientDetailsServiceConfigurer clients) throws Exception {

        String clientId = "client_id";
        String clientSecret = "123";
        clients.inMemory()
                //这个好比账号
                .withClient(clientId)
                //授权同意的类型
                .authorizedGrantTypes("password", "refresh_token")
                //有效时间
                .accessTokenValiditySeconds(1800)
                .refreshTokenValiditySeconds(60 * 60 * 2)
                .resourceIds("rid")
                //作用域,范围
                .scopes("all")
                //密码
                .secret(new BCryptPasswordEncoder().encode(clientSecret));
    }

    @Override
    public void configure(AuthorizationServerEndpointsConfigurer endpoints) throws Exception {
        endpoints.tokenStore(new RedisTokenStore(redisConnectionFactory))
                //身份验证管理
                .authenticationManager(authenticationManager)
                .userDetailsService(userDetailsService);
    }

    @Override
    public void configure(AuthorizationServerSecurityConfigurer security) throws Exception {
        //允许客户端表单身份验证
        security.allowFormAuthenticationForClients();
    }
}
授权服务器的配置,允许client_id这个账号的访问
3,ResourceServiceConfig.java
@Configuration
@EnableResourceServer
public class ResourceServiceConfig extends ResourceServerConfigurerAdapter {

    @Resource
    private UserAuthenticationEntryPoint userAuthenticationEntryPoint;

    @Resource
    private UserAccessDeniedHandler userAccessDeniedHandler;

    @Override
    public void configure(ResourceServerSecurityConfigurer resources) throws Exception {
        resources.resourceId("rid");
    }

    @Override
    public void configure(HttpSecurity http) throws Exception {

        http.authorizeRequests()
                .antMatchers("/home/**").permitAll();

        http.authorizeRequests()
                .antMatchers("/admin/**").hasAnyRole("admin","ADMIN")
                .antMatchers("/user/**").hasRole("user")
                .anyRequest().authenticated();

        //access deny
        http.exceptionHandling().accessDeniedHandler(userAccessDeniedHandler);
        //unauthorized
        http.exceptionHandling().authenticationEntryPoint(userAuthenticationEntryPoint);
    }
}
资源服务器的配置,admin这个url访问时需要有admin或ADMIN权限
4,UserAccessDeniedHandler.java
@Component("UserAccessDeniedHandler")
public class UserAccessDeniedHandler implements AccessDeniedHandler {
    @Override
    public void handle(HttpServletRequest request, HttpServletResponse response, AccessDeniedException accessDeniedException) throws IOException {
        //当用户在没有授权的情况下访问受保护的REST资源时,将调用此方法发送403 Forbidden响应
        System.out.println("UserAccessDeniedHandler");
        //response.sendError(HttpServletResponse.SC_FORBIDDEN, accessDeniedException.getMessage());
        ServletUtil.printRestResult(RestResult.error(ResponseCode.WEB_403));
    }
}
登录用户拒绝访问的处理
5,UserAuthenticationEntryPoint.java
@Component
public class UserAuthenticationEntryPoint implements AuthenticationEntryPoint {
    @Override
    public void commence(HttpServletRequest request,
                         HttpServletResponse response,
                         AuthenticationException authException) throws IOException {
        // 当用户尝试访问安全的REST资源而不提供任何凭据时,将调用此方法发送401 响应
        System.out.println("i am 401");
        ServletUtil.printRestResult(RestResult.error(ResponseCode.WEB_401));
    }
}
匿名用户拒绝访问的处理
6,SecUser.java
public class SecUser extends User {
    //用户id
    private int userid;
    //用户昵称
    private String nickname;

    public SecUser(String username, String password, Collection<? extends GrantedAuthority> authorities) {
        super(username, password, authorities);
    }

    public SecUser(String username, String password, boolean enabled, boolean accountNonExpired, boolean credentialsNonExpired, boolean accountNonLocked, Collection<? extends GrantedAuthority> authorities) {
        super(username, password, enabled, accountNonExpired, credentialsNonExpired, accountNonLocked, authorities);
    }

    public String getNickname() {
        return nickname;
    }
    public void setNickname(String nickname) {
        this.nickname = nickname;
    }

    public int getUserid() {
        return userid;
    }
    public void setUserid(int userid) {
        this.userid = userid;
    }
}
扩展spring security的user类
7,SecUserDetailService.java
@Component("SecUserDetailService")
public class SecUserDetailService implements UserDetailsService{
    @Resource
    private SysUserService sysUserService;
    //从数据库查询得到用户信息
    @Override
    public UserDetails loadUserByUsername(String s) throws UsernameNotFoundException {
        //查库
        SysUser oneUser = sysUserService.getOneUserByUsername(s);//数据库查询 看用户是否存在
        String encodedPassword = oneUser.getPassword();
        Collection<GrantedAuthority> collection = new ArrayList<>();//权限集合
        //用户权限:需要加 ROLE_
        List<String> roles = oneUser.getRoles();
        //System.out.println(roles);
        for (String roleone : roles) {
            GrantedAuthority grantedAuthority = new SimpleGrantedAuthority("ROLE_"+roleone);
            collection.add(grantedAuthority);
       }
        //增加用户的userid,nickname
        SecUser user = new SecUser(s,encodedPassword,collection);
        user.setUserid(oneUser.getUserId());
        user.setNickname(oneUser.getNickName());
        return user;
    }
}
通过查询数据库得到用户信息
8,其他非关键代码不一一贴出,可以从github访问
五,测试效果
1,得到token:
用postman访问:
http://127.0.0.1:8080/oauth/token
如图:

发送请求后效果:

此时我们可以使用 access_token访问资源服务器了
2,用postman访问:
http://127.0.0.1:8080/admin/hello?access_token=GOuq97fKw-O2eo-3yPp7jrTXc4A
说明:此处的access_token是我们上面所生成的字串
返回:
this is admin method
说明访问成功
3,刷新token,用postman访问:
http://127.0.0.1:8080/oauth/token
如图:
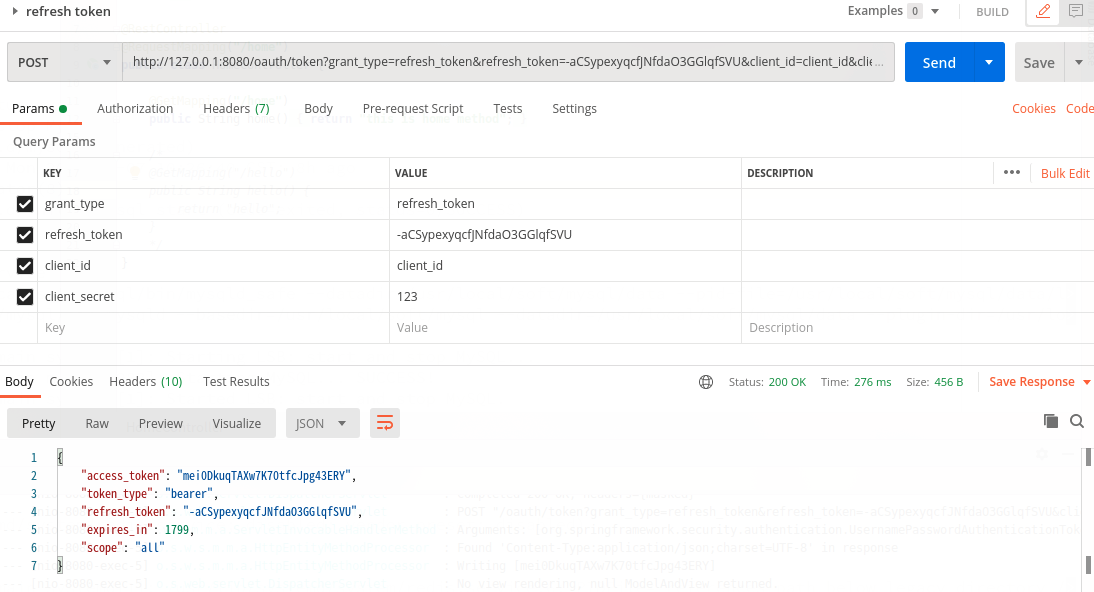
说明:此处使用的refresh_token是得到token时所返回的
4,查看redis中所保存的token?
登录到redis查看
127.0.0.1:6379> keys *
1) "access_to_refresh:mei0DkuqTAXw7K70tfcJpg43ERY"
2) "refresh_to_access:-aCSypexyqcfJNfdaO3GGlqfSVU"
3) "uname_to_access:client_id:admin"
4) "auth:mei0DkuqTAXw7K70tfcJpg43ERY"
5) "client_id_to_access:client_id"
6) "access:mei0DkuqTAXw7K70tfcJpg43ERY"
7) "refresh_auth:-aCSypexyqcfJNfdaO3GGlqfSVU"
8) "auth_to_access:8d9934986188793067df3115293372b7"
9) "refresh:-aCSypexyqcfJNfdaO3GGlqfSVU"
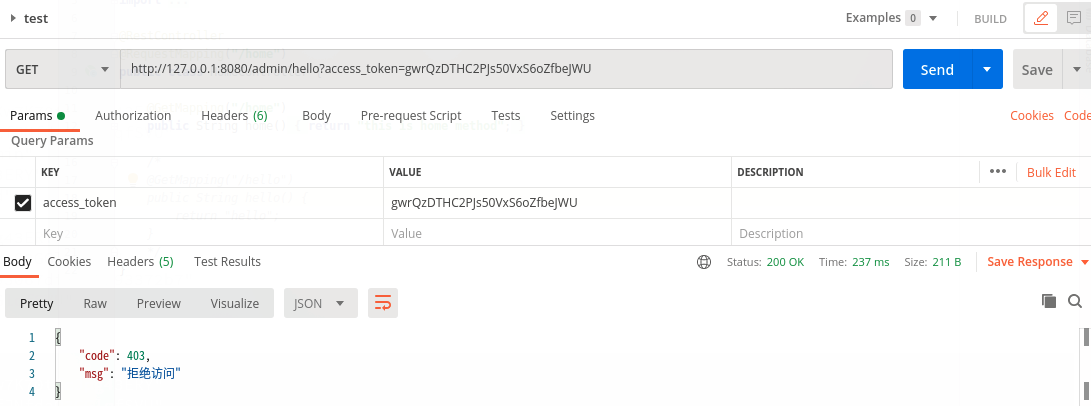
5,如果换成无权限的账号,是否还能访问/admin/hello?
这次使用lhd这个账号:
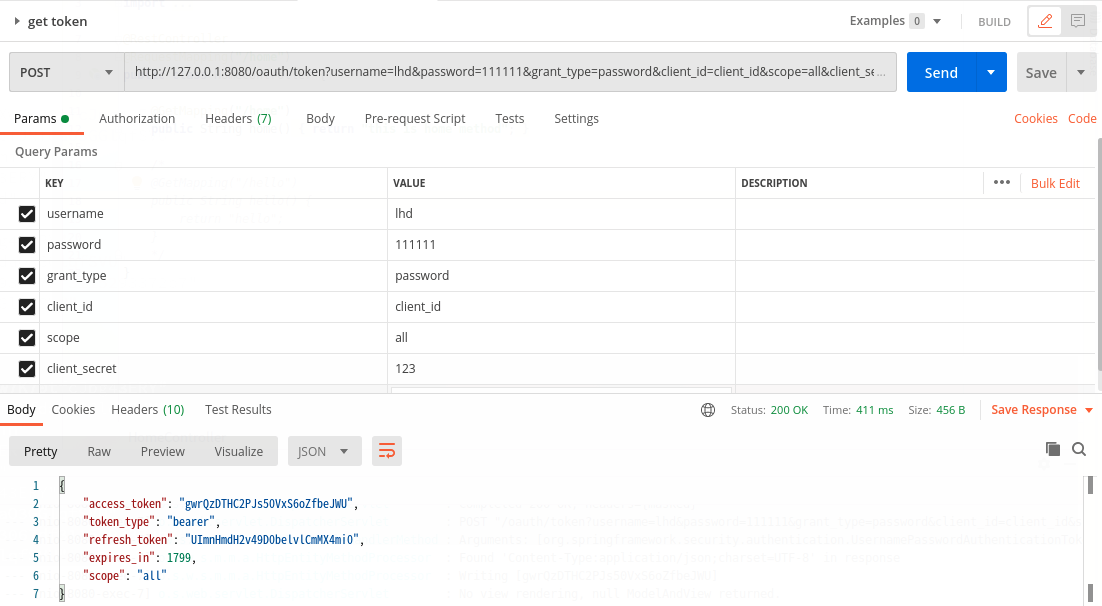
因为当前账号没有被授权,访问时会报错:
六,查看spring boot的版本
  .   ____          _            __ _ _
 /\\ / ___'_ __ _ _(_)_ __  __ _ \ \ \ \
( ( )\___ | '_ | '_| | '_ \/ _` | \ \ \ \
 \\/  ___)| |_)| | | | | || (_| |  ) ) ) )
  '  |____| .__|_| |_|_| |_\__, | / / / /
 =========|_|==============|___/=/_/_/_/
 :: Spring Boot ::        (v2.3.3.RELEASE)


 浙公网安备 33010602011771号