

python实现轮廓发现
目录:
(一)轮廓发现的介绍
(二)代码实现
(1)使用直接使用阈值方法threshold方法获取二值化图像来选择轮廓
(2)使用canny边缘检测获取二值化图像
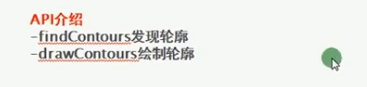
(一)轮廓发现的介绍与API的介绍


操作步骤:
1.转换图像为二值化图像:threshold方法或者canny边缘提取获取的都是二值化图像
2.通过二值化图像寻找轮廓:findContours
3.描绘轮廓:drawContours
(二)代码实现
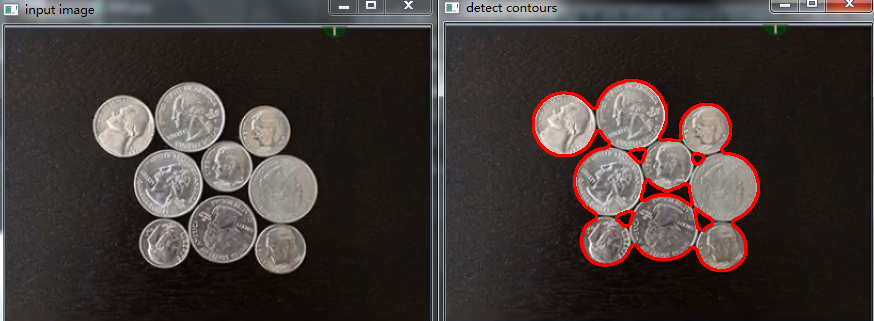
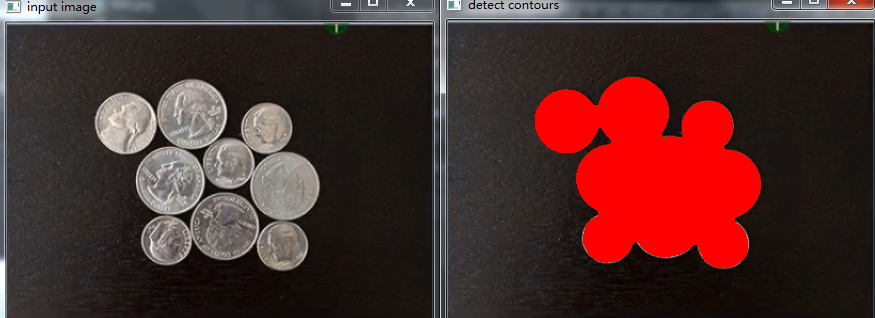
(1)使用直接使用阈值方法threshold方法获取二值化图像来选择轮廓
 1 def contours_demo(image):
 2     dst = cv.GaussianBlur(image,(9,9),15)  #高斯模糊,消除噪声
 3     gray = cv.cvtColor(dst,cv.COLOR_BGR2GRAY) #先变灰度图像
 4     ret, binary = cv.threshold(gray,0,255,cv.THRESH_BINARY|cv.THRESH_OTSU)  #获取二值图像
 5     cv.imshow("binary image",binary)
 6
 7     # cloneImage,contours,heriachy = cv.findContours(binary,cv.RETR_TREE,cv.CHAIN_APPROX_SIMPLE)    #RETR_TREE包含检测内部
 8     cloneImage,contours,heriachy = cv.findContours(binary,cv.RETR_EXTERNAL,cv.CHAIN_APPROX_SIMPLE)  #RETR_EXTERNAL检测外部轮廓
 9     for i, contour in enumerate(contours):
10         # cv.drawContours(image,contours,i,(0,0,255),2)  #绘制轮廓
11         cv.drawContours(image,contours,i,(0,0,255),-1)  #填充轮廓
12         print(i)
13     cv.imshow("detect contours",image)
14
15
16 src = cv.imread("./lk.png")  #读取图片
17 cv.namedWindow("input image",cv.WINDOW_AUTOSIZE)    #创建GUI窗口,形式为自适应
18 cv.imshow("input image",src)    #通过名字将图像和窗口联系
19
20 contours_demo(src)
21
22 cv.waitKey(0)   #等待用户操作,里面等待参数是毫秒,我们填写0,代表是永远,等待用户操作
23 cv.destroyAllWindows()  #销毁所有窗口
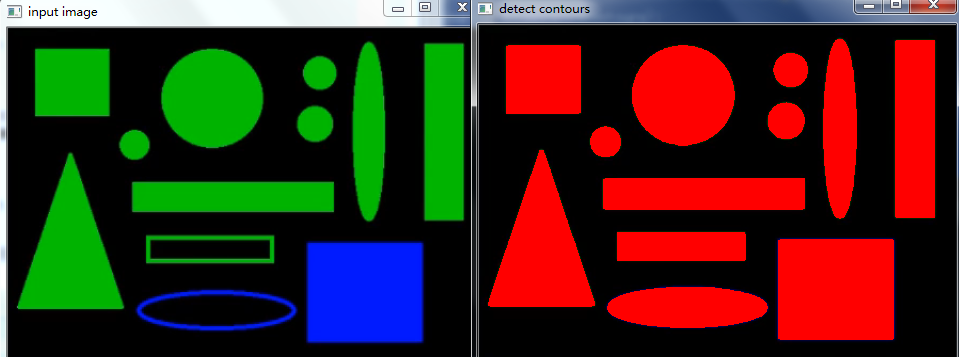
(2)使用canny边缘检测获取二值化图像
 1 def contours_demo(image):
 2     binary = edge_demo(image)
 3
 4     cloneImage,contours,heriachy = cv.findContours(binary,cv.RETR_TREE,cv.CHAIN_APPROX_SIMPLE)    #RETR_TREE包含检测内部
 5     for i, contour in enumerate(contours):
 6         # cv.drawContours(image,contours,i,(0,0,255),2)
 7         cv.drawContours(image,contours,i,(0,0,255),-1)
 8         print(i)
 9     cv.imshow("detect contours",image)
10
11 def edge_demo(image):
12     dst = cv.GaussianBlur(image,(3,3),0)
13     gray = cv.cvtColor(dst,cv.COLOR_BGR2GRAY) #先变灰度图像
14
15     edge_output = cv.Canny(gray,50,108)
16
17     cv.imshow("detect contours",edge_output)
18     return edge_output
19
20 src = cv.imread("./lk.png")  #读取图片
21 cv.namedWindow("input image",cv.WINDOW_AUTOSIZE)    #创建GUI窗口,形式为自适应
22 cv.imshow("input image",src)    #通过名字将图像和窗口联系
23
24 contours_demo(src)
25
26 cv.waitKey(0)   #等待用户操作,里面等待参数是毫秒,我们填写0,代表是永远,等待用户操作
27 cv.destroyAllWindows()  #销毁所有窗口
参考:
https://www.cnblogs.com/ssyfj/p/9276443.html

