
Yolov8-源码解析-五-
Yolov8 源码解析(五)
comments: true
description: Learn how to run YOLOv8 on AzureML. Quickstart instructions for terminal and notebooks to harness Azure's cloud computing for efficient model training.
keywords: YOLOv8, AzureML, machine learning, cloud computing, quickstart, terminal, notebooks, model training, Python SDK, AI, Ultralytics
YOLOv8 🚀 on AzureML
What is Azure?
Azure is Microsoft's cloud computing platform, designed to help organizations move their workloads to the cloud from on-premises data centers. With the full spectrum of cloud services including those for computing, databases, analytics, machine learning, and networking, users can pick and choose from these services to develop and scale new applications, or run existing applications, in the public cloud.
What is Azure Machine Learning (AzureML)?
Azure Machine Learning, commonly referred to as AzureML, is a fully managed cloud service that enables data scientists and developers to efficiently embed predictive analytics into their applications, helping organizations use massive data sets and bring all the benefits of the cloud to machine learning. AzureML offers a variety of services and capabilities aimed at making machine learning accessible, easy to use, and scalable. It provides capabilities like automated machine learning, drag-and-drop model training, as well as a robust Python SDK so that developers can make the most out of their machine learning models.
How Does AzureML Benefit YOLO Users?
For users of YOLO (You Only Look Once), AzureML provides a robust, scalable, and efficient platform to both train and deploy machine learning models. Whether you are looking to run quick prototypes or scale up to handle more extensive data, AzureML's flexible and user-friendly environment offers various tools and services to fit your needs. You can leverage AzureML to:
- Easily manage large datasets and computational resources for training.
- Utilize built-in tools for data preprocessing, feature selection, and model training.
- Collaborate more efficiently with capabilities for MLOps (Machine Learning Operations), including but not limited to monitoring, auditing, and versioning of models and data.
In the subsequent sections, you will find a quickstart guide detailing how to run YOLOv8 object detection models using AzureML, either from a compute terminal or a notebook.
Prerequisites
Before you can get started, make sure you have access to an AzureML workspace. If you don't have one, you can create a new AzureML workspace by following Azure's official documentation. This workspace acts as a centralized place to manage all AzureML resources.
Create a compute instance
From your AzureML workspace, select Compute > Compute instances > New, select the instance with the resources you need.
Quickstart from Terminal
Start your compute and open a Terminal:
Create virtualenv
Create your conda virtualenv and install pip in it:
conda create --name yolov8env -y
conda activate yolov8env
conda install pip -y
Install the required dependencies:
cd ultralytics
pip install -r requirements.txt
pip install ultralytics
pip install onnx>=1.12.0
Perform YOLOv8 tasks
Predict:
yolo predict model=yolov8n.pt source='https://ultralytics.com/images/bus.jpg'
Train a detection model for 10 epochs with an initial learning_rate of 0.01:
yolo train data=coco8.yaml model=yolov8n.pt epochs=10 lr0=0.01
You can find more instructions to use the Ultralytics CLI here.
Quickstart from a Notebook
Create a new IPython kernel
Open the compute Terminal.
From your compute terminal, you need to create a new ipykernel that will be used by your notebook to manage your dependencies:
conda create --name yolov8env -y
conda activate yolov8env
conda install pip -y
conda install ipykernel -y
python -m ipykernel install --user --name yolov8env --display-name "yolov8env"
Close your terminal and create a new notebook. From your Notebook, you can select the new kernel.
Then you can open a Notebook cell and install the required dependencies:
%%bash
source activate yolov8env
cd ultralytics
pip install -r requirements.txt
pip install ultralytics
pip install onnx>=1.12.0
Note that we need to use the source activate yolov8env for all the %%bash cells, to make sure that the %%bash cell uses environment we want.
Run some predictions using the Ultralytics CLI:
%%bash
source activate yolov8env
yolo predict model=yolov8n.pt source='https://ultralytics.com/images/bus.jpg'
Or with the Ultralytics Python interface, for example to train the model:
from ultralytics import YOLO

# Load a model
model = YOLO("yolov8n.pt")  # load an official YOLOv8n model

# Use the model
model.train(data="coco8.yaml", epochs=3)  # train the model
metrics = model.val()  # evaluate model performance on the validation set
results = model("https://ultralytics.com/images/bus.jpg")  # predict on an image
path = model.export(format="onnx")  # export the model to ONNX format
You can use either the Ultralytics CLI or Python interface for running YOLOv8 tasks, as described in the terminal section above.
By following these steps, you should be able to get YOLOv8 running quickly on AzureML for quick trials. For more advanced uses, you may refer to the full AzureML documentation linked at the beginning of this guide.
Explore More with AzureML
This guide serves as an introduction to get you up and running with YOLOv8 on AzureML. However, it only scratches the surface of what AzureML can offer. To delve deeper and unlock the full potential of AzureML for your machine learning projects, consider exploring the following resources:
- Create a Data Asset: Learn how to set up and manage your data assets effectively within the AzureML environment.
- Initiate an AzureML Job: Get a comprehensive understanding of how to kickstart your machine learning training jobs on AzureML.
- Register a Model: Familiarize yourself with model management practices including registration, versioning, and deployment.
- Train YOLOv8 with AzureML Python SDK: Explore a step-by-step guide on using the AzureML Python SDK to train your YOLOv8 models.
- Train YOLOv8 with AzureML CLI: Discover how to utilize the command-line interface for streamlined training and management of YOLOv8 models on AzureML.
FAQ
How do I run YOLOv8 on AzureML for model training?
Running YOLOv8 on AzureML for model training involves several steps:
-
Create a Compute Instance: From your AzureML workspace, navigate to Compute > Compute instances > New, and select the required instance.
-
Setup Environment: Start your compute instance, open a terminal, and create a conda environment:
conda create --name yolov8env -y conda activate yolov8env conda install pip -y pip install ultralytics onnx>=1.12.0 -
Run YOLOv8 Tasks: Use the Ultralytics CLI to train your model:
yolo train data=coco8.yaml model=yolov8n.pt epochs=10 lr0=0.01
For more details, you can refer to the instructions to use the Ultralytics CLI.
What are the benefits of using AzureML for YOLOv8 training?
AzureML provides a robust and efficient ecosystem for training YOLOv8 models:
- Scalability: Easily scale your compute resources as your data and model complexity grows.
- MLOps Integration: Utilize features like versioning, monitoring, and auditing to streamline ML operations.
- Collaboration: Share and manage resources within teams, enhancing collaborative workflows.
These advantages make AzureML an ideal platform for projects ranging from quick prototypes to large-scale deployments. For more tips, check out AzureML Jobs.
How do I troubleshoot common issues when running YOLOv8 on AzureML?
Troubleshooting common issues with YOLOv8 on AzureML can involve the following steps:
- Dependency Issues: Ensure all required packages are installed. Refer to the
requirements.txtfile for dependencies. - Environment Setup: Verify that your conda environment is correctly activated before running commands.
- Resource Allocation: Make sure your compute instances have sufficient resources to handle the training workload.
For additional guidance, review our YOLO Common Issues documentation.
Can I use both the Ultralytics CLI and Python interface on AzureML?
Yes, AzureML allows you to use both the Ultralytics CLI and the Python interface seamlessly:
-
CLI: Ideal for quick tasks and running standard scripts directly from the terminal.
yolo predict model=yolov8n.pt source='https://ultralytics.com/images/bus.jpg' -
Python Interface: Useful for more complex tasks requiring custom coding and integration within notebooks.
from ultralytics import YOLO

model = YOLO("yolov8n.pt")
model.train(data="coco8.yaml", epochs=3)
Refer to the quickstart guides for more detailed instructions here and here.
What is the advantage of using Ultralytics YOLOv8 over other object detection models?
Ultralytics YOLOv8 offers several unique advantages over competing object detection models:
- Speed: Faster inference and training times compared to models like Faster R-CNN and SSD.
- Accuracy: High accuracy in detection tasks with features like anchor-free design and enhanced augmentation strategies.
- Ease of Use: Intuitive API and CLI for quick setup, making it accessible both to beginners and experts.
To explore more about YOLOv8's features, visit the Ultralytics YOLO page for detailed insights.
comments: true
description: Learn to set up a Conda environment for Ultralytics projects. Follow our comprehensive guide for easy installation and initialization.
keywords: Ultralytics, Conda, setup, installation, environment, guide, machine learning, data science
Conda Quickstart Guide for Ultralytics
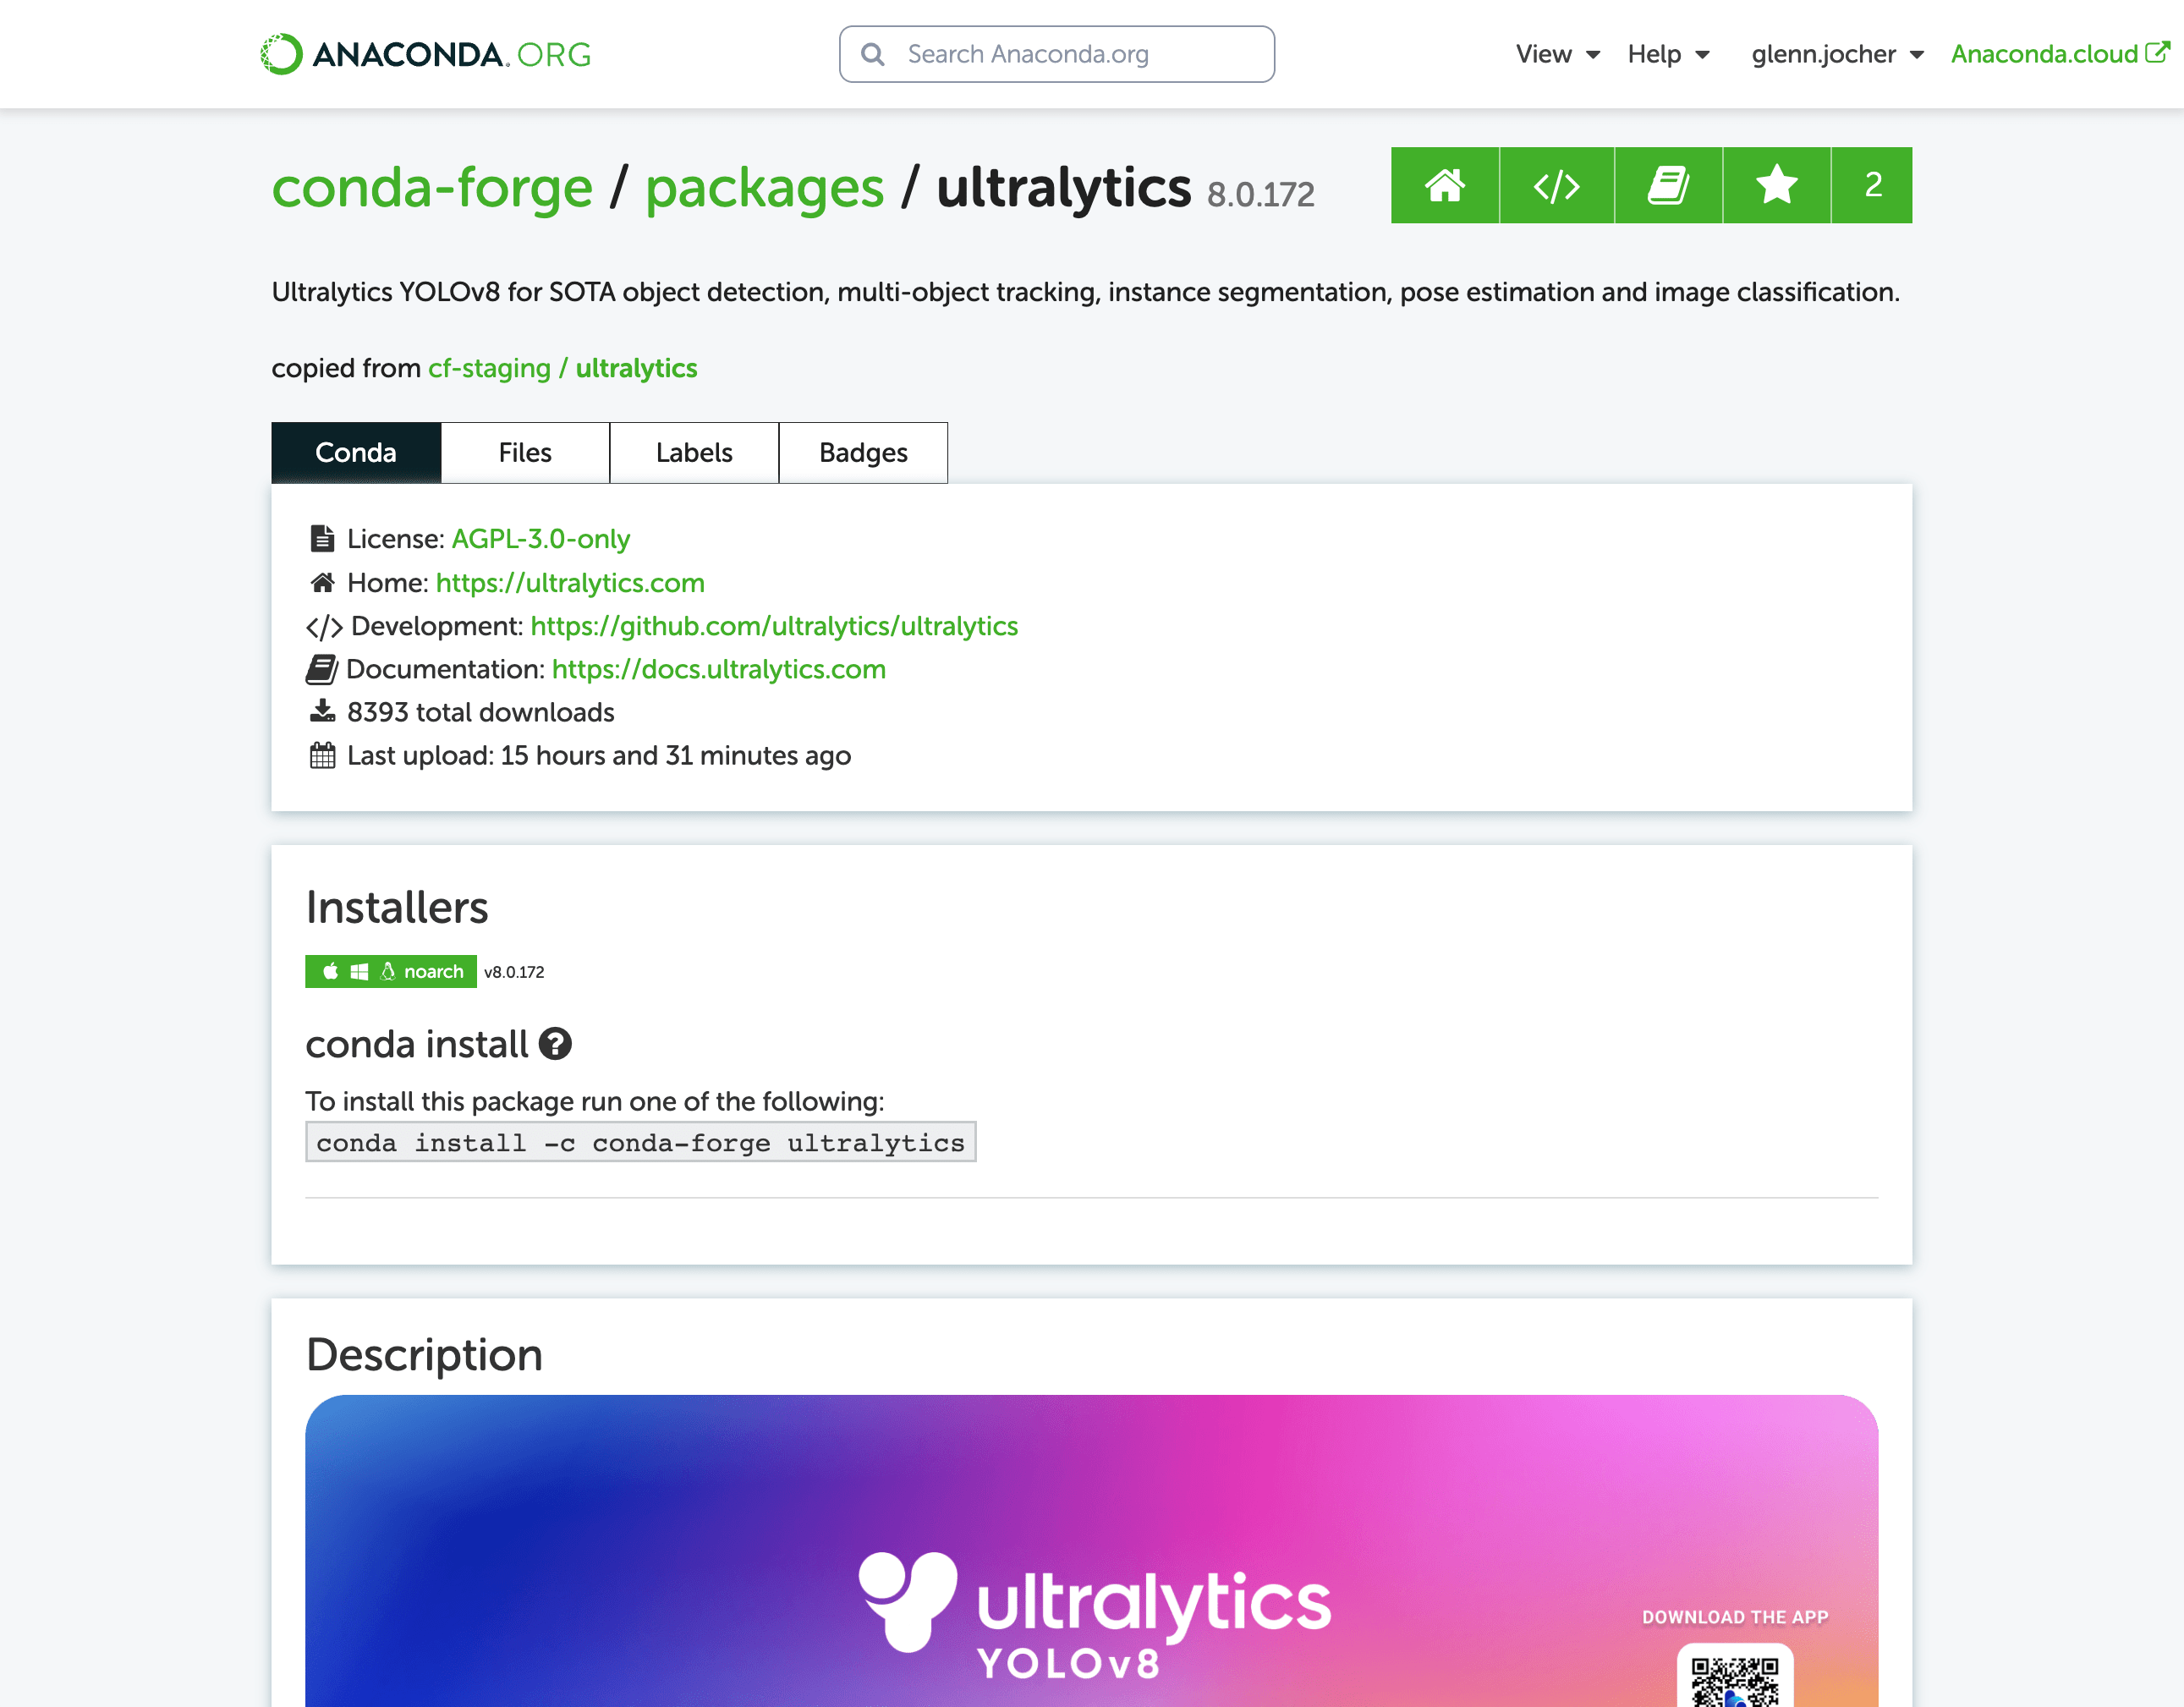
This guide provides a comprehensive introduction to setting up a Conda environment for your Ultralytics projects. Conda is an open-source package and environment management system that offers an excellent alternative to pip for installing packages and dependencies. Its isolated environments make it particularly well-suited for data science and machine learning endeavors. For more details, visit the Ultralytics Conda package on Anaconda and check out the Ultralytics feedstock repository for package updates on GitHub.

![]()


What You Will Learn
- Setting up a Conda environment
- Installing Ultralytics via Conda
- Initializing Ultralytics in your environment
- Using Ultralytics Docker images with Conda
Prerequisites
- You should have Anaconda or Miniconda installed on your system. If not, download and install it from Anaconda or Miniconda.
Setting up a Conda Environment
First, let's create a new Conda environment. Open your terminal and run the following command:
conda create --name ultralytics-env python=3.8 -y
Activate the new environment:
conda activate ultralytics-env
Installing Ultralytics
You can install the Ultralytics package from the conda-forge channel. Execute the following command:
conda install -c conda-forge ultralytics
Note on CUDA Environment
If you're working in a CUDA-enabled environment, it's a good practice to install ultralytics, pytorch, and pytorch-cuda together to resolve any conflicts:
conda install -c pytorch -c nvidia -c conda-forge pytorch torchvision pytorch-cuda=11.8 ultralytics
Using Ultralytics
With Ultralytics installed, you can now start using its robust features for object detection, instance segmentation, and more. For example, to predict an image, you can run:
from ultralytics import YOLO

model = YOLO("yolov8n.pt")  # initialize model
results = model("path/to/image.jpg")  # perform inference
results[0].show()  # display results for the first image
Ultralytics Conda Docker Image
If you prefer using Docker, Ultralytics offers Docker images with a Conda environment included. You can pull these images from DockerHub.
Pull the latest Ultralytics image:
# Set image name as a variable
t=ultralytics/ultralytics:latest-conda

# Pull the latest Ultralytics image from Docker Hub
sudo docker pull $t
Run the image:
# Run the Ultralytics image in a container with GPU support
sudo docker run -it --ipc=host --gpus all $t  # all GPUs
sudo docker run -it --ipc=host --gpus '"device=2,3"' $t  # specify GPUs
Speeding Up Installation with Libmamba
If you're looking to speed up the package installation process in Conda, you can opt to use libmamba, a fast, cross-platform, and dependency-aware package manager that serves as an alternative solver to Conda's default.
How to Enable Libmamba
To enable libmamba as the solver for Conda, you can perform the following steps:
-
First, install the
conda-libmamba-solverpackage. This can be skipped if your Conda version is 4.11 or above, aslibmambais included by default.conda install conda-libmamba-solver -
Next, configure Conda to use
libmambaas the solver:conda config --set solver libmamba
And that's it! Your Conda installation will now use libmamba as the solver, which should result in a faster package installation process.
Congratulations! You have successfully set up a Conda environment, installed the Ultralytics package, and are now ready to explore its rich functionalities. Feel free to dive deeper into the Ultralytics documentation for more advanced tutorials and examples.
FAQ
What is the process for setting up a Conda environment for Ultralytics projects?
Setting up a Conda environment for Ultralytics projects is straightforward and ensures smooth package management. First, create a new Conda environment using the following command:
conda create --name ultralytics-env python=3.8 -y
Then, activate the new environment with:
conda activate ultralytics-env
Finally, install Ultralytics from the conda-forge channel:
conda install -c conda-forge ultralytics
Why should I use Conda over pip for managing dependencies in Ultralytics projects?
Conda is a robust package and environment management system that offers several advantages over pip. It manages dependencies efficiently and ensures that all necessary libraries are compatible. Conda's isolated environments prevent conflicts between packages, which is crucial in data science and machine learning projects. Additionally, Conda supports binary package distribution, speeding up the installation process.
Can I use Ultralytics YOLO in a CUDA-enabled environment for faster performance?
Yes, you can enhance performance by utilizing a CUDA-enabled environment. Ensure that you install ultralytics, pytorch, and pytorch-cuda together to avoid conflicts:
conda install -c pytorch -c nvidia -c conda-forge pytorch torchvision pytorch-cuda=11.8 ultralytics
This setup enables GPU acceleration, crucial for intensive tasks like deep learning model training and inference. For more information, visit the Ultralytics installation guide.
What are the benefits of using Ultralytics Docker images with a Conda environment?
Using Ultralytics Docker images ensures a consistent and reproducible environment, eliminating "it works on my machine" issues. These images include a pre-configured Conda environment, simplifying the setup process. You can pull and run the latest Ultralytics Docker image with the following commands:
sudo docker pull ultralytics/ultralytics:latest-conda
sudo docker run -it --ipc=host --gpus all ultralytics/ultralytics:latest-conda
This approach is ideal for deploying applications in production or running complex workflows without manual configuration. Learn more about Ultralytics Conda Docker Image.
How can I speed up Conda package installation in my Ultralytics environment?
You can speed up the package installation process by using libmamba, a fast dependency solver for Conda. First, install the conda-libmamba-solver package:
conda install conda-libmamba-solver
Then configure Conda to use libmamba as the solver:
conda config --set solver libmamba
This setup provides faster and more efficient package management. For more tips on optimizing your environment, read about libmamba installation.
comments: true
description: Learn how to boost your Raspberry Pi's ML performance using Coral Edge TPU with Ultralytics YOLOv8. Follow our detailed setup and installation guide.
keywords: Coral Edge TPU, Raspberry Pi, YOLOv8, Ultralytics, TensorFlow Lite, ML inference, machine learning, AI, installation guide, setup tutorial
Coral Edge TPU on a Raspberry Pi with Ultralytics YOLOv8 🚀
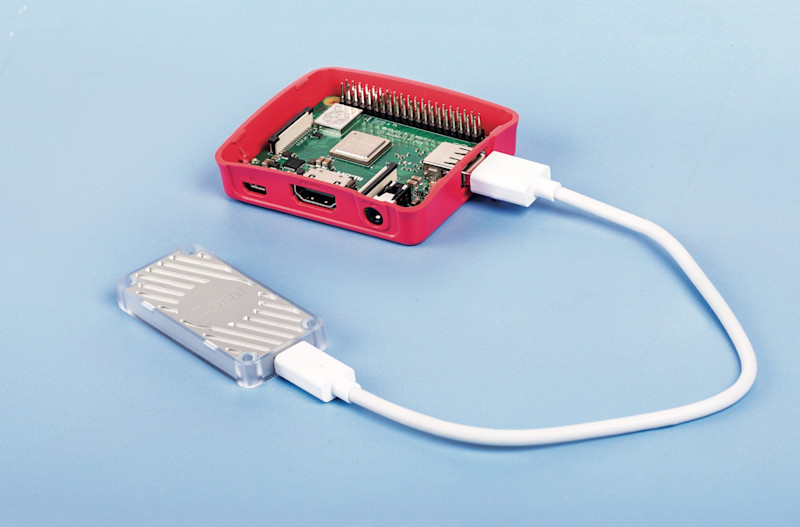
What is a Coral Edge TPU?
The Coral Edge TPU is a compact device that adds an Edge TPU coprocessor to your system. It enables low-power, high-performance ML inference for TensorFlow Lite models. Read more at the Coral Edge TPU home page.
Boost Raspberry Pi Model Performance with Coral Edge TPU
Many people want to run their models on an embedded or mobile device such as a Raspberry Pi, since they are very power efficient and can be used in many different applications. However, the inference performance on these devices is usually poor even when using formats like onnx or openvino. The Coral Edge TPU is a great solution to this problem, since it can be used with a Raspberry Pi and accelerate inference performance greatly.
Edge TPU on Raspberry Pi with TensorFlow Lite (New)⭐
The existing guide by Coral on how to use the Edge TPU with a Raspberry Pi is outdated, and the current Coral Edge TPU runtime builds do not work with the current TensorFlow Lite runtime versions anymore. In addition to that, Google seems to have completely abandoned the Coral project, and there have not been any updates between 2021 and 2024. This guide will show you how to get the Edge TPU working with the latest versions of the TensorFlow Lite runtime and an updated Coral Edge TPU runtime on a Raspberry Pi single board computer (SBC).
Prerequisites
- Raspberry Pi 4B (2GB or more recommended) or Raspberry Pi 5 (Recommended)
- Raspberry Pi OS Bullseye/Bookworm (64-bit) with desktop (Recommended)
- Coral USB Accelerator
- A non-ARM based platform for exporting an Ultralytics PyTorch model
Installation Walkthrough
This guide assumes that you already have a working Raspberry Pi OS install and have installed ultralytics and all dependencies. To get ultralytics installed, visit the quickstart guide to get setup before continuing here.
Installing the Edge TPU runtime
First, we need to install the Edge TPU runtime. There are many different versions available, so you need to choose the right version for your operating system.
| Raspberry Pi OS | High frequency mode | Version to download |
|---|---|---|
| Bullseye 32bit | No | libedgetpu1-std_ ... .bullseye_armhf.deb |
| Bullseye 64bit | No | libedgetpu1-std_ ... .bullseye_arm64.deb |
| Bullseye 32bit | Yes | libedgetpu1-max_ ... .bullseye_armhf.deb |
| Bullseye 64bit | Yes | libedgetpu1-max_ ... .bullseye_arm64.deb |
| Bookworm 32bit | No | libedgetpu1-std_ ... .bookworm_armhf.deb |
| Bookworm 64bit | No | libedgetpu1-std_ ... .bookworm_arm64.deb |
| Bookworm 32bit | Yes | libedgetpu1-max_ ... .bookworm_armhf.deb |
| Bookworm 64bit | Yes | libedgetpu1-max_ ... .bookworm_arm64.deb |
Download the latest version from here.
After downloading the file, you can install it with the following command:
sudo dpkg -i path/to/package.deb
After installing the runtime, you need to plug in your Coral Edge TPU into a USB 3.0 port on your Raspberry Pi. This is because, according to the official guide, a new udev rule needs to take effect after installation.
???+ warning "Important"
If you already have the Coral Edge TPU runtime installed, uninstall it using the following command.

```py
# If you installed the standard version
sudo apt remove libedgetpu1-std

# If you installed the high frequency version
sudo apt remove libedgetpu1-max
```
Export your model to a Edge TPU compatible model
To use the Edge TPU, you need to convert your model into a compatible format. It is recommended that you run export on Google Colab, x86_64 Linux machine, using the official Ultralytics Docker container, or using Ultralytics HUB, since the Edge TPU compiler is not available on ARM. See the Export Mode for the available arguments.
!!! Exporting the model
=== "Python"

    ```py
    from ultralytics import YOLO

    # Load a model
    model = YOLO("path/to/model.pt")  # Load an official model or custom model

    # Export the model
    model.export(format="edgetpu")
    ```

=== "CLI"

    ```py
    yolo export model=path/to/model.pt format=edgetpu  # Export an official model or custom model
    ```
The exported model will be saved in the <model_name>_saved_model/ folder with the name <model_name>_full_integer_quant_edgetpu.tflite.
Running the model
After exporting your model, you can run inference with it using the following code:
!!! Running the model
=== "Python"

    ```py
    from ultralytics import YOLO

    # Load a model
    model = YOLO("path/to/edgetpu_model.tflite")  # Load an official model or custom model

    # Run Prediction
    model.predict("path/to/source.png")
    ```

=== "CLI"

    ```py
    yolo predict model=path/to/edgetpu_model.tflite source=path/to/source.png  # Load an official model or custom model
    ```
Find comprehensive information on the Predict page for full prediction mode details.
???+ warning "Important"
You should run the model using `tflite-runtime` and not `tensorflow`.
If `tensorflow` is installed, uninstall tensorflow with the following command:

```py
pip uninstall tensorflow tensorflow-aarch64
```

Then install/update `tflite-runtime`:

```py
pip install -U tflite-runtime
```

If you want a `tflite-runtime` wheel for `tensorflow` 2.15.0 download it from [here](https://github.com/feranick/TFlite-builds/releases) and install it using `pip` or your package manager of choice.
FAQ
What is a Coral Edge TPU and how does it enhance Raspberry Pi's performance with Ultralytics YOLOv8?
The Coral Edge TPU is a compact device designed to add an Edge TPU coprocessor to your system. This coprocessor enables low-power, high-performance machine learning inference, particularly optimized for TensorFlow Lite models. When using a Raspberry Pi, the Edge TPU accelerates ML model inference, significantly boosting performance, especially for Ultralytics YOLOv8 models. You can read more about the Coral Edge TPU on their home page.
How do I install the Coral Edge TPU runtime on a Raspberry Pi?
To install the Coral Edge TPU runtime on your Raspberry Pi, download the appropriate .deb package for your Raspberry Pi OS version from this link. Once downloaded, use the following command to install it:
sudo dpkg -i path/to/package.deb
Make sure to uninstall any previous Coral Edge TPU runtime versions by following the steps outlined in the Installation Walkthrough section.
Can I export my Ultralytics YOLOv8 model to be compatible with Coral Edge TPU?
Yes, you can export your Ultralytics YOLOv8 model to be compatible with the Coral Edge TPU. It is recommended to perform the export on Google Colab, an x86_64 Linux machine, or using the Ultralytics Docker container. You can also use Ultralytics HUB for exporting. Here is how you can export your model using Python and CLI:
!!! Exporting the model
=== "Python"

    ```py
    from ultralytics import YOLO

    # Load a model
    model = YOLO("path/to/model.pt")  # Load an official model or custom model

    # Export the model
    model.export(format="edgetpu")
    ```

=== "CLI"

    ```py
    yolo export model=path/to/model.pt format=edgetpu  # Export an official model or custom model
    ```
For more information, refer to the Export Mode documentation.
What should I do if TensorFlow is already installed on my Raspberry Pi but I want to use tflite-runtime instead?
If you have TensorFlow installed on your Raspberry Pi and need to switch to tflite-runtime, you'll need to uninstall TensorFlow first using:
pip uninstall tensorflow tensorflow-aarch64
Then, install or update tflite-runtime with the following command:
pip install -U tflite-runtime
For a specific wheel, such as TensorFlow 2.15.0 tflite-runtime, you can download it from this link and install it using pip. Detailed instructions are available in the section on running the model Running the Model.
How do I run inference with an exported YOLOv8 model on a Raspberry Pi using the Coral Edge TPU?
After exporting your YOLOv8 model to an Edge TPU-compatible format, you can run inference using the following code snippets:
!!! Running the model
=== "Python"

    ```py
    from ultralytics import YOLO

    # Load a model
    model = YOLO("path/to/edgetpu_model.tflite")  # Load an official model or custom model

    # Run Prediction
    model.predict("path/to/source.png")
    ```

=== "CLI"

    ```py
    yolo predict model=path/to/edgetpu_model.tflite source=path/to/source.png  # Load an official model or custom model
    ```
Comprehensive details on full prediction mode features can be found on the Predict Page.
comments: true
description: Data collection and annotation are vital steps in any computer vision project. Explore the tools, techniques, and best practices for collecting and annotating data.
keywords: What is Data Annotation, Data Annotation Tools, Annotating Data, Avoiding Bias in Data Collection, Ethical Data Collection, Annotation Strategies
Data Collection and Annotation Strategies for Computer Vision
Introduction
The key to success in any computer vision project starts with effective data collection and annotation strategies. The quality of the data directly impacts model performance, so it's important to understand the best practices related to data collection and data annotation.
Every consideration regarding the data should closely align with your project's goals. Changes in your annotation strategies could shift the project's focus or effectiveness and vice versa. With this in mind, let's take a closer look at the best ways to approach data collection and annotation.
Setting Up Classes and Collecting Data
Collecting images and video for a computer vision project involves defining the number of classes, sourcing data, and considering ethical implications. Before you start gathering your data, you need to be clear about:
Choosing the Right Classes for Your Project
One of the first questions when starting a computer vision project is how many classes to include. You need to determine the class membership, which is involves the different categories or labels that you want your model to recognize and differentiate. The number of classes should be determined by the specific goals of your project.
For example, if you want to monitor traffic, your classes might include "car," "truck," "bus," "motorcycle," and "bicycle." On the other hand, for tracking items in a store, your classes could be "fruits," "vegetables," "beverages," and "snacks." Defining classes based on your project goals helps keep your dataset relevant and focused.
When you define your classes, another important distinction to make is whether to choose coarse or fine class counts. 'Count' refers to the number of distinct classes you are interested in. This decision influences the granularity of your data and the complexity of your model. Here are the considerations for each approach:
- Coarse Class-Count: These are broader, more inclusive categories, such as "vehicle" and "non-vehicle." They simplify annotation and require fewer computational resources but provide less detailed information, potentially limiting the model's effectiveness in complex scenarios.
- Fine Class-Count: More categories with finer distinctions, such as "sedan," "SUV," "pickup truck," and "motorcycle." They capture more detailed information, improving model accuracy and performance. However, they are more time-consuming and labor-intensive to annotate and require more computational resources.
Something to note is that starting with more specific classes can be very helpful, especially in complex projects where details are important. More specific classes lets you collect more detailed data, and gain deeper insights and clearer distinctions between categories. Not only does it improve the accuracy of the model, but it also makes it easier to adjust the model later if needed, saving both time and resources.
Sources of Data
You can use public datasets or gather your own custom data. Public datasets like those on Kaggle and Google Dataset Search Engine offer well-annotated, standardized data, making them great starting points for training and validating models.
Custom data collection, on the other hand, allows you to customize your dataset to your specific needs. You might capture images and videos with cameras or drones, scrape the web for images, or use existing internal data from your organization. Custom data gives you more control over its quality and relevance. Combining both public and custom data sources helps create a diverse and comprehensive dataset.
Avoiding Bias in Data Collection
Bias occurs when certain groups or scenarios are underrepresented or overrepresented in your dataset. It leads to a model that performs well on some data but poorly on others. It's crucial to avoid bias so that your computer vision model can perform well in a variety of scenarios.
Here is how you can avoid bias while collecting data:
- Diverse Sources: Collect data from many sources to capture different perspectives and scenarios.
- Balanced Representation: Include balanced representation from all relevant groups. For example, consider different ages, genders, and ethnicities.
- Continuous Monitoring: Regularly review and update your dataset to identify and address any emerging biases.
- Bias Mitigation Techniques: Use methods like oversampling underrepresented classes, data augmentation, and fairness-aware algorithms.
Following these practices helps create a more robust and fair model that can generalize well in real-world applications.
What is Data Annotation?
Data annotation is the process of labeling data to make it usable for training machine learning models. In computer vision, this means labeling images or videos with the information that a model needs to learn from. Without properly annotated data, models cannot accurately learn the relationships between inputs and outputs.
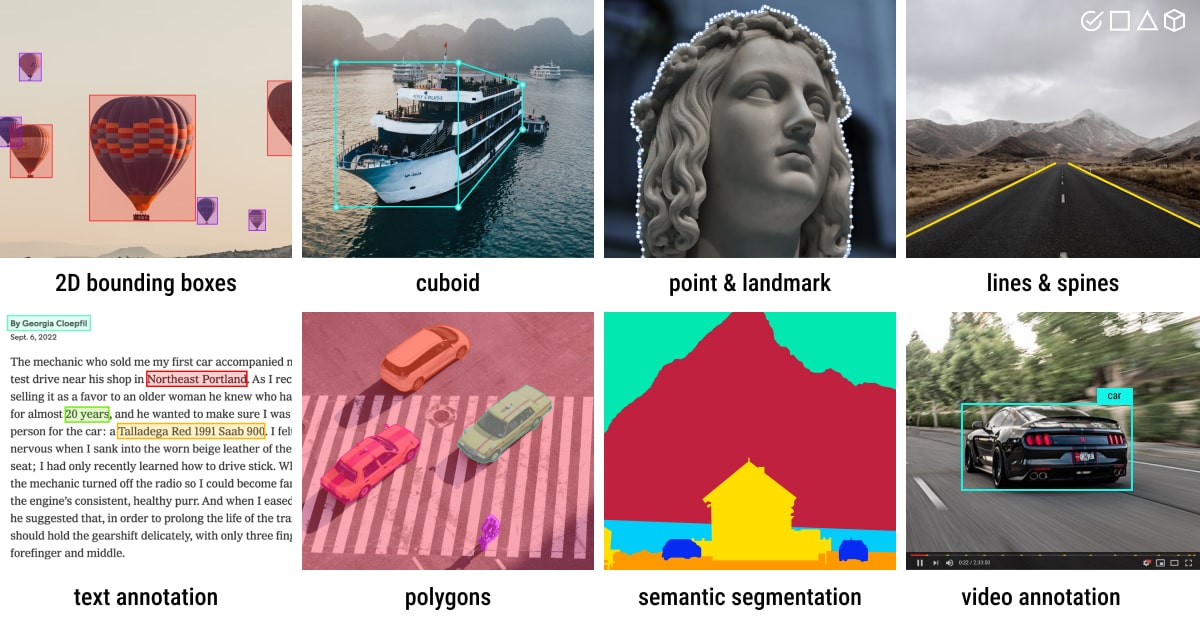
Types of Data Annotation
Depending on the specific requirements of a computer vision task, there are different types of data annotation. Here are some examples:
- Bounding Boxes: Rectangular boxes drawn around objects in an image, used primarily for object detection tasks. These boxes are defined by their top-left and bottom-right coordinates.
- Polygons: Detailed outlines for objects, allowing for more precise annotation than bounding boxes. Polygons are used in tasks like instance segmentation, where the shape of the object is important.
- Masks: Binary masks where each pixel is either part of an object or the background. Masks are used in semantic segmentation tasks to provide pixel-level detail.
- Keypoints: Specific points marked within an image to identify locations of interest. Keypoints are used in tasks like pose estimation and facial landmark detection.
Common Annotation Formats
After selecting a type of annotation, it's important to choose the appropriate format for storing and sharing annotations.
Commonly used formats include COCO, which supports various annotation types like object detection, keypoint detection, stuff segmentation, panoptic segmentation, and image captioning, stored in JSON. Pascal VOC uses XML files and is popular for object detection tasks. YOLO, on the other hand, creates a .txt file for each image, containing annotations like object class, coordinates, height, and width, making it suitable for object detection.
Techniques of Annotation
Now, assuming you've chosen a type of annotation and format, it's time to establish clear and objective labeling rules. These rules are like a roadmap for consistency and accuracy throughout the annotation process. Key aspects of these rules include:
- Clarity and Detail: Make sure your instructions are clear. Use examples and illustrations to understand what's expected.
- Consistency: Keep your annotations uniform. Set standard criteria for annotating different types of data, so all annotations follow the same rules.
- Reducing Bias: Stay neutral. Train yourself to be objective and minimize personal biases to ensure fair annotations.
- Efficiency: Work smarter, not harder. Use tools and workflows that automate repetitive tasks, making the annotation process faster and more efficient.
Regularly reviewing and updating your labeling rules will help keep your annotations accurate, consistent, and aligned with your project goals.
Popular Annotation Tools
Let's say you are ready to annotate now. There are several open-source tools available to help streamline the data annotation process. Here are some useful open annotation tools:
- Label Studio: A flexible tool that supports a wide range of annotation tasks and includes features for managing projects and quality control.
- CVAT: A powerful tool that supports various annotation formats and customizable workflows, making it suitable for complex projects.
- Labelme: A simple and easy-to-use tool that allows for quick annotation of images with polygons, making it ideal for straightforward tasks.

These open-source tools are budget-friendly and provide a range of features to meet different annotation needs.
Some More Things to Consider Before Annotating Data
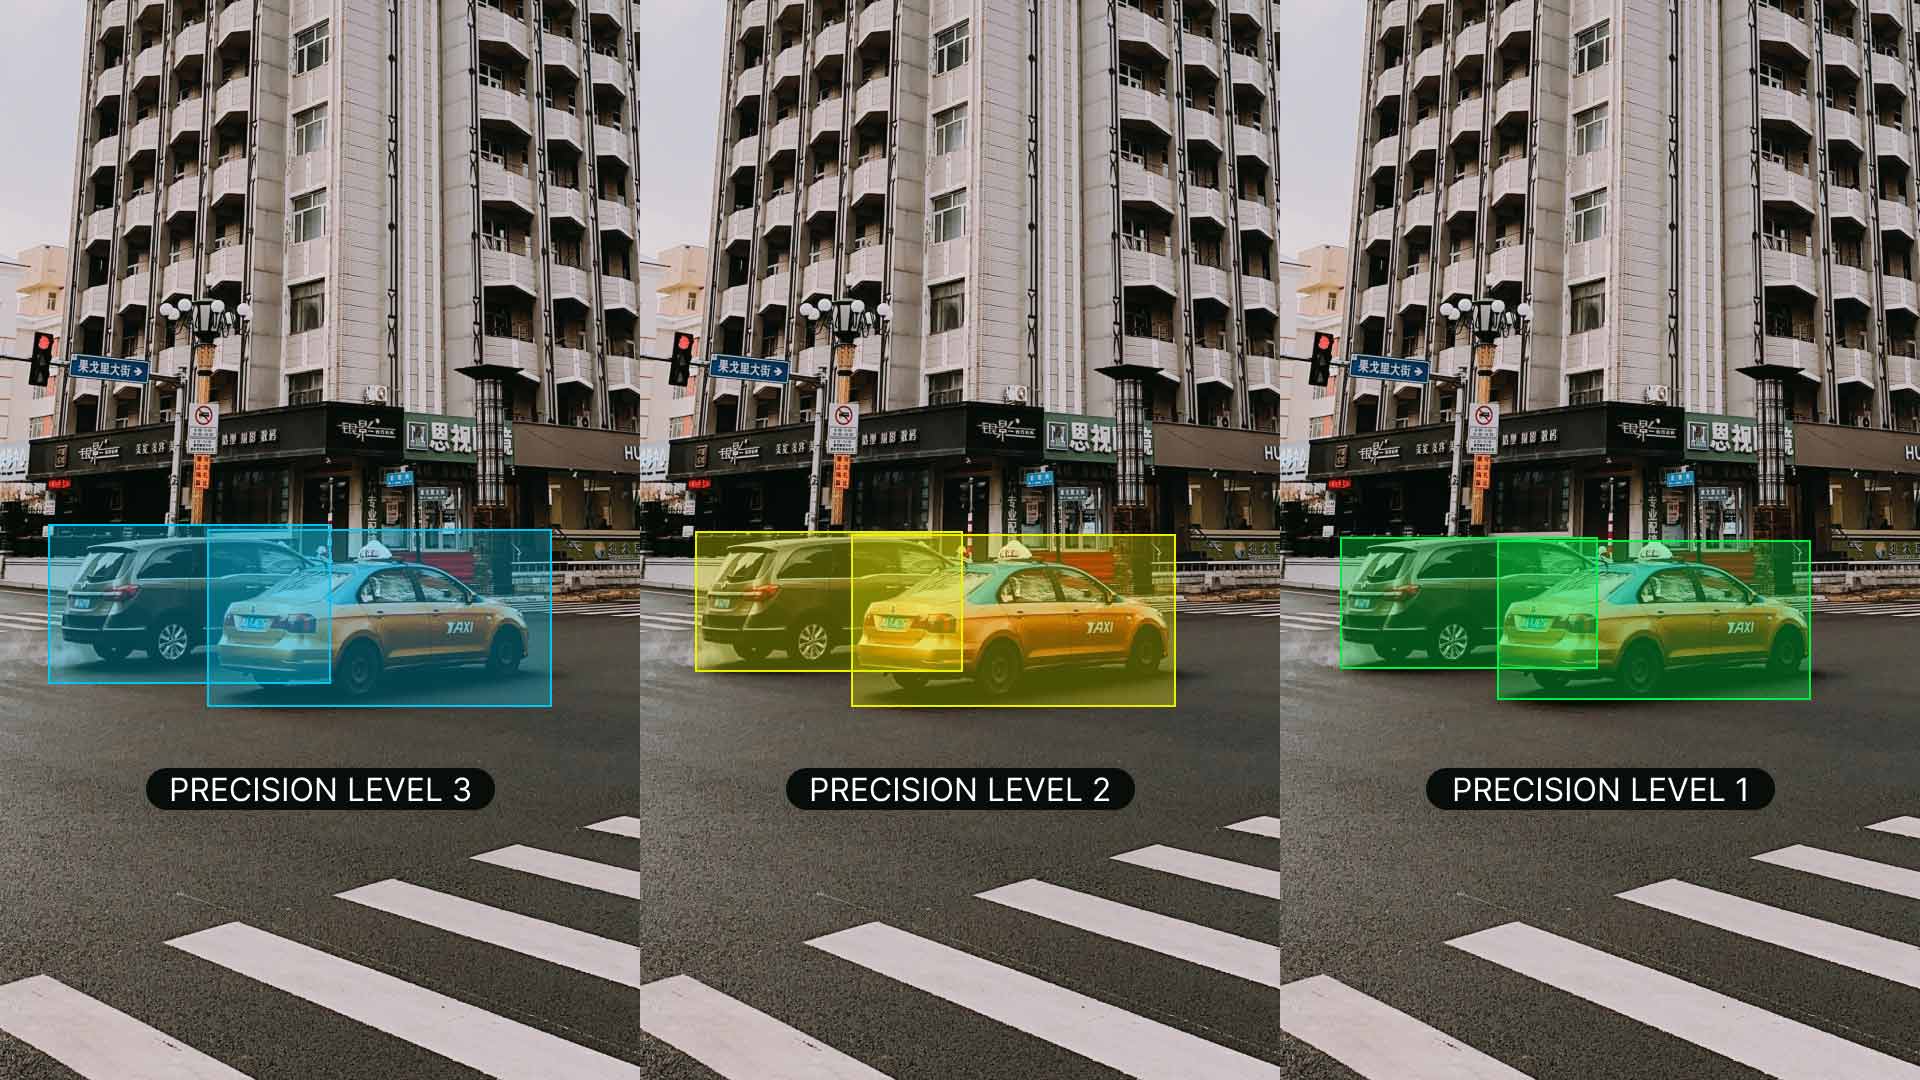
Before you dive into annotating your data, there are a few more things to keep in mind. You should be aware of accuracy, precision, outliers, and quality control to avoid labeling your data in a counterproductive manner.
Understanding Accuracy and Precision
It's important to understand the difference between accuracy and precision and how it relates to annotation. Accuracy refers to how close the annotated data is to the true values. It helps us measure how closely the labels reflect real-world scenarios. Precision indicates the consistency of annotations. It checks if you are giving the same label to the same object or feature throughout the dataset. High accuracy and precision lead to better-trained models by reducing noise and improving the model's ability to generalize from the training data.
Identifying Outliers
Outliers are data points that deviate quite a bit from other observations in the dataset. With respect to annotations, an outlier could be an incorrectly labeled image or an annotation that doesn't fit with the rest of the dataset. Outliers are concerning because they can distort the model's learning process, leading to inaccurate predictions and poor generalization.
You can use various methods to detect and correct outliers:
- Statistical Techniques: To detect outliers in numerical features like pixel values, bounding box coordinates, or object sizes, you can use methods such as box plots, histograms, or z-scores.
- Visual Techniques: To spot anomalies in categorical features like object classes, colors, or shapes, use visual methods like plotting images, labels, or heat maps.
- Algorithmic Methods: Use tools like clustering (e.g., K-means clustering, DBSCAN) and anomaly detection algorithms to identify outliers based on data distribution patterns.
Quality Control of Annotated Data
Just like other technical projects, quality control is a must for annotated data. It is a good practice to regularly check annotations to make sure they are accurate and consistent. This can be done in a few different ways:
- Reviewing samples of annotated data
- Using automated tools to spot common errors
- Having another person double-check the annotations
If you are working with multiple people, consistency between different annotators is important. Good inter-annotator agreement means that the guidelines are clear and everyone is following them the same way. It keeps everyone on the same page and the annotations consistent.
While reviewing, if you find errors, correct them and update the guidelines to avoid future mistakes. Provide feedback to annotators and offer regular training to help reduce errors. Having a strong process for handling errors keeps your dataset accurate and reliable.
Share Your Thoughts with the Community
Bouncing your ideas and queries off other computer vision enthusiasts can help accelerate your projects. Here are some great ways to learn, troubleshoot, and network:
Where to Find Help and Support
- GitHub Issues: Visit the YOLOv8 GitHub repository and use the Issues tab to raise questions, report bugs, and suggest features. The community and maintainers are there to help with any issues you face.
- Ultralytics Discord Server: Join the Ultralytics Discord server to connect with other users and developers, get support, share knowledge, and brainstorm ideas.
Official Documentation
- Ultralytics YOLOv8 Documentation: Refer to the official YOLOv8 documentation for thorough guides and valuable insights on numerous computer vision tasks and projects.
Conclusion
By following the best practices for collecting and annotating data, avoiding bias, and using the right tools and techniques, you can significantly improve your model's performance. Engaging with the community and using available resources will keep you informed and help you troubleshoot issues effectively. Remember, quality data is the foundation of a successful project, and the right strategies will help you build robust and reliable models.
FAQ
What is the best way to avoid bias in data collection for computer vision projects?
Avoiding bias in data collection ensures that your computer vision model performs well across various scenarios. To minimize bias, consider collecting data from diverse sources to capture different perspectives and scenarios. Ensure balanced representation among all relevant groups, such as different ages, genders, and ethnicities. Regularly review and update your dataset to identify and address any emerging biases. Techniques such as oversampling underrepresented classes, data augmentation, and fairness-aware algorithms can also help mitigate bias. By employing these strategies, you maintain a robust and fair dataset that enhances your model's generalization capability.
How can I ensure high consistency and accuracy in data annotation?
Ensuring high consistency and accuracy in data annotation involves establishing clear and objective labeling guidelines. Your instructions should be detailed, with examples and illustrations to clarify expectations. Consistency is achieved by setting standard criteria for annotating various data types, ensuring all annotations follow the same rules. To reduce personal biases, train annotators to stay neutral and objective. Regular reviews and updates of labeling rules help maintain accuracy and alignment with project goals. Using automated tools to check for consistency and getting feedback from other annotators also contribute to maintaining high-quality annotations.
How many images do I need for training Ultralytics YOLO models?
For effective transfer learning and object detection with Ultralytics YOLO models, start with a minimum of a few hundred annotated objects per class. If training for just one class, begin with at least 100 annotated images and train for approximately 100 epochs. More complex tasks might require thousands of images per class to achieve high reliability and performance. Quality annotations are crucial, so ensure your data collection and annotation processes are rigorous and aligned with your project's specific goals. Explore detailed training strategies in the YOLOv8 training guide.
What are some popular tools for data annotation?
Several popular open-source tools can streamline the data annotation process:
- Label Studio: A flexible tool supporting various annotation tasks, project management, and quality control features.
- CVAT: Offers multiple annotation formats and customizable workflows, making it suitable for complex projects.
- Labelme: Ideal for quick and straightforward image annotation with polygons.
These tools can help enhance the efficiency and accuracy of your annotation workflows. For extensive feature lists and guides, refer to our data annotation tools documentation.
What types of data annotation are commonly used in computer vision?
Different types of data annotation cater to various computer vision tasks:
- Bounding Boxes: Used primarily for object detection, these are rectangular boxes around objects in an image.
- Polygons: Provide more precise object outlines suitable for instance segmentation tasks.
- Masks: Offer pixel-level detail, used in semantic segmentation to differentiate objects from the background.
- Keypoints: Identify specific points of interest within an image, useful for tasks like pose estimation and facial landmark detection.
Selecting the appropriate annotation type depends on your project's requirements. Learn more about how to implement these annotations and their formats in our data annotation guide.
comments: true
description: Learn how to deploy Ultralytics YOLOv8 on NVIDIA Jetson devices using TensorRT and DeepStream SDK. Explore performance benchmarks and maximize AI capabilities.
keywords: Ultralytics, YOLOv8, NVIDIA Jetson, JetPack, AI deployment, embedded systems, deep learning, TensorRT, DeepStream SDK, computer vision
Ultralytics YOLOv8 on NVIDIA Jetson using DeepStream SDK and TensorRT
This comprehensive guide provides a detailed walkthrough for deploying Ultralytics YOLOv8 on NVIDIA Jetson devices using DeepStream SDK and TensorRT. Here we use TensorRT to maximize the inference performance on the Jetson platform.
!!! Note
This guide has been tested with both [Seeed Studio reComputer J4012](https://www.seeedstudio.com/reComputer-J4012-p-5586.html) which is based on NVIDIA Jetson Orin NX 16GB running JetPack release of [JP5.1.3](https://developer.nvidia.com/embedded/jetpack-sdk-513) and [Seeed Studio reComputer J1020 v2](https://www.seeedstudio.com/reComputer-J1020-v2-p-5498.html) which is based on NVIDIA Jetson Nano 4GB running JetPack release of [JP4.6.4](https://developer.nvidia.com/jetpack-sdk-464). It is expected to work across all the NVIDIA Jetson hardware lineup including latest and legacy.
What is NVIDIA DeepStream?
NVIDIA's DeepStream SDK is a complete streaming analytics toolkit based on GStreamer for AI-based multi-sensor processing, video, audio, and image understanding. It's ideal for vision AI developers, software partners, startups, and OEMs building IVA (Intelligent Video Analytics) apps and services. You can now create stream-processing pipelines that incorporate neural networks and other complex processing tasks like tracking, video encoding/decoding, and video rendering. These pipelines enable real-time analytics on video, image, and sensor data. DeepStream's multi-platform support gives you a faster, easier way to develop vision AI applications and services on-premise, at the edge, and in the cloud.
Prerequisites
Before you start to follow this guide:
-
Visit our documentation, Quick Start Guide: NVIDIA Jetson with Ultralytics YOLOv8 to set up your NVIDIA Jetson device with Ultralytics YOLOv8
-
Install DeepStream SDK according to the JetPack version
- For JetPack 4.6.4, install DeepStream 6.0.1
- For JetPack 5.1.3, install DeepStream 6.3
!!! Tip
In this guide we have used the Debian package method of installing DeepStream SDK to the Jetson device. You can also visit the [DeepStream SDK on Jetson (Archived)](https://developer.nvidia.com/embedded/deepstream-on-jetson-downloads-archived) to access legacy versions of DeepStream.
DeepStream Configuration for YOLOv8
Here we are using marcoslucianops/DeepStream-Yolo GitHub repository which includes NVIDIA DeepStream SDK support for YOLO models. We appreciate the efforts of marcoslucianops for his contributions!
-
Install dependencies
pip install cmake pip install onnxsim -
Clone the following repository
git clone https://github.com/marcoslucianops/DeepStream-Yolo cd DeepStream-Yolo -
Download Ultralytics YOLOv8 detection model (.pt) of your choice from YOLOv8 releases. Here we use yolov8s.pt.
wget https://github.com/ultralytics/assets/releases/download/v8.2.0/yolov8s.pt!!! Note
You can also use a [custom trained YOLOv8 model](https://docs.ultralytics.com/modes/train/). -
Convert model to ONNX
python3 utils/export_yoloV8.py -w yolov8s.pt!!! Note "Pass the below arguments to the above command"
For DeepStream 6.0.1, use opset 12 or lower. The default opset is 16. ```py --opset 12 ``` To change the inference size (default: 640) ```py -s SIZE --size SIZE -s HEIGHT WIDTH --size HEIGHT WIDTH ``` Example for 1280: ```py -s 1280 or -s 1280 1280 ``` To simplify the ONNX model (DeepStream >= 6.0) ```py --simplify ``` To use dynamic batch-size (DeepStream >= 6.1) ```py --dynamic ``` To use static batch-size (example for batch-size = 4) ```py --batch 4 ``` -
Set the CUDA version according to the JetPack version installed
For JetPack 4.6.4:
export CUDA_VER=10.2For JetPack 5.1.3:
export CUDA_VER=11.4 -
Compile the library
make -C nvdsinfer_custom_impl_Yolo clean && make -C nvdsinfer_custom_impl_Yolo -
Edit the
config_infer_primary_yoloV8.txtfile according to your model (for YOLOv8s with 80 classes)[property] ... onnx-file=yolov8s.onnx ... num-detected-classes=80 ... -
Edit the
deepstream_app_configfile... [primary-gie] ... config-file=config_infer_primary_yoloV8.txt -
You can also change the video source in
deepstream_app_configfile. Here a default video file is loaded... [source0] ... uri=file:///opt/nvidia/deepstream/deepstream/samples/streams/sample_1080p_h264.mp4
Run Inference
deepstream-app -c deepstream_app_config.txt
!!! Note
It will take a long time to generate the TensorRT engine file before starting the inference. So please be patient.
!!! Tip
If you want to convert the model to FP16 precision, simply set `model-engine-file=model_b1_gpu0_fp16.engine` and `network-mode=2` inside `config_infer_primary_yoloV8.txt`
INT8 Calibration
If you want to use INT8 precision for inference, you need to follow the steps below
-
Set
OPENCVenvironment variableexport OPENCV=1 -
Compile the library
make -C nvdsinfer_custom_impl_Yolo clean && make -C nvdsinfer_custom_impl_Yolo -
For COCO dataset, download the val2017, extract, and move to
DeepStream-Yolofolder -
Make a new directory for calibration images
mkdir calibration -
Run the following to select 1000 random images from COCO dataset to run calibration
for jpg in $(ls -1 val2017/*.jpg | sort -R | head -1000); do \
    cp ${jpg} calibration/; \
done
!!! Note
NVIDIA recommends at least 500 images to get a good accuracy. On this example, 1000 images are chosen to get better accuracy (more images = more accuracy). You can set it from **head -1000**. For example, for 2000 images, **head -2000**. This process can take a long time. -
Create the
calibration.txtfile with all selected imagesrealpath calibration/*jpg > calibration.txt -
Set environment variables
export INT8_CALIB_IMG_PATH=calibration.txt
export INT8_CALIB_BATCH_SIZE=1
!!! Note
Higher INT8_CALIB_BATCH_SIZE values will result in more accuracy and faster calibration speed. Set it according to you GPU memory. -
Update the
config_infer_primary_yoloV8.txtfileFrom
...
model-engine-file=model_b1_gpu0_fp32.engine
#int8-calib-file=calib.table
...
network-mode=0
...
To
...
model-engine-file=model_b1_gpu0_int8.engine
int8-calib-file=calib.table
...
network-mode=1
...
Run Inference
deepstream-app -c deepstream_app_config.txt
MultiStream Setup
To set up multiple streams under a single deepstream application, you can do the following changes to the deepstream_app_config.txt file
-
Change the rows and columns to build a grid display according to the number of streams you want to have. For example, for 4 streams, we can add 2 rows and 2 columns.
[tiled-display] rows=2 columns=2 -
Set
num-sources=4and adduriof all the 4 streams[source0] enable=1 type=3 uri=<path_to_video> uri=<path_to_video> uri=<path_to_video> uri=<path_to_video> num-sources=4
Run Inference
deepstream-app -c deepstream_app_config.txt
Benchmark Results
The following table summarizes how YOLOv8s models perform at different TensorRT precision levels with an input size of 640x640 on NVIDIA Jetson Orin NX 16GB.
| Model Name | Precision | Inference Time (ms/im) | FPS |
|---|---|---|---|
| YOLOv8s | FP32 | 15.63 | 64 |
| FP16 | 7.94 | 126 | |
| INT8 | 5.53 | 181 |
Acknowledgements
This guide was initially created by our friends at Seeed Studio, Lakshantha and Elaine.
FAQ
How do I set up Ultralytics YOLOv8 on an NVIDIA Jetson device?
To set up Ultralytics YOLOv8 on an NVIDIA Jetson device, you first need to install the DeepStream SDK compatible with your JetPack version. Follow the step-by-step guide in our Quick Start Guide to configure your NVIDIA Jetson for YOLOv8 deployment.
What is the benefit of using TensorRT with YOLOv8 on NVIDIA Jetson?
Using TensorRT with YOLOv8 optimizes the model for inference, significantly reducing latency and improving throughput on NVIDIA Jetson devices. TensorRT provides high-performance, low-latency deep learning inference through layer fusion, precision calibration, and kernel auto-tuning. This leads to faster and more efficient execution, particularly useful for real-time applications like video analytics and autonomous machines.
Can I run Ultralytics YOLOv8 with DeepStream SDK across different NVIDIA Jetson hardware?
Yes, the guide for deploying Ultralytics YOLOv8 with the DeepStream SDK and TensorRT is compatible across the entire NVIDIA Jetson lineup. This includes devices like the Jetson Orin NX 16GB with JetPack 5.1.3 and the Jetson Nano 4GB with JetPack 4.6.4. Refer to the section DeepStream Configuration for YOLOv8 for detailed steps.
How can I convert a YOLOv8 model to ONNX for DeepStream?
To convert a YOLOv8 model to ONNX format for deployment with DeepStream, use the utils/export_yoloV8.py script from the DeepStream-Yolo repository.
Here's an example command:
python3 utils/export_yoloV8.py -w yolov8s.pt --opset 12 --simplify
For more details on model conversion, check out our model export section.
What are the performance benchmarks for YOLOv8 on NVIDIA Jetson Orin NX?
The performance of YOLOv8 models on NVIDIA Jetson Orin NX 16GB varies based on TensorRT precision levels. For example, YOLOv8s models achieve:
- FP32 Precision: 15.63 ms/im, 64 FPS
- FP16 Precision: 7.94 ms/im, 126 FPS
- INT8 Precision: 5.53 ms/im, 181 FPS
These benchmarks underscore the efficiency and capability of using TensorRT-optimized YOLOv8 models on NVIDIA Jetson hardware. For further details, see our Benchmark Results section.
comments: true
description: Learn how to define clear goals and objectives for your computer vision project with our practical guide. Includes tips on problem statements, measurable objectives, and key decisions.
keywords: computer vision, project planning, problem statement, measurable objectives, dataset preparation, model selection, YOLOv8, Ultralytics
A Practical Guide for Defining Your Computer Vision Project
Introduction
The first step in any computer vision project is defining what you want to achieve. It's crucial to have a clear roadmap from the start, which includes everything from data collection to deploying your model.
If you need a quick refresher on the basics of a computer vision project, take a moment to read our guide on the key steps in a computer vision project. It'll give you a solid overview of the whole process. Once you're caught up, come back here to dive into how exactly you can define and refine the goals for your project.
Now, let's get to the heart of defining a clear problem statement for your project and exploring the key decisions you'll need to make along the way.
Defining A Clear Problem Statement
Setting clear goals and objectives for your project is the first big step toward finding the most effective solutions. Let's understand how you can clearly define your project's problem statement:
- Identify the Core Issue: Pinpoint the specific challenge your computer vision project aims to solve.
- Determine the Scope: Define the boundaries of your problem.
- Consider End Users and Stakeholders: Identify who will be affected by the solution.
- Analyze Project Requirements and Constraints: Assess available resources (time, budget, personnel) and identify any technical or regulatory constraints.
Example of a Business Problem Statement
Let's walk through an example.
Consider a computer vision project where you want to estimate the speed of vehicles on a highway. The core issue is that current speed monitoring methods are inefficient and error-prone due to outdated radar systems and manual processes. The project aims to develop a real-time computer vision system that can replace legacy speed estimation systems.

Primary users include traffic management authorities and law enforcement, while secondary stakeholders are highway planners and the public benefiting from safer roads. Key requirements involve evaluating budget, time, and personnel, as well as addressing technical needs like high-resolution cameras and real-time data processing. Additionally, regulatory constraints on privacy and data security must be considered.
Setting Measurable Objectives
Setting measurable objectives is key to the success of a computer vision project. These goals should be clear, achievable, and time-bound.
For example, if you are developing a system to estimate vehicle speeds on a highway. You could consider the following measurable objectives:
- To achieve at least 95% accuracy in speed detection within six months, using a dataset of 10,000 vehicle images.
- The system should be able to process real-time video feeds at 30 frames per second with minimal delay.
By setting specific and quantifiable goals, you can effectively track progress, identify areas for improvement, and ensure the project stays on course.
The Connection Between The Problem Statement and The Computer Vision Tasks
Your problem statement helps you conceptualize which computer vision task can solve your issue.
For example, if your problem is monitoring vehicle speeds on a highway, the relevant computer vision task is object tracking. Object tracking is suitable because it allows the system to continuously follow each vehicle in the video feed, which is crucial for accurately calculating their speeds.

Other tasks, like object detection, are not suitable as they don't provide continuous location or movement information. Once you've identified the appropriate computer vision task, it guides several critical aspects of your project, like model selection, dataset preparation, and model training approaches.
Which Comes First: Model Selection, Dataset Preparation, or Model Training Approach?
The order of model selection, dataset preparation, and training approach depends on the specifics of your project. Here are a few tips to help you decide:
-
Clear Understanding of the Problem: If your problem and objectives are well-defined, start with model selection. Then, prepare your dataset and decide on the training approach based on the model's requirements.
- Example: Start by selecting a model for a traffic monitoring system that estimates vehicle speeds. Choose an object tracking model, gather and annotate highway videos, and then train the model with techniques for real-time video processing.
-
Unique or Limited Data: If your project is constrained by unique or limited data, begin with dataset preparation. For instance, if you have a rare dataset of medical images, annotate and prepare the data first. Then, select a model that performs well on such data, followed by choosing a suitable training approach.
- Example: Prepare the data first for a facial recognition system with a small dataset. Annotate it, then select a model that works well with limited data, such as a pre-trained model for transfer learning. Finally, decide on a training approach, including data augmentation, to expand the dataset.
-
Need for Experimentation: In projects where experimentation is crucial, start with the training approach. This is common in research projects where you might initially test different training techniques. Refine your model selection after identifying a promising method and prepare the dataset based on your findings.
- Example: In a project exploring new methods for detecting manufacturing defects, start with experimenting on a small data subset. Once you find a promising technique, select a model tailored to those findings and prepare a comprehensive dataset.
Common Discussion Points in the Community
Next, let's look at a few common discussion points in the community regarding computer vision tasks and project planning.
What Are the Different Computer Vision Tasks?
The most popular computer vision tasks include image classification, object detection, and image segmentation.

For a detailed explanation of various tasks, please take a look at the Ultralytics Docs page on YOLOv8 Tasks.
Can a Pre-trained Model Remember Classes It Knew Before Custom Training?
No, pre-trained models don't "remember" classes in the traditional sense. They learn patterns from massive datasets, and during custom training (fine-tuning), these patterns are adjusted for your specific task. The model's capacity is limited, and focusing on new information can overwrite some previous learnings.

If you want to use the classes the model was pre-trained on, a practical approach is to use two models: one retains the original performance, and the other is fine-tuned for your specific task. This way, you can combine the outputs of both models. There are other options like freezing layers, using the pre-trained model as a feature extractor, and task-specific branching, but these are more complex solutions and require more expertise.
How Do Deployment Options Affect My Computer Vision Project?
Model deployment options critically impact the performance of your computer vision project. For instance, the deployment environment must handle the computational load of your model. Here are some practical examples:
- Edge Devices: Deploying on edge devices like smartphones or IoT devices requires lightweight models due to their limited computational resources. Example technologies include TensorFlow Lite and ONNX Runtime, which are optimized for such environments.
- Cloud Servers: Cloud deployments can handle more complex models with larger computational demands. Cloud platforms like AWS, Google Cloud, and Azure offer robust hardware options that can scale based on the project's needs.
- On-Premise Servers: For scenarios requiring high data privacy and security, deploying on-premise might be necessary. This involves significant upfront hardware investment but allows full control over the data and infrastructure.
- Hybrid Solutions: Some projects might benefit from a hybrid approach, where some processing is done on the edge, while more complex analyses are offloaded to the cloud. This can balance performance needs with cost and latency considerations.
Each deployment option offers different benefits and challenges, and the choice depends on specific project requirements like performance, cost, and security.
Connecting with the Community
Connecting with other computer vision enthusiasts can be incredibly helpful for your projects by providing support, solutions, and new ideas. Here are some great ways to learn, troubleshoot, and network:
Community Support Channels
- GitHub Issues: Head over to the YOLOv8 GitHub repository. You can use the Issues tab to raise questions, report bugs, and suggest features. The community and maintainers can assist with specific problems you encounter.
- Ultralytics Discord Server: Become part of the Ultralytics Discord server. Connect with fellow users and developers, seek support, exchange knowledge, and discuss ideas.
Comprehensive Guides and Documentation
- Ultralytics YOLOv8 Documentation: Explore the official YOLOv8 documentation for in-depth guides and valuable tips on various computer vision tasks and projects.
Conclusion
Defining a clear problem and setting measurable goals is key to a successful computer vision project. We've highlighted the importance of being clear and focused from the start. Having specific goals helps avoid oversight. Also, staying connected with others in the community through platforms like GitHub or Discord is important for learning and staying current. In short, good planning and engaging with the community is a huge part of successful computer vision projects.
FAQ
How do I define a clear problem statement for my Ultralytics computer vision project?
To define a clear problem statement for your Ultralytics computer vision project, follow these steps:
- Identify the Core Issue: Pinpoint the specific challenge your project aims to solve.
- Determine the Scope: Clearly outline the boundaries of your problem.
- Consider End Users and Stakeholders: Identify who will be affected by your solution.
- Analyze Project Requirements and Constraints: Assess available resources and any technical or regulatory limitations.
Providing a well-defined problem statement ensures that the project remains focused and aligned with your objectives. For a detailed guide, refer to our practical guide.
Why should I use Ultralytics YOLOv8 for speed estimation in my computer vision project?
Ultralytics YOLOv8 is ideal for speed estimation because of its real-time object tracking capabilities, high accuracy, and robust performance in detecting and monitoring vehicle speeds. It overcomes inefficiencies and inaccuracies of traditional radar systems by leveraging cutting-edge computer vision technology. Check out our blog on speed estimation using YOLOv8 for more insights and practical examples.
How do I set effective measurable objectives for my computer vision project with Ultralytics YOLOv8?
Set effective and measurable objectives using the SMART criteria:
- Specific: Define clear and detailed goals.
- Measurable: Ensure objectives are quantifiable.
- Achievable: Set realistic targets within your capabilities.
- Relevant: Align objectives with your overall project goals.
- Time-bound: Set deadlines for each objective.
For example, "Achieve 95% accuracy in speed detection within six months using a 10,000 vehicle image dataset." This approach helps track progress and identifies areas for improvement. Read more about setting measurable objectives.
How do deployment options affect the performance of my Ultralytics YOLO models?
Deployment options critically impact the performance of your Ultralytics YOLO models. Here are key options:
- Edge Devices: Use lightweight models like TensorFlow Lite or ONNX Runtime for deployment on devices with limited resources.
- Cloud Servers: Utilize robust cloud platforms like AWS, Google Cloud, or Azure for handling complex models.
- On-Premise Servers: High data privacy and security needs may require on-premise deployments.
- Hybrid Solutions: Combine edge and cloud approaches for balanced performance and cost-efficiency.
For more information, refer to our detailed guide on model deployment options.
What are the most common challenges in defining the problem for a computer vision project with Ultralytics?
Common challenges include:
- Vague or overly broad problem statements.
- Unrealistic objectives.
- Lack of stakeholder alignment.
- Insufficient understanding of technical constraints.
- Underestimating data requirements.
Address these challenges through thorough initial research, clear communication with stakeholders, and iterative refinement of the problem statement and objectives. Learn more about these challenges in our Computer Vision Project guide.
comments: true
description: Learn how to calculate distances between objects using Ultralytics YOLOv8 for accurate spatial positioning and scene understanding.
keywords: Ultralytics, YOLOv8, distance calculation, computer vision, object tracking, spatial positioning
Distance Calculation using Ultralytics YOLOv8
What is Distance Calculation?
Measuring the gap between two objects is known as distance calculation within a specified space. In the case of Ultralytics YOLOv8, the bounding box centroid is employed to calculate the distance for bounding boxes highlighted by the user.
Watch: Distance Calculation using Ultralytics YOLOv8
Visuals
| Distance Calculation using Ultralytics YOLOv8 |
|---|
Advantages of Distance Calculation?
- Localization Precision: Enhances accurate spatial positioning in computer vision tasks.
- Size Estimation: Allows estimation of physical sizes for better contextual understanding.
- Scene Understanding: Contributes to a 3D understanding of the environment for improved decision-making.
???+ tip "Distance Calculation"
- Click on any two bounding boxes with Left Mouse click for distance calculation
!!! Example "Distance Calculation using YOLOv8 Example"
=== "Video Stream"

    ```py
    import cv2

    from ultralytics import YOLO, solutions

    model = YOLO("yolov8n.pt")
    names = model.model.names

    cap = cv2.VideoCapture("path/to/video/file.mp4")
    assert cap.isOpened(), "Error reading video file"
    w, h, fps = (int(cap.get(x)) for x in (cv2.CAP_PROP_FRAME_WIDTH, cv2.CAP_PROP_FRAME_HEIGHT, cv2.CAP_PROP_FPS))

    # Video writer
    video_writer = cv2.VideoWriter("distance_calculation.avi", cv2.VideoWriter_fourcc(*"mp4v"), fps, (w, h))

    # Init distance-calculation obj
    dist_obj = solutions.DistanceCalculation(names=names, view_img=True)

    while cap.isOpened():
        success, im0 = cap.read()
        if not success:
            print("Video frame is empty or video processing has been successfully completed.")
            break

        tracks = model.track(im0, persist=True, show=False)
        im0 = dist_obj.start_process(im0, tracks)
        video_writer.write(im0)

    cap.release()
    video_writer.release()
    cv2.destroyAllWindows()
    ```
???+ tip "Note"
- Mouse Right Click will delete all drawn points
- Mouse Left Click can be used to draw points
Arguments DistanceCalculation()
Name |
Type |
Default |
Description |
|---|---|---|---|
names |
dict |
None |
Dictionary of classes names. |
pixels_per_meter |
int |
10 |
Conversion factor from pixels to meters. |
view_img |
bool |
False |
Flag to indicate if the video stream should be displayed. |
line_thickness |
int |
2 |
Thickness of the lines drawn on the image. |
line_color |
tuple |
(255, 255, 0) |
Color of the lines drawn on the image (BGR format). |
centroid_color |
tuple |
(255, 0, 255) |
Color of the centroids drawn (BGR format). |
Arguments model.track
| Name | Type | Default | Description |
|---|---|---|---|
source |
im0 |
None |
source directory for images or videos |
persist |
bool |
False |
persisting tracks between frames |
tracker |
str |
botsort.yaml |
Tracking method 'bytetrack' or 'botsort' |
conf |
float |
0.3 |
Confidence Threshold |
iou |
float |
0.5 |
IOU Threshold |
classes |
list |
None |
filter results by class, i.e. classes=0, or classes=[0,2,3] |
verbose |
bool |
True |
Display the object tracking results |
FAQ
How do I calculate distances between objects using Ultralytics YOLOv8?
To calculate distances between objects using Ultralytics YOLOv8, you need to identify the bounding box centroids of the detected objects. This process involves initializing the DistanceCalculation class from Ultralytics' solutions module and using the model's tracking outputs to calculate the distances. You can refer to the implementation in the distance calculation example.
What are the advantages of using distance calculation with Ultralytics YOLOv8?
Using distance calculation with Ultralytics YOLOv8 offers several advantages:
- Localization Precision: Provides accurate spatial positioning for objects.
- Size Estimation: Helps estimate physical sizes, contributing to better contextual understanding.
- Scene Understanding: Enhances 3D scene comprehension, aiding improved decision-making in applications like autonomous driving and surveillance.
Can I perform distance calculation in real-time video streams with Ultralytics YOLOv8?
Yes, you can perform distance calculation in real-time video streams with Ultralytics YOLOv8. The process involves capturing video frames using OpenCV, running YOLOv8 object detection, and using the DistanceCalculation class to calculate distances between objects in successive frames. For a detailed implementation, see the video stream example.
How do I delete points drawn during distance calculation using Ultralytics YOLOv8?
To delete points drawn during distance calculation with Ultralytics YOLOv8, you can use a right mouse click. This action will clear all the points you have drawn. For more details, refer to the note section under the distance calculation example.
What are the key arguments for initializing the DistanceCalculation class in Ultralytics YOLOv8?
The key arguments for initializing the DistanceCalculation class in Ultralytics YOLOv8 include:
names: Dictionary mapping class indices to class names.pixels_per_meter: Conversion factor from pixels to meters.view_img: Flag to indicate if the video stream should be displayed.line_thickness: Thickness of the lines drawn on the image.line_color: Color of the lines drawn on the image (BGR format).centroid_color: Color of the centroids (BGR format).
For an exhaustive list and default values, see the arguments of DistanceCalculation.
comments: true
description: Learn to effortlessly set up Ultralytics in Docker, from installation to running with CPU/GPU support. Follow our comprehensive guide for seamless container experience.
keywords: Ultralytics, Docker, Quickstart Guide, CPU support, GPU support, NVIDIA Docker, container setup, Docker environment, Docker Hub, Ultralytics projects
Docker Quickstart Guide for Ultralytics

This guide serves as a comprehensive introduction to setting up a Docker environment for your Ultralytics projects. Docker is a platform for developing, shipping, and running applications in containers. It is particularly beneficial for ensuring that the software will always run the same, regardless of where it's deployed. For more details, visit the Ultralytics Docker repository on Docker Hub.


What You Will Learn
- Setting up Docker with NVIDIA support
- Installing Ultralytics Docker images
- Running Ultralytics in a Docker container with CPU or GPU support
- Using a Display Server with Docker to Show Ultralytics Detection Results
- Mounting local directories into the container
Prerequisites
- Make sure Docker is installed on your system. If not, you can download and install it from Docker's website.
- Ensure that your system has an NVIDIA GPU and NVIDIA drivers are installed.
Setting up Docker with NVIDIA Support
First, verify that the NVIDIA drivers are properly installed by running:
nvidia-smi
Installing NVIDIA Docker Runtime
Now, let's install the NVIDIA Docker runtime to enable GPU support in Docker containers:
# Add NVIDIA package repositories
curl -s -L https://nvidia.github.io/nvidia-docker/gpgkey | sudo apt-key add -
distribution=$(lsb_release -cs)
curl -s -L https://nvidia.github.io/nvidia-docker/$distribution/nvidia-docker.list | sudo tee /etc/apt/sources.list.d/nvidia-docker.list

# Install NVIDIA Docker runtime
sudo apt-get update
sudo apt-get install -y nvidia-docker2

# Restart Docker service to apply changes
sudo systemctl restart docker
Verify NVIDIA Runtime with Docker
Run docker info | grep -i runtime to ensure that nvidia appears in the list of runtimes:
docker info | grep -i runtime
Installing Ultralytics Docker Images
Ultralytics offers several Docker images optimized for various platforms and use-cases:
- Dockerfile: GPU image, ideal for training.
- Dockerfile-arm64: For ARM64 architecture, suitable for devices like Raspberry Pi.
- Dockerfile-cpu: CPU-only version for inference and non-GPU environments.
- Dockerfile-jetson: Optimized for NVIDIA Jetson devices.
- Dockerfile-python: Minimal Python environment for lightweight applications.
- Dockerfile-conda: Includes Miniconda3 and Ultralytics package installed via Conda.
To pull the latest image:
# Set image name as a variable
t=ultralytics/ultralytics:latest

# Pull the latest Ultralytics image from Docker Hub
sudo docker pull $t
Running Ultralytics in Docker Container
Here's how to execute the Ultralytics Docker container:
Using only the CPU
# Run with all GPUs
sudo docker run -it --ipc=host $t
Using GPUs
# Run with all GPUs
sudo docker run -it --ipc=host --gpus all $t

# Run specifying which GPUs to use
sudo docker run -it --ipc=host --gpus '"device=2,3"' $t
The -it flag assigns a pseudo-TTY and keeps stdin open, allowing you to interact with the container. The --ipc=host flag enables sharing of host's IPC namespace, essential for sharing memory between processes. The --gpus flag allows the container to access the host's GPUs.
Note on File Accessibility
To work with files on your local machine within the container, you can use Docker volumes:
# Mount a local directory into the container
sudo docker run -it --ipc=host --gpus all -v /path/on/host:/path/in/container $t
Replace /path/on/host with the directory path on your local machine and /path/in/container with the desired path inside the Docker container.
Run graphical user interface (GUI) applications in a Docker Container
!!! danger "Highly Experimental - User Assumes All Risk"
The following instructions are experimental. Sharing a X11 socket with a Docker container poses potential security risks. Therefore, it's recommended to test this solution only in a controlled environment. For more information, refer to these resources on how to use `xhost`<sup>[(1)](http://users.stat.umn.edu/~geyer/secure.html)[(2)](https://linux.die.net/man/1/xhost)</sup>.
Docker is primarily used to containerize background applications and CLI programs, but it can also run graphical programs. In the Linux world, two main graphic servers handle graphical display: X11 (also known as the X Window System) and Wayland. Before starting, it's essential to determine which graphics server you are currently using. Run this command to find out:
env | grep -E -i 'x11|xorg|wayland'
Setup and configuration of an X11 or Wayland display server is outside the scope of this guide. If the above command returns nothing, then you'll need to start by getting either working for your system before continuing.
Running a Docker Container with a GUI
!!! example
??? info "Use GPUs"
        If you're using [GPUs](#using-gpus), you can add the `--gpus all` flag to the command.

=== "X11"

    If you're using X11, you can run the following command to allow the Docker container to access the X11 socket:

    ```py
    xhost +local:docker && docker run -e DISPLAY=$DISPLAY \
    -v /tmp/.X11-unix:/tmp/.X11-unix \
    -v ~/.Xauthority:/root/.Xauthority \
    -it --ipc=host $t
    ```

    This command sets the `DISPLAY` environment variable to the host's display, mounts the X11 socket, and maps the `.Xauthority` file to the container. The `xhost +local:docker` command allows the Docker container to access the X11 server.


=== "Wayland"

    For Wayland, use the following command:

    ```py
    xhost +local:docker && docker run -e DISPLAY=$DISPLAY \
    -v $XDG_RUNTIME_DIR/$WAYLAND_DISPLAY:/tmp/$WAYLAND_DISPLAY \
    --net=host -it --ipc=host $t
    ```

    This command sets the `DISPLAY` environment variable to the host's display, mounts the Wayland socket, and allows the Docker container to access the Wayland server.
Using Docker with a GUI
Now you can display graphical applications inside your Docker container. For example, you can run the following CLI command to visualize the predictions from a YOLOv8 model:
yolo predict model=yolov8n.pt show=True
??? info "Testing"
A simple way to validate that the Docker group has access to the X11 server is to run a container with a GUI program like [`xclock`](https://www.x.org/archive/X11R6.8.1/doc/xclock.1.html) or [`xeyes`](https://www.x.org/releases/X11R7.5/doc/man/man1/xeyes.1.html). Alternatively, you can also install these programs in the Ultralytics Docker container to test the access to the X11 server of your GNU-Linux display server. If you run into any problems, consider setting the environment variable `-e QT_DEBUG_PLUGINS=1`. Setting this environment variable enables the output of debugging information, aiding in the troubleshooting process.
When finished with Docker GUI
!!! warning "Revoke access"
In both cases, don't forget to revoke access from the Docker group when you're done.

```py
xhost -local:docker
```
??? question "Want to view image results directly in the Terminal?"
Refer to the following guide on [viewing the image results using a terminal](./view-results-in-terminal.md)
Congratulations! You're now set up to use Ultralytics with Docker and ready to take advantage of its powerful capabilities. For alternate installation methods, feel free to explore the Ultralytics quickstart documentation.
FAQ
How do I set up Ultralytics with Docker?
To set up Ultralytics with Docker, first ensure that Docker is installed on your system. If you have an NVIDIA GPU, install the NVIDIA Docker runtime to enable GPU support. Then, pull the latest Ultralytics Docker image from Docker Hub using the following command:
sudo docker pull ultralytics/ultralytics:latest
For detailed steps, refer to our Docker Quickstart Guide.
What are the benefits of using Ultralytics Docker images for machine learning projects?
Using Ultralytics Docker images ensures a consistent environment across different machines, replicating the same software and dependencies. This is particularly useful for collaborating across teams, running models on various hardware, and maintaining reproducibility. For GPU-based training, Ultralytics provides optimized Docker images such as Dockerfile for general GPU usage and Dockerfile-jetson for NVIDIA Jetson devices. Explore Ultralytics Docker Hub for more details.
How can I run Ultralytics YOLO in a Docker container with GPU support?
First, ensure that the NVIDIA Docker runtime is installed and configured. Then, use the following command to run Ultralytics YOLO with GPU support:
sudo docker run -it --ipc=host --gpus all ultralytics/ultralytics:latest
This command sets up a Docker container with GPU access. For additional details, see the Docker Quickstart Guide.
How do I visualize YOLO prediction results in a Docker container with a display server?
To visualize YOLO prediction results with a GUI in a Docker container, you need to allow Docker to access your display server. For systems running X11, the command is:
xhost +local:docker && docker run -e DISPLAY=$DISPLAY \
-v /tmp/.X11-unix:/tmp/.X11-unix \
-v ~/.Xauthority:/root/.Xauthority \
-it --ipc=host ultralytics/ultralytics:latest
For systems running Wayland, use:
xhost +local:docker && docker run -e DISPLAY=$DISPLAY \
-v $XDG_RUNTIME_DIR/$WAYLAND_DISPLAY:/tmp/$WAYLAND_DISPLAY \
--net=host -it --ipc=host ultralytics/ultralytics:latest
More information can be found in the Run graphical user interface (GUI) applications in a Docker Container section.
Can I mount local directories into the Ultralytics Docker container?
Yes, you can mount local directories into the Ultralytics Docker container using the -v flag:
sudo docker run -it --ipc=host --gpus all -v /path/on/host:/path/in/container ultralytics/ultralytics:latest
Replace /path/on/host with the directory on your local machine and /path/in/container with the desired path inside the container. This setup allows you to work with your local files within the container. For more information, refer to the relevant section on mounting local directories.
comments: true
description: Transform complex data into insightful heatmaps using Ultralytics YOLOv8. Discover patterns, trends, and anomalies with vibrant visualizations.
keywords: Ultralytics, YOLOv8, heatmaps, data visualization, data analysis, complex data, patterns, trends, anomalies
Advanced Data Visualization: Heatmaps using Ultralytics YOLOv8 🚀
Introduction to Heatmaps
A heatmap generated with Ultralytics YOLOv8 transforms complex data into a vibrant, color-coded matrix. This visual tool employs a spectrum of colors to represent varying data values, where warmer hues indicate higher intensities and cooler tones signify lower values. Heatmaps excel in visualizing intricate data patterns, correlations, and anomalies, offering an accessible and engaging approach to data interpretation across diverse domains.
Watch: Heatmaps using Ultralytics YOLOv8
Why Choose Heatmaps for Data Analysis?
- Intuitive Data Distribution Visualization: Heatmaps simplify the comprehension of data concentration and distribution, converting complex datasets into easy-to-understand visual formats.
- Efficient Pattern Detection: By visualizing data in heatmap format, it becomes easier to spot trends, clusters, and outliers, facilitating quicker analysis and insights.
- Enhanced Spatial Analysis and Decision-Making: Heatmaps are instrumental in illustrating spatial relationships, aiding in decision-making processes in sectors such as business intelligence, environmental studies, and urban planning.
Real World Applications
| Transportation | Retail |
|---|---|
| Ultralytics YOLOv8 Transportation Heatmap | Ultralytics YOLOv8 Retail Heatmap |
!!! tip "Heatmap Configuration"
- `heatmap_alpha`: Ensure this value is within the range (0.0 - 1.0).
- `decay_factor`: Used for removing heatmap after an object is no longer in the frame, its value should also be in the range (0.0 - 1.0).
!!! Example "Heatmaps using Ultralytics YOLOv8 Example"
=== "Heatmap"

    ```py
    import cv2

    from ultralytics import YOLO, solutions

    model = YOLO("yolov8n.pt")
    cap = cv2.VideoCapture("path/to/video/file.mp4")
    assert cap.isOpened(), "Error reading video file"
    w, h, fps = (int(cap.get(x)) for x in (cv2.CAP_PROP_FRAME_WIDTH, cv2.CAP_PROP_FRAME_HEIGHT, cv2.CAP_PROP_FPS))

    # Video writer
    video_writer = cv2.VideoWriter("heatmap_output.avi", cv2.VideoWriter_fourcc(*"mp4v"), fps, (w, h))

    # Init heatmap
    heatmap_obj = solutions.Heatmap(
        colormap=cv2.COLORMAP_PARULA,
        view_img=True,
        shape="circle",
        names=model.names,
    )

    while cap.isOpened():
        success, im0 = cap.read()
        if not success:
            print("Video frame is empty or video processing has been successfully completed.")
            break
        tracks = model.track(im0, persist=True, show=False)

        im0 = heatmap_obj.generate_heatmap(im0, tracks)
        video_writer.write(im0)

    cap.release()
    video_writer.release()
    cv2.destroyAllWindows()
    ```

=== "Line Counting"

    ```py
    import cv2

    from ultralytics import YOLO, solutions

    model = YOLO("yolov8n.pt")
    cap = cv2.VideoCapture("path/to/video/file.mp4")
    assert cap.isOpened(), "Error reading video file"
    w, h, fps = (int(cap.get(x)) for x in (cv2.CAP_PROP_FRAME_WIDTH, cv2.CAP_PROP_FRAME_HEIGHT, cv2.CAP_PROP_FPS))

    # Video writer
    video_writer = cv2.VideoWriter("heatmap_output.avi", cv2.VideoWriter_fourcc(*"mp4v"), fps, (w, h))

    line_points = [(20, 400), (1080, 404)]  # line for object counting

    # Init heatmap
    heatmap_obj = solutions.Heatmap(
        colormap=cv2.COLORMAP_PARULA,
        view_img=True,
        shape="circle",
        count_reg_pts=line_points,
        names=model.names,
    )

    while cap.isOpened():
        success, im0 = cap.read()
        if not success:
            print("Video frame is empty or video processing has been successfully completed.")
            break

        tracks = model.track(im0, persist=True, show=False)
        im0 = heatmap_obj.generate_heatmap(im0, tracks)
        video_writer.write(im0)

    cap.release()
    video_writer.release()
    cv2.destroyAllWindows()
    ```

=== "Polygon Counting"

    ```py
    import cv2

    from ultralytics import YOLO, solutions

    model = YOLO("yolov8n.pt")
    cap = cv2.VideoCapture("path/to/video/file.mp4")
    assert cap.isOpened(), "Error reading video file"
    w, h, fps = (int(cap.get(x)) for x in (cv2.CAP_PROP_FRAME_WIDTH, cv2.CAP_PROP_FRAME_HEIGHT, cv2.CAP_PROP_FPS))

    # Video writer
    video_writer = cv2.VideoWriter("heatmap_output.avi", cv2.VideoWriter_fourcc(*"mp4v"), fps, (w, h))

    # Define polygon points
    region_points = [(20, 400), (1080, 404), (1080, 360), (20, 360), (20, 400)]

    # Init heatmap
    heatmap_obj = solutions.Heatmap(
        colormap=cv2.COLORMAP_PARULA,
        view_img=True,
        shape="circle",
        count_reg_pts=region_points,
        names=model.names,
    )

    while cap.isOpened():
        success, im0 = cap.read()
        if not success:
            print("Video frame is empty or video processing has been successfully completed.")
            break

        tracks = model.track(im0, persist=True, show=False)
        im0 = heatmap_obj.generate_heatmap(im0, tracks)
        video_writer.write(im0)

    cap.release()
    video_writer.release()
    cv2.destroyAllWindows()
    ```

=== "Region Counting"

    ```py
    import cv2

    from ultralytics import YOLO, solutions

    model = YOLO("yolov8n.pt")
    cap = cv2.VideoCapture("path/to/video/file.mp4")
    assert cap.isOpened(), "Error reading video file"
    w, h, fps = (int(cap.get(x)) for x in (cv2.CAP_PROP_FRAME_WIDTH, cv2.CAP_PROP_FRAME_HEIGHT, cv2.CAP_PROP_FPS))

    # Video writer
    video_writer = cv2.VideoWriter("heatmap_output.avi", cv2.VideoWriter_fourcc(*"mp4v"), fps, (w, h))

    # Define region points
    region_points = [(20, 400), (1080, 404), (1080, 360), (20, 360)]

    # Init heatmap
    heatmap_obj = solutions.Heatmap(
        colormap=cv2.COLORMAP_PARULA,
        view_img=True,
        shape="circle",
        count_reg_pts=region_points,
        names=model.names,
    )

    while cap.isOpened():
        success, im0 = cap.read()
        if not success:
            print("Video frame is empty or video processing has been successfully completed.")
            break

        tracks = model.track(im0, persist=True, show=False)
        im0 = heatmap_obj.generate_heatmap(im0, tracks)
        video_writer.write(im0)

    cap.release()
    video_writer.release()
    cv2.destroyAllWindows()
    ```

=== "Im0"

    ```py
    import cv2

    from ultralytics import YOLO, solutions

    model = YOLO("yolov8s.pt")  # YOLOv8 custom/pretrained model

    im0 = cv2.imread("path/to/image.png")  # path to image file
    h, w = im0.shape[:2]  # image height and width

    # Heatmap Init
    heatmap_obj = solutions.Heatmap(
        colormap=cv2.COLORMAP_PARULA,
        view_img=True,
        shape="circle",
        names=model.names,
    )

    results = model.track(im0, persist=True)
    im0 = heatmap_obj.generate_heatmap(im0, tracks=results)
    cv2.imwrite("ultralytics_output.png", im0)
    ```

=== "Specific Classes"

    ```py
    import cv2

    from ultralytics import YOLO, solutions

    model = YOLO("yolov8n.pt")
    cap = cv2.VideoCapture("path/to/video/file.mp4")
    assert cap.isOpened(), "Error reading video file"
    w, h, fps = (int(cap.get(x)) for x in (cv2.CAP_PROP_FRAME_WIDTH, cv2.CAP_PROP_FRAME_HEIGHT, cv2.CAP_PROP_FPS))

    # Video writer
    video_writer = cv2.VideoWriter("heatmap_output.avi", cv2.VideoWriter_fourcc(*"mp4v"), fps, (w, h))

    classes_for_heatmap = [0, 2]  # classes for heatmap

    # Init heatmap
    heatmap_obj = solutions.Heatmap(
        colormap=cv2.COLORMAP_PARULA,
        view_img=True,
        shape="circle",
        names=model.names,
    )

    while cap.isOpened():
        success, im0 = cap.read()
        if not success:
            print("Video frame is empty or video processing has been successfully completed.")
            break
        tracks = model.track(im0, persist=True, show=False, classes=classes_for_heatmap)

        im0 = heatmap_obj.generate_heatmap(im0, tracks)
        video_writer.write(im0)

    cap.release()
    video_writer.release()
    cv2.destroyAllWindows()
    ```
Arguments Heatmap()
| Name | Type | Default | Description |
|---|---|---|---|
names |
list |
None |
Dictionary of class names. |
imw |
int |
0 |
Image width. |
imh |
int |
0 |
Image height. |
colormap |
int |
cv2.COLORMAP_JET |
Colormap to use for the heatmap. |
heatmap_alpha |
float |
0.5 |
Alpha blending value for heatmap overlay. |
view_img |
bool |
False |
Whether to display the image with the heatmap overlay. |
view_in_counts |
bool |
True |
Whether to display the count of objects entering the region. |
view_out_counts |
bool |
True |
Whether to display the count of objects exiting the region. |
count_reg_pts |
list or None |
None |
Points defining the counting region (either a line or a polygon). |
count_txt_color |
tuple |
(0, 0, 0) |
Text color for displaying counts. |
count_bg_color |
tuple |
(255, 255, 255) |
Background color for displaying counts. |
count_reg_color |
tuple |
(255, 0, 255) |
Color for the counting region. |
region_thickness |
int |
5 |
Thickness of the region line. |
line_dist_thresh |
int |
15 |
Distance threshold for line-based counting. |
line_thickness |
int |
2 |
Thickness of the lines used in drawing. |
decay_factor |
float |
0.99 |
Decay factor for the heatmap to reduce intensity over time. |
shape |
str |
"circle" |
Shape of the heatmap blobs ('circle' or 'rect'). |
Arguments model.track
| Name | Type | Default | Description |
|---|---|---|---|
source |
im0 |
None |
source directory for images or videos |
persist |
bool |
False |
persisting tracks between frames |
tracker |
str |
botsort.yaml |
Tracking method 'bytetrack' or 'botsort' |
conf |
float |
0.3 |
Confidence Threshold |
iou |
float |
0.5 |
IOU Threshold |
classes |
list |
None |
filter results by class, i.e. classes=0, or classes=[0,2,3] |
Heatmap COLORMAPs
| Colormap Name | Description |
|---|---|
cv::COLORMAP_AUTUMN |
Autumn color map |
cv::COLORMAP_BONE |
Bone color map |
cv::COLORMAP_JET |
Jet color map |
cv::COLORMAP_WINTER |
Winter color map |
cv::COLORMAP_RAINBOW |
Rainbow color map |
cv::COLORMAP_OCEAN |
Ocean color map |
cv::COLORMAP_SUMMER |
Summer color map |
cv::COLORMAP_SPRING |
Spring color map |
cv::COLORMAP_COOL |
Cool color map |
cv::COLORMAP_HSV |
HSV (Hue, Saturation, Value) color map |
cv::COLORMAP_PINK |
Pink color map |
cv::COLORMAP_HOT |
Hot color map |
cv::COLORMAP_PARULA |
Parula color map |
cv::COLORMAP_MAGMA |
Magma color map |
cv::COLORMAP_INFERNO |
Inferno color map |
cv::COLORMAP_PLASMA |
Plasma color map |
cv::COLORMAP_VIRIDIS |
Viridis color map |
cv::COLORMAP_CIVIDIS |
Cividis color map |
cv::COLORMAP_TWILIGHT |
Twilight color map |
cv::COLORMAP_TWILIGHT_SHIFTED |
Shifted Twilight color map |
cv::COLORMAP_TURBO |
Turbo color map |
cv::COLORMAP_DEEPGREEN |
Deep Green color map |
These colormaps are commonly used for visualizing data with different color representations.
FAQ
How does Ultralytics YOLOv8 generate heatmaps and what are their benefits?
Ultralytics YOLOv8 generates heatmaps by transforming complex data into a color-coded matrix where different hues represent data intensities. Heatmaps make it easier to visualize patterns, correlations, and anomalies in the data. Warmer hues indicate higher values, while cooler tones represent lower values. The primary benefits include intuitive visualization of data distribution, efficient pattern detection, and enhanced spatial analysis for decision-making. For more details and configuration options, refer to the Heatmap Configuration section.
Can I use Ultralytics YOLOv8 to perform object tracking and generate a heatmap simultaneously?
Yes, Ultralytics YOLOv8 supports object tracking and heatmap generation concurrently. This can be achieved through its Heatmap solution integrated with object tracking models. To do so, you need to initialize the heatmap object and use YOLOv8's tracking capabilities. Here's a simple example:
import cv2

from ultralytics import YOLO, solutions

model = YOLO("yolov8n.pt")
cap = cv2.VideoCapture("path/to/video/file.mp4")
heatmap_obj = solutions.Heatmap(colormap=cv2.COLORMAP_PARULA, view_img=True, shape="circle", names=model.names)

while cap.isOpened():
    success, im0 = cap.read()
    if not success:
        break
    tracks = model.track(im0, persist=True, show=False)
    im0 = heatmap_obj.generate_heatmap(im0, tracks)
    cv2.imshow("Heatmap", im0)
    if cv2.waitKey(1) & 0xFF == ord("q"):
        break

cap.release()
cv2.destroyAllWindows()
For further guidance, check the Tracking Mode page.
What makes Ultralytics YOLOv8 heatmaps different from other data visualization tools like those from OpenCV or Matplotlib?
Ultralytics YOLOv8 heatmaps are specifically designed for integration with its object detection and tracking models, providing an end-to-end solution for real-time data analysis. Unlike generic visualization tools like OpenCV or Matplotlib, YOLOv8 heatmaps are optimized for performance and automated processing, supporting features like persistent tracking, decay factor adjustment, and real-time video overlay. For more information on YOLOv8's unique features, visit the Ultralytics YOLOv8 Introduction.
How can I visualize only specific object classes in heatmaps using Ultralytics YOLOv8?
You can visualize specific object classes by specifying the desired classes in the track() method of the YOLO model. For instance, if you only want to visualize cars and persons (assuming their class indices are 0 and 2), you can set the classes parameter accordingly.
import cv2

from ultralytics import YOLO, solutions

model = YOLO("yolov8n.pt")
cap = cv2.VideoCapture("path/to/video/file.mp4")
heatmap_obj = solutions.Heatmap(colormap=cv2.COLORMAP_PARULA, view_img=True, shape="circle", names=model.names)

classes_for_heatmap = [0, 2]  # Classes to visualize
while cap.isOpened():
    success, im0 = cap.read()
    if not success:
        break
    tracks = model.track(im0, persist=True, show=False, classes=classes_for_heatmap)
    im0 = heatmap_obj.generate_heatmap(im0, tracks)
    cv2.imshow("Heatmap", im0)
    if cv2.waitKey(1) & 0xFF == ord("q"):
        break

cap.release()
cv2.destroyAllWindows()
Why should businesses choose Ultralytics YOLOv8 for heatmap generation in data analysis?
Ultralytics YOLOv8 offers seamless integration of advanced object detection and real-time heatmap generation, making it an ideal choice for businesses looking to visualize data more effectively. The key advantages include intuitive data distribution visualization, efficient pattern detection, and enhanced spatial analysis for better decision-making. Additionally, YOLOv8's cutting-edge features such as persistent tracking, customizable colormaps, and support for various export formats make it superior to other tools like TensorFlow and OpenCV for comprehensive data analysis. Learn more about business applications at Ultralytics Plans.


 浙公网安备 33010602011771号