Yolov8-源码解析-十一-
Yolov8 源码解析(十一)
comments: true
description: Learn how to run inference using the Ultralytics HUB Inference API. Includes examples in Python and cURL for quick integration.
keywords: Ultralytics, HUB, Inference API, Python, cURL, REST API, YOLO, image processing, machine learning, AI integration
Ultralytics HUB Inference API
The Ultralytics HUB Inference API allows you to run inference through our REST API without the need to install and set up the Ultralytics YOLO environment locally.
Watch: Ultralytics HUB Inference API Walkthrough
Python
To access the Ultralytics HUB Inference API using Python, use the following code:
import requests

# API URL, use actual MODEL_ID
url = "https://api.ultralytics.com/v1/predict/MODEL_ID"

# Headers, use actual API_KEY
headers = {"x-api-key": "API_KEY"}

# Inference arguments (optional)
data = {"size": 640, "confidence": 0.25, "iou": 0.45}

# Load image and send request
with open("path/to/image.jpg", "rb") as image_file:
    files = {"image": image_file}
    response = requests.post(url, headers=headers, files=files, data=data)

print(response.json())
!!! note "Note"
Replace `MODEL_ID` with the desired model ID, `API_KEY` with your actual API key, and `path/to/image.jpg` with the path to the image you want to run inference on.
cURL
To access the Ultralytics HUB Inference API using cURL, use the following code:
curl -X POST "https://api.ultralytics.com/v1/predict/MODEL_ID" \
	-H "x-api-key: API_KEY" \
	-F "image=@/path/to/image.jpg" \
	-F "size=640" \
	-F "confidence=0.25" \
	-F "iou=0.45"
!!! note "Note"
Replace `MODEL_ID` with the desired model ID, `API_KEY` with your actual API key, and `path/to/image.jpg` with the path to the image you want to run inference on.
Arguments
See the table below for a full list of available inference arguments.
| Argument | Default | Type | Description |
|---|---|---|---|
image |
image |
Image file to be used for inference. | |
url |
str |
URL of the image if not passing a file. | |
size |
640 |
int |
Size of the input image, valid range is 32 - 1280 pixels. |
confidence |
0.25 |
float |
Confidence threshold for predictions, valid range 0.01 - 1.0. |
iou |
0.45 |
float |
Intersection over Union (IoU) threshold, valid range 0.0 - 0.95. |
Response
The Ultralytics HUB Inference API returns a JSON response.
Classification
!!! Example "Classification Model"
=== "`ultralytics`"

    ```py
    from ultralytics import YOLO

    # Load model
    model = YOLO("yolov8n-cls.pt")

    # Run inference
    results = model("image.jpg")

    # Print image.jpg results in JSON format
    print(results[0].tojson())
    ```

=== "cURL"

    ```py
    curl -X POST "https://api.ultralytics.com/v1/predict/MODEL_ID" \
        -H "x-api-key: API_KEY" \
        -F "image=@/path/to/image.jpg" \
        -F "size=640" \
        -F "confidence=0.25" \
        -F "iou=0.45"
    ```

=== "Python"

    ```py
    import requests

    # API URL, use actual MODEL_ID
    url = "https://api.ultralytics.com/v1/predict/MODEL_ID"

    # Headers, use actual API_KEY
    headers = {"x-api-key": "API_KEY"}

    # Inference arguments (optional)
    data = {"size": 640, "confidence": 0.25, "iou": 0.45}

    # Load image and send request
    with open("path/to/image.jpg", "rb") as image_file:
        files = {"image": image_file}
        response = requests.post(url, headers=headers, files=files, data=data)

    print(response.json())
    ```

=== "Response"

    ```py
    {
      success: true,
      message: "Inference complete.",
      data: [
        {
          class: 0,
          name: "person",
          confidence: 0.92
        }
      ]
    }
    ```
Detection
!!! Example "Detection Model"
=== "`ultralytics`"

    ```py
    from ultralytics import YOLO

    # Load model
    model = YOLO("yolov8n.pt")

    # Run inference
    results = model("image.jpg")

    # Print image.jpg results in JSON format
    print(results[0].tojson())
    ```

=== "cURL"

    ```py
    curl -X POST "https://api.ultralytics.com/v1/predict/MODEL_ID" \
        -H "x-api-key: API_KEY" \
        -F "image=@/path/to/image.jpg" \
        -F "size=640" \
        -F "confidence=0.25" \
        -F "iou=0.45"
    ```

=== "Python"

    ```py
    import requests

    # API URL, use actual MODEL_ID
    url = "https://api.ultralytics.com/v1/predict/MODEL_ID"

    # Headers, use actual API_KEY
    headers = {"x-api-key": "API_KEY"}

    # Inference arguments (optional)
    data = {"size": 640, "confidence": 0.25, "iou": 0.45}

    # Load image and send request
    with open("path/to/image.jpg", "rb") as image_file:
        files = {"image": image_file}
        response = requests.post(url, headers=headers, files=files, data=data)

    print(response.json())
    ```

=== "Response"

    ```py
    {
      success: true,
      message: "Inference complete.",
      data: [
        {
          class: 0,
          name: "person",
          confidence: 0.92,
          width: 0.4893378019332886,
          height: 0.7437513470649719,
          xcenter: 0.4434437155723572,
          ycenter: 0.5198975801467896
        }
      ]
    }
    ```
OBB
!!! Example "OBB Model"
=== "`ultralytics`"

    ```py
    from ultralytics import YOLO

    # Load model
    model = YOLO("yolov8n-obb.pt")

    # Run inference
    results = model("image.jpg")

    # Print image.jpg results in JSON format
    print(results[0].tojson())
    ```

=== "cURL"

    ```py
    curl -X POST "https://api.ultralytics.com/v1/predict/MODEL_ID" \
        -H "x-api-key: API_KEY" \
        -F "image=@/path/to/image.jpg" \
        -F "size=640" \
        -F "confidence=0.25" \
        -F "iou=0.45"
    ```

=== "Python"

    ```py
    import requests

    # API URL, use actual MODEL_ID
    url = "https://api.ultralytics.com/v1/predict/MODEL_ID"

    # Headers, use actual API_KEY
    headers = {"x-api-key": "API_KEY"}

    # Inference arguments (optional)
    data = {"size": 640, "confidence": 0.25, "iou": 0.45}

    # Load image and send request
    with open("path/to/image.jpg", "rb") as image_file:
        files = {"image": image_file}
        response = requests.post(url, headers=headers, files=files, data=data)

    print(response.json())
    ```

=== "Response"

    ```py
    {
      success: true,
      message: "Inference complete.",
      data: [
        {
          class: 0,
          name: "person",
          confidence: 0.92,
          obb: [
            0.669310450553894,
            0.6247171759605408,
            0.9847468137741089,
            ...
          ]
        }
      ]
    }
    ```
Segmentation
!!! Example "Segmentation Model"
=== "`ultralytics`"

    ```py
    from ultralytics import YOLO

    # Load model
    model = YOLO("yolov8n-seg.pt")

    # Run inference
    results = model("image.jpg")

    # Print image.jpg results in JSON format
    print(results[0].tojson())
    ```

=== "cURL"

    ```py
    curl -X POST "https://api.ultralytics.com/v1/predict/MODEL_ID" \
        -H "x-api-key: API_KEY" \
        -F "image=@/path/to/image.jpg" \
        -F "size=640" \
        -F "confidence=0.25" \
        -F "iou=0.45"
    ```

=== "Python"

    ```py
    import requests

    # API URL, use actual MODEL_ID
    url = "https://api.ultralytics.com/v1/predict/MODEL_ID"

    # Headers, use actual API_KEY
    headers = {"x-api-key": "API_KEY"}

    # Inference arguments (optional)
    data = {"size": 640, "confidence": 0.25, "iou": 0.45}

    # Load image and send request
    with open("path/to/image.jpg", "rb") as image_file:
        files = {"image": image_file}
        response = requests.post(url, headers=headers, files=files, data=data)

    print(response.json())
    ```

=== "Response"

    ```py
    {
      success: true,
      message: "Inference complete.",
      data: [
        {
          class: 0,
          name: "person",
          confidence: 0.92,
          segment: [0.44140625, 0.15625, 0.439453125, ...]
        }
      ]
    }
    ```
Pose
!!! Example "Pose Model"
=== "`ultralytics`"

    ```py
    from ultralytics import YOLO

    # Load model
    model = YOLO("yolov8n-pose.pt")

    # Run inference
    results = model("image.jpg")

    # Print image.jpg results in JSON format
    print(results[0].tojson())
    ```

=== "cURL"

    ```py
    curl -X POST "https://api.ultralytics.com/v1/predict/MODEL_ID" \
        -H "x-api-key: API_KEY" \
        -F "image=@/path/to/image.jpg" \
        -F "size=640" \
        -F "confidence=0.25" \
        -F "iou=0.45"
    ```

=== "Python"

    ```py
    import requests

    # API URL, use actual MODEL_ID
    url = "https://api.ultralytics.com/v1/predict/MODEL_ID"

    # Headers, use actual API_KEY
    headers = {"x-api-key": "API_KEY"}

    # Inference arguments (optional)
    data = {"size": 640, "confidence": 0.25, "iou": 0.45}

    # Load image and send request
    with open("path/to/image.jpg", "rb") as image_file:
        files = {"image": image_file}
        response = requests.post(url, headers=headers, files=files, data=data)

    print(response.json())
    ```

=== "Response"

    ```py
    {
      success: true,
      message: "Inference complete.",
      data: [
        {
          class: 0,
          name: "person",
          confidence: 0.92,
          keypoints: [
            0.5290805697441101,
            0.20698919892311096,
            1.0,
            0.5263055562973022,
            0.19584226608276367,
            1.0,
            0.5094948410987854,
            0.19120082259178162,
            1.0,
            ...
          ]
        }
      ]
    }
    ```
comments: true
description: Explore seamless integrations between Ultralytics HUB and platforms like Roboflow. Learn how to import datasets, train models, and more.
keywords: Ultralytics HUB, Roboflow integration, dataset import, model training, AI, machine learning
Ultralytics HUB Integrations
Learn about Ultralytics HUB integrations with various platforms and formats.
Datasets
Seamlessly import your datasets in Ultralytics HUB for model training.
After a dataset is imported in Ultralytics HUB, you can train a model on your dataset just like you would using the Ultralytics HUB datasets.
Roboflow
You can easily filter the Roboflow datasets on the Ultralytics HUB Datasets page.

Ultralytics HUB supports two types of integrations with Roboflow, Universe and Workspace.
Universe
The Roboflow Universe integration allows you to import one dataset at a time into Ultralytics HUB from Roboflow.
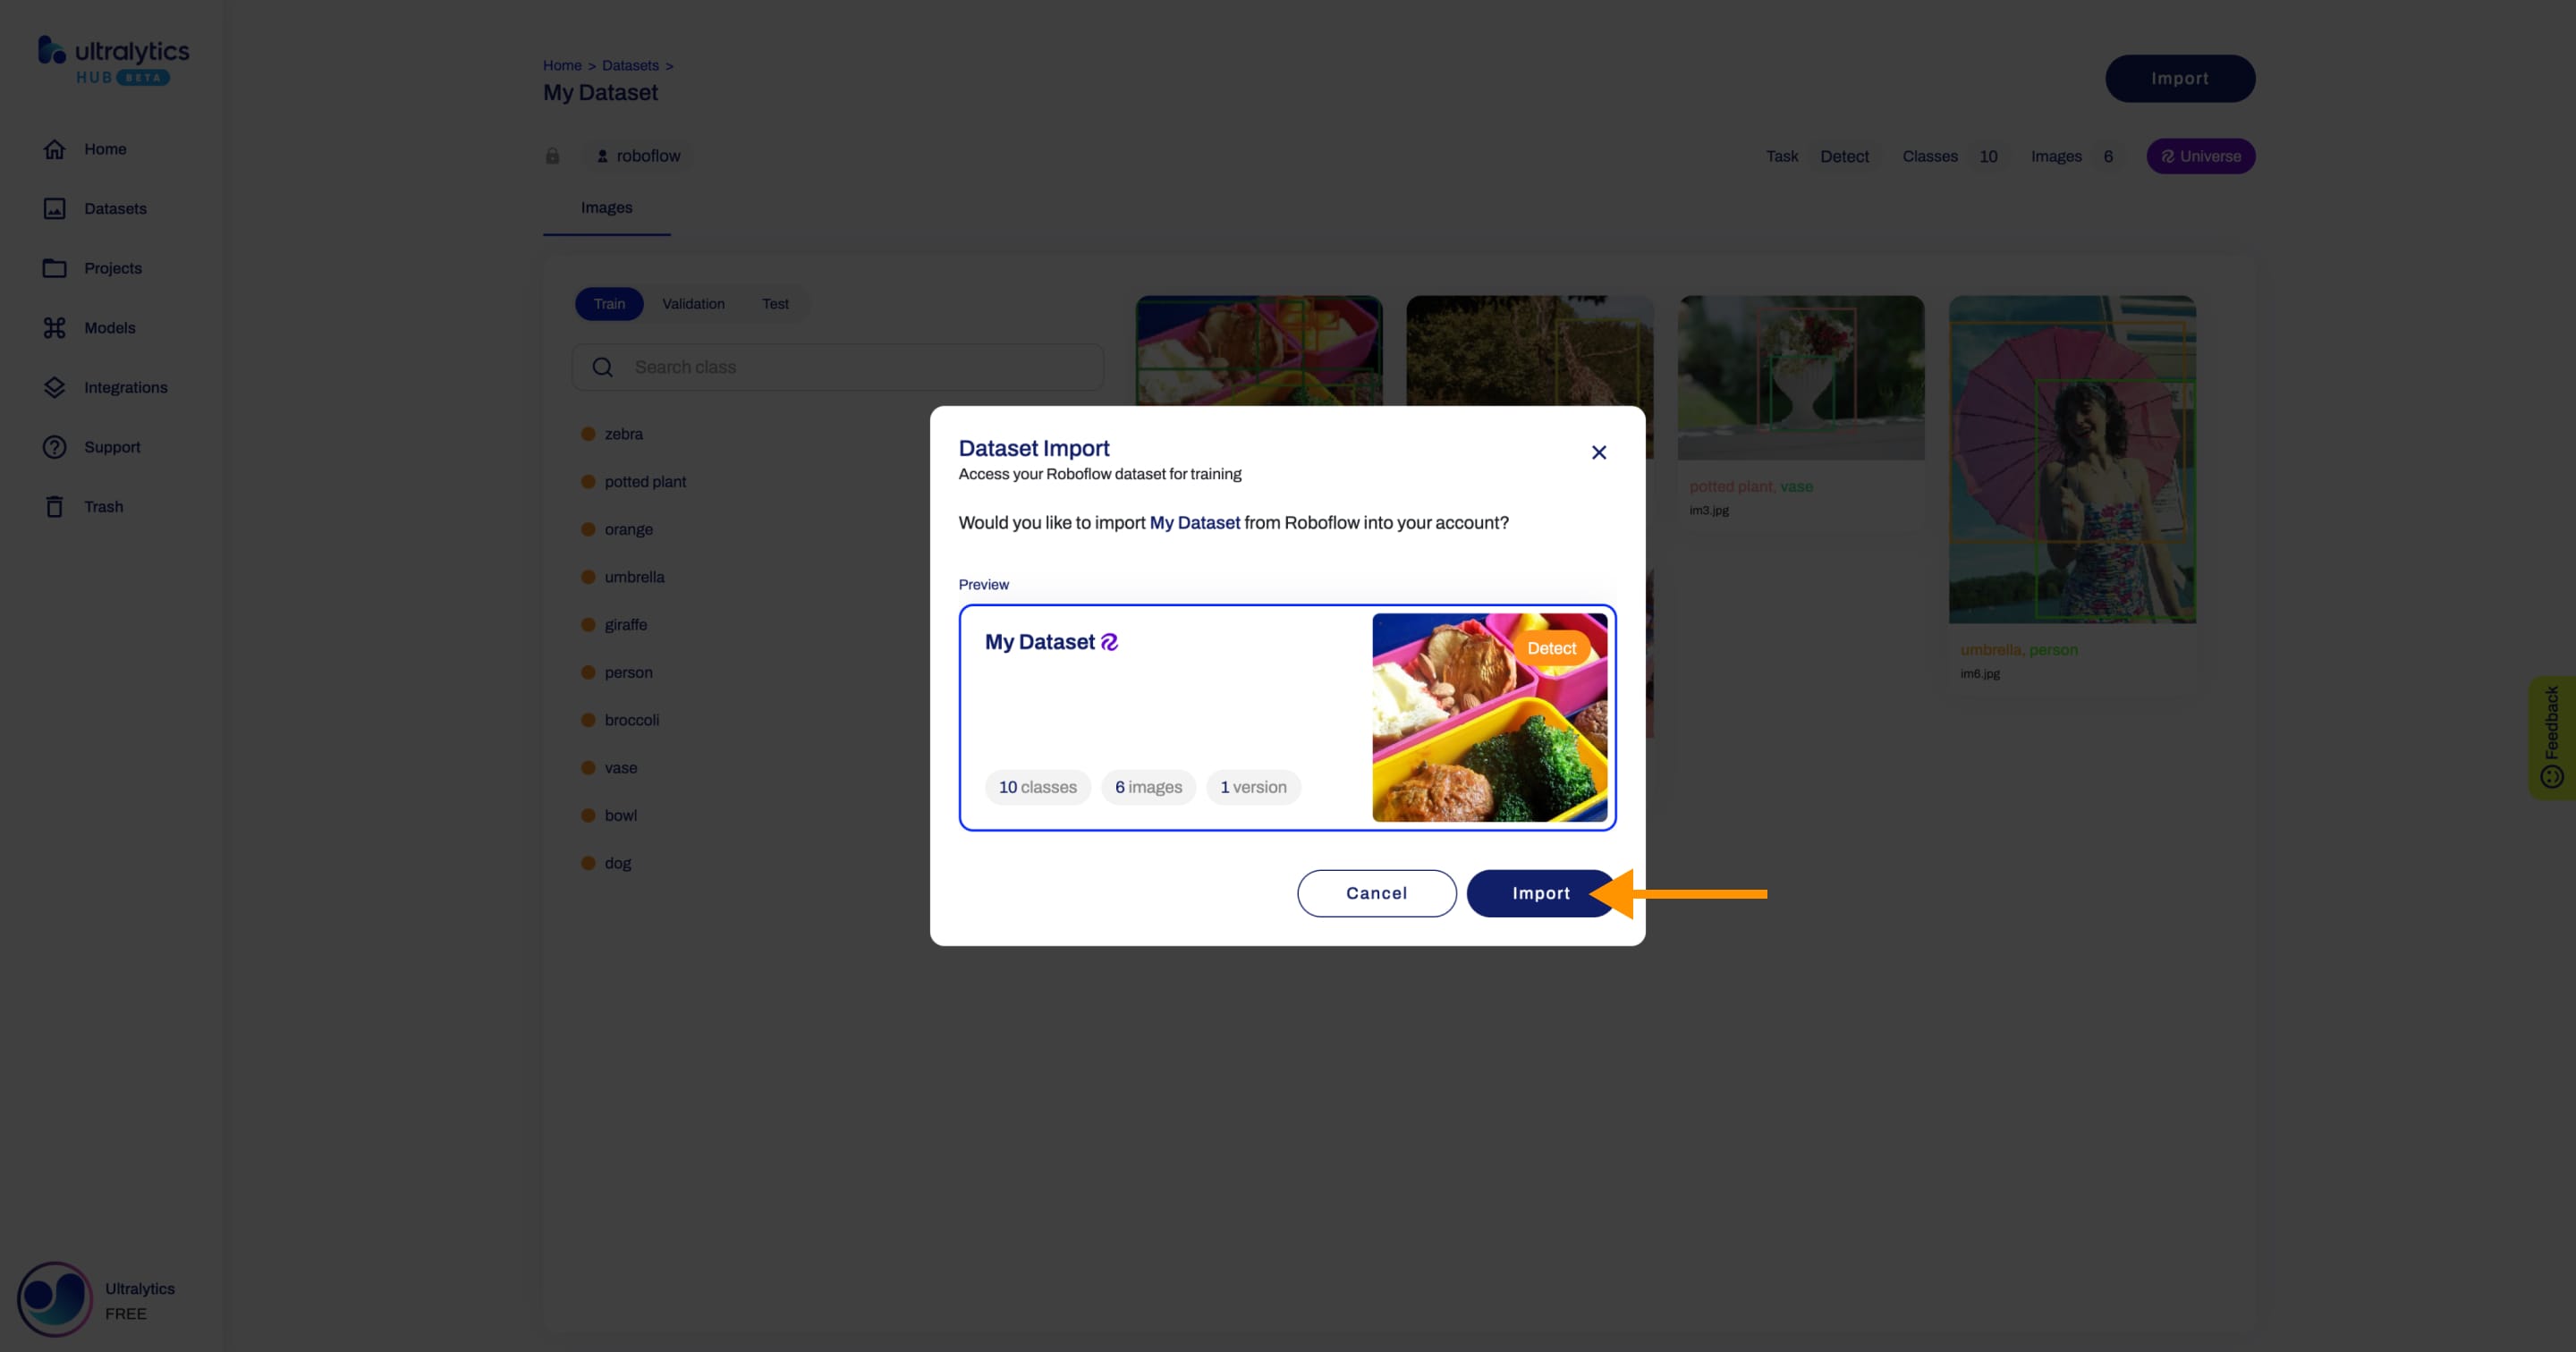
Import
When you export a Roboflow dataset, select the Ultralytics HUB format. This action will redirect you to Ultralytics HUB and trigger the Dataset Import dialog.
You can import your Roboflow dataset by clicking on the Import button.
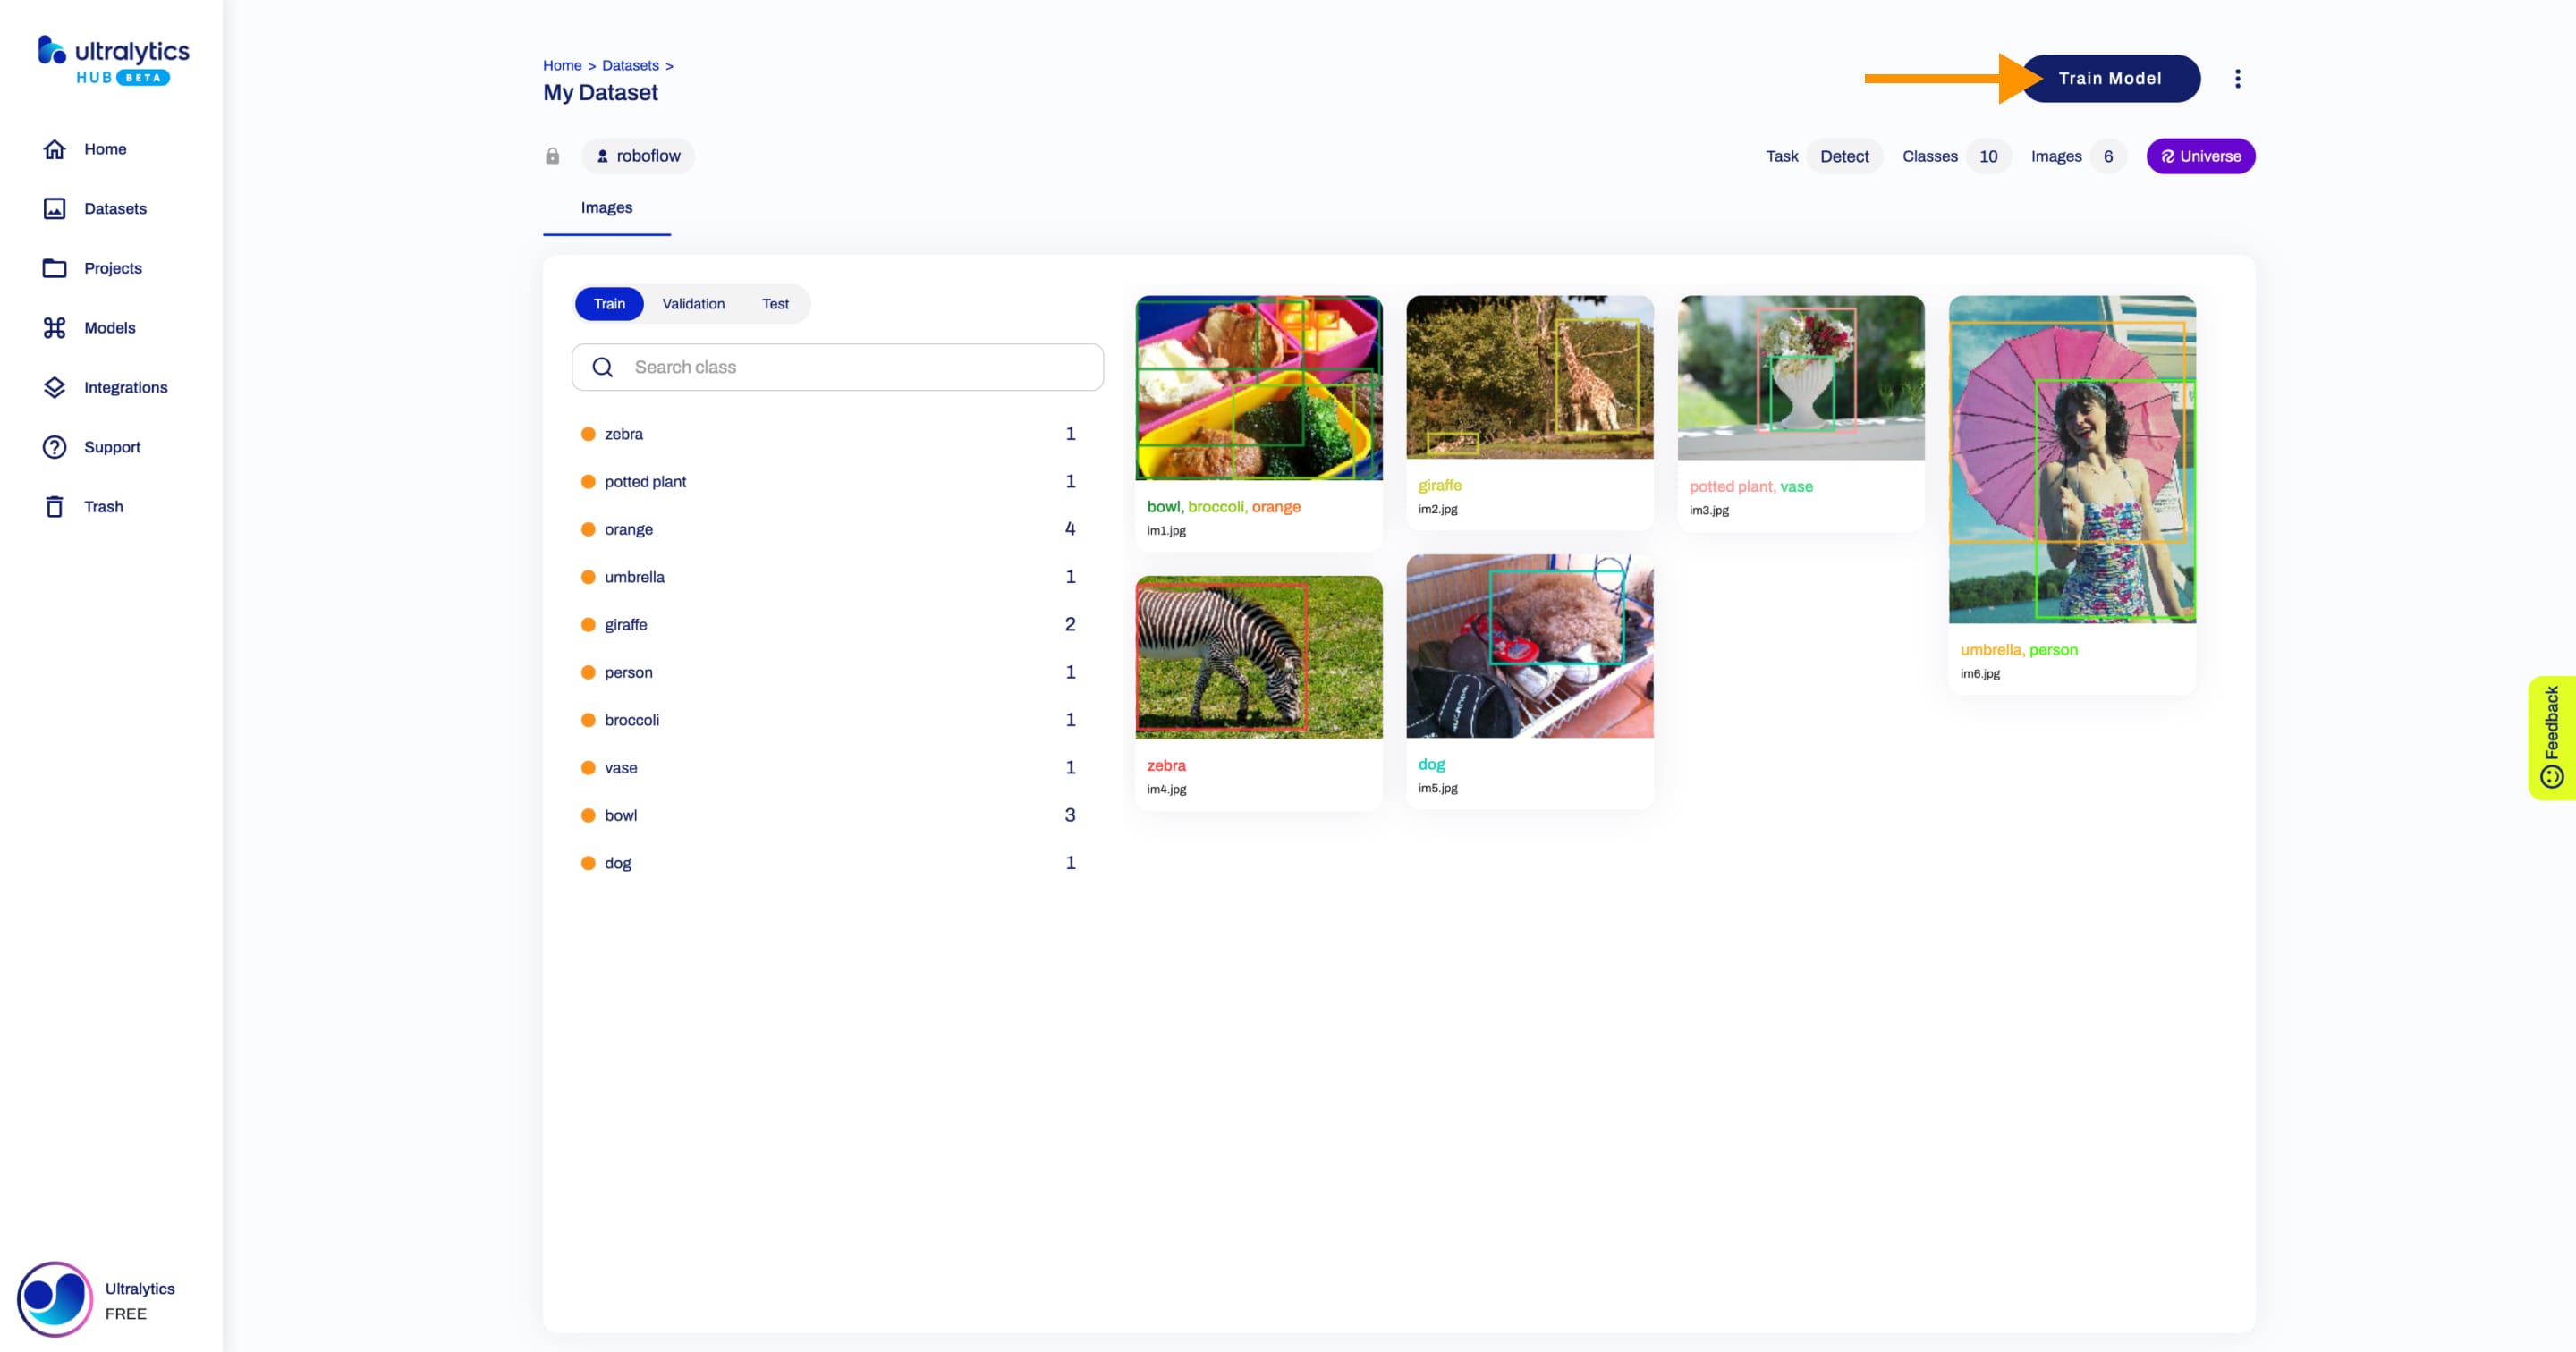
Next, train a model on your dataset.
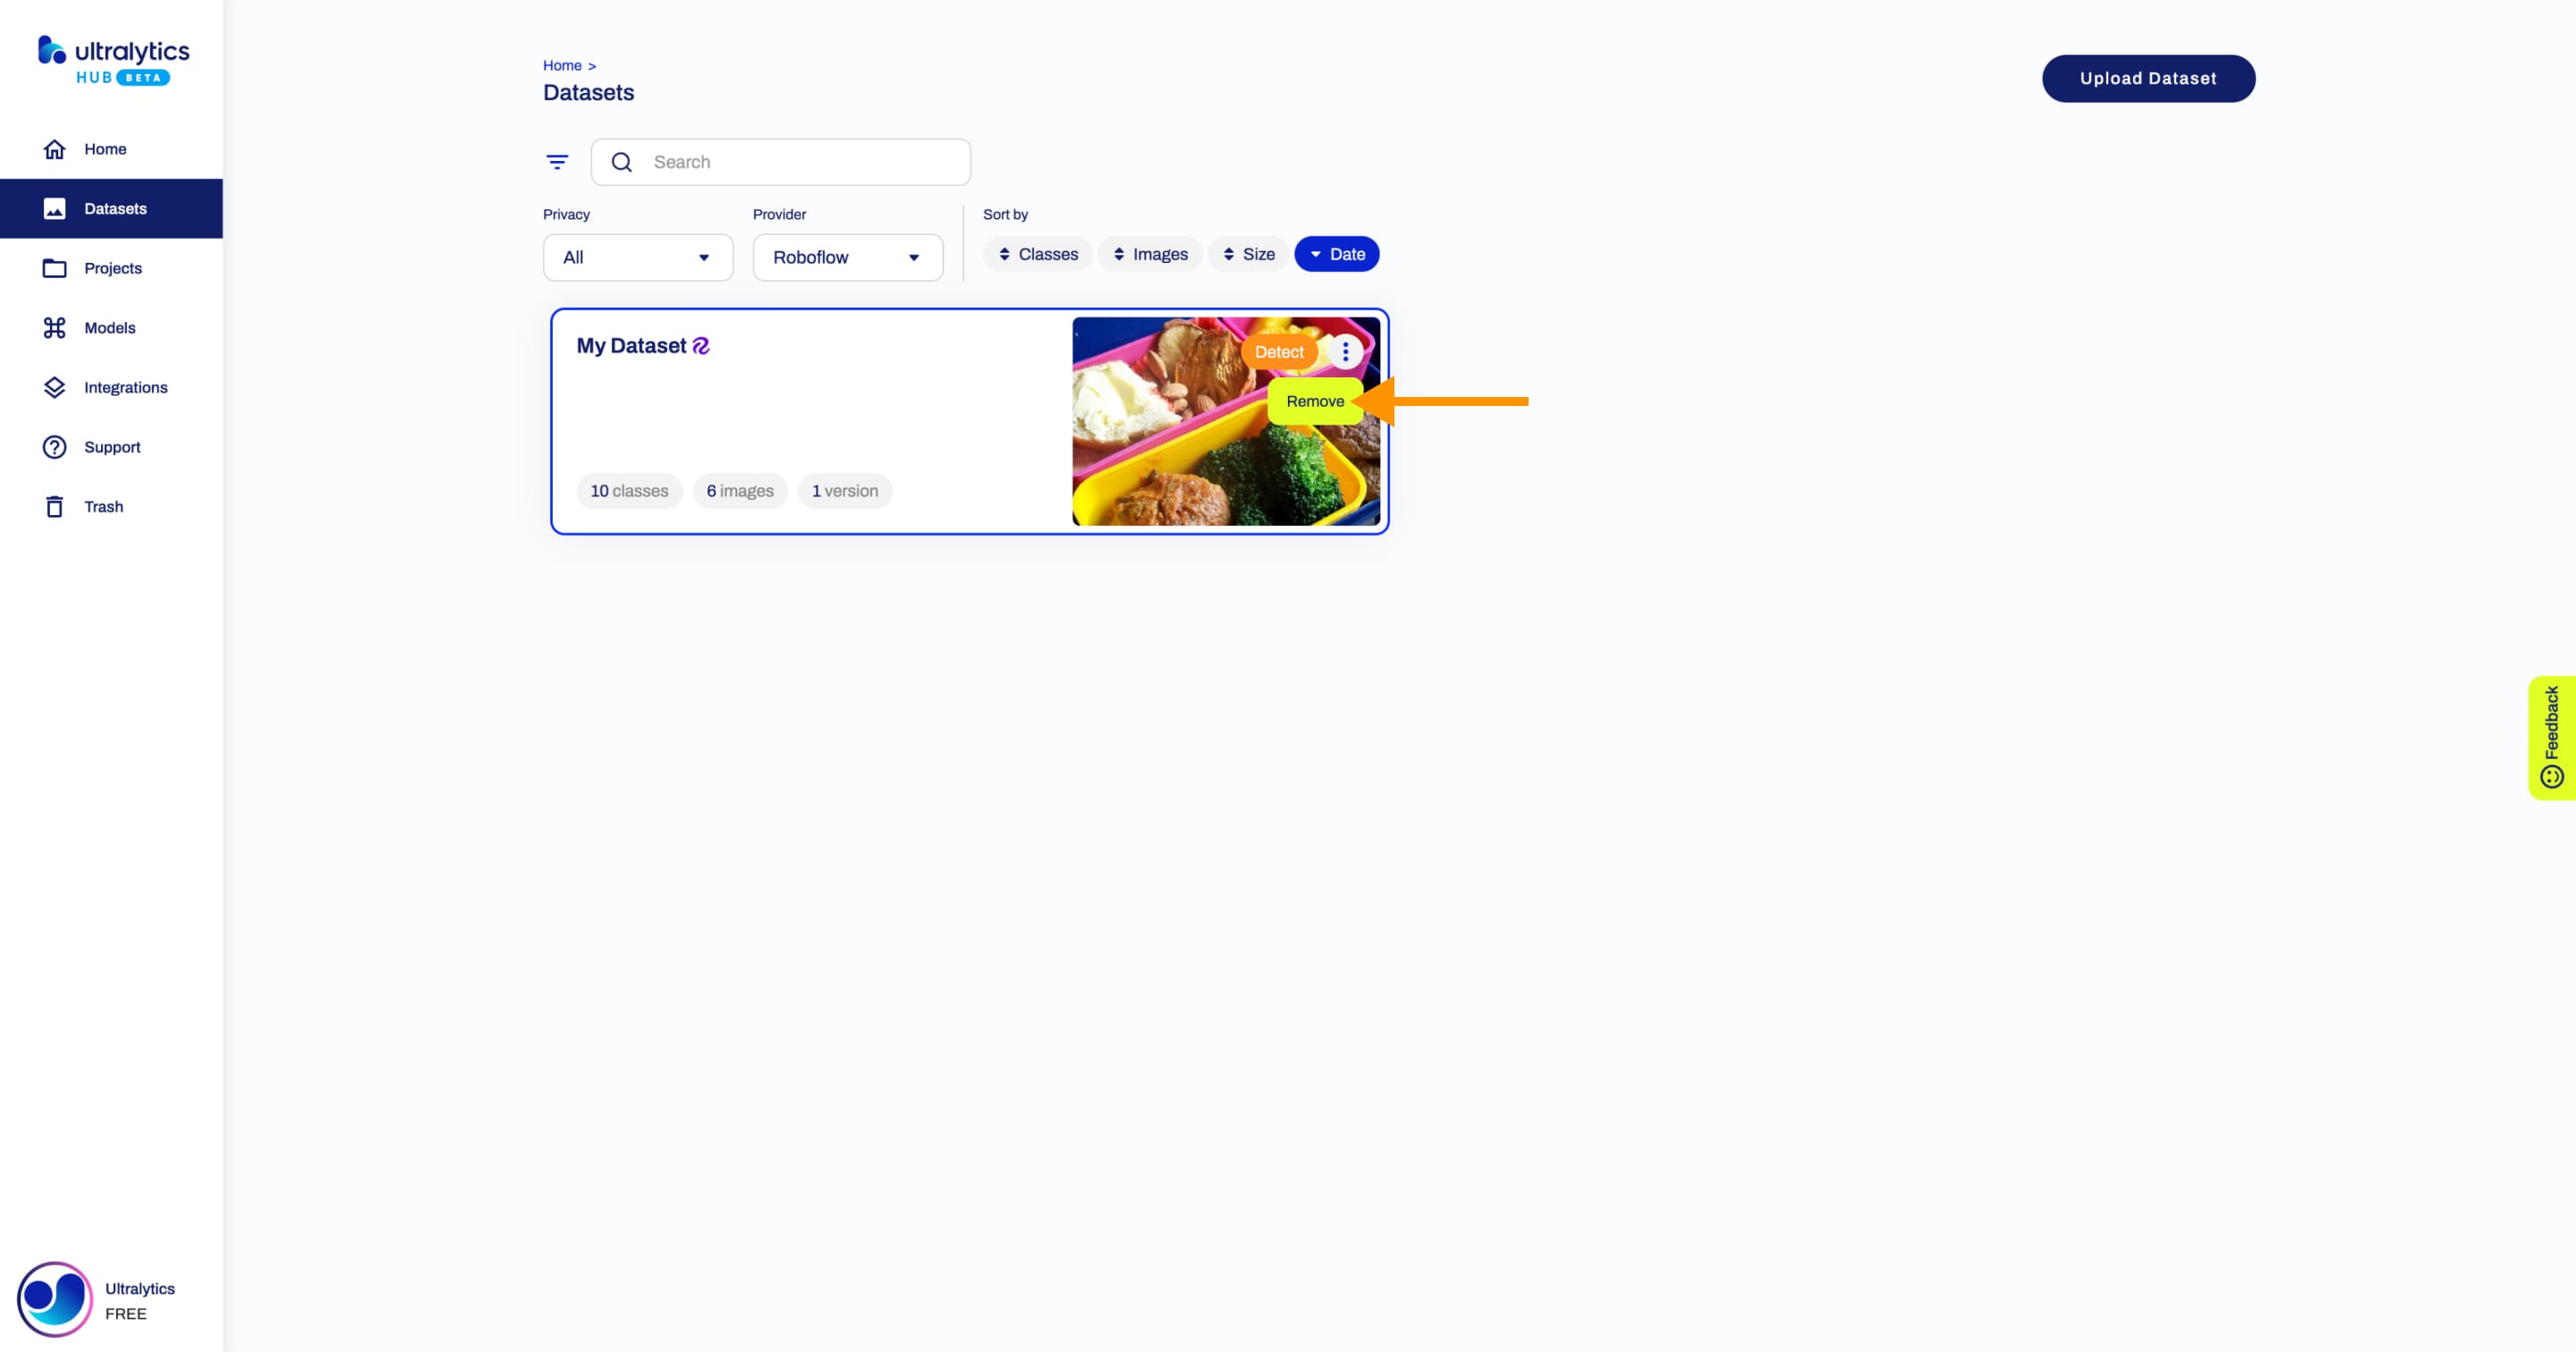
Remove
Navigate to the Dataset page of the Roboflow dataset you want to remove, open the dataset actions dropdown and click on the Remove option.

??? tip "Tip"
You can remove an imported [Roboflow](https://roboflow.com/?ref=ultralytics) dataset directly from the [Datasets](https://hub.ultralytics.com/datasets) page.
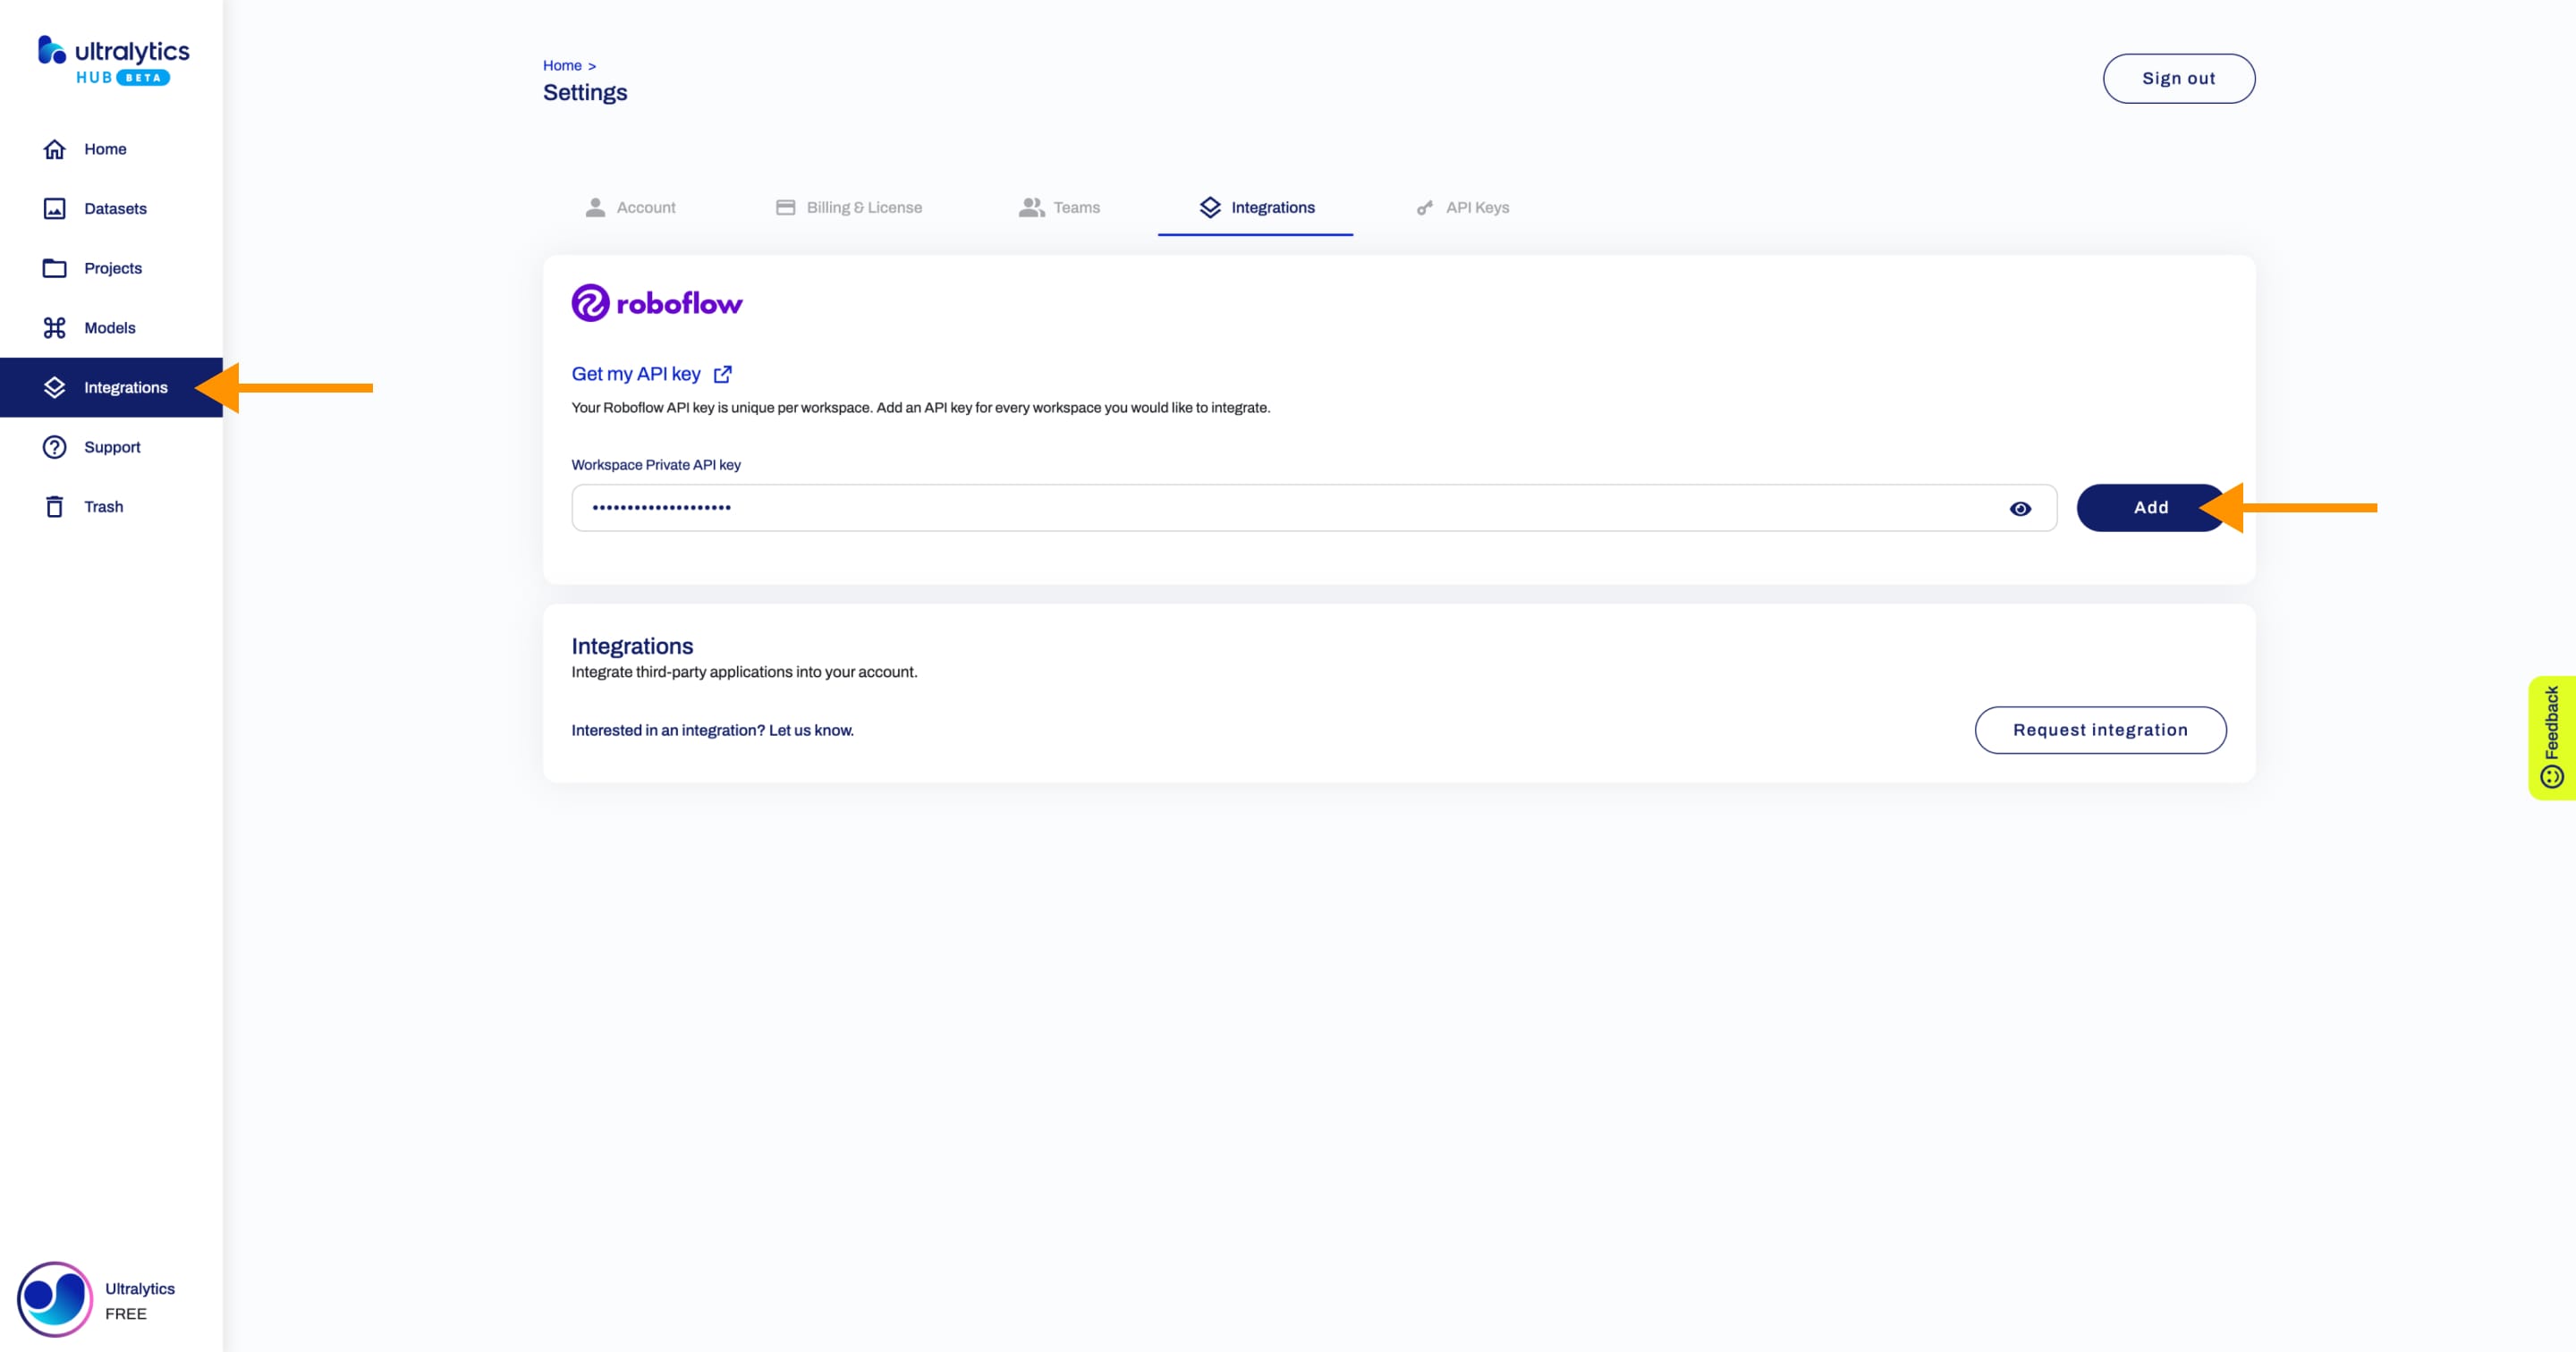
Workspace
The Roboflow Workspace integration allows you to import an entire Roboflow Workspace at once into Ultralytics HUB.
Import
Navigate to the Integrations page by clicking on the Integrations button in the sidebar.
Type your Roboflow Workspace private API key and click on the Add button.
??? tip "Tip"
You can click on the **Get my API key** button which will redirect you to the settings of your [Roboflow](https://roboflow.com/?ref=ultralytics) Workspace from where you can obtain your private API key.
This will connect your Ultralytics HUB account with your Roboflow Workspace and make your Roboflow datasets available in Ultralytics HUB.
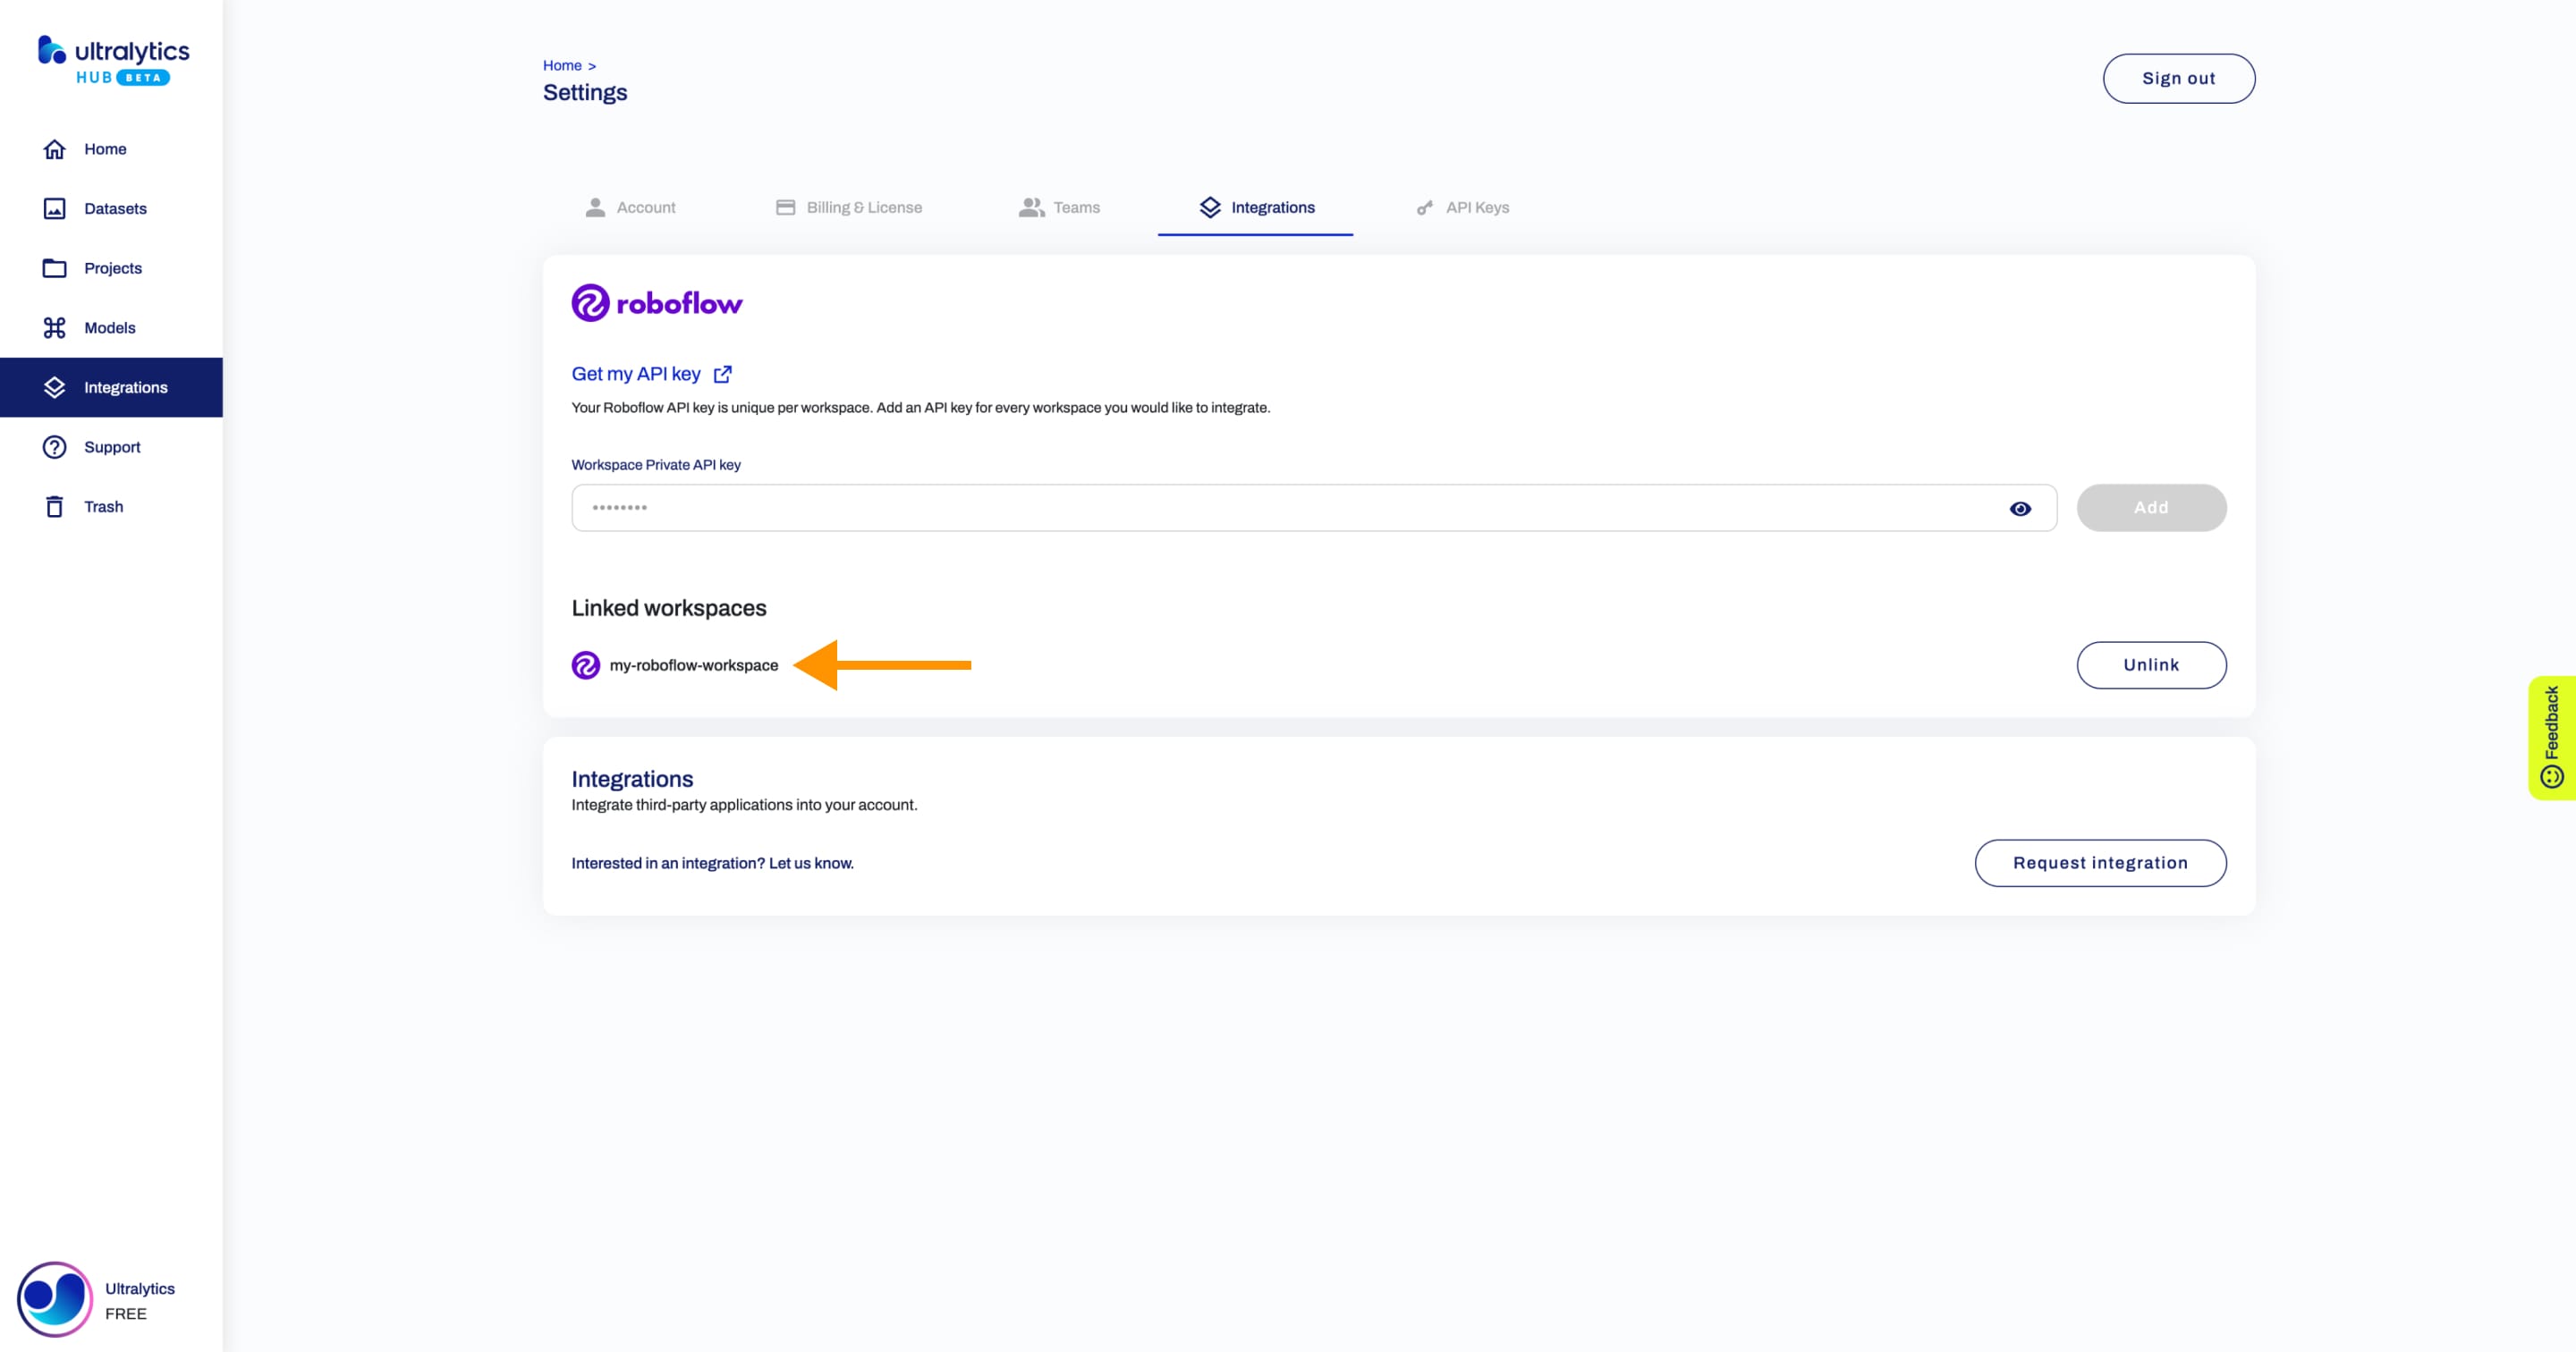
Next, train a model on your dataset.

Remove
Navigate to the Integrations page by clicking on the Integrations button in the sidebar and click on the Unlink button of the Roboflow Workspace you want to remove.
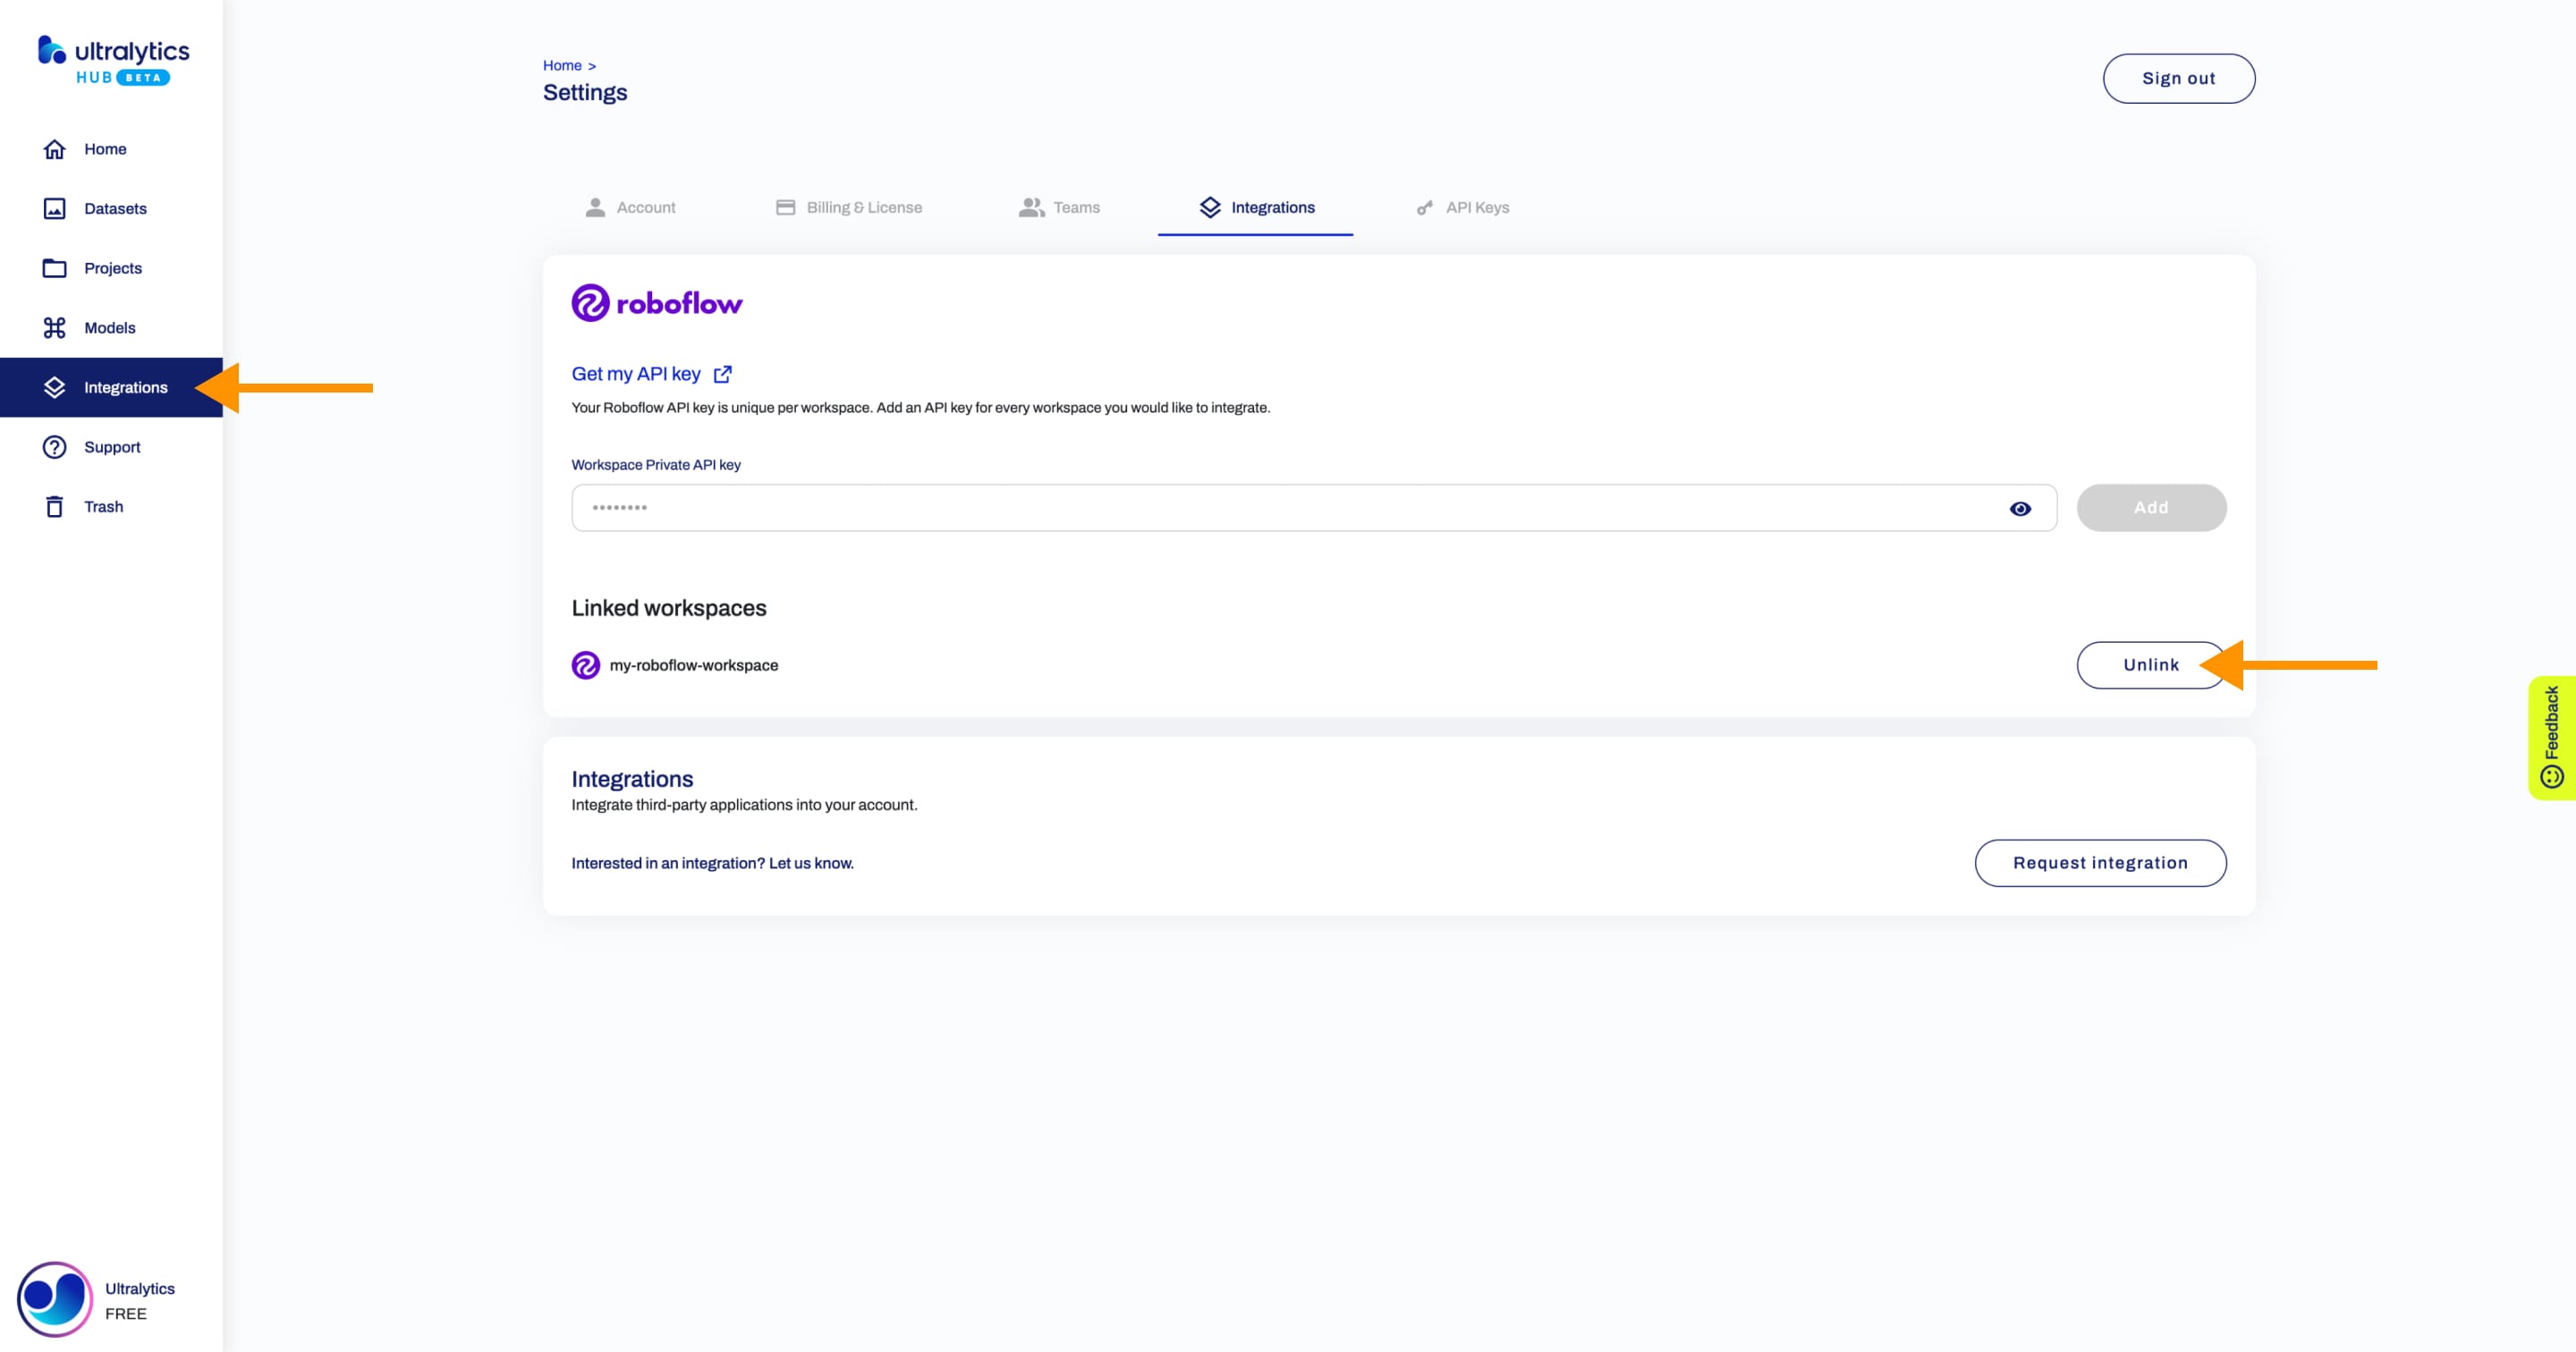
??? tip "Tip"
You can remove a connected [Roboflow](https://roboflow.com/?ref=ultralytics) Workspace directly from the Dataset page of one of the datasets from your [Roboflow](https://roboflow.com/?ref=ultralytics) Workspace.

??? tip "Tip"
You can remove a connected [Roboflow](https://roboflow.com/?ref=ultralytics) Workspace directly from the [Datasets](https://hub.ultralytics.com/datasets) page.

Models
Exports
After you train a model, you can export it to 13 different formats, including ONNX, OpenVINO, CoreML, TensorFlow, Paddle and many others.
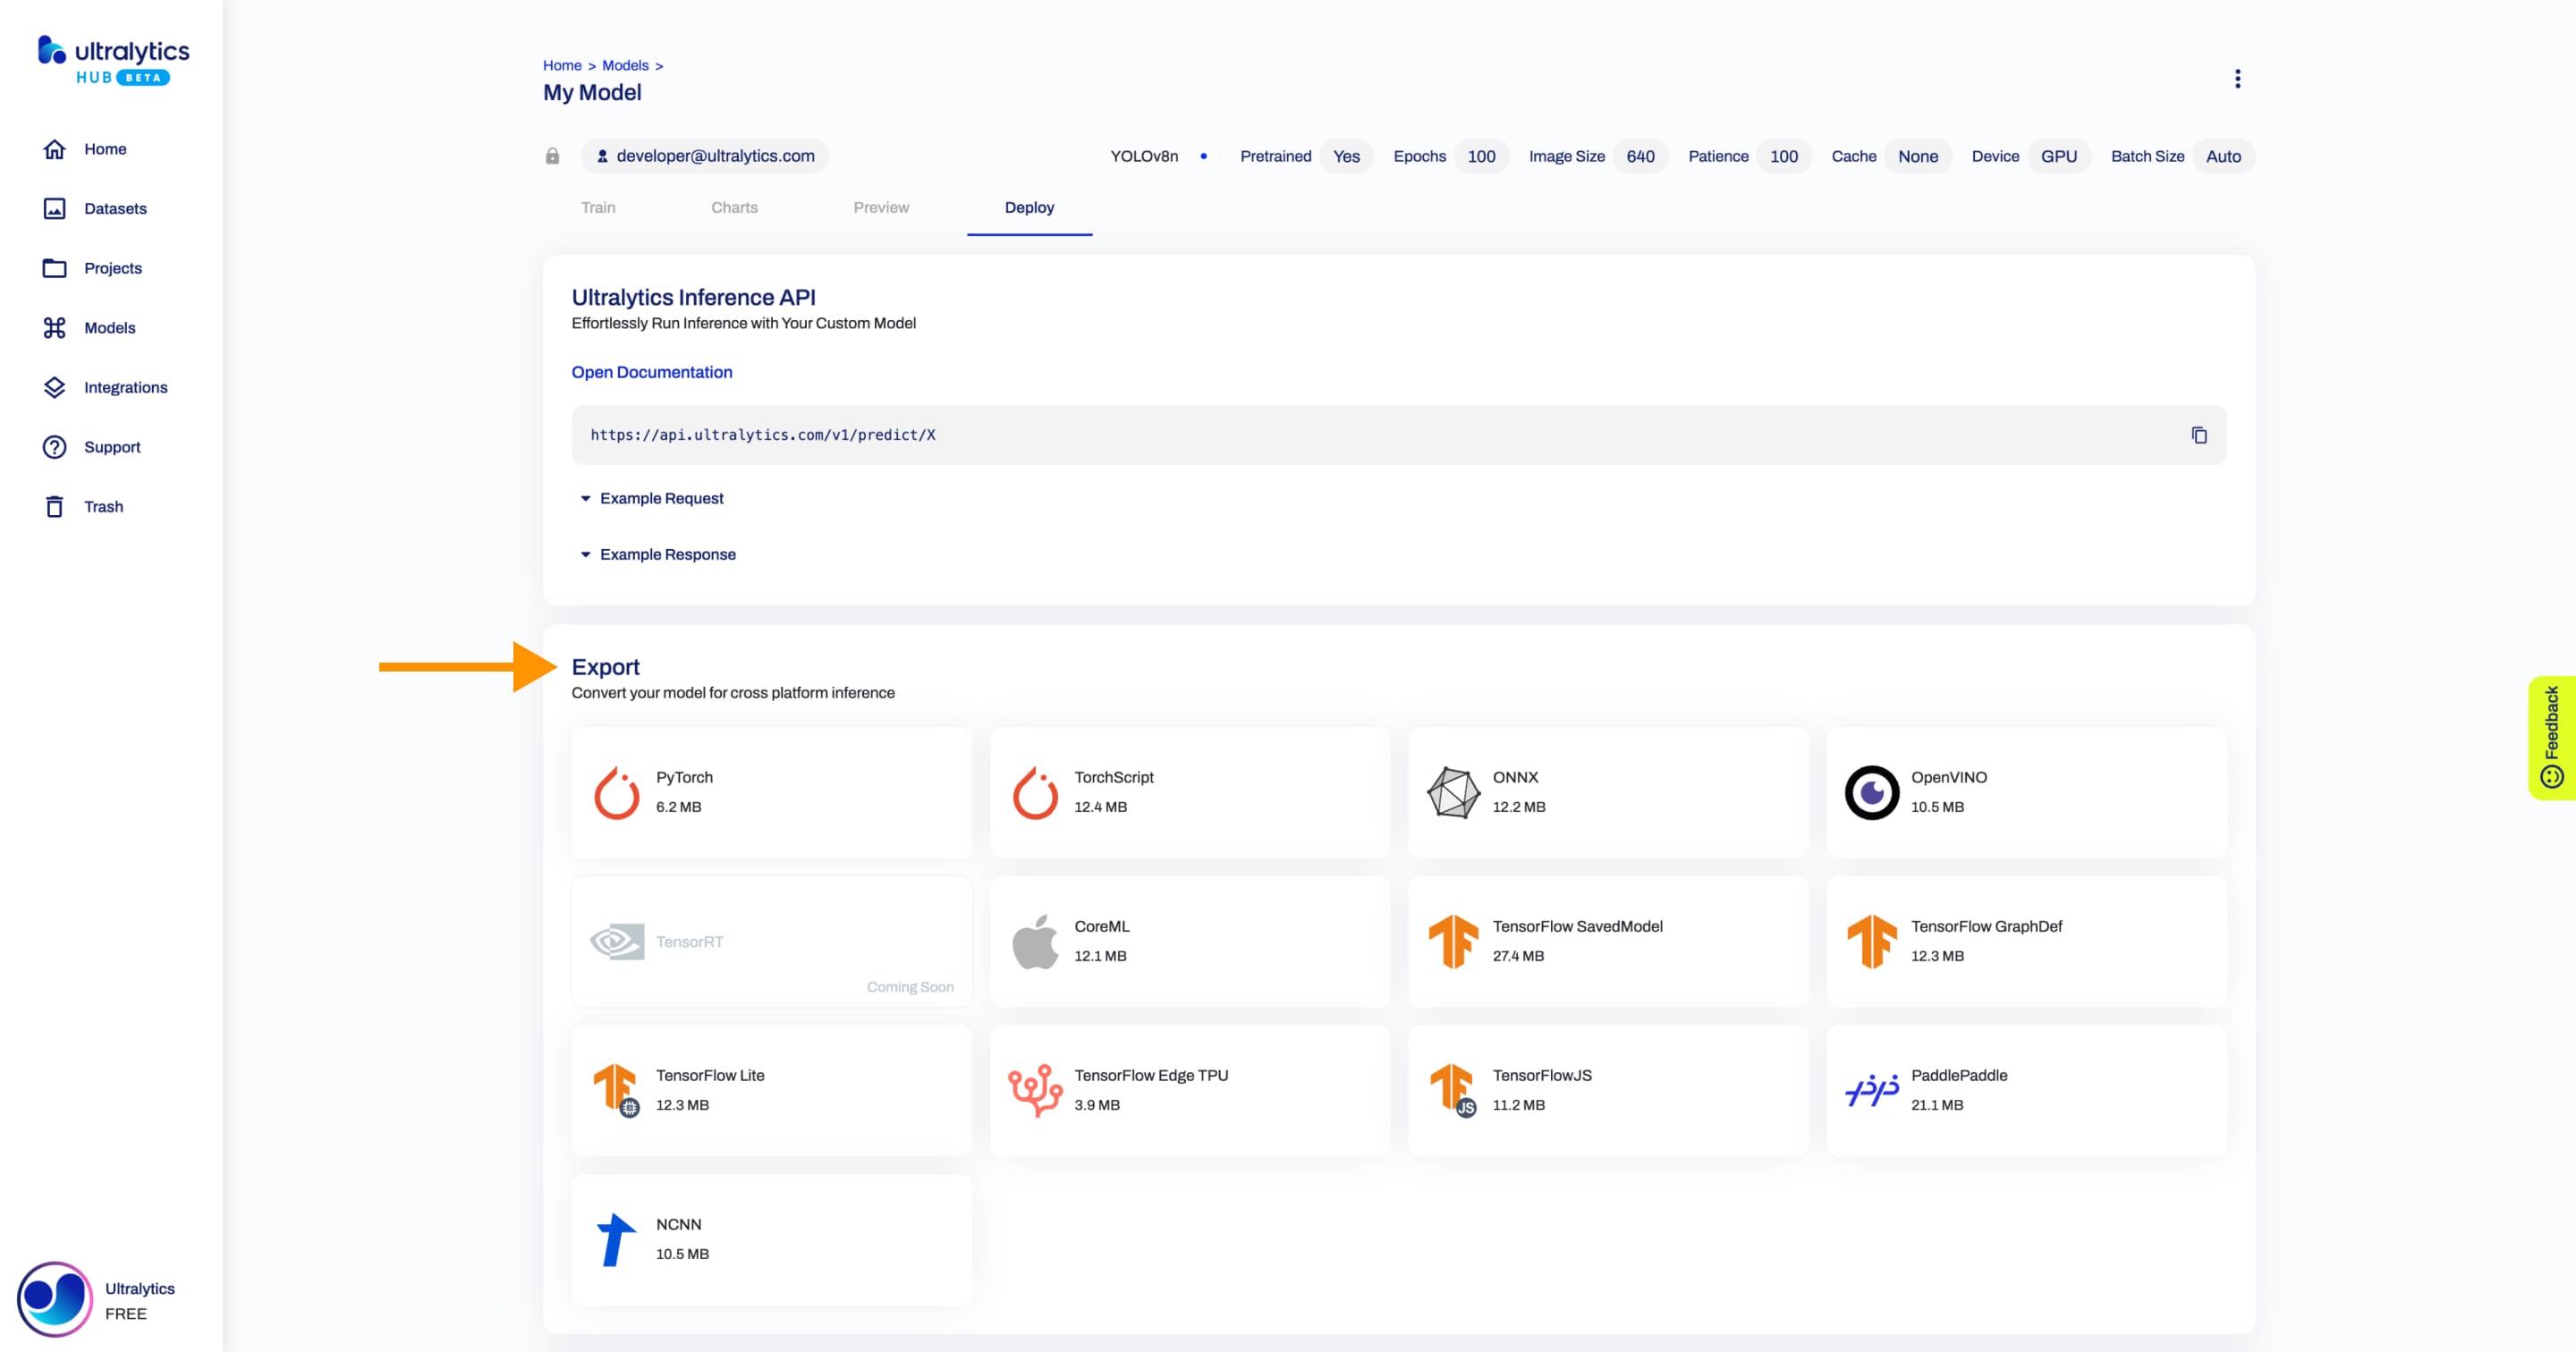
The available export formats are presented in the table below.
| Format | format Argument |
Model | Metadata | Arguments |
|---|---|---|---|---|
| PyTorch | - | yolov8n.pt |
✅ | - |
| TorchScript | torchscript |
yolov8n.torchscript |
✅ | imgsz, optimize, batch |
| ONNX | onnx |
yolov8n.onnx |
✅ | imgsz, half, dynamic, simplify, opset, batch |
| OpenVINO | openvino |
yolov8n_openvino_model/ |
✅ | imgsz, half, int8, batch |
| TensorRT | engine |
yolov8n.engine |
✅ | imgsz, half, dynamic, simplify, workspace, int8, batch |
| CoreML | coreml |
yolov8n.mlpackage |
✅ | imgsz, half, int8, nms, batch |
| TF SavedModel | saved_model |
yolov8n_saved_model/ |
✅ | imgsz, keras, int8, batch |
| TF GraphDef | pb |
yolov8n.pb |
❌ | imgsz, batch |
| TF Lite | tflite |
yolov8n.tflite |
✅ | imgsz, half, int8, batch |
| TF Edge TPU | edgetpu |
yolov8n_edgetpu.tflite |
✅ | imgsz, batch |
| TF.js | tfjs |
yolov8n_web_model/ |
✅ | imgsz, half, int8, batch |
| PaddlePaddle | paddle |
yolov8n_paddle_model/ |
✅ | imgsz, batch |
| NCNN | ncnn |
yolov8n_ncnn_model/ |
✅ | imgsz, half, batch |
Exciting New Features on the Way 🎉
- Additional Dataset Integrations
- Detailed Export Integration Guides
- Step-by-Step Tutorials for Each Integration
Stay Updated 🚧
This integrations page is your first stop for upcoming developments. Keep an eye out with our:
- Newsletter: Subscribe here for the latest news.
- Social Media: Follow us here for updates and teasers.
- Blog: Visit our blog for detailed insights.
We Value Your Input 🗣️
Your feedback shapes our future releases. Share your thoughts and suggestions here.
Thank You, Community! 🌍
Your contributions inspire our continuous innovation. Stay tuned for the big reveal of what's next in AI and ML at Ultralytics!
comments: true
description: Explore Ultralytics HUB for easy training, analysis, preview, deployment and sharing of custom vision AI models using YOLOv8. Start training today!.
keywords: Ultralytics HUB, YOLOv8, custom AI models, model training, model deployment, model analysis, vision AI
Ultralytics HUB Models
Ultralytics HUB models provide a streamlined solution for training vision AI models on custom datasets.
The process is user-friendly and efficient, involving a simple three-step creation and accelerated training powered by Ultralytics YOLOv8. During training, real-time updates on model metrics are available so that you can monitor each step of the progress. Once training is completed, you can preview your model and easily deploy it to real-world applications. Therefore, Ultralytics HUB offers a comprehensive yet straightforward system for model creation, training, evaluation, and deployment.
Watch: Ultralytics HUB Training and Validation Overview
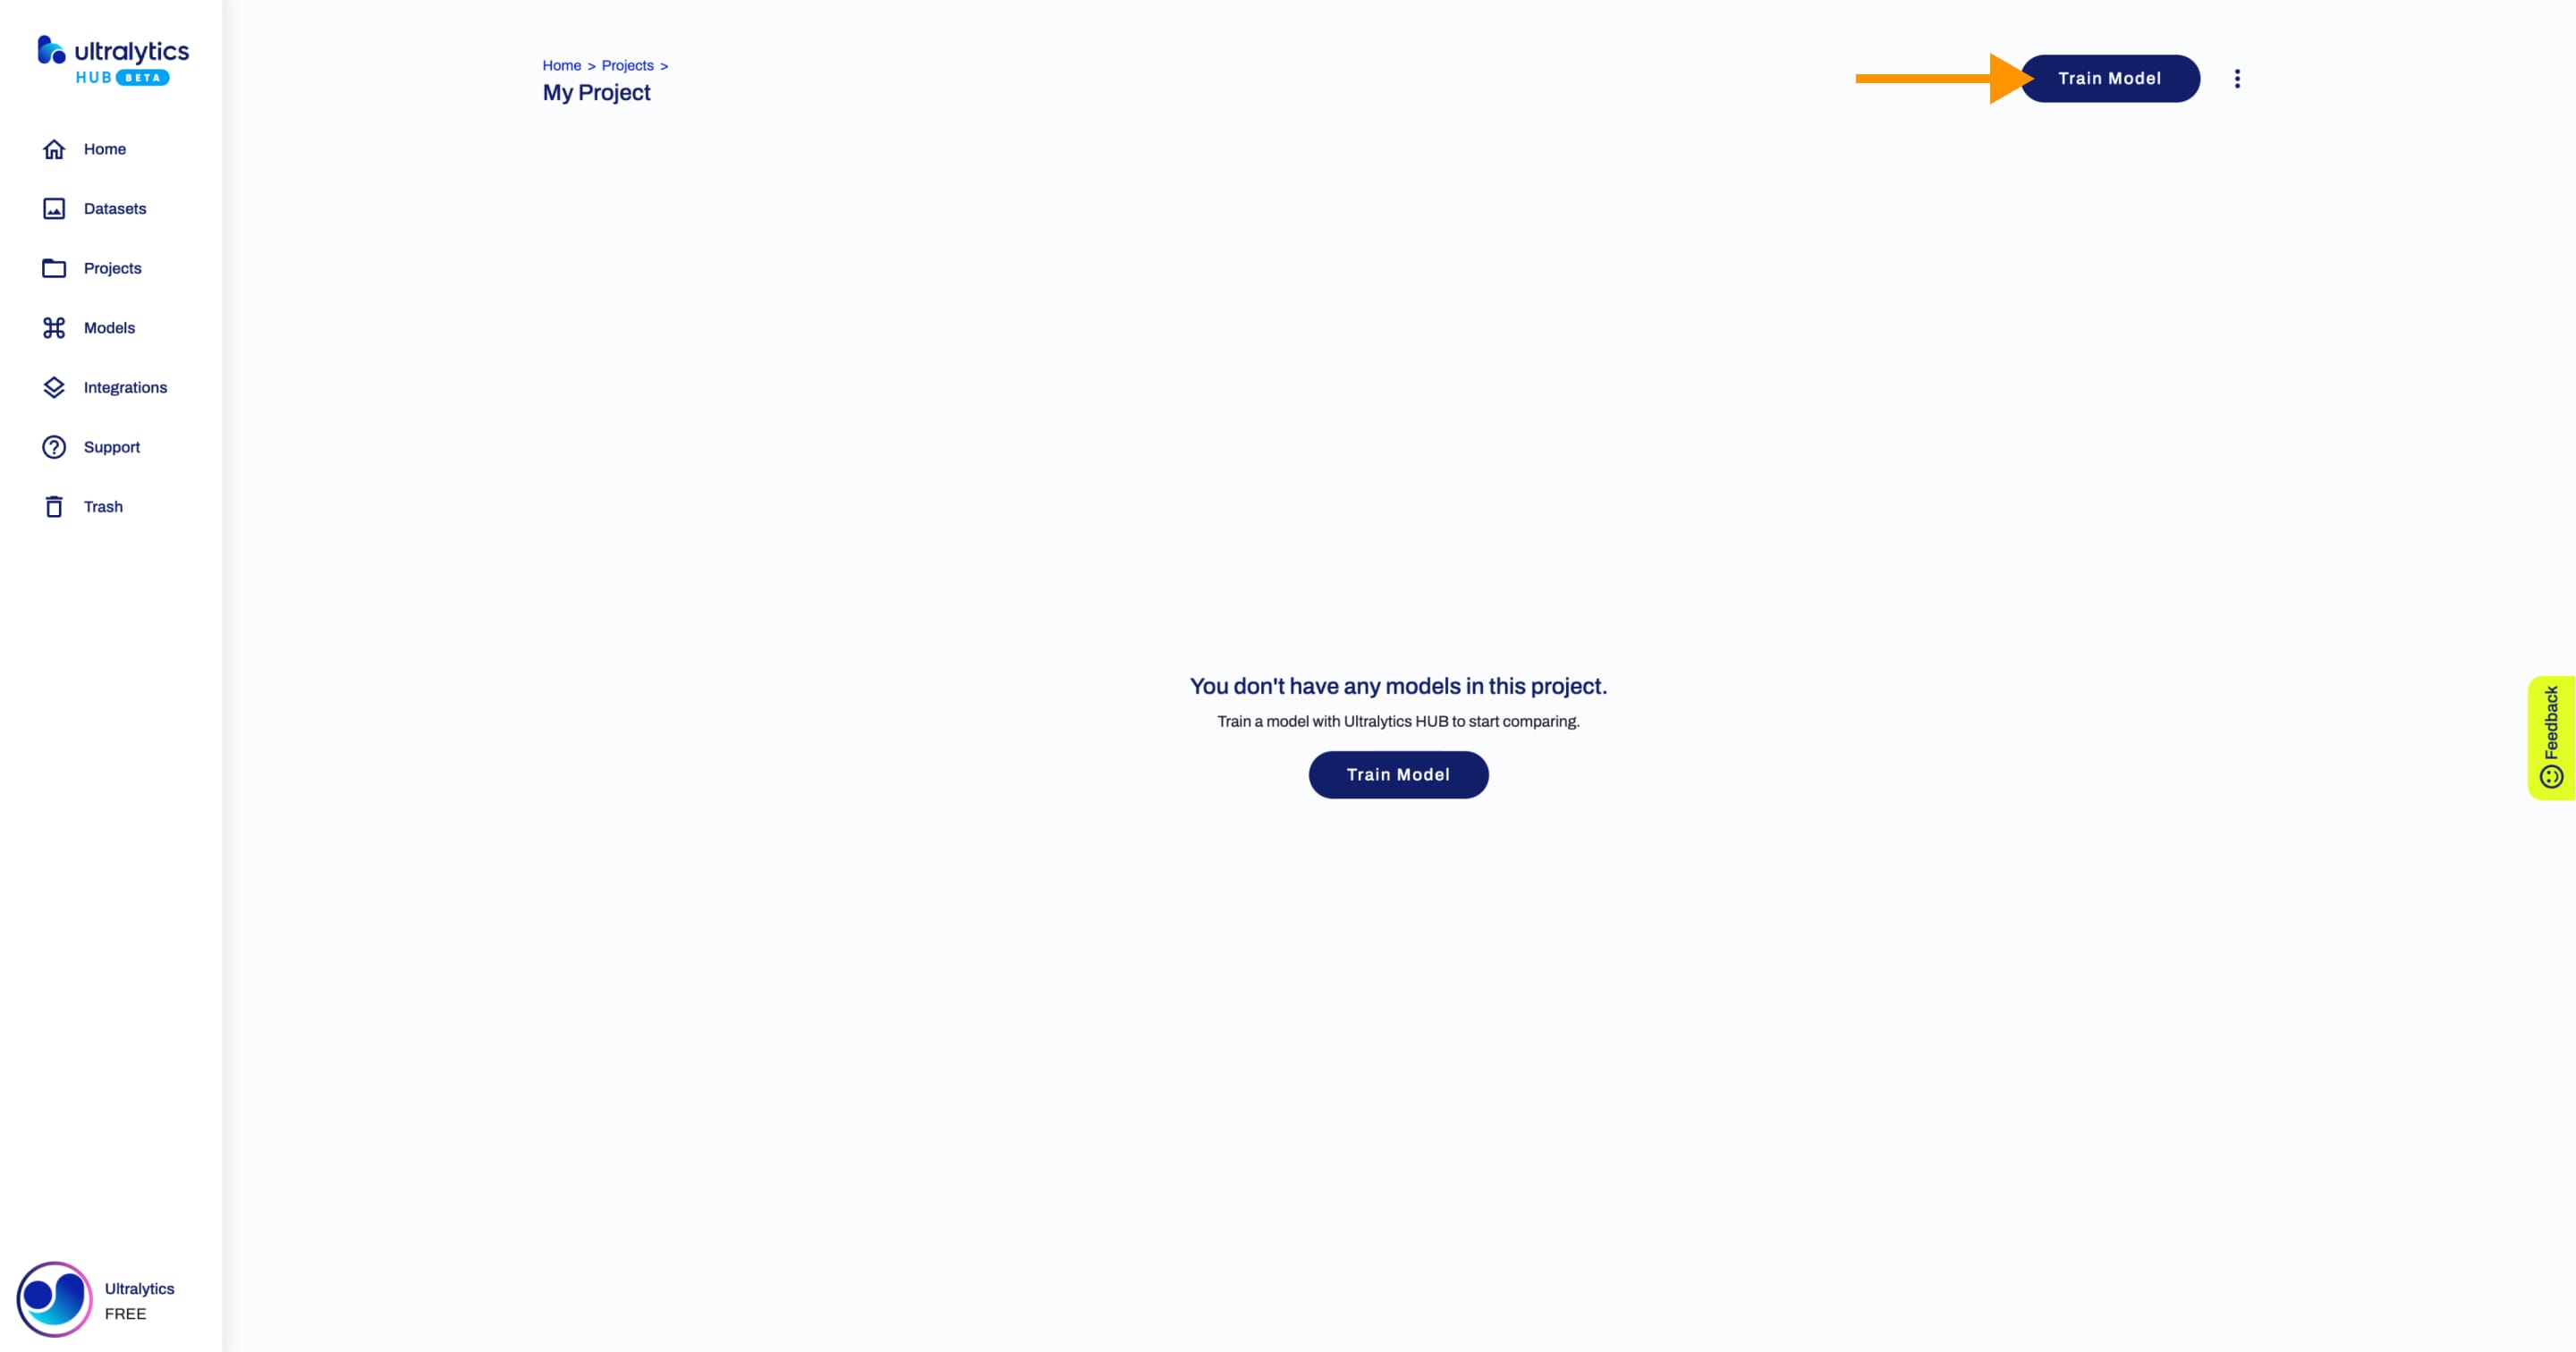
Train Model
Navigate to the Models page by clicking on the Models button in the sidebar and click on the Train Model button on the top right of the page.
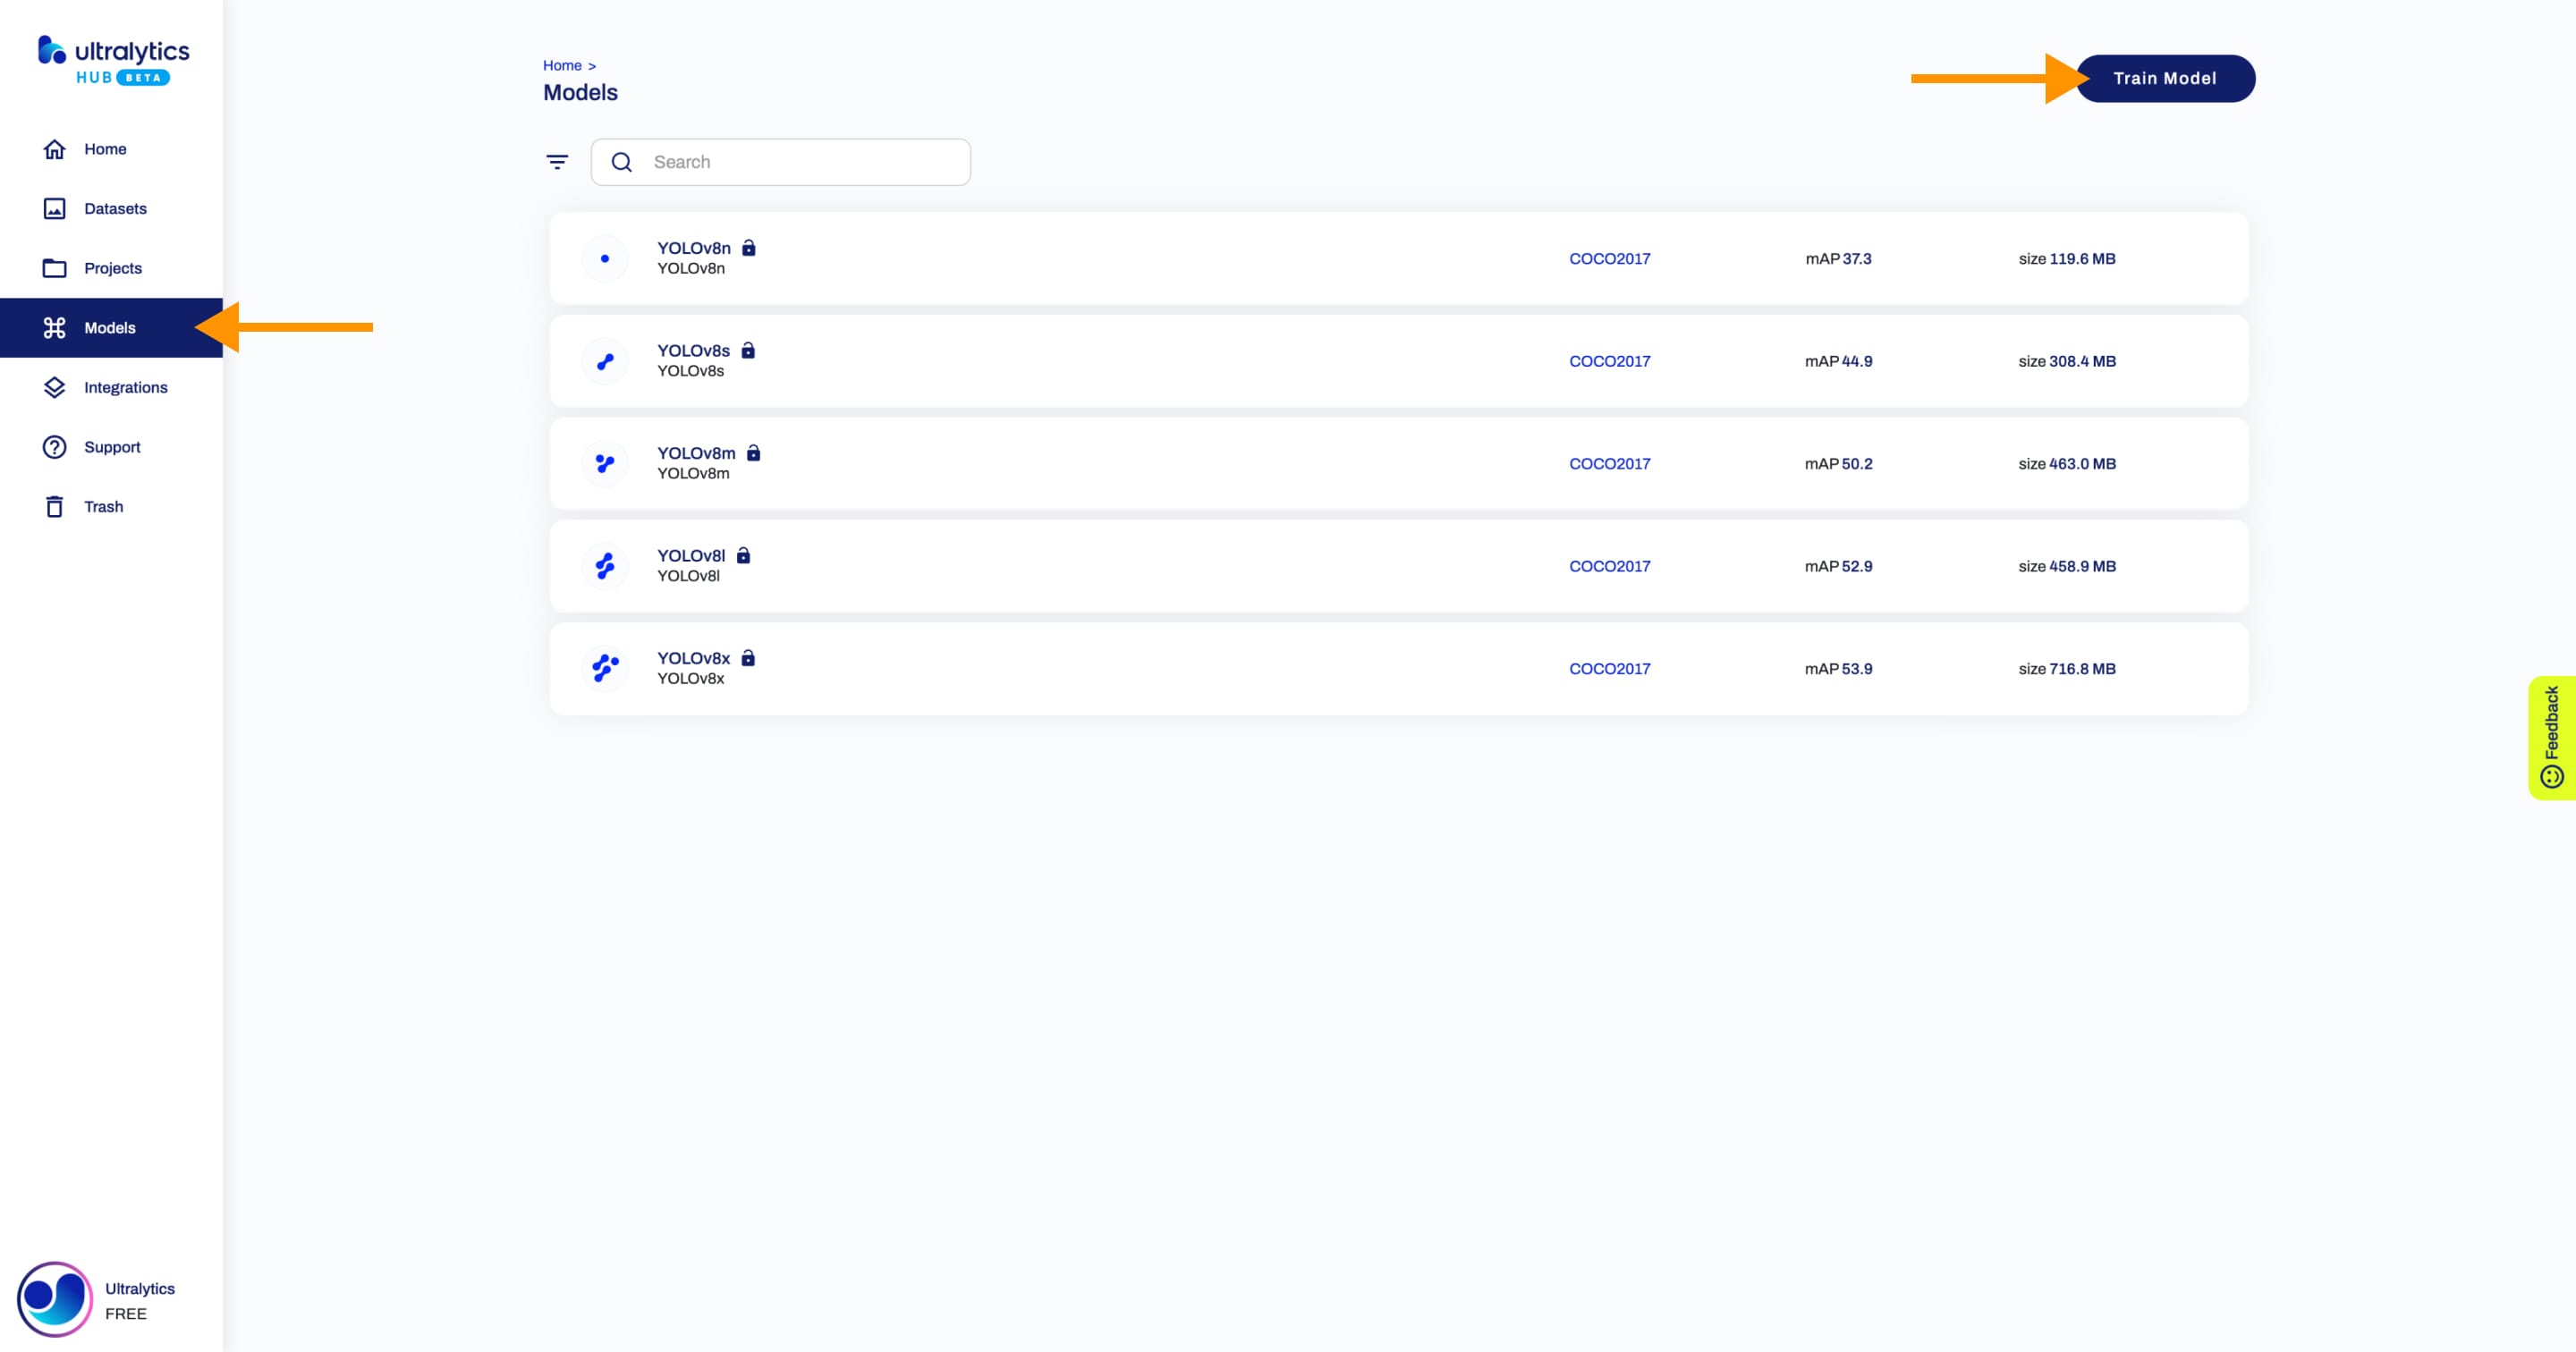
??? tip "Tip"
You can train a model directly from the [Home](https://hub.ultralytics.com/home) page.
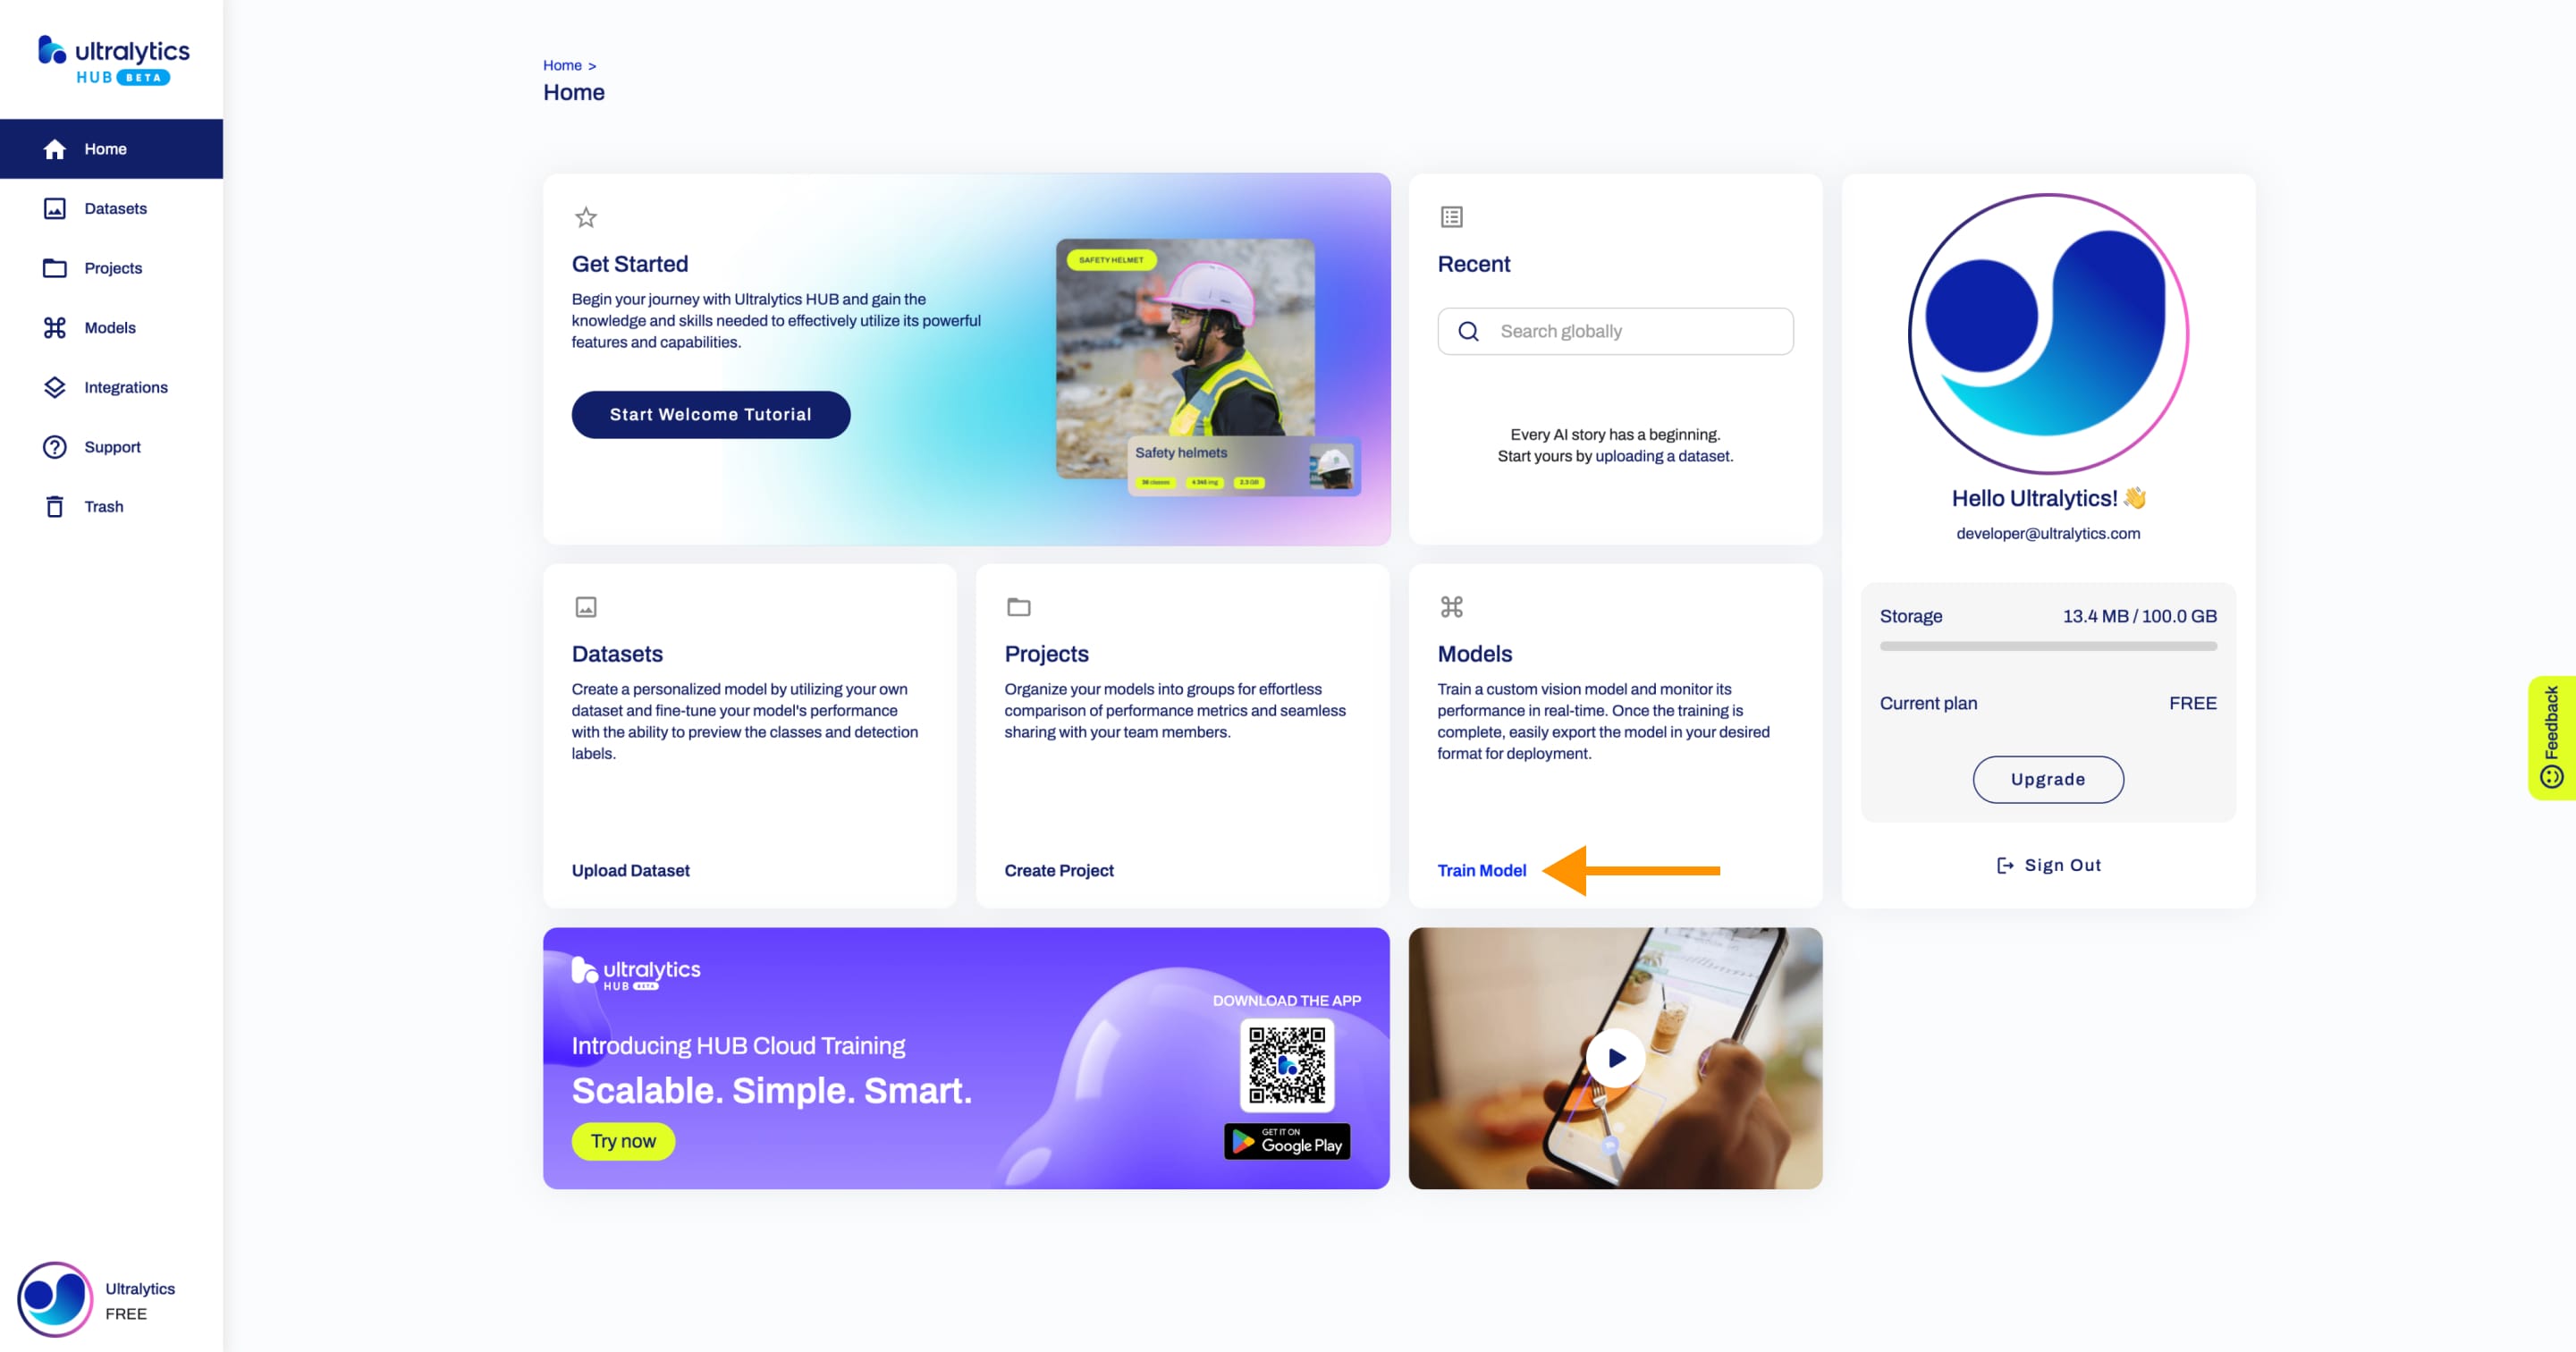
This action will trigger the Train Model dialog which has three simple steps:
1. Dataset
In this step, you have to select the dataset you want to train your model on. After you selected a dataset, click Continue.
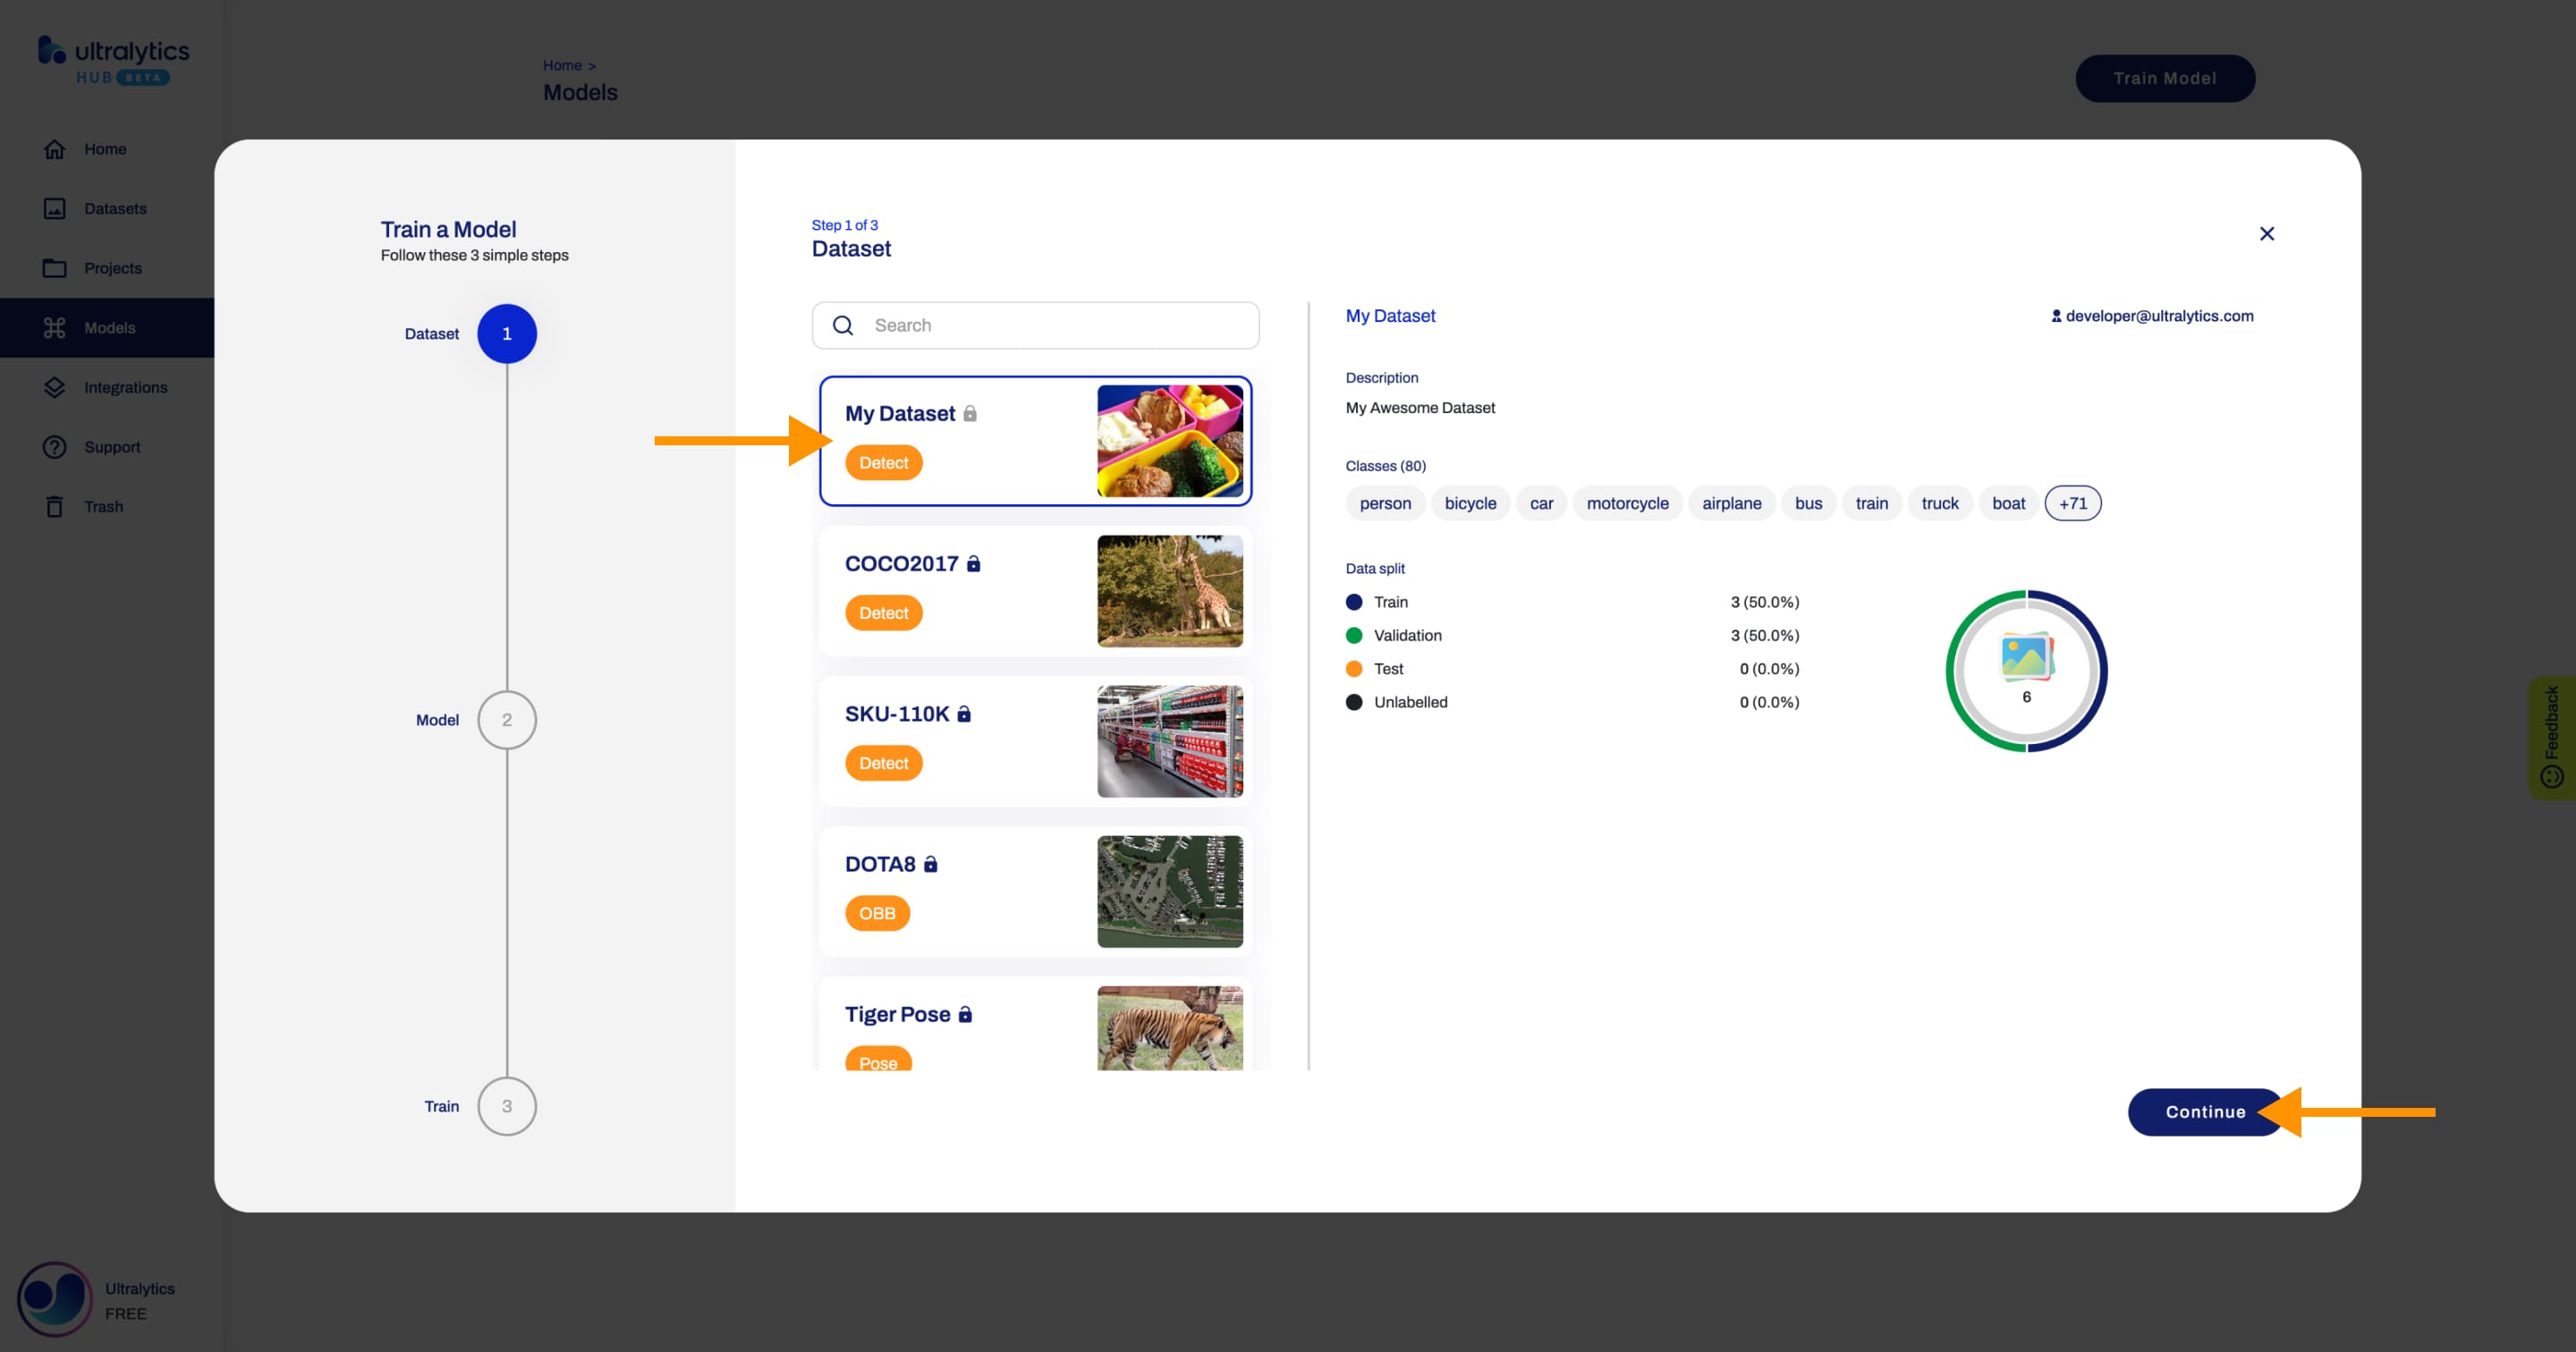
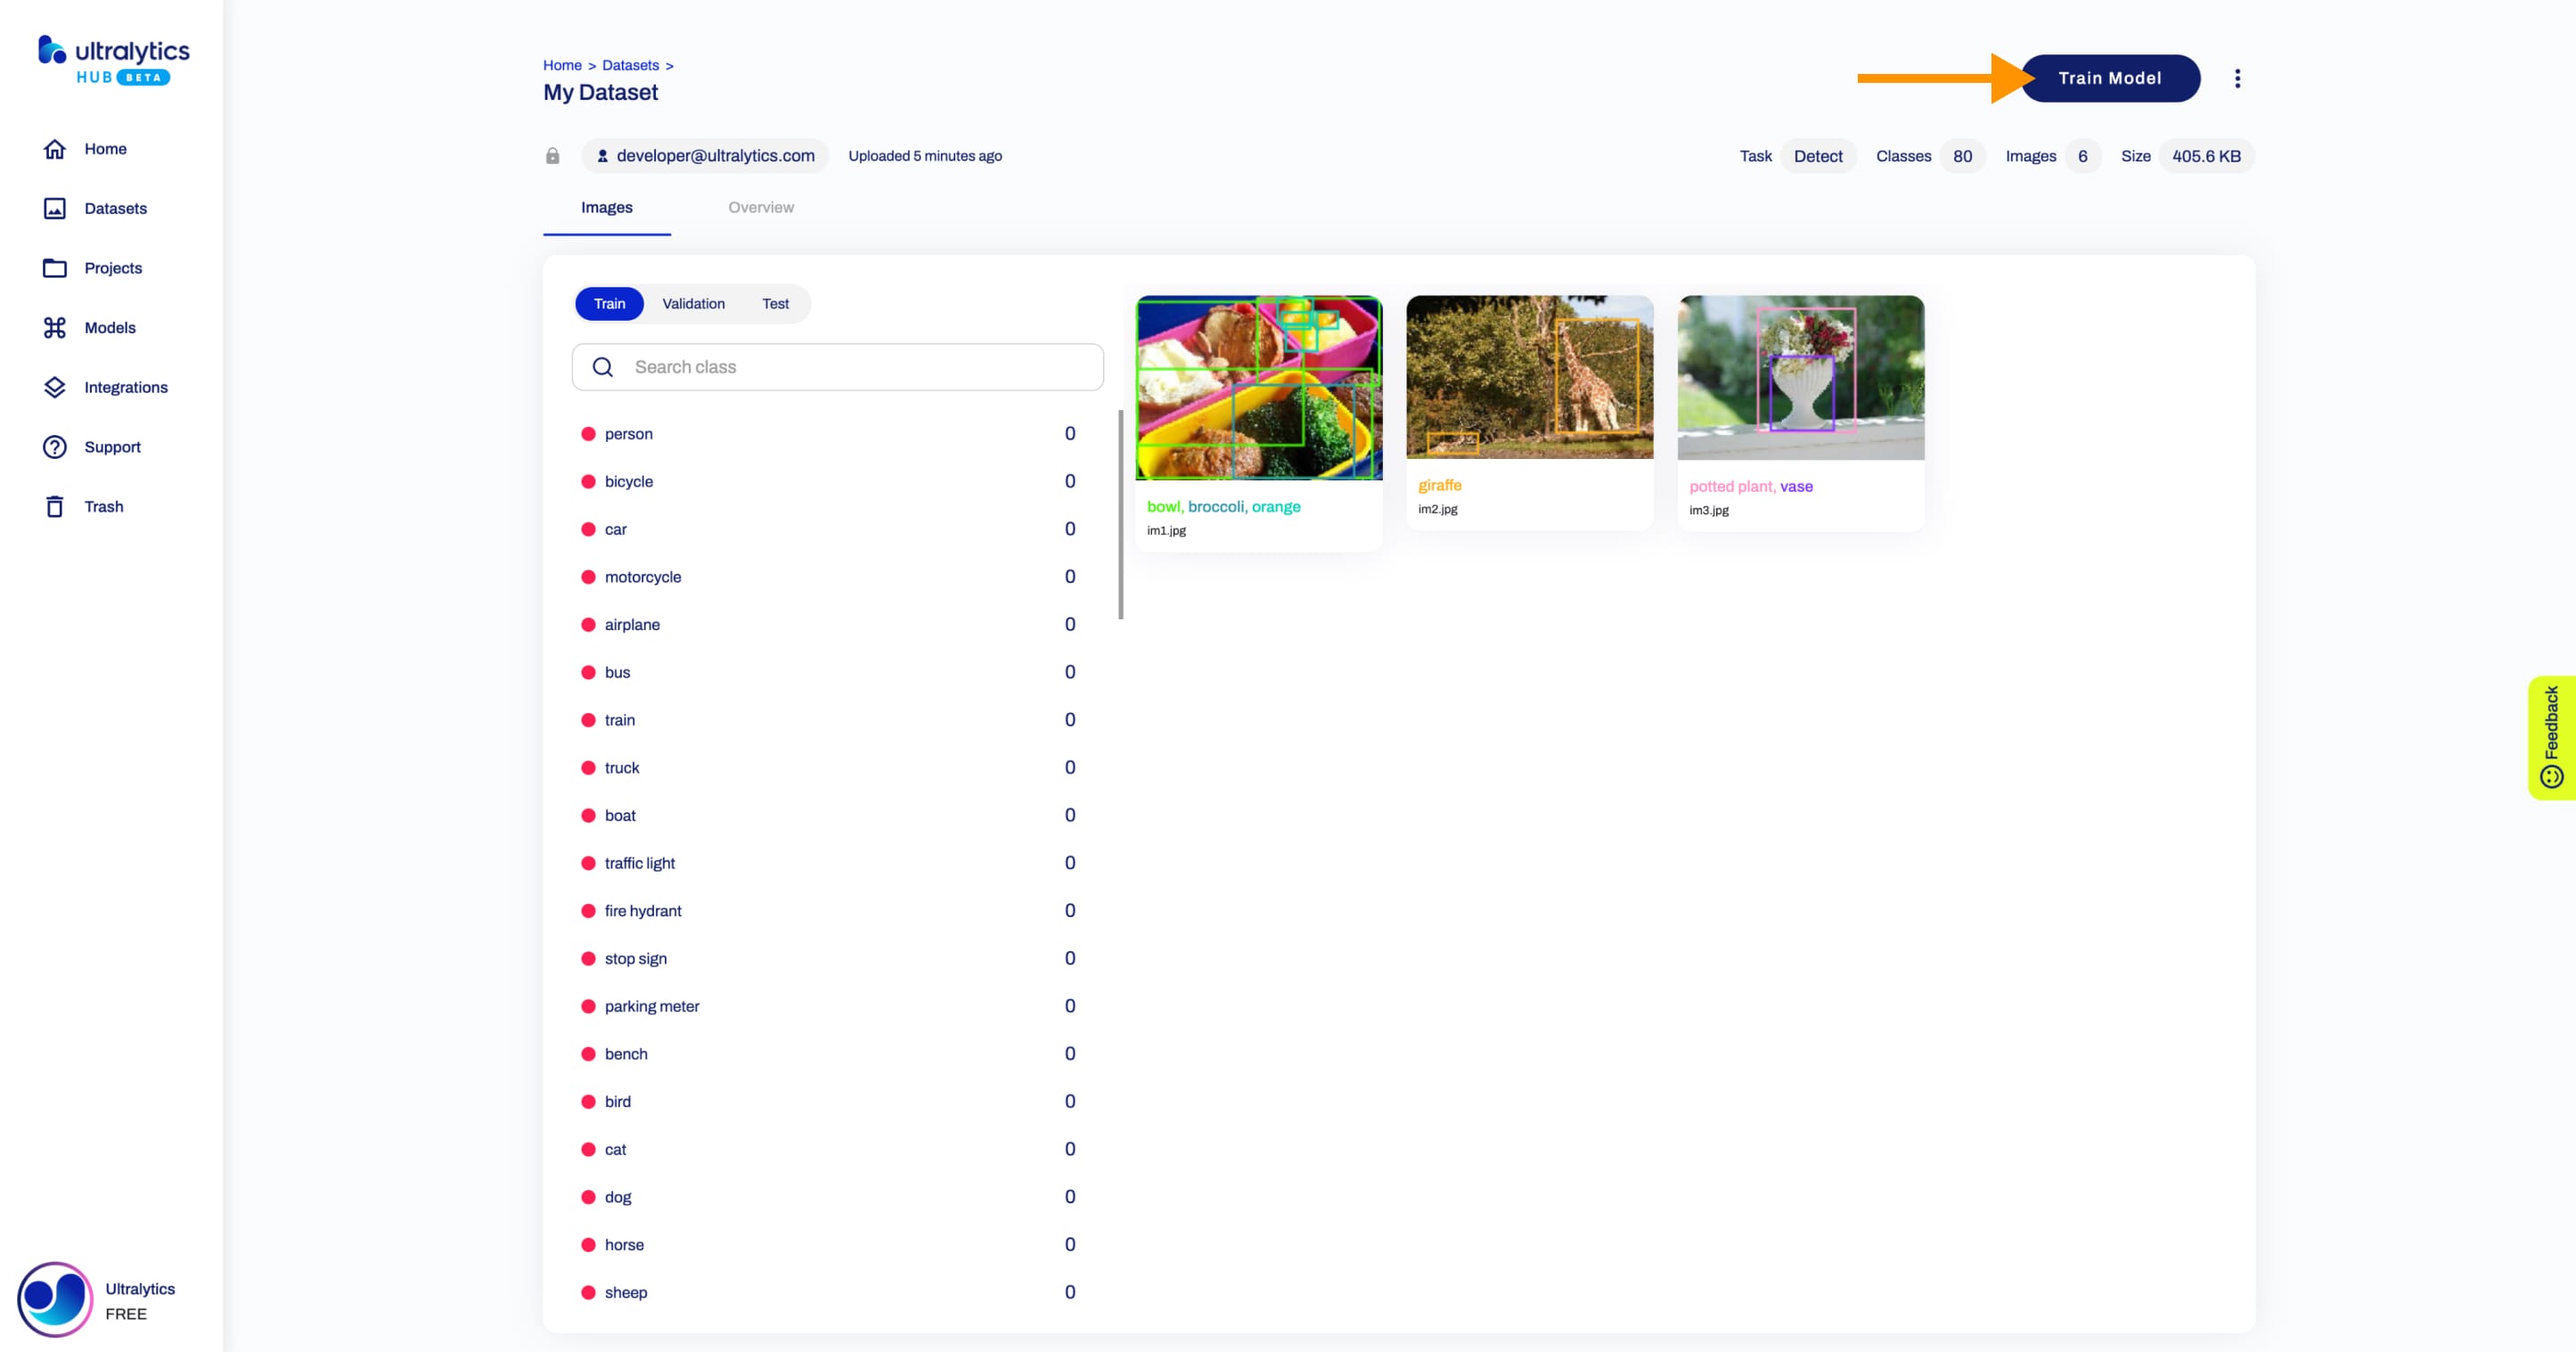
??? tip "Tip"
You can skip this step if you train a model directly from the Dataset page.
2. Model
In this step, you have to choose the project in which you want to create your model, the name of your model and your model's architecture.
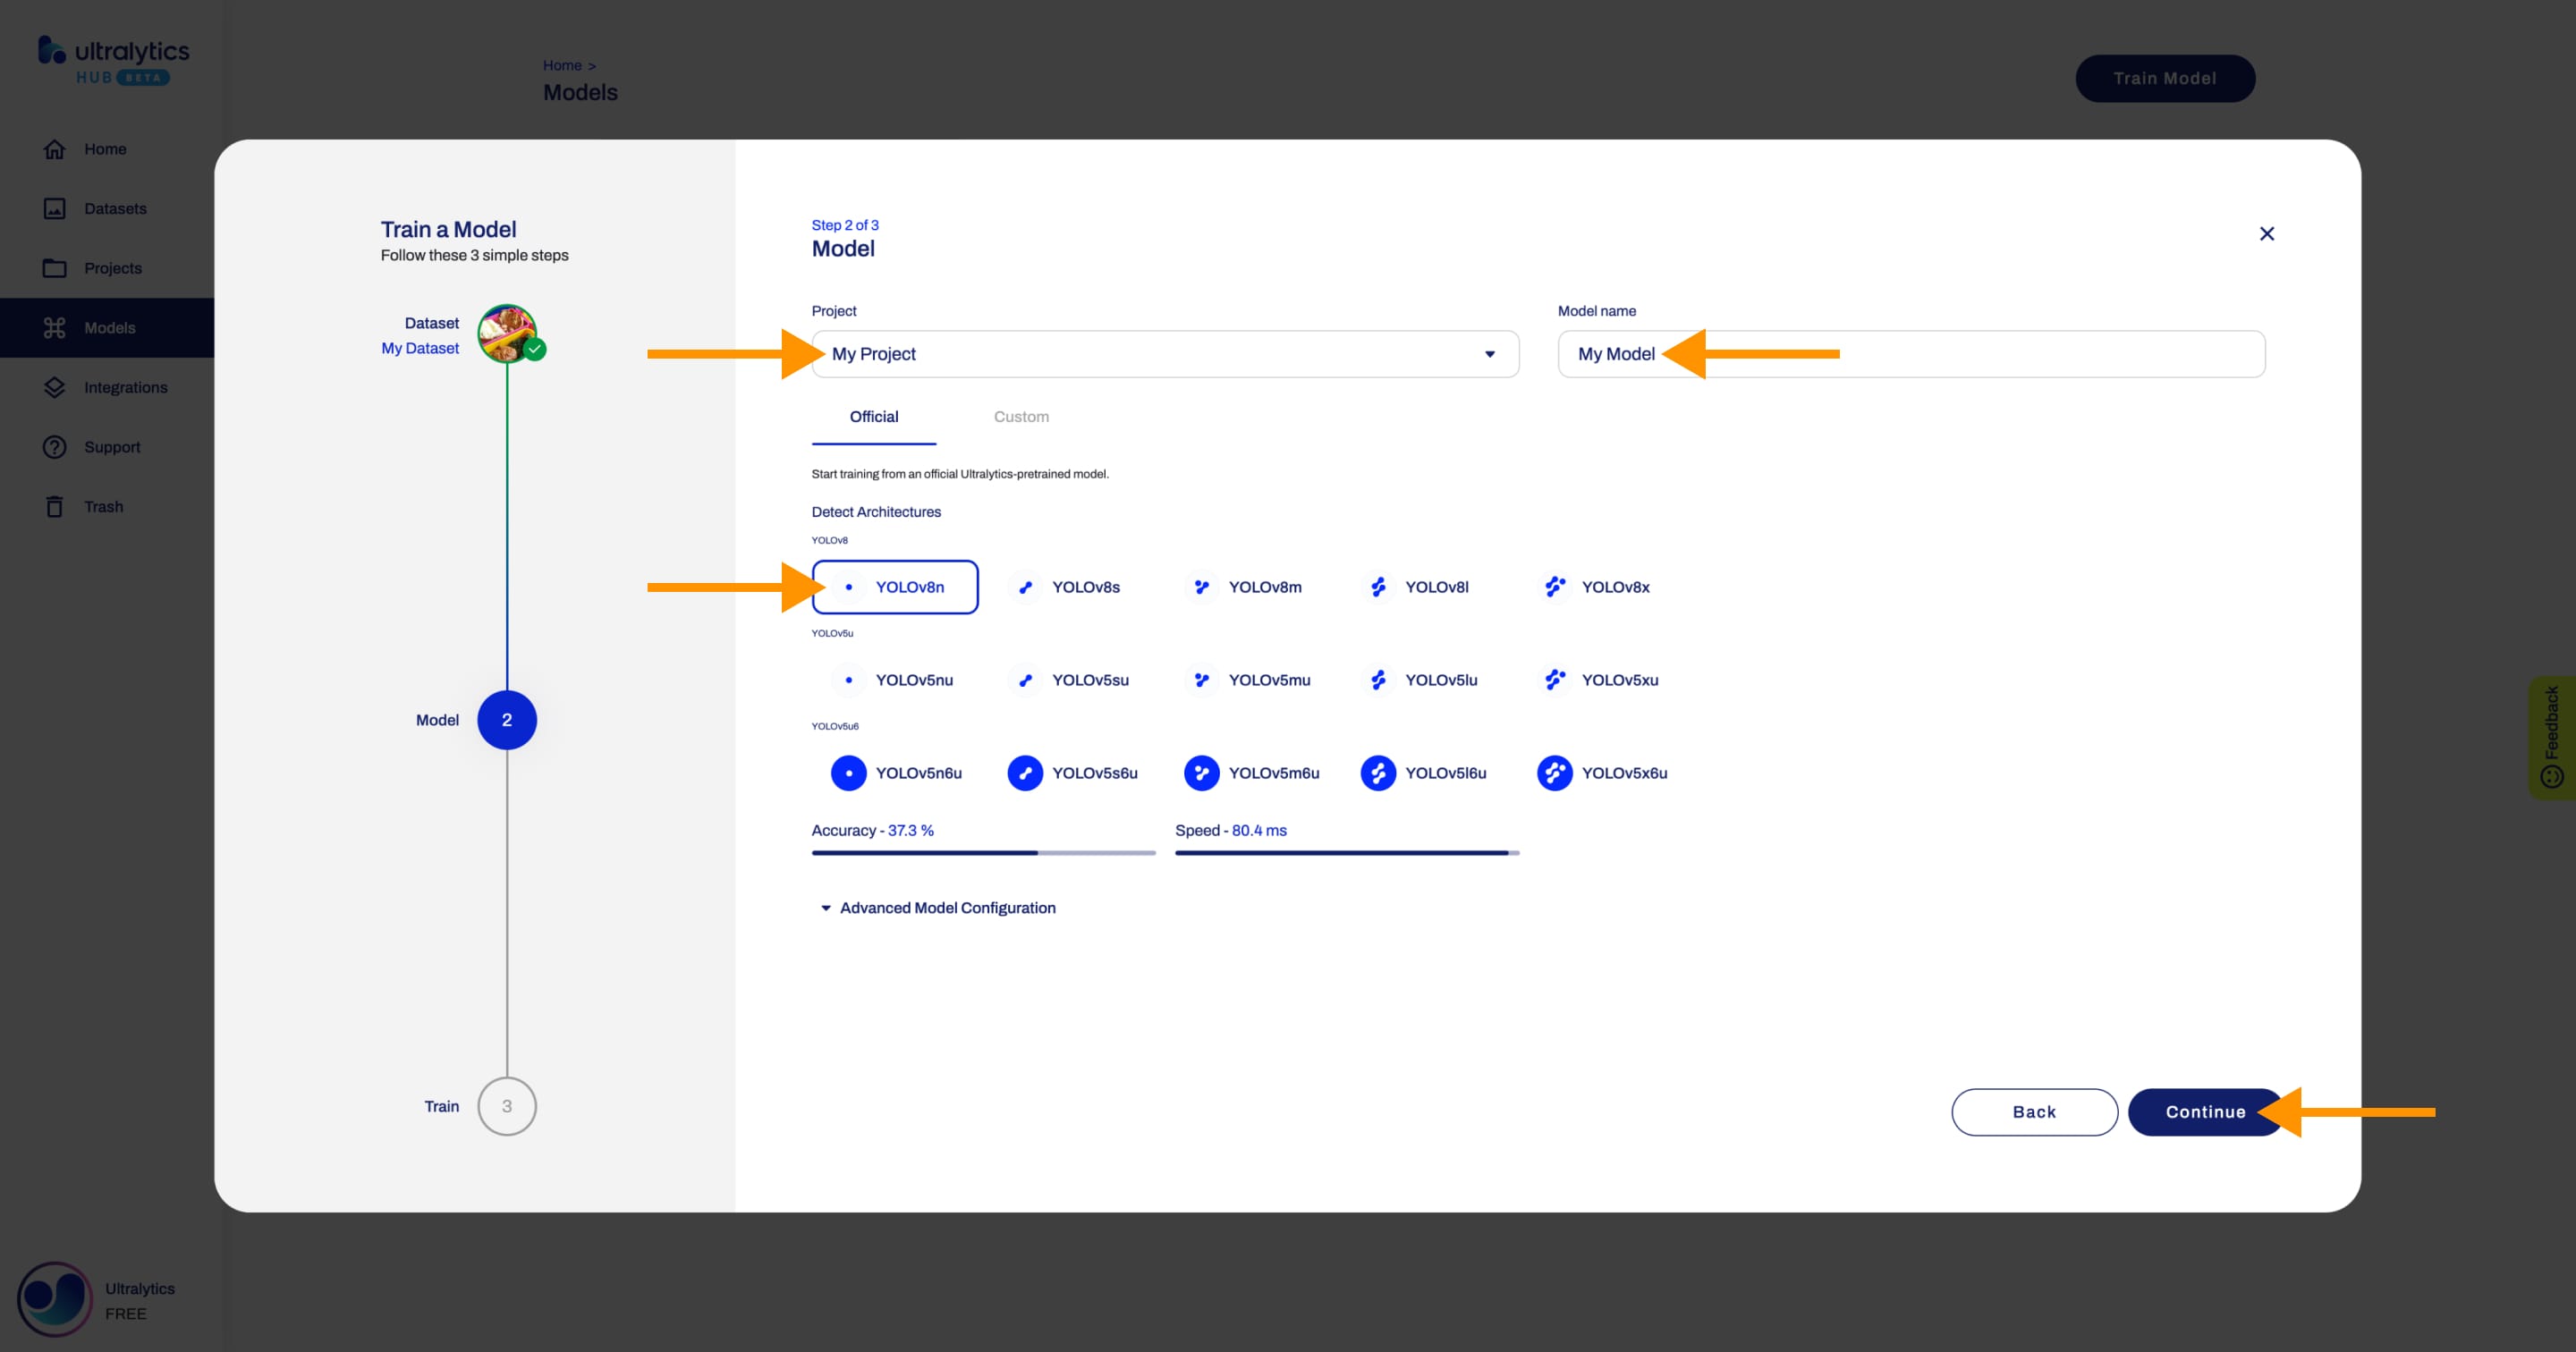
??? note "Note"
Ultralytics HUB will try to pre-select the project.
If you opened the **Train Model** dialog as described above, [Ultralytics HUB](https://ultralytics.com/hub) will pre-select the last project you used.
If you opened the **Train Model** dialog from the Project page, [Ultralytics HUB](https://ultralytics.com/hub) will pre-select the project you were inside of.
In case you don't have a project created yet, you can set the name of your project in this step and it will be created together with your model.
!!! Info "Info"
You can read more about the available [YOLOv8](https://docs.ultralytics.com/models/yolov8) (and [YOLOv5](https://docs.ultralytics.com/models/yolov5)) architectures in our documentation.
By default, your model will use a pre-trained model (trained on the COCO dataset) to reduce training time. You can change this behavior and tweak your model's configuration by opening the Advanced Model Configuration accordion.
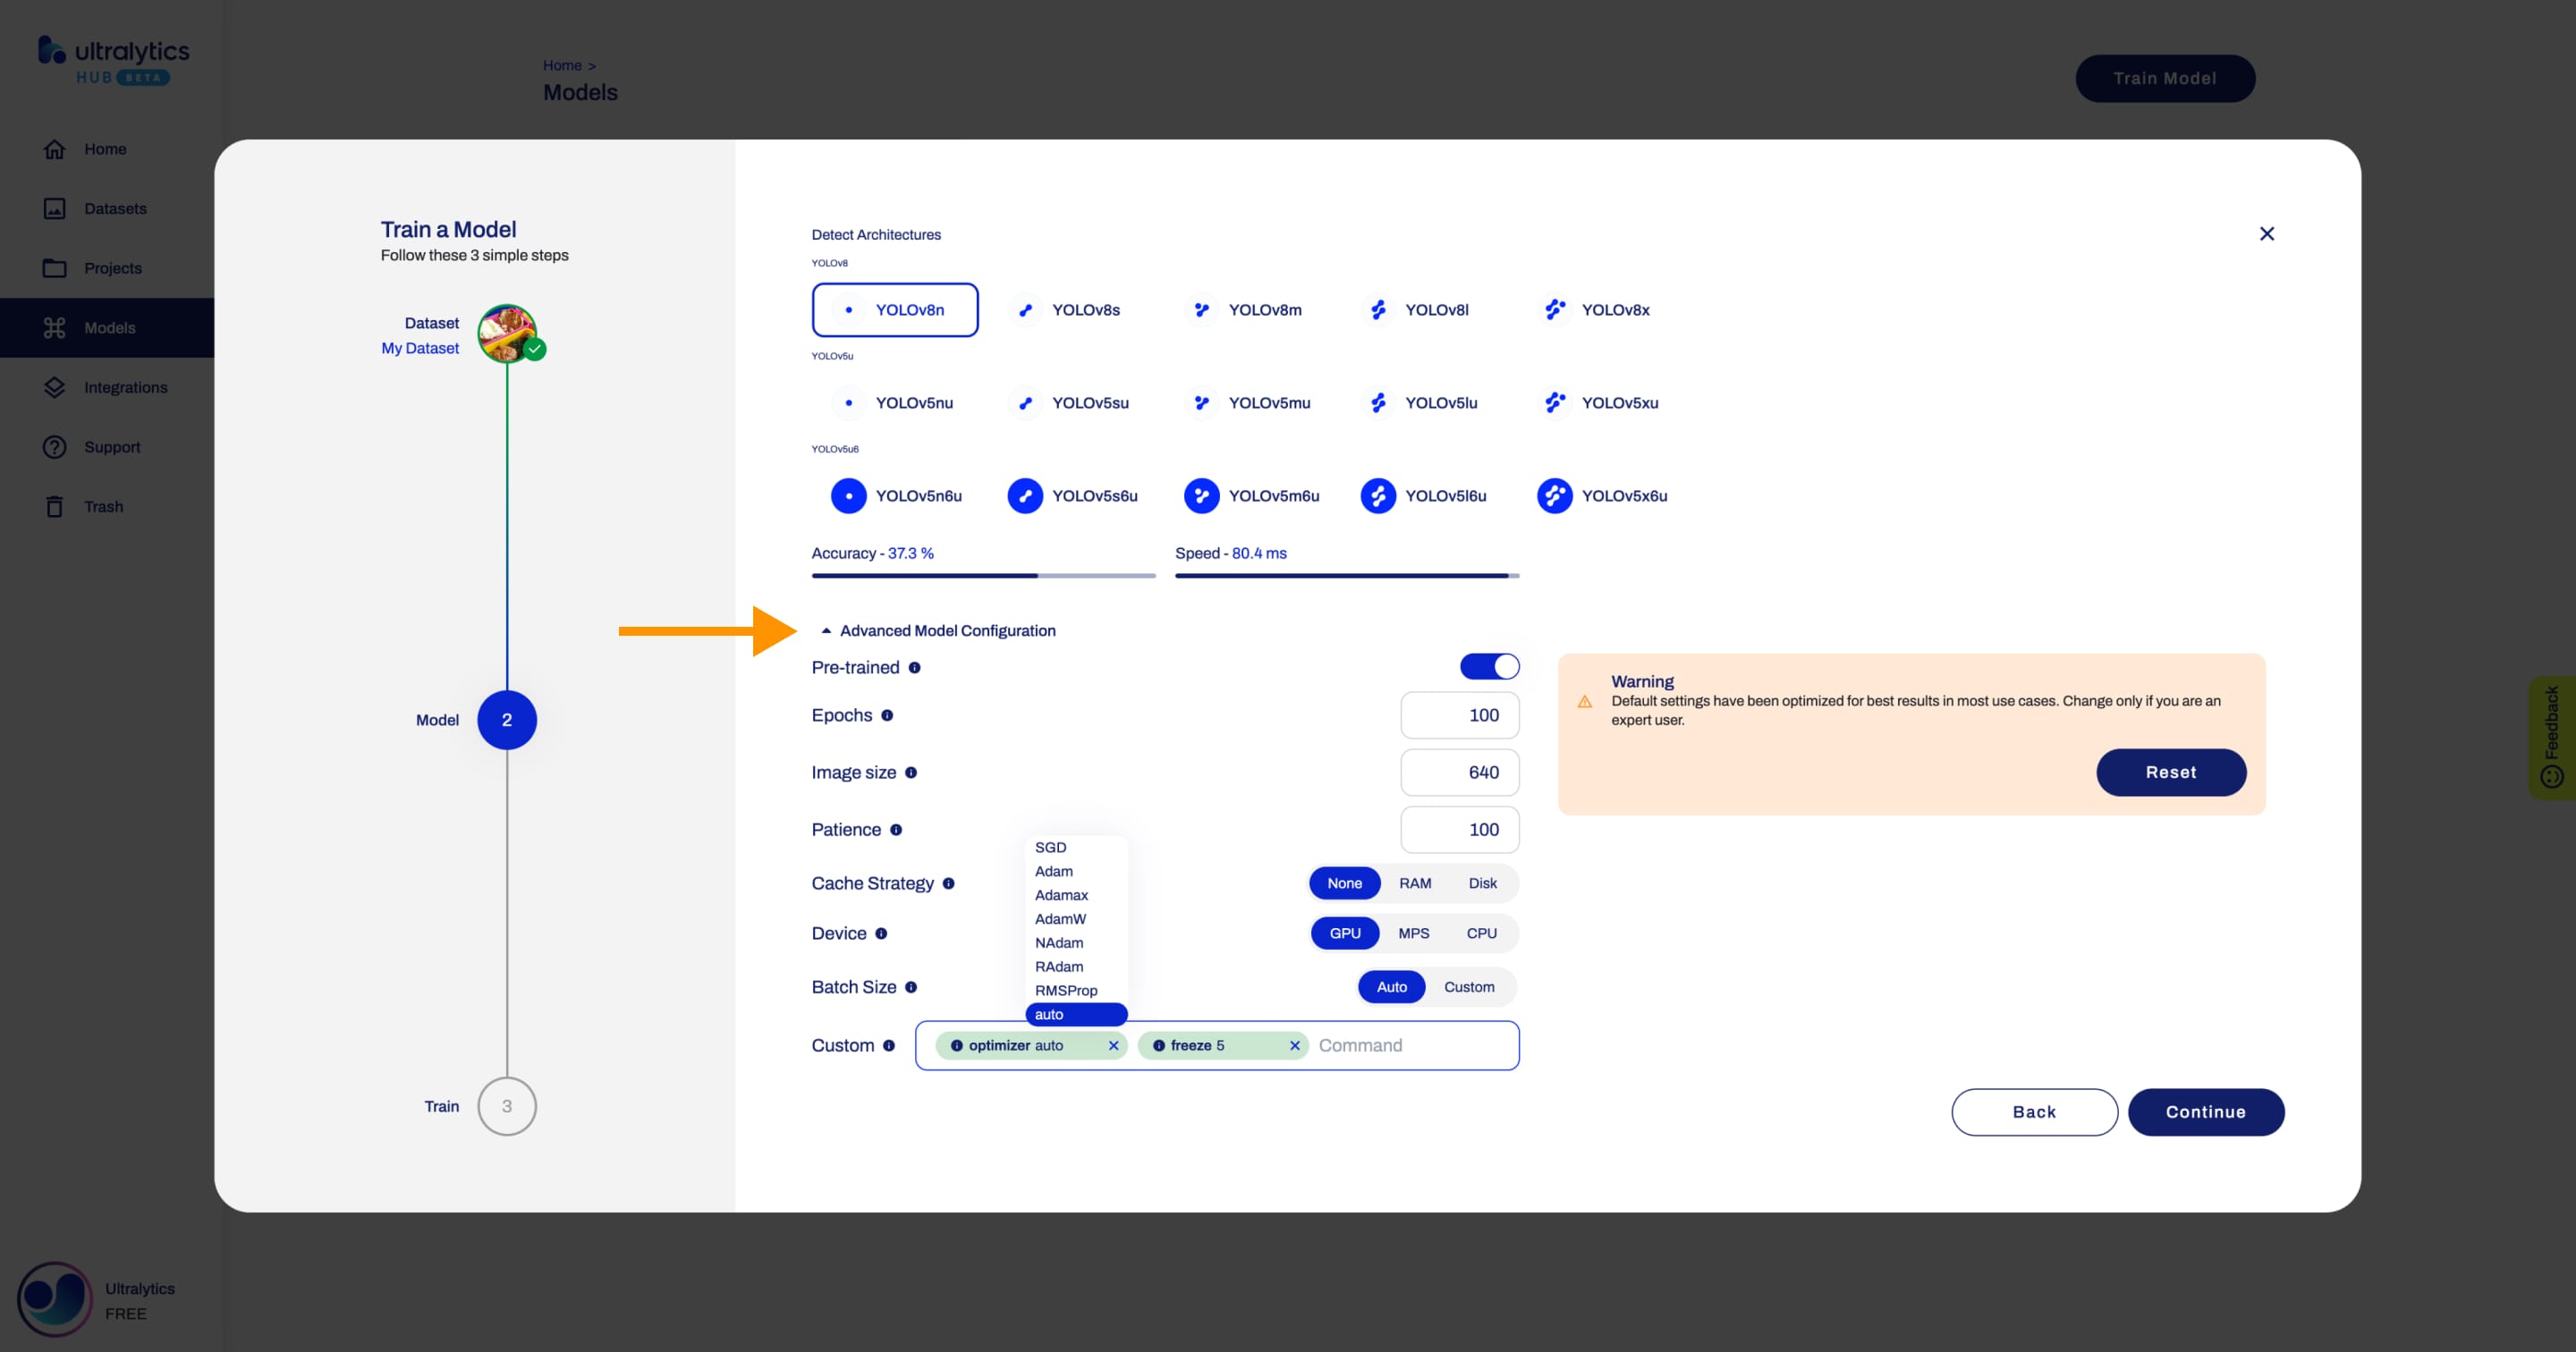
!!! note "Note"
You can easily change the most common model configuration options (such as the number of epochs) but you can also use the **Custom** option to access all [Train Settings](https://docs.ultralytics.com/modes/train/#train-settings) relevant to [Ultralytics HUB](https://ultralytics.com/hub).
Watch: How to Configure Ultralytics YOLOv8 Training Parameters in Ultralytics HUB
Alternatively, you start training from one of your previously trained models by clicking on the Custom tab.
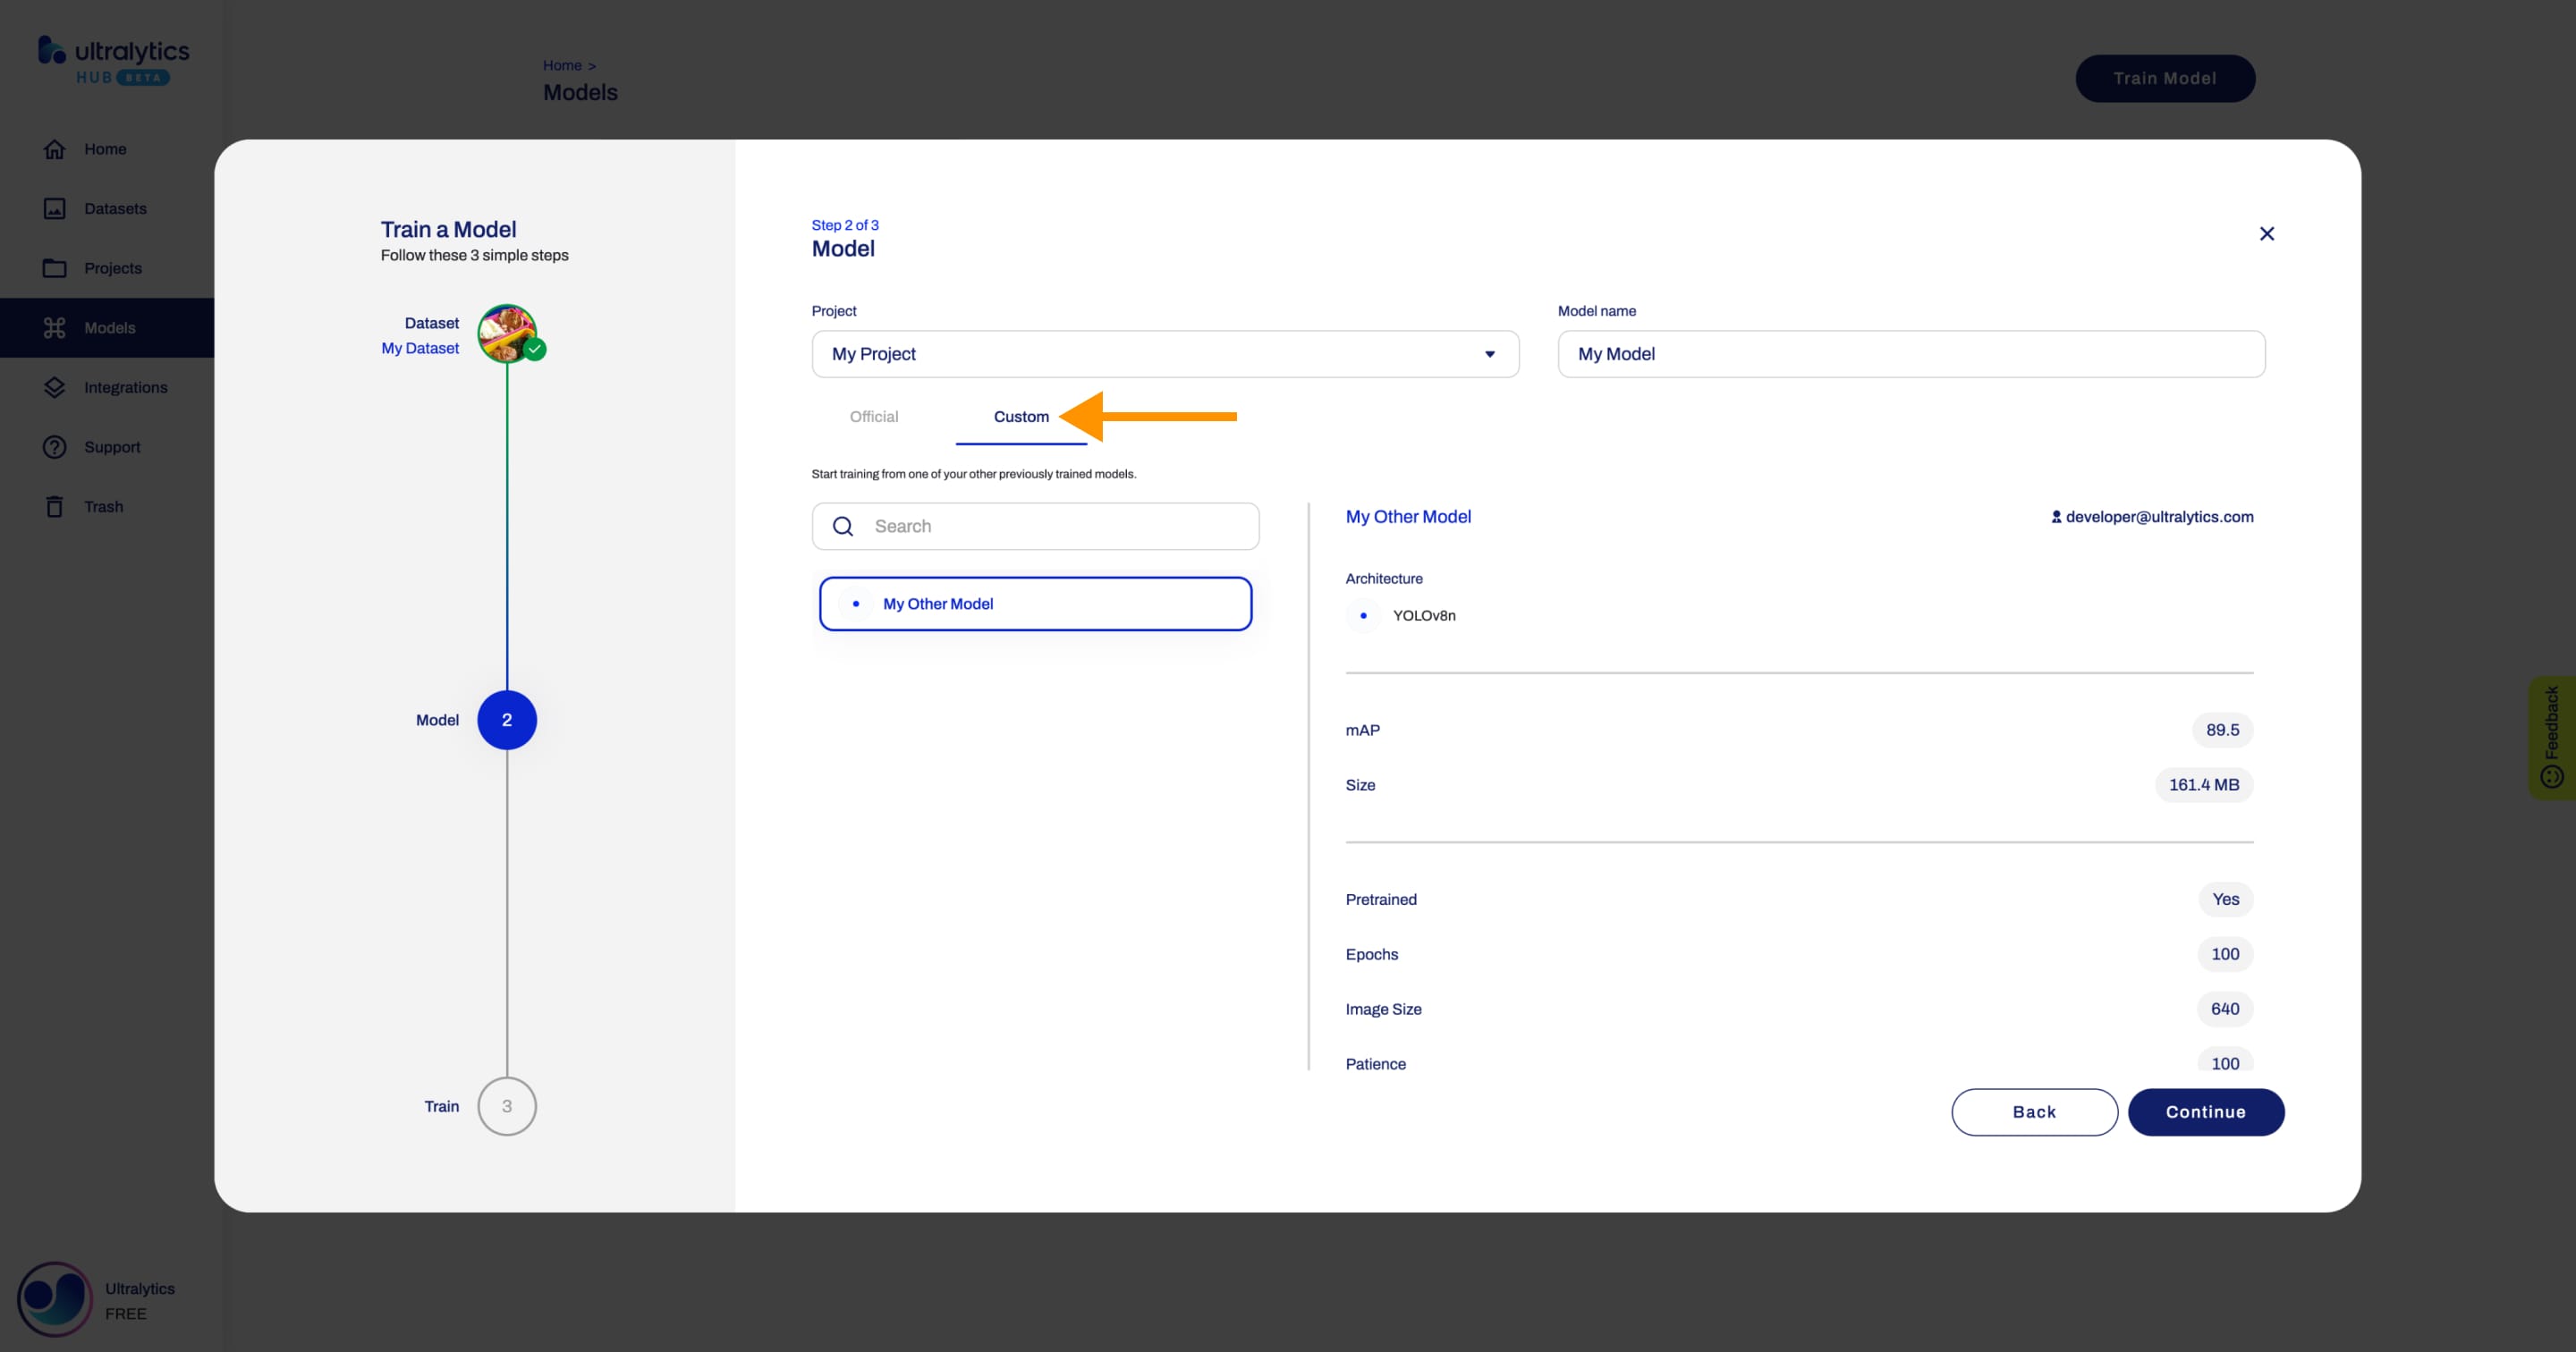
When you're happy with your model configuration, click Continue.
3. Train
In this step, you will start training you model.
??? note "Note"
When you are on this step, you have the option to close the **Train Model** dialog and start training your model from the Model page later.
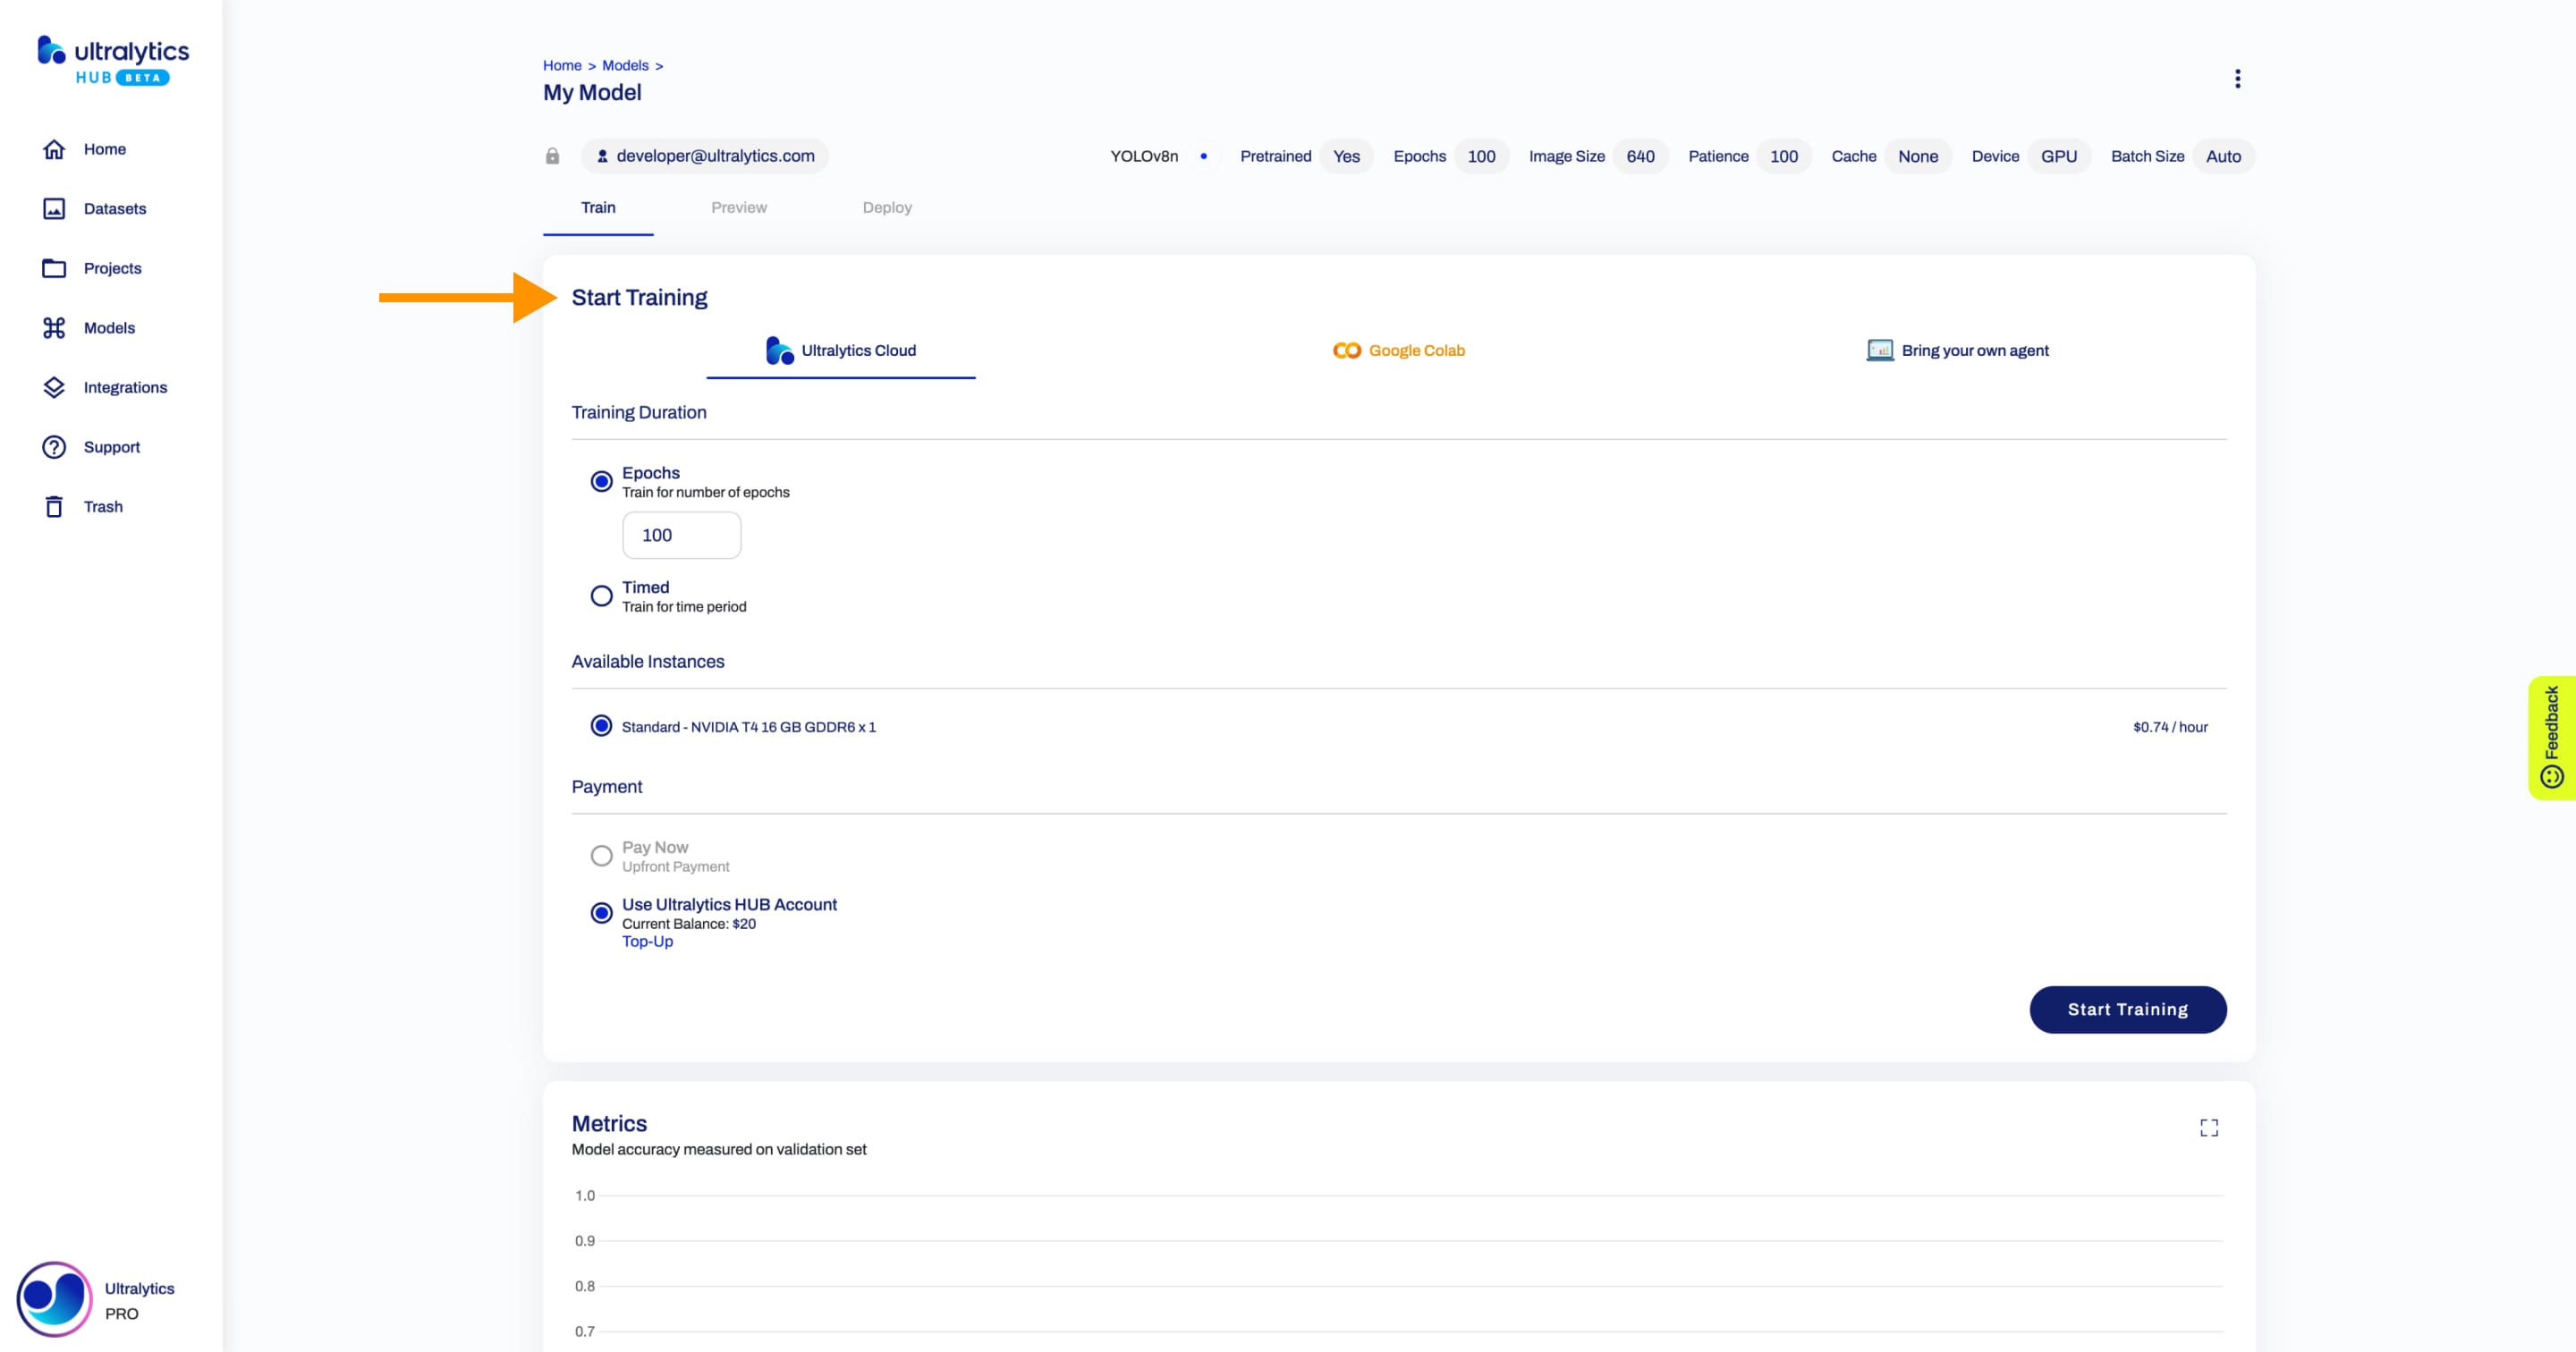
Ultralytics HUB offers three training options:
- Ultralytics Cloud
- Google Colab
- Bring your own agent
a. Ultralytics Cloud
You need to upgrade to the Pro Plan in order to access Ultralytics Cloud.
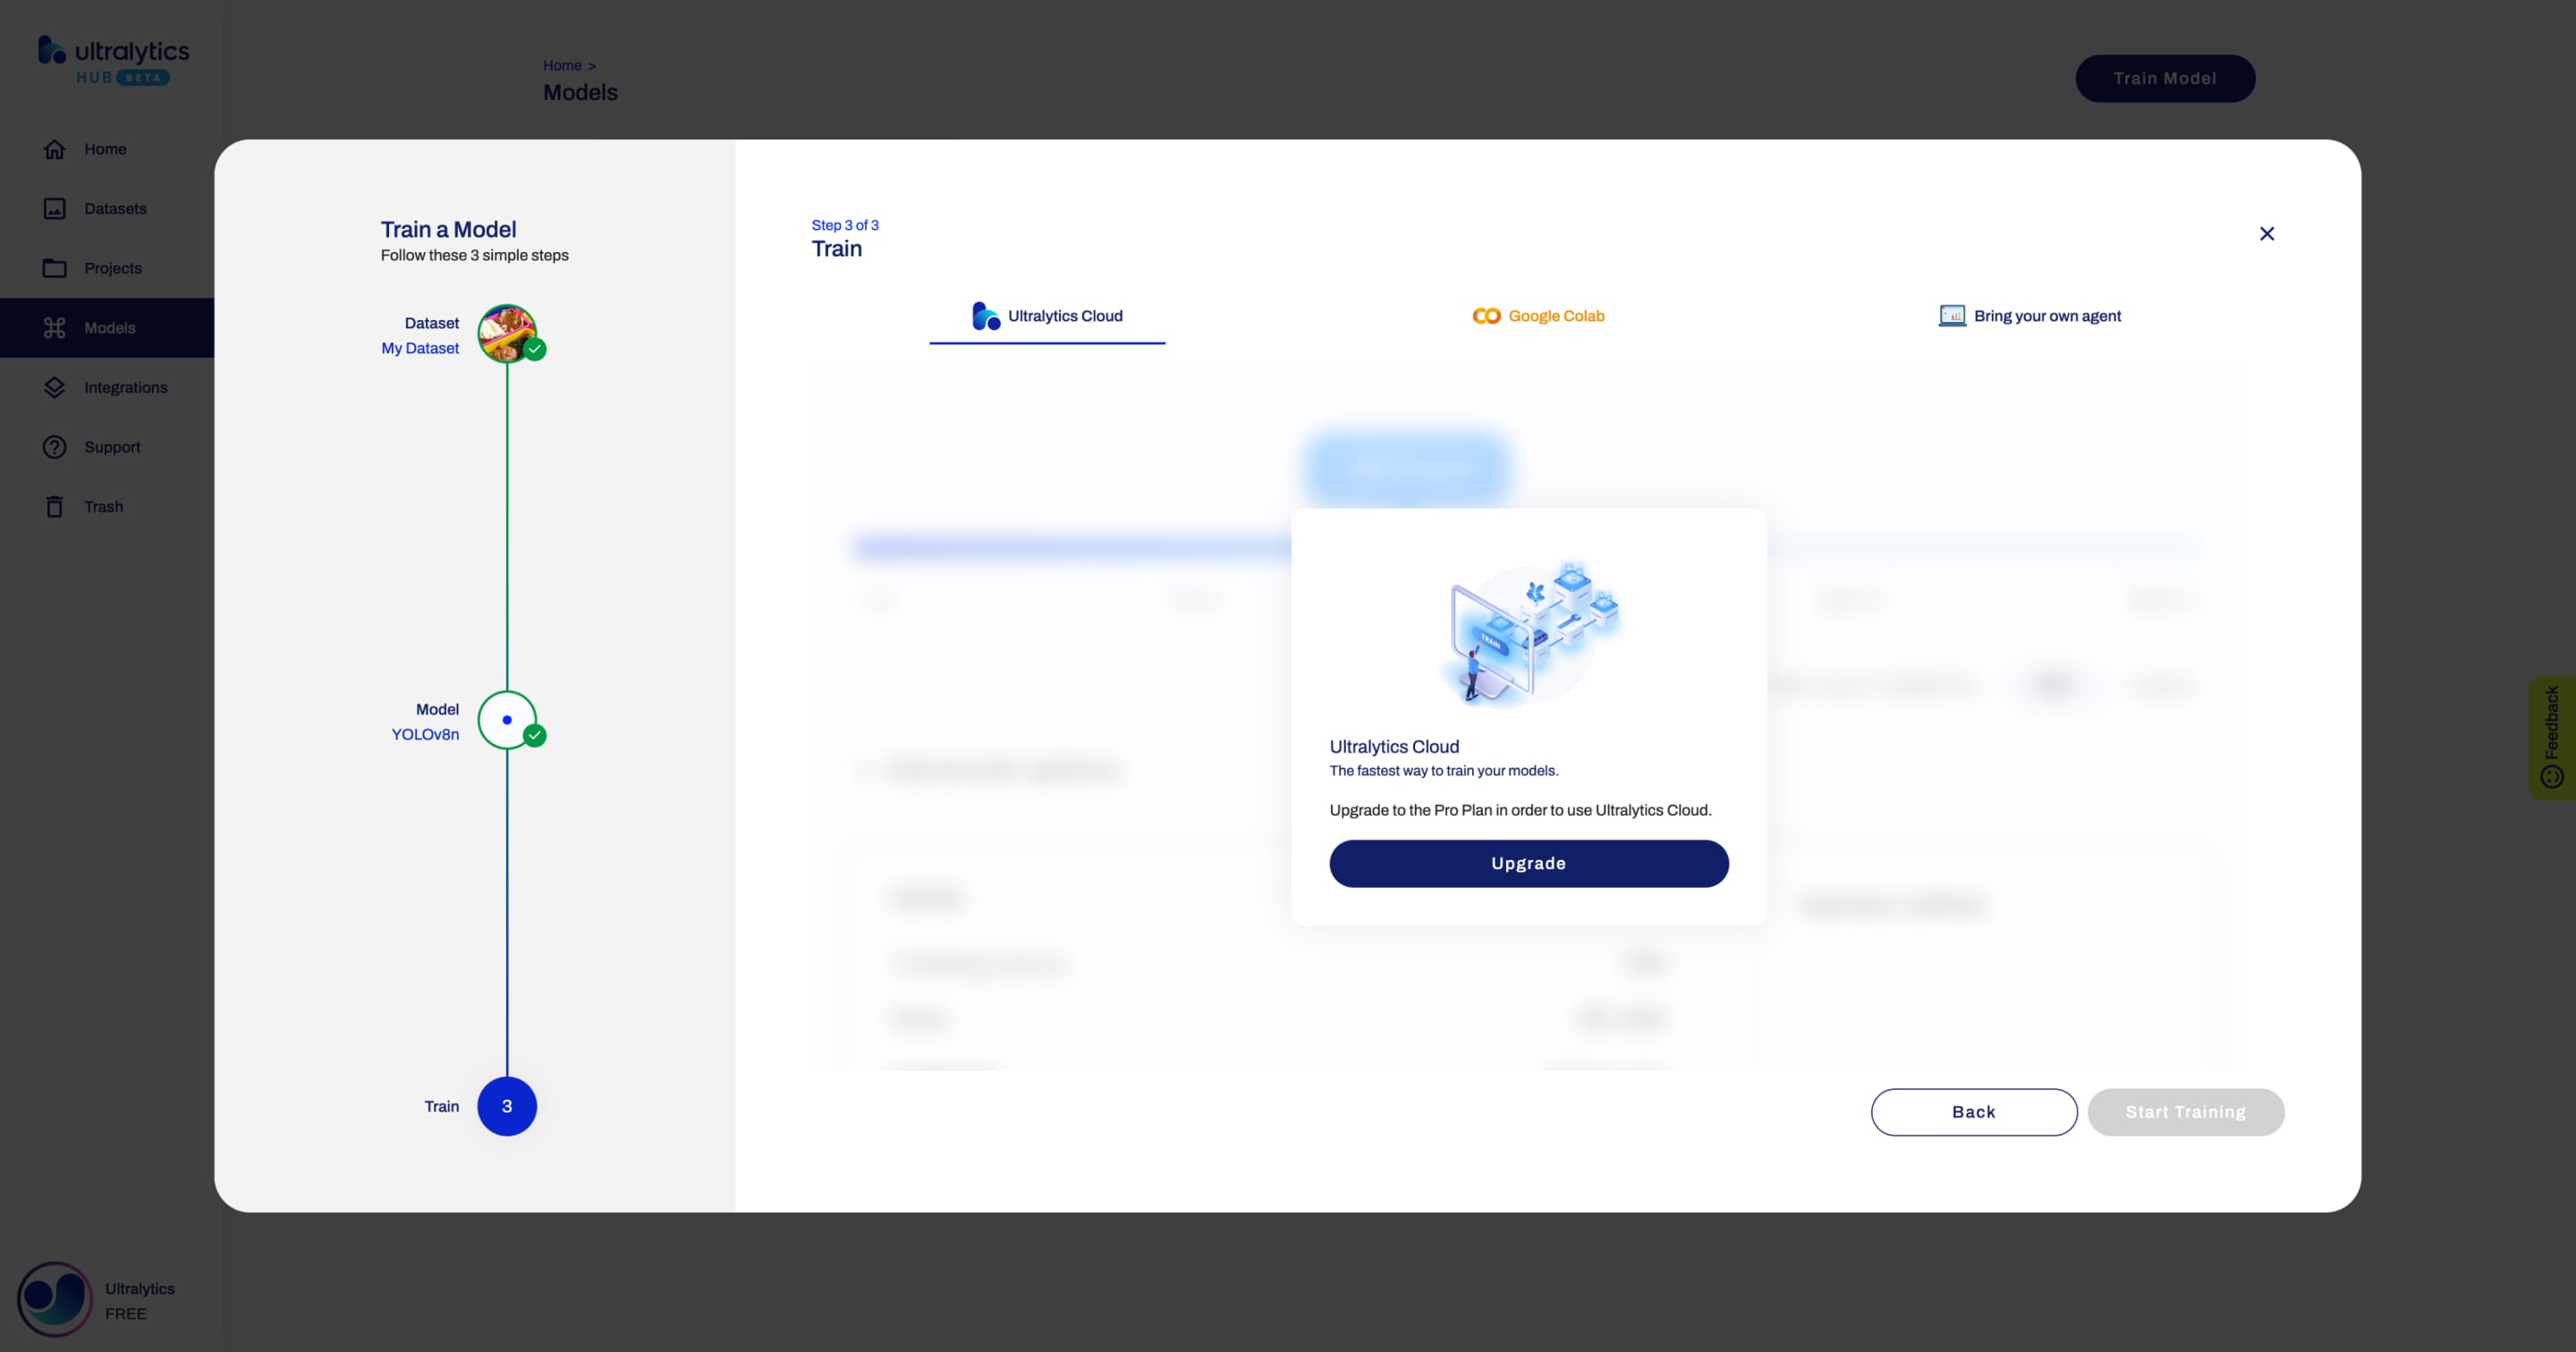
To train models using our Cloud Training solution, read the Ultralytics Cloud Training documentation.
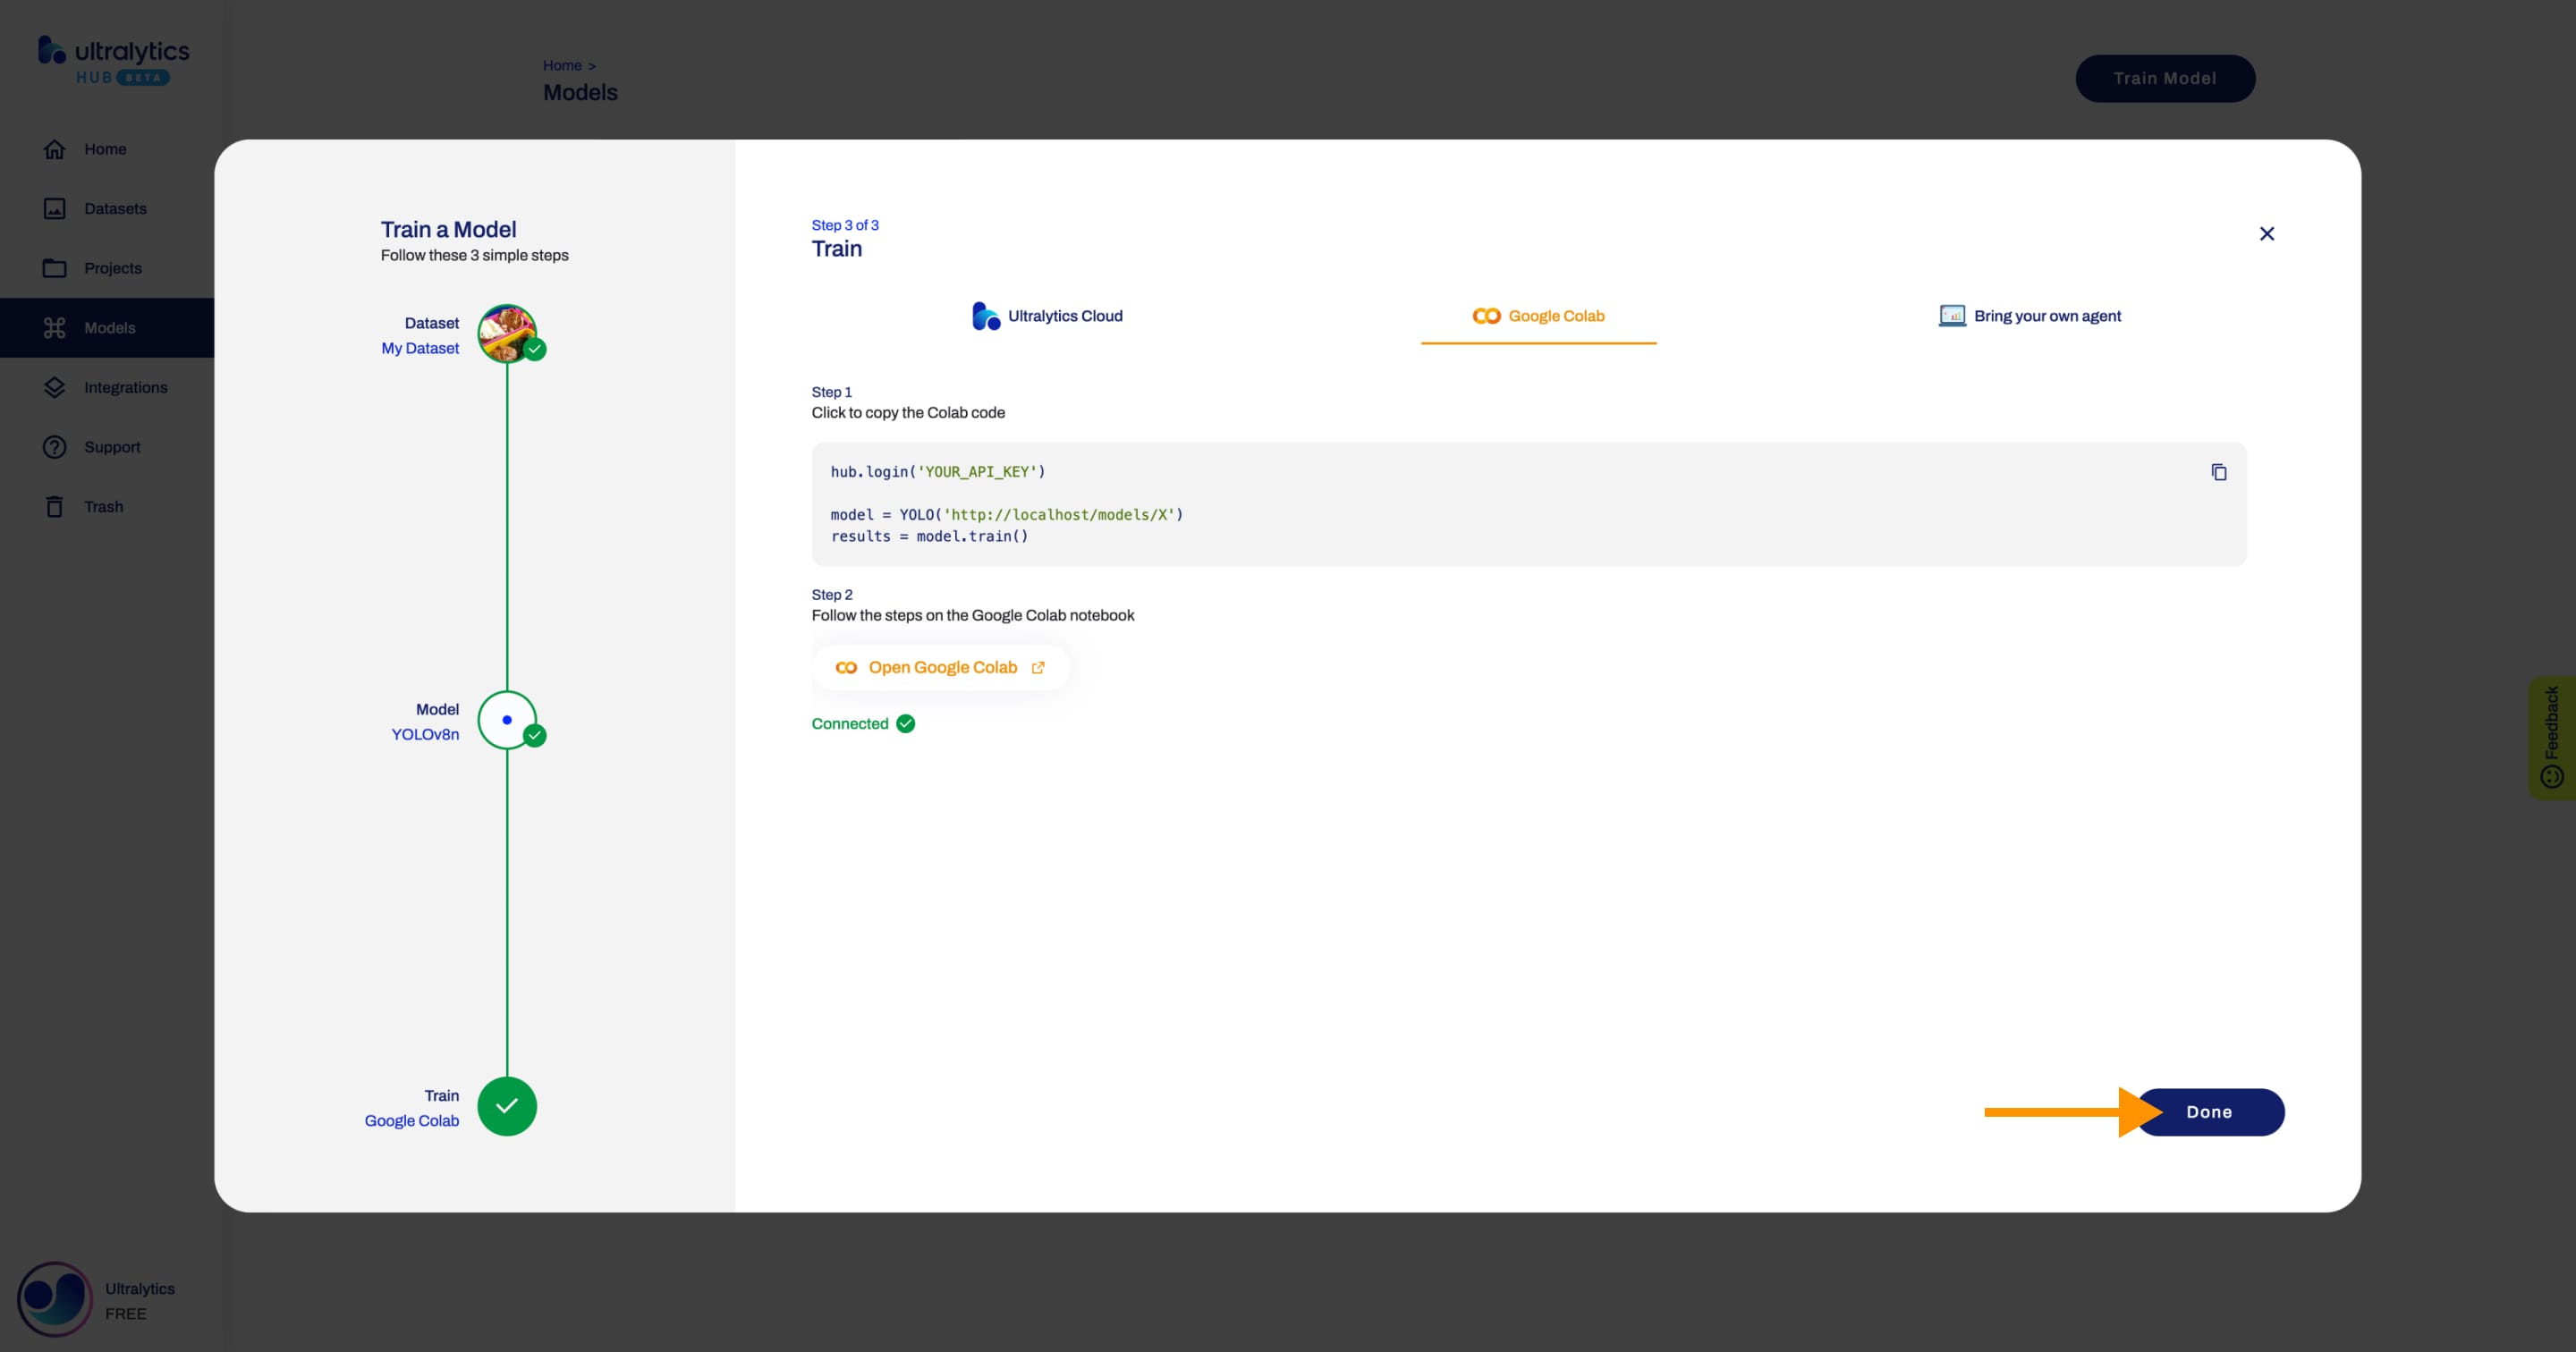
b. Google Colab
To start training your model using Google Colab, follow the instructions shown in the Ultralytics HUB Train Model dialog or on the Google Colab notebook.
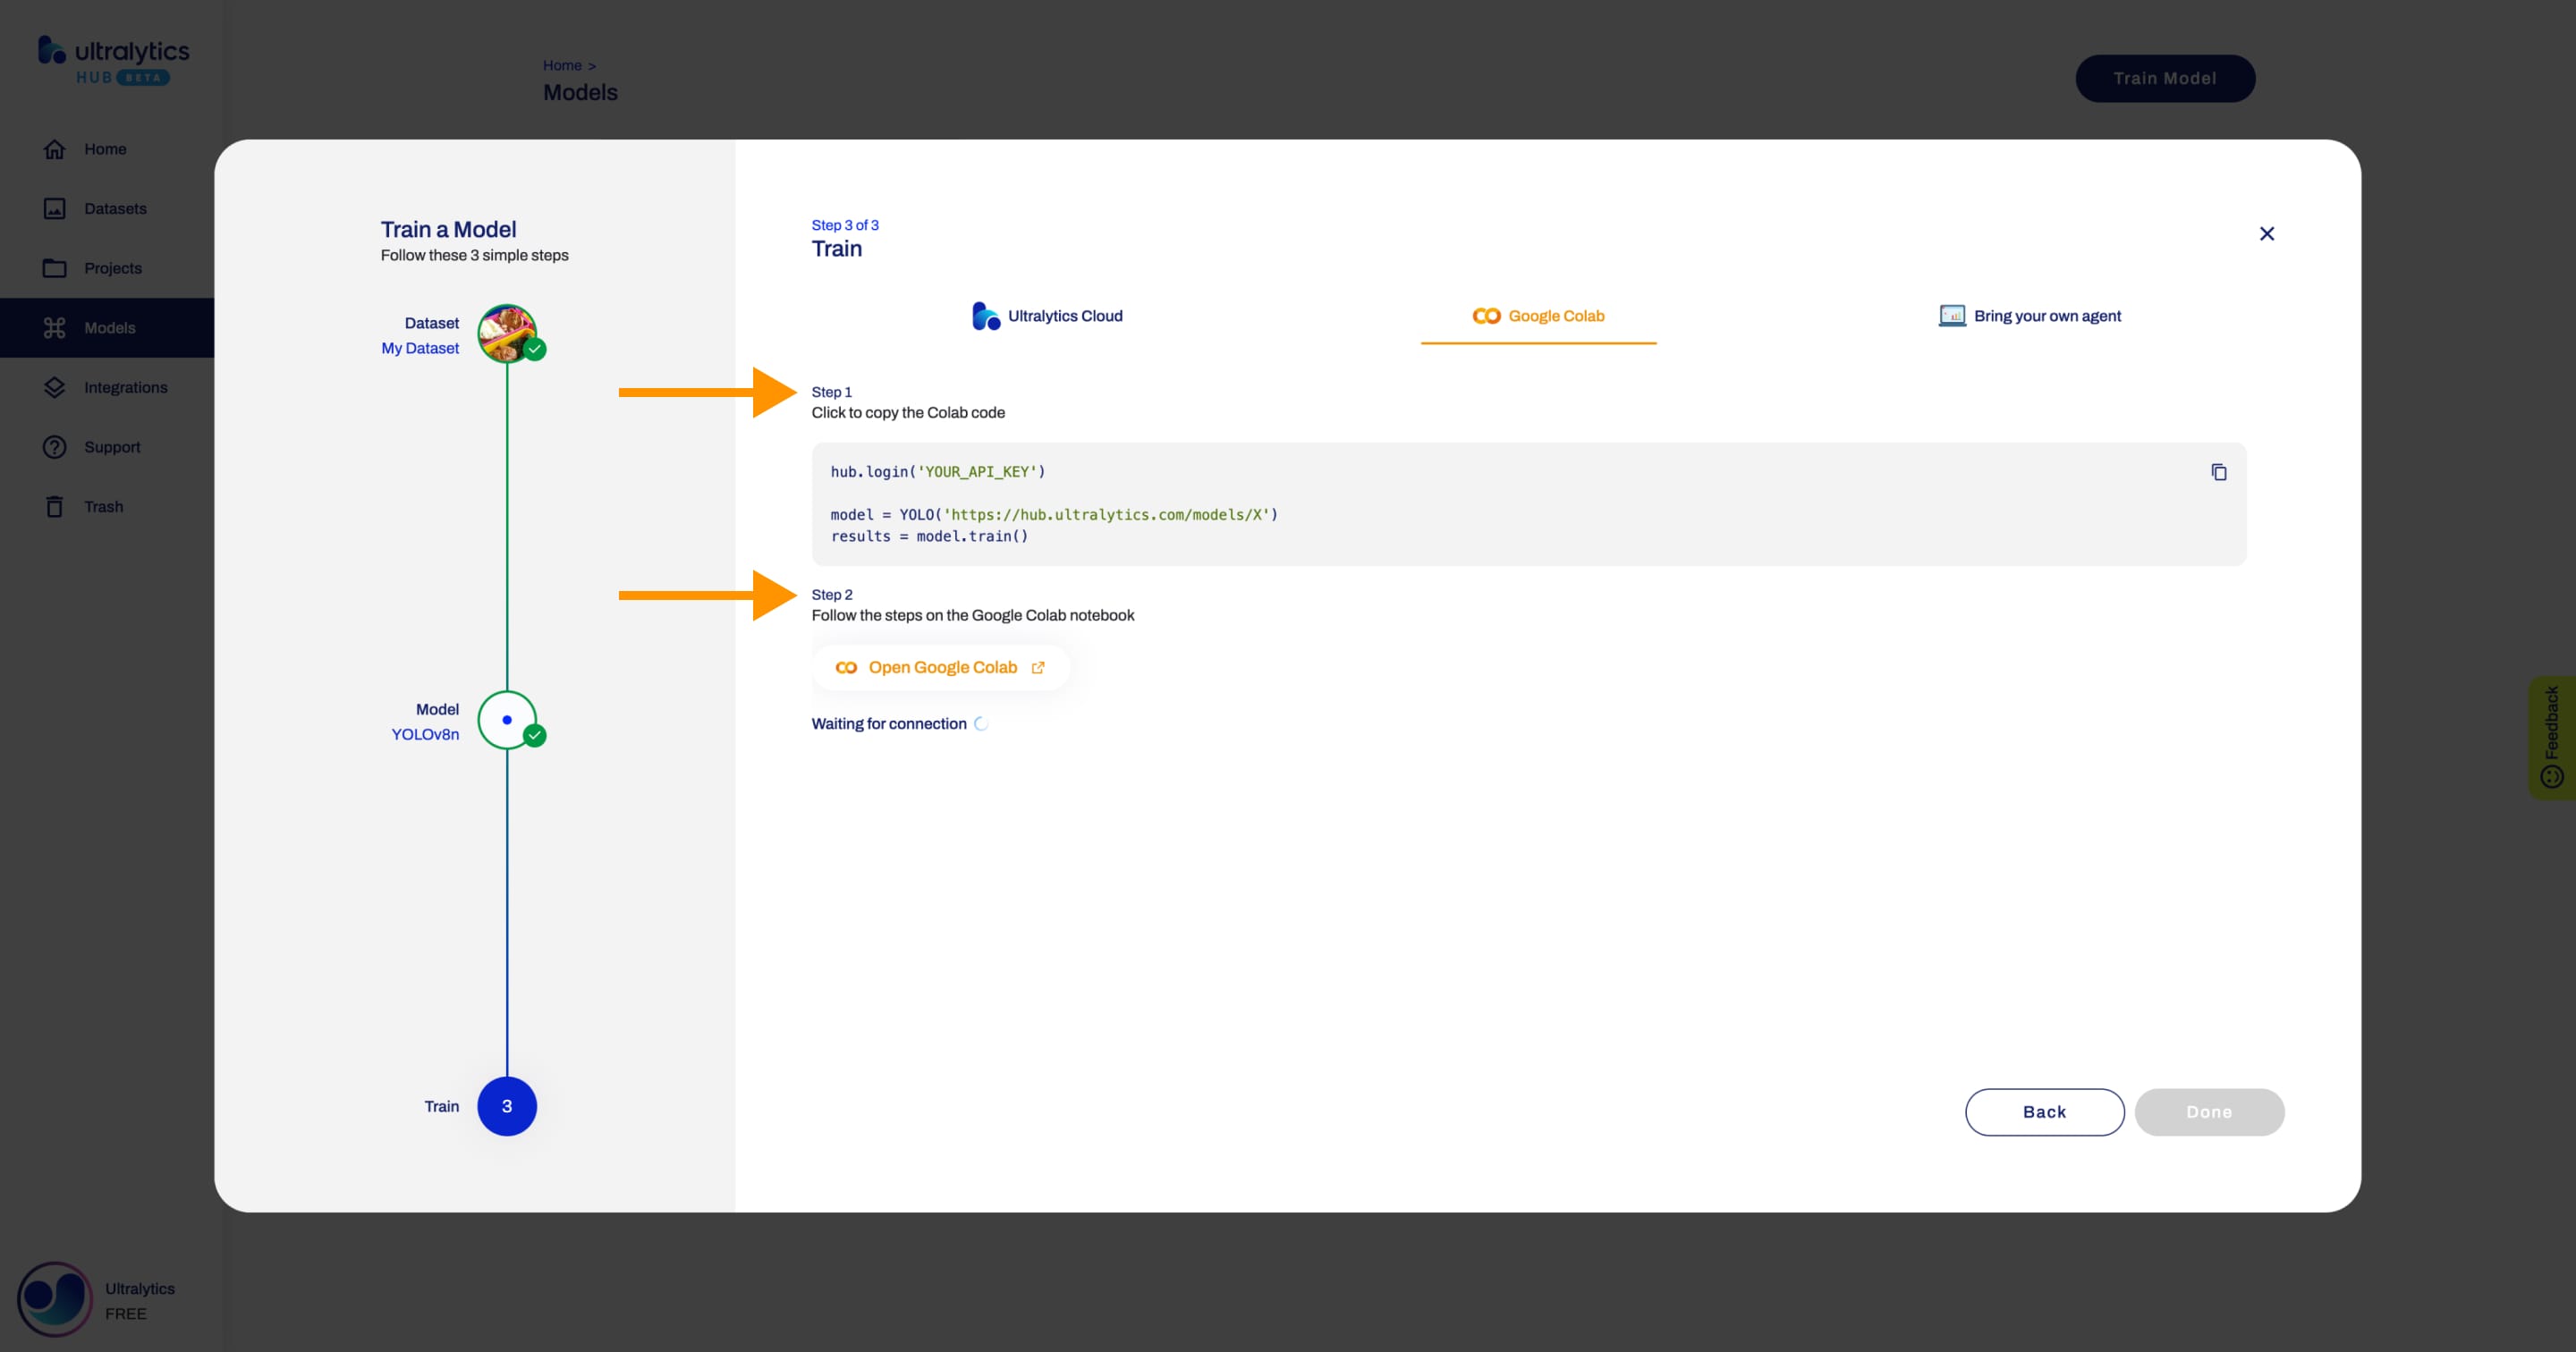
When the training starts, you can click Done and monitor the training progress on the Model page.
!!! note "Note"
In case the training stops and a checkpoint was saved, you can resume training your model from the Model page.

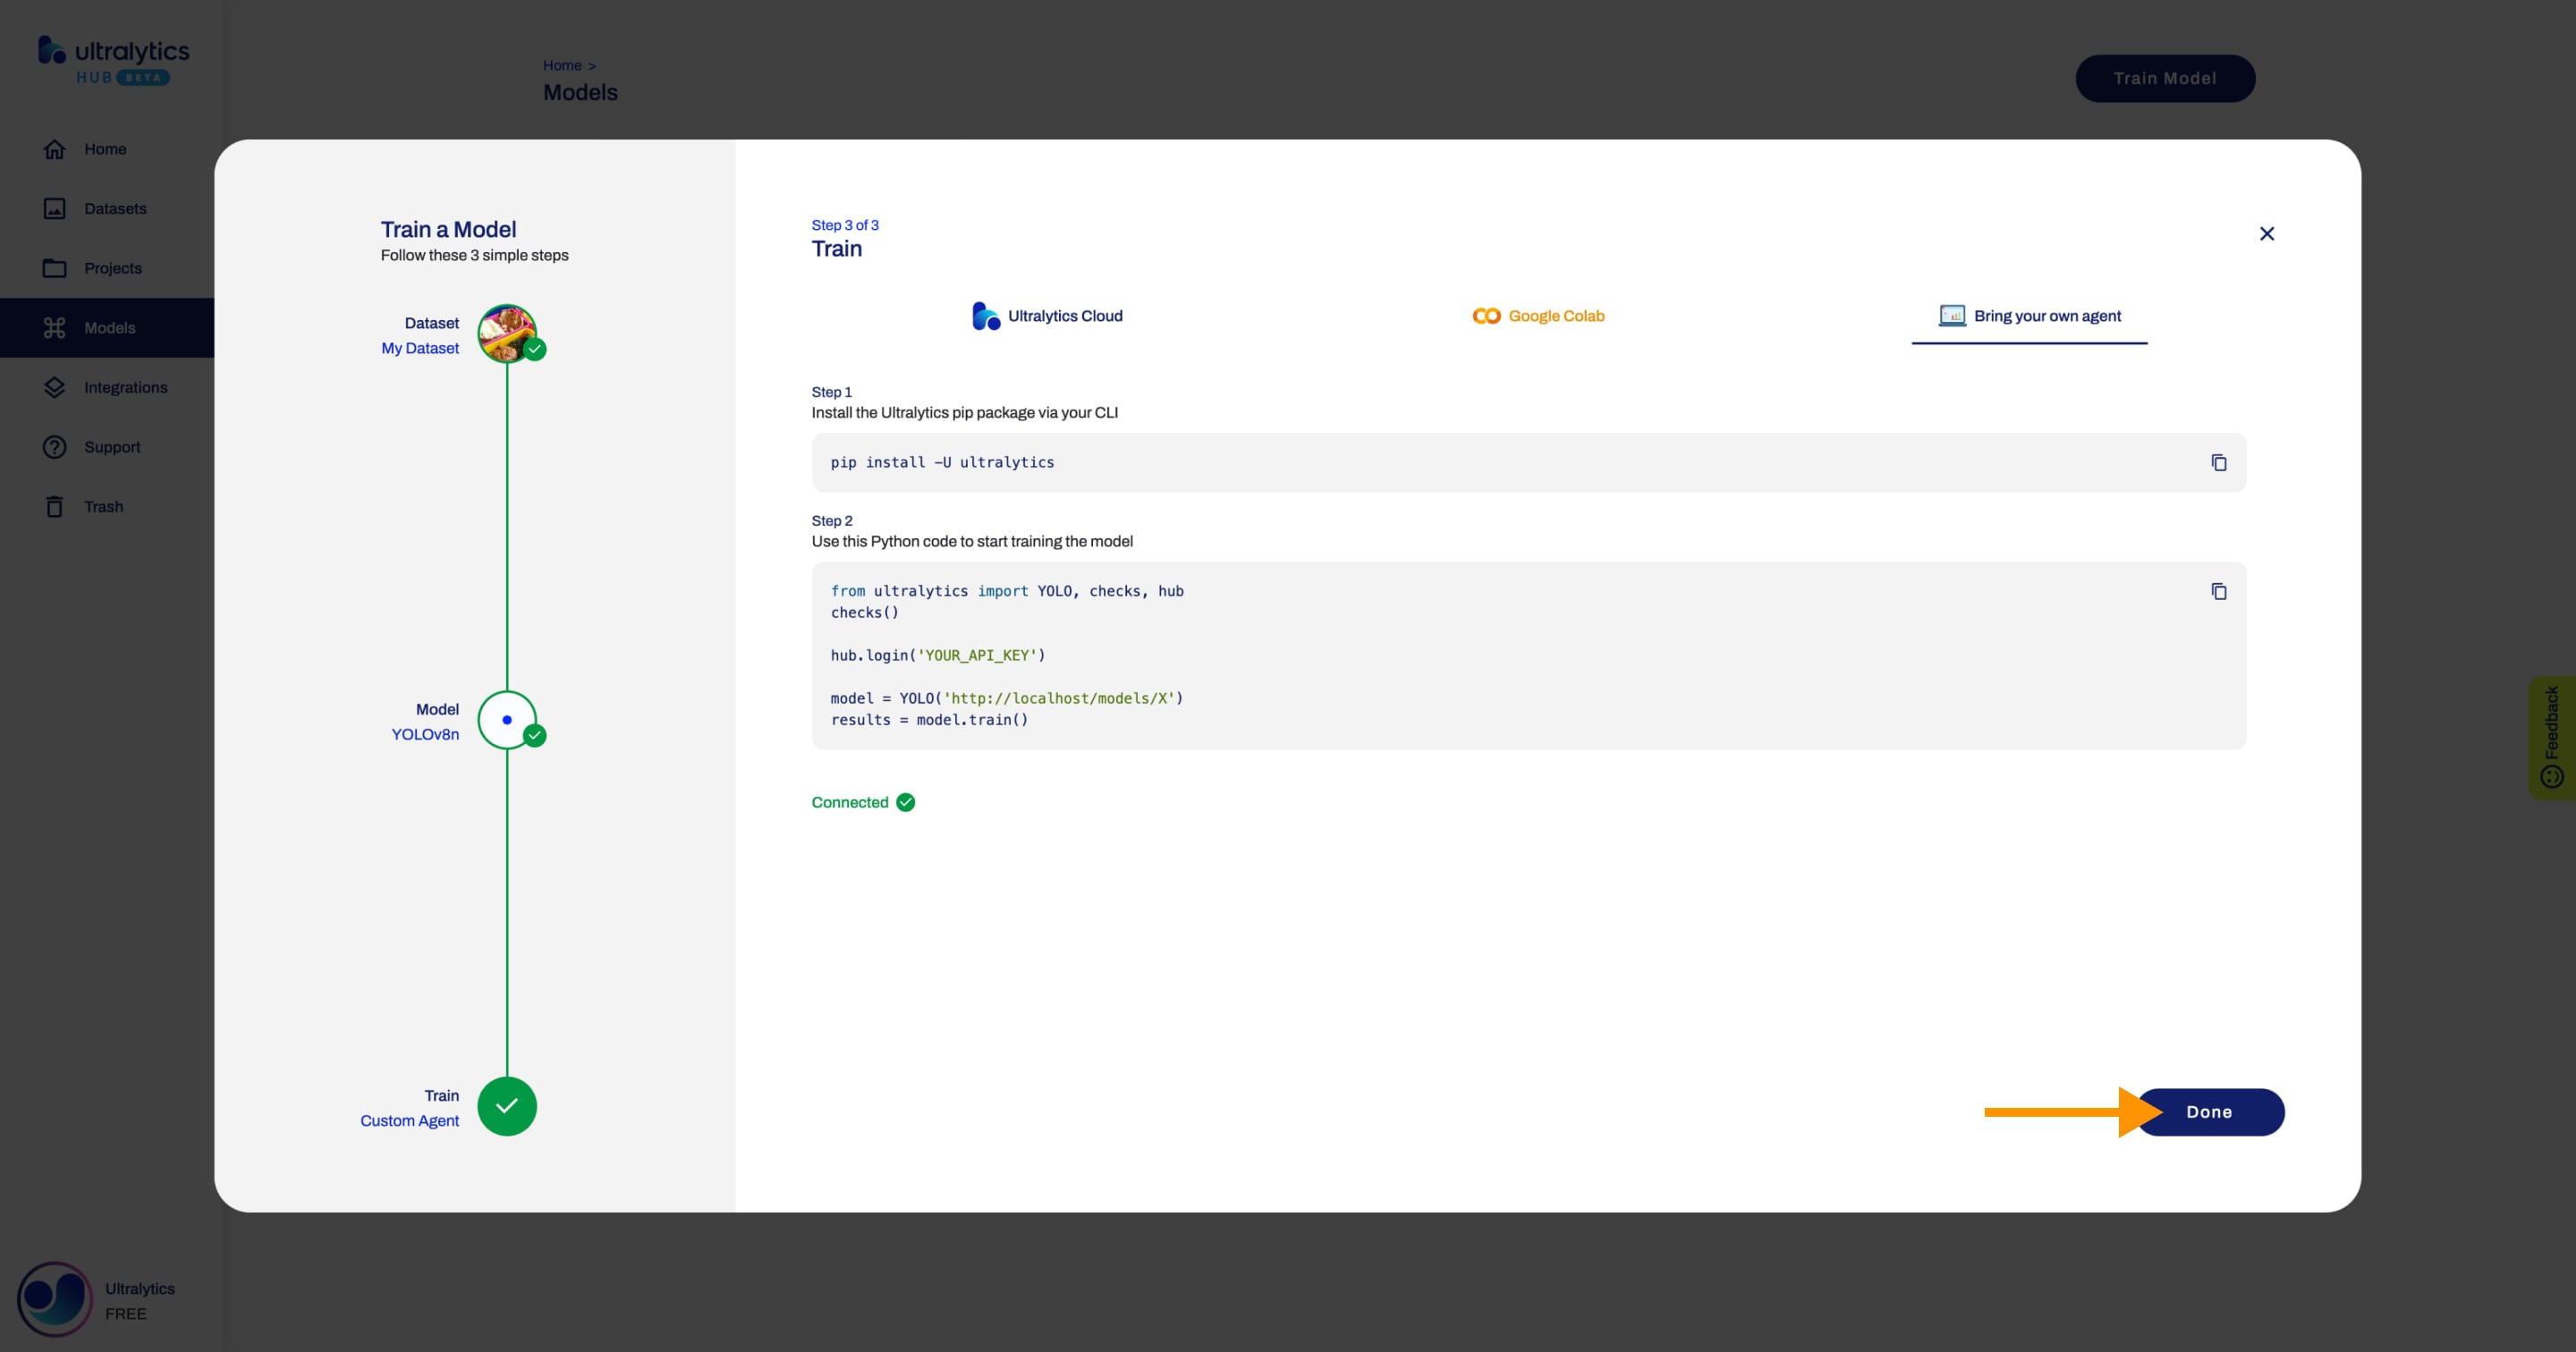
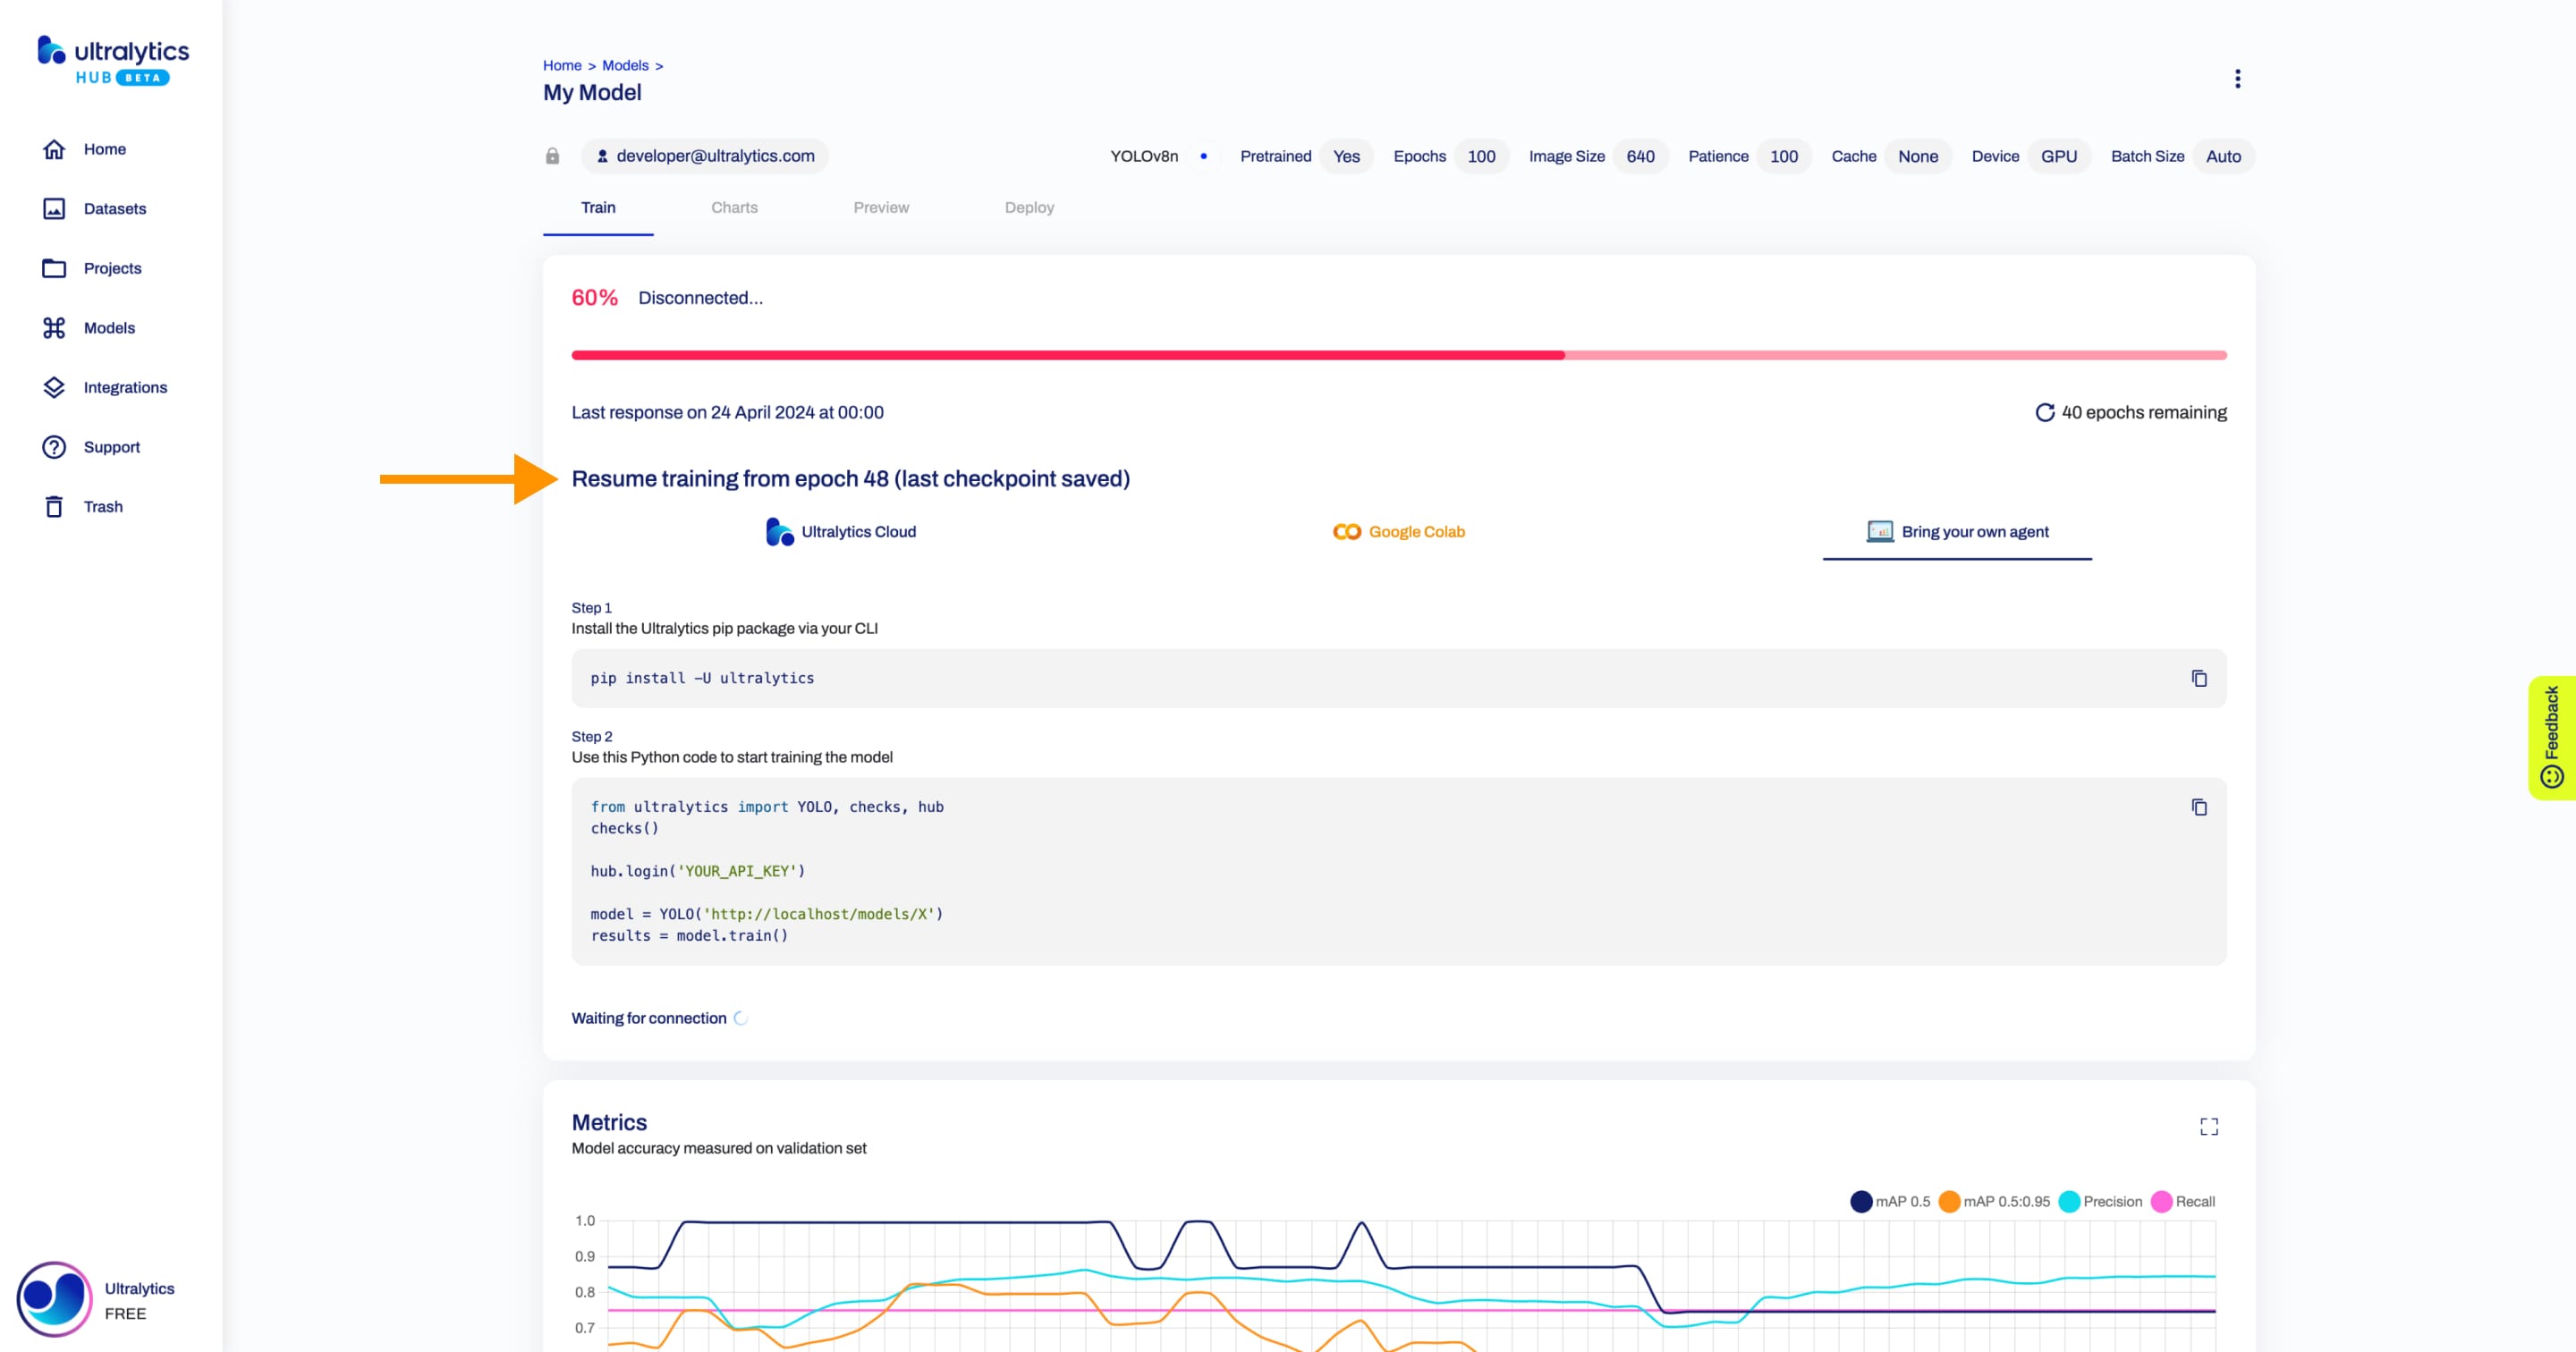
c. Bring your own agent
Watch: Bring your Own Agent model training using Ultralytics HUB
To start training your model using your own agent, follow the instructions shown in the Ultralytics HUB Train Model dialog.
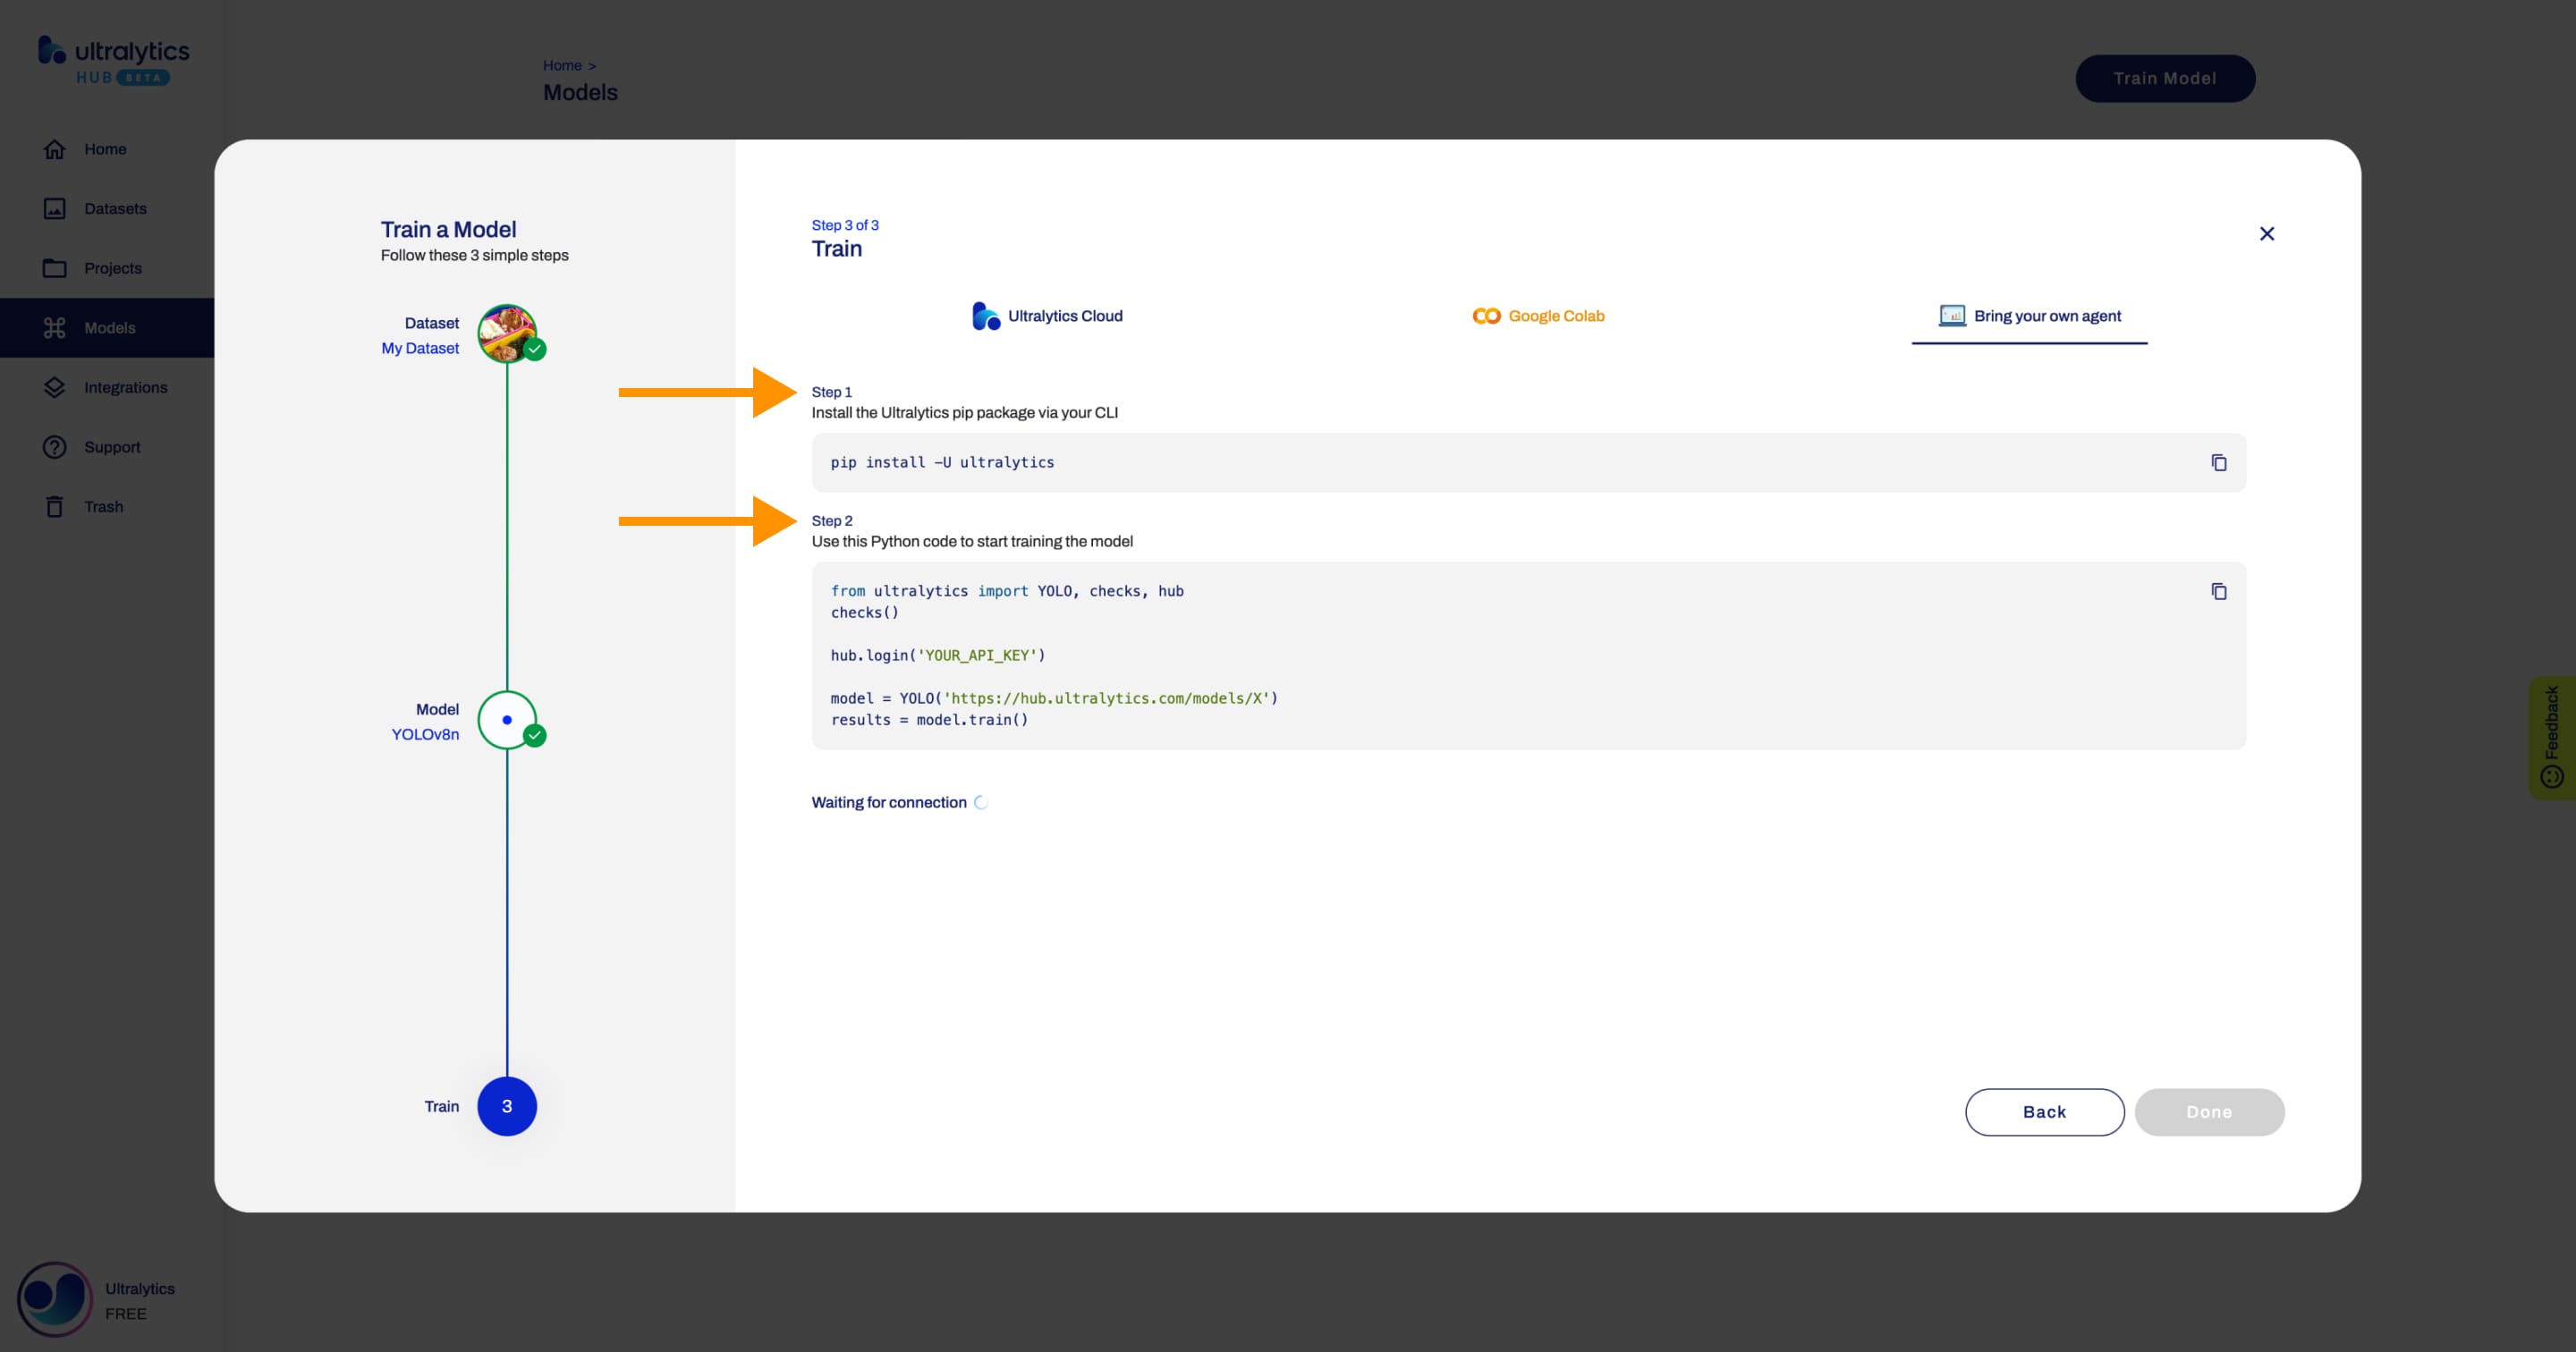
Install the ultralytics package from PyPI.
pip install -U ultralytics
Next, use the Python code provided to start training the model.
When the training starts, you can click Done and monitor the training progress on the Model page.
!!! note "Note"
In case the training stops and a checkpoint was saved, you can resume training your model from the Model page.
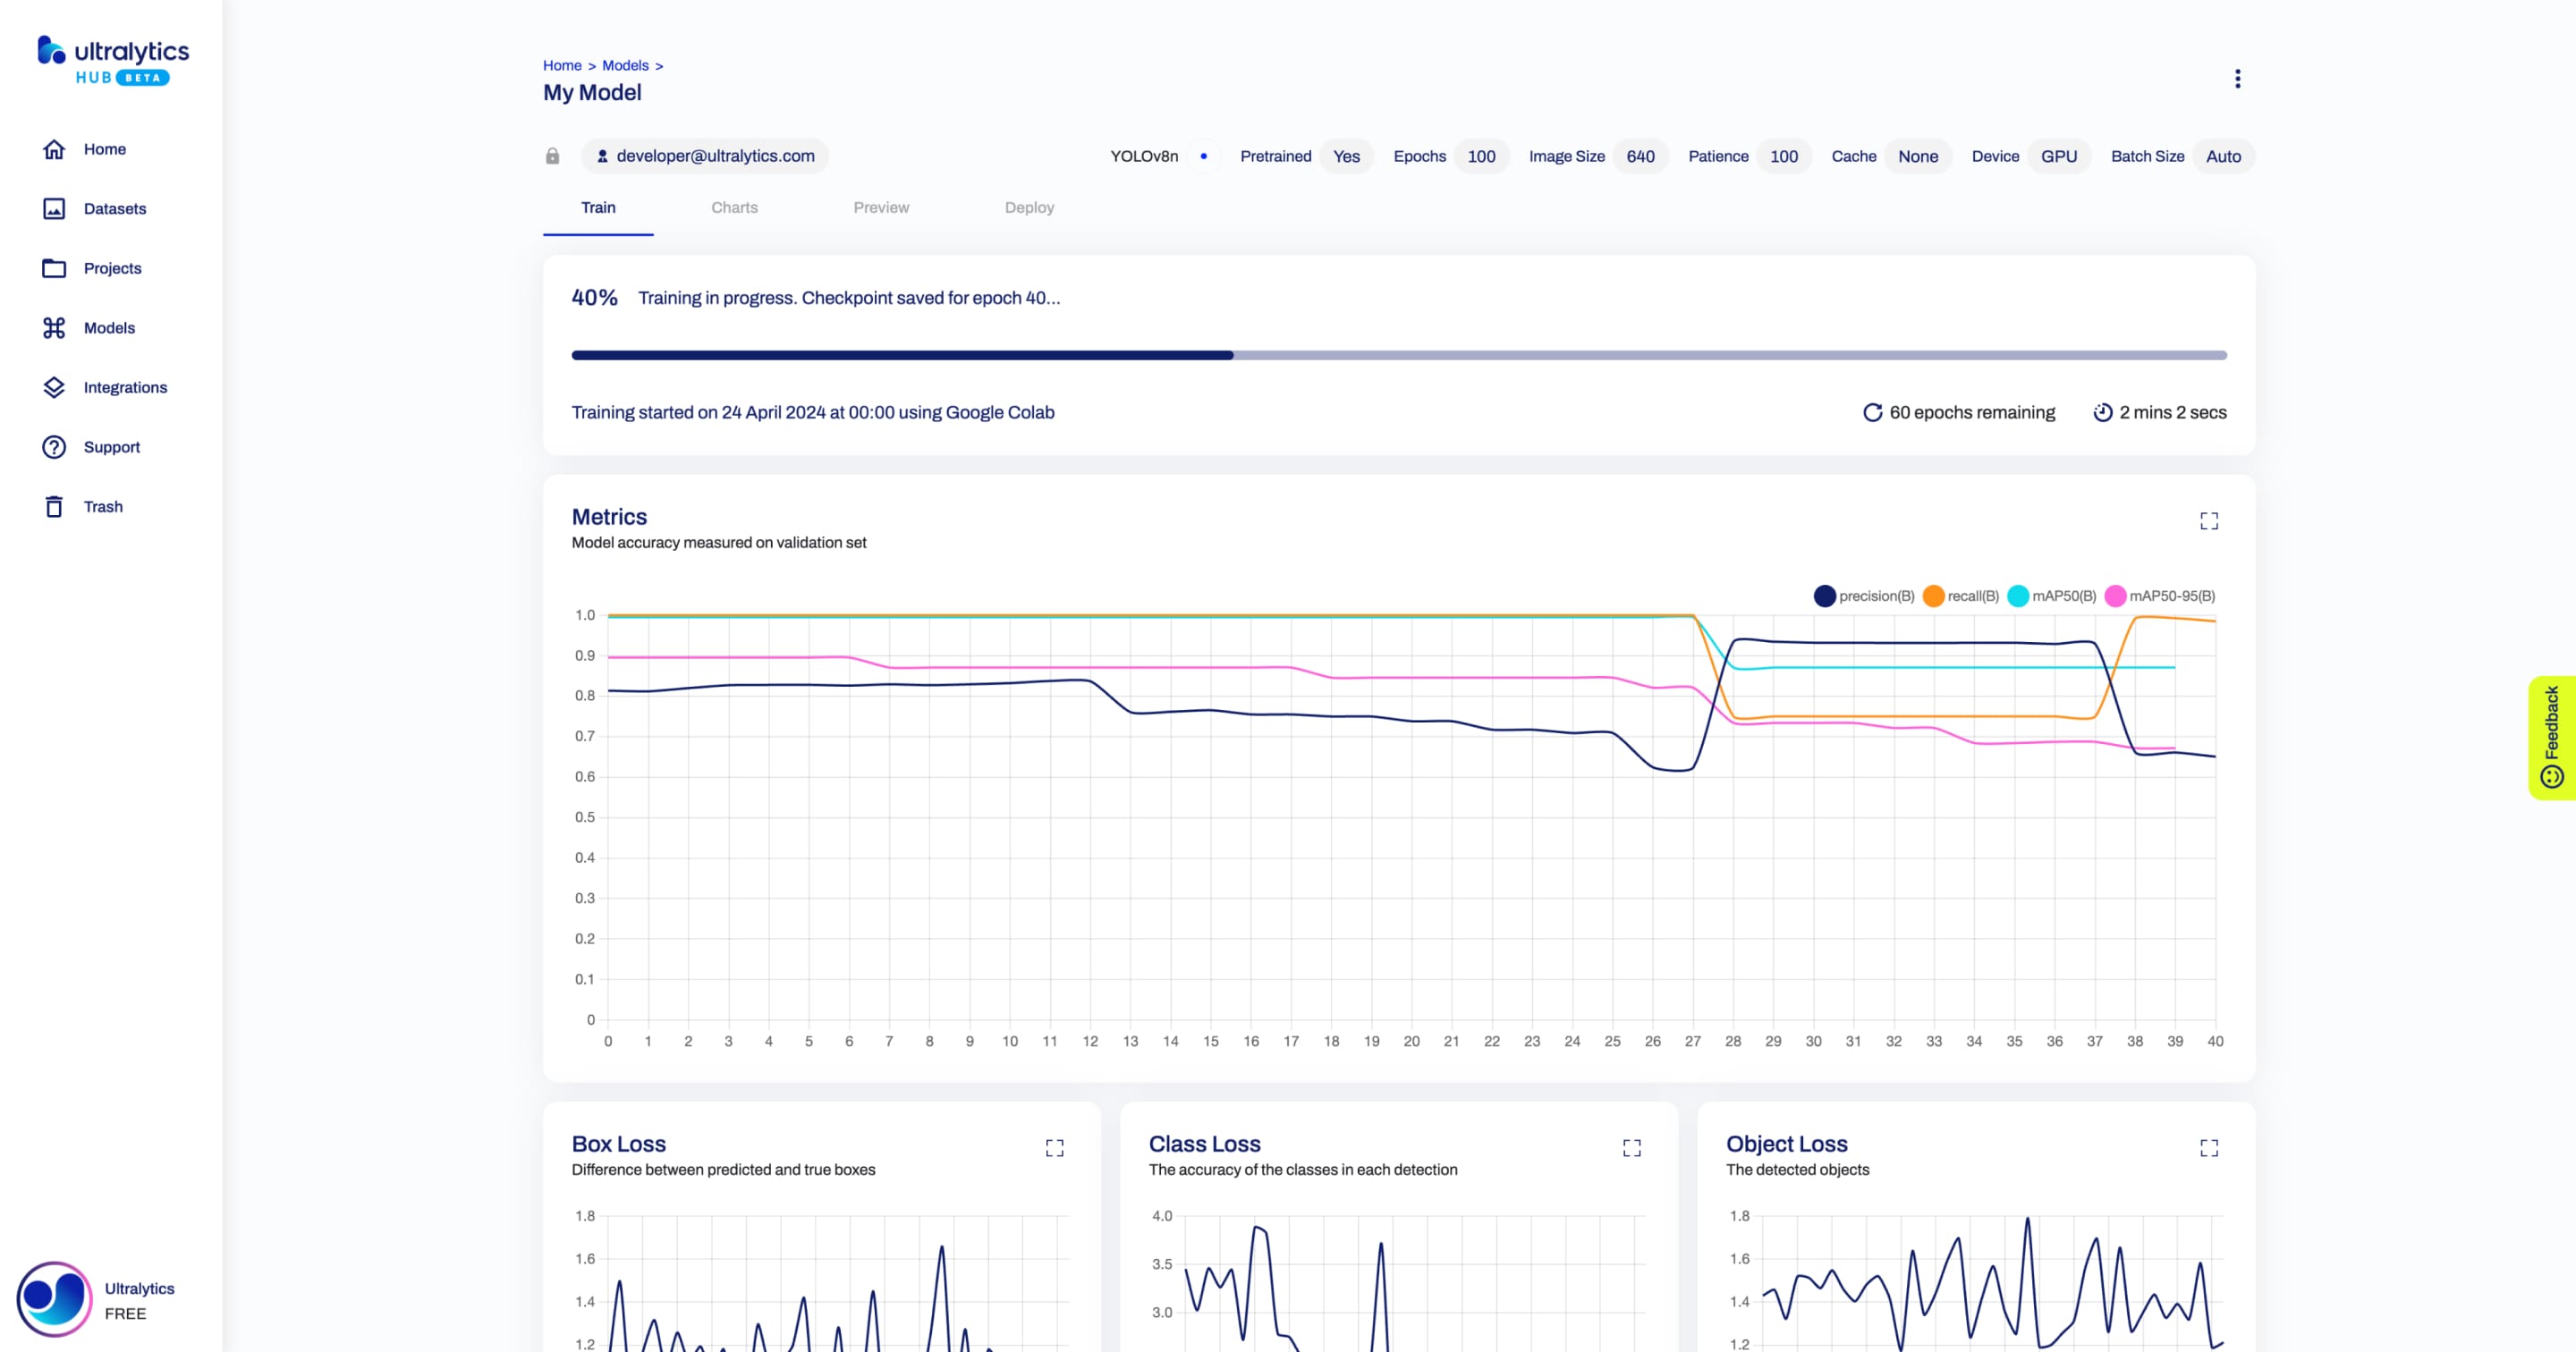
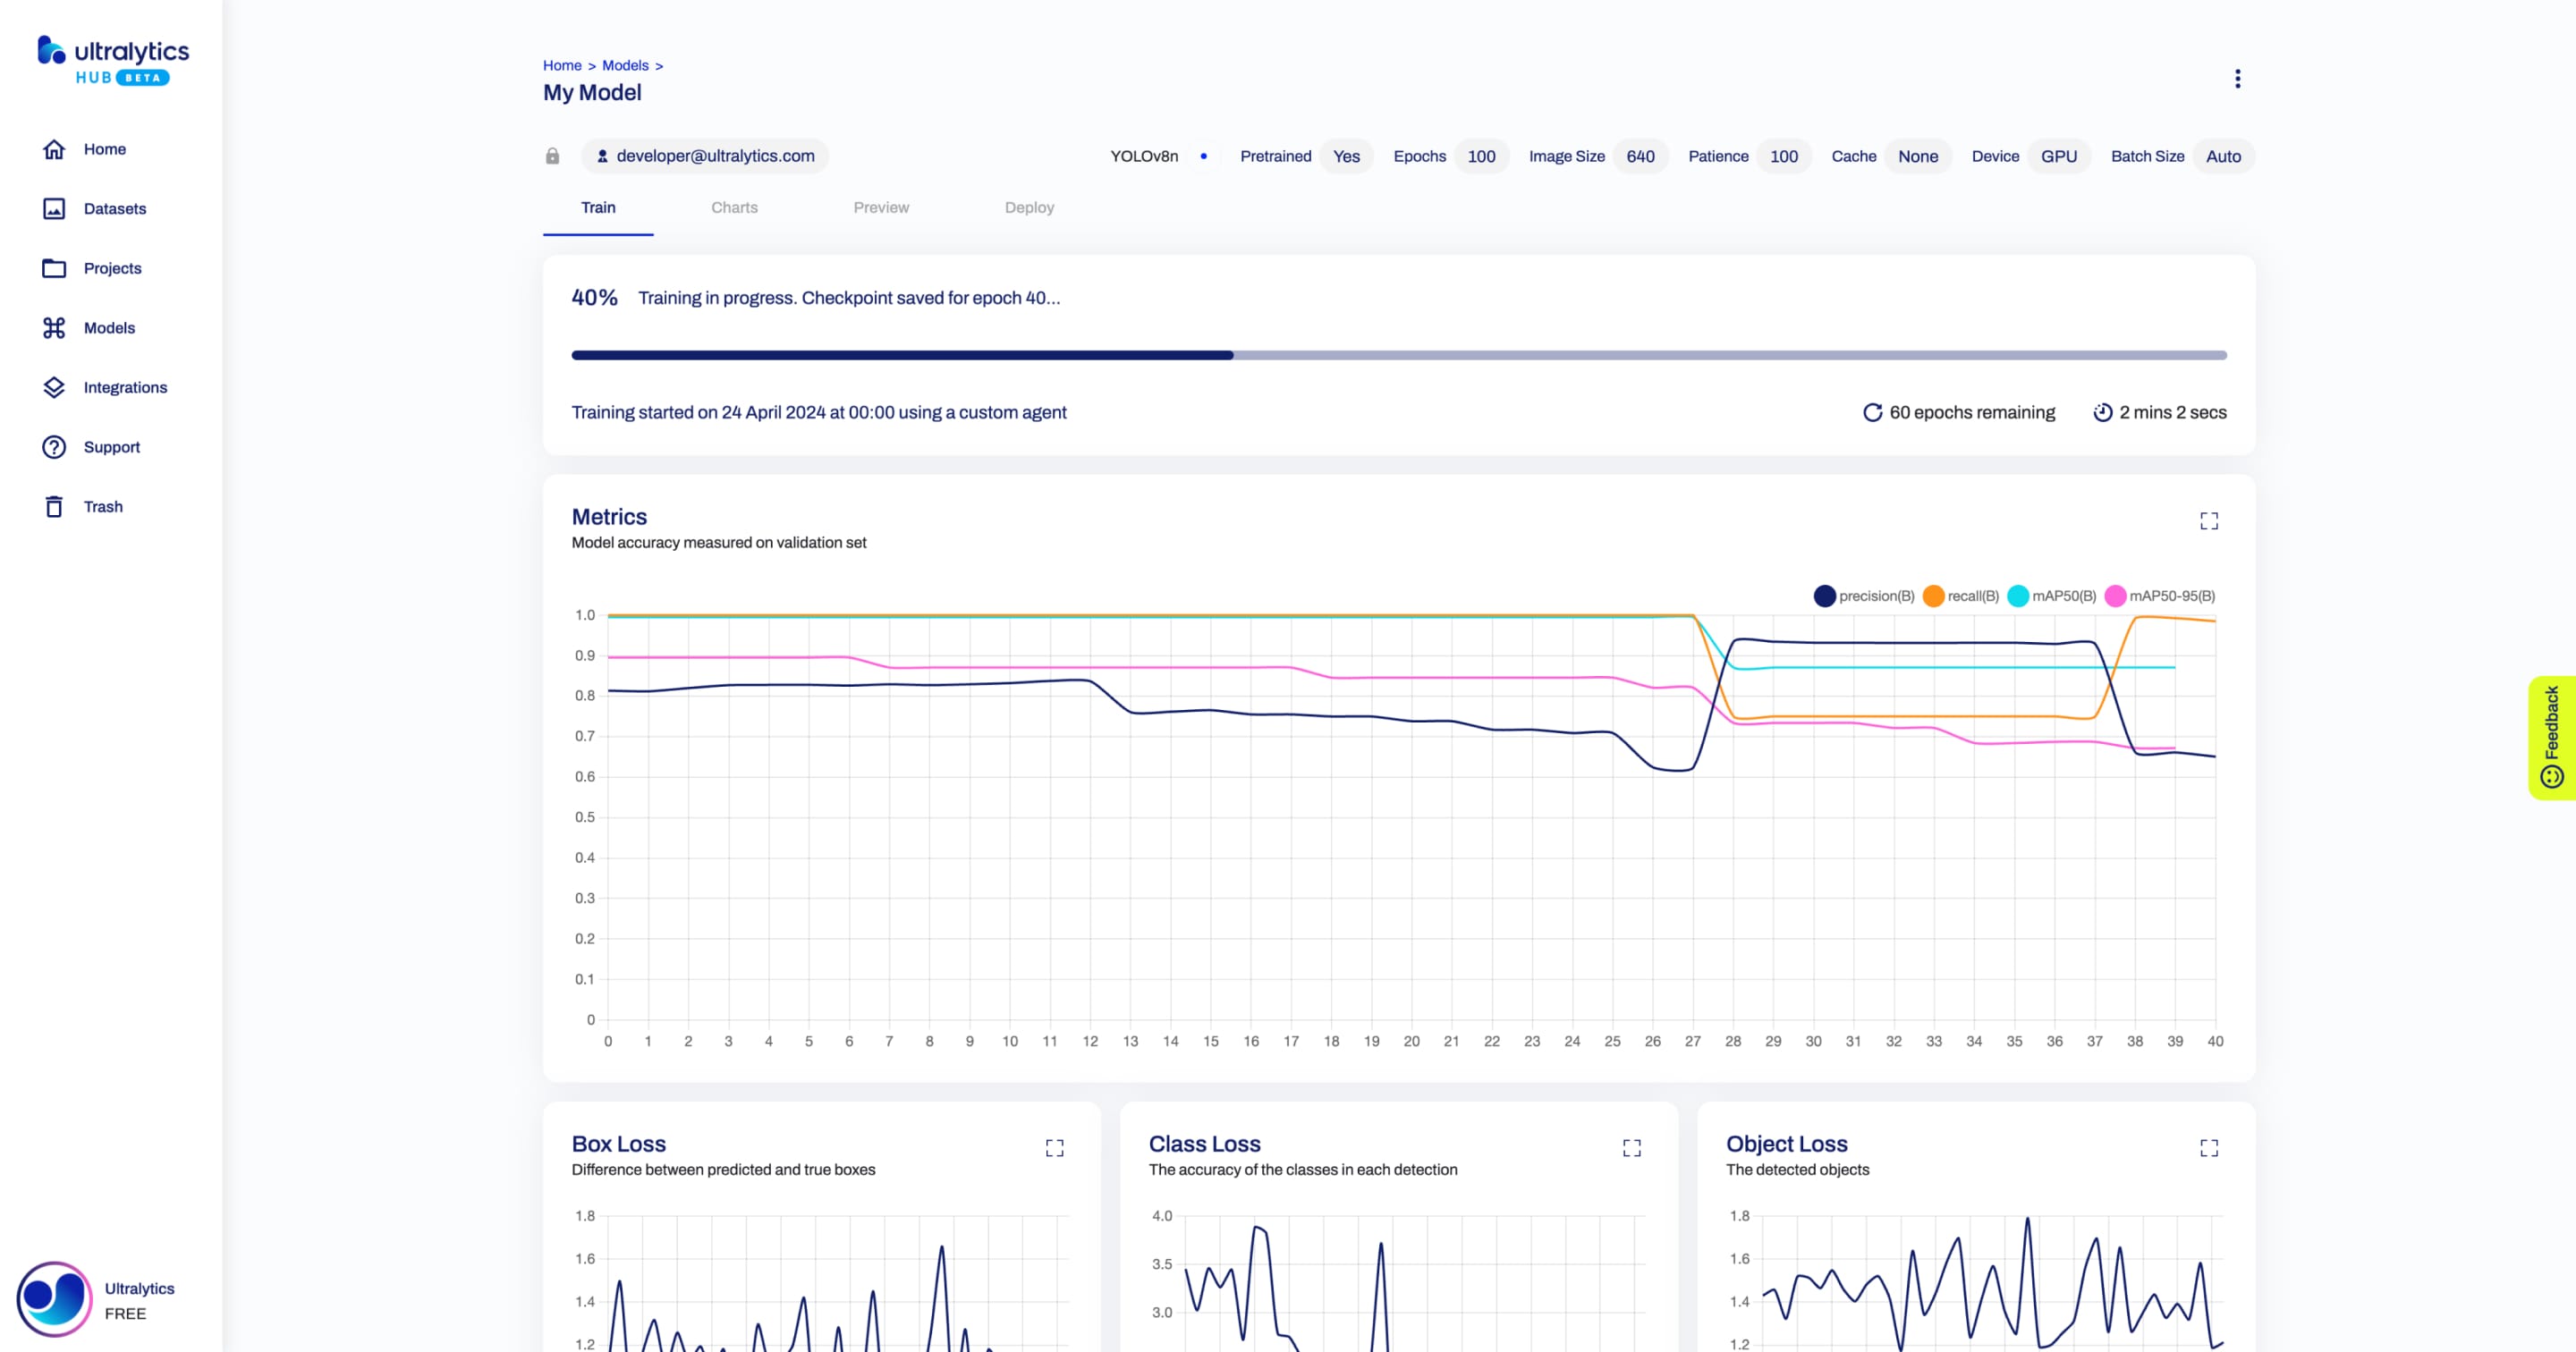
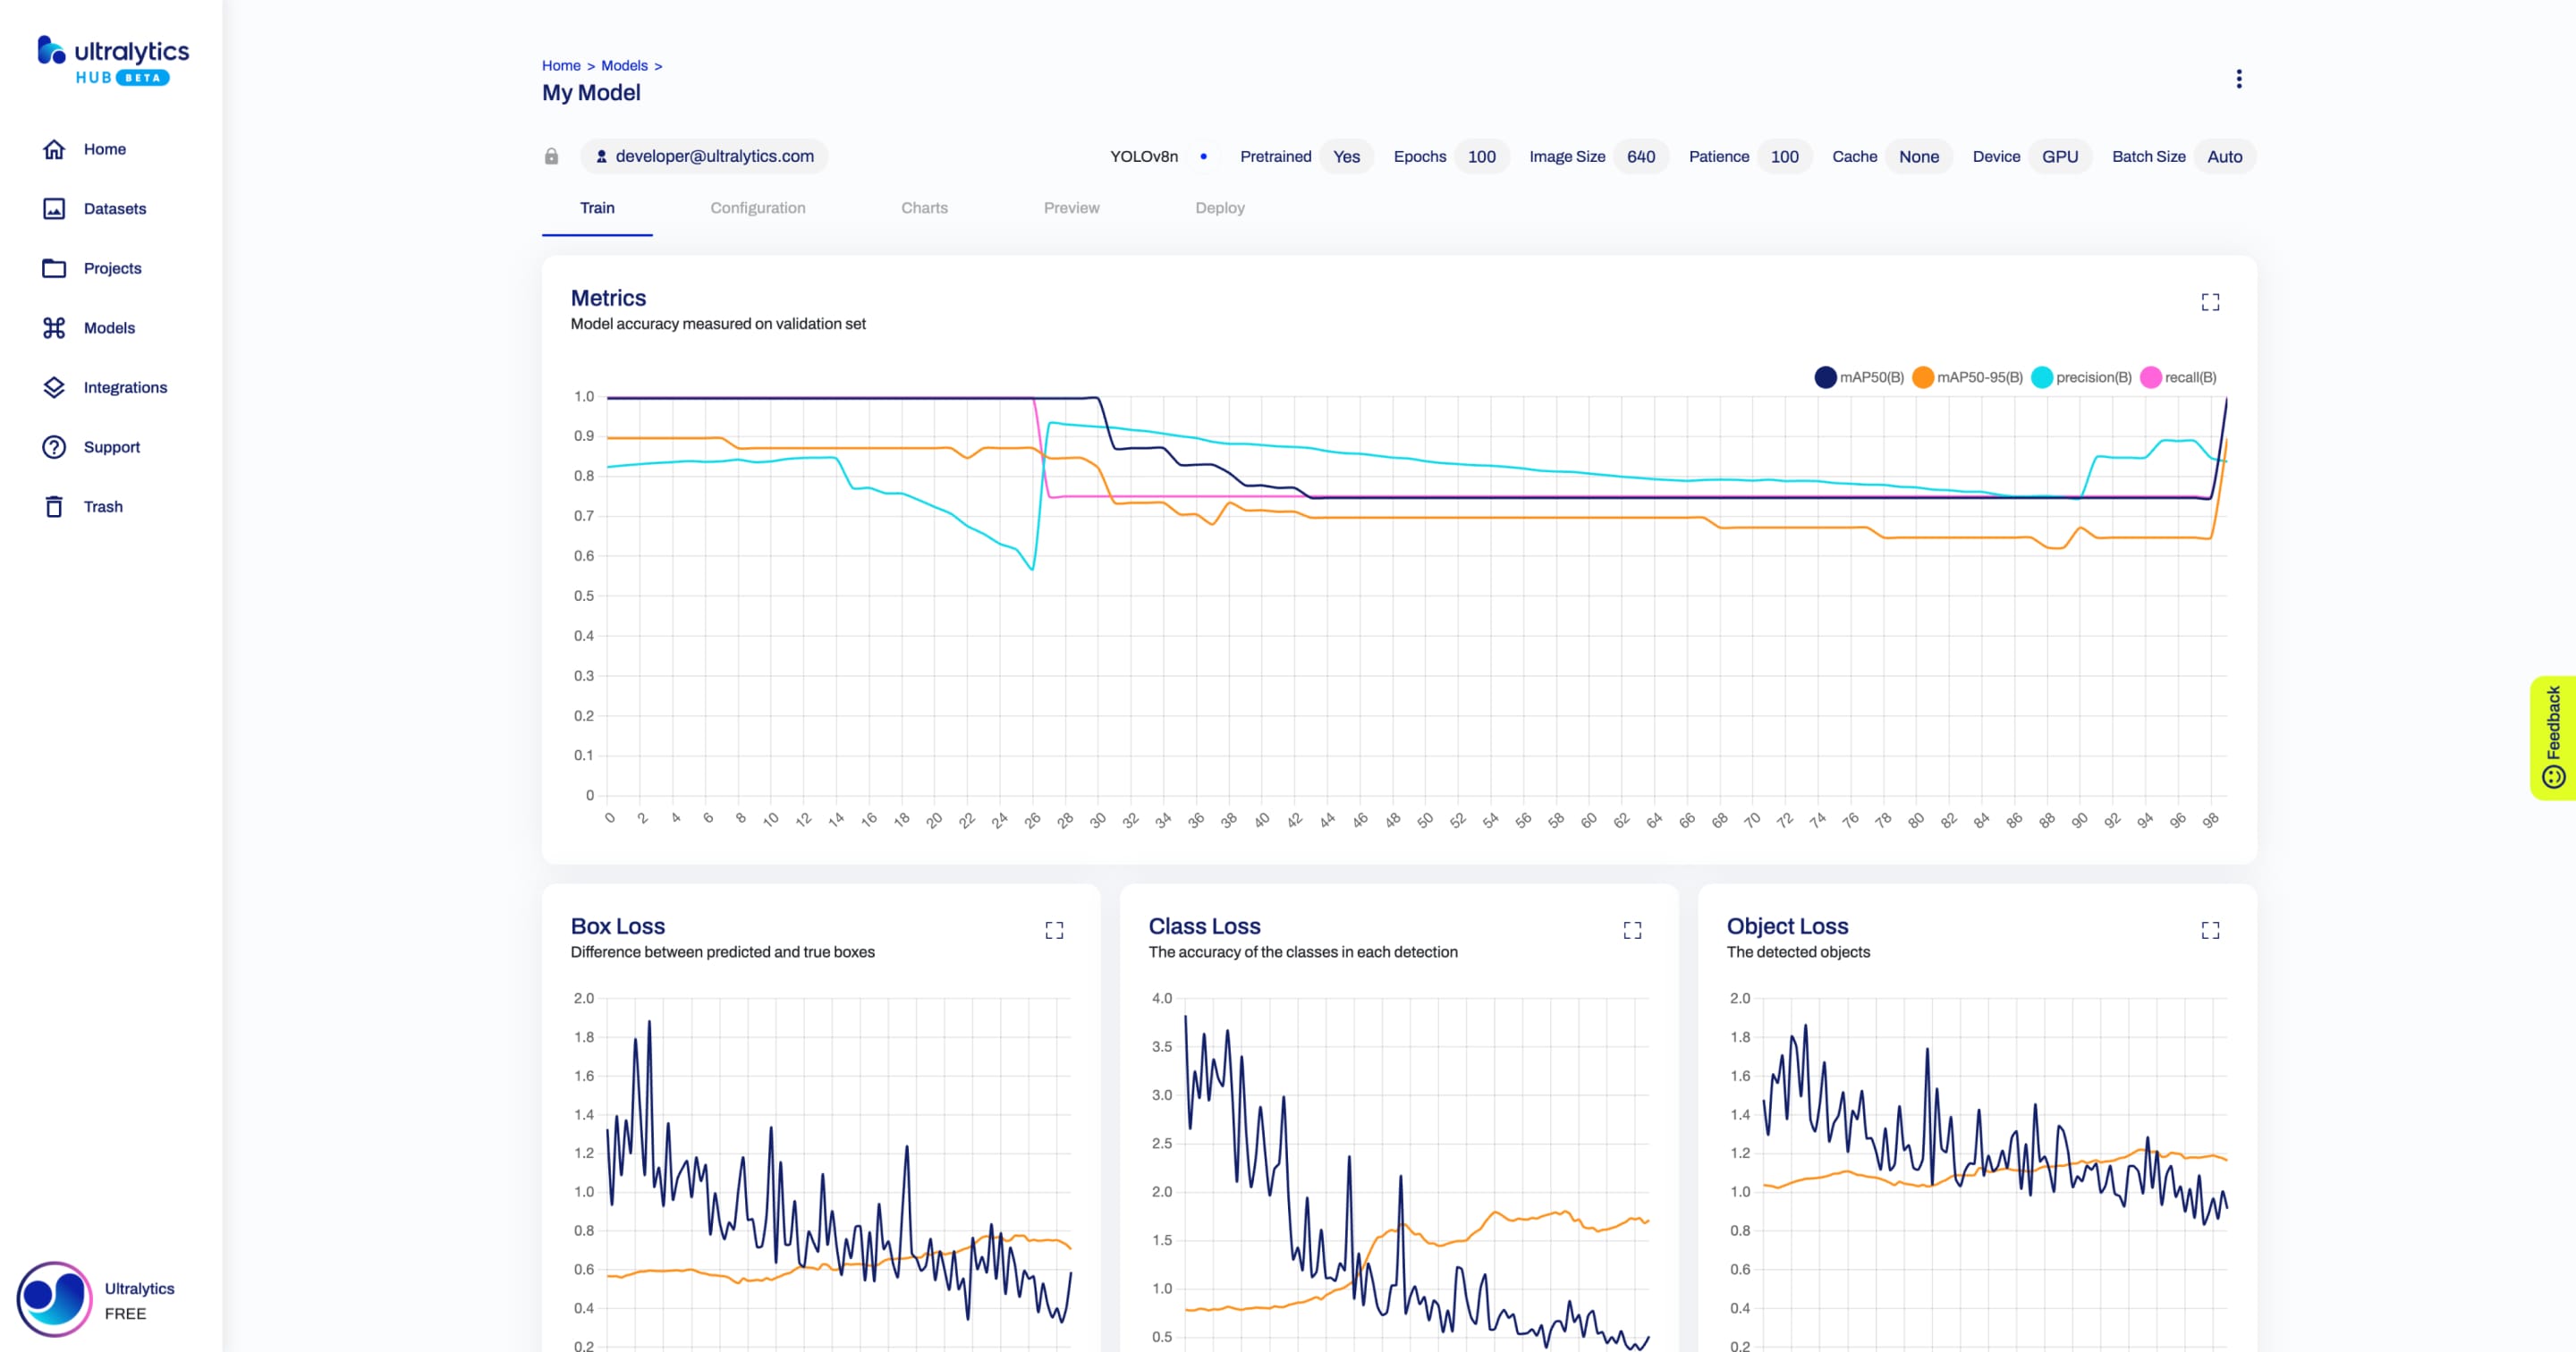
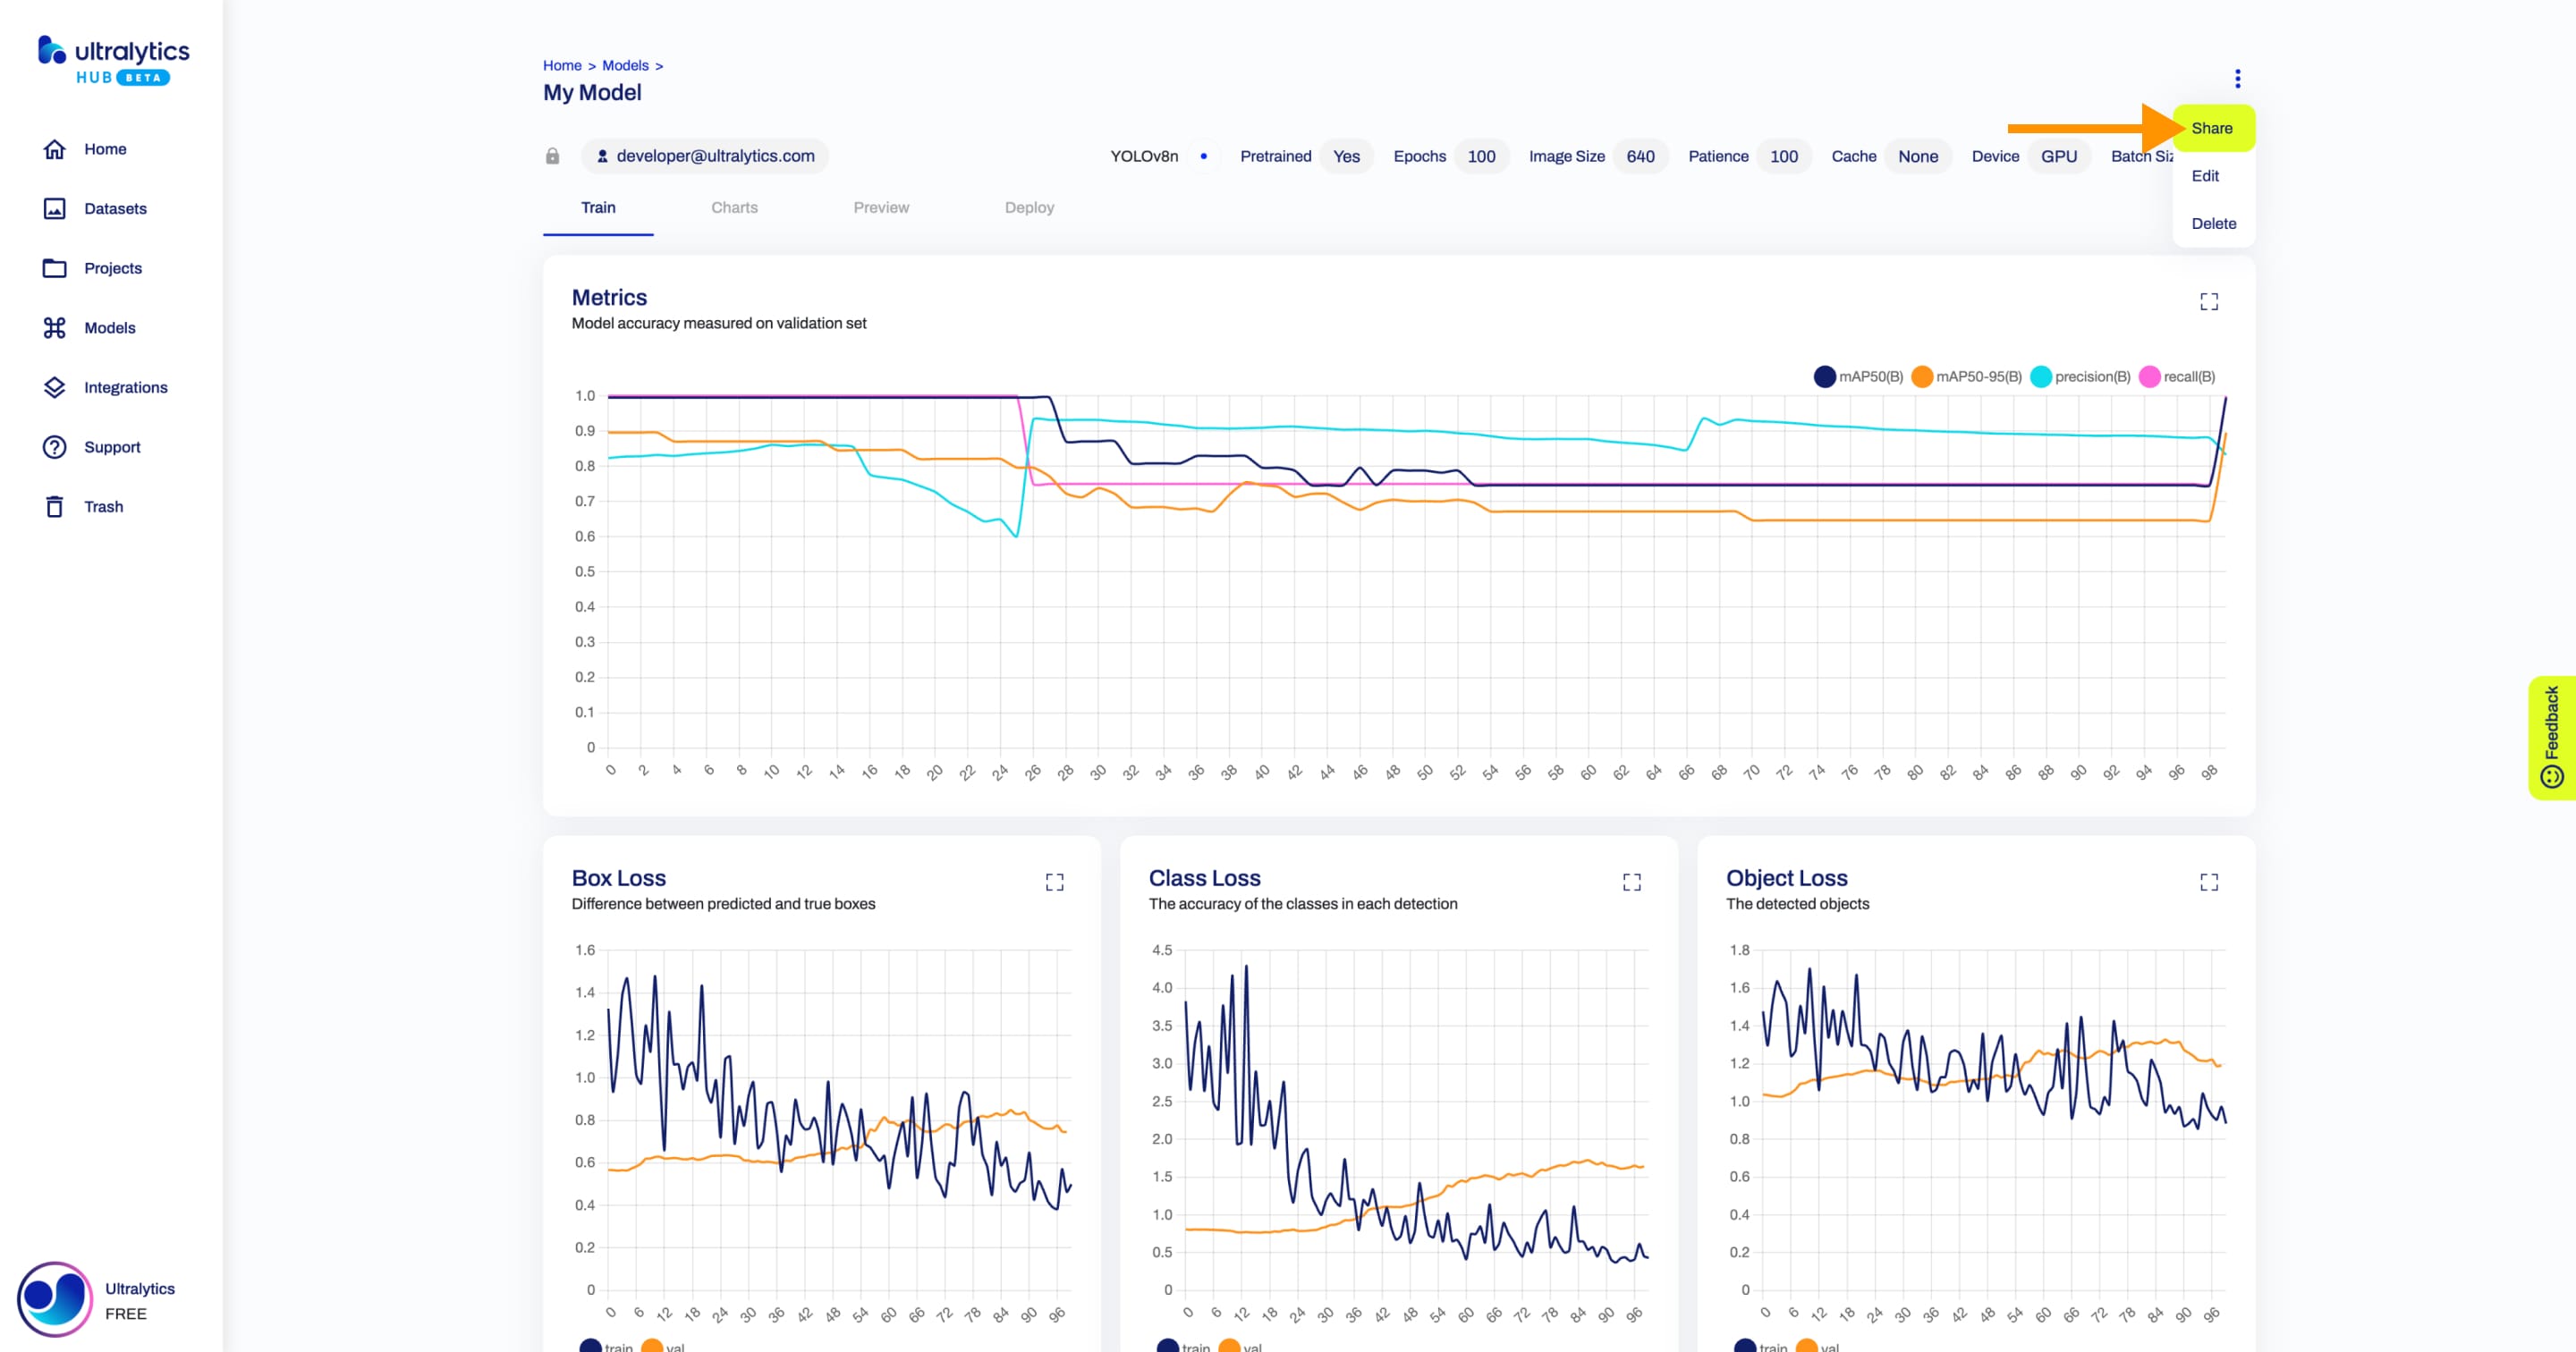
Analyze Model
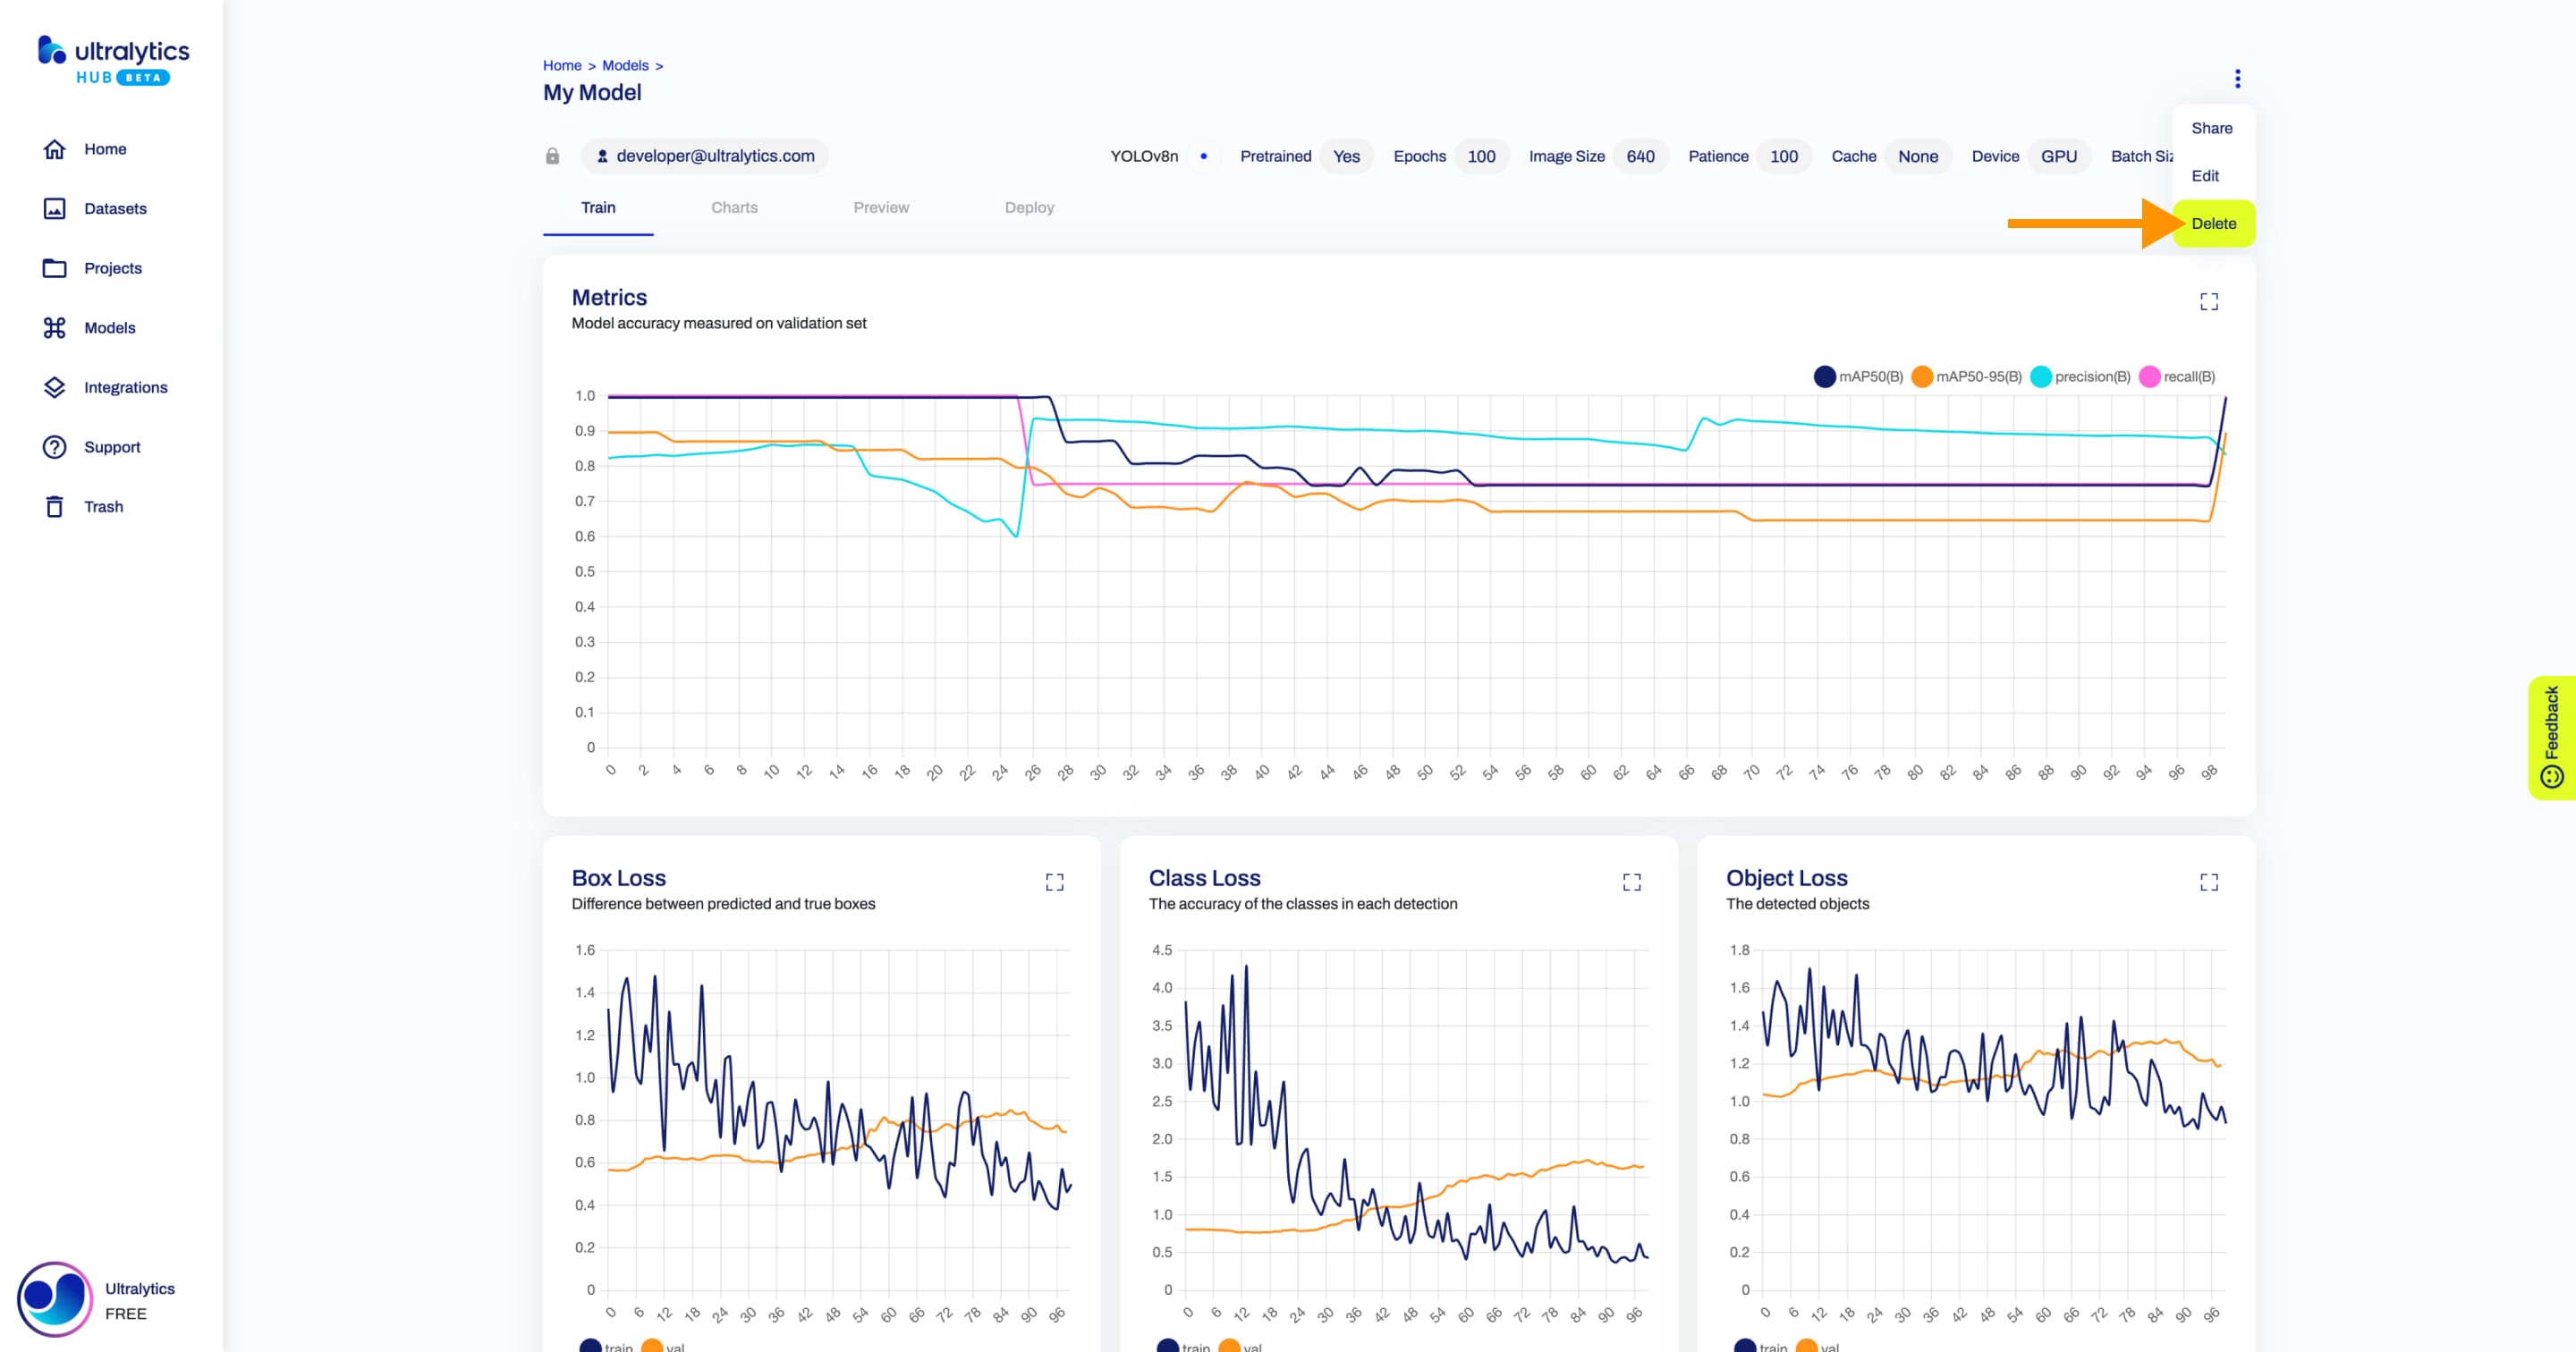
After you train a model, you can analyze the model metrics.
The Train tab presents the most important metrics carefully grouped based on the task.
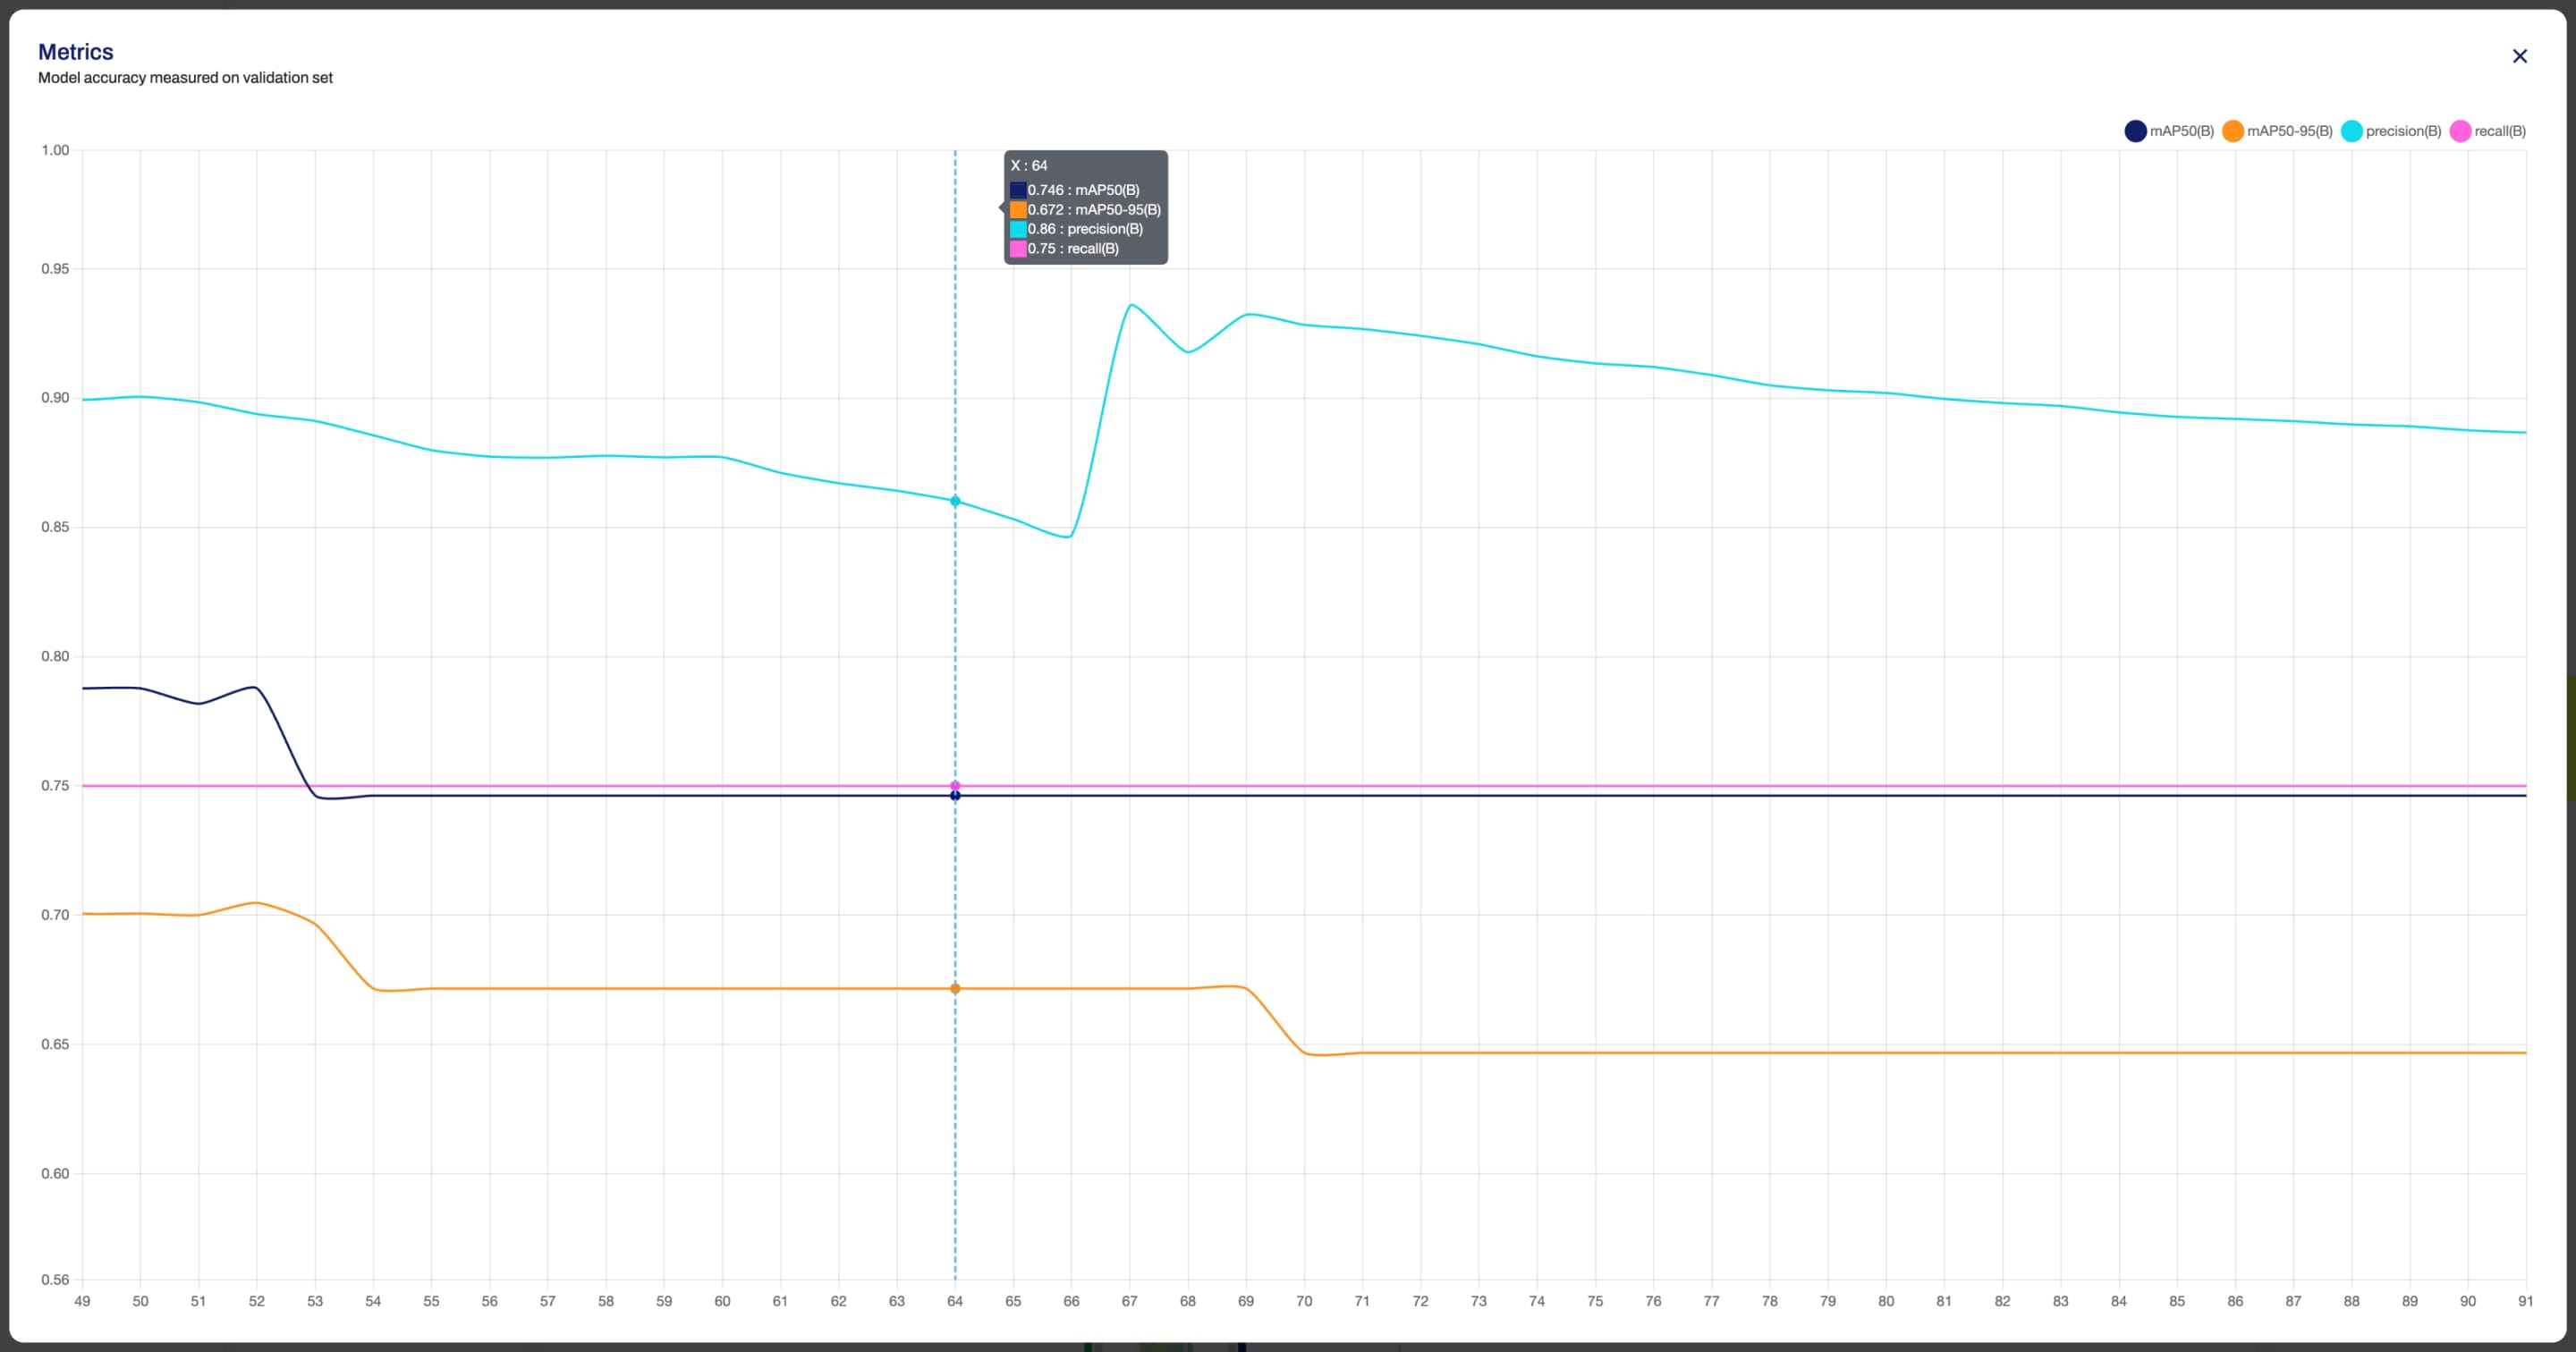
To access all model metrics, click on the Charts tab.
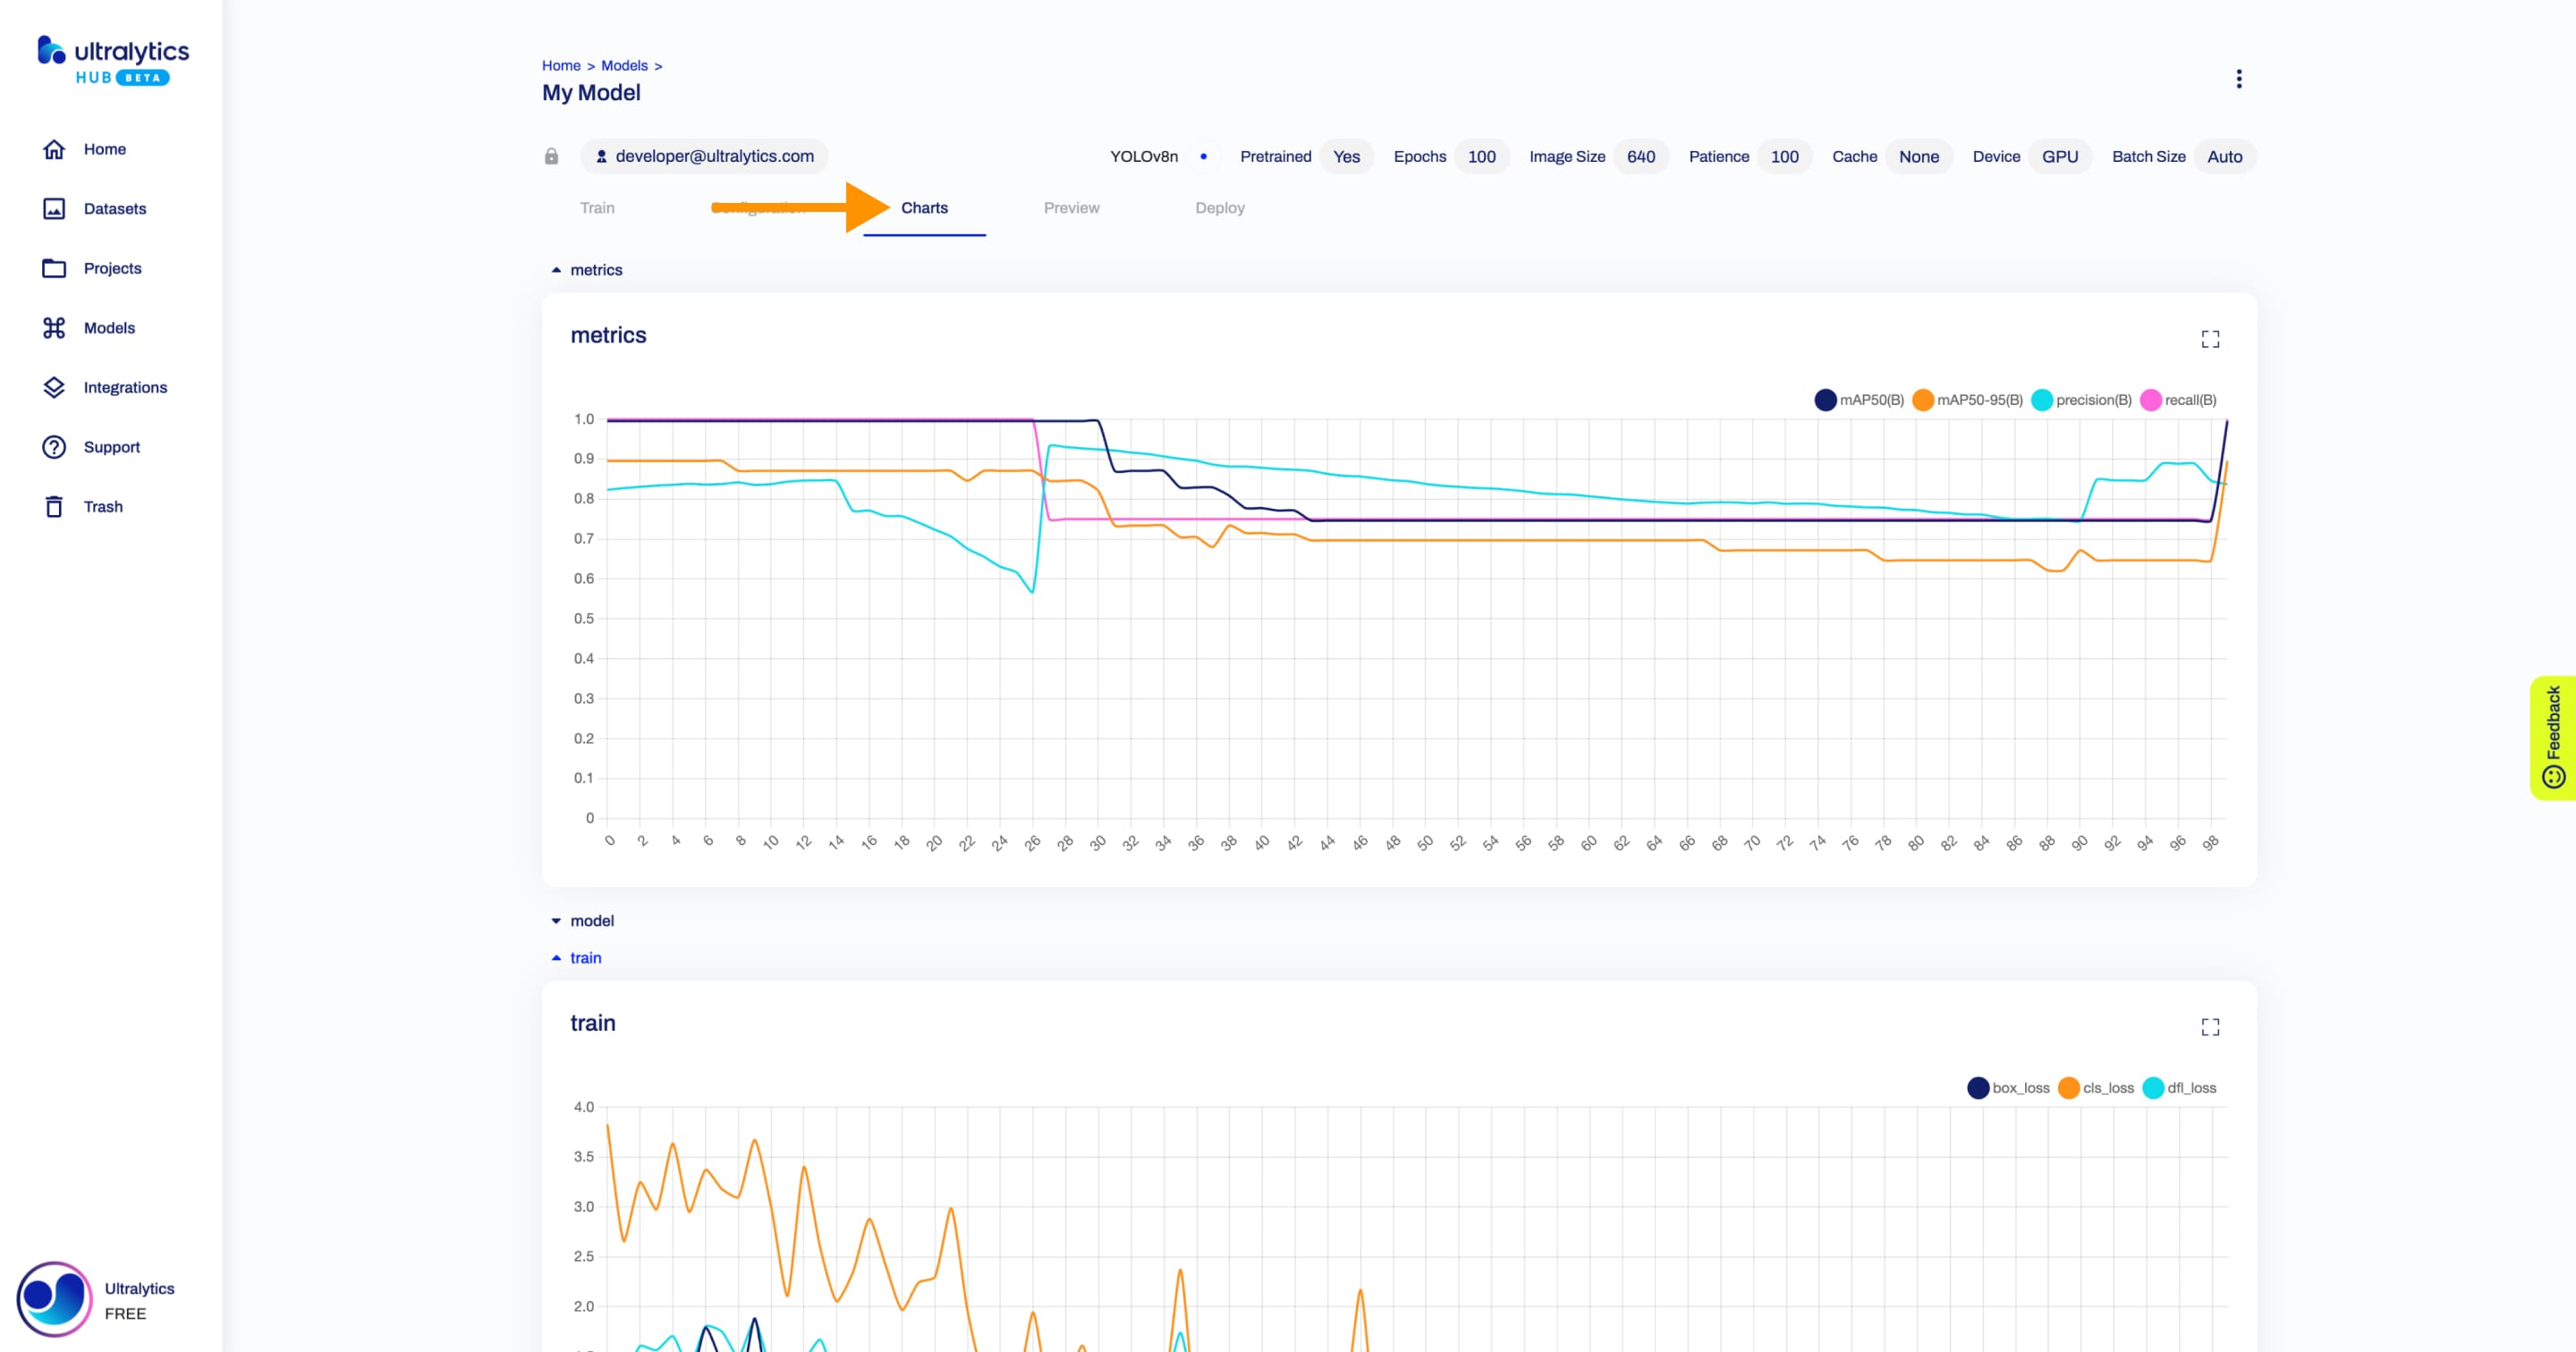
??? tip "Tip"
Each chart can be enlarged for better visualization.
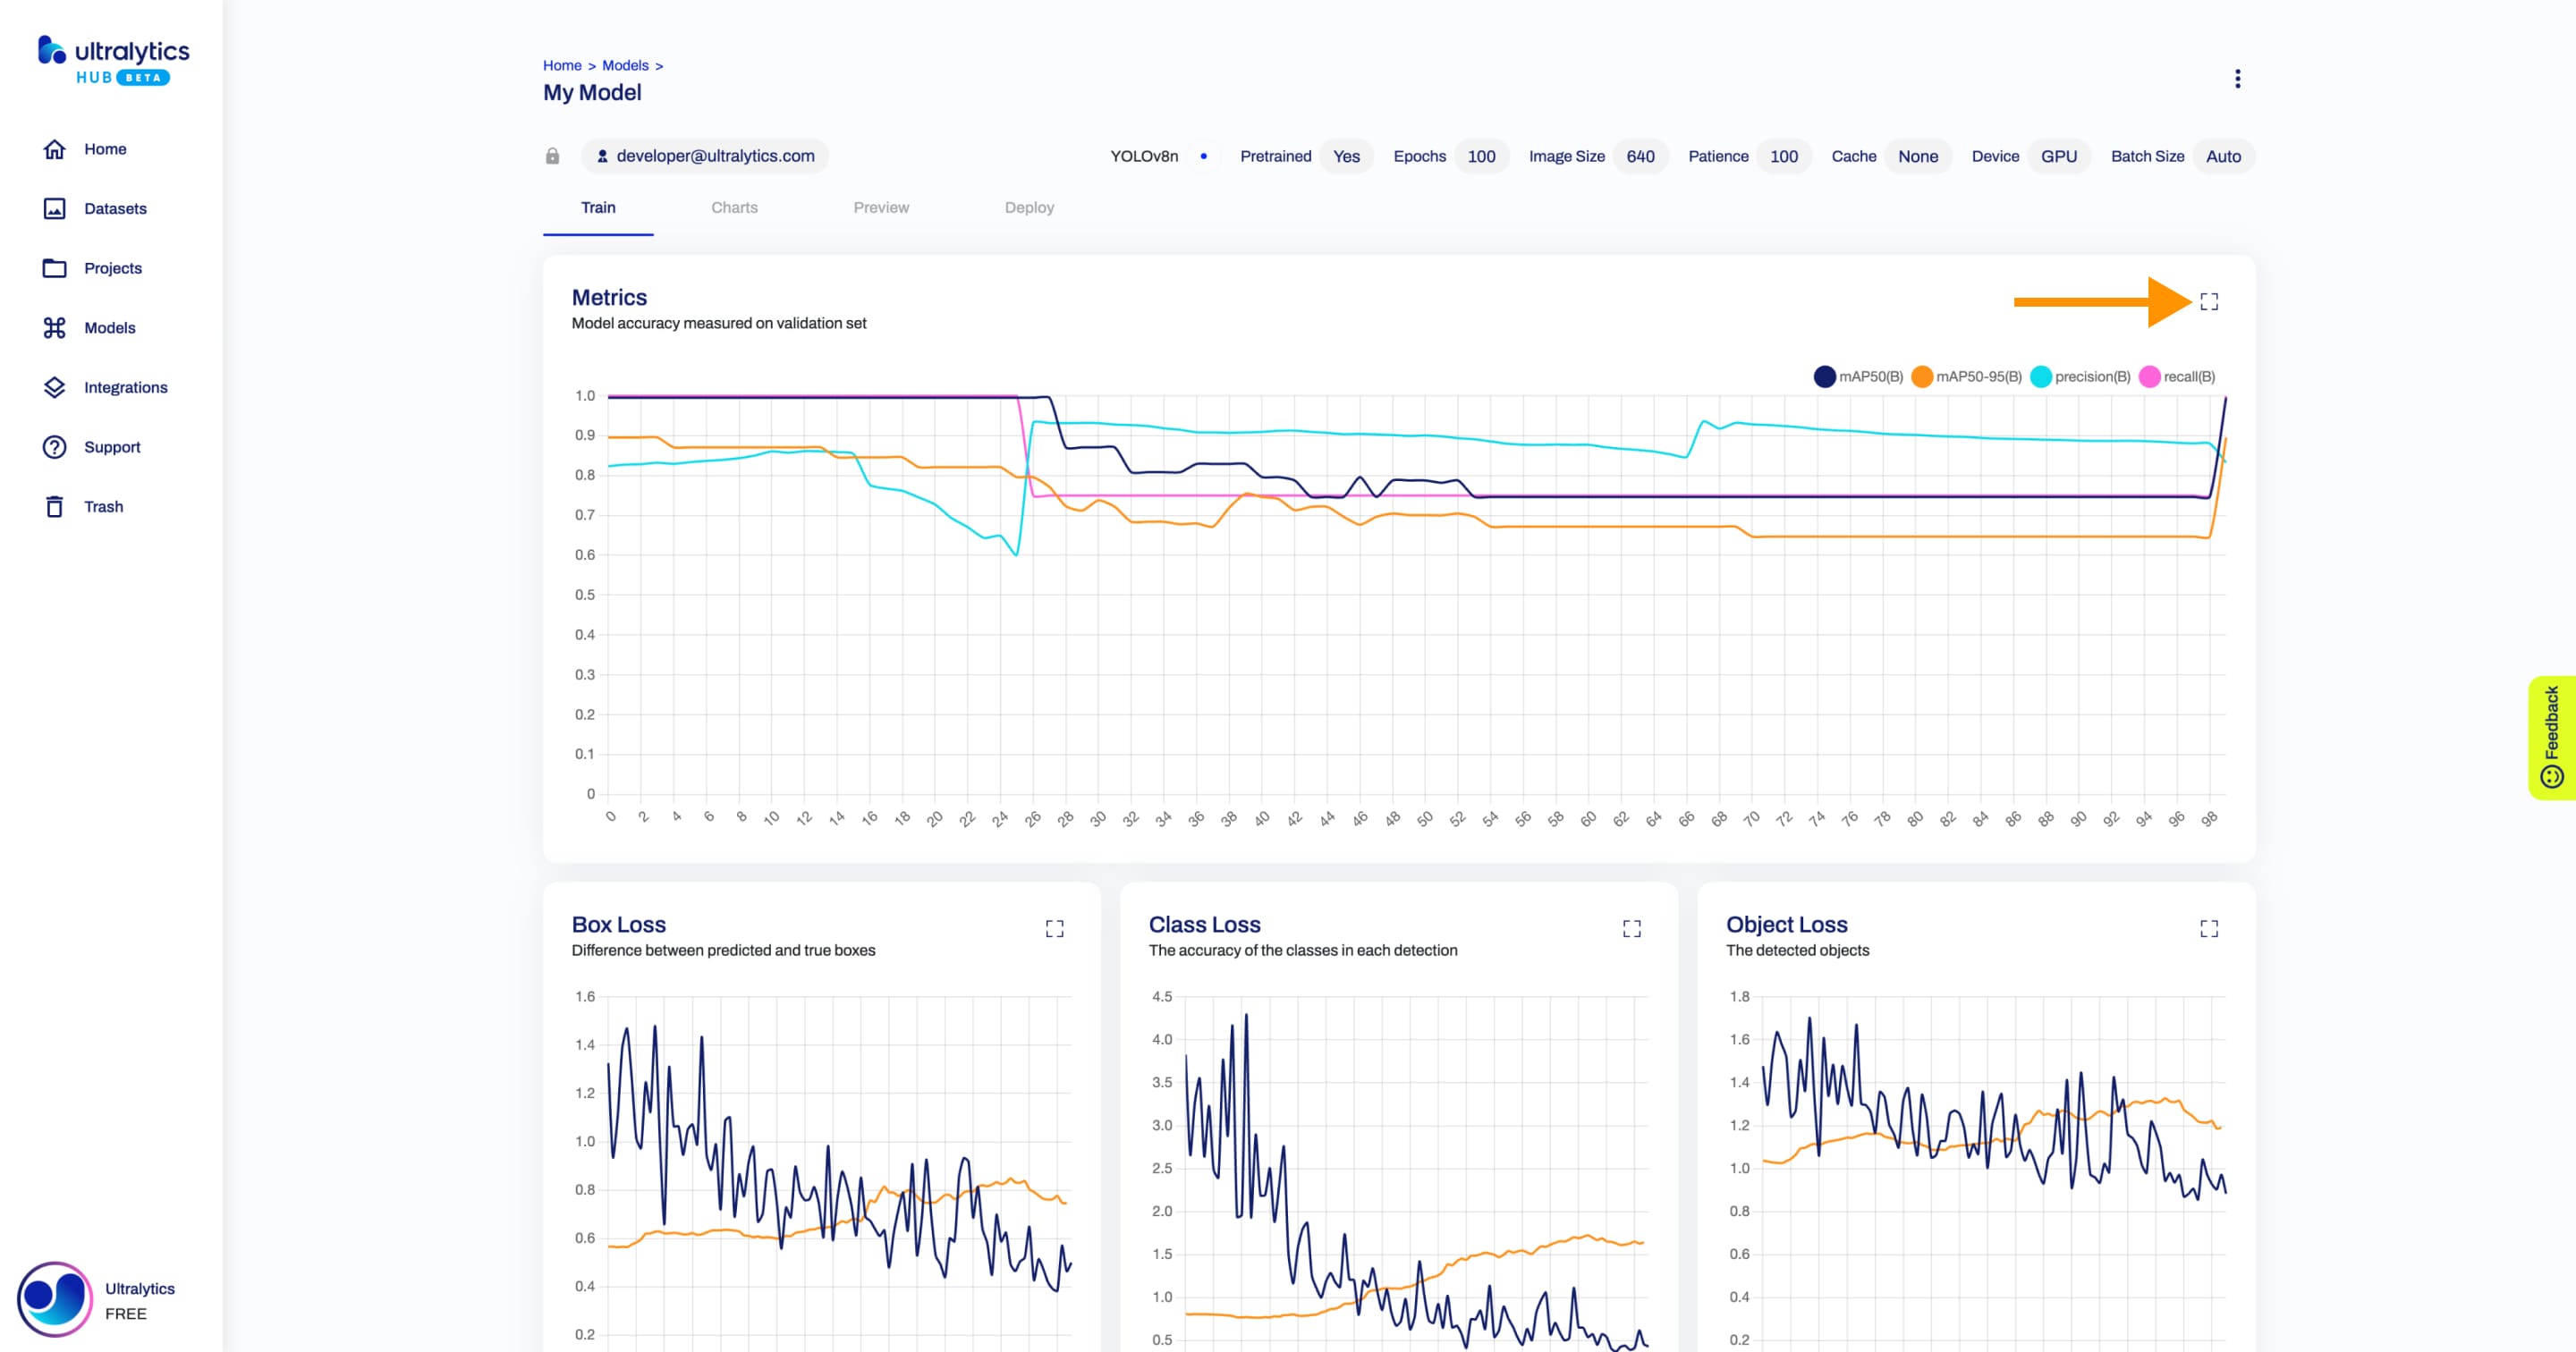
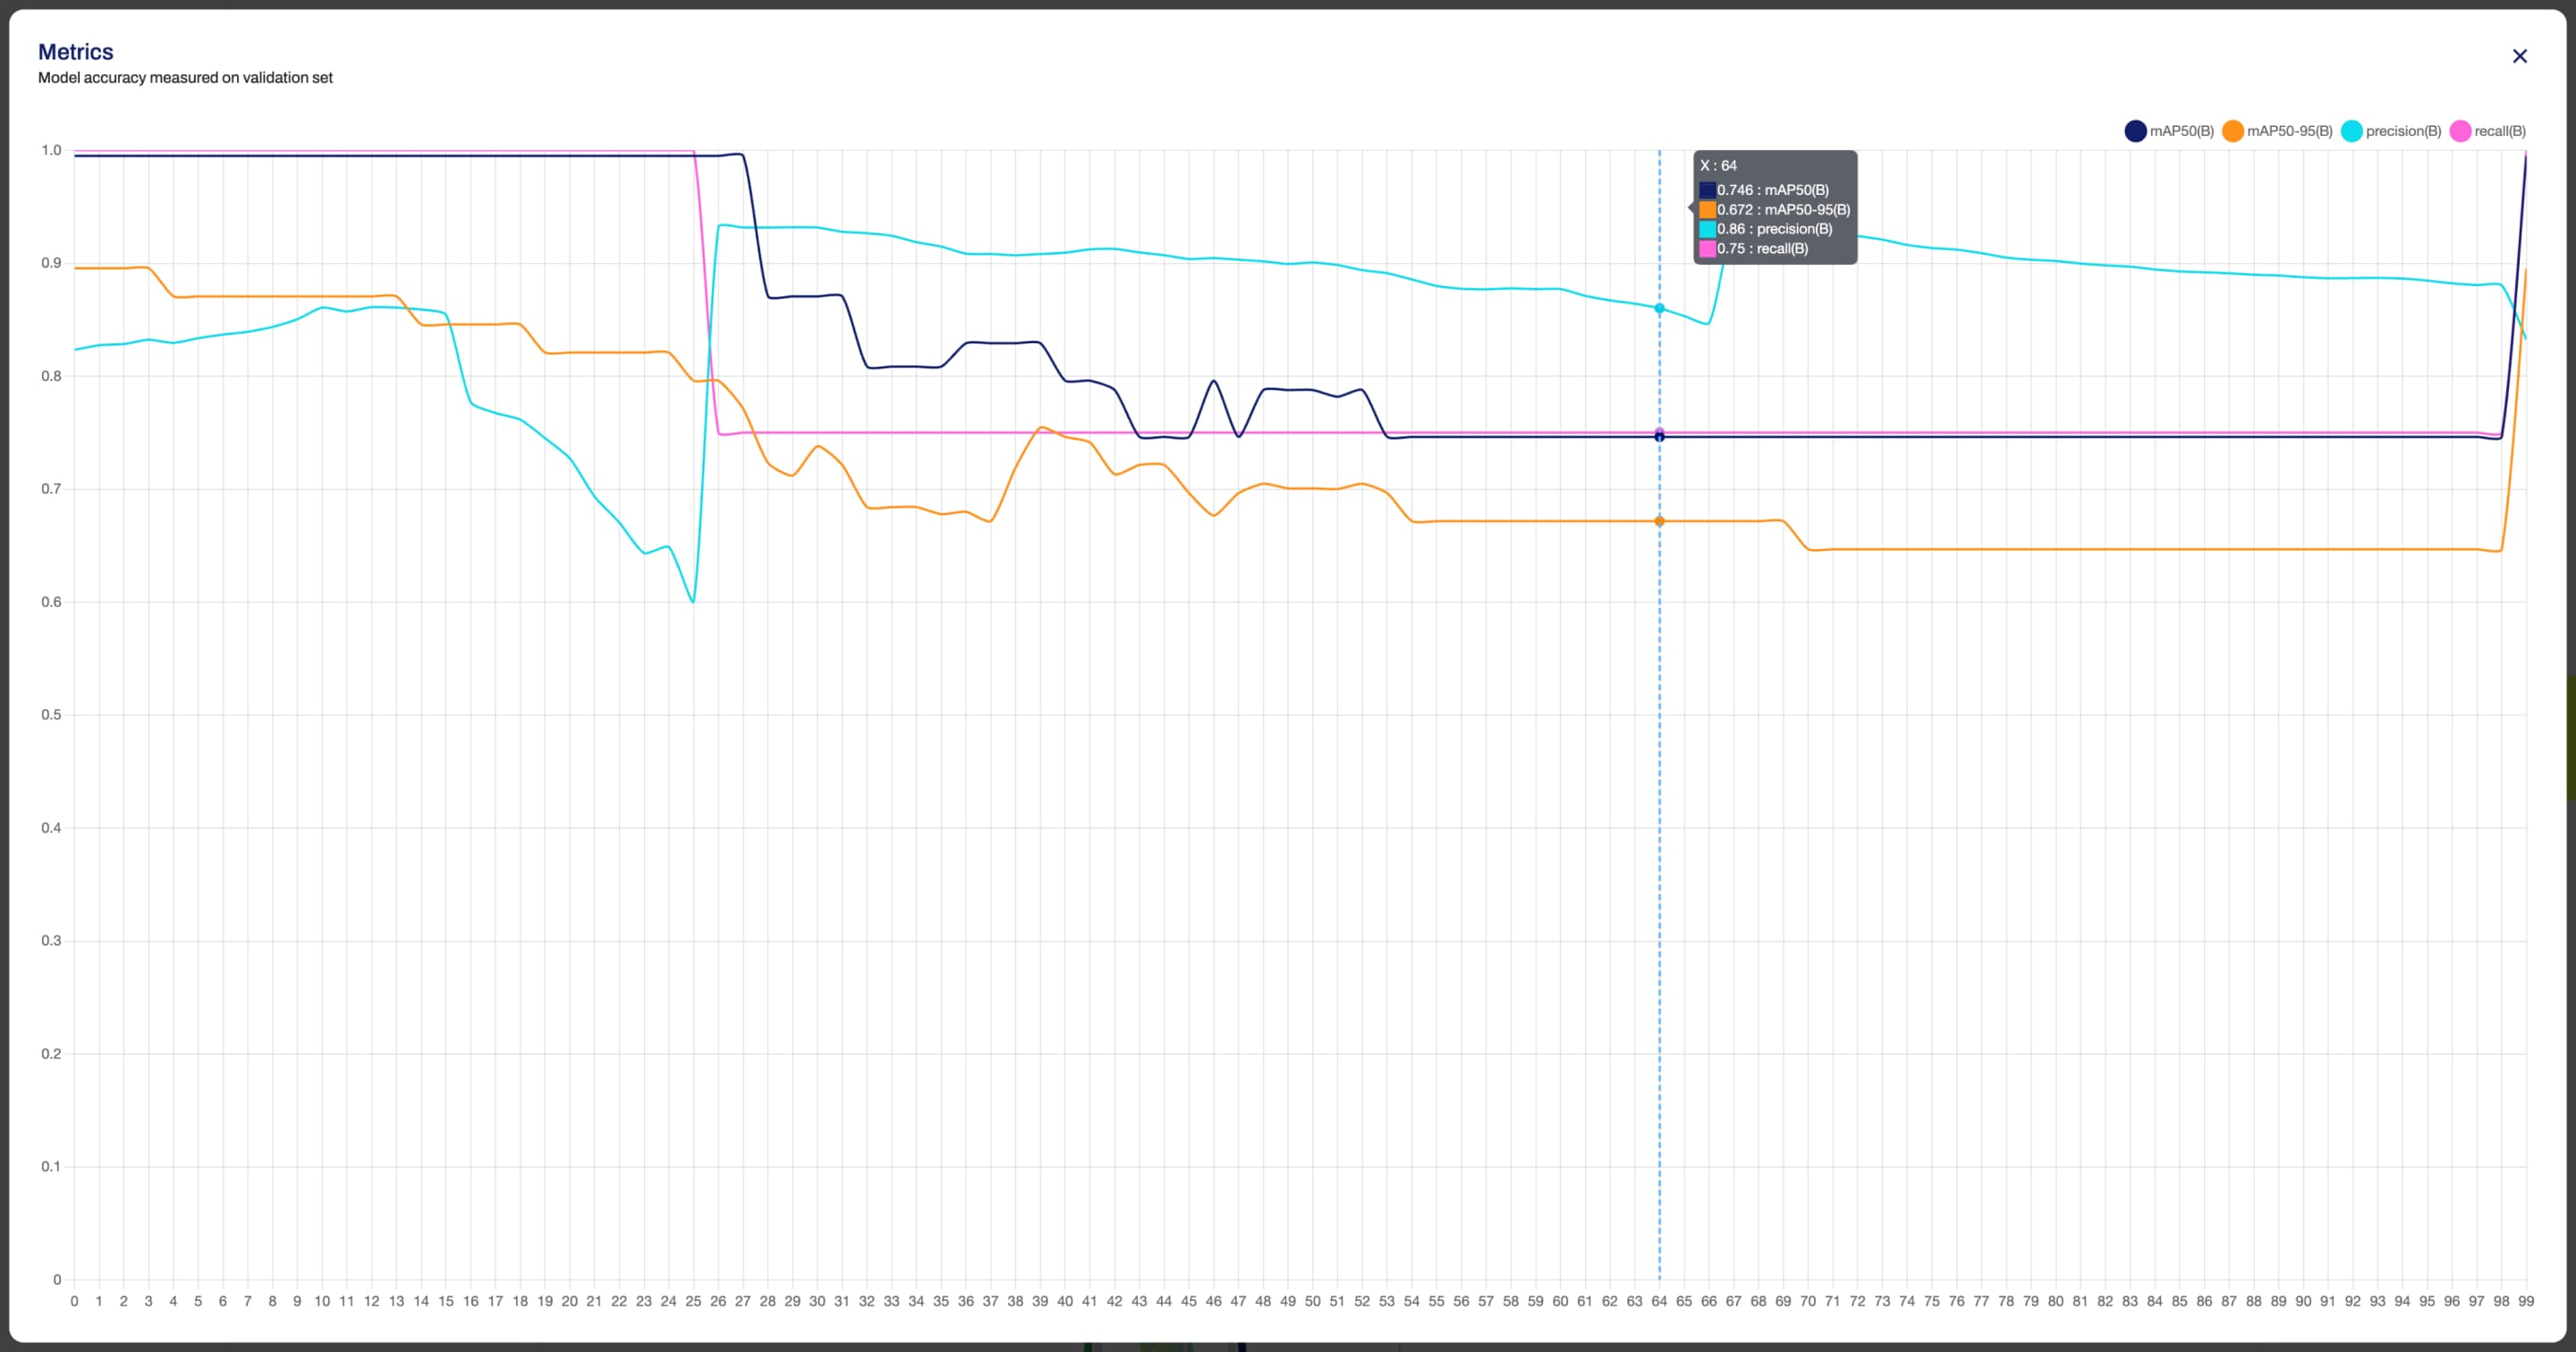
Furthermore, to properly analyze the data, you can utilize the zoom feature.
Preview Model
After you train a model, you can preview it by clicking on the Preview tab.
In the Test card, you can select a preview image from the dataset used during training or upload an image from your device.
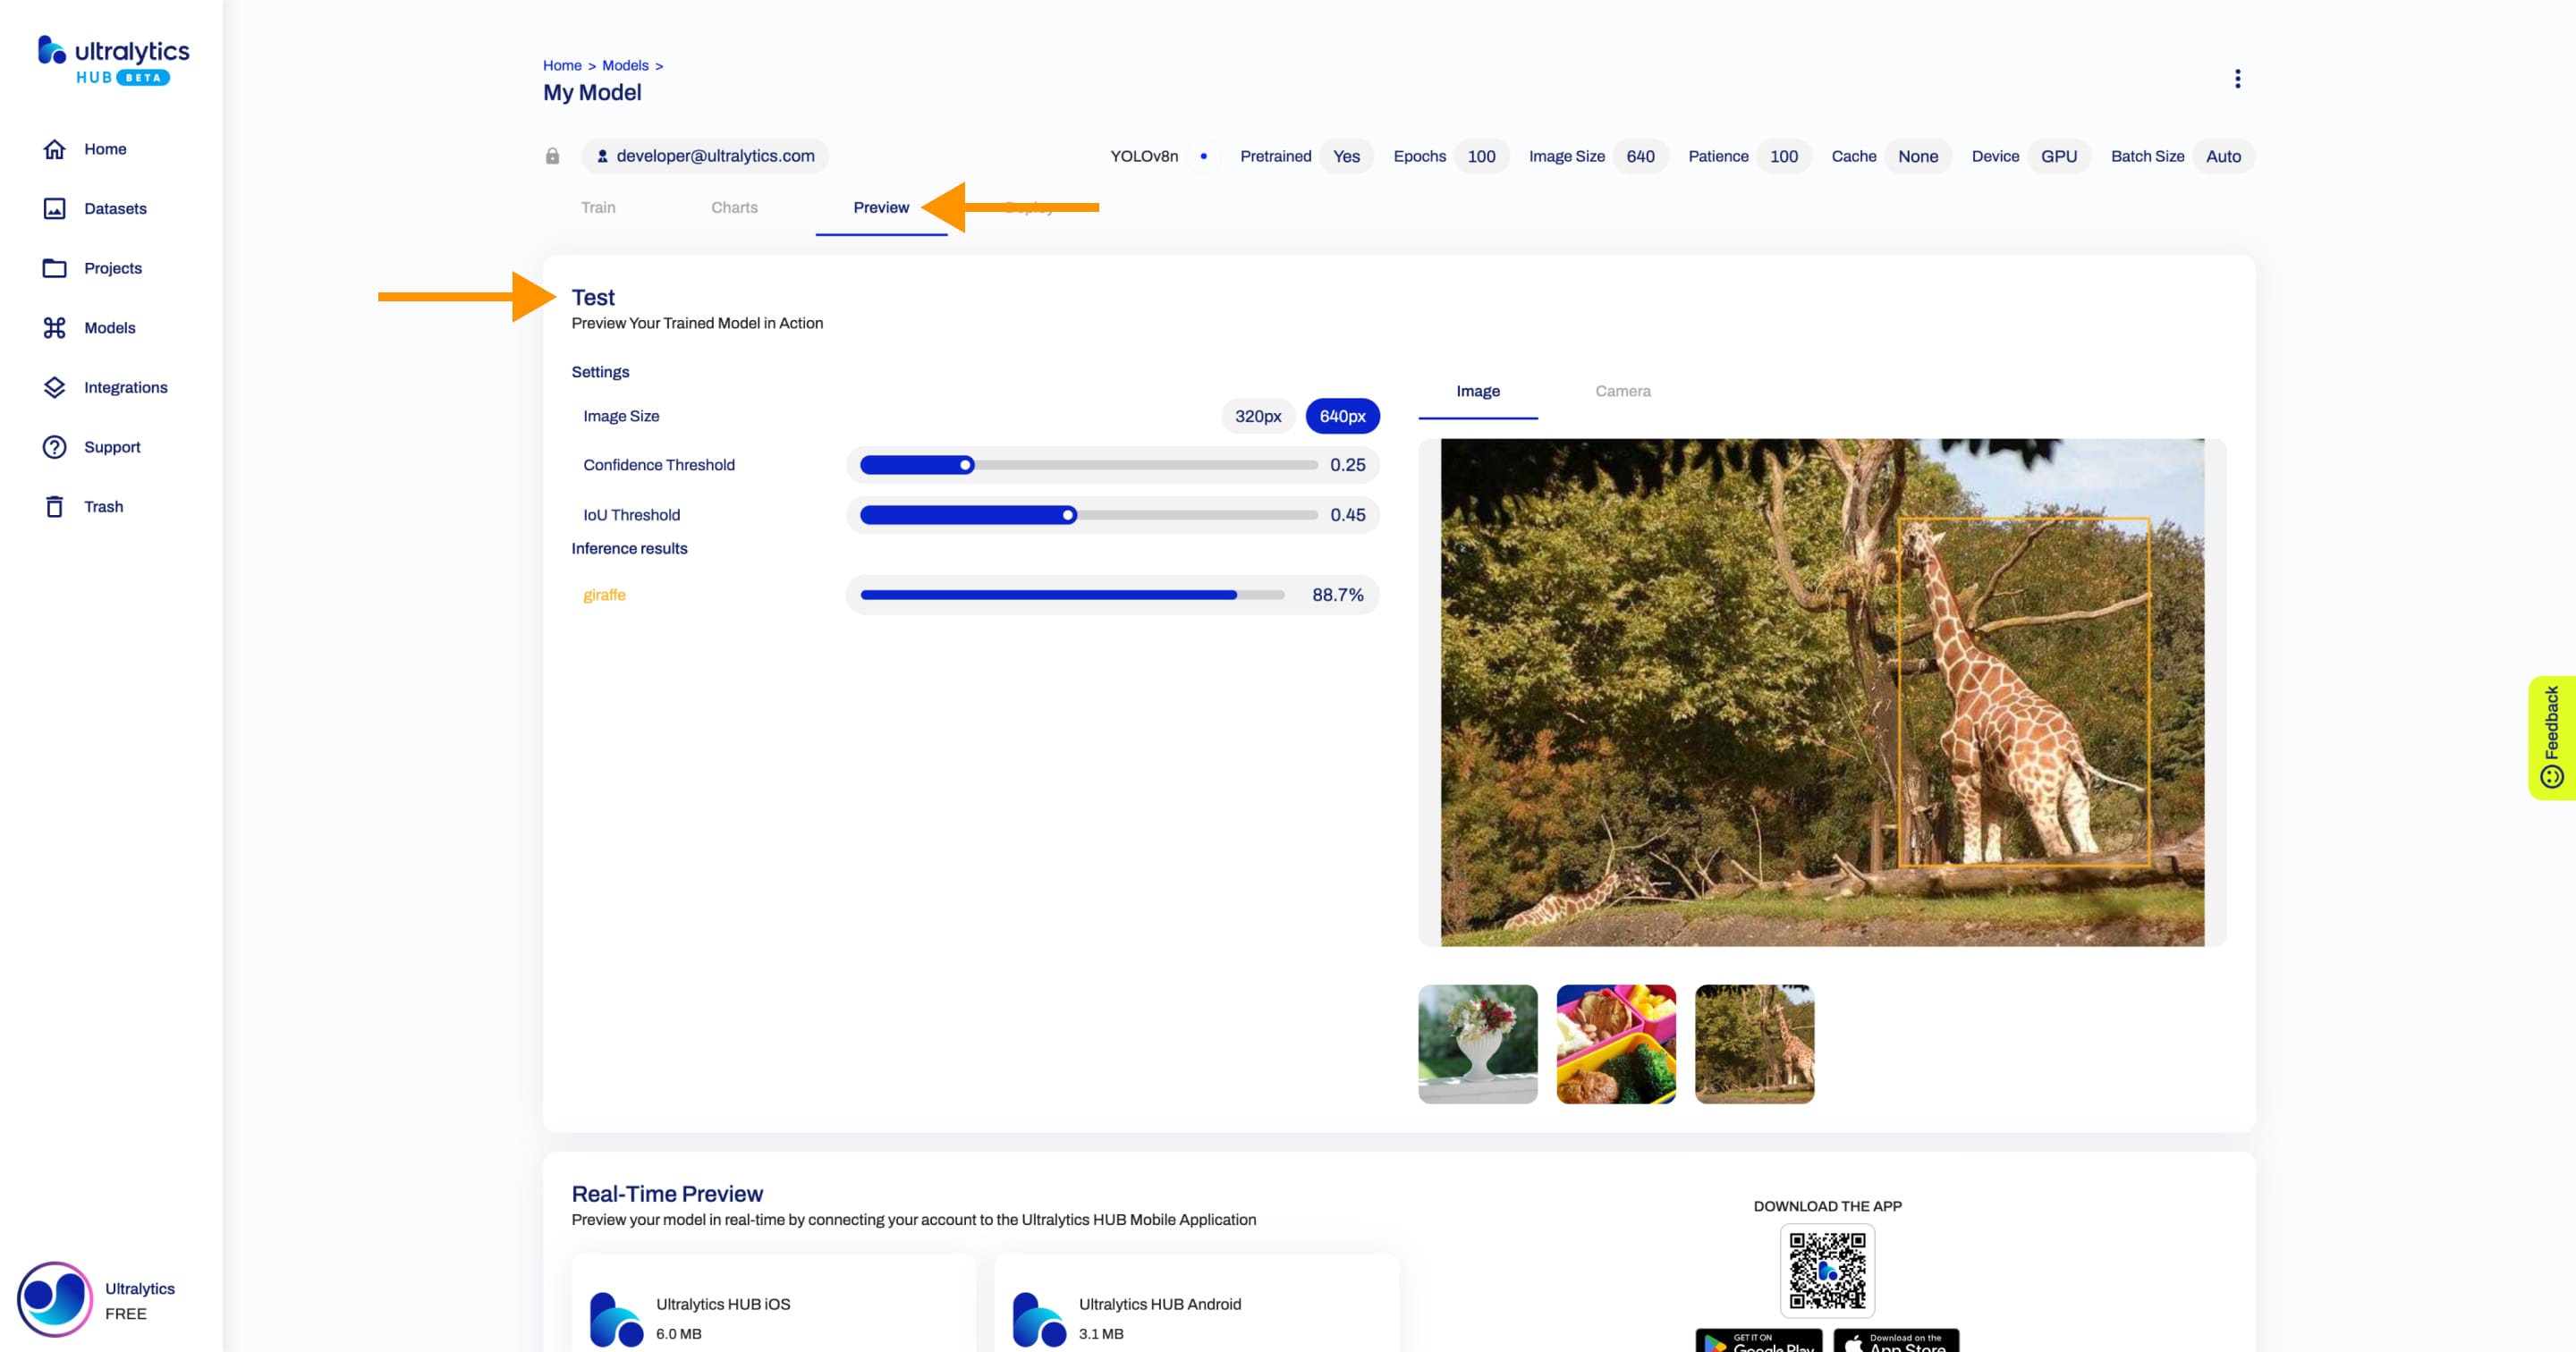
!!! note "Note"
You can also use your camera to take a picture and run inference on it directly.
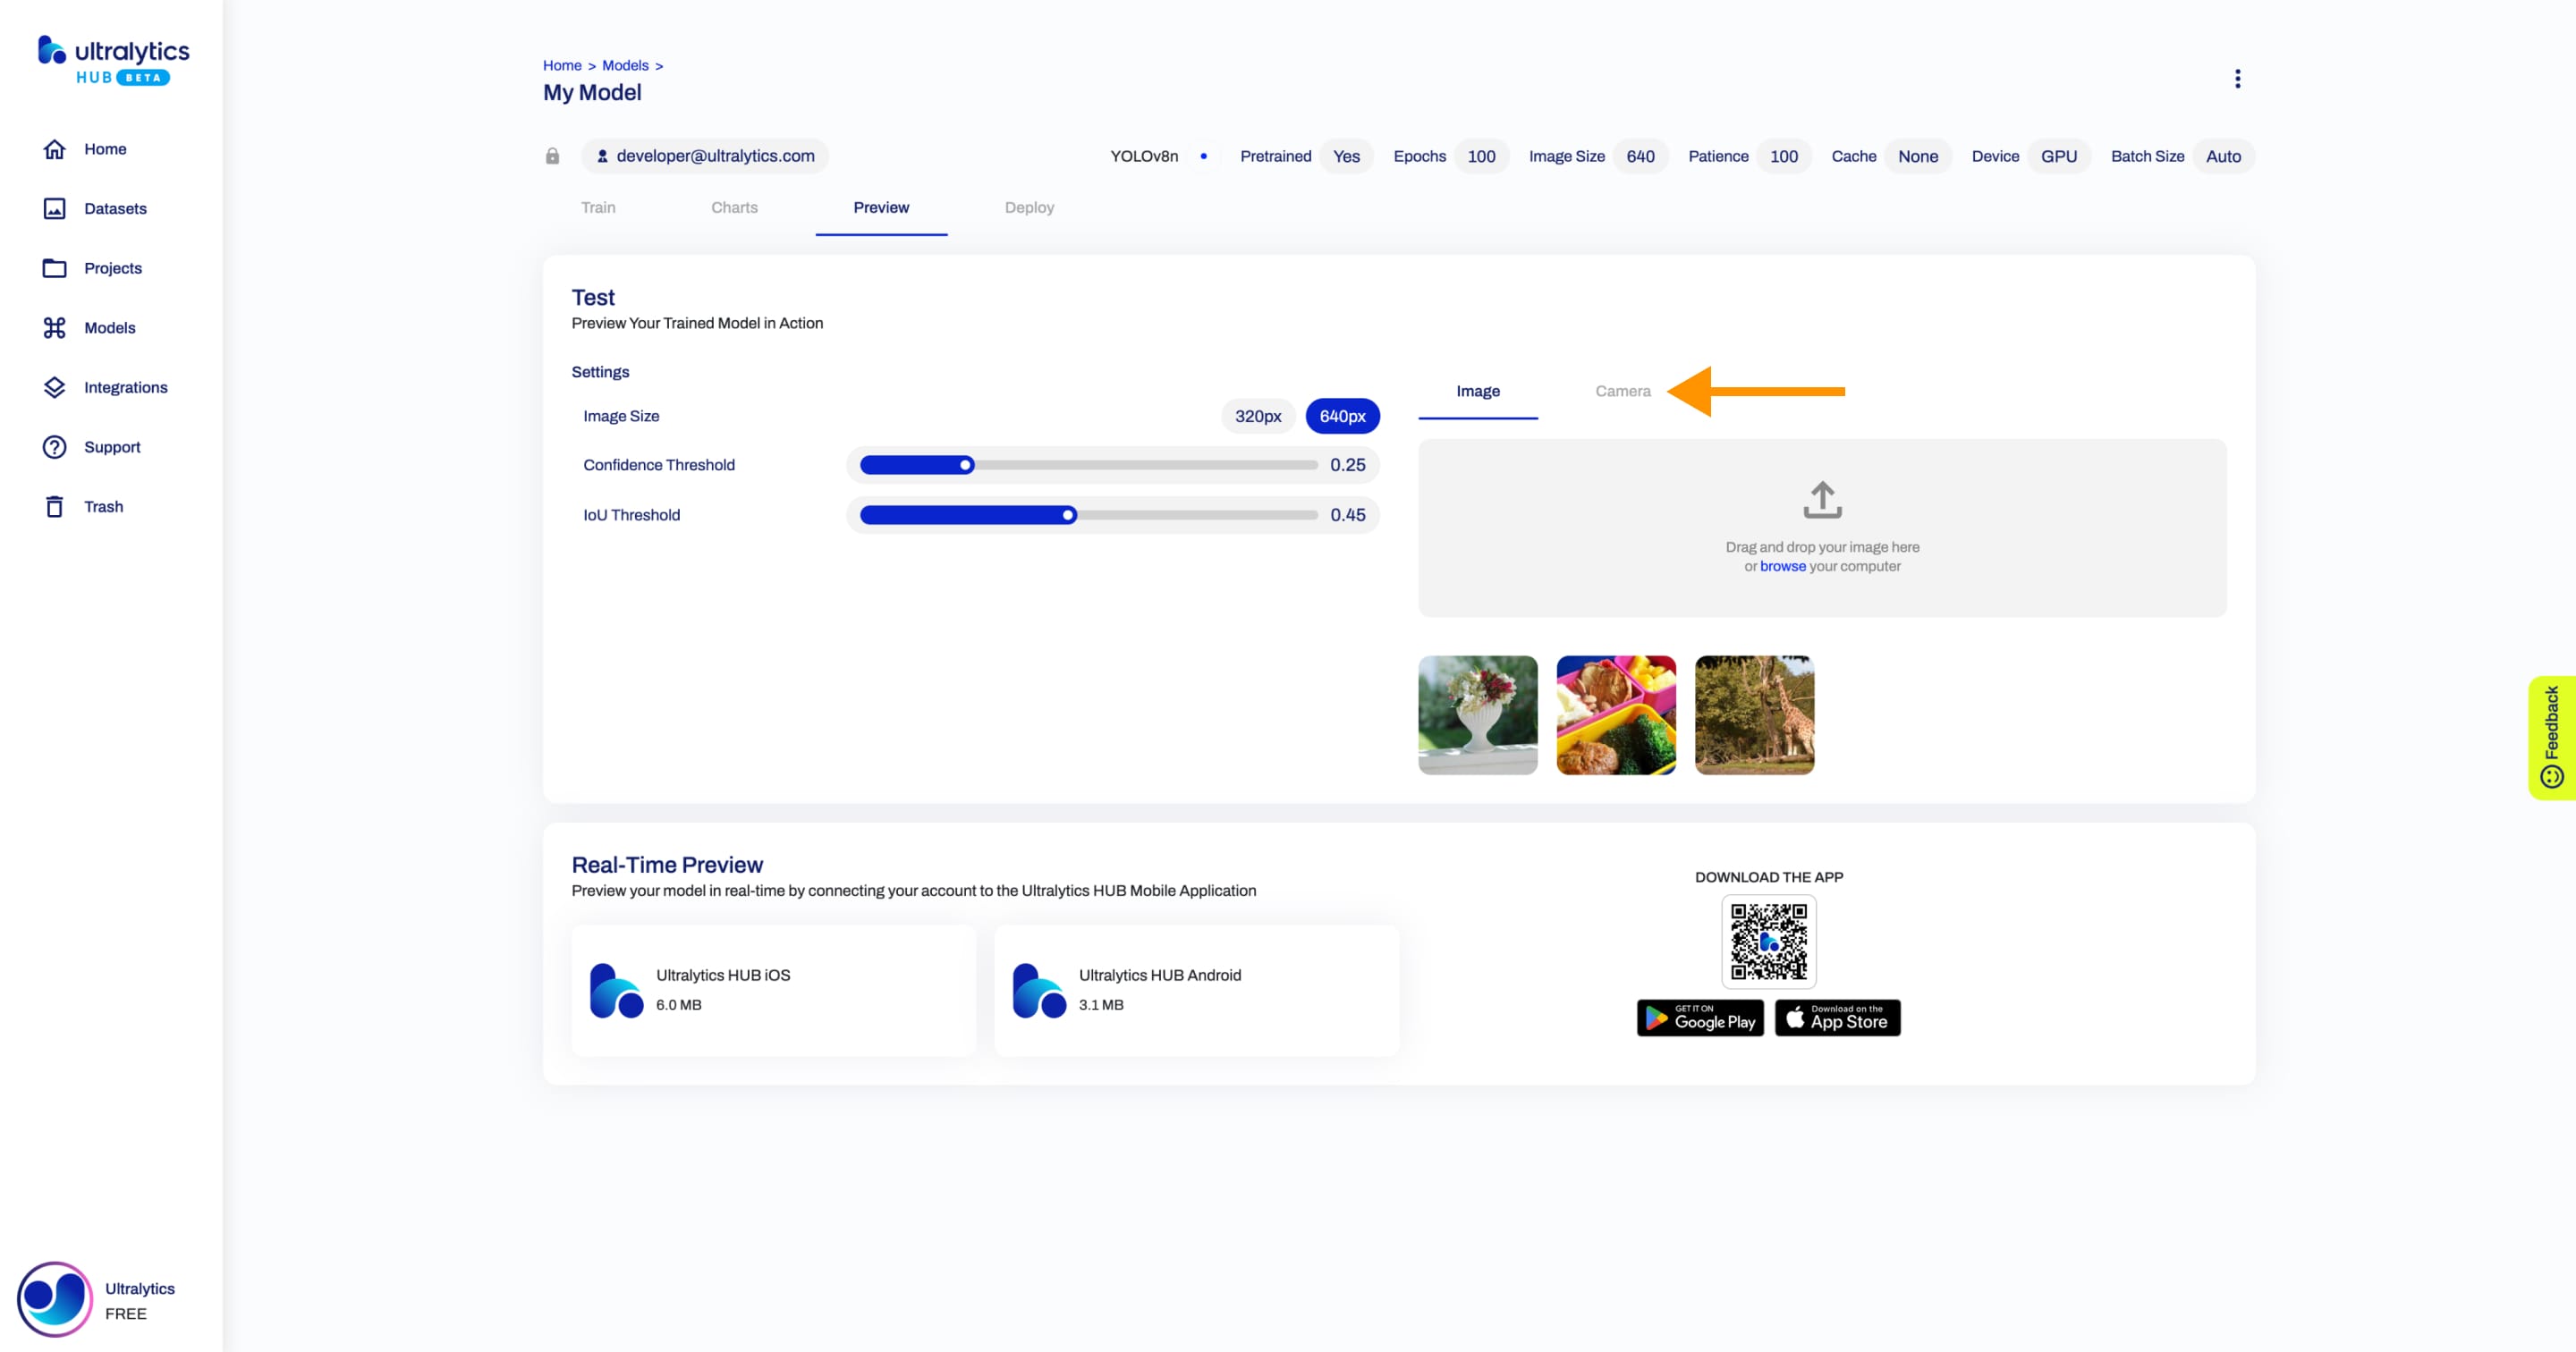
Furthermore, you can preview your model in real-time directly on your iOS or Android mobile device by downloading our Ultralytics HUB App.

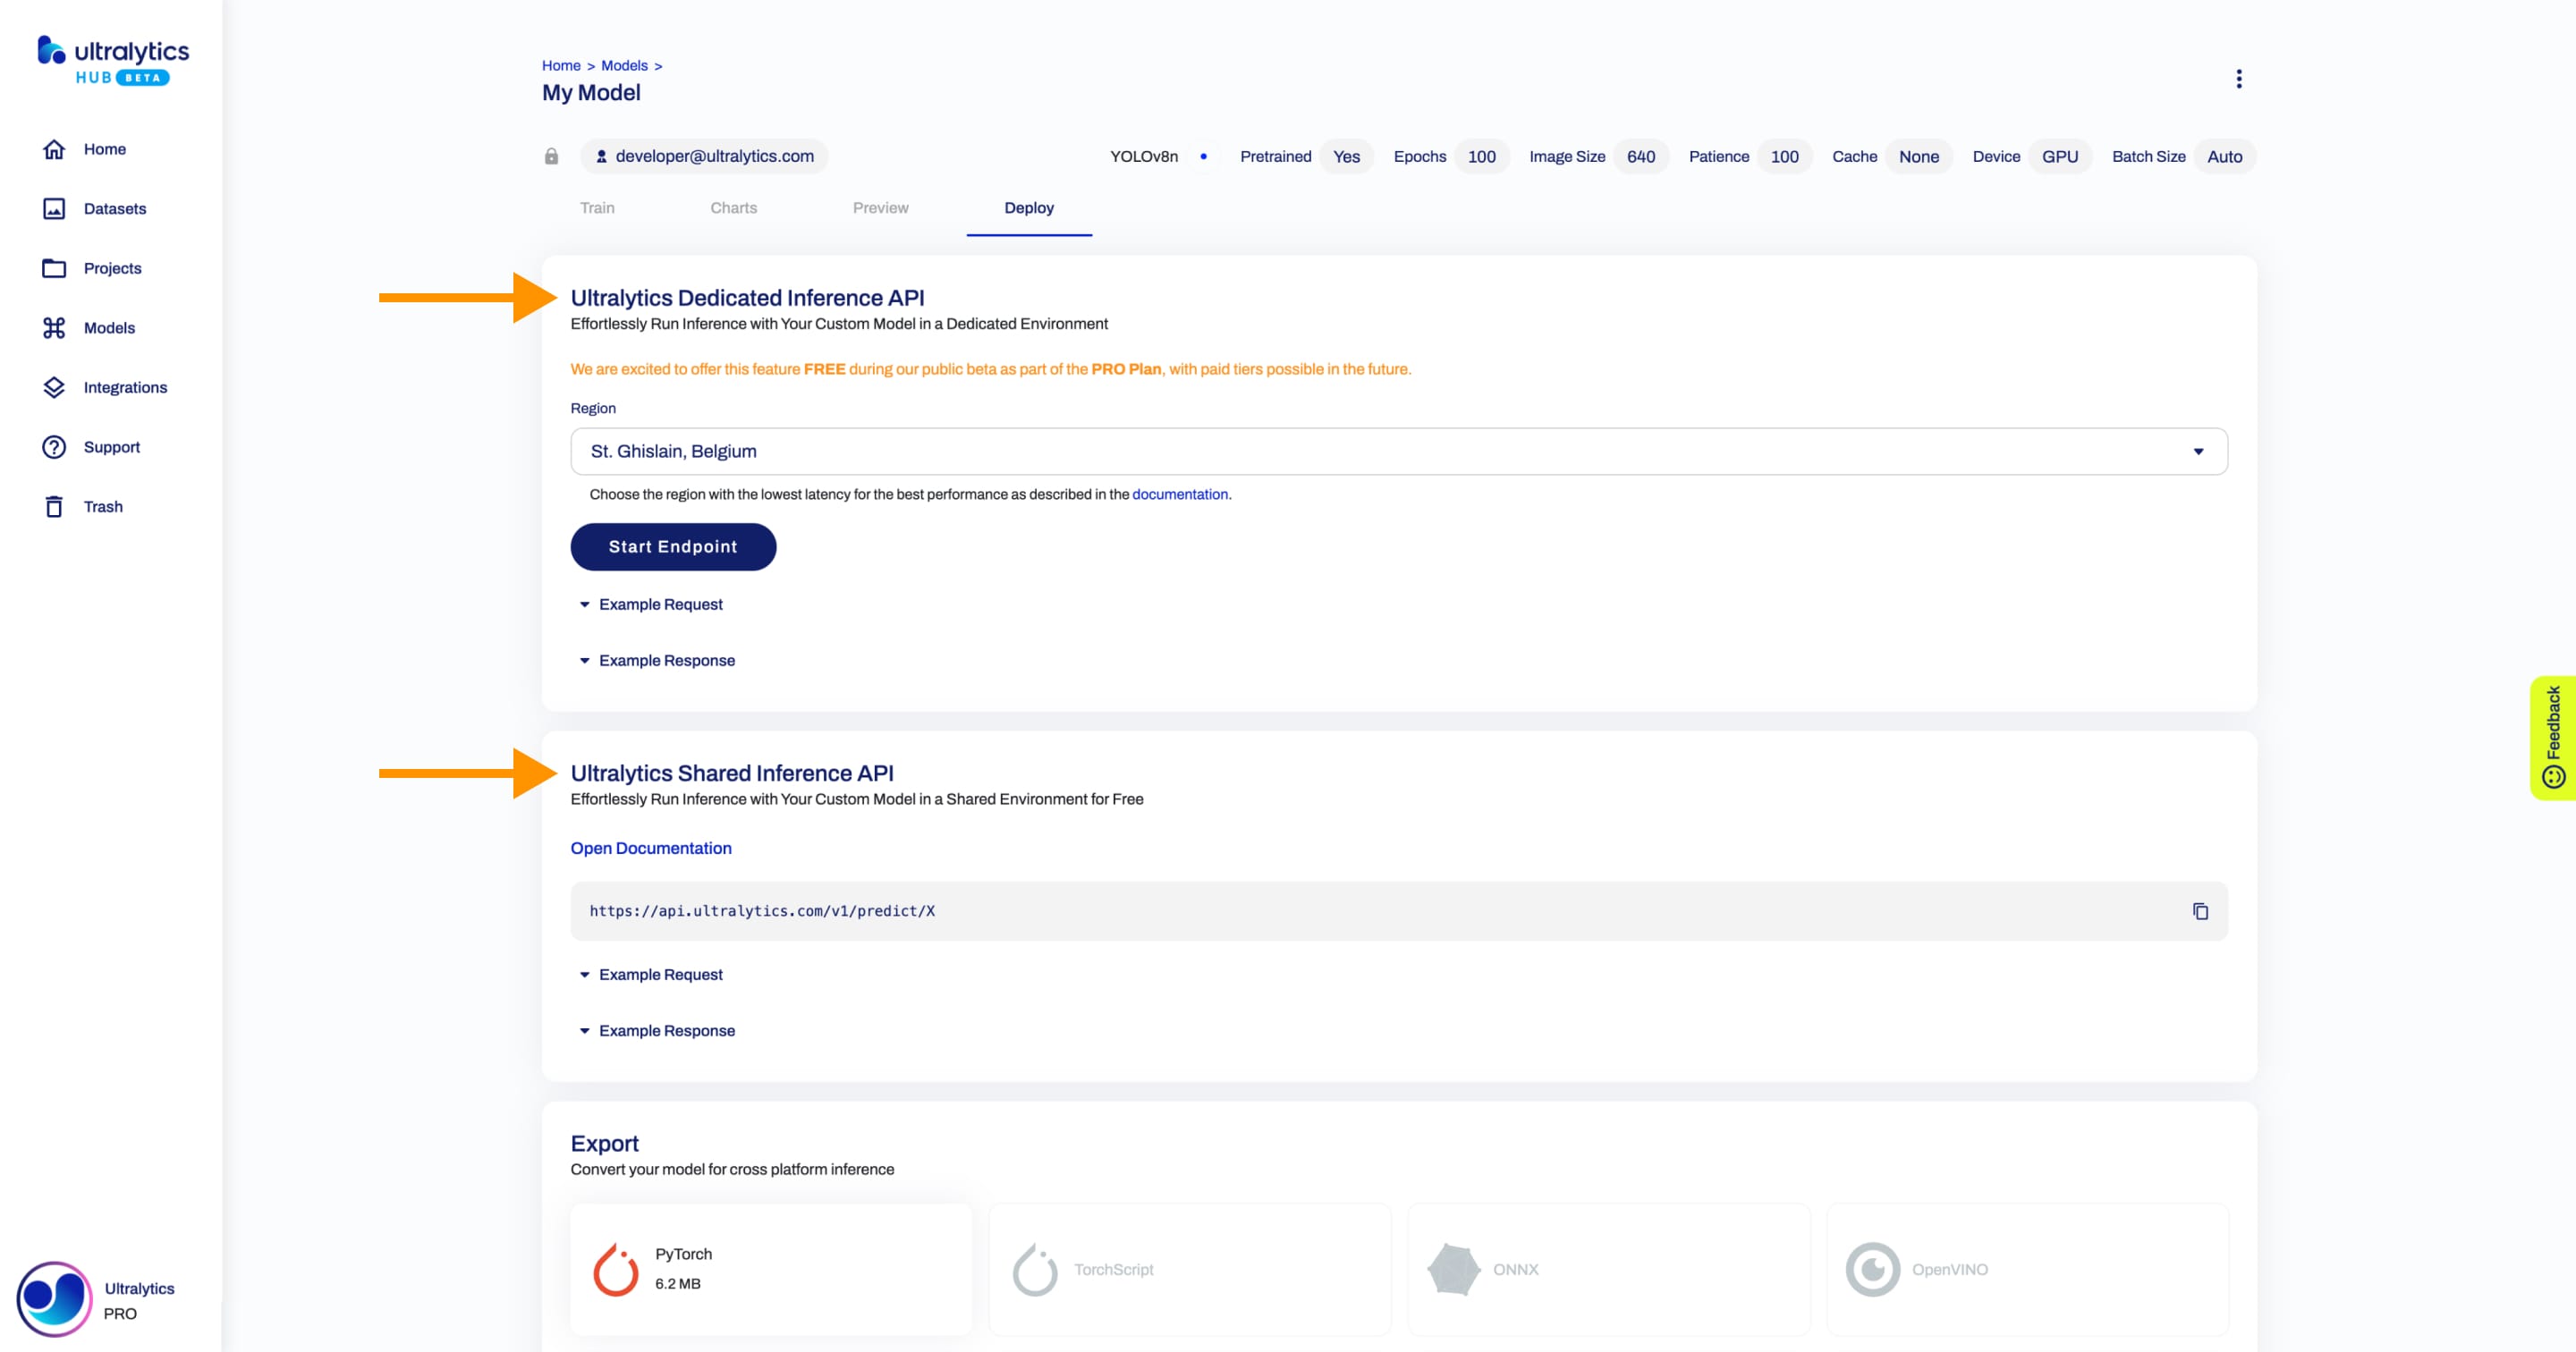
Deploy Model
After you train a model, you can export it to 13 different formats, including ONNX, OpenVINO, CoreML, TensorFlow, Paddle and many others.
??? tip "Tip"
You can customize the export options of each format if you open the export actions dropdown and click on the **Advanced** option.
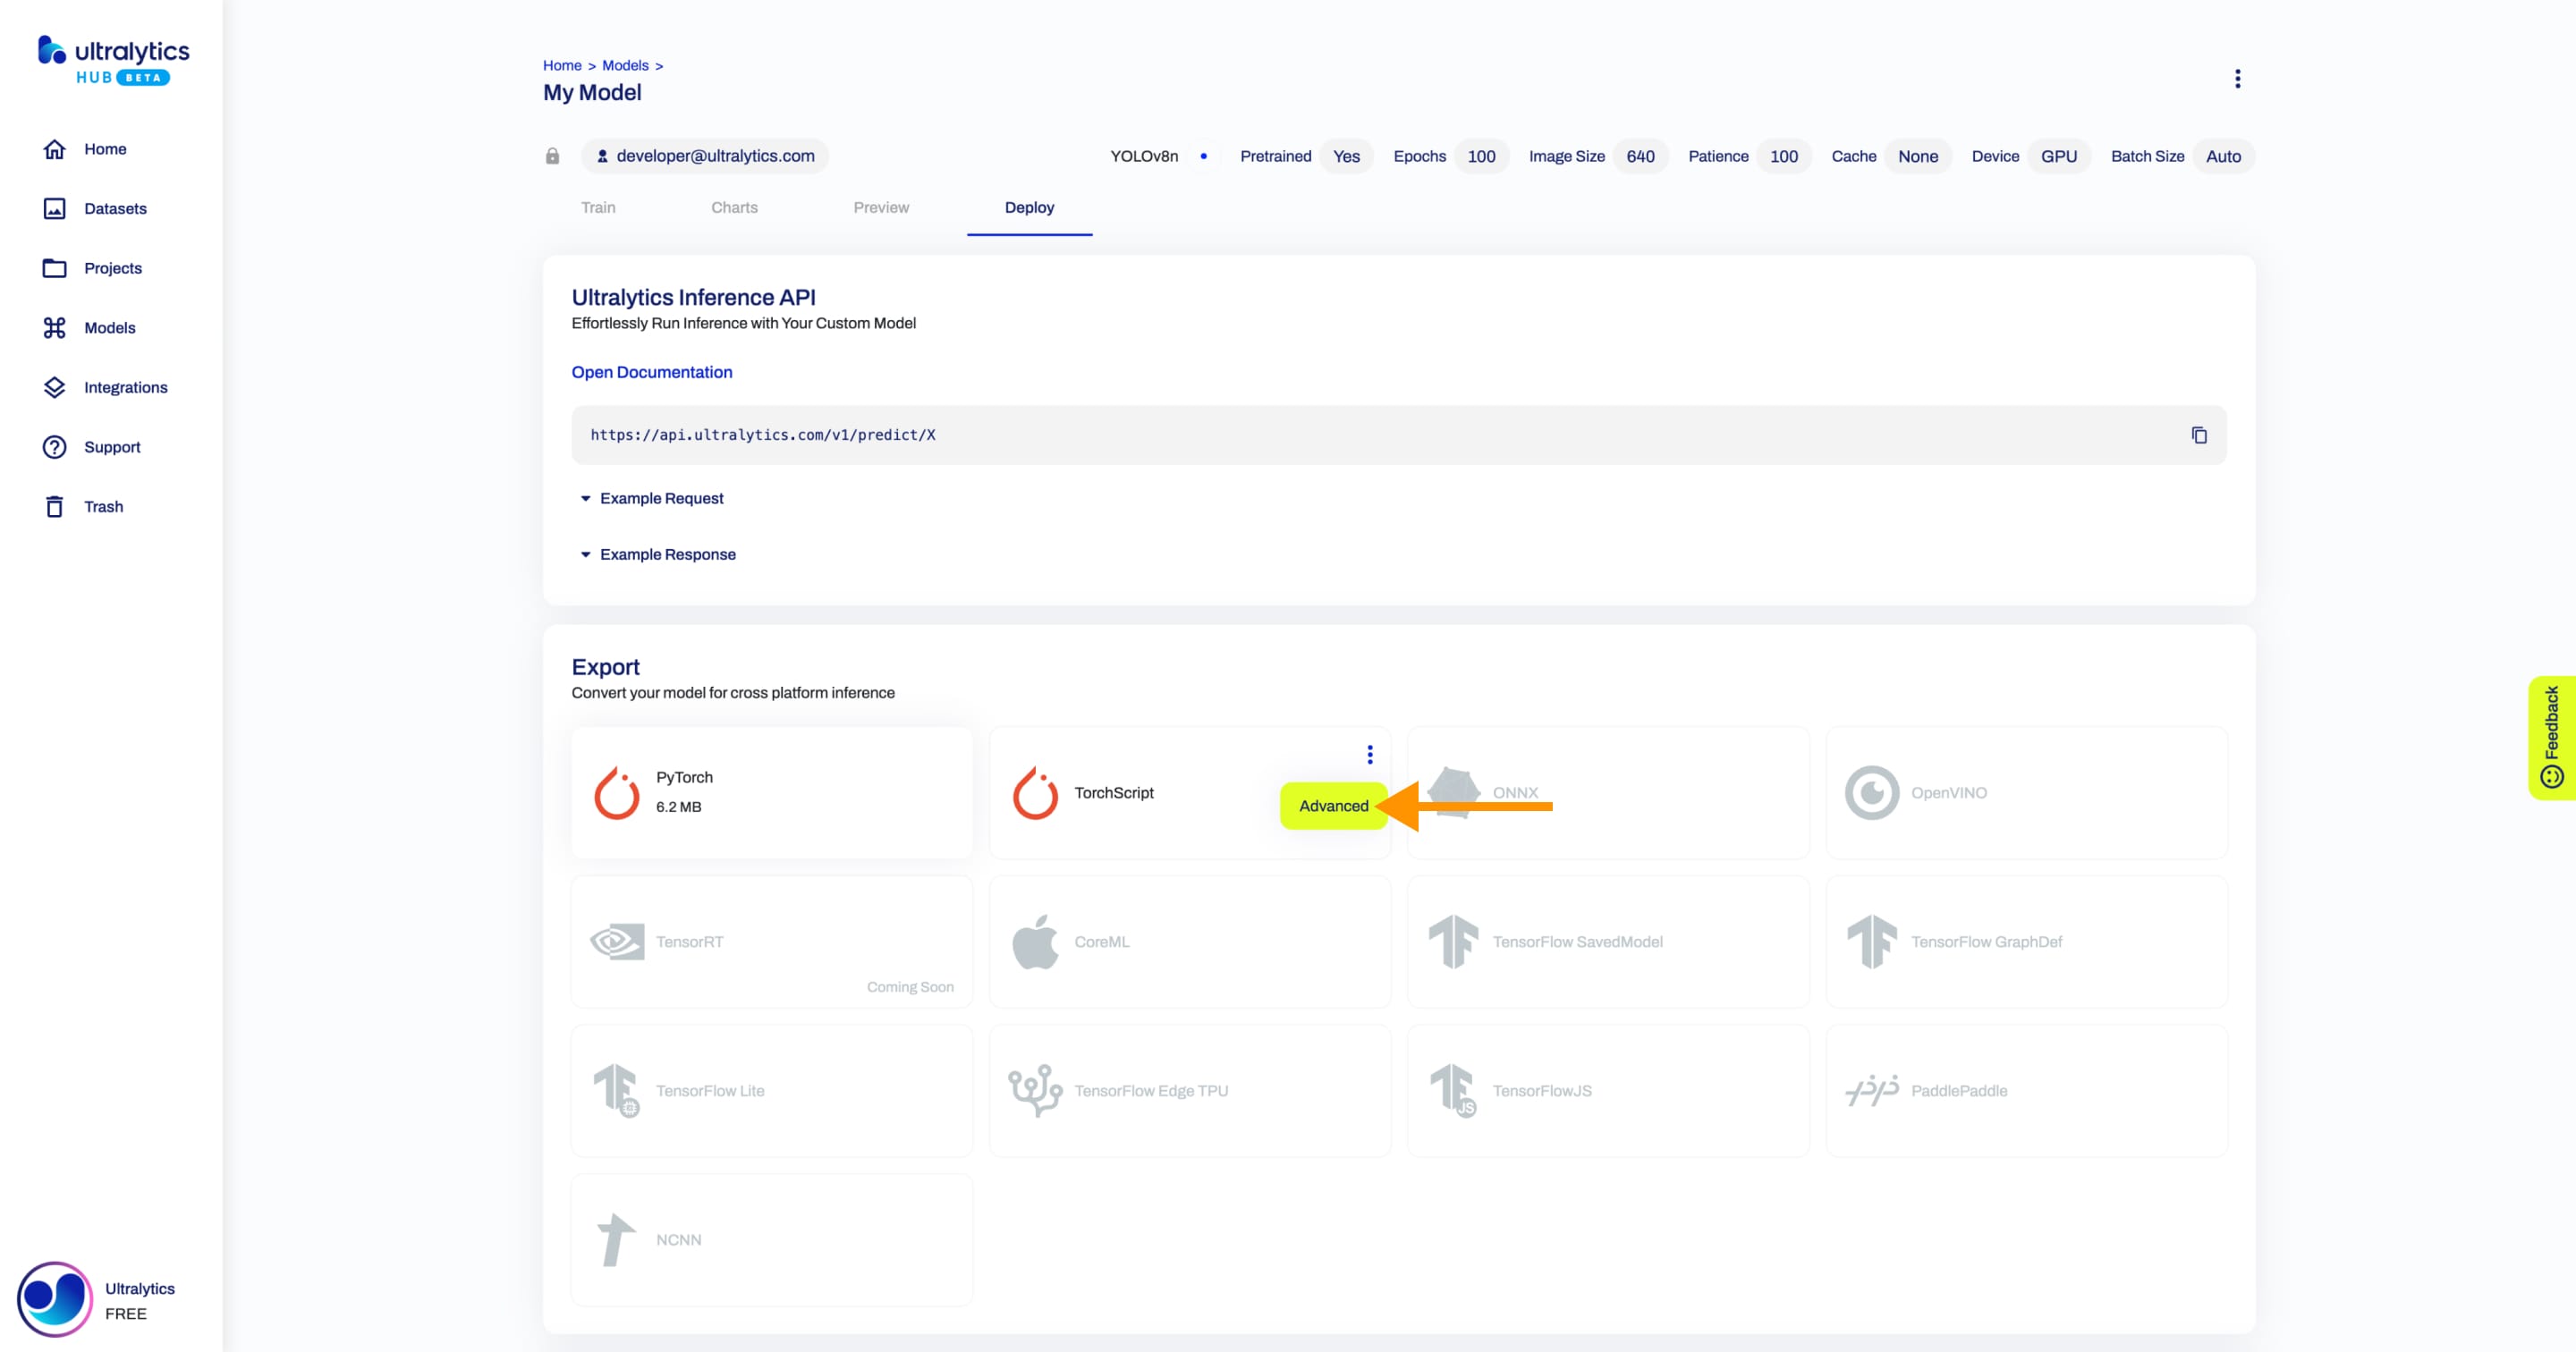
!!! note "Note"
You can re-export each format if you open the export actions dropdown and click on the **Advanced** option.
You can also use our Inference API in production.
Read the Ultralytics Inference API documentation for more information.
Share Model
!!! info "Info"
[Ultralytics HUB](https://ultralytics.com/hub)'s sharing functionality provides a convenient way to share models with others. This feature is designed to accommodate both existing [Ultralytics HUB](https://ultralytics.com/hub) users and those who have yet to create an account.
??? note "Note"
You have control over the general access of your models.

You can choose to set the general access to "Private", in which case, only you will have access to it. Alternatively, you can set the general access to "Unlisted" which grants viewing access to anyone who has the direct link to the model, regardless of whether they have an [Ultralytics HUB](https://ultralytics.com/hub) account or not.
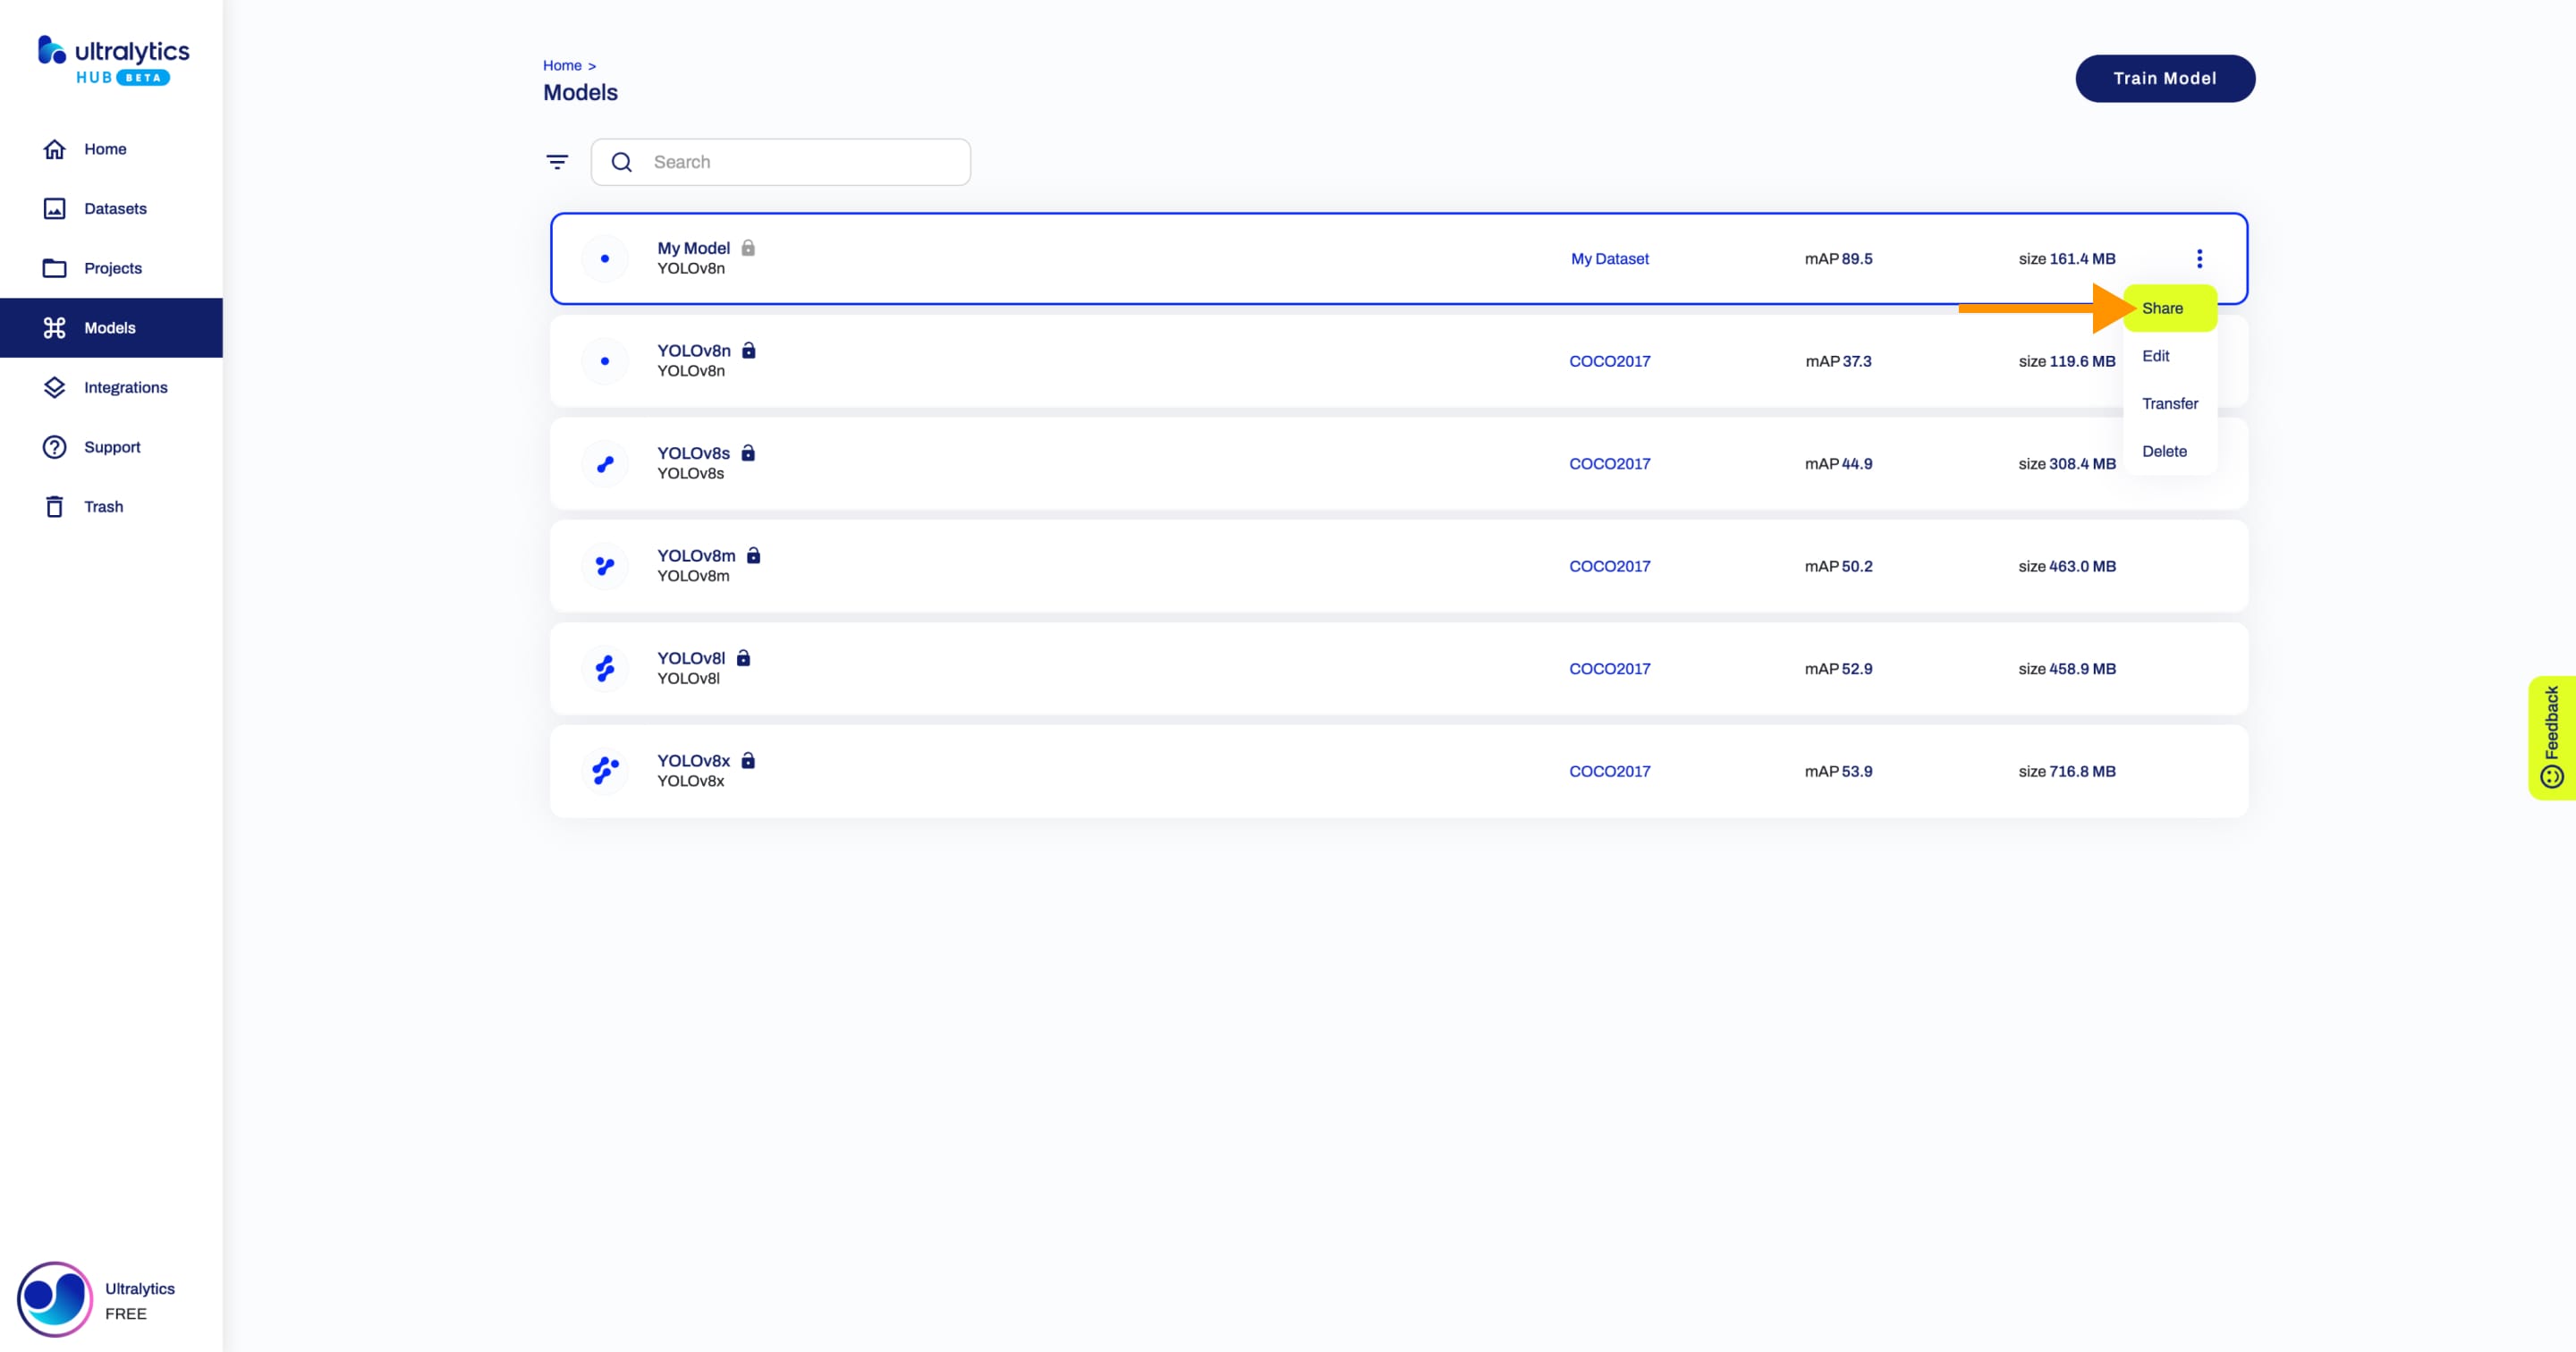
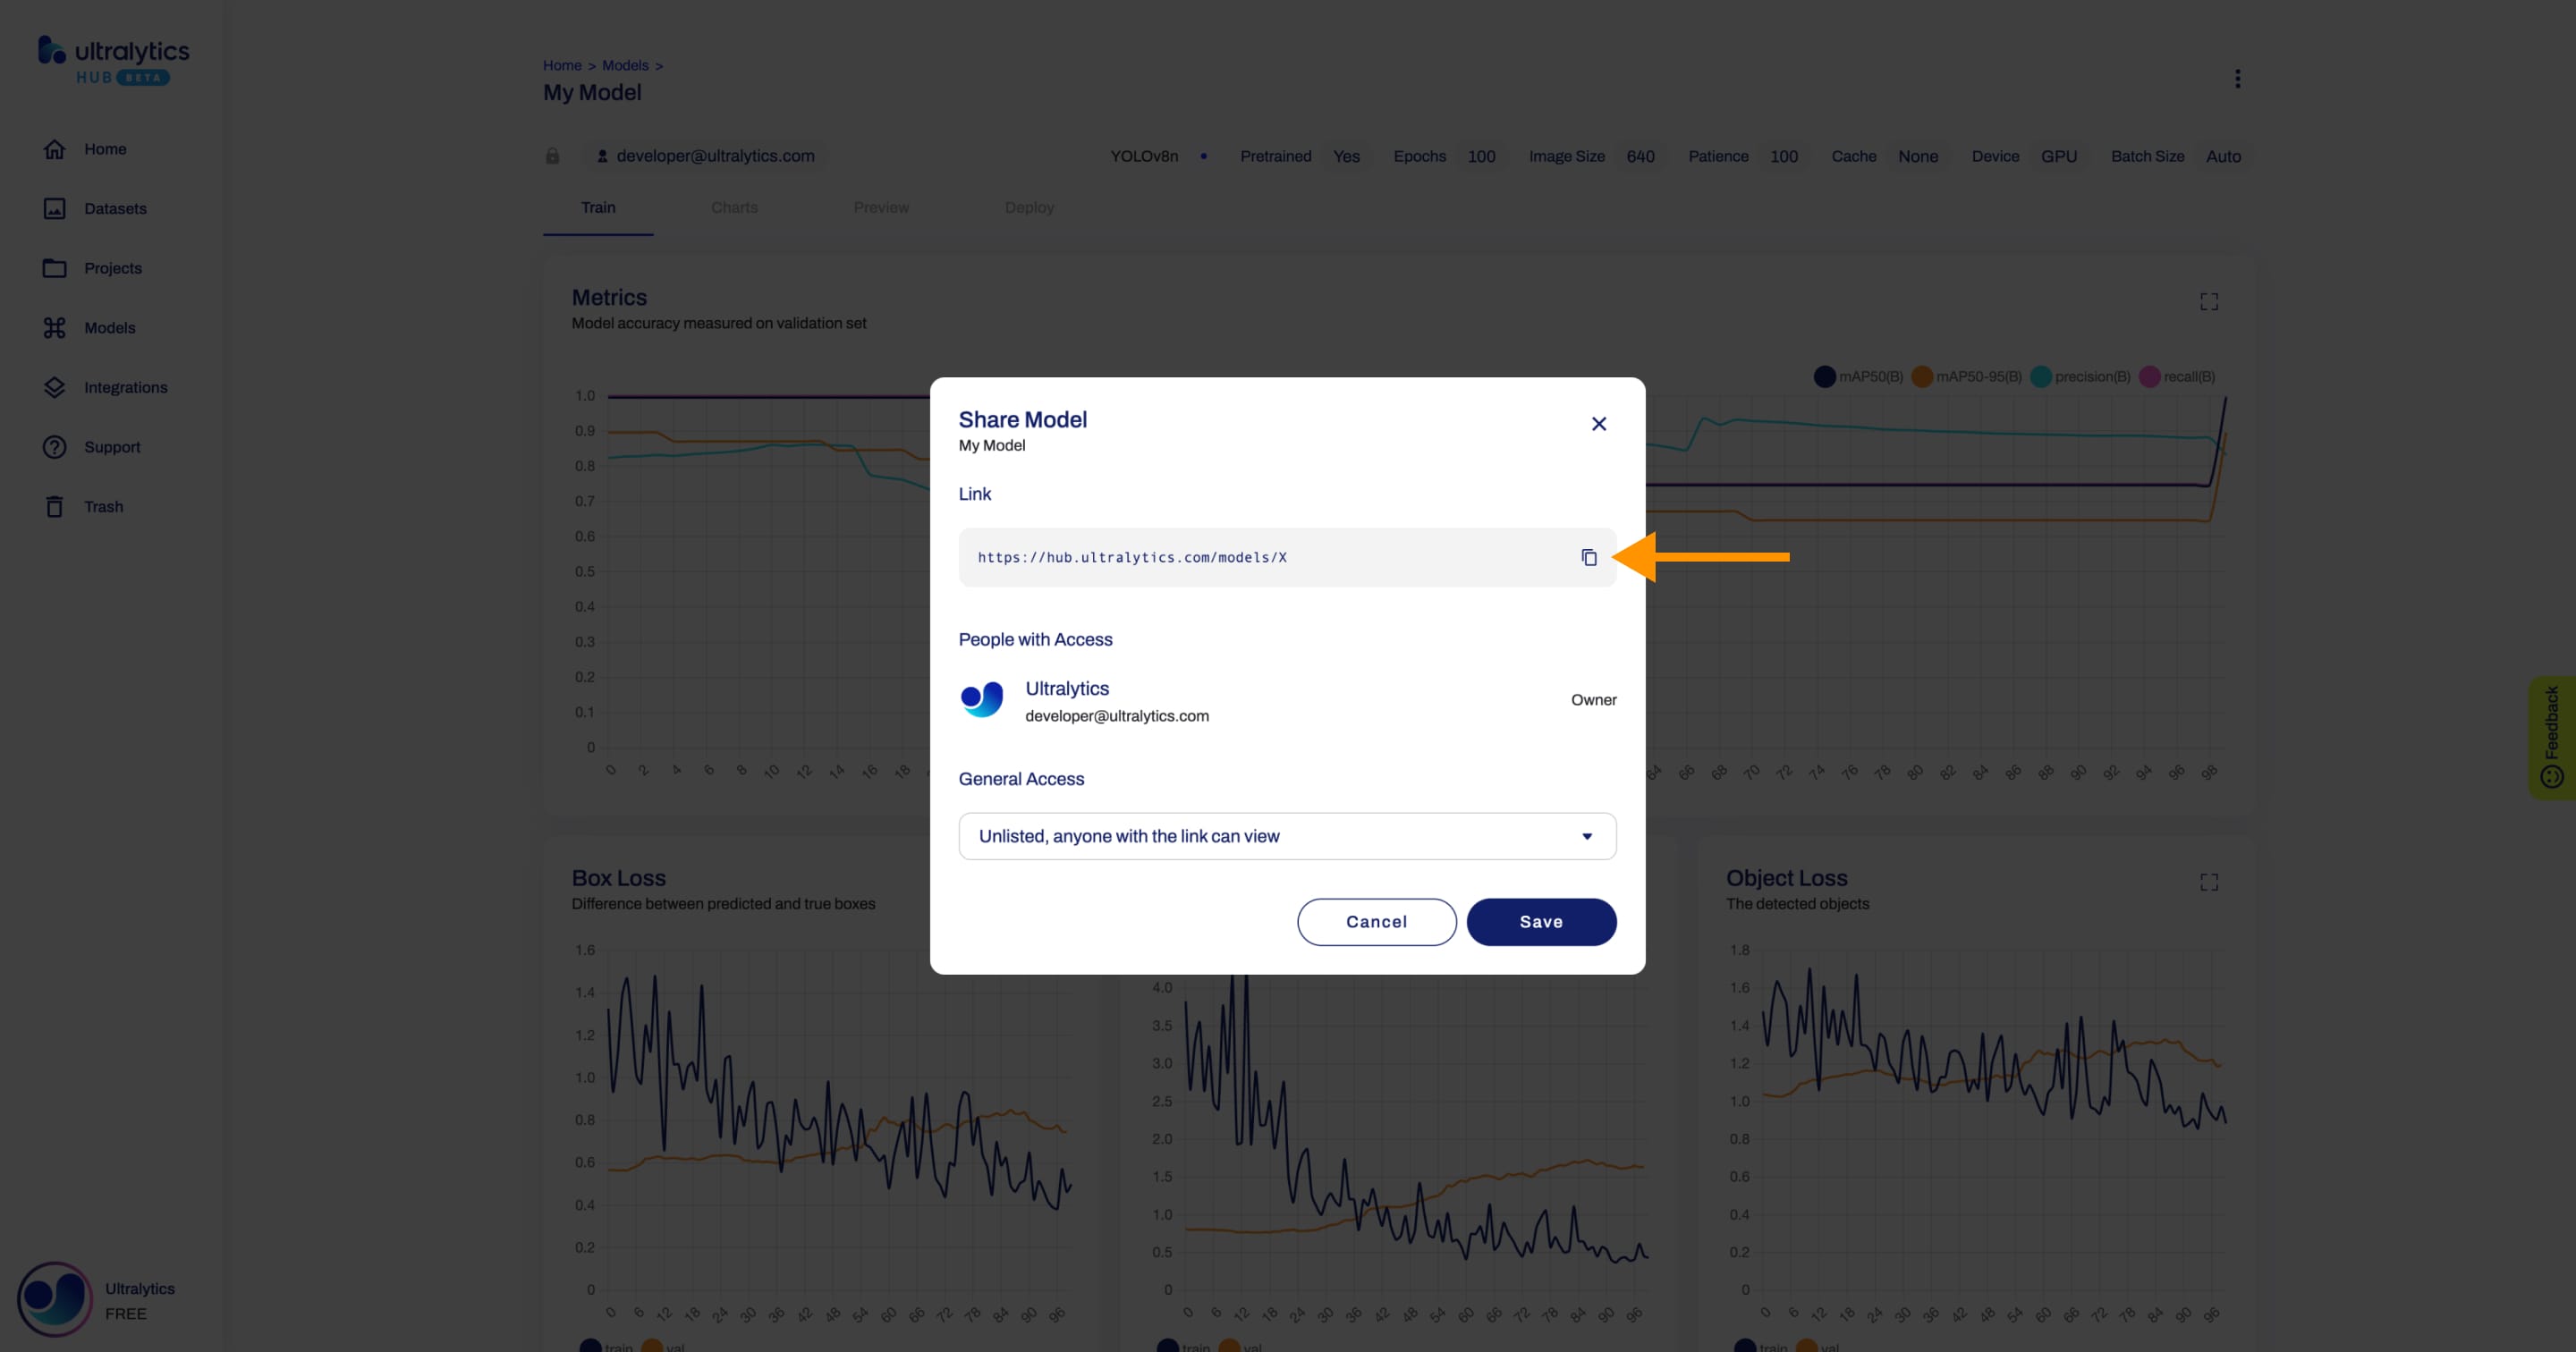
Navigate to the Model page of the model you want to share, open the model actions dropdown and click on the Share option. This action will trigger the Share Model dialog.
??? tip "Tip"
You can also share a model directly from the [Models](https://hub.ultralytics.com/models) page or from the Project page of the project where your model is located.
Set the general access to "Unlisted" and click Save.
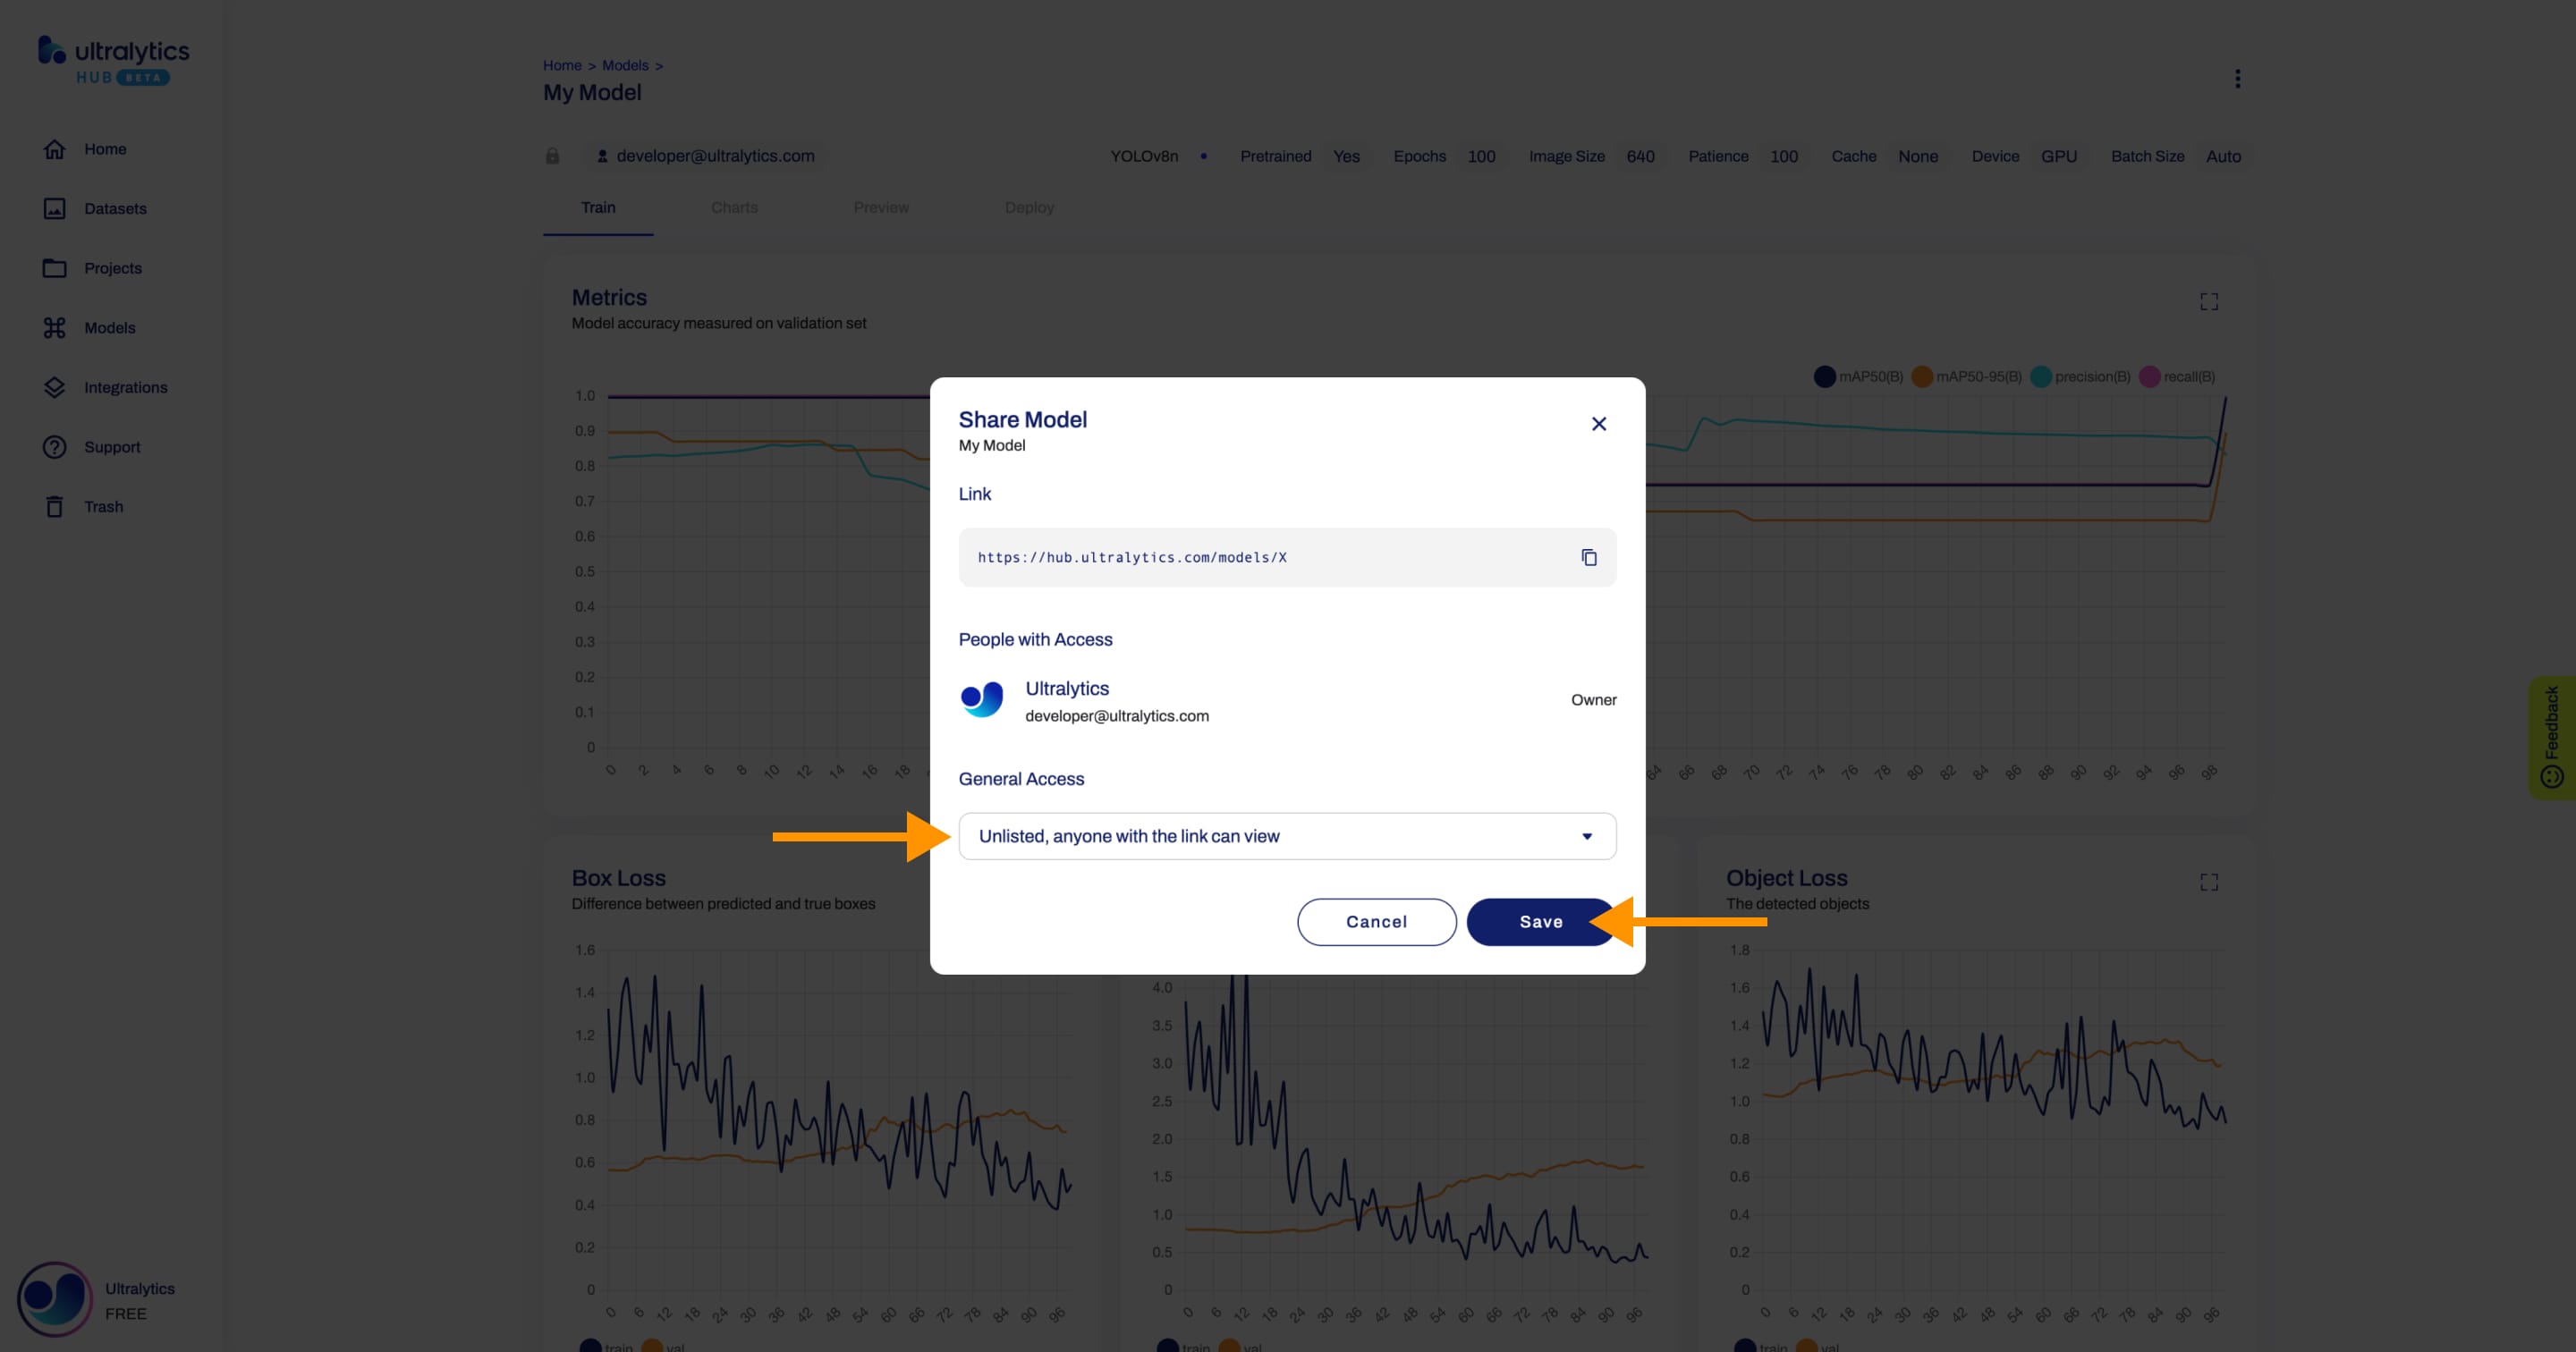
Now, anyone who has the direct link to your model can view it.
??? tip "Tip"
You can easily click on the model's link shown in the **Share Model** dialog to copy it.
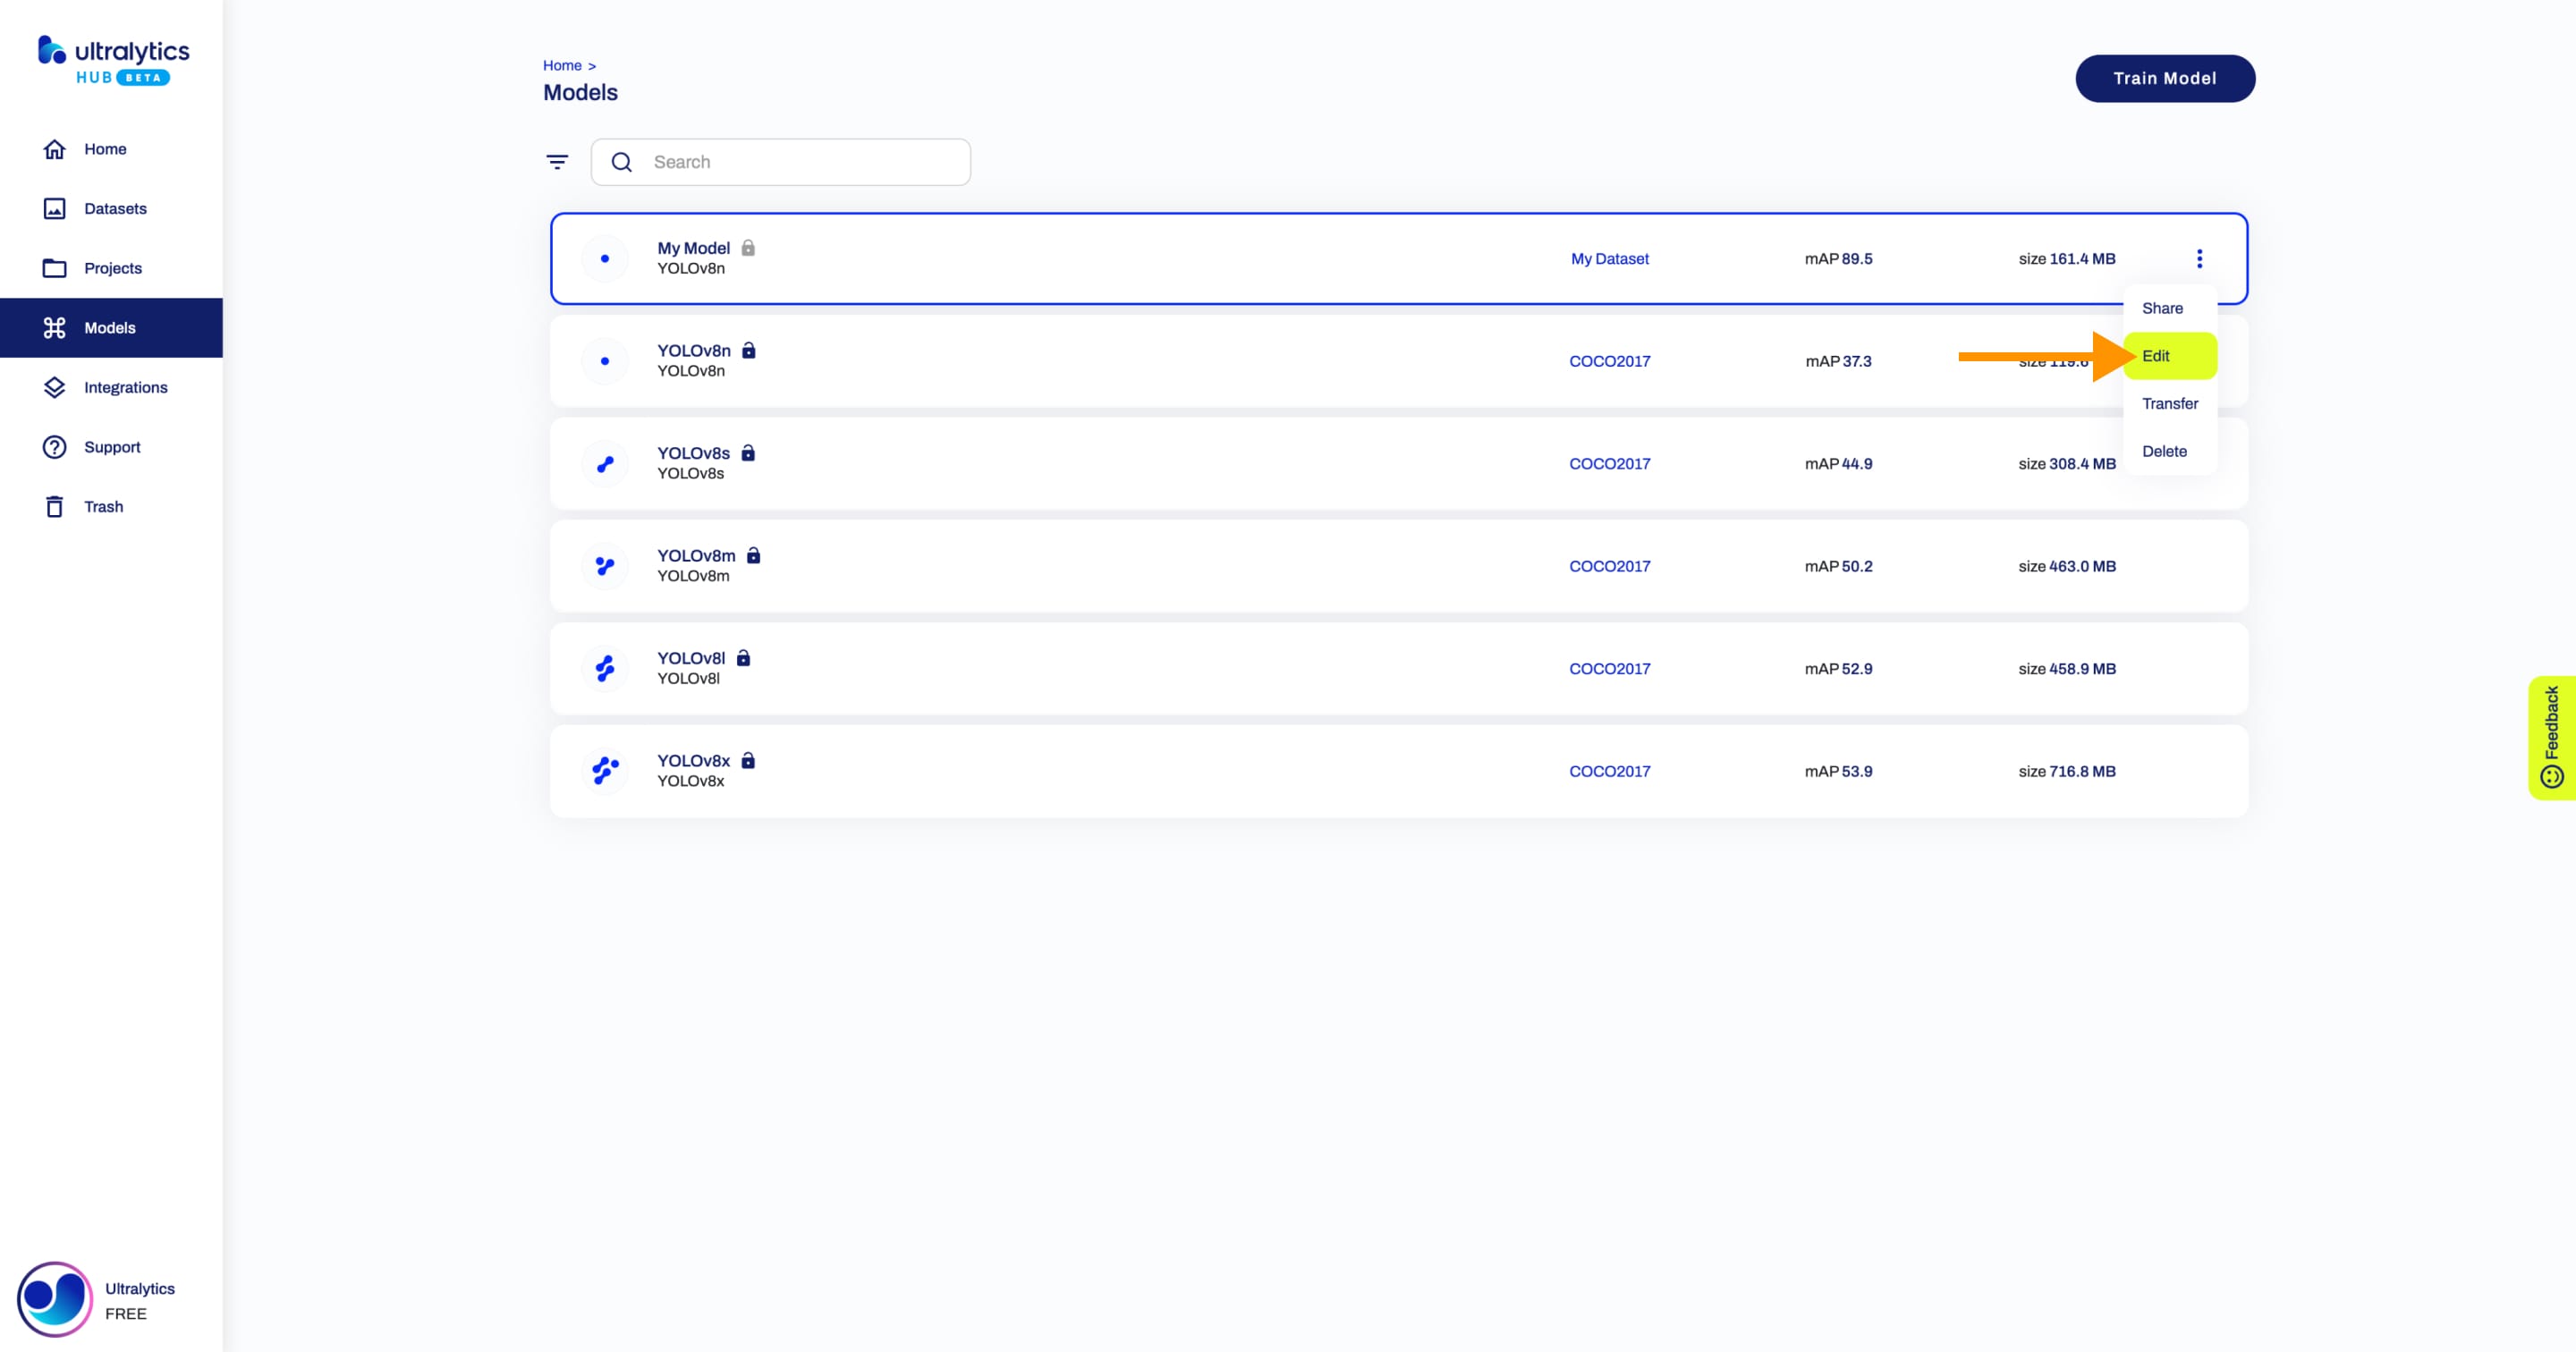
Edit Model
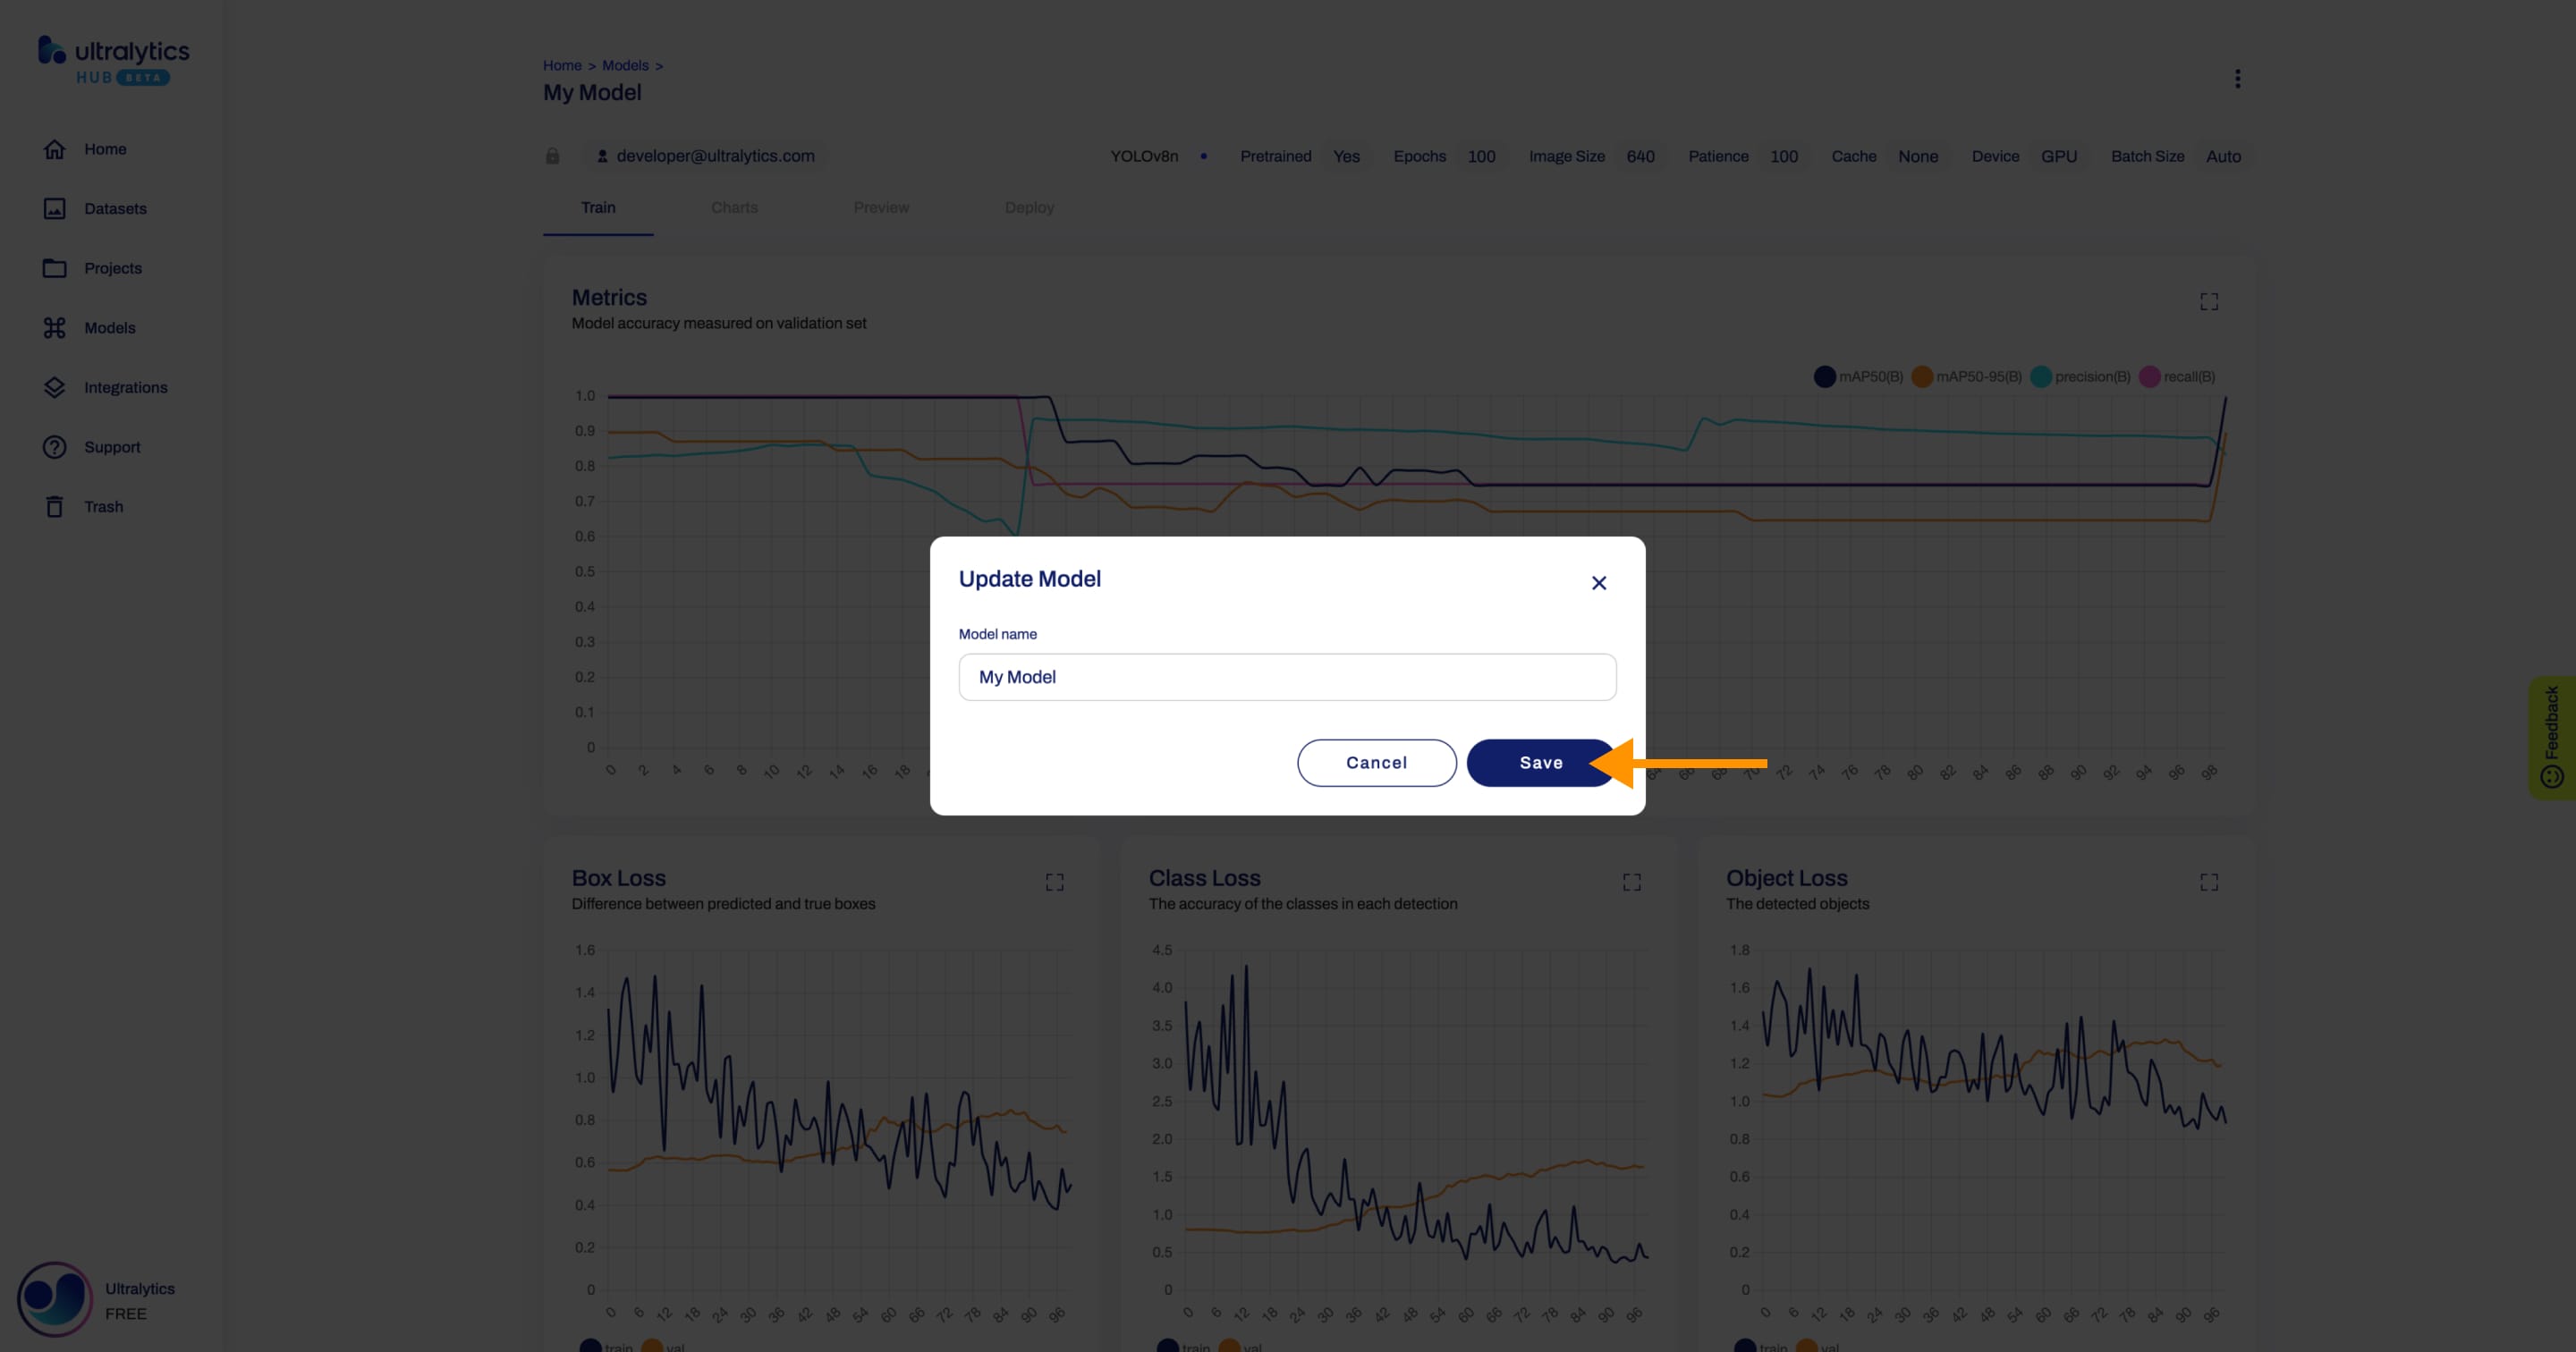
Navigate to the Model page of the model you want to edit, open the model actions dropdown and click on the Edit option. This action will trigger the Update Model dialog.
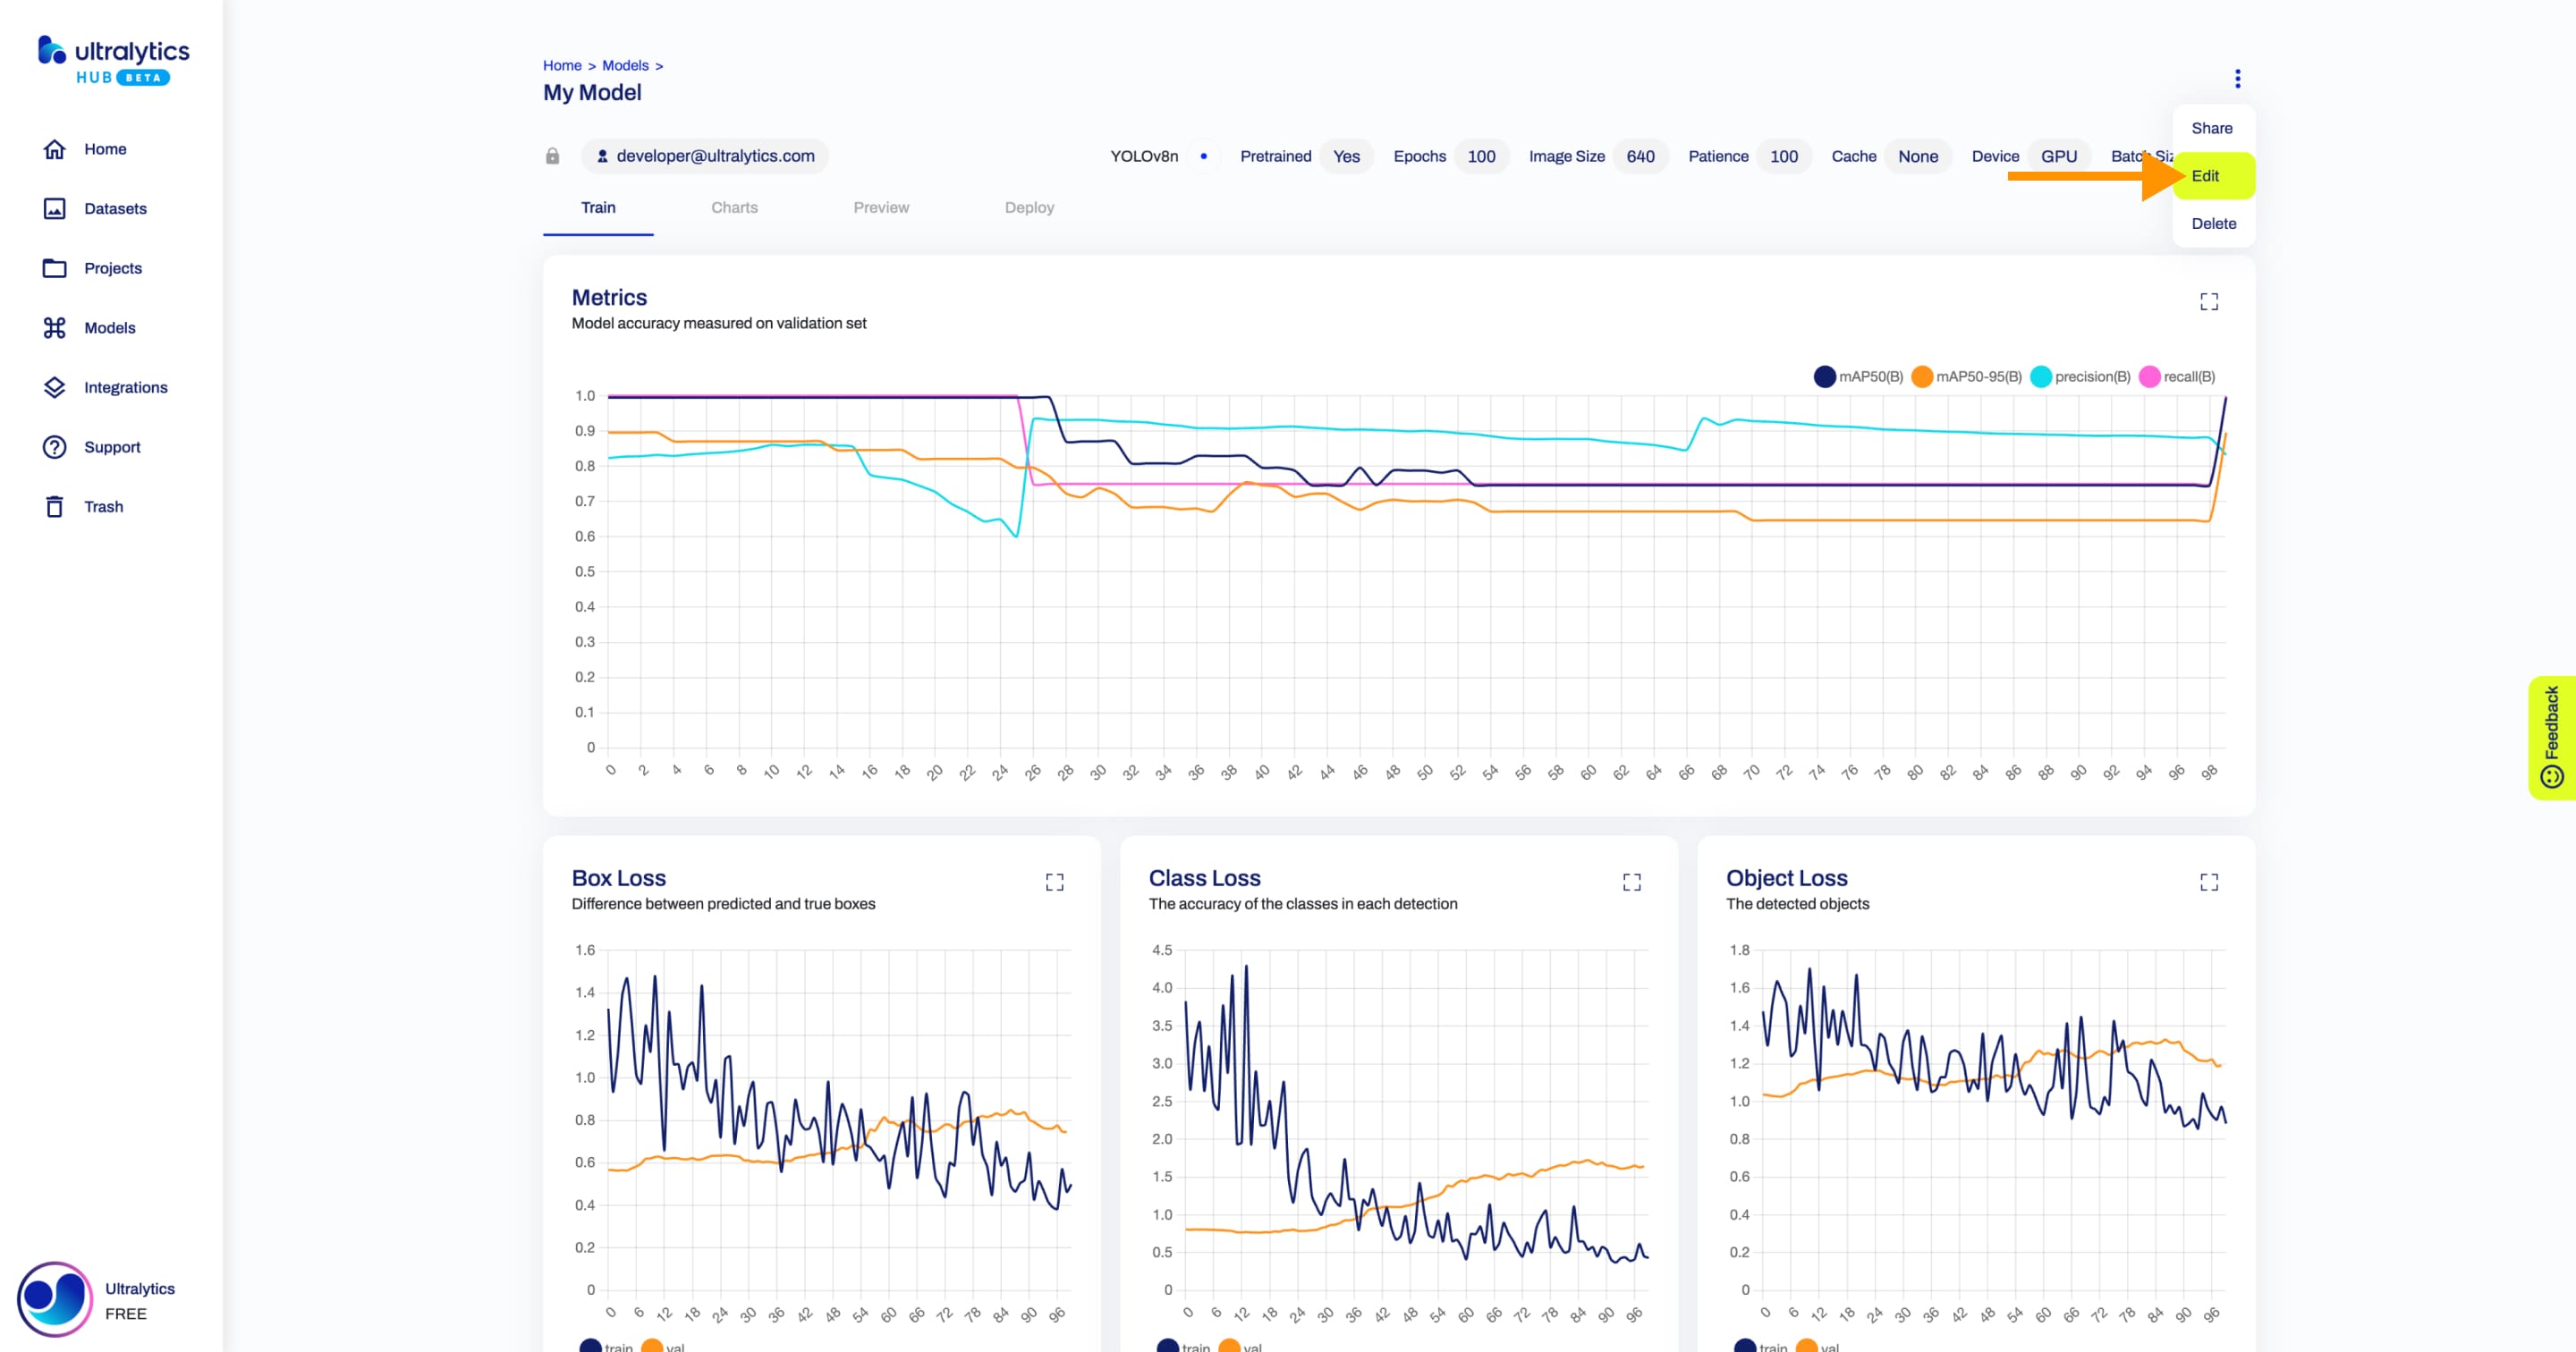
??? tip "Tip"
You can also edit a model directly from the [Models](https://hub.ultralytics.com/models) page or from the Project page of the project where your model is located.
Apply the desired modifications to your model and then confirm the changes by clicking Save.
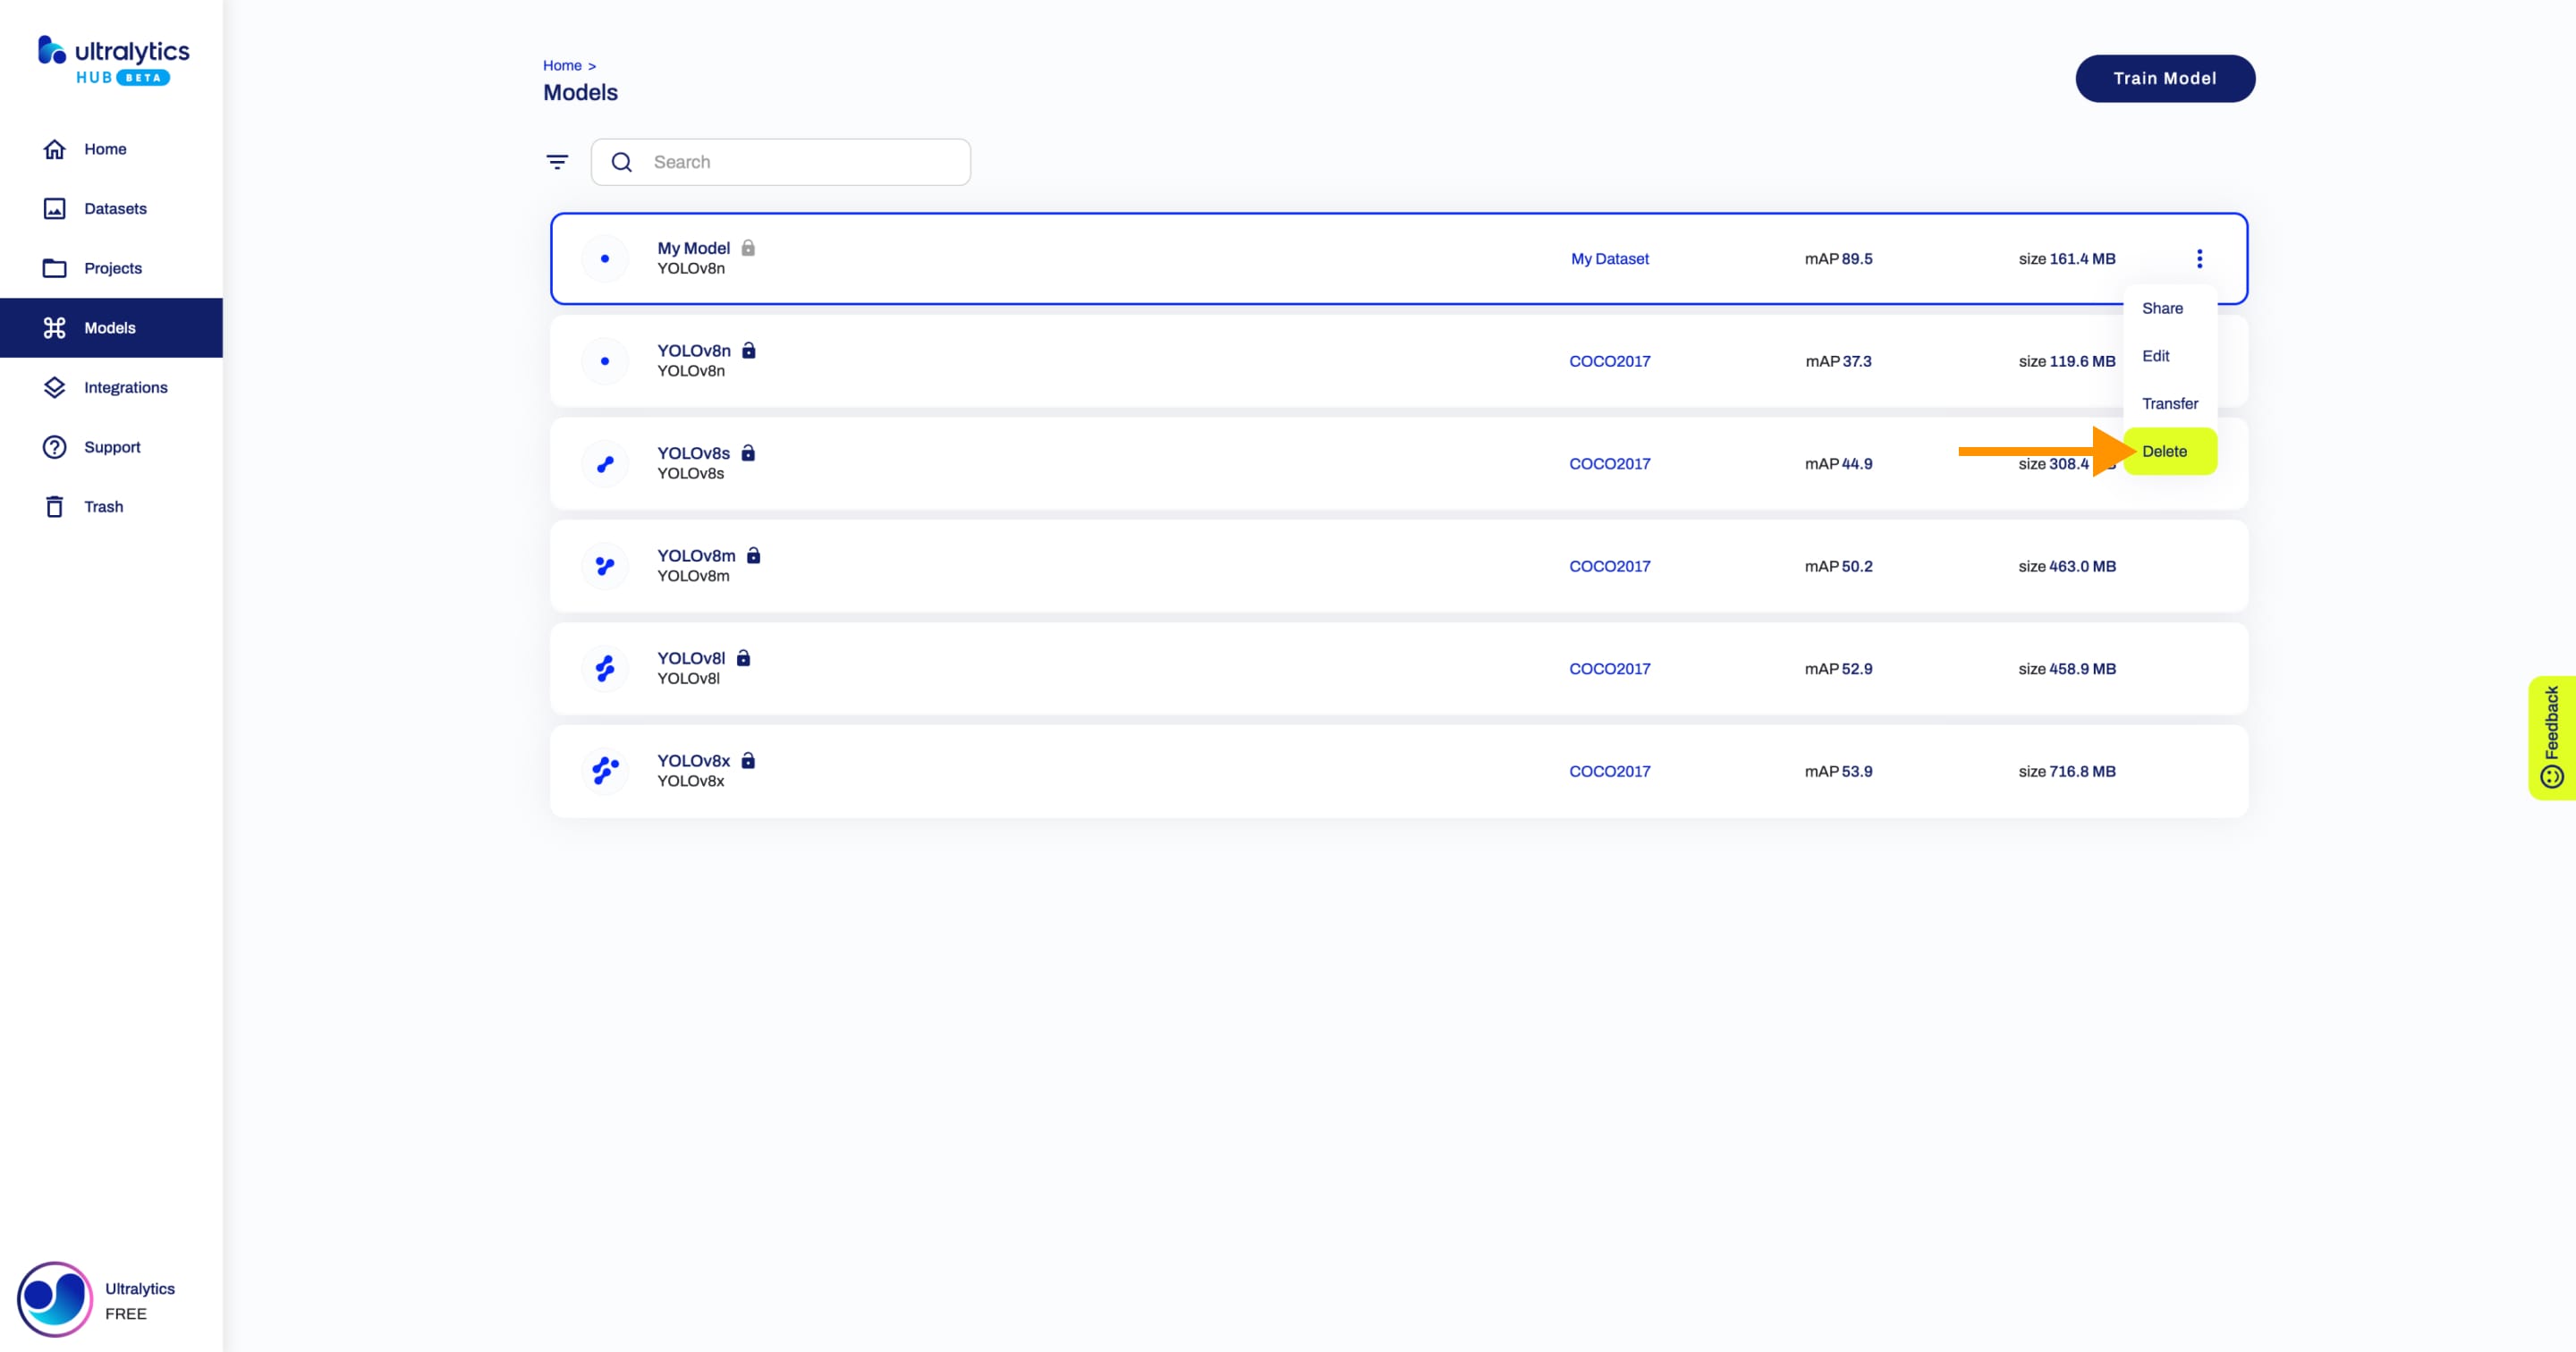
Delete Model
Navigate to the Model page of the model you want to delete, open the model actions dropdown and click on the Delete option. This action will delete the model.
??? tip "Tip"
You can also delete a model directly from the [Models](https://hub.ultralytics.com/models) page or from the Project page of the project where your model is located.
!!! note "Note"
If you change your mind, you can restore the model from the [Trash](https://hub.ultralytics.com/trash) page.

comments: true
description: Discover the enhanced features of Ultralytics HUB Pro Plan including 200GB storage, cloud training, and more. Learn how to upgrade and manage your account balance.
keywords: Ultralytics HUB, Pro Plan, upgrade guide, cloud training, storage, inference API, team collaboration, account balance
Ultralytics HUB Pro
Ultralytics HUB offers the Pro Plan as a monthly or annual subscription.
The Pro Plan provides early access to upcoming features and includes enhanced benefits:
- 200GB of storage, compared to the standard 20GB.
- Access to our Cloud Training.
- Increased rate limits for our Inference API.
- Collaboration features for teams.
Upgrade
You can upgrade to the Pro Plan from the Billing & License tab on the Settings page by clicking on the Upgrade button.
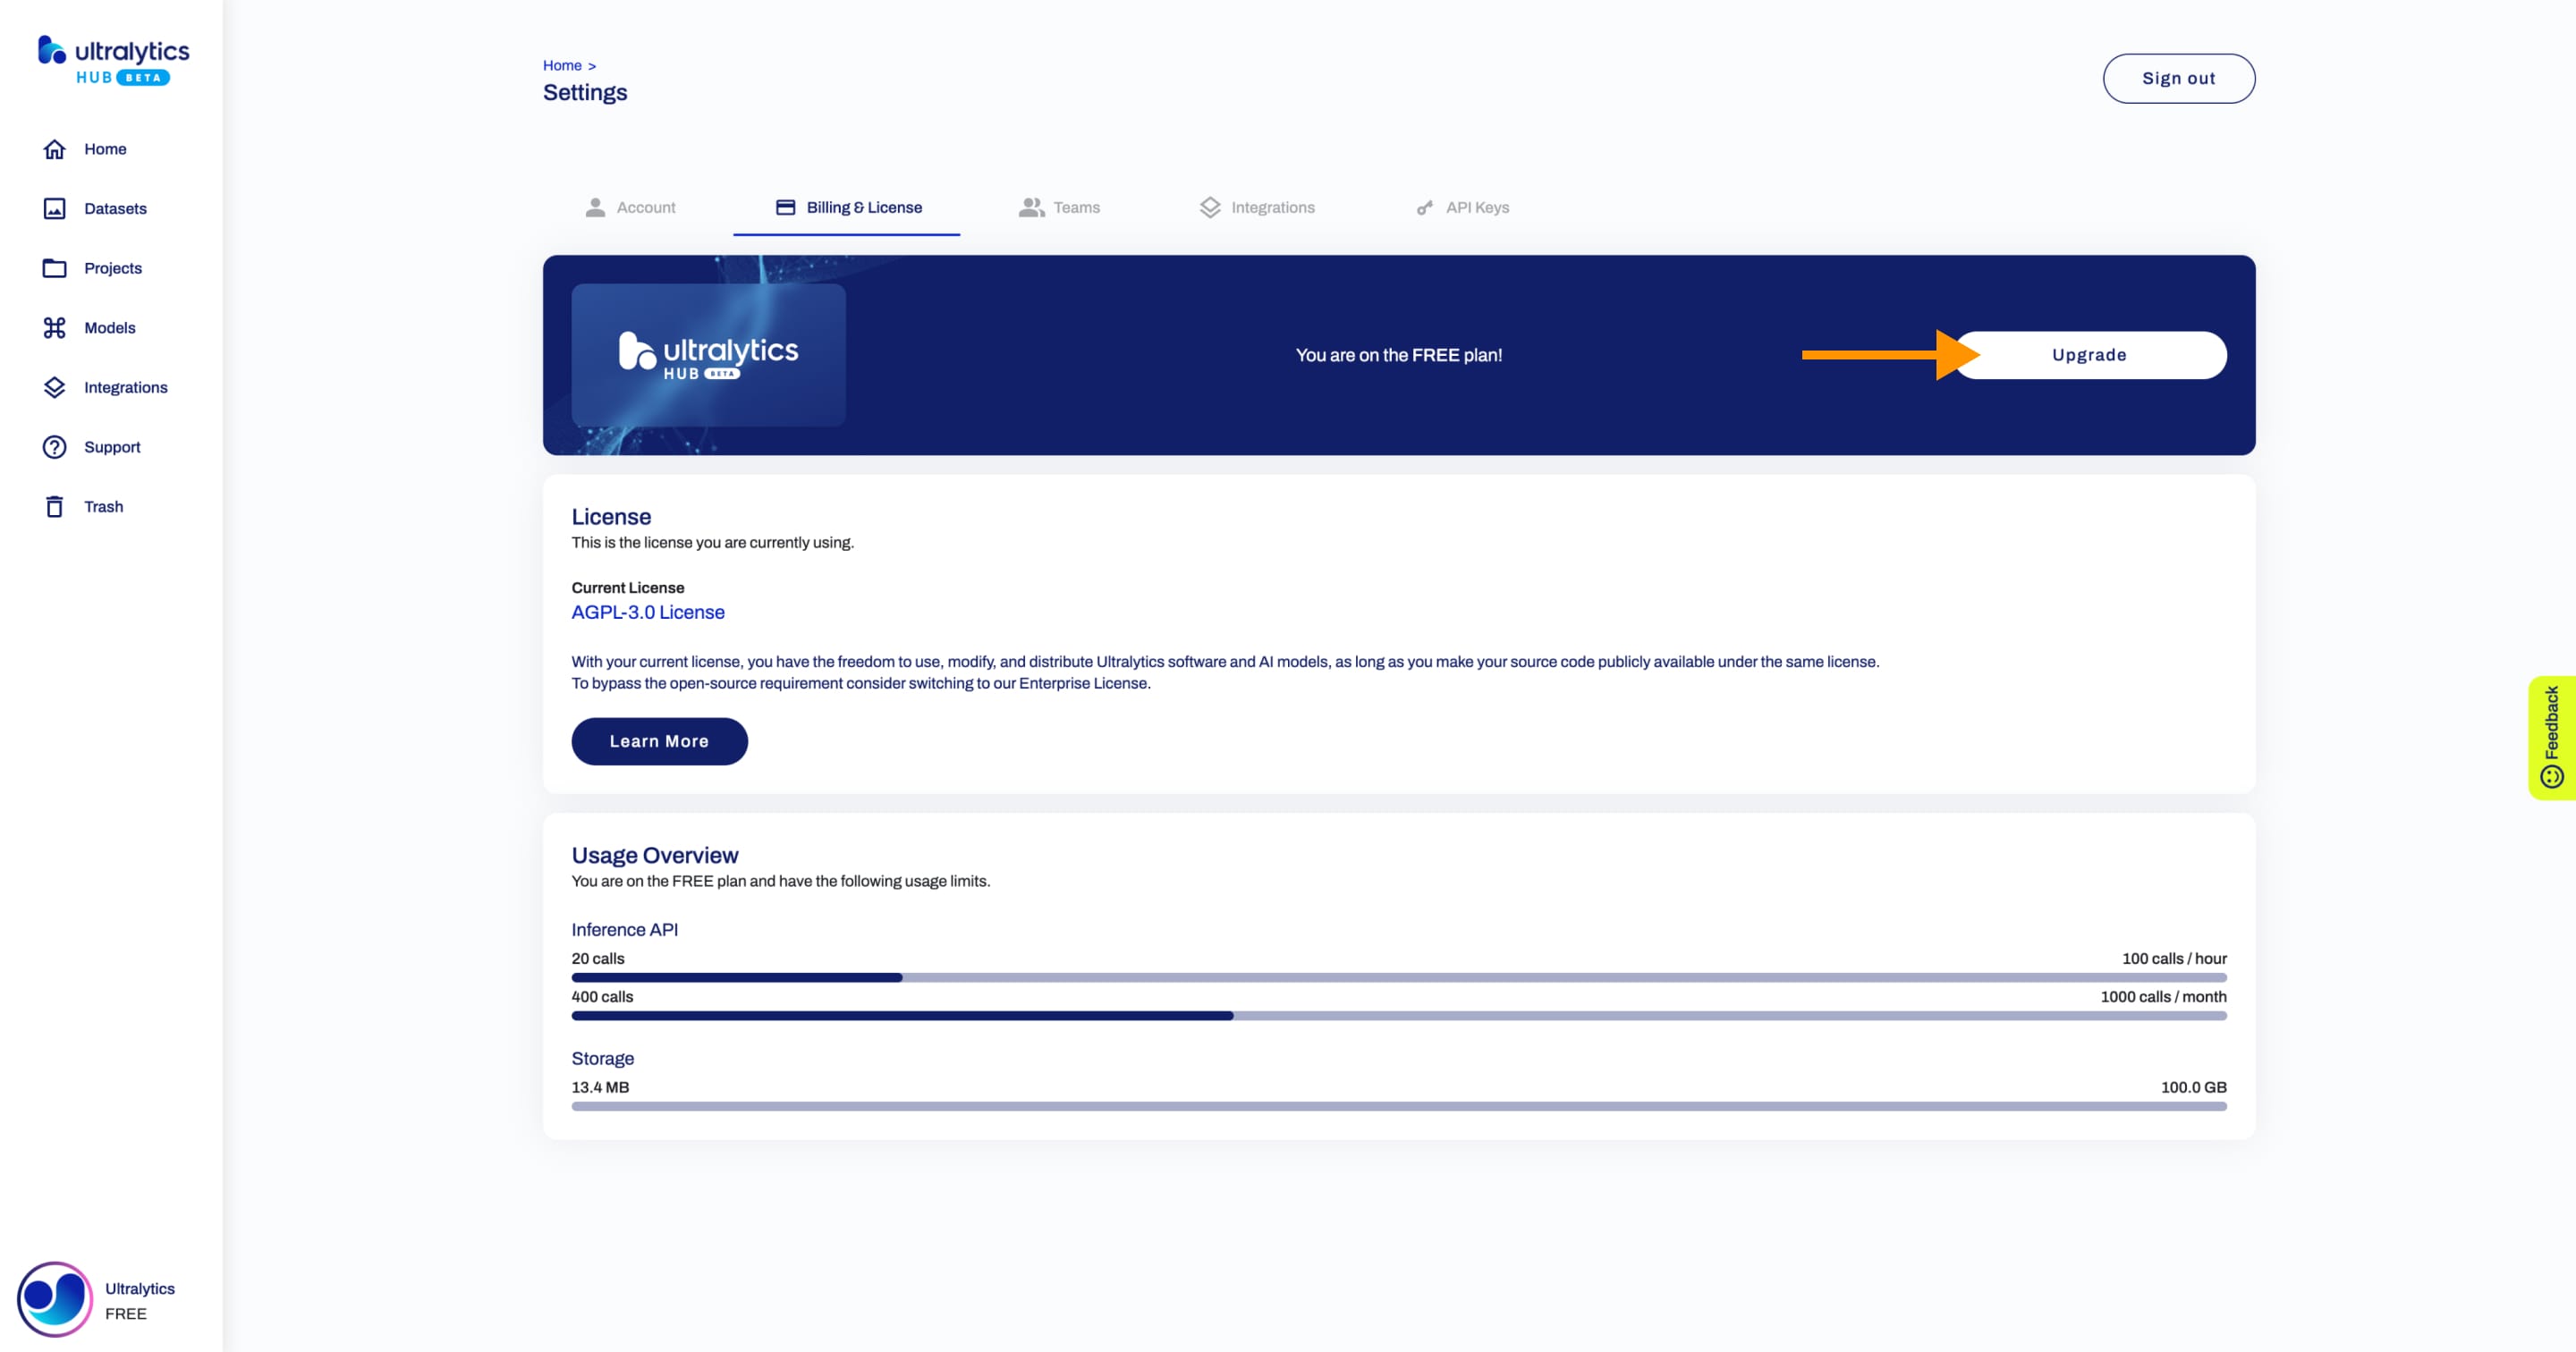
Next, select the Pro Plan.
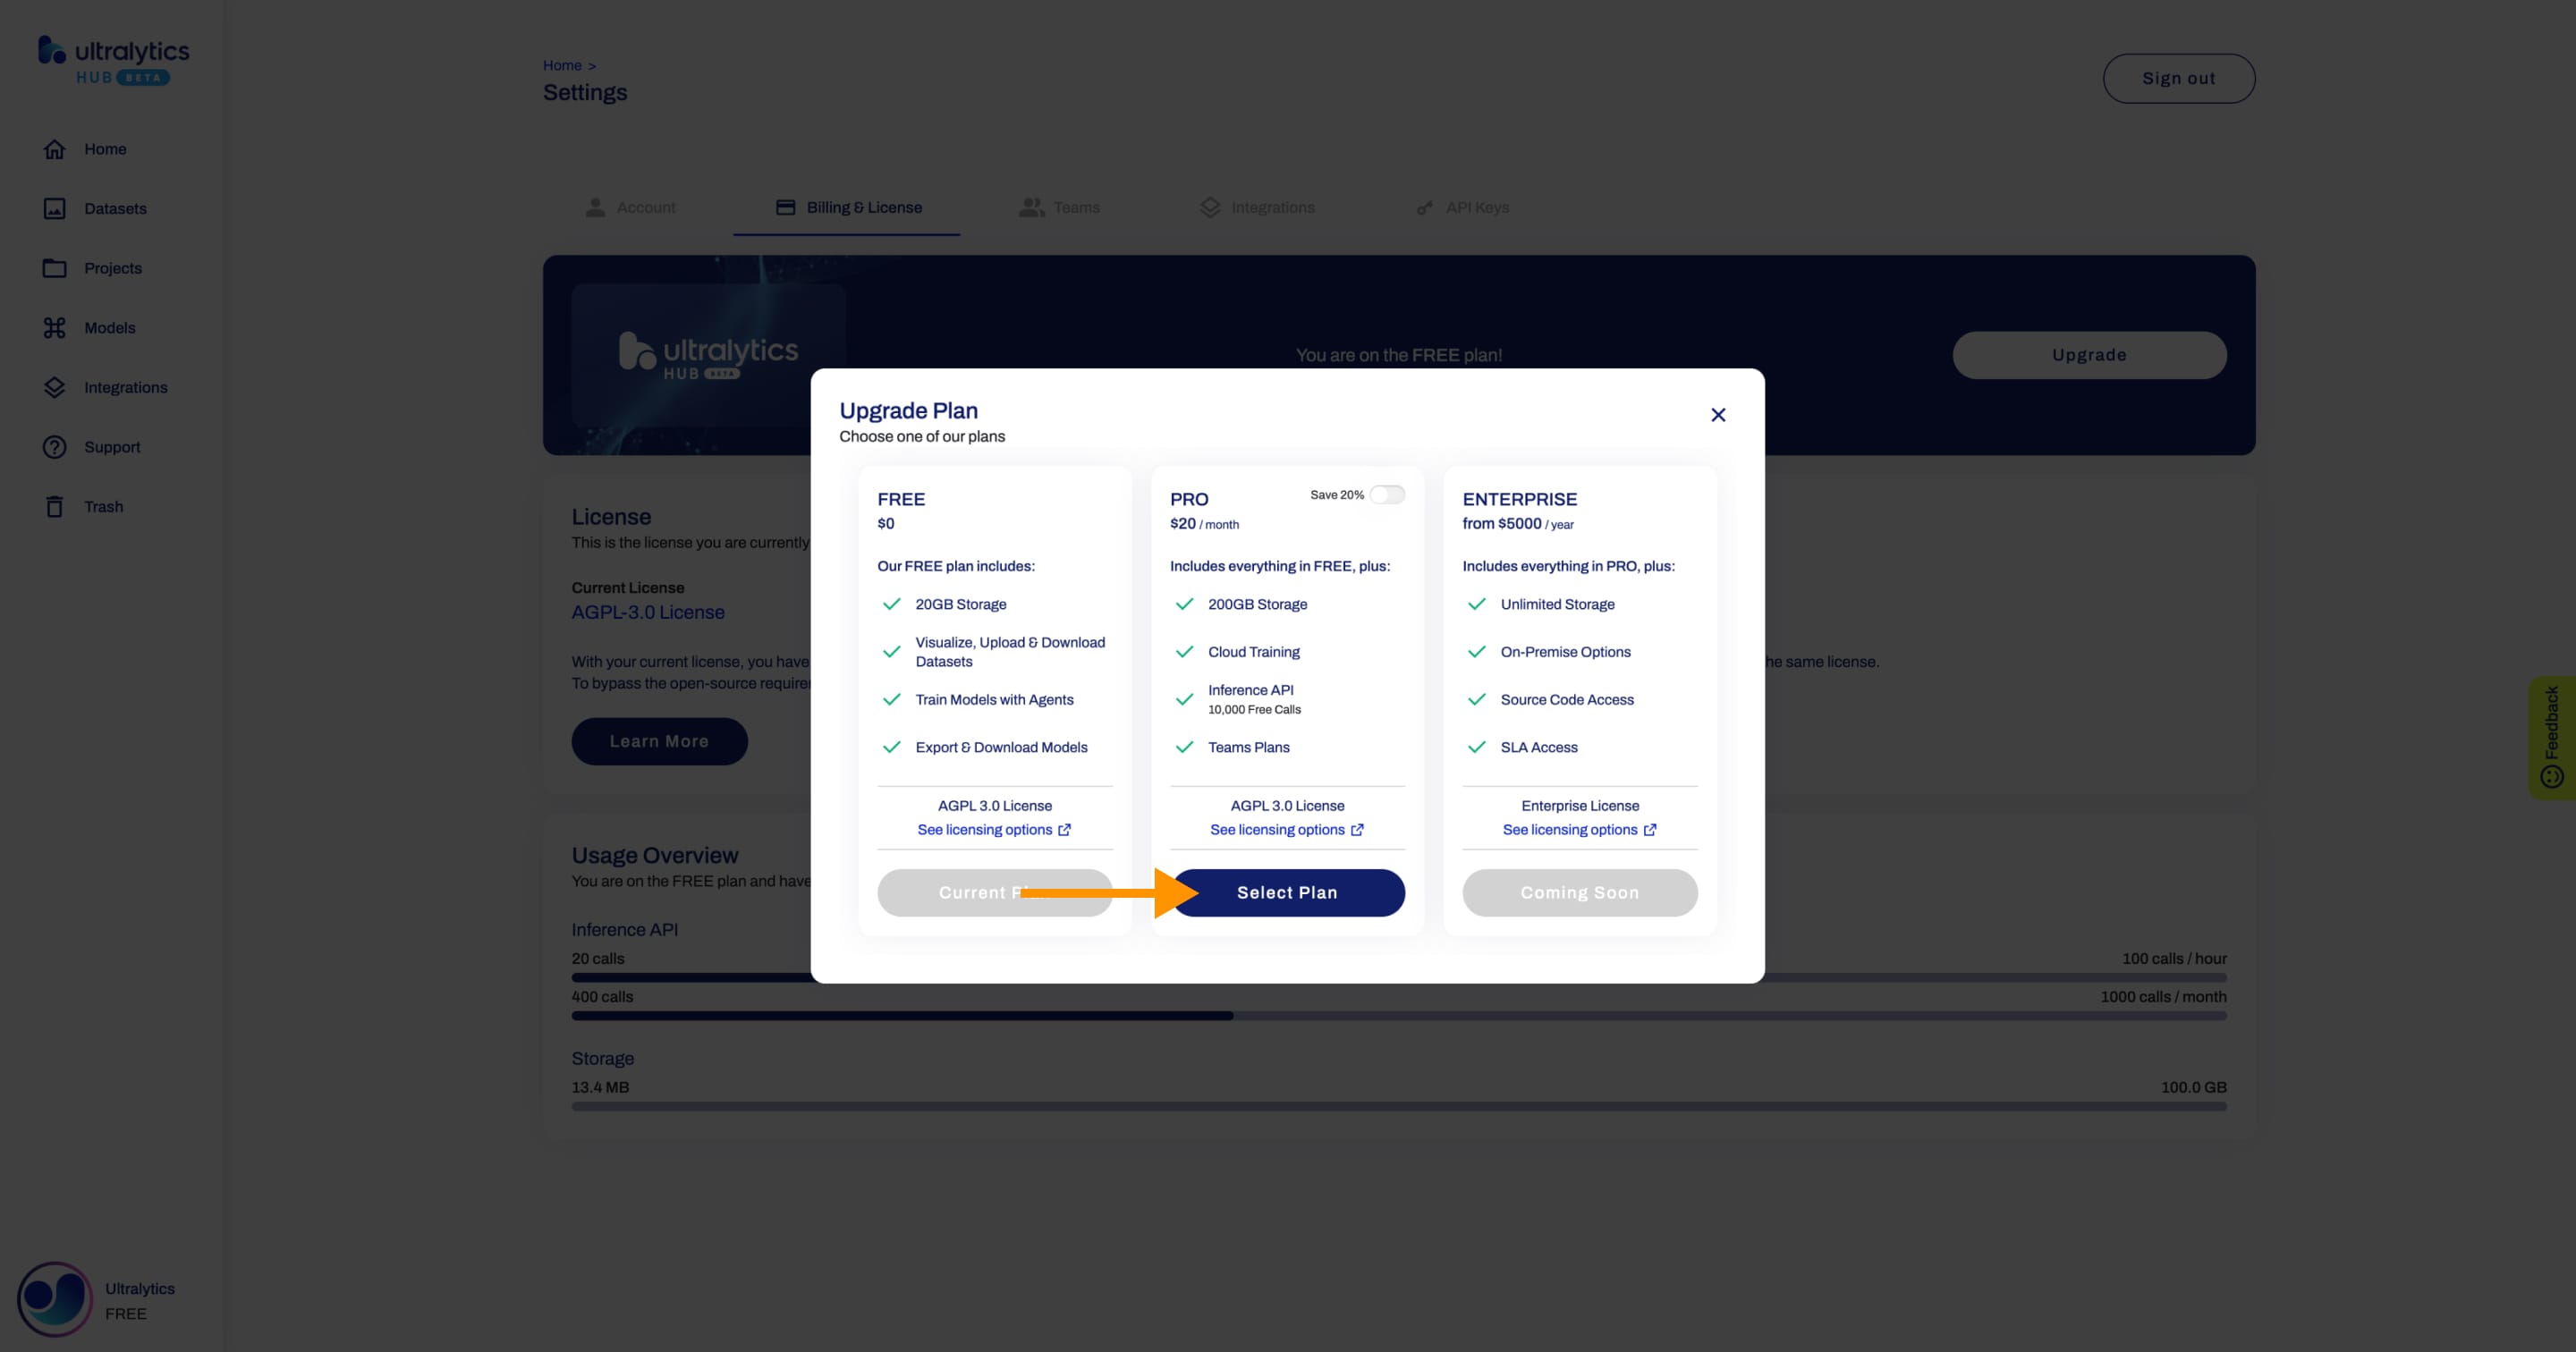
!!! tip "Tip"
You can save 20% if you choose the annual Pro Plan.

Fill in your details during the checkout.
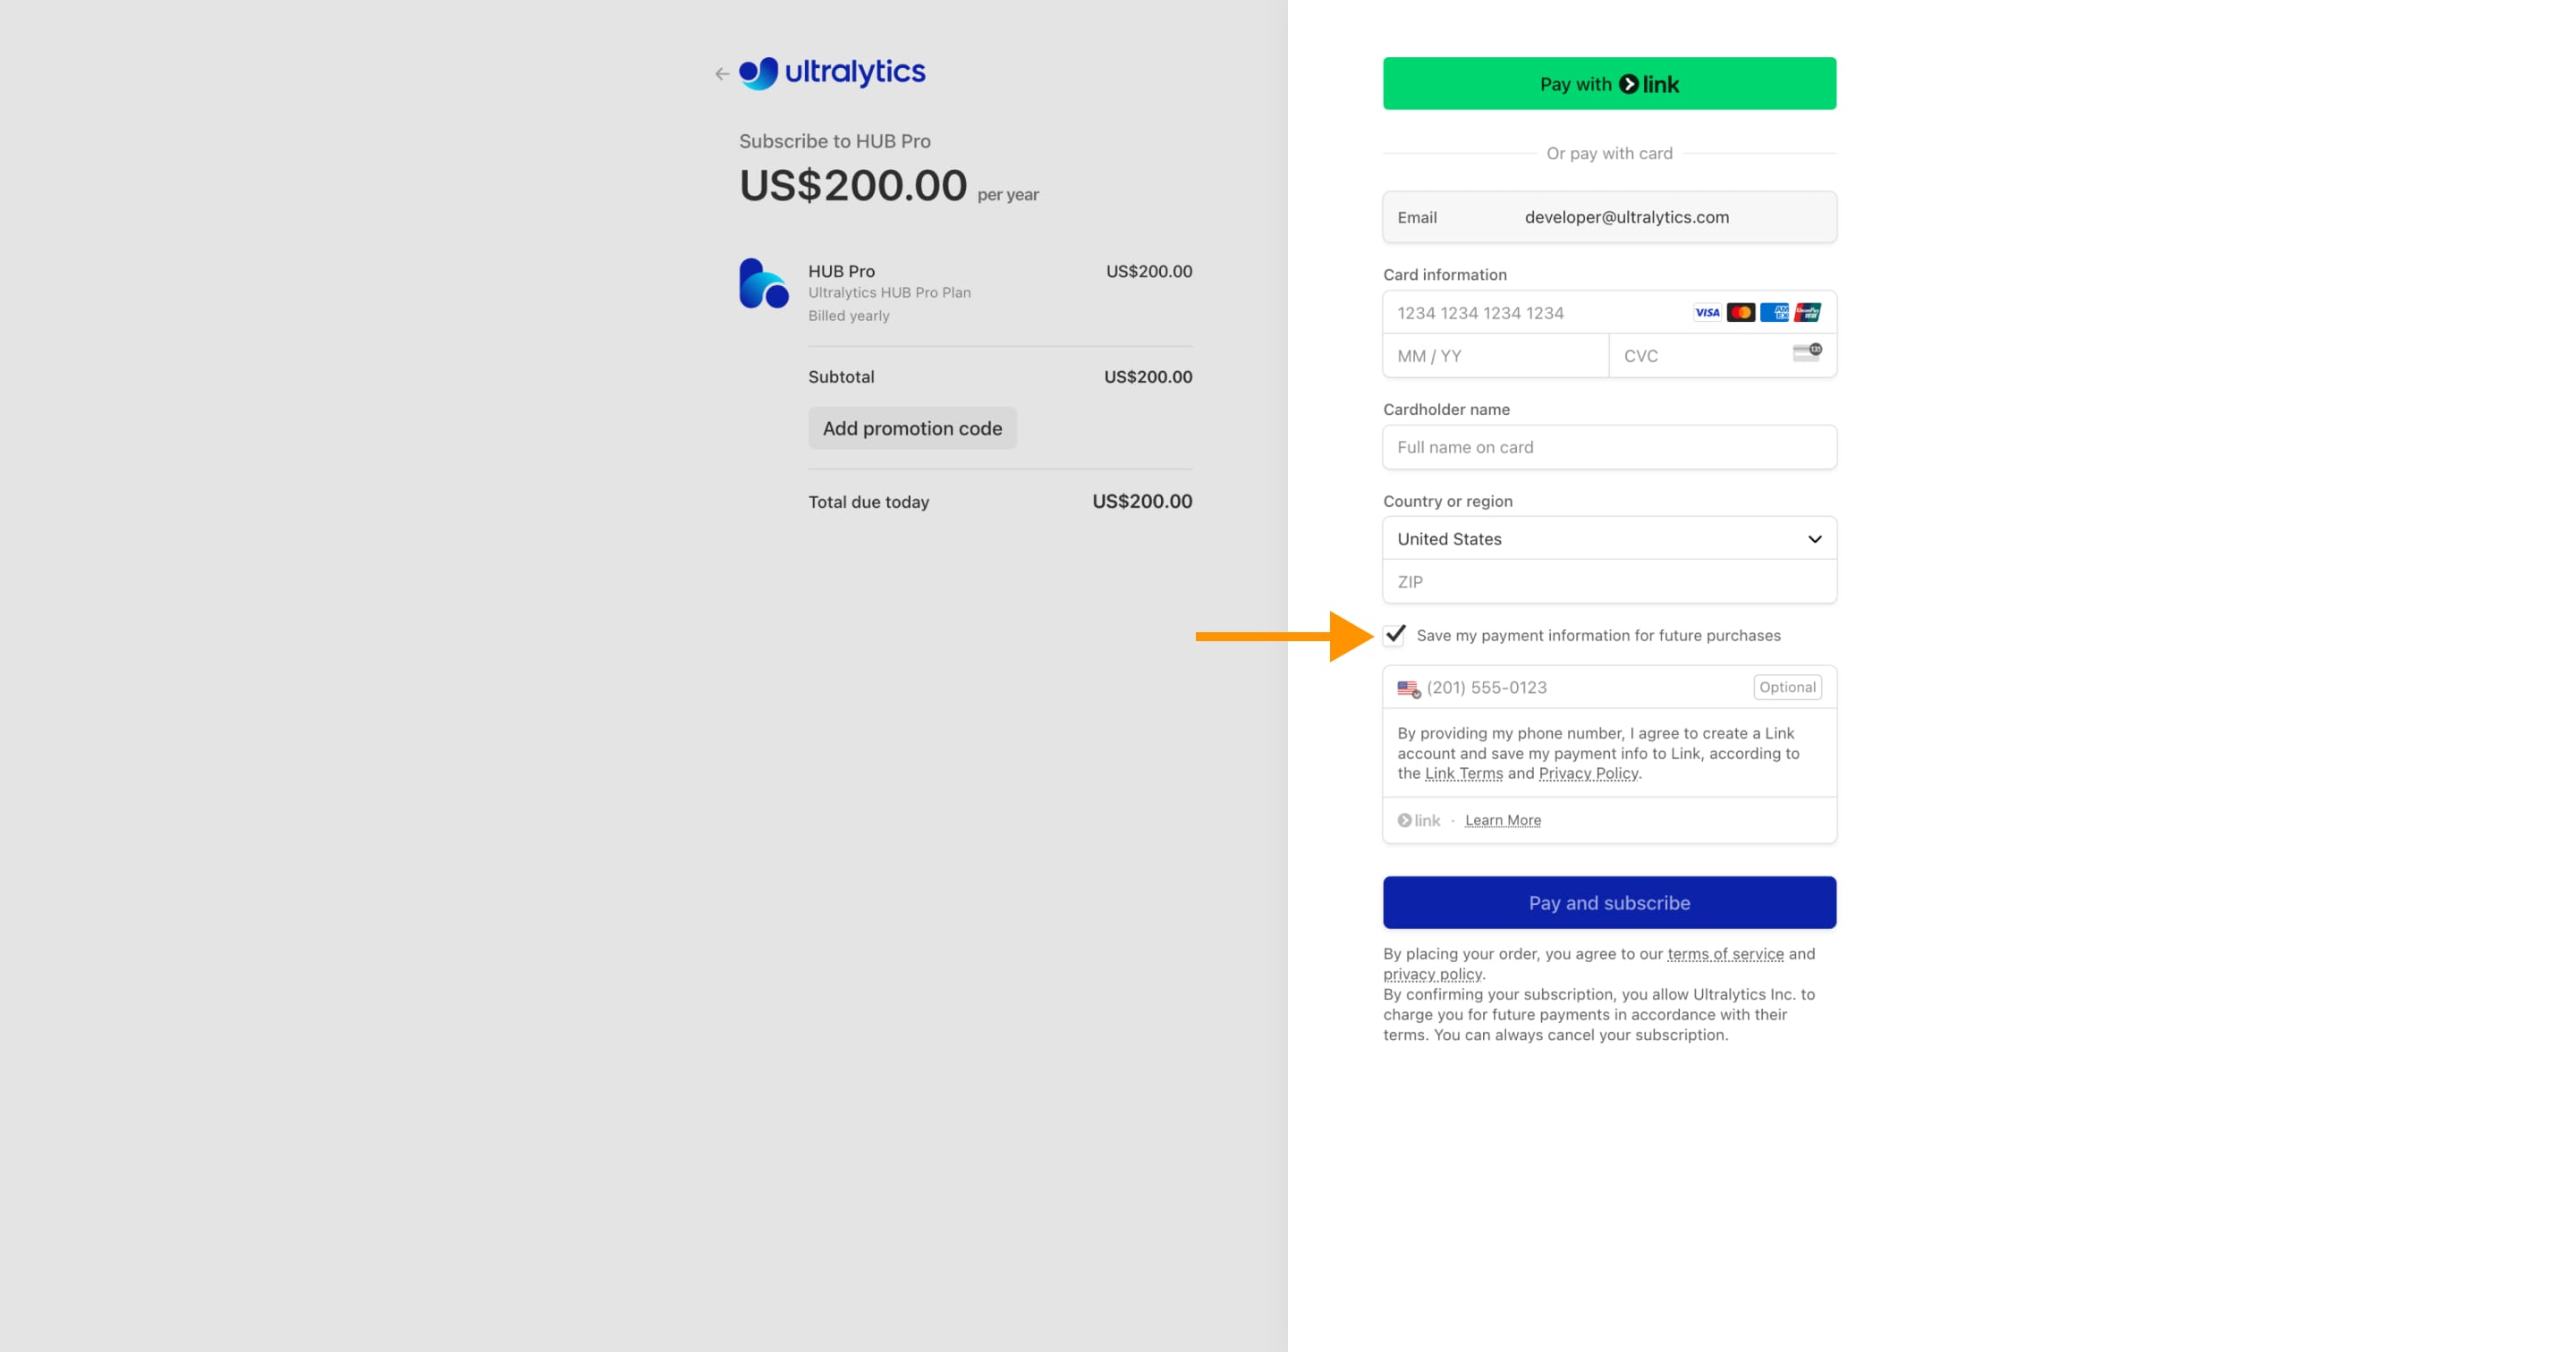
!!! tip "Tip"
We recommend ticking the checkbox to save your payment information for future purchases, facilitating easier top-ups to your account balance.
That's it!

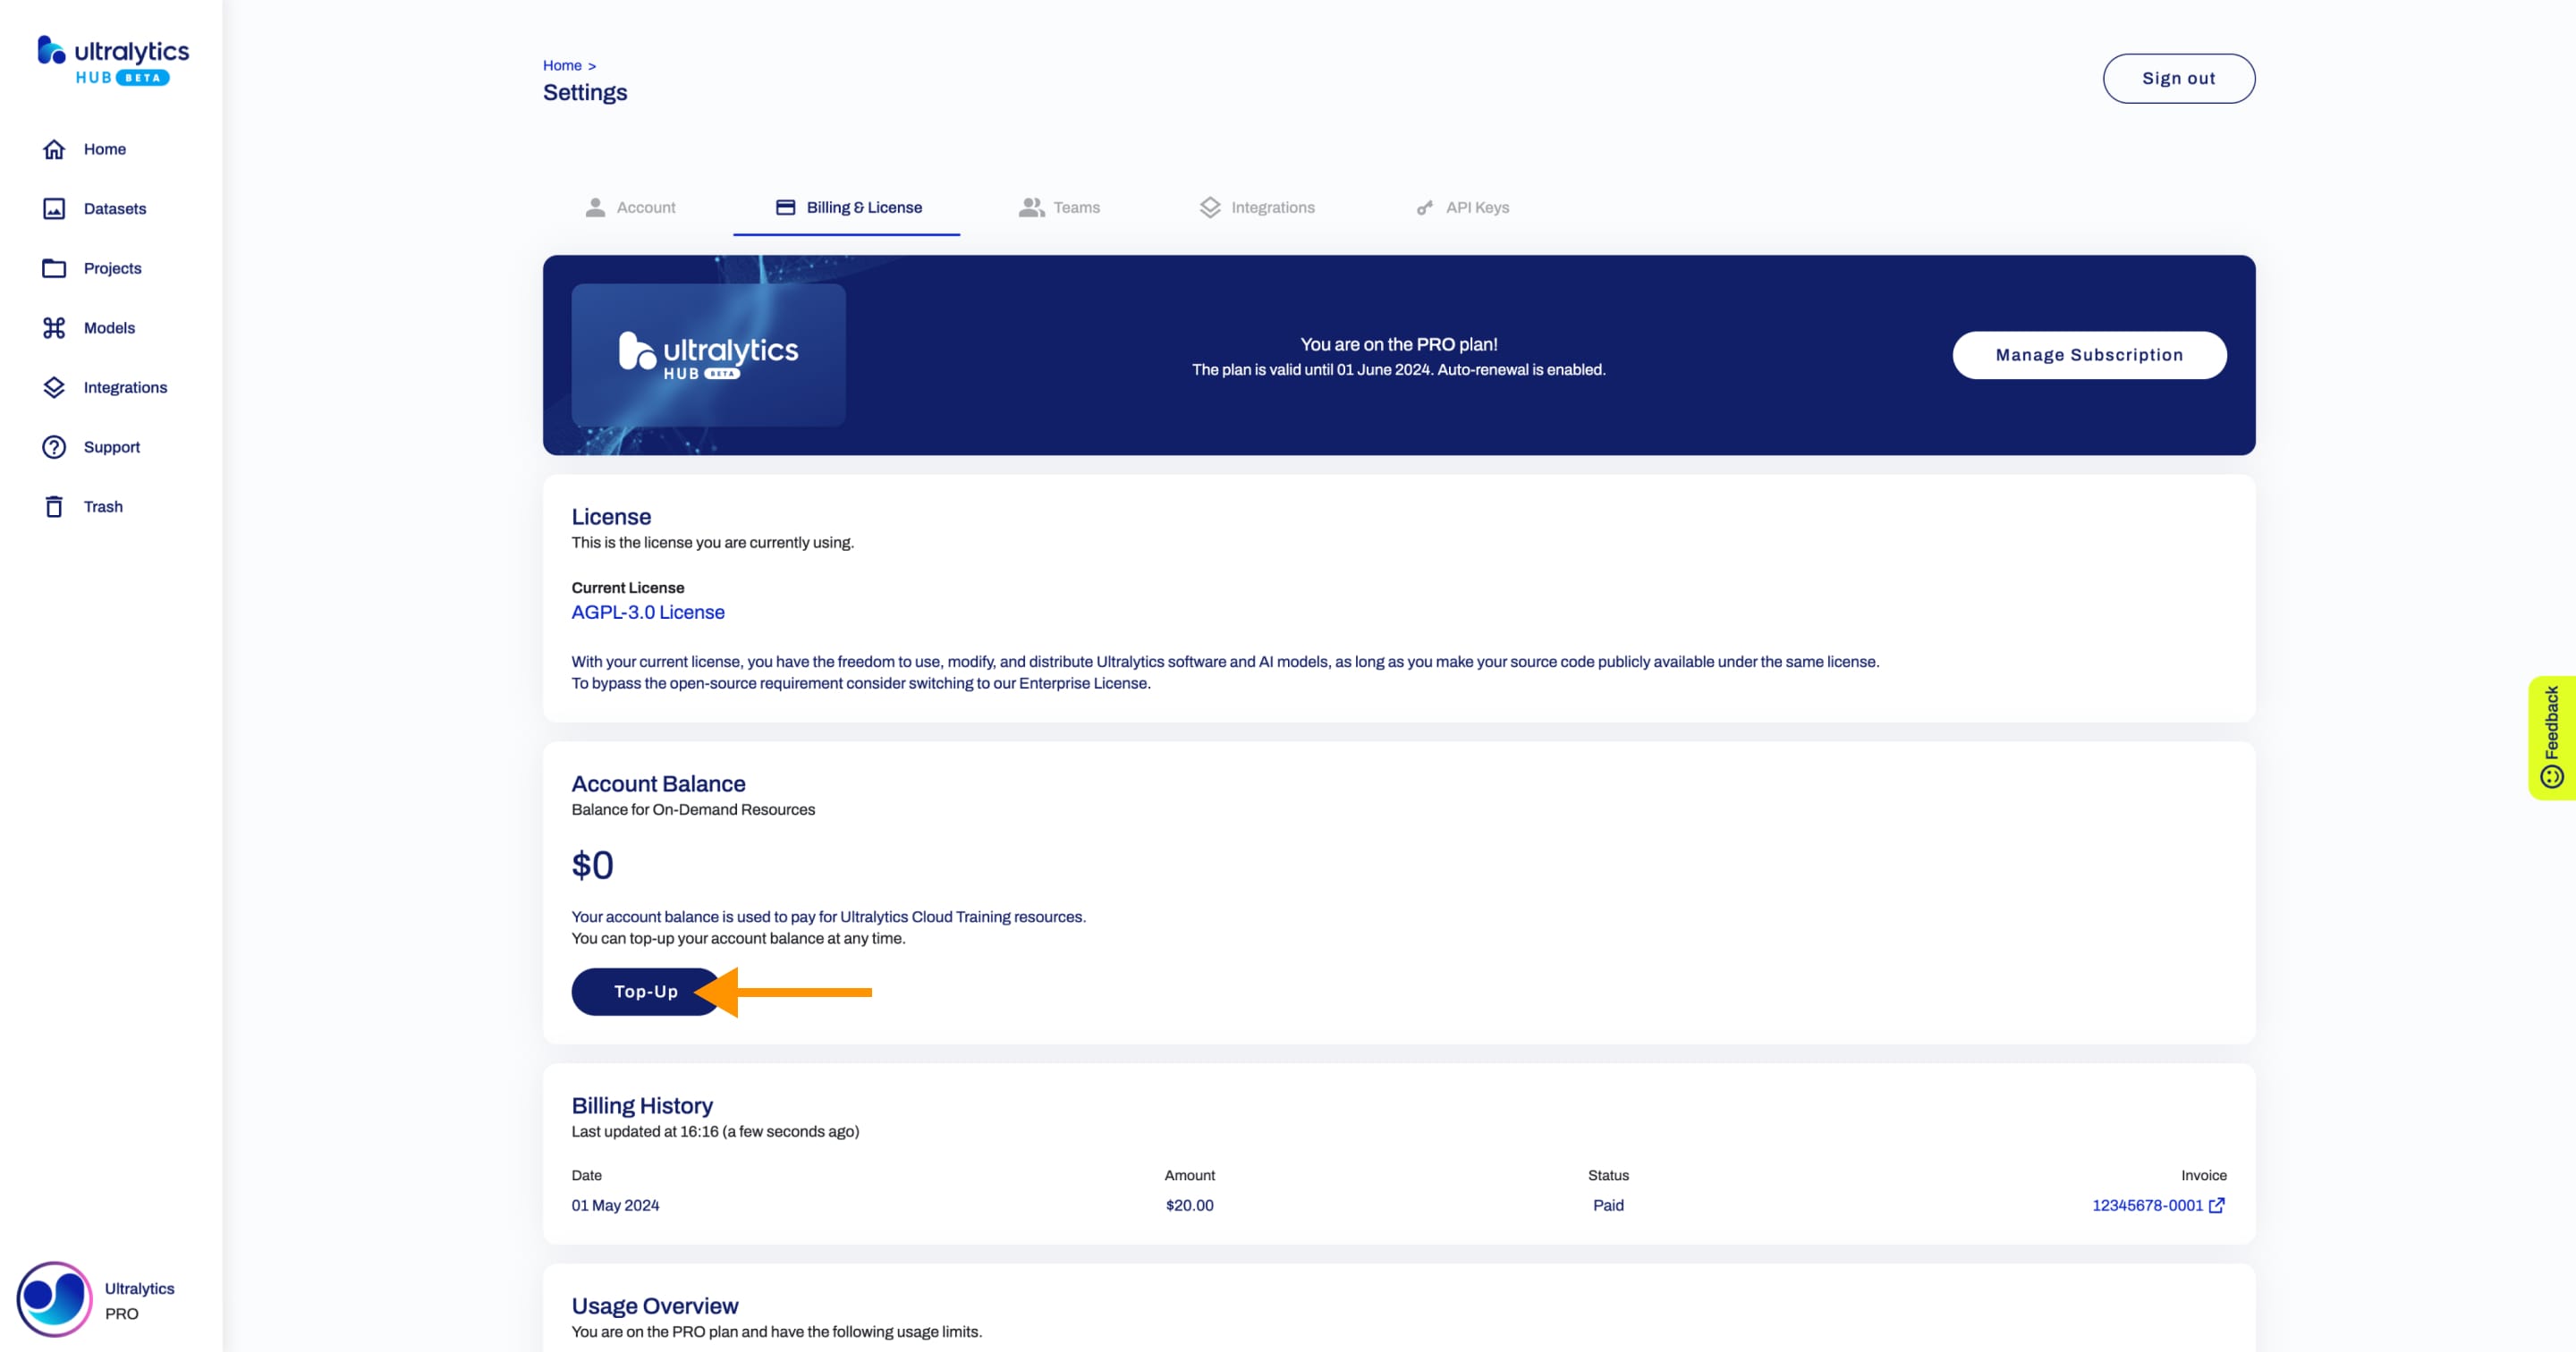
Account Balance
The account balance is used to pay for Ultralytics Cloud Training resources.
In order to top up your account balance, simply click on the Top-Up button.
Next, set the amount you want to top-up.
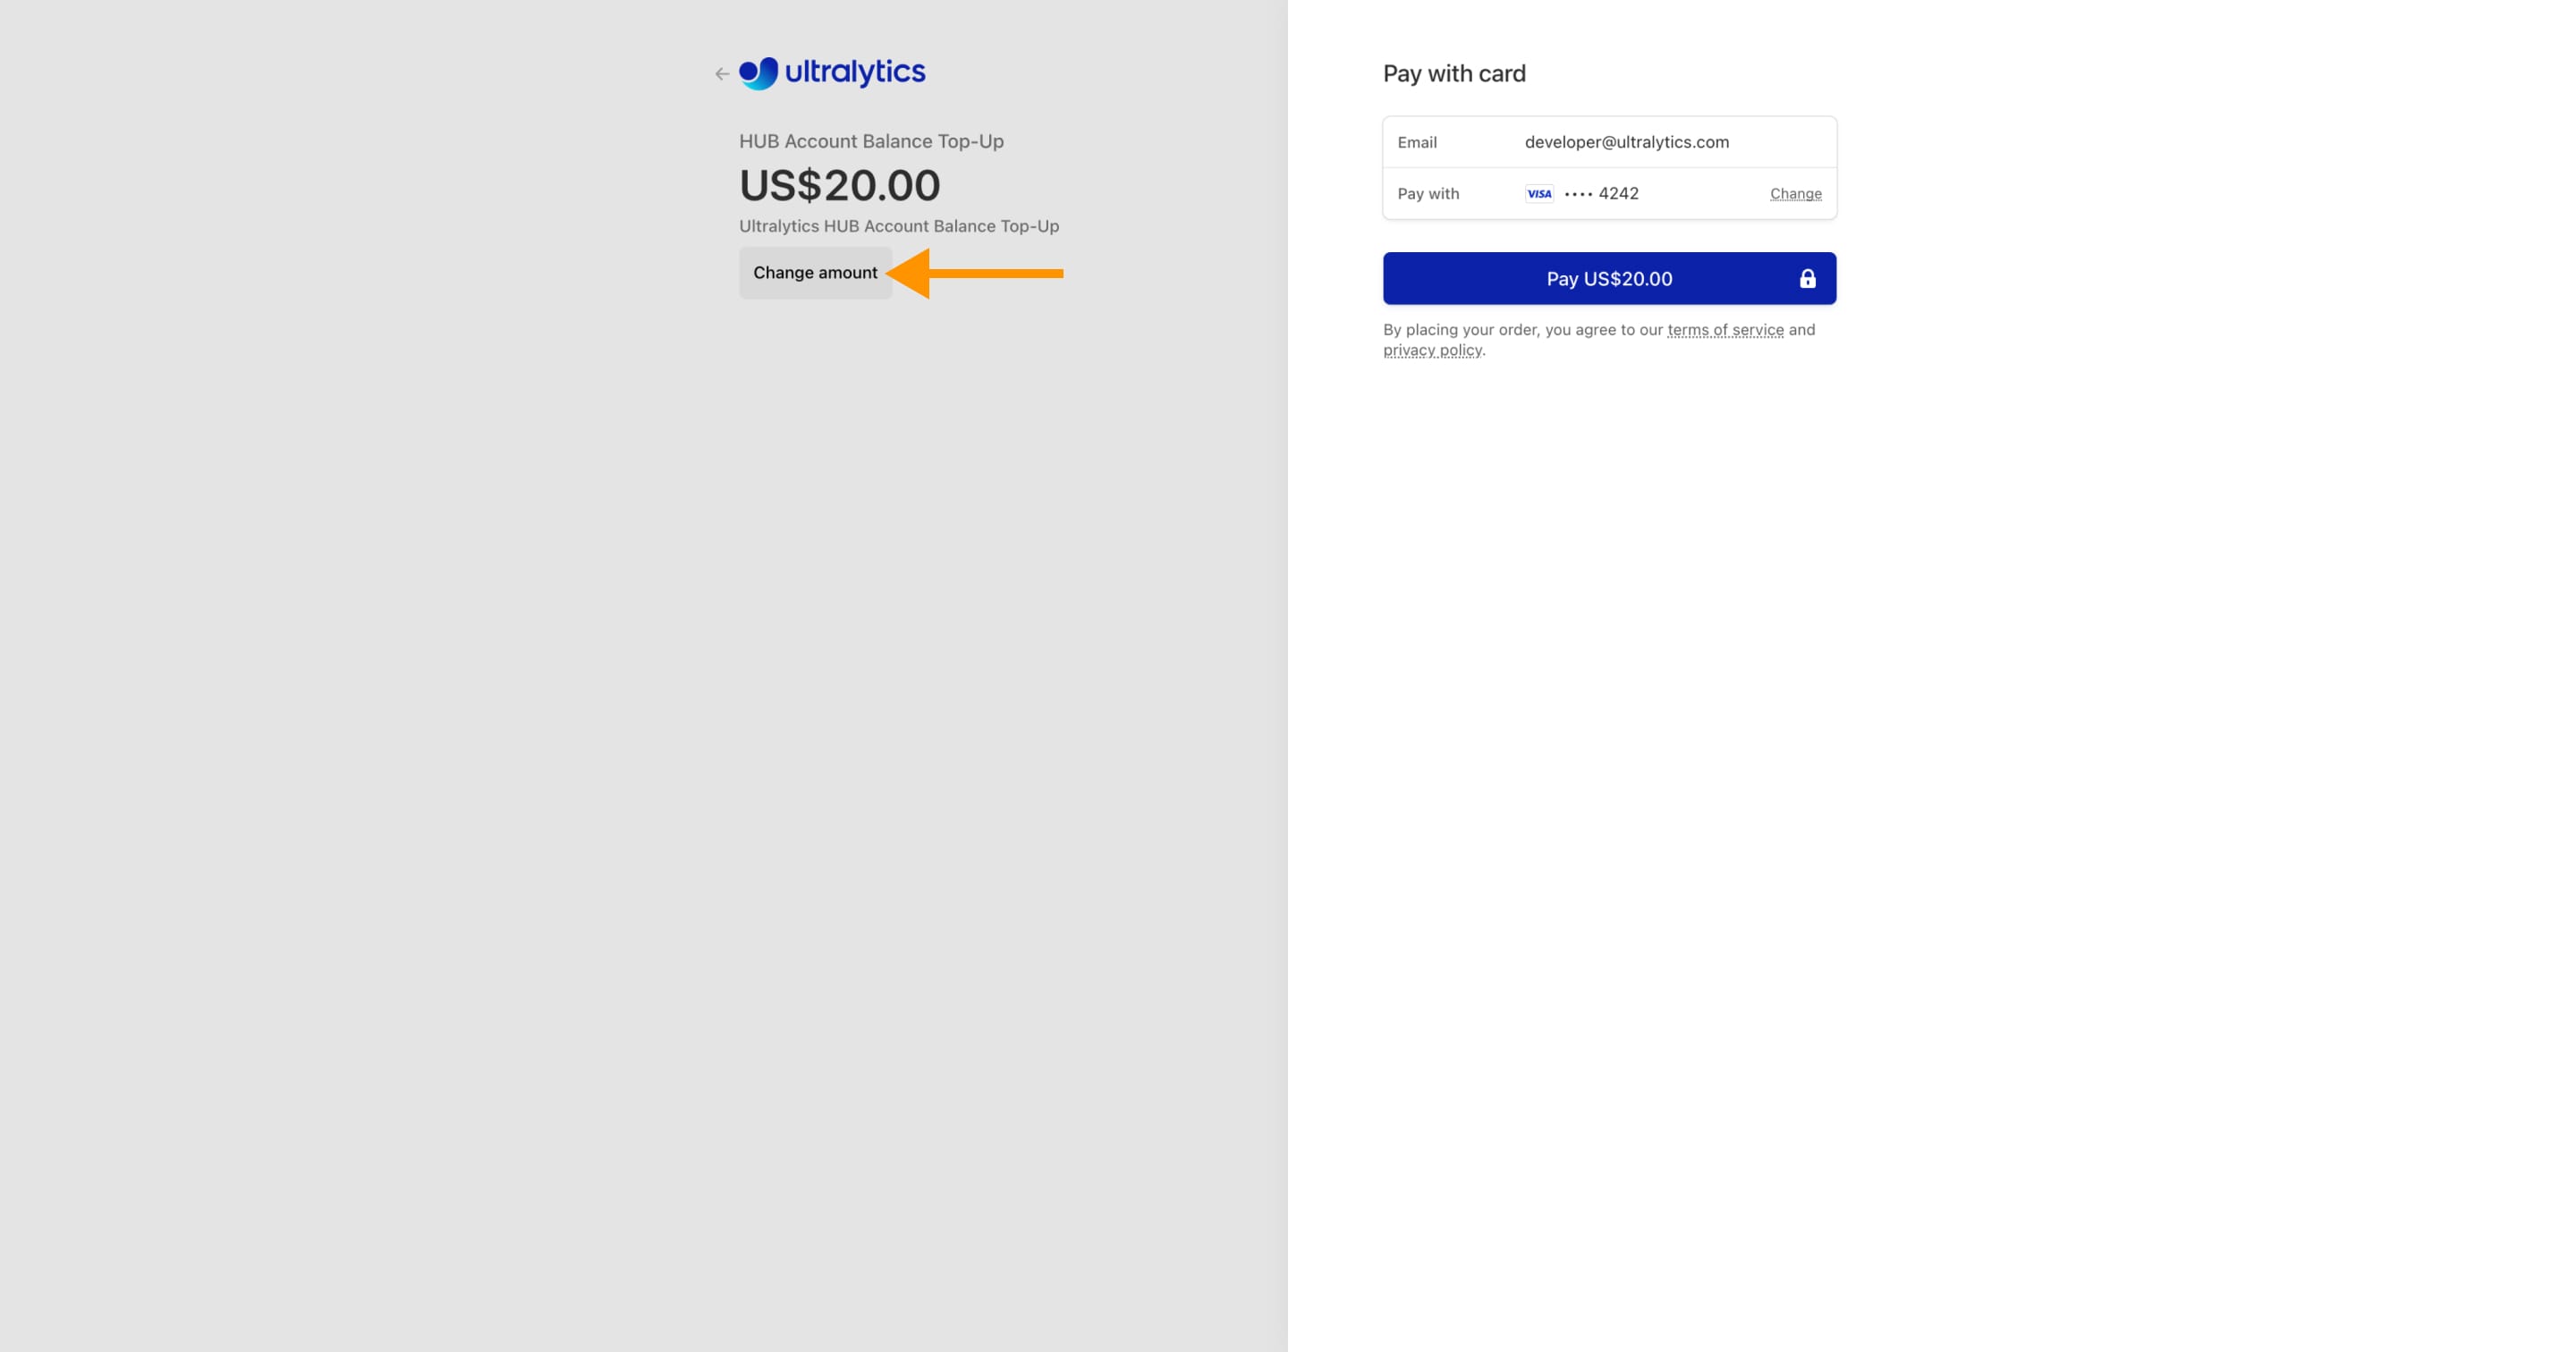
That's it!

comments: true
description: Optimize your model management with Ultralytics HUB Projects. Easily create, share, edit, and compare models for efficient development.
keywords: Ultralytics HUB, model management, create project, share project, edit project, delete project, compare models, reorder models, transfer models
Ultralytics HUB Projects
Ultralytics HUB projects provide an effective solution for consolidating and managing your models. If you are working with several models that perform similar tasks or have related purposes, Ultralytics HUB projects allow you to group these models together.
This creates a unified and organized workspace that facilitates easier model management, comparison and development. Having similar models or various iterations together can facilitate rapid benchmarking, as you can compare their effectiveness. This can lead to faster, more insightful iterative development and refinement of your models.
Watch: Train YOLOv8 Pose Model on Tiger-Pose Dataset Using Ultralytics HUB
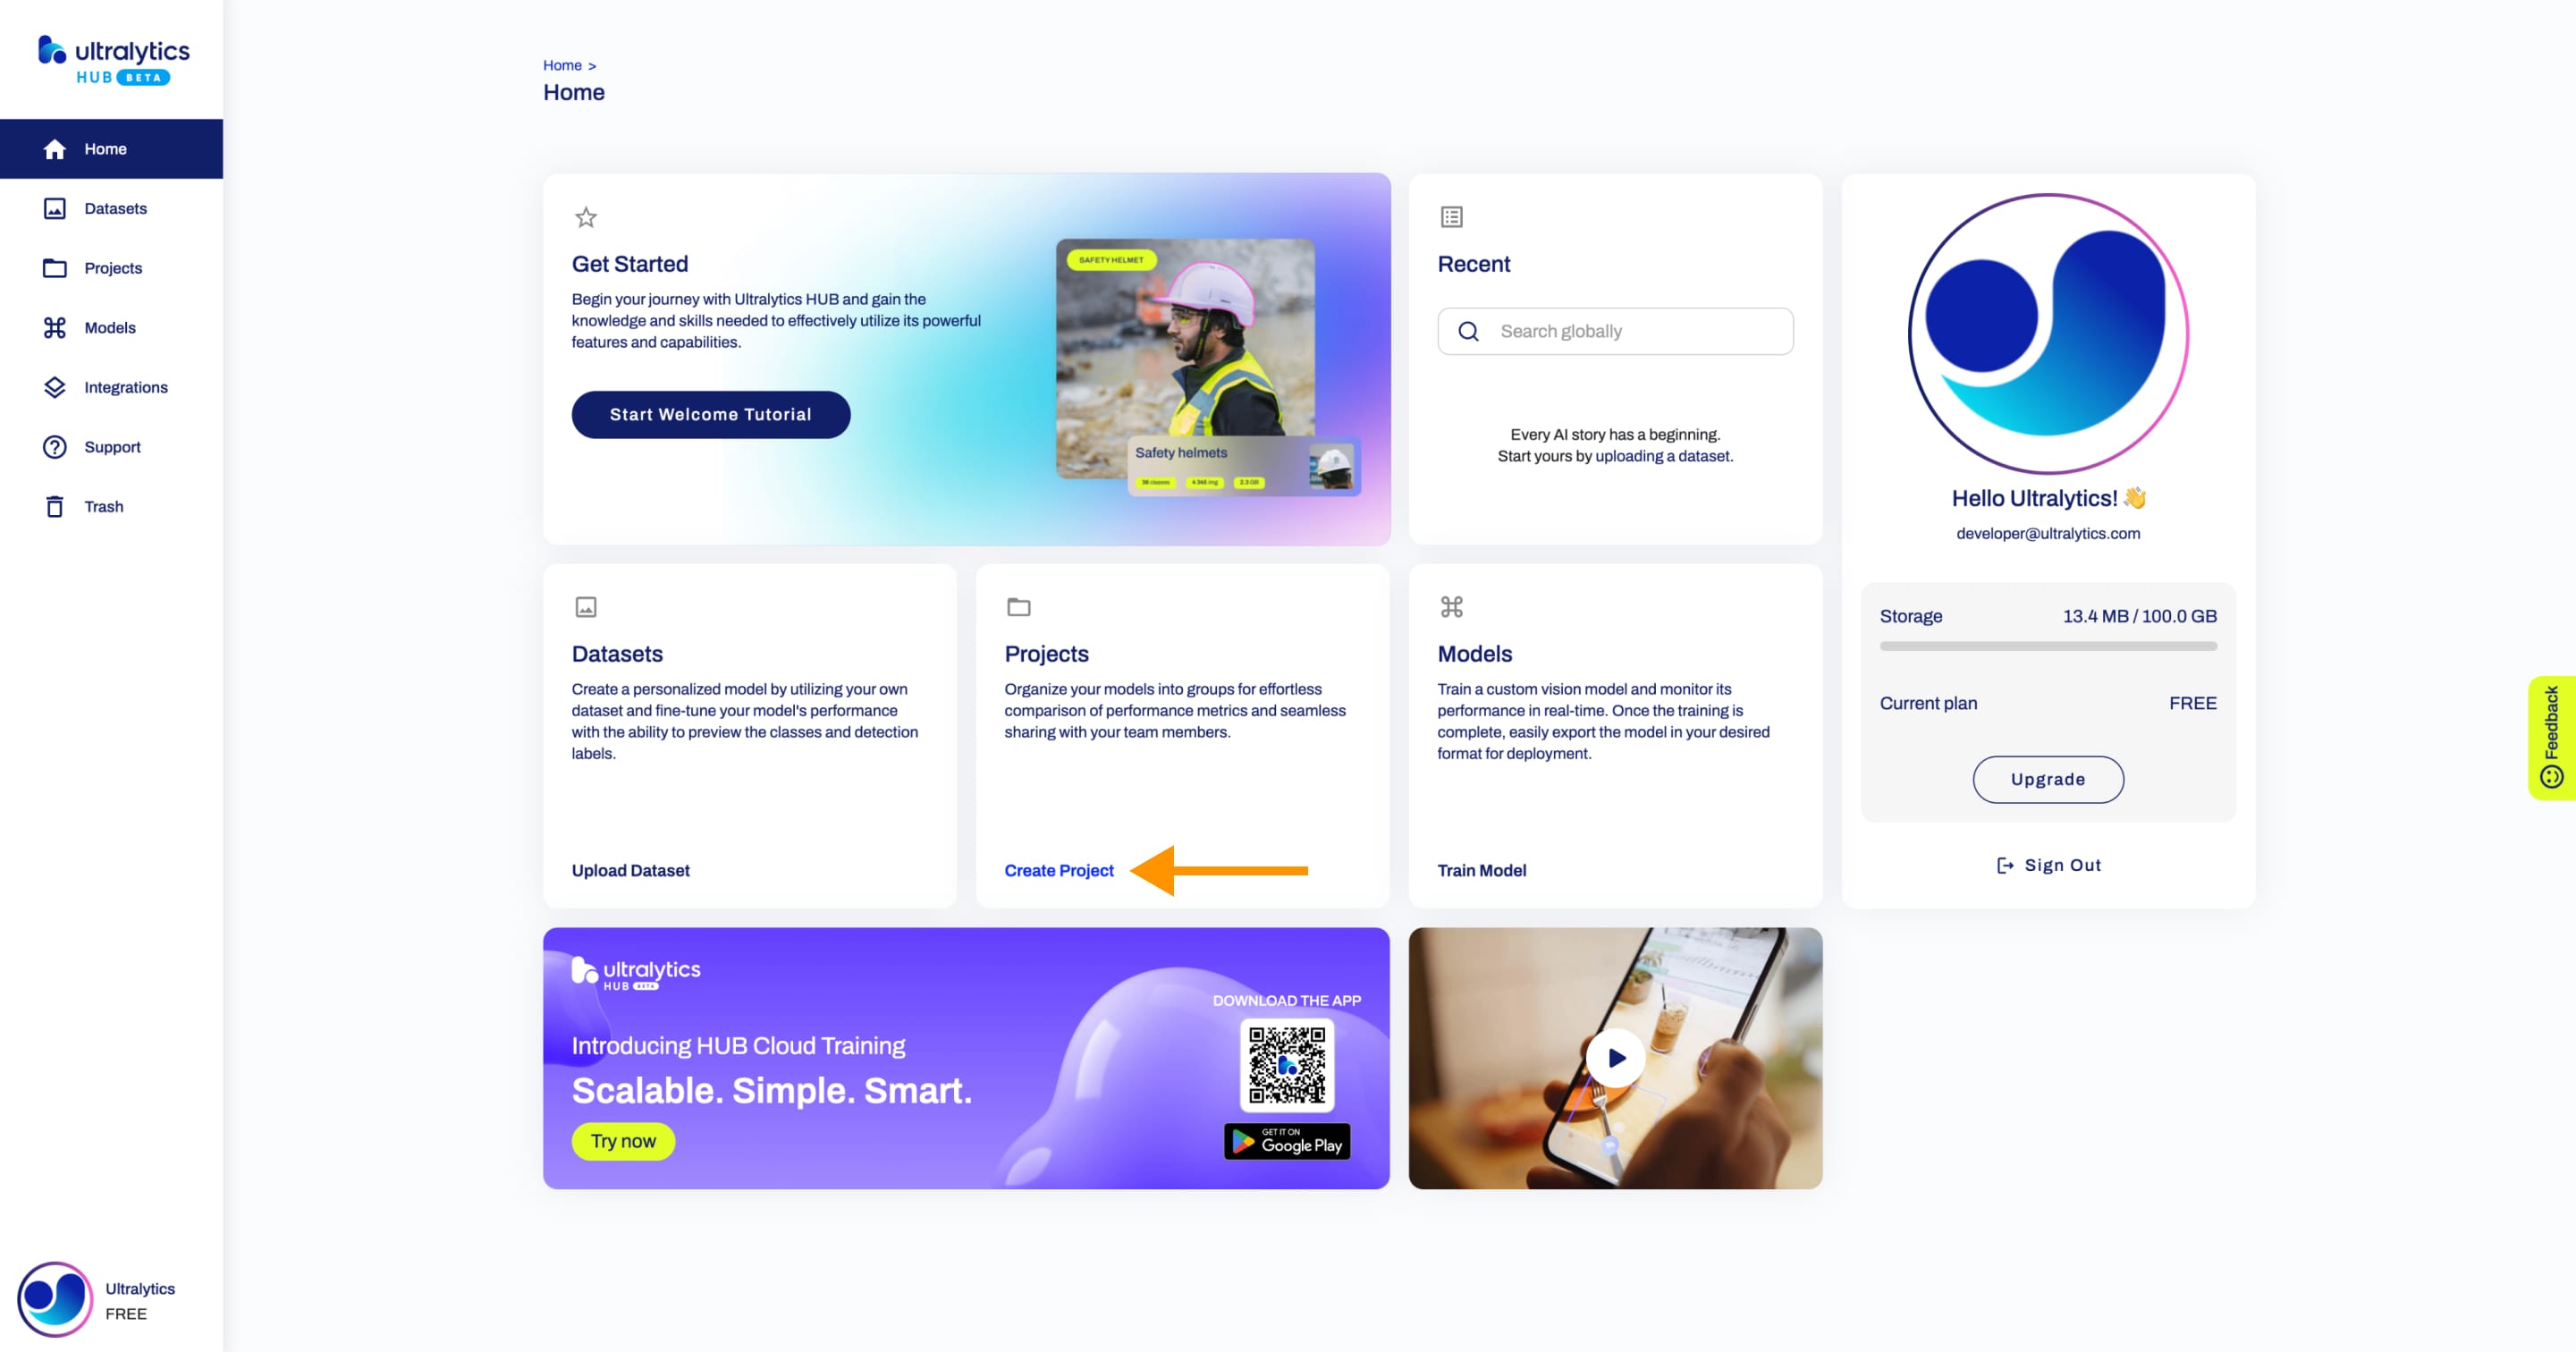
Create Project
Navigate to the Projects page by clicking on the Projects button in the sidebar and click on the Create Project button on the top right of the page.
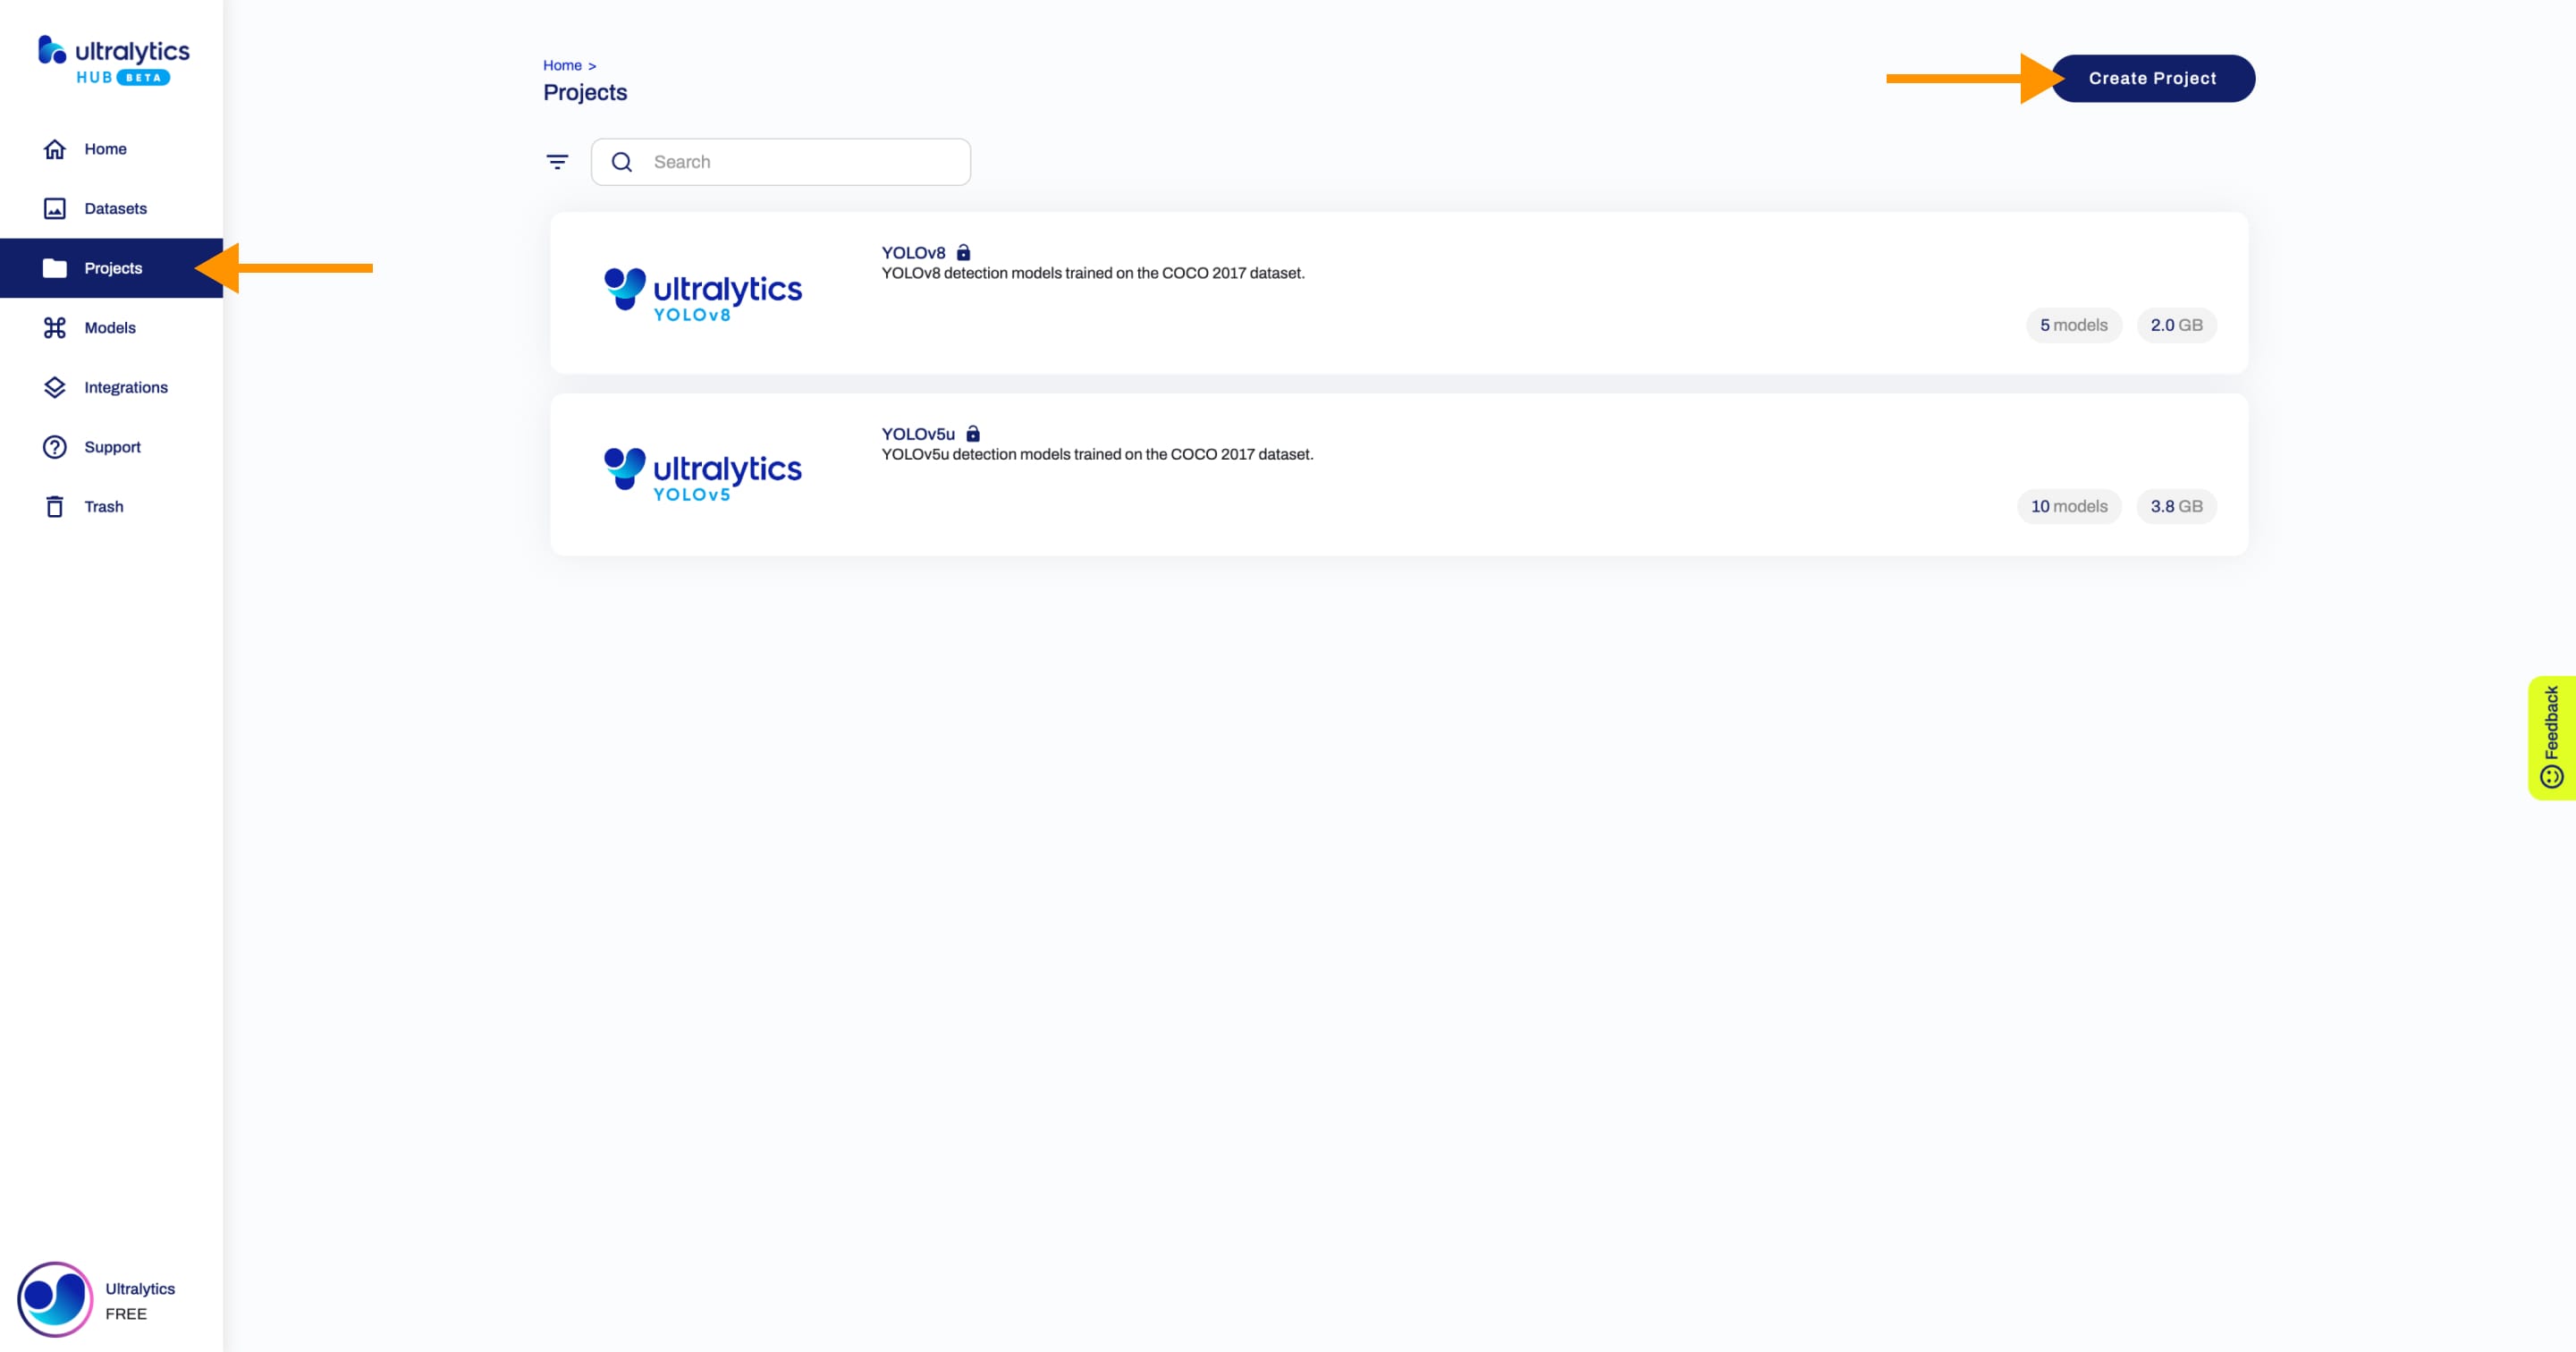
??? tip "Tip"
You can create a project directly from the [Home](https://hub.ultralytics.com/home) page.
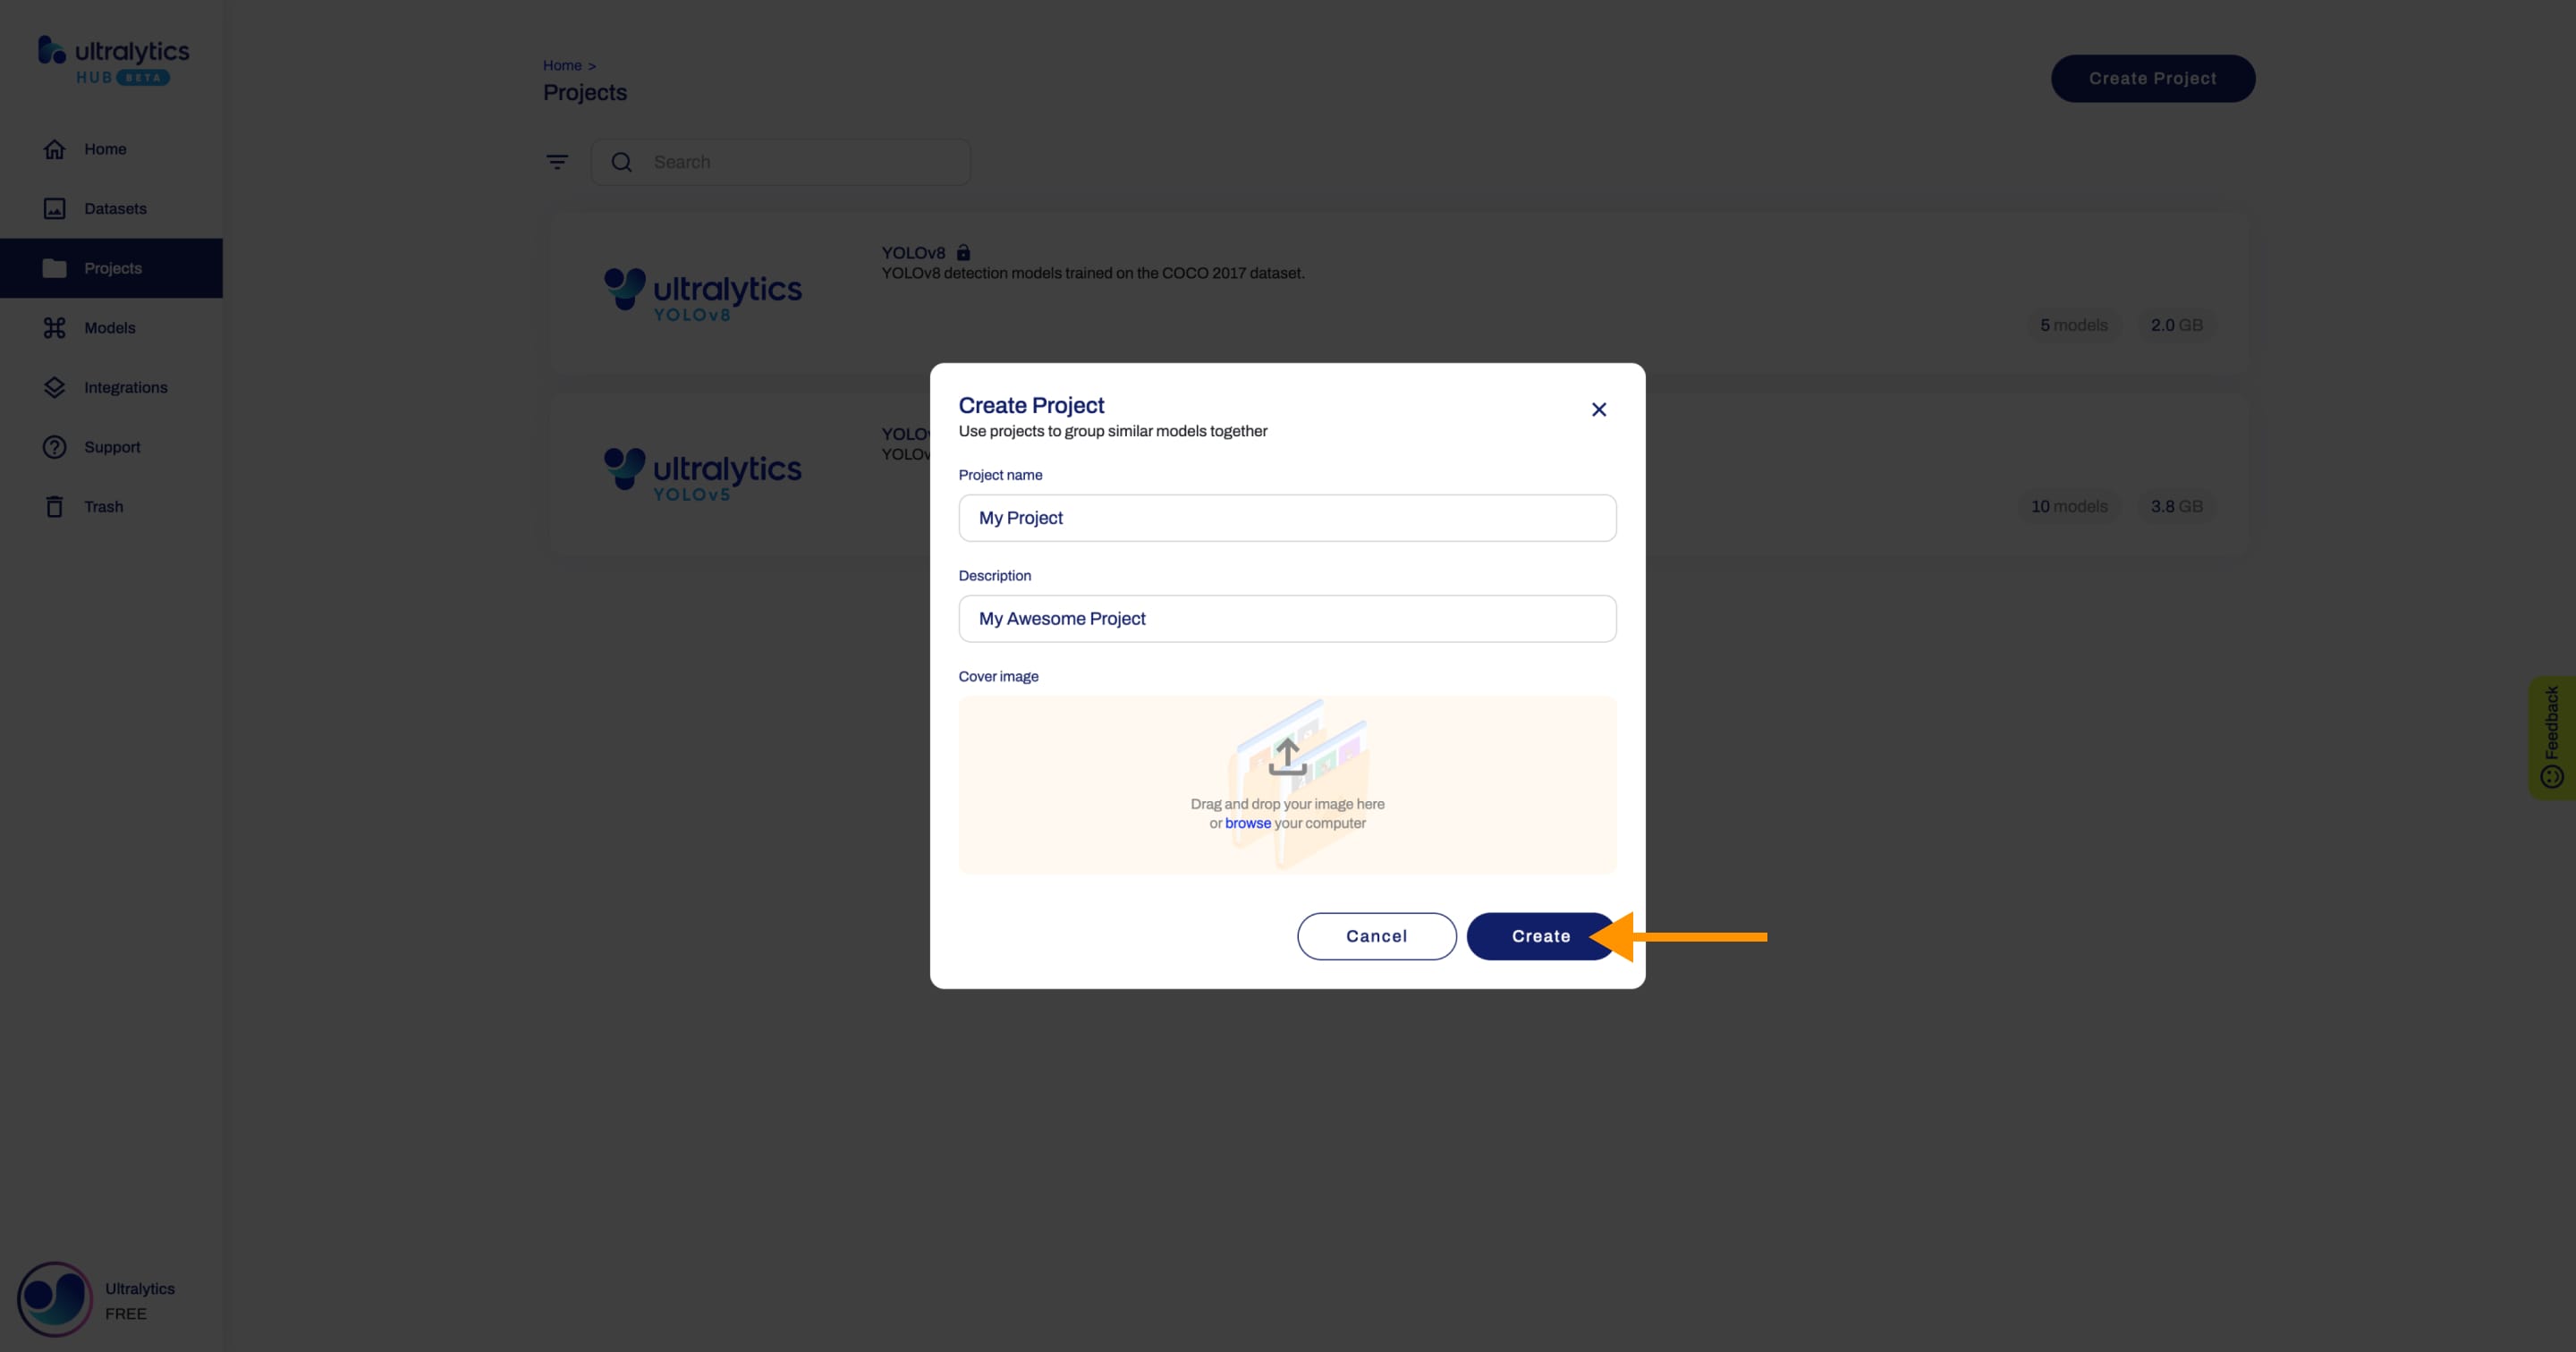
This action will trigger the Create Project dialog, opening up a suite of options for tailoring your project to your needs.
Type the name of your project in the Project name field or keep the default name and finalize the project creation with a single click.
You have the additional option to enrich your project with a description and a unique image, enhancing its recognizability on the Projects page.
When you're happy with your project configuration, click Create.
After your project is created, you will be able to access it from the Projects page.
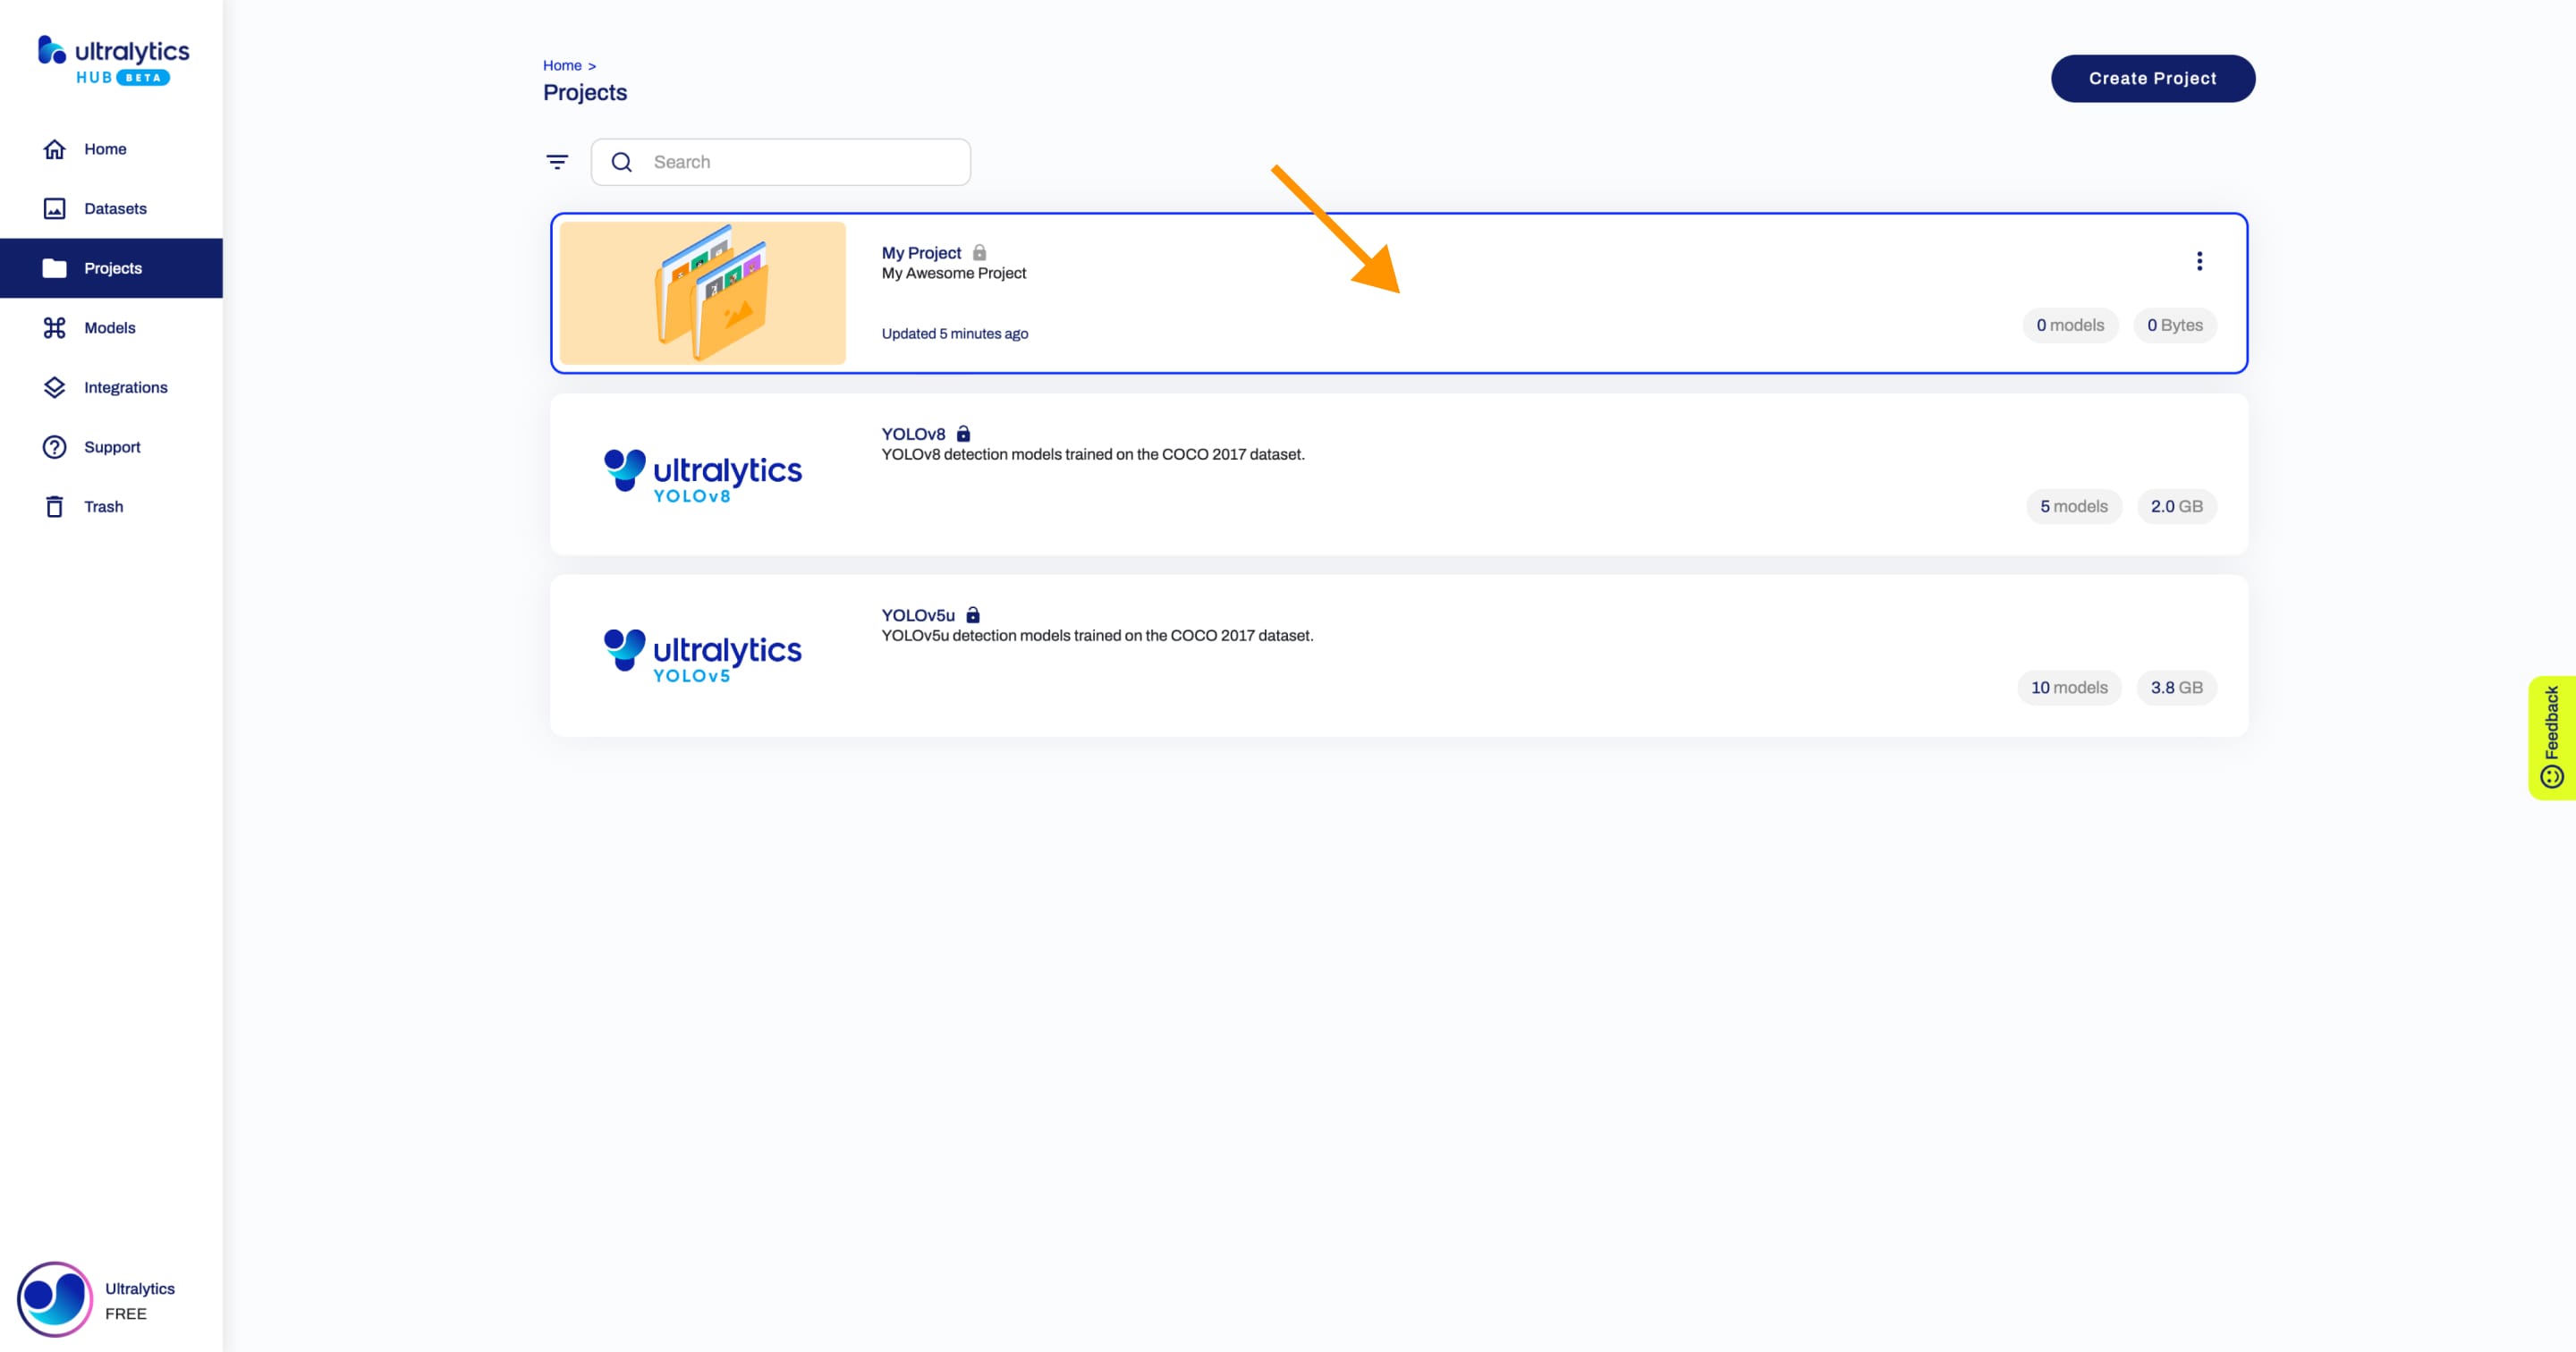
Next, train a model inside your project.

Share Project
!!! info "Info"
[Ultralytics HUB](https://ultralytics.com/hub)'s sharing functionality provides a convenient way to share projects with others. This feature is designed to accommodate both existing [Ultralytics HUB](https://ultralytics.com/hub) users and those who have yet to create an account.
??? note "Note"
You have control over the general access of your projects.

You can choose to set the general access to "Private", in which case, only you will have access to it. Alternatively, you can set the general access to "Unlisted" which grants viewing access to anyone who has the direct link to the project, regardless of whether they have an [Ultralytics HUB](https://ultralytics.com/hub) account or not.
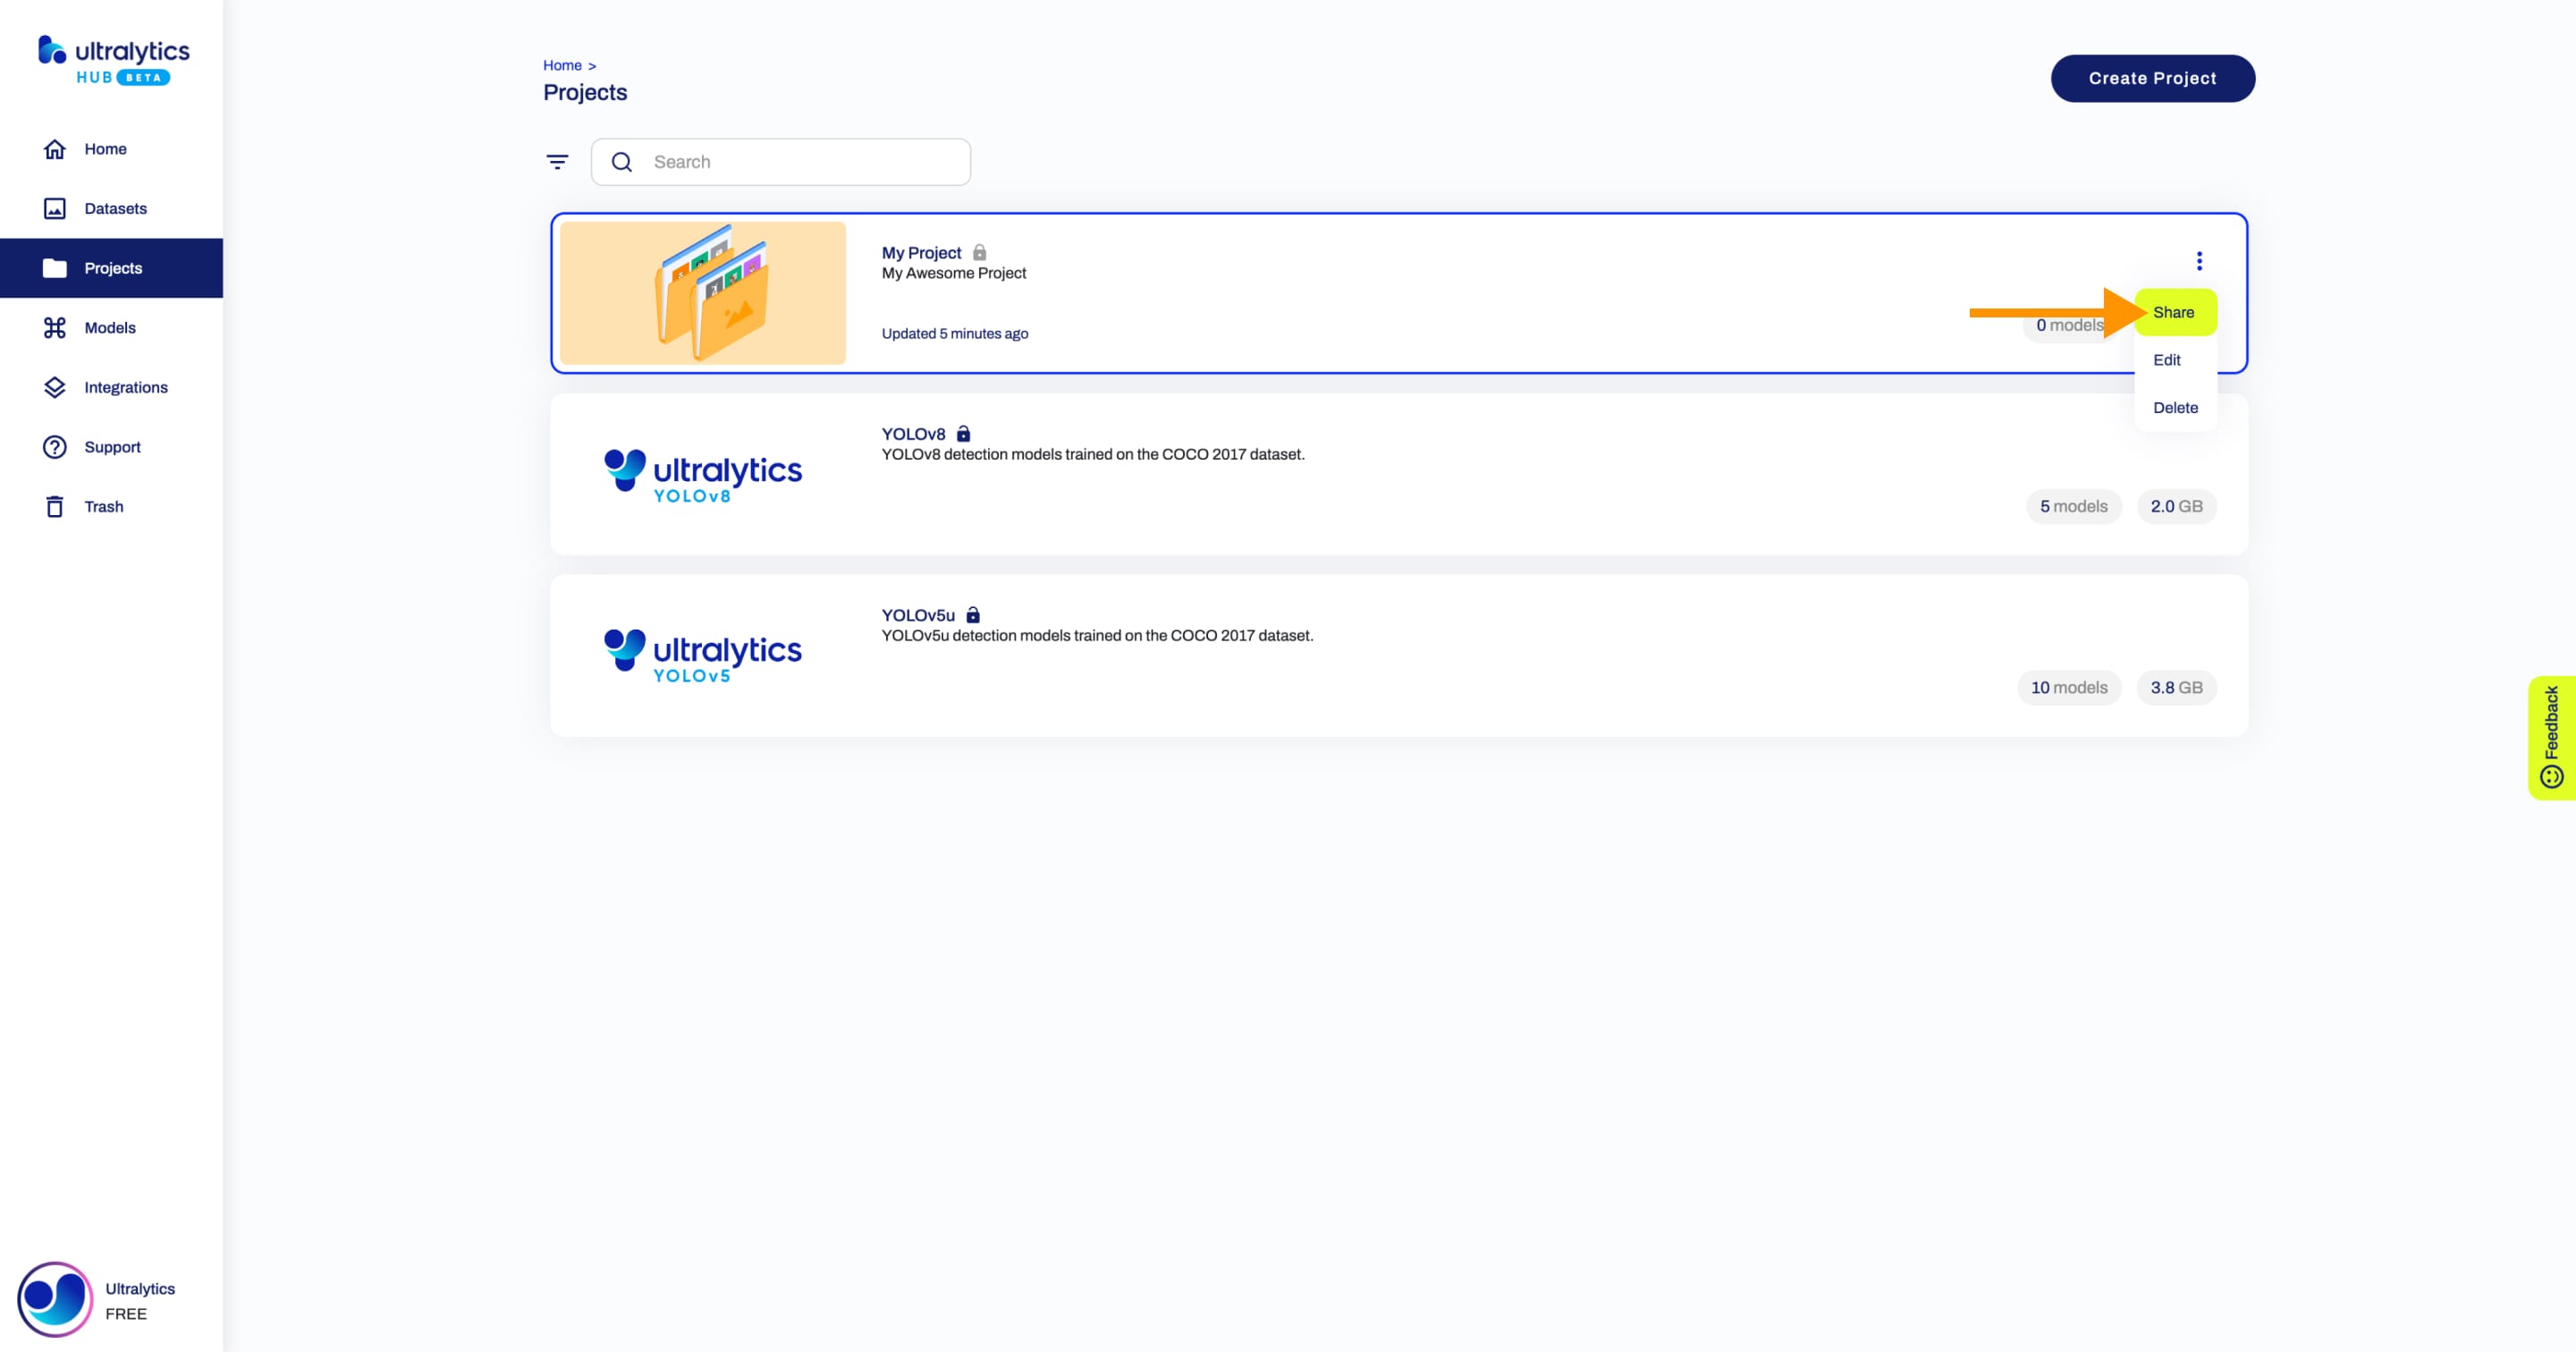
Navigate to the Project page of the project you want to share, open the project actions dropdown and click on the Share option. This action will trigger the Share Project dialog.
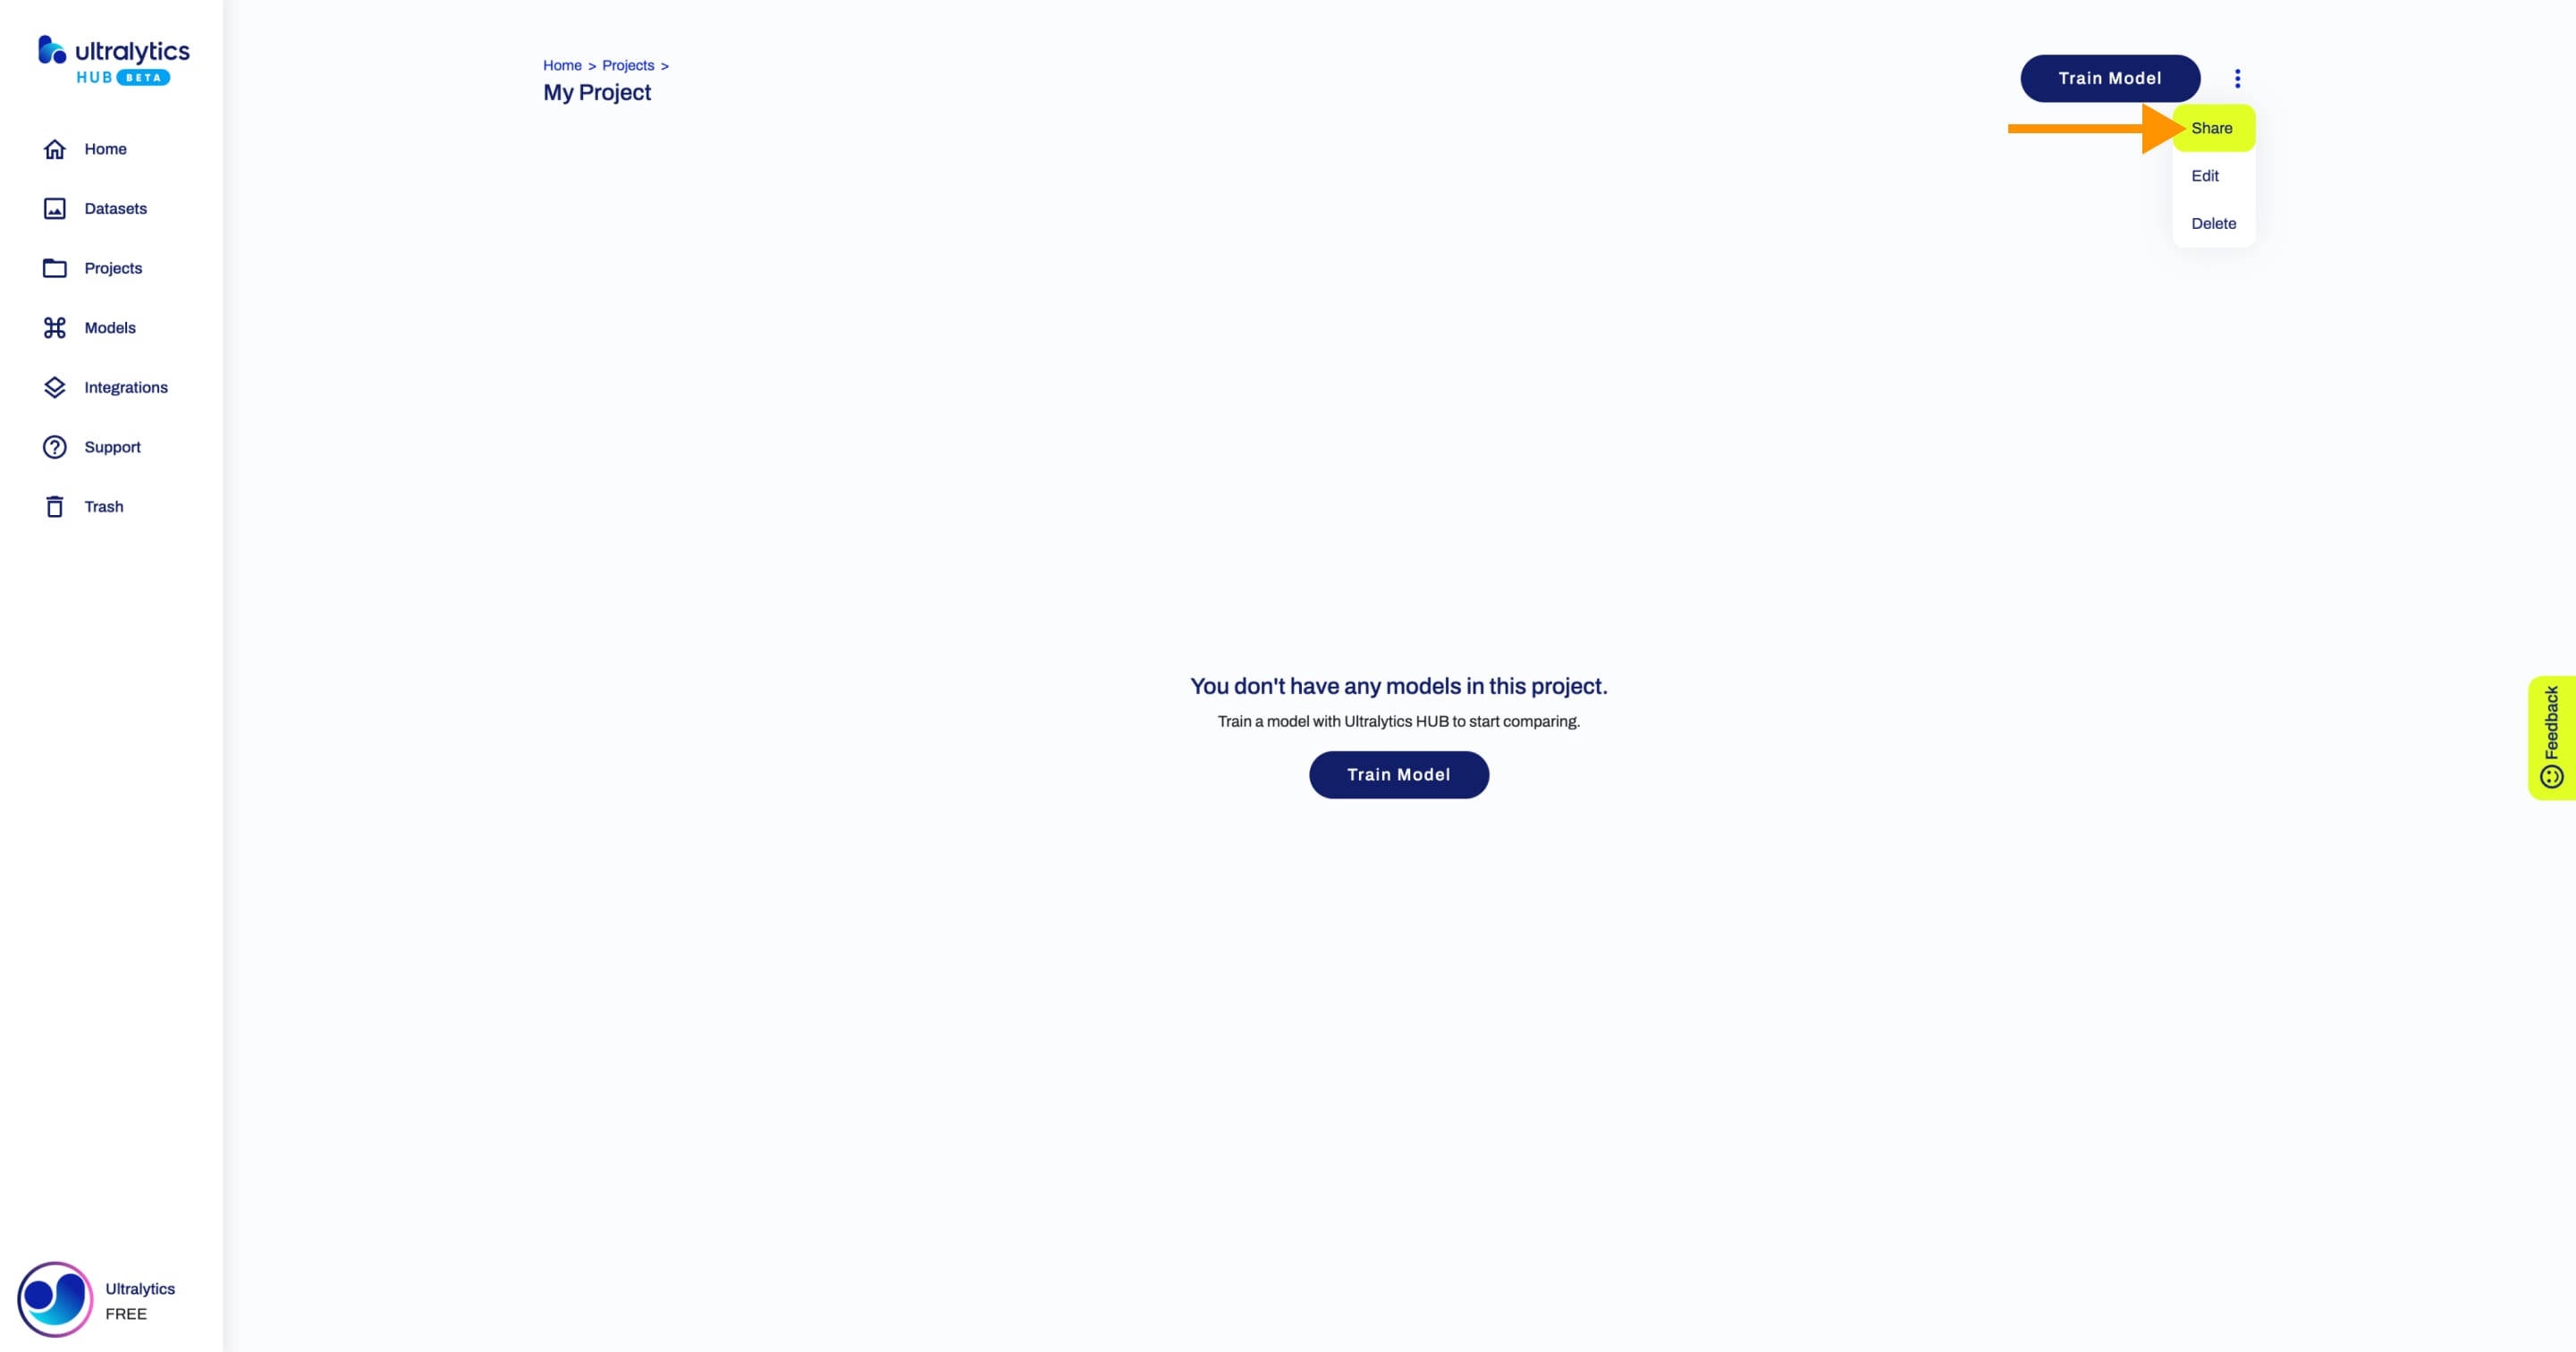
??? tip "Tip"
You can share a project directly from the [Projects](https://hub.ultralytics.com/projects) page.
Set the general access to "Unlisted" and click Save.
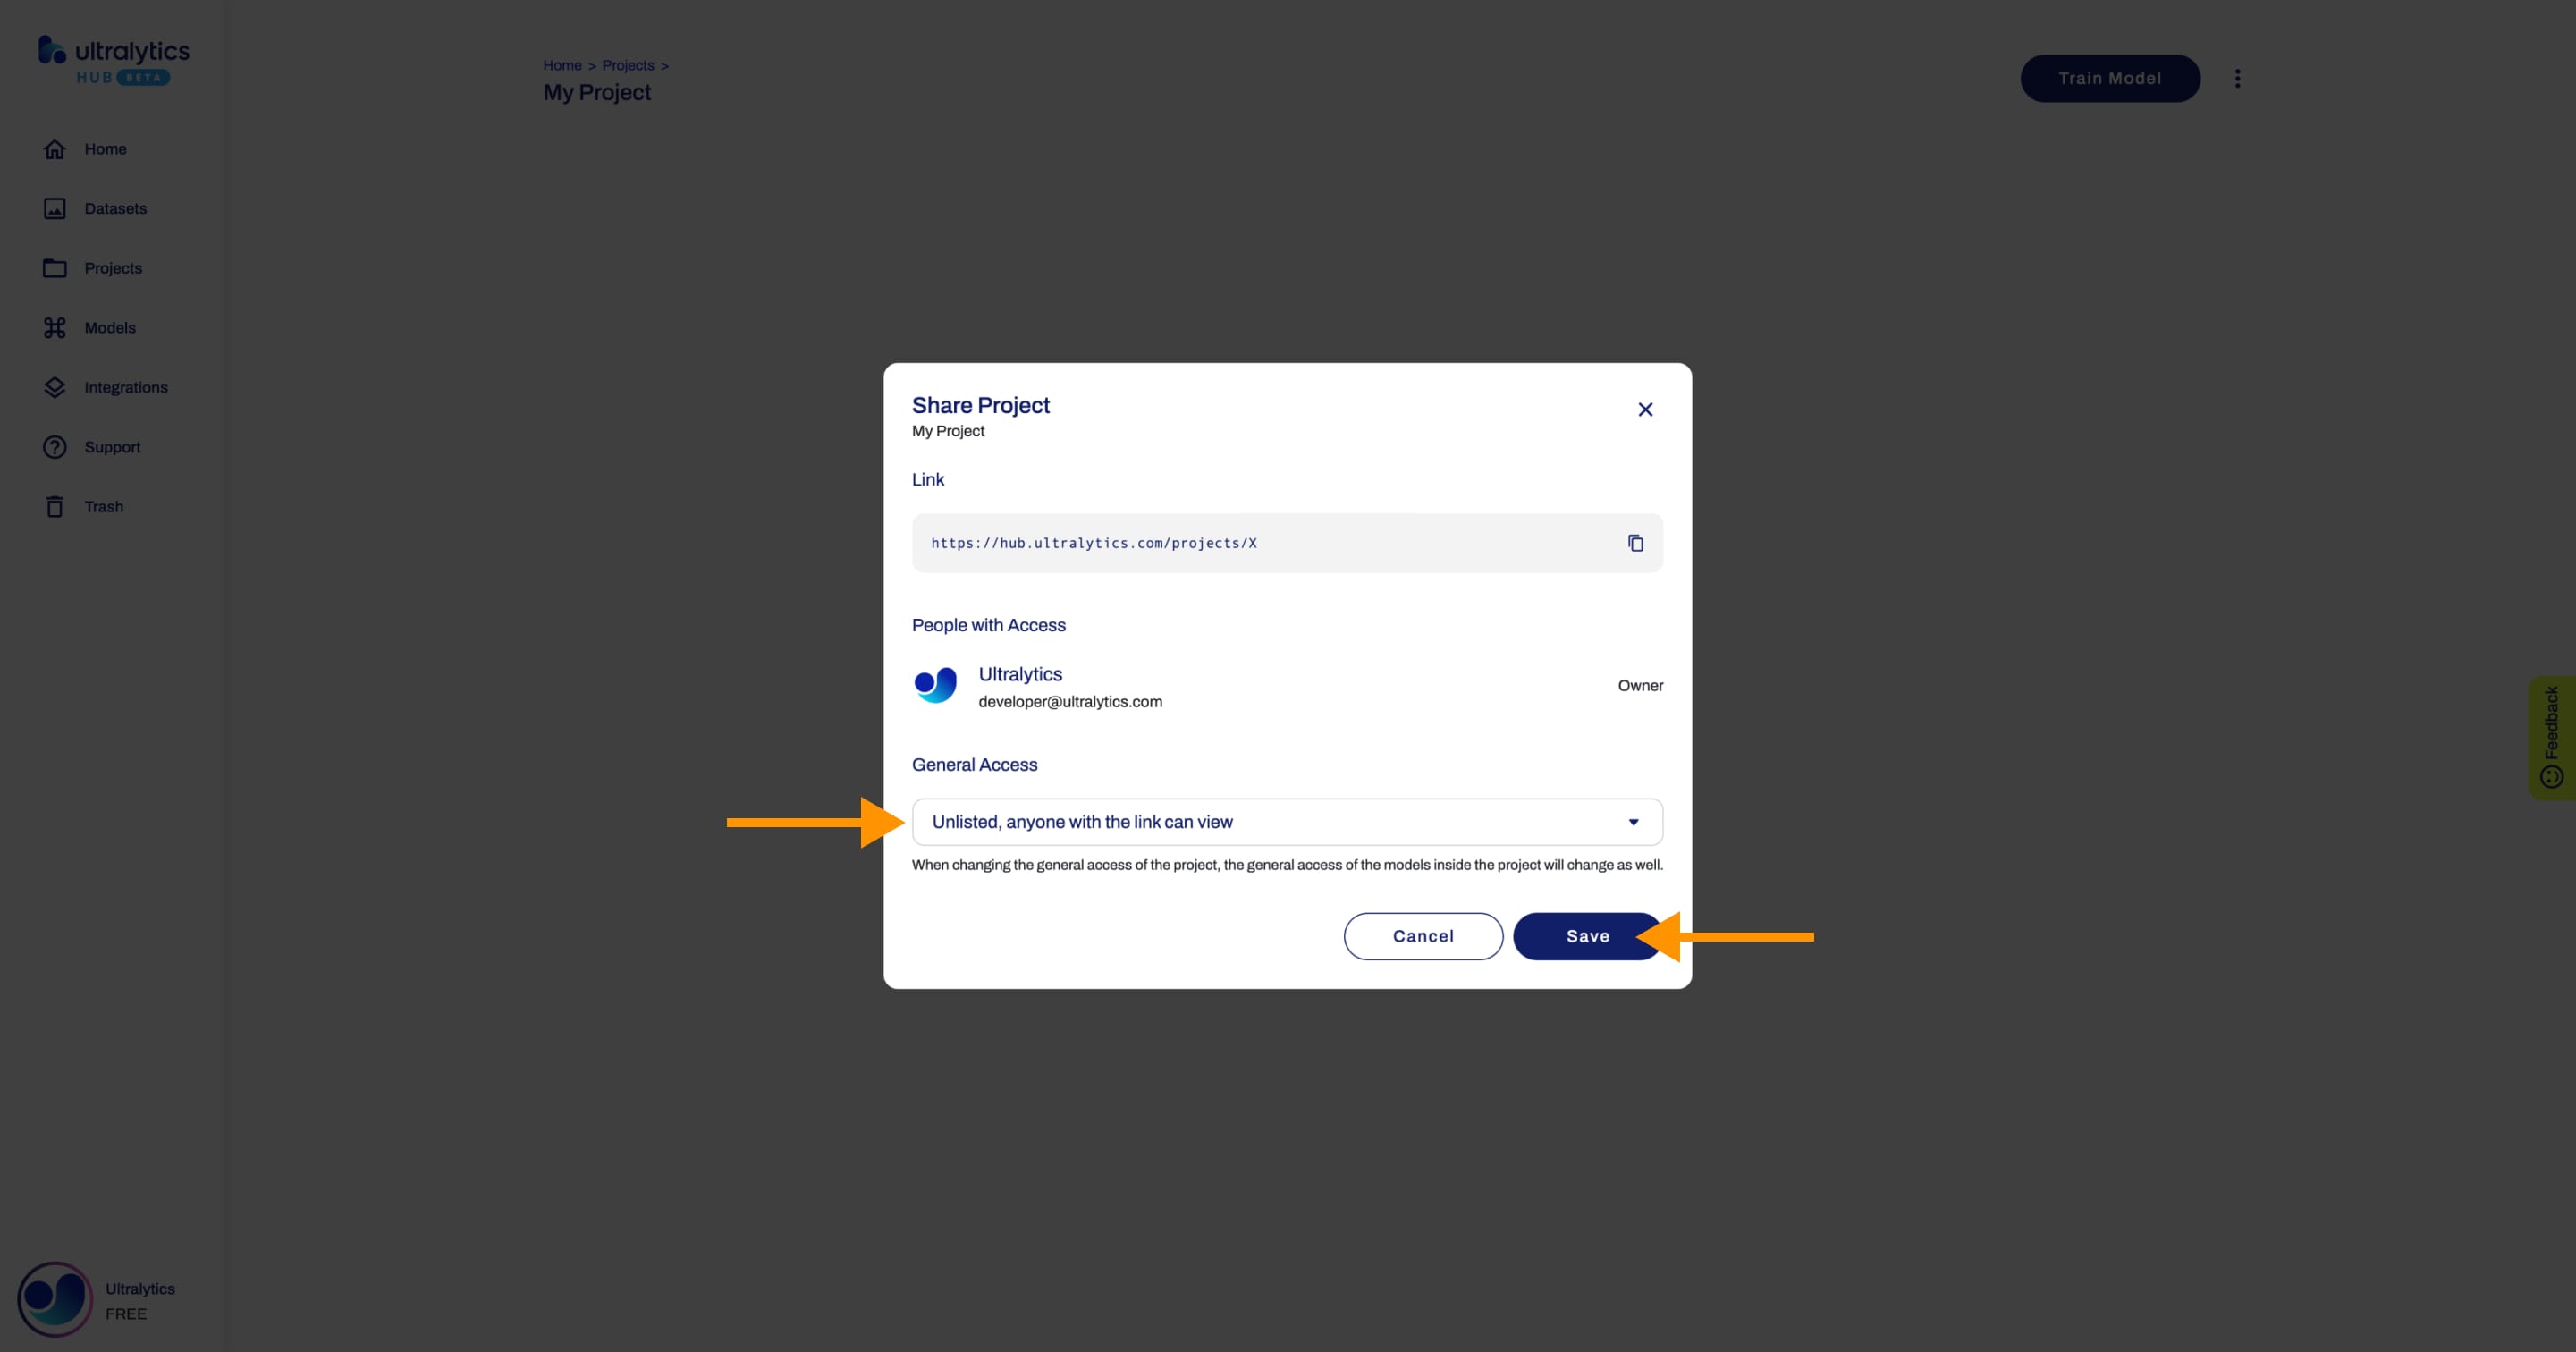
!!! Warning "Warning"
When changing the general access of a project, the general access of the models inside the project will be changed as well.
Now, anyone who has the direct link to your project can view it.
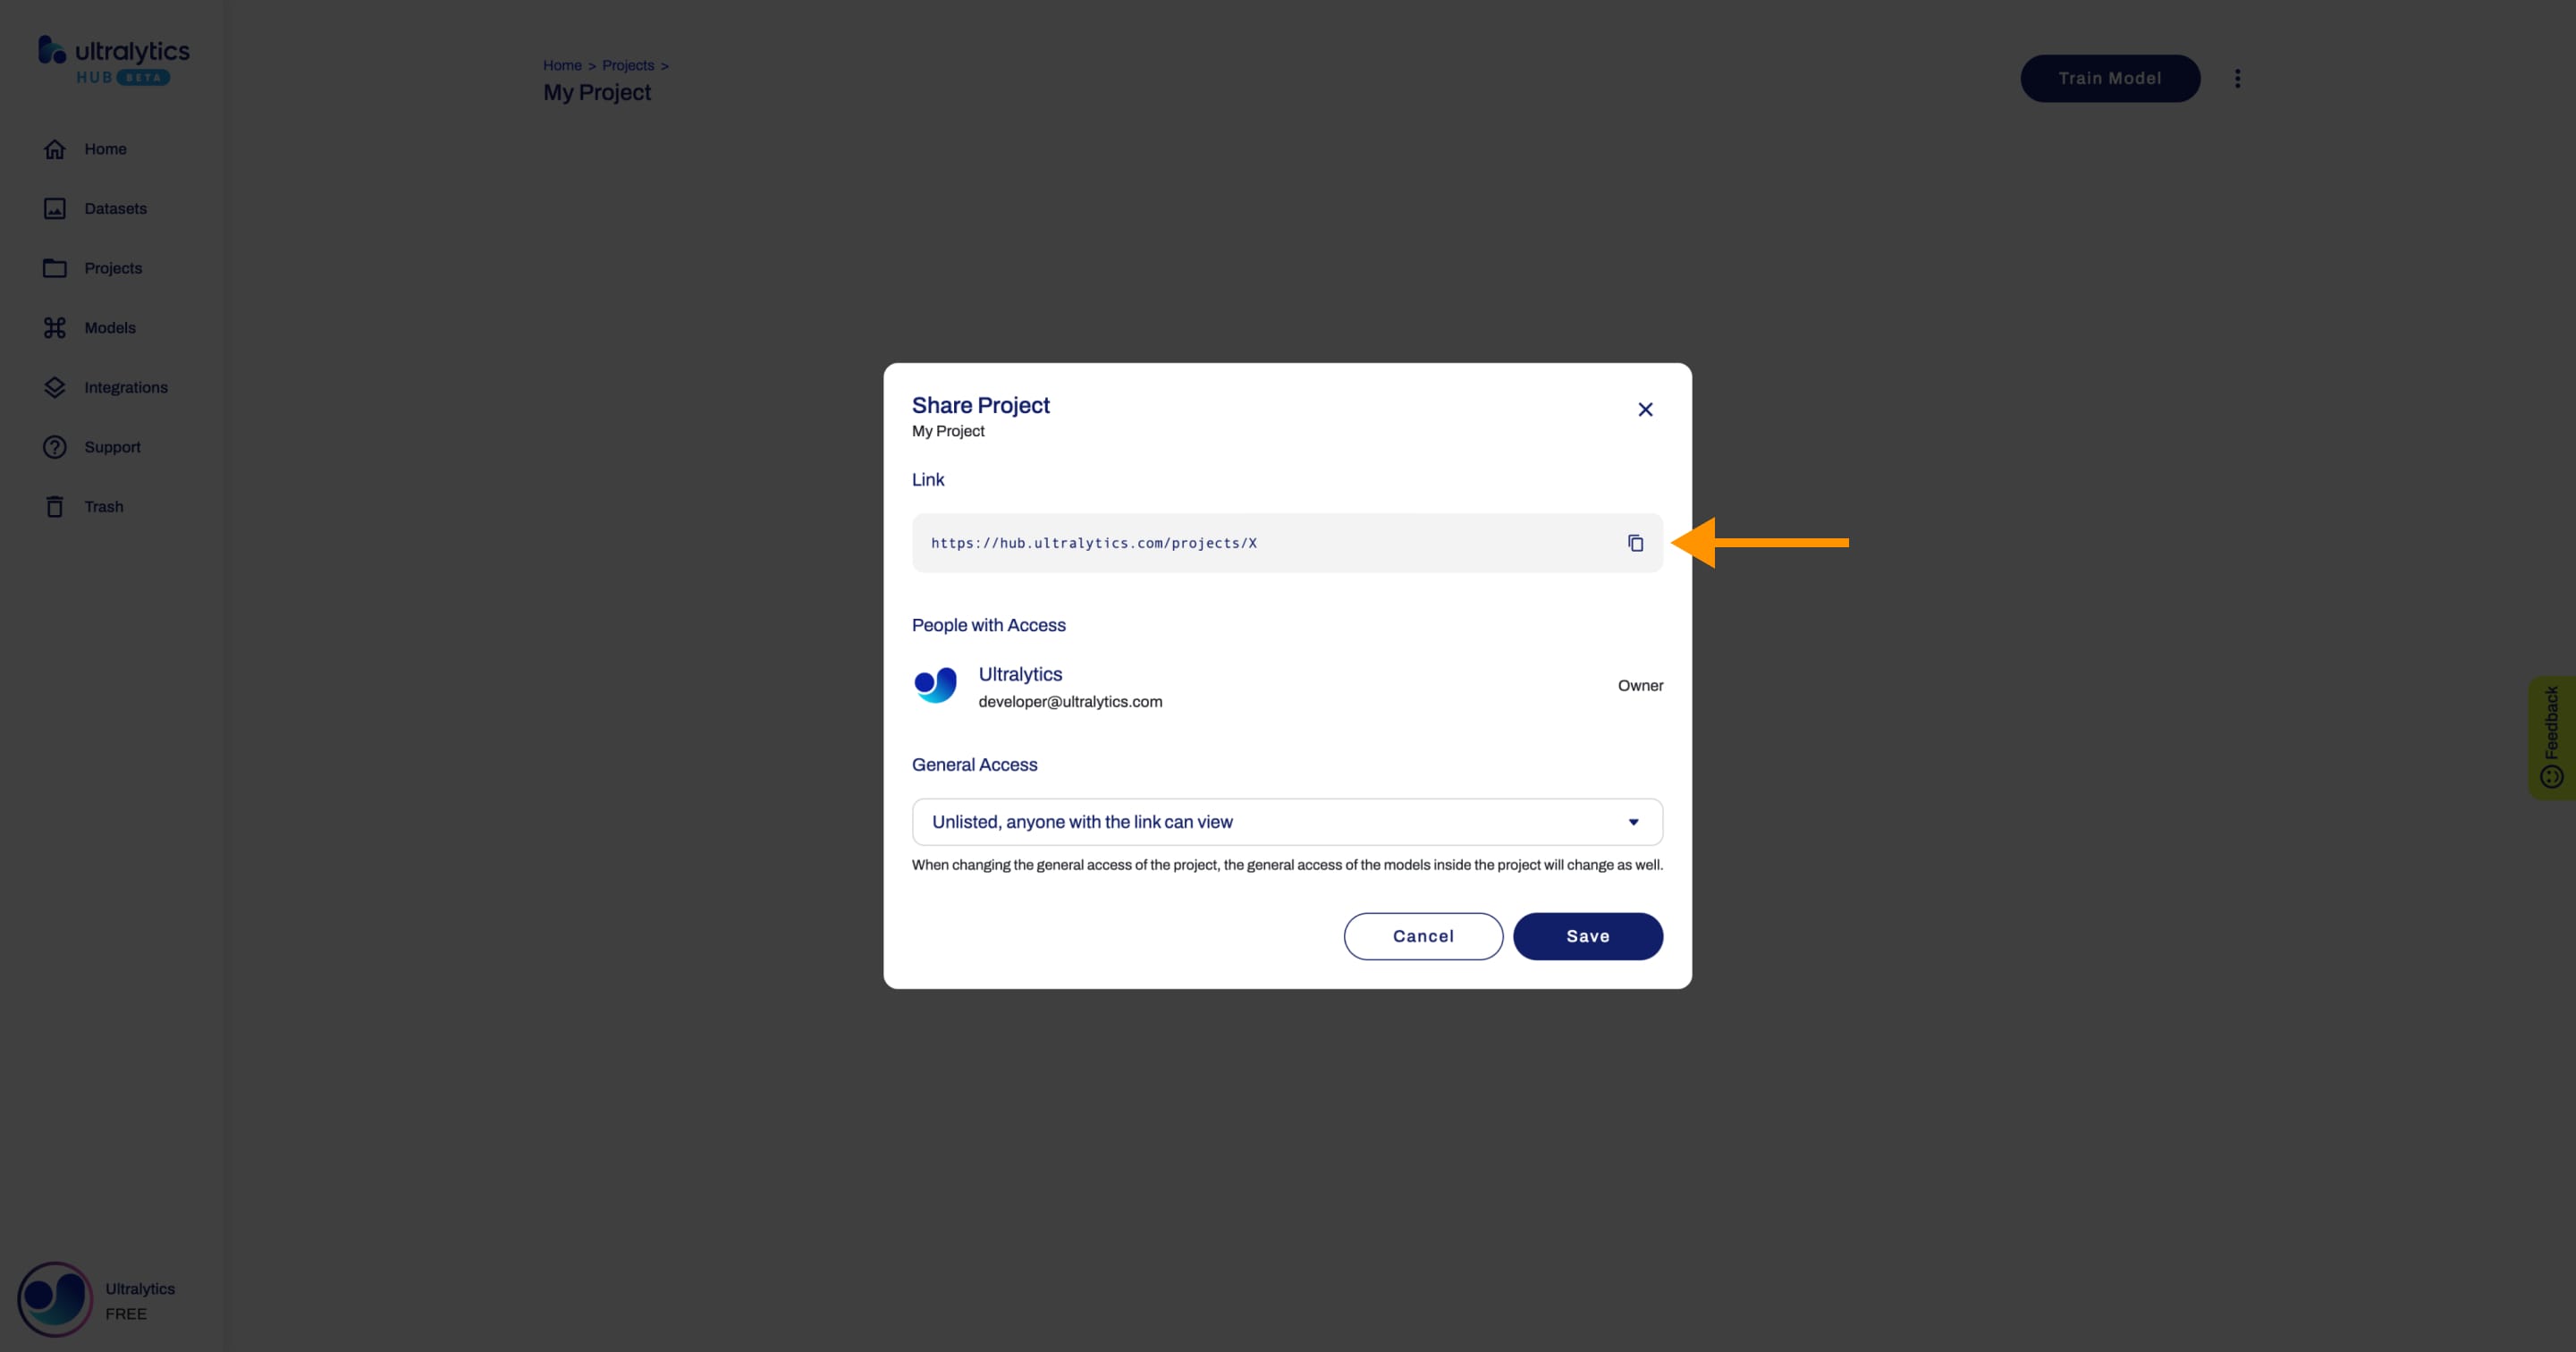
??? tip "Tip"
You can easily click on the project's link shown in the **Share Project** dialog to copy it.
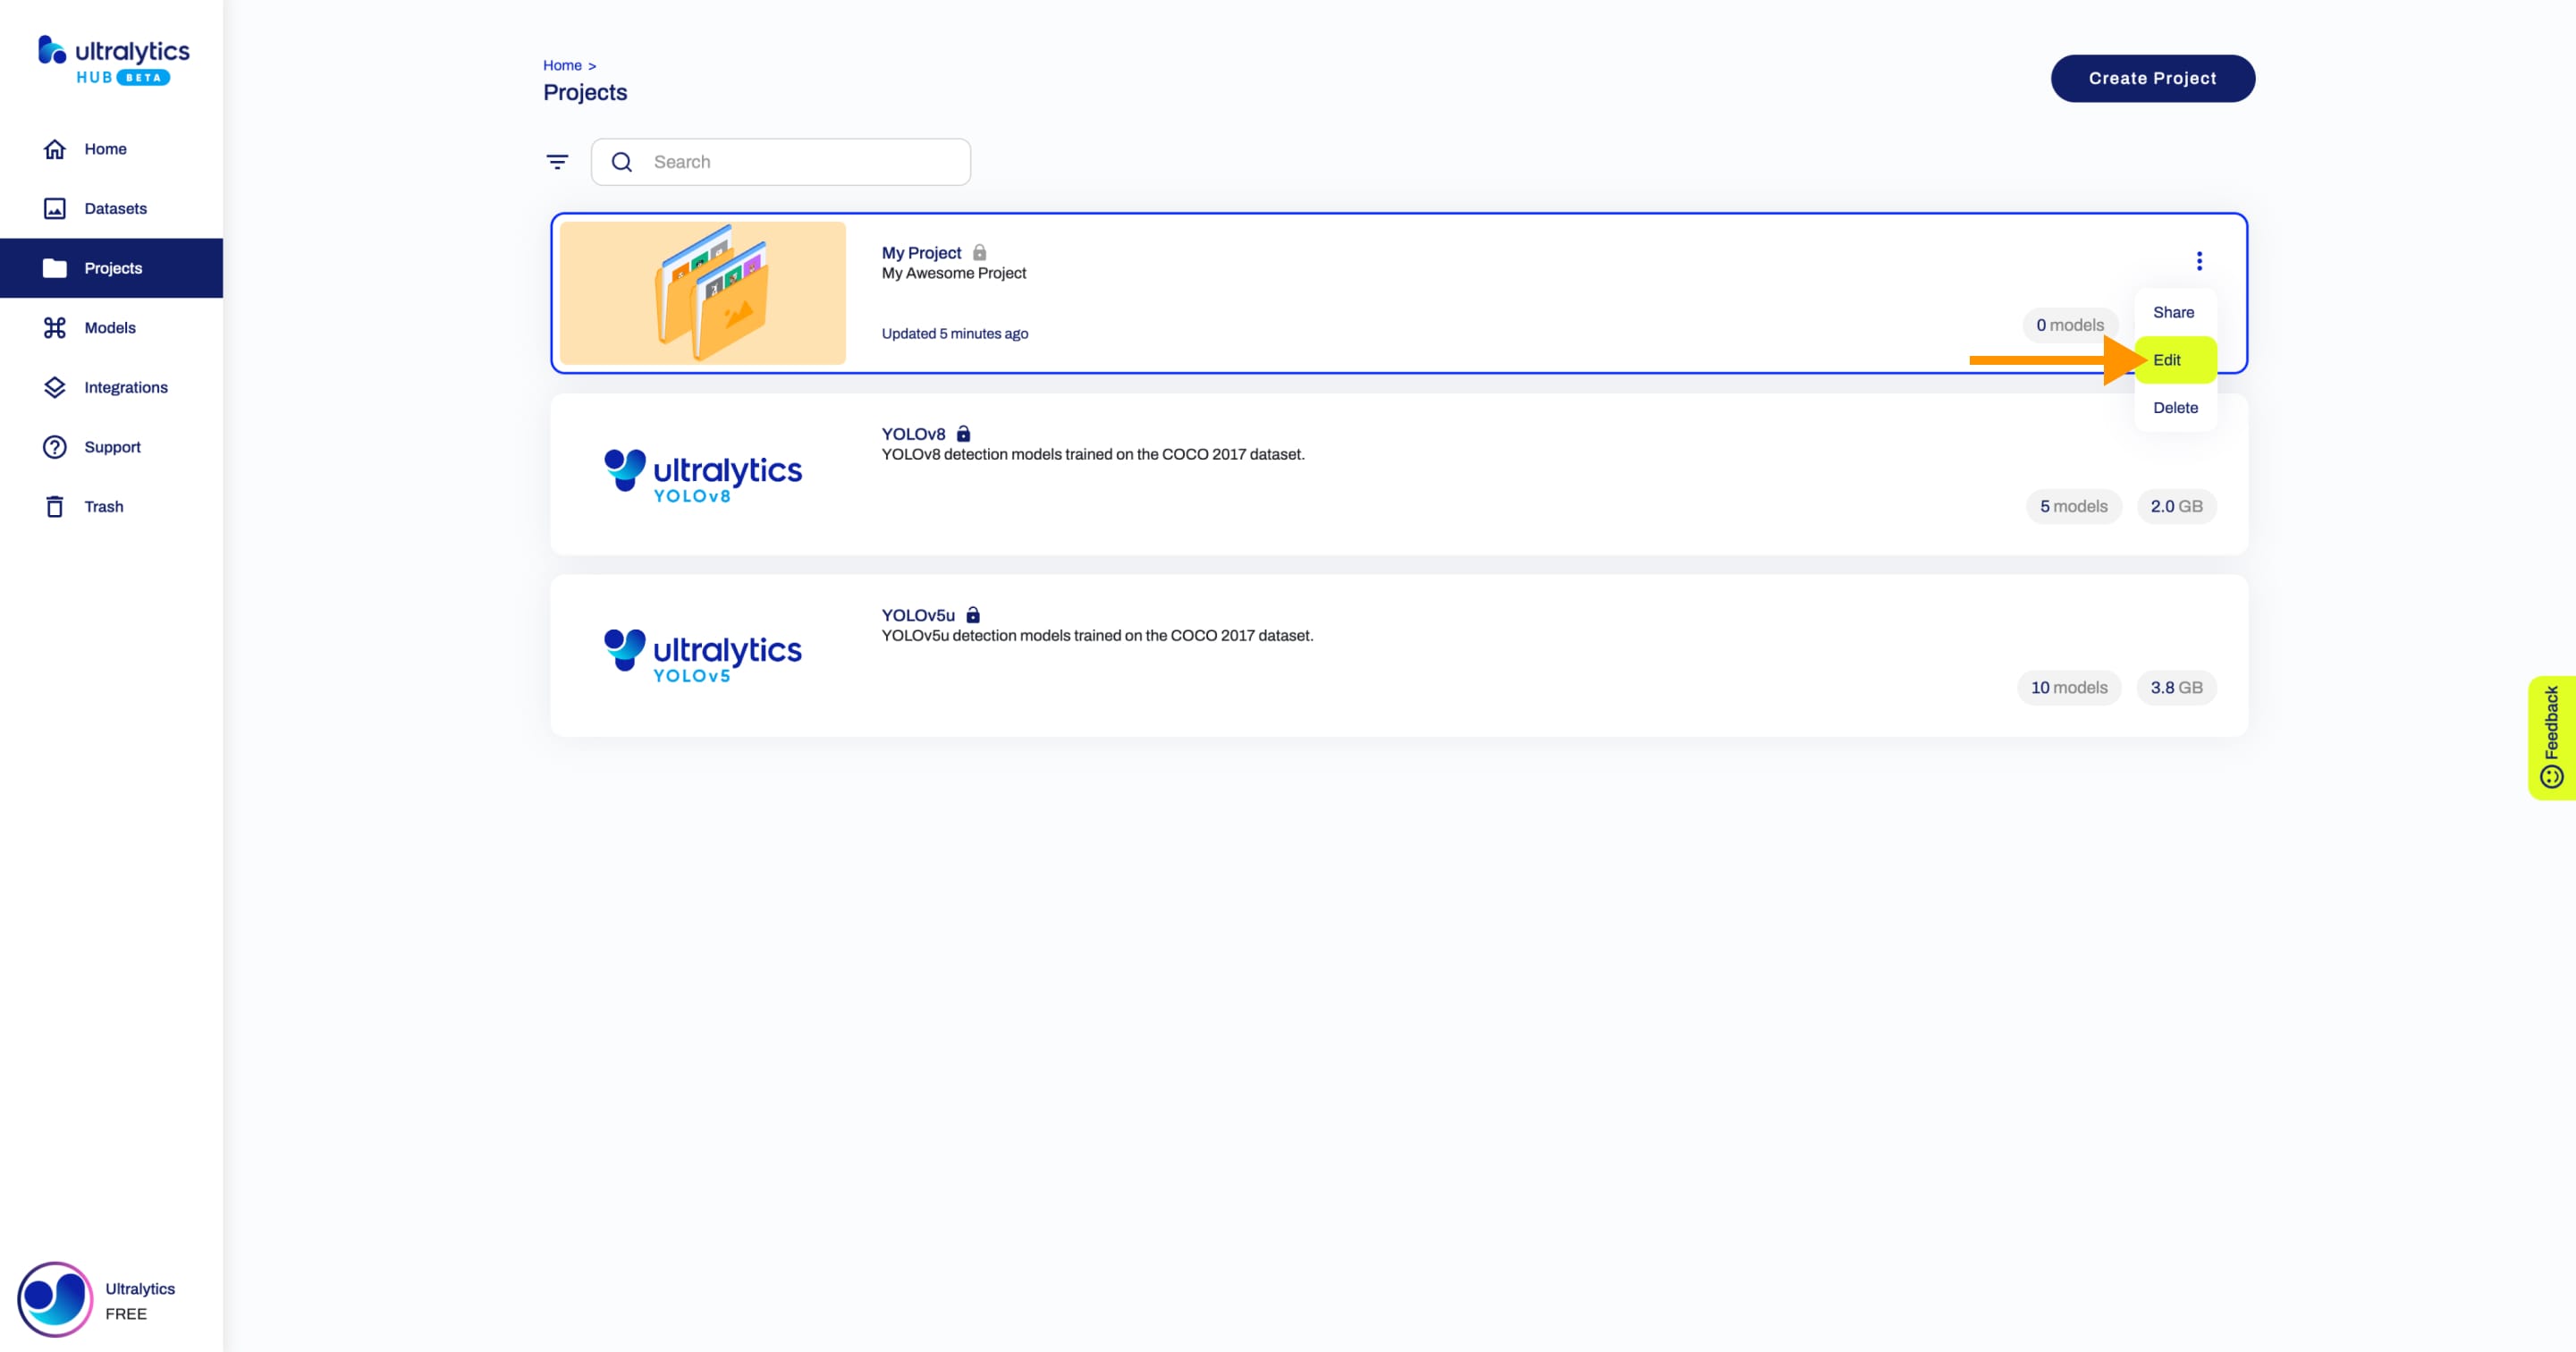
Edit Project
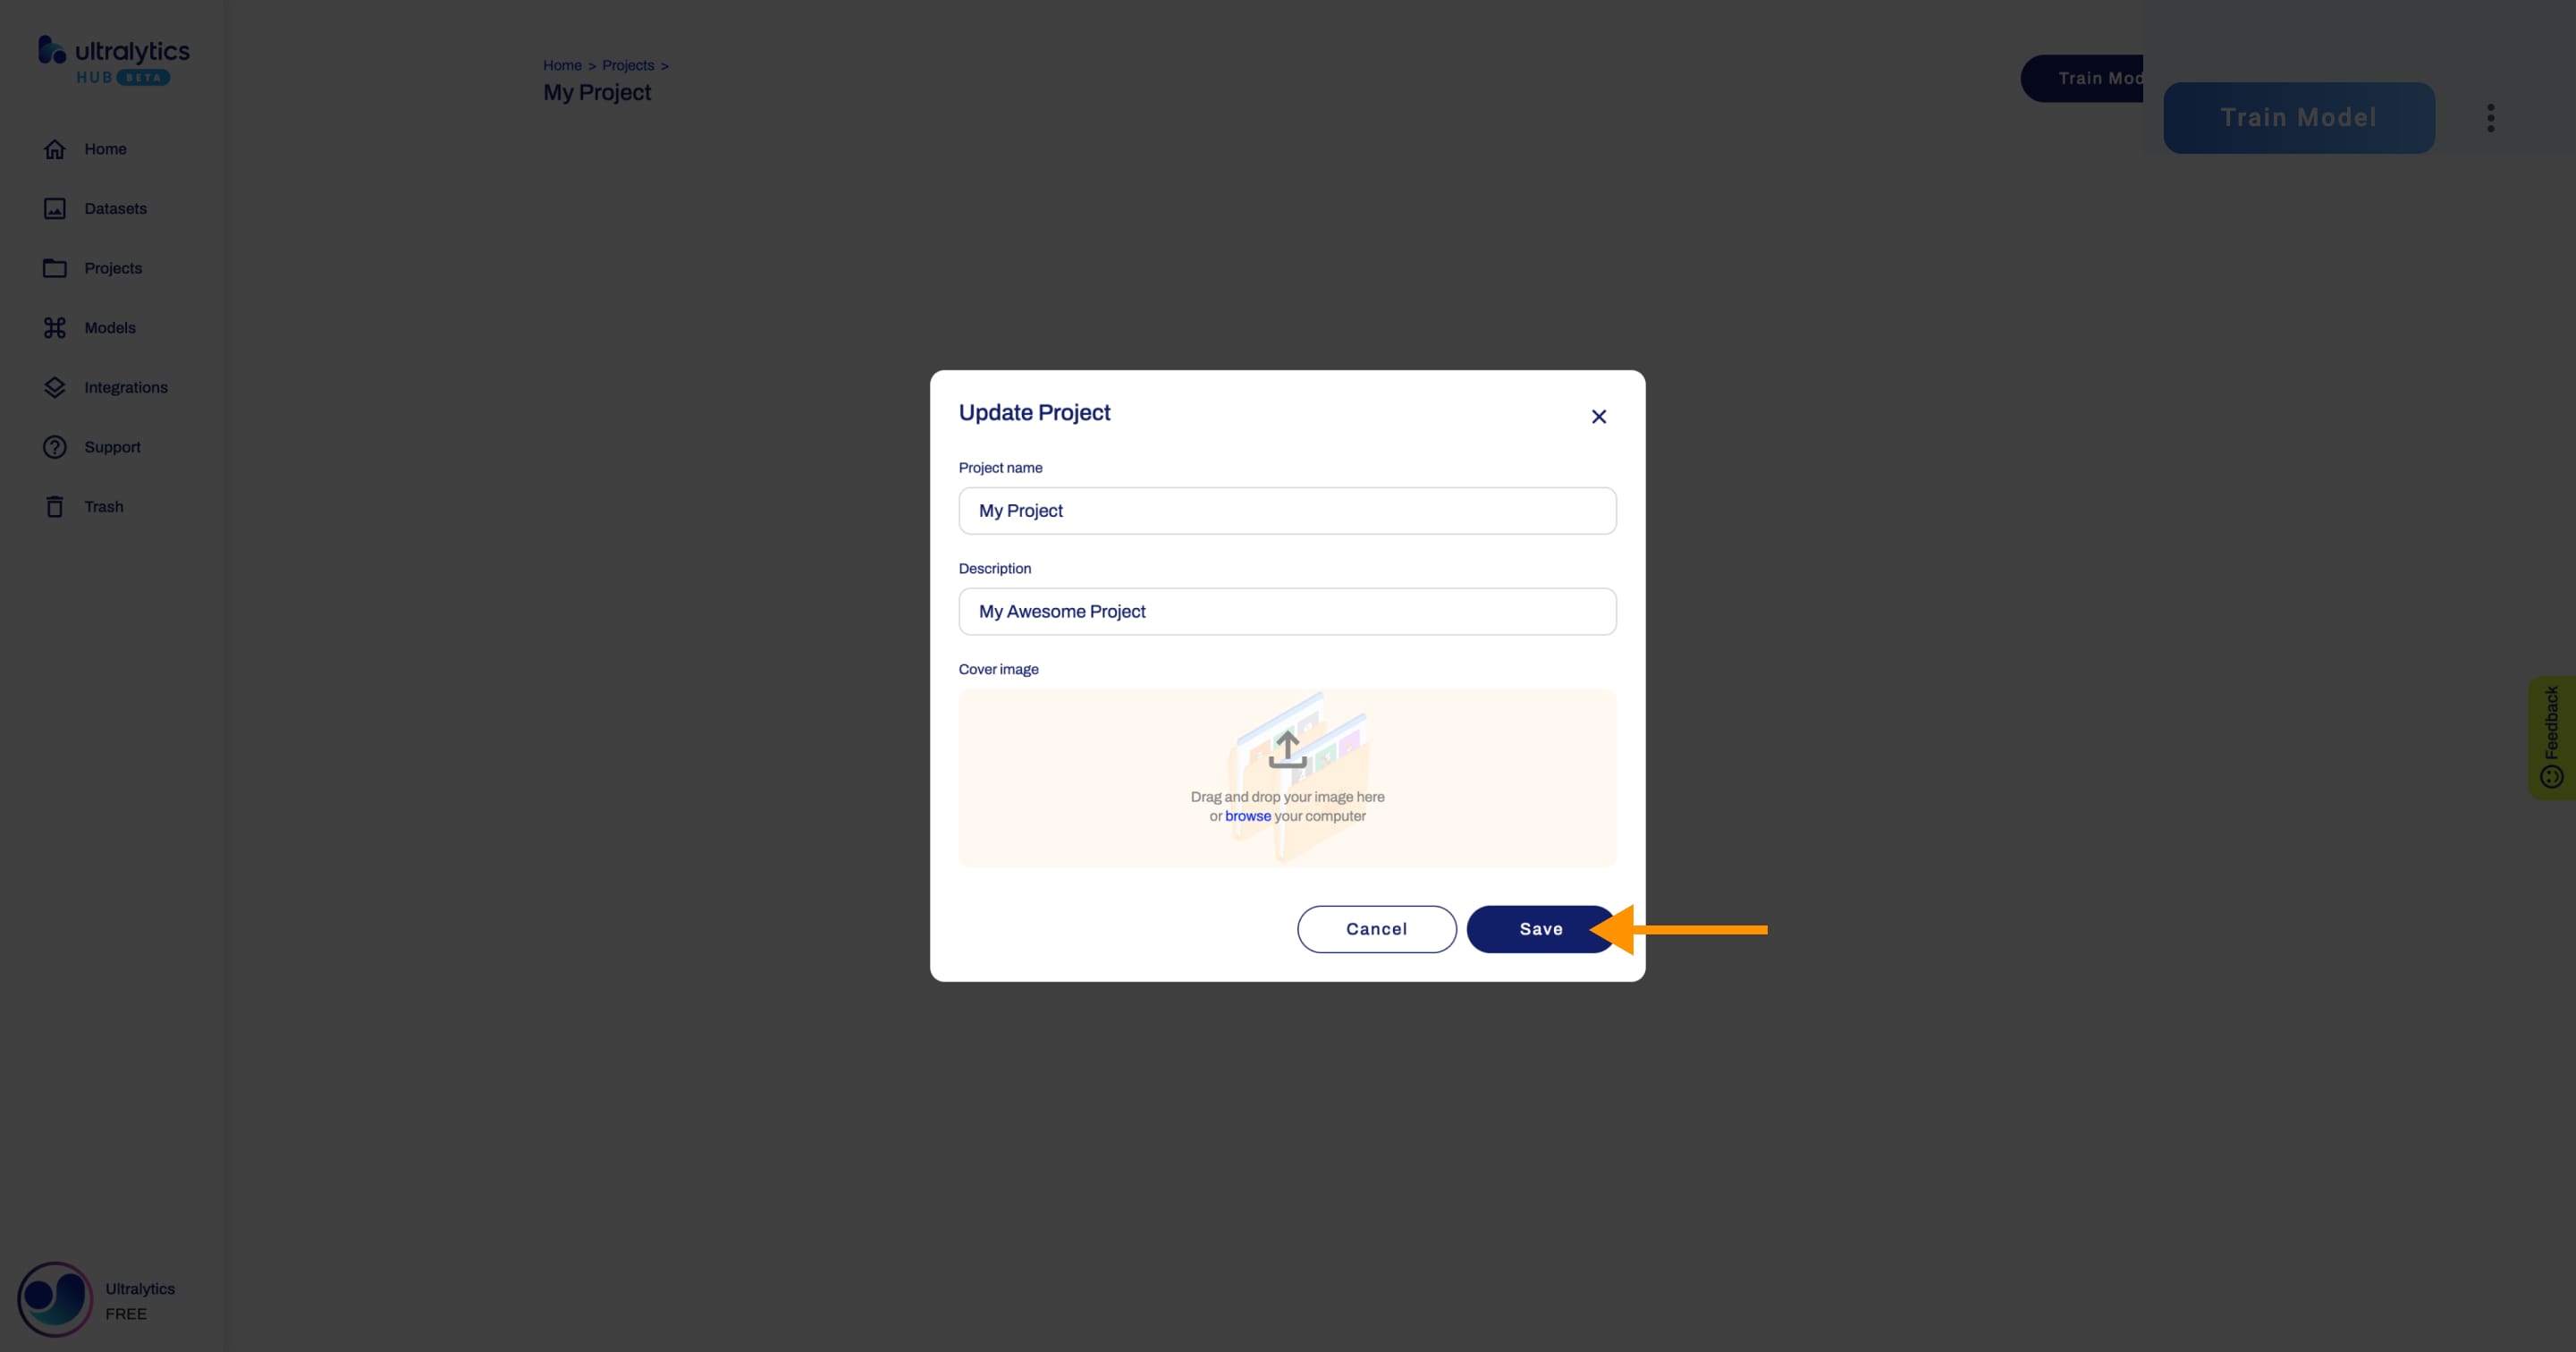
Navigate to the Project page of the project you want to edit, open the project actions dropdown and click on the Edit option. This action will trigger the Update Project dialog.
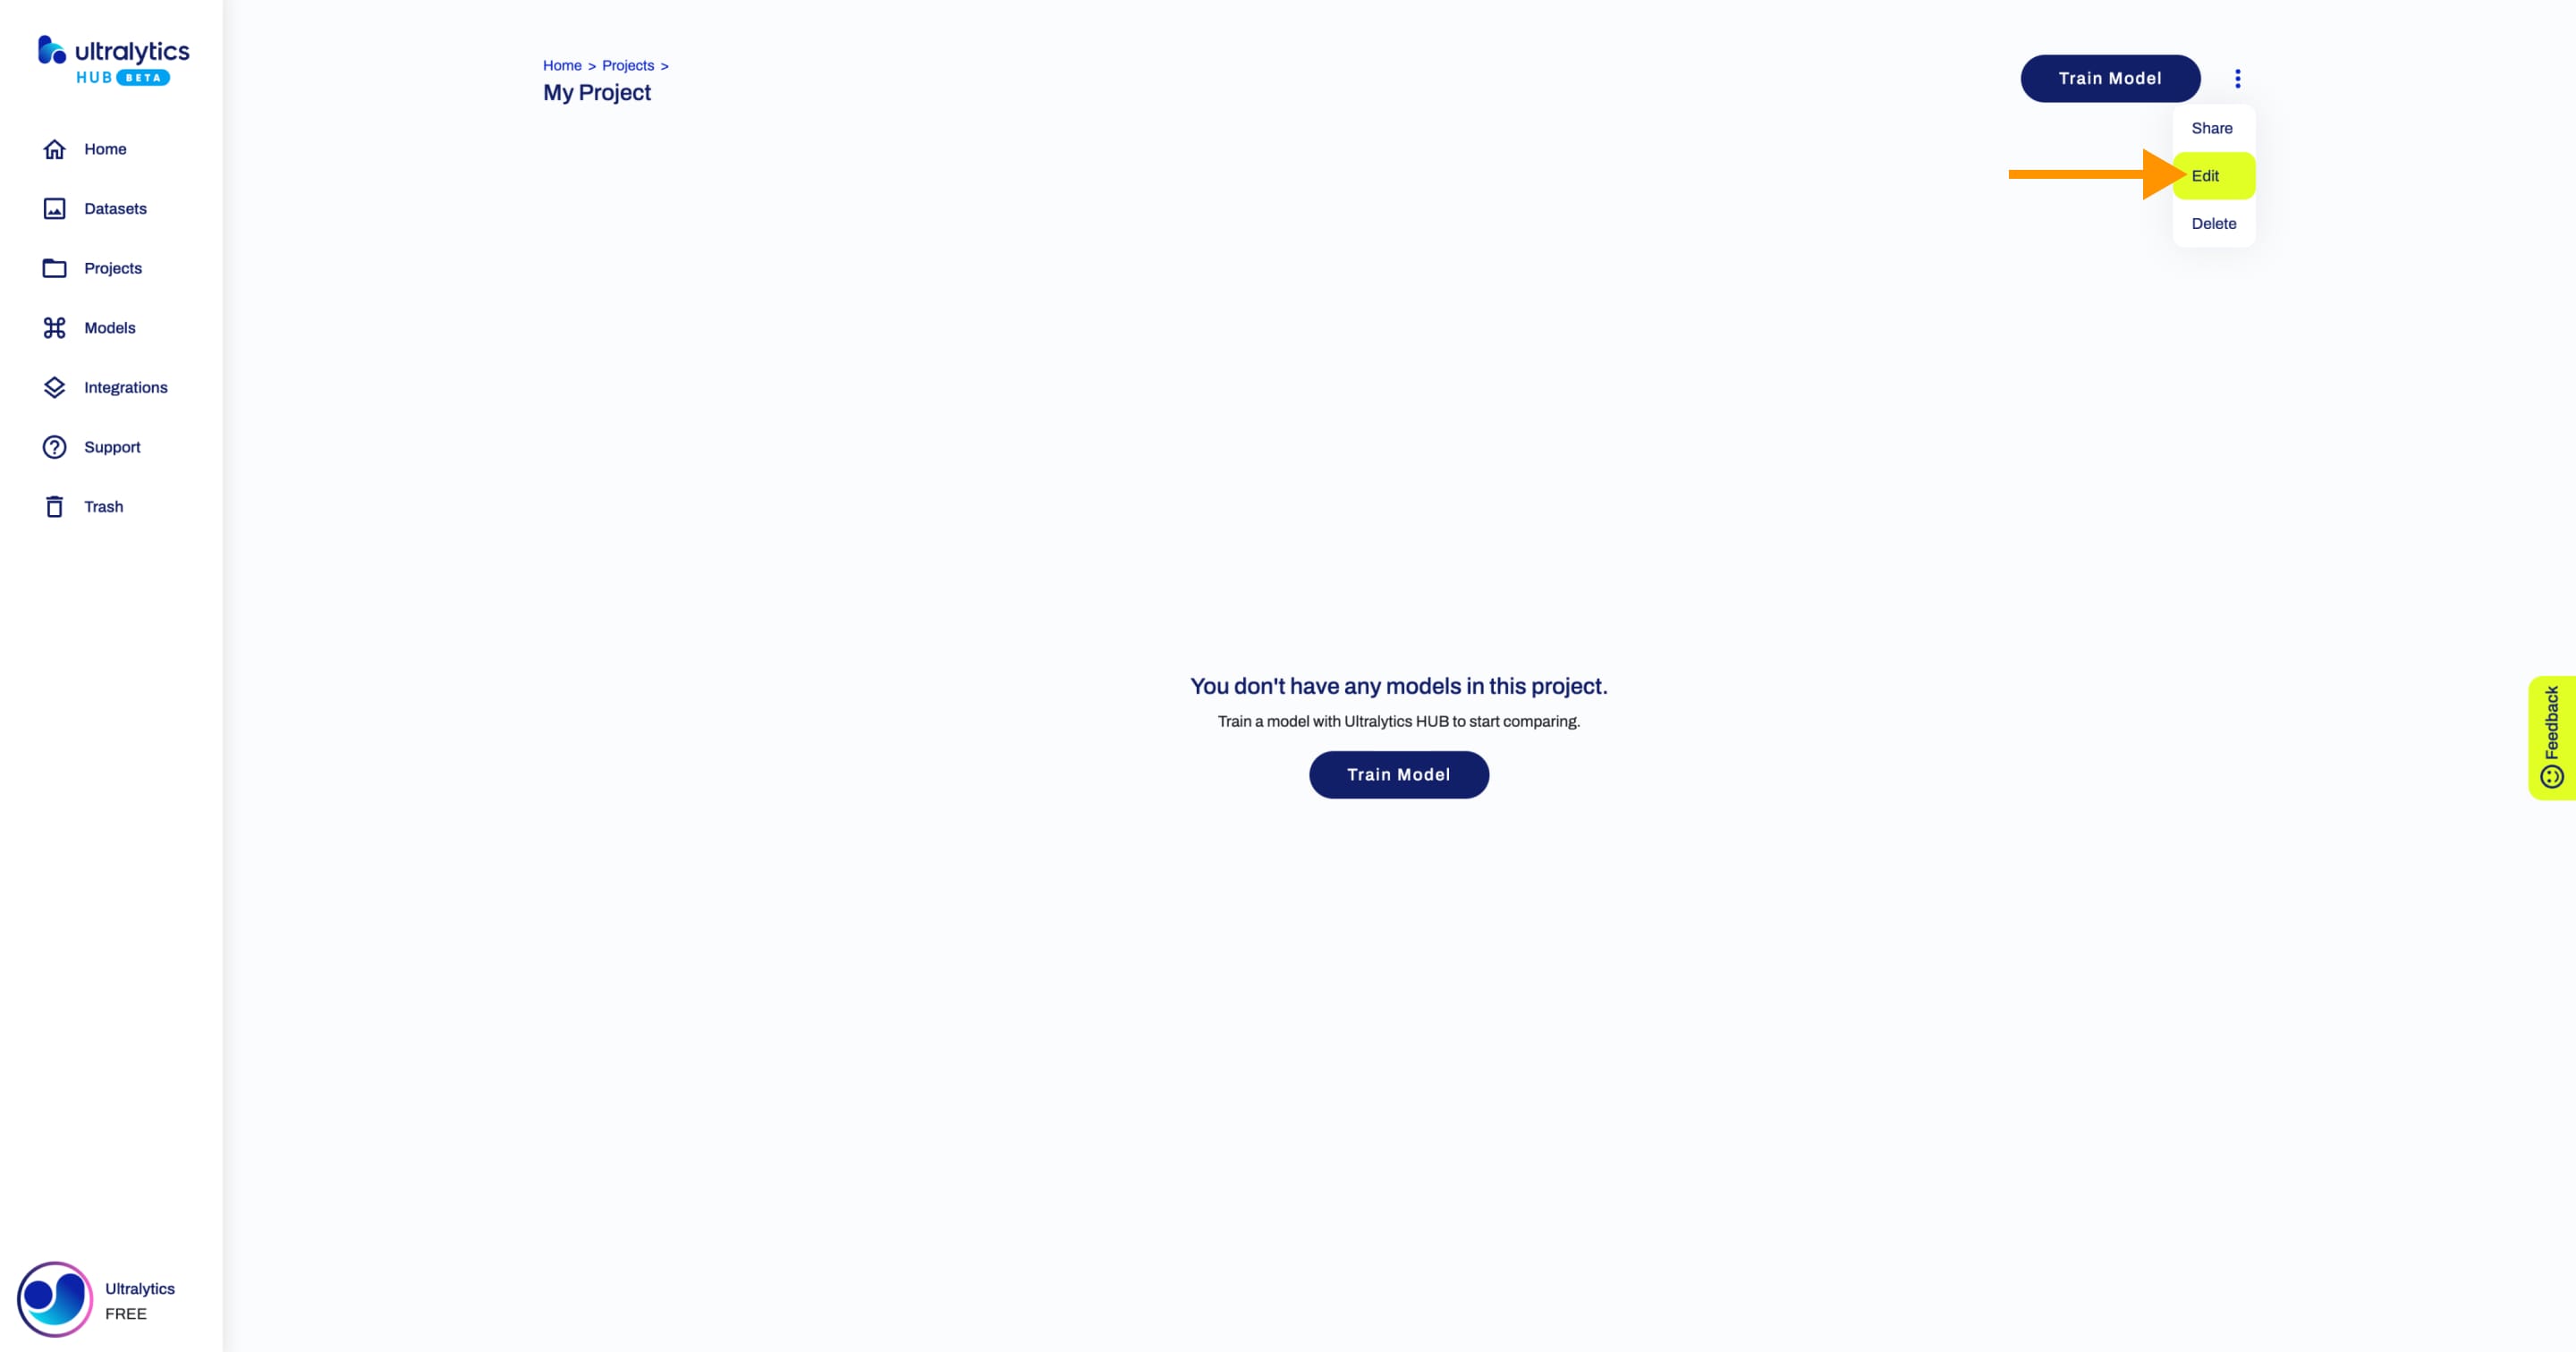
??? tip "Tip"
You can edit a project directly from the [Projects](https://hub.ultralytics.com/projects) page.
Apply the desired modifications to your project and then confirm the changes by clicking Save.
Delete Project
Navigate to the Project page of the project you want to delete, open the project actions dropdown and click on the Delete option. This action will delete the project.
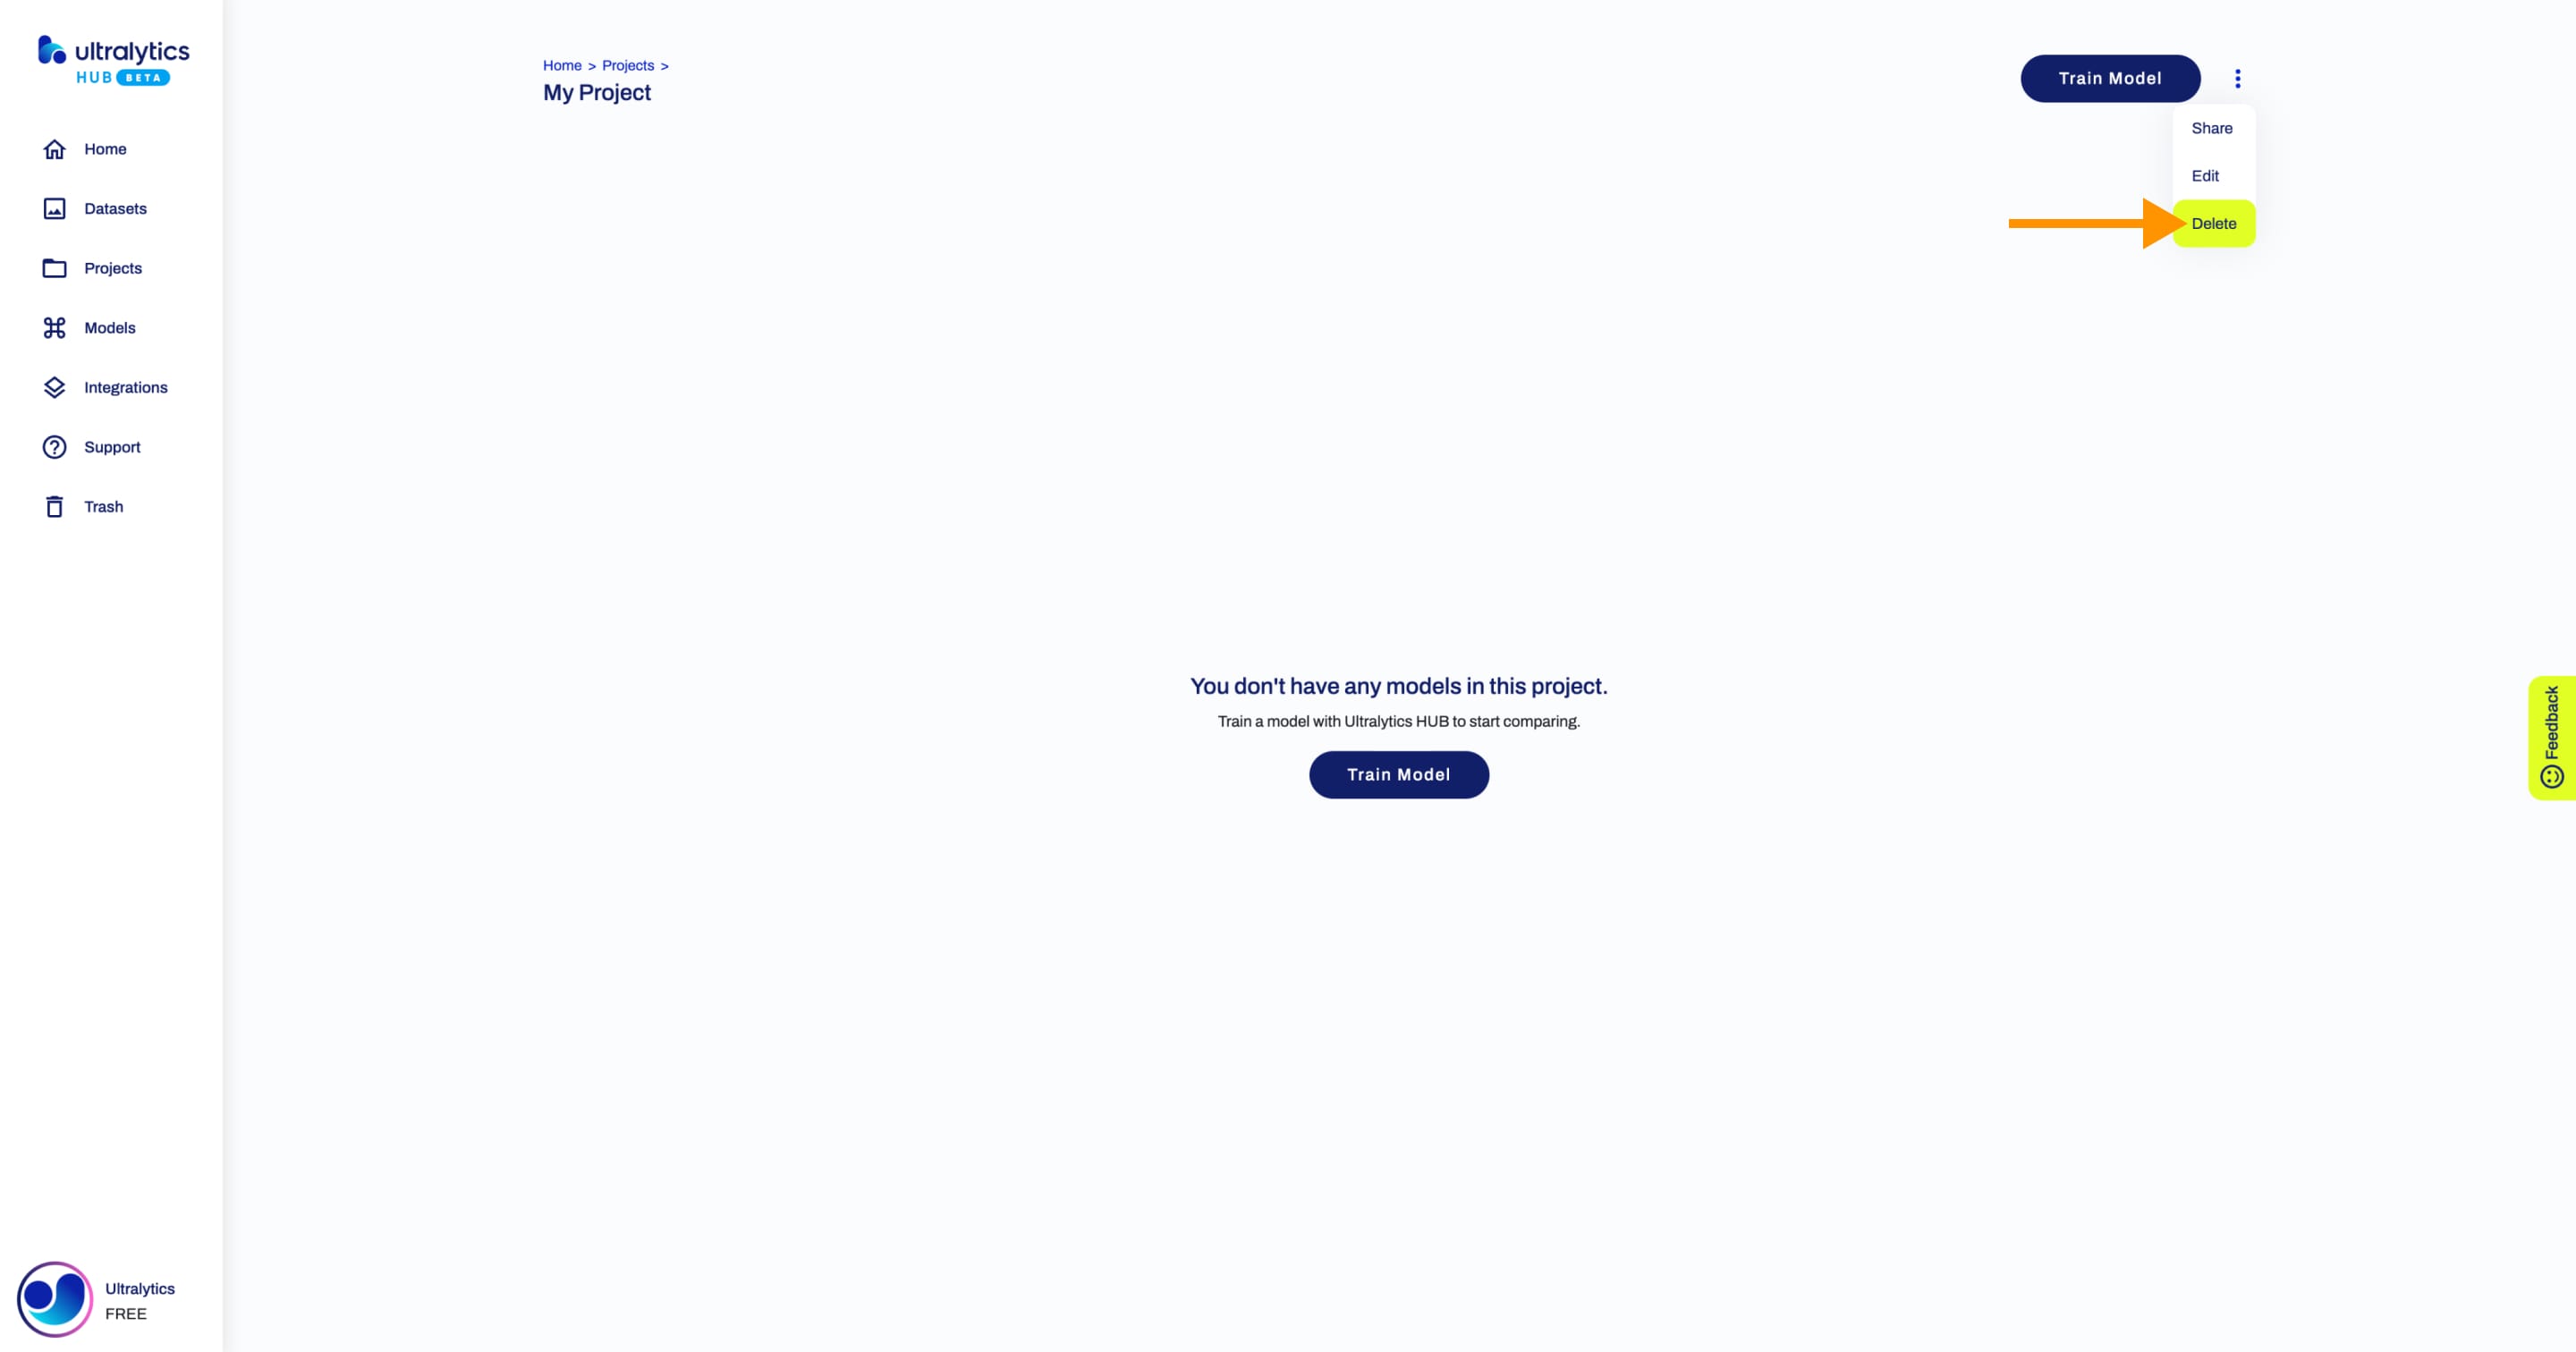
??? tip "Tip"
You can delete a project directly from the [Projects](https://hub.ultralytics.com/projects) page.

!!! Warning "Warning"
When deleting a project, the models inside the project will be deleted as well.
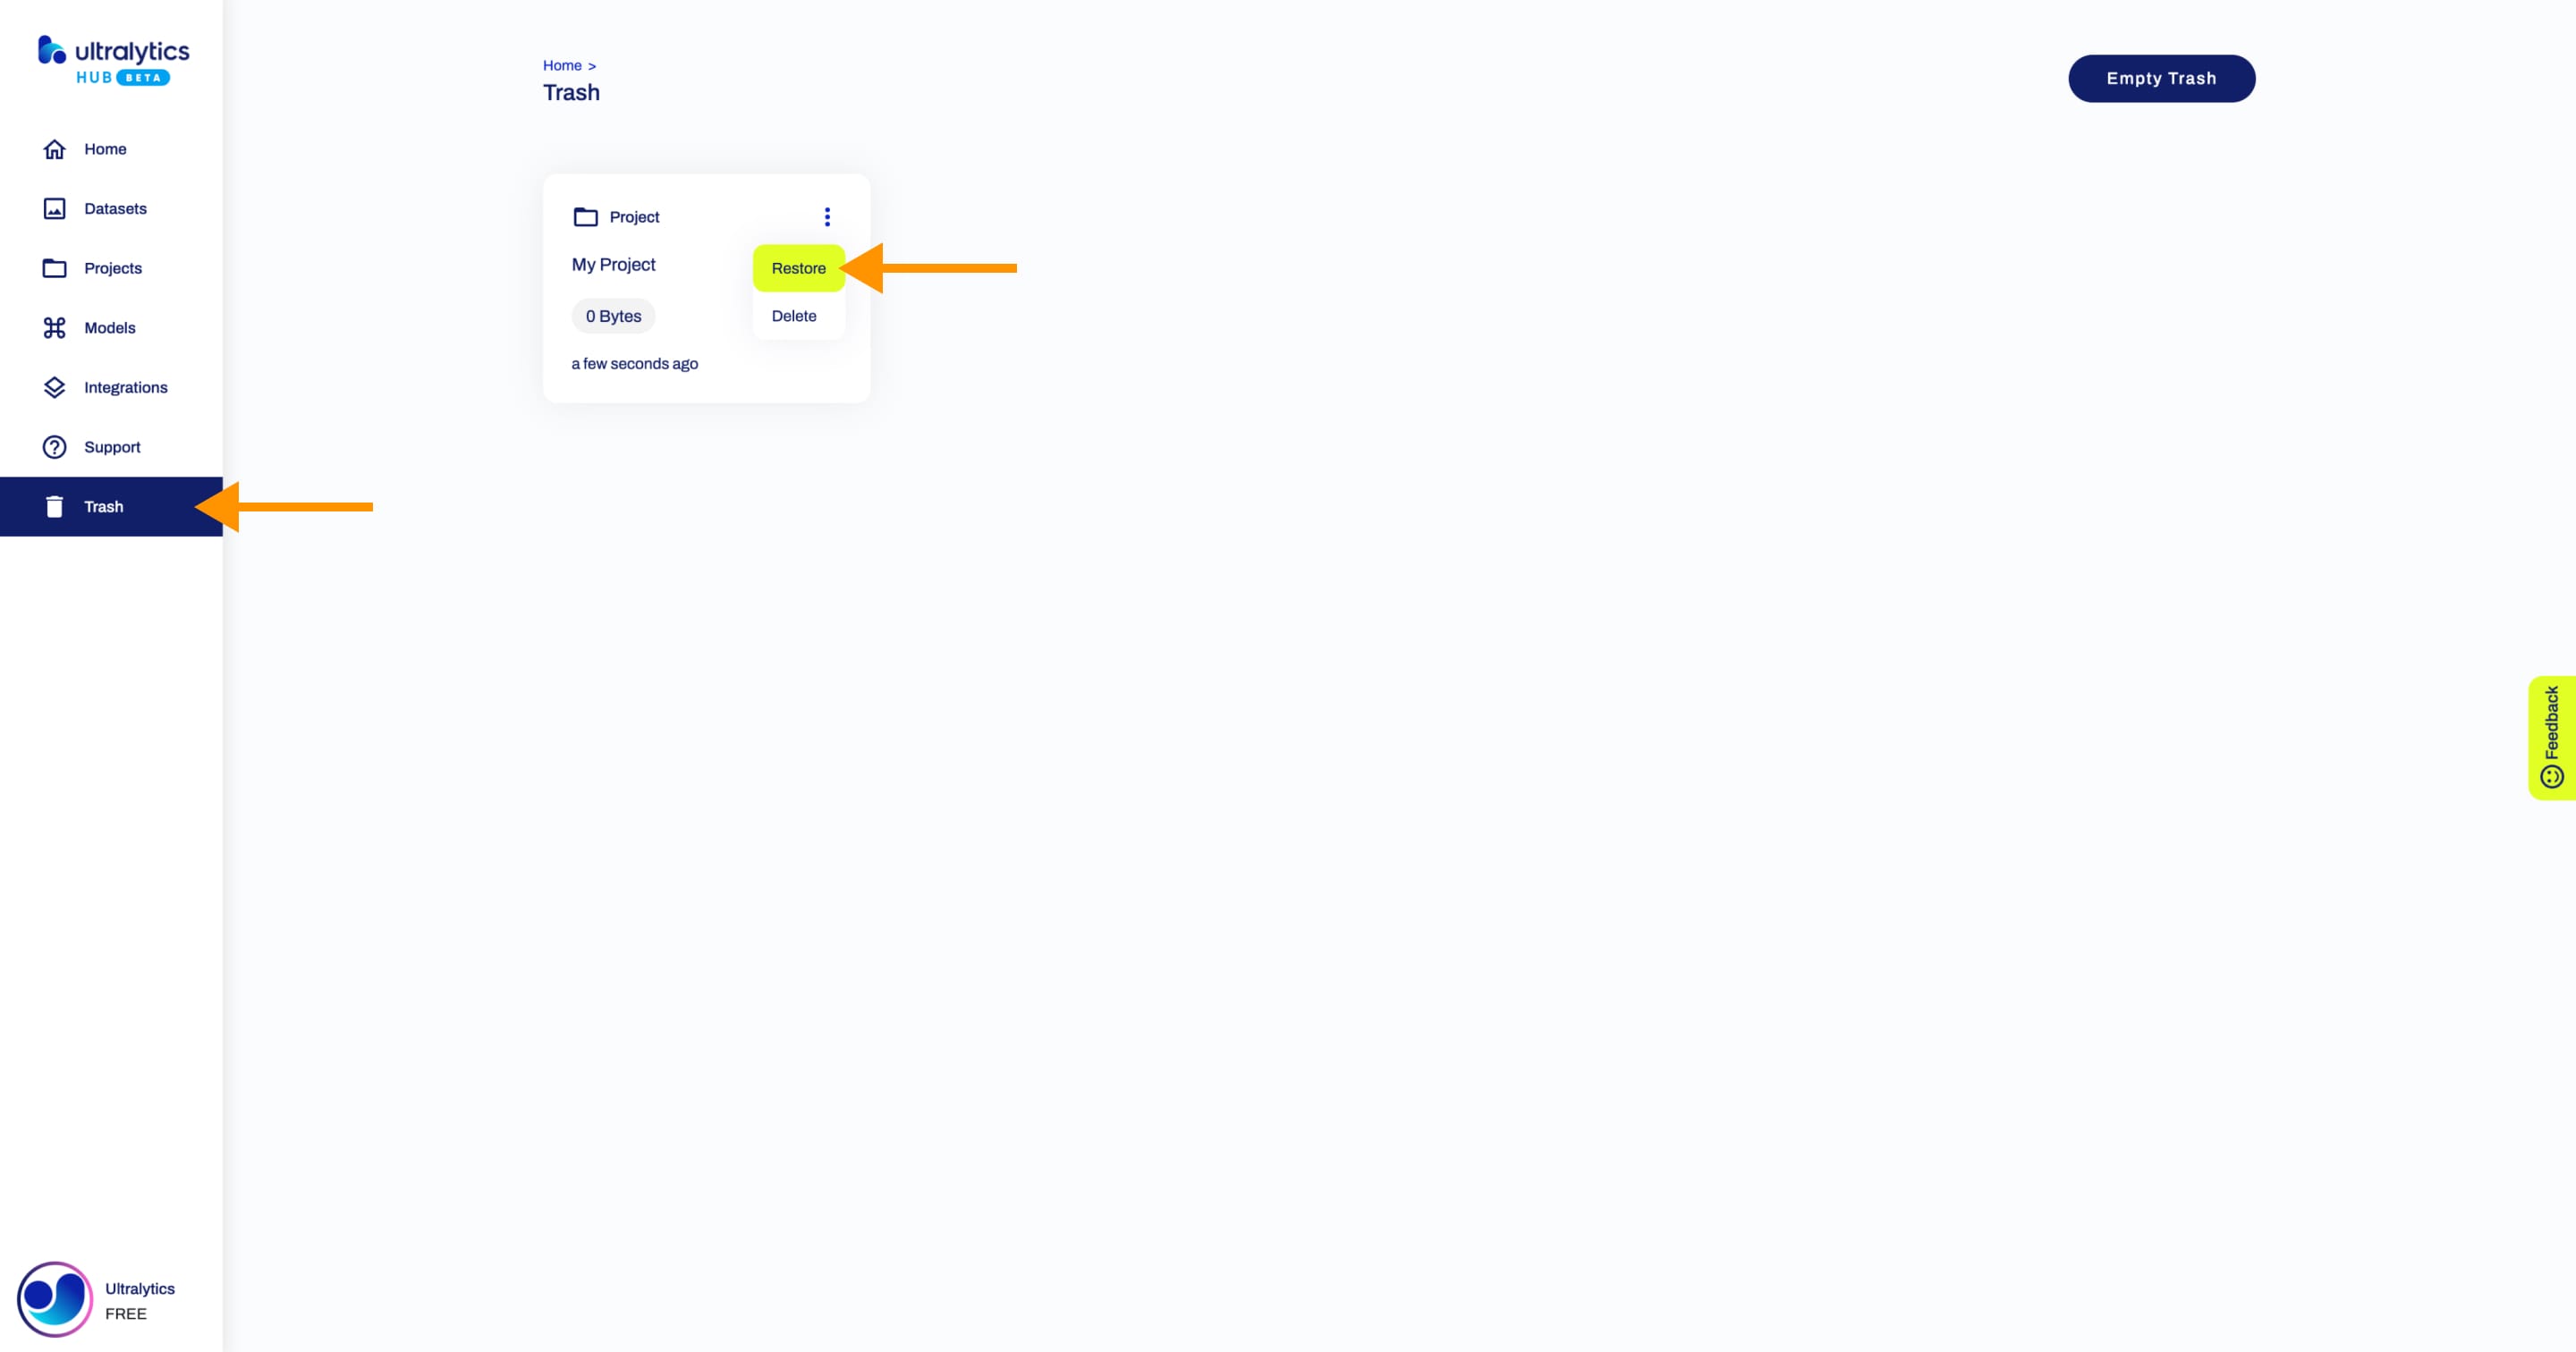
!!! note "Note"
If you change your mind, you can restore the project from the [Trash](https://hub.ultralytics.com/trash) page.
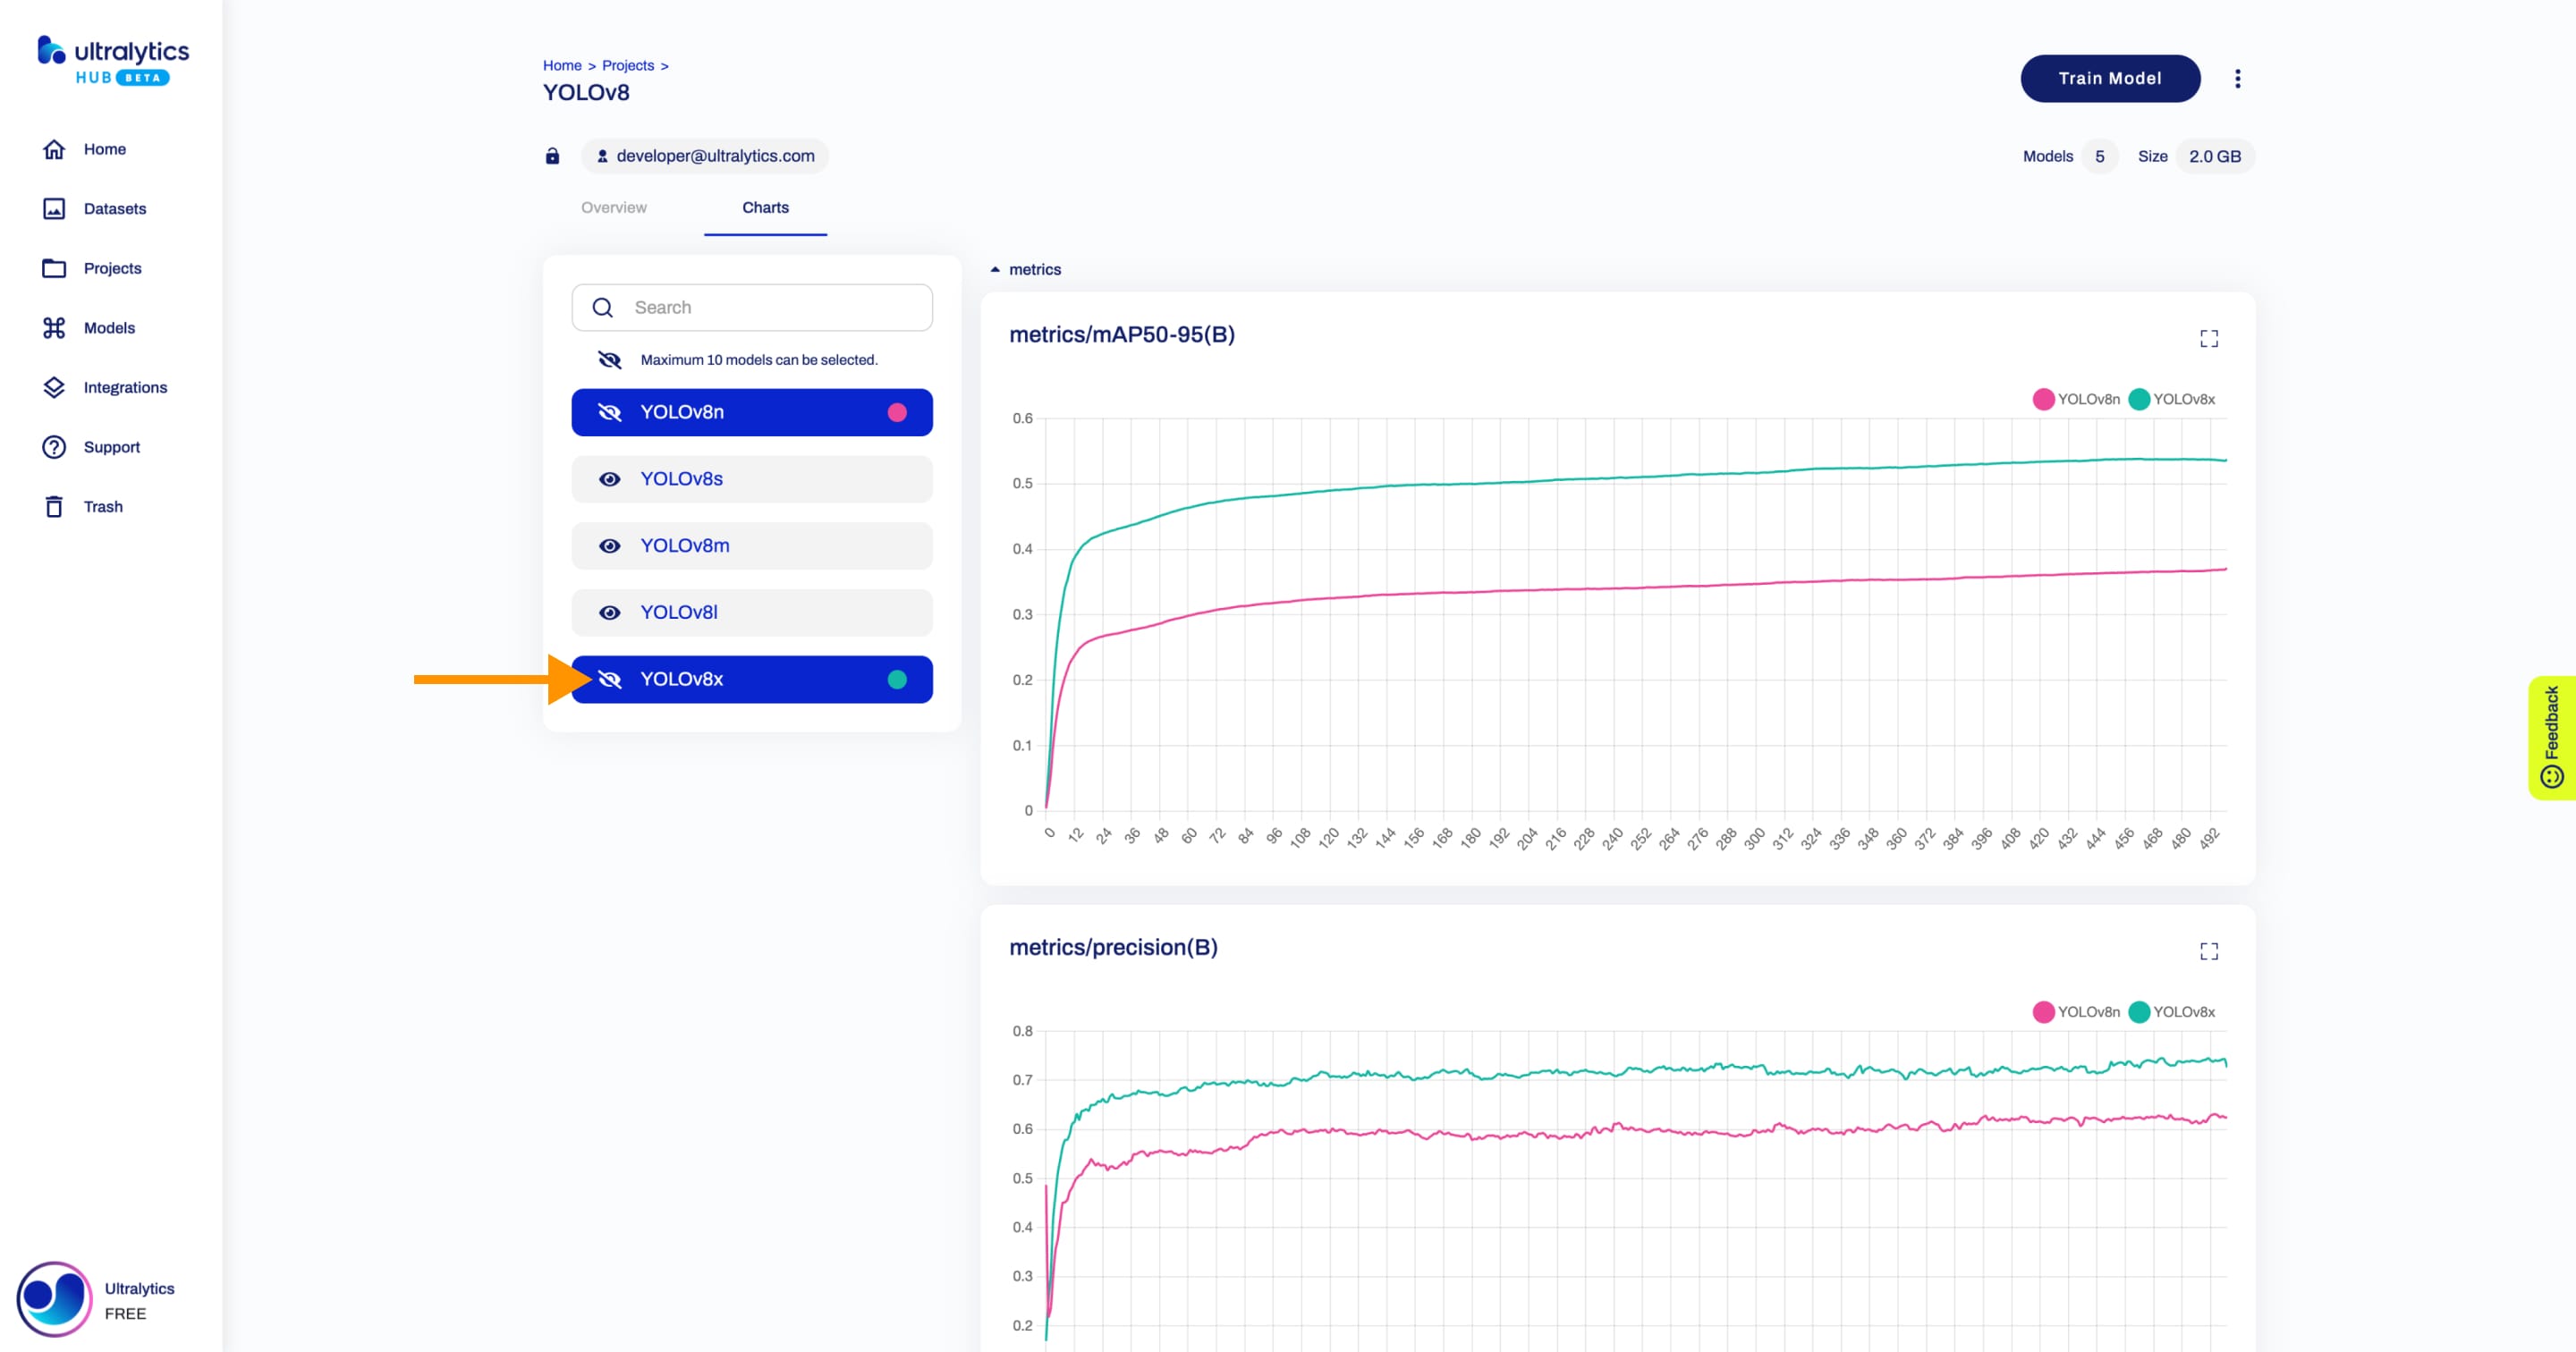
Compare Models
Navigate to the Project page of the project where the models you want to compare are located. To use the model comparison feature, click on the Charts tab.
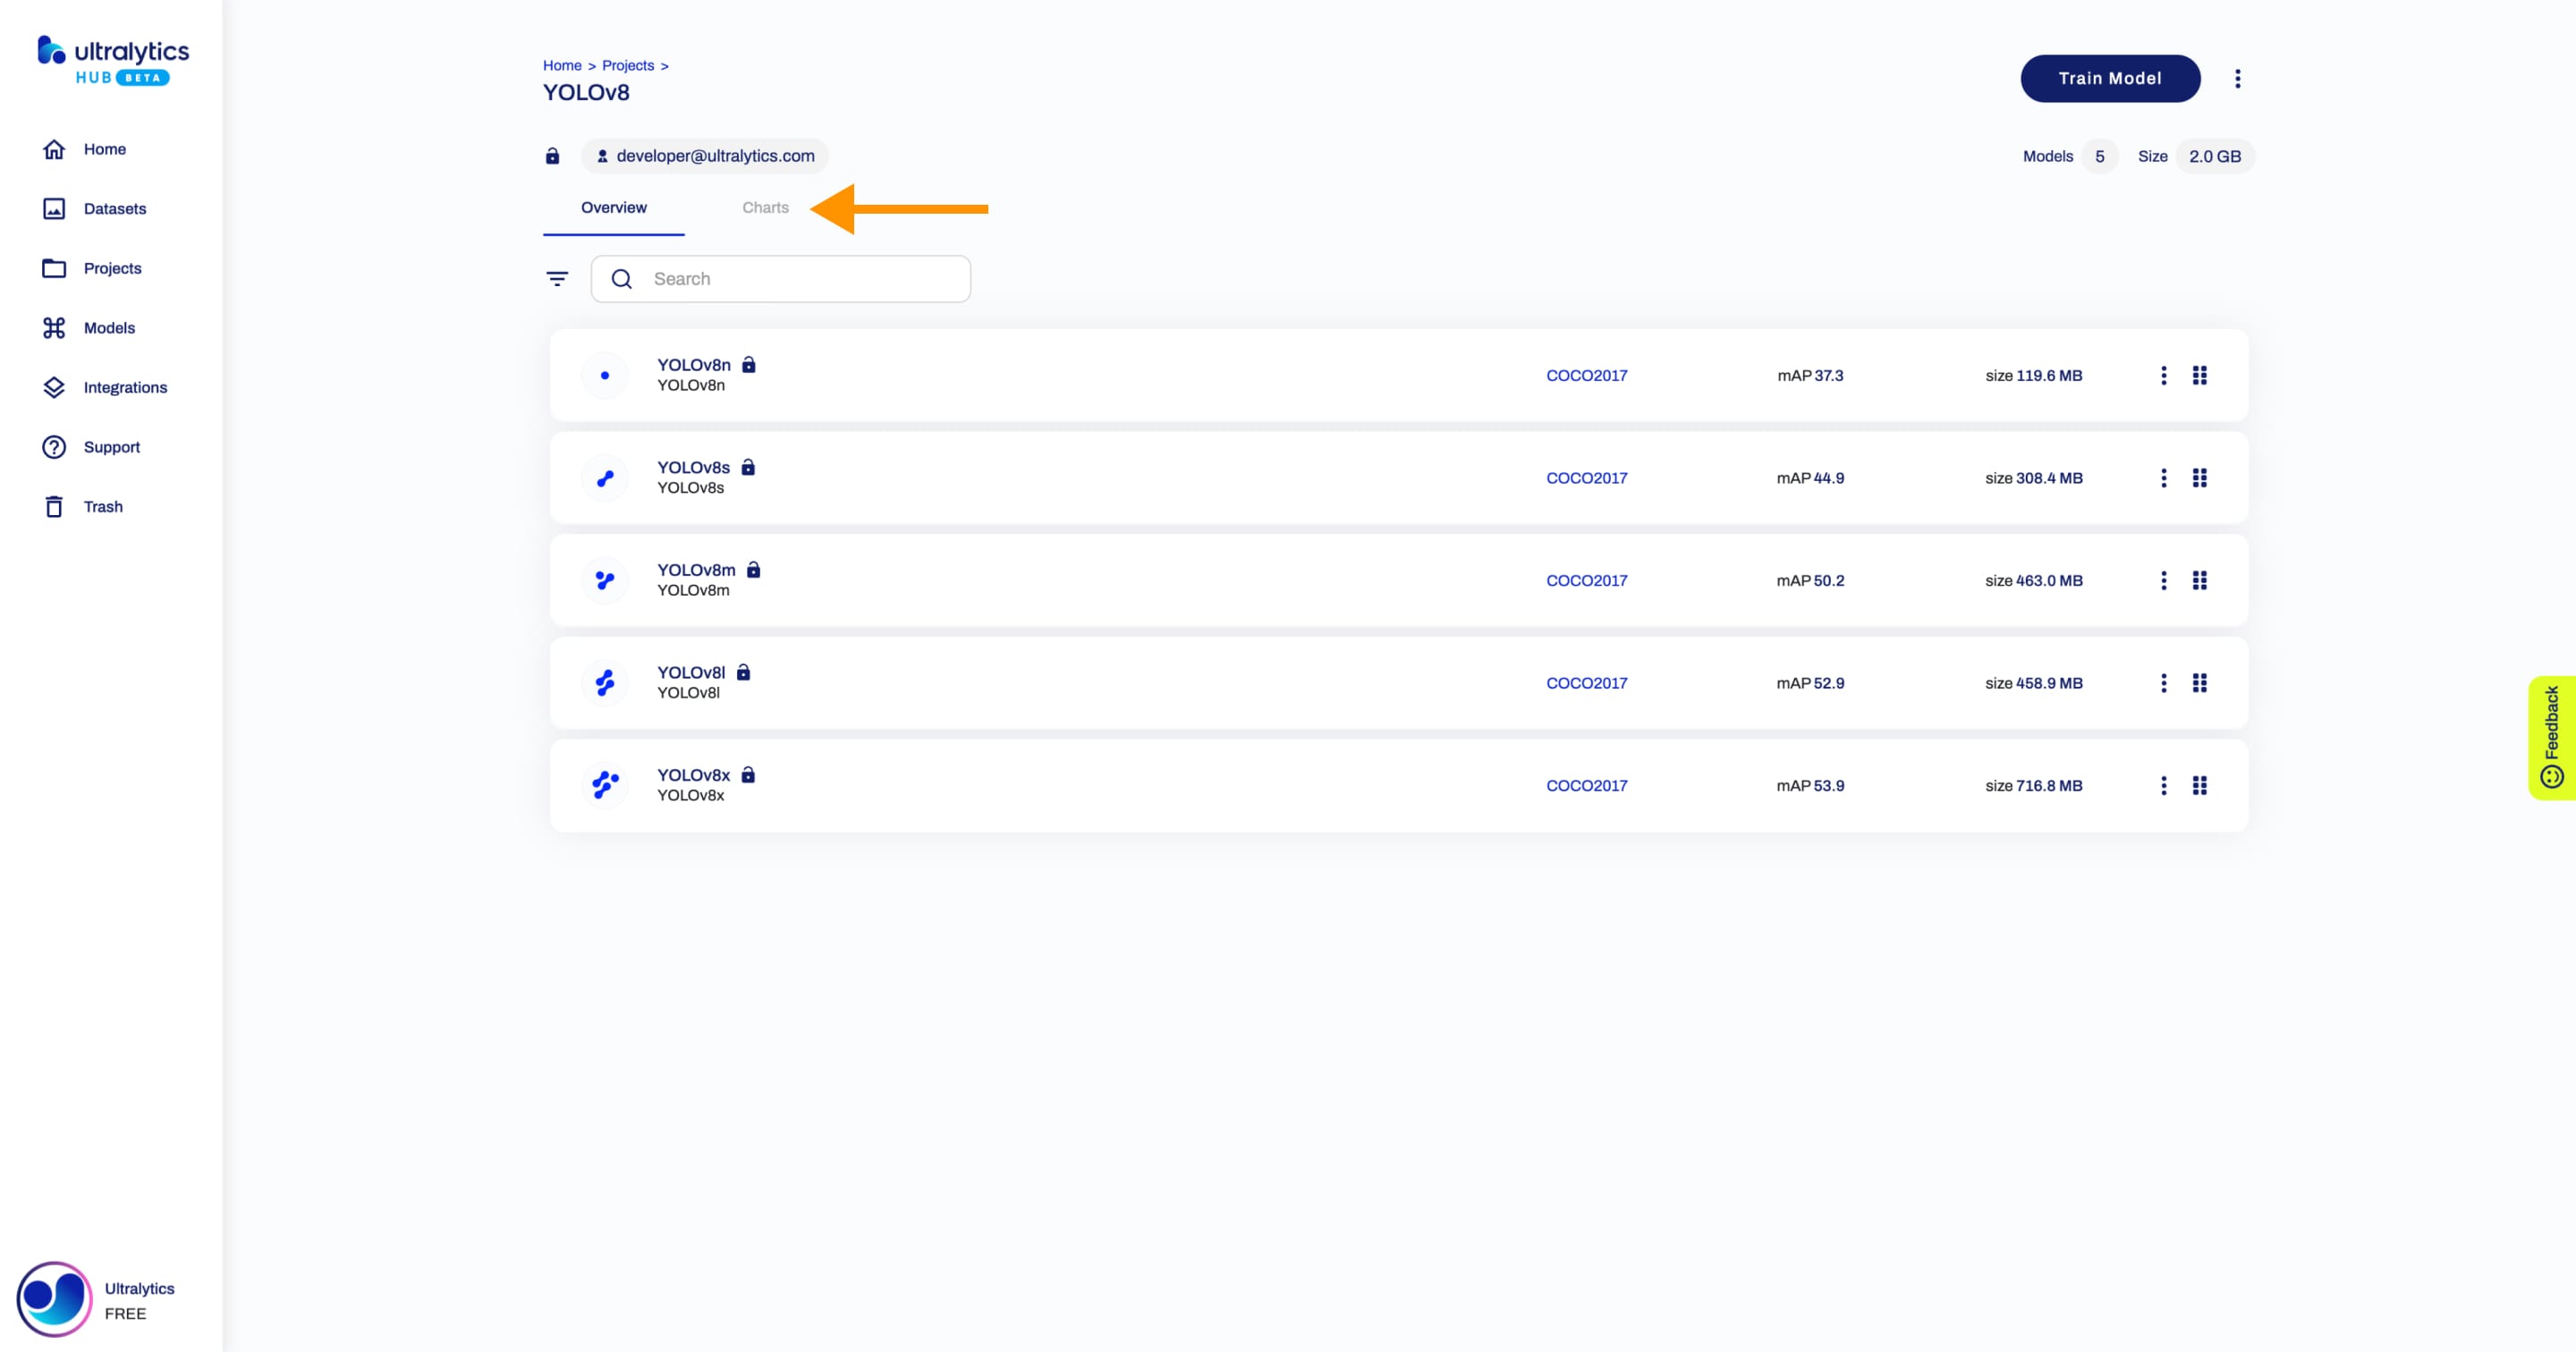
This will display all the relevant charts. Each chart corresponds to a different metric and contains the performance of each model for that metric. The models are represented by different colors, and you can hover over each data point to get more information.

??? tip "Tip"
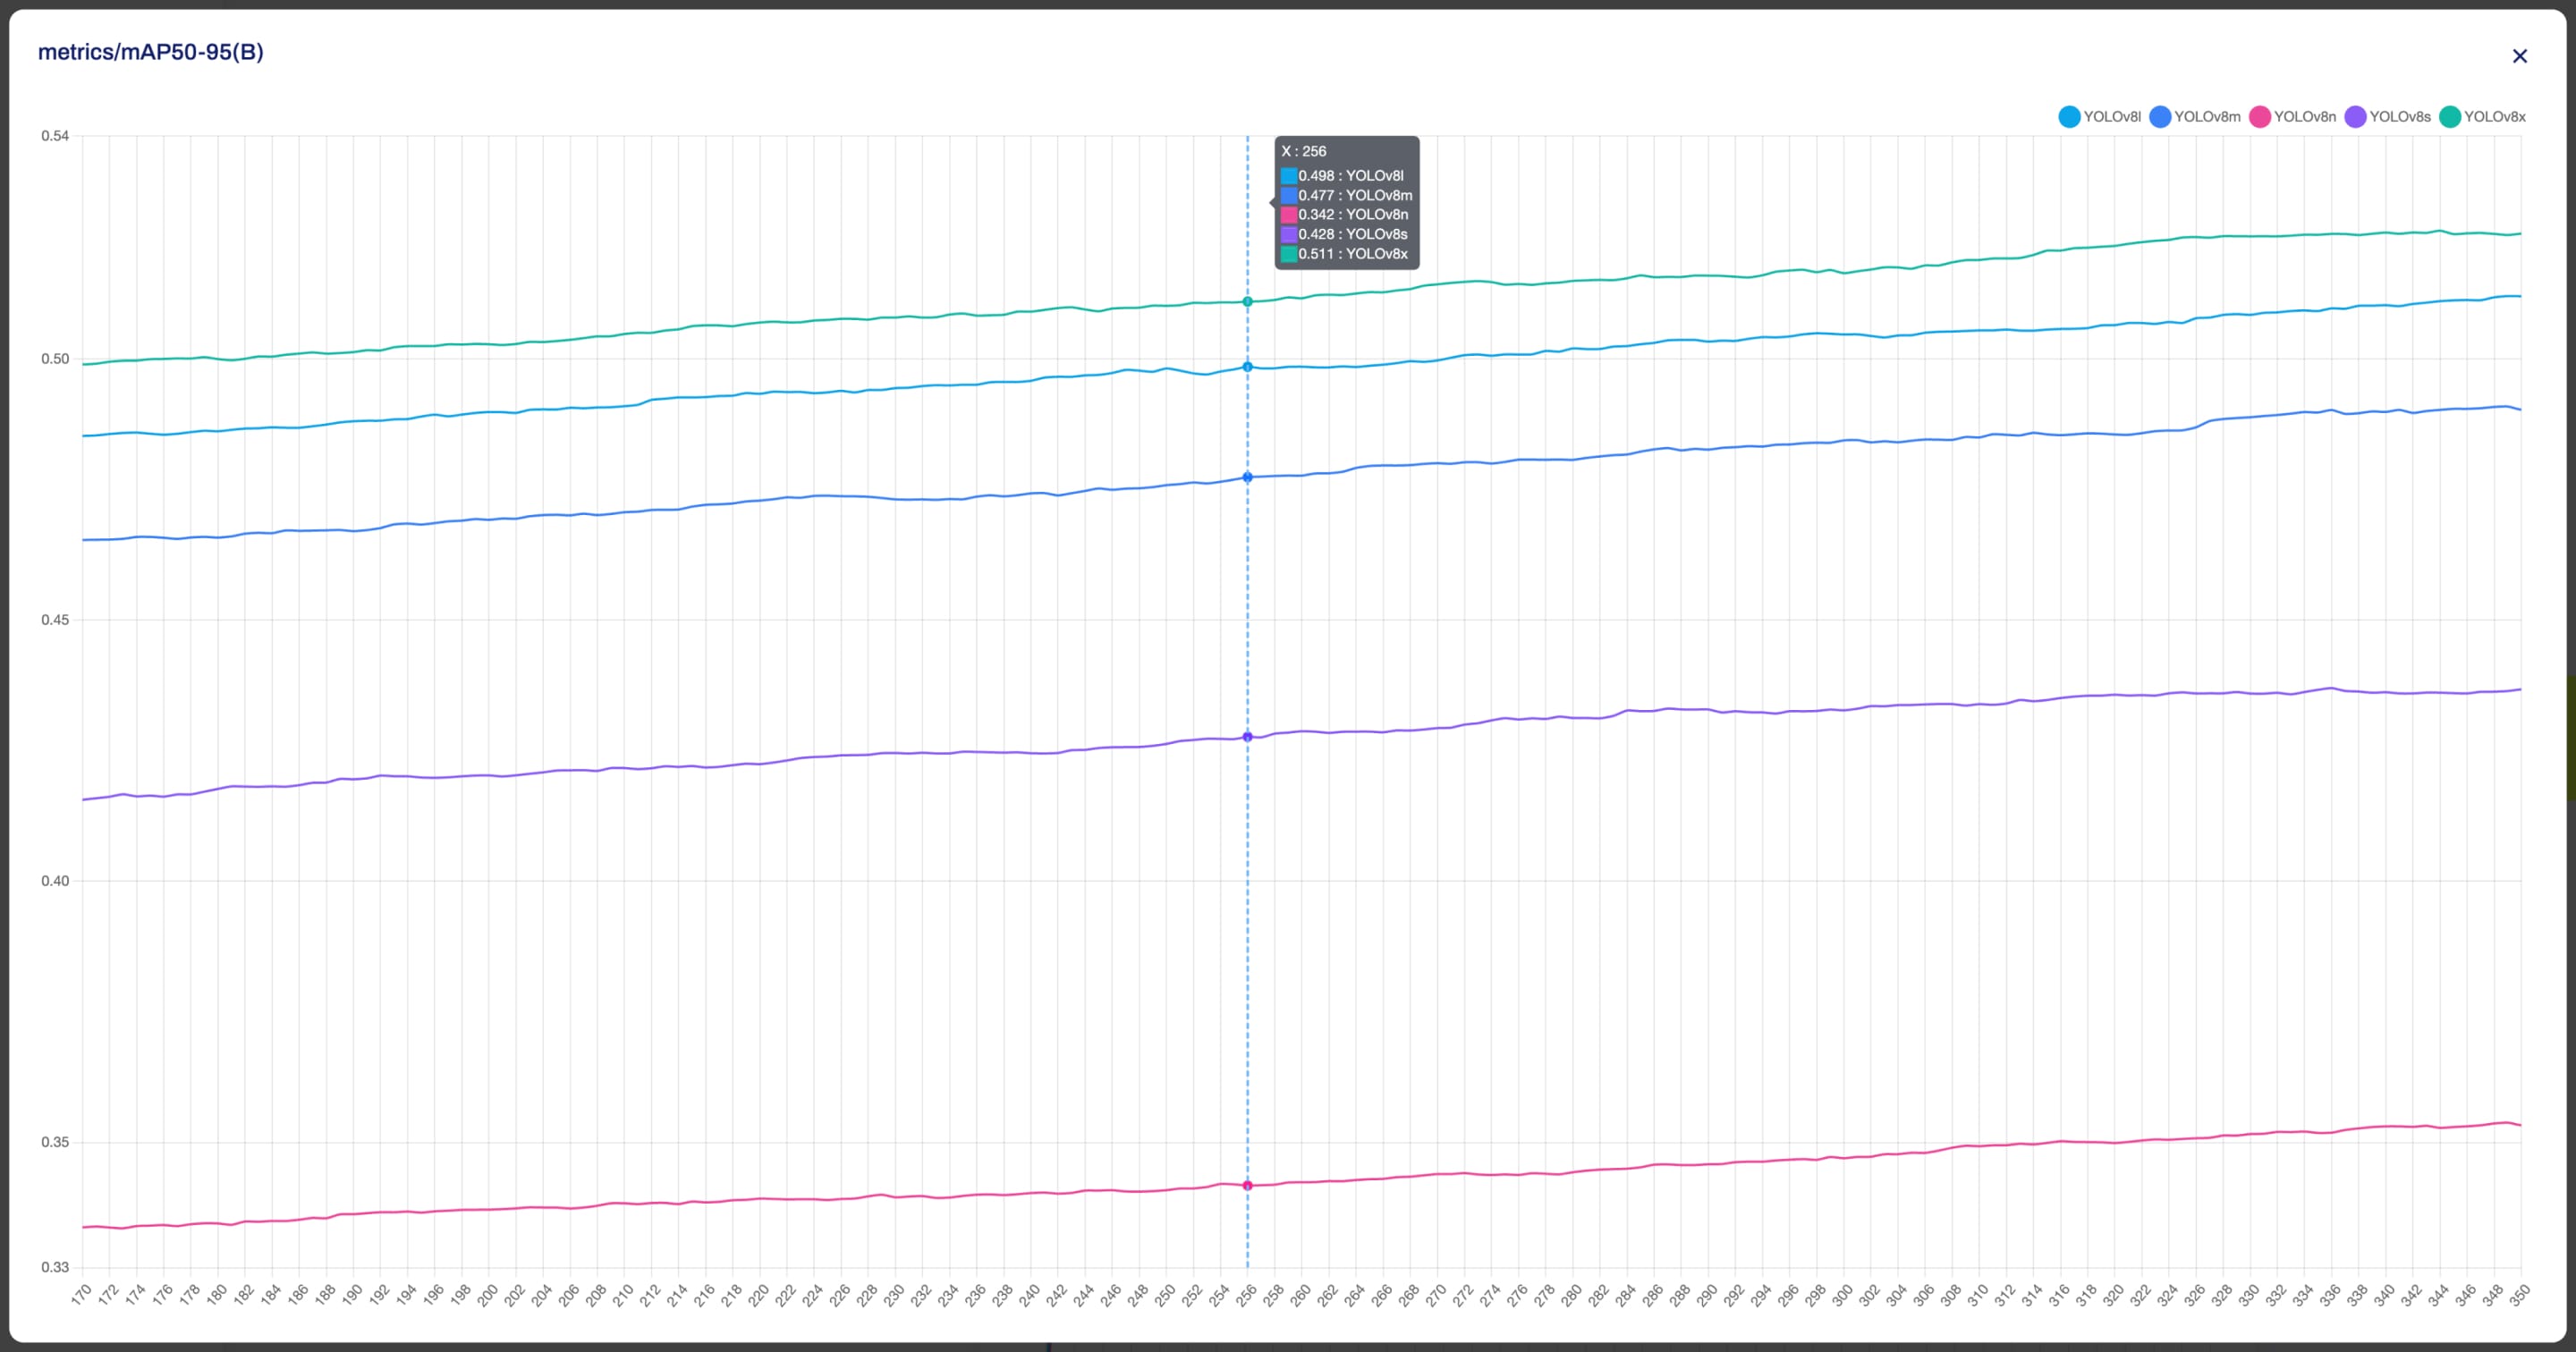
Each chart can be enlarged for better visualization.
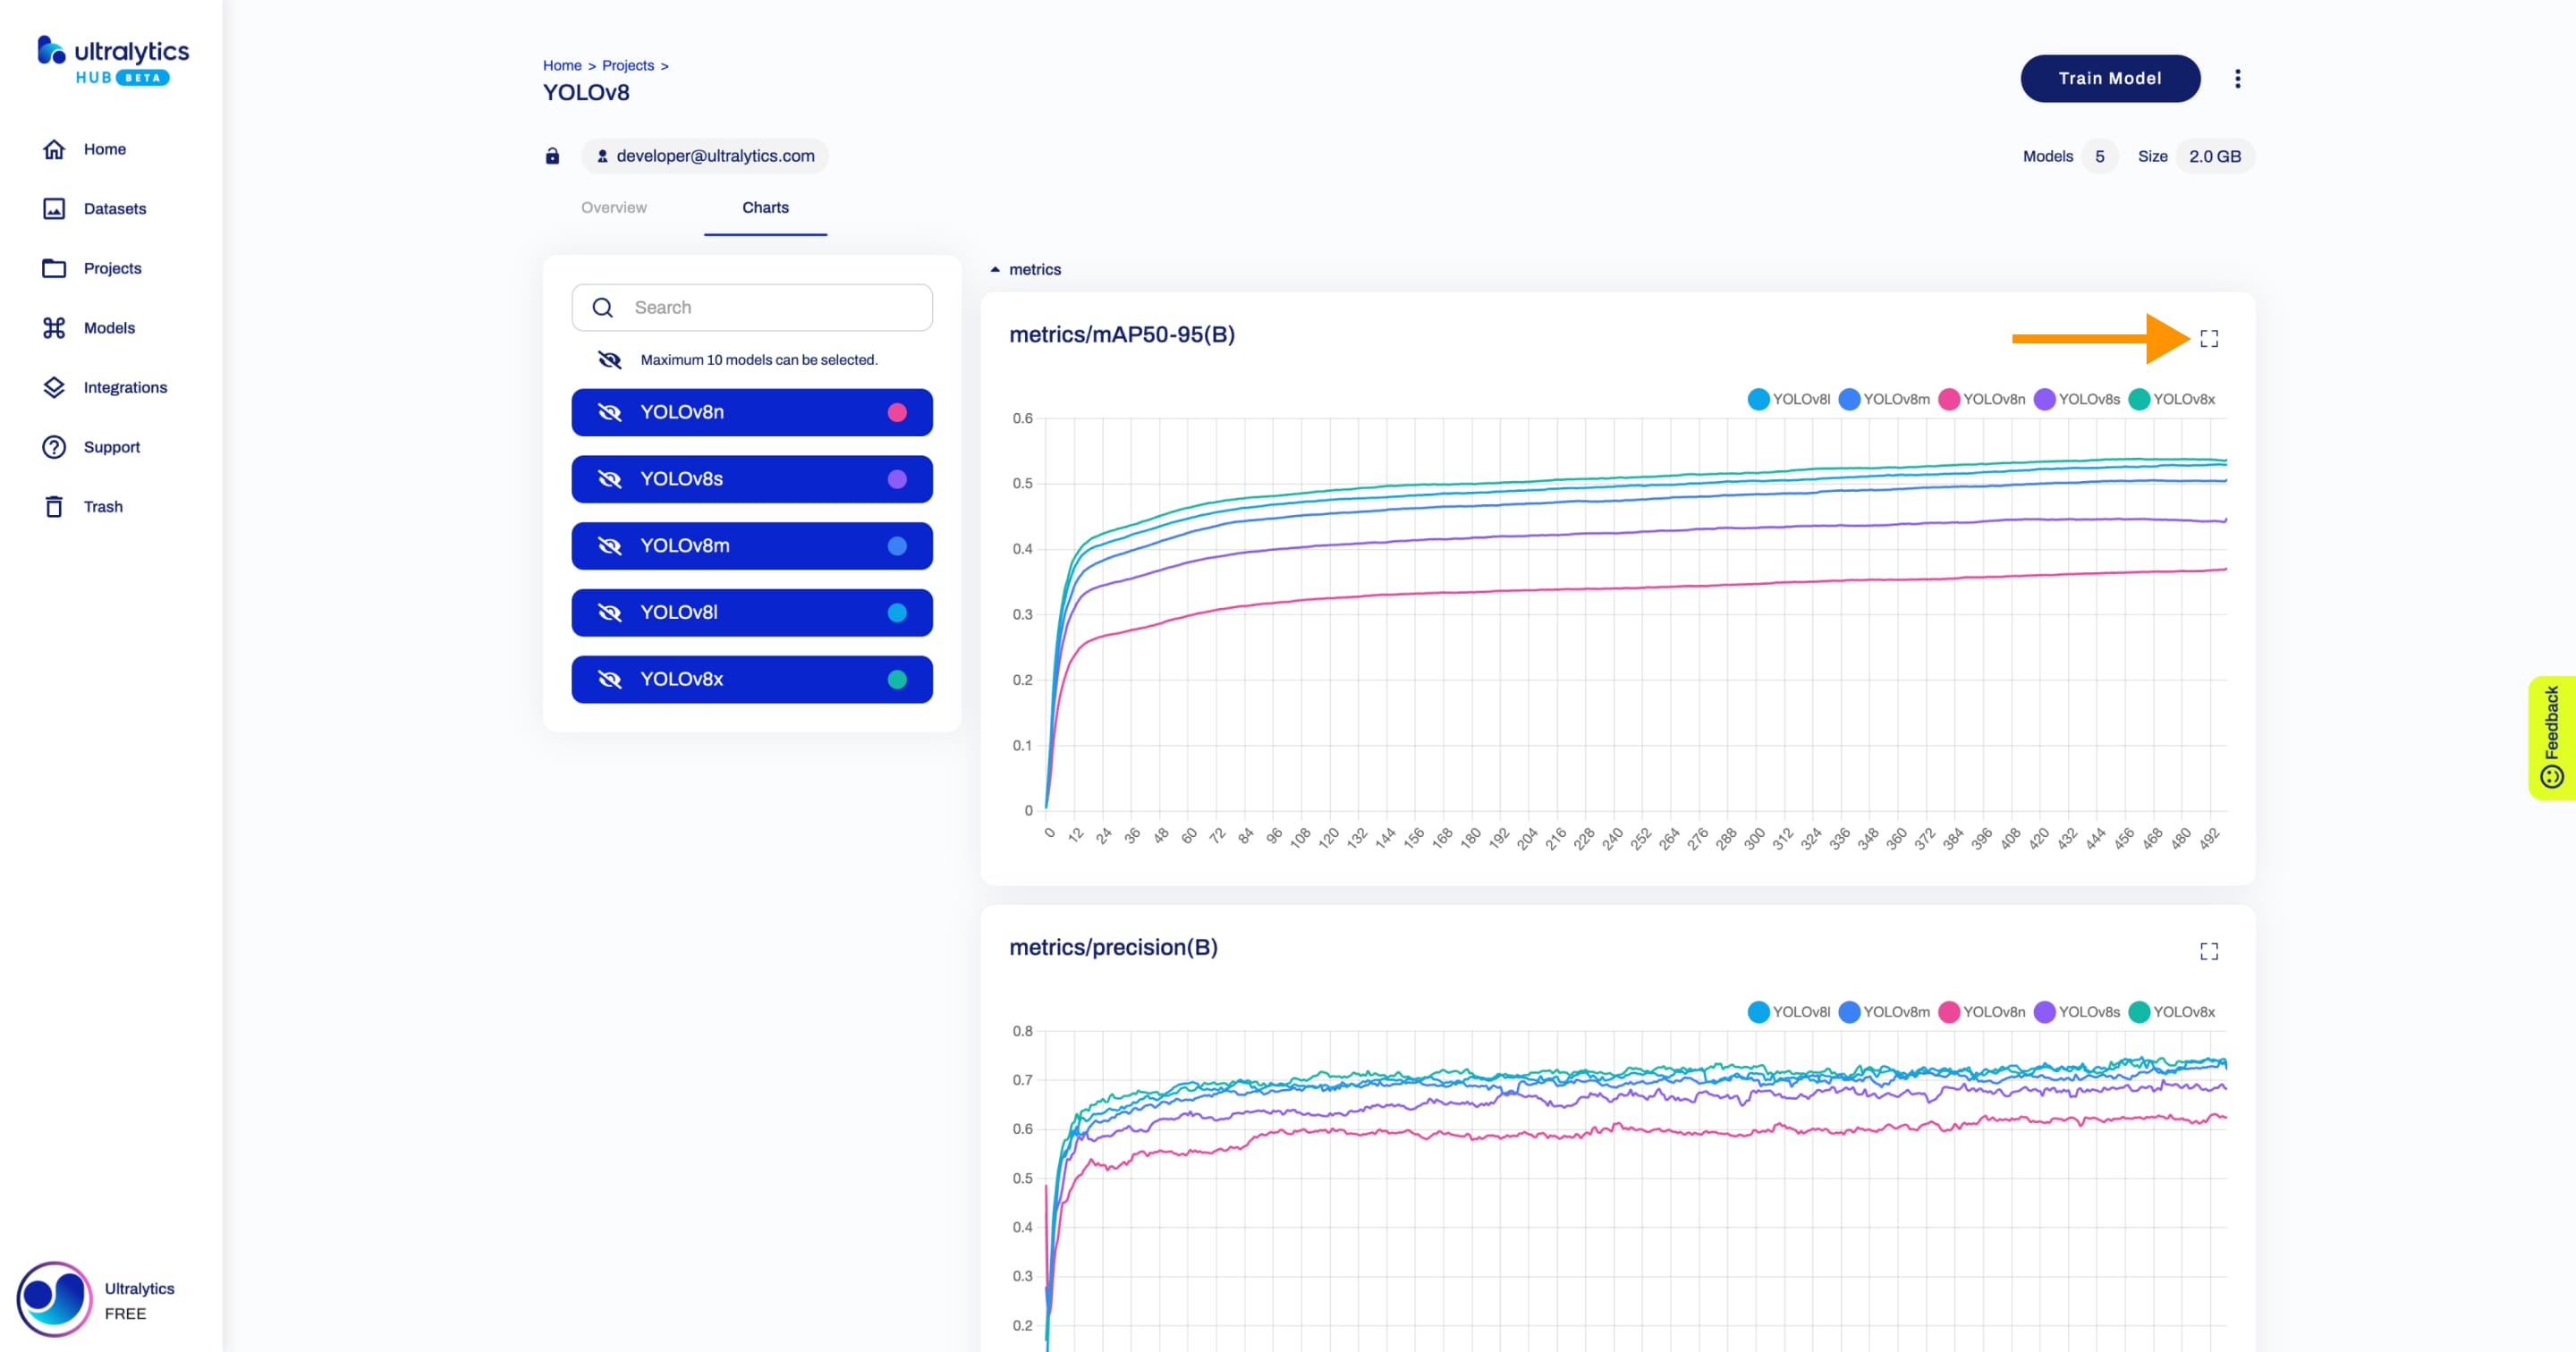
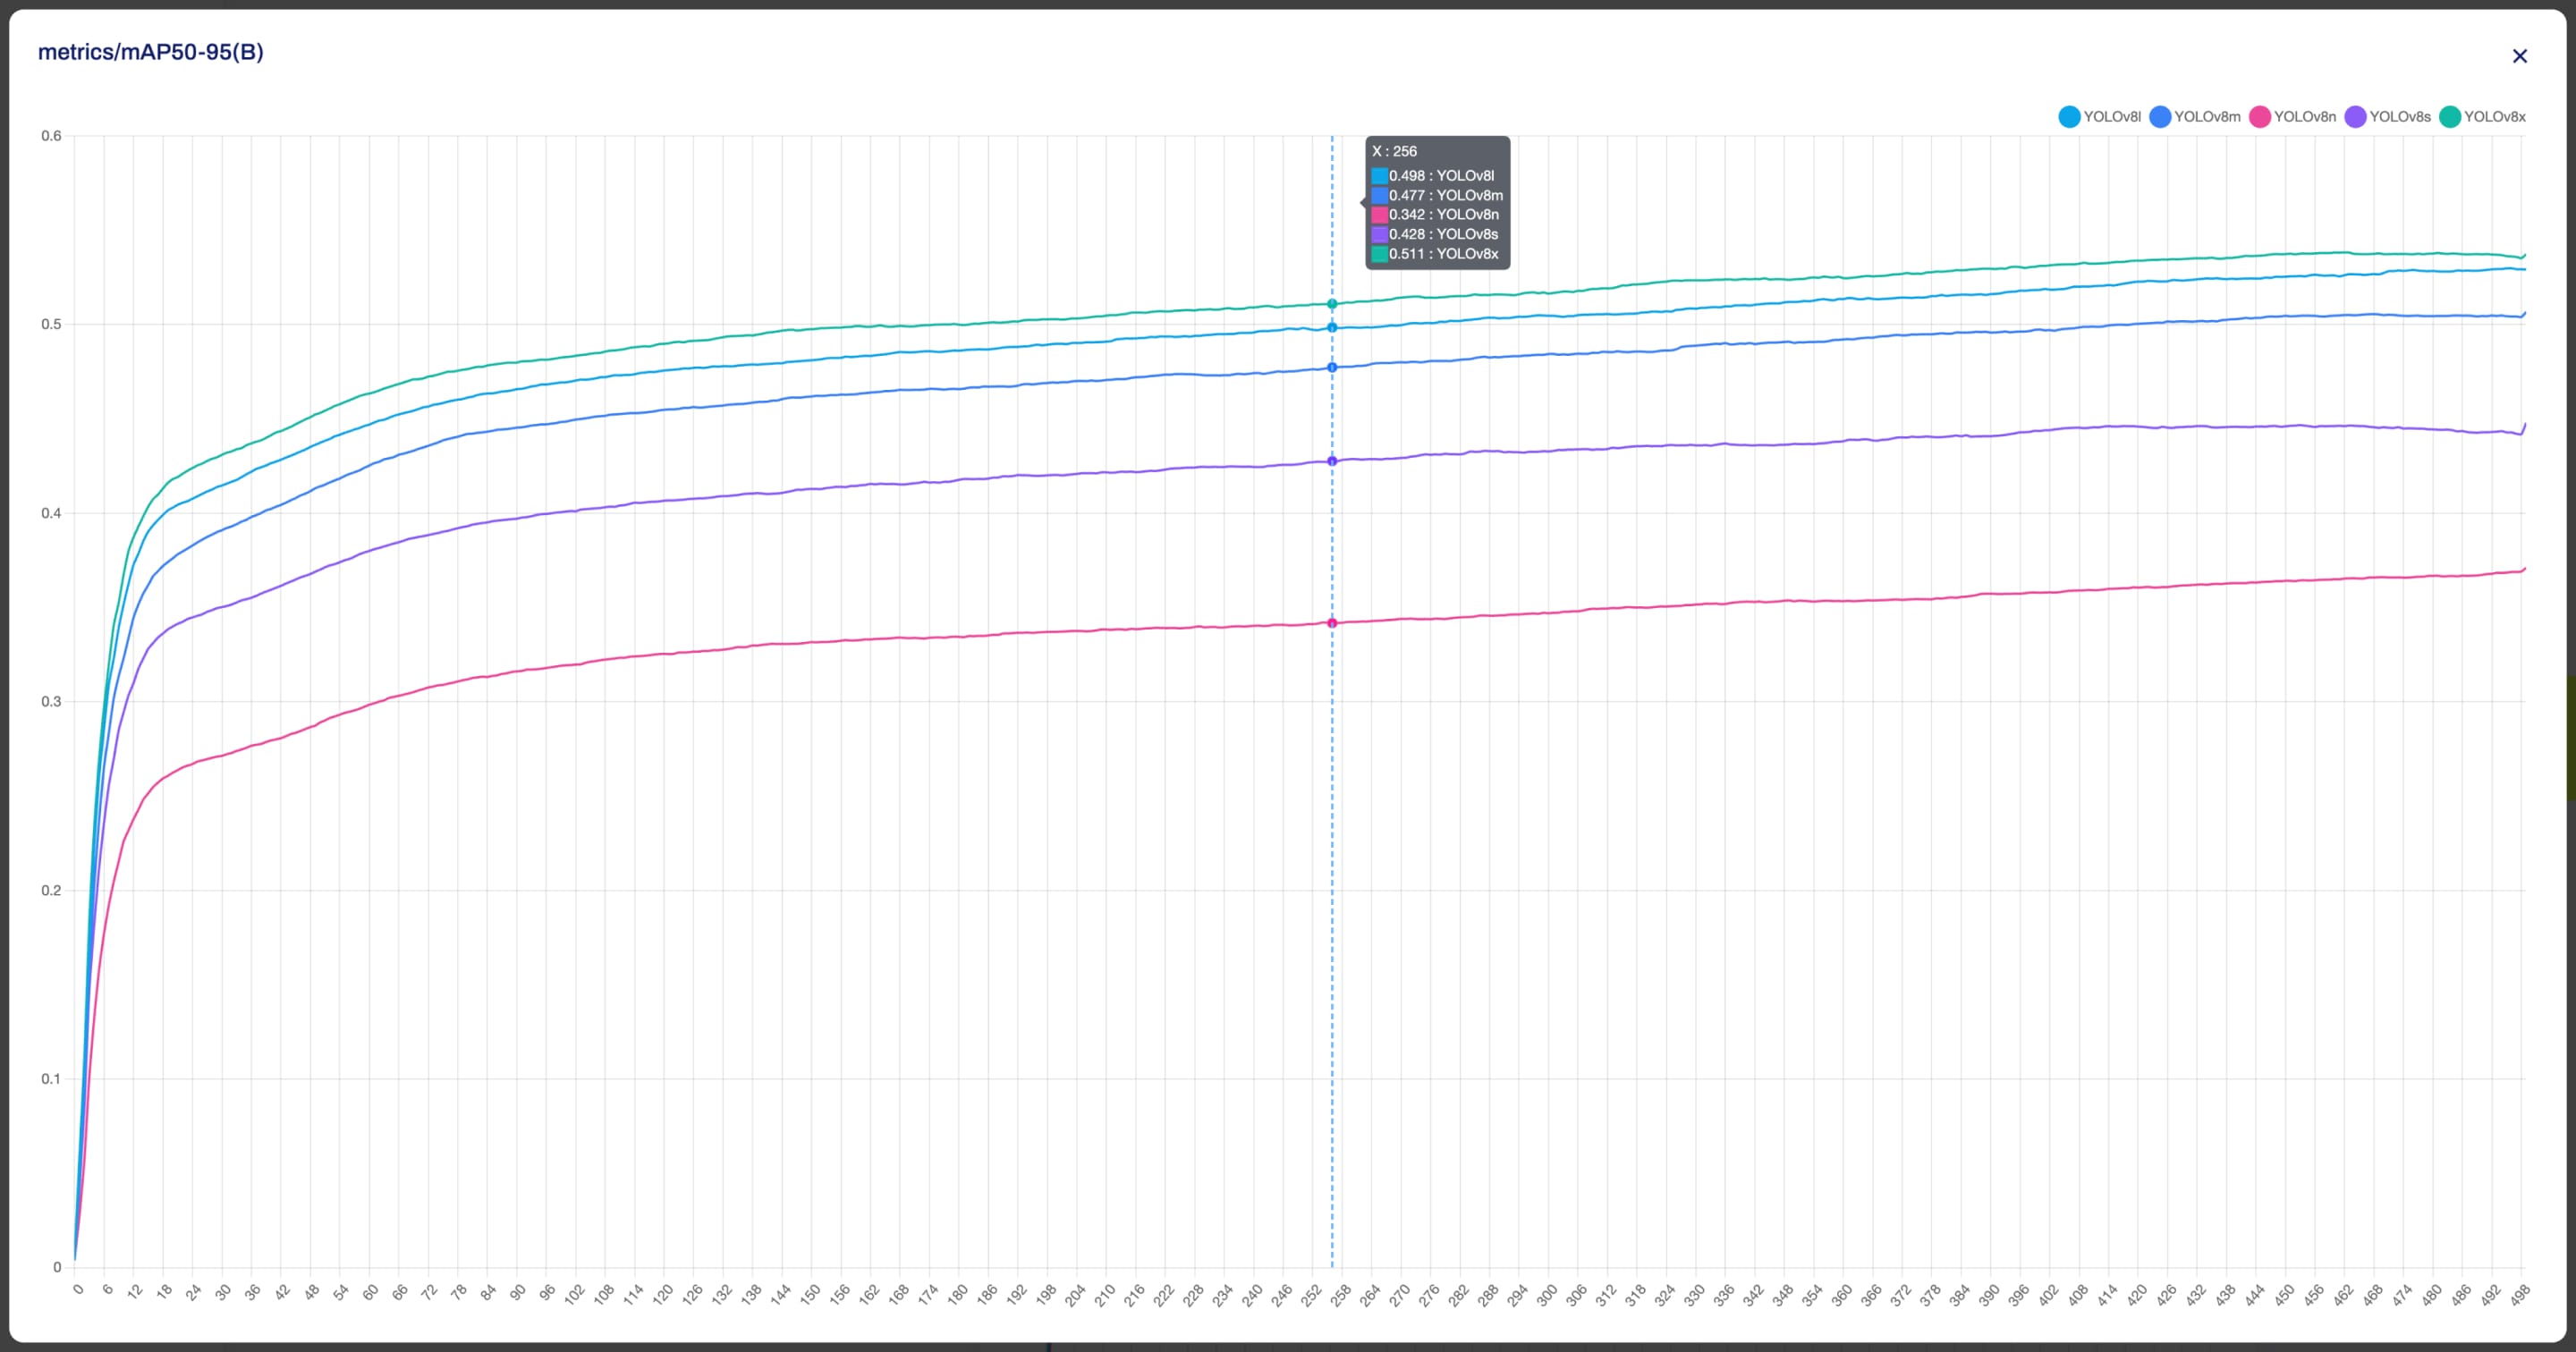
Furthermore, to properly analyze the data, you can utilize the zoom feature.
??? tip "Tip"
You have the flexibility to customize your view by selectively hiding certain models. This feature allows you to concentrate on the models of interest.
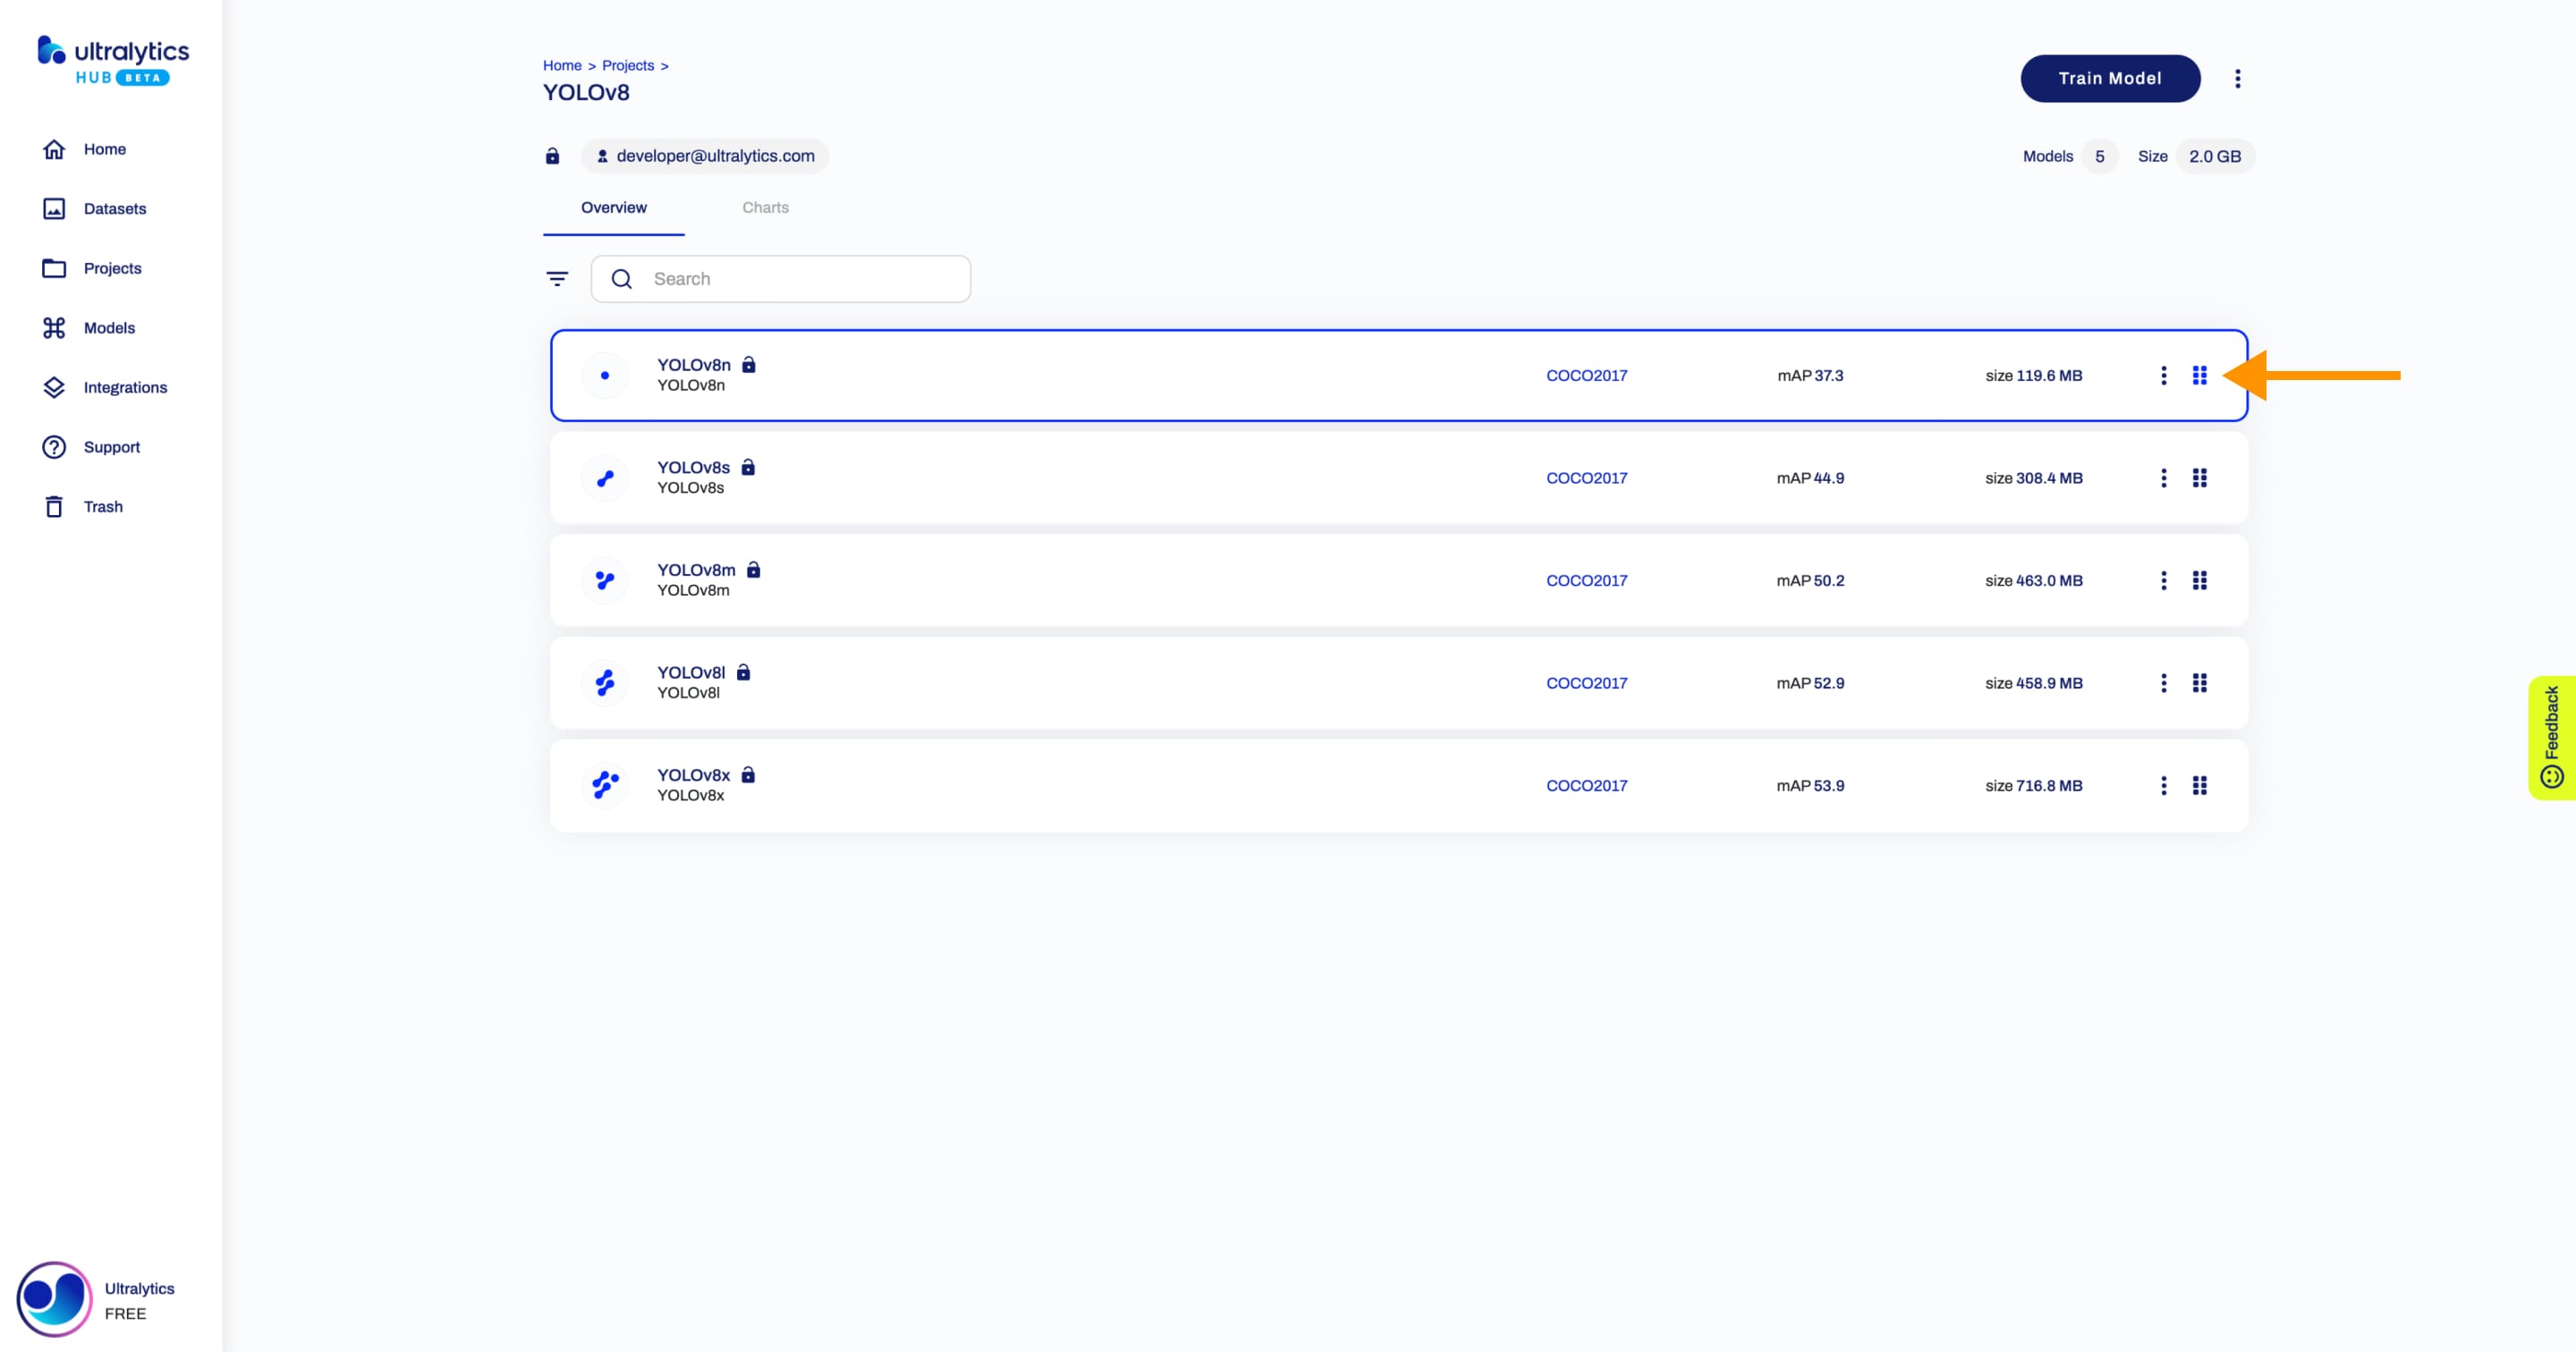
Reorder Models
??? note "Note"
Ultralytics HUB's reordering functionality works only inside projects you own.
Navigate to the Project page of the project where the models you want to reorder are located. Click on the designated reorder icon of the model you want to move and drag it to the desired location.
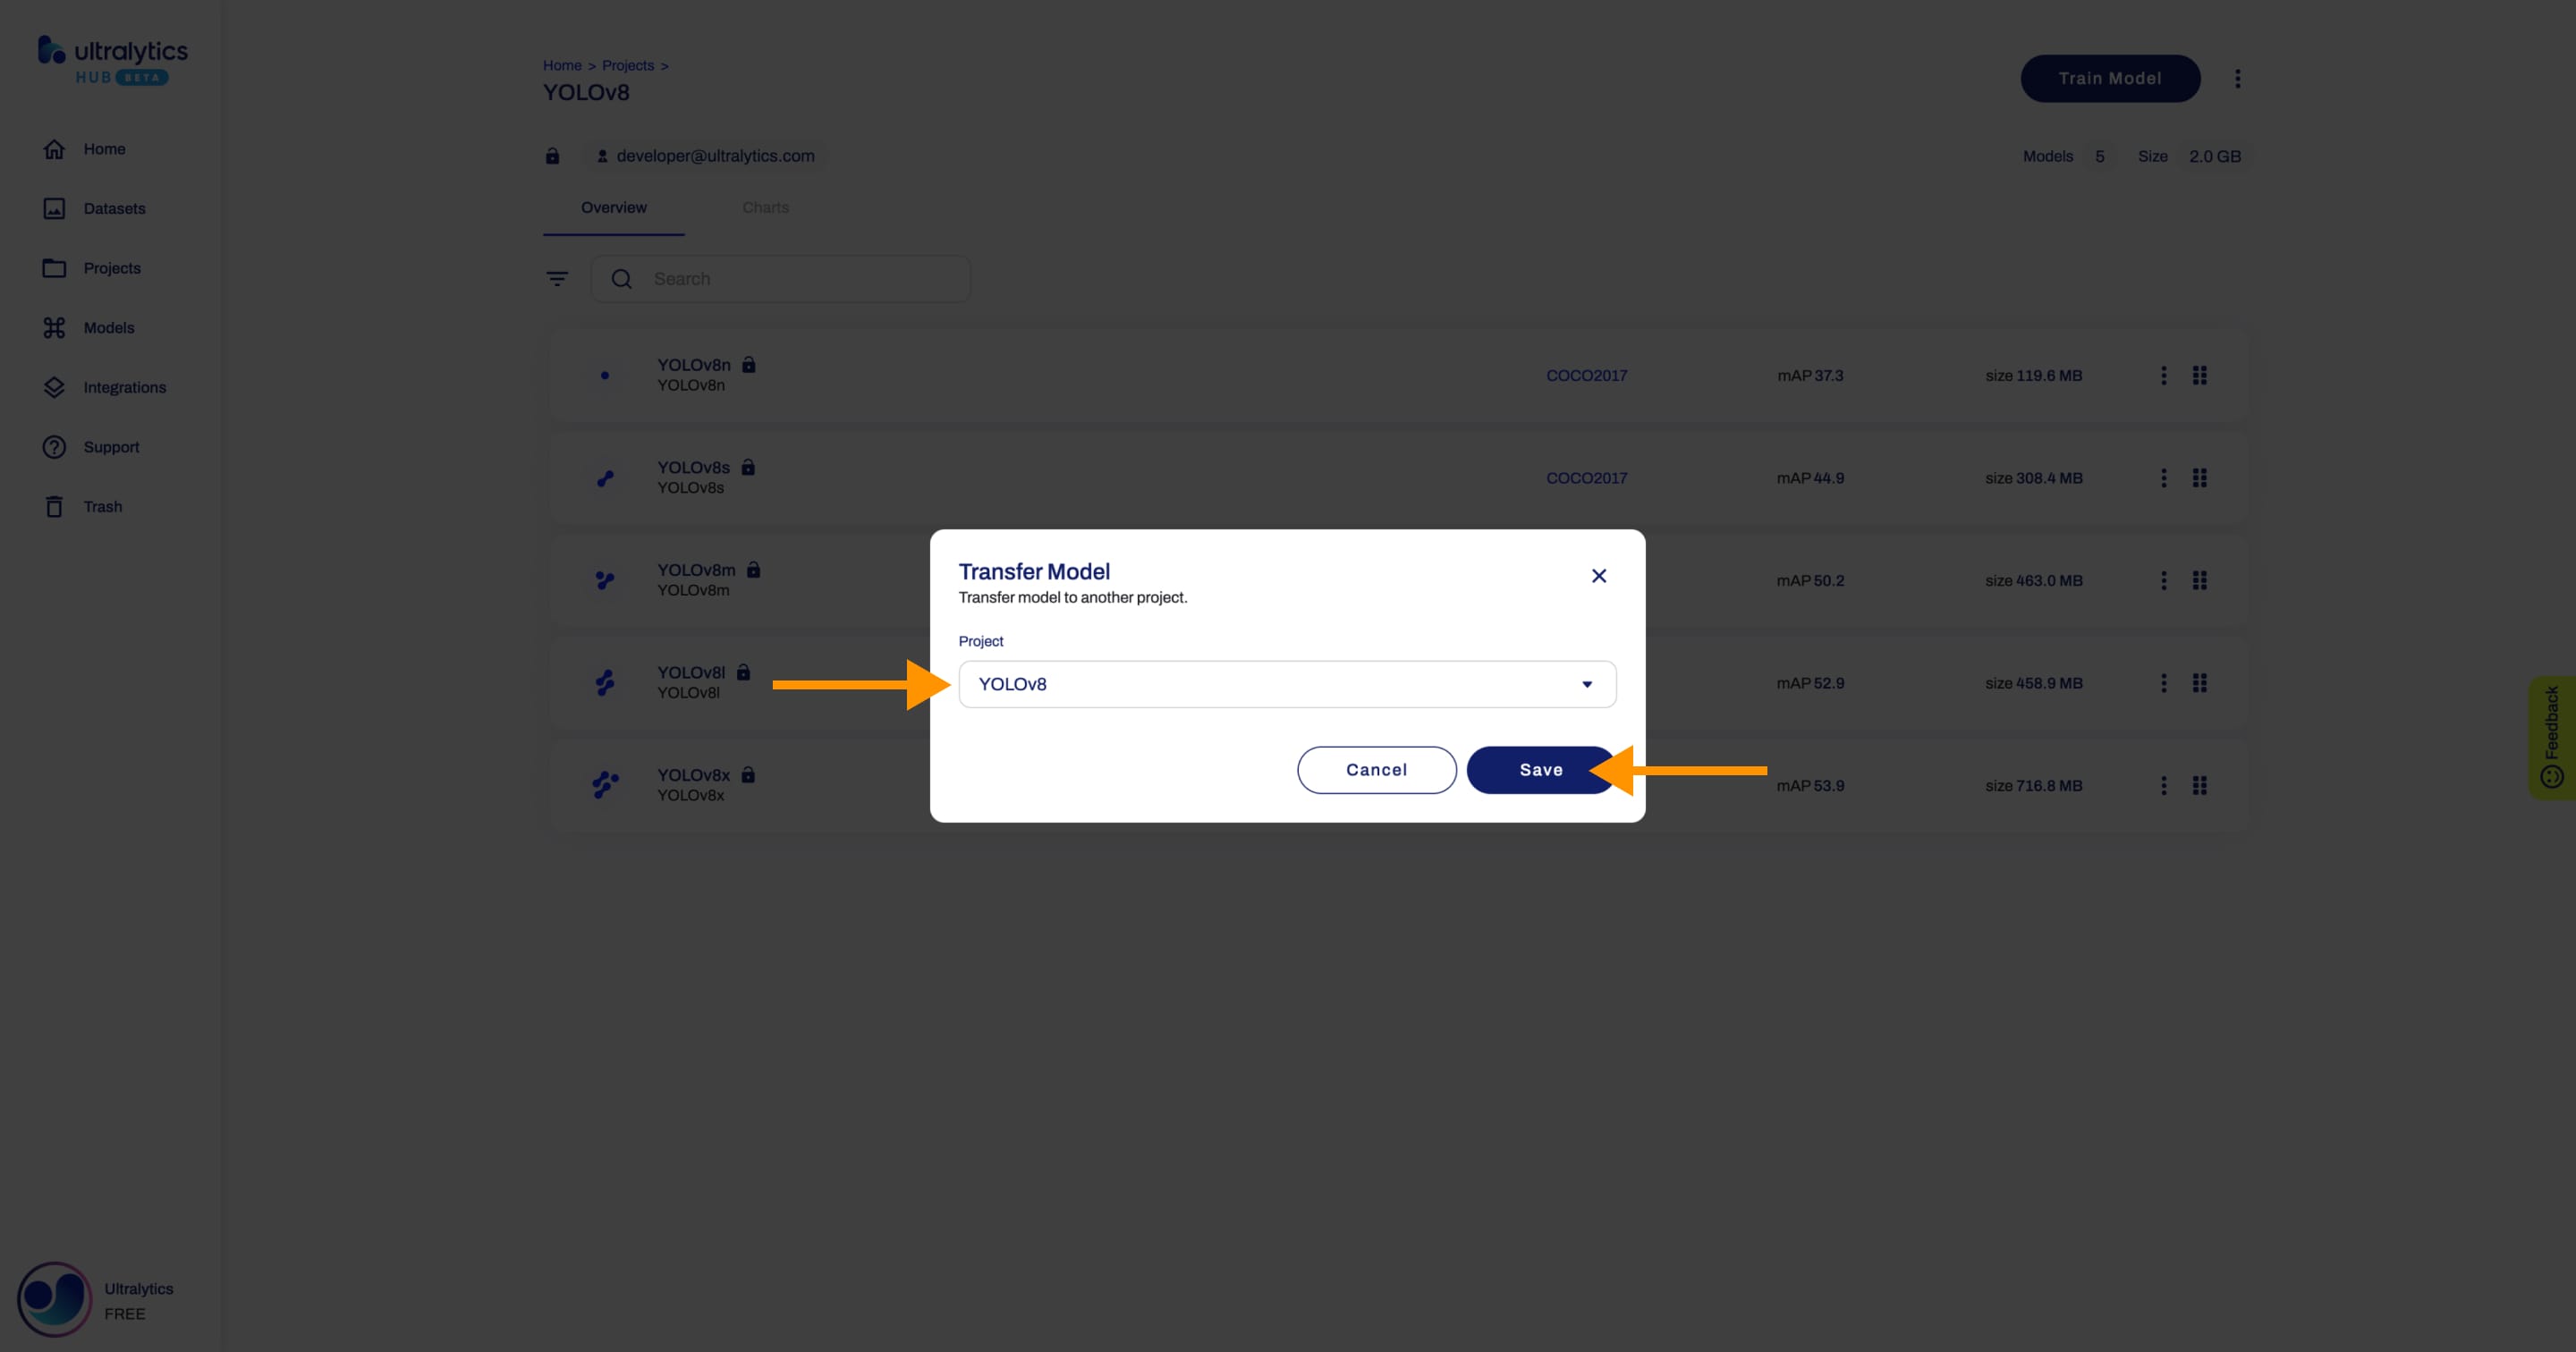
Transfer Models
Navigate to the Project page of the project where the model you want to mode is located, open the project actions dropdown and click on the Transfer option. This action will trigger the Transfer Model dialog.
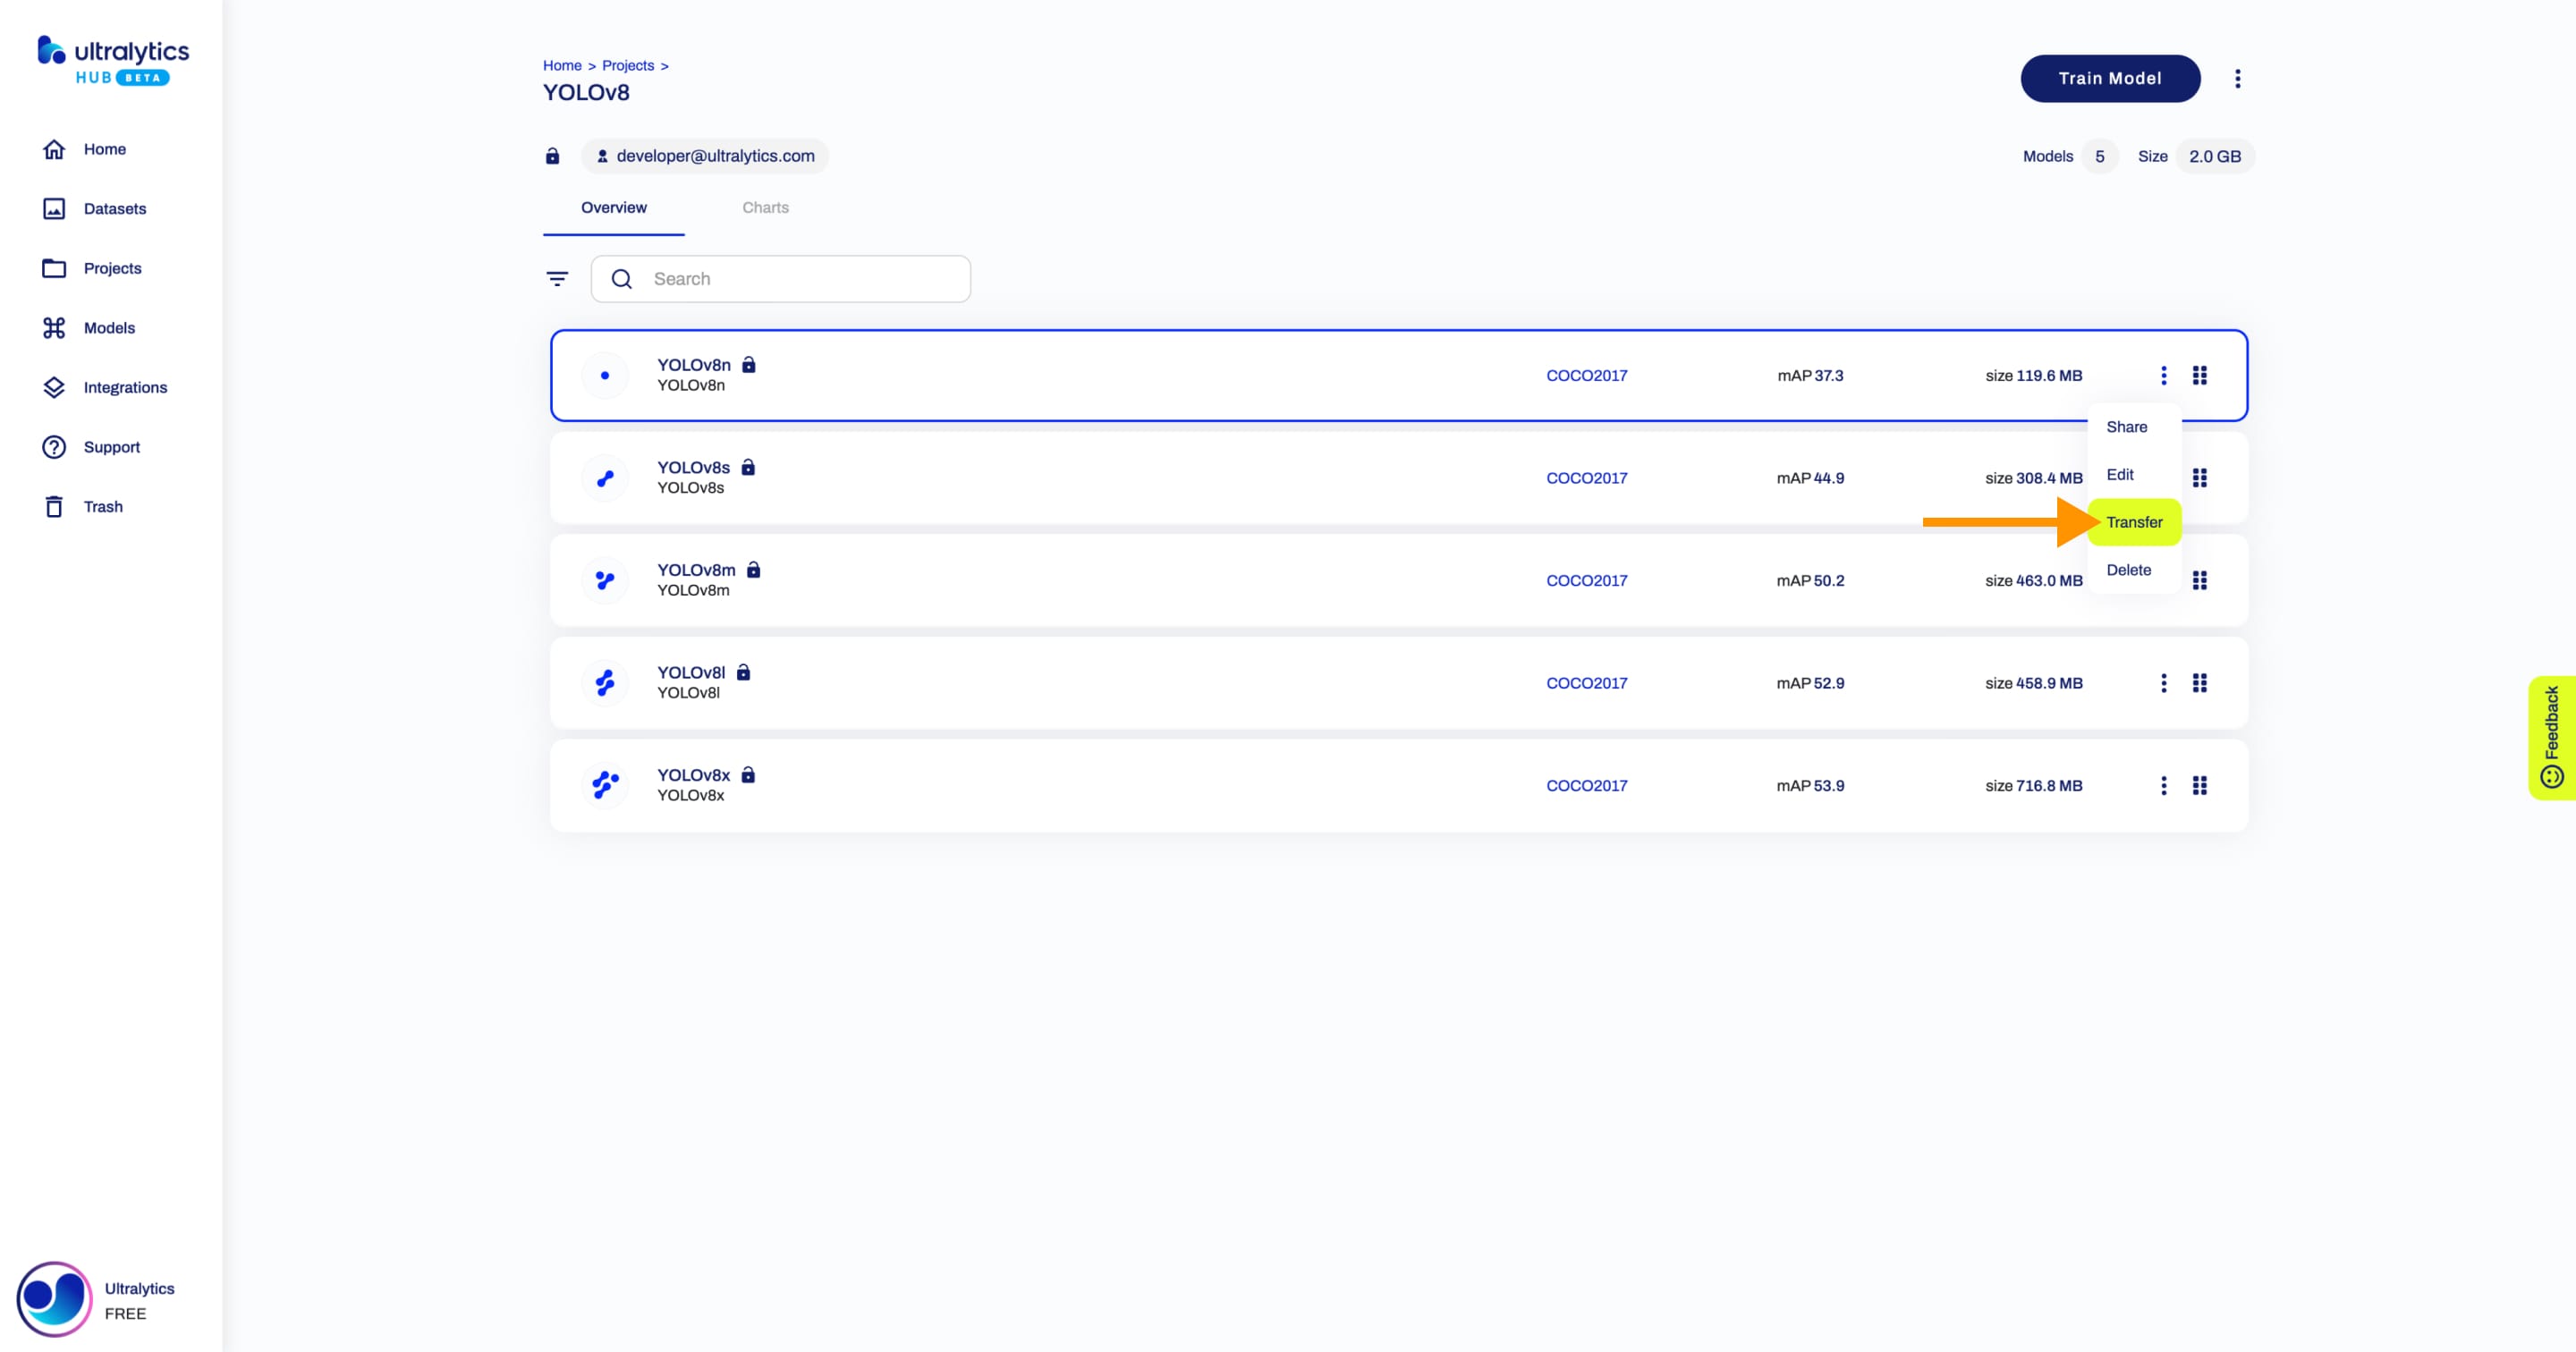
??? tip "Tip"
You can also transfer a model directly from the [Models](https://hub.ultralytics.com/models) page.
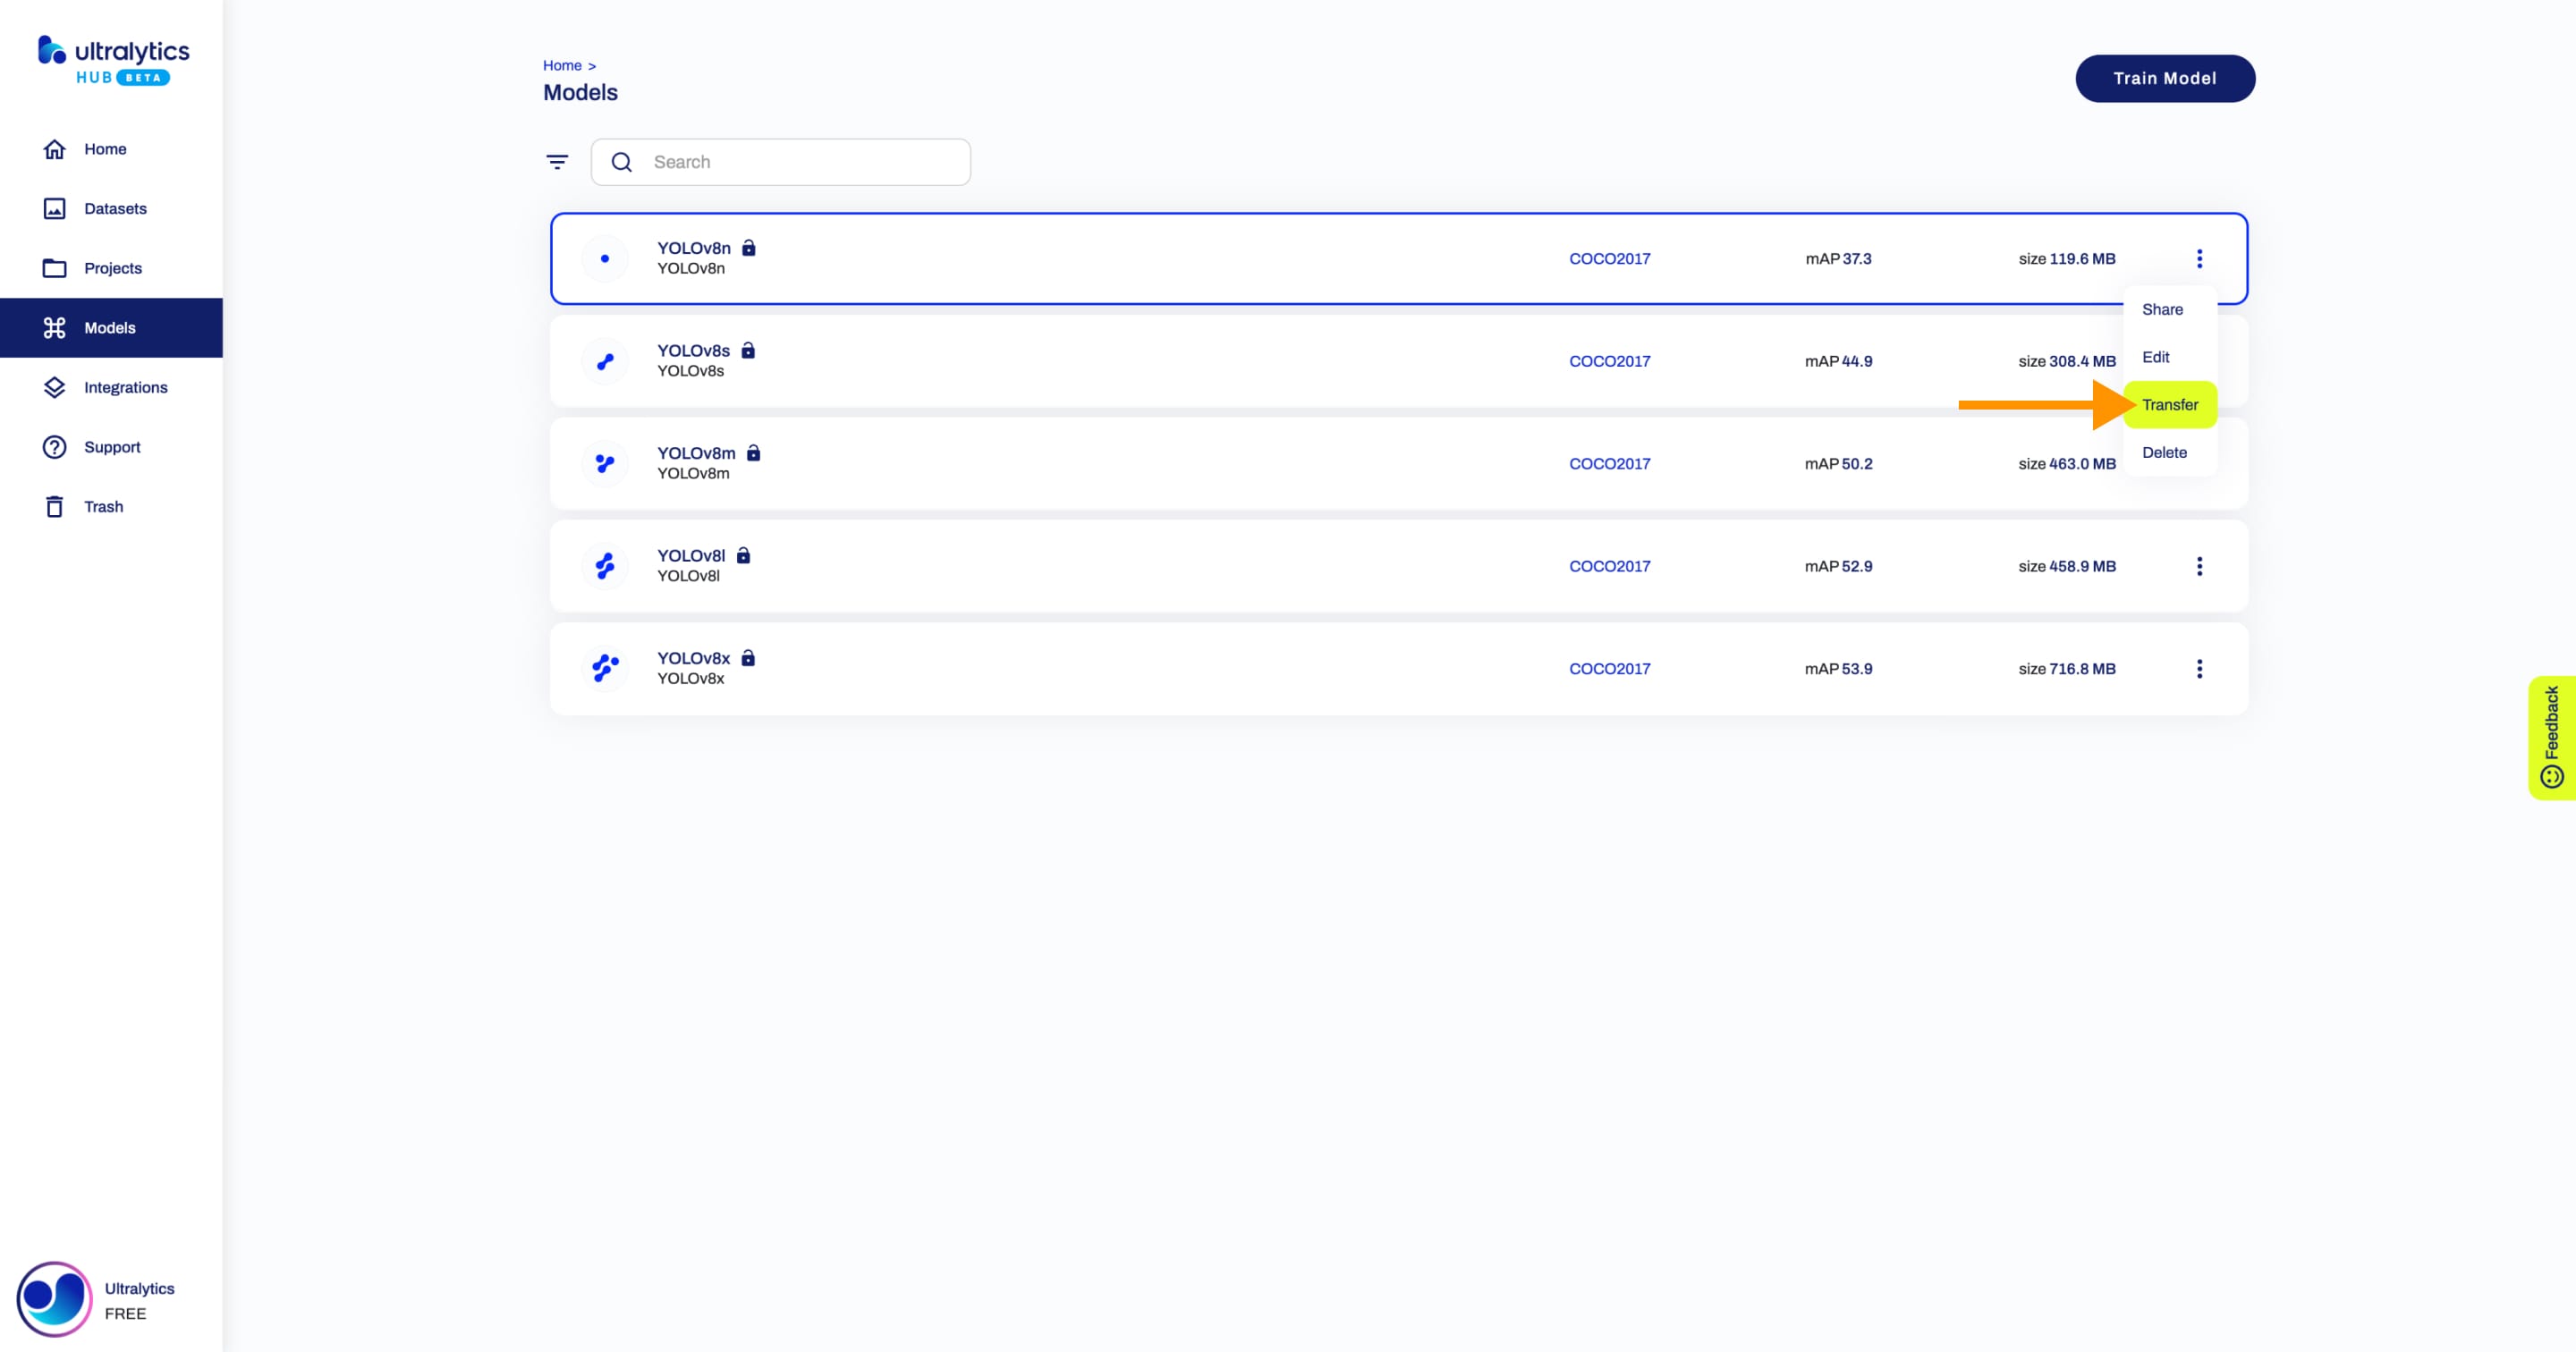
Select the project you want to transfer the model to and click Save.
comments: true
description: Get started with Ultralytics HUB! Learn to upload datasets, train YOLO models, and manage projects easily with our user-friendly platform.
keywords: Ultralytics HUB, Quickstart, YOLO models, dataset upload, project management, train models, machine learning
Ultralytics HUB Quickstart
Ultralytics HUB is designed to be user-friendly and intuitive, allowing users to quickly upload their datasets and train new YOLO models. It also offers a range of pre-trained models to choose from, making it extremely easy for users to get started. Once a model is trained, it can be effortlessly previewed in the Ultralytics HUB App before being deployed for real-time classification, object detection, and instance segmentation tasks.
Watch: Train Your Custom YOLO Models In A Few Clicks with Ultralytics HUB
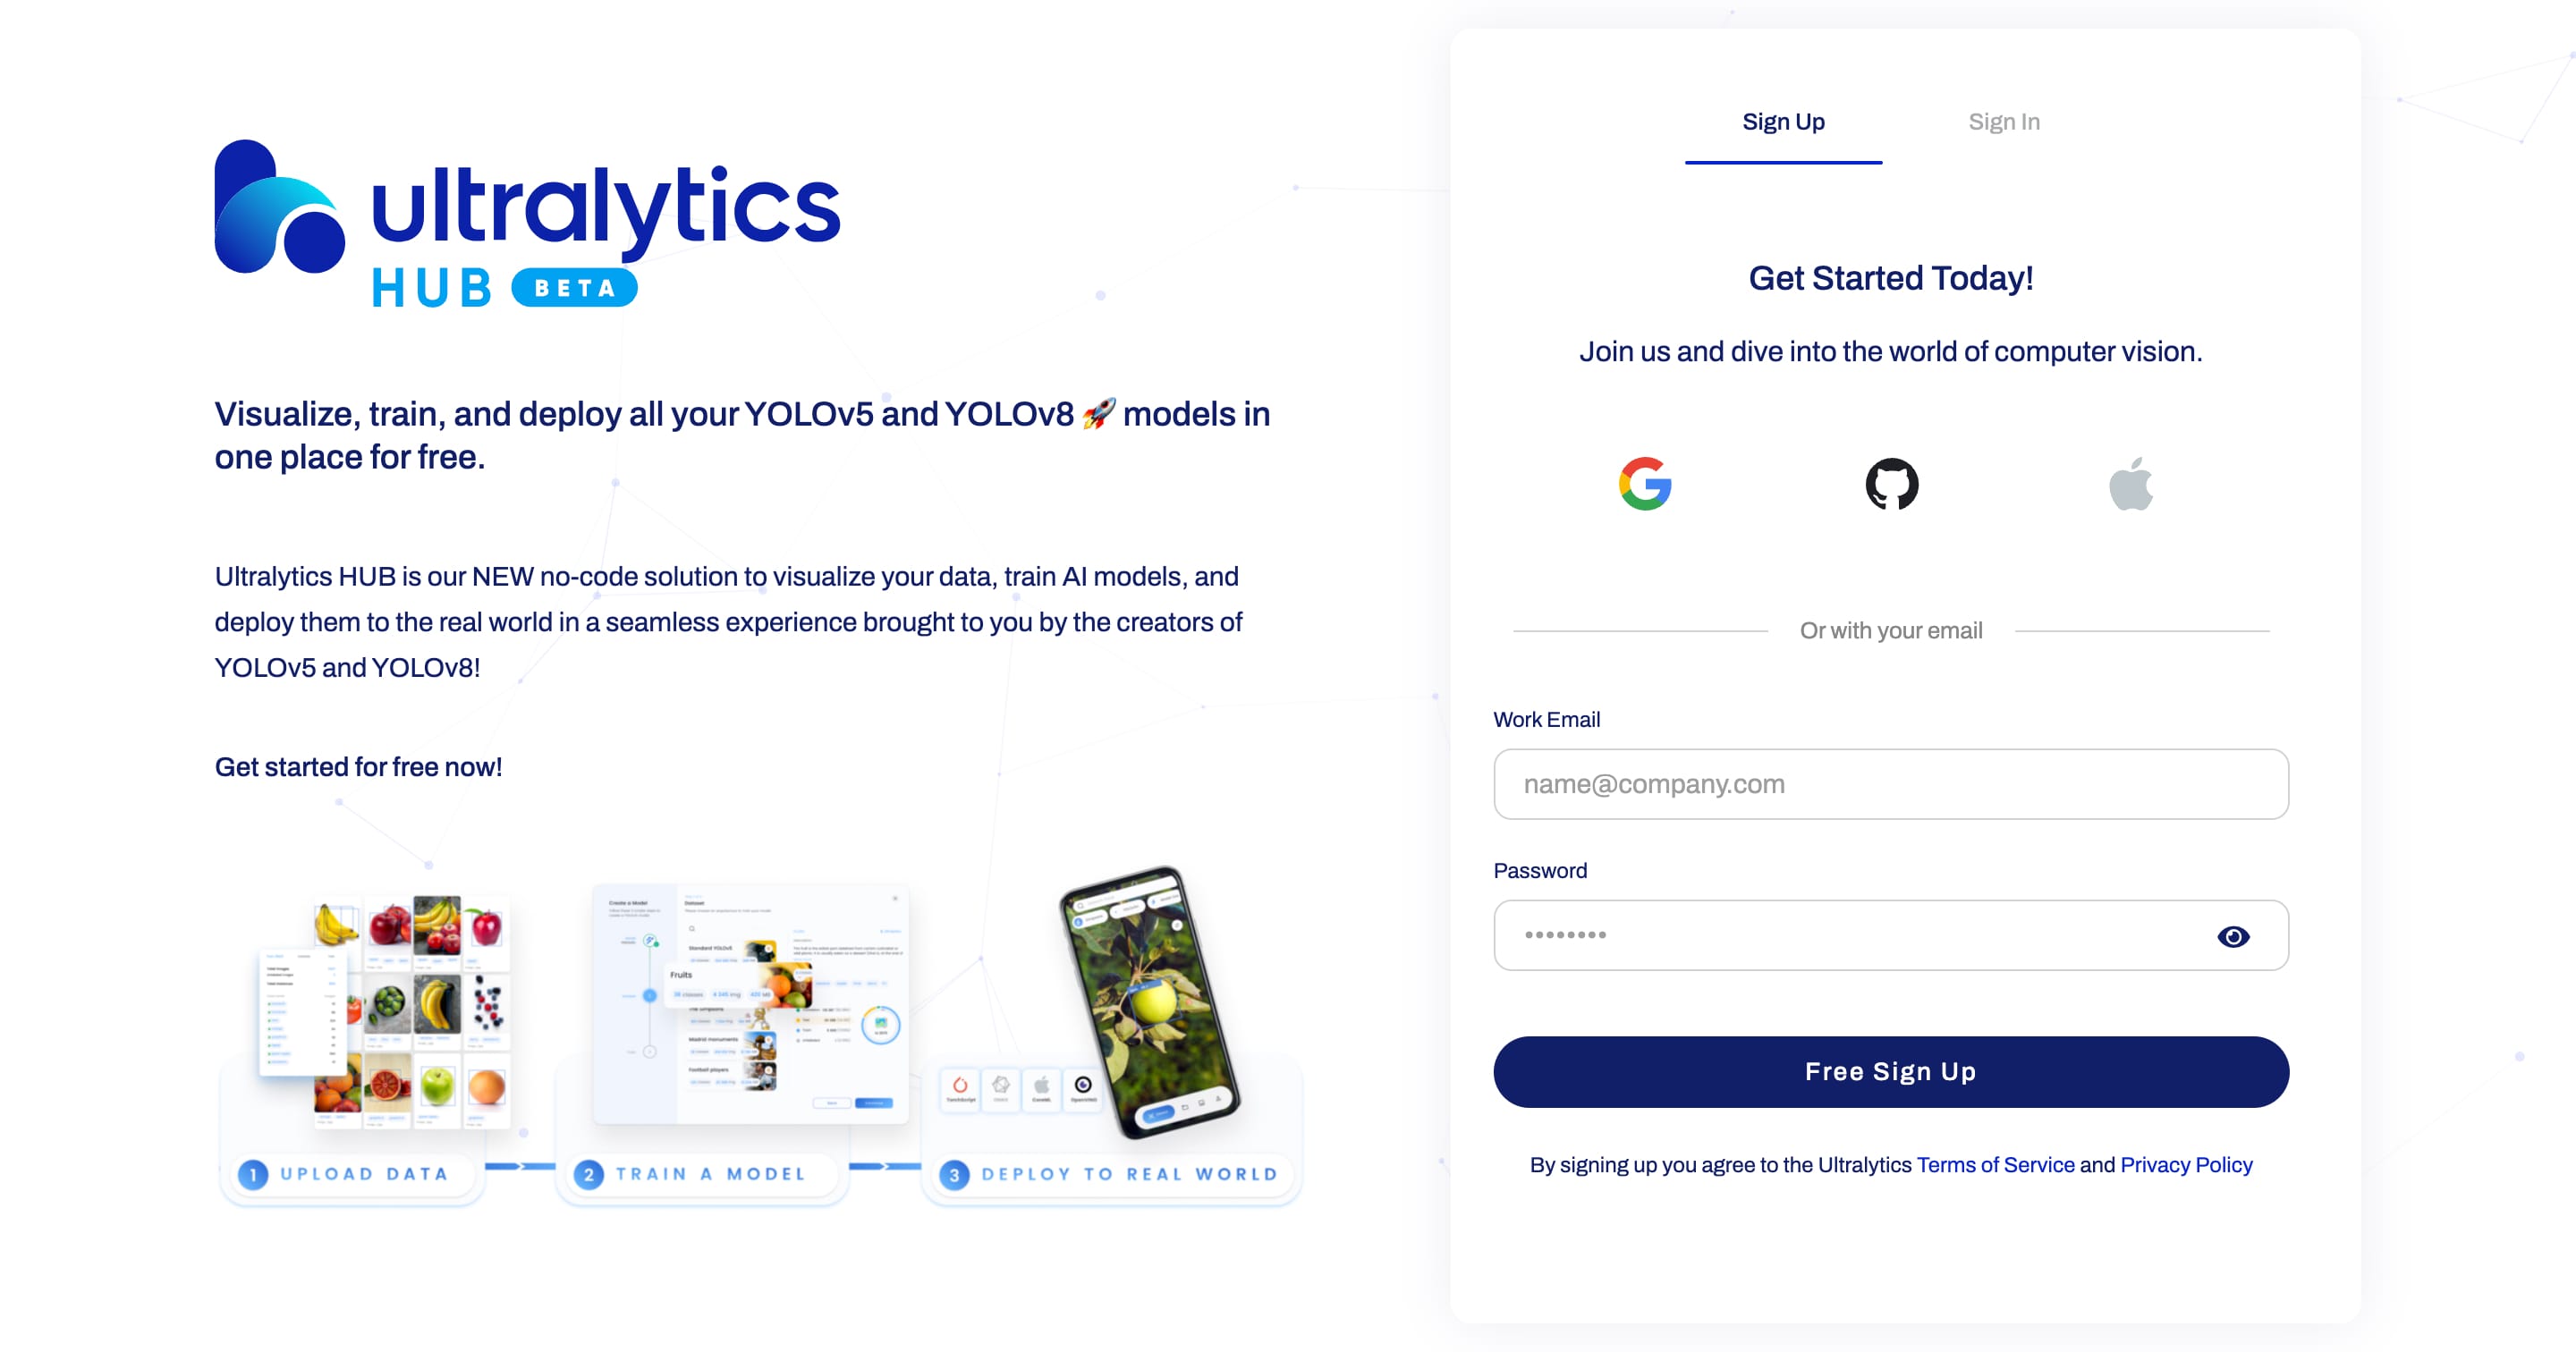
Get Started
Ultralytics HUB offers a variety easy of signup options. You can register and log in using your Google, Apple, or GitHub accounts, or simply with your email address.
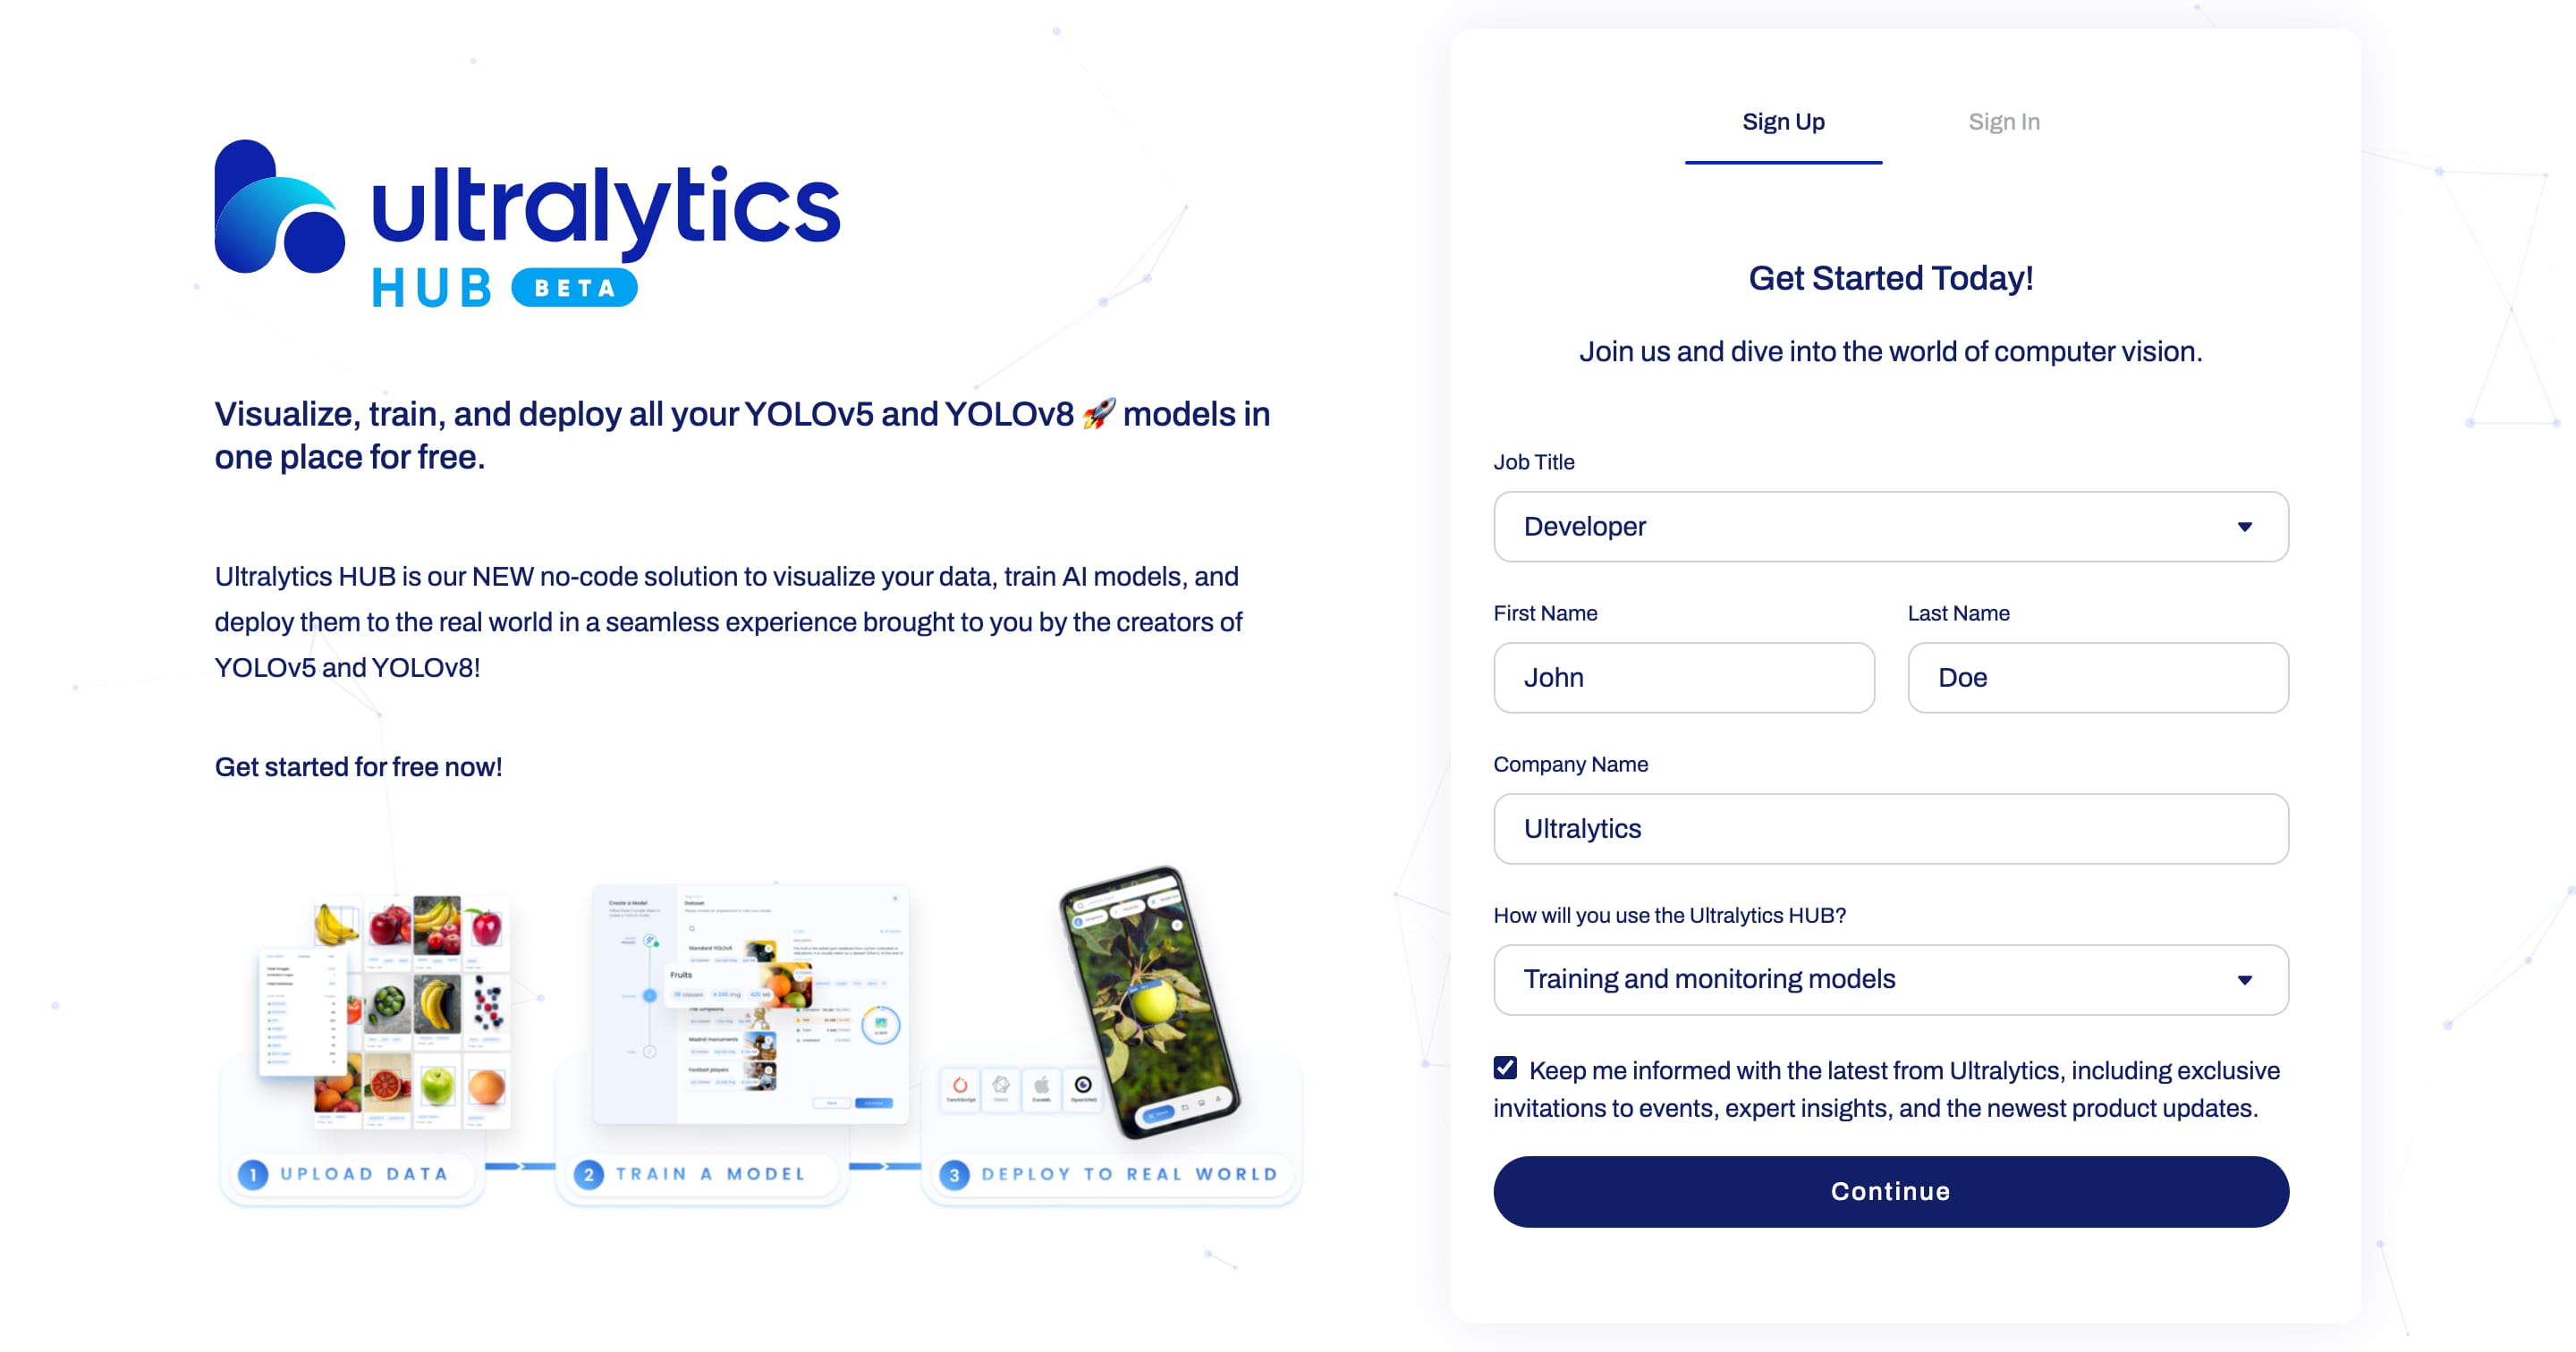
During the signup, you will be asked to complete your profile.
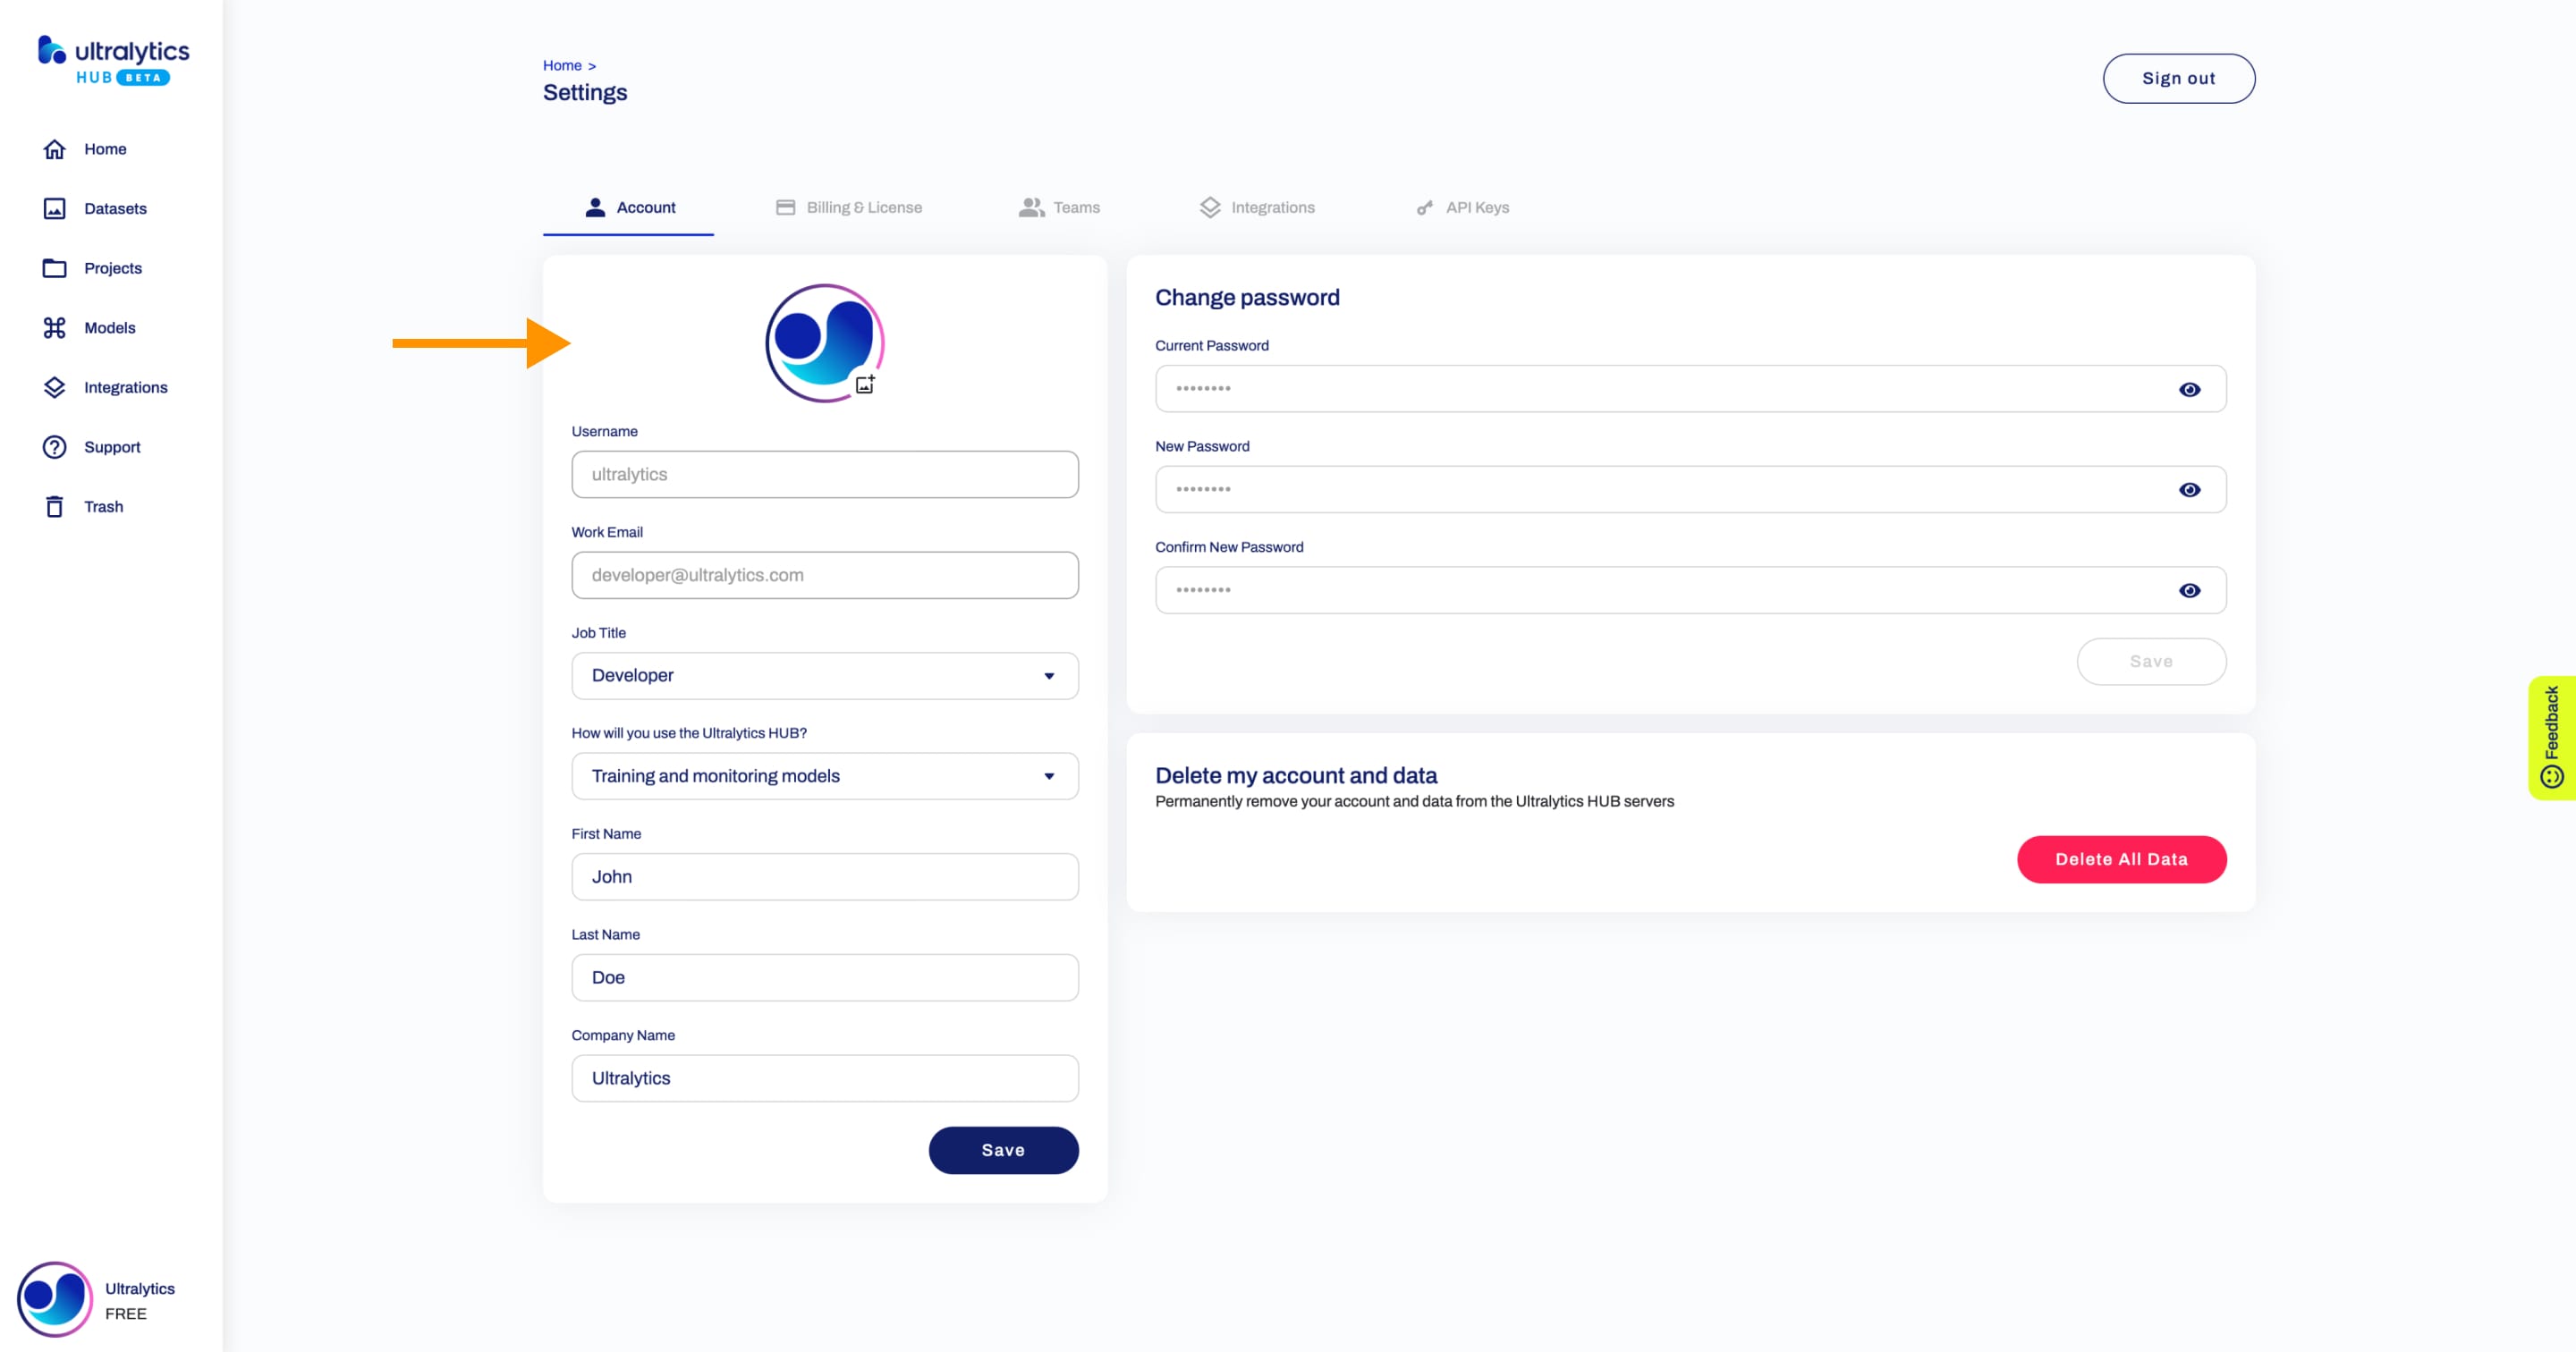
??? tip "Tip"
You can update your profile from the [Account](https://hub.ultralytics.com/settings?tab=account) tab on the [Settings](https://hub.ultralytics.com/settings) page.
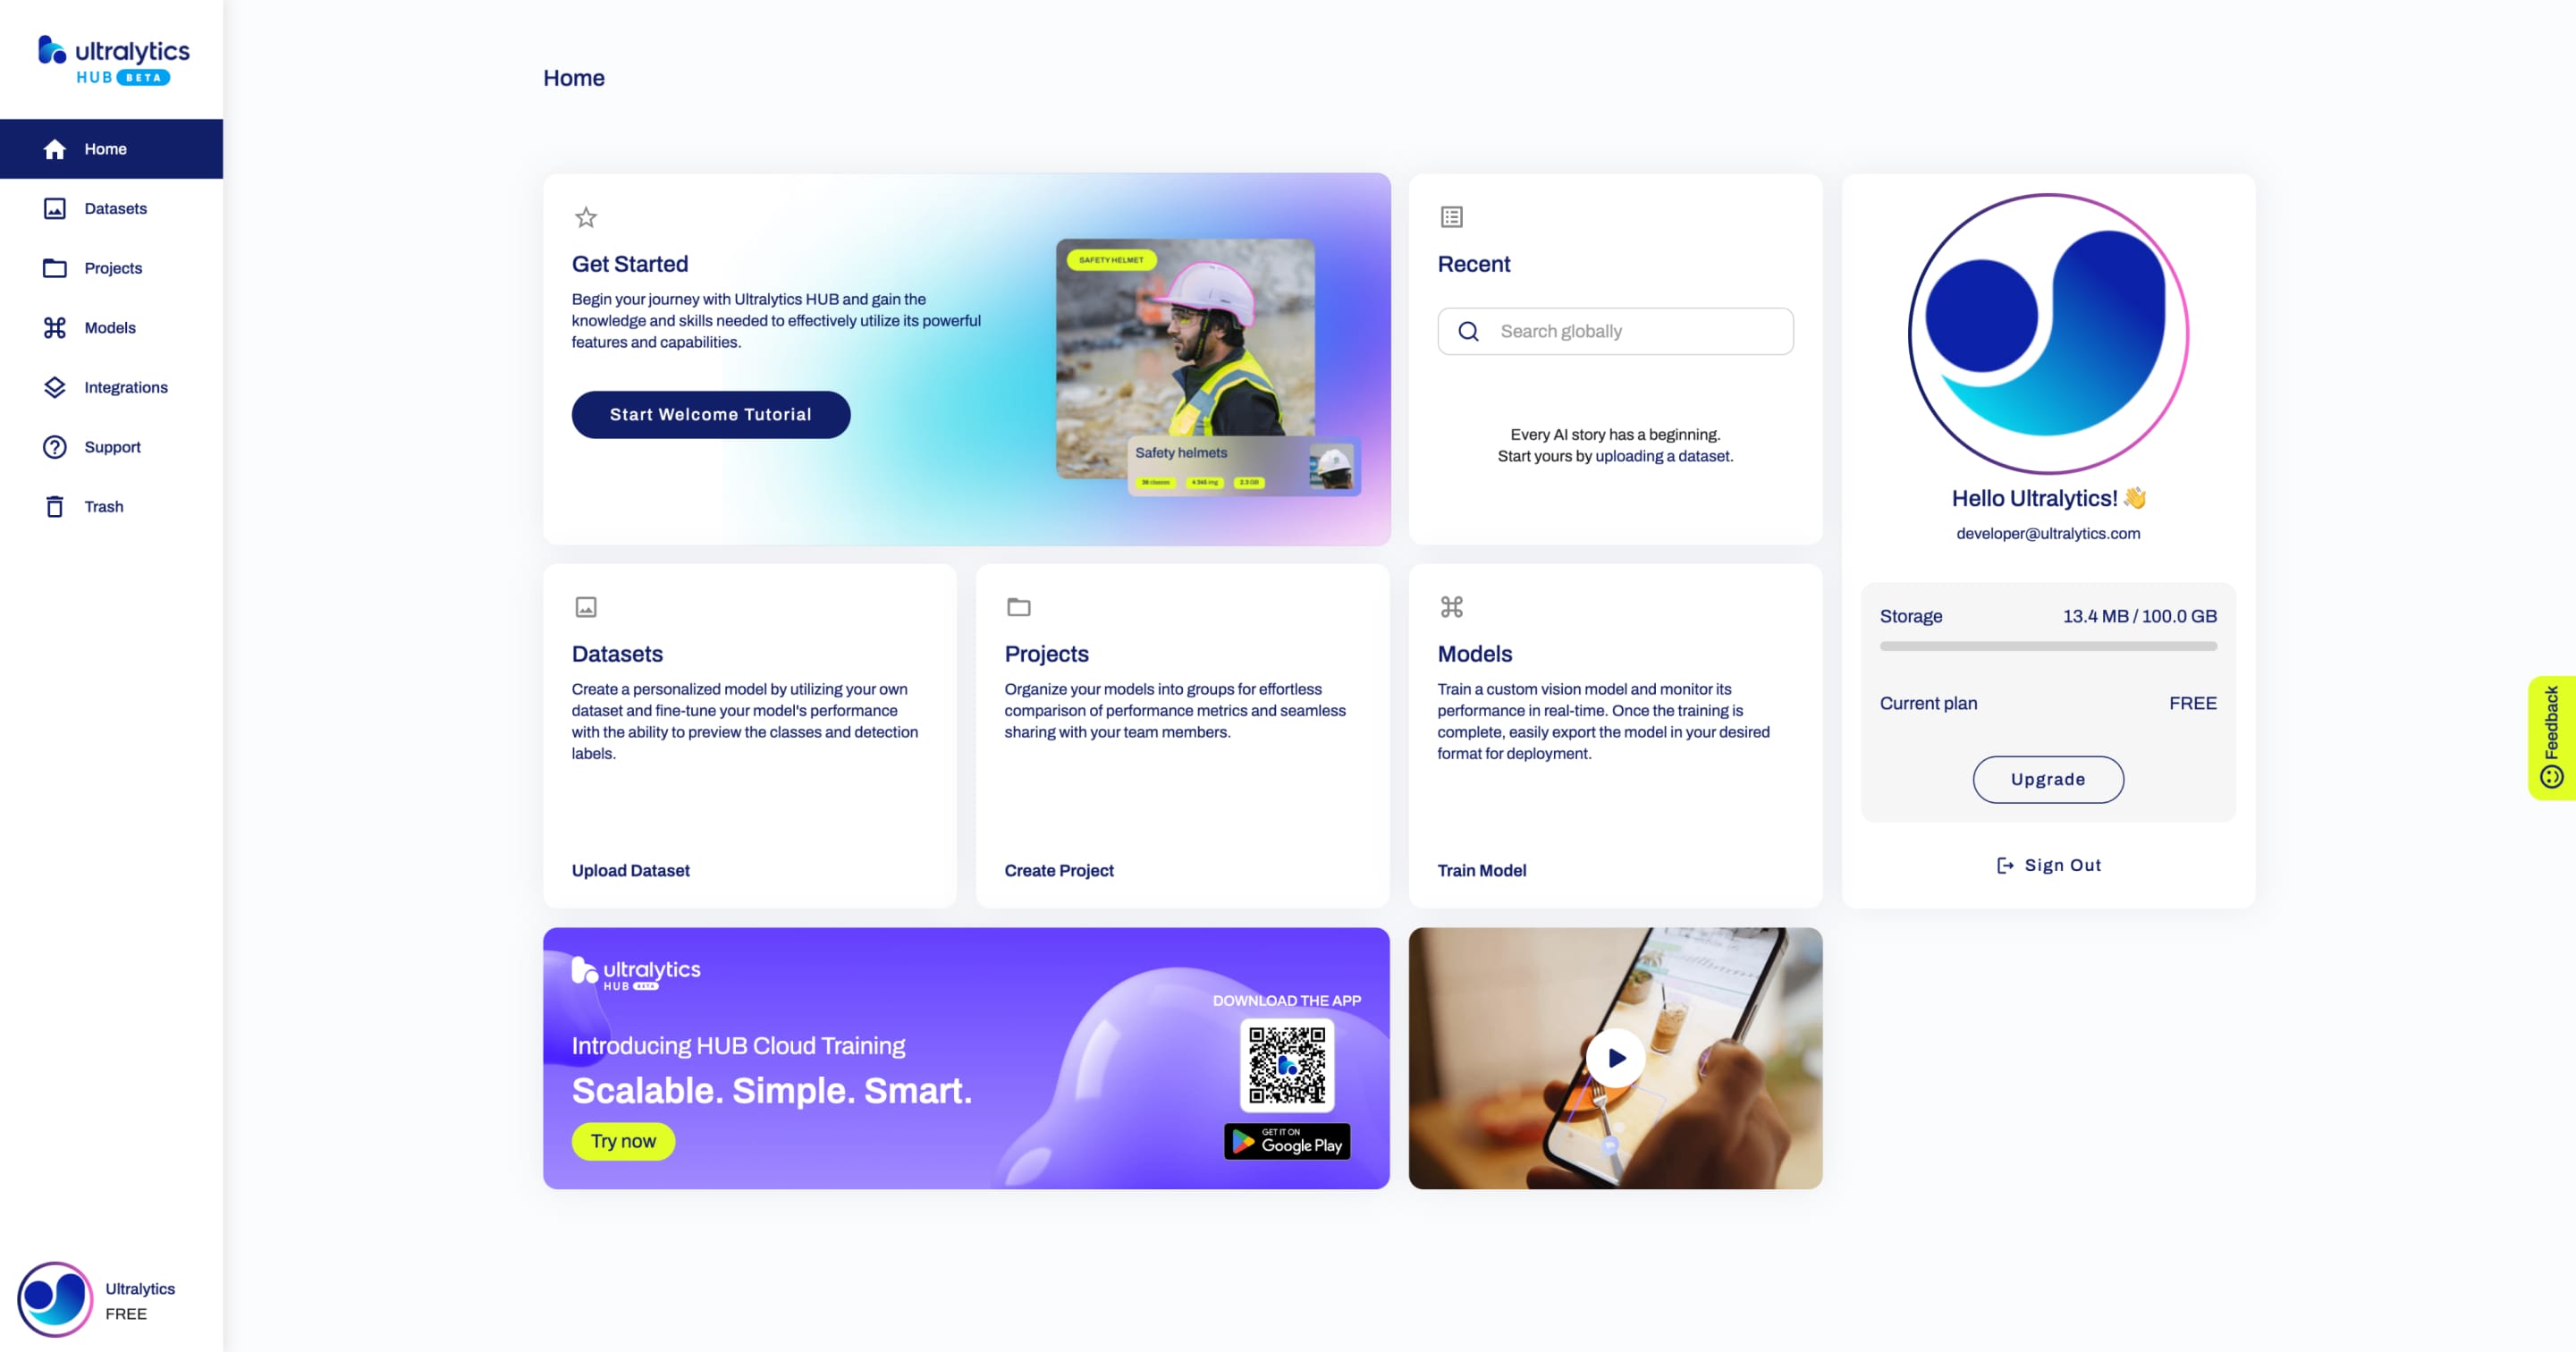
Home
After signing in, you will be directed to the Home page of Ultralytics HUB, which provides a comprehensive overview, quick links, and updates.
The sidebar conveniently offers links to important modules of the platform, such as Datasets, Projects, and Models.
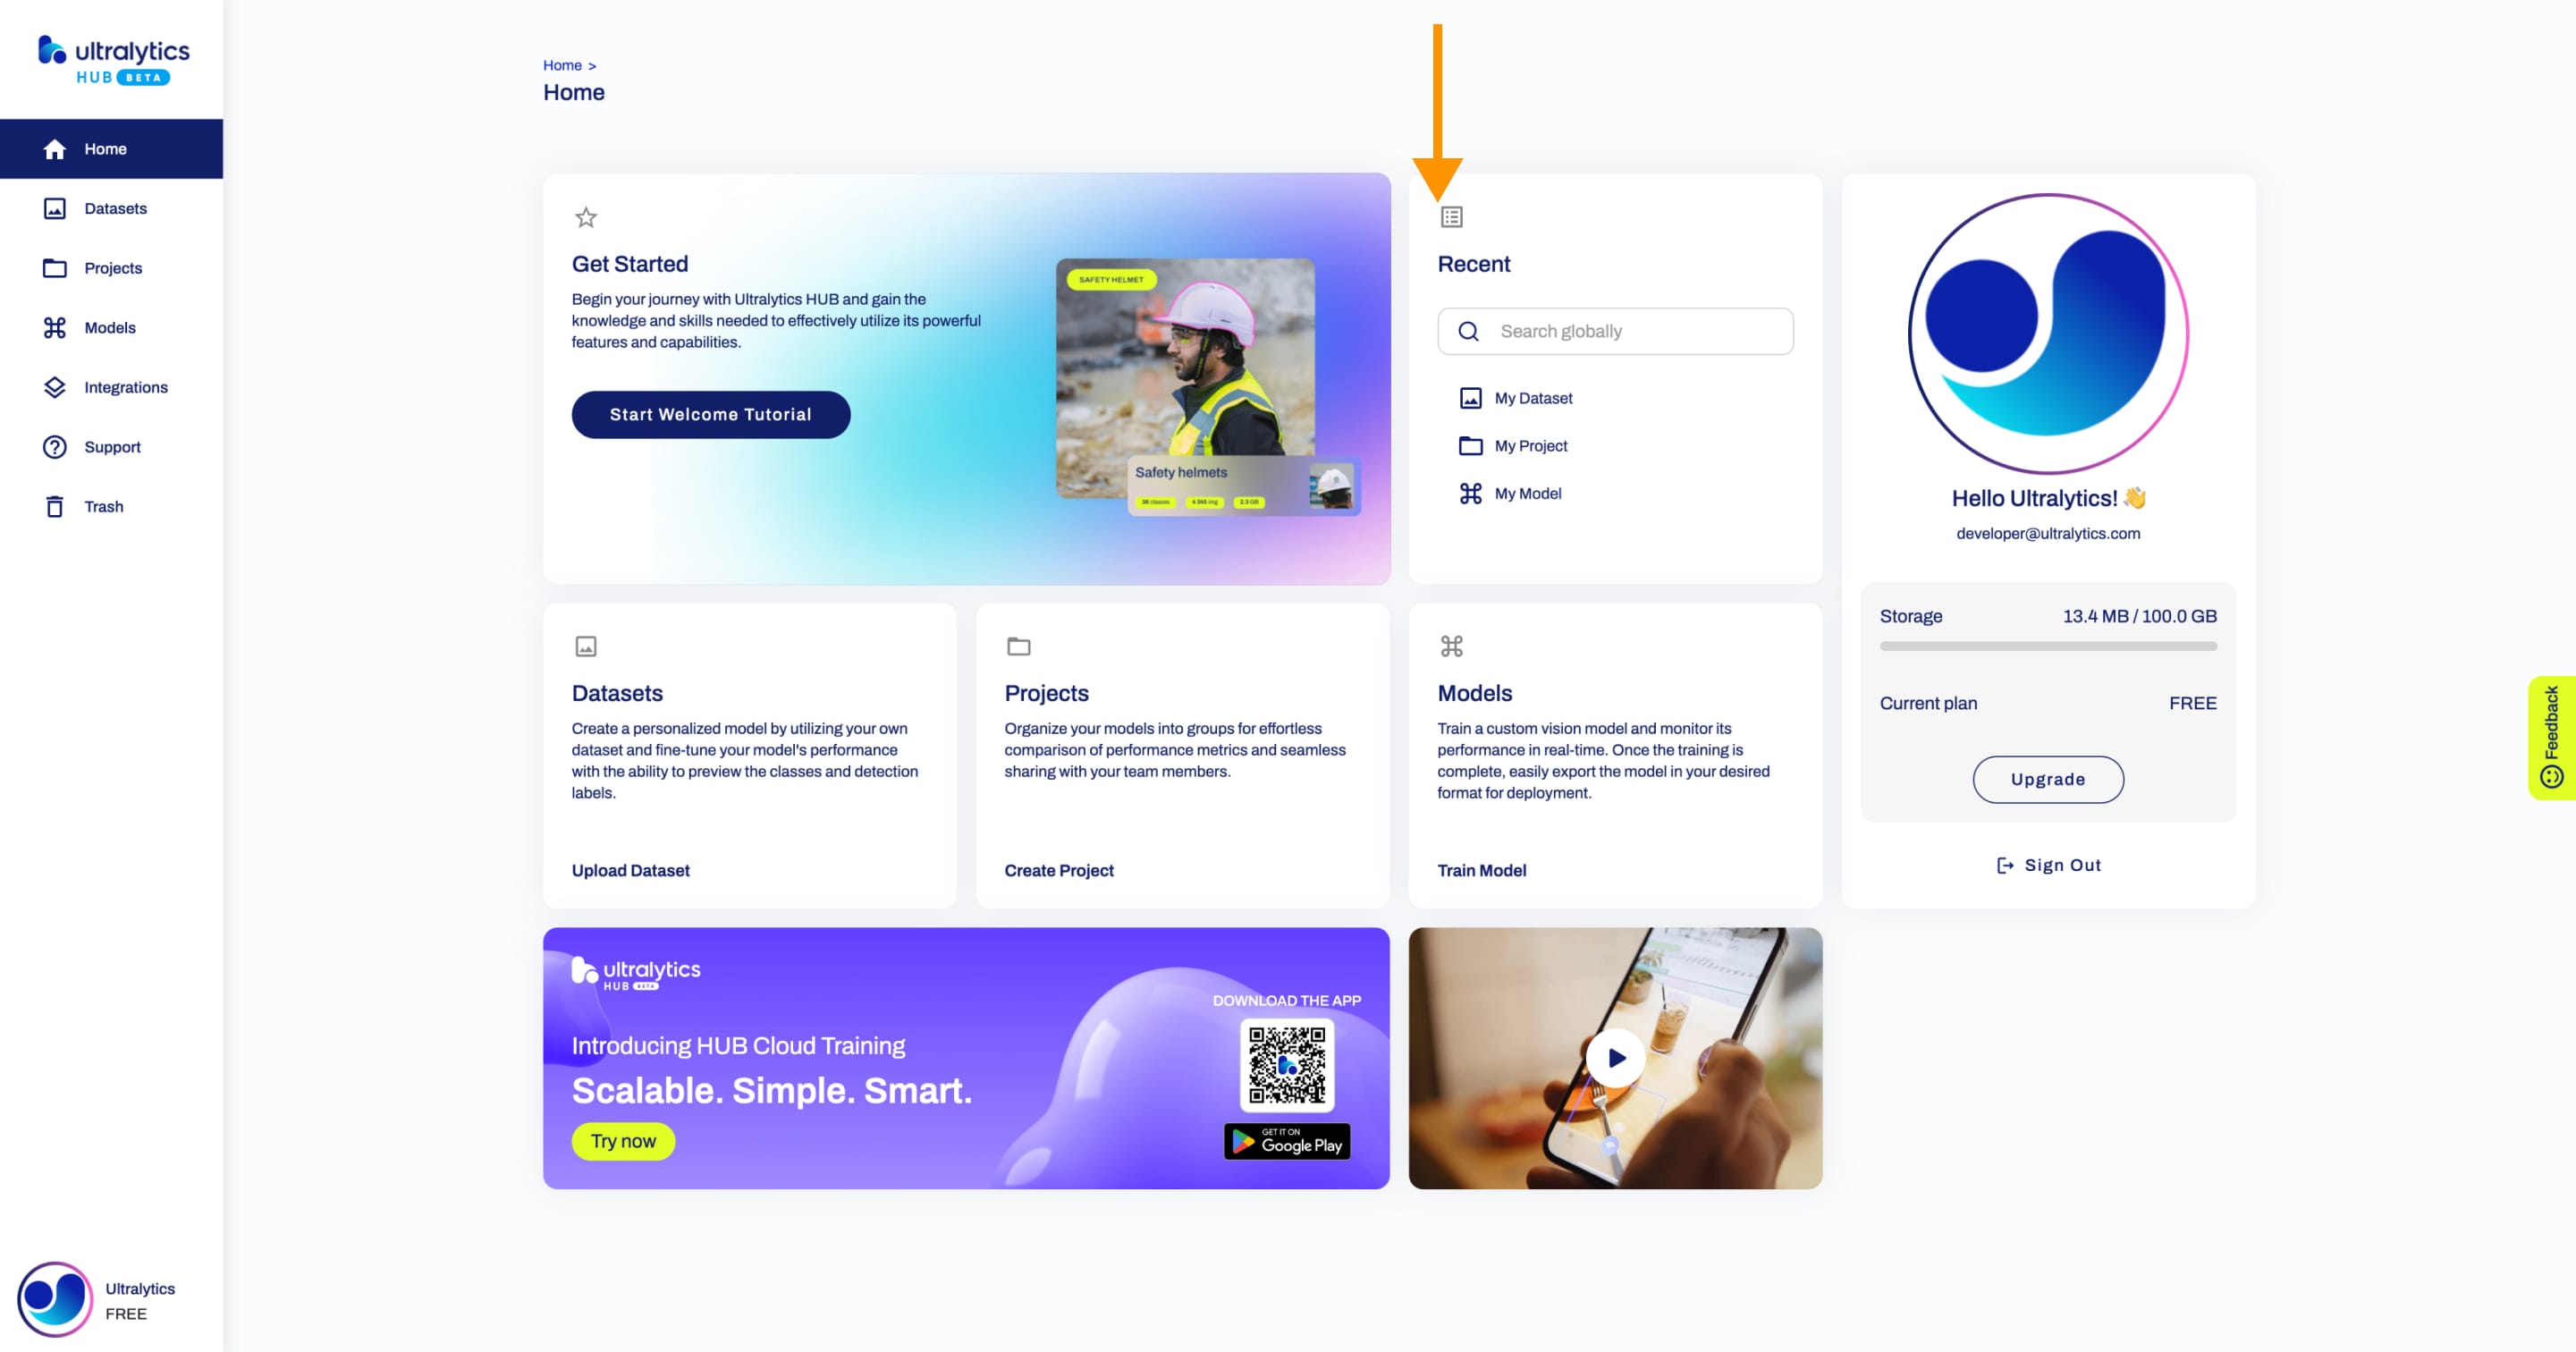
Recent
You can easily search globally or directly access your last updated Datasets, Projects, or Models using the Recent card on the Home page.
Upload Dataset
You can upload a dataset directly from the Home page.
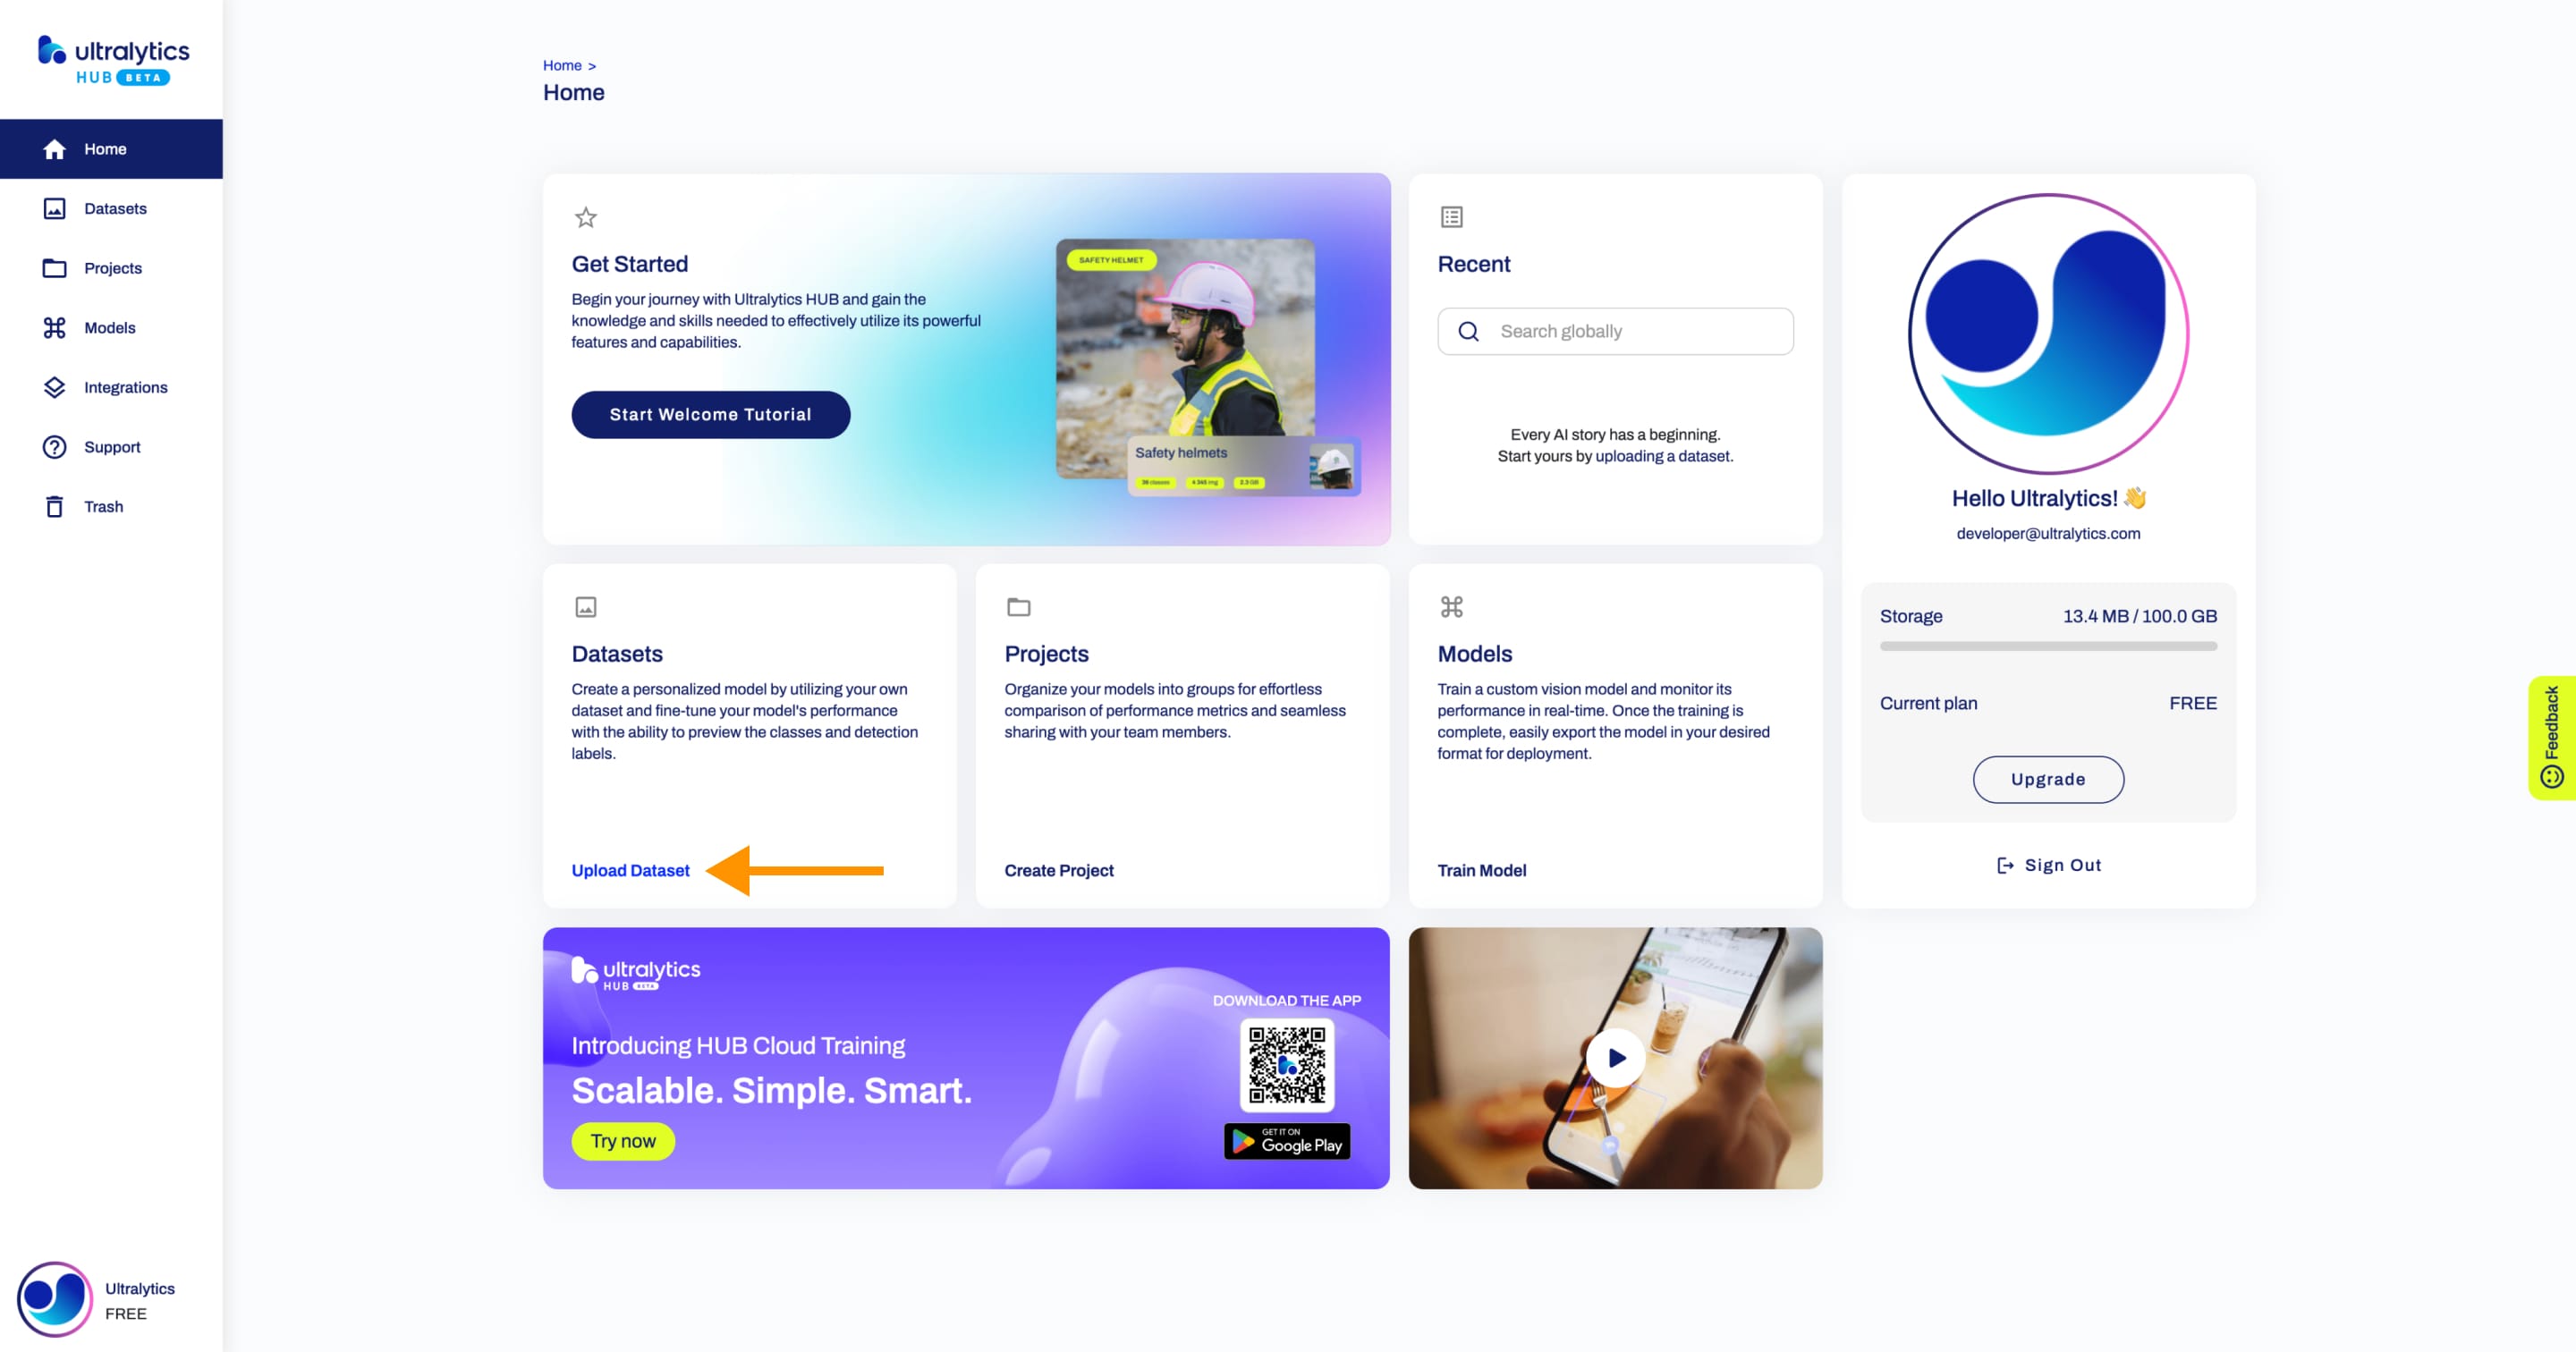
Read more about datasets.
Create Project
You can create a project directly from the Home page.

Read more about projects.
Train Model
You can train a model directly from the Home page.

Read more about models.
Feedback
We value your feedback! Feel free to leave a review at any time.
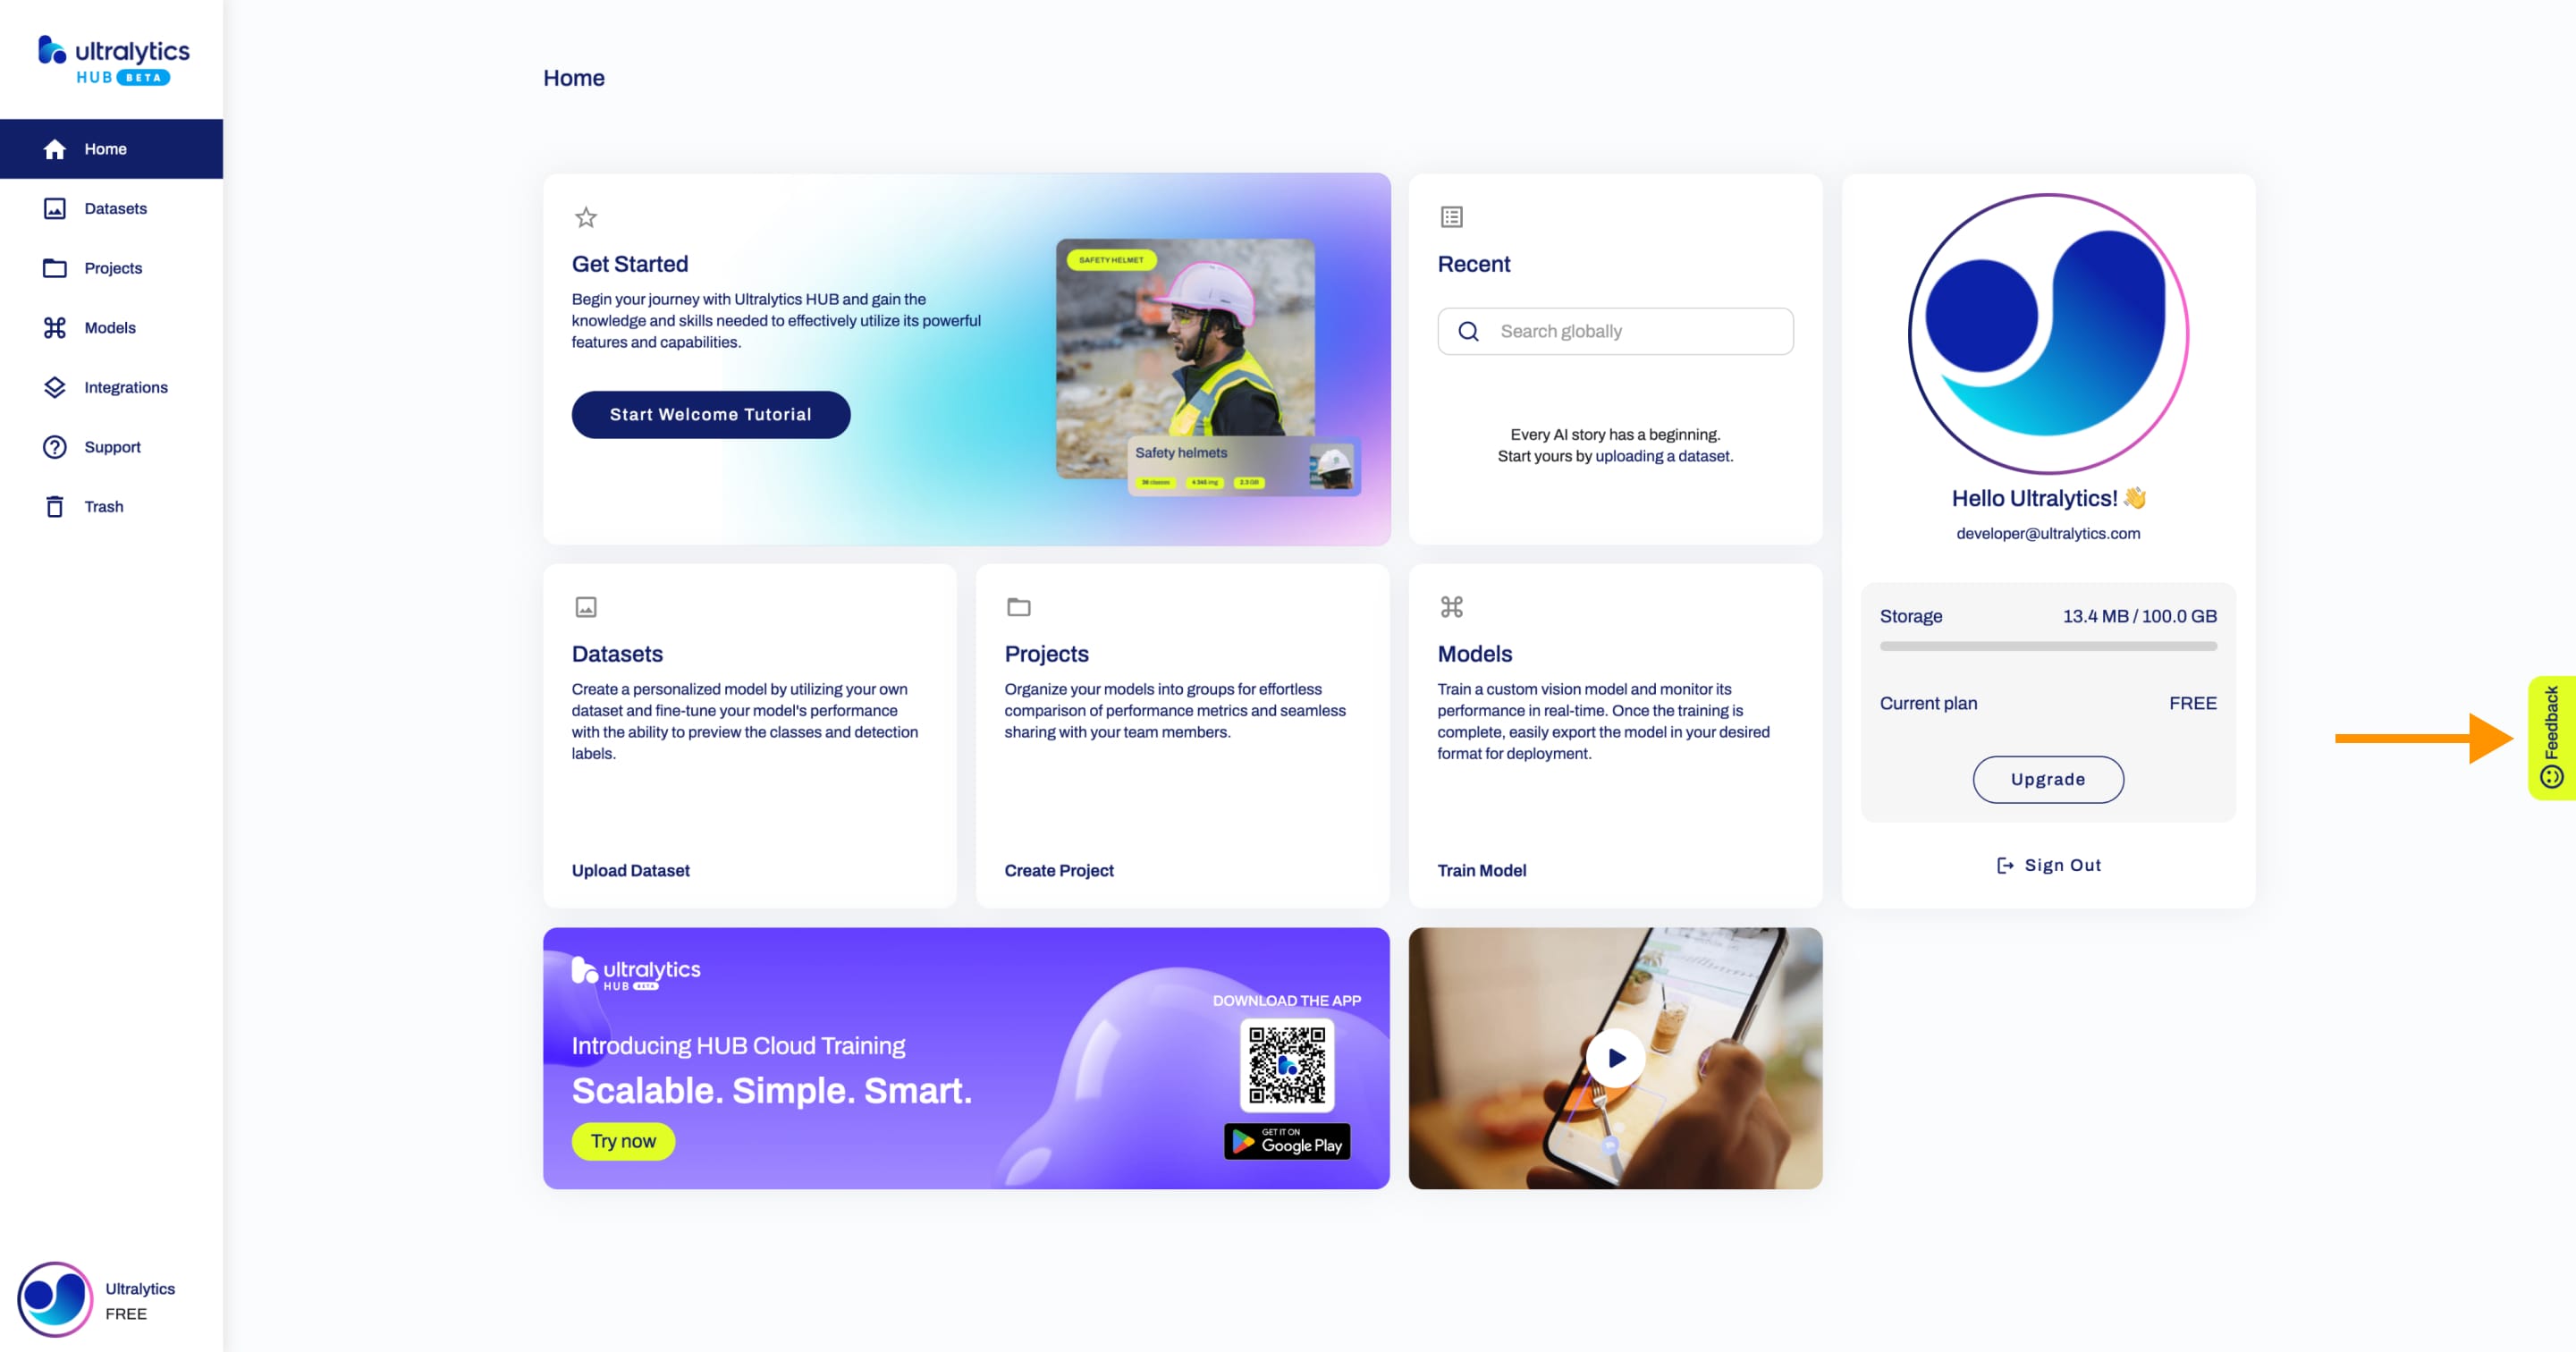
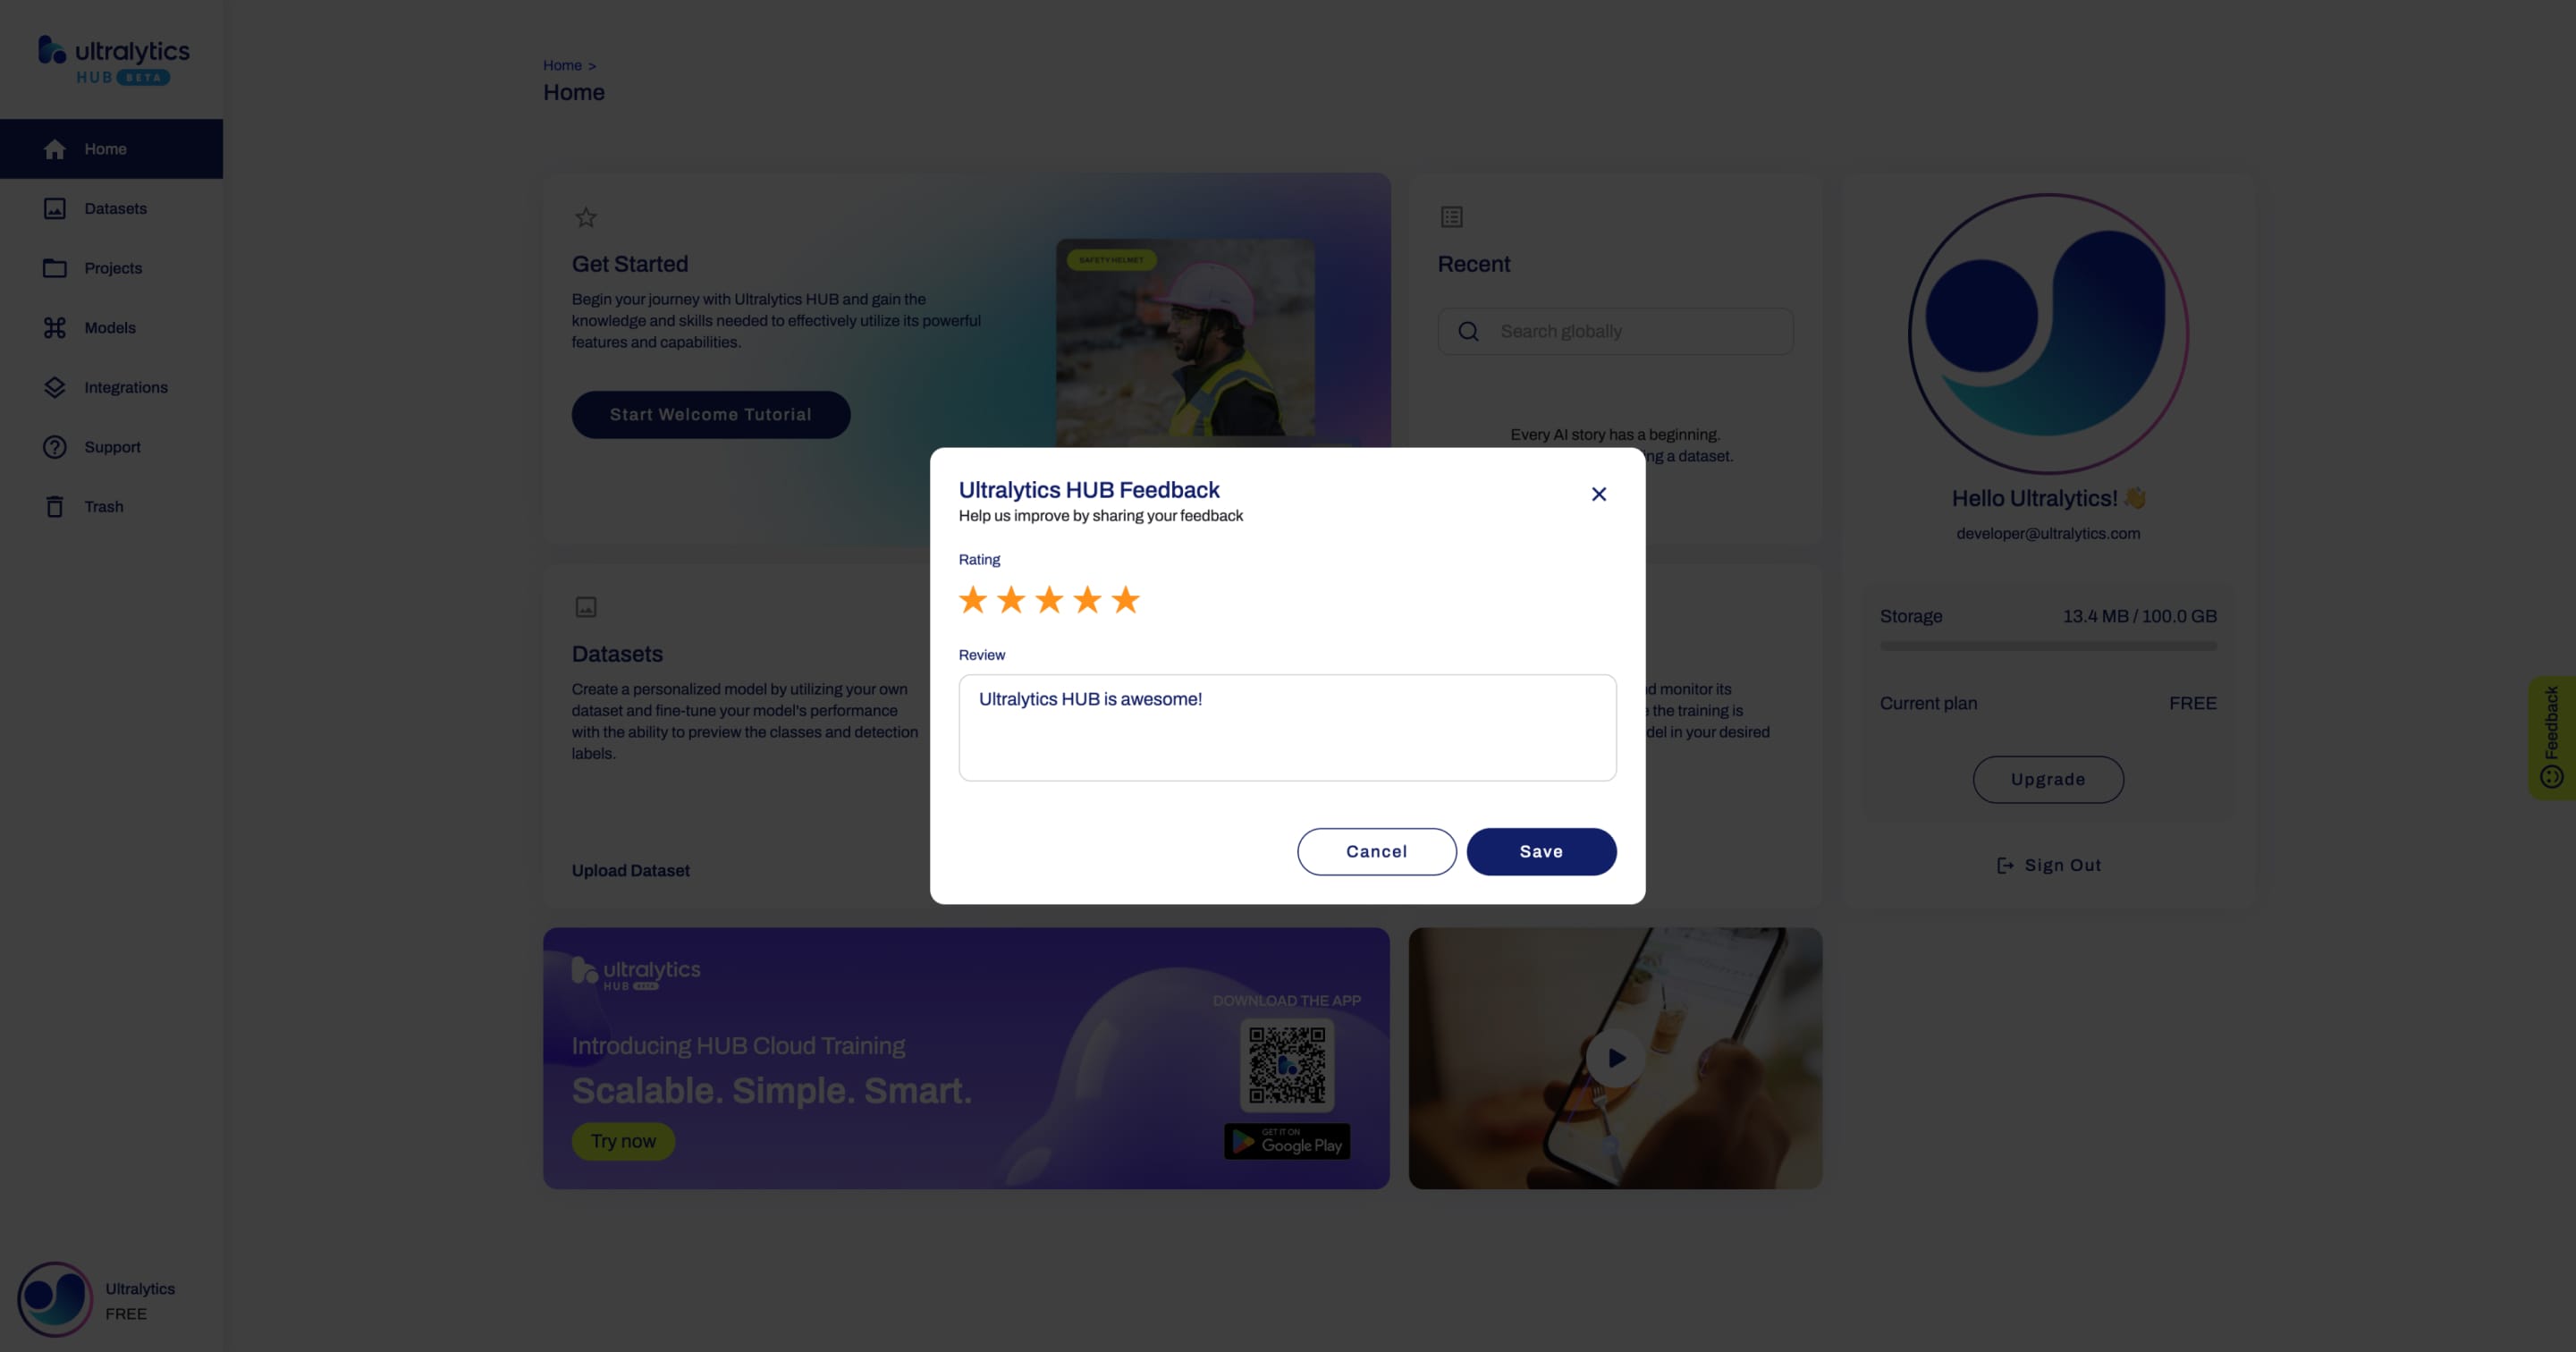
??? info "Info"
Only our team will see your feedback, and we will use it to improve our platform.
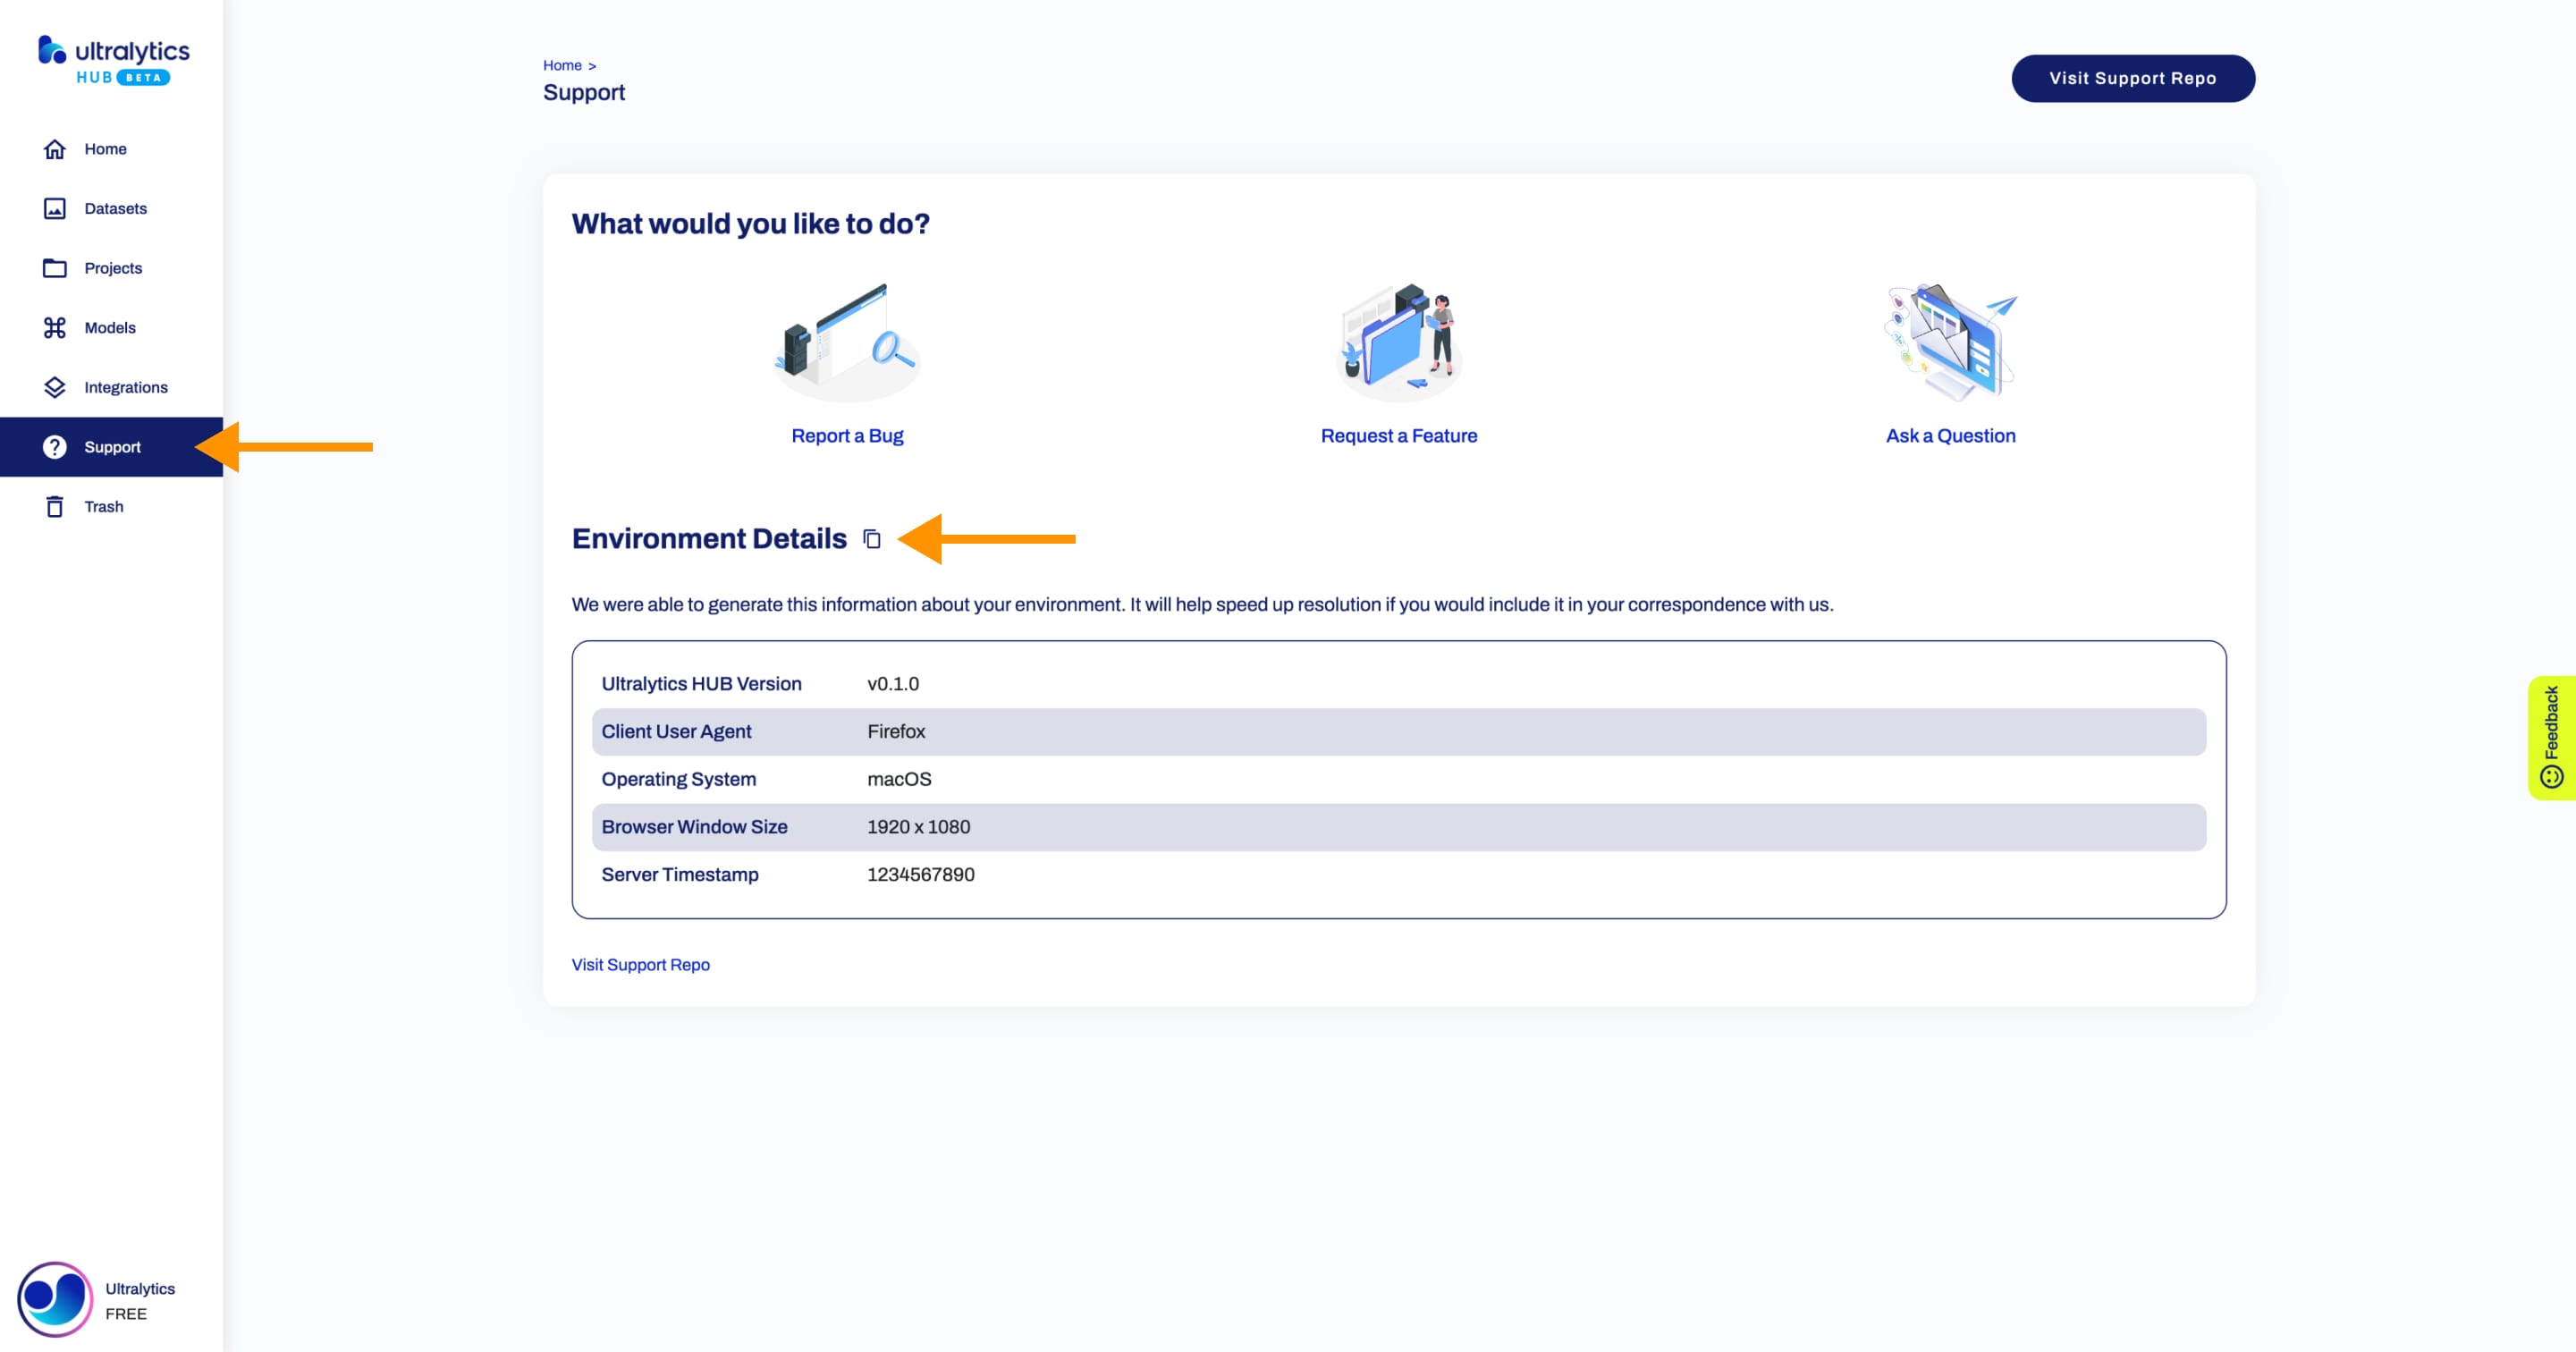
Need Help?
If you encounter any issues or have questions, we're here to assist you.
You can report a bug, request a feature, or ask a question on GitHub.
!!! note "Note"
When reporting a bug, please include your Environment Details from the [Support](https://hub.ultralytics.com/support) page.
??? tip "Tip"
You can join our <a href="https://ultralytics.com/discord">Discord</a> community for questions and discussions!
comments: true
description: Discover how to manage and collaborate with team members using Ultralytics HUB Teams. Learn to create, edit, and share resources efficiently.
keywords: Ultralytics HUB, Teams, collaboration, team management, AI projects, resource sharing, Pro Plan, data sharing, project management
Ultralytics HUB Teams
We're excited to introduce you to the new Teams feature within Ultralytics HUB for our Pro users!
Here, you'll learn how to manage team members, share resources seamlessly, and collaborate efficiently on various projects.
!!! note "Note"
As this is a new feature, we're still in the process of developing and refining it to ensure it meets your needs.
Create Team
!!! note "Note"
You need to [upgrade](./pro.md#upgrade) to the [Pro Plan](./pro.md) in order to create a team.
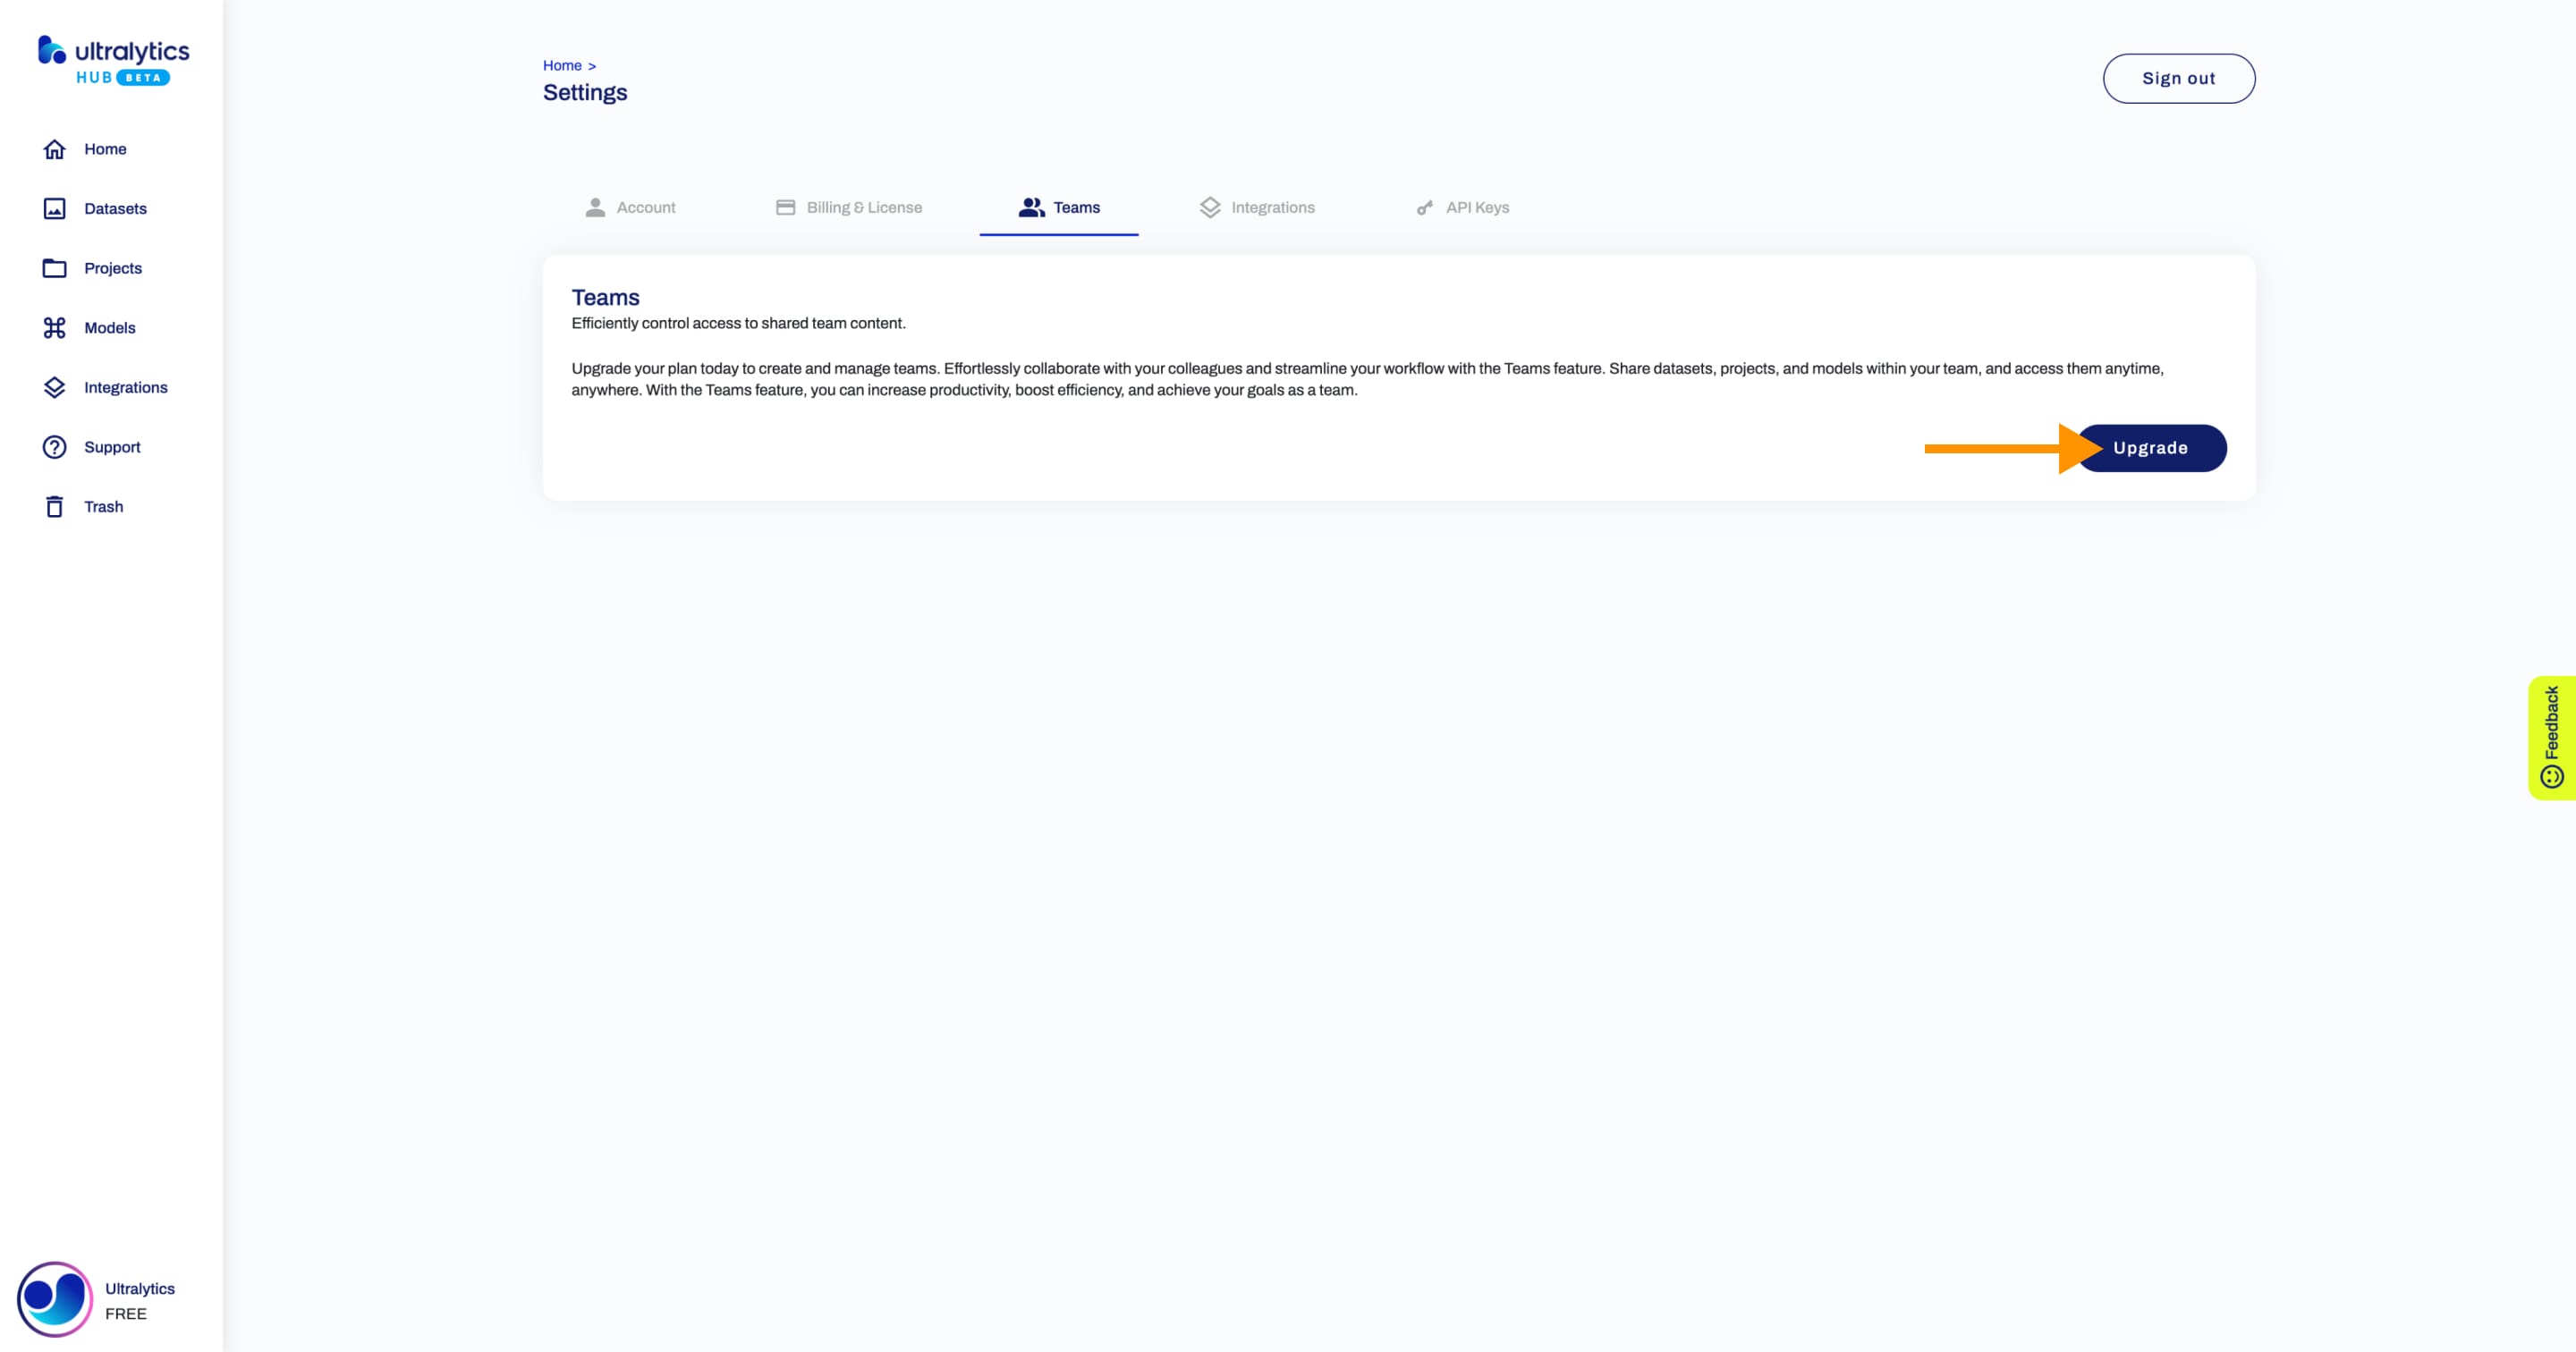
Navigate to the Teams page by clicking on the Teams tab in the Settings page and click on the Create Team button.
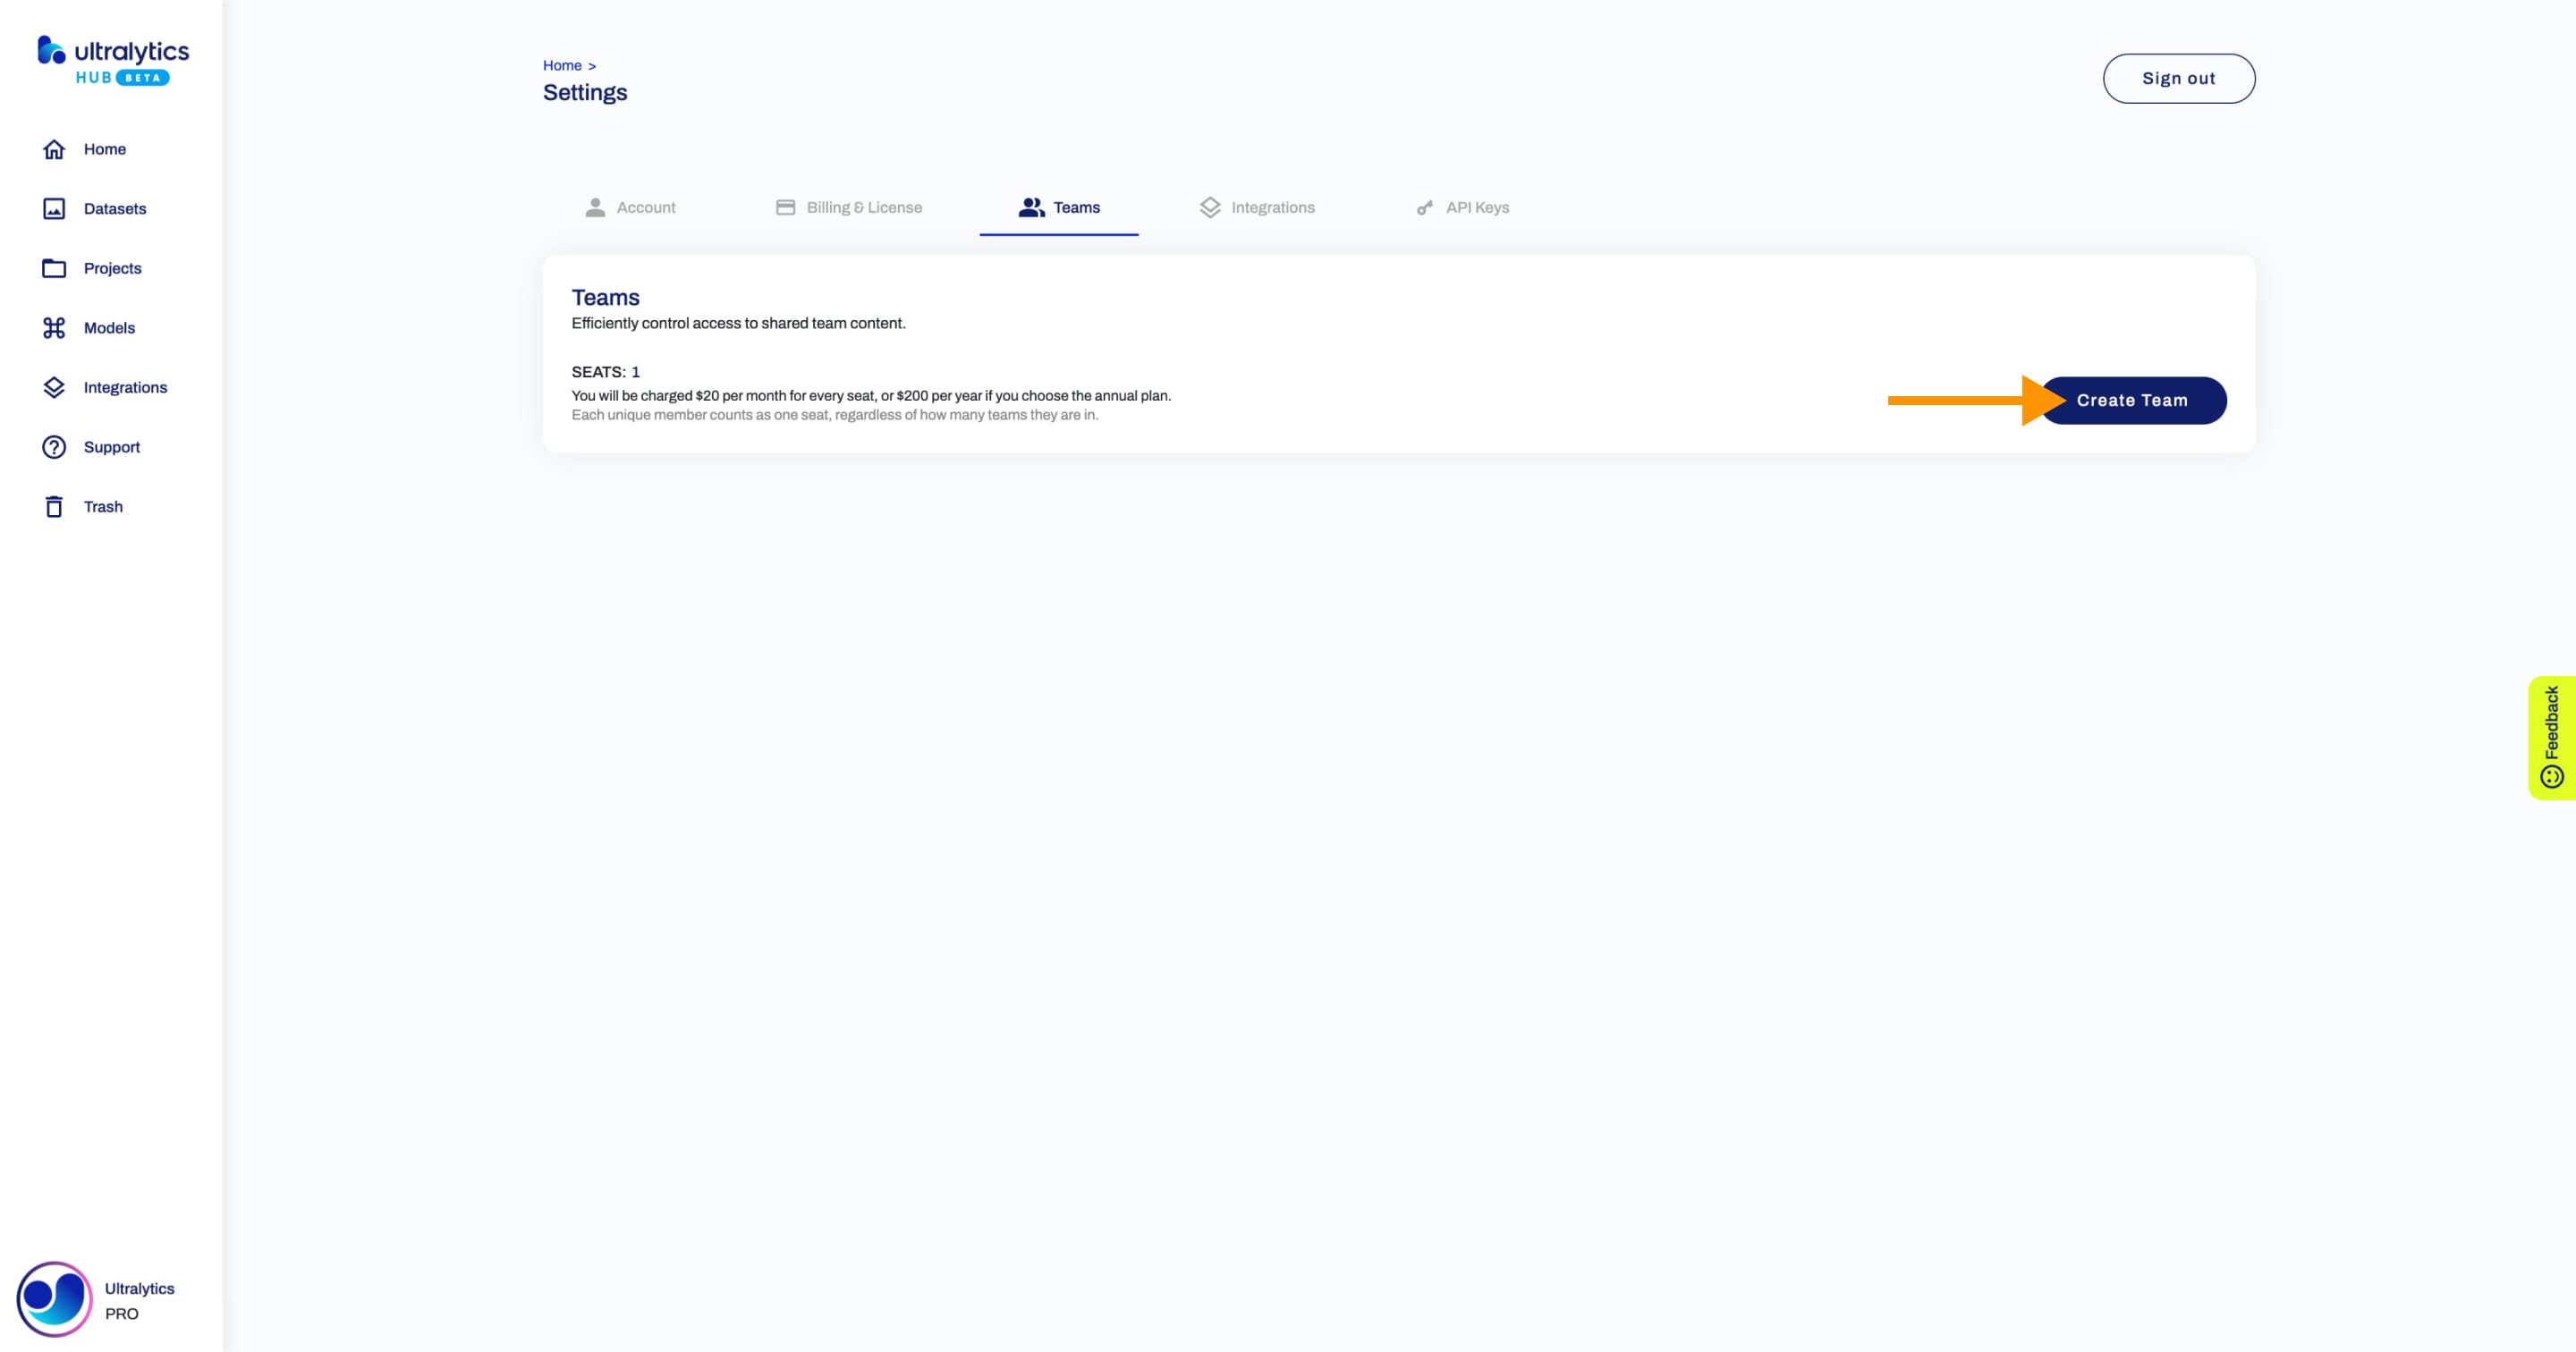
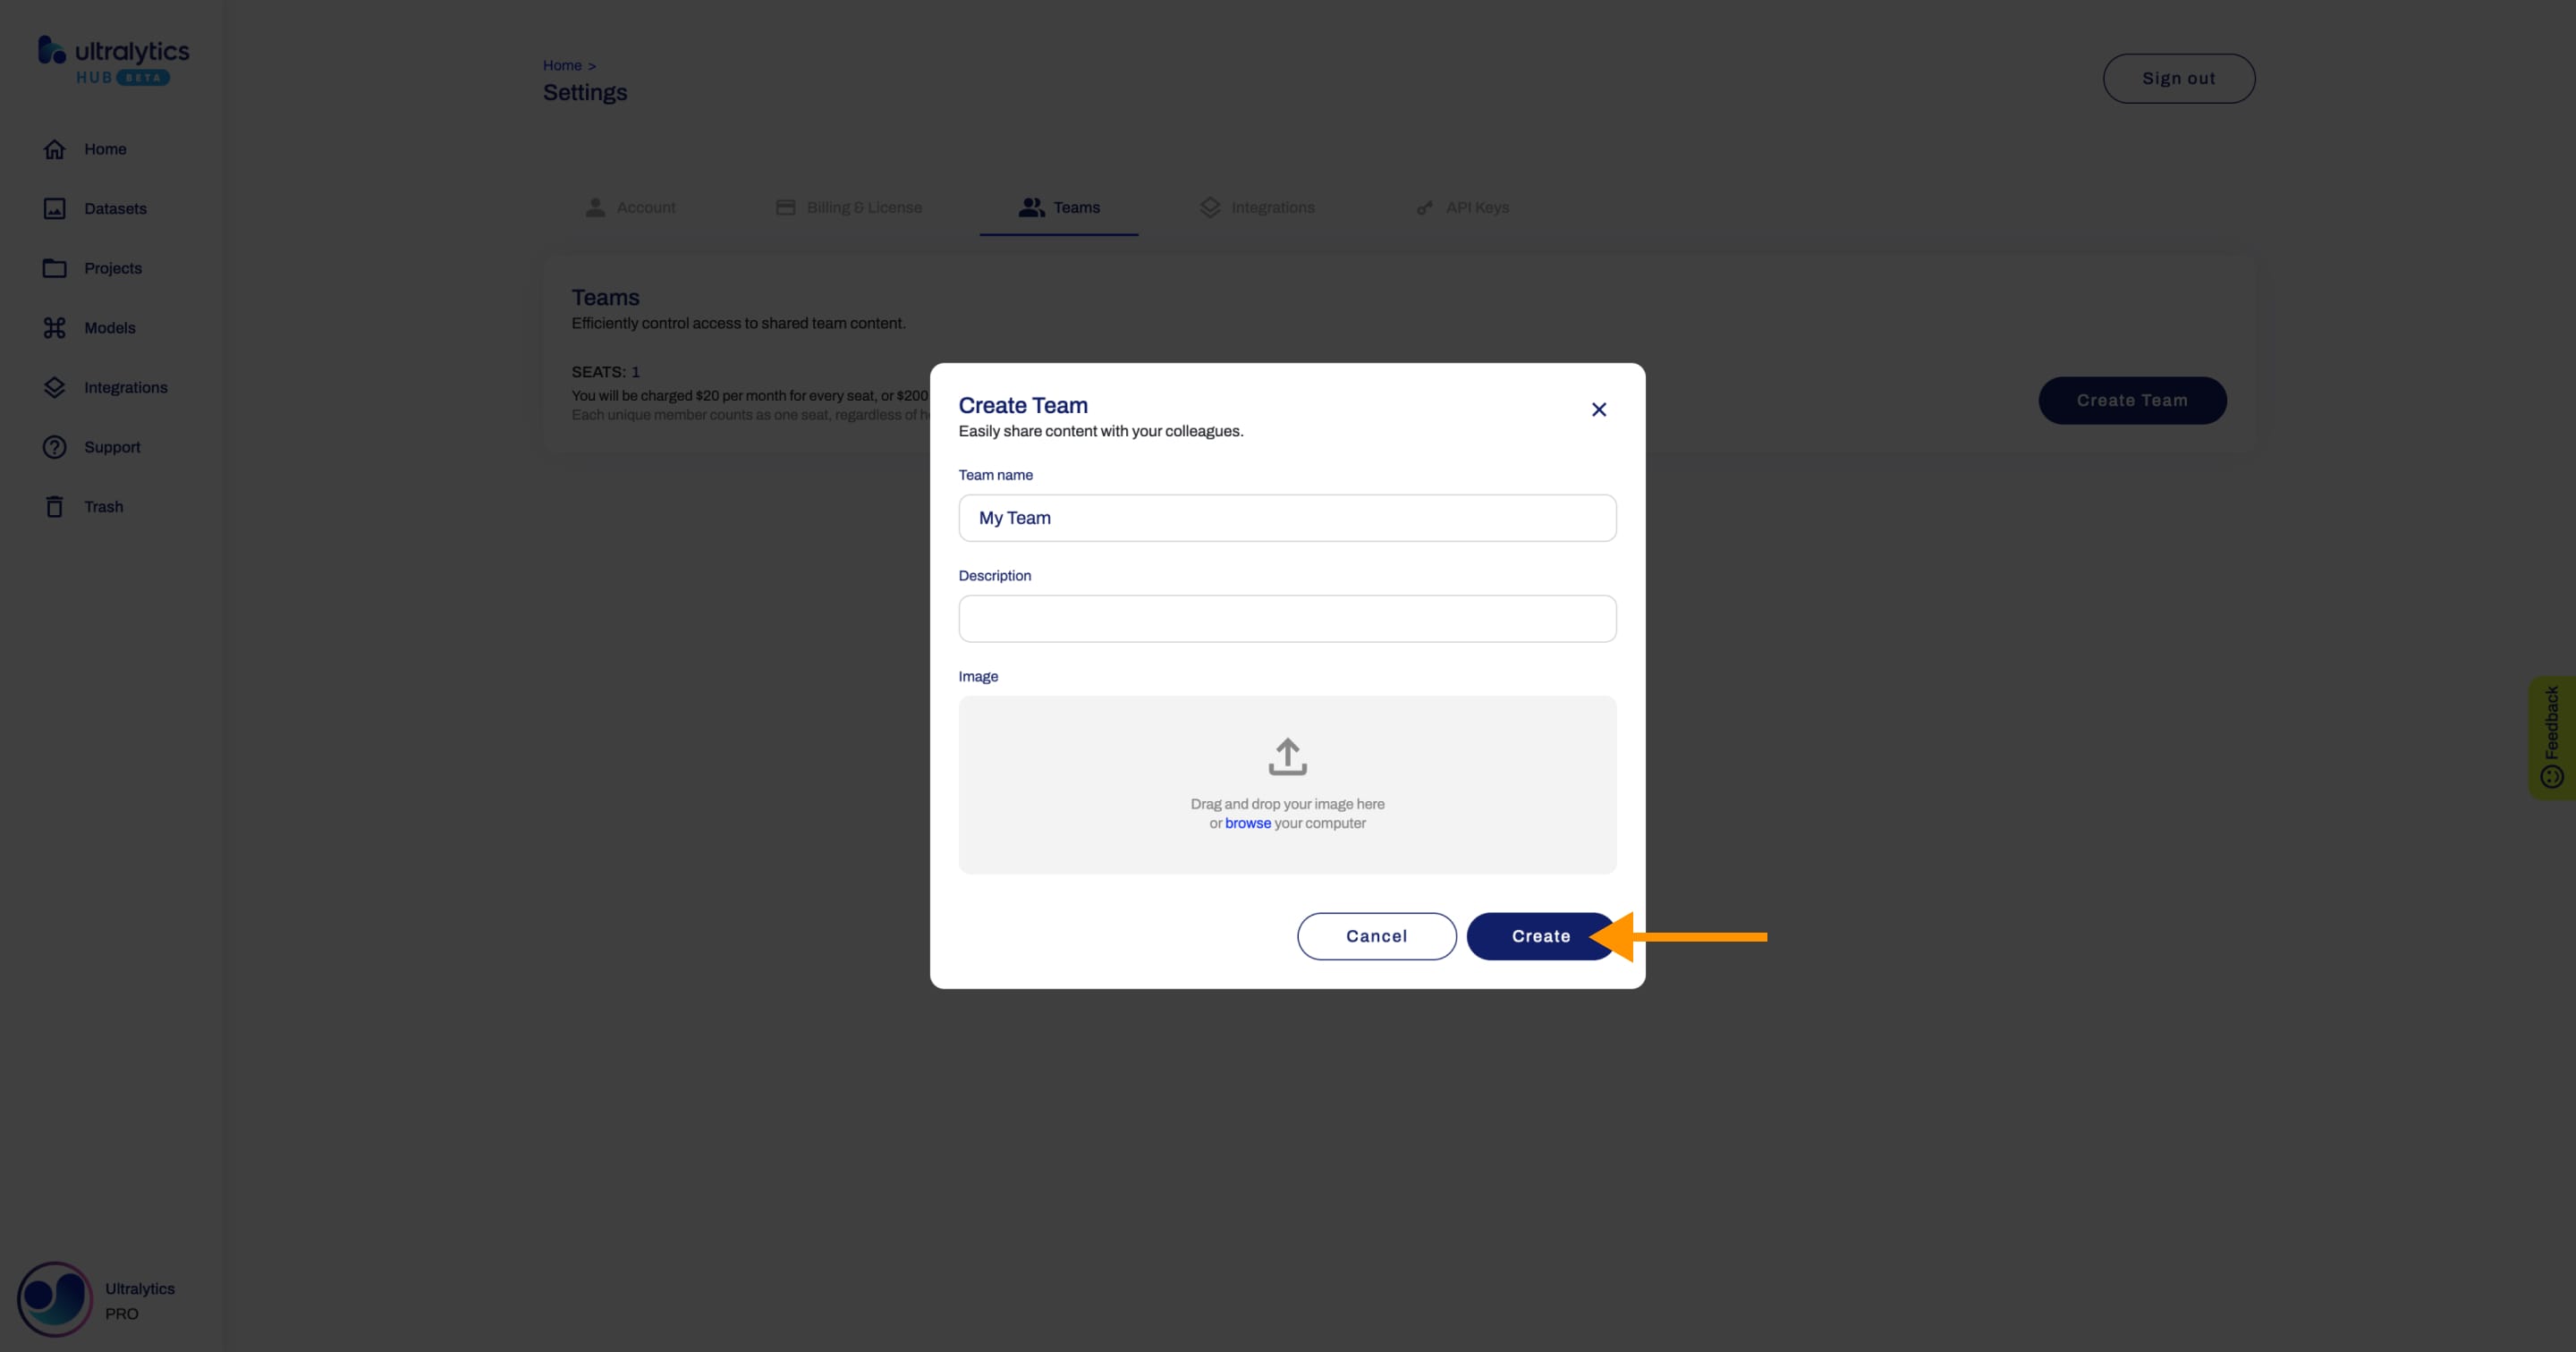
This action will trigger the Create Team dialog.
Type the name of your team in the Team name field or keep the default name and finalize the team creation with a single click.
You have the additional option to enrich your team with a description and a unique image, enhancing its recognizability on the Teams page.
When you're happy with your team configuration, click Create.
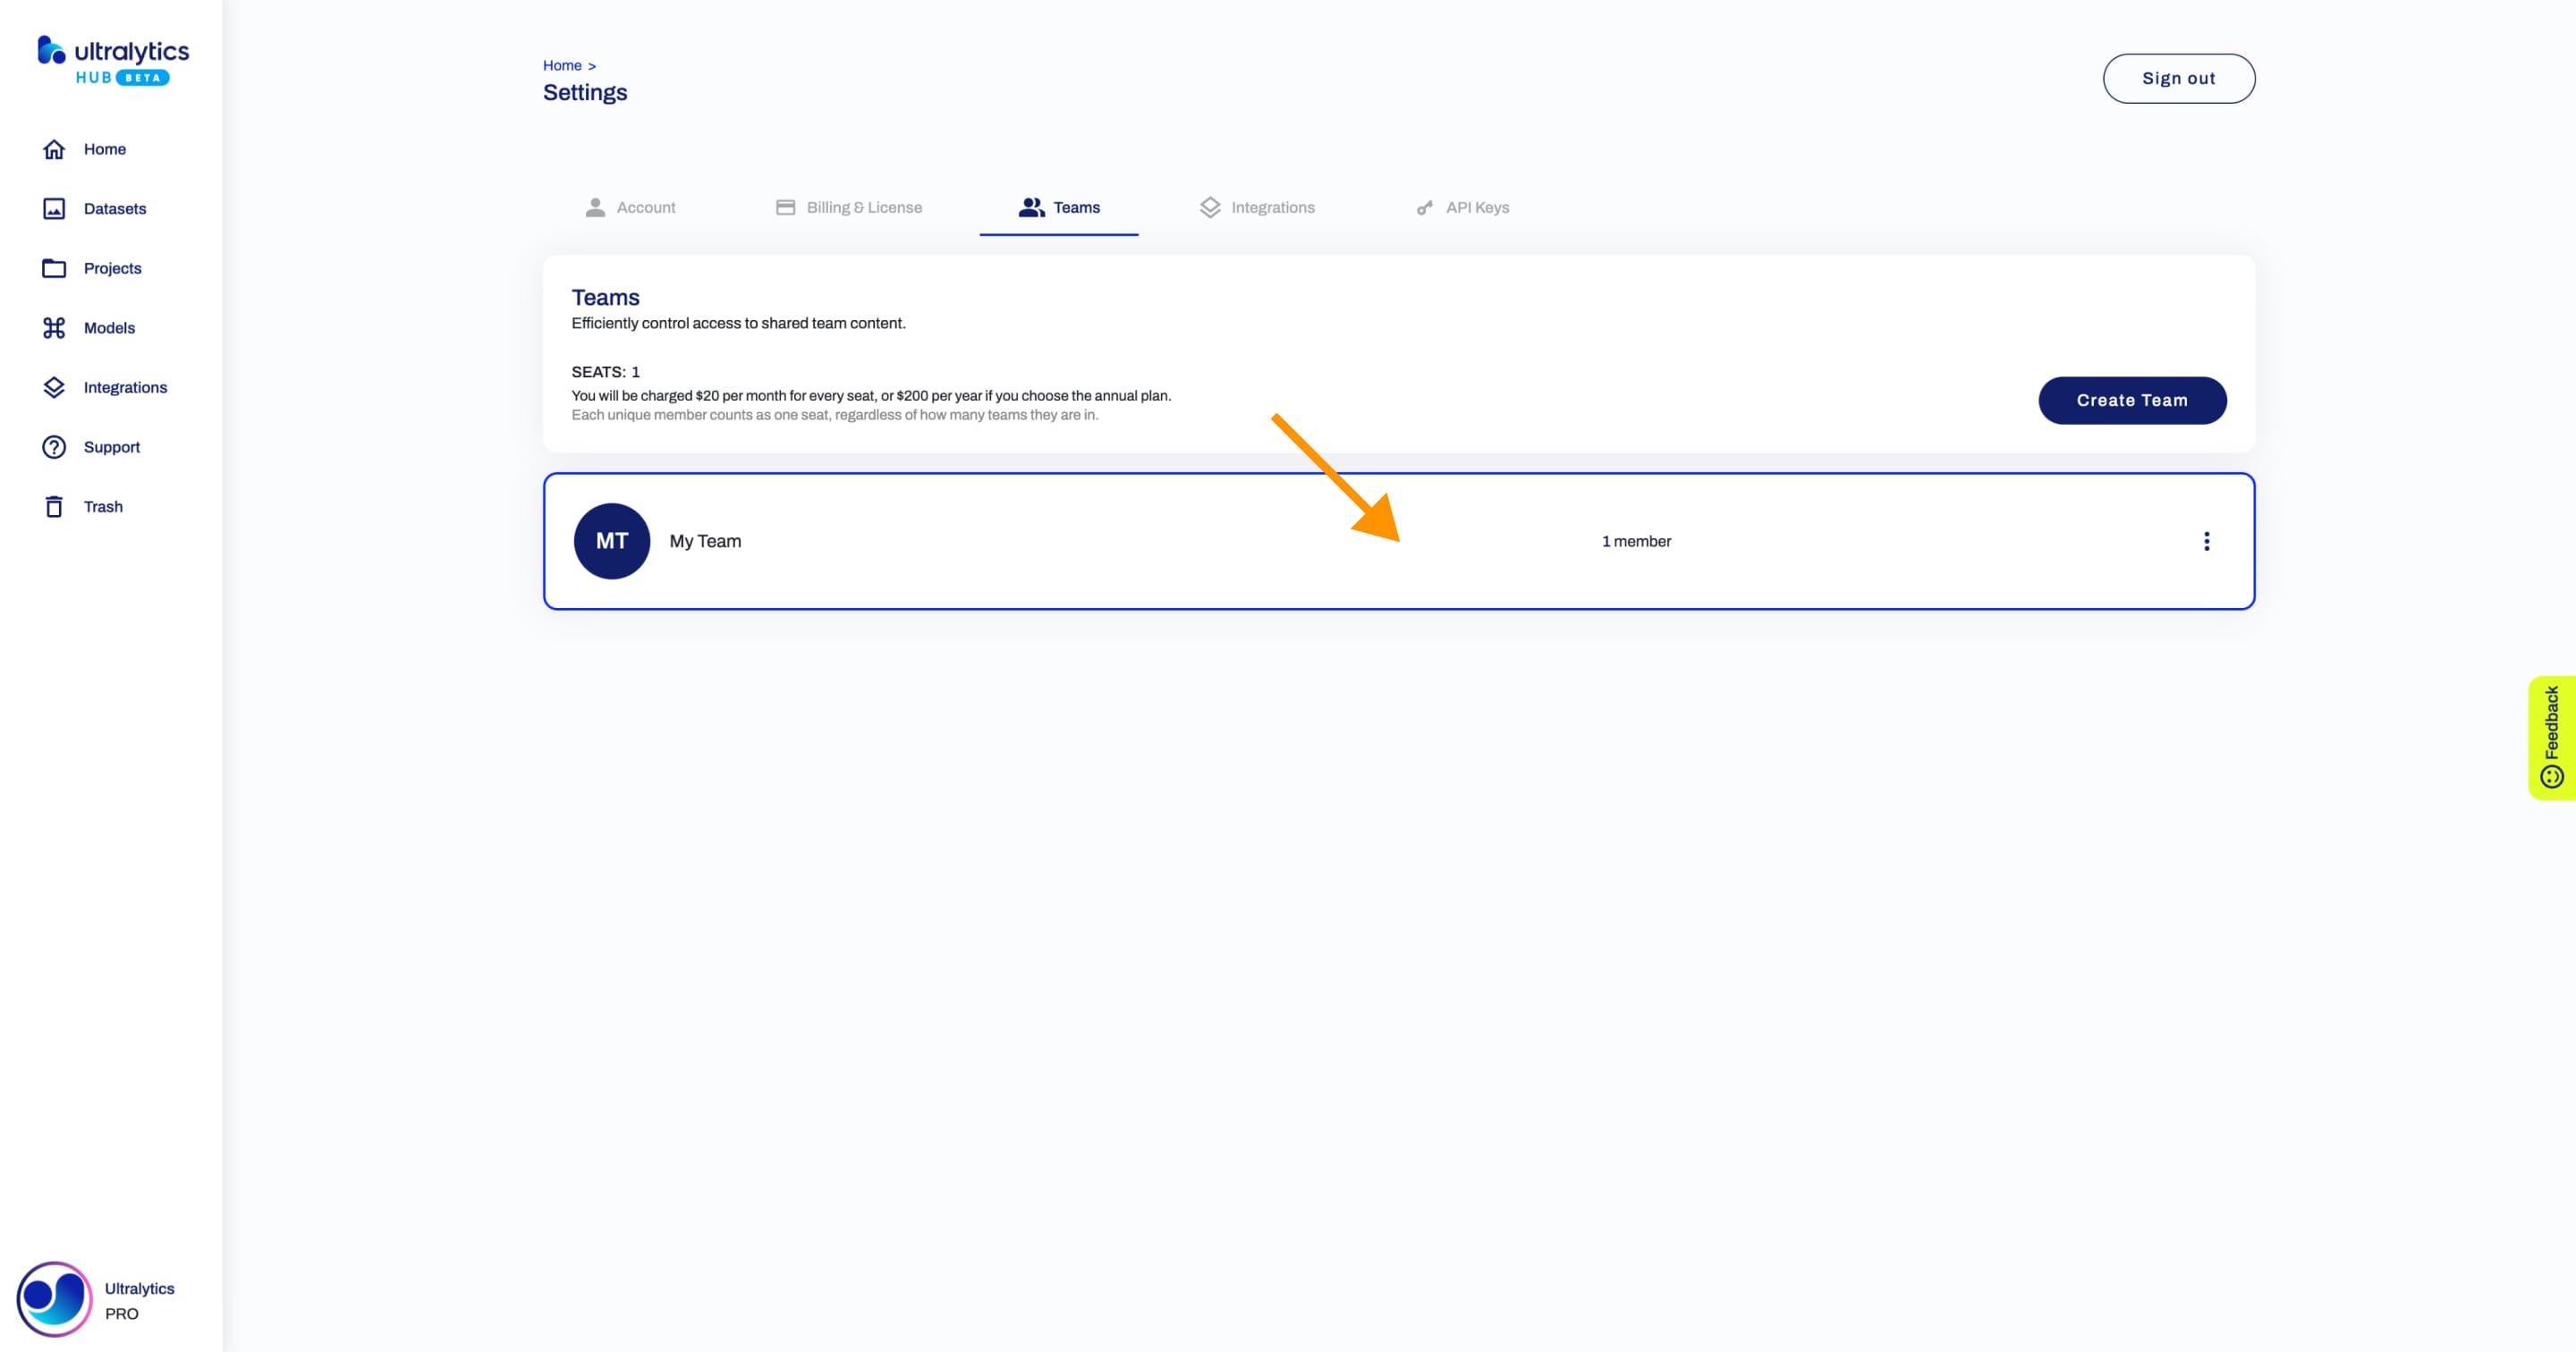
After your team is created, you will be able to access it from the Teams page.
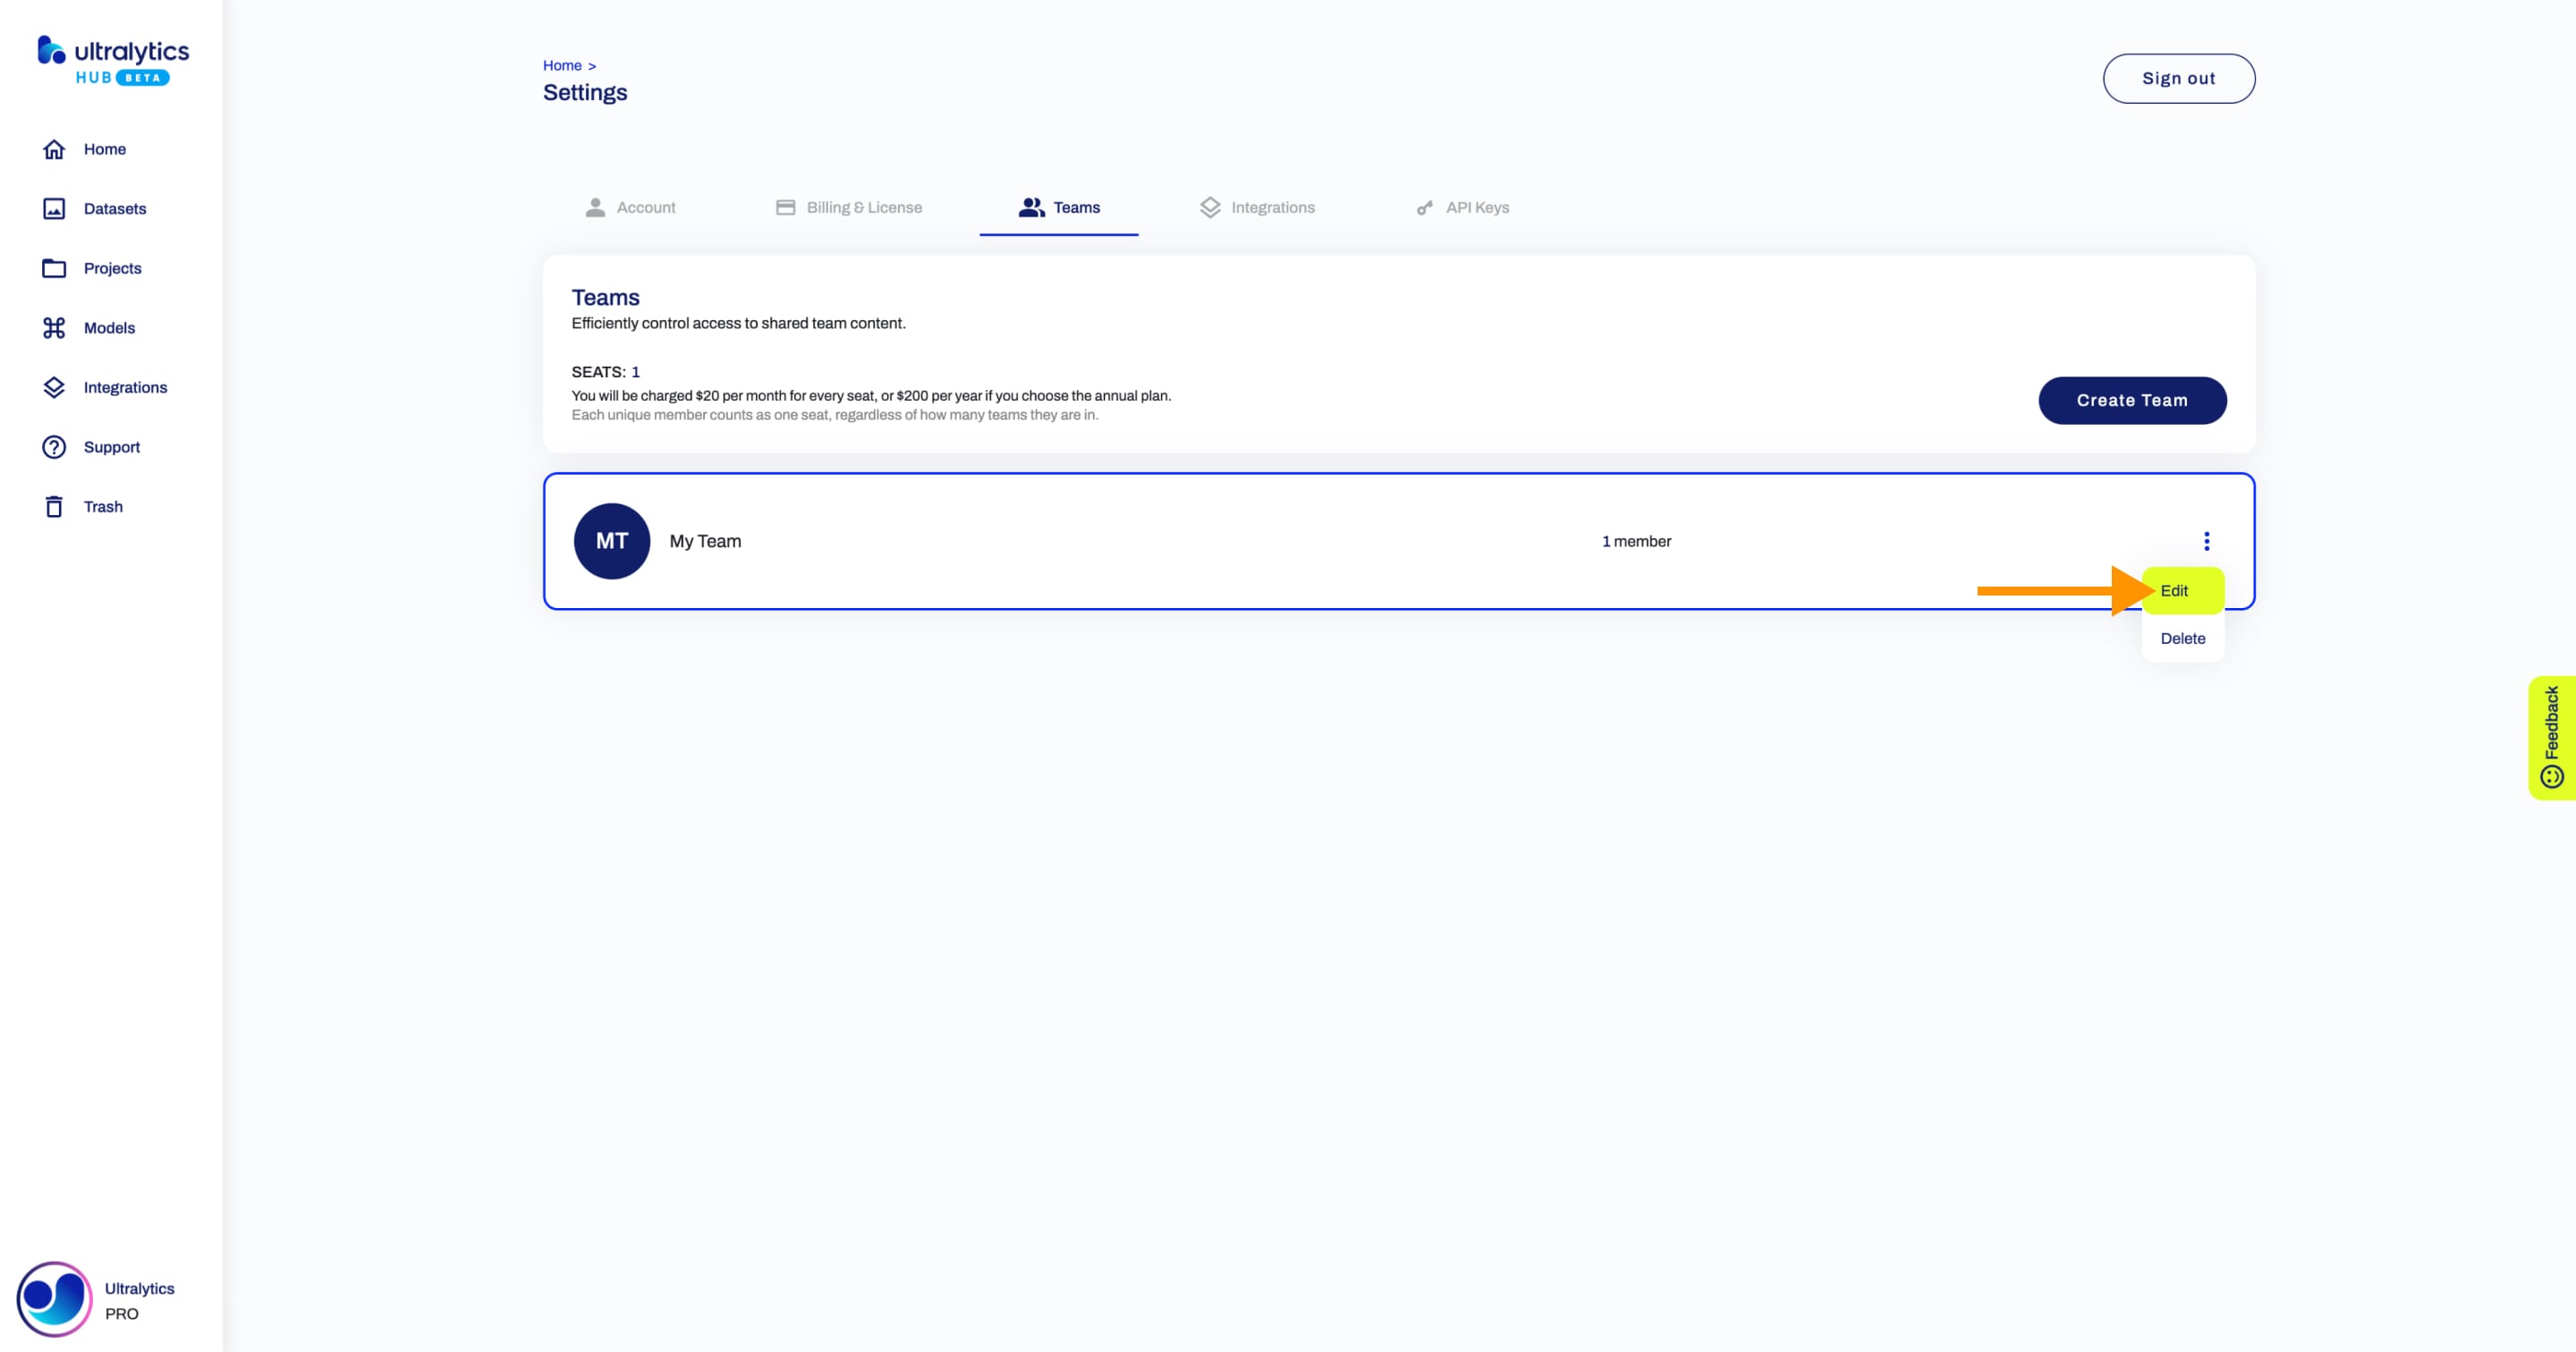
Edit Team
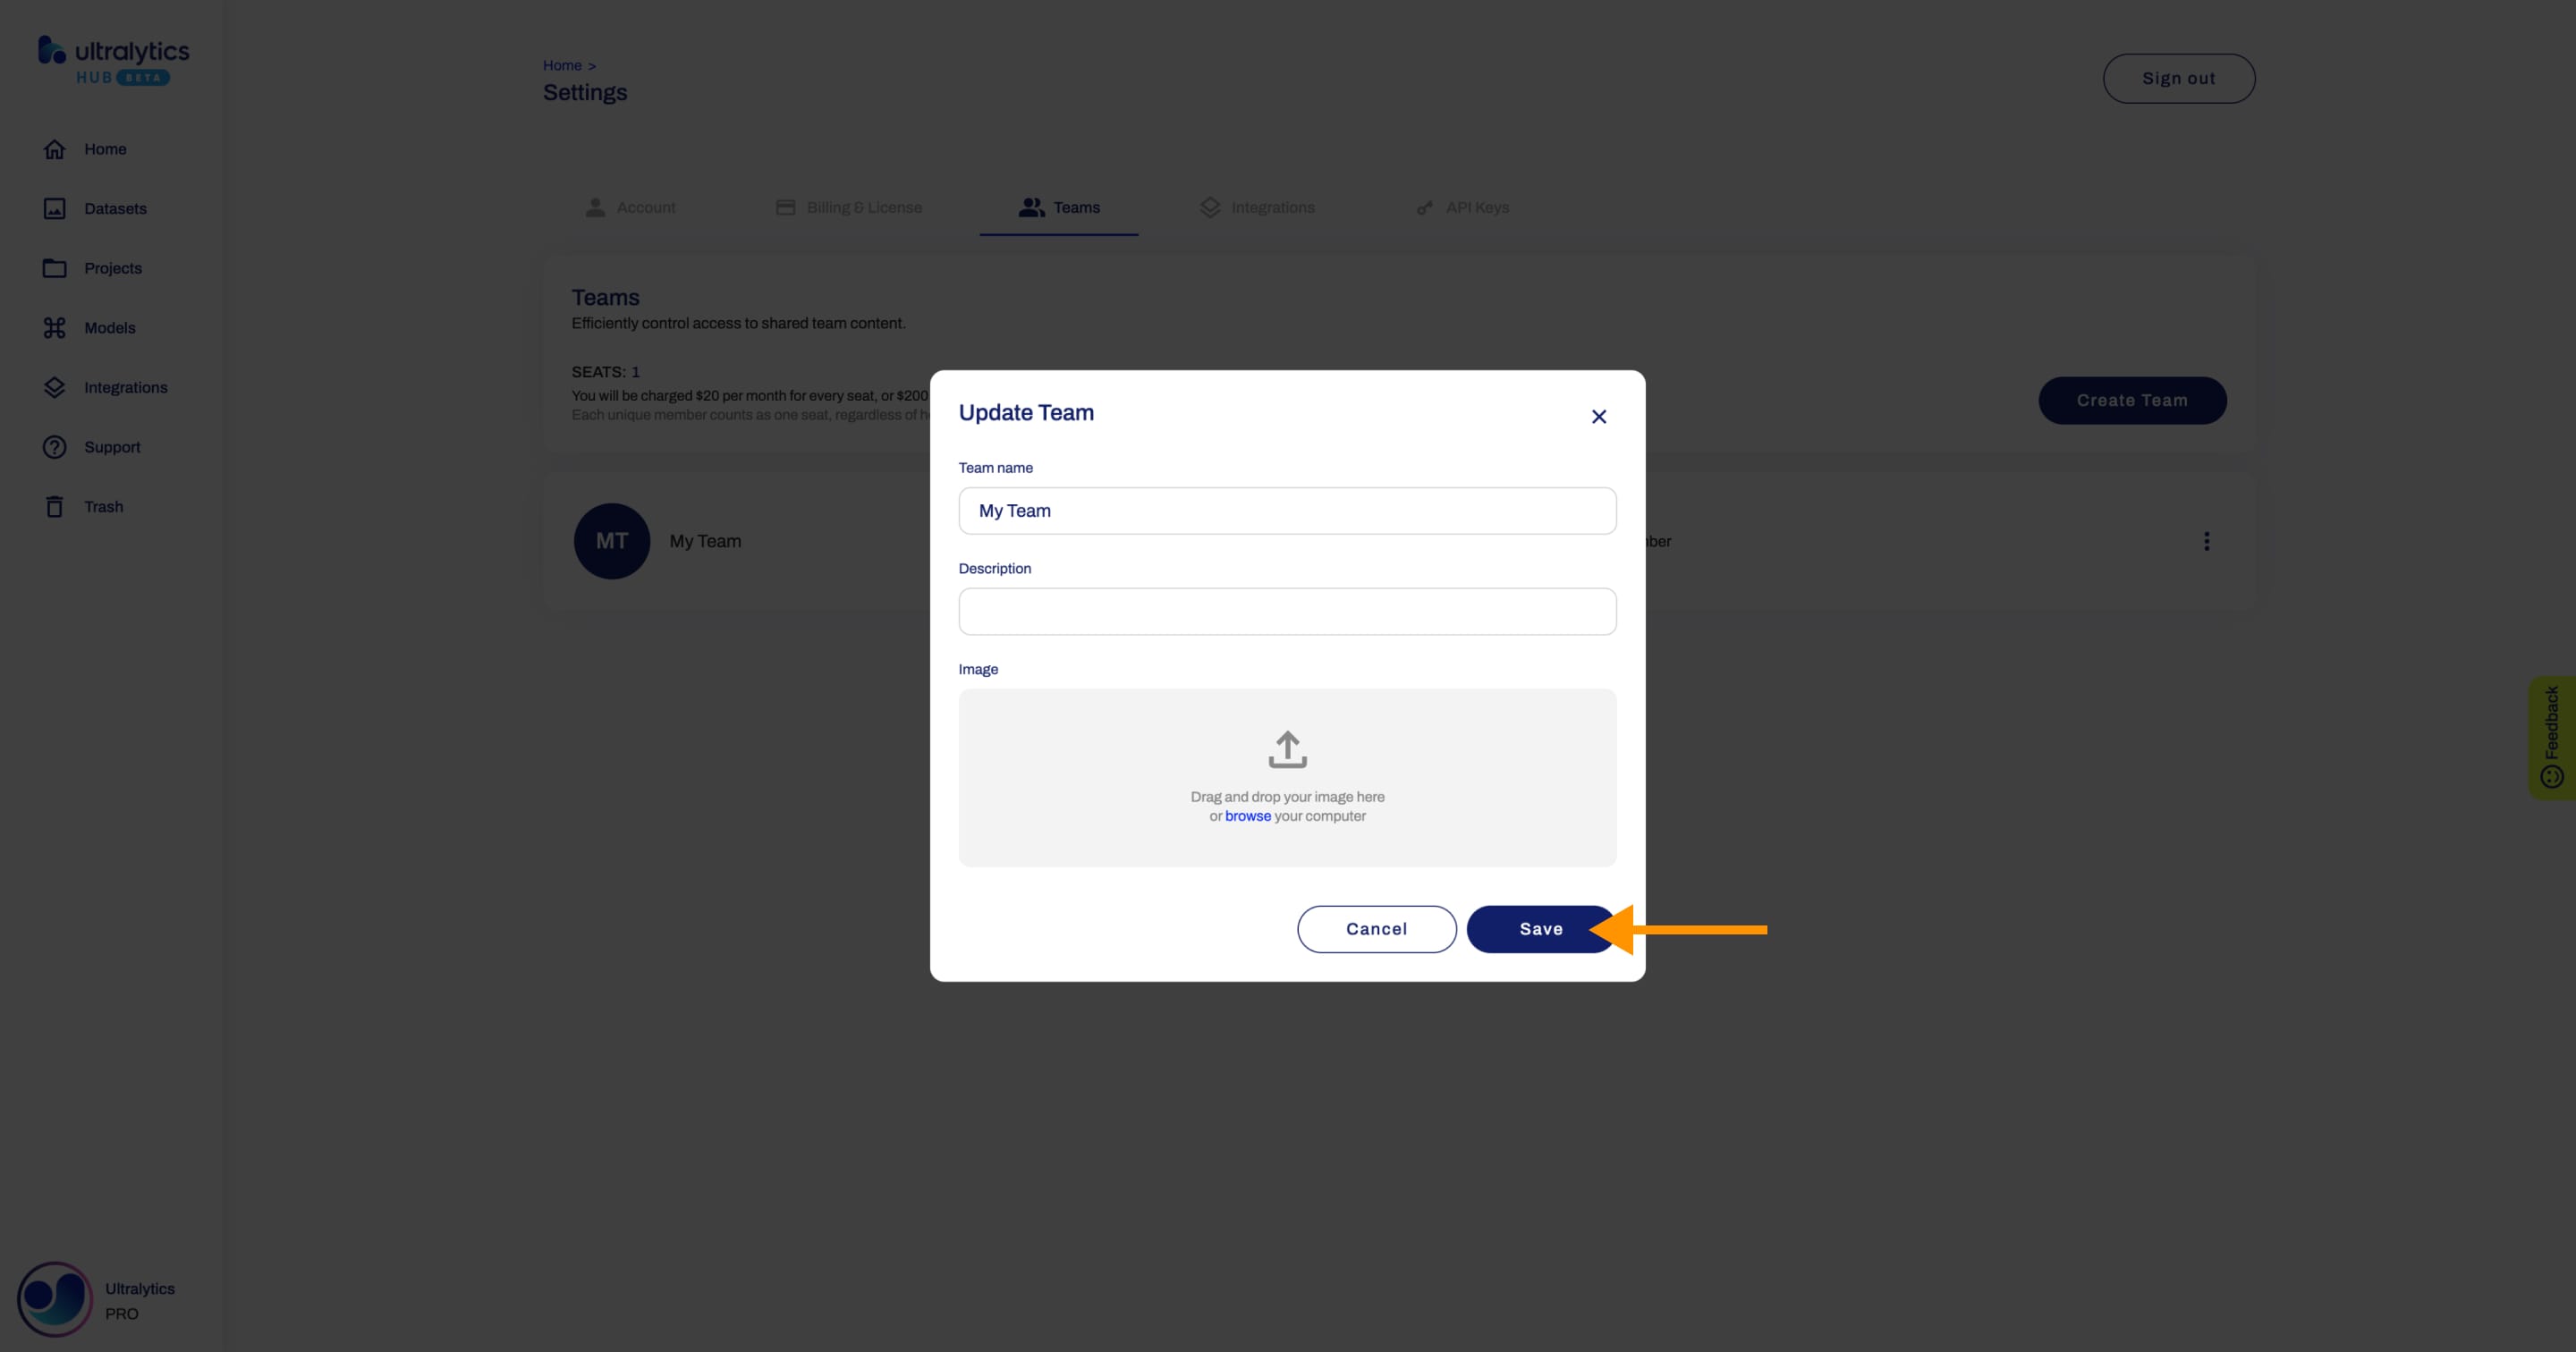
Navigate to the Teams page, open the team actions dropdown of team you want to edit and click on the Edit option. This action will trigger the Update Team dialog.
Apply the desired modifications to your team and then confirm the changes by clicking Save.
Delete Team
Navigate to the Teams page, open the team actions dropdown of team you want to delete and click on the Delete option.

!!! Warning "Warning"
When deleting a team, the team can't be restored.
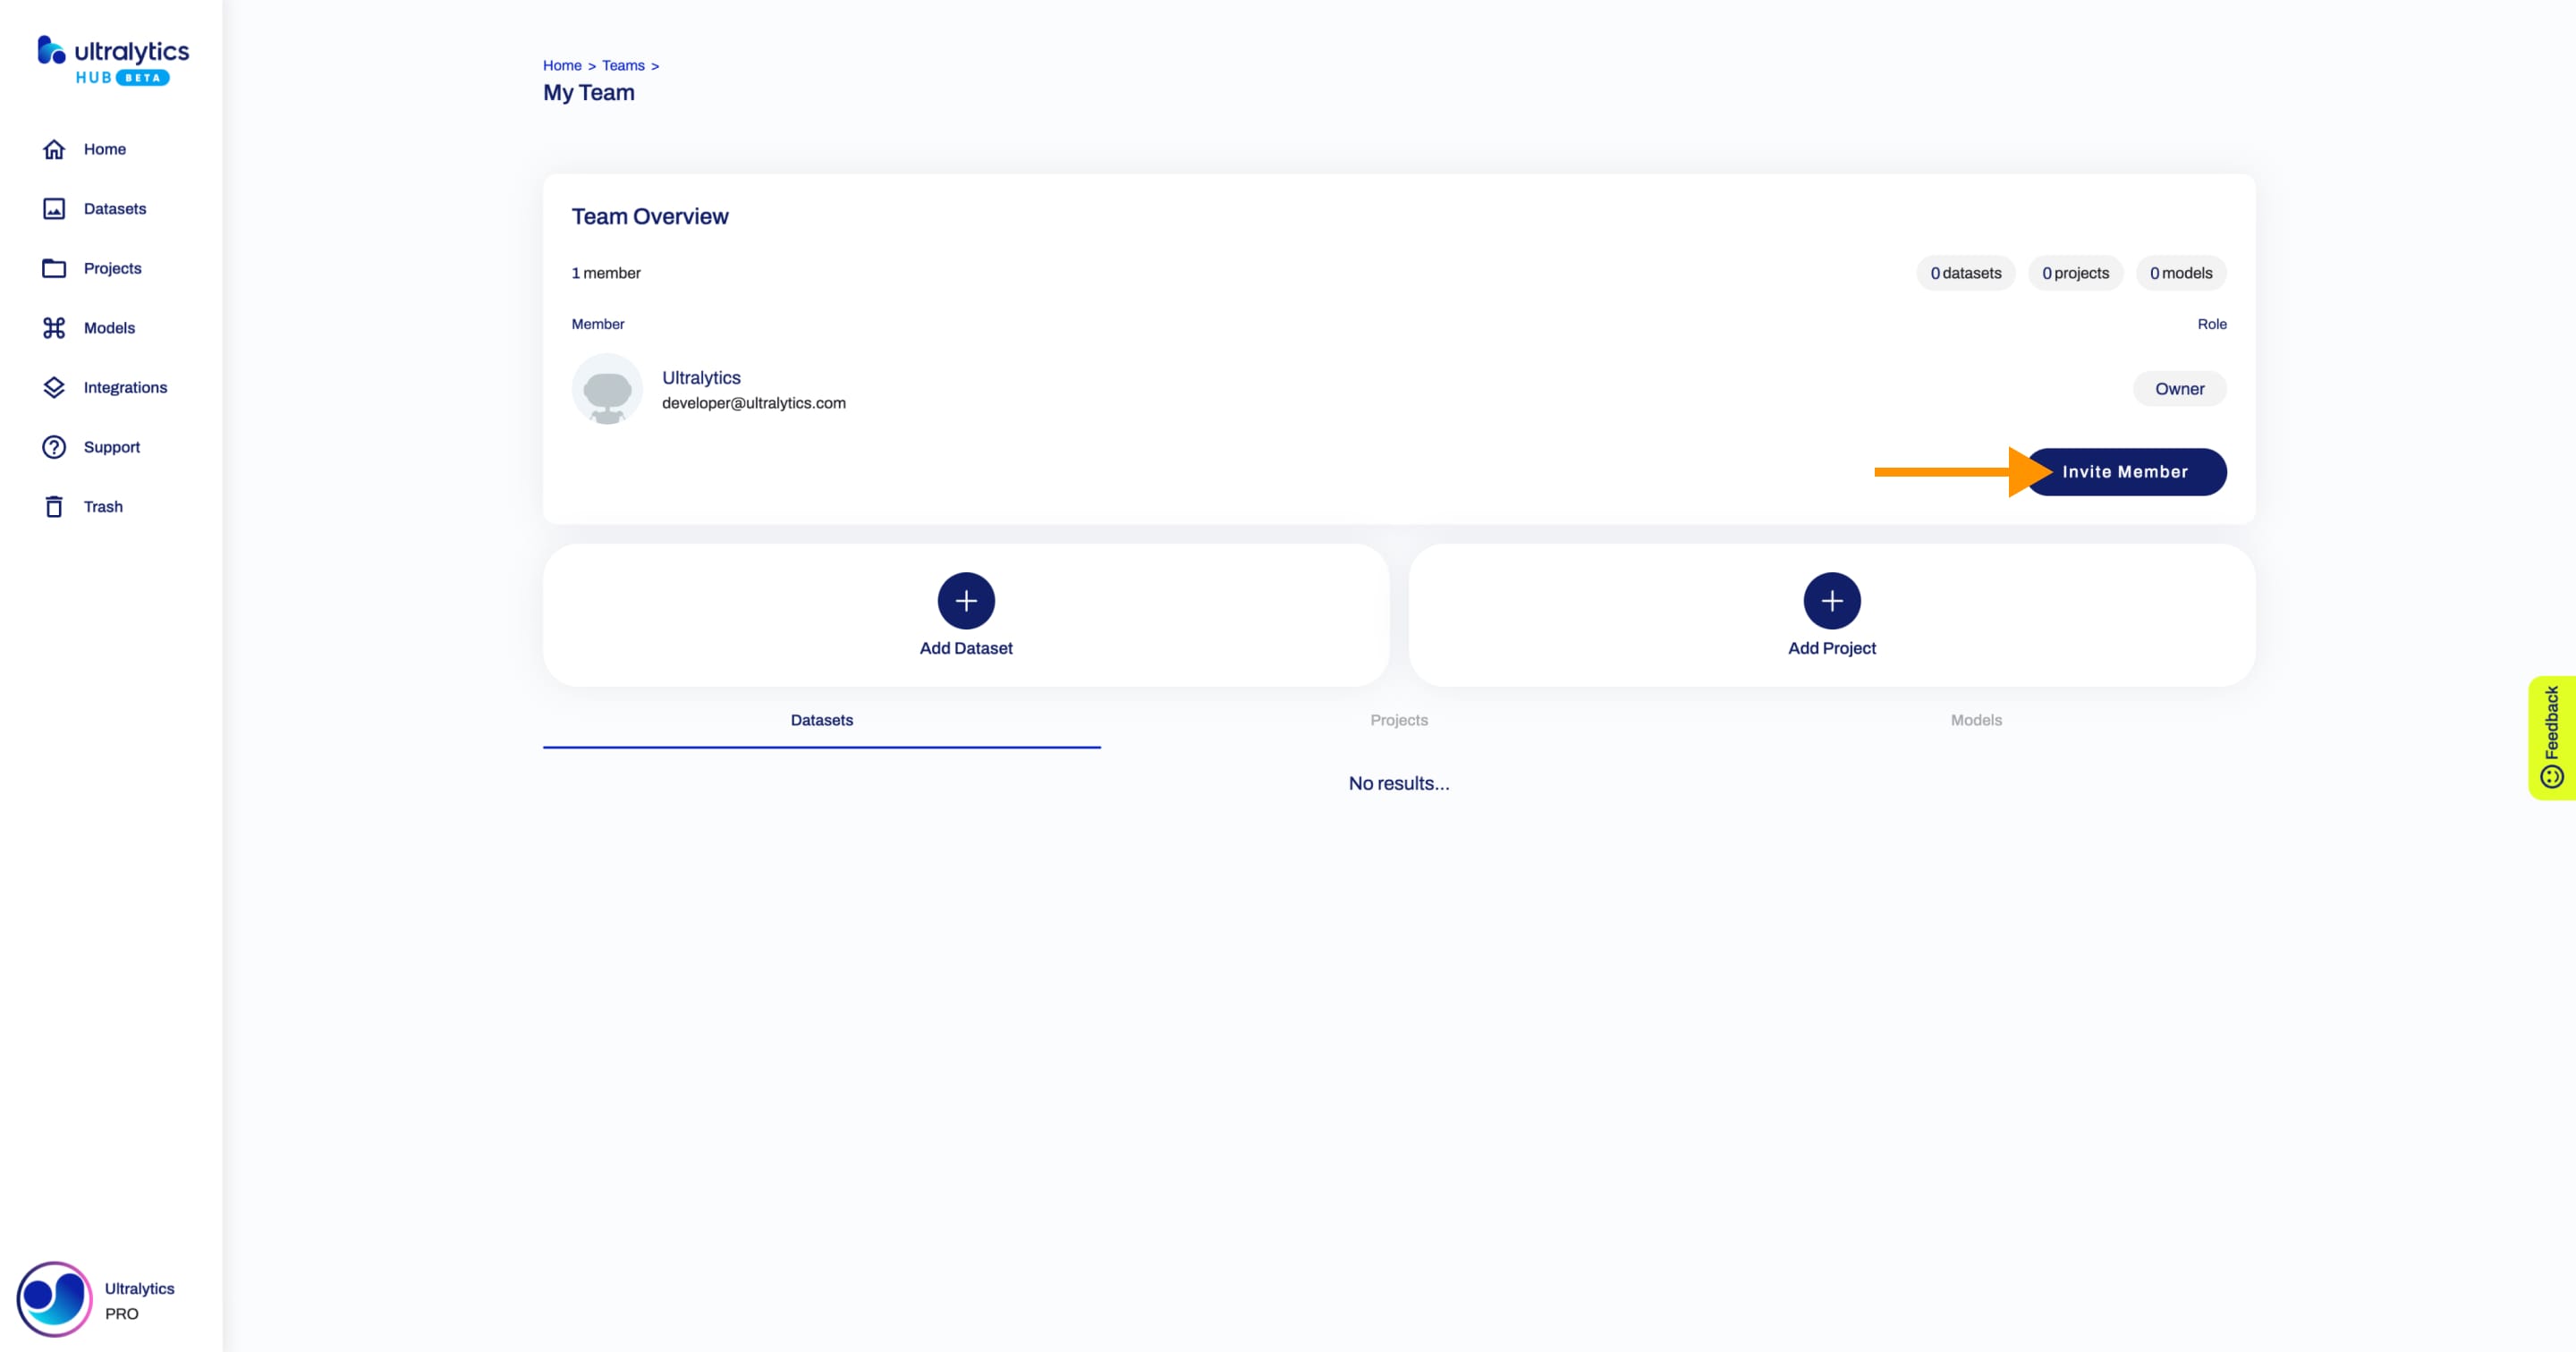
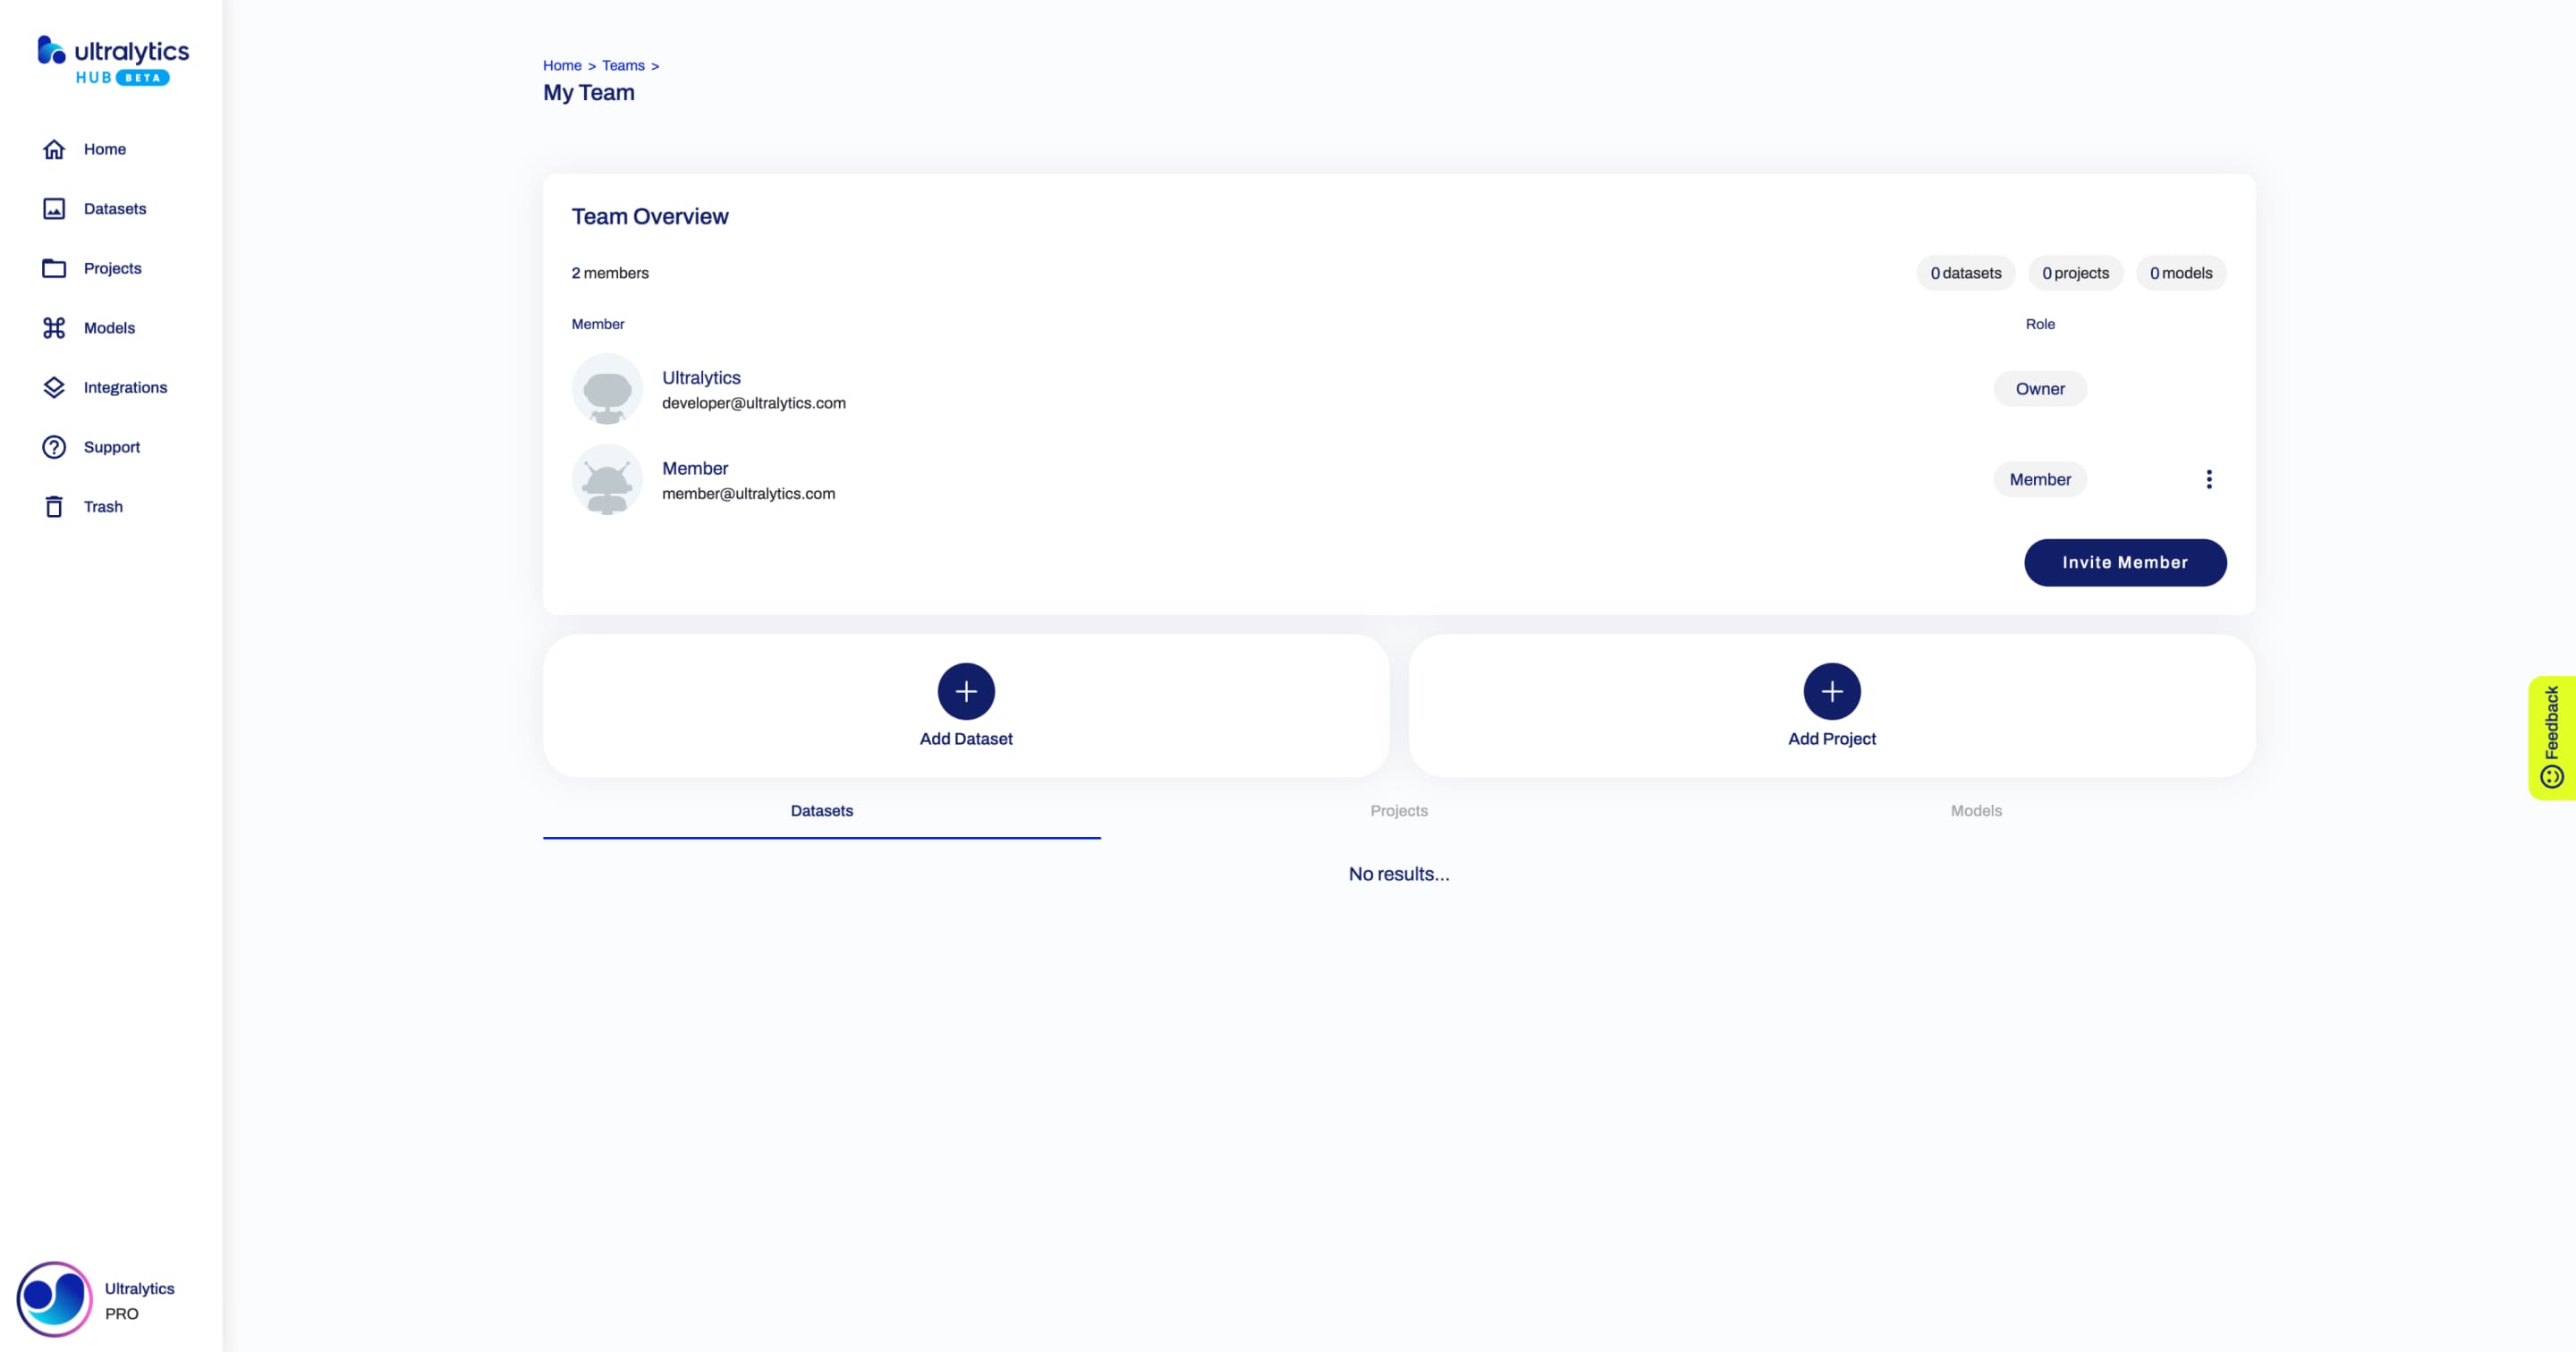
Invite Member
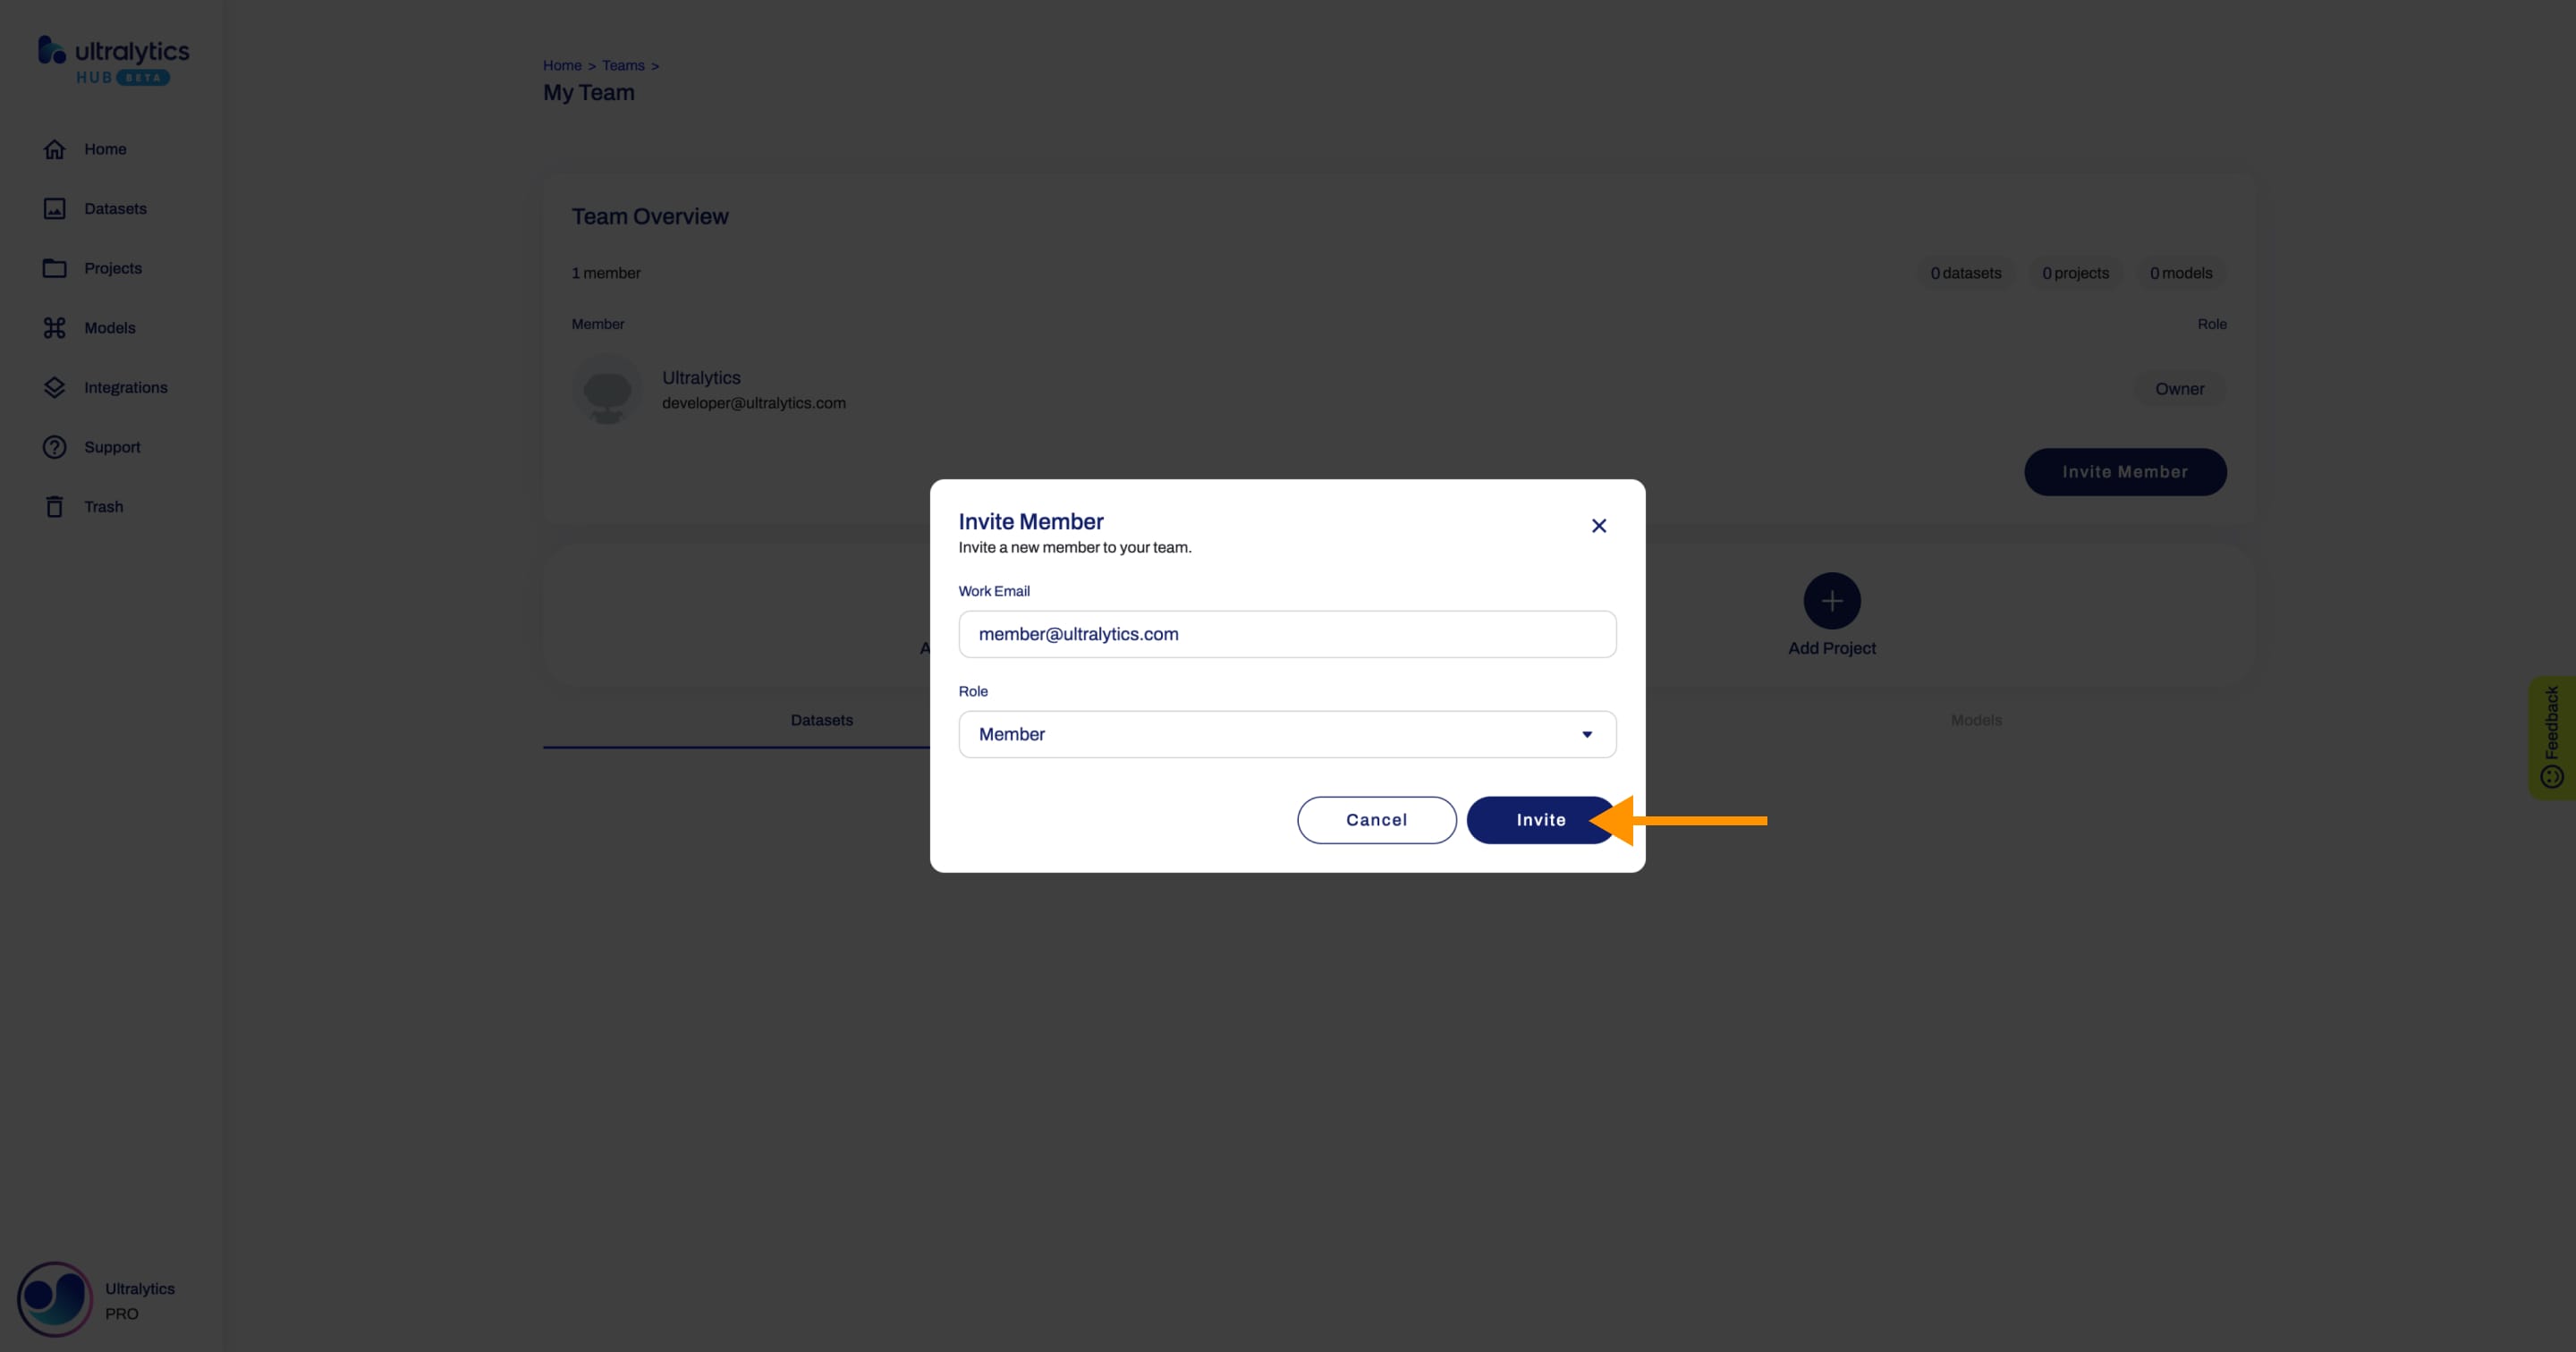
Navigate to the Team page of the team to which you want to add a new member and click on the Invite Member button. This action will trigger the Invite Member dialog.
Type the email and select the role of the new member and click Invite.
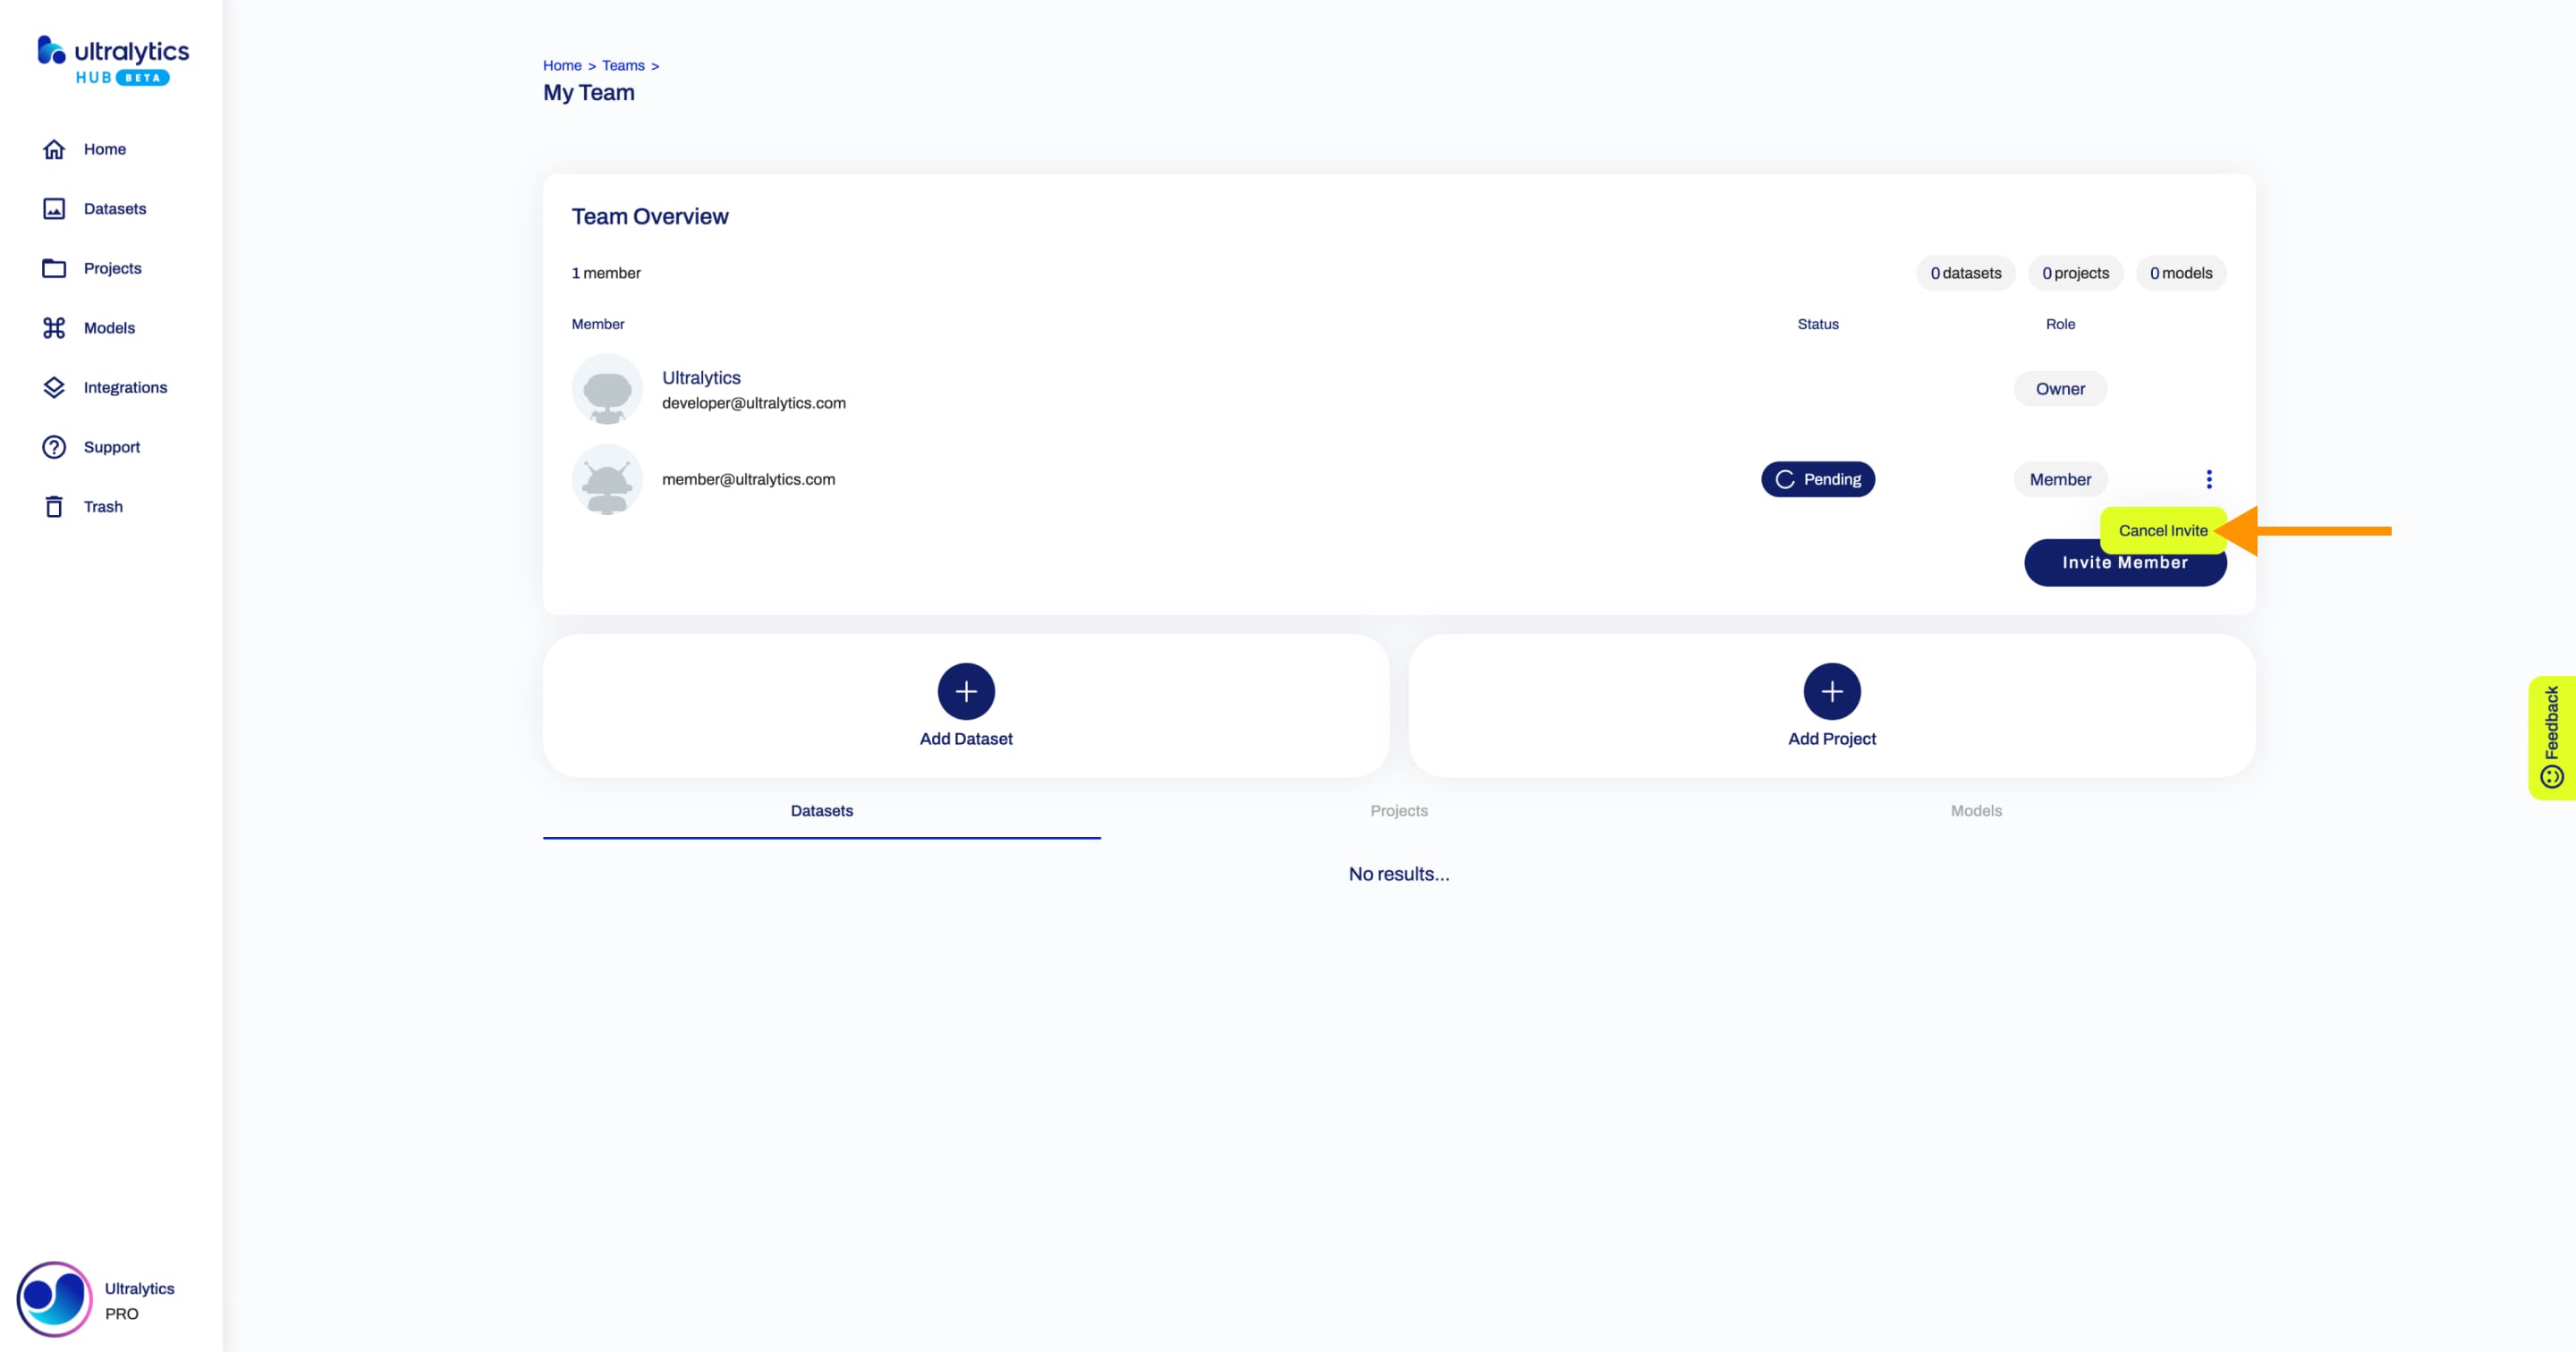
??? tip "Tip"
You can cancel the invite before the new member accepts it.
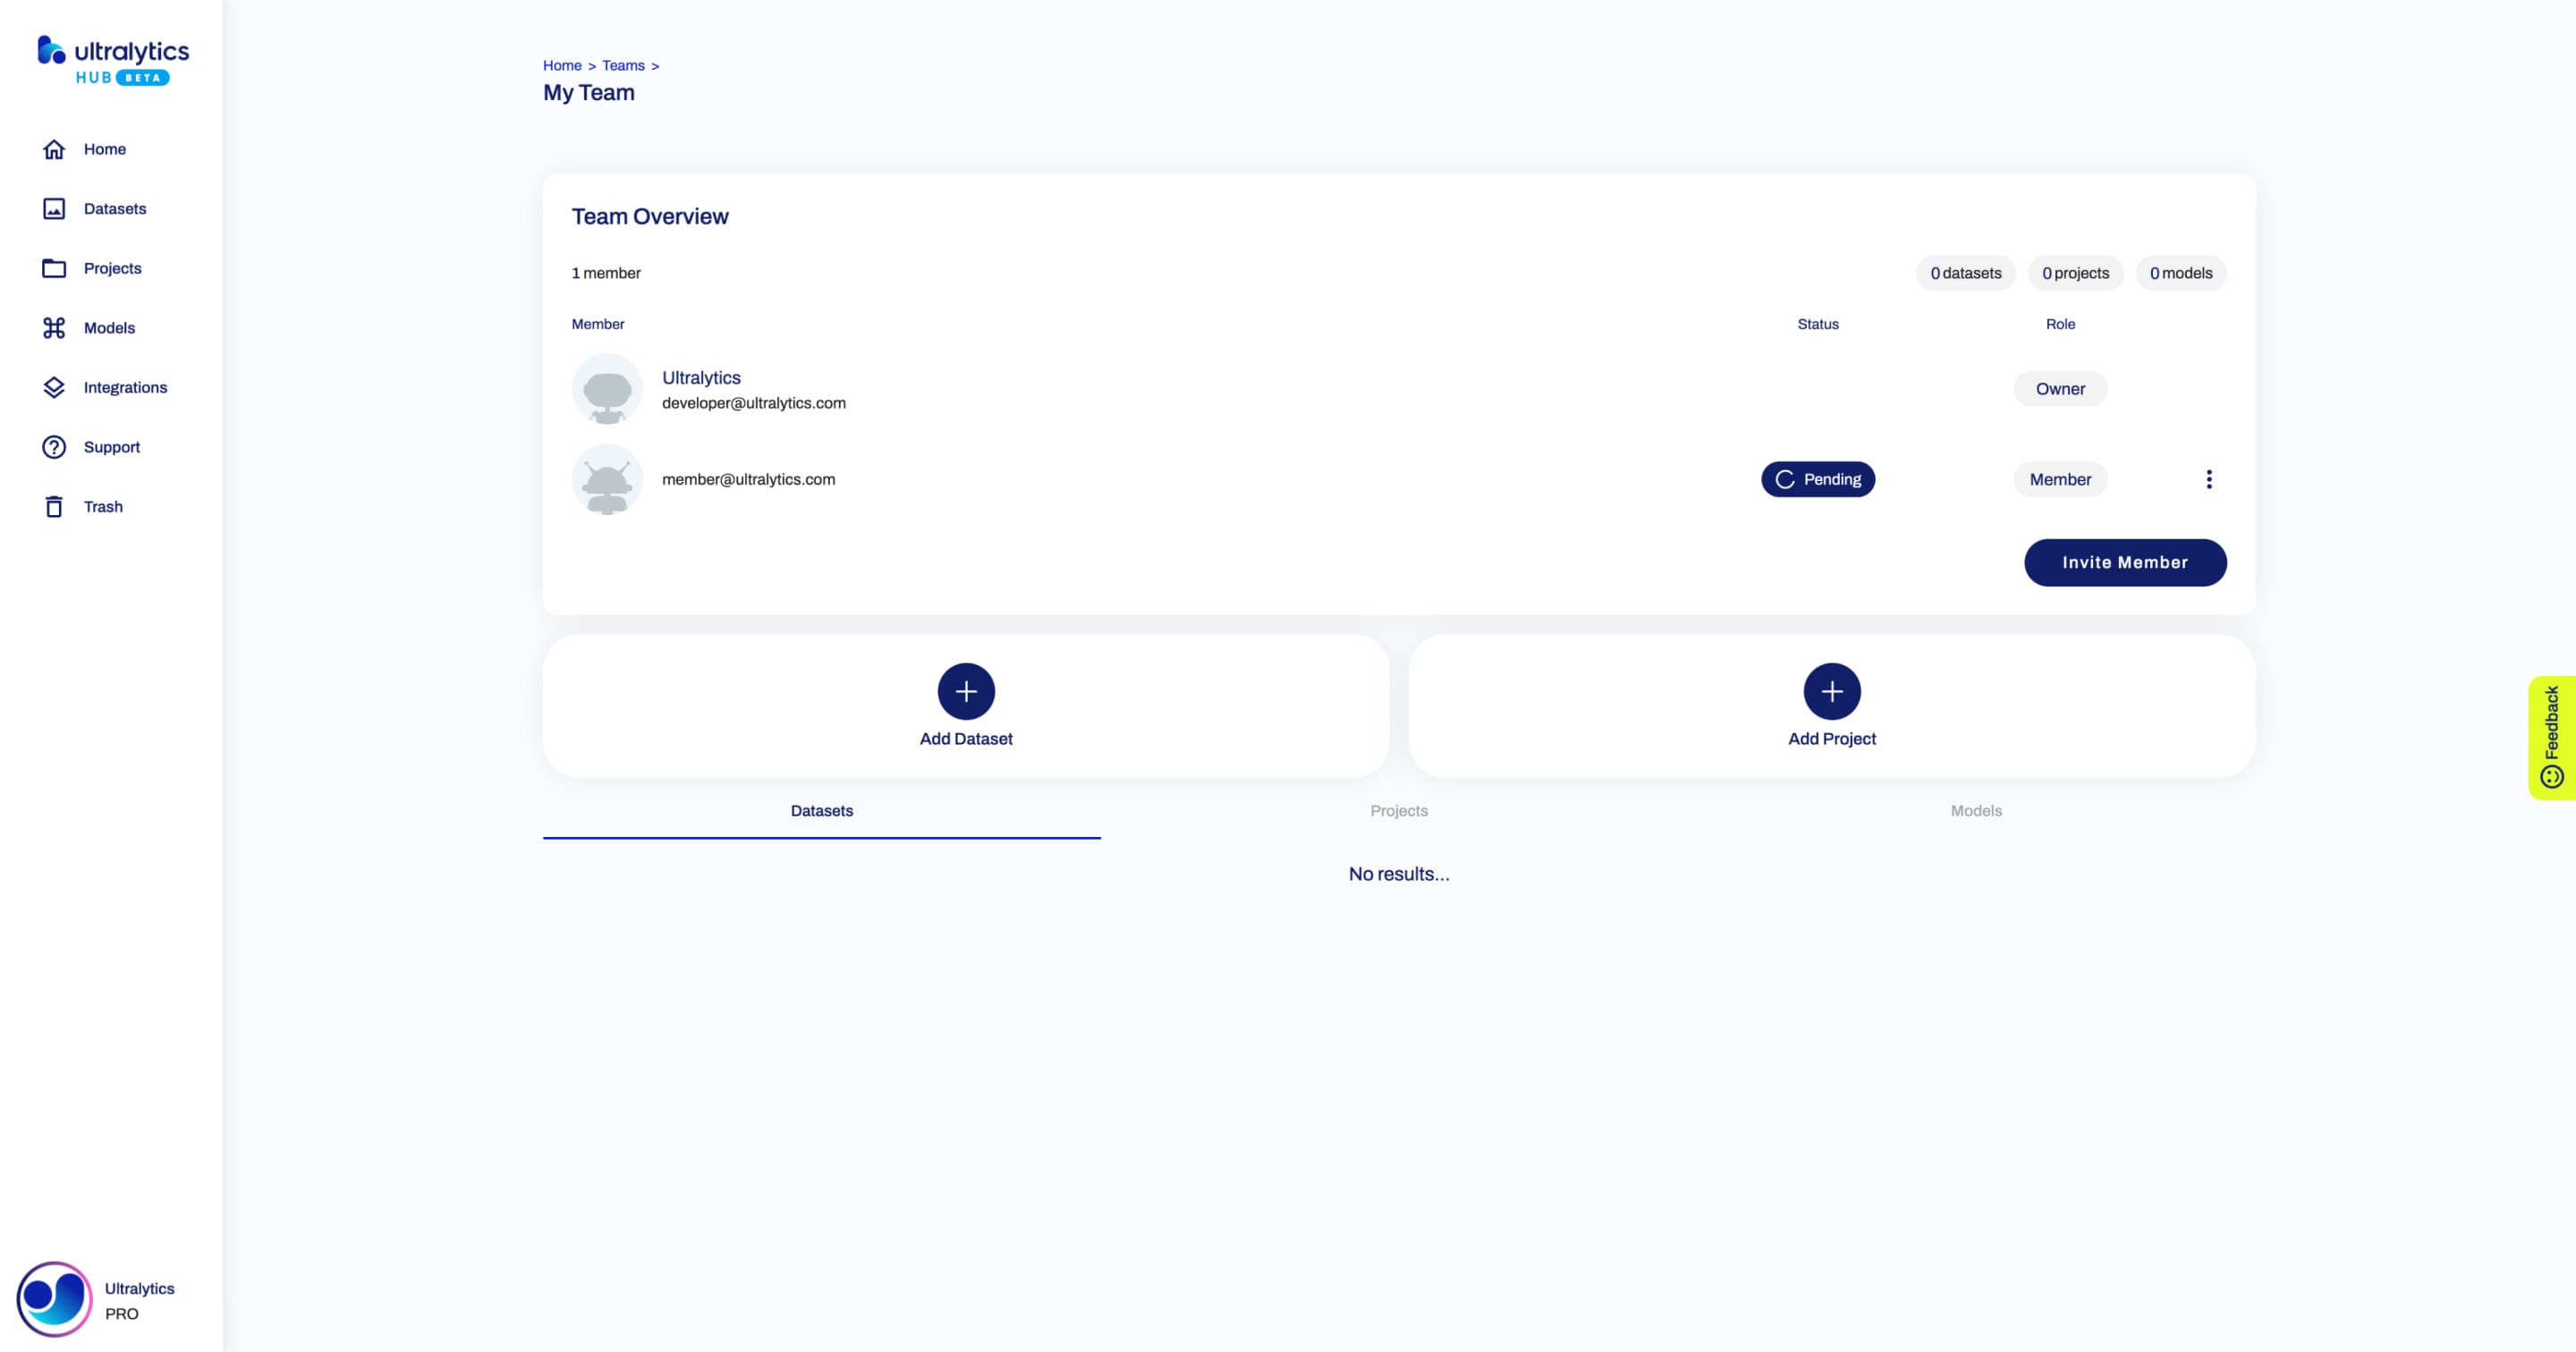
The Pending status disappears after the new member accepts the invite.
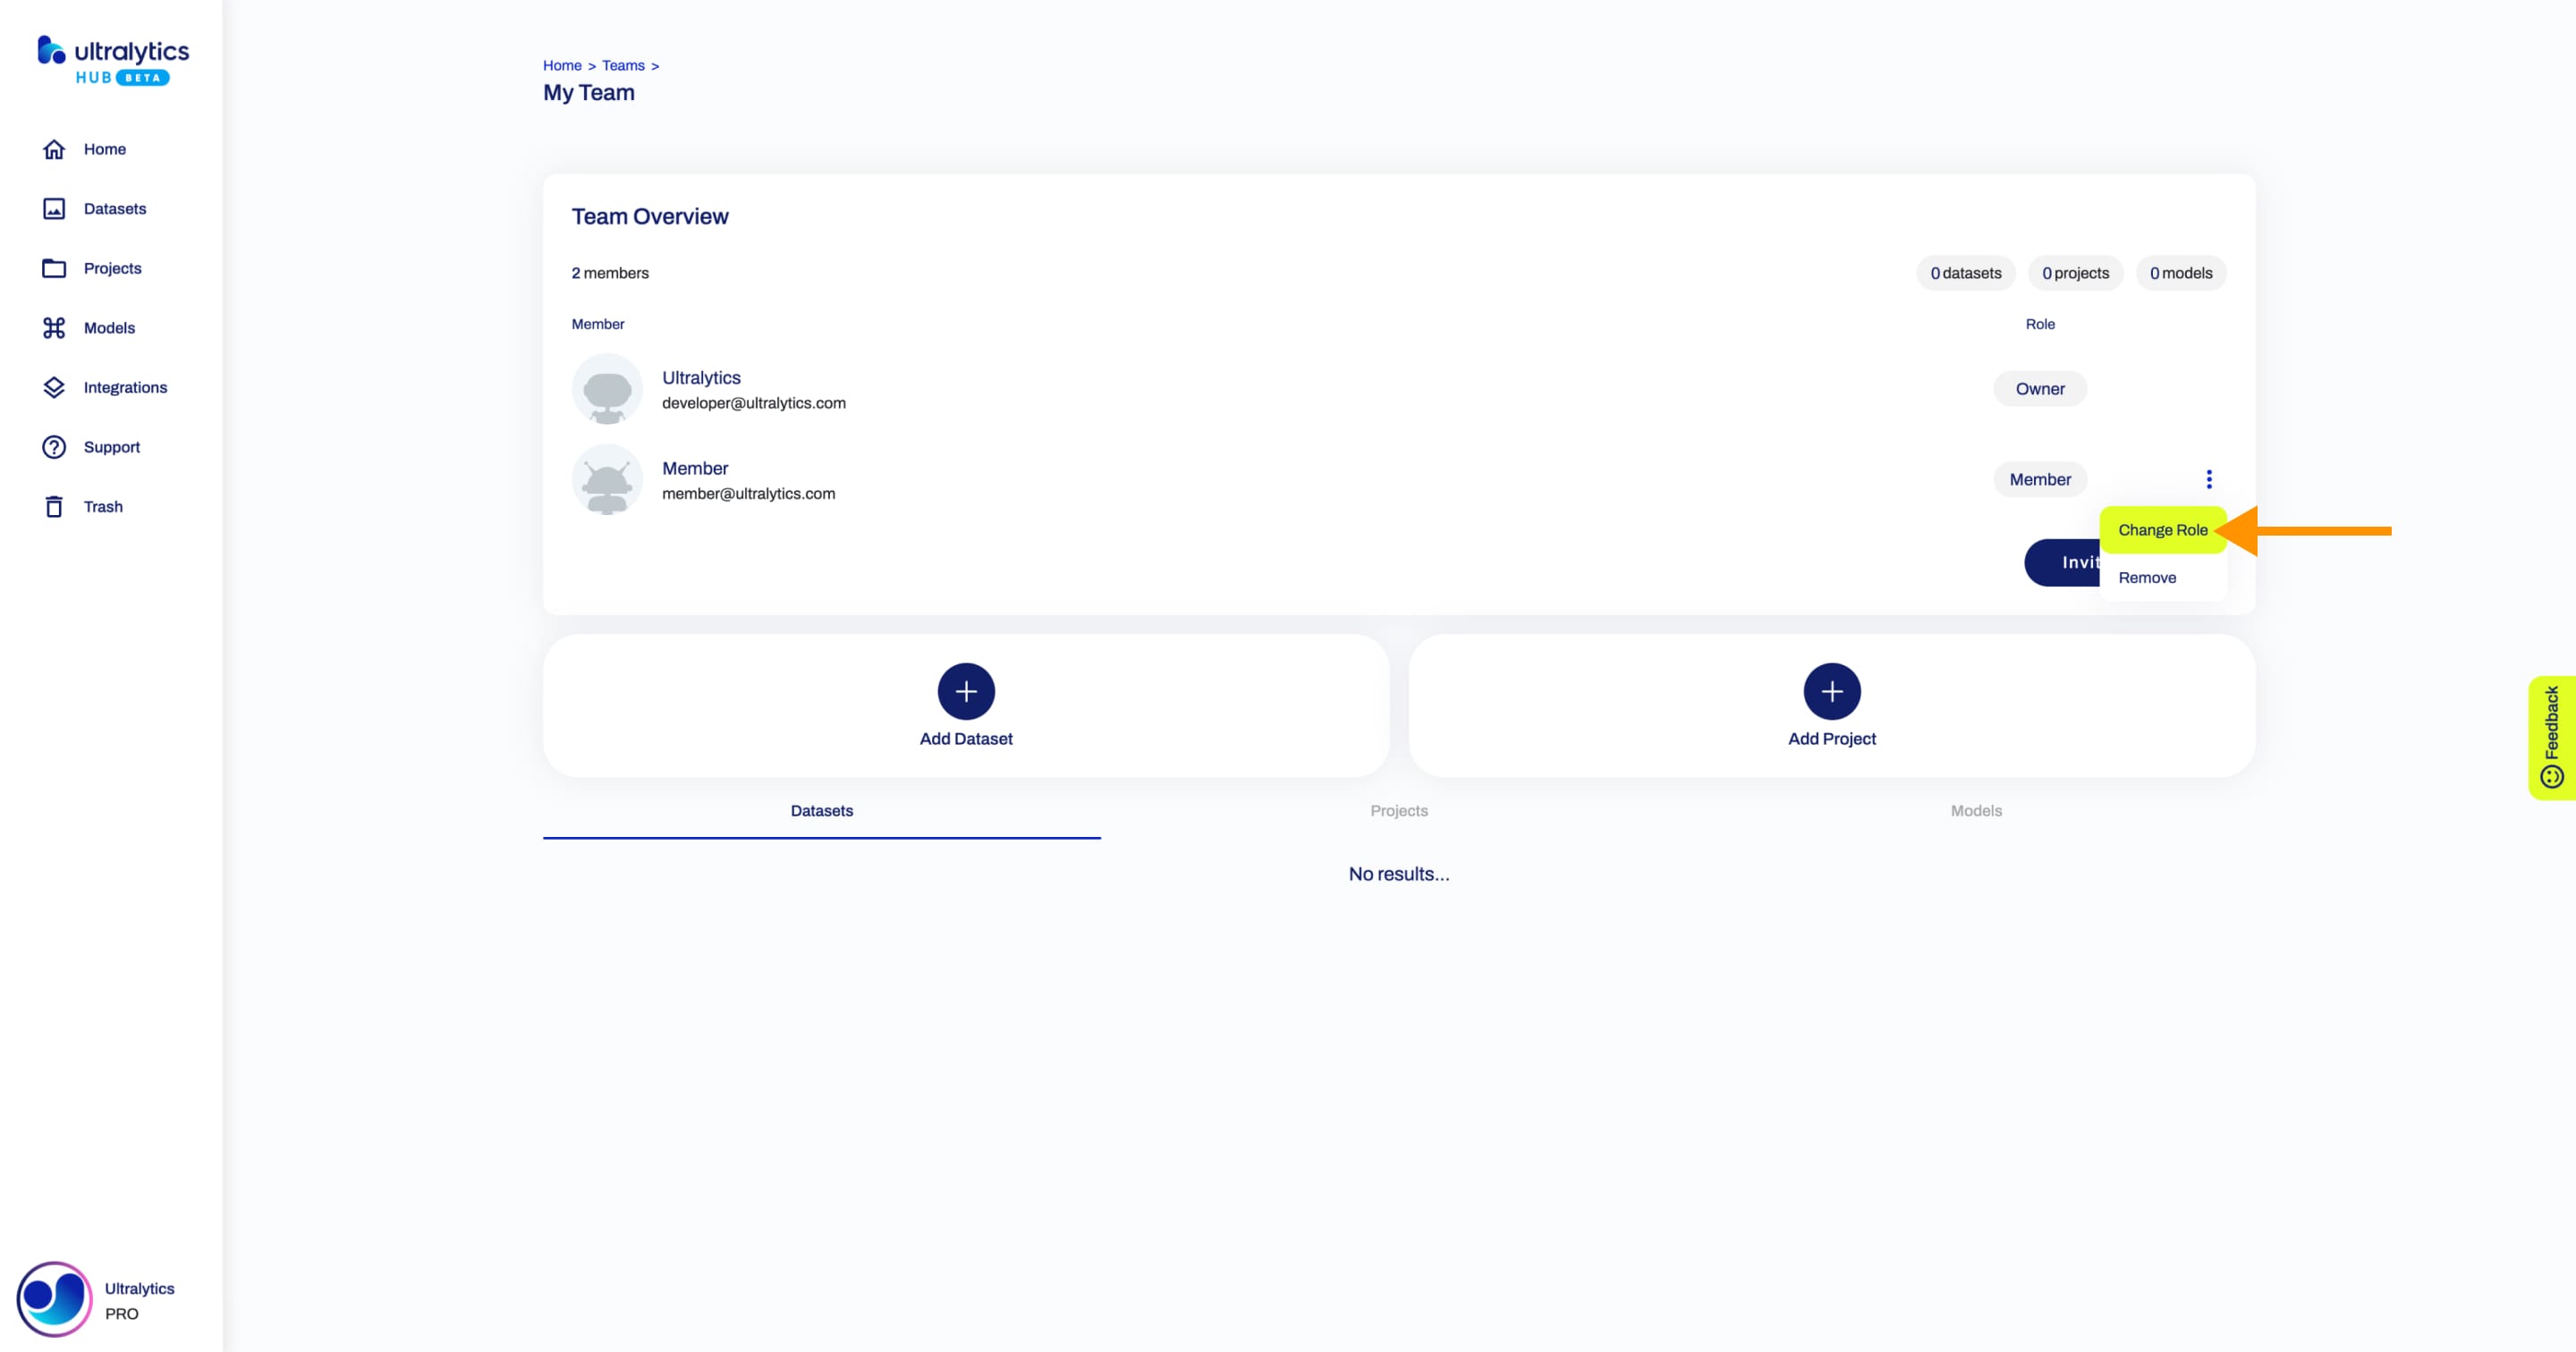
??? tip "Tip"
You can update a member's role at any time.
The **Admin** role allows inviting and removing members, as well as removing shared datasets or projects.
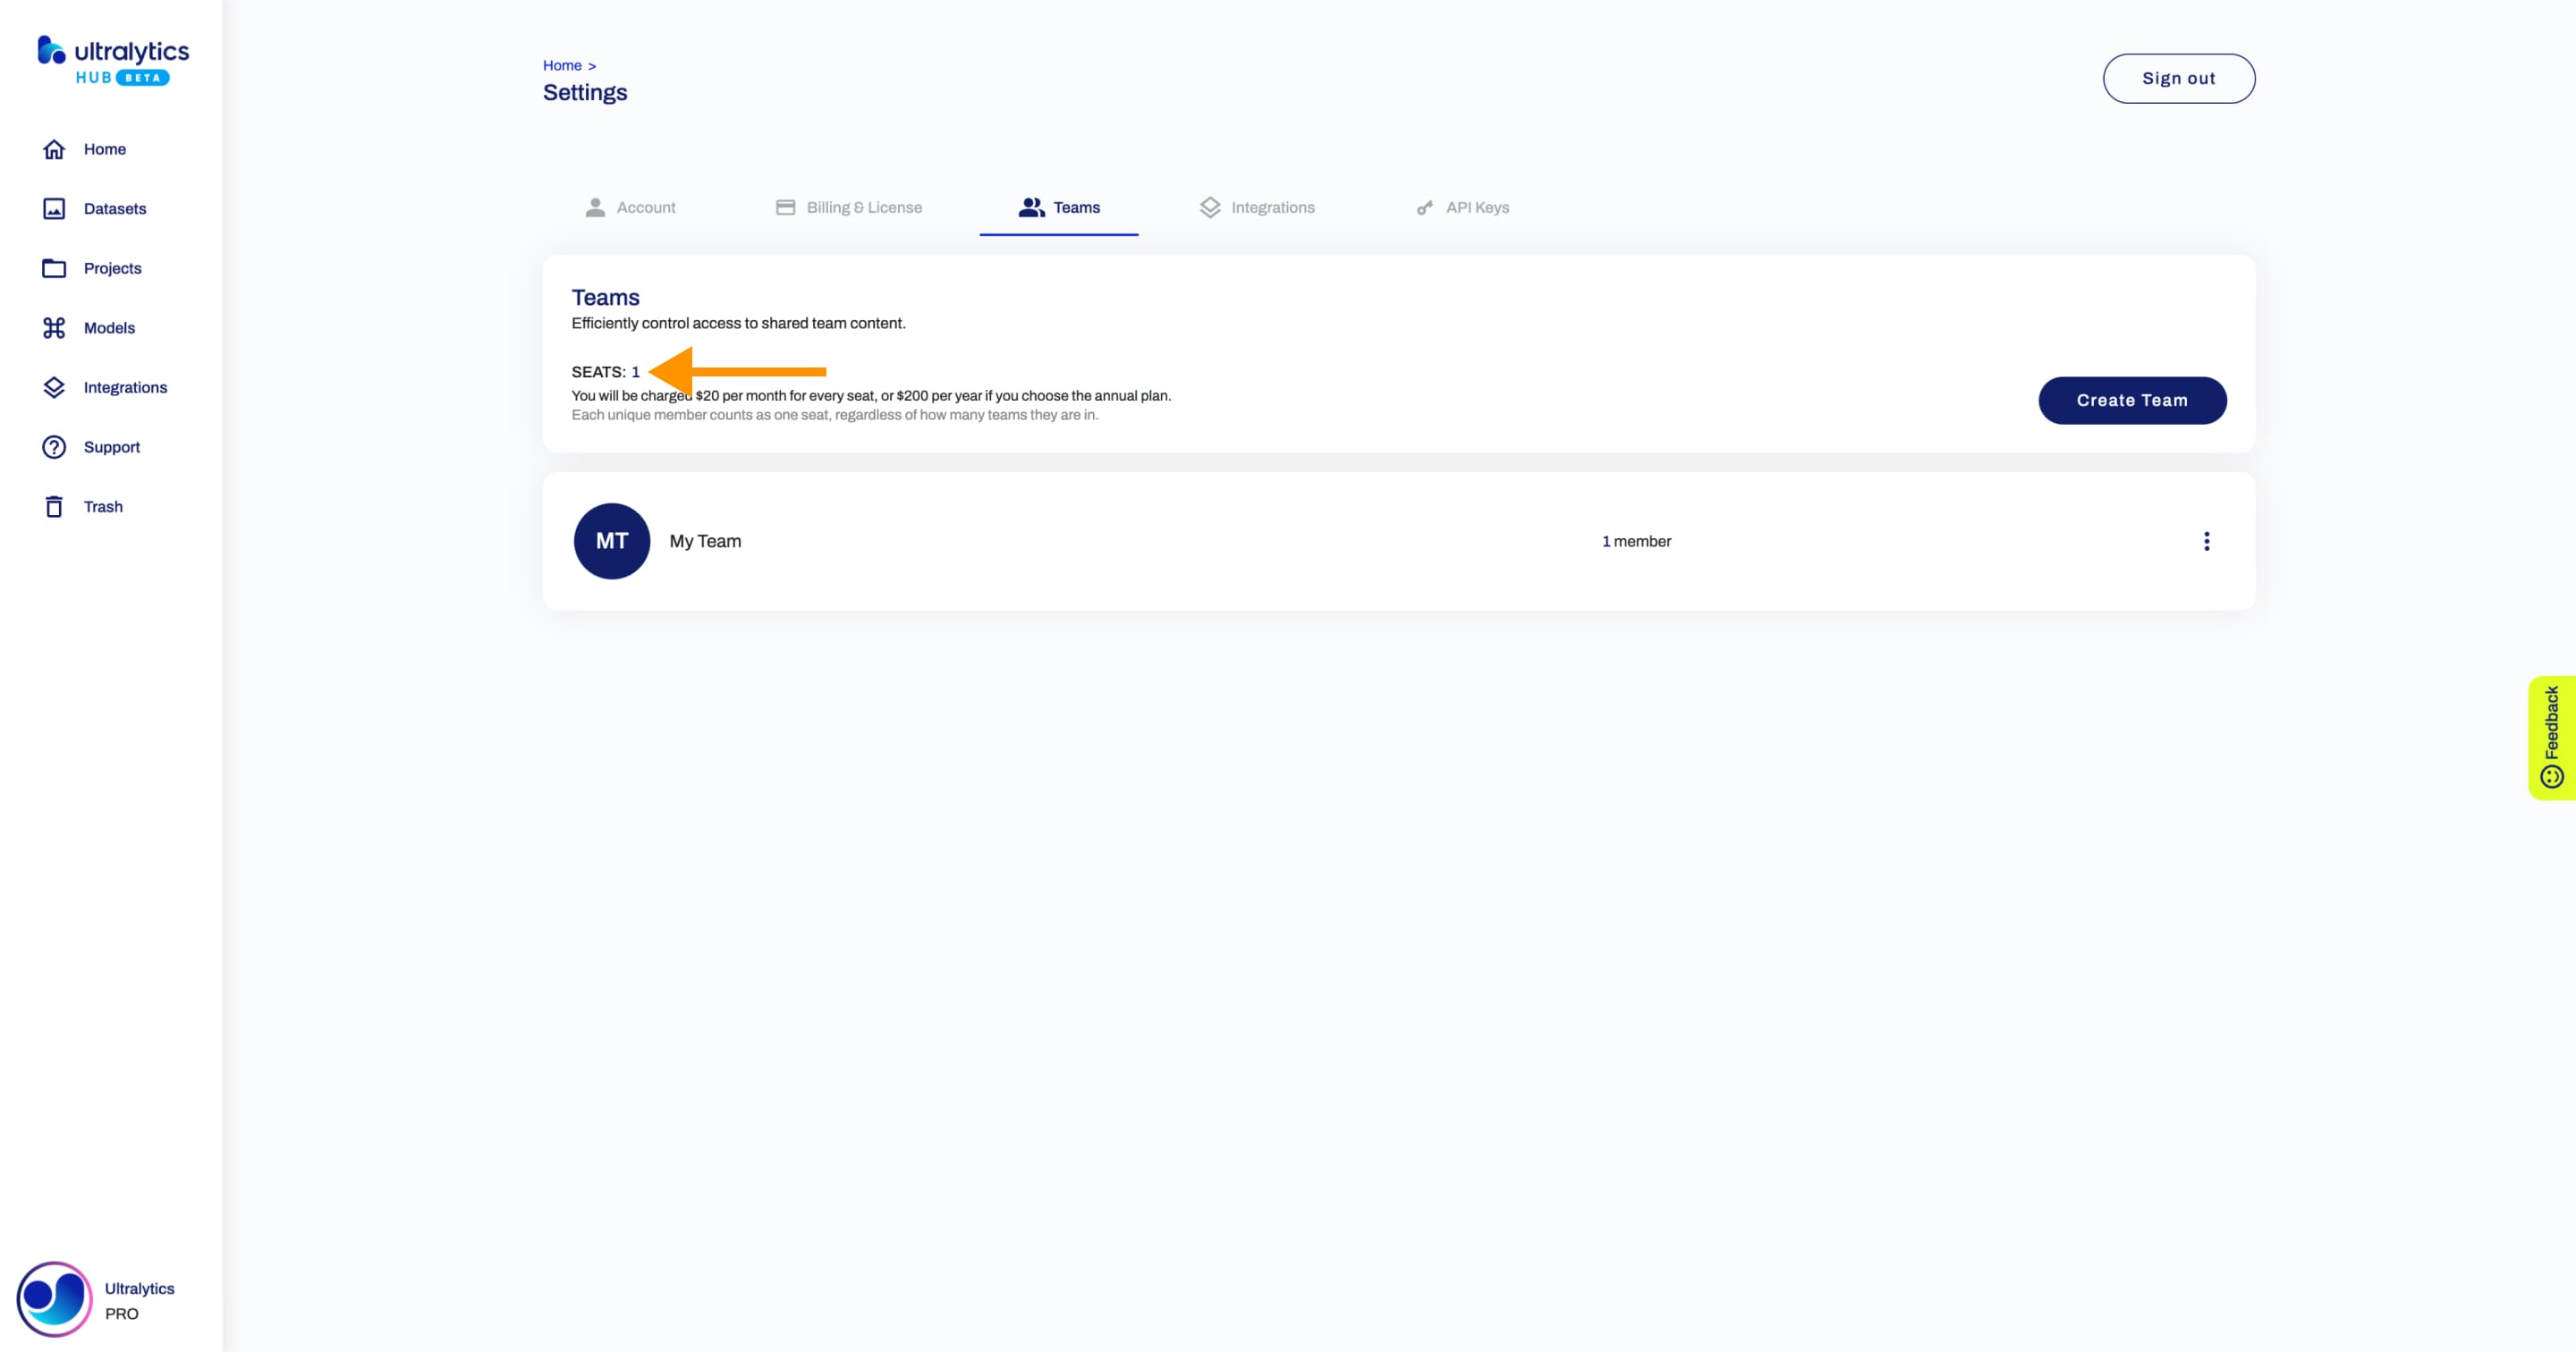
Seats
The Pro Plan offers one free seat (yours).
When a new unique member joins one of your teams, the number of seats increases, and you will be charged $20 per month for each seat, or $200 per year if you choose the annual plan.
Each unique member counts as one seat, regardless of how many teams they are in. For example, if John Doe is a member of 5 of your teams, he is using one seat.
When you remove a unique member from the last team they are a member of, the number of seats decreases. The charge is prorated and can be applied to adding other unique members, paying for the Pro Plan, or topping up your account balance.
You can see the number of seats on the Teams page.
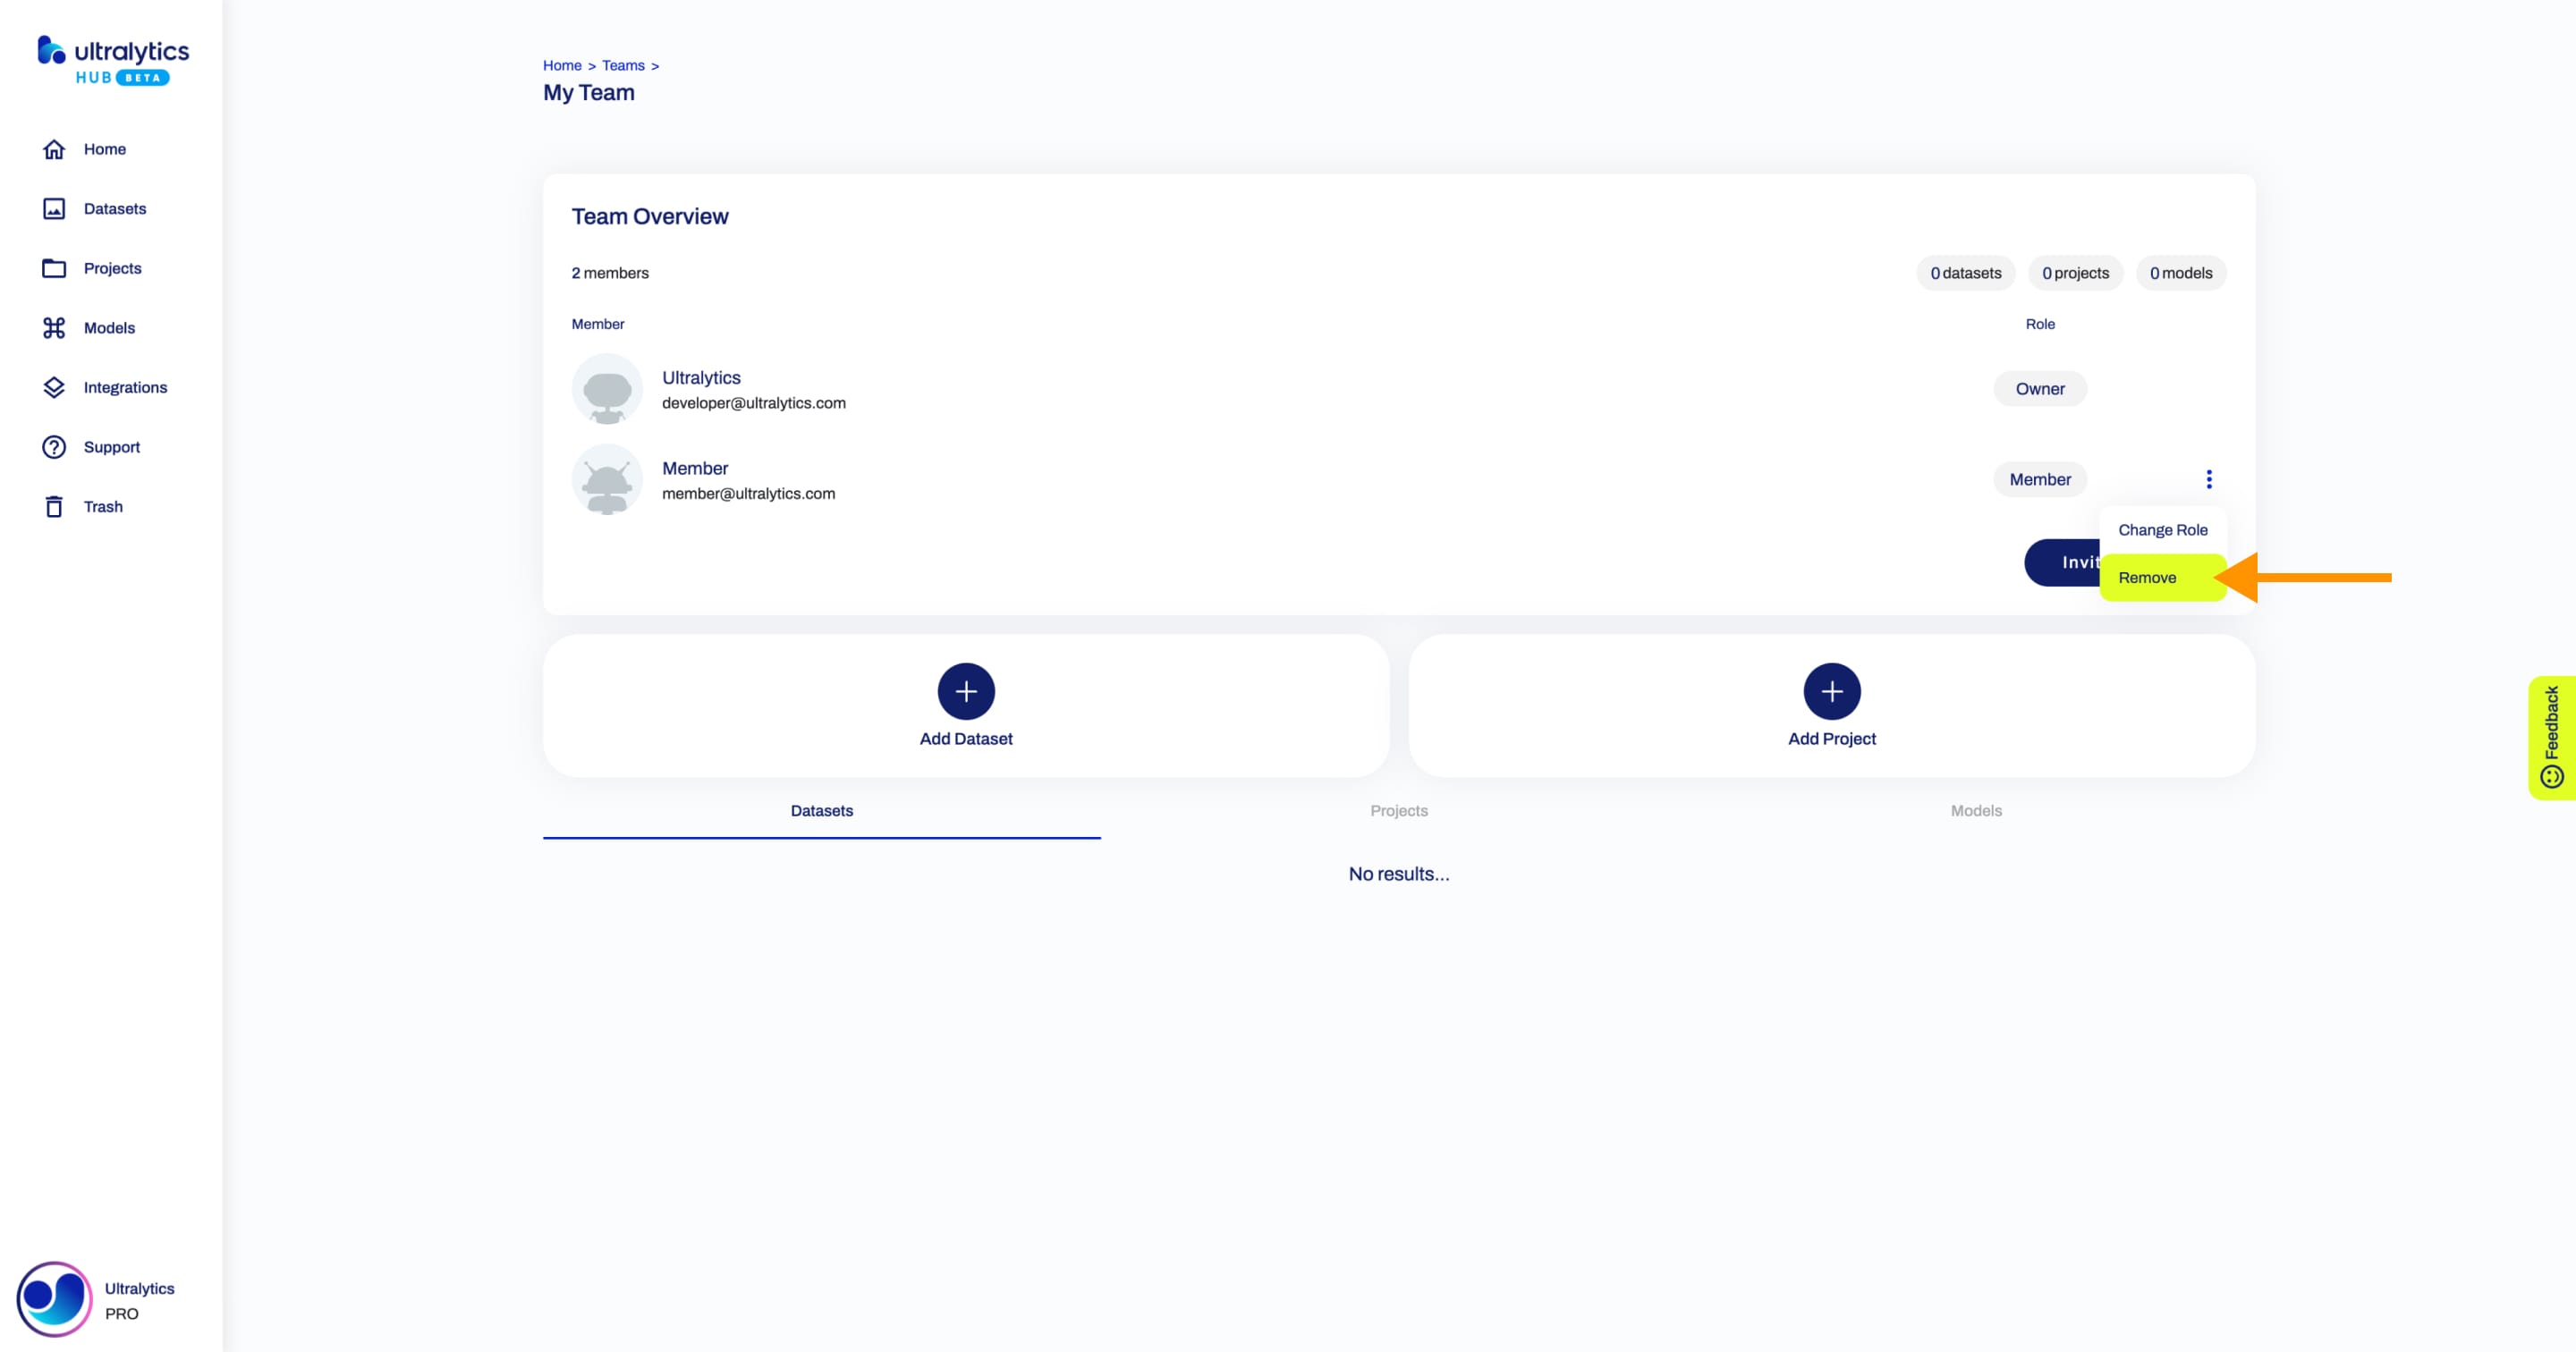
Remove Member
Navigate to the Team page of the team from which you want to remove a member, open the member actions dropdown, and click on the Remove option.
Join Team
When you are invited to a team, you receive an in-app notification.
You can view your notifications by clicking on the View button on the Notifications card on the Home page.
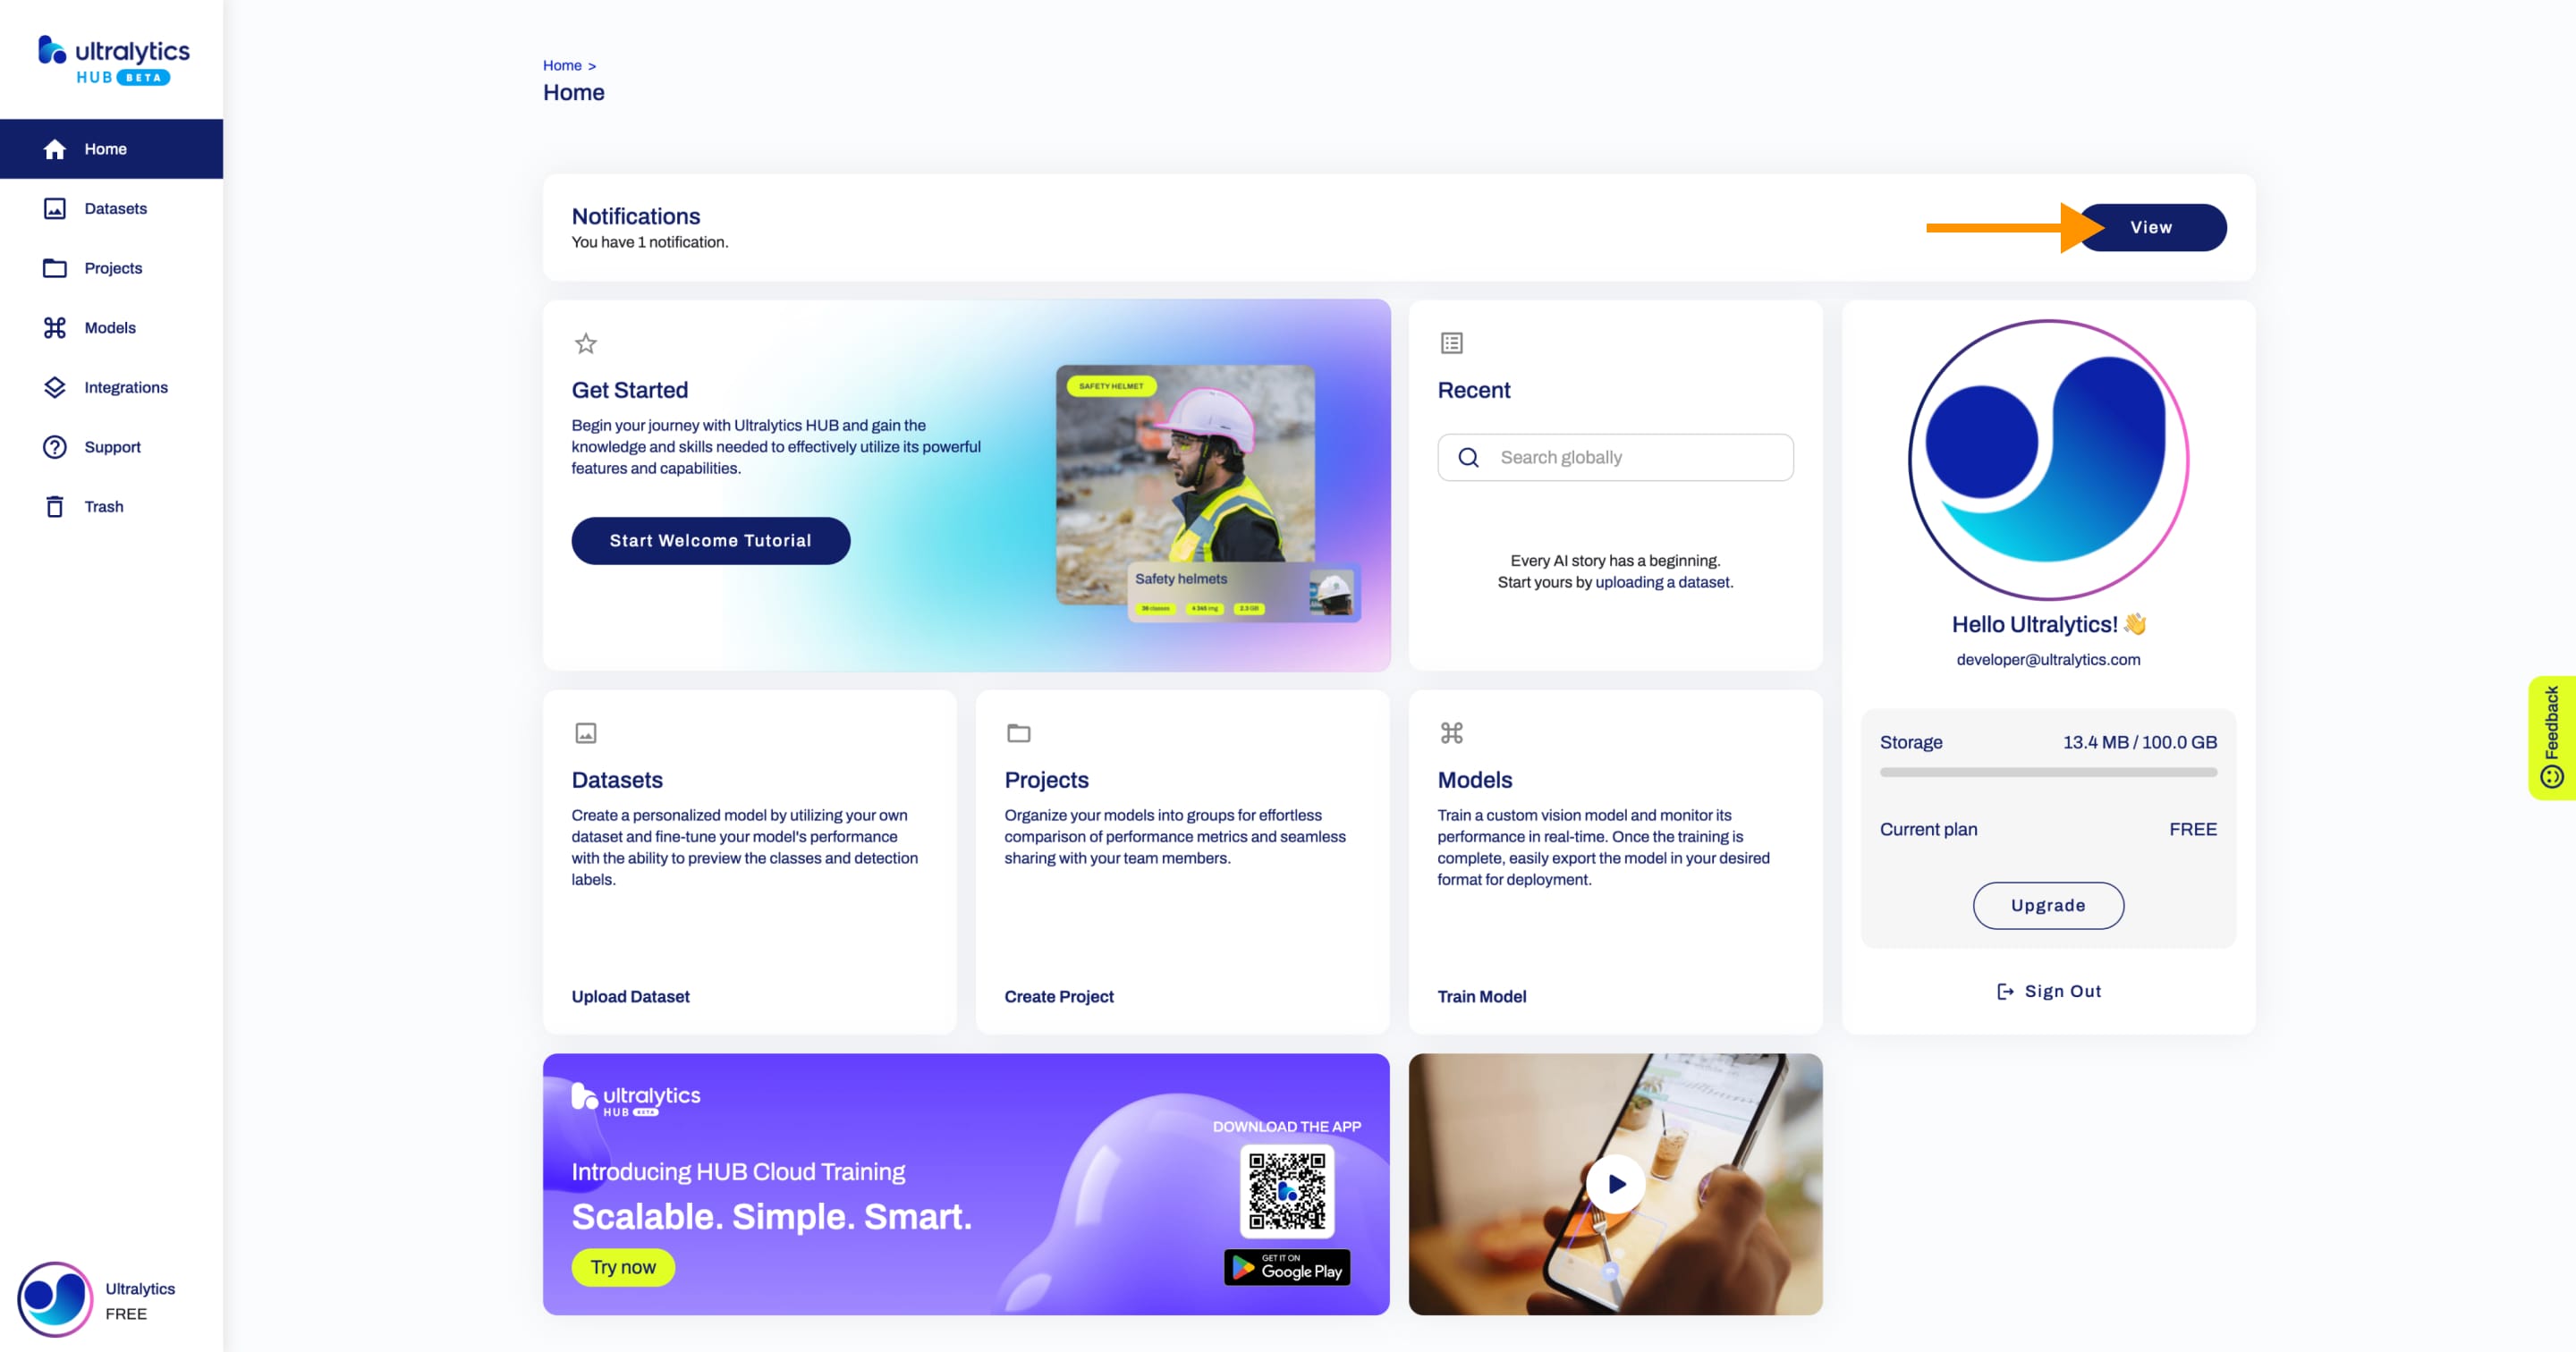
Alternatively, you can view your notifications by accessing the Notifications page directly.
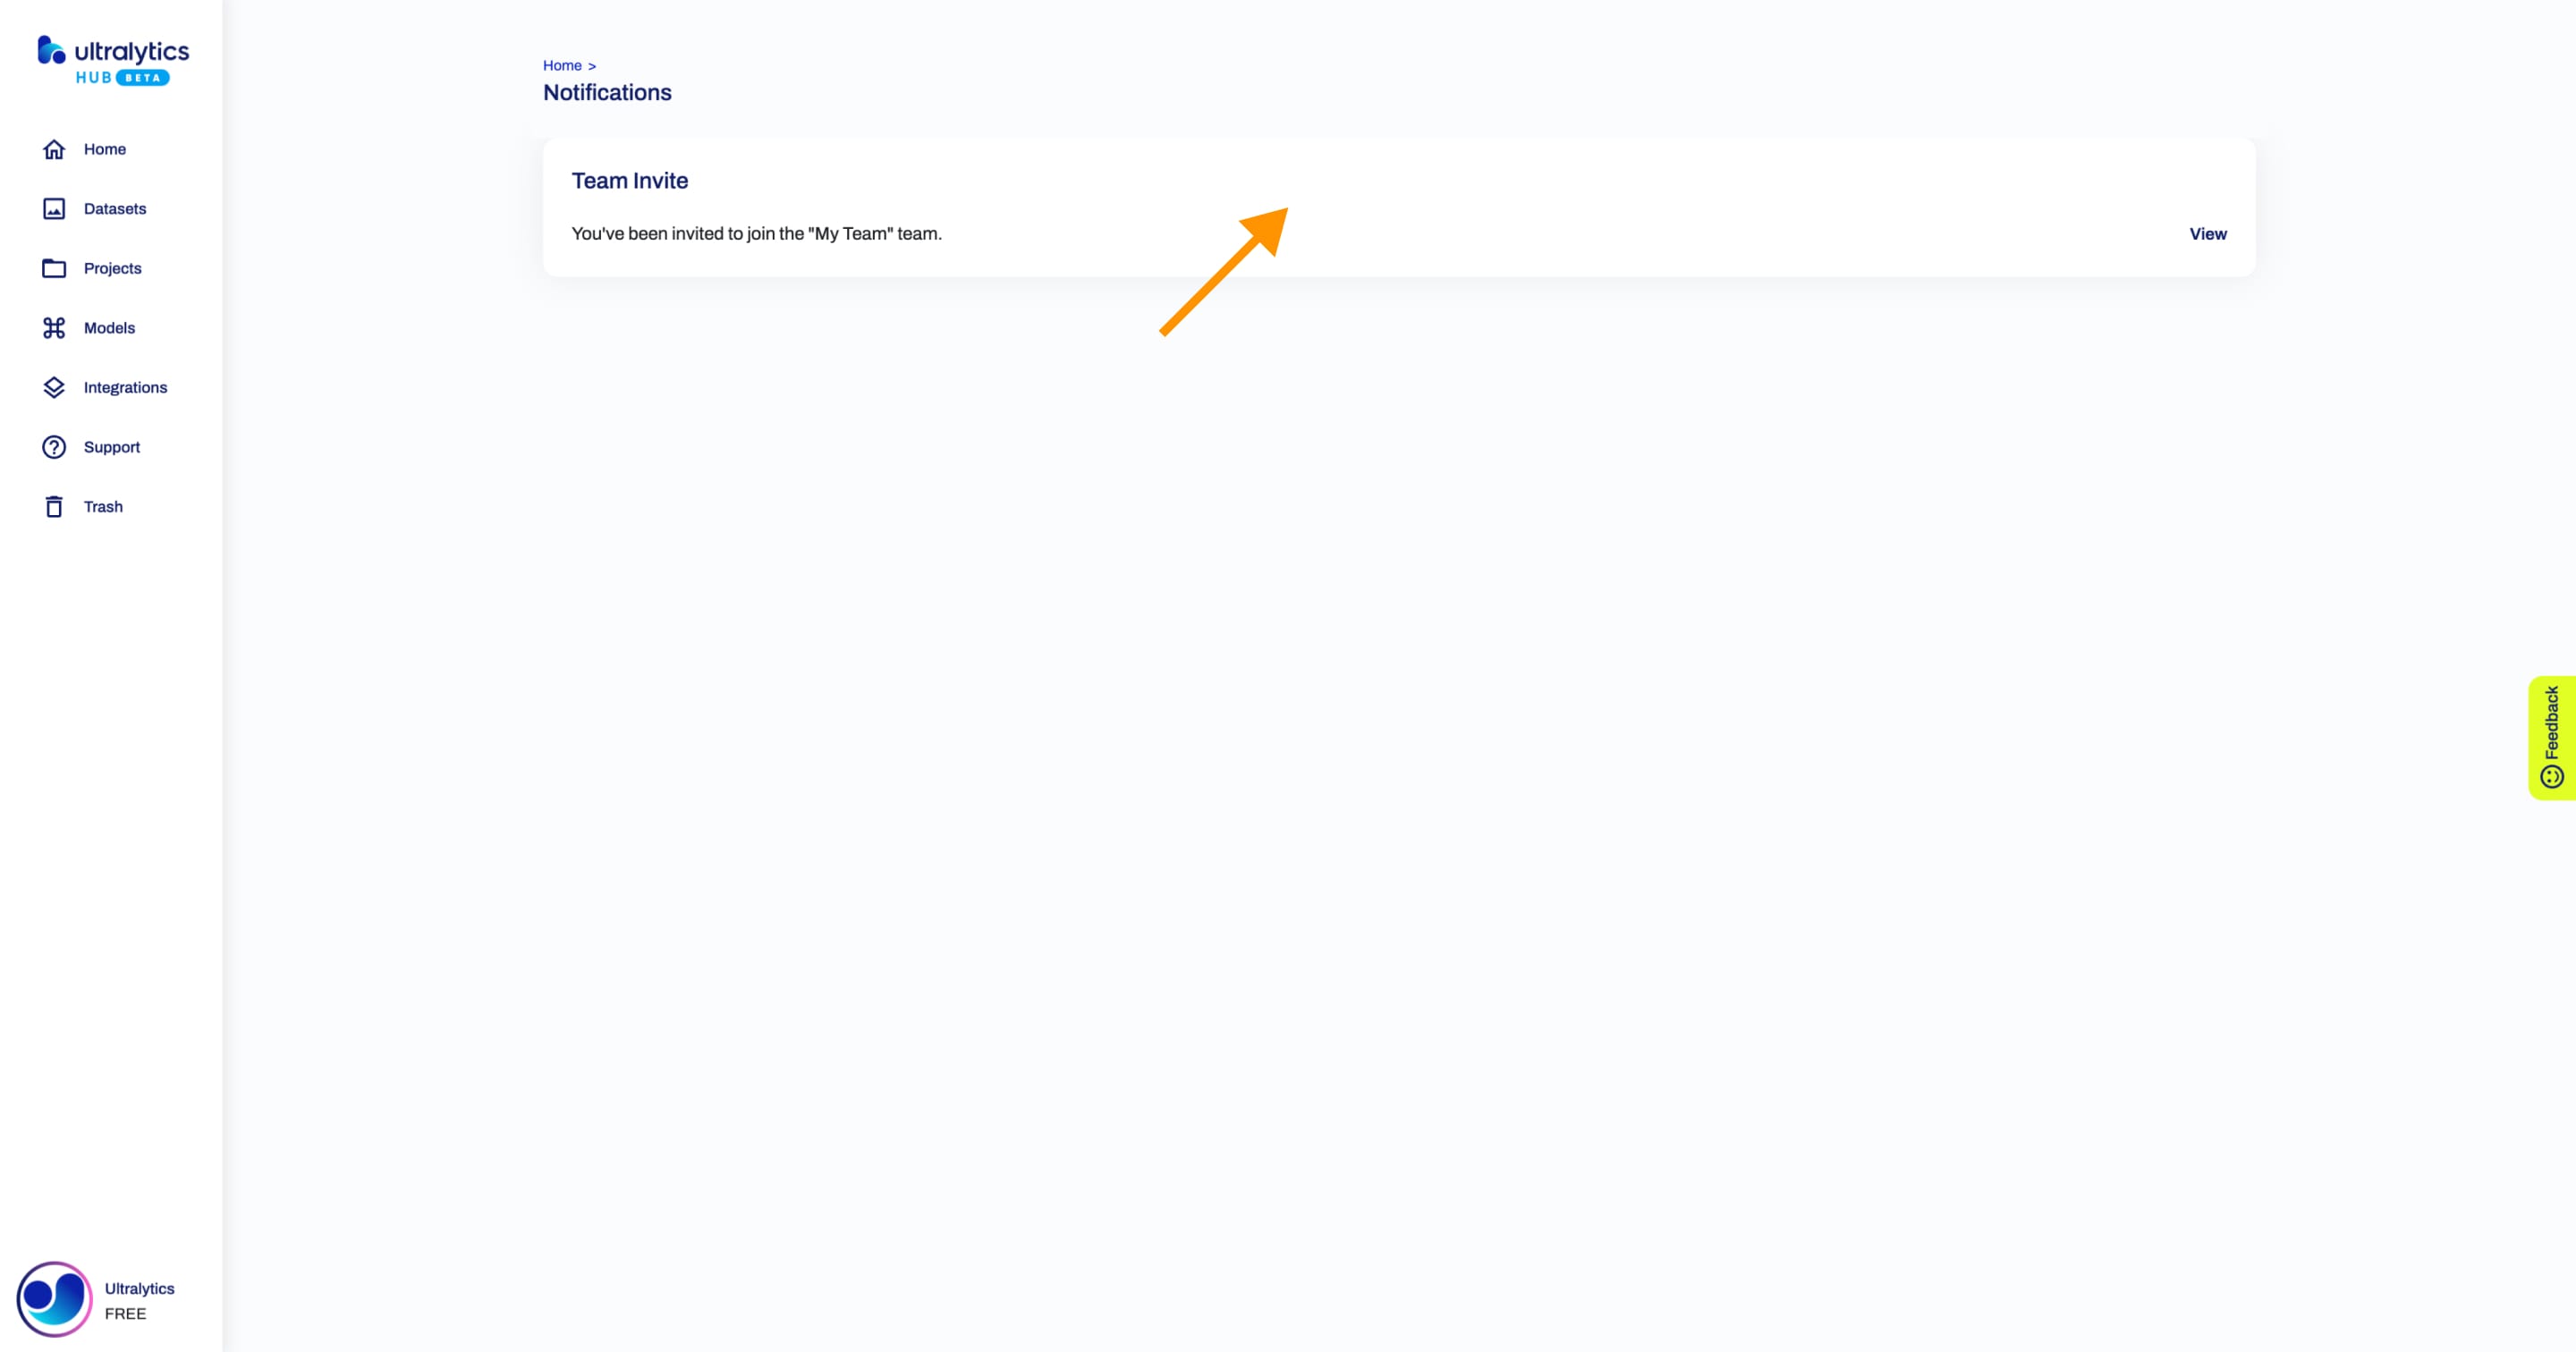
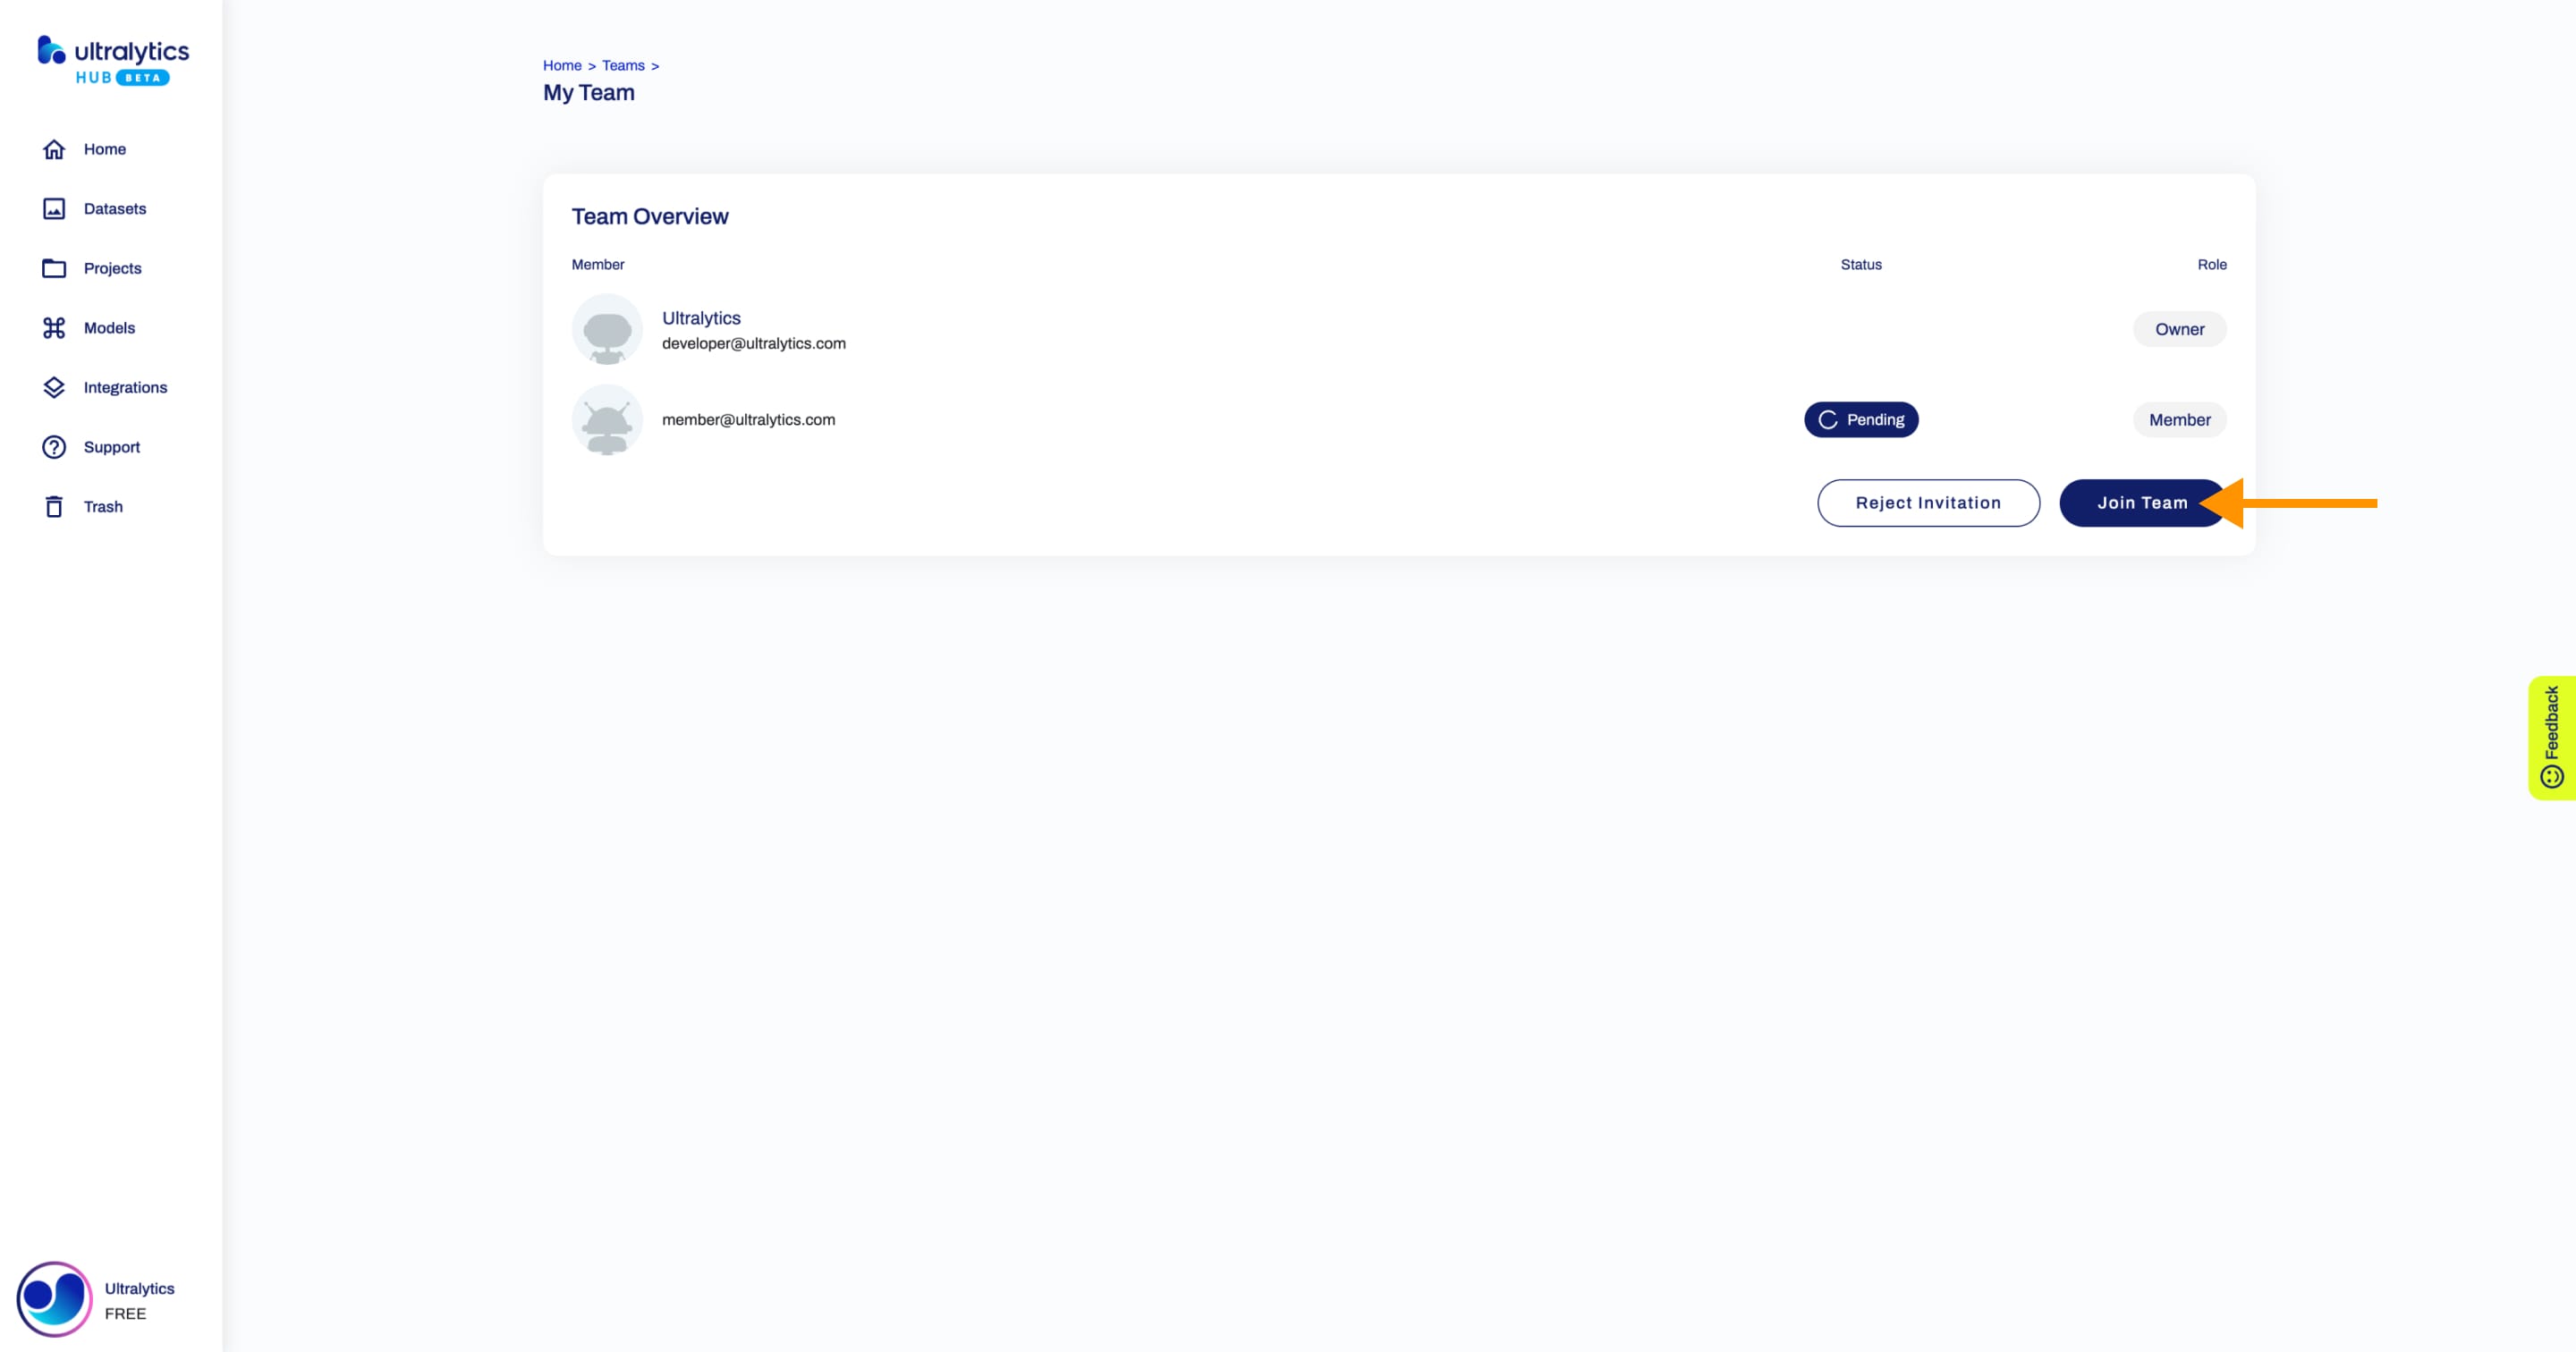
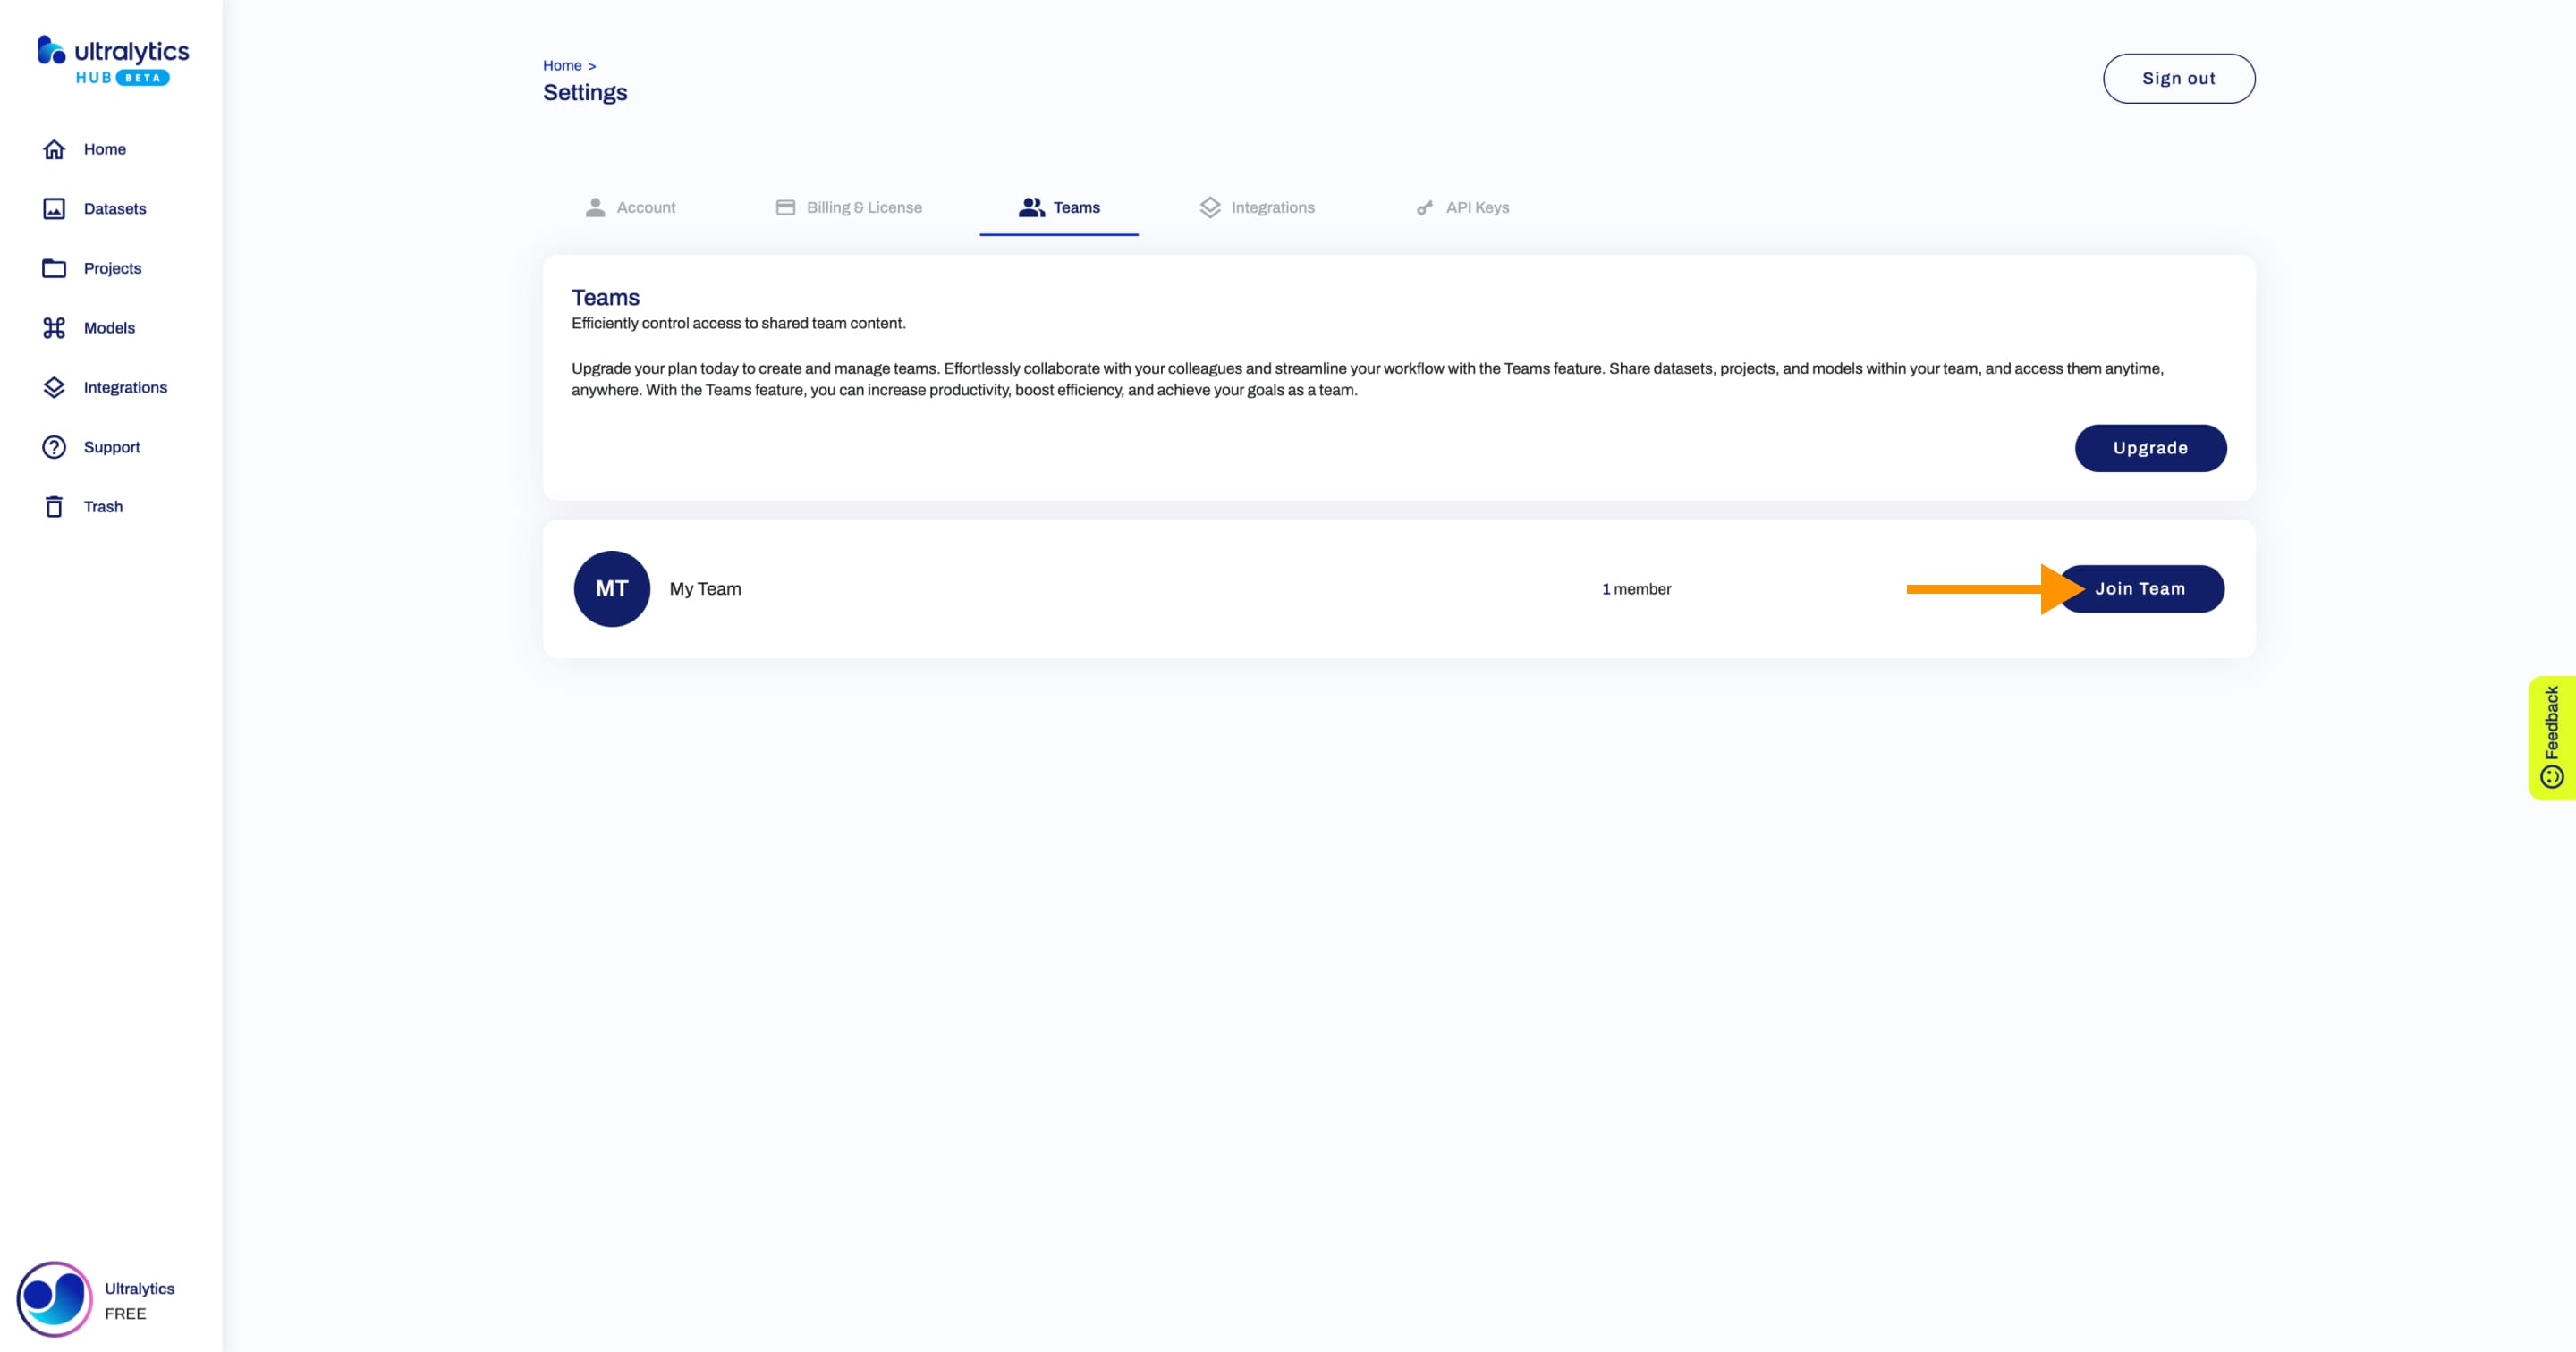
You can decide whether to join the team on the Team page of the team to which you were invited.
If you want to join the team, click on the Join Team button.
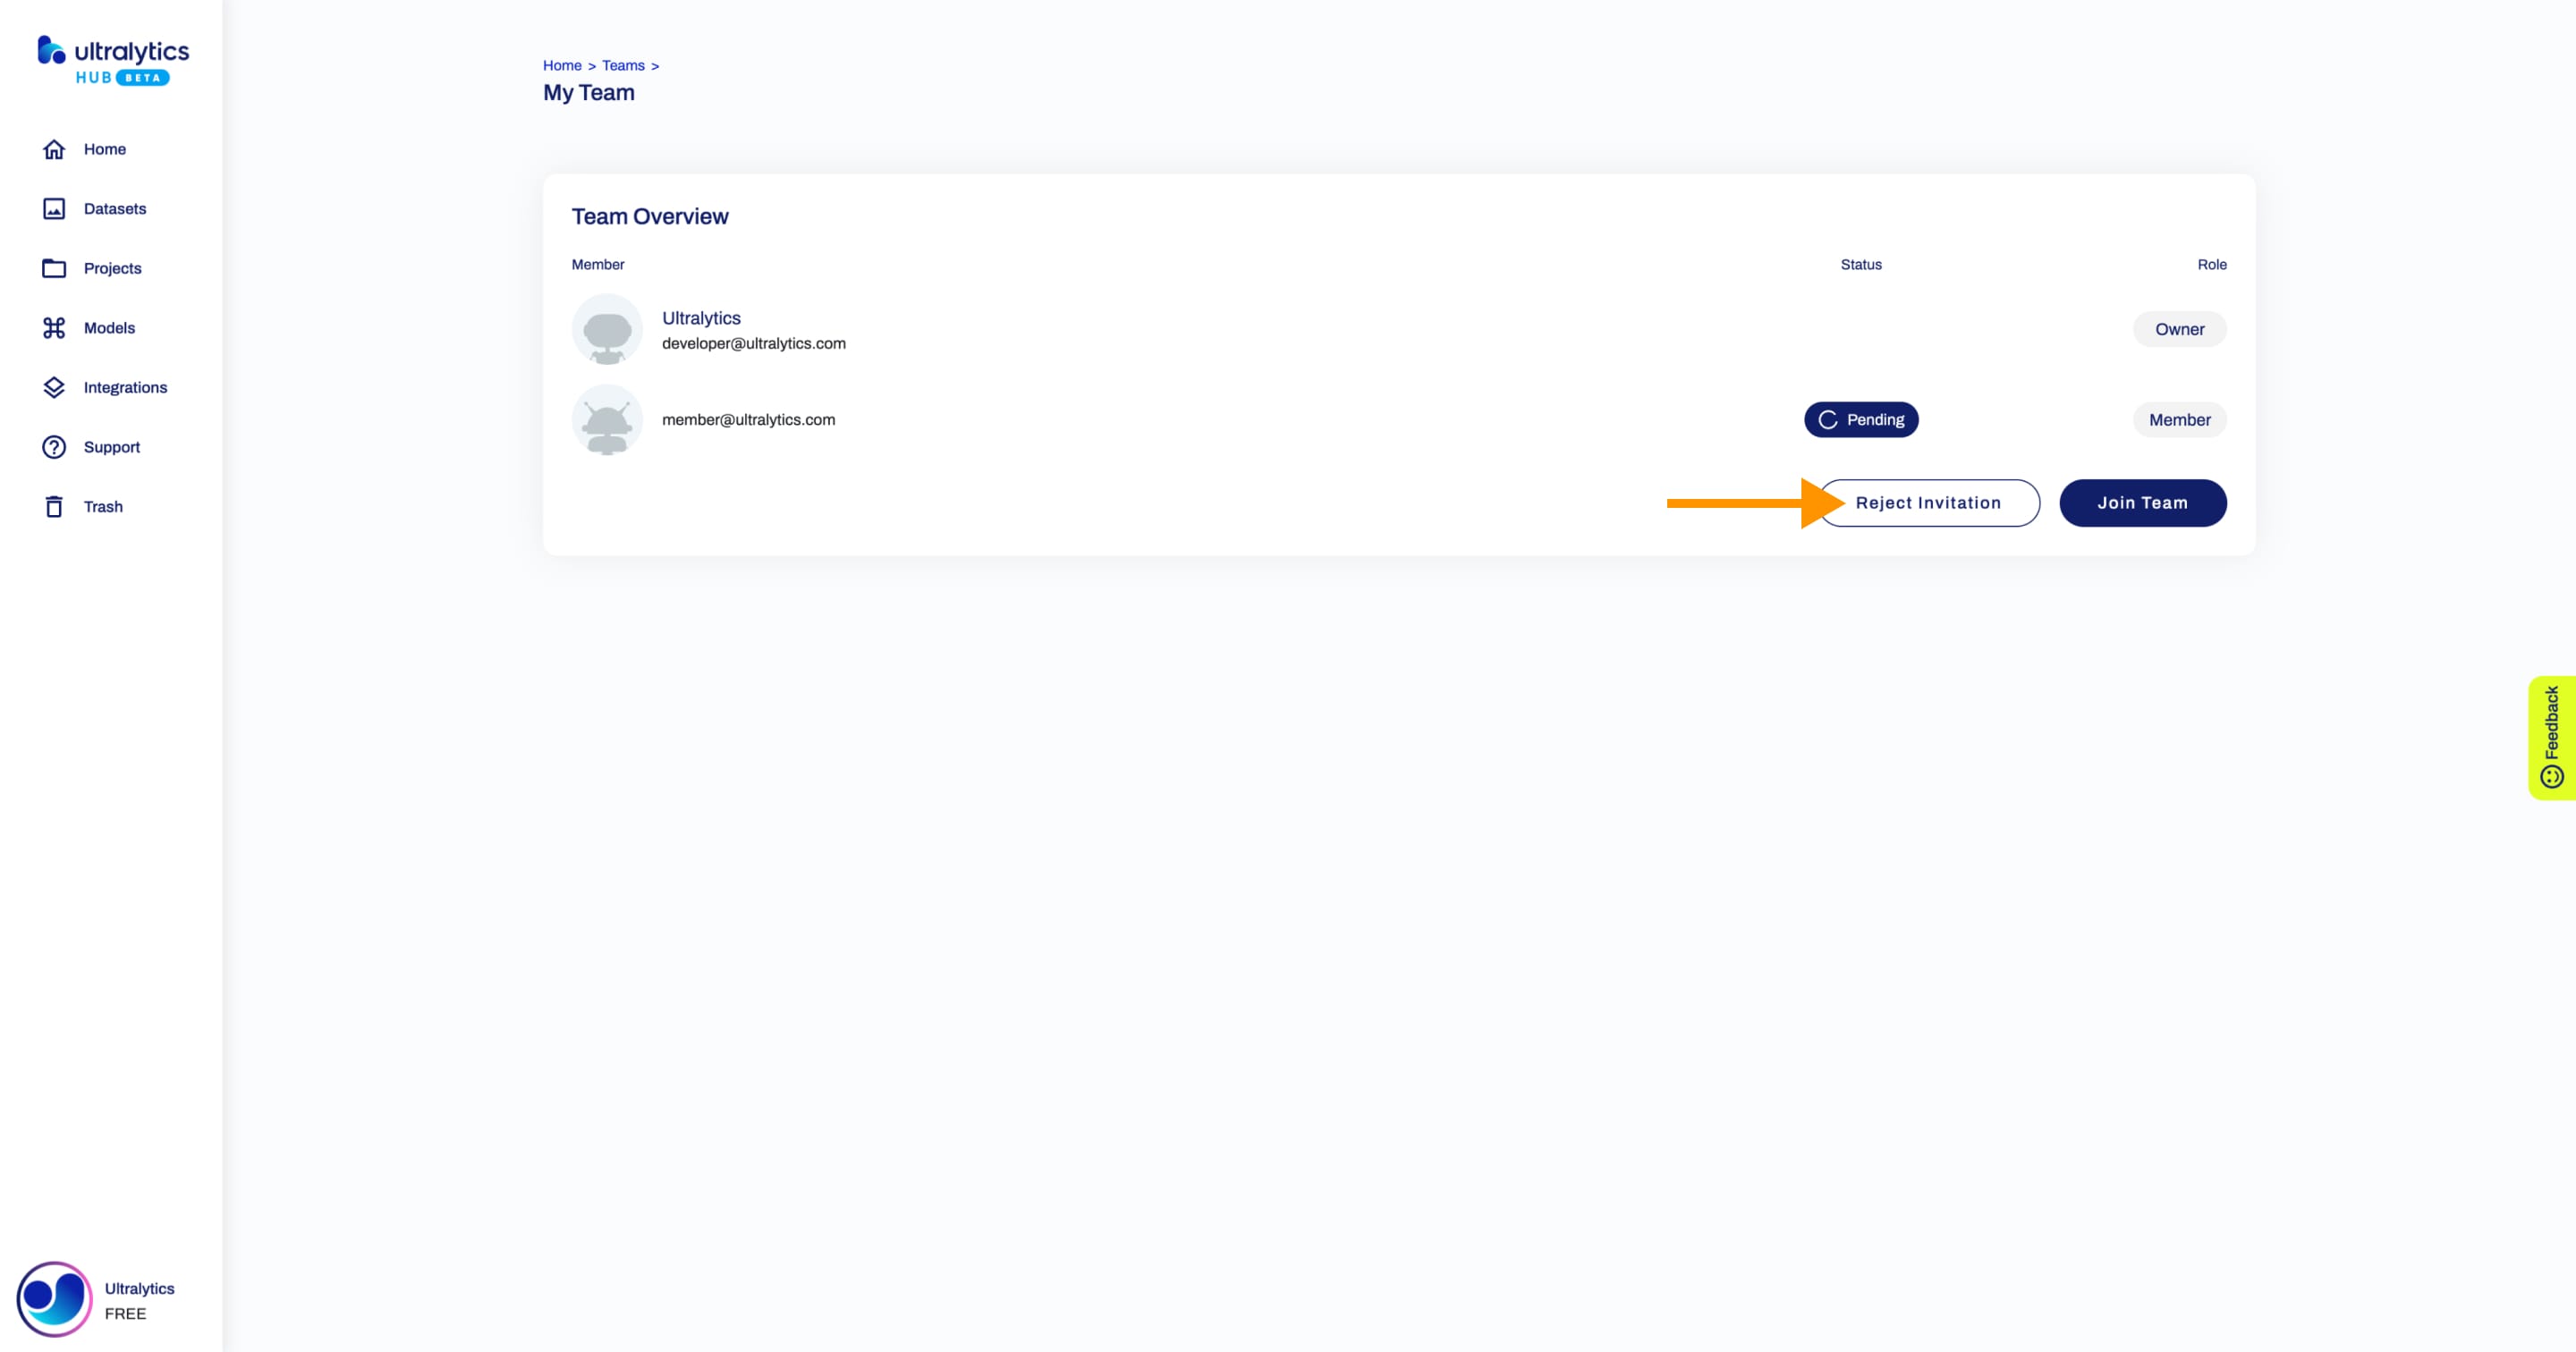
If you don't want to join the team, click on the Reject Invitation button.
??? tip "Tip"
You can join the team directly from the [Teams](https://hub.ultralytics.com/settings?tab=teams) page.
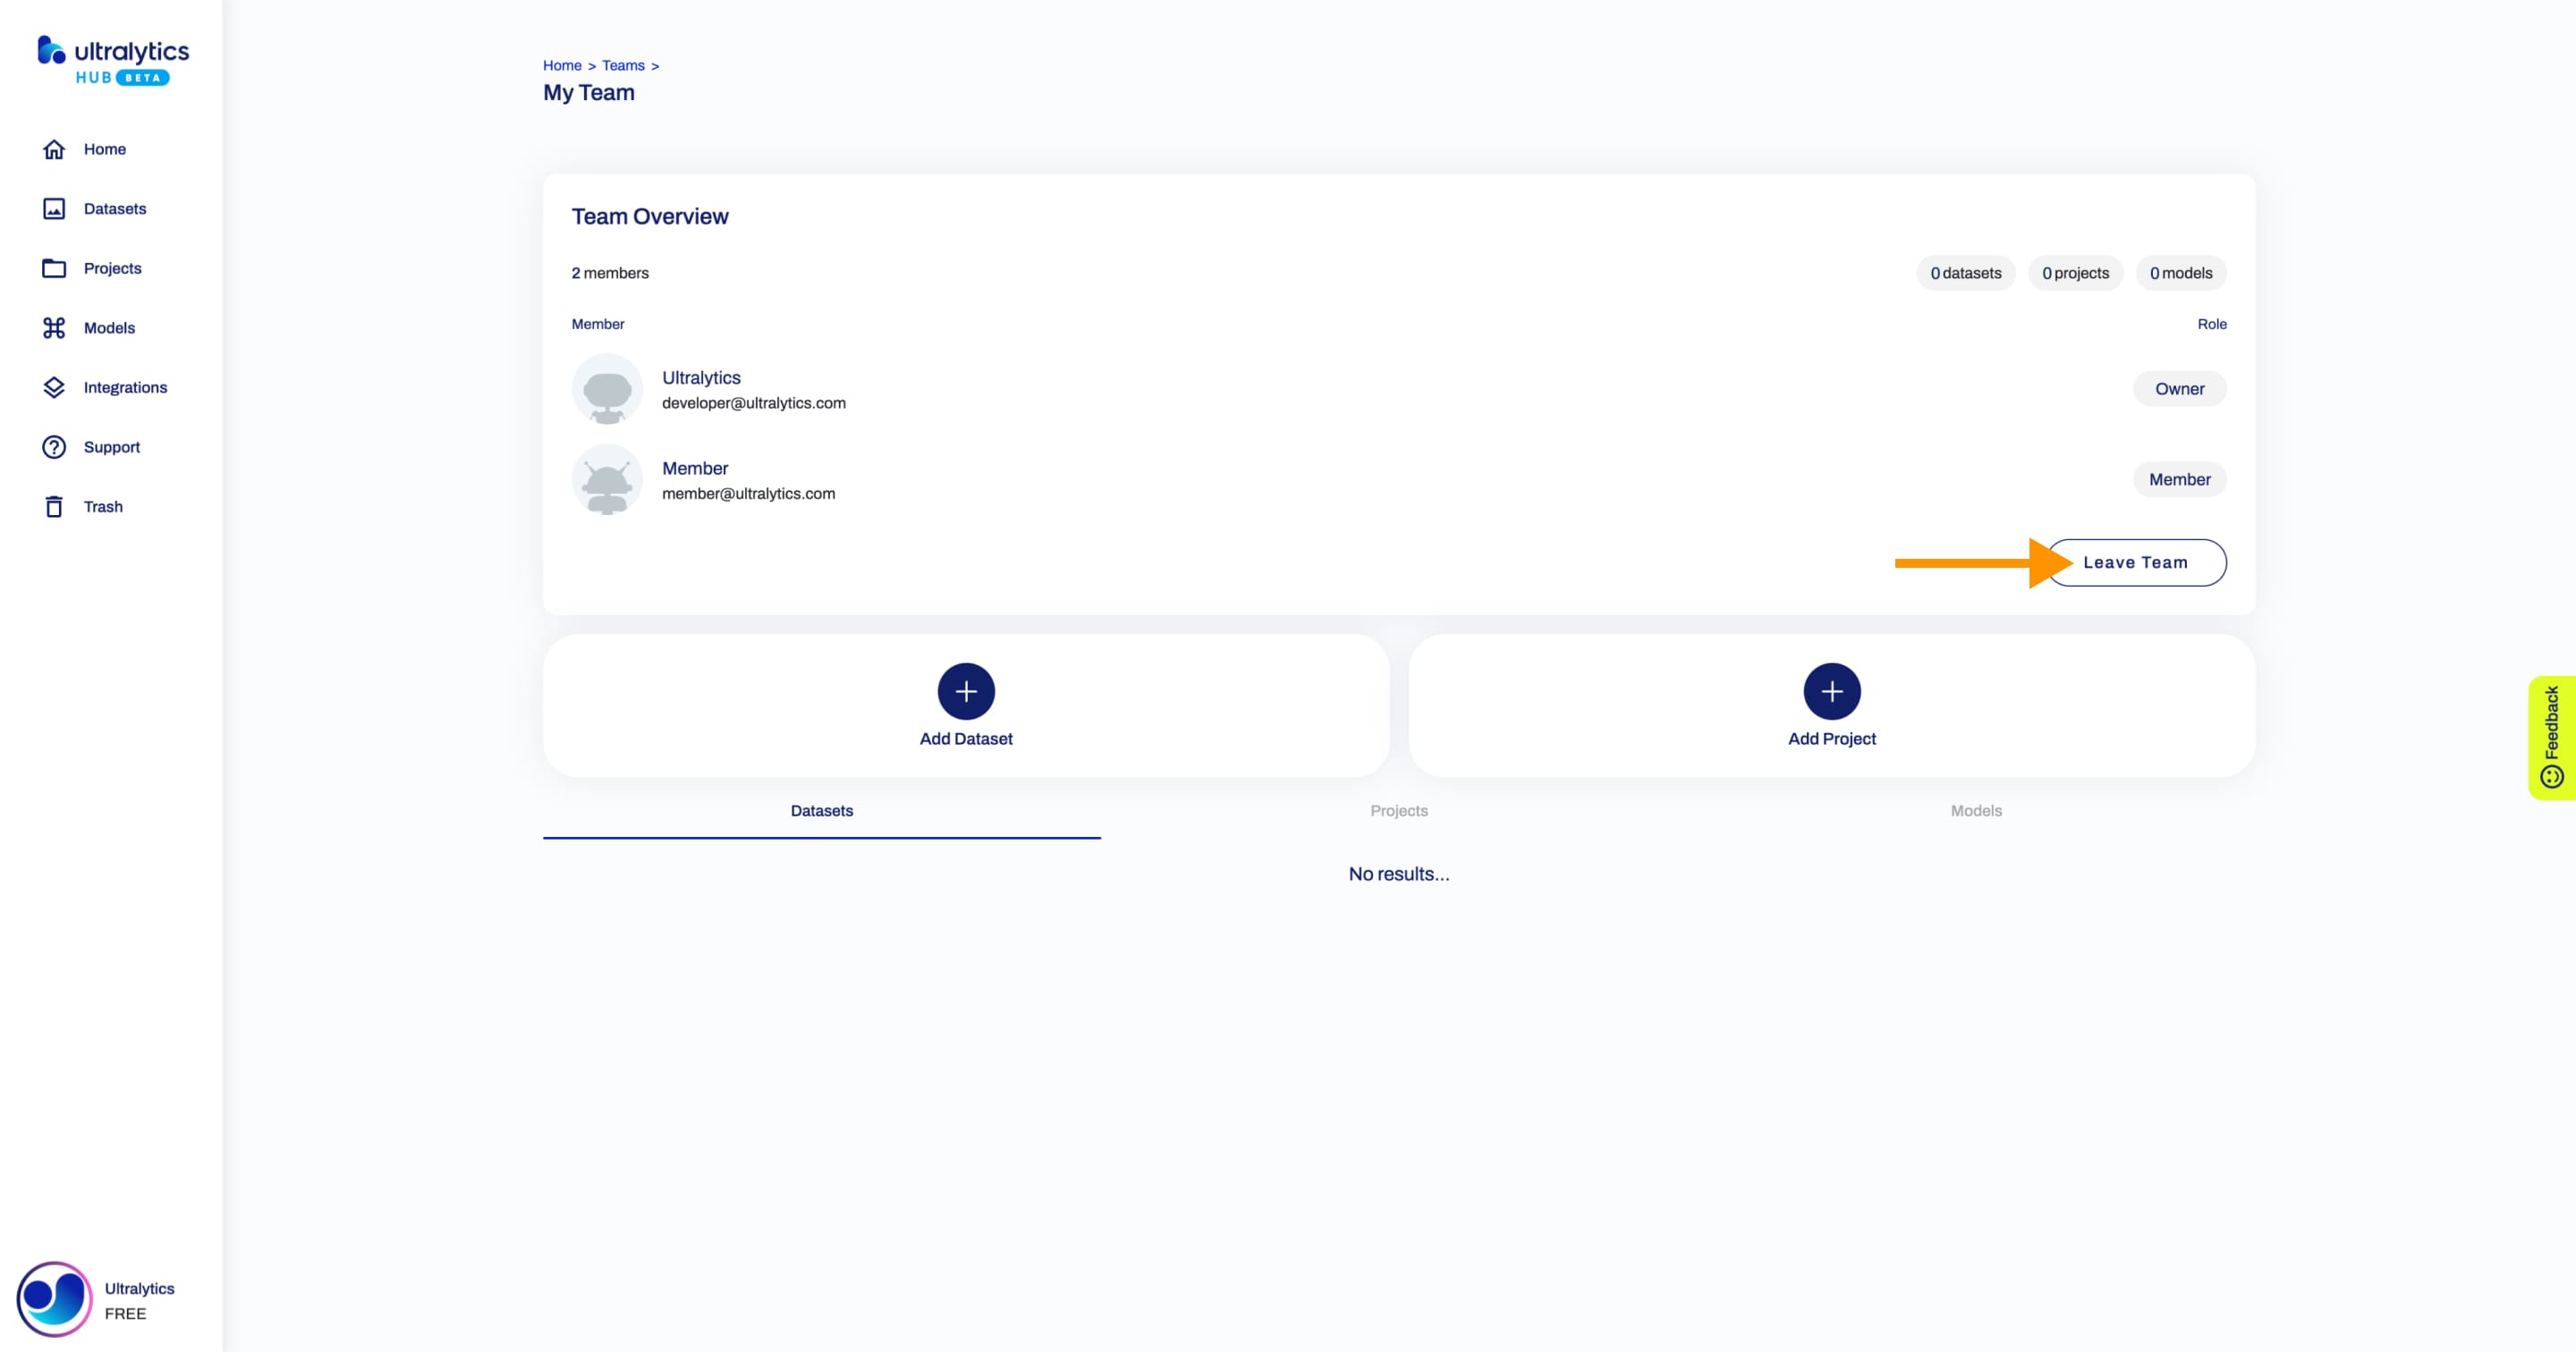
Leave Team
Navigate to the Team page of the team you want to leave and click on the Leave Team button.
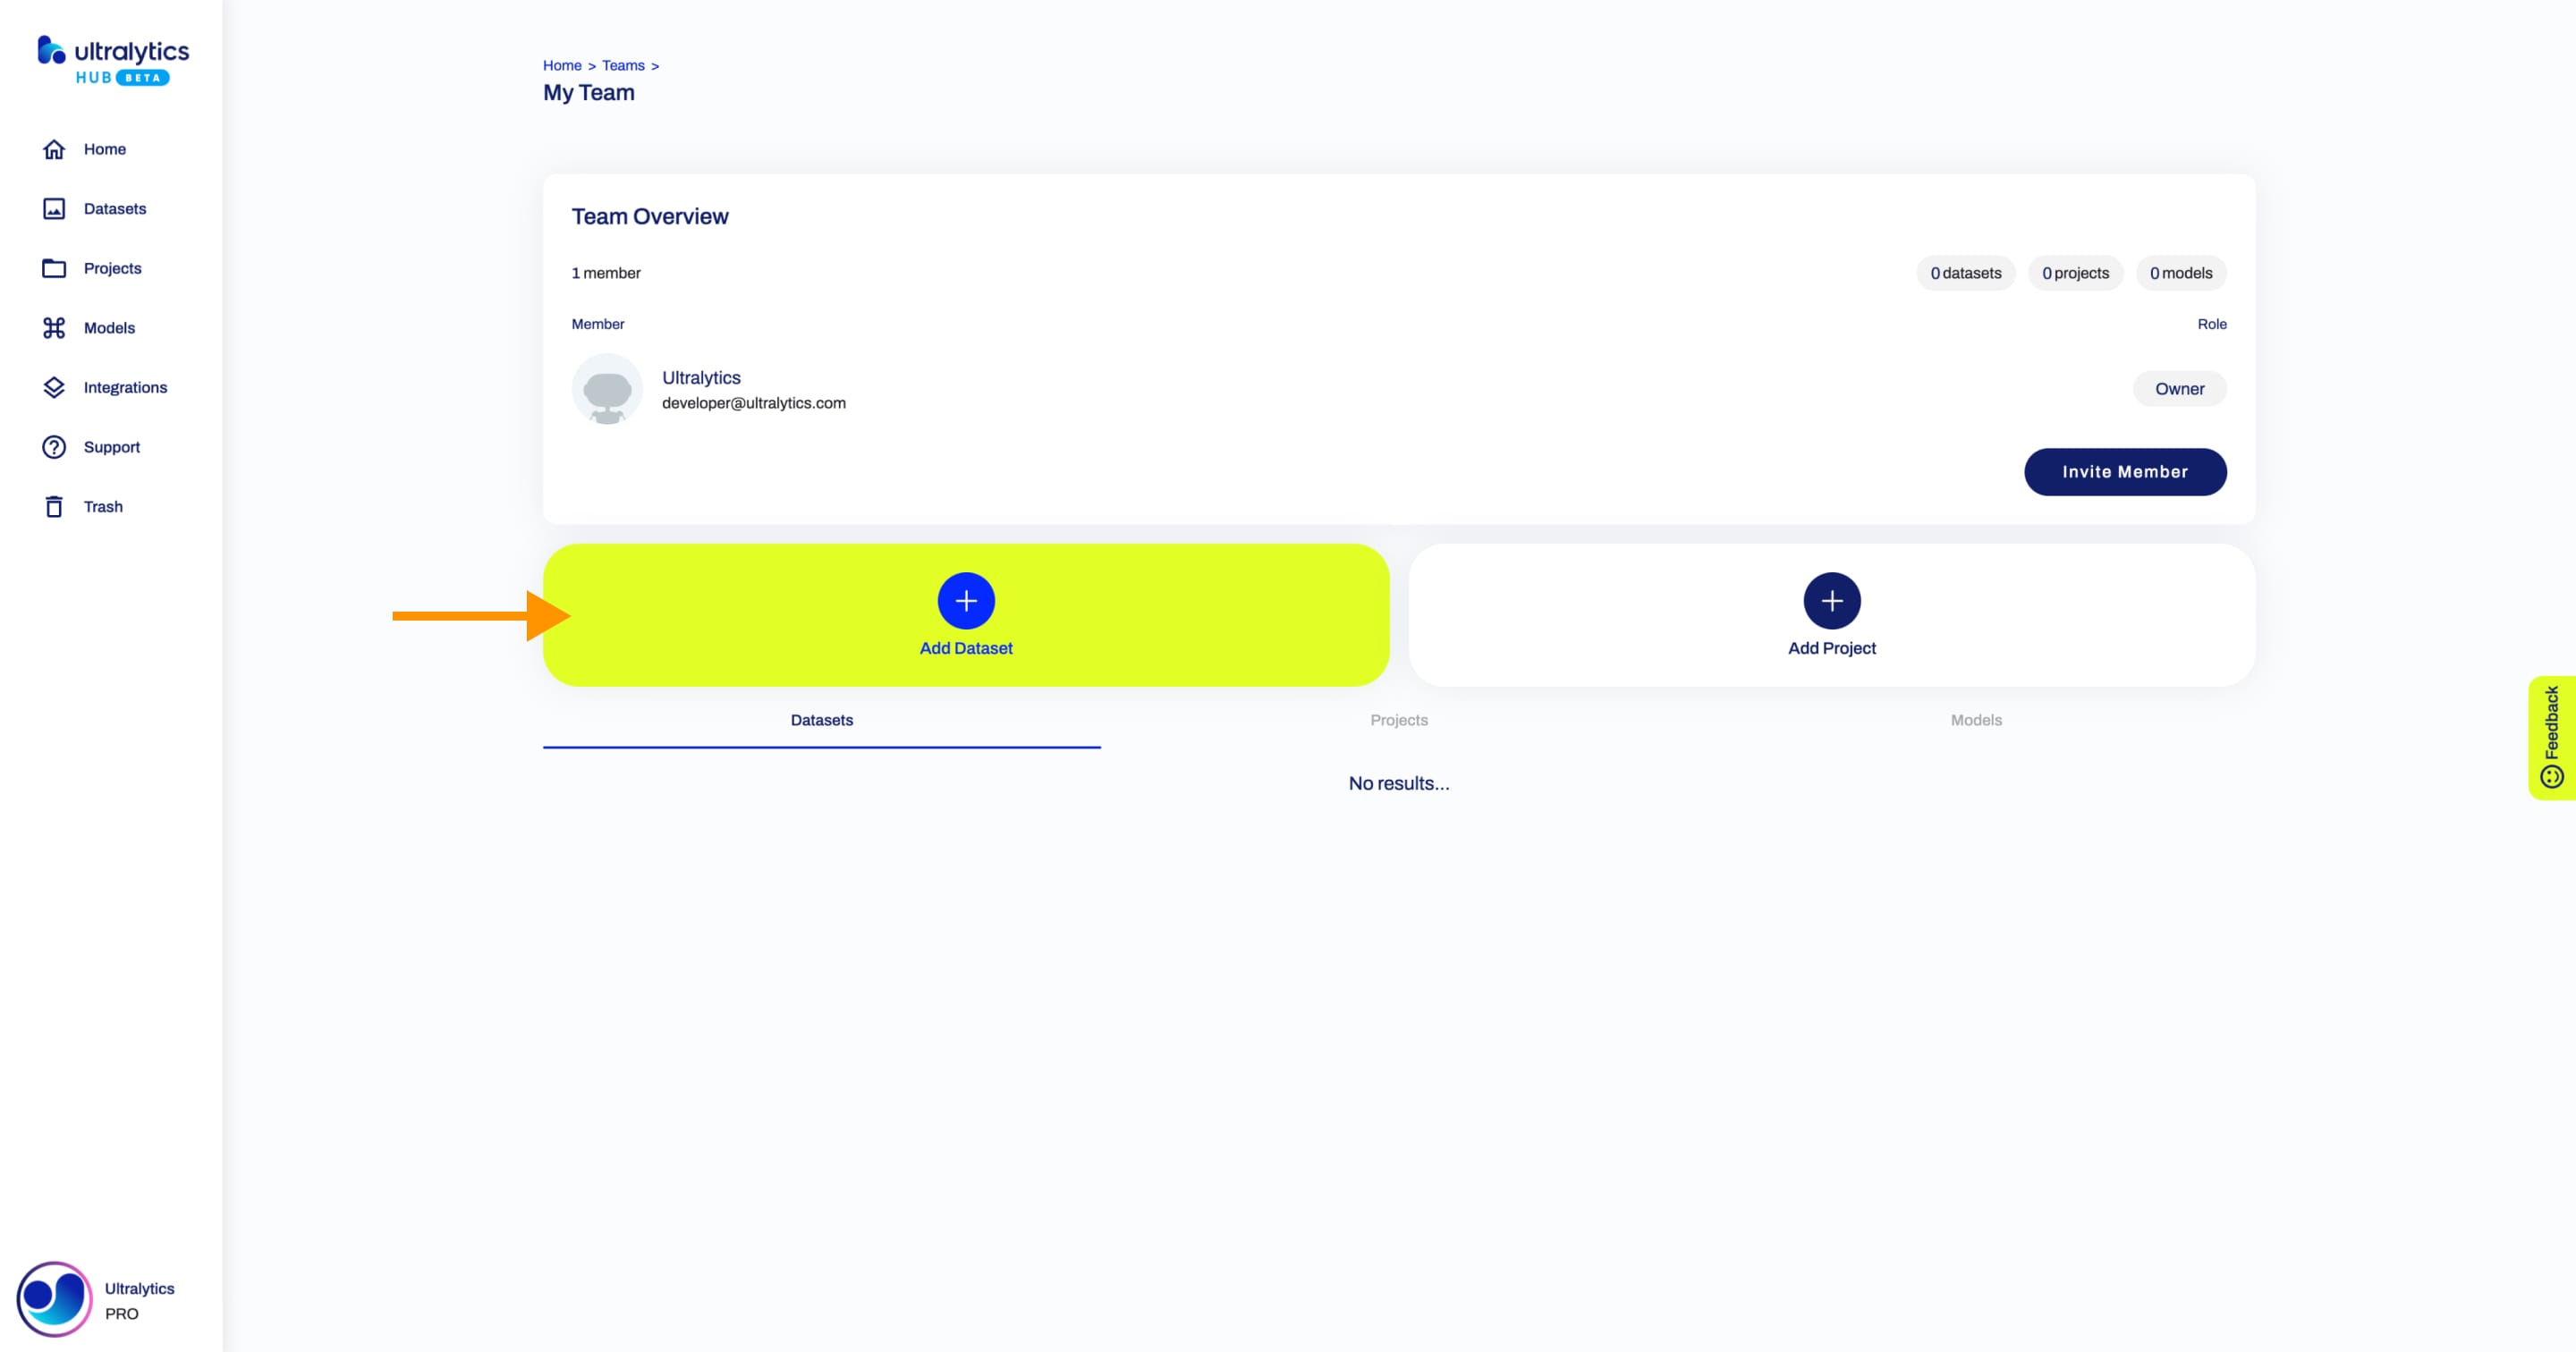
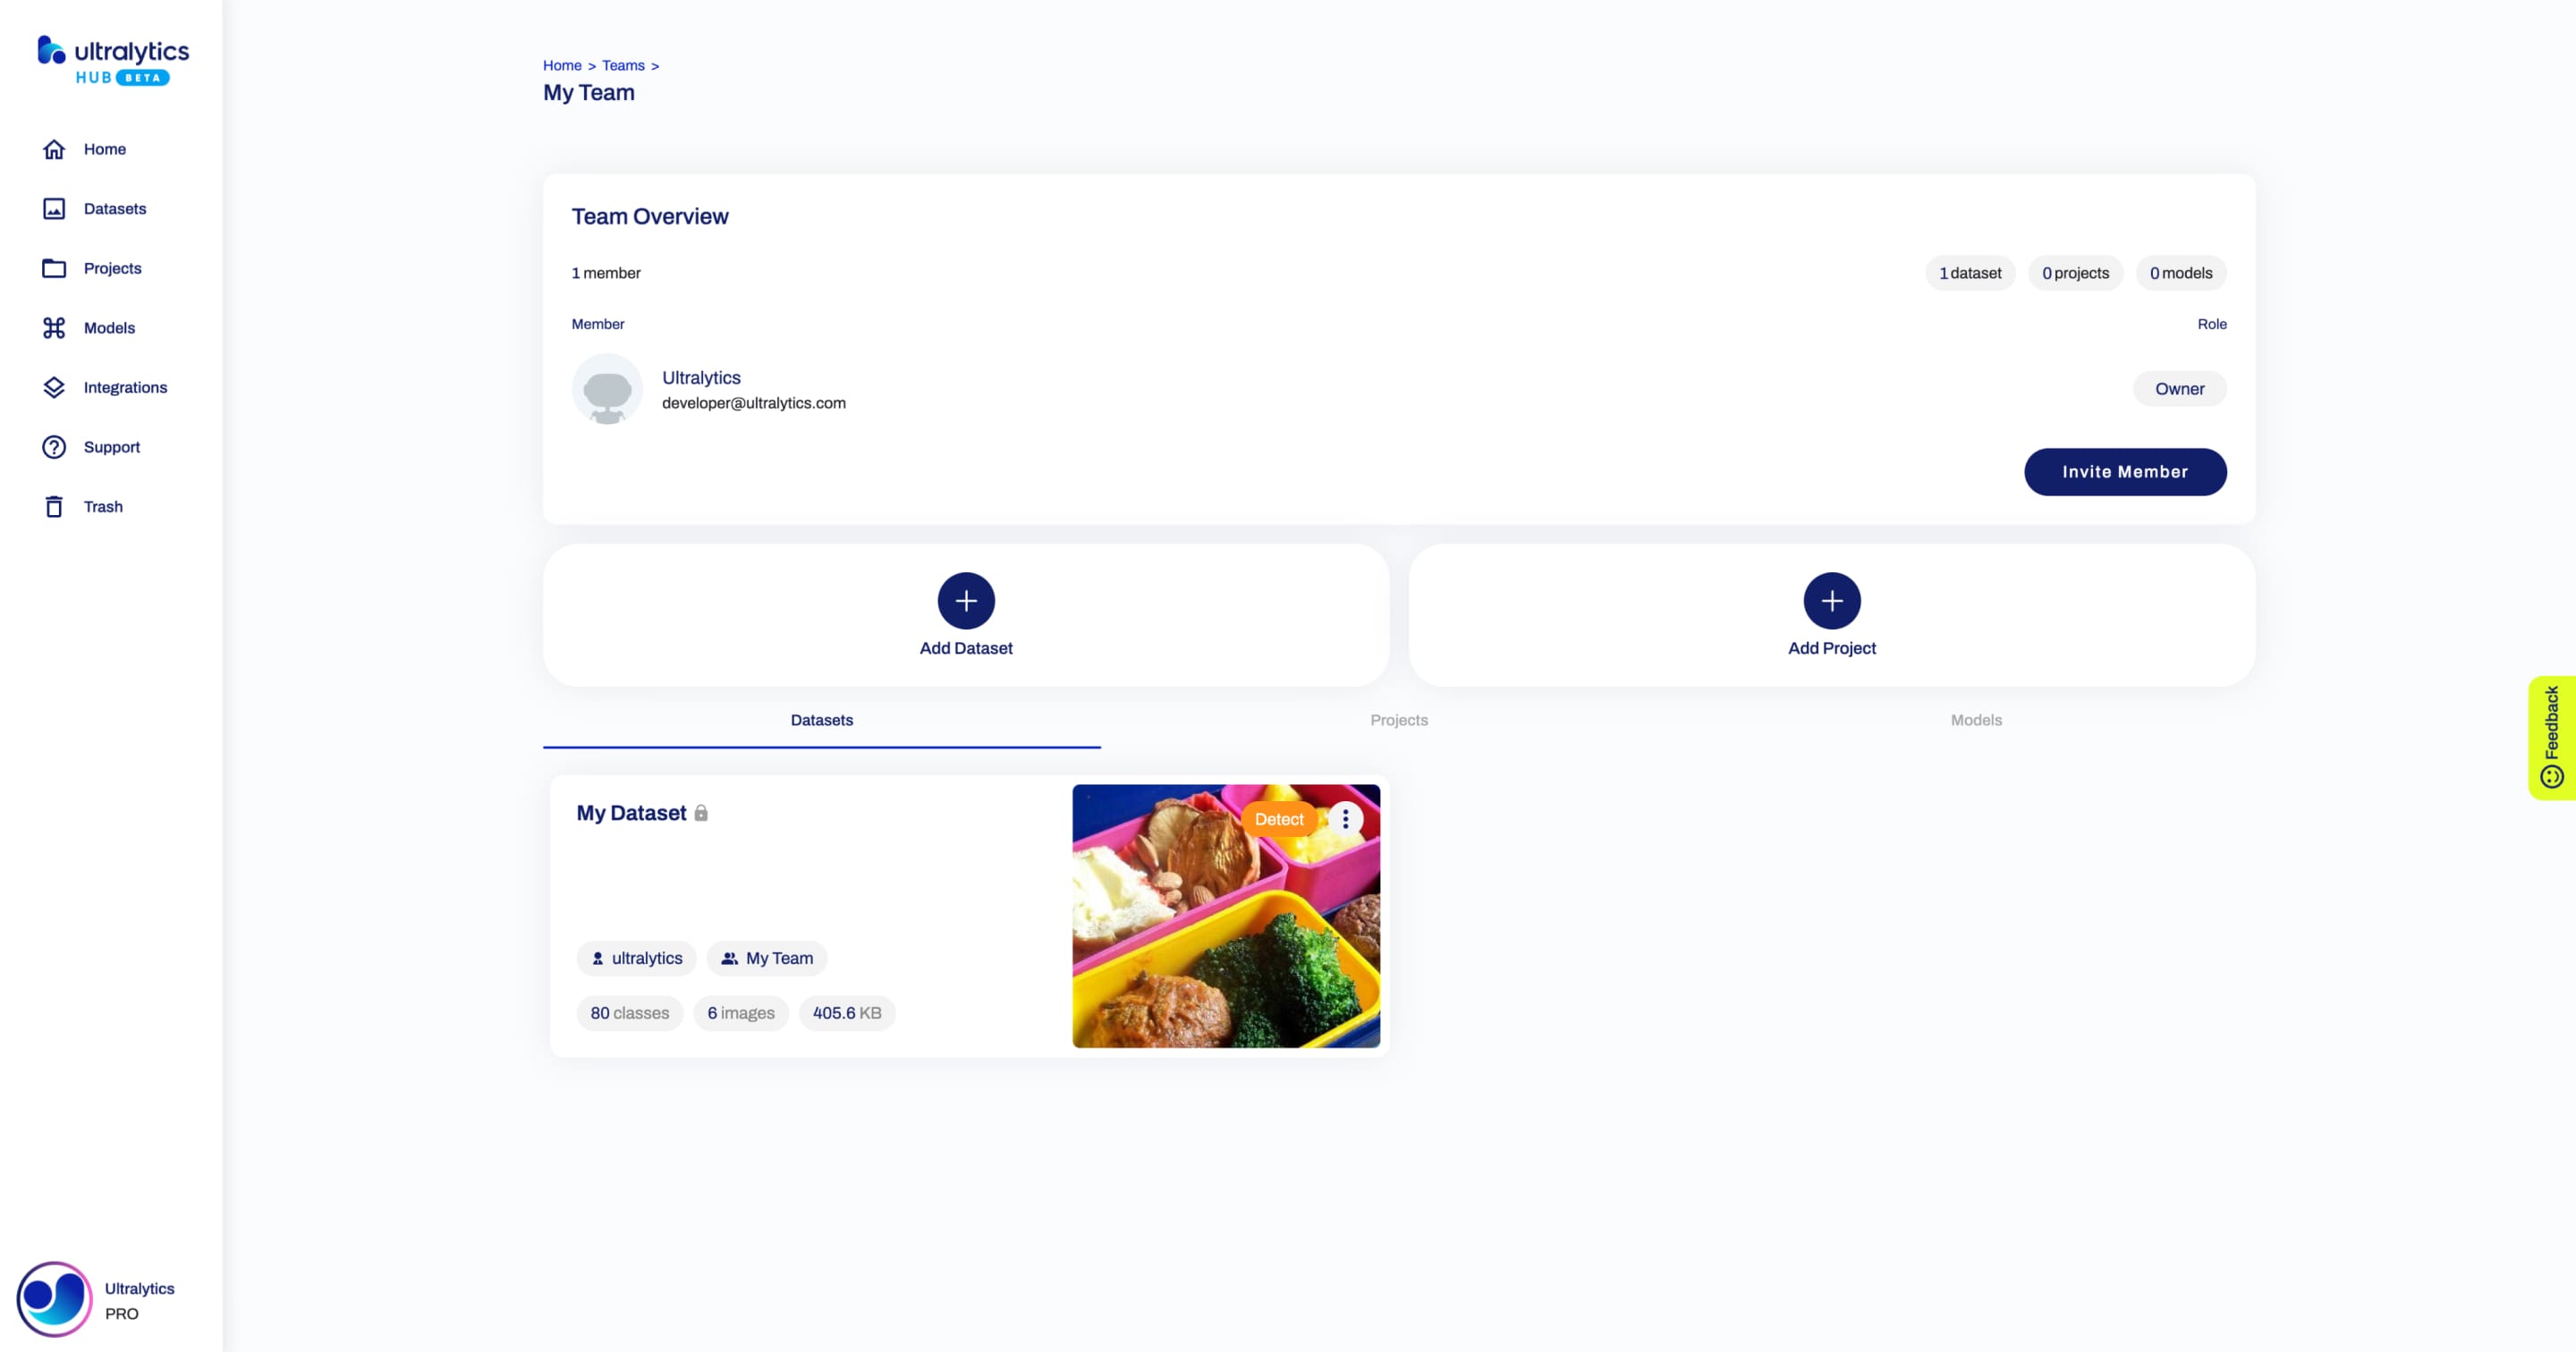
Share Dataset
Navigate to the Team page of the team you want to share your dataset with and click on the Add Dataset button.
Select the dataset you want to share with your team and click on the Add button.
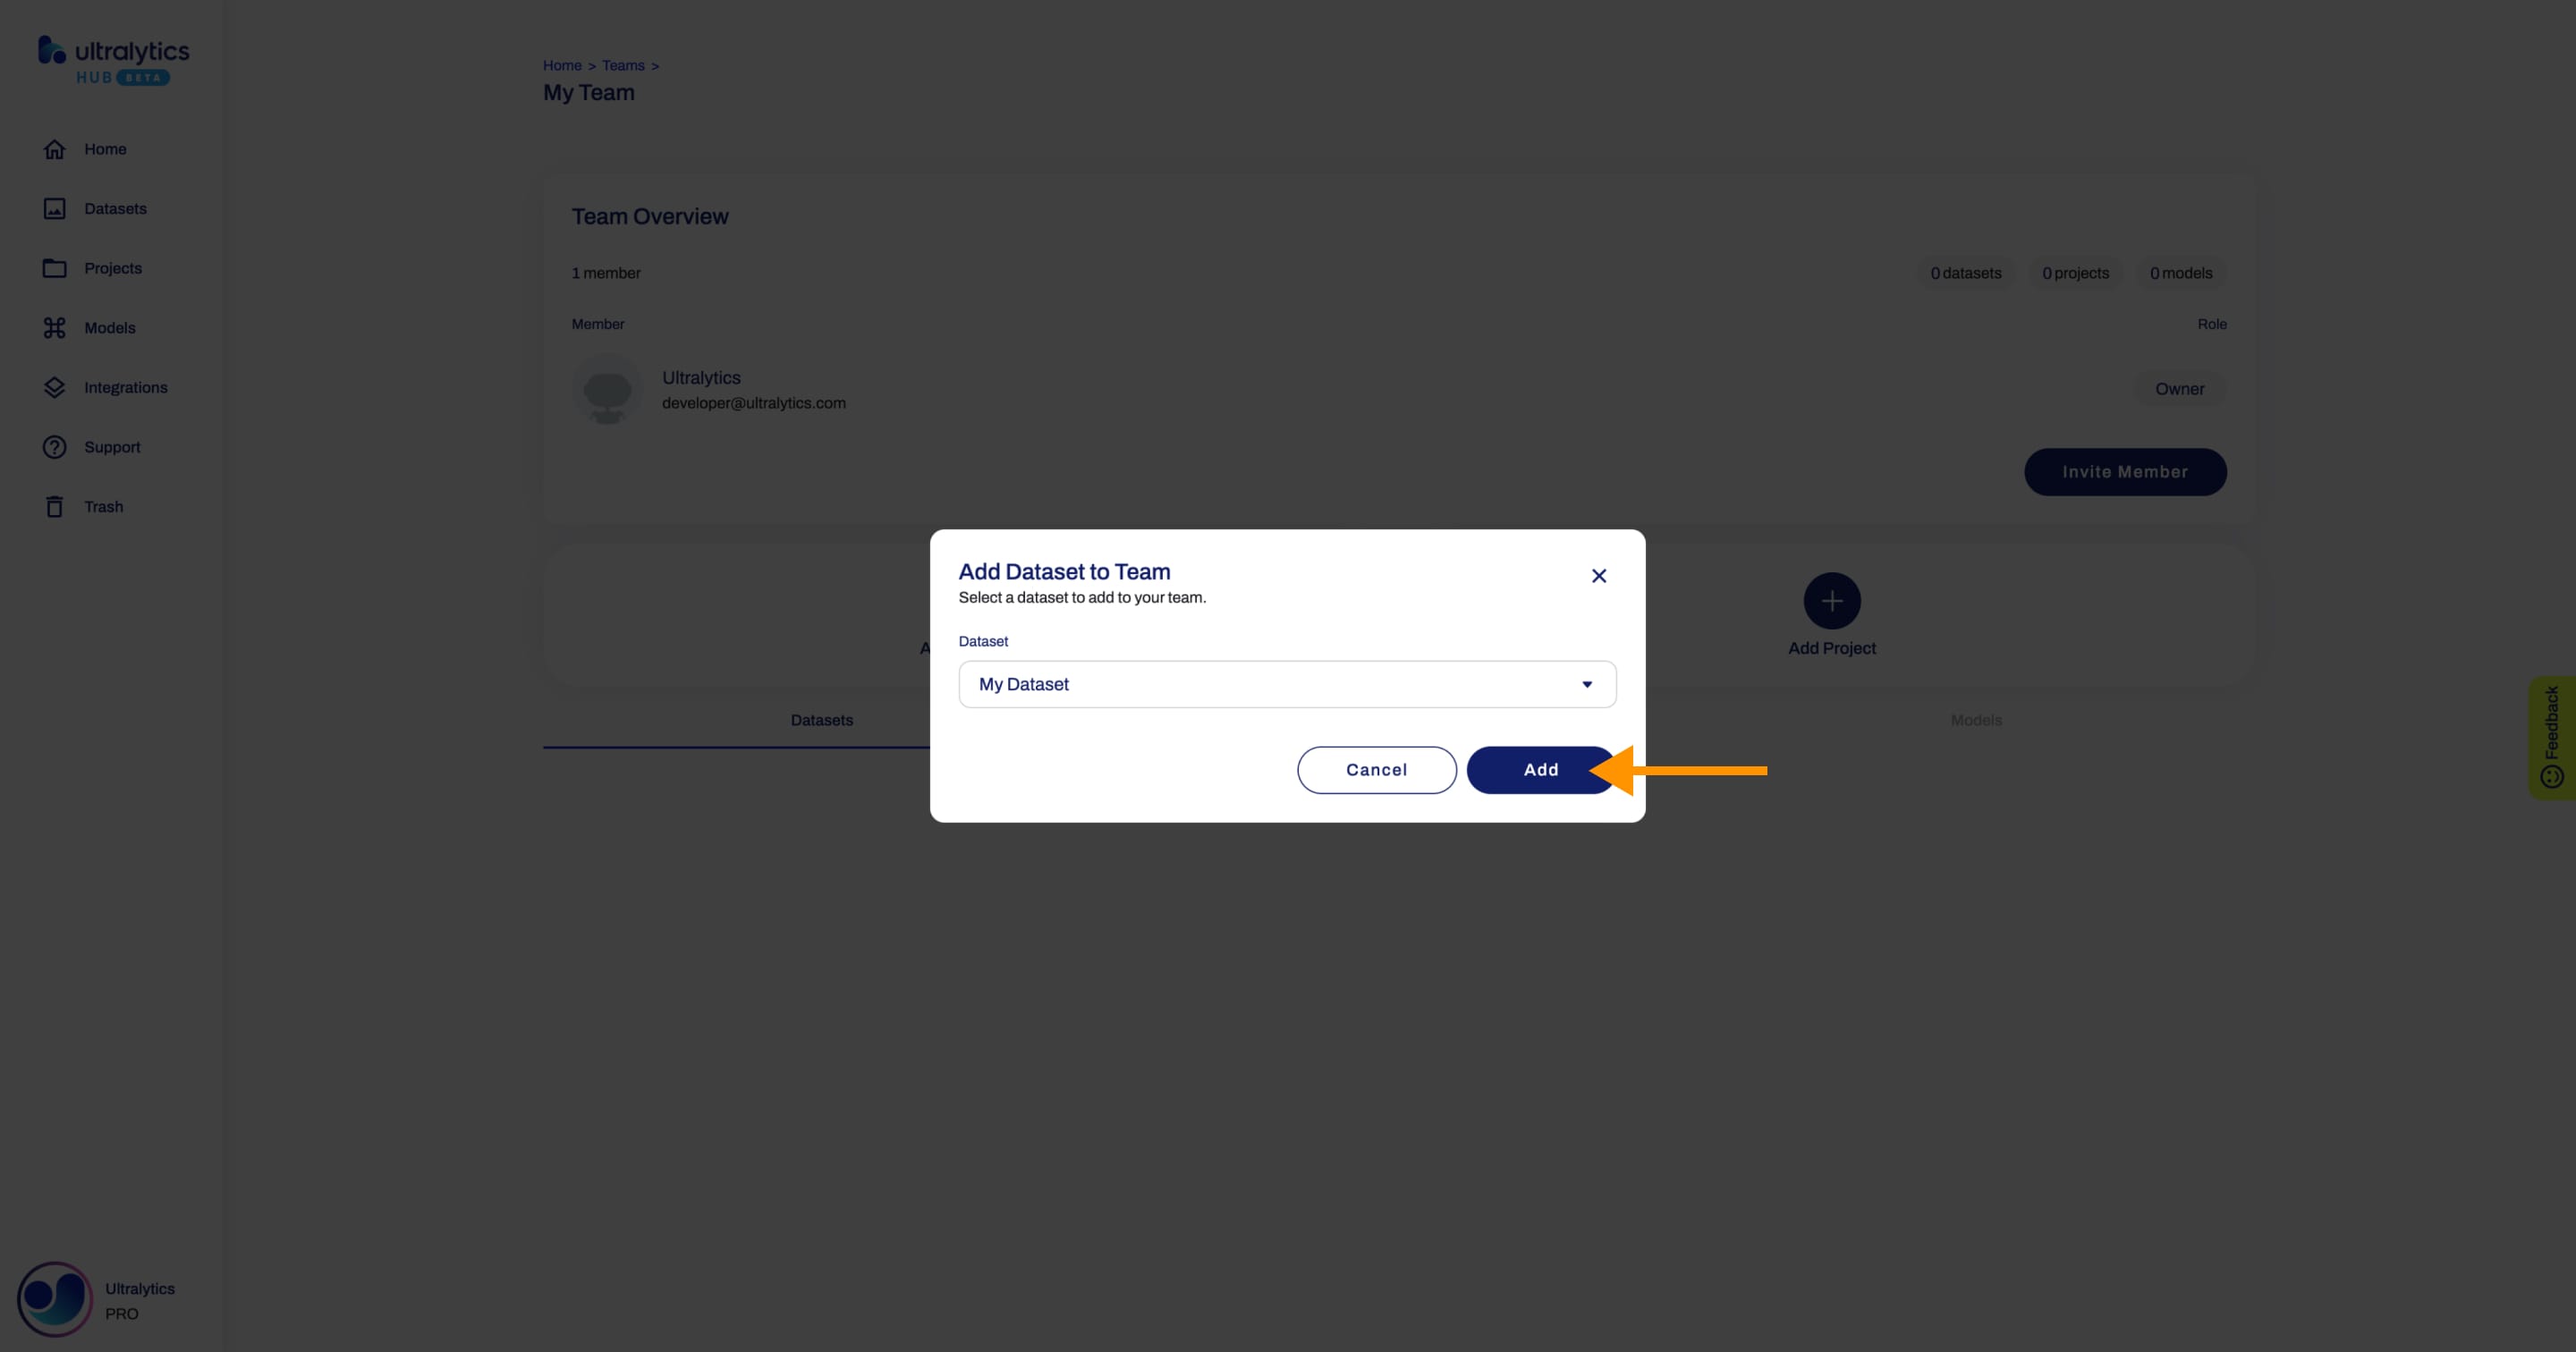
That's it! Your team now has access to your dataset.
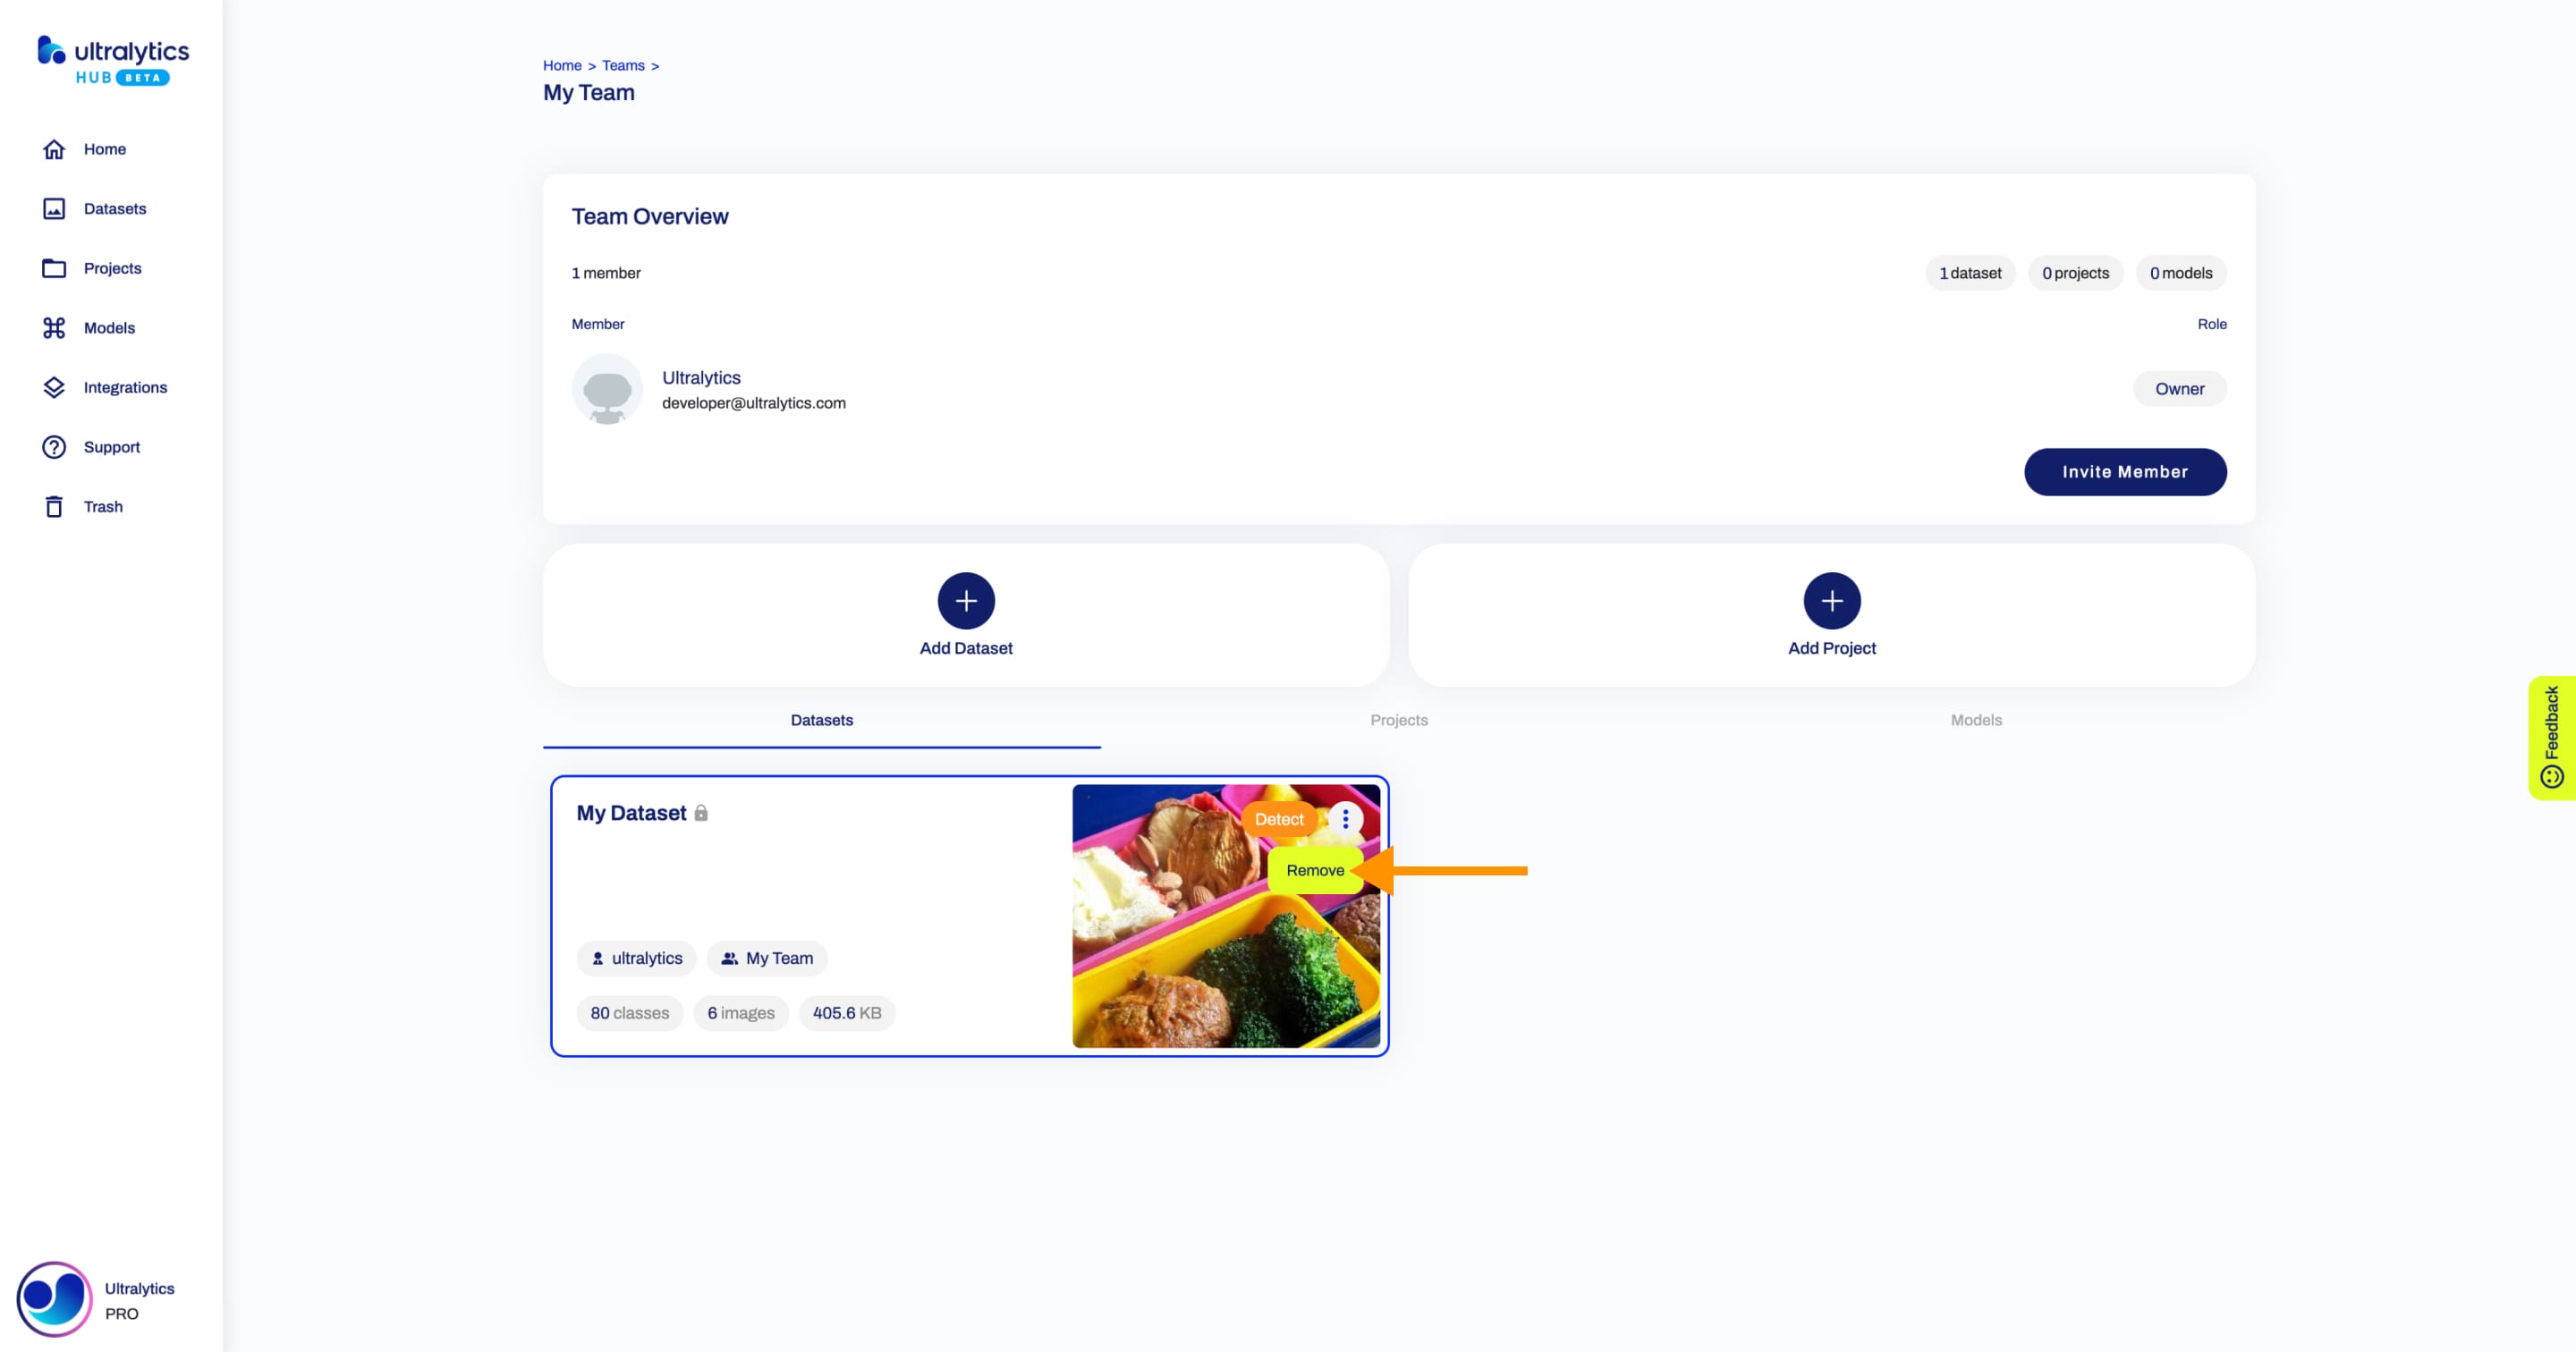
??? tip "Tip"
As a team owner or team admin, you can remove a shared dataset.
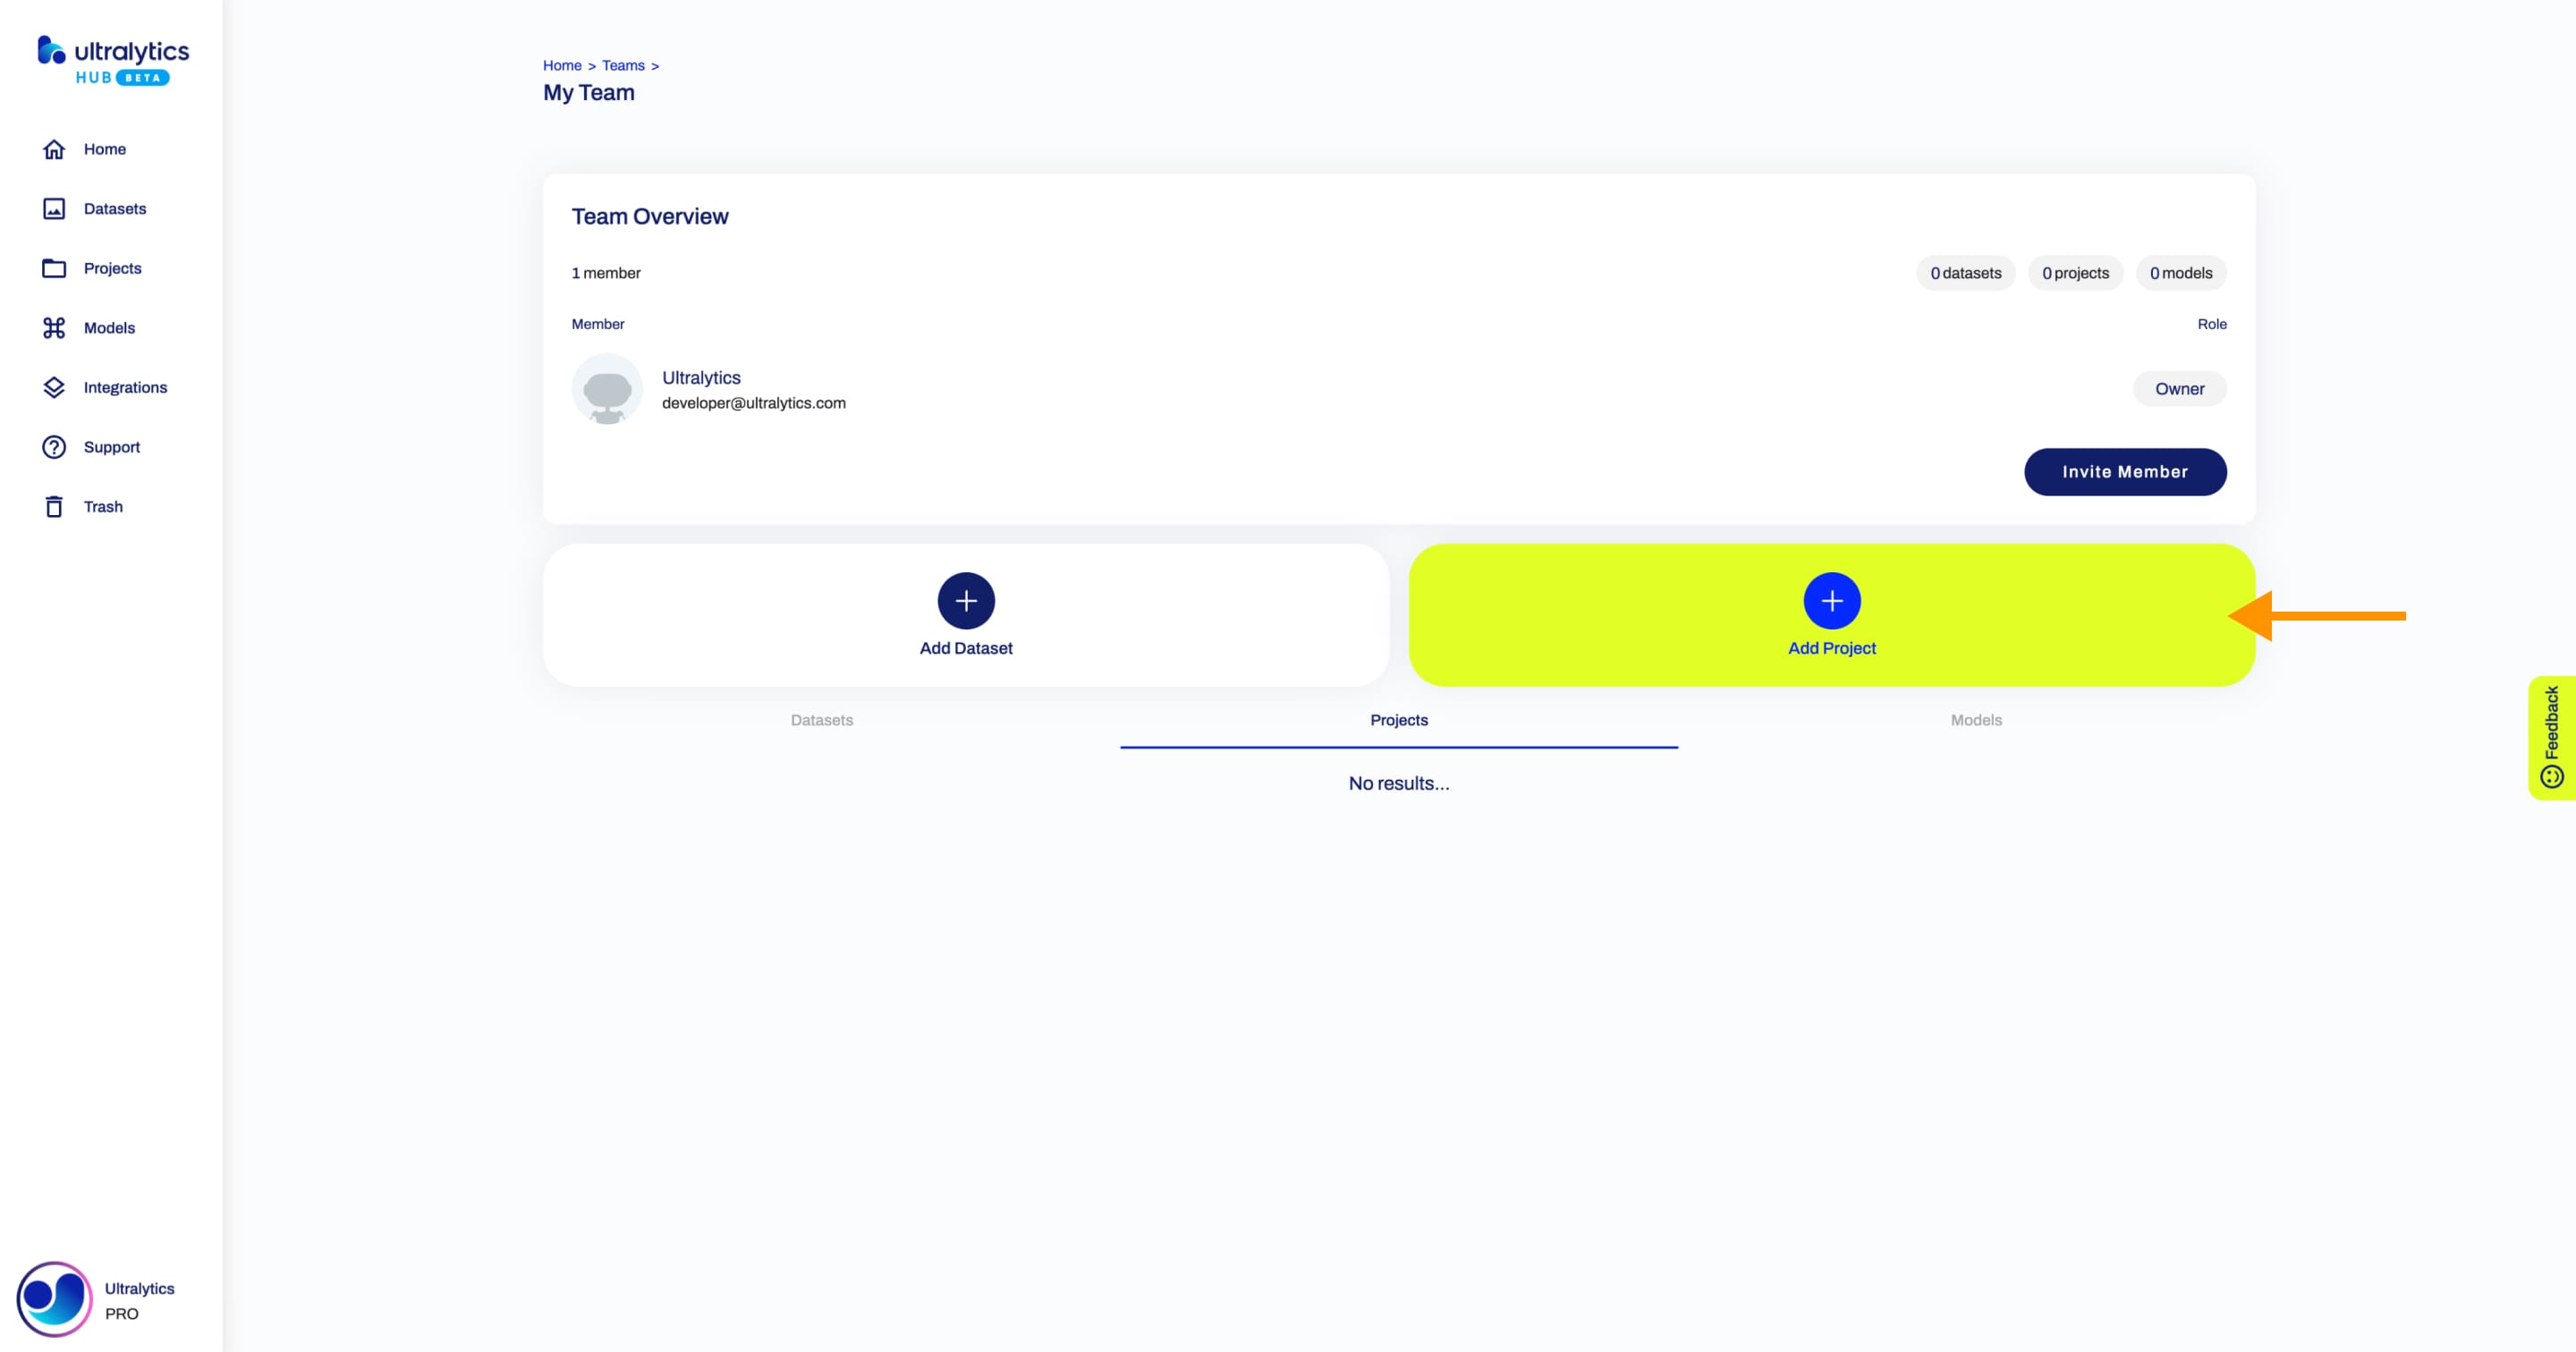
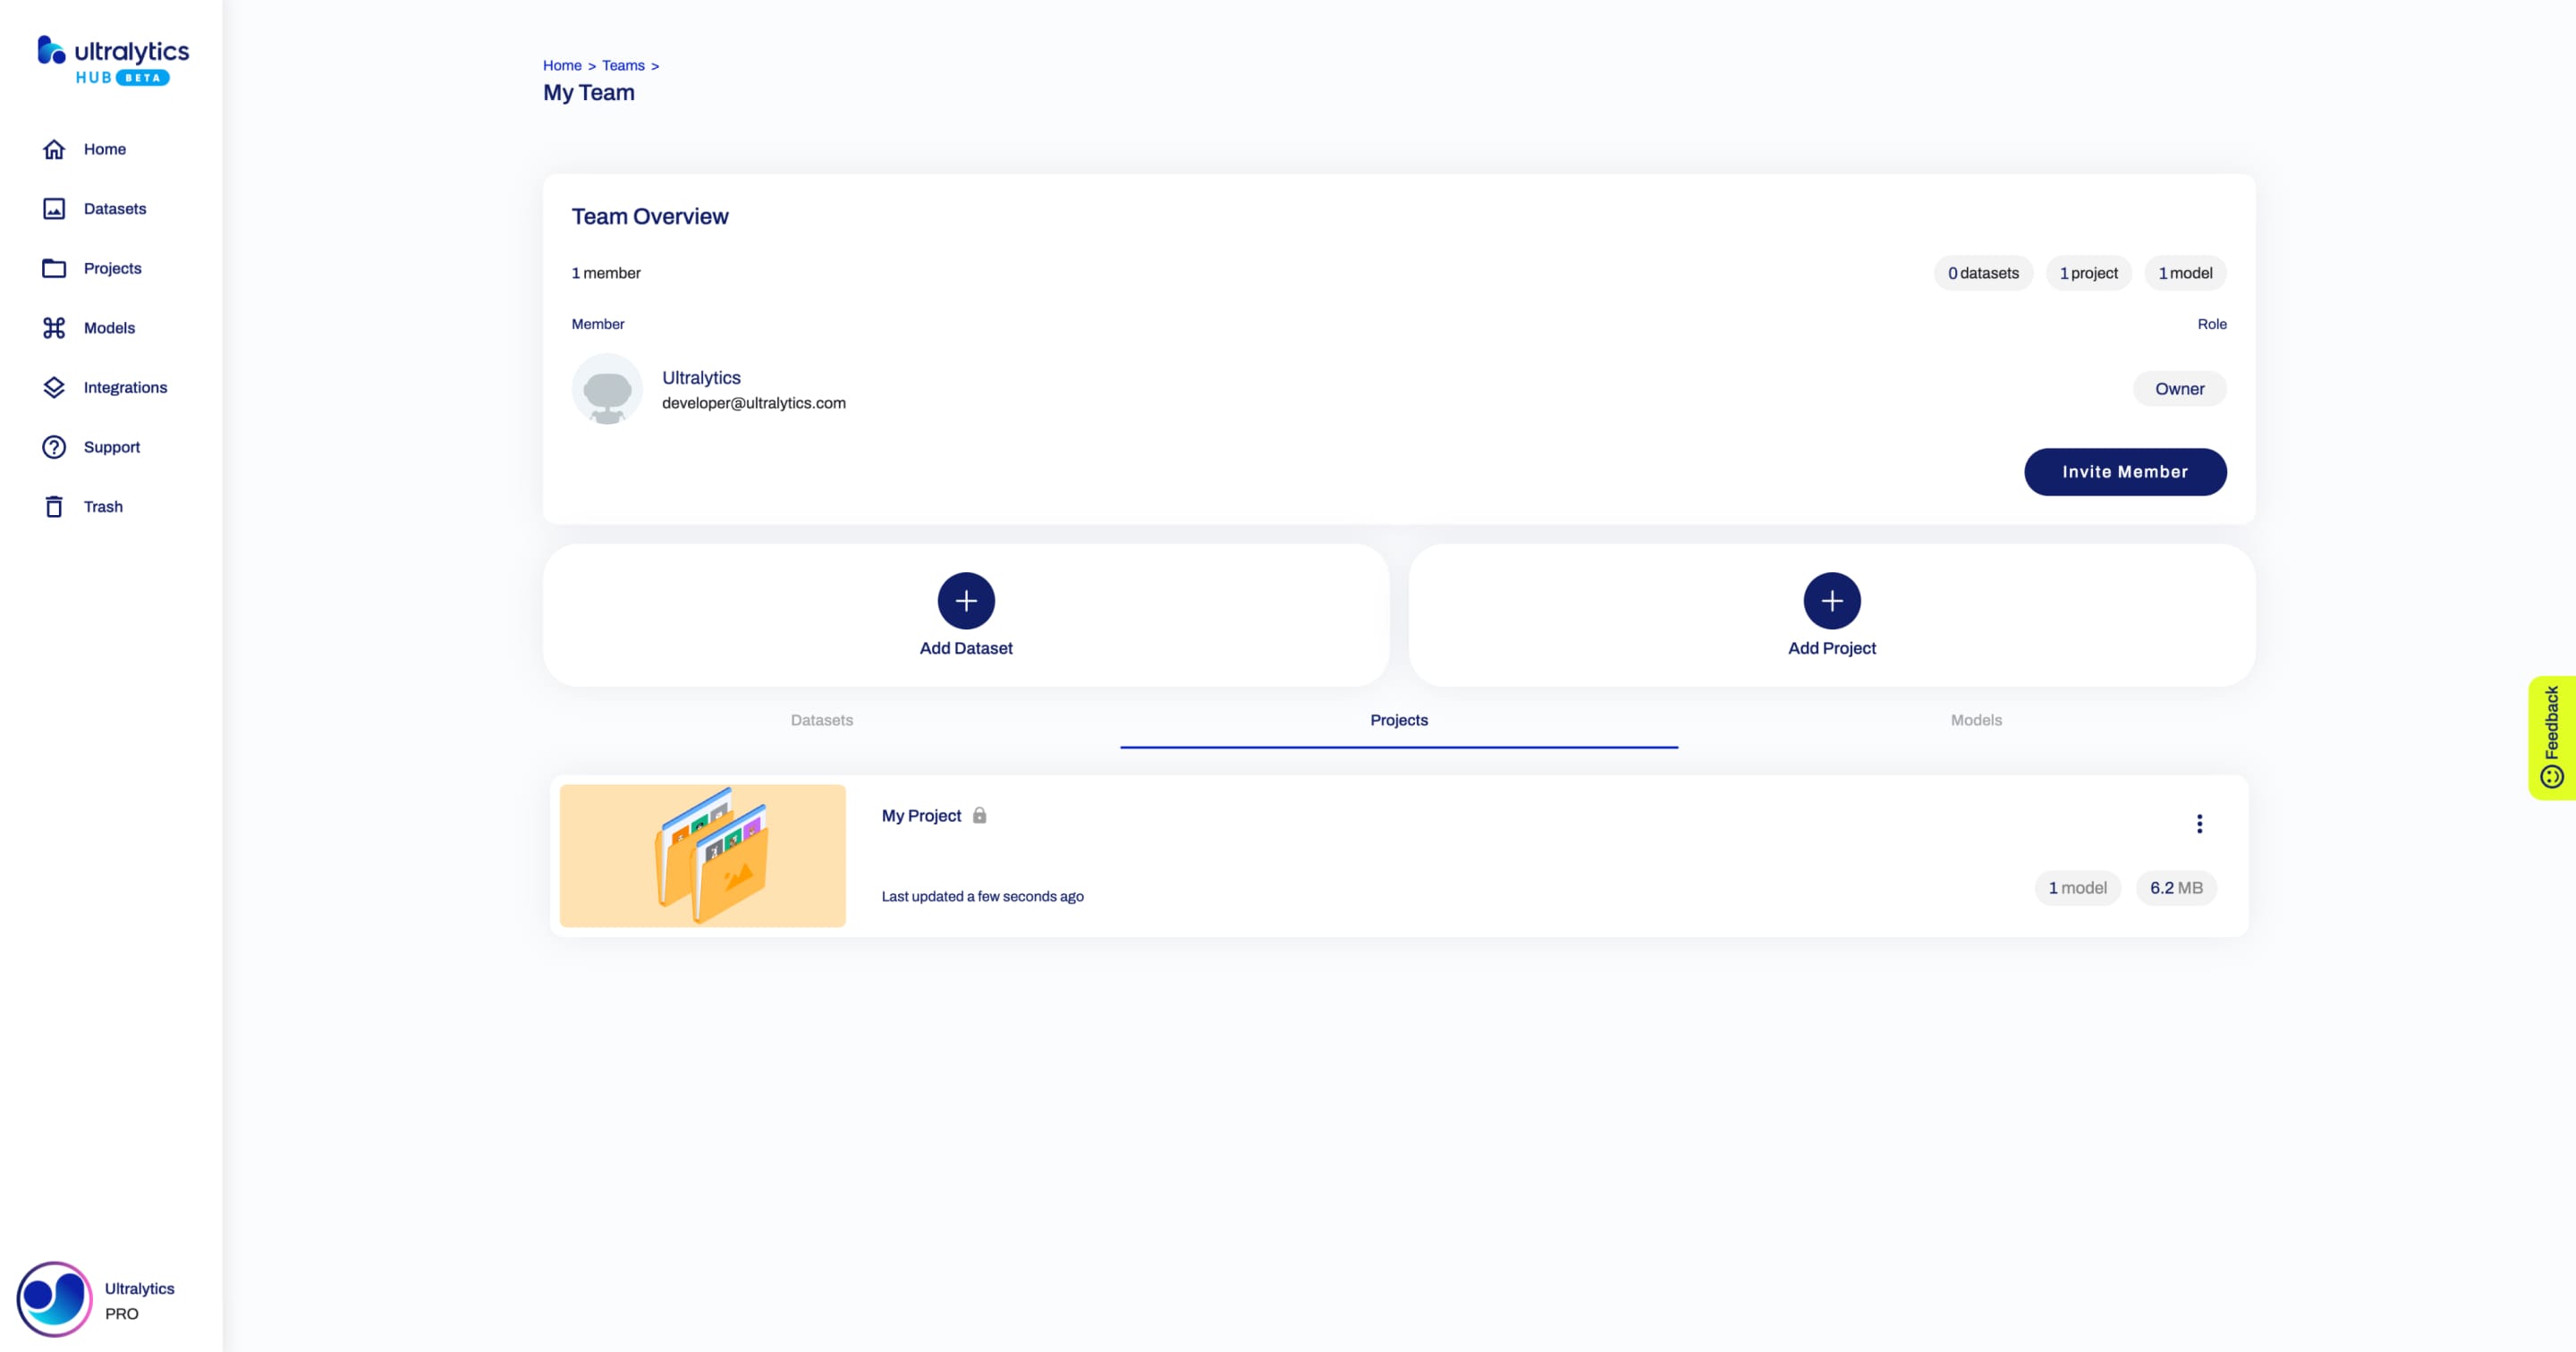
Share Project
Navigate to the Team page of the team you want to share your project with and click on the Add Project button.
Select the project you want to share with your team and click on the Add button.
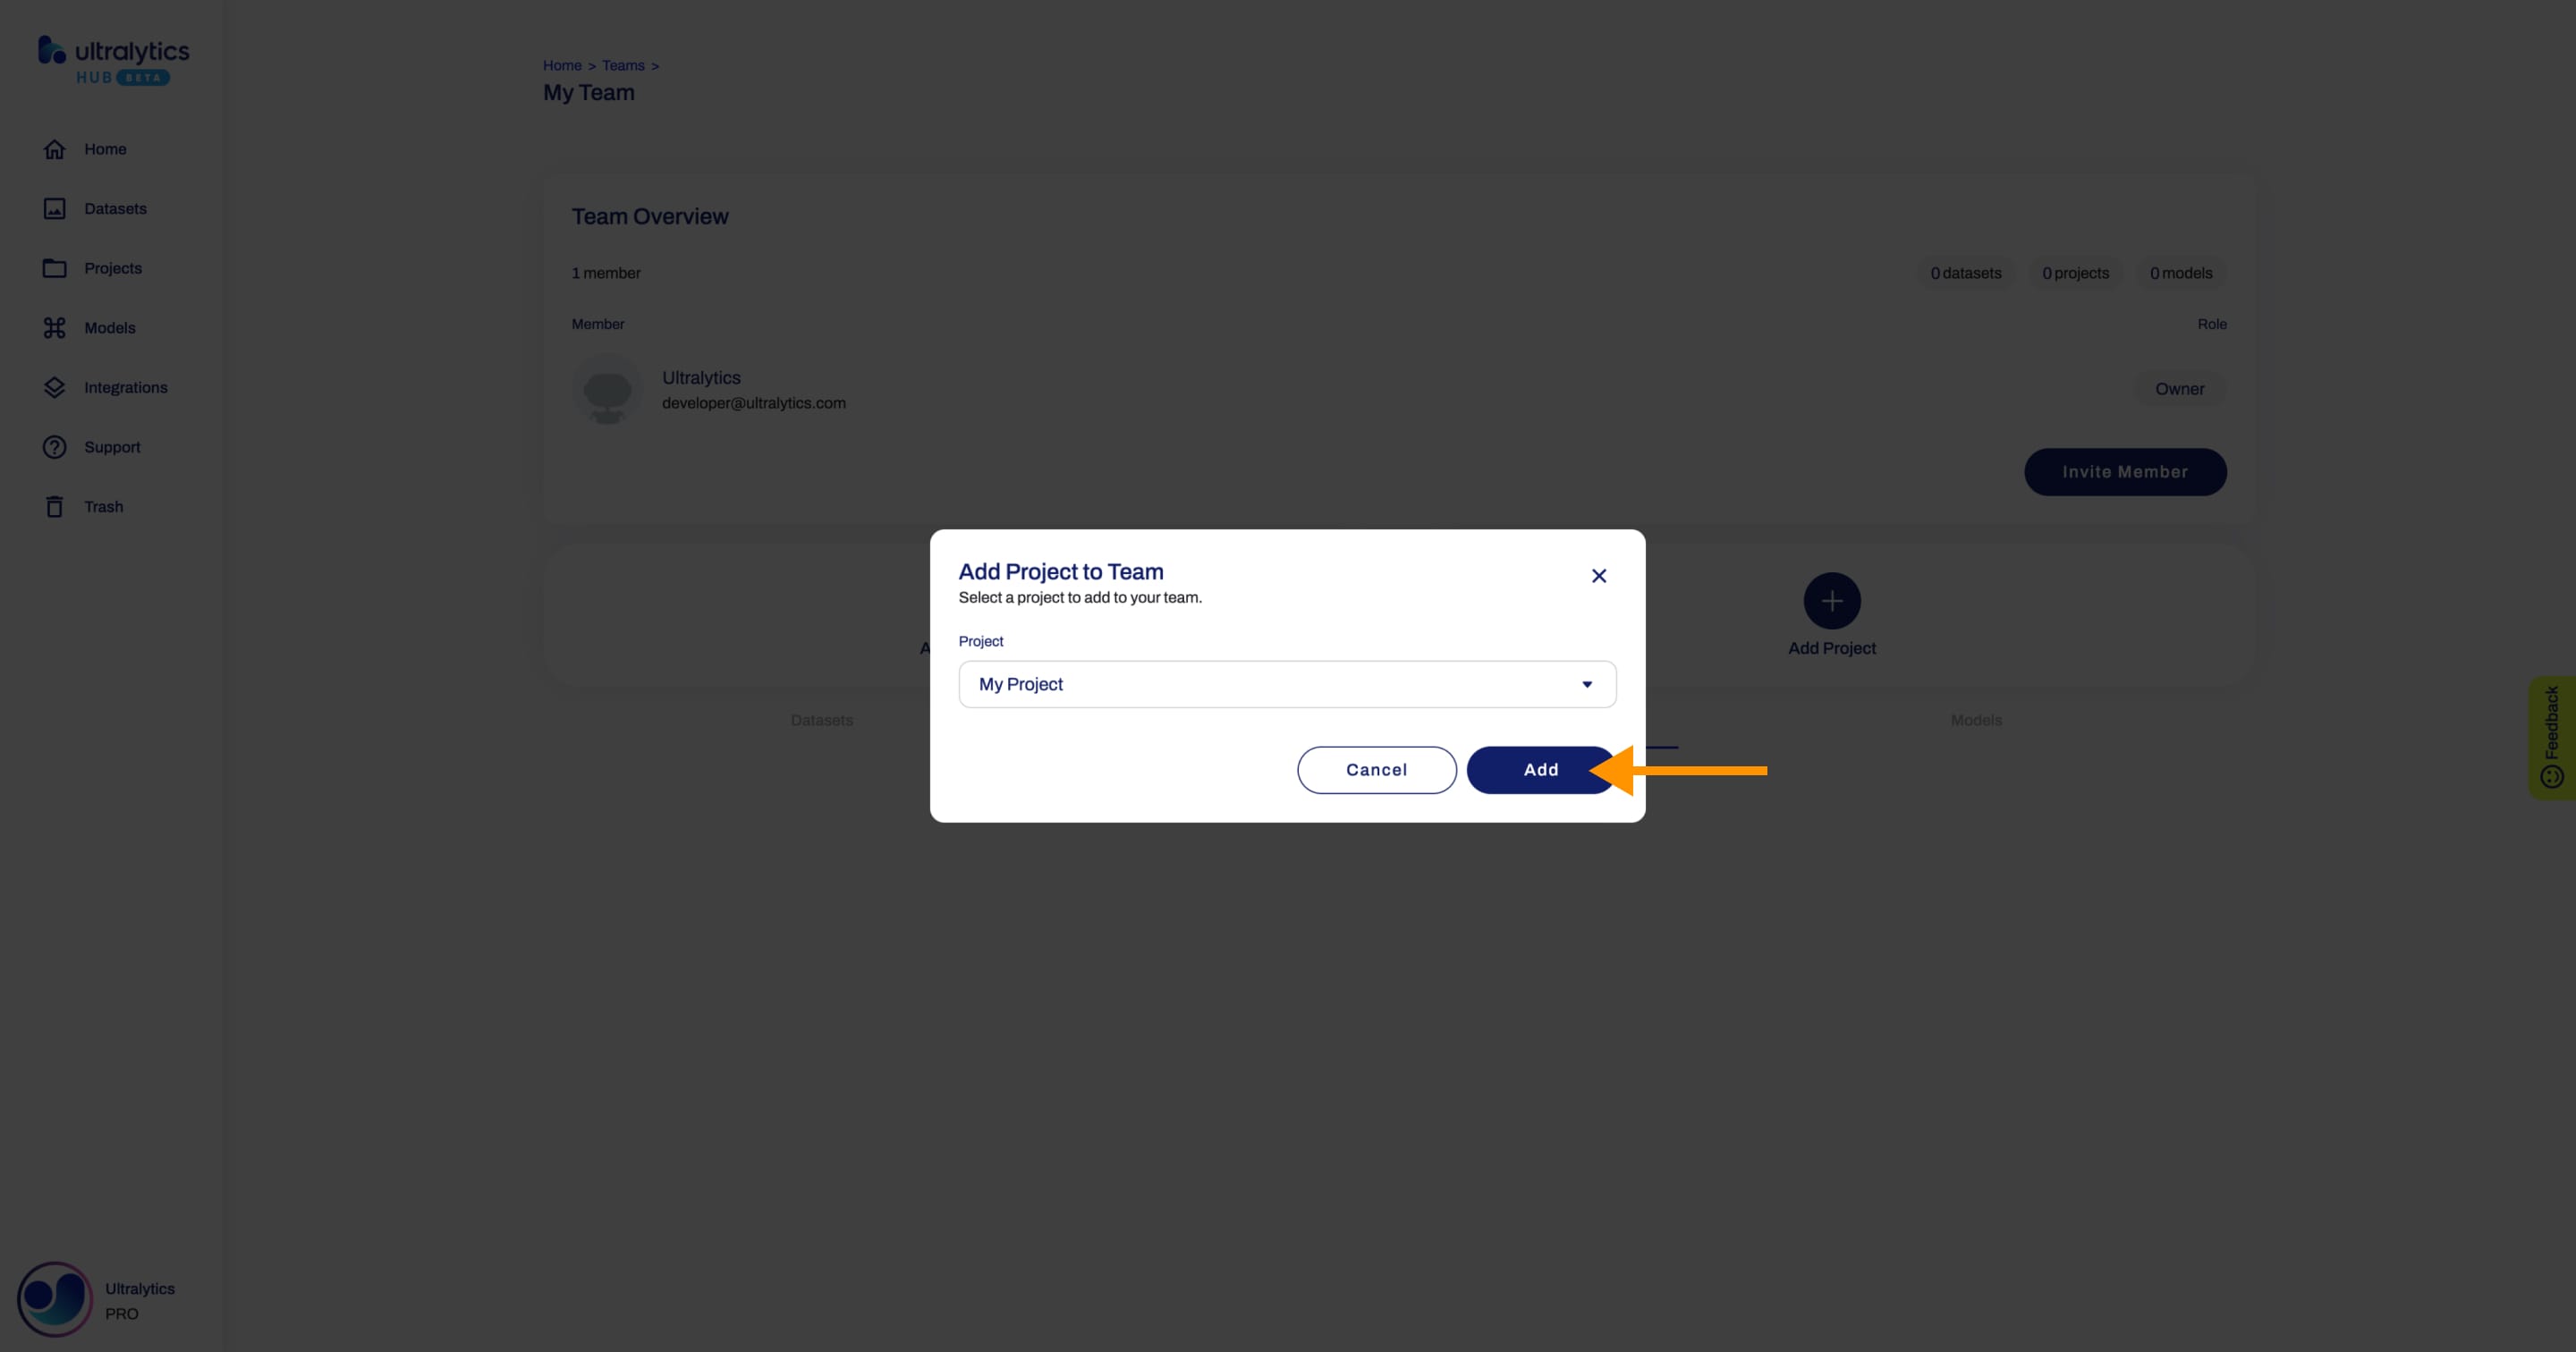
That's it! Your team now has access to your project.
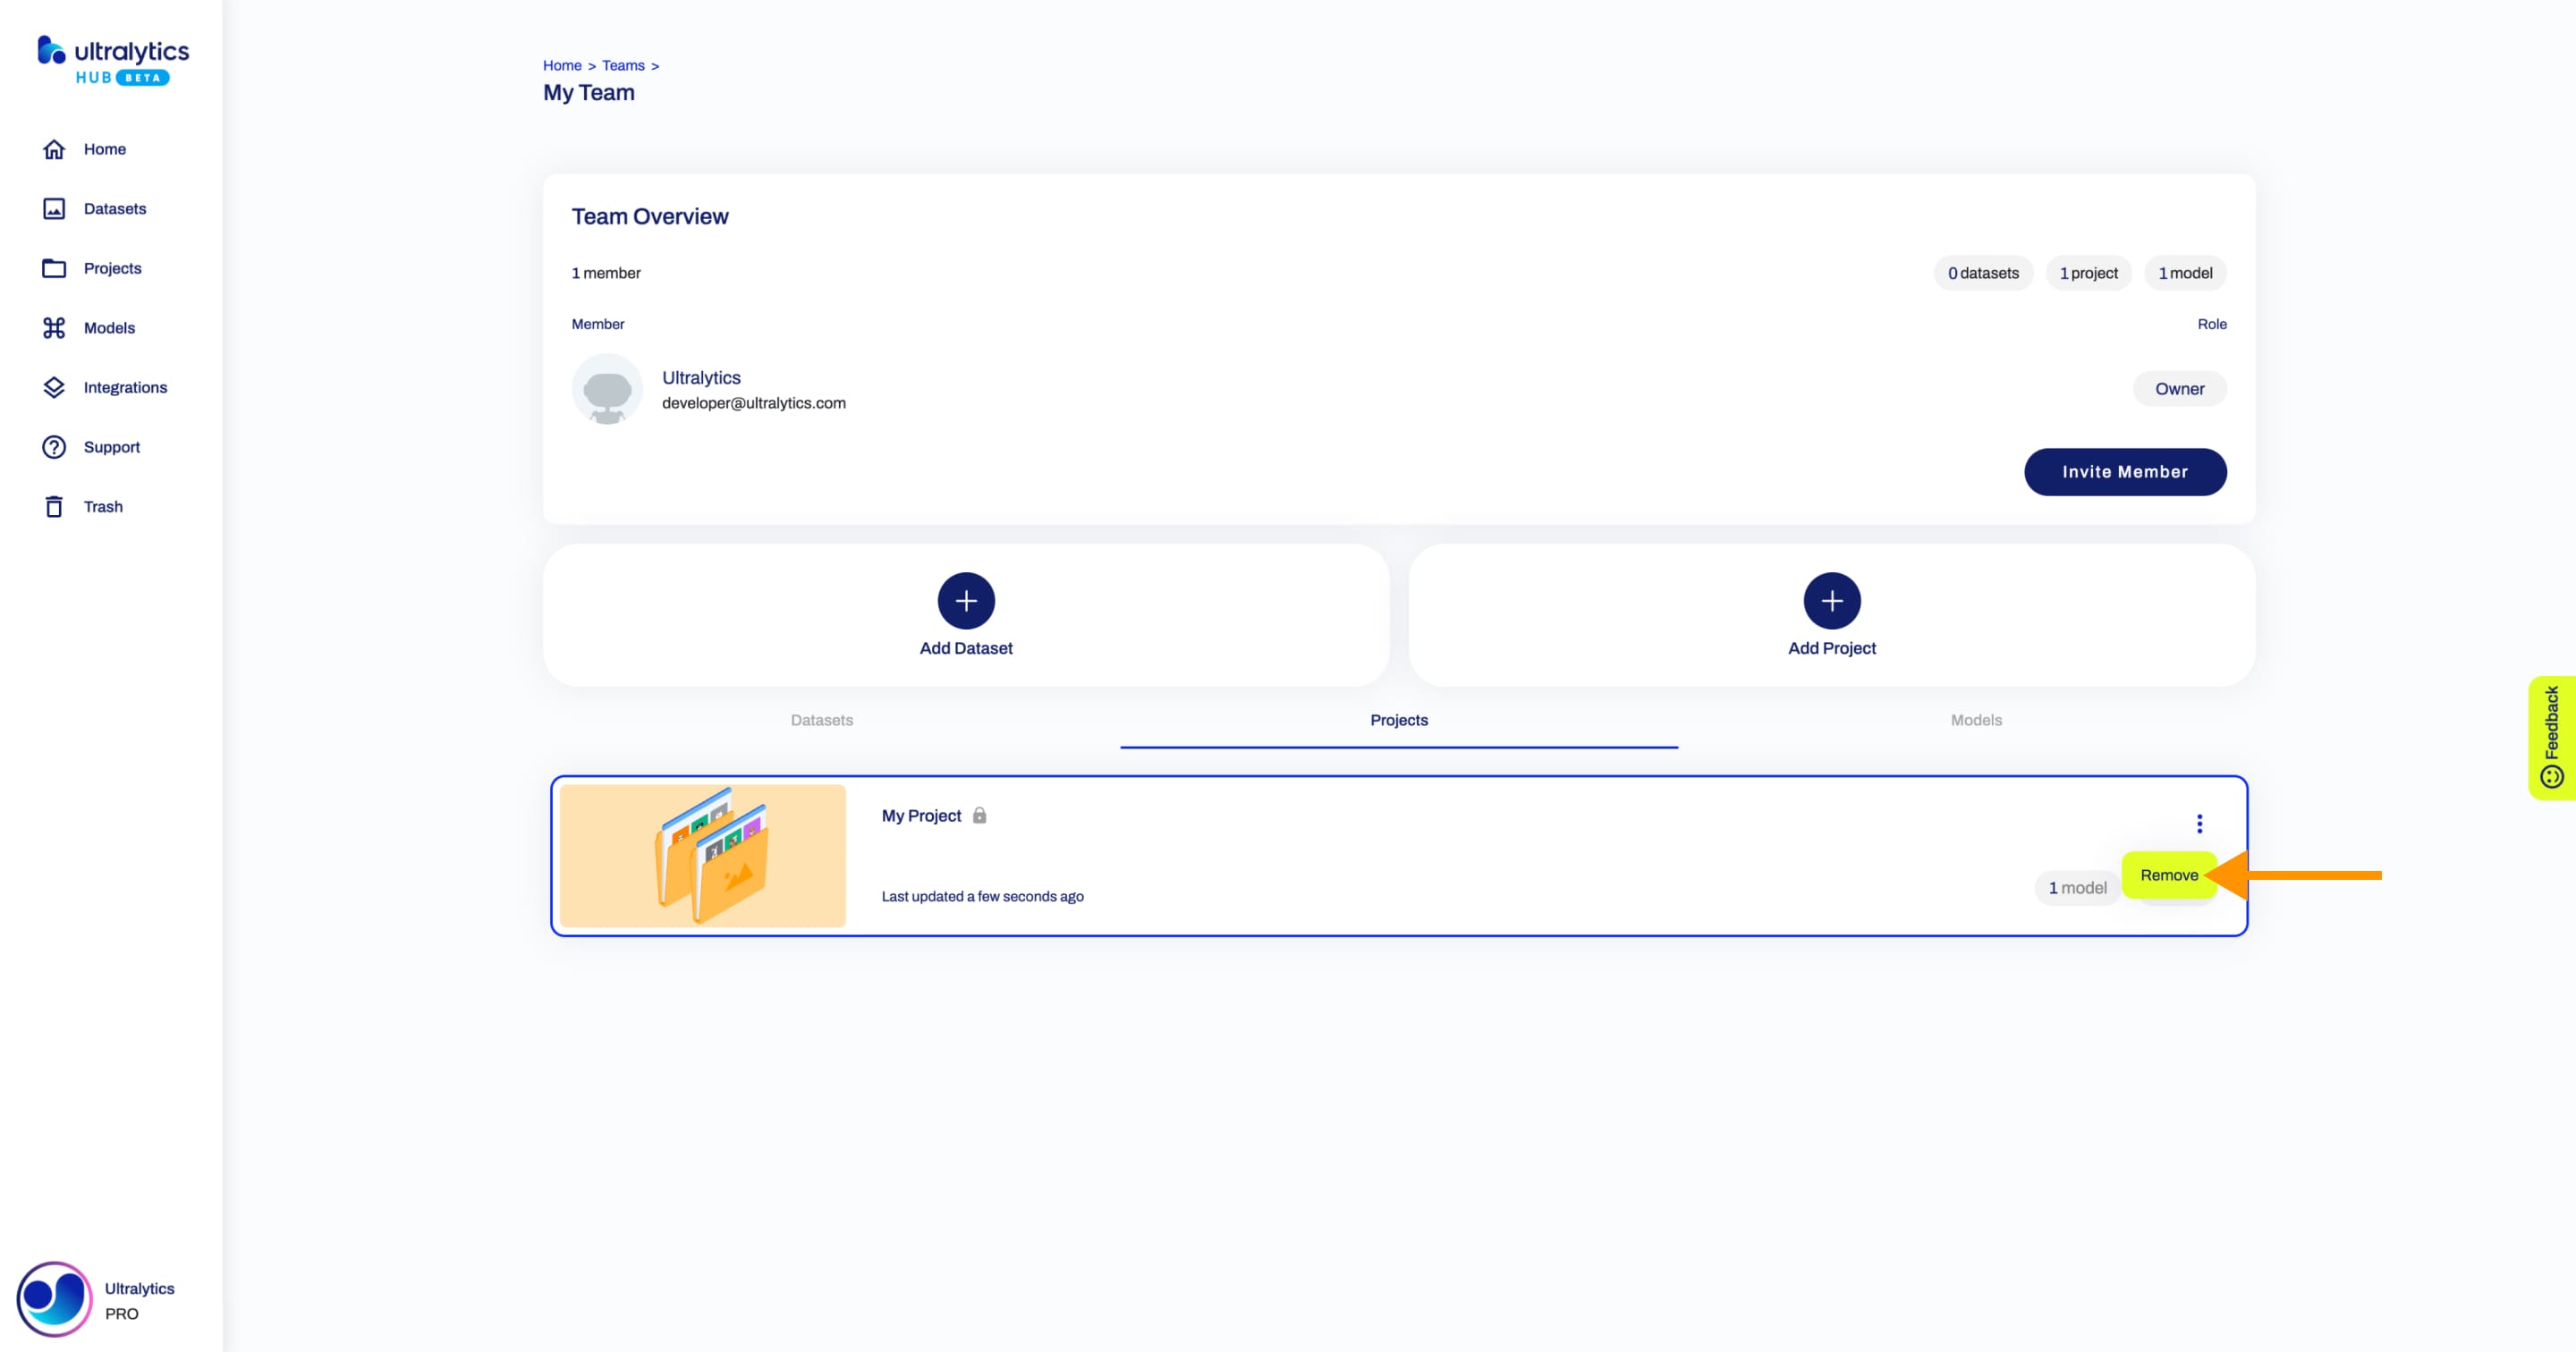
??? tip "Tip"
As a team owner or team admin, you can remove a shared project.
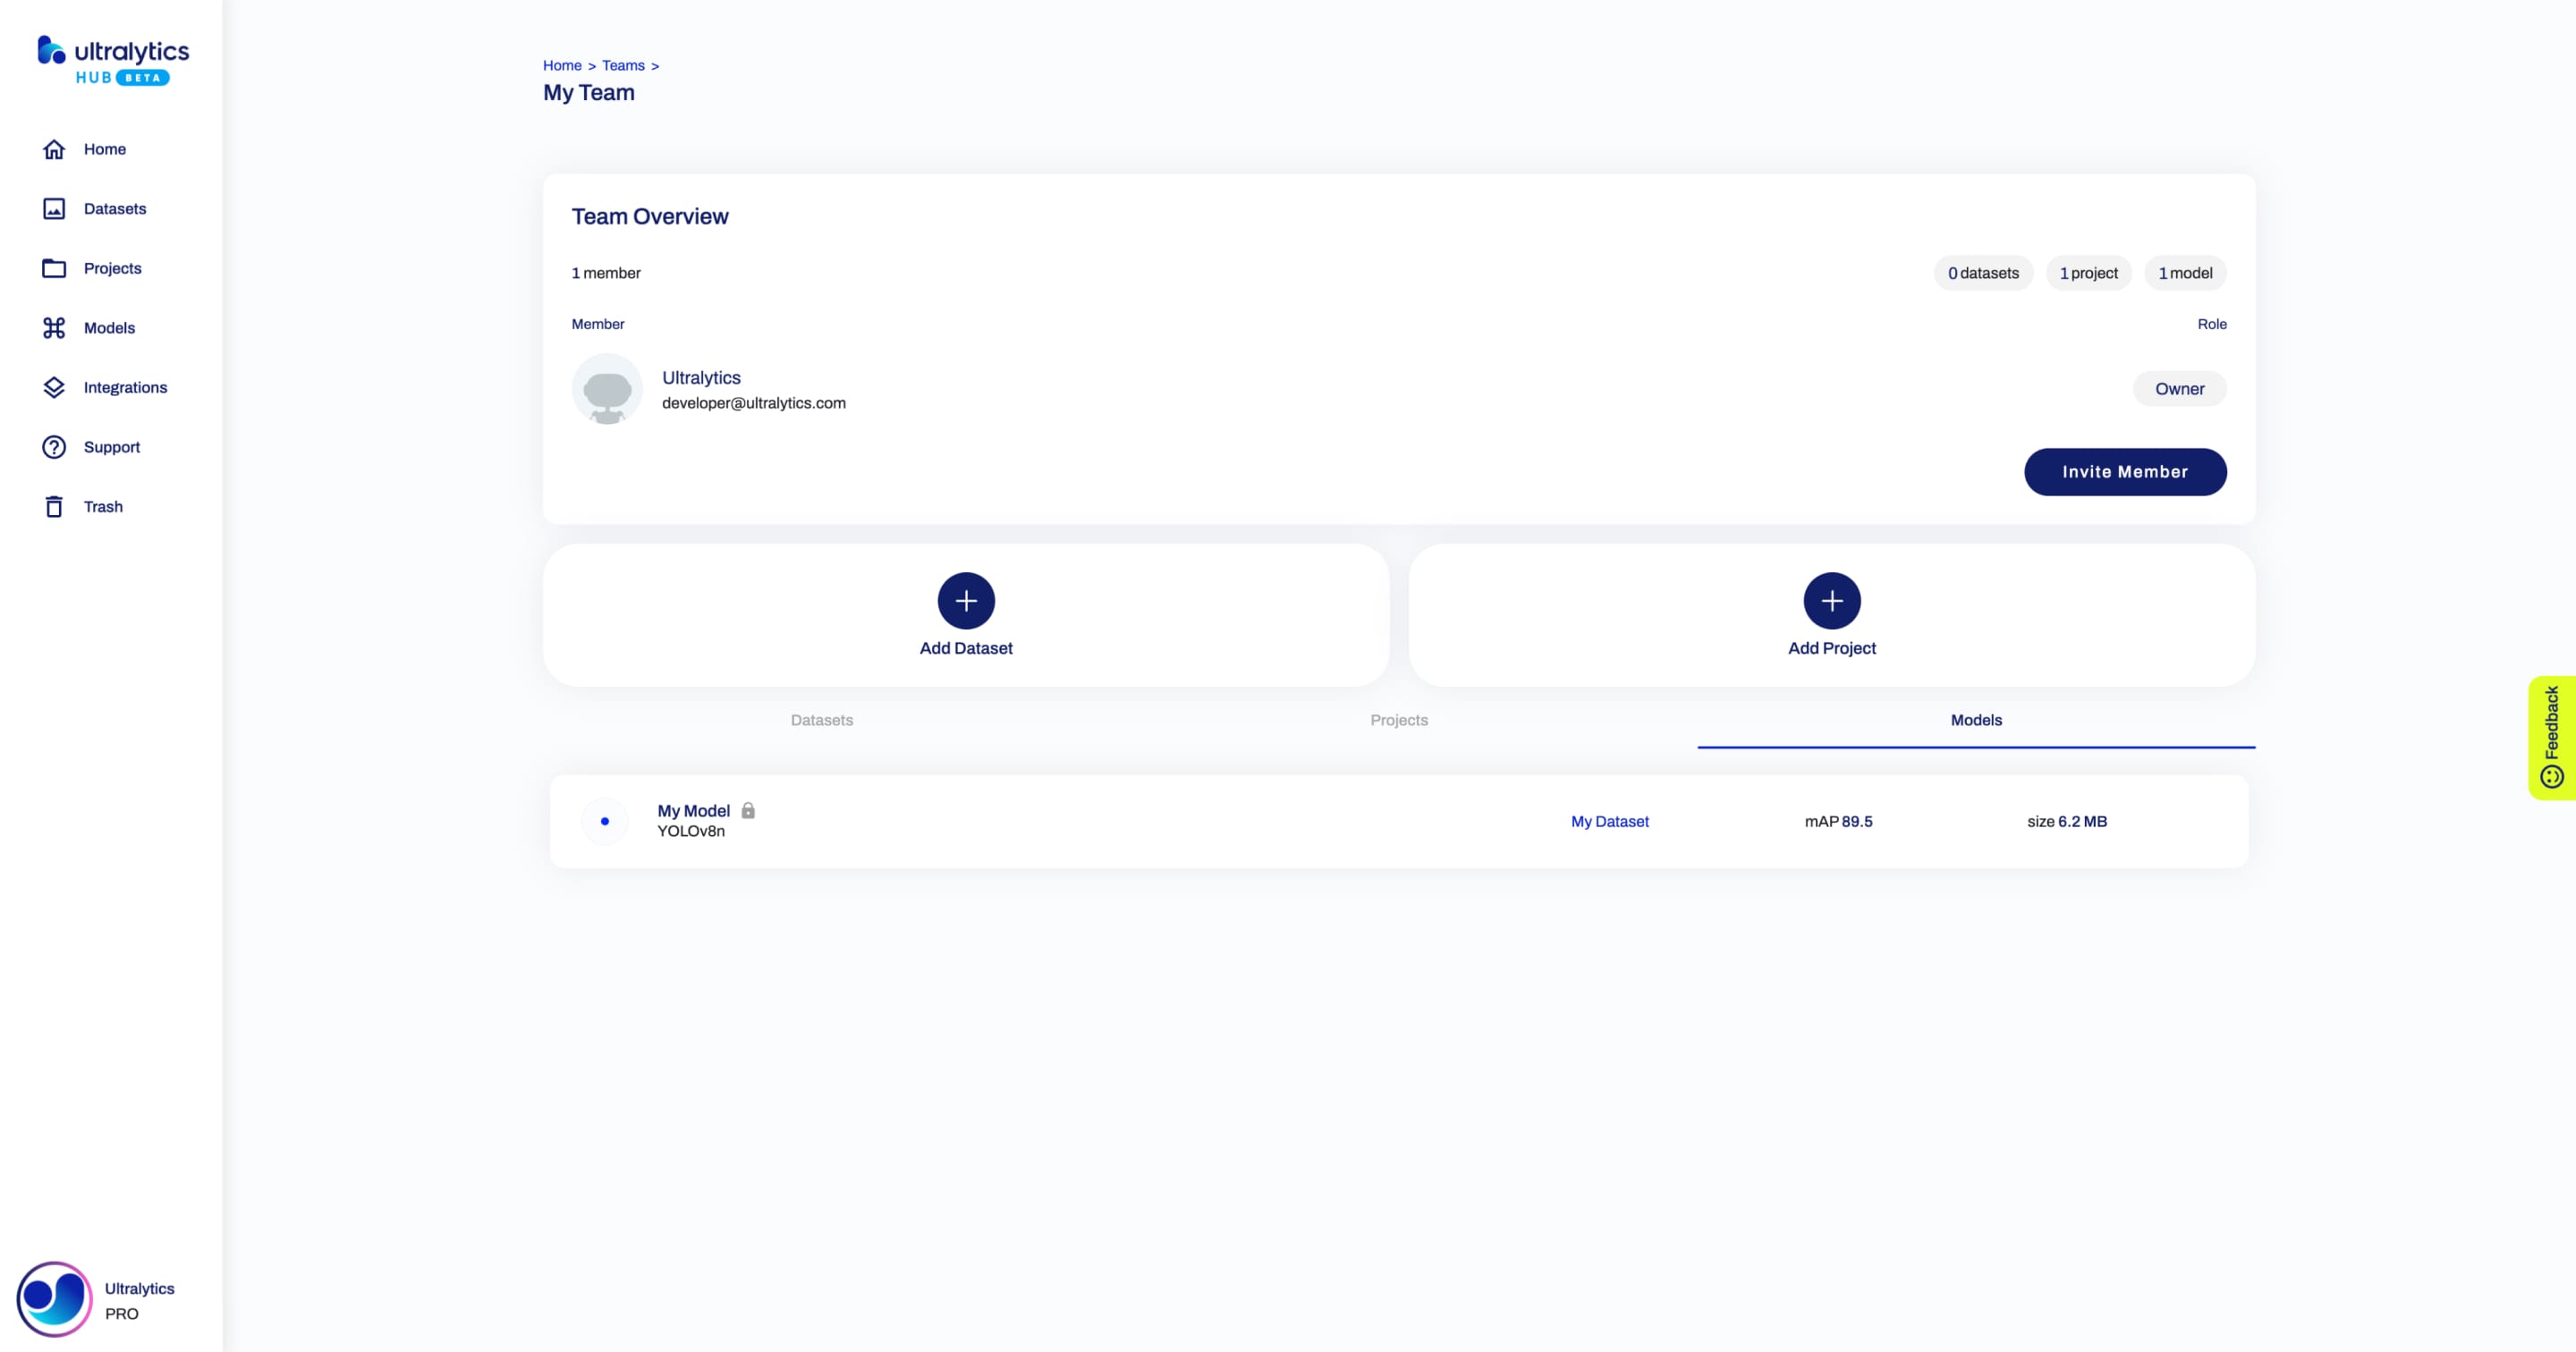
!!! note "Note"
When you share a project with your team, all models inside the project are shared as well.
comments: true
description: Discover Ultralytics YOLOv8 - the latest in real-time object detection and image segmentation. Learn its features and maximize its potential in your projects.
keywords: Ultralytics, YOLOv8, object detection, image segmentation, deep learning, computer vision, AI, machine learning, documentation, tutorial
 中文 |
한국어 |
日本語 |
Русский |
Deutsch |
Français |
Español |
Português |
Türkçe |
Tiếng Việt |
हिन्दी |
العربية
中文 |
한국어 |
日本語 |
Русский |
Deutsch |
Français |
Español |
Português |
Türkçe |
Tiếng Việt |
हिन्दी |
العربية


Introducing Ultralytics YOLOv8, the latest version of the acclaimed real-time object detection and image segmentation model. YOLOv8 is built on cutting-edge advancements in deep learning and computer vision, offering unparalleled performance in terms of speed and accuracy. Its streamlined design makes it suitable for various applications and easily adaptable to different hardware platforms, from edge devices to cloud APIs.
Explore the YOLOv8 Docs, a comprehensive resource designed to help you understand and utilize its features and capabilities. Whether you are a seasoned machine learning practitioner or new to the field, this hub aims to maximize YOLOv8's potential in your projects
Where to Start
- Install
ultralyticswith pip and get up and running in minutes :material-clock-fast: Get Started - Predict new images and videos with YOLOv8 :octicons-image-16: Predict on Images
- Train a new YOLOv8 model on your own custom dataset :fontawesome-solid-brain: Train a Model
- Tasks YOLOv8 tasks like segment, classify, pose and track :material-magnify-expand: Explore Tasks
- NEW 🚀 Explore datasets with advanced semantic and SQL search :material-magnify-expand: Explore a Dataset
Watch: How to Train a YOLOv8 model on Your Custom Dataset in Google Colab.
YOLO: A Brief History
YOLO (You Only Look Once), a popular object detection and image segmentation model, was developed by Joseph Redmon and Ali Farhadi at the University of Washington. Launched in 2015, YOLO quickly gained popularity for its high speed and accuracy.
- YOLOv2, released in 2016, improved the original model by incorporating batch normalization, anchor boxes, and dimension clusters.
- YOLOv3, launched in 2018, further enhanced the model's performance using a more efficient backbone network, multiple anchors and spatial pyramid pooling.
- YOLOv4 was released in 2020, introducing innovations like Mosaic data augmentation, a new anchor-free detection head, and a new loss function.
- YOLOv5 further improved the model's performance and added new features such as hyperparameter optimization, integrated experiment tracking and automatic export to popular export formats.
- YOLOv6 was open-sourced by Meituan in 2022 and is in use in many of the company's autonomous delivery robots.
- YOLOv7 added additional tasks such as pose estimation on the COCO keypoints dataset.
- YOLOv8 is the latest version of YOLO by Ultralytics. As a cutting-edge, state-of-the-art (SOTA) model, YOLOv8 builds on the success of previous versions, introducing new features and improvements for enhanced performance, flexibility, and efficiency. YOLOv8 supports a full range of vision AI tasks, including detection, segmentation, pose estimation, tracking, and classification. This versatility allows users to leverage YOLOv8's capabilities across diverse applications and domains.
- YOLOv9 introduces innovative methods like Programmable Gradient Information (PGI) and the Generalized Efficient Layer Aggregation Network (GELAN).
- YOLOv10 is created by researchers from Tsinghua University using the Ultralytics Python package. This version provides real-time object detection advancements by introducing an End-to-End head that eliminates Non-Maximum Suppression (NMS) requirements.
YOLO Licenses: How is Ultralytics YOLO licensed?
Ultralytics offers two licensing options to accommodate diverse use cases:
- AGPL-3.0 License: This OSI-approved open-source license is ideal for students and enthusiasts, promoting open collaboration and knowledge sharing. See the LICENSE file for more details.
- Enterprise License: Designed for commercial use, this license permits seamless integration of Ultralytics software and AI models into commercial goods and services, bypassing the open-source requirements of AGPL-3.0. If your scenario involves embedding our solutions into a commercial offering, reach out through Ultralytics Licensing.
Our licensing strategy is designed to ensure that any improvements to our open-source projects are returned to the community. We hold the principles of open source close to our hearts ❤️, and our mission is to guarantee that our contributions can be utilized and expanded upon in ways that are beneficial to all.
FAQ
What is Ultralytics YOLO and how does it improve object detection?
Ultralytics YOLO is the latest advancement in the acclaimed YOLO (You Only Look Once) series for real-time object detection and image segmentation. It builds on previous versions by introducing new features and improvements for enhanced performance, flexibility, and efficiency. YOLOv8 supports various vision AI tasks such as detection, segmentation, pose estimation, tracking, and classification. Its state-of-the-art architecture ensures superior speed and accuracy, making it suitable for diverse applications, including edge devices and cloud APIs.
How can I get started with YOLO installation and setup?
Getting started with YOLO is quick and straightforward. You can install the Ultralytics package using pip and get up and running in minutes. Here's a basic installation command:
pip install ultralytics
For a comprehensive step-by-step guide, visit our quickstart guide. This resource will help you with installation instructions, initial setup, and running your first model.
How can I train a custom YOLO model on my dataset?
Training a custom YOLO model on your dataset involves a few detailed steps:
- Prepare your annotated dataset.
- Configure the training parameters in a YAML file.
- Use the
yolo traincommand to start training.
Here's an example command:
yolo train model=yolov8n.pt data=coco128.yaml epochs=100 imgsz=640
For a detailed walkthrough, check out our Train a Model guide, which includes examples and tips for optimizing your training process.
What are the licensing options available for Ultralytics YOLO?
Ultralytics offers two licensing options for YOLO:
- AGPL-3.0 License: This open-source license is ideal for educational and non-commercial use, promoting open collaboration.
- Enterprise License: This is designed for commercial applications, allowing seamless integration of Ultralytics software into commercial products without the restrictions of the AGPL-3.0 license.
For more details, visit our Licensing page.
How can Ultralytics YOLO be used for real-time object tracking?
Ultralytics YOLO supports efficient and customizable multi-object tracking. To utilize tracking capabilities, you can use the yolo track command as shown below:
yolo track model=yolov8n.pt source=video.mp4
For a detailed guide on setting up and running object tracking, check our tracking mode documentation, which explains the configuration and practical applications in real-time scenarios.
comments: true
description: Learn step-by-step how to deploy Ultralytics' YOLOv8 on Amazon SageMaker Endpoints, from setup to testing, for powerful real-time inference with AWS services.
keywords: YOLOv8, Amazon SageMaker, AWS, Ultralytics, machine learning, computer vision, model deployment, AWS CloudFormation, AWS CDK, real-time inference
A Guide to Deploying YOLOv8 on Amazon SageMaker Endpoints
Deploying advanced computer vision models like Ultralytics' YOLOv8 on Amazon SageMaker Endpoints opens up a wide range of possibilities for various machine learning applications. The key to effectively using these models lies in understanding their setup, configuration, and deployment processes. YOLOv8 becomes even more powerful when integrated seamlessly with Amazon SageMaker, a robust and scalable machine learning service by AWS.
This guide will take you through the process of deploying YOLOv8 PyTorch models on Amazon SageMaker Endpoints step by step. You'll learn the essentials of preparing your AWS environment, configuring the model appropriately, and using tools like AWS CloudFormation and the AWS Cloud Development Kit (CDK) for deployment.
Amazon SageMaker
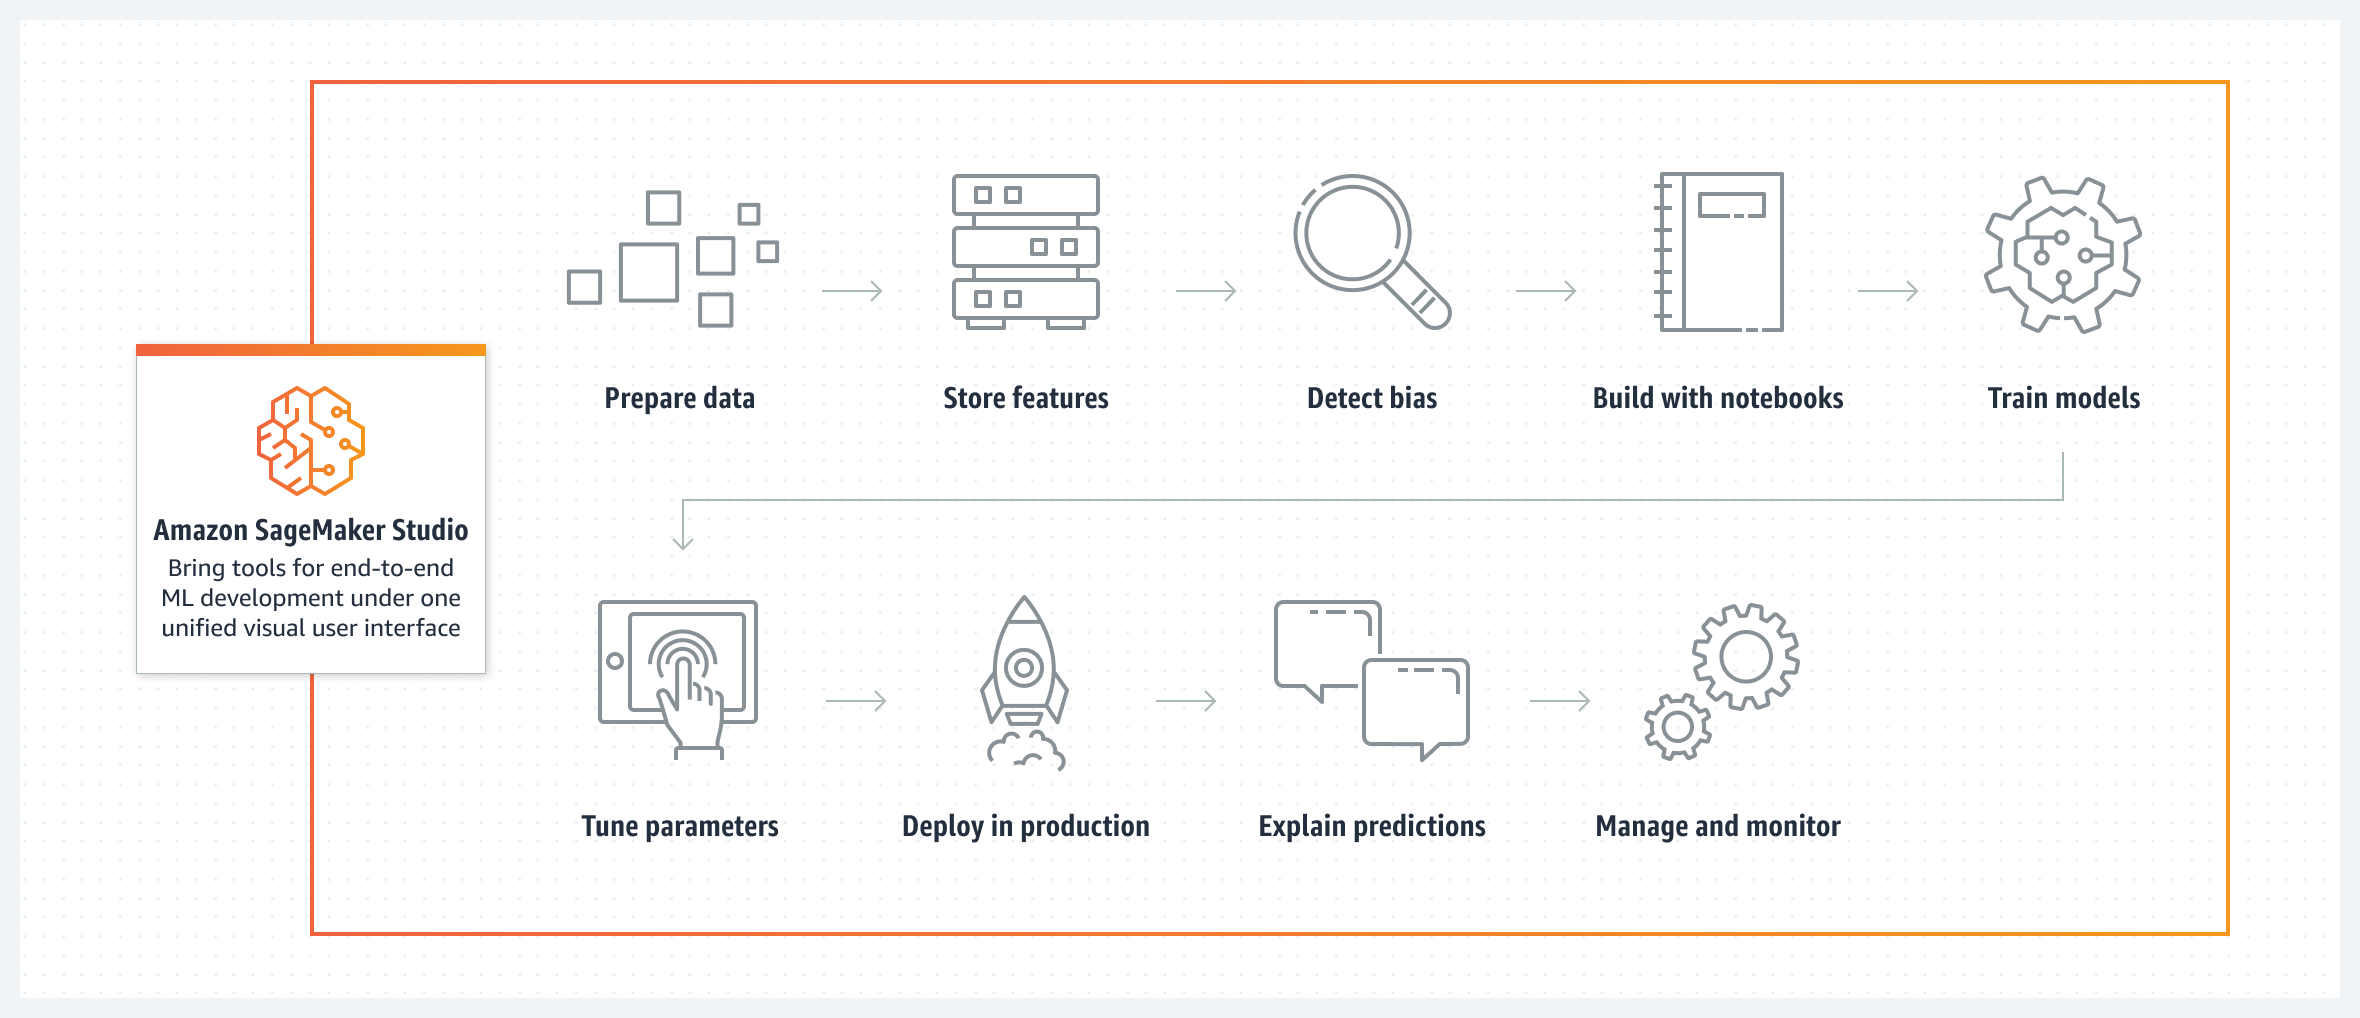
Amazon SageMaker is a machine learning service from Amazon Web Services (AWS) that simplifies the process of building, training, and deploying machine learning models. It provides a broad range of tools for handling various aspects of machine learning workflows. This includes automated features for tuning models, options for training models at scale, and straightforward methods for deploying models into production. SageMaker supports popular machine learning frameworks, offering the flexibility needed for diverse projects. Its features also cover data labeling, workflow management, and performance analysis.
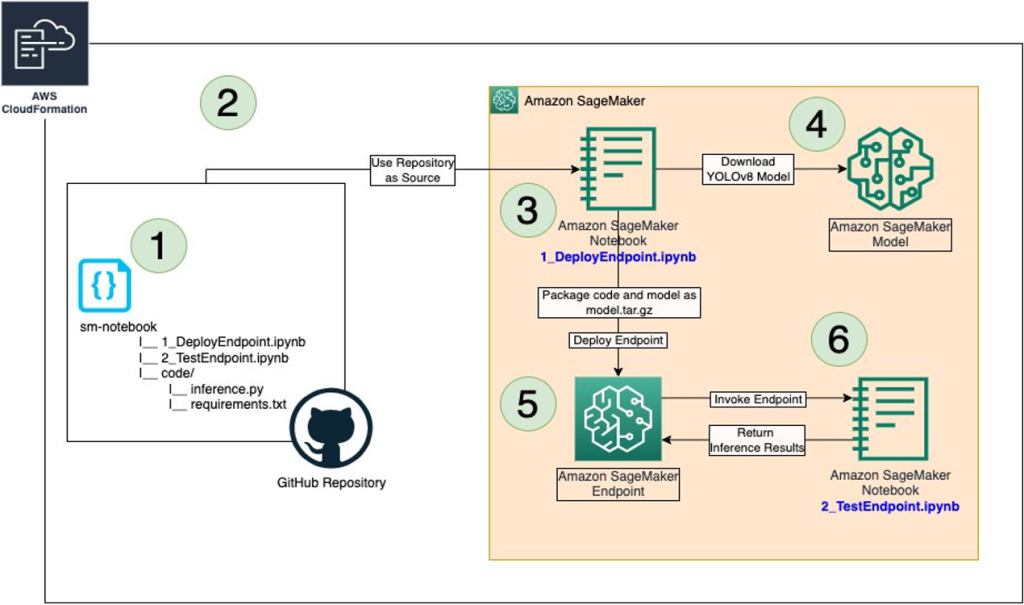
Deploying YOLOv8 on Amazon SageMaker Endpoints
Deploying YOLOv8 on Amazon SageMaker lets you use its managed environment for real-time inference and take advantage of features like autoscaling. Take a look at the AWS architecture below.
Step 1: Setup Your AWS Environment
First, ensure you have the following prerequisites in place:
-
An AWS Account: If you don't already have one, sign up for an AWS account.
-
Configured IAM Roles: You'll need an IAM role with the necessary permissions for Amazon SageMaker, AWS CloudFormation, and Amazon S3. This role should have policies that allow it to access these services.
-
AWS CLI: If not already installed, download and install the AWS Command Line Interface (CLI) and configure it with your account details. Follow the AWS CLI instructions for installation.
-
AWS CDK: If not already installed, install the AWS Cloud Development Kit (CDK), which will be used for scripting the deployment. Follow the AWS CDK instructions for installation.
-
Adequate Service Quota: Confirm that you have sufficient quotas for two separate resources in Amazon SageMaker: one for
ml.m5.4xlargefor endpoint usage and another forml.m5.4xlargefor notebook instance usage. Each of these requires a minimum of one quota value. If your current quotas are below this requirement, it's important to request an increase for each. You can request a quota increase by following the detailed instructions in the AWS Service Quotas documentation.
Step 2: Clone the YOLOv8 SageMaker Repository
The next step is to clone the specific AWS repository that contains the resources for deploying YOLOv8 on SageMaker. This repository, hosted on GitHub, includes the necessary CDK scripts and configuration files.
- Clone the GitHub Repository: Execute the following command in your terminal to clone the host-yolov8-on-sagemaker-endpoint repository:
git clone https://github.com/aws-samples/host-yolov8-on-sagemaker-endpoint.git
- Navigate to the Cloned Directory: Change your directory to the cloned repository:
cd host-yolov8-on-sagemaker-endpoint/yolov8-pytorch-cdk
Step 3: Set Up the CDK Environment
Now that you have the necessary code, set up your environment for deploying with AWS CDK.
- Create a Python Virtual Environment: This isolates your Python environment and dependencies. Run:
python3 -m venv .venv
- Activate the Virtual Environment:
source .venv/bin/activate
- Install Dependencies: Install the required Python dependencies for the project:
pip3 install -r requirements.txt
- Upgrade AWS CDK Library: Ensure you have the latest version of the AWS CDK library:
pip install --upgrade aws-cdk-lib
Step 4: Create the AWS CloudFormation Stack
- Synthesize the CDK Application: Generate the AWS CloudFormation template from your CDK code:
cdk synth
- Bootstrap the CDK Application: Prepare your AWS environment for CDK deployment:
cdk bootstrap
- Deploy the Stack: This will create the necessary AWS resources and deploy your model:
cdk deploy
Step 5: Deploy the YOLOv8 Model
Before diving into the deployment instructions, be sure to check out the range of YOLOv8 models offered by Ultralytics. This will help you choose the most appropriate model for your project requirements.
After creating the AWS CloudFormation Stack, the next step is to deploy YOLOv8.
-
Open the Notebook Instance: Go to the AWS Console and navigate to the Amazon SageMaker service. Select "Notebook Instances" from the dashboard, then locate the notebook instance that was created by your CDK deployment script. Open the notebook instance to access the Jupyter environment.
-
Access and Modify inference.py: After opening the SageMaker notebook instance in Jupyter, locate the inference.py file. Edit the output_fn function in inference.py as shown below and save your changes to the script, ensuring that there are no syntax errors.
import json


def output_fn(prediction_output):
    """Formats model outputs as JSON string, extracting attributes like boxes, masks, keypoints."""
    print("Executing output_fn from inference.py ...")
    infer = {}
    for result in prediction_output:
        if result.boxes is not None:
            infer["boxes"] = result.boxes.numpy().data.tolist()
        if result.masks is not None:
            infer["masks"] = result.masks.numpy().data.tolist()
        if result.keypoints is not None:
            infer["keypoints"] = result.keypoints.numpy().data.tolist()
        if result.obb is not None:
            infer["obb"] = result.obb.numpy().data.tolist()
        if result.probs is not None:
            infer["probs"] = result.probs.numpy().data.tolist()
    return json.dumps(infer)
- Deploy the Endpoint Using 1_DeployEndpoint.ipynb: In the Jupyter environment, open the 1_DeployEndpoint.ipynb notebook located in the sm-notebook directory. Follow the instructions in the notebook and run the cells to download the YOLOv8 model, package it with the updated inference code, and upload it to an Amazon S3 bucket. The notebook will guide you through creating and deploying a SageMaker endpoint for the YOLOv8 model.
Step 6: Testing Your Deployment
Now that your YOLOv8 model is deployed, it's important to test its performance and functionality.
-
Open the Test Notebook: In the same Jupyter environment, locate and open the 2_TestEndpoint.ipynb notebook, also in the sm-notebook directory.
-
Run the Test Notebook: Follow the instructions within the notebook to test the deployed SageMaker endpoint. This includes sending an image to the endpoint and running inferences. Then, you'll plot the output to visualize the model's performance and accuracy, as shown below.

- Clean-Up Resources: The test notebook will also guide you through the process of cleaning up the endpoint and the hosted model. This is an important step to manage costs and resources effectively, especially if you do not plan to use the deployed model immediately.
Step 7: Monitoring and Management
After testing, continuous monitoring and management of your deployed model are essential.
-
Monitor with Amazon CloudWatch: Regularly check the performance and health of your SageMaker endpoint using Amazon CloudWatch.
-
Manage the Endpoint: Use the SageMaker console for ongoing management of the endpoint. This includes scaling, updating, or redeploying the model as required.
By completing these steps, you will have successfully deployed and tested a YOLOv8 model on Amazon SageMaker Endpoints. This process not only equips you with practical experience in using AWS services for machine learning deployment but also lays the foundation for deploying other advanced models in the future.
Summary
This guide took you step by step through deploying YOLOv8 on Amazon SageMaker Endpoints using AWS CloudFormation and the AWS Cloud Development Kit (CDK). The process includes cloning the necessary GitHub repository, setting up the CDK environment, deploying the model using AWS services, and testing its performance on SageMaker.
For more technical details, refer to this article on the AWS Machine Learning Blog. You can also check out the official Amazon SageMaker Documentation for more insights into various features and functionalities.
Are you interested in learning more about different YOLOv8 integrations? Visit the Ultralytics integrations guide page to discover additional tools and capabilities that can enhance your machine-learning projects.
FAQ
How do I deploy the Ultralytics YOLOv8 model on Amazon SageMaker Endpoints?
To deploy the Ultralytics YOLOv8 model on Amazon SageMaker Endpoints, follow these steps:
- Set Up Your AWS Environment: Ensure you have an AWS Account, IAM roles with necessary permissions, and the AWS CLI configured. Install AWS CDK if not already done (refer to the AWS CDK instructions).
- Clone the YOLOv8 SageMaker Repository:
git clone https://github.com/aws-samples/host-yolov8-on-sagemaker-endpoint.git cd host-yolov8-on-sagemaker-endpoint/yolov8-pytorch-cdk - Set Up the CDK Environment: Create a Python virtual environment, activate it, install dependencies, and upgrade AWS CDK library.
python3 -m venv .venv source .venv/bin/activate pip3 install -r requirements.txt pip install --upgrade aws-cdk-lib - Deploy using AWS CDK: Synthesize and deploy the CloudFormation stack, bootstrap the environment.
cdk synth
cdk bootstrap
cdk deploy
For further details, review the documentation section.
What are the prerequisites for deploying YOLOv8 on Amazon SageMaker?
To deploy YOLOv8 on Amazon SageMaker, ensure you have the following prerequisites:
- AWS Account: Active AWS account (sign up here).
- IAM Roles: Configured IAM roles with permissions for SageMaker, CloudFormation, and Amazon S3.
- AWS CLI: Installed and configured AWS Command Line Interface (AWS CLI installation guide).
- AWS CDK: Installed AWS Cloud Development Kit (CDK setup guide).
- Service Quotas: Sufficient quotas for
ml.m5.4xlargeinstances for both endpoint and notebook usage (request a quota increase).
For detailed setup, refer to this section.
Why should I use Ultralytics YOLOv8 on Amazon SageMaker?
Using Ultralytics YOLOv8 on Amazon SageMaker offers several advantages:
- Scalability and Management: SageMaker provides a managed environment with features like autoscaling, which helps in real-time inference needs.
- Integration with AWS Services: Seamlessly integrate with other AWS services, such as S3 for data storage, CloudFormation for infrastructure as code, and CloudWatch for monitoring.
- Ease of Deployment: Simplified setup using AWS CDK scripts and streamlined deployment processes.
- Performance: Leverage Amazon SageMaker's high-performance infrastructure for running large scale inference tasks efficiently.
Explore more about the advantages of using SageMaker in the introduction section.
Can I customize the inference logic for YOLOv8 on Amazon SageMaker?
Yes, you can customize the inference logic for YOLOv8 on Amazon SageMaker:
-
Modify
inference.py: Locate and customize theoutput_fnfunction in theinference.pyfile to tailor output formats.import json def output_fn(prediction_output): """Formats model outputs as JSON string, extracting attributes like boxes, masks, keypoints.""" infer = {} for result in prediction_output: if result.boxes is not None: infer["boxes"] = result.boxes.numpy().data.tolist() # Add more processing logic if necessary return json.dumps(infer) -
Deploy Updated Model: Ensure you redeploy the model using Jupyter notebooks provided (
1_DeployEndpoint.ipynb) to include these changes.
Refer to the detailed steps for deploying the modified model.
How can I test the deployed YOLOv8 model on Amazon SageMaker?
To test the deployed YOLOv8 model on Amazon SageMaker:
- Open the Test Notebook: Locate the
2_TestEndpoint.ipynbnotebook in the SageMaker Jupyter environment. - Run the Notebook: Follow the notebook's instructions to send an image to the endpoint, perform inference, and display results.
- Visualize Results: Use built-in plotting functionalities to visualize performance metrics, such as bounding boxes around detected objects.
For comprehensive testing instructions, visit the testing section.
comments: true
description: Discover how to integrate YOLOv8 with ClearML to streamline your MLOps workflow, automate experiments, and enhance model management effortlessly.
keywords: YOLOv8, ClearML, MLOps, Ultralytics, machine learning, object detection, model training, automation, experiment management
Training YOLOv8 with ClearML: Streamlining Your MLOps Workflow
MLOps bridges the gap between creating and deploying machine learning models in real-world settings. It focuses on efficient deployment, scalability, and ongoing management to ensure models perform well in practical applications.
Ultralytics YOLOv8 effortlessly integrates with ClearML, streamlining and enhancing your object detection model's training and management. This guide will walk you through the integration process, detailing how to set up ClearML, manage experiments, automate model management, and collaborate effectively.
ClearML
ClearML is an innovative open-source MLOps platform that is skillfully designed to automate, monitor, and orchestrate machine learning workflows. Its key features include automated logging of all training and inference data for full experiment reproducibility, an intuitive web UI for easy data visualization and analysis, advanced hyperparameter optimization algorithms, and robust model management for efficient deployment across various platforms.
YOLOv8 Training with ClearML
You can bring automation and efficiency to your machine learning workflow by improving your training process by integrating YOLOv8 with ClearML.
Installation
To install the required packages, run:
!!! Tip "Installation"
=== "CLI"

    ```py
    # Install the required packages for YOLOv8 and ClearML
    pip install ultralytics clearml
    ```
For detailed instructions and best practices related to the installation process, be sure to check our YOLOv8 Installation guide. While installing the required packages for YOLOv8, if you encounter any difficulties, consult our Common Issues guide for solutions and tips.
Configuring ClearML
Once you have installed the necessary packages, the next step is to initialize and configure your ClearML SDK. This involves setting up your ClearML account and obtaining the necessary credentials for a seamless connection between your development environment and the ClearML server.
Begin by initializing the ClearML SDK in your environment. The 'clearml-init' command starts the setup process and prompts you for the necessary credentials.
!!! Tip "Initial SDK Setup"
=== "CLI"

    ```py
    # Initialize your ClearML SDK setup process
    clearml-init
    ```
After executing this command, visit the ClearML Settings page. Navigate to the top right corner and select "Settings." Go to the "Workspace" section and click on "Create new credentials." Use the credentials provided in the "Create Credentials" pop-up to complete the setup as instructed, depending on whether you are configuring ClearML in a Jupyter Notebook or a local Python environment.
Usage
Before diving into the usage instructions, be sure to check out the range of YOLOv8 models offered by Ultralytics. This will help you choose the most appropriate model for your project requirements.
!!! Example "Usage"
=== "Python"

    ```py
    from clearml import Task

    from ultralytics import YOLO

    # Step 1: Creating a ClearML Task
    task = Task.init(project_name="my_project", task_name="my_yolov8_task")

    # Step 2: Selecting the YOLOv8 Model
    model_variant = "yolov8n"
    task.set_parameter("model_variant", model_variant)

    # Step 3: Loading the YOLOv8 Model
    model = YOLO(f"{model_variant}.pt")

    # Step 4: Setting Up Training Arguments
    args = dict(data="coco8.yaml", epochs=16)
    task.connect(args)

    # Step 5: Initiating Model Training
    results = model.train(**args)
    ```
Understanding the Code
Let's understand the steps showcased in the usage code snippet above.
Step 1: Creating a ClearML Task: A new task is initialized in ClearML, specifying your project and task names. This task will track and manage your model's training.
Step 2: Selecting the YOLOv8 Model: The model_variant variable is set to 'yolov8n', one of the YOLOv8 models. This variant is then logged in ClearML for tracking.
Step 3: Loading the YOLOv8 Model: The selected YOLOv8 model is loaded using Ultralytics' YOLO class, preparing it for training.
Step 4: Setting Up Training Arguments: Key training arguments like the dataset (coco8.yaml) and the number of epochs (16) are organized in a dictionary and connected to the ClearML task. This allows for tracking and potential modification via the ClearML UI. For a detailed understanding of the model training process and best practices, refer to our YOLOv8 Model Training guide.
Step 5: Initiating Model Training: The model training is started with the specified arguments. The results of the training process are captured in the results variable.
Understanding the Output
Upon running the usage code snippet above, you can expect the following output:
- A confirmation message indicating the creation of a new ClearML task, along with its unique ID.
- An informational message about the script code being stored, indicating that the code execution is being tracked by ClearML.
- A URL link to the ClearML results page where you can monitor the training progress and view detailed logs.
- Download progress for the YOLOv8 model and the specified dataset, followed by a summary of the model architecture and training configuration.
- Initialization messages for various training components like TensorBoard, Automatic Mixed Precision (AMP), and dataset preparation.
- Finally, the training process starts, with progress updates as the model trains on the specified dataset. For an in-depth understanding of the performance metrics used during training, read our guide on performance metrics.
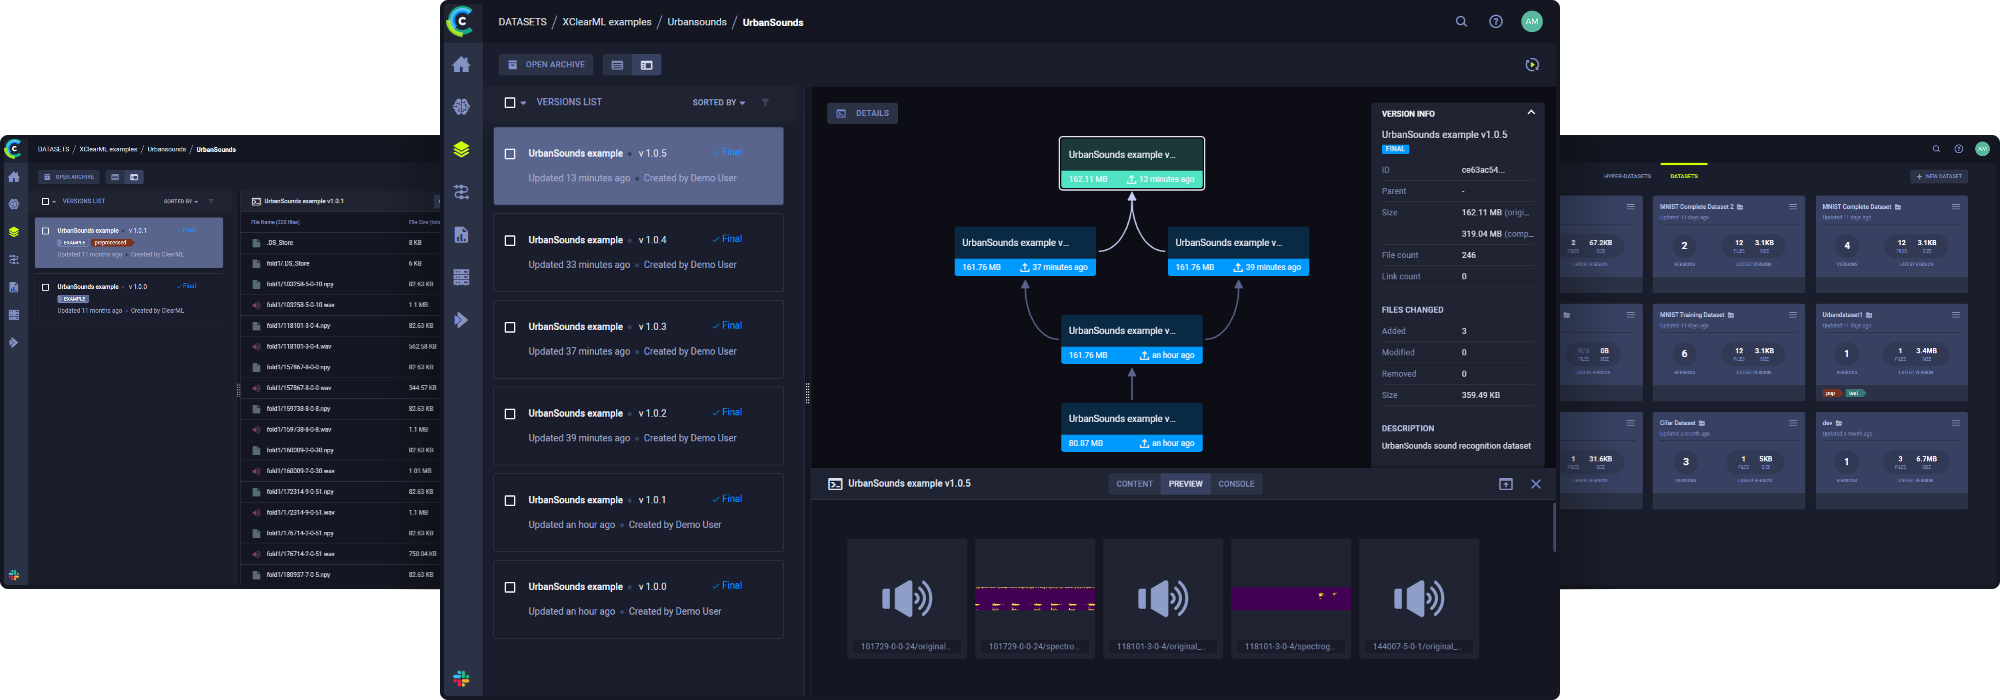
Viewing the ClearML Results Page
By clicking on the URL link to the ClearML results page in the output of the usage code snippet, you can access a comprehensive view of your model's training process.
Key Features of the ClearML Results Page
-
Real-Time Metrics Tracking
- Track critical metrics like loss, accuracy, and validation scores as they occur.
- Provides immediate feedback for timely model performance adjustments.
-
Experiment Comparison
- Compare different training runs side-by-side.
- Essential for hyperparameter tuning and identifying the most effective models.
-
Detailed Logs and Outputs
- Access comprehensive logs, graphical representations of metrics, and console outputs.
- Gain a deeper understanding of model behavior and issue resolution.
-
Resource Utilization Monitoring
- Monitor the utilization of computational resources, including CPU, GPU, and memory.
- Key to optimizing training efficiency and costs.
-
Model Artifacts Management
- View, download, and share model artifacts like trained models and checkpoints.
- Enhances collaboration and streamlines model deployment and sharing.
For a visual walkthrough of what the ClearML Results Page looks like, watch the video below:
Watch: YOLOv8 MLOps Integration using ClearML
Advanced Features in ClearML
ClearML offers several advanced features to enhance your MLOps experience.
Remote Execution
ClearML's remote execution feature facilitates the reproduction and manipulation of experiments on different machines. It logs essential details like installed packages and uncommitted changes. When a task is enqueued, the ClearML Agent pulls it, recreates the environment, and runs the experiment, reporting back with detailed results.
Deploying a ClearML Agent is straightforward and can be done on various machines using the following command:
clearml-agent daemon --queue <queues_to_listen_to> [--docker]
This setup is applicable to cloud VMs, local GPUs, or laptops. ClearML Autoscalers help manage cloud workloads on platforms like AWS, GCP, and Azure, automating the deployment of agents and adjusting resources based on your resource budget.
Cloning, Editing, and Enqueuing
ClearML's user-friendly interface allows easy cloning, editing, and enqueuing of tasks. Users can clone an existing experiment, adjust parameters or other details through the UI, and enqueue the task for execution. This streamlined process ensures that the ClearML Agent executing the task uses updated configurations, making it ideal for iterative experimentation and model fine-tuning.
Summary
This guide has led you through the process of integrating ClearML with Ultralytics' YOLOv8. Covering everything from initial setup to advanced model management, you've discovered how to leverage ClearML for efficient training, experiment tracking, and workflow optimization in your machine learning projects.
For further details on usage, visit ClearML's official documentation.
Additionally, explore more integrations and capabilities of Ultralytics by visiting the Ultralytics integration guide page, which is a treasure trove of resources and insights.
FAQ
What is the process for integrating Ultralytics YOLOv8 with ClearML?
Integrating Ultralytics YOLOv8 with ClearML involves a series of steps to streamline your MLOps workflow. First, install the necessary packages:
pip install ultralytics clearml
Next, initialize the ClearML SDK in your environment using:
clearml-init
You then configure ClearML with your credentials from the ClearML Settings page. Detailed instructions on the entire setup process, including model selection and training configurations, can be found in our YOLOv8 Model Training guide.
Why should I use ClearML with Ultralytics YOLOv8 for my machine learning projects?
Using ClearML with Ultralytics YOLOv8 enhances your machine learning projects by automating experiment tracking, streamlining workflows, and enabling robust model management. ClearML offers real-time metrics tracking, resource utilization monitoring, and a user-friendly interface for comparing experiments. These features help optimize your model's performance and make the development process more efficient. Learn more about the benefits and procedures in our MLOps Integration guide.
How do I troubleshoot common issues during YOLOv8 and ClearML integration?
If you encounter issues during the integration of YOLOv8 with ClearML, consult our Common Issues guide for solutions and tips. Typical problems might involve package installation errors, credential setup, or configuration issues. This guide provides step-by-step troubleshooting instructions to resolve these common issues efficiently.
How do I set up the ClearML task for YOLOv8 model training?
Setting up a ClearML task for YOLOv8 training involves initializing a task, selecting the model variant, loading the model, setting up training arguments, and finally, starting the model training. Here's a simplified example:
from clearml import Task

from ultralytics import YOLO

# Step 1: Creating a ClearML Task
task = Task.init(project_name="my_project", task_name="my_yolov8_task")

# Step 2: Selecting the YOLOv8 Model
model_variant = "yolov8n"
task.set_parameter("model_variant", model_variant)

# Step 3: Loading the YOLOv8 Model
model = YOLO(f"{model_variant}.pt")

# Step 4: Setting Up Training Arguments
args = dict(data="coco8.yaml", epochs=16)
task.connect(args)

# Step 5: Initiating Model Training
results = model.train(**args)
Refer to our Usage guide for a detailed breakdown of these steps.
Where can I view the results of my YOLOv8 training in ClearML?
After running your YOLOv8 training script with ClearML, you can view the results on the ClearML results page. The output will include a URL link to the ClearML dashboard, where you can track metrics, compare experiments, and monitor resource usage. For more details on how to view and interpret the results, check our section on Viewing the ClearML Results Page.


 浙公网安备 33010602011771号