
Yolov8-源码解析-十四-
Yolov8 源码解析(十四)
comments: true
description: Learn how to integrate YOLOv8 with TensorBoard for real-time visual insights into your model's training metrics, performance graphs, and debugging workflows.
keywords: YOLOv8, TensorBoard, model training, visualization, machine learning, deep learning, Ultralytics, training metrics, performance analysis
Gain Visual Insights with YOLOv8's Integration with TensorBoard
Understanding and fine-tuning computer vision models like Ultralytics' YOLOv8 becomes more straightforward when you take a closer look at their training processes. Model training visualization helps with getting insights into the model's learning patterns, performance metrics, and overall behavior. YOLOv8's integration with TensorBoard makes this process of visualization and analysis easier and enables more efficient and informed adjustments to the model.
This guide covers how to use TensorBoard with YOLOv8. You'll learn about various visualizations, from tracking metrics to analyzing model graphs. These tools will help you understand your YOLOv8 model's performance better.
TensorBoard
TensorBoard, TensorFlow's visualization toolkit, is essential for machine learning experimentation. TensorBoard features a range of visualization tools, crucial for monitoring machine learning models. These tools include tracking key metrics like loss and accuracy, visualizing model graphs, and viewing histograms of weights and biases over time. It also provides capabilities for projecting embeddings to lower-dimensional spaces and displaying multimedia data.
YOLOv8 Training with TensorBoard
Using TensorBoard while training YOLOv8 models is straightforward and offers significant benefits.
Installation
To install the required package, run:
!!! Tip "Installation"
=== "CLI"

    ```py
    # Install the required package for YOLOv8 and Tensorboard
    pip install ultralytics
    ```
TensorBoard is conveniently pre-installed with YOLOv8, eliminating the need for additional setup for visualization purposes.
For detailed instructions and best practices related to the installation process, be sure to check our YOLOv8 Installation guide. While installing the required packages for YOLOv8, if you encounter any difficulties, consult our Common Issues guide for solutions and tips.
Configuring TensorBoard for Google Colab
When using Google Colab, it's important to set up TensorBoard before starting your training code:
!!! Example "Configure TensorBoard for Google Colab"
=== "Python"

    ```py
    %load_ext tensorboard
    %tensorboard --logdir path/to/runs
    ```
Usage
Before diving into the usage instructions, be sure to check out the range of YOLOv8 models offered by Ultralytics. This will help you choose the most appropriate model for your project requirements.
!!! Example "Usage"
=== "Python"

    ```py
    rom ultralytics import YOLO

     Load a pre-trained model
    odel = YOLO('yolov8n.pt')

     Train the model
    esults = model.train(data='coco8.yaml', epochs=100, imgsz=640)
    ``

    ning the usage code snippet above, you can expect the following output:

    text
    ard: Start with 'tensorboard --logdir path_to_your_tensorboard_logs', view at http://localhost:6006/
    ```

    put indicates that TensorBoard is now actively monitoring your YOLOv8 training session. You can access the TensorBoard dashboard by visiting the provided URL (http://localhost:6006/) to view real-time training metrics and model performance. For users working in Google Colab, the TensorBoard will be displayed in the same cell where you executed the TensorBoard configuration commands.

     information related to the model training process, be sure to check our [YOLOv8 Model Training guide](../modes/train.md). If you are interested in learning more about logging, checkpoints, plotting, and file management, read our [usage guide on configuration](../usage/cfg.md).

    standing Your TensorBoard for YOLOv8 Training

    's focus on understanding the various features and components of TensorBoard in the context of YOLOv8 training. The three key sections of the TensorBoard are Time Series, Scalars, and Graphs.

     Series

     Series feature in the TensorBoard offers a dynamic and detailed perspective of various training metrics over time for YOLOv8 models. It focuses on the progression and trends of metrics across training epochs. Here's an example of what you can expect to see.

    (https://github.com/ultralytics/ultralytics/assets/25847604/20b3e038-0356-465e-a37e-1ea232c68354)

     Features of Time Series in TensorBoard

    er Tags and Pinned Cards**: This functionality allows users to filter specific metrics and pin cards for quick comparison and access. It's particularly useful for focusing on specific aspects of the training process.

    iled Metric Cards**: Time Series divides metrics into different categories like learning rate (lr), training (train), and validation (val) metrics, each represented by individual cards.

    hical Display**: Each card in the Time Series section shows a detailed graph of a specific metric over the course of training. This visual representation aids in identifying trends, patterns, or anomalies in the training process.

    epth Analysis**: Time Series provides an in-depth analysis of each metric. For instance, different learning rate segments are shown, offering insights into how adjustments in learning rate impact the model's learning curve.

    ortance of Time Series in YOLOv8 Training

     Series section is essential for a thorough analysis of the YOLOv8 model's training progress. It lets you track the metrics in real time to promptly identify and solve issues. It also offers a detailed view of each metrics progression, which is crucial for fine-tuning the model and enhancing its performance.

    ars

    in the TensorBoard are crucial for plotting and analyzing simple metrics like loss and accuracy during the training of YOLOv8 models. They offer a clear and concise view of how these metrics evolve with each training epoch, providing insights into the model's learning effectiveness and stability. Here's an example of what you can expect to see.

    (https://github.com/ultralytics/ultralytics/assets/25847604/f9228193-13e9-4768-9edf-8fa15ecd24fa)

     Features of Scalars in TensorBoard

    ning Rate (lr) Tags**: These tags show the variations in the learning rate across different segments (e.g., `pg0`, `pg1`, `pg2`). This helps us understand the impact of learning rate adjustments on the training process.

    ics Tags**: Scalars include performance indicators such as:

    AP50 (B)`: Mean Average Precision at 50% Intersection over Union (IoU), crucial for assessing object detection accuracy.

    AP50-95 (B)`: Mean Average Precision calculated over a range of IoU thresholds, offering a more comprehensive evaluation of accuracy.

    recision (B)`: Indicates the ratio of correctly predicted positive observations, key to understanding prediction accuracy.

    ecall (B)`: Important for models where missing a detection is significant, this metric measures the ability to detect all relevant instances.

     learn more about the different metrics, read our guide on [performance metrics](../guides/yolo-performance-metrics.md).

    ning and Validation Tags (`train`, `val`)**: These tags display metrics specifically for the training and validation datasets, allowing for a comparative analysis of model performance across different data sets.

    ortance of Monitoring Scalars

    g scalar metrics is crucial for fine-tuning the YOLOv8 model. Variations in these metrics, such as spikes or irregular patterns in loss graphs, can highlight potential issues such as overfitting, underfitting, or inappropriate learning rate settings. By closely monitoring these scalars, you can make informed decisions to optimize the training process, ensuring that the model learns effectively and achieves the desired performance.

    erence Between Scalars and Time Series

    th Scalars and Time Series in TensorBoard are used for tracking metrics, they serve slightly different purposes. Scalars focus on plotting simple metrics such as loss and accuracy as scalar values. They provide a high-level overview of how these metrics change with each training epoch. While, the time-series section of the TensorBoard offers a more detailed timeline view of various metrics. It is particularly useful for monitoring the progression and trends of metrics over time, providing a deeper dive into the specifics of the training process.

    hs

    hs section of the TensorBoard visualizes the computational graph of the YOLOv8 model, showing how operations and data flow within the model. It's a powerful tool for understanding the model's structure, ensuring that all layers are connected correctly, and for identifying any potential bottlenecks in data flow. Here's an example of what you can expect to see.

    (https://github.com/ultralytics/ultralytics/assets/25847604/039028e0-4ab3-4170-bfa8-f93ce483f615)

    re particularly useful for debugging the model, especially in complex architectures typical in deep learning models like YOLOv8. They help in verifying layer connections and the overall design of the model.

    ry

    de aims to help you use TensorBoard with YOLOv8 for visualization and analysis of machine learning model training. It focuses on explaining how key TensorBoard features can provide insights into training metrics and model performance during YOLOv8 training sessions.

    re detailed exploration of these features and effective utilization strategies, you can refer to TensorFlow's official [TensorBoard documentation](https://www.tensorflow.org/tensorboard/get_started) and their [GitHub repository](https://github.com/tensorflow/tensorboard).

    learn more about the various integrations of Ultralytics? Check out the [Ultralytics integrations guide page](../integrations/index.md) to see what other exciting capabilities are waiting to be discovered!

    ## FAQ

    do I integrate YOLOv8 with TensorBoard for real-time visualization?

    ing YOLOv8 with TensorBoard allows for real-time visual insights during model training. First, install the necessary package:

    ple "Installation"

    "CLI"
    ```py
    # Install the required package for YOLOv8 and Tensorboard
    pip install ultralytics
    ```
Next, configure TensorBoard to log your training runs, then start TensorBoard:
!!! Example "Configure TensorBoard for Google Colab"
=== "Python"

    ```py
    %load_ext tensorboard
    %tensorboard --logdir path/to/runs
    ```
Finally, during training, YOLOv8 automatically logs metrics like loss and accuracy to TensorBoard. You can monitor these metrics by visiting http://localhost:6006/.
For a comprehensive guide, refer to our YOLOv8 Model Training guide.
What benefits does using TensorBoard with YOLOv8 offer?
Using TensorBoard with YOLOv8 provides several visualization tools essential for efficient model training:
- Real-Time Metrics Tracking: Track key metrics such as loss, accuracy, precision, and recall live.
- Model Graph Visualization: Understand and debug the model architecture by visualizing computational graphs.
- Embedding Visualization: Project embeddings to lower-dimensional spaces for better insight.
These tools enable you to make informed adjustments to enhance your YOLOv8 model's performance. For more details on TensorBoard features, check out the TensorFlow TensorBoard guide.
How can I monitor training metrics using TensorBoard when training a YOLOv8 model?
To monitor training metrics while training a YOLOv8 model with TensorBoard, follow these steps:
- Install TensorBoard and YOLOv8: Run
pip install ultralyticswhich includes TensorBoard. - Configure TensorBoard Logging: During the training process, YOLOv8 logs metrics to a specified log directory.
- Start TensorBoard: Launch TensorBoard using the command
tensorboard --logdir path/to/your/tensorboard/logs.
The TensorBoard dashboard, accessible via http://localhost:6006/, provides real-time insights into various training metrics. For a deeper dive into training configurations, visit our YOLOv8 Configuration guide.
What kind of metrics can I visualize with TensorBoard when training YOLOv8 models?
When training YOLOv8 models, TensorBoard allows you to visualize an array of important metrics including:
- Loss (Training and Validation): Indicates how well the model is performing during training and validation.
- Accuracy/Precision/Recall: Key performance metrics to evaluate detection accuracy.
- Learning Rate: Track learning rate changes to understand its impact on training dynamics.
- mAP (mean Average Precision): For a comprehensive evaluation of object detection accuracy at various IoU thresholds.
These visualizations are essential for tracking model performance and making necessary optimizations. For more information on these metrics, refer to our Performance Metrics guide.
Can I use TensorBoard in a Google Colab environment for training YOLOv8?
Yes, you can use TensorBoard in a Google Colab environment to train YOLOv8 models. Here's a quick setup:
!!! Example "Configure TensorBoard for Google Colab"
=== "Python"

    ```py
    %load_ext tensorboard
    %tensorboard --logdir path/to/runs
    ```
Then, run the YOLOv8 training script:
from ultralytics import YOLO

# Load a pre-trained model
model = YOLO("yolov8n.pt")

# Train the model
results = model.train(data="coco8.yaml", epochs=100, imgsz=640)
TensorBoard will visualize the training progress within Colab, providing real-time insights into metrics like loss and accuracy. For additional details on configuring YOLOv8 training, see our detailed YOLOv8 Installation guide.
comments: true
description: Learn to convert YOLOv8 models to TensorRT for high-speed NVIDIA GPU inference. Boost efficiency and deploy optimized models with our step-by-step guide.
keywords: YOLOv8, TensorRT, NVIDIA, GPU, deep learning, model optimization, high-speed inference, model export
TensorRT Export for YOLOv8 Models
Deploying computer vision models in high-performance environments can require a format that maximizes speed and efficiency. This is especially true when you are deploying your model on NVIDIA GPUs.
By using the TensorRT export format, you can enhance your Ultralytics YOLOv8 models for swift and efficient inference on NVIDIA hardware. This guide will give you easy-to-follow steps for the conversion process and help you make the most of NVIDIA's advanced technology in your deep learning projects.
TensorRT
TensorRT, developed by NVIDIA, is an advanced software development kit (SDK) designed for high-speed deep learning inference. It's well-suited for real-time applications like object detection.
This toolkit optimizes deep learning models for NVIDIA GPUs and results in faster and more efficient operations. TensorRT models undergo TensorRT optimization, which includes techniques like layer fusion, precision calibration (INT8 and FP16), dynamic tensor memory management, and kernel auto-tuning. Converting deep learning models into the TensorRT format allows developers to realize the potential of NVIDIA GPUs fully.
TensorRT is known for its compatibility with various model formats, including TensorFlow, PyTorch, and ONNX, providing developers with a flexible solution for integrating and optimizing models from different frameworks. This versatility enables efficient model deployment across diverse hardware and software environments.
Key Features of TensorRT Models
TensorRT models offer a range of key features that contribute to their efficiency and effectiveness in high-speed deep learning inference:
-
Precision Calibration: TensorRT supports precision calibration, allowing models to be fine-tuned for specific accuracy requirements. This includes support for reduced precision formats like INT8 and FP16, which can further boost inference speed while maintaining acceptable accuracy levels.
-
Layer Fusion: The TensorRT optimization process includes layer fusion, where multiple layers of a neural network are combined into a single operation. This reduces computational overhead and improves inference speed by minimizing memory access and computation.

-
Dynamic Tensor Memory Management: TensorRT efficiently manages tensor memory usage during inference, reducing memory overhead and optimizing memory allocation. This results in more efficient GPU memory utilization.
-
Automatic Kernel Tuning: TensorRT applies automatic kernel tuning to select the most optimized GPU kernel for each layer of the model. This adaptive approach ensures that the model takes full advantage of the GPU's computational power.
Deployment Options in TensorRT
Before we look at the code for exporting YOLOv8 models to the TensorRT format, let's understand where TensorRT models are normally used.
TensorRT offers several deployment options, and each option balances ease of integration, performance optimization, and flexibility differently:
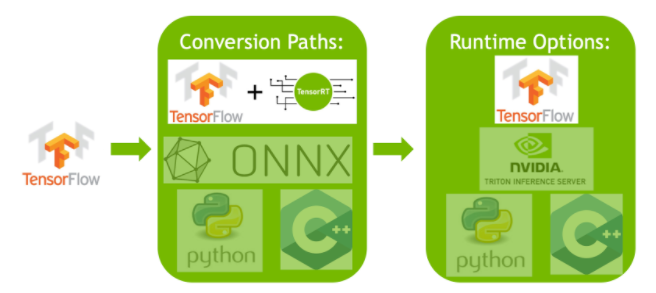
- Deploying within TensorFlow: This method integrates TensorRT into TensorFlow, allowing optimized models to run in a familiar TensorFlow environment. It's useful for models with a mix of supported and unsupported layers, as TF-TRT can handle these efficiently.
-
Standalone TensorRT Runtime API: Offers granular control, ideal for performance-critical applications. It's more complex but allows for custom implementation of unsupported operators.
-
NVIDIA Triton Inference Server: An option that supports models from various frameworks. Particularly suited for cloud or edge inference, it provides features like concurrent model execution and model analysis.
Exporting YOLOv8 Models to TensorRT
You can improve execution efficiency and optimize performance by converting YOLOv8 models to TensorRT format.
Installation
To install the required package, run:
!!! Tip "Installation"
=== "CLI"

    ```py
    # Install the required package for YOLOv8
    pip install ultralytics
    ```
For detailed instructions and best practices related to the installation process, check our YOLOv8 Installation guide. While installing the required packages for YOLOv8, if you encounter any difficulties, consult our Common Issues guide for solutions and tips.
Usage
Before diving into the usage instructions, be sure to check out the range of YOLOv8 models offered by Ultralytics. This will help you choose the most appropriate model for your project requirements.
!!! Example "Usage"
=== "Python"

    ```py
    from ultralytics import YOLO

    # Load the YOLOv8 model
    model = YOLO("yolov8n.pt")

    # Export the model to TensorRT format
    model.export(format="engine")  # creates 'yolov8n.engine'

    # Load the exported TensorRT model
    tensorrt_model = YOLO("yolov8n.engine")

    # Run inference
    results = tensorrt_model("https://ultralytics.com/images/bus.jpg")
    ```

=== "CLI"

    ```py
    # Export a YOLOv8n PyTorch model to TensorRT format
    yolo export model=yolov8n.pt format=engine  # creates 'yolov8n.engine''

    # Run inference with the exported model
    yolo predict model=yolov8n.engine source='https://ultralytics.com/images/bus.jpg'
    ```
For more details about the export process, visit the Ultralytics documentation page on exporting.
Exporting TensorRT with INT8 Quantization
Exporting Ultralytics YOLO models using TensorRT with INT8 precision executes post-training quantization (PTQ). TensorRT uses calibration for PTQ, which measures the distribution of activations within each activation tensor as the YOLO model processes inference on representative input data, and then uses that distribution to estimate scale values for each tensor. Each activation tensor that is a candidate for quantization has an associated scale that is deduced by a calibration process.
When processing implicitly quantized networks TensorRT uses INT8 opportunistically to optimize layer execution time. If a layer runs faster in INT8 and has assigned quantization scales on its data inputs and outputs, then a kernel with INT8 precision is assigned to that layer, otherwise TensorRT selects a precision of either FP32 or FP16 for the kernel based on whichever results in faster execution time for that layer.
!!! tip
It is **critical** to ensure that the same device that will use the TensorRT model weights for deployment is used for exporting with INT8 precision, as the calibration results can vary across devices.
Configuring INT8 Export
The arguments provided when using export for an Ultralytics YOLO model will greatly influence the performance of the exported model. They will also need to be selected based on the device resources available, however the default arguments should work for most Ampere (or newer) NVIDIA discrete GPUs. The calibration algorithm used is "ENTROPY_CALIBRATION_2" and you can read more details about the options available in the TensorRT Developer Guide. Ultralytics tests found that "ENTROPY_CALIBRATION_2" was the best choice and exports are fixed to using this algorithm.
-
workspace: Controls the size (in GiB) of the device memory allocation while converting the model weights.-
Adjust the
workspacevalue according to your calibration needs and resource availability. While a largerworkspacemay increase calibration time, it allows TensorRT to explore a wider range of optimization tactics, potentially enhancing model performance and accuracy. Conversely, a smallerworkspacecan reduce calibration time but may limit the optimization strategies, affecting the quality of the quantized model. -
Default is
workspace=4(GiB), this value may need to be increased if calibration crashes (exits without warning). -
TensorRT will report
UNSUPPORTED_STATEduring export if the value forworkspaceis larger than the memory available to the device, which means the value forworkspaceshould be lowered. -
If
workspaceis set to max value and calibration fails/crashes, consider reducing the values forimgszandbatchto reduce memory requirements. -
Remember calibration for INT8 is specific to each device, borrowing a "high-end" GPU for calibration, might result in poor performance when inference is run on another device.
-
-
batch: The maximum batch-size that will be used for inference. During inference smaller batches can be used, but inference will not accept batches any larger than what is specified.
!!! note
During calibration, twice the `batch` size provided will be used. Using small batches can lead to inaccurate scaling during calibration. This is because the process adjusts based on the data it sees. Small batches might not capture the full range of values, leading to issues with the final calibration, so the `batch` size is doubled automatically. If no batch size is specified `batch=1`, calibration will be run at `batch=1 * 2` to reduce calibration scaling errors.
Experimentation by NVIDIA led them to recommend using at least 500 calibration images that are representative of the data for your model, with INT8 quantization calibration. This is a guideline and not a hard requirement, and you will need to experiment with what is required to perform well for your dataset. Since the calibration data is required for INT8 calibration with TensorRT, make certain to use the data argument when int8=True for TensorRT and use data="my_dataset.yaml", which will use the images from validation to calibrate with. When no value is passed for data with export to TensorRT with INT8 quantization, the default will be to use one of the "small" example datasets based on the model task instead of throwing an error.
!!! example
=== "Python"

    ```py{ .py .annotate }
    from ultralytics import YOLO

    model = YOLO("yolov8n.pt")
    model.export(
        format="engine",
        dynamic=True,  # (1)!
        batch=8,  # (2)!
        workspace=4,  # (3)!
        int8=True,
        data="coco.yaml",  # (4)!
    )

    # Load the exported TensorRT INT8 model
    model = YOLO("yolov8n.engine", task="detect")

    # Run inference
    result = model.predict("https://ultralytics.com/images/bus.jpg")
    ```

    1. Exports with dynamic axes, this will be enabled by default when exporting with `int8=True` even when not explicitly set. See [export arguments](../modes/export.md#arguments) for additional information.
    2. Sets max batch size of 8 for exported model, which calibrates with `batch = 2 * 8` to avoid scaling errors during calibration.
    3. Allocates 4 GiB of memory instead of allocating the entire device for conversion process.
    4. Uses [COCO dataset](../datasets/detect/coco.md) for calibration, specifically the images used for [validation](../modes/val.md) (5,000 total).


=== "CLI"

    ```py
    # Export a YOLOv8n PyTorch model to TensorRT format with INT8 quantization
    yolo export model=yolov8n.pt format=engine batch=8 workspace=4 int8=True data=coco.yaml  # creates 'yolov8n.engine''

    # Run inference with the exported TensorRT quantized model
    yolo predict model=yolov8n.engine source='https://ultralytics.com/images/bus.jpg'
    ```
???+ warning "Calibration Cache"
TensorRT will generate a calibration `.cache` which can be re-used to speed up export of future model weights using the same data, but this may result in poor calibration when the data is vastly different or if the `batch` value is changed drastically. In these circumstances, the existing `.cache` should be renamed and moved to a different directory or deleted entirely.
Advantages of using YOLO with TensorRT INT8
-
Reduced model size: Quantization from FP32 to INT8 can reduce the model size by 4x (on disk or in memory), leading to faster download times. lower storage requirements, and reduced memory footprint when deploying a model.
-
Lower power consumption: Reduced precision operations for INT8 exported YOLO models can consume less power compared to FP32 models, especially for battery-powered devices.
-
Improved inference speeds: TensorRT optimizes the model for the target hardware, potentially leading to faster inference speeds on GPUs, embedded devices, and accelerators.
??? note "Note on Inference Speeds"
The first few inference calls with a model exported to TensorRT INT8 can be expected to have longer than usual preprocessing, inference, and/or postprocessing times. This may also occur when changing `imgsz` during inference, especially when `imgsz` is not the same as what was specified during export (export `imgsz` is set as TensorRT "optimal" profile).
Drawbacks of using YOLO with TensorRT INT8
-
Decreases in evaluation metrics: Using a lower precision will mean that
mAP,Precision,Recallor any other metric used to evaluate model performance is likely to be somewhat worse. See the Performance results section to compare the differences inmAP50andmAP50-95when exporting with INT8 on small sample of various devices. -
Increased development times: Finding the "optimal" settings for INT8 calibration for dataset and device can take a significant amount of testing.
-
Hardware dependency: Calibration and performance gains could be highly hardware dependent and model weights are less transferable.
Ultralytics YOLO TensorRT Export Performance
NVIDIA A100
!!! tip "Performance"
Tested with Ubuntu 22.04.3 LTS, `python 3.10.12`, `ultralytics==8.2.4`, `tensorrt==8.6.1.post1`

=== "Detection (COCO)"

    See [Detection Docs](../tasks/detect.md) for usage examples with these models trained on [COCO](../datasets/detect/coco.md), which include 80 pre-trained classes.

    !!! note
        Inference times shown for `mean`, `min` (fastest), and `max` (slowest) for each test using pre-trained weights `yolov8n.engine`

    | Precision | Eval test    | mean<br>(ms) | min \| max<br>(ms) | mAP<sup>val<br>50(B) | mAP<sup>val<br>50-95(B) | `batch` | size<br><sup>(pixels) |
    |-----------|--------------|--------------|--------------------|----------------------|-------------------------|---------|-----------------------|
    | FP32      | Predict      | 0.52         | 0.51 \| 0.56       |                      |                         | 8       | 640                   |
    | FP32      | COCO<sup>val | 0.52         |                    | 0.52                 | 0.37                    | 1       | 640                   |
    | FP16      | Predict      | 0.34         | 0.34 \| 0.41       |                      |                         | 8       | 640                   |
    | FP16      | COCO<sup>val | 0.33         |                    | 0.52                 | 0.37                    | 1       | 640                   |
    | INT8      | Predict      | 0.28         | 0.27 \| 0.31       |                      |                         | 8       | 640                   |
    | INT8      | COCO<sup>val | 0.29         |                    | 0.47                 | 0.33                    | 1       | 640                   |

=== "Segmentation (COCO)"

    See [Segmentation Docs](../tasks/segment.md) for usage examples with these models trained on [COCO](../datasets/segment/coco.md), which include 80 pre-trained classes.

    !!! note
        Inference times shown for `mean`, `min` (fastest), and `max` (slowest) for each test using pre-trained weights `yolov8n-seg.engine`

    | Precision | Eval test    | mean<br>(ms) | min \| max<br>(ms) | mAP<sup>val<br>50(B) | mAP<sup>val<br>50-95(B) | mAP<sup>val<br>50(M) | mAP<sup>val<br>50-95(M) | `batch` | size<br><sup>(pixels) |
    |-----------|--------------|--------------|--------------------|----------------------|-------------------------|----------------------|-------------------------|---------|-----------------------|
    | FP32      | Predict      | 0.62         | 0.61 \| 0.68       |                      |                         |                      |                         | 8       | 640                   |
    | FP32      | COCO<sup>val | 0.63         |                    | 0.52                 | 0.36                    | 0.49                 | 0.31                    | 1       | 640                   |
    | FP16      | Predict      | 0.40         | 0.39 \| 0.44       |                      |                         |                      |                         | 8       | 640                   |
    | FP16      | COCO<sup>val | 0.43         |                    | 0.52                 | 0.36                    | 0.49                 | 0.30                    | 1       | 640                   |
    | INT8      | Predict      | 0.34         | 0.33 \| 0.37       |                      |                         |                      |                         | 8       | 640                   |
    | INT8      | COCO<sup>val | 0.36         |                    | 0.46                 | 0.32                    | 0.43                 | 0.27                    | 1       | 640                   |

=== "Classification (ImageNet)"

    See [Classification Docs](../tasks/classify.md) for usage examples with these models trained on [ImageNet](../datasets/classify/imagenet.md), which include 1000 pre-trained classes.

    !!! note
        Inference times shown for `mean`, `min` (fastest), and `max` (slowest) for each test using pre-trained weights `yolov8n-cls.engine`

    | Precision | Eval test        | mean<br>(ms) | min \| max<br>(ms) | top-1 | top-5 | `batch` | size<br><sup>(pixels) |
    |-----------|------------------|--------------|--------------------|-------|-------|---------|-----------------------|
    | FP32      | Predict          | 0.26         | 0.25 \| 0.28       |       |       | 8       | 640                   |
    | FP32      | ImageNet<sup>val | 0.26         |                    | 0.35  | 0.61  | 1       | 640                   |
    | FP16      | Predict          | 0.18         | 0.17 \| 0.19       |       |       | 8       | 640                   |
    | FP16      | ImageNet<sup>val | 0.18         |                    | 0.35  | 0.61  | 1       | 640                   |
    | INT8      | Predict          | 0.16         | 0.15 \| 0.57       |       |       | 8       | 640                   |
    | INT8      | ImageNet<sup>val | 0.15         |                    | 0.32  | 0.59  | 1       | 640                   |

=== "Pose (COCO)"

    See [Pose Estimation Docs](../tasks/pose.md) for usage examples with these models trained on [COCO](../datasets/pose/coco.md), which include 1 pre-trained class, "person".

    !!! note
        Inference times shown for `mean`, `min` (fastest), and `max` (slowest) for each test using pre-trained weights `yolov8n-pose.engine`

    | Precision | Eval test    | mean<br>(ms) | min \| max<br>(ms) | mAP<sup>val<br>50(B) | mAP<sup>val<br>50-95(B) | mAP<sup>val<br>50(P) | mAP<sup>val<br>50-95(P) | `batch` | size<br><sup>(pixels) |
    |-----------|--------------|--------------|--------------------|----------------------|-------------------------|----------------------|-------------------------|---------|-----------------------|
    | FP32      | Predict      | 0.54         | 0.53 \| 0.58       |                      |                         |                      |                         | 8       | 640                   |
    | FP32      | COCO<sup>val | 0.55         |                    | 0.91                 | 0.69                    | 0.80                 | 0.51                    | 1       | 640                   |
    | FP16      | Predict      | 0.37         | 0.35 \| 0.41       |                      |                         |                      |                         | 8       | 640                   |
    | FP16      | COCO<sup>val | 0.36         |                    | 0.91                 | 0.69                    | 0.80                 | 0.51                    | 1       | 640                   |
    | INT8      | Predict      | 0.29         | 0.28 \| 0.33       |                      |                         |                      |                         | 8       | 640                   |
    | INT8      | COCO<sup>val | 0.30         |                    | 0.90                 | 0.68                    | 0.78                 | 0.47                    | 1       | 640                   |

=== "OBB (DOTAv1)"

    See [Oriented Detection Docs](../tasks/obb.md) for usage examples with these models trained on [DOTAv1](../datasets/obb/dota-v2.md#dota-v10), which include 15 pre-trained classes.

    !!! note
        Inference times shown for `mean`, `min` (fastest), and `max` (slowest) for each test using pre-trained weights `yolov8n-obb.engine`

    | Precision | Eval test      | mean<br>(ms) | min \| max<br>(ms) | mAP<sup>val<br>50(B) | mAP<sup>val<br>50-95(B) | `batch` | size<br><sup>(pixels) |
    |-----------|----------------|--------------|--------------------|----------------------|-------------------------|---------|-----------------------|
    | FP32      | Predict        | 0.52         | 0.51 \| 0.59       |                      |                         | 8       | 640                   |
    | FP32      | DOTAv1<sup>val | 0.76         |                    | 0.50                 | 0.36                    | 1       | 640                   |
    | FP16      | Predict        | 0.34         | 0.33 \| 0.42       |                      |                         | 8       | 640                   |
    | FP16      | DOTAv1<sup>val | 0.59         |                    | 0.50                 | 0.36                    | 1       | 640                   |
    | INT8      | Predict        | 0.29         | 0.28 \| 0.33       |                      |                         | 8       | 640                   |
    | INT8      | DOTAv1<sup>val | 0.32         |                    | 0.45                 | 0.32                    | 1       | 640                   |
Consumer GPUs
!!! tip "Detection Performance (COCO)"
=== "RTX 3080 12 GB"

    Tested with Windows 10.0.19045, `python 3.10.9`, `ultralytics==8.2.4`, `tensorrt==10.0.0b6`

    !!! note
        Inference times shown for `mean`, `min` (fastest), and `max` (slowest) for each test using pre-trained weights `yolov8n.engine`

    | Precision | Eval test    | mean<br>(ms) | min \| max<br>(ms) | mAP<sup>val<br>50(B) | mAP<sup>val<br>50-95(B) | `batch` | size<br><sup>(pixels) |
    |-----------|--------------|--------------|--------------------|----------------------|-------------------------|---------|-----------------------|
    | FP32      | Predict      | 1.06         | 0.75 \| 1.88       |                      |                         | 8       | 640                   |
    | FP32      | COCO<sup>val | 1.37         |                    | 0.52                 | 0.37                    | 1       | 640                   |
    | FP16      | Predict      | 0.62         | 0.75 \| 1.13       |                      |                         | 8       | 640                   |
    | FP16      | COCO<sup>val | 0.85         |                    | 0.52                 | 0.37                    | 1       | 640                   |
    | INT8      | Predict      | 0.52         | 0.38 \| 1.00       |                      |                         | 8       | 640                   |
    | INT8      | COCO<sup>val | 0.74         |                    | 0.47                 | 0.33                    | 1       | 640                   |

=== "RTX 3060 12 GB"

    Tested with Windows 10.0.22631, `python 3.11.9`, `ultralytics==8.2.4`, `tensorrt==10.0.1`

    !!! note
        Inference times shown for `mean`, `min` (fastest), and `max` (slowest) for each test using pre-trained weights `yolov8n.engine`


    | Precision | Eval test    | mean<br>(ms) | min \| max<br>(ms) | mAP<sup>val<br>50(B) | mAP<sup>val<br>50-95(B) | `batch` | size<br><sup>(pixels) |
    |-----------|--------------|--------------|--------------------|----------------------|-------------------------|---------|-----------------------|
    | FP32      | Predict      | 1.76         | 1.69 \| 1.87       |                      |                         | 8       | 640                   |
    | FP32      | COCO<sup>val | 1.94         |                    | 0.52                 | 0.37                    | 1       | 640                   |
    | FP16      | Predict      | 0.86         | 0.75 \| 1.00       |                      |                         | 8       | 640                   |
    | FP16      | COCO<sup>val | 1.43         |                    | 0.52                 | 0.37                    | 1       | 640                   |
    | INT8      | Predict      | 0.80         | 0.75 \| 1.00       |                      |                         | 8       | 640                   |
    | INT8      | COCO<sup>val | 1.35         |                    | 0.47                 | 0.33                    | 1       | 640                   |

=== "RTX 2060 6 GB"

    Tested with Pop!_OS 22.04 LTS, `python 3.10.12`, `ultralytics==8.2.4`, `tensorrt==8.6.1.post1`

    !!! note
        Inference times shown for `mean`, `min` (fastest), and `max` (slowest) for each test using pre-trained weights `yolov8n.engine`

    | Precision | Eval test    | mean<br>(ms) | min \| max<br>(ms) | mAP<sup>val<br>50(B) | mAP<sup>val<br>50-95(B) | `batch` | size<br><sup>(pixels) |
    |-----------|--------------|--------------|--------------------|----------------------|-------------------------|---------|-----------------------|
    | FP32      | Predict      | 2.84         | 2.84 \| 2.85       |                      |                         | 8       | 640                   |
    | FP32      | COCO<sup>val | 2.94         |                    | 0.52                 | 0.37                    | 1       | 640                   |
    | FP16      | Predict      | 1.09         | 1.09 \| 1.10       |                      |                         | 8       | 640                   |
    | FP16      | COCO<sup>val | 1.20         |                    | 0.52                 | 0.37                    | 1       | 640                   |
    | INT8      | Predict      | 0.75         | 0.74 \| 0.75       |                      |                         | 8       | 640                   |
    | INT8      | COCO<sup>val | 0.76         |                    | 0.47                 | 0.33                    | 1       | 640                   |
Embedded Devices
!!! tip "Detection Performance (COCO)"
=== "Jetson Orin NX 16GB"

    Tested with JetPack 6.0 (L4T 36.3) Ubuntu 22.04.4 LTS, `python 3.10.12`, `ultralytics==8.2.16`, `tensorrt==10.0.1`

    !!! note
        Inference times shown for `mean`, `min` (fastest), and `max` (slowest) for each test using pre-trained weights `yolov8n.engine`

    | Precision | Eval test    | mean<br>(ms) | min \| max<br>(ms) | mAP<sup>val<br>50(B) | mAP<sup>val<br>50-95(B) | `batch` | size<br><sup>(pixels) |
    |-----------|--------------|--------------|--------------------|----------------------|-------------------------|---------|-----------------------|
    | FP32      | Predict      | 6.11         | 6.10 \| 6.29       |                      |                         | 8       | 640                   |
    | FP32      | COCO<sup>val | 6.17         |                    | 0.52                 | 0.37                    | 1       | 640                   |
    | FP16      | Predict      | 3.18         | 3.18 \| 3.20       |                      |                         | 8       | 640                   |
    | FP16      | COCO<sup>val | 3.19         |                    | 0.52                 | 0.37                    | 1       | 640                   |
    | INT8      | Predict      | 2.30         | 2.29 \| 2.35       |                      |                         | 8       | 640                   |
    | INT8      | COCO<sup>val | 2.32         |                    | 0.46                 | 0.32                    | 1       | 640                   |
!!! info
See our [quickstart guide on NVIDIA Jetson with Ultralytics YOLO](../guides/nvidia-jetson.md) to learn more about setup and configuration.
Evaluation methods
Expand sections below for information on how these models were exported and tested.
??? example "Export configurations"
See [export mode](../modes/export.md) for details regarding export configuration arguments.

```py
from ultralytics import YOLO

model = YOLO("yolov8n.pt")

# TensorRT FP32
out = model.export(format="engine", imgsz=640, dynamic=True, verbose=False, batch=8, workspace=2)

# TensorRT FP16
out = model.export(format="engine", imgsz=640, dynamic=True, verbose=False, batch=8, workspace=2, half=True)

# TensorRT INT8 with calibration `data` (i.e. COCO, ImageNet, or DOTAv1 for appropriate model task)
out = model.export(
    format="engine", imgsz=640, dynamic=True, verbose=False, batch=8, workspace=2, int8=True, data="coco8.yaml"
)
```
??? example "Predict loop"
See [predict mode](../modes/predict.md) for additional information.

```py
import cv2

from ultralytics import YOLO

model = YOLO("yolov8n.engine")
img = cv2.imread("path/to/image.jpg")

for _ in range(100):
    result = model.predict(
        [img] * 8,  # batch=8 of the same image
        verbose=False,
        device="cuda",
    )
```
??? example "Validation configuration"
See [`val` mode](../modes/val.md) to learn more about validation configuration arguments.

```py
from ultralytics import YOLO

model = YOLO("yolov8n.engine")
results = model.val(
    data="data.yaml",  # COCO, ImageNet, or DOTAv1 for appropriate model task
    batch=1,
    imgsz=640,
    verbose=False,
    device="cuda",
)
```
Deploying Exported YOLOv8 TensorRT Models
Having successfully exported your Ultralytics YOLOv8 models to TensorRT format, you're now ready to deploy them. For in-depth instructions on deploying your TensorRT models in various settings, take a look at the following resources:
-
Deploy Ultralytics with a Triton Server: Our guide on how to use NVIDIA's Triton Inference (formerly TensorRT Inference) Server specifically for use with Ultralytics YOLO models.
-
Deploying Deep Neural Networks with NVIDIA TensorRT: This article explains how to use NVIDIA TensorRT to deploy deep neural networks on GPU-based deployment platforms efficiently.
-
End-to-End AI for NVIDIA-Based PCs: NVIDIA TensorRT Deployment: This blog post explains the use of NVIDIA TensorRT for optimizing and deploying AI models on NVIDIA-based PCs.
-
GitHub Repository for NVIDIA TensorRT:: This is the official GitHub repository that contains the source code and documentation for NVIDIA TensorRT.
Summary
In this guide, we focused on converting Ultralytics YOLOv8 models to NVIDIA's TensorRT model format. This conversion step is crucial for improving the efficiency and speed of YOLOv8 models, making them more effective and suitable for diverse deployment environments.
For more information on usage details, take a look at the TensorRT official documentation.
If you're curious about additional Ultralytics YOLOv8 integrations, our integration guide page provides an extensive selection of informative resources and insights.
FAQ
How do I convert YOLOv8 models to TensorRT format?
To convert your Ultralytics YOLOv8 models to TensorRT format for optimized NVIDIA GPU inference, follow these steps:
-
Install the required package:
pip install ultralytics -
Export your YOLOv8 model:
from ultralytics import YOLO

model = YOLO("yolov8n.pt")
model.export(format="engine")  # creates 'yolov8n.engine'

# Run inference
model = YOLO("yolov8n.engine")
results = model("https://ultralytics.com/images/bus.jpg")
For more details, visit the YOLOv8 Installation guide and the export documentation.
What are the benefits of using TensorRT for YOLOv8 models?
Using TensorRT to optimize YOLOv8 models offers several benefits:
- Faster Inference Speed: TensorRT optimizes the model layers and uses precision calibration (INT8 and FP16) to speed up inference without significantly sacrificing accuracy.
- Memory Efficiency: TensorRT manages tensor memory dynamically, reducing overhead and improving GPU memory utilization.
- Layer Fusion: Combines multiple layers into single operations, reducing computational complexity.
- Kernel Auto-Tuning: Automatically selects optimized GPU kernels for each model layer, ensuring maximum performance.
For more information, explore the detailed features of TensorRT here and read our TensorRT overview section.
Can I use INT8 quantization with TensorRT for YOLOv8 models?
Yes, you can export YOLOv8 models using TensorRT with INT8 quantization. This process involves post-training quantization (PTQ) and calibration:
-
Export with INT8:
from ultralytics import YOLO model = YOLO("yolov8n.pt") model.export(format="engine", batch=8, workspace=4, int8=True, data="coco.yaml") -
Run inference:
from ultralytics import YOLO

model = YOLO("yolov8n.engine", task="detect")
result = model.predict("https://ultralytics.com/images/bus.jpg")
For more details, refer to the exporting TensorRT with INT8 quantization section.
How do I deploy YOLOv8 TensorRT models on an NVIDIA Triton Inference Server?
Deploying YOLOv8 TensorRT models on an NVIDIA Triton Inference Server can be done using the following resources:
- Deploy Ultralytics YOLOv8 with Triton Server: Step-by-step guidance on setting up and using Triton Inference Server.
- NVIDIA Triton Inference Server Documentation: Official NVIDIA documentation for detailed deployment options and configurations.
These guides will help you integrate YOLOv8 models efficiently in various deployment environments.
What are the performance improvements observed with YOLOv8 models exported to TensorRT?
Performance improvements with TensorRT can vary based on the hardware used. Here are some typical benchmarks:
-
NVIDIA A100:
- FP32 Inference: ~0.52 ms / image
- FP16 Inference: ~0.34 ms / image
- INT8 Inference: ~0.28 ms / image
- Slight reduction in mAP with INT8 precision, but significant improvement in speed.
-
Consumer GPUs (e.g., RTX 3080):
- FP32 Inference: ~1.06 ms / image
- FP16 Inference: ~0.62 ms / image
- INT8 Inference: ~0.52 ms / image
Detailed performance benchmarks for different hardware configurations can be found in the performance section.
For more comprehensive insights into TensorRT performance, refer to the Ultralytics documentation and our performance analysis reports.
comments: true
description: Learn how to export YOLOv8 models to the TF GraphDef format for seamless deployment on various platforms, including mobile and web.
keywords: YOLOv8, export, TensorFlow, GraphDef, model deployment, TensorFlow Serving, TensorFlow Lite, TensorFlow.js, machine learning, AI, computer vision
How to Export to TF GraphDef from YOLOv8 for Deployment
When you are deploying cutting-edge computer vision models, like YOLOv8, in different environments, you might run into compatibility issues. Google's TensorFlow GraphDef, or TF GraphDef, offers a solution by providing a serialized, platform-independent representation of your model. Using the TF GraphDef model format, you can deploy your YOLOv8 model in environments where the complete TensorFlow ecosystem may not be available, such as mobile devices or specialized hardware.
In this guide, we'll walk you step by step through how to export your Ultralytics YOLOv8 models to the TF GraphDef model format. By converting your model, you can streamline deployment and use YOLOv8's computer vision capabilities in a broader range of applications and platforms.
Why Should You Export to TF GraphDef?
TF GraphDef is a powerful component of the TensorFlow ecosystem that was developed by Google. It can be used to optimize and deploy models like YOLOv8. Exporting to TF GraphDef lets us move models from research to real-world applications. It allows models to run in environments without the full TensorFlow framework.
The GraphDef format represents the model as a serialized computation graph. This enables various optimization techniques like constant folding, quantization, and graph transformations. These optimizations ensure efficient execution, reduced memory usage, and faster inference speeds.
GraphDef models can use hardware accelerators such as GPUs, TPUs, and AI chips, unlocking significant performance gains for the YOLOv8 inference pipeline. The TF GraphDef format creates a self-contained package with the model and its dependencies, simplifying deployment and integration into diverse systems.
Key Features of TF GraphDef Models
TF GraphDef offers distinct features for streamlining model deployment and optimization.
Here's a look at its key characteristics:
-
Model Serialization: TF GraphDef provides a way to serialize and store TensorFlow models in a platform-independent format. This serialized representation allows you to load and execute your models without the original Python codebase, making deployment easier.
-
Graph Optimization: TF GraphDef enables the optimization of computational graphs. These optimizations can boost performance by streamlining execution flow, reducing redundancies, and tailoring operations to suit specific hardware.
-
Deployment Flexibility: Models exported to the GraphDef format can be used in various environments, including resource-constrained devices, web browsers, and systems with specialized hardware. This opens up possibilities for wider deployment of your TensorFlow models.
-
Production Focus: GraphDef is designed for production deployment. It supports efficient execution, serialization features, and optimizations that align with real-world use cases.
Deployment Options with TF GraphDef
Before we dive into the process of exporting YOLOv8 models to TF GraphDef, let's take a look at some typical deployment situations where this format is used.
Here's how you can deploy with TF GraphDef efficiently across various platforms.
-
TensorFlow Serving: This framework is designed to deploy TensorFlow models in production environments. TensorFlow Serving offers model management, versioning, and the infrastructure for efficient model serving at scale. It's a seamless way to integrate your GraphDef-based models into production web services or APIs.
-
Mobile and Embedded Devices: With tools like TensorFlow Lite, you can convert TF GraphDef models into formats optimized for smartphones, tablets, and various embedded devices. Your models can then be used for on-device inference, where execution is done locally, often providing performance gains and offline capabilities.
-
Web Browsers: TensorFlow.js enables the deployment of TF GraphDef models directly within web browsers. It paves the way for real-time object detection applications running on the client side, using the capabilities of YOLOv8 through JavaScript.
-
Specialized Hardware: TF GraphDef's platform-agnostic nature allows it to target custom hardware, such as accelerators and TPUs (Tensor Processing Units). These devices can provide performance advantages for computationally intensive models.
Exporting YOLOv8 Models to TF GraphDef
You can convert your YOLOv8 object detection model to the TF GraphDef format, which is compatible with various systems, to improve its performance across platforms.
Installation
To install the required package, run:
!!! Tip "Installation"
=== "CLI"

    ```py
    # Install the required package for YOLOv8
    pip install ultralytics
    ```
For detailed instructions and best practices related to the installation process, check our Ultralytics Installation guide. While installing the required packages for YOLOv8, if you encounter any difficulties, consult our Common Issues guide for solutions and tips.
Usage
Before diving into the usage instructions, it's important to note that while all Ultralytics YOLOv8 models are available for exporting, you can ensure that the model you select supports export functionality here.
!!! Example "Usage"
=== "Python"

    ```py
    from ultralytics import YOLO

    # Load the YOLOv8 model
    model = YOLO("yolov8n.pt")

    # Export the model to TF GraphDef format
    model.export(format="pb")  # creates 'yolov8n.pb'

    # Load the exported TF GraphDef model
    tf_graphdef_model = YOLO("yolov8n.pb")

    # Run inference
    results = tf_graphdef_model("https://ultralytics.com/images/bus.jpg")
    ```

=== "CLI"

    ```py
    # Export a YOLOv8n PyTorch model to TF GraphDef format
    yolo export model=yolov8n.pt format=pb  # creates 'yolov8n.pb'

    # Run inference with the exported model
    yolo predict model='yolov8n.pb' source='https://ultralytics.com/images/bus.jpg'
    ```
For more details about supported export options, visit the Ultralytics documentation page on deployment options.
Deploying Exported YOLOv8 TF GraphDef Models
Once you've exported your YOLOv8 model to the TF GraphDef format, the next step is deployment. The primary and recommended first step for running a TF GraphDef model is to use the YOLO("model.pb") method, as previously shown in the usage code snippet.
However, for more information on deploying your TF GraphDef models, take a look at the following resources:
-
TensorFlow Serving: A guide on TensorFlow Serving that teaches how to deploy and serve machine learning models efficiently in production environments.
-
TensorFlow Lite: This page describes how to convert machine learning models into a format optimized for on-device inference with TensorFlow Lite.
-
TensorFlow.js: A guide on model conversion that teaches how to convert TensorFlow or Keras models into TensorFlow.js format for use in web applications.
Summary
In this guide, we explored how to export Ultralytics YOLOv8 models to the TF GraphDef format. By doing this, you can flexibly deploy your optimized YOLOv8 models in different environments.
For further details on usage, visit the TF GraphDef official documentation.
For more information on integrating Ultralytics YOLOv8 with other platforms and frameworks, don't forget to check out our integration guide page. It has great resources and insights to help you make the most of YOLOv8 in your projects.
FAQ
How do I export a YOLOv8 model to TF GraphDef format?
Ultralytics YOLOv8 models can be exported to TensorFlow GraphDef (TF GraphDef) format seamlessly. This format provides a serialized, platform-independent representation of the model, ideal for deploying in varied environments like mobile and web. To export a YOLOv8 model to TF GraphDef, follow these steps:
!!! Example "Usage"
=== "Python"

    ```py
    from ultralytics import YOLO

    # Load the YOLOv8 model
    model = YOLO("yolov8n.pt")

    # Export the model to TF GraphDef format
    model.export(format="pb")  # creates 'yolov8n.pb'

    # Load the exported TF GraphDef model
    tf_graphdef_model = YOLO("yolov8n.pb")

    # Run inference
    results = tf_graphdef_model("https://ultralytics.com/images/bus.jpg")
    ```

=== "CLI"

    ```py
    # Export a YOLOv8n PyTorch model to TF GraphDef format
    yolo export model="yolov8n.pt" format="pb"  # creates 'yolov8n.pb'

    # Run inference with the exported model
    yolo predict model="yolov8n.pb" source="https://ultralytics.com/images/bus.jpg"
    ```
For more information on different export options, visit the Ultralytics documentation on model export.
What are the benefits of using TF GraphDef for YOLOv8 model deployment?
Exporting YOLOv8 models to the TF GraphDef format offers multiple advantages, including:
- Platform Independence: TF GraphDef provides a platform-independent format, allowing models to be deployed across various environments including mobile and web browsers.
- Optimizations: The format enables several optimizations, such as constant folding, quantization, and graph transformations, which enhance execution efficiency and reduce memory usage.
- Hardware Acceleration: Models in TF GraphDef format can leverage hardware accelerators like GPUs, TPUs, and AI chips for performance gains.
Read more about the benefits in the TF GraphDef section of our documentation.
Why should I use Ultralytics YOLOv8 over other object detection models?
Ultralytics YOLOv8 offers numerous advantages compared to other models like YOLOv5 and YOLOv7. Some key benefits include:
- State-of-the-Art Performance: YOLOv8 provides exceptional speed and accuracy for real-time object detection, segmentation, and classification.
- Ease of Use: Features a user-friendly API for model training, validation, prediction, and export, making it accessible for both beginners and experts.
- Broad Compatibility: Supports multiple export formats including ONNX, TensorRT, CoreML, and TensorFlow, for versatile deployment options.
Explore further details in our introduction to YOLOv8.
How can I deploy a YOLOv8 model on specialized hardware using TF GraphDef?
Once a YOLOv8 model is exported to TF GraphDef format, you can deploy it across various specialized hardware platforms. Typical deployment scenarios include:
- TensorFlow Serving: Use TensorFlow Serving for scalable model deployment in production environments. It supports model management and efficient serving.
- Mobile Devices: Convert TF GraphDef models to TensorFlow Lite, optimized for mobile and embedded devices, enabling on-device inference.
- Web Browsers: Deploy models using TensorFlow.js for client-side inference in web applications.
- AI Accelerators: Leverage TPUs and custom AI chips for accelerated inference.
Check the deployment options section for detailed information.
Where can I find solutions for common issues while exporting YOLOv8 models?
For troubleshooting common issues with exporting YOLOv8 models, Ultralytics provides comprehensive guides and resources. If you encounter problems during installation or model export, refer to:
- Common Issues Guide: Offers solutions to frequently faced problems.
- Installation Guide: Step-by-step instructions for setting up the required packages.
These resources should help you resolve most issues related to YOLOv8 model export and deployment.
comments: true
description: Learn how to export Ultralytics YOLOv8 models to TensorFlow SavedModel format for easy deployment across various platforms and environments.
keywords: YOLOv8, TF SavedModel, Ultralytics, TensorFlow, model export, model deployment, machine learning, AI
Understand How to Export to TF SavedModel Format From YOLOv8
Deploying machine learning models can be challenging. However, using an efficient and flexible model format can make your job easier. TF SavedModel is an open-source machine-learning framework used by TensorFlow to load machine-learning models in a consistent way. It is like a suitcase for TensorFlow models, making them easy to carry and use on different devices and systems.
Learning how to export to TF SavedModel from Ultralytics YOLOv8 models can help you deploy models easily across different platforms and environments. In this guide, we'll walk through how to convert your models to the TF SavedModel format, simplifying the process of running inferences with your models on different devices.
Why Should You Export to TF SavedModel?
The TensorFlow SavedModel format is a part of the TensorFlow ecosystem developed by Google as shown below. It is designed to save and serialize TensorFlow models seamlessly. It encapsulates the complete details of models like the architecture, weights, and even compilation information. This makes it straightforward to share, deploy, and continue training across different environments.
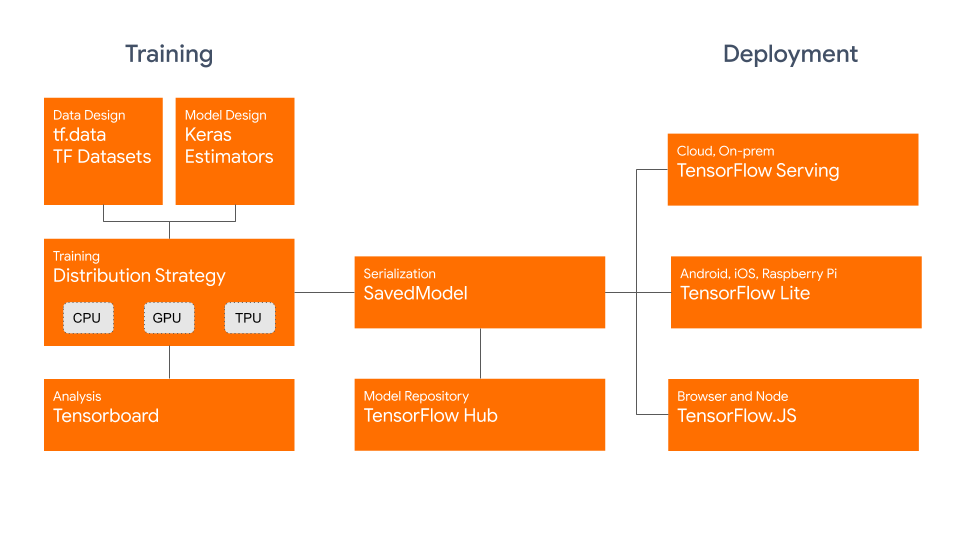
The TF SavedModel has a key advantage: its compatibility. It works well with TensorFlow Serving, TensorFlow Lite, and TensorFlow.js. This compatibility makes it easier to share and deploy models across various platforms, including web and mobile applications. The TF SavedModel format is useful both for research and production. It provides a unified way to manage your models, ensuring they are ready for any application.
Key Features of TF SavedModels
Here are the key features that make TF SavedModel a great option for AI developers:
-
Portability: TF SavedModel provides a language-neutral, recoverable, hermetic serialization format. They enable higher-level systems and tools to produce, consume, and transform TensorFlow models. SavedModels can be easily shared and deployed across different platforms and environments.
-
Ease of Deployment: TF SavedModel bundles the computational graph, trained parameters, and necessary metadata into a single package. They can be easily loaded and used for inference without requiring the original code that built the model. This makes the deployment of TensorFlow models straightforward and efficient in various production environments.
-
Asset Management: TF SavedModel supports the inclusion of external assets such as vocabularies, embeddings, or lookup tables. These assets are stored alongside the graph definition and variables, ensuring they are available when the model is loaded. This feature simplifies the management and distribution of models that rely on external resources.
Deployment Options with TF SavedModel
Before we dive into the process of exporting YOLOv8 models to the TF SavedModel format, let's explore some typical deployment scenarios where this format is used.
TF SavedModel provides a range of options to deploy your machine learning models:
-
TensorFlow Serving: TensorFlow Serving is a flexible, high-performance serving system designed for production environments. It natively supports TF SavedModels, making it easy to deploy and serve your models on cloud platforms, on-premises servers, or edge devices.
-
Cloud Platforms: Major cloud providers like Google Cloud Platform (GCP), Amazon Web Services (AWS), and Microsoft Azure offer services for deploying and running TensorFlow models, including TF SavedModels. These services provide scalable and managed infrastructure, allowing you to deploy and scale your models easily.
-
Mobile and Embedded Devices: TensorFlow Lite, a lightweight solution for running machine learning models on mobile, embedded, and IoT devices, supports converting TF SavedModels to the TensorFlow Lite format. This allows you to deploy your models on a wide range of devices, from smartphones and tablets to microcontrollers and edge devices.
-
TensorFlow Runtime: TensorFlow Runtime (
tfrt) is a high-performance runtime for executing TensorFlow graphs. It provides lower-level APIs for loading and running TF SavedModels in C++ environments. TensorFlow Runtime offers better performance compared to the standard TensorFlow runtime. It is suitable for deployment scenarios that require low-latency inference and tight integration with existing C++ codebases.
Exporting YOLOv8 Models to TF SavedModel
By exporting YOLOv8 models to the TF SavedModel format, you enhance their adaptability and ease of deployment across various platforms.
Installation
To install the required package, run:
!!! Tip "Installation"
=== "CLI"

    ```py
    # Install the required package for YOLOv8
    pip install ultralytics
    ```
For detailed instructions and best practices related to the installation process, check our Ultralytics Installation guide. While installing the required packages for YOLOv8, if you encounter any difficulties, consult our Common Issues guide for solutions and tips.
Usage
Before diving into the usage instructions, it's important to note that while all Ultralytics YOLOv8 models are available for exporting, you can ensure that the model you select supports export functionality here.
!!! Example "Usage"
=== "Python"

    ```py
    from ultralytics import YOLO

    # Load the YOLOv8 model
    model = YOLO("yolov8n.pt")

    # Export the model to TF SavedModel format
    model.export(format="saved_model")  # creates '/yolov8n_saved_model'

    # Load the exported TF SavedModel model
    tf_savedmodel_model = YOLO("./yolov8n_saved_model")

    # Run inference
    results = tf_savedmodel_model("https://ultralytics.com/images/bus.jpg")
    ```

=== "CLI"

    ```py
    # Export a YOLOv8n PyTorch model to TF SavedModel format
    yolo export model=yolov8n.pt format=saved_model  # creates '/yolov8n_saved_model'

    # Run inference with the exported model
    yolo predict model='./yolov8n_saved_model' source='https://ultralytics.com/images/bus.jpg'
    ```
For more details about supported export options, visit the Ultralytics documentation page on deployment options.
Deploying Exported YOLOv8 TF SavedModel Models
Now that you have exported your YOLOv8 model to the TF SavedModel format, the next step is to deploy it. The primary and recommended first step for running a TF GraphDef model is to use the YOLO("./yolov8n_saved_model") method, as previously shown in the usage code snippet.
However, for in-depth instructions on deploying your TF SavedModel models, take a look at the following resources:
-
TensorFlow Serving: Here's the developer documentation for how to deploy your TF SavedModel models using TensorFlow Serving.
-
Run a TensorFlow SavedModel in Node.js: A TensorFlow blog post on running a TensorFlow SavedModel in Node.js directly without conversion.
-
Deploying on Cloud: A TensorFlow blog post on deploying a TensorFlow SavedModel model on the Cloud AI Platform.
Summary
In this guide, we explored how to export Ultralytics YOLOv8 models to the TF SavedModel format. By exporting to TF SavedModel, you gain the flexibility to optimize, deploy, and scale your YOLOv8 models on a wide range of platforms.
For further details on usage, visit the TF SavedModel official documentation.
For more information on integrating Ultralytics YOLOv8 with other platforms and frameworks, don't forget to check out our integration guide page. It's packed with great resources to help you make the most of YOLOv8 in your projects.
FAQ
How do I export an Ultralytics YOLO model to TensorFlow SavedModel format?
Exporting an Ultralytics YOLO model to the TensorFlow SavedModel format is straightforward. You can use either Python or CLI to achieve this:
!!! Example "Exporting YOLOv8 to TF SavedModel"
=== "Python"

    ```py
    from ultralytics import YOLO

    # Load the YOLOv8 model
    model = YOLO("yolov8n.pt")

    # Export the model to TF SavedModel format
    model.export(format="saved_model")  # creates '/yolov8n_saved_model'

    # Load the exported TF SavedModel for inference
    tf_savedmodel_model = YOLO("./yolov8n_saved_model")
    results = tf_savedmodel_model("https://ultralytics.com/images/bus.jpg")
    ```

=== "CLI"

    ```py
    # Export the YOLOv8 model to TF SavedModel format
    yolo export model=yolov8n.pt format=saved_model  # creates '/yolov8n_saved_model'

    # Run inference with the exported model
    yolo predict model='./yolov8n_saved_model' source='https://ultralytics.com/images/bus.jpg'
    ```
Refer to the Ultralytics Export documentation for more details.
Why should I use the TensorFlow SavedModel format?
The TensorFlow SavedModel format offers several advantages for model deployment:
- Portability: It provides a language-neutral format, making it easy to share and deploy models across different environments.
- Compatibility: Integrates seamlessly with tools like TensorFlow Serving, TensorFlow Lite, and TensorFlow.js, which are essential for deploying models on various platforms, including web and mobile applications.
- Complete encapsulation: Encodes the model architecture, weights, and compilation information, allowing for straightforward sharing and training continuation.
For more benefits and deployment options, check out the Ultralytics YOLO model deployment options.
What are the typical deployment scenarios for TF SavedModel?
TF SavedModel can be deployed in various environments, including:
- TensorFlow Serving: Ideal for production environments requiring scalable and high-performance model serving.
- Cloud Platforms: Supports major cloud services like Google Cloud Platform (GCP), Amazon Web Services (AWS), and Microsoft Azure for scalable model deployment.
- Mobile and Embedded Devices: Using TensorFlow Lite to convert TF SavedModels allows for deployment on mobile devices, IoT devices, and microcontrollers.
- TensorFlow Runtime: For C++ environments needing low-latency inference with better performance.
For detailed deployment options, visit the official guides on deploying TensorFlow models.
How can I install the necessary packages to export YOLOv8 models?
To export YOLOv8 models, you need to install the ultralytics package. Run the following command in your terminal:
pip install ultralytics
For more detailed installation instructions and best practices, refer to our Ultralytics Installation guide. If you encounter any issues, consult our Common Issues guide.
What are the key features of the TensorFlow SavedModel format?
TF SavedModel format is beneficial for AI developers due to the following features:
- Portability: Allows sharing and deployment across various environments effortlessly.
- Ease of Deployment: Encapsulates the computational graph, trained parameters, and metadata into a single package, which simplifies loading and inference.
- Asset Management: Supports external assets like vocabularies, ensuring they are available when the model loads.
For further details, explore the official TensorFlow documentation.
comments: true
description: Convert your Ultralytics YOLOv8 models to TensorFlow.js for high-speed, local object detection. Learn how to optimize ML models for browser and Node.js apps.
keywords: YOLOv8, TensorFlow.js, TF.js, model export, machine learning, object detection, browser ML, Node.js, Ultralytics, YOLO, export models
Export to TF.js Model Format From a YOLOv8 Model Format
Deploying machine learning models directly in the browser or on Node.js can be tricky. You'll need to make sure your model format is optimized for faster performance so that the model can be used to run interactive applications locally on the user's device. The TensorFlow.js, or TF.js, model format is designed to use minimal power while delivering fast performance.
The 'export to TF.js model format' feature allows you to optimize your Ultralytics YOLOv8 models for high-speed and locally-run object detection inference. In this guide, we'll walk you through converting your models to the TF.js format, making it easier for your models to perform well on various local browsers and Node.js applications.
Why Should You Export to TF.js?
Exporting your machine learning models to TensorFlow.js, developed by the TensorFlow team as part of the broader TensorFlow ecosystem, offers numerous advantages for deploying machine learning applications. It helps enhance user privacy and security by keeping sensitive data on the device. The image below shows the TensorFlow.js architecture, and how machine learning models are converted and deployed on both web browsers and Node.js.
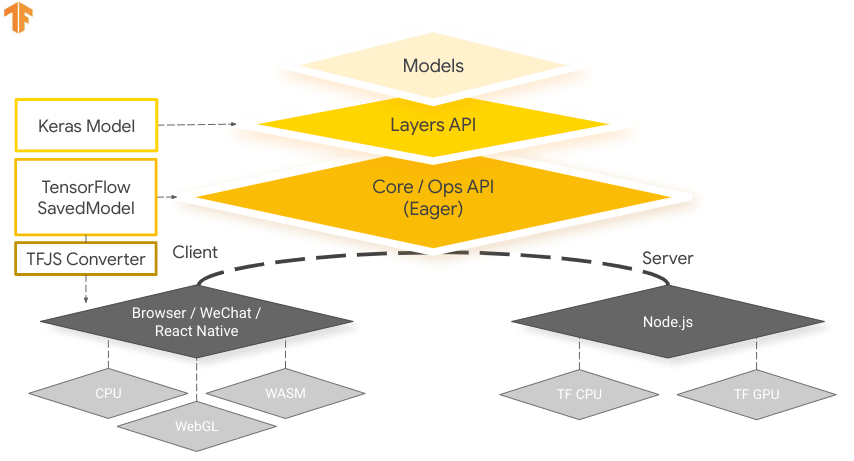
Running models locally also reduces latency and provides a more responsive user experience. TensorFlow.js also comes with offline capabilities, allowing users to use your application even without an internet connection. TF.js is designed for efficient execution of complex models on devices with limited resources as it is engineered for scalability, with GPU acceleration support.
Key Features of TF.js
Here are the key features that make TF.js a powerful tool for developers:
-
Cross-Platform Support: TensorFlow.js can be used in both browser and Node.js environments, providing flexibility in deployment across different platforms. It lets developers build and deploy applications more easily.
-
Support for Multiple Backends: TensorFlow.js supports various backends for computation including CPU, WebGL for GPU acceleration, WebAssembly (WASM) for near-native execution speed, and WebGPU for advanced browser-based machine learning capabilities.
-
Offline Capabilities: With TensorFlow.js, models can run in the browser without the need for an internet connection, making it possible to develop applications that are functional offline.
Deployment Options with TensorFlow.js
Before we dive into the process of exporting YOLOv8 models to the TF.js format, let's explore some typical deployment scenarios where this format is used.
TF.js provides a range of options to deploy your machine learning models:
-
In-Browser ML Applications: You can build web applications that run machine learning models directly in the browser. The need for server-side computation is eliminated and the server load is reduced.
-
Node.js Applications:: TensorFlow.js also supports deployment in Node.js environments, enabling the development of server-side machine learning applications. It is particularly useful for applications that require the processing power of a server or access to server-side data.
-
Chrome Extensions: An interesting deployment scenario is the creation of Chrome extensions with TensorFlow.js. For instance, you can develop an extension that allows users to right-click on an image within any webpage to classify it using a pre-trained ML model. TensorFlow.js can be integrated into everyday web browsing experiences to provide immediate insights or augmentations based on machine learning.
Exporting YOLOv8 Models to TensorFlow.js
You can expand model compatibility and deployment flexibility by converting YOLOv8 models to TF.js.
Installation
To install the required package, run:
!!! Tip "Installation"
=== "CLI"

    ```py
    # Install the required package for YOLOv8
    pip install ultralytics
    ```
For detailed instructions and best practices related to the installation process, check our Ultralytics Installation guide. While installing the required packages for YOLOv8, if you encounter any difficulties, consult our Common Issues guide for solutions and tips.
Usage
Before diving into the usage instructions, it's important to note that while all Ultralytics YOLOv8 models are available for exporting, you can ensure that the model you select supports export functionality here.
!!! Example "Usage"
=== "Python"

    ```py
    from ultralytics import YOLO

    # Load the YOLOv8 model
    model = YOLO("yolov8n.pt")

    # Export the model to TF.js format
    model.export(format="tfjs")  # creates '/yolov8n_web_model'

    # Load the exported TF.js model
    tfjs_model = YOLO("./yolov8n_web_model")

    # Run inference
    results = tfjs_model("https://ultralytics.com/images/bus.jpg")
    ```

=== "CLI"

    ```py
    # Export a YOLOv8n PyTorch model to TF.js format
    yolo export model=yolov8n.pt format=tfjs  # creates '/yolov8n_web_model'

    # Run inference with the exported model
    yolo predict model='./yolov8n_web_model' source='https://ultralytics.com/images/bus.jpg'
    ```
For more details about supported export options, visit the Ultralytics documentation page on deployment options.
Deploying Exported YOLOv8 TensorFlow.js Models
Now that you have exported your YOLOv8 model to the TF.js format, the next step is to deploy it. The primary and recommended first step for running a TF.js is to use the YOLO("./yolov8n_web_model") method, as previously shown in the usage code snippet.
However, for in-depth instructions on deploying your TF.js models, take a look at the following resources:
-
Chrome Extension: Here's the developer documentation for how to deploy your TF.js models to a Chrome extension.
-
Run TensorFlow.js in Node.js: A TensorFlow blog post on running TensorFlow.js in Node.js directly.
-
Deploying TensorFlow.js - Node Project on Cloud Platform: A TensorFlow blog post on deploying a TensorFlow.js model on a Cloud Platform.
Summary
In this guide, we learned how to export Ultralytics YOLOv8 models to the TensorFlow.js format. By exporting to TF.js, you gain the flexibility to optimize, deploy, and scale your YOLOv8 models on a wide range of platforms.
For further details on usage, visit the TensorFlow.js official documentation.
For more information on integrating Ultralytics YOLOv8 with other platforms and frameworks, don't forget to check out our integration guide page. It's packed with great resources to help you make the most of YOLOv8 in your projects.
FAQ
How do I export Ultralytics YOLOv8 models to TensorFlow.js format?
Exporting Ultralytics YOLOv8 models to TensorFlow.js (TF.js) format is straightforward. You can follow these steps:
!!! Example "Usage"
=== "Python"

    ```py
    from ultralytics import YOLO

    # Load the YOLOv8 model
    model = YOLO("yolov8n.pt")

    # Export the model to TF.js format
    model.export(format="tfjs")  # creates '/yolov8n_web_model'

    # Load the exported TF.js model
    tfjs_model = YOLO("./yolov8n_web_model")

    # Run inference
    results = tfjs_model("https://ultralytics.com/images/bus.jpg")
    ```

=== "CLI"

    ```py
    # Export a YOLOv8n PyTorch model to TF.js format
    yolo export model=yolov8n.pt format=tfjs  # creates '/yolov8n_web_model'

    # Run inference with the exported model
    yolo predict model='./yolov8n_web_model' source='https://ultralytics.com/images/bus.jpg'
    ```
For more details about supported export options, visit the Ultralytics documentation page on deployment options.
Why should I export my YOLOv8 models to TensorFlow.js?
Exporting YOLOv8 models to TensorFlow.js offers several advantages, including:
- Local Execution: Models can run directly in the browser or Node.js, reducing latency and enhancing user experience.
- Cross-Platform Support: TF.js supports multiple environments, allowing flexibility in deployment.
- Offline Capabilities: Enables applications to function without an internet connection, ensuring reliability and privacy.
- GPU Acceleration: Leverages WebGL for GPU acceleration, optimizing performance on devices with limited resources.
For a comprehensive overview, see our Integrations with TensorFlow.js.
How does TensorFlow.js benefit browser-based machine learning applications?
TensorFlow.js is specifically designed for efficient execution of ML models in browsers and Node.js environments. Here's how it benefits browser-based applications:
- Reduces Latency: Runs machine learning models locally, providing immediate results without relying on server-side computations.
- Improves Privacy: Keeps sensitive data on the user's device, minimizing security risks.
- Enables Offline Use: Models can operate without an internet connection, ensuring consistent functionality.
- Supports Multiple Backends: Offers flexibility with backends like CPU, WebGL, WebAssembly (WASM), and WebGPU for varying computational needs.
Interested in learning more about TF.js? Check out the official TensorFlow.js guide.
What are the key features of TensorFlow.js for deploying YOLOv8 models?
Key features of TensorFlow.js include:
- Cross-Platform Support: TF.js can be used in both web browsers and Node.js, providing extensive deployment flexibility.
- Multiple Backends: Supports CPU, WebGL for GPU acceleration, WebAssembly (WASM), and WebGPU for advanced operations.
- Offline Capabilities: Models can run directly in the browser without internet connectivity, making it ideal for developing responsive web applications.
For deployment scenarios and more in-depth information, see our section on Deployment Options with TensorFlow.js.
Can I deploy a YOLOv8 model on server-side Node.js applications using TensorFlow.js?
Yes, TensorFlow.js allows the deployment of YOLOv8 models on Node.js environments. This enables server-side machine learning applications that benefit from the processing power of a server and access to server-side data. Typical use cases include real-time data processing and machine learning pipelines on backend servers.
To get started with Node.js deployment, refer to the Run TensorFlow.js in Node.js guide from TensorFlow.
comments: true
description: Learn how to convert YOLOv8 models to TFLite for edge device deployment. Optimize performance and ensure seamless execution on various platforms.
keywords: YOLOv8, TFLite, model export, TensorFlow Lite, edge devices, deployment, Ultralytics, machine learning, on-device inference, model optimization
A Guide on YOLOv8 Model Export to TFLite for Deployment
Deploying computer vision models on edge devices or embedded devices requires a format that can ensure seamless performance.
The TensorFlow Lite or TFLite export format allows you to optimize your Ultralytics YOLOv8 models for tasks like object detection and image classification in edge device-based applications. In this guide, we'll walk through the steps for converting your models to the TFLite format, making it easier for your models to perform well on various edge devices.
Why should you export to TFLite?
Introduced by Google in May 2017 as part of their TensorFlow framework, TensorFlow Lite, or TFLite for short, is an open-source deep learning framework designed for on-device inference, also known as edge computing. It gives developers the necessary tools to execute their trained models on mobile, embedded, and IoT devices, as well as traditional computers.
TensorFlow Lite is compatible with a wide range of platforms, including embedded Linux, Android, iOS, and MCU. Exporting your model to TFLite makes your applications faster, more reliable, and capable of running offline.
Key Features of TFLite Models
TFLite models offer a wide range of key features that enable on-device machine learning by helping developers run their models on mobile, embedded, and edge devices:
-
On-device Optimization: TFLite optimizes for on-device ML, reducing latency by processing data locally, enhancing privacy by not transmitting personal data, and minimizing model size to save space.
-
Multiple Platform Support: TFLite offers extensive platform compatibility, supporting Android, iOS, embedded Linux, and microcontrollers.
-
Diverse Language Support: TFLite is compatible with various programming languages, including Java, Swift, Objective-C, C++, and Python.
-
High Performance: Achieves superior performance through hardware acceleration and model optimization.
Deployment Options in TFLite
Before we look at the code for exporting YOLOv8 models to the TFLite format, let's understand how TFLite models are normally used.
TFLite offers various on-device deployment options for machine learning models, including:
- Deploying with Android and iOS: Both Android and iOS applications with TFLite can analyze edge-based camera feeds and sensors to detect and identify objects. TFLite also offers native iOS libraries written in Swift and Objective-C. The architecture diagram below shows the process of deploying a trained model onto Android and iOS platforms using TensorFlow Lite.

-
Implementing with Embedded Linux: If running inferences on a Raspberry Pi using the Ultralytics Guide does not meet the speed requirements for your use case, you can use an exported TFLite model to accelerate inference times. Additionally, it's possible to further improve performance by utilizing a Coral Edge TPU device.
-
Deploying with Microcontrollers: TFLite models can also be deployed on microcontrollers and other devices with only a few kilobytes of memory. The core runtime just fits in 16 KB on an Arm Cortex M3 and can run many basic models. It doesn't require operating system support, any standard C or C++ libraries, or dynamic memory allocation.
Export to TFLite: Converting Your YOLOv8 Model
You can improve on-device model execution efficiency and optimize performance by converting them to TFLite format.
Installation
To install the required packages, run:
!!! Tip "Installation"
=== "CLI"

    ```py
    # Install the required package for YOLOv8
    pip install ultralytics
    ```
For detailed instructions and best practices related to the installation process, check our Ultralytics Installation guide. While installing the required packages for YOLOv8, if you encounter any difficulties, consult our Common Issues guide for solutions and tips.
Usage
Before diving into the usage instructions, it's important to note that while all Ultralytics YOLOv8 models are available for exporting, you can ensure that the model you select supports export functionality here.
!!! Example "Usage"
=== "Python"

      ```py
      from ultralytics import YOLO

      # Load the YOLOv8 model
      model = YOLO("yolov8n.pt")

      # Export the model to TFLite format
      model.export(format="tflite")  # creates 'yolov8n_float32.tflite'

      # Load the exported TFLite model
      tflite_model = YOLO("yolov8n_float32.tflite")

      # Run inference
      results = tflite_model("https://ultralytics.com/images/bus.jpg")
      ```

=== "CLI"

      ```py
      # Export a YOLOv8n PyTorch model to TFLite format
      yolo export model=yolov8n.pt format=tflite  # creates 'yolov8n_float32.tflite'

      # Run inference with the exported model
      yolo predict model='yolov8n_float32.tflite' source='https://ultralytics.com/images/bus.jpg'
      ```
For more details about the export process, visit the Ultralytics documentation page on exporting.
Deploying Exported YOLOv8 TFLite Models
After successfully exporting your Ultralytics YOLOv8 models to TFLite format, you can now deploy them. The primary and recommended first step for running a TFLite model is to utilize the YOLO("model.tflite") method, as outlined in the previous usage code snippet. However, for in-depth instructions on deploying your TFLite models in various other settings, take a look at the following resources:
-
Android: A quick start guide for integrating TensorFlow Lite into Android applications, providing easy-to-follow steps for setting up and running machine learning models.
-
iOS: Check out this detailed guide for developers on integrating and deploying TensorFlow Lite models in iOS applications, offering step-by-step instructions and resources.
-
End-To-End Examples: This page provides an overview of various TensorFlow Lite examples, showcasing practical applications and tutorials designed to help developers implement TensorFlow Lite in their machine learning projects on mobile and edge devices.
Summary
In this guide, we focused on how to export to TFLite format. By converting your Ultralytics YOLOv8 models to TFLite model format, you can improve the efficiency and speed of YOLOv8 models, making them more effective and suitable for edge computing environments.
For further details on usage, visit the TFLite official documentation.
Also, if you're curious about other Ultralytics YOLOv8 integrations, make sure to check out our integration guide page. You'll find tons of helpful info and insights waiting for you there.
FAQ
How do I export a YOLOv8 model to TFLite format?
To export a YOLOv8 model to TFLite format, you can use the Ultralytics library. First, install the required package using:
pip install ultralytics
Then, use the following code snippet to export your model:
from ultralytics import YOLO

# Load the YOLOv8 model
model = YOLO("yolov8n.pt")

# Export the model to TFLite format
model.export(format="tflite")  # creates 'yolov8n_float32.tflite'
For CLI users, you can achieve this with:
yolo export model=yolov8n.pt format=tflite # creates 'yolov8n_float32.tflite'
For more details, visit the Ultralytics export guide.
What are the benefits of using TensorFlow Lite for YOLOv8 model deployment?
TensorFlow Lite (TFLite) is an open-source deep learning framework designed for on-device inference, making it ideal for deploying YOLOv8 models on mobile, embedded, and IoT devices. Key benefits include:
- On-device optimization: Minimize latency and enhance privacy by processing data locally.
- Platform compatibility: Supports Android, iOS, embedded Linux, and MCU.
- Performance: Utilizes hardware acceleration to optimize model speed and efficiency.
To learn more, check out the TFLite guide.
Is it possible to run YOLOv8 TFLite models on Raspberry Pi?
Yes, you can run YOLOv8 TFLite models on Raspberry Pi to improve inference speeds. First, export your model to TFLite format as explained here. Then, use a tool like TensorFlow Lite Interpreter to execute the model on your Raspberry Pi.
For further optimizations, you might consider using Coral Edge TPU. For detailed steps, refer to our Raspberry Pi deployment guide.
Can I use TFLite models on microcontrollers for YOLOv8 predictions?
Yes, TFLite supports deployment on microcontrollers with limited resources. TFLite's core runtime requires only 16 KB of memory on an Arm Cortex M3 and can run basic YOLOv8 models. This makes it suitable for deployment on devices with minimal computational power and memory.
To get started, visit the TFLite Micro for Microcontrollers guide.
What platforms are compatible with TFLite exported YOLOv8 models?
TensorFlow Lite provides extensive platform compatibility, allowing you to deploy YOLOv8 models on a wide range of devices, including:
- Android and iOS: Native support through TFLite Android and iOS libraries.
- Embedded Linux: Ideal for single-board computers such as Raspberry Pi.
- Microcontrollers: Suitable for MCUs with constrained resources.
For more information on deployment options, see our detailed deployment guide.
How do I troubleshoot common issues during YOLOv8 model export to TFLite?
If you encounter errors while exporting YOLOv8 models to TFLite, common solutions include:
- Check package compatibility: Ensure you're using compatible versions of Ultralytics and TensorFlow. Refer to our installation guide.
- Model support: Verify that the specific YOLOv8 model supports TFLite export by checking here.
For additional troubleshooting tips, visit our Common Issues guide.
comments: true
description: Learn how to export Ultralytics YOLOv8 models to TorchScript for flexible, cross-platform deployment. Boost performance and utilize in various environments.
keywords: YOLOv8, TorchScript, model export, Ultralytics, PyTorch, deep learning, AI deployment, cross-platform, performance optimization
YOLOv8 Model Export to TorchScript for Quick Deployment
Deploying computer vision models across different environments, including embedded systems, web browsers, or platforms with limited Python support, requires a flexible and portable solution. TorchScript focuses on portability and the ability to run models in environments where the entire Python framework is unavailable. This makes it ideal for scenarios where you need to deploy your computer vision capabilities across various devices or platforms.
Export to Torchscript to serialize your Ultralytics YOLOv8 models for cross-platform compatibility and streamlined deployment. In this guide, we'll show you how to export your YOLOv8 models to the TorchScript format, making it easier for you to use them across a wider range of applications.
Why should you export to TorchScript?
Developed by the creators of PyTorch, TorchScript is a powerful tool for optimizing and deploying PyTorch models across a variety of platforms. Exporting YOLOv8 models to TorchScript is crucial for moving from research to real-world applications. TorchScript, part of the PyTorch framework, helps make this transition smoother by allowing PyTorch models to be used in environments that don't support Python.
The process involves two techniques: tracing and scripting. Tracing records operations during model execution, while scripting allows for the definition of models using a subset of Python. These techniques ensure that models like YOLOv8 can still work their magic even outside their usual Python environment.
TorchScript models can also be optimized through techniques such as operator fusion and refinements in memory usage, ensuring efficient execution. Another advantage of exporting to TorchScript is its potential to accelerate model execution across various hardware platforms. It creates a standalone, production-ready representation of your PyTorch model that can be integrated into C++ environments, embedded systems, or deployed in web or mobile applications.
Key Features of TorchScript Models
TorchScript, a key part of the PyTorch ecosystem, provides powerful features for optimizing and deploying deep learning models.
Here are the key features that make TorchScript a valuable tool for developers:
-
Static Graph Execution: TorchScript uses a static graph representation of the model's computation, which is different from PyTorch's dynamic graph execution. In static graph execution, the computational graph is defined and compiled once before the actual execution, resulting in improved performance during inference.
-
Model Serialization: TorchScript allows you to serialize PyTorch models into a platform-independent format. Serialized models can be loaded without requiring the original Python code, enabling deployment in different runtime environments.
-
JIT Compilation: TorchScript uses Just-In-Time (JIT) compilation to convert PyTorch models into an optimized intermediate representation. JIT compiles the model's computational graph, enabling efficient execution on target devices.
-
Cross-Language Integration: With TorchScript, you can export PyTorch models to other languages such as C++, Java, and JavaScript. This makes it easier to integrate PyTorch models into existing software systems written in different languages.
-
Gradual Conversion: TorchScript provides a gradual conversion approach, allowing you to incrementally convert parts of your PyTorch model into TorchScript. This flexibility is particularly useful when dealing with complex models or when you want to optimize specific portions of the code.
Deployment Options in TorchScript
Before we look at the code for exporting YOLOv8 models to the TorchScript format, let's understand where TorchScript models are normally used.
TorchScript offers various deployment options for machine learning models, such as:
-
C++ API: The most common use case for TorchScript is its C++ API, which allows you to load and execute optimized TorchScript models directly within C++ applications. This is ideal for production environments where Python may not be suitable or available. The C++ API offers low-overhead and efficient execution of TorchScript models, maximizing performance potential.
-
Mobile Deployment: TorchScript offers tools for converting models into formats readily deployable on mobile devices. PyTorch Mobile provides a runtime for executing these models within iOS and Android apps. This enables low-latency, offline inference capabilities, enhancing user experience and data privacy.
-
Cloud Deployment: TorchScript models can be deployed to cloud-based servers using solutions like TorchServe. It provides features like model versioning, batching, and metrics monitoring for scalable deployment in production environments. Cloud deployment with TorchScript can make your models accessible via APIs or other web services.
Export to TorchScript: Converting Your YOLOv8 Model
Exporting YOLOv8 models to TorchScript makes it easier to use them in different places and helps them run faster and more efficiently. This is great for anyone looking to use deep learning models more effectively in real-world applications.
Installation
To install the required package, run:
!!! Tip "Installation"
=== "CLI"

    ```py
    # Install the required package for YOLOv8
    pip install ultralytics
    ```
For detailed instructions and best practices related to the installation process, check our Ultralytics Installation guide. While installing the required packages for YOLOv8, if you encounter any difficulties, consult our Common Issues guide for solutions and tips.
Usage
Before diving into the usage instructions, it's important to note that while all Ultralytics YOLOv8 models are available for exporting, you can ensure that the model you select supports export functionality here.
!!! Example "Usage"
=== "Python"

    ```py
    from ultralytics import YOLO

    # Load the YOLOv8 model
    model = YOLO("yolov8n.pt")

    # Export the model to TorchScript format
    model.export(format="torchscript")  # creates 'yolov8n.torchscript'

    # Load the exported TorchScript model
    torchscript_model = YOLO("yolov8n.torchscript")

    # Run inference
    results = torchscript_model("https://ultralytics.com/images/bus.jpg")
    ```

=== "CLI"

    ```py
    # Export a YOLOv8n PyTorch model to TorchScript format
    yolo export model=yolov8n.pt format=torchscript  # creates 'yolov8n.torchscript'

    # Run inference with the exported model
    yolo predict model=yolov8n.torchscript source='https://ultralytics.com/images/bus.jpg'
    ```
For more details about the export process, visit the Ultralytics documentation page on exporting.
Deploying Exported YOLOv8 TorchScript Models
After successfully exporting your Ultralytics YOLOv8 models to TorchScript format, you can now deploy them. The primary and recommended first step for running a TorchScript model is to utilize the YOLO("model.torchscript") method, as outlined in the previous usage code snippet. However, for in-depth instructions on deploying your TorchScript models in various other settings, take a look at the following resources:
-
Explore Mobile Deployment: The PyTorch Mobile Documentation provides comprehensive guidelines for deploying models on mobile devices, ensuring your applications are efficient and responsive.
-
Master Server-Side Deployment: Learn how to deploy models server-side with TorchServe, offering a step-by-step tutorial for scalable, efficient model serving.
-
Implement C++ Deployment: Dive into the Tutorial on Loading a TorchScript Model in C++, facilitating the integration of your TorchScript models into C++ applications for enhanced performance and versatility.
Summary
In this guide, we explored the process of exporting Ultralytics YOLOv8 models to the TorchScript format. By following the provided instructions, you can optimize YOLOv8 models for performance and gain the flexibility to deploy them across various platforms and environments.
For further details on usage, visit TorchScript's official documentation.
Also, if you'd like to know more about other Ultralytics YOLOv8 integrations, visit our integration guide page. You'll find plenty of useful resources and insights there.
FAQ
What is Ultralytics YOLOv8 model export to TorchScript?
Exporting an Ultralytics YOLOv8 model to TorchScript allows for flexible, cross-platform deployment. TorchScript, a part of the PyTorch ecosystem, facilitates the serialization of models, which can then be executed in environments that lack Python support. This makes it ideal for deploying models on embedded systems, C++ environments, mobile applications, and even web browsers. Exporting to TorchScript enables efficient performance and wider applicability of your YOLOv8 models across diverse platforms.
How can I export my YOLOv8 model to TorchScript using Ultralytics?
To export a YOLOv8 model to TorchScript, you can use the following example code:
!!! Example "Usage"
=== "Python"

    ```py
    from ultralytics import YOLO

    # Load the YOLOv8 model
    model = YOLO("yolov8n.pt")

    # Export the model to TorchScript format
    model.export(format="torchscript")  # creates 'yolov8n.torchscript'

    # Load the exported TorchScript model
    torchscript_model = YOLO("yolov8n.torchscript")

    # Run inference
    results = torchscript_model("https://ultralytics.com/images/bus.jpg")
    ```

=== "CLI"

    ```py
    # Export a YOLOv8n PyTorch model to TorchScript format
    yolo export model=yolov8n.pt format=torchscript  # creates 'yolov8n.torchscript'

    # Run inference with the exported model
    yolo predict model=yolov8n.torchscript source='https://ultralytics.com/images/bus.jpg'
    ```
For more details about the export process, refer to the Ultralytics documentation on exporting.
Why should I use TorchScript for deploying YOLOv8 models?
Using TorchScript for deploying YOLOv8 models offers several advantages:
- Portability: Exported models can run in environments without the need for Python, such as C++ applications, embedded systems, or mobile devices.
- Optimization: TorchScript supports static graph execution and Just-In-Time (JIT) compilation, which can optimize model performance.
- Cross-Language Integration: TorchScript models can be integrated into other programming languages, enhancing flexibility and expandability.
- Serialization: Models can be serialized, allowing for platform-independent loading and inference.
For more insights into deployment, visit the PyTorch Mobile Documentation, TorchServe Documentation, and C++ Deployment Guide.
What are the installation steps for exporting YOLOv8 models to TorchScript?
To install the required package for exporting YOLOv8 models, use the following command:
!!! Tip "Installation"
=== "CLI"

    ```py
    # Install the required package for YOLOv8
    pip install ultralytics
    ```
For detailed instructions, visit the Ultralytics Installation guide. If any issues arise during installation, consult the Common Issues guide.
How do I deploy my exported TorchScript YOLOv8 models?
After exporting YOLOv8 models to the TorchScript format, you can deploy them across a variety of platforms:
- C++ API: Ideal for low-overhead, highly efficient production environments.
- Mobile Deployment: Use PyTorch Mobile for iOS and Android applications.
- Cloud Deployment: Utilize services like TorchServe for scalable server-side deployment.
Explore comprehensive guidelines for deploying models in these settings to take full advantage of TorchScript's capabilities.
comments: true
description: Learn how to enhance YOLOv8 experiment tracking and visualization with Weights & Biases for better model performance and management.
keywords: YOLOv8, Weights & Biases, model training, experiment tracking, Ultralytics, machine learning, computer vision, model visualization
Enhancing YOLOv8 Experiment Tracking and Visualization with Weights & Biases
Object detection models like Ultralytics YOLOv8 have become integral to many computer vision applications. However, training, evaluating, and deploying these complex models introduces several challenges. Tracking key training metrics, comparing model variants, analyzing model behavior, and detecting issues require substantial instrumentation and experiment management.
This guide showcases Ultralytics YOLOv8 integration with Weights & Biases' for enhanced experiment tracking, model-checkpointing, and visualization of model performance. It also includes instructions for setting up the integration, training, fine-tuning, and visualizing results using Weights & Biases' interactive features.
Weights & Biases
Weights & Biases is a cutting-edge MLOps platform designed for tracking, visualizing, and managing machine learning experiments. It features automatic logging of training metrics for full experiment reproducibility, an interactive UI for streamlined data analysis, and efficient model management tools for deploying across various environments.
YOLOv8 Training with Weights & Biases
You can use Weights & Biases to bring efficiency and automation to your YOLOv8 training process.
Installation
To install the required packages, run:
!!! Tip "Installation"
=== "CLI"

    ```py
    # Install the required packages for YOLOv8 and Weights & Biases
    pip install --upgrade ultralytics==8.0.186 wandb
    ```
For detailed instructions and best practices related to the installation process, be sure to check our YOLOv8 Installation guide. While installing the required packages for YOLOv8, if you encounter any difficulties, consult our Common Issues guide for solutions and tips.
Configuring Weights & Biases
After installing the necessary packages, the next step is to set up your Weights & Biases environment. This includes creating a Weights & Biases account and obtaining the necessary API key for a smooth connection between your development environment and the W&B platform.
Start by initializing the Weights & Biases environment in your workspace. You can do this by running the following command and following the prompted instructions.
!!! Tip "Initial SDK Setup"
=== "CLI"

    ```py
    # Initialize your Weights & Biases environment
    import wandb
    wandb.login()
    ```
Navigate to the Weights & Biases authorization page to create and retrieve your API key. Use this key to authenticate your environment with W&B.
Usage: Training YOLOv8 with Weights & Biases
Before diving into the usage instructions for YOLOv8 model training with Weights & Biases, be sure to check out the range of YOLOv8 models offered by Ultralytics. This will help you choose the most appropriate model for your project requirements.
!!! Example "Usage: Training YOLOv8 with Weights & Biases"
=== "Python"

    ```py
    import wandb
    from wandb.integration.ultralytics import add_wandb_callback

    from ultralytics import YOLO

    # Initialize a Weights & Biases run
    wandb.init(project="ultralytics", job_type="training")

    # Load a YOLO model
    model = YOLO("yolov8n.pt")

    # Add W&B Callback for Ultralytics
    add_wandb_callback(model, enable_model_checkpointing=True)

    # Train and Fine-Tune the Model
    model.train(project="ultralytics", data="coco8.yaml", epochs=5, imgsz=640)

    # Validate the Model
    model.val()

    # Perform Inference and Log Results
    model(["path/to/image1", "path/to/image2"])

    # Finalize the W&B Run
    wandb.finish()
    ```
Understanding the Code
Let's understand the steps showcased in the usage code snippet above.
-
Step 1: Initialize a Weights & Biases Run: Start by initializing a Weights & Biases run, specifying the project name and the job type. This run will track and manage the training and validation processes of your model.
-
Step 2: Define the YOLOv8 Model and Dataset: Specify the model variant and the dataset you wish to use. The YOLO model is then initialized with the specified model file.
-
Step 3: Add Weights & Biases Callback for Ultralytics: This step is crucial as it enables the automatic logging of training metrics and validation results to Weights & Biases, providing a detailed view of the model's performance.
-
Step 4: Train and Fine-Tune the Model: Begin training the model with the specified dataset, number of epochs, and image size. The training process includes logging of metrics and predictions at the end of each epoch, offering a comprehensive view of the model's learning progress.
-
Step 5: Validate the Model: After training, the model is validated. This step is crucial for assessing the model's performance on unseen data and ensuring its generalizability.
-
Step 6: Perform Inference and Log Results: The model performs predictions on specified images. These predictions, along with visual overlays and insights, are automatically logged in a W&B Table for interactive exploration.
-
Step 7: Finalize the W&B Run: This step marks the end of data logging and saves the final state of your model's training and validation process in the W&B dashboard.
Understanding the Output
Upon running the usage code snippet above, you can expect the following key outputs:
- The setup of a new run with its unique ID, indicating the start of the training process.
- A concise summary of the model's structure, including the number of layers and parameters.
- Regular updates on important metrics such as box loss, cls loss, dfl loss, precision, recall, and mAP scores during each training epoch.
- At the end of training, detailed metrics including the model's inference speed, and overall accuracy metrics are displayed.
- Links to the Weights & Biases dashboard for in-depth analysis and visualization of the training process, along with information on local log file locations.
Viewing the Weights & Biases Dashboard
After running the usage code snippet, you can access the Weights & Biases (W&B) dashboard through the provided link in the output. This dashboard offers a comprehensive view of your model's training process with YOLOv8.
Key Features of the Weights & Biases Dashboard
-
Real-Time Metrics Tracking: Observe metrics like loss, accuracy, and validation scores as they evolve during the training, offering immediate insights for model tuning. See how experiments are tracked using Weights & Biases.
-
Hyperparameter Optimization: Weights & Biases aids in fine-tuning critical parameters such as learning rate, batch size, and more, enhancing the performance of YOLOv8.
-
Comparative Analysis: The platform allows side-by-side comparisons of different training runs, essential for assessing the impact of various model configurations.
-
Visualization of Training Progress: Graphical representations of key metrics provide an intuitive understanding of the model's performance across epochs. See how Weights & Biases helps you visualize validation results.
-
Resource Monitoring: Keep track of CPU, GPU, and memory usage to optimize the efficiency of the training process.
-
Model Artifacts Management: Access and share model checkpoints, facilitating easy deployment and collaboration.
-
Viewing Inference Results with Image Overlay: Visualize the prediction results on images using interactive overlays in Weights & Biases, providing a clear and detailed view of model performance on real-world data. For more detailed information on Weights & Biases' image overlay capabilities, check out this link. See how Weights & Biases' image overlays helps visualize model inferences.
By using these features, you can effectively track, analyze, and optimize your YOLOv8 model's training, ensuring the best possible performance and efficiency.
Summary
This guide helped you explore Ultralytics' YOLOv8 integration with Weights & Biases. It illustrates the ability of this integration to efficiently track and visualize model training and prediction results.
For further details on usage, visit Weights & Biases' official documentation.
Also, be sure to check out the Ultralytics integration guide page, to learn more about different exciting integrations.
FAQ
How do I install the required packages for YOLOv8 and Weights & Biases?
To install the required packages for YOLOv8 and Weights & Biases, open your command line interface and run:
pip install --upgrade ultralytics==8.0.186 wandb
For further guidance on installation steps, refer to our YOLOv8 Installation guide. If you encounter issues, consult the Common Issues guide for troubleshooting tips.
What are the benefits of integrating Ultralytics YOLOv8 with Weights & Biases?
Integrating Ultralytics YOLOv8 with Weights & Biases offers several benefits including:
- Real-Time Metrics Tracking: Observe metric changes during training for immediate insights.
- Hyperparameter Optimization: Improve model performance by fine-tuning learning rate, batch size, etc.
- Comparative Analysis: Side-by-side comparison of different training runs.
- Resource Monitoring: Keep track of CPU, GPU, and memory usage.
- Model Artifacts Management: Easy access and sharing of model checkpoints.
Explore these features in detail in the Weights & Biases Dashboard section above.
How can I configure Weights & Biases for YOLOv8 training?
To configure Weights & Biases for YOLOv8 training, follow these steps:
- Run the command to initialize Weights & Biases:
import wandb wandb.login() - Retrieve your API key from the Weights & Biases website.
- Use the API key to authenticate your development environment.
Detailed setup instructions can be found in the Configuring Weights & Biases section above.
How do I train a YOLOv8 model using Weights & Biases?
For training a YOLOv8 model using Weights & Biases, use the following steps in a Python script:
import wandb
from wandb.integration.ultralytics import add_wandb_callback

from ultralytics import YOLO

# Initialize a Weights & Biases run
wandb.init(project="ultralytics", job_type="training")

# Load a YOLO model
model = YOLO("yolov8n.pt")

# Add W&B Callback for Ultralytics
add_wandb_callback(model, enable_model_checkpointing=True)

# Train and Fine-Tune the Model
model.train(project="ultralytics", data="coco8.yaml", epochs=5, imgsz=640)

# Validate the Model
model.val()

# Perform Inference and Log Results
model(["path/to/image1", "path/to/image2"])

# Finalize the W&B Run
wandb.finish()
This script initializes Weights & Biases, sets up the model, trains it, and logs results. For more details, visit the Usage section above.
Why should I use Ultralytics YOLOv8 with Weights & Biases over other platforms?
Ultralytics YOLOv8 integrated with Weights & Biases offers several unique advantages:
- High Efficiency: Real-time tracking of training metrics and performance optimization.
- Scalability: Easily manage large-scale training jobs with robust resource monitoring and utilization tools.
- Interactivity: A user-friendly interactive UI for data visualization and model management.
- Community and Support: Strong integration documentation and community support with flexible customization and enhancement options.
For comparisons with other platforms like Comet and ClearML, refer to Ultralytics integrations.


 浙公网安备 33010602011771号