Yolov8-源码解析-十三-
Yolov8 源码解析(十三)
comments: true
description: Dive into our guide on YOLOv8's integration with Kaggle. Find out what Kaggle is, its key features, and how to train a YOLOv8 model using the integration.
keywords: What is Kaggle, What is Kaggle Used For, YOLOv8, Kaggle Machine Learning, Model Training, GPU, TPU, cloud computing
A Guide on Using Kaggle to Train Your YOLOv8 Models
If you are learning about AI and working on small projects, you might not have access to powerful computing resources yet, and high-end hardware can be pretty expensive. Fortunately, Kaggle, a platform owned by Google, offers a great solution. Kaggle provides a free, cloud-based environment where you can access GPU resources, handle large datasets, and collaborate with a diverse community of data scientists and machine learning enthusiasts.
Kaggle is a great choice for training and experimenting with Ultralytics YOLOv8 models. Kaggle Notebooks make using popular machine-learning libraries and frameworks in your projects easy. Let's explore Kaggle's main features and learn how you can train YOLOv8 models on this platform!
What is Kaggle?
Kaggle is a platform that brings together data scientists from around the world to collaborate, learn, and compete in solving real-world data science problems. Launched in 2010 by Anthony Goldbloom and Jeremy Howard and acquired by Google in 2017. Kaggle enables users to connect, discover and share datasets, use GPU-powered notebooks, and participate in data science competitions. The platform is designed to help both seasoned professionals and eager learners achieve their goals by offering robust tools and resources.
With more than 10 million users as of 2022, Kaggle provides a rich environment for developing and experimenting with machine learning models. You don't need to worry about your local machine's specs or setup; you can dive right in with just a Kaggle account and a web browser.
Training YOLOv8 Using Kaggle
Training YOLOv8 models on Kaggle is simple and efficient, thanks to the platform's access to powerful GPUs.
To get started, access the Kaggle YOLOv8 Notebook. Kaggle's environment comes with pre-installed libraries like TensorFlow and PyTorch, making the setup process hassle-free.
Once you sign in to your Kaggle account, you can click on the option to copy and edit the code, select a GPU under the accelerator settings, and run the notebook's cells to begin training your model. For a detailed understanding of the model training process and best practices, refer to our YOLOv8 Model Training guide.
On the official YOLOv8 Kaggle notebook page, if you click on the three dots in the upper right-hand corner, you'll notice more options will pop up.
These options include:
- View Versions: Browse through different versions of the notebook to see changes over time and revert to previous versions if needed.
- Copy API Command: Get an API command to programmatically interact with the notebook, which is useful for automation and integration into workflows.
- Open in Google Notebooks: Open the notebook in Google's hosted notebook environment.
- Open in Colab: Launch the notebook in Google Colab for further editing and execution.
- Follow Comments: Subscribe to the comments section to get updates and engage with the community.
- Download Code: Download the entire notebook as a Jupyter (.ipynb) file for offline use or version control in your local environment.
- Add to Collection: Save the notebook to a collection within your Kaggle account for easy access and organization.
- Bookmark: Bookmark the notebook for quick access in the future.
- Embed Notebook: Get an embed link to include the notebook in blogs, websites, or documentation.
Common Issues While Working with Kaggle
When working with Kaggle, you might come across some common issues. Here are some points to help you navigate the platform smoothly:
- Access to GPUs: In your Kaggle notebooks, you can activate a GPU at any time, with usage allowed for up to 30 hours per week. Kaggle provides the Nvidia Tesla P100 GPU with 16GB of memory and also offers the option of using a Nvidia GPU T4 x2. Powerful hardware accelerates your machine-learning tasks, making model training and inference much faster.
- Kaggle Kernels: Kaggle Kernels are free Jupyter notebook servers that can integrate GPUs, allowing you to perform machine learning operations on cloud computers. You don't have to rely on your own computer's CPU, avoiding overload and freeing up your local resources.
- Kaggle Datasets: Kaggle datasets are free to download. However, it's important to check the license for each dataset to understand any usage restrictions. Some datasets may have limitations on academic publications or commercial use. You can download datasets directly to your Kaggle notebook or anywhere else via the Kaggle API.
- Saving and Committing Notebooks: To save and commit a notebook on Kaggle, click "Save Version." This saves the current state of your notebook. Once the background kernel finishes generating the output files, you can access them from the Output tab on the main notebook page.
- Collaboration: Kaggle supports collaboration, but multiple users cannot edit a notebook simultaneously. Collaboration on Kaggle is asynchronous, meaning users can share and work on the same notebook at different times.
- Reverting to a Previous Version: If you need to revert to a previous version of your notebook, open the notebook and click on the three vertical dots in the top right corner to select "View Versions." Find the version you want to revert to, click on the "..." menu next to it, and select "Revert to Version." After the notebook reverts, click "Save Version" to commit the changes.
Key Features of Kaggle
Next, let's understand the features Kaggle offers that make it an excellent platform for data science and machine learning enthusiasts. Here are some of the key highlights:
- Datasets: Kaggle hosts a massive collection of datasets on various topics. You can easily search and use these datasets in your projects, which is particularly handy for training and testing your YOLOv8 models.
- Competitions: Known for its exciting competitions, Kaggle allows data scientists and machine learning enthusiasts to solve real-world problems. Competing helps you improve your skills, learn new techniques, and gain recognition in the community.
- Free Access to TPUs: Kaggle provides free access to powerful TPUs, which are essential for training complex machine learning models. This means you can speed up processing and boost the performance of your YOLOv8 projects without incurring extra costs.
- Integration with Github: Kaggle allows you to easily connect your GitHub repository to upload notebooks and save your work. This integration makes it convenient to manage and access your files.
- Community and Discussions: Kaggle boasts a strong community of data scientists and machine learning practitioners. The discussion forums and shared notebooks are fantastic resources for learning and troubleshooting. You can easily find help, share your knowledge, and collaborate with others.
Why Should You Use Kaggle for Your YOLOv8 Projects?
There are multiple platforms for training and evaluating machine learning models, so what makes Kaggle stand out? Let's dive into the benefits of using Kaggle for your machine-learning projects:
- Public Notebooks: You can make your Kaggle notebooks public, allowing other users to view, vote, fork, and discuss your work. Kaggle promotes collaboration, feedback, and the sharing of ideas, helping you improve your YOLOv8 models.
- Comprehensive History of Notebook Commits: Kaggle creates a detailed history of your notebook commits. This allows you to review and track changes over time, making it easier to understand the evolution of your project and revert to previous versions if needed.
- Console Access: Kaggle provides a console, giving you more control over your environment. This feature allows you to perform various tasks directly from the command line, enhancing your workflow and productivity.
- Resource Availability: Each notebook editing session on Kaggle is provided with significant resources: 12 hours of execution time for CPU and GPU sessions, 9 hours of execution time for TPU sessions, and 20 gigabytes of auto-saved disk space.
- Notebook Scheduling: Kaggle allows you to schedule your notebooks to run at specific times. You can automate repetitive tasks without manual intervention, such as training your model at regular intervals.
Keep Learning about Kaggle
If you want to learn more about Kaggle, here are some helpful resources to guide you:
- Kaggle Learn: Discover a variety of free, interactive tutorials on Kaggle Learn. These courses cover essential data science topics and provide hands-on experience to help you master new skills.
- Getting Started with Kaggle: This comprehensive guide walks you through the basics of using Kaggle, from joining competitions to creating your first notebook. It's a great starting point for newcomers.
- Kaggle Medium Page: Explore tutorials, updates, and community contributions on Kaggle's Medium page. It's an excellent source for staying up-to-date with the latest trends and gaining deeper insights into data science.
Summary
We've seen how Kaggle can boost your YOLOv8 projects by providing free access to powerful GPUs, making model training and evaluation efficient. Kaggle's platform is user-friendly, with pre-installed libraries for quick setup.
For more details, visit Kaggle's documentation.
Interested in more YOLOv8 integrations? Check out the Ultralytics integration guide to explore additional tools and capabilities for your machine learning projects.
FAQ
How do I train a YOLOv8 model on Kaggle?
Training a YOLOv8 model on Kaggle is straightforward. First, access the Kaggle YOLOv8 Notebook. Sign in to your Kaggle account, copy and edit the notebook, and select a GPU under the accelerator settings. Run the notebook cells to start training. For more detailed steps, refer to our YOLOv8 Model Training guide.
What are the benefits of using Kaggle for YOLOv8 model training?
Kaggle offers several advantages for training YOLOv8 models:
- Free GPU Access: Utilize powerful GPUs like Nvidia Tesla P100 or T4 x2 for up to 30 hours per week.
- Pre-installed Libraries: Libraries like TensorFlow and PyTorch are pre-installed, simplifying the setup.
- Community Collaboration: Engage with a vast community of data scientists and machine learning enthusiasts.
- Version Control: Easily manage different versions of your notebooks and revert to previous versions if needed.
For more details, visit our Ultralytics integration guide.
What common issues might I encounter when using Kaggle for YOLOv8, and how can I resolve them?
Common issues include:
- Access to GPUs: Ensure you activate a GPU in your notebook settings. Kaggle allows up to 30 hours of GPU usage per week.
- Dataset Licenses: Check the license of each dataset to understand usage restrictions.
- Saving and Committing Notebooks: Click "Save Version" to save your notebook's state and access output files from the Output tab.
- Collaboration: Kaggle supports asynchronous collaboration; multiple users cannot edit a notebook simultaneously.
For more troubleshooting tips, see our Common Issues guide.
Why should I choose Kaggle over other platforms like Google Colab for training YOLOv8 models?
Kaggle offers unique features that make it an excellent choice:
- Public Notebooks: Share your work with the community for feedback and collaboration.
- Free Access to TPUs: Speed up training with powerful TPUs without extra costs.
- Comprehensive History: Track changes over time with a detailed history of notebook commits.
- Resource Availability: Significant resources are provided for each notebook session, including 12 hours of execution time for CPU and GPU sessions.
For a comparison with Google Colab, refer to our Google Colab guide.
How can I revert to a previous version of my Kaggle notebook?
To revert to a previous version:
- Open the notebook and click on the three vertical dots in the top right corner.
- Select "View Versions."
- Find the version you want to revert to, click on the "..." menu next to it, and select "Revert to Version."
- Click "Save Version" to commit the changes.
comments: true
description: Learn how to set up and use MLflow logging with Ultralytics YOLO for enhanced experiment tracking, model reproducibility, and performance improvements.
keywords: MLflow, Ultralytics YOLO, machine learning, experiment tracking, metrics logging, parameter logging, artifact logging
MLflow Integration for Ultralytics YOLO
Introduction
Experiment logging is a crucial aspect of machine learning workflows that enables tracking of various metrics, parameters, and artifacts. It helps to enhance model reproducibility, debug issues, and improve model performance. Ultralytics YOLO, known for its real-time object detection capabilities, now offers integration with MLflow, an open-source platform for complete machine learning lifecycle management.
This documentation page is a comprehensive guide to setting up and utilizing the MLflow logging capabilities for your Ultralytics YOLO project.
What is MLflow?
MLflow is an open-source platform developed by Databricks for managing the end-to-end machine learning lifecycle. It includes tools for tracking experiments, packaging code into reproducible runs, and sharing and deploying models. MLflow is designed to work with any machine learning library and programming language.
Features
- Metrics Logging: Logs metrics at the end of each epoch and at the end of the training.
- Parameter Logging: Logs all the parameters used in the training.
- Artifacts Logging: Logs model artifacts, including weights and configuration files, at the end of the training.
Setup and Prerequisites
Ensure MLflow is installed. If not, install it using pip:
pip install mlflow
Make sure that MLflow logging is enabled in Ultralytics settings. Usually, this is controlled by the settings mflow key. See the settings page for more info.
!!! Example "Update Ultralytics MLflow Settings"
=== "Python"

    Within the Python environment, call the `update` method on the `settings` object to change your settings:
    ```py
    from ultralytics import settings

    # Update a setting
    settings.update({"mlflow": True})

    # Reset settings to default values
    settings.reset()
    ```

=== "CLI"

    If you prefer using the command-line interface, the following commands will allow you to modify your settings:
    ```py
    # Update a setting
    yolo settings runs_dir='/path/to/runs'

    # Reset settings to default values
    yolo settings reset
    ```
How to Use
Commands
-
Set a Project Name: You can set the project name via an environment variable:
export MLFLOW_EXPERIMENT_NAME=<your_experiment_name>Or use the
project=<project>argument when training a YOLO model, i.e.yolo train project=my_project. -
Set a Run Name: Similar to setting a project name, you can set the run name via an environment variable:
export MLFLOW_RUN=<your_run_name>Or use the
name=<name>argument when training a YOLO model, i.e.yolo train project=my_project name=my_name. -
Start Local MLflow Server: To start tracking, use:
mlflow server --backend-store-uri runs/mlflow'This will start a local server at http://127.0.0.1:5000 by default and save all mlflow logs to the 'runs/mlflow' directory. To specify a different URI, set the
MLFLOW_TRACKING_URIenvironment variable. -
Kill MLflow Server Instances: To stop all running MLflow instances, run:
ps aux | grep 'mlflow' | grep -v 'grep' | awk '{print $2}' | xargs kill -9
Logging
The logging is taken care of by the on_pretrain_routine_end, on_fit_epoch_end, and on_train_end callback functions. These functions are automatically called during the respective stages of the training process, and they handle the logging of parameters, metrics, and artifacts.
Examples
-
Logging Custom Metrics: You can add custom metrics to be logged by modifying the
trainer.metricsdictionary beforeon_fit_epoch_endis called. -
View Experiment: To view your logs, navigate to your MLflow server (usually http://127.0.0.1:5000) and select your experiment and run.
![YOLO MLflow Experiment]()
-
View Run: Runs are individual models inside an experiment. Click on a Run and see the Run details, including uploaded artifacts and model weights.
![YOLO MLflow Run]()


Disabling MLflow
To turn off MLflow logging:
yolo settings mlflow=False
Conclusion
MLflow logging integration with Ultralytics YOLO offers a streamlined way to keep track of your machine learning experiments. It empowers you to monitor performance metrics and manage artifacts effectively, thus aiding in robust model development and deployment. For further details please visit the MLflow official documentation.
FAQ
How do I set up MLflow logging with Ultralytics YOLO?
To set up MLflow logging with Ultralytics YOLO, you first need to ensure MLflow is installed. You can install it using pip:
pip install mlflow
Next, enable MLflow logging in Ultralytics settings. This can be controlled using the mlflow key. For more information, see the settings guide.
!!! Example "Update Ultralytics MLflow Settings"
=== "Python"

    ```py
    from ultralytics import settings

    # Update a setting
    settings.update({"mlflow": True})

    # Reset settings to default values
    settings.reset()
    ```

=== "CLI"

    ```py
    # Update a setting
    yolo settings runs_dir='/path/to/runs'

    # Reset settings to default values
    yolo settings reset
    ```
Finally, start a local MLflow server for tracking:
mlflow server --backend-store-uri runs/mlflow
What metrics and parameters can I log using MLflow with Ultralytics YOLO?
Ultralytics YOLO with MLflow supports logging various metrics, parameters, and artifacts throughout the training process:
- Metrics Logging: Tracks metrics at the end of each epoch and upon training completion.
- Parameter Logging: Logs all parameters used in the training process.
- Artifacts Logging: Saves model artifacts like weights and configuration files after training.
For more detailed information, visit the Ultralytics YOLO tracking documentation.
Can I disable MLflow logging once it is enabled?
Yes, you can disable MLflow logging for Ultralytics YOLO by updating the settings. Here's how you can do it using the CLI:
yolo settings mlflow=False
For further customization and resetting settings, refer to the settings guide.
How can I start and stop an MLflow server for Ultralytics YOLO tracking?
To start an MLflow server for tracking your experiments in Ultralytics YOLO, use the following command:
mlflow server --backend-store-uri runs/mlflow
This command starts a local server at http://127.0.0.1:5000 by default. If you need to stop running MLflow server instances, use the following bash command:
ps aux | grep 'mlflow' | grep -v 'grep' | awk '{print $2}' | xargs kill -9
Refer to the commands section for more command options.
What are the benefits of integrating MLflow with Ultralytics YOLO for experiment tracking?
Integrating MLflow with Ultralytics YOLO offers several benefits for managing your machine learning experiments:
- Enhanced Experiment Tracking: Easily track and compare different runs and their outcomes.
- Improved Model Reproducibility: Ensure that your experiments are reproducible by logging all parameters and artifacts.
- Performance Monitoring: Visualize performance metrics over time to make data-driven decisions for model improvements.
For an in-depth look at setting up and leveraging MLflow with Ultralytics YOLO, explore the MLflow Integration for Ultralytics YOLO documentation.
comments: true
description: Optimize YOLOv8 models for mobile and embedded devices by exporting to NCNN format. Enhance performance in resource-constrained environments.
keywords: Ultralytics, YOLOv8, NCNN, model export, machine learning, deployment, mobile, embedded systems, deep learning, AI models
How to Export to NCNN from YOLOv8 for Smooth Deployment
Deploying computer vision models on devices with limited computational power, such as mobile or embedded systems, can be tricky. You need to make sure you use a format optimized for optimal performance. This makes sure that even devices with limited processing power can handle advanced computer vision tasks well.
The export to NCNN format feature allows you to optimize your Ultralytics YOLOv8 models for lightweight device-based applications. In this guide, we'll walk you through how to convert your models to the NCNN format, making it easier for your models to perform well on various mobile and embedded devices.
Why should you export to NCNN?
The NCNN framework, developed by Tencent, is a high-performance neural network inference computing framework optimized specifically for mobile platforms, including mobile phones, embedded devices, and IoT devices. NCNN is compatible with a wide range of platforms, including Linux, Android, iOS, and macOS.
NCNN is known for its fast processing speed on mobile CPUs and enables rapid deployment of deep learning models to mobile platforms. This makes it easier to build smart apps, putting the power of AI right at your fingertips.
Key Features of NCNN Models
NCNN models offer a wide range of key features that enable on-device machine learning by helping developers run their models on mobile, embedded, and edge devices:
-
Efficient and High-Performance: NCNN models are made to be efficient and lightweight, optimized for running on mobile and embedded devices like Raspberry Pi with limited resources. They can also achieve high performance with high accuracy on various computer vision-based tasks.
-
Quantization: NCNN models often support quantization which is a technique that reduces the precision of the model's weights and activations. This leads to further improvements in performance and reduces memory footprint.
-
Compatibility: NCNN models are compatible with popular deep learning frameworks like TensorFlow, Caffe, and ONNX. This compatibility allows developers to use existing models and workflows easily.
-
Easy to Use: NCNN models are designed for easy integration into various applications, thanks to their compatibility with popular deep learning frameworks. Additionally, NCNN offers user-friendly tools for converting models between different formats, ensuring smooth interoperability across the development landscape.
Deployment Options with NCNN
Before we look at the code for exporting YOLOv8 models to the NCNN format, let's understand how NCNN models are normally used.
NCNN models, designed for efficiency and performance, are compatible with a variety of deployment platforms:
-
Mobile Deployment: Specifically optimized for Android and iOS, allowing for seamless integration into mobile applications for efficient on-device inference.
-
Embedded Systems and IoT Devices: If you find that running inference on a Raspberry Pi with the Ultralytics Guide isn't fast enough, switching to an NCNN exported model could help speed things up. NCNN is great for devices like Raspberry Pi and NVIDIA Jetson, especially in situations where you need quick processing right on the device.
-
Desktop and Server Deployment: Capable of being deployed in desktop and server environments across Linux, Windows, and macOS, supporting development, training, and evaluation with higher computational capacities.
Export to NCNN: Converting Your YOLOv8 Model
You can expand model compatibility and deployment flexibility by converting YOLOv8 models to NCNN format.
Installation
To install the required packages, run:
!!! Tip "Installation"
=== "CLI"

    ```py
    # Install the required package for YOLOv8
    pip install ultralytics
    ```
For detailed instructions and best practices related to the installation process, check our Ultralytics Installation guide. While installing the required packages for YOLOv8, if you encounter any difficulties, consult our Common Issues guide for solutions and tips.
Usage
Before diving into the usage instructions, it's important to note that while all Ultralytics YOLOv8 models are available for exporting, you can ensure that the model you select supports export functionality here.
!!! Example "Usage"
=== "Python"

      ```py
      from ultralytics import YOLO

      # Load the YOLOv8 model
      model = YOLO("yolov8n.pt")

      # Export the model to NCNN format
      model.export(format="ncnn")  # creates '/yolov8n_ncnn_model'

      # Load the exported NCNN model
      ncnn_model = YOLO("./yolov8n_ncnn_model")

      # Run inference
      results = ncnn_model("https://ultralytics.com/images/bus.jpg")
      ```

=== "CLI"

      ```py
      # Export a YOLOv8n PyTorch model to NCNN format
      yolo export model=yolov8n.pt format=ncnn  # creates '/yolov8n_ncnn_model'

      # Run inference with the exported model
      yolo predict model='./yolov8n_ncnn_model' source='https://ultralytics.com/images/bus.jpg'
      ```
For more details about supported export options, visit the Ultralytics documentation page on deployment options.
Deploying Exported YOLOv8 NCNN Models
After successfully exporting your Ultralytics YOLOv8 models to NCNN format, you can now deploy them. The primary and recommended first step for running a NCNN model is to utilize the YOLO("./model_ncnn_model") method, as outlined in the previous usage code snippet. However, for in-depth instructions on deploying your NCNN models in various other settings, take a look at the following resources:
-
Android: This blog explains how to use NCNN models for performing tasks like object detection through Android applications.
-
macOS: Understand how to use NCNN models for performing tasks through macOS.
-
Linux: Explore this page to learn how to deploy NCNN models on limited resource devices like Raspberry Pi and other similar devices.
-
Windows x64 using VS2017: Explore this blog to learn how to deploy NCNN models on windows x64 using Visual Studio Community 2017.
Summary
In this guide, we've gone over exporting Ultralytics YOLOv8 models to the NCNN format. This conversion step is crucial for improving the efficiency and speed of YOLOv8 models, making them more effective and suitable for limited-resource computing environments.
For detailed instructions on usage, please refer to the official NCNN documentation.
Also, if you're interested in exploring other integration options for Ultralytics YOLOv8, be sure to visit our integration guide page for further insights and information.
FAQ
How do I export Ultralytics YOLOv8 models to NCNN format?
To export your Ultralytics YOLOv8 model to NCNN format, follow these steps:
-
Python: Use the
exportfunction from the YOLO class.from ultralytics import YOLO # Load the YOLOv8 model model = YOLO("yolov8n.pt") # Export to NCNN format model.export(format="ncnn") # creates '/yolov8n_ncnn_model' -
CLI: Use the
yolocommand with theexportargument.yolo export model=yolov8n.pt format=ncnn # creates '/yolov8n_ncnn_model'
For detailed export options, check the Export page in the documentation.
What are the advantages of exporting YOLOv8 models to NCNN?
Exporting your Ultralytics YOLOv8 models to NCNN offers several benefits:
- Efficiency: NCNN models are optimized for mobile and embedded devices, ensuring high performance even with limited computational resources.
- Quantization: NCNN supports techniques like quantization that improve model speed and reduce memory usage.
- Broad Compatibility: You can deploy NCNN models on multiple platforms, including Android, iOS, Linux, and macOS.
For more details, see the Export to NCNN section in the documentation.
Why should I use NCNN for my mobile AI applications?
NCNN, developed by Tencent, is specifically optimized for mobile platforms. Key reasons to use NCNN include:
- High Performance: Designed for efficient and fast processing on mobile CPUs.
- Cross-Platform: Compatible with popular frameworks such as TensorFlow and ONNX, making it easier to convert and deploy models across different platforms.
- Community Support: Active community support ensures continual improvements and updates.
To understand more, visit the NCNN overview in the documentation.
What platforms are supported for NCNN model deployment?
NCNN is versatile and supports various platforms:
- Mobile: Android, iOS.
- Embedded Systems and IoT Devices: Devices like Raspberry Pi and NVIDIA Jetson.
- Desktop and Servers: Linux, Windows, and macOS.
If running models on a Raspberry Pi isn't fast enough, converting to the NCNN format could speed things up as detailed in our Raspberry Pi Guide.
How can I deploy Ultralytics YOLOv8 NCNN models on Android?
To deploy your YOLOv8 models on Android:
- Build for Android: Follow the NCNN Build for Android guide.
- Integrate with Your App: Use the NCNN Android SDK to integrate the exported model into your application for efficient on-device inference.
For step-by-step instructions, refer to our guide on Deploying YOLOv8 NCNN Models.
For more advanced guides and use cases, visit the Ultralytics documentation page.
comments: true
description: Enhance YOLOv8 performance using Neural Magic's DeepSparse Engine. Learn how to deploy and benchmark YOLOv8 models on CPUs for efficient object detection.
keywords: YOLOv8, DeepSparse, Neural Magic, model optimization, object detection, inference speed, CPU performance, sparsity, pruning, quantization
Optimizing YOLOv8 Inferences with Neural Magic's DeepSparse Engine
When deploying object detection models like Ultralytics YOLOv8 on various hardware, you can bump into unique issues like optimization. This is where YOLOv8's integration with Neural Magic's DeepSparse Engine steps in. It transforms the way YOLOv8 models are executed and enables GPU-level performance directly on CPUs.
This guide shows you how to deploy YOLOv8 using Neural Magic's DeepSparse, how to run inferences, and also how to benchmark performance to ensure it is optimized.
Neural Magic's DeepSparse
Neural Magic's DeepSparse is an inference run-time designed to optimize the execution of neural networks on CPUs. It applies advanced techniques like sparsity, pruning, and quantization to dramatically reduce computational demands while maintaining accuracy. DeepSparse offers an agile solution for efficient and scalable neural network execution across various devices.
Benefits of Integrating Neural Magic's DeepSparse with YOLOv8
Before diving into how to deploy YOLOV8 using DeepSparse, let's understand the benefits of using DeepSparse. Some key advantages include:
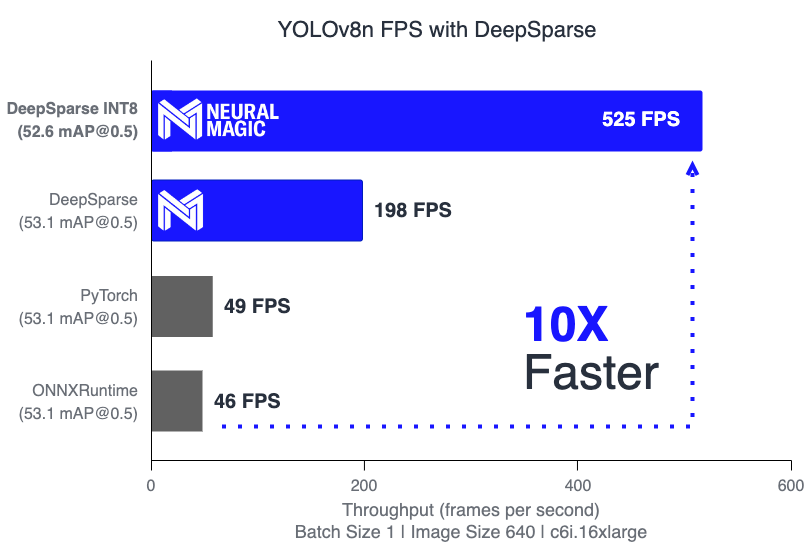
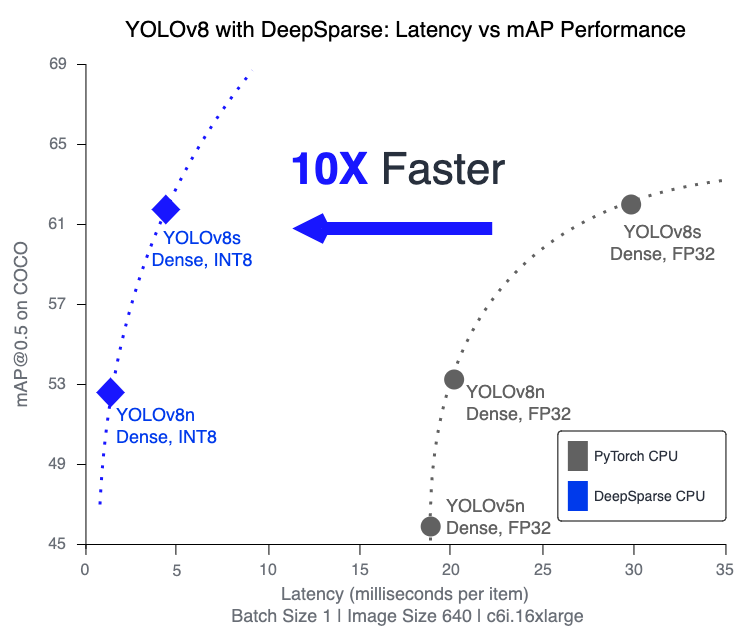
- Enhanced Inference Speed: Achieves up to 525 FPS (on YOLOv8n), significantly speeding up YOLOv8's inference capabilities compared to traditional methods.
- Optimized Model Efficiency: Uses pruning and quantization to enhance YOLOv8's efficiency, reducing model size and computational requirements while maintaining accuracy.
-
High Performance on Standard CPUs: Delivers GPU-like performance on CPUs, providing a more accessible and cost-effective option for various applications.
-
Streamlined Integration and Deployment: Offers user-friendly tools for easy integration of YOLOv8 into applications, including image and video annotation features.
-
Support for Various Model Types: Compatible with both standard and sparsity-optimized YOLOv8 models, adding deployment flexibility.
-
Cost-Effective and Scalable Solution: Reduces operational expenses and offers scalable deployment of advanced object detection models.
How Does Neural Magic's DeepSparse Technology Works?
Neural Magic's Deep Sparse technology is inspired by the human brain's efficiency in neural network computation. It adopts two key principles from the brain as follows:
-
Sparsity: The process of sparsification involves pruning redundant information from deep learning networks, leading to smaller and faster models without compromising accuracy. This technique reduces the network's size and computational needs significantly.
-
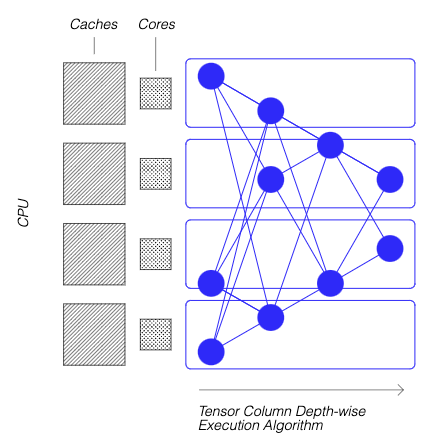
Locality of Reference: DeepSparse uses a unique execution method, breaking the network into Tensor Columns. These columns are executed depth-wise, fitting entirely within the CPU's cache. This approach mimics the brain's efficiency, minimizing data movement and maximizing the CPU's cache use.
For more details on how Neural Magic's DeepSparse technology work, check out their blog post.
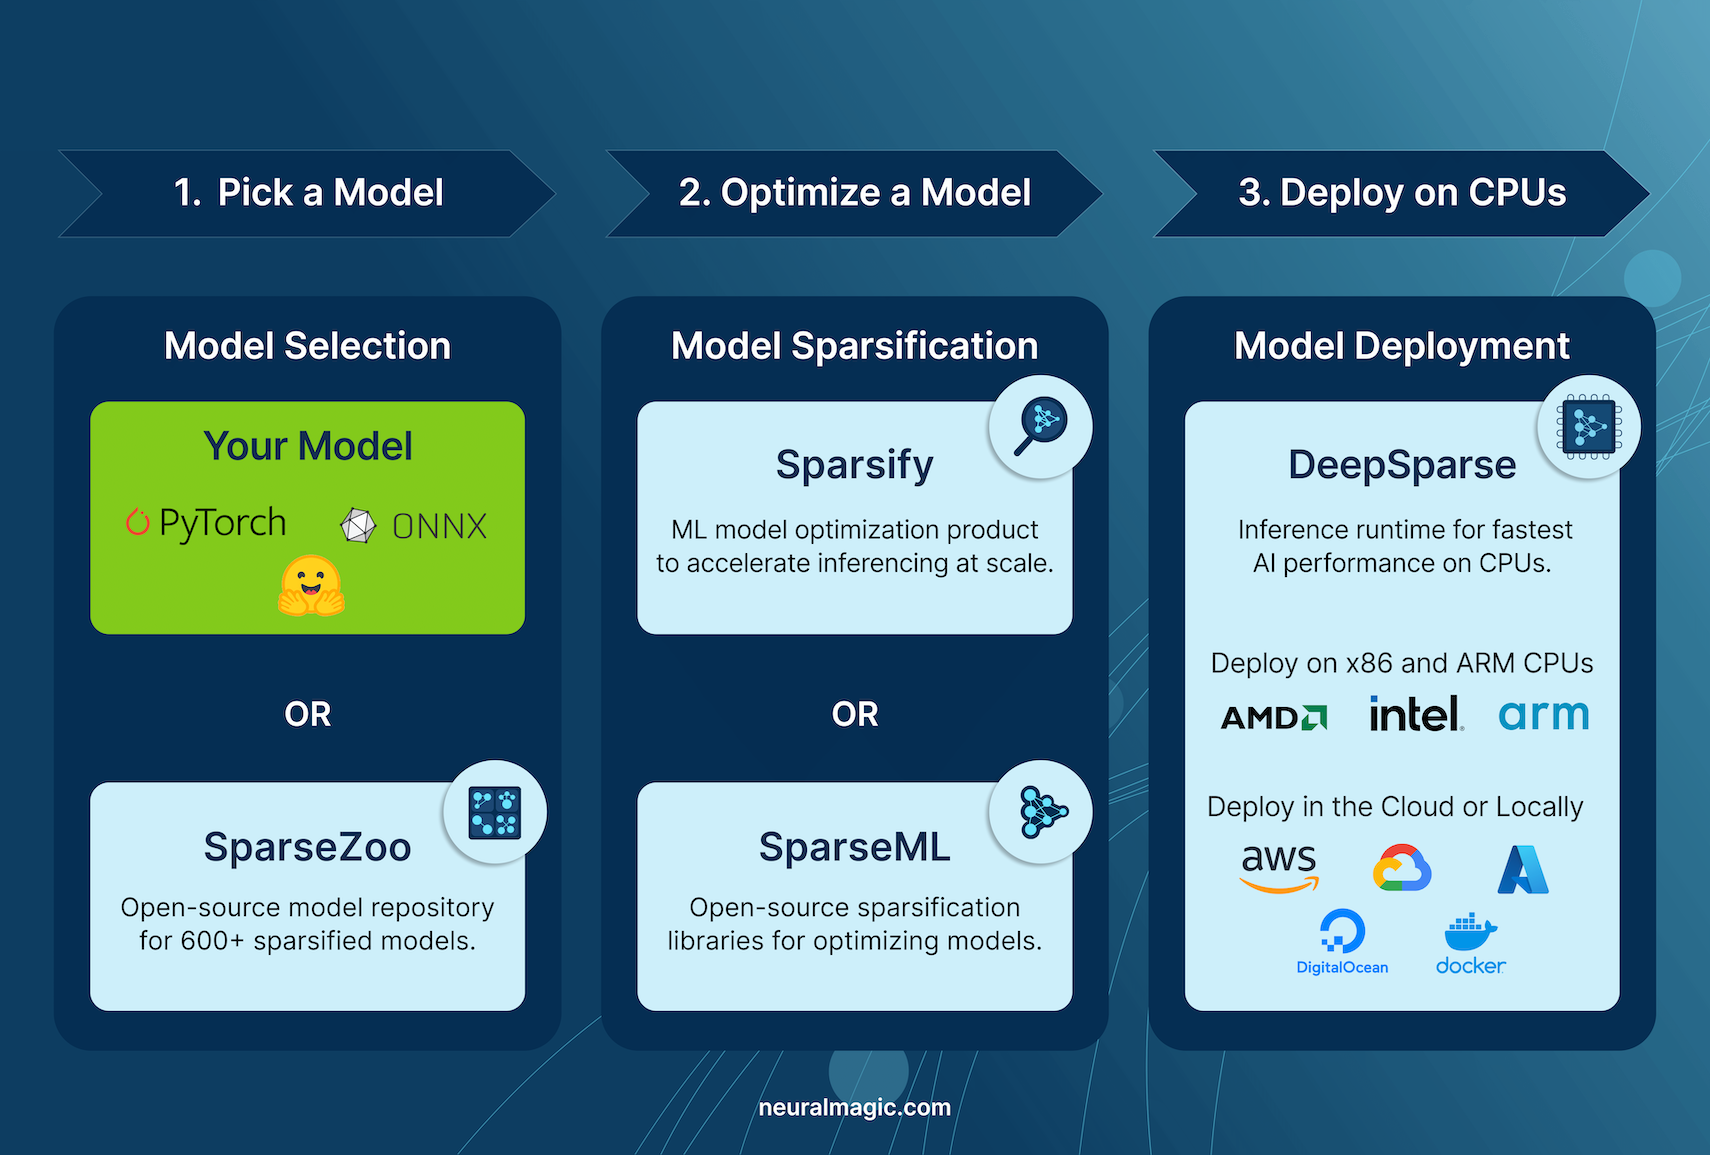
Creating A Sparse Version of YOLOv8 Trained on a Custom Dataset
SparseZoo, an open-source model repository by Neural Magic, offers a collection of pre-sparsified YOLOv8 model checkpoints. With SparseML, seamlessly integrated with Ultralytics, users can effortlessly fine-tune these sparse checkpoints on their specific datasets using a straightforward command-line interface.
Checkout Neural Magic's SparseML YOLOv8 documentation for more details.
Usage: Deploying YOLOV8 using DeepSparse
Deploying YOLOv8 with Neural Magic's DeepSparse involves a few straightforward steps. Before diving into the usage instructions, be sure to check out the range of YOLOv8 models offered by Ultralytics. This will help you choose the most appropriate model for your project requirements. Here's how you can get started.
Step 1: Installation
To install the required packages, run:
!!! Tip "Installation"
=== "CLI"

    ```py
    # Install the required packages
    pip install deepsparse[yolov8]
    ```
Step 2: Exporting YOLOv8 to ONNX Format
DeepSparse Engine requires YOLOv8 models in ONNX format. Exporting your model to this format is essential for compatibility with DeepSparse. Use the following command to export YOLOv8 models:
!!! Tip "Model Export"
=== "CLI"

    ```py
    # Export YOLOv8 model to ONNX format
    yolo task=detect mode=export model=yolov8n.pt format=onnx opset=13
    ```
This command will save the yolov8n.onnx model to your disk.
Step 3: Deploying and Running Inferences
With your YOLOv8 model in ONNX format, you can deploy and run inferences using DeepSparse. This can be done easily with their intuitive Python API:
!!! Tip "Deploying and Running Inferences"
=== "Python"

    ```py
    from deepsparse import Pipeline

    # Specify the path to your YOLOv8 ONNX model
    model_path = "path/to/yolov8n.onnx"

    # Set up the DeepSparse Pipeline
    yolo_pipeline = Pipeline.create(task="yolov8", model_path=model_path)

    # Run the model on your images
    images = ["path/to/image.jpg"]
    pipeline_outputs = yolo_pipeline(images=images)
    ```
Step 4: Benchmarking Performance
It's important to check that your YOLOv8 model is performing optimally on DeepSparse. You can benchmark your model's performance to analyze throughput and latency:
!!! Tip "Benchmarking"
=== "CLI"

    ```py
    # Benchmark performance
    deepsparse.benchmark model_path="path/to/yolov8n.onnx" --scenario=sync --input_shapes="[1,3,640,640]"
    ```
Step 5: Additional Features
DeepSparse provides additional features for practical integration of YOLOv8 in applications, such as image annotation and dataset evaluation.
!!! Tip "Additional Features"
=== "CLI"

    ```py
    # For image annotation
    deepsparse.yolov8.annotate --source "path/to/image.jpg" --model_filepath "path/to/yolov8n.onnx"

    # For evaluating model performance on a dataset
    deepsparse.yolov8.eval --model_path "path/to/yolov8n.onnx"
    ```
Running the annotate command processes your specified image, detecting objects, and saving the annotated image with bounding boxes and classifications. The annotated image will be stored in an annotation-results folder. This helps provide a visual representation of the model's detection capabilities.

After running the eval command, you will receive detailed output metrics such as precision, recall, and mAP (mean Average Precision). This provides a comprehensive view of your model's performance on the dataset. This functionality is particularly useful for fine-tuning and optimizing your YOLOv8 models for specific use cases, ensuring high accuracy and efficiency.
Summary
This guide explored integrating Ultralytics' YOLOv8 with Neural Magic's DeepSparse Engine. It highlighted how this integration enhances YOLOv8's performance on CPU platforms, offering GPU-level efficiency and advanced neural network sparsity techniques.
For more detailed information and advanced usage, visit Neural Magic's DeepSparse documentation. Also, check out Neural Magic's documentation on the integration with YOLOv8 here and watch a great session on it here.
Additionally, for a broader understanding of various YOLOv8 integrations, visit the Ultralytics integration guide page, where you can discover a range of other exciting integration possibilities.
FAQ
What is Neural Magic's DeepSparse Engine and how does it optimize YOLOv8 performance?
Neural Magic's DeepSparse Engine is an inference runtime designed to optimize the execution of neural networks on CPUs through advanced techniques such as sparsity, pruning, and quantization. By integrating DeepSparse with YOLOv8, you can achieve GPU-like performance on standard CPUs, significantly enhancing inference speed, model efficiency, and overall performance while maintaining accuracy. For more details, check out the Neural Magic's DeepSparse section.
How can I install the needed packages to deploy YOLOv8 using Neural Magic's DeepSparse?
Installing the required packages for deploying YOLOv8 with Neural Magic's DeepSparse is straightforward. You can easily install them using the CLI. Here's the command you need to run:
pip install deepsparse[yolov8]
Once installed, follow the steps provided in the Installation section to set up your environment and start using DeepSparse with YOLOv8.
How do I convert YOLOv8 models to ONNX format for use with DeepSparse?
To convert YOLOv8 models to the ONNX format, which is required for compatibility with DeepSparse, you can use the following CLI command:
yolo task=detect mode=export model=yolov8n.pt format=onnx opset=13
This command will export your YOLOv8 model (yolov8n.pt) to a format (yolov8n.onnx) that can be utilized by the DeepSparse Engine. More information about model export can be found in the Model Export section.
How do I benchmark YOLOv8 performance on the DeepSparse Engine?
Benchmarking YOLOv8 performance on DeepSparse helps you analyze throughput and latency to ensure your model is optimized. You can use the following CLI command to run a benchmark:
deepsparse.benchmark model_path="path/to/yolov8n.onnx" --scenario=sync --input_shapes="[1,3,640,640]"
This command will provide you with vital performance metrics. For more details, see the Benchmarking Performance section.
Why should I use Neural Magic's DeepSparse with YOLOv8 for object detection tasks?
Integrating Neural Magic's DeepSparse with YOLOv8 offers several benefits:
- Enhanced Inference Speed: Achieves up to 525 FPS, significantly speeding up YOLOv8's capabilities.
- Optimized Model Efficiency: Uses sparsity, pruning, and quantization techniques to reduce model size and computational needs while maintaining accuracy.
- High Performance on Standard CPUs: Offers GPU-like performance on cost-effective CPU hardware.
- Streamlined Integration: User-friendly tools for easy deployment and integration.
- Flexibility: Supports both standard and sparsity-optimized YOLOv8 models.
- Cost-Effective: Reduces operational expenses through efficient resource utilization.
For a deeper dive into these advantages, visit the Benefits of Integrating Neural Magic's DeepSparse with YOLOv8 section.
comments: true
description: Learn how to export YOLOv8 models to ONNX format for flexible deployment across various platforms with enhanced performance.
keywords: YOLOv8, ONNX, model export, Ultralytics, ONNX Runtime, machine learning, model deployment, computer vision, deep learning
ONNX Export for YOLOv8 Models
Often, when deploying computer vision models, you'll need a model format that's both flexible and compatible with multiple platforms.
Exporting Ultralytics YOLOv8 models to ONNX format streamlines deployment and ensures optimal performance across various environments. This guide will show you how to easily convert your YOLOv8 models to ONNX and enhance their scalability and effectiveness in real-world applications.
ONNX and ONNX Runtime
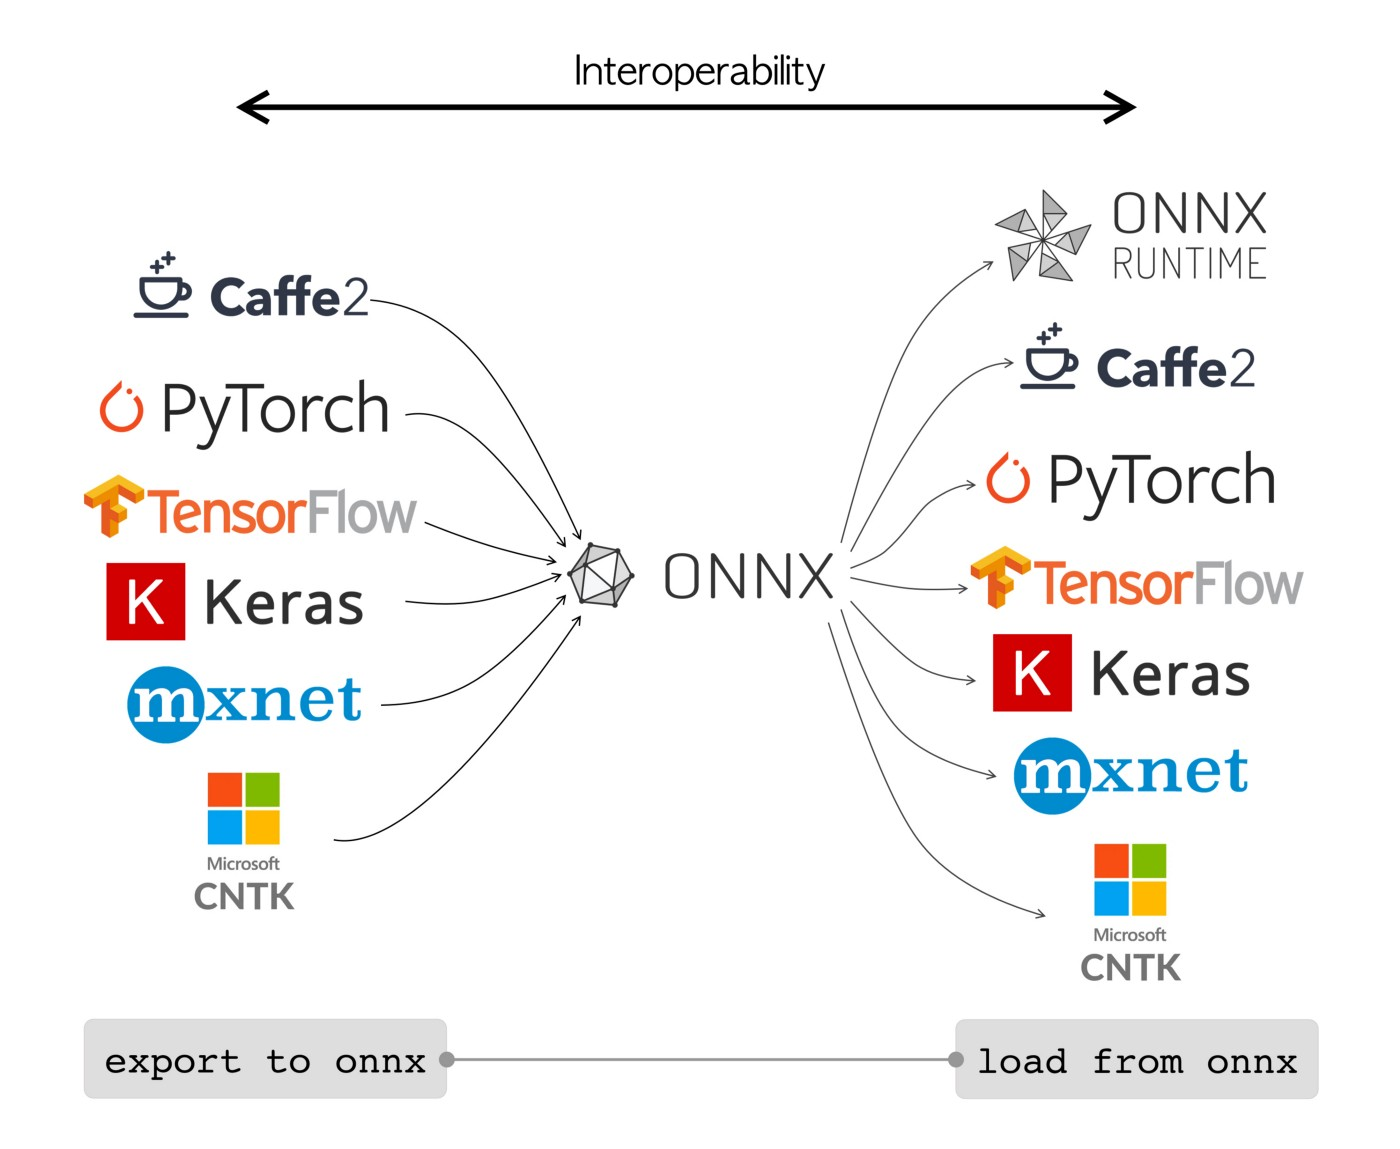
ONNX, which stands for Open Neural Network Exchange, is a community project that Facebook and Microsoft initially developed. The ongoing development of ONNX is a collaborative effort supported by various organizations like IBM, Amazon (through AWS), and Google. The project aims to create an open file format designed to represent machine learning models in a way that allows them to be used across different AI frameworks and hardware.
ONNX models can be used to transition between different frameworks seamlessly. For instance, a deep learning model trained in PyTorch can be exported to ONNX format and then easily imported into TensorFlow.
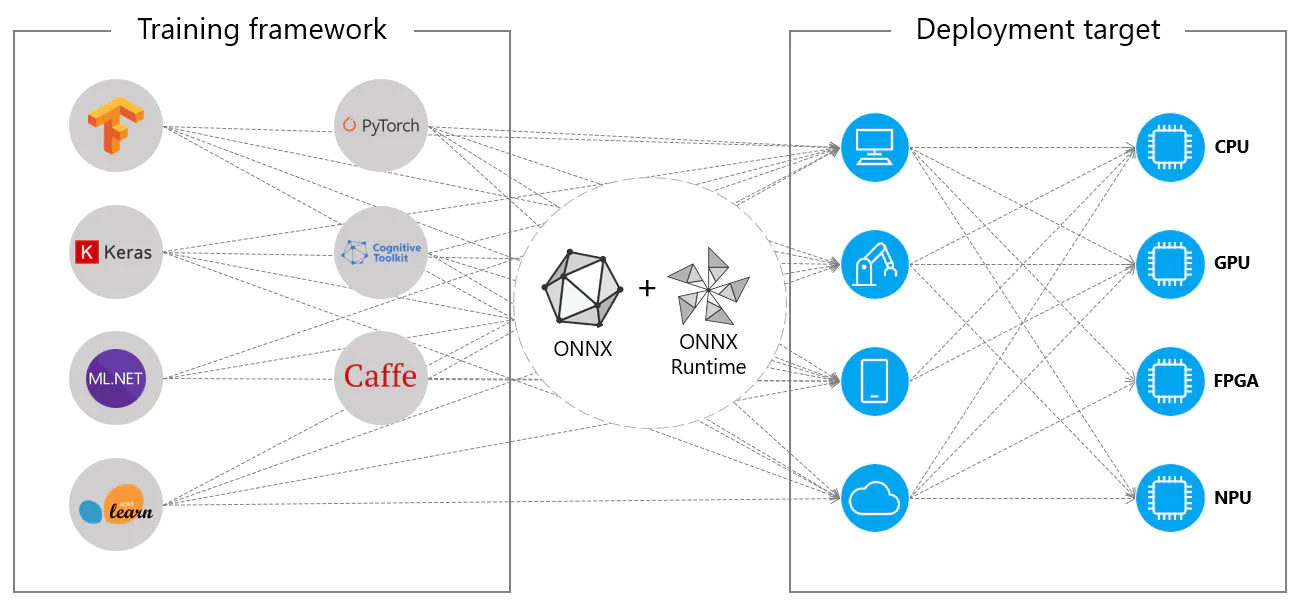
Alternatively, ONNX models can be used with ONNX Runtime. ONNX Runtime is a versatile cross-platform accelerator for machine learning models that is compatible with frameworks like PyTorch, TensorFlow, TFLite, scikit-learn, etc.
ONNX Runtime optimizes the execution of ONNX models by leveraging hardware-specific capabilities. This optimization allows the models to run efficiently and with high performance on various hardware platforms, including CPUs, GPUs, and specialized accelerators.
Whether used independently or in tandem with ONNX Runtime, ONNX provides a flexible solution for machine learning model deployment and compatibility.
Key Features of ONNX Models
The ability of ONNX to handle various formats can be attributed to the following key features:
-
Common Model Representation: ONNX defines a common set of operators (like convolutions, layers, etc.) and a standard data format. When a model is converted to ONNX format, its architecture and weights are translated into this common representation. This uniformity ensures that the model can be understood by any framework that supports ONNX.
-
Versioning and Backward Compatibility: ONNX maintains a versioning system for its operators. This ensures that even as the standard evolves, models created in older versions remain usable. Backward compatibility is a crucial feature that prevents models from becoming obsolete quickly.
-
Graph-based Model Representation: ONNX represents models as computational graphs. This graph-based structure is a universal way of representing machine learning models, where nodes represent operations or computations, and edges represent the tensors flowing between them. This format is easily adaptable to various frameworks which also represent models as graphs.
-
Tools and Ecosystem: There is a rich ecosystem of tools around ONNX that assist in model conversion, visualization, and optimization. These tools make it easier for developers to work with ONNX models and to convert models between different frameworks seamlessly.
Common Usage of ONNX
Before we jump into how to export YOLOv8 models to the ONNX format, let's take a look at where ONNX models are usually used.
CPU Deployment
ONNX models are often deployed on CPUs due to their compatibility with ONNX Runtime. This runtime is optimized for CPU execution. It significantly improves inference speed and makes real-time CPU deployments feasible.
Supported Deployment Options
While ONNX models are commonly used on CPUs, they can also be deployed on the following platforms:
-
GPU Acceleration: ONNX fully supports GPU acceleration, particularly NVIDIA CUDA. This enables efficient execution on NVIDIA GPUs for tasks that demand high computational power.
-
Edge and Mobile Devices: ONNX extends to edge and mobile devices, perfect for on-device and real-time inference scenarios. It's lightweight and compatible with edge hardware.
-
Web Browsers: ONNX can run directly in web browsers, powering interactive and dynamic web-based AI applications.
Exporting YOLOv8 Models to ONNX
You can expand model compatibility and deployment flexibility by converting YOLOv8 models to ONNX format.
Installation
To install the required package, run:
!!! Tip "Installation"
=== "CLI"

    ```py
    # Install the required package for YOLOv8
    pip install ultralytics
    ```
For detailed instructions and best practices related to the installation process, check our YOLOv8 Installation guide. While installing the required packages for YOLOv8, if you encounter any difficulties, consult our Common Issues guide for solutions and tips.
Usage
Before diving into the usage instructions, be sure to check out the range of YOLOv8 models offered by Ultralytics. This will help you choose the most appropriate model for your project requirements.
!!! Example "Usage"
=== "Python"

    ```py
    from ultralytics import YOLO

    # Load the YOLOv8 model
    model = YOLO("yolov8n.pt")

    # Export the model to ONNX format
    model.export(format="onnx")  # creates 'yolov8n.onnx'

    # Load the exported ONNX model
    onnx_model = YOLO("yolov8n.onnx")

    # Run inference
    results = onnx_model("https://ultralytics.com/images/bus.jpg")
    ```

=== "CLI"

    ```py
    # Export a YOLOv8n PyTorch model to ONNX format
    yolo export model=yolov8n.pt format=onnx  # creates 'yolov8n.onnx'

    # Run inference with the exported model
    yolo predict model=yolov8n.onnx source='https://ultralytics.com/images/bus.jpg'
    ```
For more details about the export process, visit the Ultralytics documentation page on exporting.
Deploying Exported YOLOv8 ONNX Models
Once you've successfully exported your Ultralytics YOLOv8 models to ONNX format, the next step is deploying these models in various environments. For detailed instructions on deploying your ONNX models, take a look at the following resources:
-
ONNX Runtime Python API Documentation: This guide provides essential information for loading and running ONNX models using ONNX Runtime.
-
Deploying on Edge Devices: Check out this docs page for different examples of deploying ONNX models on edge.
-
ONNX Tutorials on GitHub: A collection of comprehensive tutorials that cover various aspects of using and implementing ONNX models in different scenarios.
Summary
In this guide, you've learned how to export Ultralytics YOLOv8 models to ONNX format to increase their interoperability and performance across various platforms. You were also introduced to the ONNX Runtime and ONNX deployment options.
For further details on usage, visit the ONNX official documentation.
Also, if you'd like to know more about other Ultralytics YOLOv8 integrations, visit our integration guide page. You'll find plenty of useful resources and insights there.
FAQ
How do I export YOLOv8 models to ONNX format using Ultralytics?
To export your YOLOv8 models to ONNX format using Ultralytics, follow these steps:
!!! Example "Usage"
=== "Python"

    ```py
    from ultralytics import YOLO

    # Load the YOLOv8 model
    model = YOLO("yolov8n.pt")

    # Export the model to ONNX format
    model.export(format="onnx")  # creates 'yolov8n.onnx'

    # Load the exported ONNX model
    onnx_model = YOLO("yolov8n.onnx")

    # Run inference
    results = onnx_model("https://ultralytics.com/images/bus.jpg")
    ```

=== "CLI"

    ```py
    # Export a YOLOv8n PyTorch model to ONNX format
    yolo export model=yolov8n.pt format=onnx  # creates 'yolov8n.onnx'

    # Run inference with the exported model
    yolo predict model=yolov8n.onnx source='https://ultralytics.com/images/bus.jpg'
    ```
For more details, visit the export documentation.
What are the advantages of using ONNX Runtime for deploying YOLOv8 models?
Using ONNX Runtime for deploying YOLOv8 models offers several advantages:
- Cross-platform compatibility: ONNX Runtime supports various platforms, such as Windows, macOS, and Linux, ensuring your models run smoothly across different environments.
- Hardware acceleration: ONNX Runtime can leverage hardware-specific optimizations for CPUs, GPUs, and dedicated accelerators, providing high-performance inference.
- Framework interoperability: Models trained in popular frameworks like PyTorch or TensorFlow can be easily converted to ONNX format and run using ONNX Runtime.
Learn more by checking the ONNX Runtime documentation.
What deployment options are available for YOLOv8 models exported to ONNX?
YOLOv8 models exported to ONNX can be deployed on various platforms including:
- CPUs: Utilizing ONNX Runtime for optimized CPU inference.
- GPUs: Leveraging NVIDIA CUDA for high-performance GPU acceleration.
- Edge devices: Running lightweight models on edge and mobile devices for real-time, on-device inference.
- Web browsers: Executing models directly within web browsers for interactive web-based applications.
For more information, explore our guide on model deployment options.
Why should I use ONNX format for Ultralytics YOLOv8 models?
Using ONNX format for Ultralytics YOLOv8 models provides numerous benefits:
- Interoperability: ONNX allows models to be transferred between different machine learning frameworks seamlessly.
- Performance Optimization: ONNX Runtime can enhance model performance by utilizing hardware-specific optimizations.
- Flexibility: ONNX supports various deployment environments, enabling you to use the same model on different platforms without modification.
Refer to the comprehensive guide on exporting YOLOv8 models to ONNX.
How can I troubleshoot issues when exporting YOLOv8 models to ONNX?
When exporting YOLOv8 models to ONNX, you might encounter common issues such as mismatched dependencies or unsupported operations. To troubleshoot these problems:
- Verify that you have the correct version of required dependencies installed.
- Check the official ONNX documentation for supported operators and features.
- Review the error messages for clues and consult the Ultralytics Common Issues guide.
If issues persist, contact Ultralytics support for further assistance.
comments: true
description: Learn to export YOLOv8 models to OpenVINO format for up to 3x CPU speedup and hardware acceleration on Intel GPU and NPU.
keywords: YOLOv8, OpenVINO, model export, Intel, AI inference, CPU speedup, GPU acceleration, NPU, deep learning
Intel OpenVINO Export
In this guide, we cover exporting YOLOv8 models to the OpenVINO format, which can provide up to 3x CPU speedup, as well as accelerating YOLO inference on Intel GPU and NPU hardware.
OpenVINO, short for Open Visual Inference & Neural Network Optimization toolkit, is a comprehensive toolkit for optimizing and deploying AI inference models. Even though the name contains Visual, OpenVINO also supports various additional tasks including language, audio, time series, etc.
Watch: How To Export and Optimize an Ultralytics YOLOv8 Model for Inference with OpenVINO.
Usage Examples
Export a YOLOv8n model to OpenVINO format and run inference with the exported model.
!!! Example
=== "Python"

    ```py
    from ultralytics import YOLO

    # Load a YOLOv8n PyTorch model
    model = YOLO("yolov8n.pt")

    # Export the model
    model.export(format="openvino")  # creates 'yolov8n_openvino_model/'

    # Load the exported OpenVINO model
    ov_model = YOLO("yolov8n_openvino_model/")

    # Run inference
    results = ov_model("https://ultralytics.com/images/bus.jpg")
    ```

=== "CLI"

    ```py
    # Export a YOLOv8n PyTorch model to OpenVINO format
    yolo export model=yolov8n.pt format=openvino  # creates 'yolov8n_openvino_model/'

    # Run inference with the exported model
    yolo predict model=yolov8n_openvino_model source='https://ultralytics.com/images/bus.jpg'
    ```
Arguments
| Key | Value | Description |
|---|---|---|
format |
'openvino' |
format to export to |
imgsz |
640 |
image size as scalar or (h, w) list, i.e. (640, 480) |
half |
False |
FP16 quantization |
int8 |
False |
INT8 quantization |
batch |
1 |
batch size for inference |
Benefits of OpenVINO
- Performance: OpenVINO delivers high-performance inference by utilizing the power of Intel CPUs, integrated and discrete GPUs, and FPGAs.
- Support for Heterogeneous Execution: OpenVINO provides an API to write once and deploy on any supported Intel hardware (CPU, GPU, FPGA, VPU, etc.).
- Model Optimizer: OpenVINO provides a Model Optimizer that imports, converts, and optimizes models from popular deep learning frameworks such as PyTorch, TensorFlow, TensorFlow Lite, Keras, ONNX, PaddlePaddle, and Caffe.
- Ease of Use: The toolkit comes with more than 80 tutorial notebooks (including YOLOv8 optimization) teaching different aspects of the toolkit.
OpenVINO Export Structure
When you export a model to OpenVINO format, it results in a directory containing the following:
- XML file: Describes the network topology.
- BIN file: Contains the weights and biases binary data.
- Mapping file: Holds mapping of original model output tensors to OpenVINO tensor names.
You can use these files to run inference with the OpenVINO Inference Engine.
Using OpenVINO Export in Deployment
Once you have the OpenVINO files, you can use the OpenVINO Runtime to run the model. The Runtime provides a unified API to inference across all supported Intel hardware. It also provides advanced capabilities like load balancing across Intel hardware and asynchronous execution. For more information on running the inference, refer to the Inference with OpenVINO Runtime Guide.
Remember, you'll need the XML and BIN files as well as any application-specific settings like input size, scale factor for normalization, etc., to correctly set up and use the model with the Runtime.
In your deployment application, you would typically do the following steps:
- Initialize OpenVINO by creating
core = Core(). - Load the model using the
core.read_model()method. - Compile the model using the
core.compile_model()function. - Prepare the input (image, text, audio, etc.).
- Run inference using
compiled_model(input_data).
For more detailed steps and code snippets, refer to the OpenVINO documentation or API tutorial.
OpenVINO YOLOv8 Benchmarks
YOLOv8 benchmarks below were run by the Ultralytics team on 4 different model formats measuring speed and accuracy: PyTorch, TorchScript, ONNX and OpenVINO. Benchmarks were run on Intel Flex and Arc GPUs, and on Intel Xeon CPUs at FP32 precision (with the half=False argument).
!!! Note
The benchmarking results below are for reference and might vary based on the exact hardware and software configuration of a system, as well as the current workload of the system at the time the benchmarks are run.

All benchmarks run with `openvino` Python package version [2023.0.1](https://pypi.org/project/openvino/2023.0.1/).
Intel Flex GPU
The Intel® Data Center GPU Flex Series is a versatile and robust solution designed for the intelligent visual cloud. This GPU supports a wide array of workloads including media streaming, cloud gaming, AI visual inference, and virtual desktop Infrastructure workloads. It stands out for its open architecture and built-in support for the AV1 encode, providing a standards-based software stack for high-performance, cross-architecture applications. The Flex Series GPU is optimized for density and quality, offering high reliability, availability, and scalability.
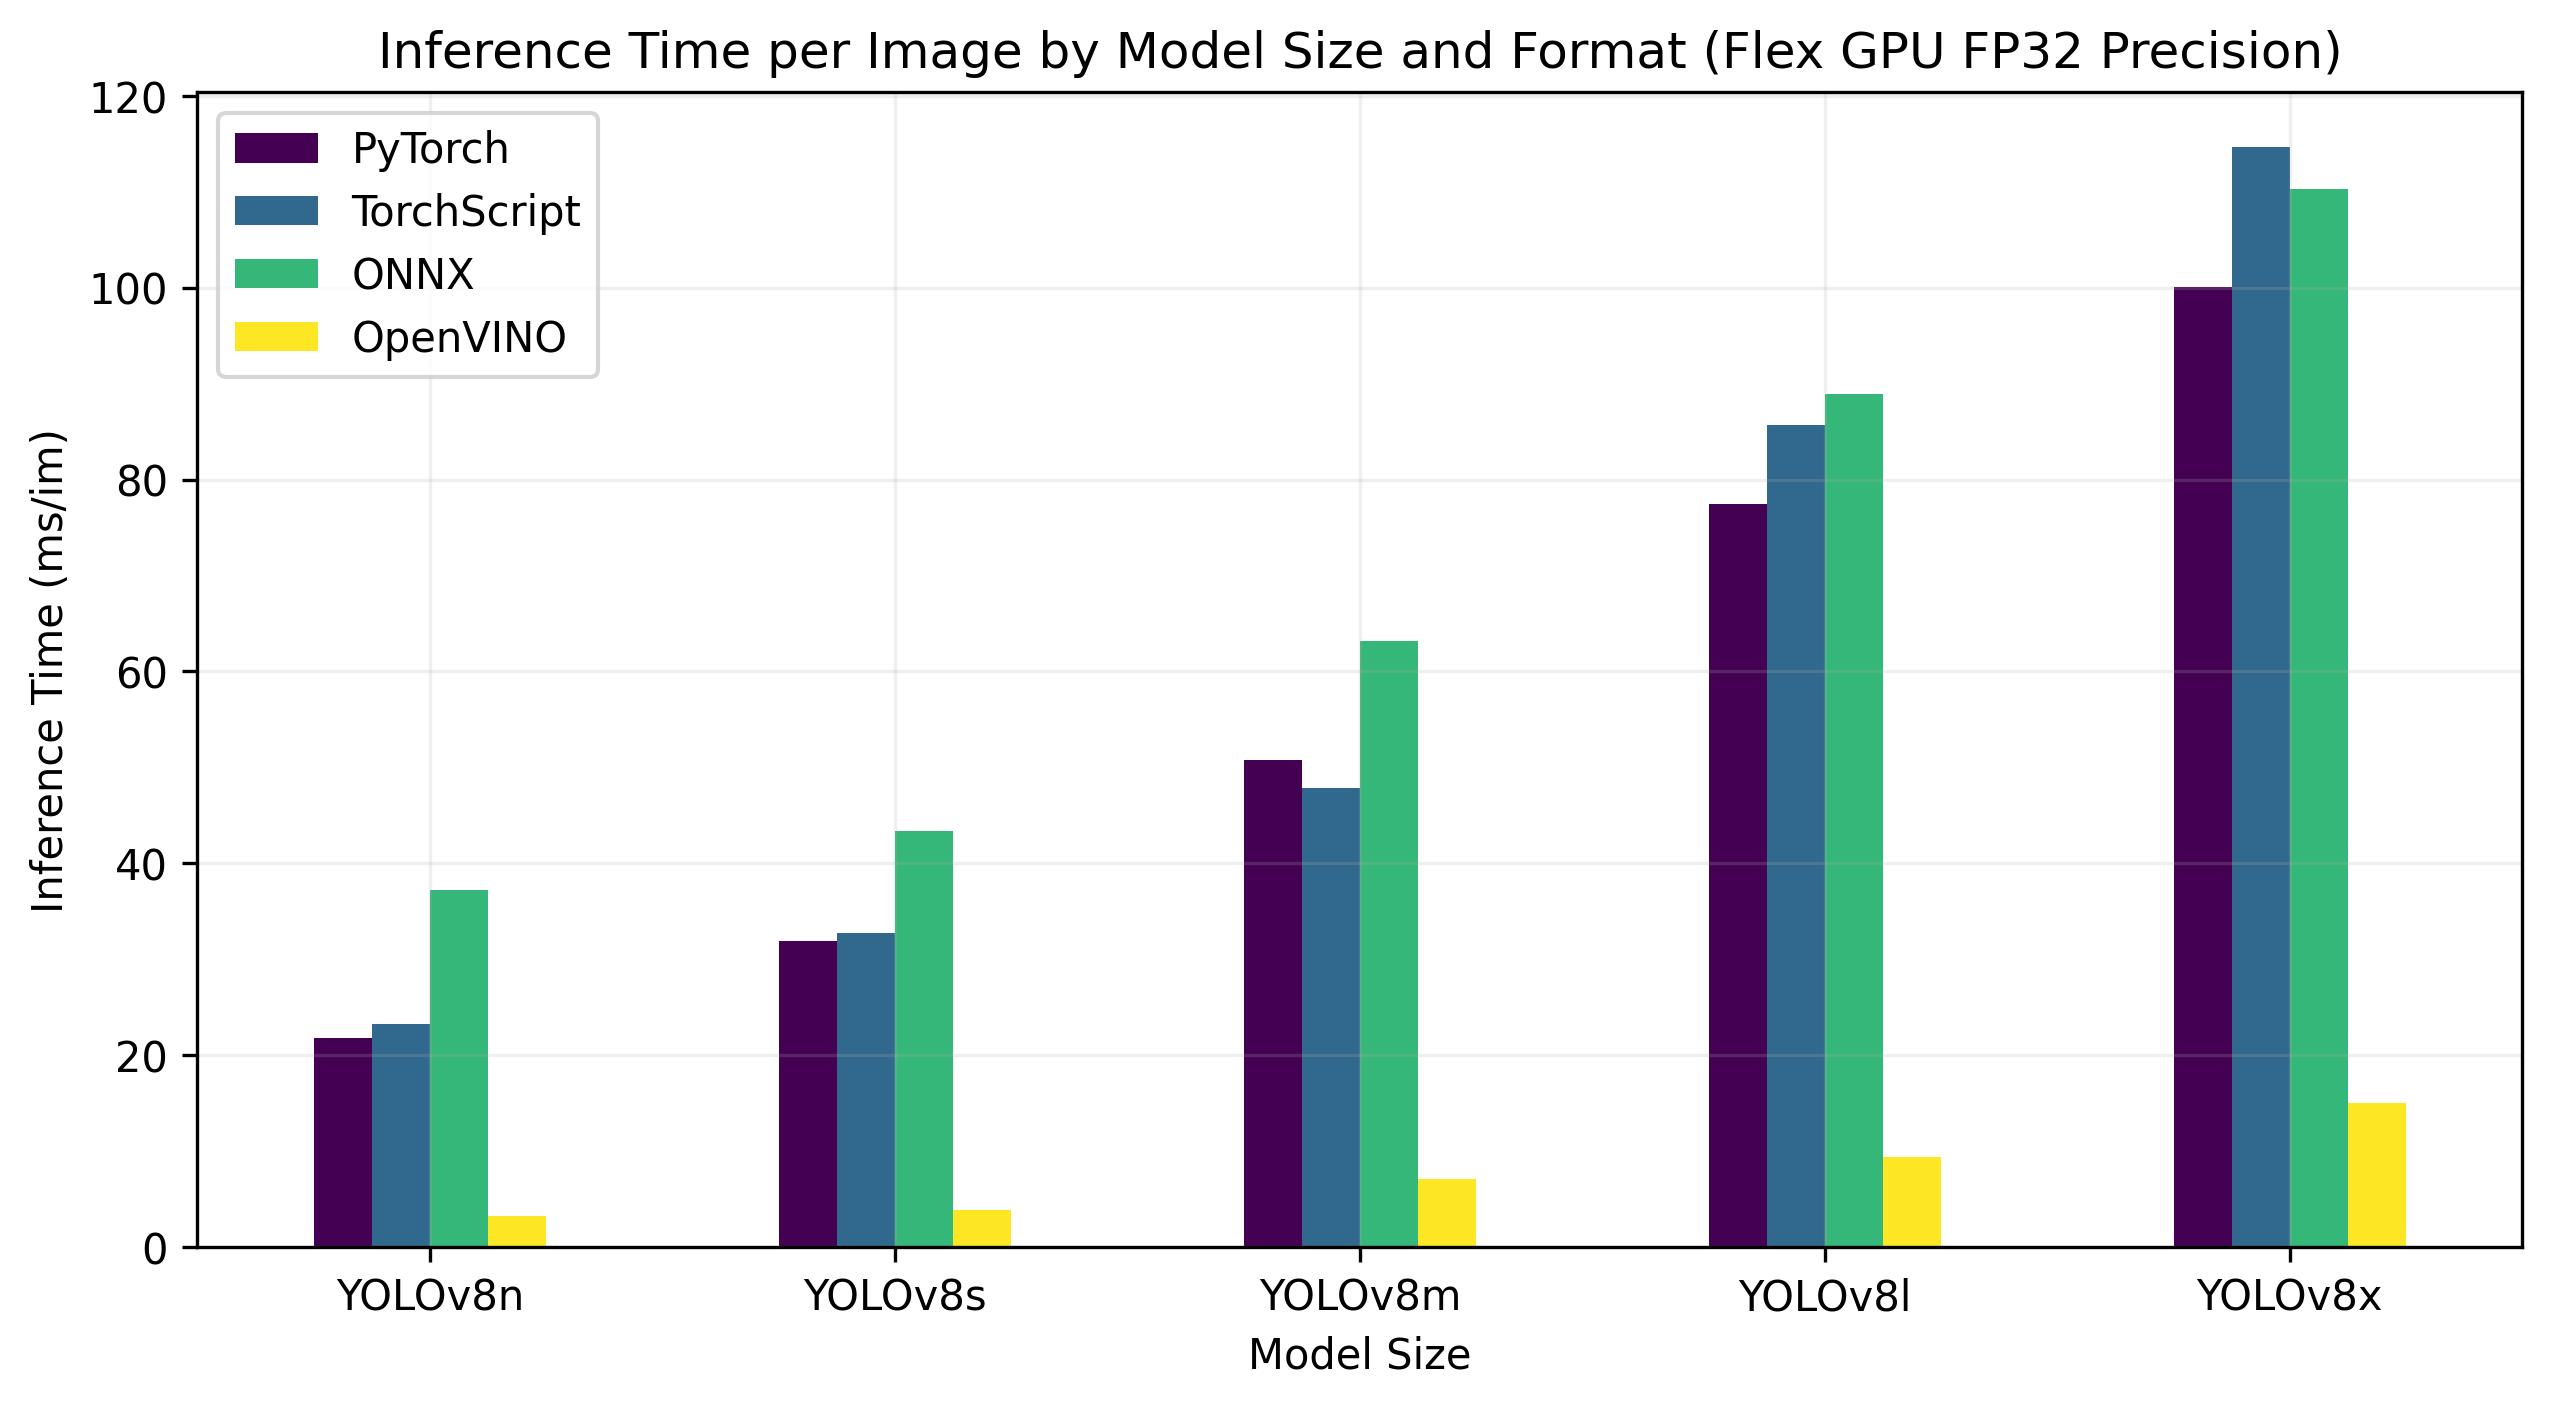
Benchmarks below run on Intel® Data Center GPU Flex 170 at FP32 precision.
| Model | Format | Status | Size (MB) | mAP50-95(B) | Inference time (ms/im) |
|---|---|---|---|---|---|
| YOLOv8n | PyTorch | ✅ | 6.2 | 0.3709 | 21.79 |
| YOLOv8n | TorchScript | ✅ | 12.4 | 0.3704 | 23.24 |
| YOLOv8n | ONNX | ✅ | 12.2 | 0.3704 | 37.22 |
| YOLOv8n | OpenVINO | ✅ | 12.3 | 0.3703 | 3.29 |
| YOLOv8s | PyTorch | ✅ | 21.5 | 0.4471 | 31.89 |
| YOLOv8s | TorchScript | ✅ | 42.9 | 0.4472 | 32.71 |
| YOLOv8s | ONNX | ✅ | 42.8 | 0.4472 | 43.42 |
| YOLOv8s | OpenVINO | ✅ | 42.9 | 0.4470 | 3.92 |
| YOLOv8m | PyTorch | ✅ | 49.7 | 0.5013 | 50.75 |
| YOLOv8m | TorchScript | ✅ | 99.2 | 0.4999 | 47.90 |
| YOLOv8m | ONNX | ✅ | 99.0 | 0.4999 | 63.16 |
| YOLOv8m | OpenVINO | ✅ | 49.8 | 0.4997 | 7.11 |
| YOLOv8l | PyTorch | ✅ | 83.7 | 0.5293 | 77.45 |
| YOLOv8l | TorchScript | ✅ | 167.2 | 0.5268 | 85.71 |
| YOLOv8l | ONNX | ✅ | 166.8 | 0.5268 | 88.94 |
| YOLOv8l | OpenVINO | ✅ | 167.0 | 0.5264 | 9.37 |
| YOLOv8x | PyTorch | ✅ | 130.5 | 0.5404 | 100.09 |
| YOLOv8x | TorchScript | ✅ | 260.7 | 0.5371 | 114.64 |
| YOLOv8x | ONNX | ✅ | 260.4 | 0.5371 | 110.32 |
| YOLOv8x | OpenVINO | ✅ | 260.6 | 0.5367 | 15.02 |
This table represents the benchmark results for five different models (YOLOv8n, YOLOv8s, YOLOv8m, YOLOv8l, YOLOv8x) across four different formats (PyTorch, TorchScript, ONNX, OpenVINO), giving us the status, size, mAP50-95(B) metric, and inference time for each combination.
Intel Arc GPU
Intel® Arc™ represents Intel's foray into the dedicated GPU market. The Arc™ series, designed to compete with leading GPU manufacturers like AMD and Nvidia, caters to both the laptop and desktop markets. The series includes mobile versions for compact devices like laptops, and larger, more powerful versions for desktop computers.
The Arc™ series is divided into three categories: Arc™ 3, Arc™ 5, and Arc™ 7, with each number indicating the performance level. Each category includes several models, and the 'M' in the GPU model name signifies a mobile, integrated variant.
Early reviews have praised the Arc™ series, particularly the integrated A770M GPU, for its impressive graphics performance. The availability of the Arc™ series varies by region, and additional models are expected to be released soon. Intel® Arc™ GPUs offer high-performance solutions for a range of computing needs, from gaming to content creation.
Benchmarks below run on Intel® Arc 770 GPU at FP32 precision.
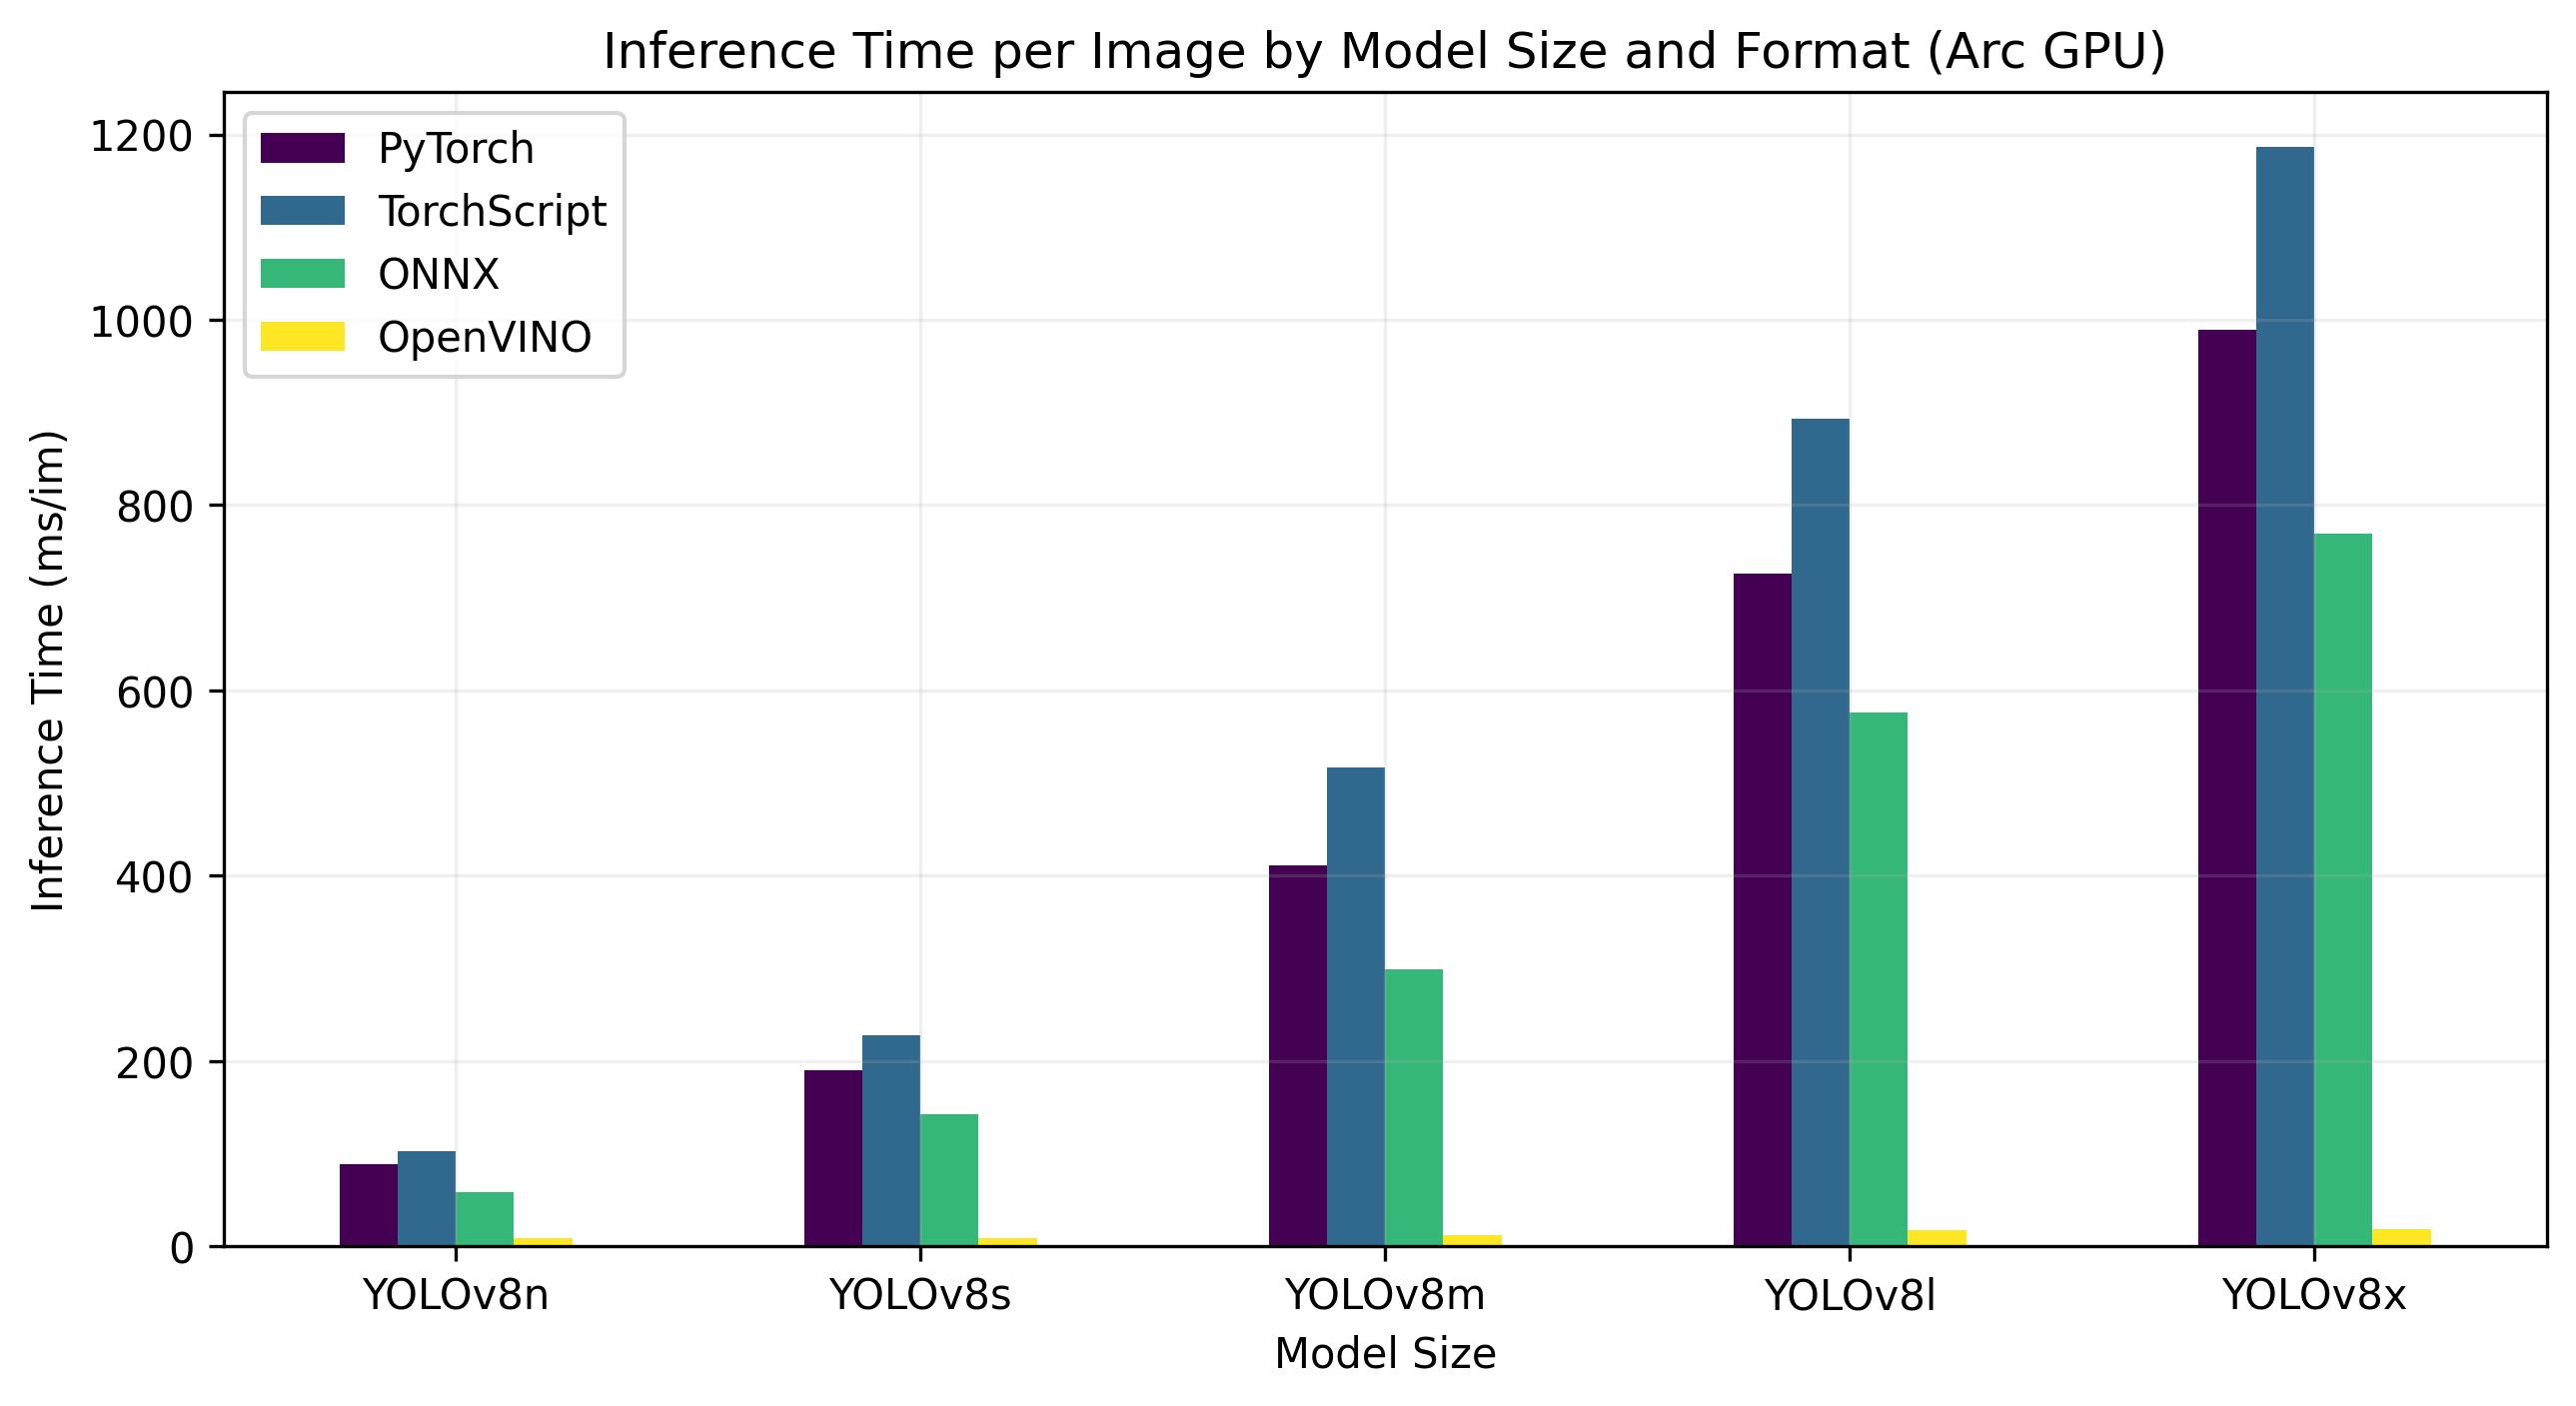
| Model | Format | Status | Size (MB) | metrics/mAP50-95(B) | Inference time (ms/im) |
|---|---|---|---|---|---|
| YOLOv8n | PyTorch | ✅ | 6.2 | 0.3709 | 88.79 |
| YOLOv8n | TorchScript | ✅ | 12.4 | 0.3704 | 102.66 |
| YOLOv8n | ONNX | ✅ | 12.2 | 0.3704 | 57.98 |
| YOLOv8n | OpenVINO | ✅ | 12.3 | 0.3703 | 8.52 |
| YOLOv8s | PyTorch | ✅ | 21.5 | 0.4471 | 189.83 |
| YOLOv8s | TorchScript | ✅ | 42.9 | 0.4472 | 227.58 |
| YOLOv8s | ONNX | ✅ | 42.7 | 0.4472 | 142.03 |
| YOLOv8s | OpenVINO | ✅ | 42.9 | 0.4469 | 9.19 |
| YOLOv8m | PyTorch | ✅ | 49.7 | 0.5013 | 411.64 |
| YOLOv8m | TorchScript | ✅ | 99.2 | 0.4999 | 517.12 |
| YOLOv8m | ONNX | ✅ | 98.9 | 0.4999 | 298.68 |
| YOLOv8m | OpenVINO | ✅ | 99.1 | 0.4996 | 12.55 |
| YOLOv8l | PyTorch | ✅ | 83.7 | 0.5293 | 725.73 |
| YOLOv8l | TorchScript | ✅ | 167.1 | 0.5268 | 892.83 |
| YOLOv8l | ONNX | ✅ | 166.8 | 0.5268 | 576.11 |
| YOLOv8l | OpenVINO | ✅ | 167.0 | 0.5262 | 17.62 |
| YOLOv8x | PyTorch | ✅ | 130.5 | 0.5404 | 988.92 |
| YOLOv8x | TorchScript | ✅ | 260.7 | 0.5371 | 1186.42 |
| YOLOv8x | ONNX | ✅ | 260.4 | 0.5371 | 768.90 |
| YOLOv8x | OpenVINO | ✅ | 260.6 | 0.5367 | 19 |
Intel Xeon CPU
The Intel® Xeon® CPU is a high-performance, server-grade processor designed for complex and demanding workloads. From high-end cloud computing and virtualization to artificial intelligence and machine learning applications, Xeon® CPUs provide the power, reliability, and flexibility required for today's data centers.
Notably, Xeon® CPUs deliver high compute density and scalability, making them ideal for both small businesses and large enterprises. By choosing Intel® Xeon® CPUs, organizations can confidently handle their most demanding computing tasks and foster innovation while maintaining cost-effectiveness and operational efficiency.
Benchmarks below run on 4th Gen Intel® Xeon® Scalable CPU at FP32 precision.

| Model | Format | Status | Size (MB) | metrics/mAP50-95(B) | Inference time (ms/im) |
|---|---|---|---|---|---|
| YOLOv8n | PyTorch | ✅ | 6.2 | 0.3709 | 24.36 |
| YOLOv8n | TorchScript | ✅ | 12.4 | 0.3704 | 23.93 |
| YOLOv8n | ONNX | ✅ | 12.2 | 0.3704 | 39.86 |
| YOLOv8n | OpenVINO | ✅ | 12.3 | 0.3704 | 11.34 |
| YOLOv8s | PyTorch | ✅ | 21.5 | 0.4471 | 33.77 |
| YOLOv8s | TorchScript | ✅ | 42.9 | 0.4472 | 34.84 |
| YOLOv8s | ONNX | ✅ | 42.8 | 0.4472 | 43.23 |
| YOLOv8s | OpenVINO | ✅ | 42.9 | 0.4471 | 13.86 |
| YOLOv8m | PyTorch | ✅ | 49.7 | 0.5013 | 53.91 |
| YOLOv8m | TorchScript | ✅ | 99.2 | 0.4999 | 53.51 |
| YOLOv8m | ONNX | ✅ | 99.0 | 0.4999 | 64.16 |
| YOLOv8m | OpenVINO | ✅ | 99.1 | 0.4996 | 28.79 |
| YOLOv8l | PyTorch | ✅ | 83.7 | 0.5293 | 75.78 |
| YOLOv8l | TorchScript | ✅ | 167.2 | 0.5268 | 79.13 |
| YOLOv8l | ONNX | ✅ | 166.8 | 0.5268 | 88.45 |
| YOLOv8l | OpenVINO | ✅ | 167.0 | 0.5263 | 56.23 |
| YOLOv8x | PyTorch | ✅ | 130.5 | 0.5404 | 96.60 |
| YOLOv8x | TorchScript | ✅ | 260.7 | 0.5371 | 114.28 |
| YOLOv8x | ONNX | ✅ | 260.4 | 0.5371 | 111.02 |
| YOLOv8x | OpenVINO | ✅ | 260.6 | 0.5371 | 83.28 |
Intel Core CPU
The Intel® Core® series is a range of high-performance processors by Intel. The lineup includes Core i3 (entry-level), Core i5 (mid-range), Core i7 (high-end), and Core i9 (extreme performance). Each series caters to different computing needs and budgets, from everyday tasks to demanding professional workloads. With each new generation, improvements are made to performance, energy efficiency, and features.
Benchmarks below run on 13th Gen Intel® Core® i7-13700H CPU at FP32 precision.
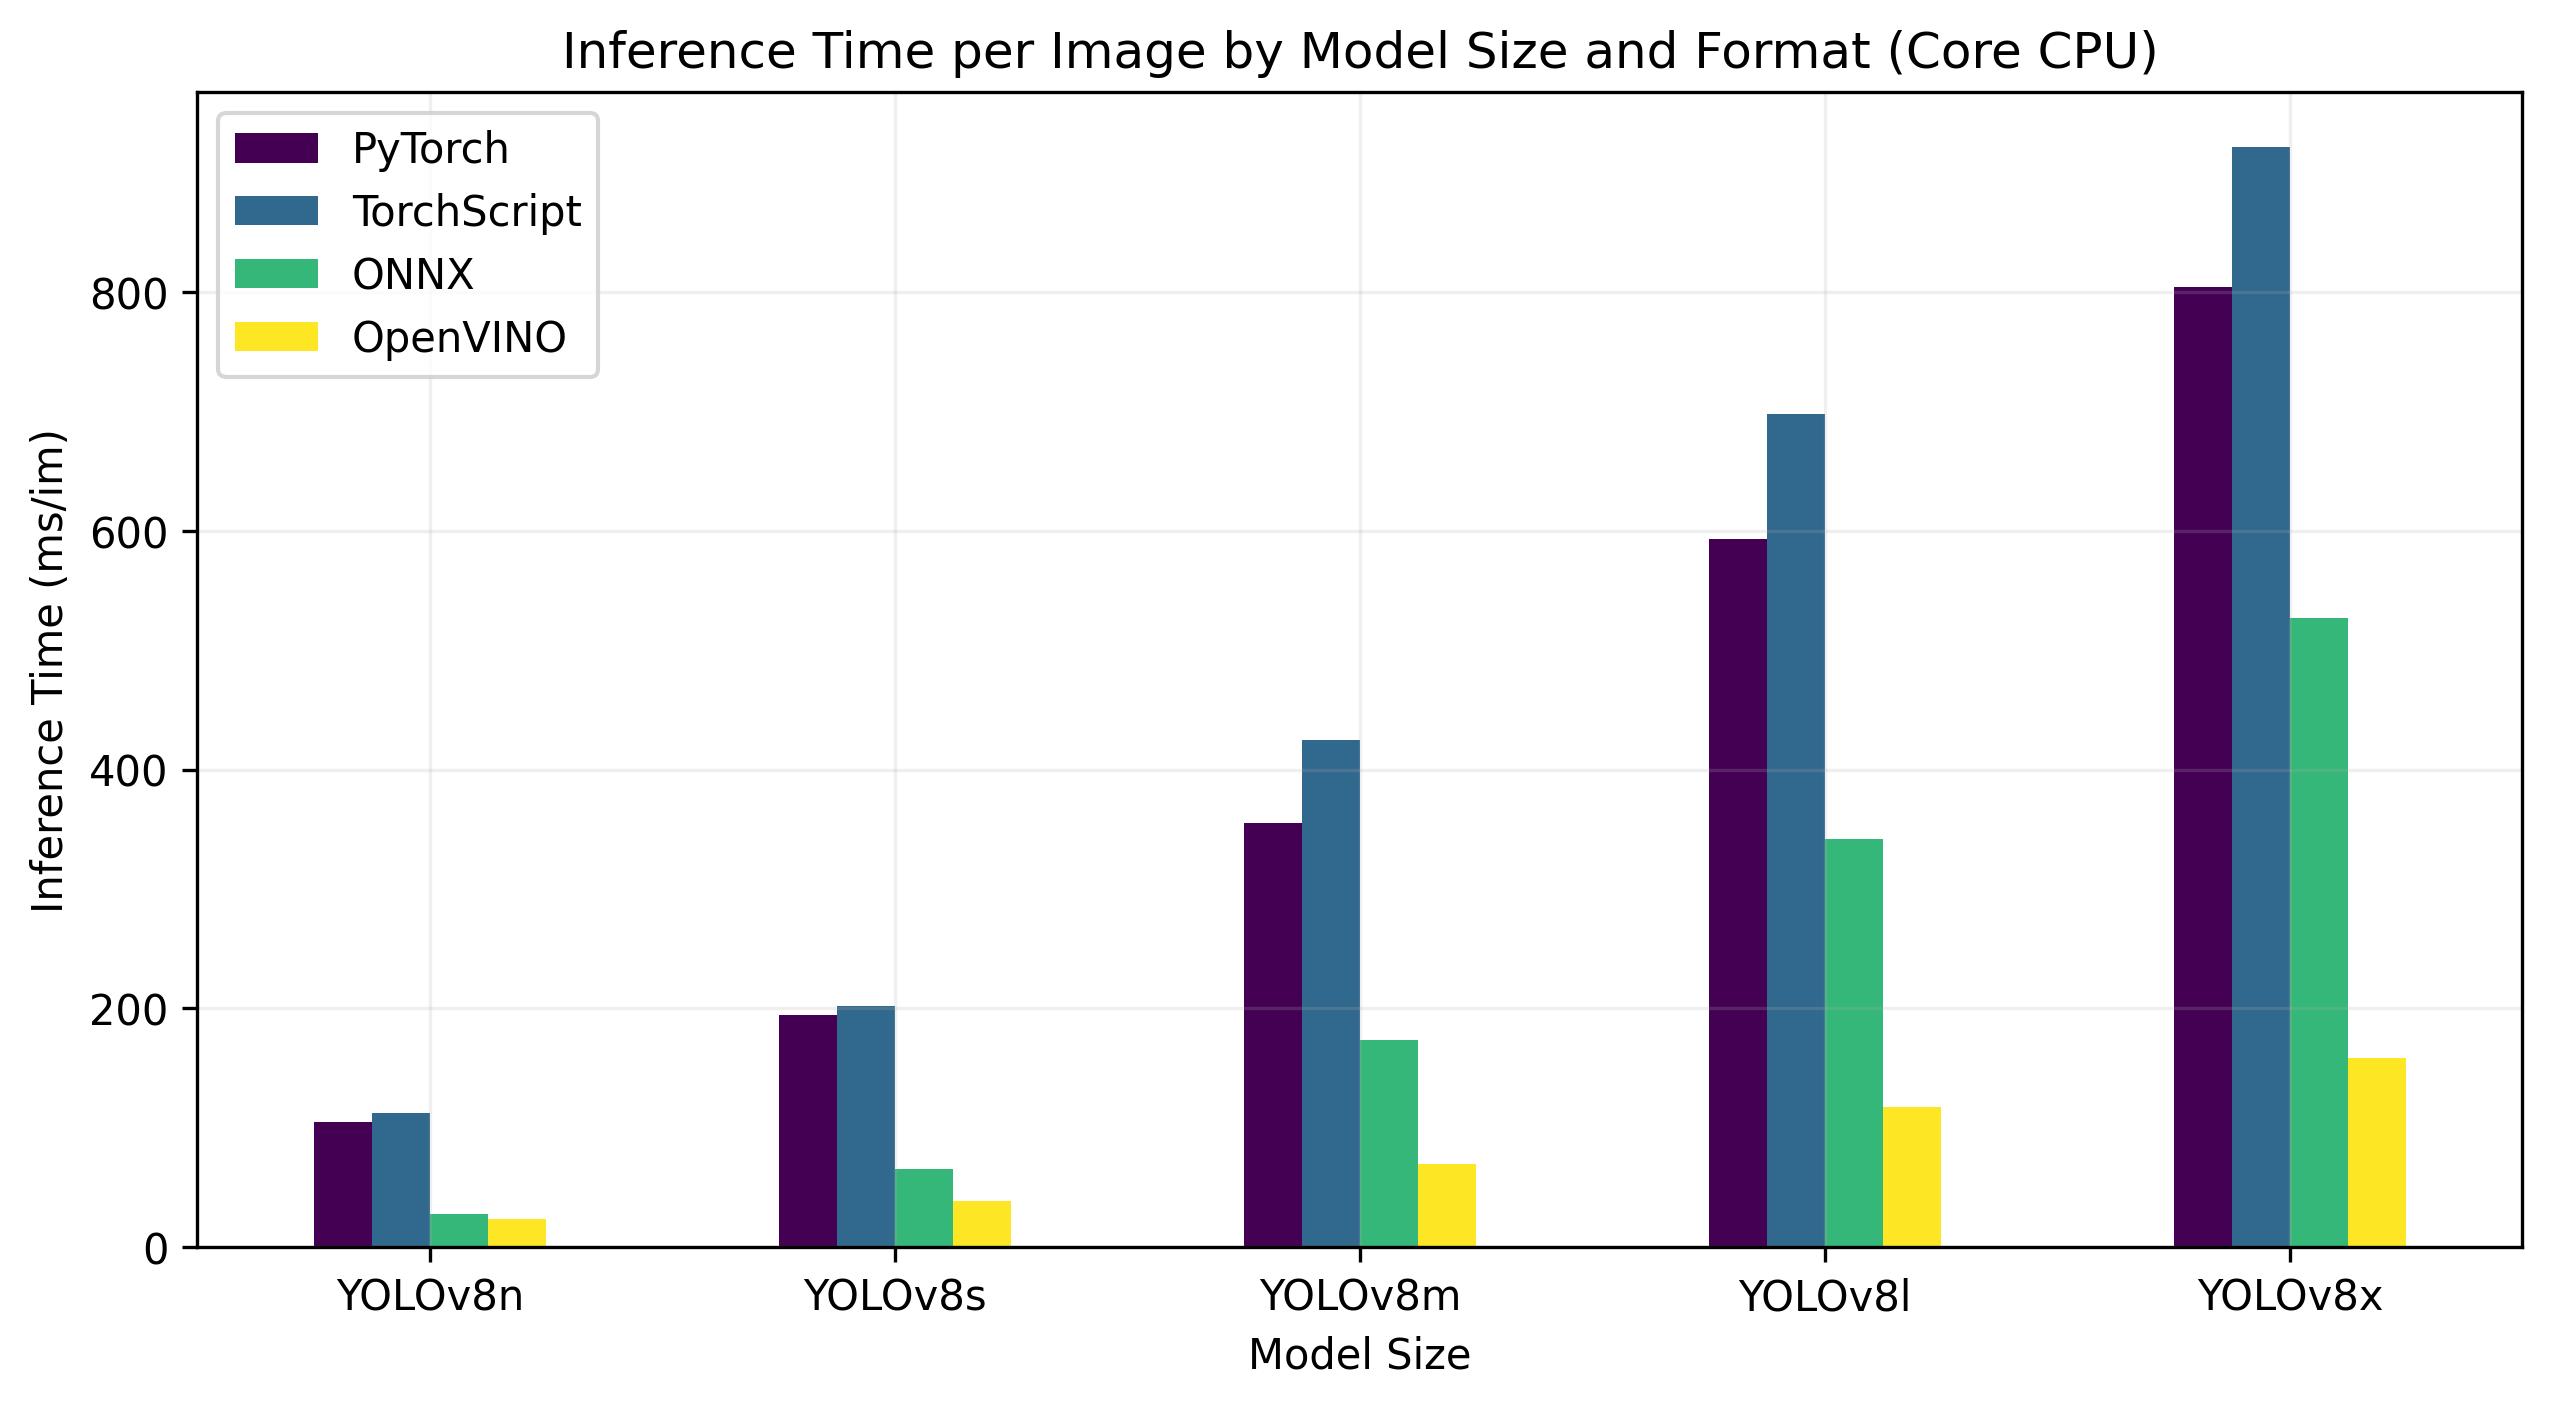
| Model | Format | Status | Size (MB) | metrics/mAP50-95(B) | Inference time (ms/im) |
|---|---|---|---|---|---|
| YOLOv8n | PyTorch | ✅ | 6.2 | 0.4478 | 104.61 |
| YOLOv8n | TorchScript | ✅ | 12.4 | 0.4525 | 112.39 |
| YOLOv8n | ONNX | ✅ | 12.2 | 0.4525 | 28.02 |
| YOLOv8n | OpenVINO | ✅ | 12.3 | 0.4504 | 23.53 |
| YOLOv8s | PyTorch | ✅ | 21.5 | 0.5885 | 194.83 |
| YOLOv8s | TorchScript | ✅ | 43.0 | 0.5962 | 202.01 |
| YOLOv8s | ONNX | ✅ | 42.8 | 0.5962 | 65.74 |
| YOLOv8s | OpenVINO | ✅ | 42.9 | 0.5966 | 38.66 |
| YOLOv8m | PyTorch | ✅ | 49.7 | 0.6101 | 355.23 |
| YOLOv8m | TorchScript | ✅ | 99.2 | 0.6120 | 424.78 |
| YOLOv8m | ONNX | ✅ | 99.0 | 0.6120 | 173.39 |
| YOLOv8m | OpenVINO | ✅ | 99.1 | 0.6091 | 69.80 |
| YOLOv8l | PyTorch | ✅ | 83.7 | 0.6591 | 593.00 |
| YOLOv8l | TorchScript | ✅ | 167.2 | 0.6580 | 697.54 |
| YOLOv8l | ONNX | ✅ | 166.8 | 0.6580 | 342.15 |
| YOLOv8l | OpenVINO | ✅ | 167.0 | 0.0708 | 117.69 |
| YOLOv8x | PyTorch | ✅ | 130.5 | 0.6651 | 804.65 |
| YOLOv8x | TorchScript | ✅ | 260.8 | 0.6650 | 921.46 |
| YOLOv8x | ONNX | ✅ | 260.4 | 0.6650 | 526.66 |
| YOLOv8x | OpenVINO | ✅ | 260.6 | 0.6619 | 158.73 |
Reproduce Our Results
To reproduce the Ultralytics benchmarks above on all export formats run this code:
!!! Example
=== "Python"

    ```py
    from ultralytics import YOLO

    # Load a YOLOv8n PyTorch model
    model = YOLO("yolov8n.pt")

    # Benchmark YOLOv8n speed and accuracy on the COCO8 dataset for all export formats
    results = model.benchmarks(data="coco8.yaml")
    ```

=== "CLI"

    ```py
    # Benchmark YOLOv8n speed and accuracy on the COCO8 dataset for all export formats
    yolo benchmark model=yolov8n.pt data=coco8.yaml
    ```

Note that benchmarking results might vary based on the exact hardware and software configuration of a system, as well as the current workload of the system at the time the benchmarks are run. For the most reliable results use a dataset with a large number of images, i.e. `data='coco128.yaml' (128 val images), or `data='coco.yaml'` (5000 val images).
Conclusion
The benchmarking results clearly demonstrate the benefits of exporting the YOLOv8 model to the OpenVINO format. Across different models and hardware platforms, the OpenVINO format consistently outperforms other formats in terms of inference speed while maintaining comparable accuracy.
For the Intel® Data Center GPU Flex Series, the OpenVINO format was able to deliver inference speeds almost 10 times faster than the original PyTorch format. On the Xeon CPU, the OpenVINO format was twice as fast as the PyTorch format. The accuracy of the models remained nearly identical across the different formats.
The benchmarks underline the effectiveness of OpenVINO as a tool for deploying deep learning models. By converting models to the OpenVINO format, developers can achieve significant performance improvements, making it easier to deploy these models in real-world applications.
For more detailed information and instructions on using OpenVINO, refer to the official OpenVINO documentation.
FAQ
How do I export YOLOv8 models to OpenVINO format?
Exporting YOLOv8 models to the OpenVINO format can significantly enhance CPU speed and enable GPU and NPU accelerations on Intel hardware. To export, you can use either Python or CLI as shown below:
!!! Example
=== "Python"

    ```py
    from ultralytics import YOLO

    # Load a YOLOv8n PyTorch model
    model = YOLO("yolov8n.pt")

    # Export the model
    model.export(format="openvino")  # creates 'yolov8n_openvino_model/'
    ```

=== "CLI"

    ```py
    # Export a YOLOv8n PyTorch model to OpenVINO format
    yolo export model=yolov8n.pt format=openvino  # creates 'yolov8n_openvino_model/'
    ```
For more information, refer to the export formats documentation.
What are the benefits of using OpenVINO with YOLOv8 models?
Using Intel's OpenVINO toolkit with YOLOv8 models offers several benefits:
- Performance: Achieve up to 3x speedup on CPU inference and leverage Intel GPUs and NPUs for acceleration.
- Model Optimizer: Convert, optimize, and execute models from popular frameworks like PyTorch, TensorFlow, and ONNX.
- Ease of Use: Over 80 tutorial notebooks are available to help users get started, including ones for YOLOv8.
- Heterogeneous Execution: Deploy models on various Intel hardware with a unified API.
For detailed performance comparisons, visit our benchmarks section.
How can I run inference using a YOLOv8 model exported to OpenVINO?
After exporting a YOLOv8 model to OpenVINO format, you can run inference using Python or CLI:
!!! Example
=== "Python"

    ```py
    from ultralytics import YOLO

    # Load the exported OpenVINO model
    ov_model = YOLO("yolov8n_openvino_model/")

    # Run inference
    results = ov_model("https://ultralytics.com/images/bus.jpg")
    ```

=== "CLI"

    ```py
    # Run inference with the exported model
    yolo predict model=yolov8n_openvino_model source='https://ultralytics.com/images/bus.jpg'
    ```
Refer to our predict mode documentation for more details.
Why should I choose Ultralytics YOLOv8 over other models for OpenVINO export?
Ultralytics YOLOv8 is optimized for real-time object detection with high accuracy and speed. Specifically, when combined with OpenVINO, YOLOv8 provides:
- Up to 3x speedup on Intel CPUs
- Seamless deployment on Intel GPUs and NPUs
- Consistent and comparable accuracy across various export formats
For in-depth performance analysis, check our detailed YOLOv8 benchmarks on different hardware.
Can I benchmark YOLOv8 models on different formats such as PyTorch, ONNX, and OpenVINO?
Yes, you can benchmark YOLOv8 models in various formats including PyTorch, TorchScript, ONNX, and OpenVINO. Use the following code snippet to run benchmarks on your chosen dataset:
!!! Example
=== "Python"

    ```py
    from ultralytics import YOLO

    # Load a YOLOv8n PyTorch model
    model = YOLO("yolov8n.pt")

    # Benchmark YOLOv8n speed and accuracy on the COCO8 dataset for all export formats
    results = model.benchmarks(data="coco8.yaml")
    ```

=== "CLI"

    ```py
    # Benchmark YOLOv8n speed and accuracy on the COCO8 dataset for all export formats
    yolo benchmark model=yolov8n.pt data=coco8.yaml
    ```
For detailed benchmark results, refer to our benchmarks section and export formats documentation.
comments: true
description: Learn how to export YOLOv8 models to PaddlePaddle format for enhanced performance, flexibility, and deployment across various platforms and devices.
keywords: YOLOv8, PaddlePaddle, export models, computer vision, deep learning, model deployment, performance optimization
How to Export to PaddlePaddle Format from YOLOv8 Models
Bridging the gap between developing and deploying computer vision models in real-world scenarios with varying conditions can be difficult. PaddlePaddle makes this process easier with its focus on flexibility, performance, and its capability for parallel processing in distributed environments. This means you can use your YOLOv8 computer vision models on a wide variety of devices and platforms, from smartphones to cloud-based servers.
The ability to export to PaddlePaddle model format allows you to optimize your Ultralytics YOLOv8 models for use within the PaddlePaddle framework. PaddlePaddle is known for facilitating industrial deployments and is a good choice for deploying computer vision applications in real-world settings across various domains.
Why should you export to PaddlePaddle?
![]()
Developed by Baidu, PaddlePaddle (PArallel Distributed Deep LEarning) is China's first open-source deep learning platform. Unlike some frameworks built mainly for research, PaddlePaddle prioritizes ease of use and smooth integration across industries.
It offers tools and resources similar to popular frameworks like TensorFlow and PyTorch, making it accessible for developers of all experience levels. From farming and factories to service businesses, PaddlePaddle's large developer community of over 4.77 million is helping create and deploy AI applications.
By exporting your Ultralytics YOLOv8 models to PaddlePaddle format, you can tap into PaddlePaddle's strengths in performance optimization. PaddlePaddle prioritizes efficient model execution and reduced memory usage. As a result, your YOLOv8 models can potentially achieve even better performance, delivering top-notch results in practical scenarios.
Key Features of PaddlePaddle Models
PaddlePaddle models offer a range of key features that contribute to their flexibility, performance, and scalability across diverse deployment scenarios:
-
Dynamic-to-Static Graph: PaddlePaddle supports dynamic-to-static compilation, where models can be translated into a static computational graph. This enables optimizations that reduce runtime overhead and boost inference performance.
-
Operator Fusion: PaddlePaddle, like TensorRT, uses operator fusion to streamline computation and reduce overhead. The framework minimizes memory transfers and computational steps by merging compatible operations, resulting in faster inference.
-
Quantization: PaddlePaddle supports quantization techniques, including post-training quantization and quantization-aware training. These techniques allow for the use of lower-precision data representations, effectively boosting performance and reducing model size.
Deployment Options in PaddlePaddle
Before diving into the code for exporting YOLOv8 models to PaddlePaddle, let's take a look at the different deployment scenarios in which PaddlePaddle models excel.
PaddlePaddle provides a range of options, each offering a distinct balance of ease of use, flexibility, and performance:
-
Paddle Serving: This framework simplifies the deployment of PaddlePaddle models as high-performance RESTful APIs. Paddle Serving is ideal for production environments, providing features like model versioning, online A/B testing, and scalability for handling large volumes of requests.
-
Paddle Inference API: The Paddle Inference API gives you low-level control over model execution. This option is well-suited for scenarios where you need to integrate the model tightly within a custom application or optimize performance for specific hardware.
-
Paddle Lite: Paddle Lite is designed for deployment on mobile and embedded devices where resources are limited. It optimizes models for smaller sizes and faster inference on ARM CPUs, GPUs, and other specialized hardware.
-
Paddle.js: Paddle.js enables you to deploy PaddlePaddle models directly within web browsers. Paddle.js can either load a pre-trained model or transform a model from paddle-hub with model transforming tools provided by Paddle.js. It can run in browsers that support WebGL/WebGPU/WebAssembly.
Export to PaddlePaddle: Converting Your YOLOv8 Model
Converting YOLOv8 models to the PaddlePaddle format can improve execution flexibility and optimize performance for various deployment scenarios.
Installation
To install the required package, run:
!!! Tip "Installation"
=== "CLI"

    ```py
    # Install the required package for YOLOv8
    pip install ultralytics
    ```
For detailed instructions and best practices related to the installation process, check our Ultralytics Installation guide. While installing the required packages for YOLOv8, if you encounter any difficulties, consult our Common Issues guide for solutions and tips.
Usage
Before diving into the usage instructions, it's important to note that while all Ultralytics YOLOv8 models are available for exporting, you can ensure that the model you select supports export functionality here.
!!! Example "Usage"
=== "Python"

    ```py
    from ultralytics import YOLO

    # Load the YOLOv8 model
    model = YOLO("yolov8n.pt")

    # Export the model to PaddlePaddle format
    model.export(format="paddle")  # creates '/yolov8n_paddle_model'

    # Load the exported PaddlePaddle model
    paddle_model = YOLO("./yolov8n_paddle_model")

    # Run inference
    results = paddle_model("https://ultralytics.com/images/bus.jpg")
    ```

=== "CLI"

    ```py
    # Export a YOLOv8n PyTorch model to PaddlePaddle format
    yolo export model=yolov8n.pt format=paddle  # creates '/yolov8n_paddle_model'

    # Run inference with the exported model
    yolo predict model='./yolov8n_paddle_model' source='https://ultralytics.com/images/bus.jpg'
    ```
For more details about supported export options, visit the Ultralytics documentation page on deployment options.
Deploying Exported YOLOv8 PaddlePaddle Models
After successfully exporting your Ultralytics YOLOv8 models to PaddlePaddle format, you can now deploy them. The primary and recommended first step for running a PaddlePaddle model is to use the YOLO("./model_paddle_model") method, as outlined in the previous usage code snippet.
However, for in-depth instructions on deploying your PaddlePaddle models in various other settings, take a look at the following resources:
-
Paddle Serving: Learn how to deploy your PaddlePaddle models as performant services using Paddle Serving.
-
Paddle Lite: Explore how to optimize and deploy models on mobile and embedded devices using Paddle Lite.
-
Paddle.js: Discover how to run PaddlePaddle models in web browsers for client-side AI using Paddle.js.
Summary
In this guide, we explored the process of exporting Ultralytics YOLOv8 models to the PaddlePaddle format. By following these steps, you can leverage PaddlePaddle's strengths in diverse deployment scenarios, optimizing your models for different hardware and software environments.
For further details on usage, visit the PaddlePaddle official documentation
Want to explore more ways to integrate your Ultralytics YOLOv8 models? Our integration guide page explores various options, equipping you with valuable resources and insights.
FAQ
How do I export Ultralytics YOLOv8 models to PaddlePaddle format?
Exporting Ultralytics YOLOv8 models to PaddlePaddle format is straightforward. You can use the export method of the YOLO class to perform this exportation. Here is an example using Python:
!!! Example "Usage"
=== "Python"

    ```py
    from ultralytics import YOLO

    # Load the YOLOv8 model
    model = YOLO("yolov8n.pt")

    # Export the model to PaddlePaddle format
    model.export(format="paddle")  # creates '/yolov8n_paddle_model'

    # Load the exported PaddlePaddle model
    paddle_model = YOLO("./yolov8n_paddle_model")

    # Run inference
    results = paddle_model("https://ultralytics.com/images/bus.jpg")
    ```

=== "CLI"

    ```py
    # Export a YOLOv8n PyTorch model to PaddlePaddle format
    yolo export model=yolov8n.pt format=paddle  # creates '/yolov8n_paddle_model'

    # Run inference with the exported model
    yolo predict model='./yolov8n_paddle_model' source='https://ultralytics.com/images/bus.jpg'
    ```
For more detailed setup and troubleshooting, check the Ultralytics Installation Guide and Common Issues Guide.
What are the advantages of using PaddlePaddle for model deployment?
PaddlePaddle offers several key advantages for model deployment:
- Performance Optimization: PaddlePaddle excels in efficient model execution and reduced memory usage.
- Dynamic-to-Static Graph Compilation: It supports dynamic-to-static compilation, allowing for runtime optimizations.
- Operator Fusion: By merging compatible operations, it reduces computational overhead.
- Quantization Techniques: Supports both post-training and quantization-aware training, enabling lower-precision data representations for improved performance.
You can achieve enhanced results by exporting your Ultralytics YOLOv8 models to PaddlePaddle, ensuring flexibility and high performance across various applications and hardware platforms. Learn more about PaddlePaddle's features here.
Why should I choose PaddlePaddle for deploying my YOLOv8 models?
PaddlePaddle, developed by Baidu, is optimized for industrial and commercial AI deployments. Its large developer community and robust framework provide extensive tools similar to TensorFlow and PyTorch. By exporting your YOLOv8 models to PaddlePaddle, you leverage:
- Enhanced Performance: Optimal execution speed and reduced memory footprint.
- Flexibility: Wide compatibility with various devices from smartphones to cloud servers.
- Scalability: Efficient parallel processing capabilities for distributed environments.
These features make PaddlePaddle a compelling choice for deploying YOLOv8 models in production settings.
How does PaddlePaddle improve model performance over other frameworks?
PaddlePaddle employs several advanced techniques to optimize model performance:
- Dynamic-to-Static Graph: Converts models into a static computational graph for runtime optimizations.
- Operator Fusion: Combines compatible operations to minimize memory transfer and increase inference speed.
- Quantization: Reduces model size and increases efficiency using lower-precision data while maintaining accuracy.
These techniques prioritize efficient model execution, making PaddlePaddle an excellent option for deploying high-performance YOLOv8 models. For more on optimization, see the PaddlePaddle official documentation.
What deployment options does PaddlePaddle offer for YOLOv8 models?
PaddlePaddle provides flexible deployment options:
- Paddle Serving: Deploys models as RESTful APIs, ideal for production with features like model versioning and online A/B testing.
- Paddle Inference API: Gives low-level control over model execution for custom applications.
- Paddle Lite: Optimizes models for mobile and embedded devices' limited resources.
- Paddle.js: Enables deploying models directly within web browsers.
These options cover a broad range of deployment scenarios, from on-device inference to scalable cloud services. Explore more deployment strategies on the Ultralytics Model Deployment Options page.
comments: true
description: Simplify YOLOv8 training with Paperspace Gradient's all-in-one MLOps platform. Access GPUs, automate workflows, and deploy with ease.
keywords: YOLOv8, Paperspace Gradient, MLOps, machine learning, training, GPUs, Jupyter notebooks, model deployment, AI, cloud platform
YOLOv8 Model Training Made Simple with Paperspace Gradient
Training computer vision models like YOLOv8 can be complicated. It involves managing large datasets, using different types of computer hardware like GPUs, TPUs, and CPUs, and making sure data flows smoothly during the training process. Typically, developers end up spending a lot of time managing their computer systems and environments. It can be frustrating when you just want to focus on building the best model.
This is where a platform like Paperspace Gradient can make things simpler. Paperspace Gradient is a MLOps platform that lets you build, train, and deploy machine learning models all in one place. With Gradient, developers can focus on training their YOLOv8 models without the hassle of managing infrastructure and environments.
Paperspace

Paperspace, launched in 2014 by University of Michigan graduates and acquired by DigitalOcean in 2023, is a cloud platform specifically designed for machine learning. It provides users with powerful GPUs, collaborative Jupyter notebooks, a container service for deployments, automated workflows for machine learning tasks, and high-performance virtual machines. These features aim to streamline the entire machine learning development process, from coding to deployment.
Paperspace Gradient

Paperspace Gradient is a suite of tools designed to make working with AI and machine learning in the cloud much faster and easier. Gradient addresses the entire machine learning development process, from building and training models to deploying them.
Within its toolkit, it includes support for Google's TPUs via a job runner, comprehensive support for Jupyter notebooks and containers, and new programming language integrations. Its focus on language integration particularly stands out, allowing users to easily adapt their existing Python projects to use the most advanced GPU infrastructure available.
Training YOLOv8 Using Paperspace Gradient
Paperspace Gradient makes training a YOLOv8 model possible with a few clicks. Thanks to the integration, you can access the Paperspace console and start training your model immediately. For a detailed understanding of the model training process and best practices, refer to our YOLOv8 Model Training guide.
Sign in and then click on the “Start Machine” button shown in the image below. In a few seconds, a managed GPU environment will start up, and then you can run the notebook's cells.
Explore more capabilities of YOLOv8 and Paperspace Gradient in a discussion with Glenn Jocher, Ultralytics founder, and James Skelton from Paperspace. Watch the discussion below.
Watch: Ultralytics Live Session 7: It's All About the Environment: Optimizing YOLOv8 Training With Gradient
Key Features of Paperspace Gradient
As you explore the Paperspace console, you'll see how each step of the machine-learning workflow is supported and enhanced. Here are some things to look out for:
-
One-Click Notebooks: Gradient provides pre-configured Jupyter Notebooks specifically tailored for YOLOv8, eliminating the need for environment setup and dependency management. Simply choose the desired notebook and start experimenting immediately.
-
Hardware Flexibility: Choose from a range of machine types with varying CPU, GPU, and TPU configurations to suit your training needs and budget. Gradient handles all the backend setup, allowing you to focus on model development.
-
Experiment Tracking: Gradient automatically tracks your experiments, including hyperparameters, metrics, and code changes. This allows you to easily compare different training runs, identify optimal configurations, and reproduce successful results.
-
Dataset Management: Efficiently manage your datasets directly within Gradient. Upload, version, and pre-process data with ease, streamlining the data preparation phase of your project.
-
Model Serving: Deploy your trained YOLOv8 models as REST APIs with just a few clicks. Gradient handles the infrastructure, allowing you to easily integrate your object detection models into your applications.
-
Real-time Monitoring: Monitor the performance and health of your deployed models through Gradient's intuitive dashboard. Gain insights into inference speed, resource utilization, and potential errors.
Why Should You Use Gradient for Your YOLOv8 Projects?
While many options are available for training, deploying, and evaluating YOLOv8 models, the integration with Paperspace Gradient offers a unique set of advantages that separates it from other solutions. Let's explore what makes this integration unique:
-
Enhanced Collaboration: Shared workspaces and version control facilitate seamless teamwork and ensure reproducibility, allowing your team to work together effectively and maintain a clear history of your project.
-
Low-Cost GPUs: Gradient provides access to high-performance GPUs at significantly lower costs than major cloud providers or on-premise solutions. With per-second billing, you only pay for the resources you actually use, optimizing your budget.
-
Predictable Costs: Gradient's on-demand pricing ensures cost transparency and predictability. You can scale your resources up or down as needed and only pay for the time you use, avoiding unnecessary expenses.
-
No Commitments: You can adjust your instance types anytime to adapt to changing project requirements and optimize the cost-performance balance. There are no lock-in periods or commitments, providing maximum flexibility.
Summary
This guide explored the Paperspace Gradient integration for training YOLOv8 models. Gradient provides the tools and infrastructure to accelerate your AI development journey from effortless model training and evaluation to streamlined deployment options.
For further exploration, visit PaperSpace's official documentation.
Also, visit the Ultralytics integration guide page to learn more about different YOLOv8 integrations. It's full of insights and tips to take your computer vision projects to the next level.
FAQ
How do I train a YOLOv8 model using Paperspace Gradient?
Training a YOLOv8 model with Paperspace Gradient is straightforward and efficient. First, sign in to the Paperspace console. Next, click the “Start Machine” button to initiate a managed GPU environment. Once the environment is ready, you can run the notebook's cells to start training your YOLOv8 model. For detailed instructions, refer to our YOLOv8 Model Training guide.
What are the advantages of using Paperspace Gradient for YOLOv8 projects?
Paperspace Gradient offers several unique advantages for training and deploying YOLOv8 models:
- Hardware Flexibility: Choose from various CPU, GPU, and TPU configurations.
- One-Click Notebooks: Use pre-configured Jupyter Notebooks for YOLOv8 without worrying about environment setup.
- Experiment Tracking: Automatic tracking of hyperparameters, metrics, and code changes.
- Dataset Management: Efficiently manage your datasets within Gradient.
- Model Serving: Deploy models as REST APIs easily.
- Real-time Monitoring: Monitor model performance and resource utilization through a dashboard.
Why should I choose Ultralytics YOLOv8 over other object detection models?
Ultralytics YOLOv8 stands out for its real-time object detection capabilities and high accuracy. Its seamless integration with platforms like Paperspace Gradient enhances productivity by simplifying the training and deployment process. YOLOv8 supports various use cases, from security systems to retail inventory management. Explore more about YOLOv8's advantages here.
Can I deploy my YOLOv8 model on edge devices using Paperspace Gradient?
Yes, you can deploy YOLOv8 models on edge devices using Paperspace Gradient. The platform supports various deployment formats like TFLite and Edge TPU, which are optimized for edge devices. After training your model on Gradient, refer to our export guide for instructions on converting your model to the desired format.
How does experiment tracking in Paperspace Gradient help improve YOLOv8 training?
Experiment tracking in Paperspace Gradient streamlines the model development process by automatically logging hyperparameters, metrics, and code changes. This allows you to easily compare different training runs, identify optimal configurations, and reproduce successful experiments.
comments: true
description: Optimize YOLOv8 model performance with Ray Tune. Learn efficient hyperparameter tuning using advanced search strategies, parallelism, and early stopping.
keywords: YOLOv8, Ray Tune, hyperparameter tuning, model optimization, machine learning, deep learning, AI, Ultralytics, Weights & Biases
Efficient Hyperparameter Tuning with Ray Tune and YOLOv8
Hyperparameter tuning is vital in achieving peak model performance by discovering the optimal set of hyperparameters. This involves running trials with different hyperparameters and evaluating each trial's performance.
Accelerate Tuning with Ultralytics YOLOv8 and Ray Tune
Ultralytics YOLOv8 incorporates Ray Tune for hyperparameter tuning, streamlining the optimization of YOLOv8 model hyperparameters. With Ray Tune, you can utilize advanced search strategies, parallelism, and early stopping to expedite the tuning process.
Ray Tune
Ray Tune is a hyperparameter tuning library designed for efficiency and flexibility. It supports various search strategies, parallelism, and early stopping strategies, and seamlessly integrates with popular machine learning frameworks, including Ultralytics YOLOv8.
Integration with Weights & Biases
YOLOv8 also allows optional integration with Weights & Biases for monitoring the tuning process.
Installation
To install the required packages, run:
!!! Tip "Installation"
=== "CLI"

    ```py
    # Install and update Ultralytics and Ray Tune packages
    pip install -U ultralytics "ray[tune]"

    # Optionally install W&B for logging
    pip install wandb
    ```
Usage
!!! Example "Usage"
=== "Python"

    ```py
    from ultralytics import YOLO

    # Load a YOLOv8n model
    model = YOLO("yolov8n.pt")

    # Start tuning hyperparameters for YOLOv8n training on the COCO8 dataset
    result_grid = model.tune(data="coco8.yaml", use_ray=True)
    ```
tune() Method Parameters
The tune() method in YOLOv8 provides an easy-to-use interface for hyperparameter tuning with Ray Tune. It accepts several arguments that allow you to customize the tuning process. Below is a detailed explanation of each parameter:
| Parameter | Type | Description | Default Value |
|---|---|---|---|
data |
str |
The dataset configuration file (in YAML format) to run the tuner on. This file should specify the training and validation data paths, as well as other dataset-specific settings. | |
space |
dict, optional |
A dictionary defining the hyperparameter search space for Ray Tune. Each key corresponds to a hyperparameter name, and the value specifies the range of values to explore during tuning. If not provided, YOLOv8 uses a default search space with various hyperparameters. | |
grace_period |
int, optional |
The grace period in epochs for the ASHA scheduler in Ray Tune. The scheduler will not terminate any trial before this number of epochs, allowing the model to have some minimum training before making a decision on early stopping. | 10 |
gpu_per_trial |
int, optional |
The number of GPUs to allocate per trial during tuning. This helps manage GPU usage, particularly in multi-GPU environments. If not provided, the tuner will use all available GPUs. | None |
iterations |
int, optional |
The maximum number of trials to run during tuning. This parameter helps control the total number of hyperparameter combinations tested, ensuring the tuning process does not run indefinitely. | 10 |
**train_args |
dict, optional |
Additional arguments to pass to the train() method during tuning. These arguments can include settings like the number of training epochs, batch size, and other training-specific configurations. |
{} |
By customizing these parameters, you can fine-tune the hyperparameter optimization process to suit your specific needs and available computational resources.
Default Search Space Description
The following table lists the default search space parameters for hyperparameter tuning in YOLOv8 with Ray Tune. Each parameter has a specific value range defined by tune.uniform().
| Parameter | Value Range | Description |
|---|---|---|
lr0 |
tune.uniform(1e-5, 1e-1) |
Initial learning rate |
lrf |
tune.uniform(0.01, 1.0) |
Final learning rate factor |
momentum |
tune.uniform(0.6, 0.98) |
Momentum |
weight_decay |
tune.uniform(0.0, 0.001) |
Weight decay |
warmup_epochs |
tune.uniform(0.0, 5.0) |
Warmup epochs |
warmup_momentum |
tune.uniform(0.0, 0.95) |
Warmup momentum |
box |
tune.uniform(0.02, 0.2) |
Box loss weight |
cls |
tune.uniform(0.2, 4.0) |
Class loss weight |
hsv_h |
tune.uniform(0.0, 0.1) |
Hue augmentation range |
hsv_s |
tune.uniform(0.0, 0.9) |
Saturation augmentation range |
hsv_v |
tune.uniform(0.0, 0.9) |
Value (brightness) augmentation range |
degrees |
tune.uniform(0.0, 45.0) |
Rotation augmentation range (degrees) |
translate |
tune.uniform(0.0, 0.9) |
Translation augmentation range |
scale |
tune.uniform(0.0, 0.9) |
Scaling augmentation range |
shear |
tune.uniform(0.0, 10.0) |
Shear augmentation range (degrees) |
perspective |
tune.uniform(0.0, 0.001) |
Perspective augmentation range |
flipud |
tune.uniform(0.0, 1.0) |
Vertical flip augmentation probability |
fliplr |
tune.uniform(0.0, 1.0) |
Horizontal flip augmentation probability |
mosaic |
tune.uniform(0.0, 1.0) |
Mosaic augmentation probability |
mixup |
tune.uniform(0.0, 1.0) |
Mixup augmentation probability |
copy_paste |
tune.uniform(0.0, 1.0) |
Copy-paste augmentation probability |
Custom Search Space Example
In this example, we demonstrate how to use a custom search space for hyperparameter tuning with Ray Tune and YOLOv8. By providing a custom search space, you can focus the tuning process on specific hyperparameters of interest.
!!! Example "Usage"
```py
from ultralytics import YOLO

# Define a YOLO model
model = YOLO("yolov8n.pt")

# Run Ray Tune on the model
result_grid = model.tune(
    data="coco8.yaml",
    space={"lr0": tune.uniform(1e-5, 1e-1)},
    epochs=50,
    use_ray=True,
)
```
In the code snippet above, we create a YOLO model with the "yolov8n.pt" pretrained weights. Then, we call the tune() method, specifying the dataset configuration with "coco8.yaml". We provide a custom search space for the initial learning rate lr0 using a dictionary with the key "lr0" and the value tune.uniform(1e-5, 1e-1). Finally, we pass additional training arguments, such as the number of epochs directly to the tune method as epochs=50.
Processing Ray Tune Results
After running a hyperparameter tuning experiment with Ray Tune, you might want to perform various analyses on the obtained results. This guide will take you through common workflows for processing and analyzing these results.
Loading Tune Experiment Results from a Directory
After running the tuning experiment with tuner.fit(), you can load the results from a directory. This is useful, especially if you're performing the analysis after the initial training script has exited.
experiment_path = f"{storage_path}/{exp_name}"
print(f"Loading results from {experiment_path}...")

restored_tuner = tune.Tuner.restore(experiment_path, trainable=train_mnist)
result_grid = restored_tuner.get_results()
Basic Experiment-Level Analysis
Get an overview of how trials performed. You can quickly check if there were any errors during the trials.
if result_grid.errors:
    print("One or more trials failed!")
else:
    print("No errors!")
Basic Trial-Level Analysis
Access individual trial hyperparameter configurations and the last reported metrics.
for i, result in enumerate(result_grid):
    print(f"Trial #{i}: Configuration: {result.config}, Last Reported Metrics: {result.metrics}")
Plotting the Entire History of Reported Metrics for a Trial
You can plot the history of reported metrics for each trial to see how the metrics evolved over time.
import matplotlib.pyplot as plt

for result in result_grid:
    plt.plot(
        result.metrics_dataframe["training_iteration"],
        result.metrics_dataframe["mean_accuracy"],
        label=f"Trial {i}",
    )

plt.xlabel("Training Iterations")
plt.ylabel("Mean Accuracy")
plt.legend()
plt.show()
Summary
In this documentation, we covered common workflows to analyze the results of experiments run with Ray Tune using Ultralytics. The key steps include loading the experiment results from a directory, performing basic experiment-level and trial-level analysis and plotting metrics.
Explore further by looking into Ray Tune's Analyze Results docs page to get the most out of your hyperparameter tuning experiments.
FAQ
How do I tune the hyperparameters of my YOLOv8 model using Ray Tune?
To tune the hyperparameters of your Ultralytics YOLOv8 model using Ray Tune, follow these steps:
-
Install the required packages:
pip install -U ultralytics "ray[tune]" pip install wandb # optional for logging -
Load your YOLOv8 model and start tuning:
from ultralytics import YOLO

# Load a YOLOv8 model
model = YOLO("yolov8n.pt")

# Start tuning with the COCO8 dataset
result_grid = model.tune(data="coco8.yaml", use_ray=True)
This utilizes Ray Tune's advanced search strategies and parallelism to efficiently optimize your model's hyperparameters. For more information, check out the Ray Tune documentation.
What are the default hyperparameters for YOLOv8 tuning with Ray Tune?
Ultralytics YOLOv8 uses the following default hyperparameters for tuning with Ray Tune:
| Parameter | Value Range | Description |
|---|---|---|
lr0 |
tune.uniform(1e-5, 1e-1) |
Initial learning rate |
lrf |
tune.uniform(0.01, 1.0) |
Final learning rate factor |
momentum |
tune.uniform(0.6, 0.98) |
Momentum |
weight_decay |
tune.uniform(0.0, 0.001) |
Weight decay |
warmup_epochs |
tune.uniform(0.0, 5.0) |
Warmup epochs |
box |
tune.uniform(0.02, 0.2) |
Box loss weight |
cls |
tune.uniform(0.2, 4.0) |
Class loss weight |
hsv_h |
tune.uniform(0.0, 0.1) |
Hue augmentation range |
translate |
tune.uniform(0.0, 0.9) |
Translation augmentation range |
These hyperparameters can be customized to suit your specific needs. For a complete list and more details, refer to the Hyperparameter Tuning guide.
How can I integrate Weights & Biases with my YOLOv8 model tuning?
To integrate Weights & Biases (W&B) with your Ultralytics YOLOv8 tuning process:
-
Install W&B:
pip install wandb -
Modify your tuning script:
import wandb

from ultralytics import YOLO

wandb.init(project="YOLO-Tuning", entity="your-entity")

# Load YOLO model
model = YOLO("yolov8n.pt")

# Tune hyperparameters
result_grid = model.tune(data="coco8.yaml", use_ray=True)
This setup will allow you to monitor the tuning process, track hyperparameter configurations, and visualize results in W&B.
Why should I use Ray Tune for hyperparameter optimization with YOLOv8?
Ray Tune offers numerous advantages for hyperparameter optimization:
- Advanced Search Strategies: Utilizes algorithms like Bayesian Optimization and HyperOpt for efficient parameter search.
- Parallelism: Supports parallel execution of multiple trials, significantly speeding up the tuning process.
- Early Stopping: Employs strategies like ASHA to terminate under-performing trials early, saving computational resources.
Ray Tune seamlessly integrates with Ultralytics YOLOv8, providing an easy-to-use interface for tuning hyperparameters effectively. To get started, check out the Efficient Hyperparameter Tuning with Ray Tune and YOLOv8 guide.
How can I define a custom search space for YOLOv8 hyperparameter tuning?
To define a custom search space for your YOLOv8 hyperparameter tuning with Ray Tune:
from ray import tune

from ultralytics import YOLO

model = YOLO("yolov8n.pt")
search_space = {"lr0": tune.uniform(1e-5, 1e-1), "momentum": tune.uniform(0.6, 0.98)}
result_grid = model.tune(data="coco8.yaml", space=search_space, use_ray=True)
This customizes the range of hyperparameters like initial learning rate and momentum to be explored during the tuning process. For advanced configurations, refer to the Custom Search Space Example section.
comments: true
description: Learn how to gather, label, and deploy data for custom YOLOv8 models using Roboflow's powerful tools. Optimize your computer vision pipeline effortlessly.
keywords: Roboflow, YOLOv8, data labeling, computer vision, model training, model deployment, dataset management, automated image annotation, AI tools
Roboflow
Roboflow has everything you need to build and deploy computer vision models. Connect Roboflow at any step in your pipeline with APIs and SDKs, or use the end-to-end interface to automate the entire process from image to inference. Whether you're in need of data labeling, model training, or model deployment, Roboflow gives you building blocks to bring custom computer vision solutions to your project.
!!! Question "Licensing"
Ultralytics offers two licensing options:

- The [AGPL-3.0 License](https://github.com/ultralytics/ultralytics/blob/main/LICENSE), an [OSI-approved](https://opensource.org/licenses/) open-source license ideal for students and enthusiasts.
- The [Enterprise License](https://ultralytics.com/license) for businesses seeking to incorporate our AI models into their products and services.

For more details see [Ultralytics Licensing](https://ultralytics.com/license).
In this guide, we are going to showcase how to find, label, and organize data for use in training a custom Ultralytics YOLOv8 model. Use the table of contents below to jump directly to a specific section:
- Gather data for training a custom YOLOv8 model
- Upload, convert and label data for YOLOv8 format
- Pre-process and augment data for model robustness
- Dataset management for YOLOv8
- Export data in 40+ formats for model training
- Upload custom YOLOv8 model weights for testing and deployment
- Gather Data for Training a Custom YOLOv8 Model
Roboflow provides two services that can help you collect data for YOLOv8 models: Universe and Collect.
Universe is an online repository with over 250,000 vision datasets totalling over 100 million images.
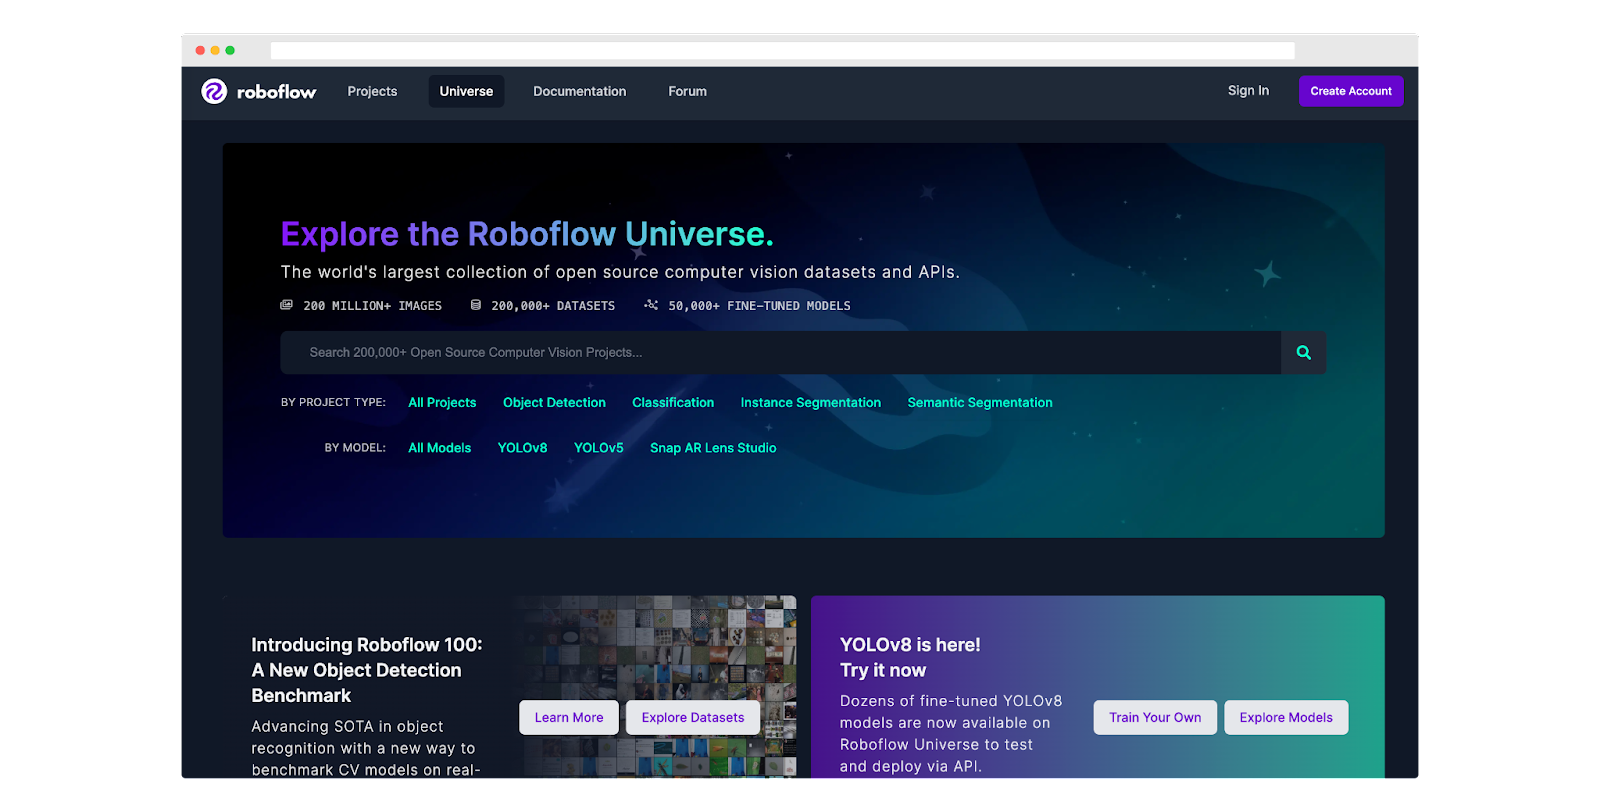
With a free Roboflow account, you can export any dataset available on Universe. To export a dataset, click the "Download this Dataset" button on any dataset.
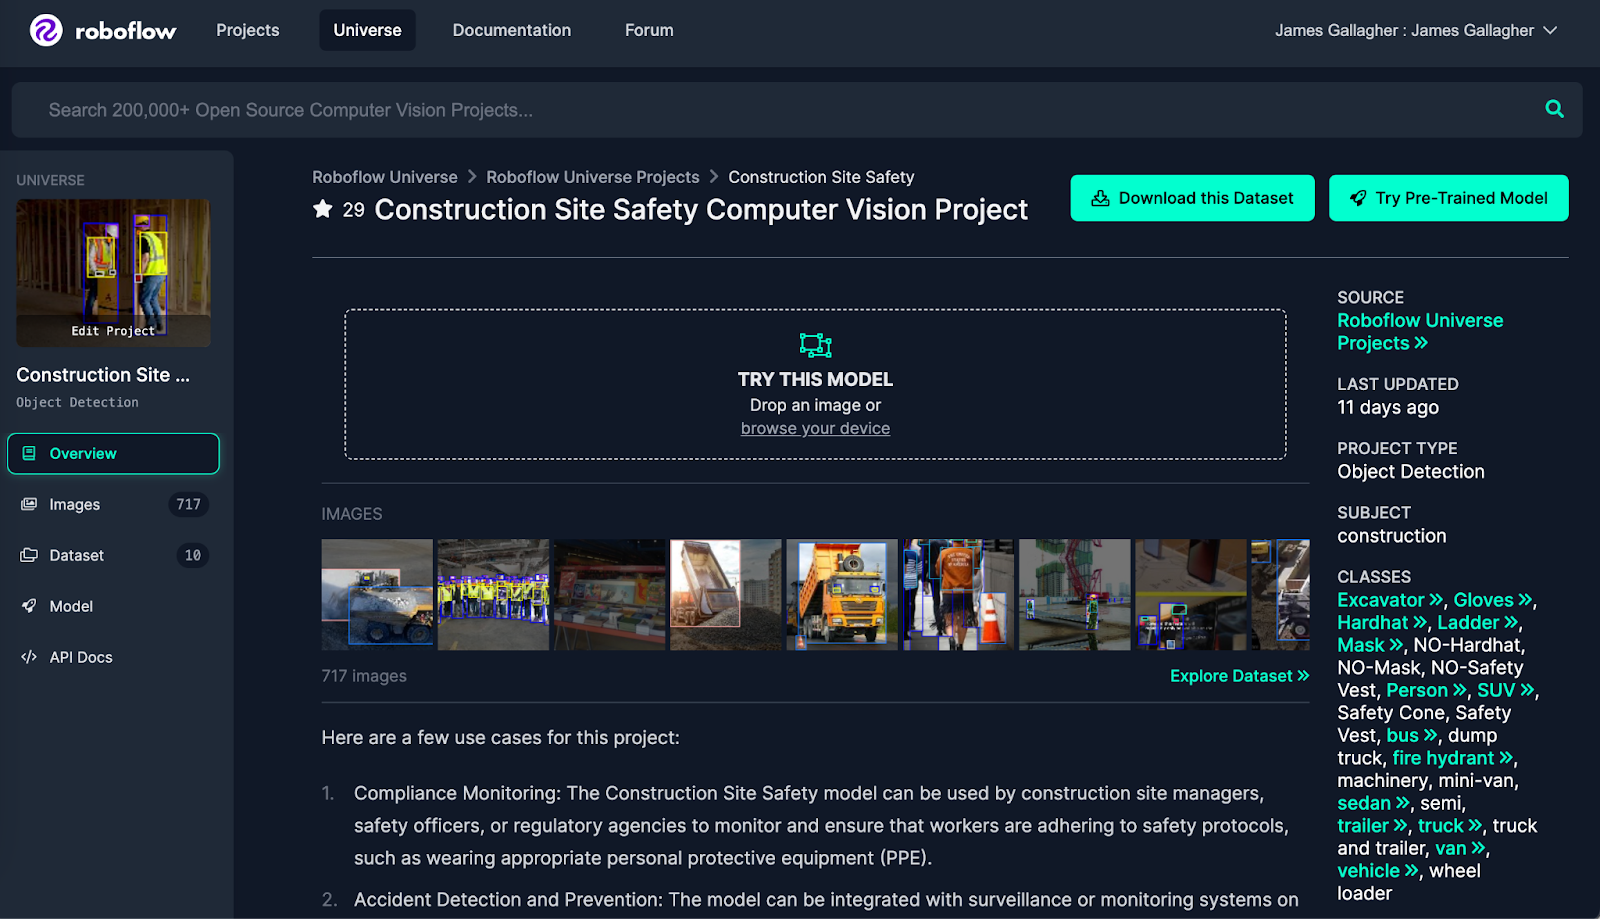
For YOLOv8, select "YOLOv8" as the export format:

Universe also has a page that aggregates all public fine-tuned YOLOv8 models uploaded to Roboflow. You can use this page to explore pre-trained models you can use for testing or for automated data labeling or to prototype with Roboflow inference.
If you want to gather images yourself, try Collect, an open source project that allows you to automatically gather images using a webcam on the edge. You can use text or image prompts with Collect to instruct what data should be collected, allowing you to capture only the useful data you need to build your vision model.
Upload, Convert and Label Data for YOLOv8 Format
Roboflow Annotate is an online annotation tool for use in labeling images for object detection, classification, and segmentation.
To label data for a YOLOv8 object detection, instance segmentation, or classification model, first create a project in Roboflow.
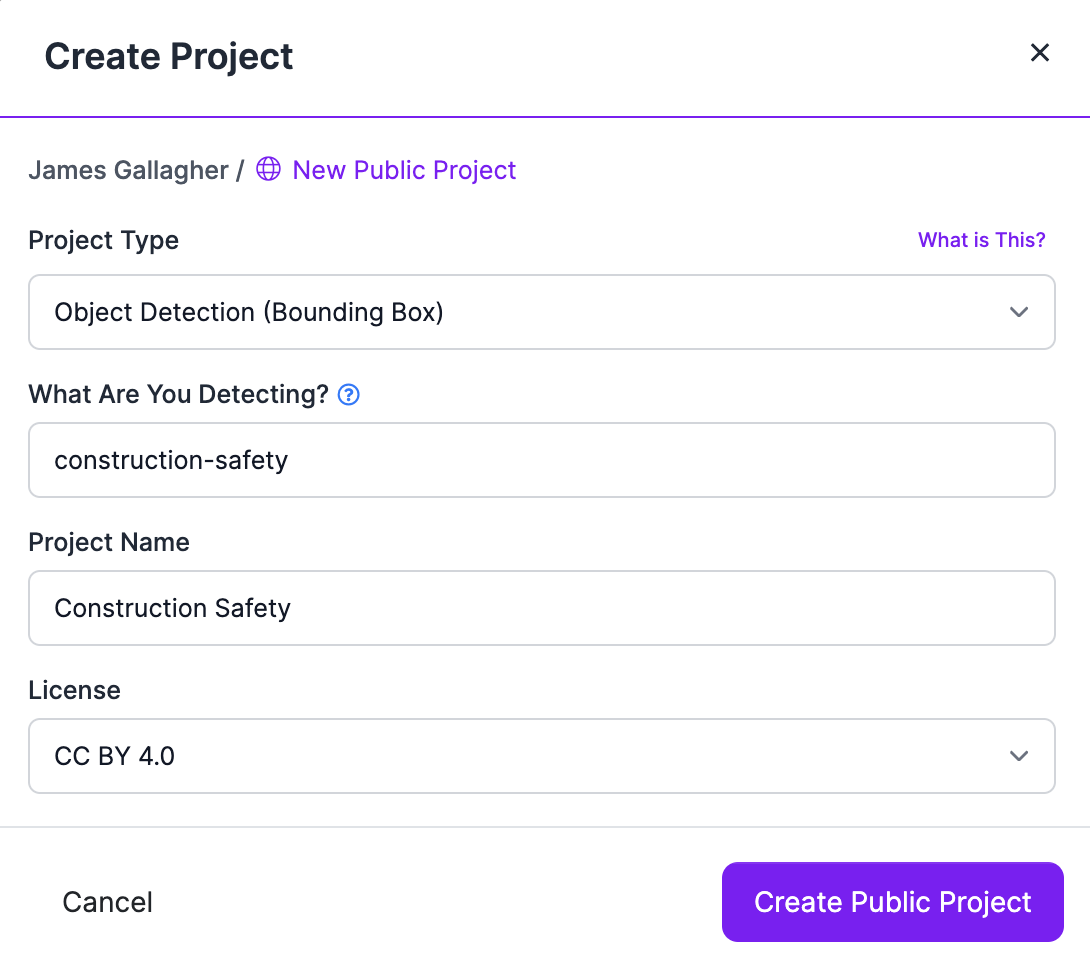
Next, upload your images, and any pre-existing annotations you have from other tools (using one of the 40+ supported import formats), into Roboflow.
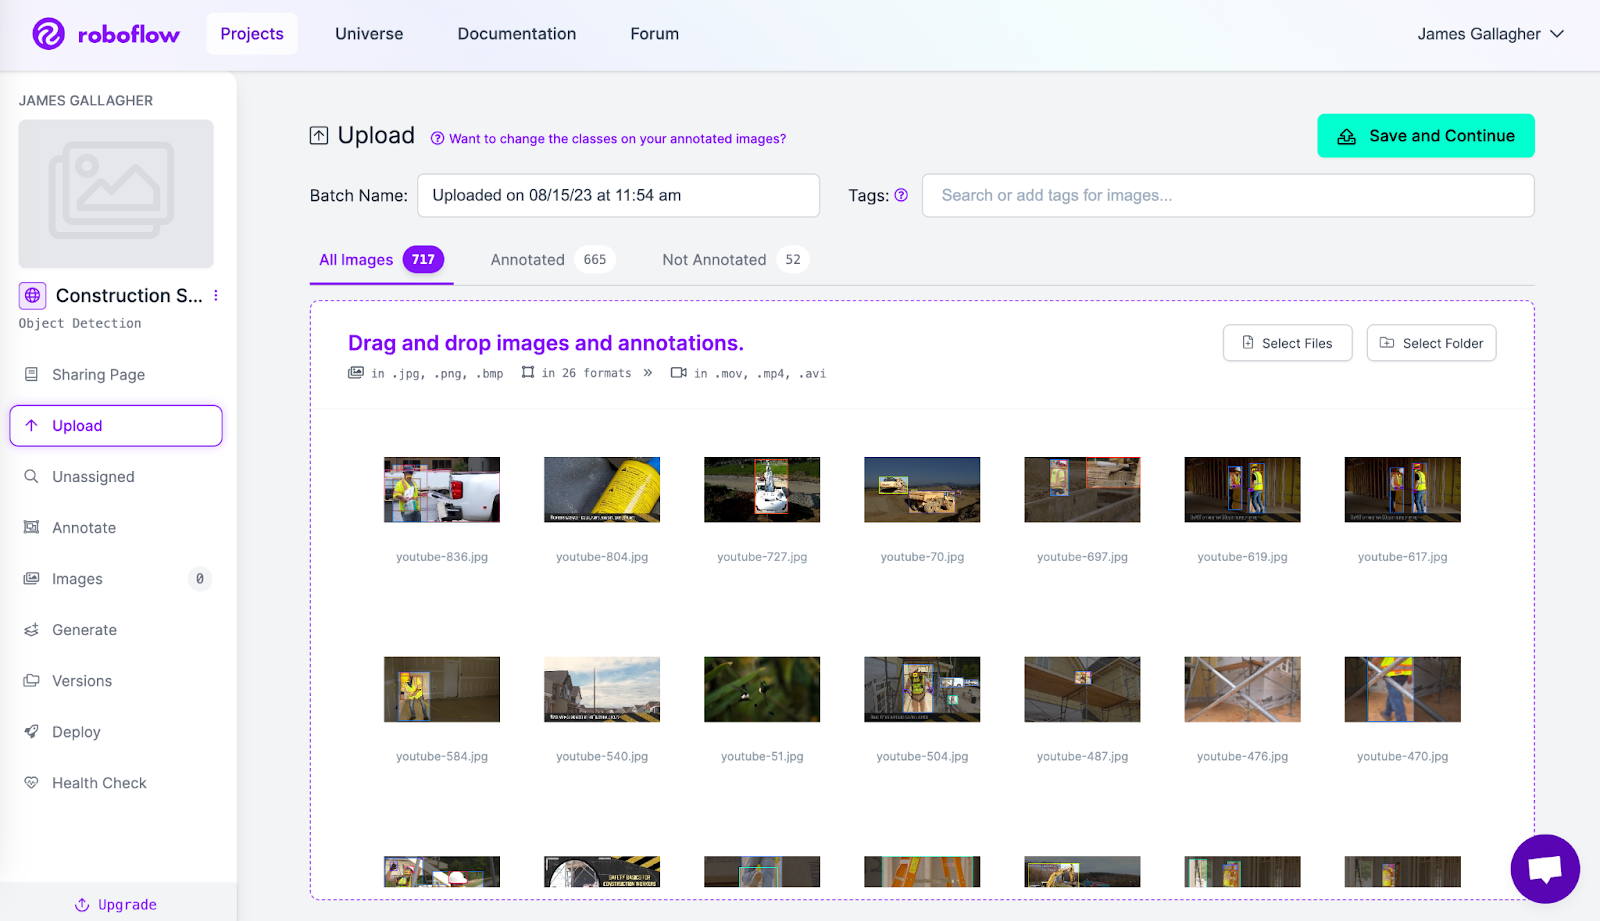
Select the batch of images you have uploaded on the Annotate page to which you are taken after uploading images. Then, click "Start Annotating" to label images.
To label with bounding boxes, press the B key on your keyboard or click the box icon in the sidebar. Click on a point where you want to start your bounding box, then drag to create the box:
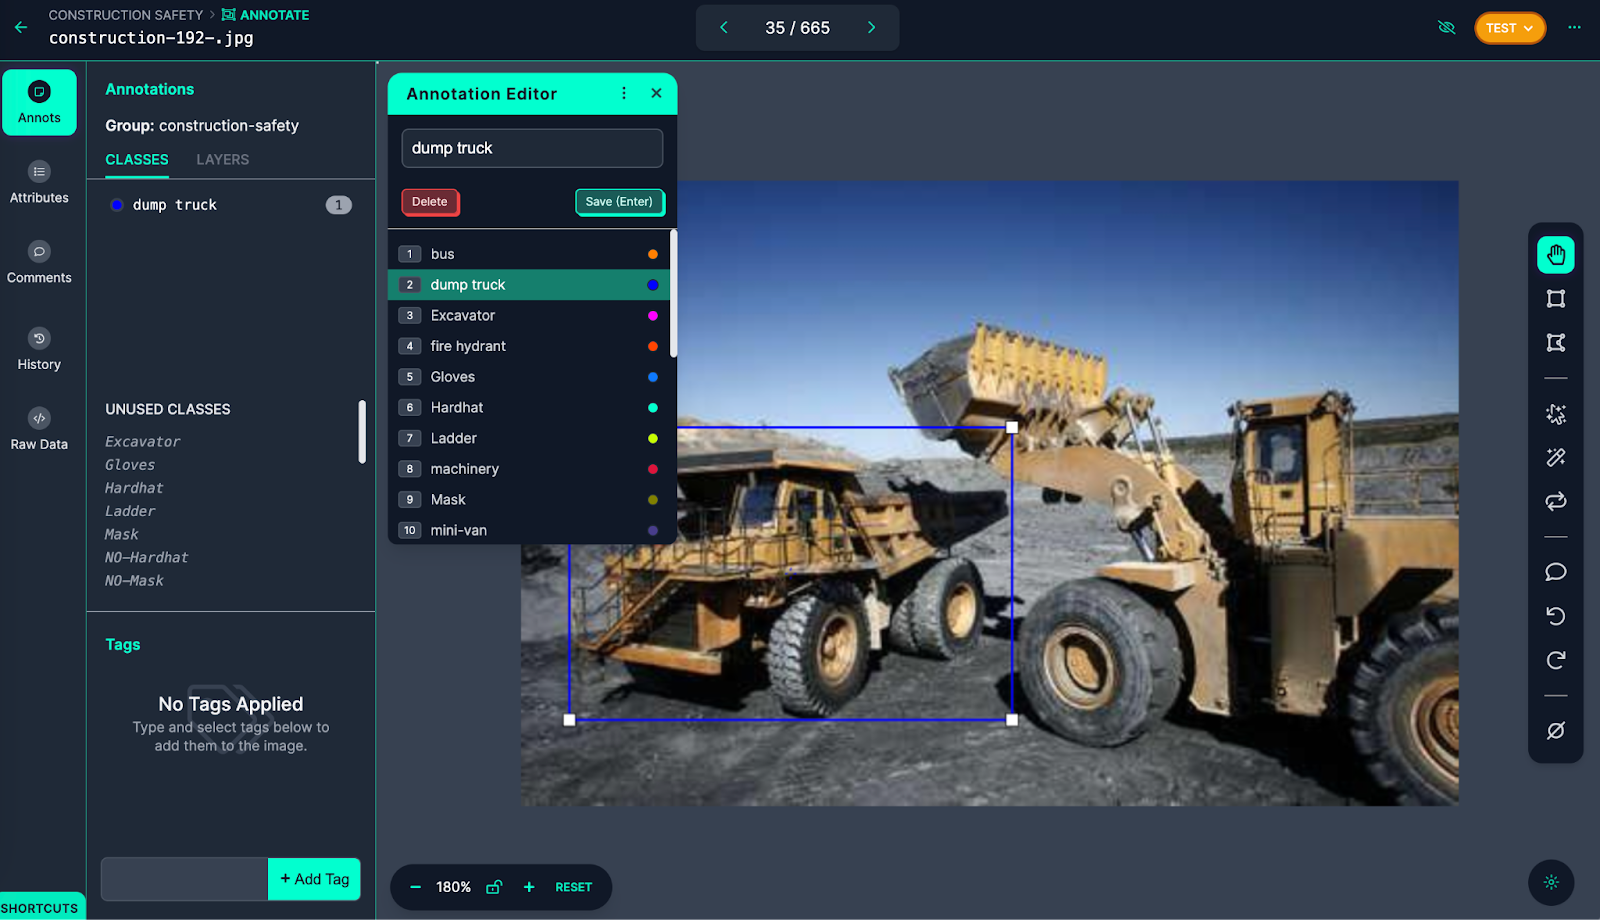
A pop-up will appear asking you to select a class for your annotation once you have created an annotation.
To label with polygons, press the P key on your keyboard, or the polygon icon in the sidebar. With the polygon annotation tool enabled, click on individual points in the image to draw a polygon.
Roboflow offers a SAM-based label assistant with which you can label images faster than ever. SAM (Segment Anything Model) is a state-of-the-art computer vision model that can precisely label images. With SAM, you can significantly speed up the image labeling process. Annotating images with polygons becomes as simple as a few clicks, rather than the tedious process of precisely clicking points around an object.
To use the label assistant, click the cursor icon in the sidebar, SAM will be loaded for use in your project.
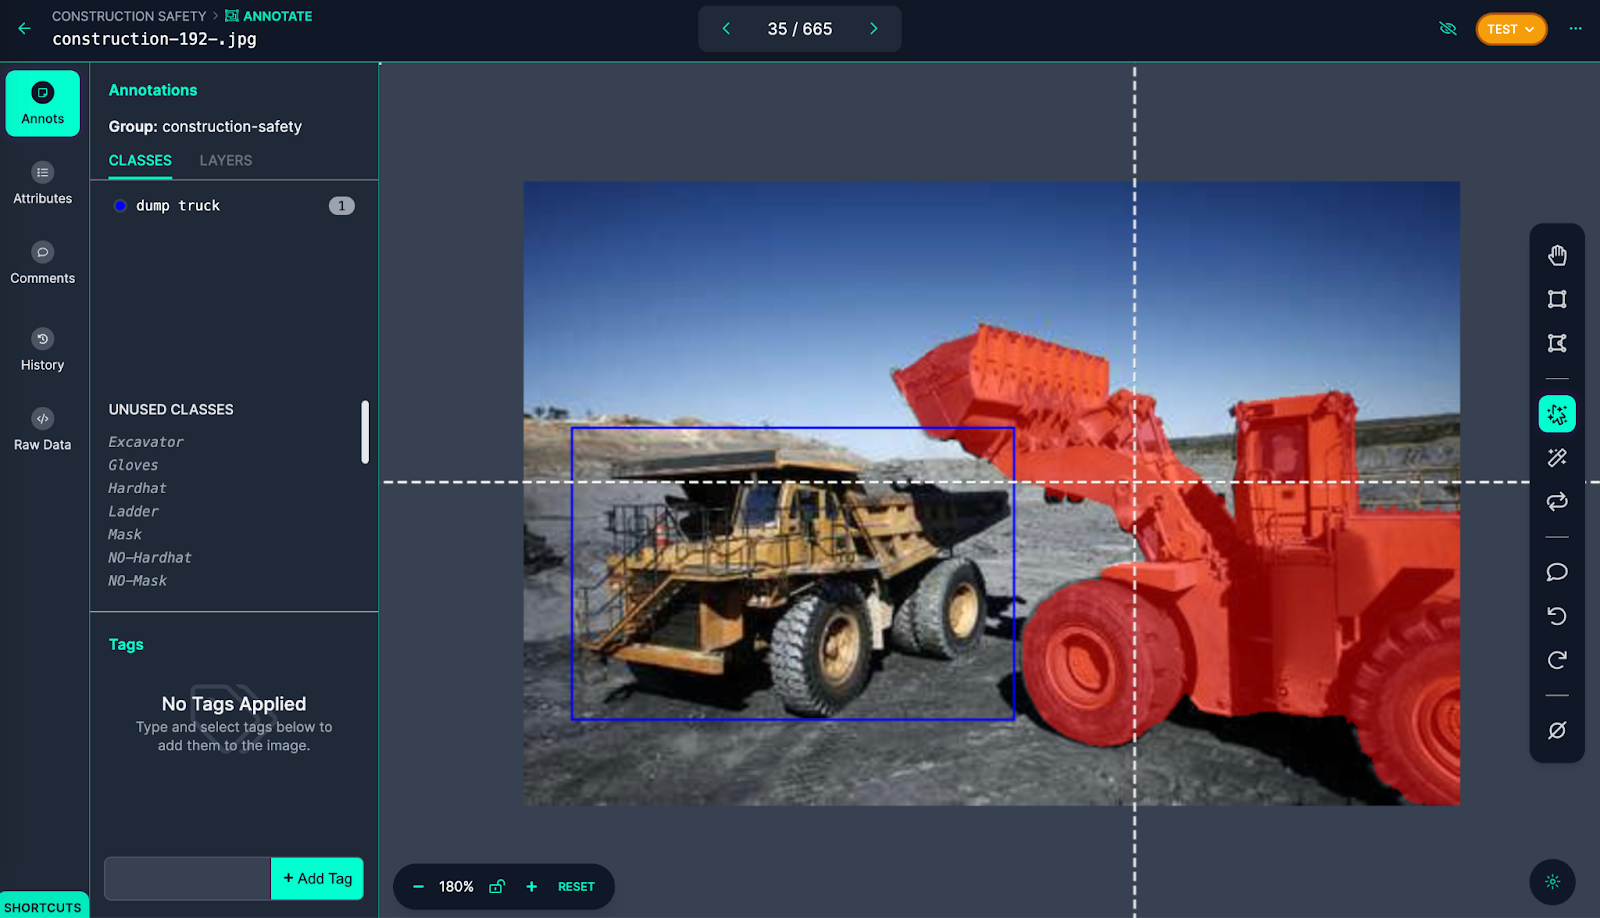
Hover over any object in the image and SAM will recommend an annotation. You can hover to find the right place to annotate, then click to create your annotation. To amend your annotation to be more or less specific, you can click inside or outside the annotation SAM has created on the document.
You can also add tags to images from the Tags panel in the sidebar. You can apply tags to data from a particular area, taken from a specific camera, and more. You can then use these tags to search through data for images matching a tag and generate versions of a dataset with images that contain a particular tag or set of tags.
Models hosted on Roboflow can be used with Label Assist, an automated annotation tool that uses your YOLOv8 model to recommend annotations. To use Label Assist, first upload a YOLOv8 model to Roboflow (see instructions later in the guide). Then, click the magic wand icon in the left sidebar and select your model for use in Label Assist.
Choose a model, then click "Continue" to enable Label Assist:
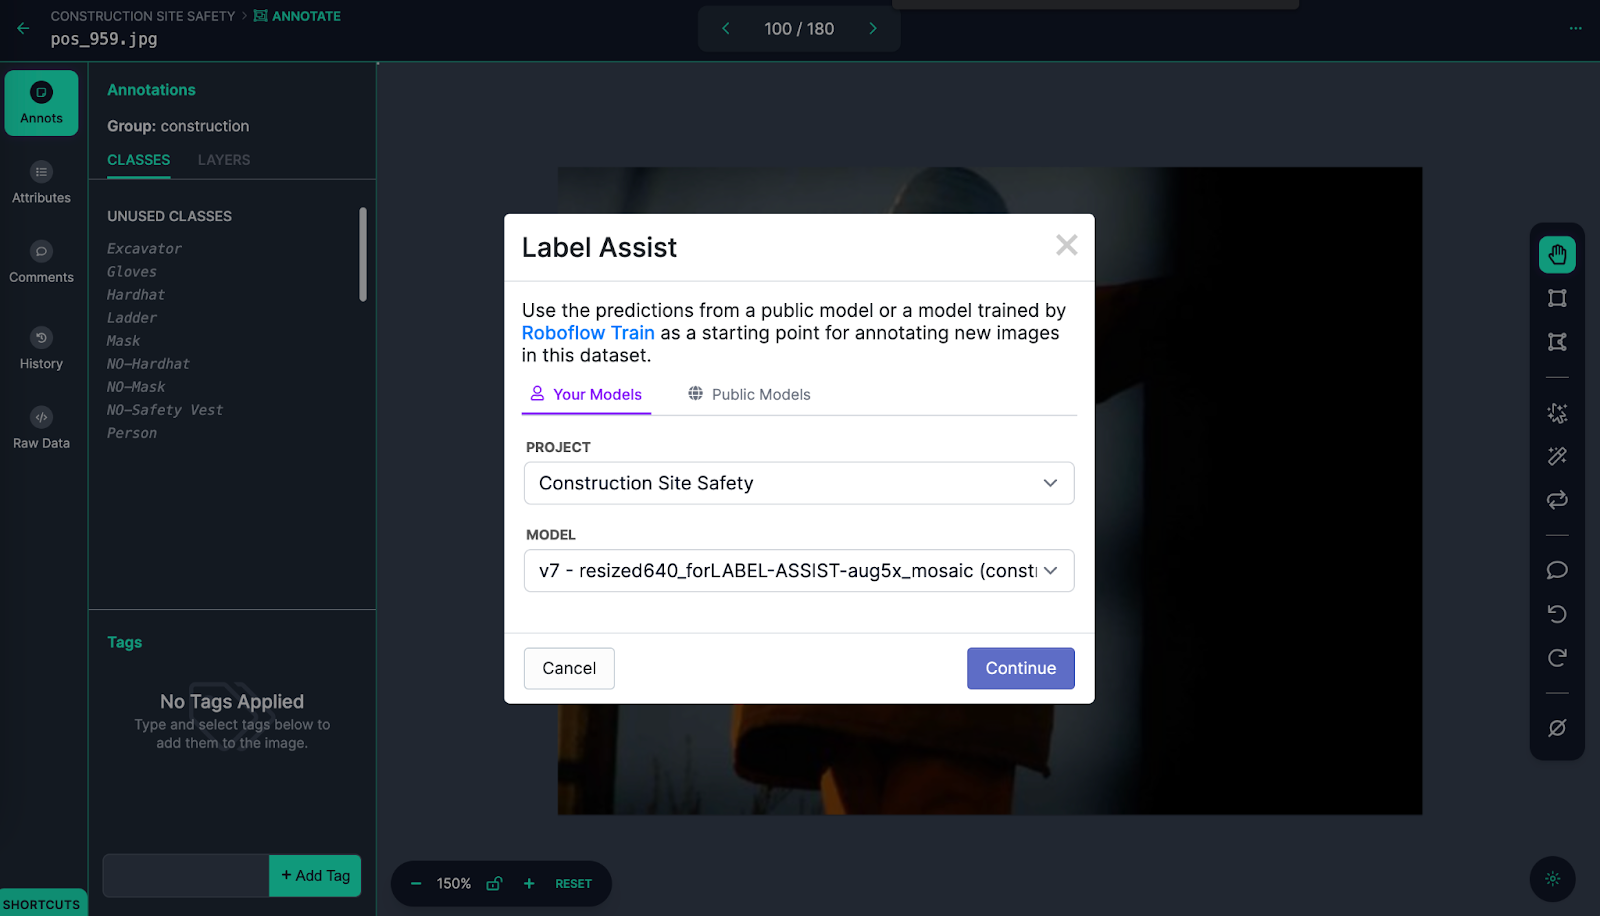
When you open new images for annotation, Label Assist will trigger and recommend annotations.
Dataset Management for YOLOv8
Roboflow provides a suite of tools for understanding computer vision datasets.
First, you can use dataset search to find images that meet a semantic text description (i.e. find all images that contain people), or that meet a specified label (i.e. the image is associated with a specific tag). To use dataset search, click "Dataset" in the sidebar. Then, input a search query using the search bar and associated filters at the top of the page.
For example, the following text query finds images that contain people in a dataset:
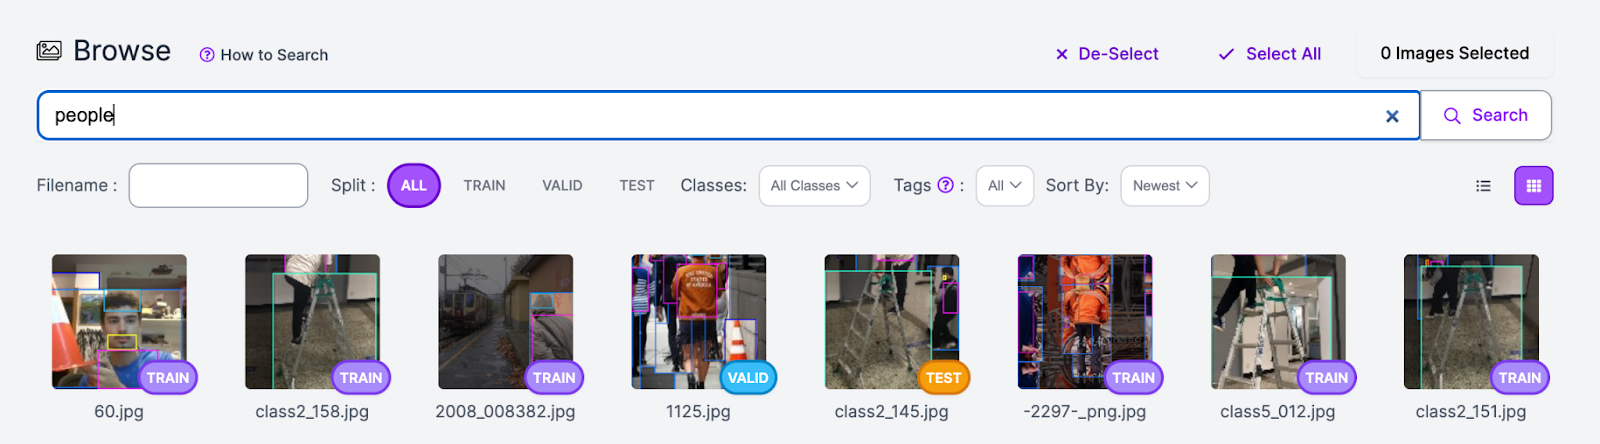
You can narrow your search to images with a particular tag using the "Tags" selector:

Before you start training a model with your dataset, we recommend using Roboflow Health Check, a web tool that provides an insight into your dataset and how you can improve the dataset prior to training a vision model.
To use Health Check, click the "Health Check" sidebar link. A list of statistics will appear that show the average size of images in your dataset, class balance, a heatmap of where annotations are in your images, and more.
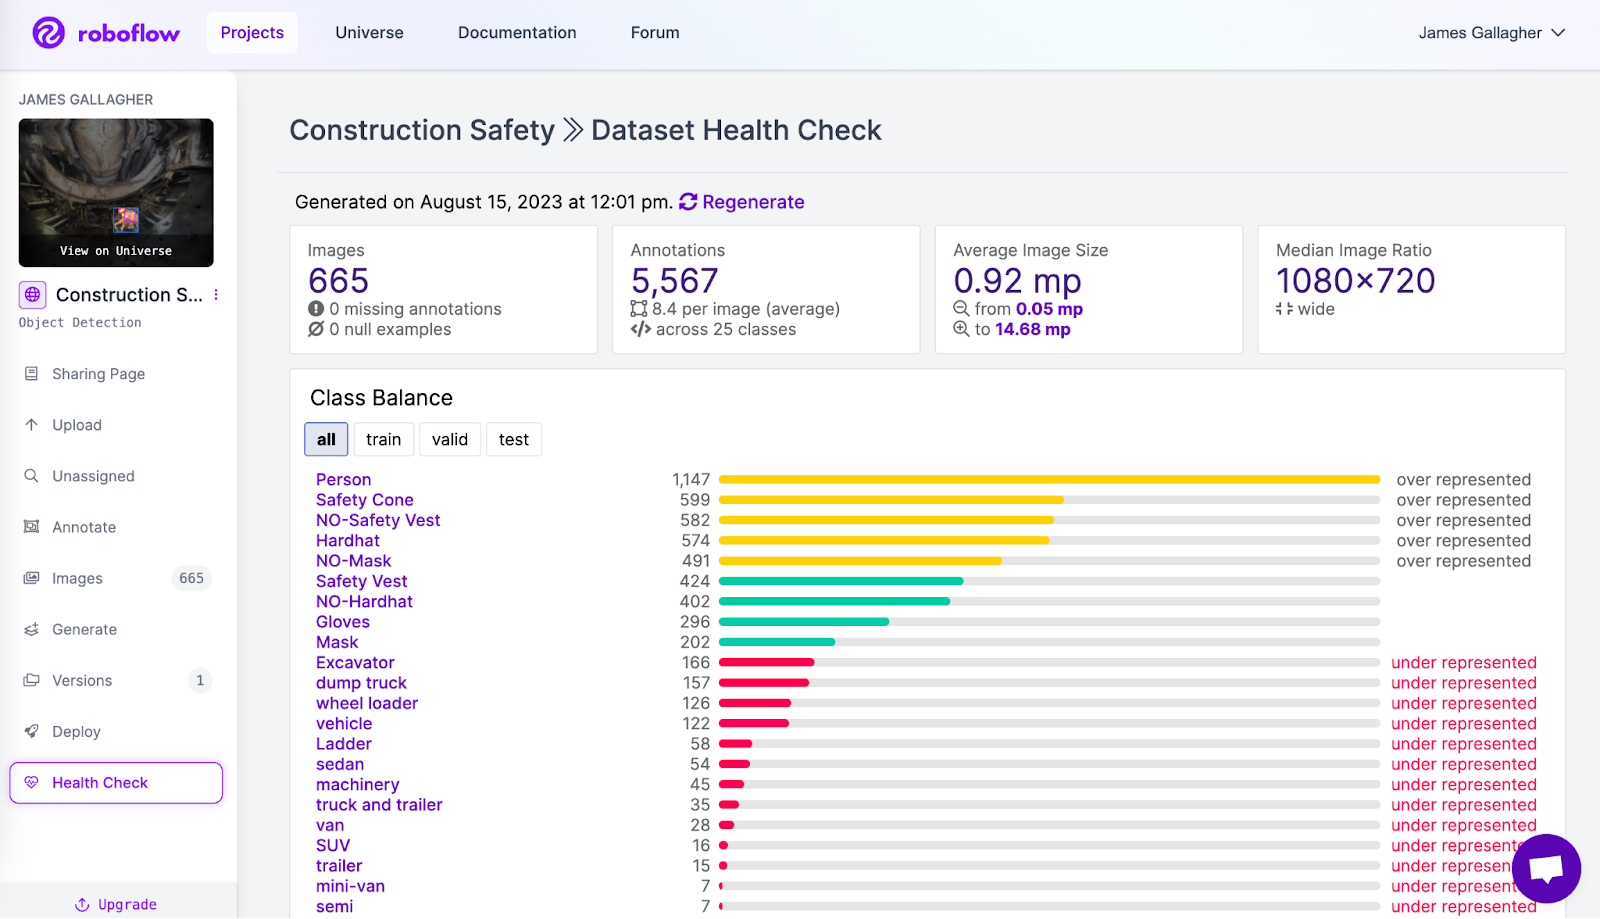
Health Check may recommend changes to help enhance dataset performance. For example, the class balance feature may show that there is an imbalance in labels that, if solved, may boost performance or your model.
Export Data in 40+ Formats for Model Training
To export your data, you will need a dataset version. A version is a state of your dataset frozen-in-time. To create a version, first click "Versions" in the sidebar. Then, click the "Create New Version" button. On this page, you will be able to choose augmentations and preprocessing steps to apply to your dataset:
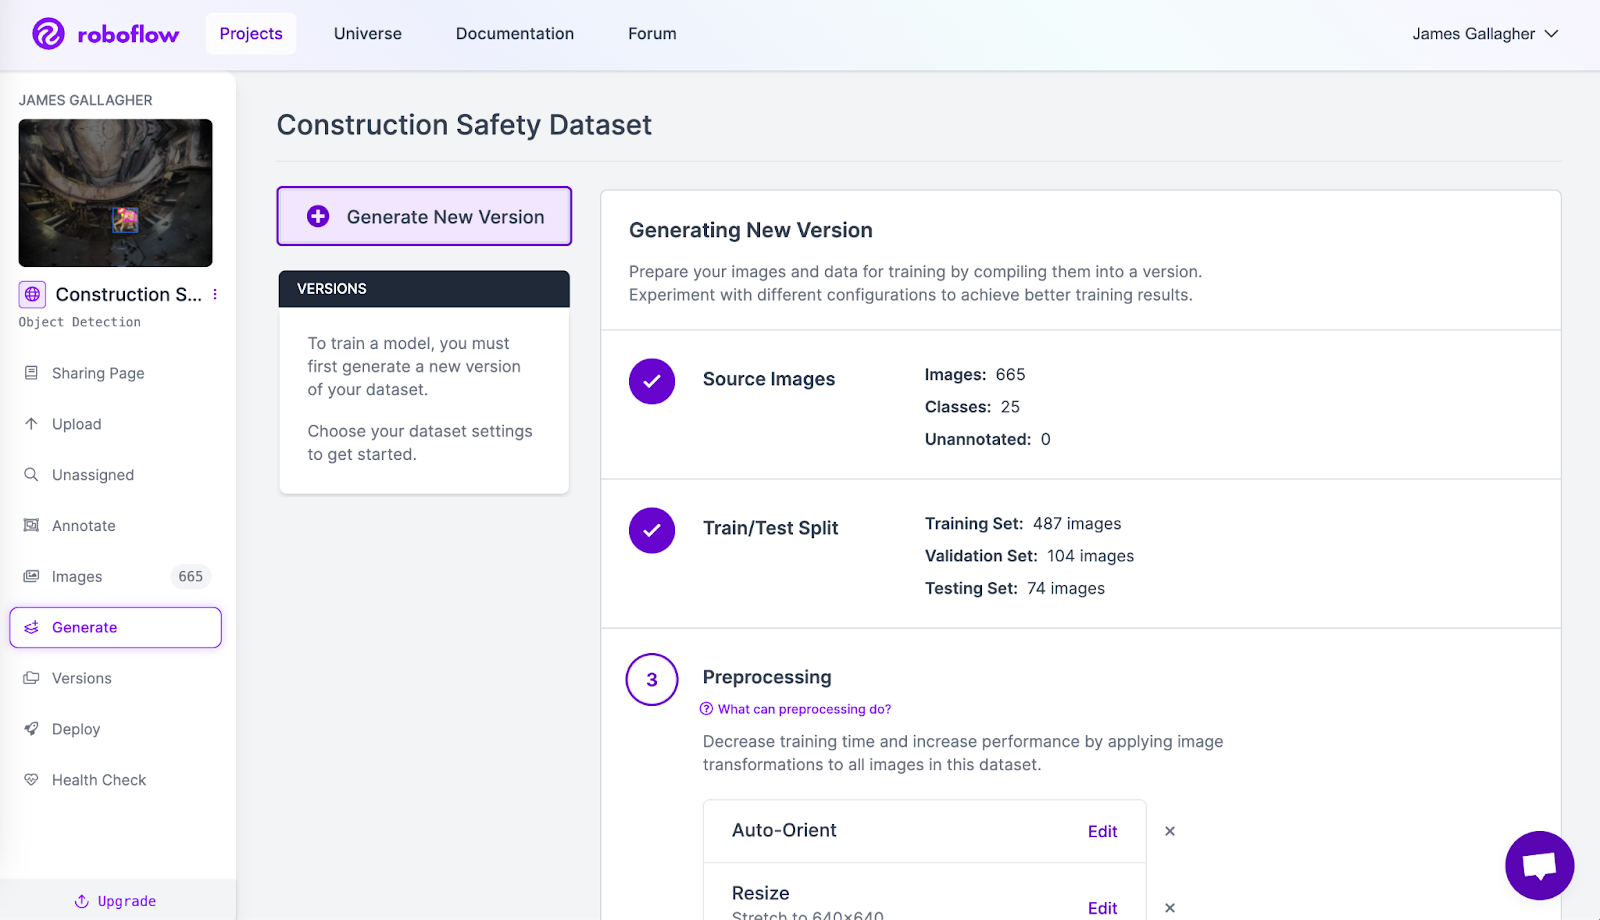
For each augmentation you select, a pop-up will appear allowing you to tune the augmentation to your needs. Here is an example of tuning a brightness augmentation within specified parameters:
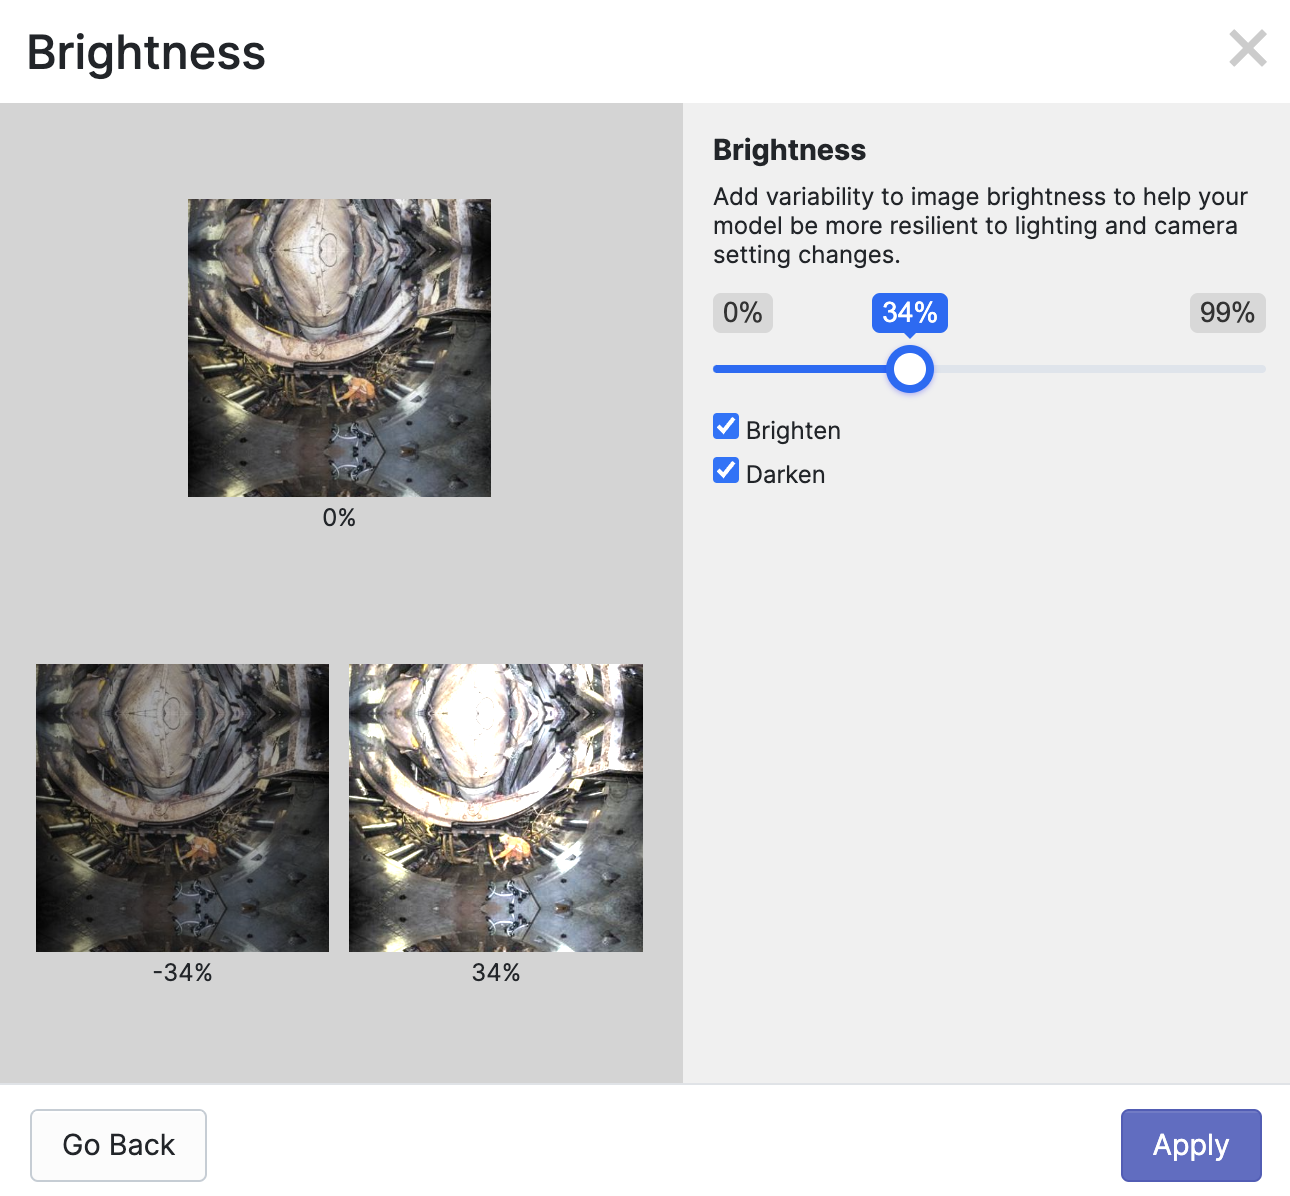
When your dataset version has been generated, you can export your data into a range of formats. Click the "Export Dataset" button on your dataset version page to export your data:
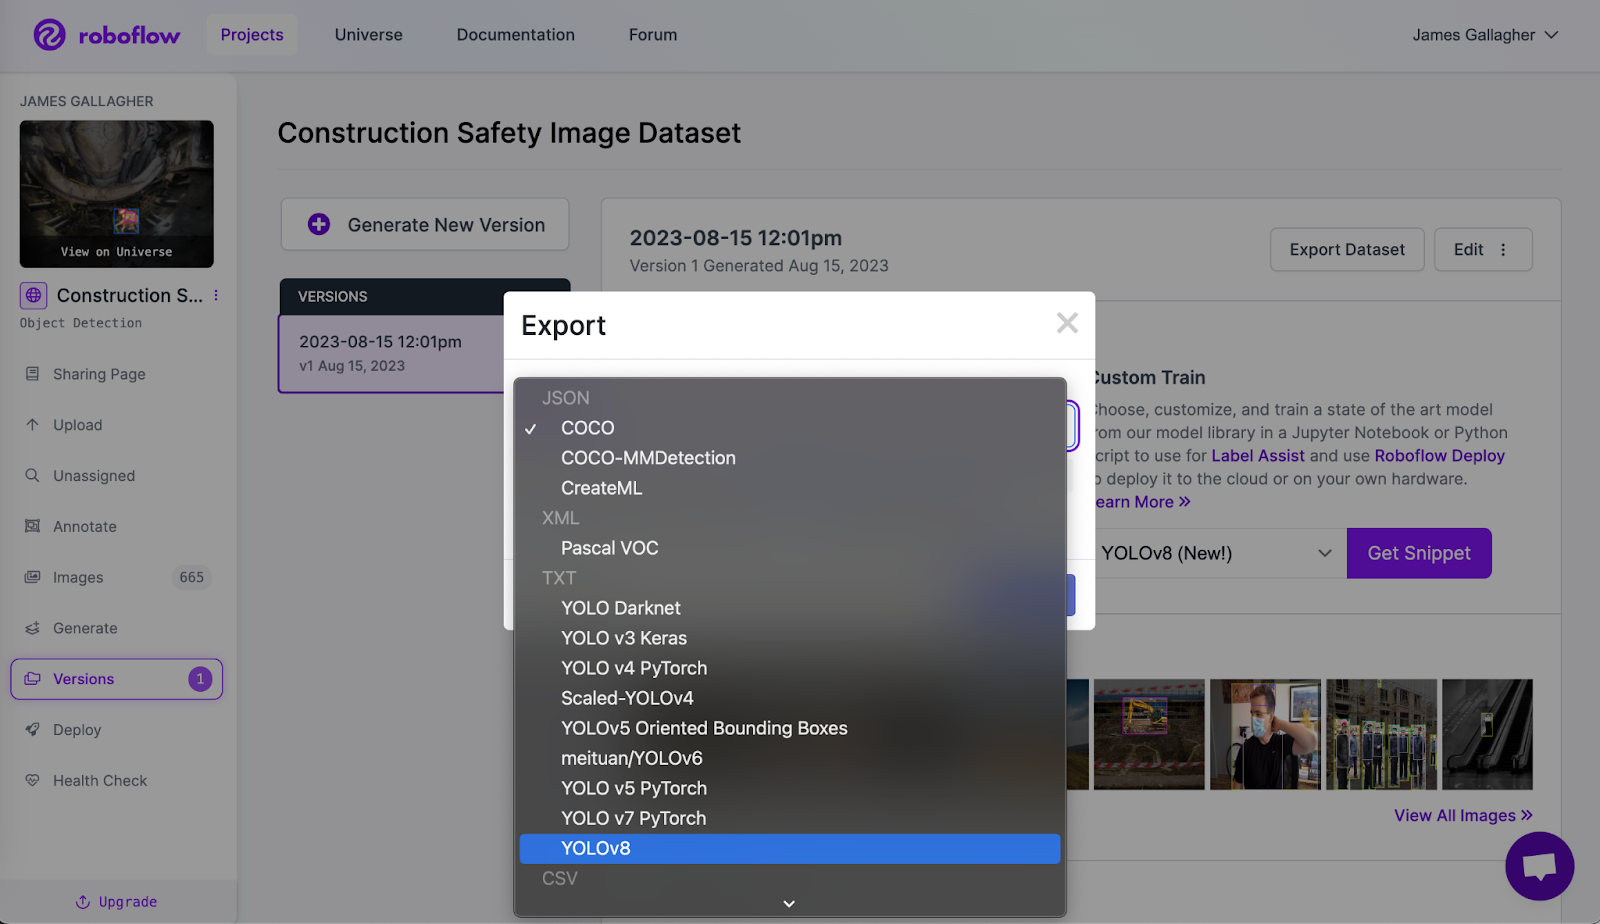
You are now ready to train YOLOv8 on a custom dataset. Follow this written guide and YouTube video for step-by-step instructions or refer to the Ultralytics documentation.
Upload Custom YOLOv8 Model Weights for Testing and Deployment
Roboflow offers an infinitely scalable API for deployed models and SDKs for use with NVIDIA Jetsons, Luxonis OAKs, Raspberry Pis, GPU-based devices, and more.
You can deploy YOLOv8 models by uploading YOLOv8 weights to Roboflow. You can do this in a few lines of Python code. Create a new Python file and add the following code:
import roboflow  # install with 'pip install roboflow'

roboflow.login()

rf = roboflow.Roboflow()

project = rf.workspace(WORKSPACE_ID).project("football-players-detection-3zvbc")
dataset = project.version(VERSION).download("yolov8")

project.version(dataset.version).deploy(model_type="yolov8", model_path=f"{HOME}/runs/detect/train/")
In this code, replace the project ID and version ID with the values for your account and project. Learn how to retrieve your Roboflow API key.
When you run the code above, you will be asked to authenticate. Then, your model will be uploaded and an API will be created for your project. This process can take up to 30 minutes to complete.
To test your model and find deployment instructions for supported SDKs, go to the "Deploy" tab in the Roboflow sidebar. At the top of this page, a widget will appear with which you can test your model. You can use your webcam for live testing or upload images or videos.
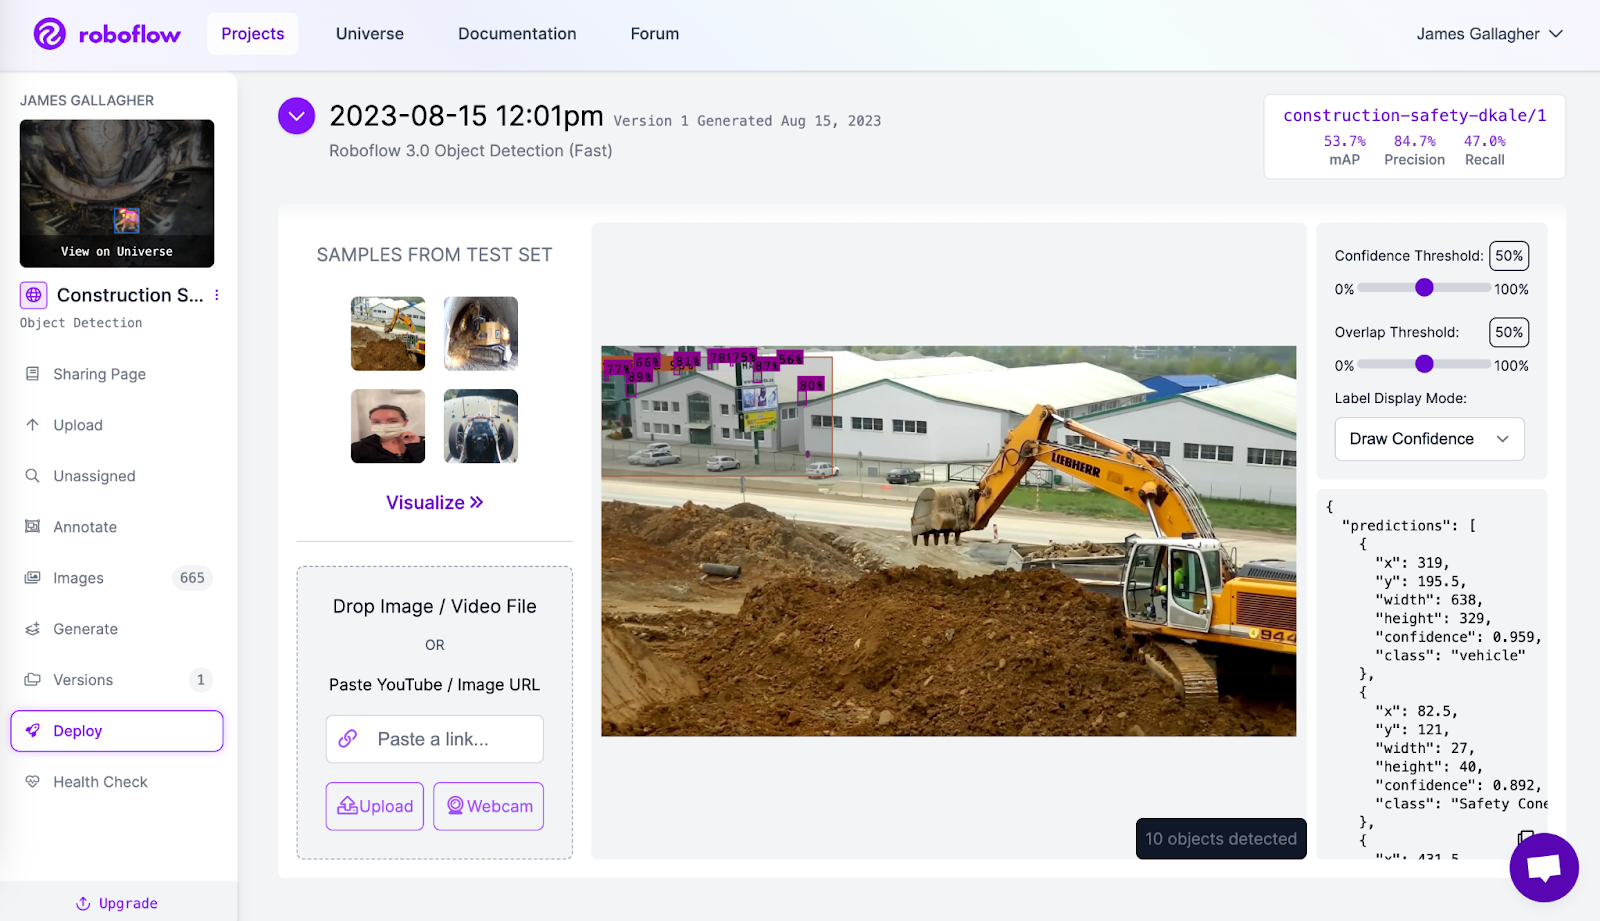
You can also use your uploaded model as a labeling assistant. This feature uses your trained model to recommend annotations on images uploaded to Roboflow.
How to Evaluate YOLOv8 Models
Roboflow provides a range of features for use in evaluating models.
Once you have uploaded a model to Roboflow, you can access our model evaluation tool, which provides a confusion matrix showing the performance of your model as well as an interactive vector analysis plot. These features can help you find opportunities to improve your model.
To access a confusion matrix, go to your model page on the Roboflow dashboard, then click "View Detailed Evaluation":

A pop-up will appear showing a confusion matrix:
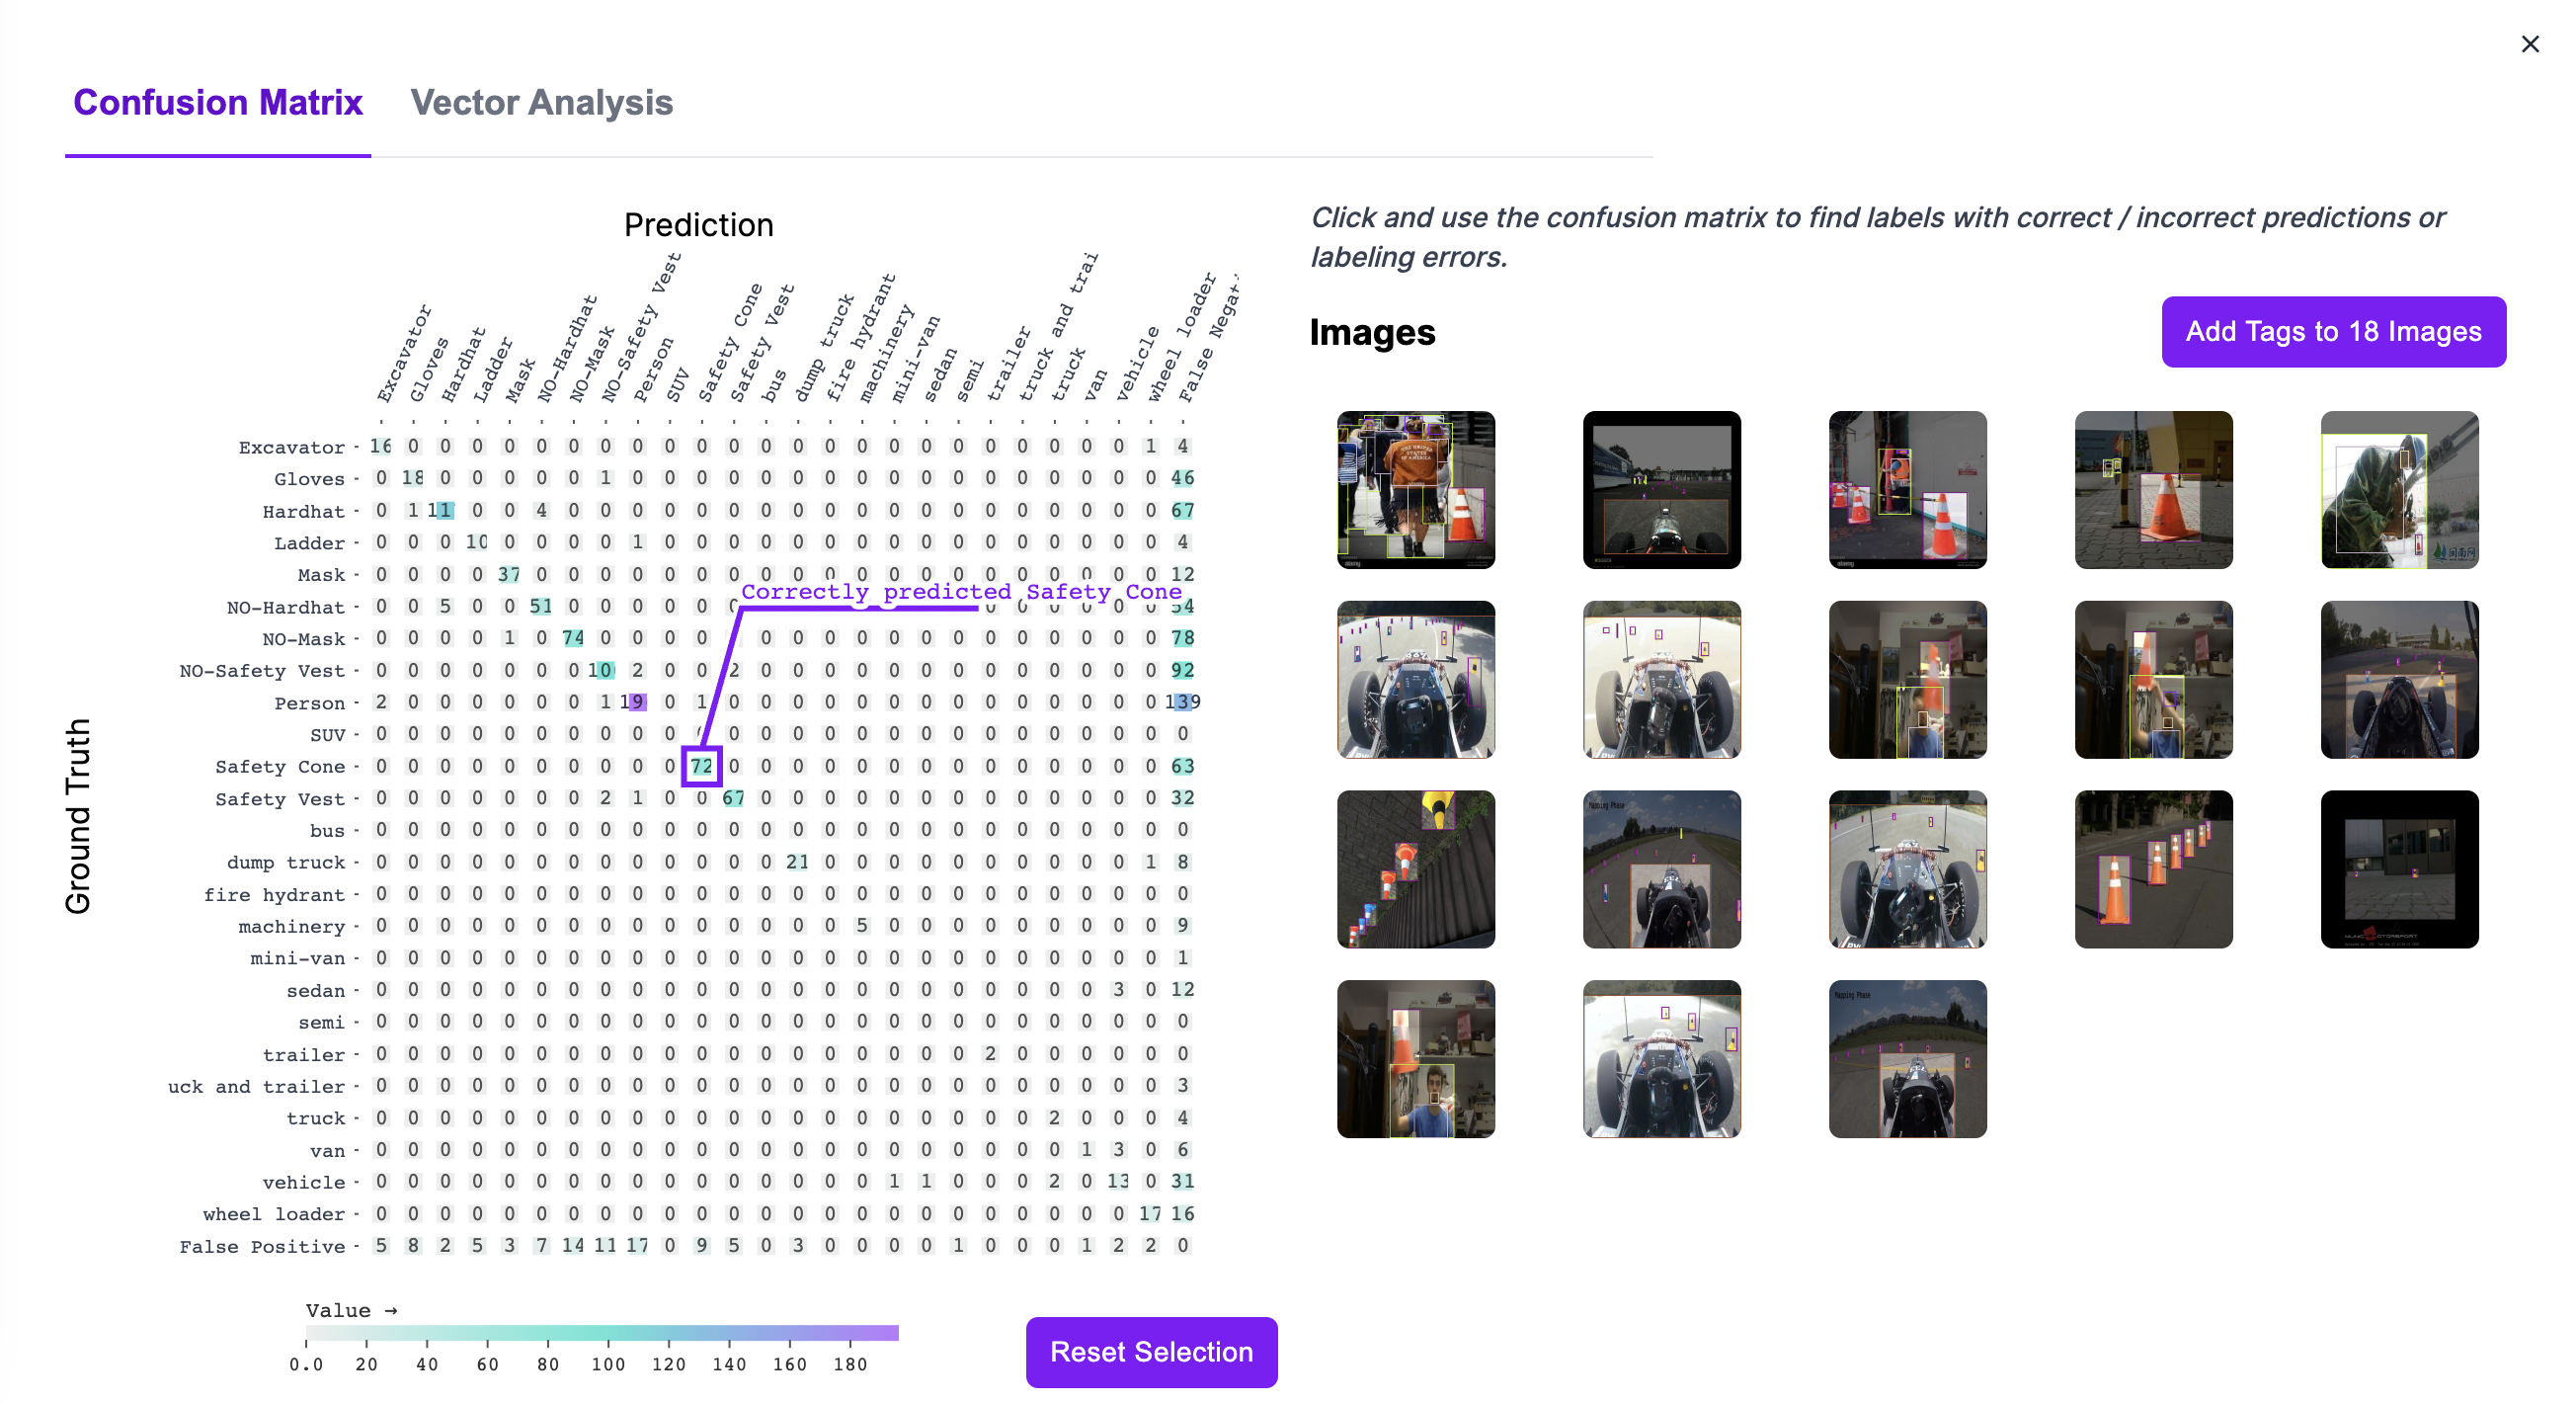
Hover over a box on the confusion matrix to see the value associated with the box. Click on a box to see images in the respective category. Click on an image to view the model predictions and ground truth data associated with that image.
For more insights, click Vector Analysis. This will show a scatter plot of the images in your dataset, calculated using CLIP. The closer images are in the plot, the more similar they are, semantically. Each image is represented as a dot with a color between white and red. The more red the dot, the worse the model performed.
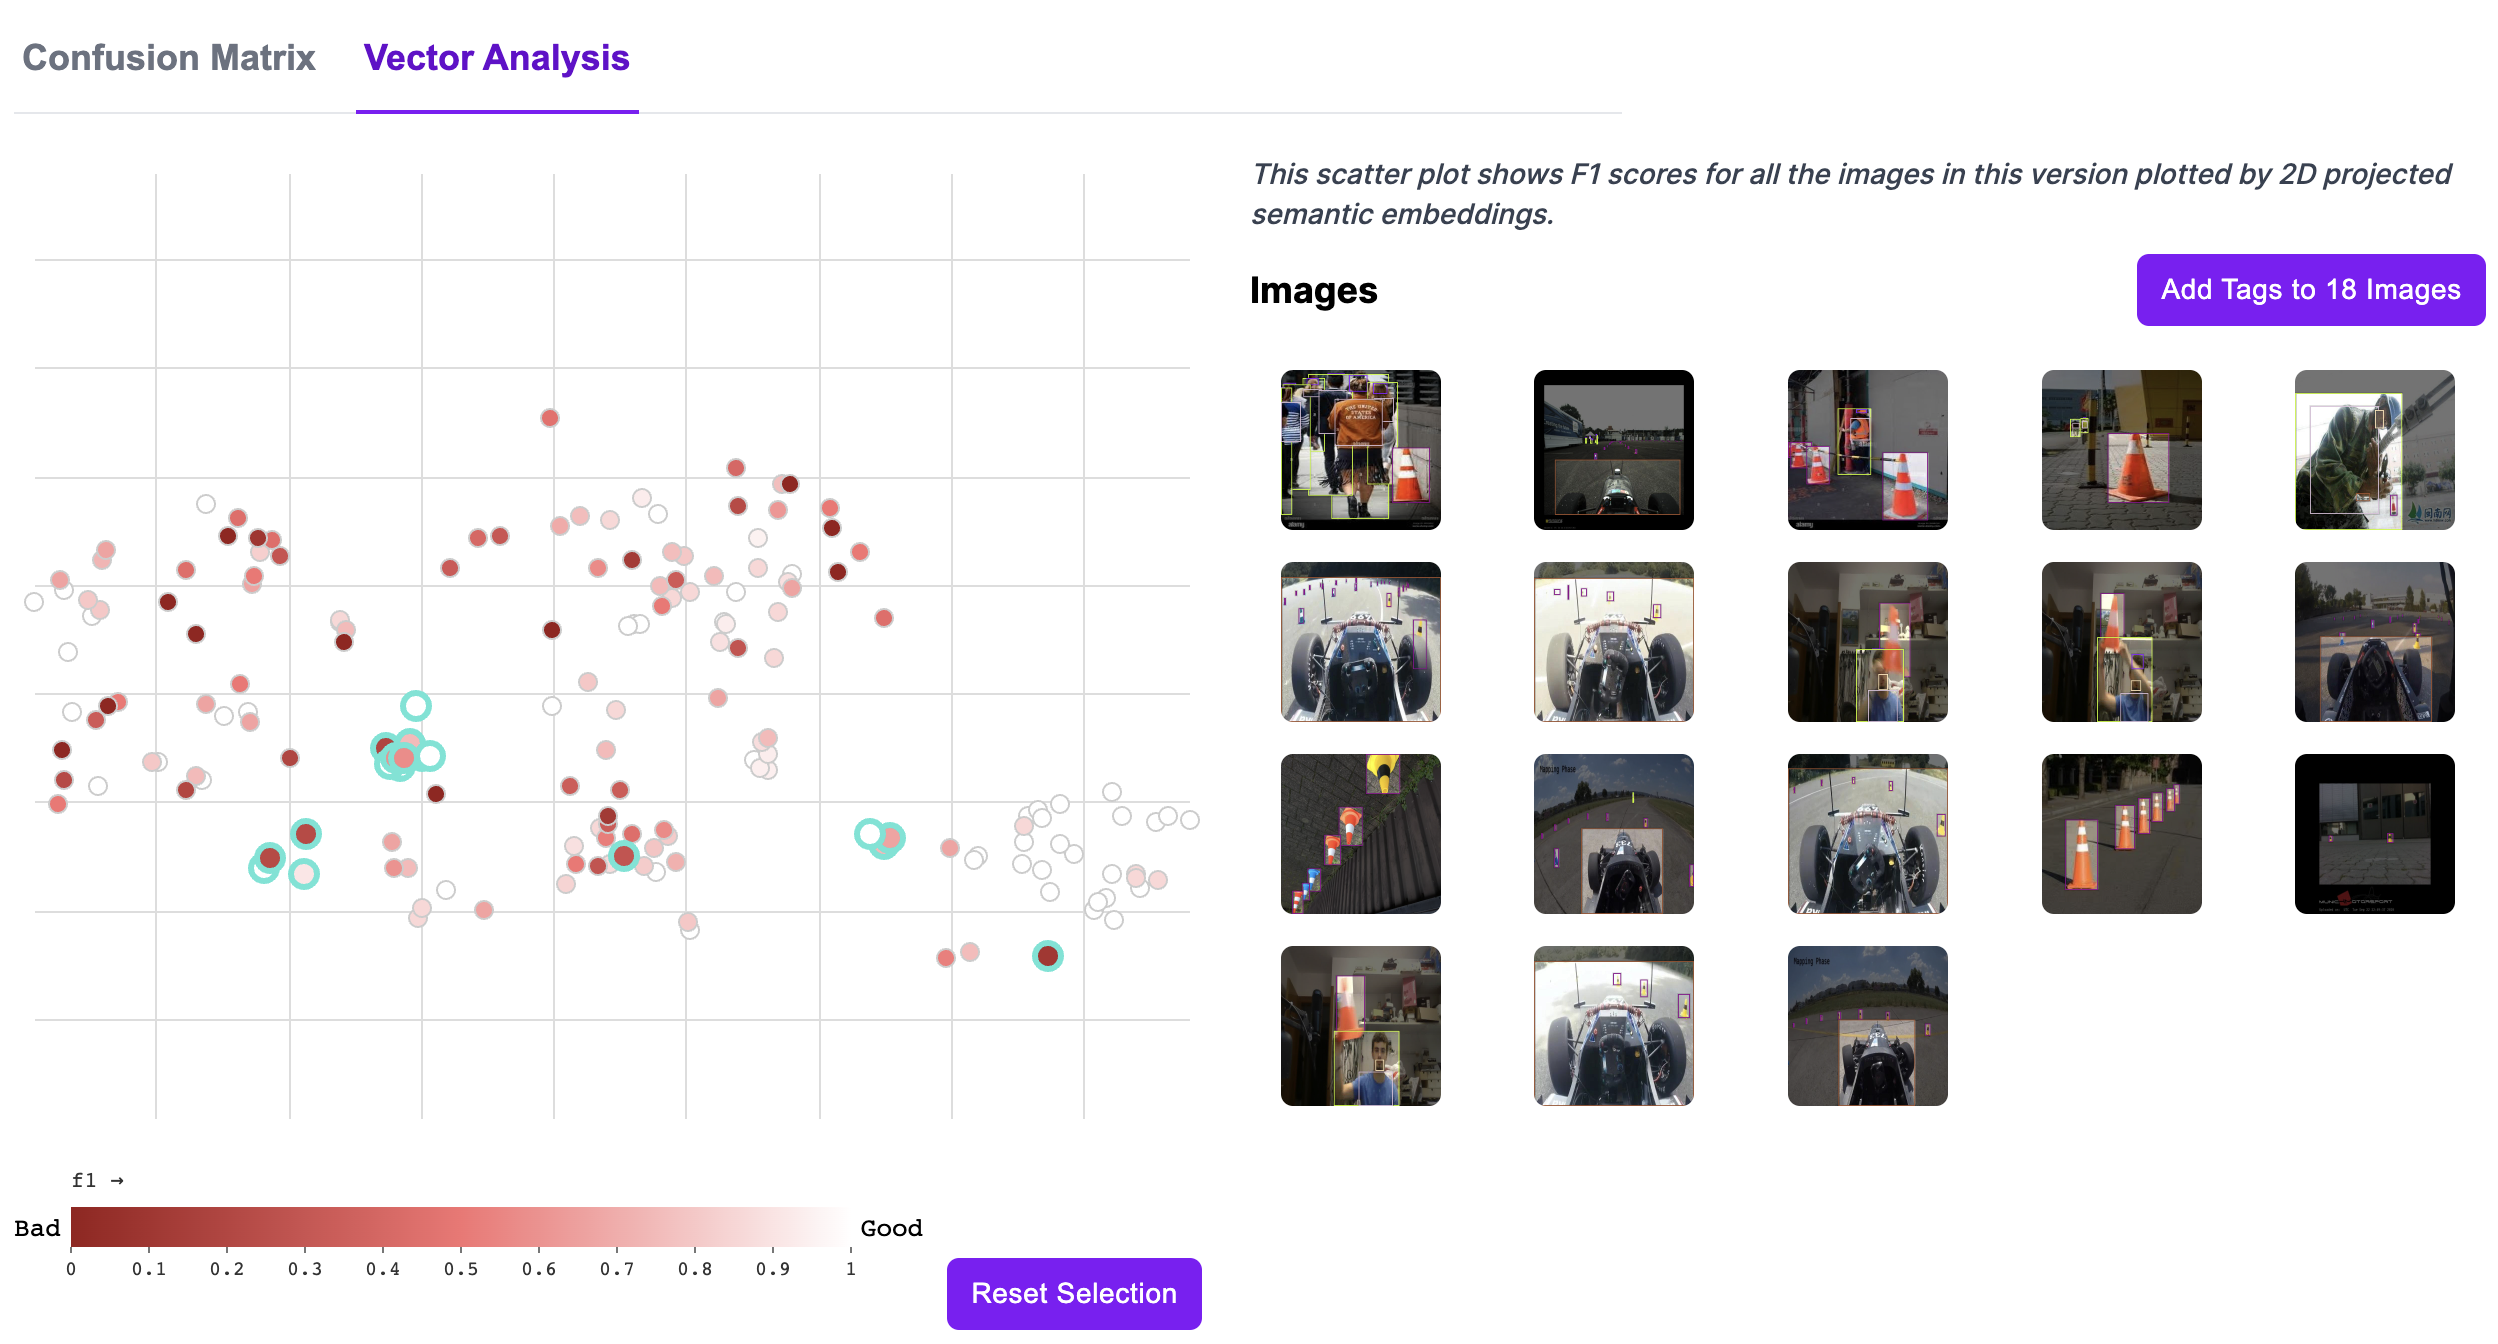
You can use Vector Analysis to:
- Find clusters of images;
- Identify clusters where the model performs poorly, and;
- Visualize commonalities between images on which the model performs poorly.
Learning Resources
Want to learn more about using Roboflow for creating YOLOv8 models? The following resources may be helpful in your work.
- Train YOLOv8 on a Custom Dataset: Follow our interactive notebook that shows you how to train a YOLOv8 model on a custom dataset.
- Autodistill: Use large foundation vision models to label data for specific models. You can label images for use in training YOLOv8 classification, detection, and segmentation models with Autodistill.
- Supervision: A Python package with helpful utilities for use in working with computer vision models. You can use supervision to filter detections, compute confusion matrices, and more, all in a few lines of Python code.
- Roboflow Blog: The Roboflow Blog features over 500 articles on computer vision, covering topics from how to train a YOLOv8 model to annotation best practices.
- Roboflow YouTube channel: Browse dozens of in-depth computer vision guides on our YouTube channel, covering topics from training YOLOv8 models to automated image labeling.
Project Showcase
Below are a few of the many pieces of feedback we have received for using YOLOv8 and Roboflow together to create computer vision models.
FAQ
How do I label data for YOLOv8 models using Roboflow?
Labeling data for YOLOv8 models using Roboflow is straightforward with Roboflow Annotate. First, create a project on Roboflow and upload your images. After uploading, select the batch of images and click "Start Annotating." You can use the B key for bounding boxes or the P key for polygons. For faster annotation, use the SAM-based label assistant by clicking the cursor icon in the sidebar. Detailed steps can be found here.
What services does Roboflow offer for collecting YOLOv8 training data?
Roboflow provides two key services for collecting YOLOv8 training data: Universe and Collect. Universe offers access to over 250,000 vision datasets, while Collect helps you gather images using a webcam and automated prompts.
How can I manage and analyze my YOLOv8 dataset using Roboflow?
Roboflow offers robust dataset management tools, including dataset search, tagging, and Health Check. Use the search feature to find images based on text descriptions or tags. Health Check provides insights into dataset quality, showing class balance, image sizes, and annotation heatmaps. This helps optimize dataset performance before training YOLOv8 models. Detailed information can be found here.
How do I export my YOLOv8 dataset from Roboflow?
To export your YOLOv8 dataset from Roboflow, you need to create a dataset version. Click "Versions" in the sidebar, then "Create New Version" and apply any desired augmentations. Once the version is generated, click "Export Dataset" and choose the YOLOv8 format. Follow this process here.
How can I integrate and deploy YOLOv8 models with Roboflow?
Integrate and deploy YOLOv8 models on Roboflow by uploading your YOLOv8 weights through a few lines of Python code. Use the provided script to authenticate and upload your model, which will create an API for deployment. For details on the script and further instructions, see this section.
What tools does Roboflow provide for evaluating YOLOv8 models?
Roboflow offers model evaluation tools, including a confusion matrix and vector analysis plots. Access these tools from the "View Detailed Evaluation" button on your model page. These features help identify model performance issues and find areas for improvement. For more information, refer to this section.


 浙公网安备 33010602011771号