
Yolov8-源码解析-十二-
Yolov8 源码解析(十二)
comments: true
description: Learn to simplify the logging of YOLOv8 training with Comet ML. This guide covers installation, setup, real-time insights, and custom logging.
keywords: YOLOv8, Comet ML, logging, machine learning, training, model checkpoints, metrics, installation, configuration, real-time insights, custom logging
Elevating YOLOv8 Training: Simplify Your Logging Process with Comet ML
Logging key training details such as parameters, metrics, image predictions, and model checkpoints is essential in machine learning—it keeps your project transparent, your progress measurable, and your results repeatable.
Ultralytics YOLOv8 seamlessly integrates with Comet ML, efficiently capturing and optimizing every aspect of your YOLOv8 object detection model's training process. In this guide, we'll cover the installation process, Comet ML setup, real-time insights, custom logging, and offline usage, ensuring that your YOLOv8 training is thoroughly documented and fine-tuned for outstanding results.
Comet ML

Comet ML is a platform for tracking, comparing, explaining, and optimizing machine learning models and experiments. It allows you to log metrics, parameters, media, and more during your model training and monitor your experiments through an aesthetically pleasing web interface. Comet ML helps data scientists iterate more rapidly, enhances transparency and reproducibility, and aids in the development of production models.
Harnessing the Power of YOLOv8 and Comet ML
By combining Ultralytics YOLOv8 with Comet ML, you unlock a range of benefits. These include simplified experiment management, real-time insights for quick adjustments, flexible and tailored logging options, and the ability to log experiments offline when internet access is limited. This integration empowers you to make data-driven decisions, analyze performance metrics, and achieve exceptional results.
Installation
To install the required packages, run:
!!! Tip "Installation"
=== "CLI"

    ```py
    # Install the required packages for YOLOv8 and Comet ML
    pip install ultralytics comet_ml torch torchvision
    ```
Configuring Comet ML
After installing the required packages, you'll need to sign up, get a Comet API Key, and configure it.
!!! Tip "Configuring Comet ML"
=== "CLI"

    ```py
    # Set your Comet Api Key
    export COMET_API_KEY=<Your API Key>
    ```
Then, you can initialize your Comet project. Comet will automatically detect the API key and proceed with the setup.
import comet_ml

comet_ml.login(project_name="comet-example-yolov8-coco128")
If you are using a Google Colab notebook, the code above will prompt you to enter your API key for initialization.
Usage
Before diving into the usage instructions, be sure to check out the range of YOLOv8 models offered by Ultralytics. This will help you choose the most appropriate model for your project requirements.
!!! Example "Usage"
=== "Python"

    ```py
    from ultralytics import YOLO

    # Load a model
    model = YOLO("yolov8n.pt")

    # Train the model
    results = model.train(
        data="coco8.yaml",
        project="comet-example-yolov8-coco128",
        batch=32,
        save_period=1,
        save_json=True,
        epochs=3,
    )
    ```
After running the training code, Comet ML will create an experiment in your Comet workspace to track the run automatically. You will then be provided with a link to view the detailed logging of your YOLOv8 model's training process.
Comet automatically logs the following data with no additional configuration: metrics such as mAP and loss, hyperparameters, model checkpoints, interactive confusion matrix, and image bounding box predictions.
Understanding Your Model's Performance with Comet ML Visualizations
Let's dive into what you'll see on the Comet ML dashboard once your YOLOv8 model begins training. The dashboard is where all the action happens, presenting a range of automatically logged information through visuals and statistics. Here's a quick tour:
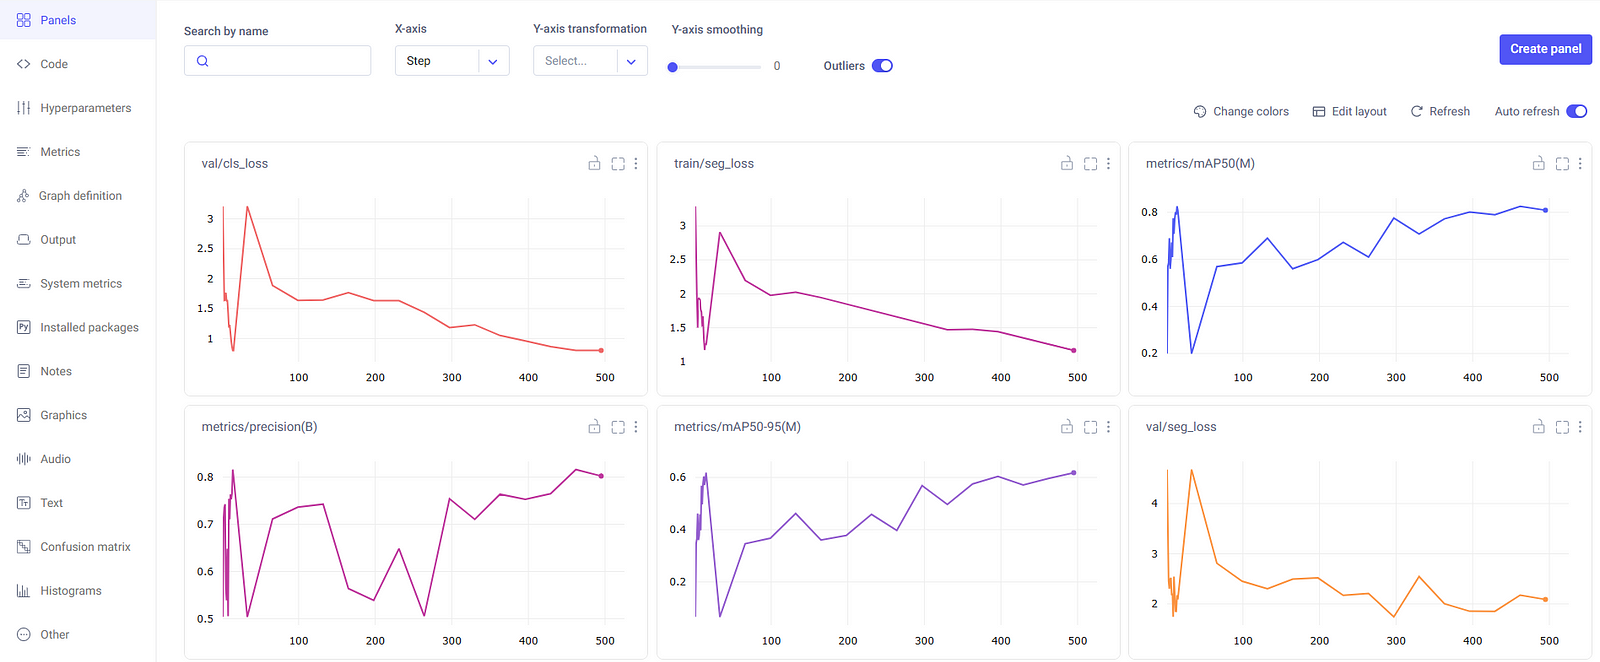
Experiment Panels
The experiment panels section of the Comet ML dashboard organize and present the different runs and their metrics, such as segment mask loss, class loss, precision, and mean average precision.
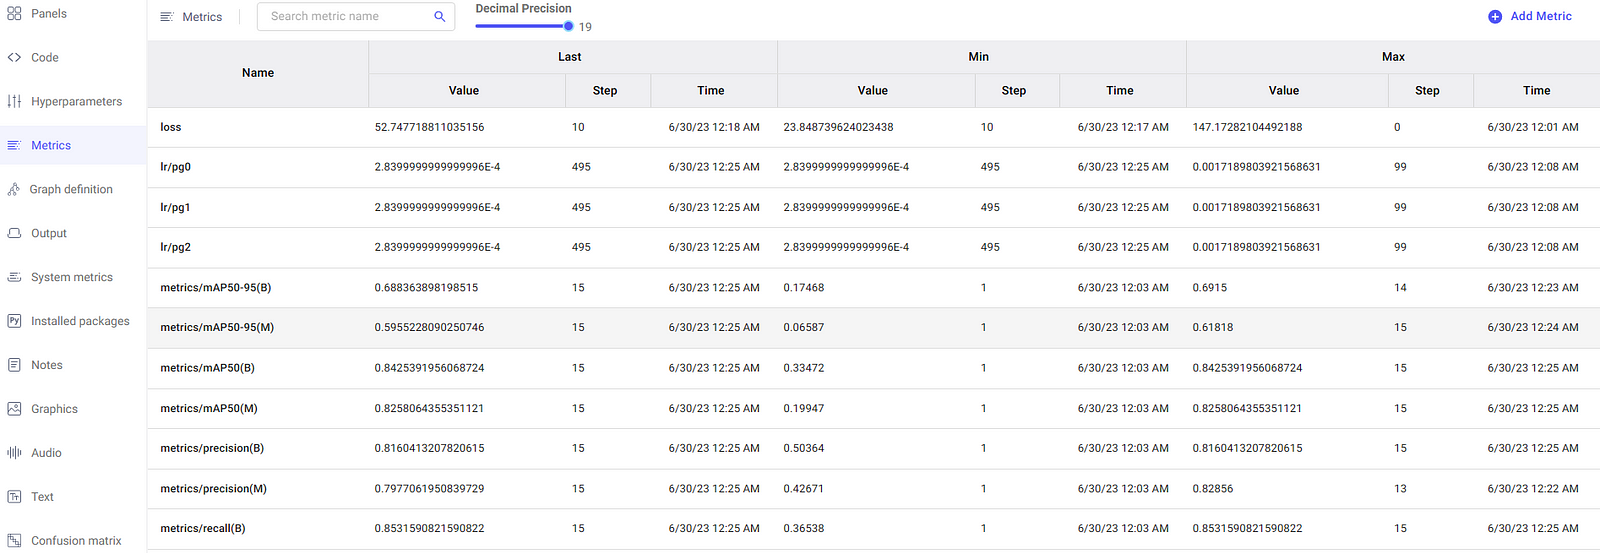
Metrics
In the metrics section, you have the option to examine the metrics in a tabular format as well, which is displayed in a dedicated pane as illustrated here.
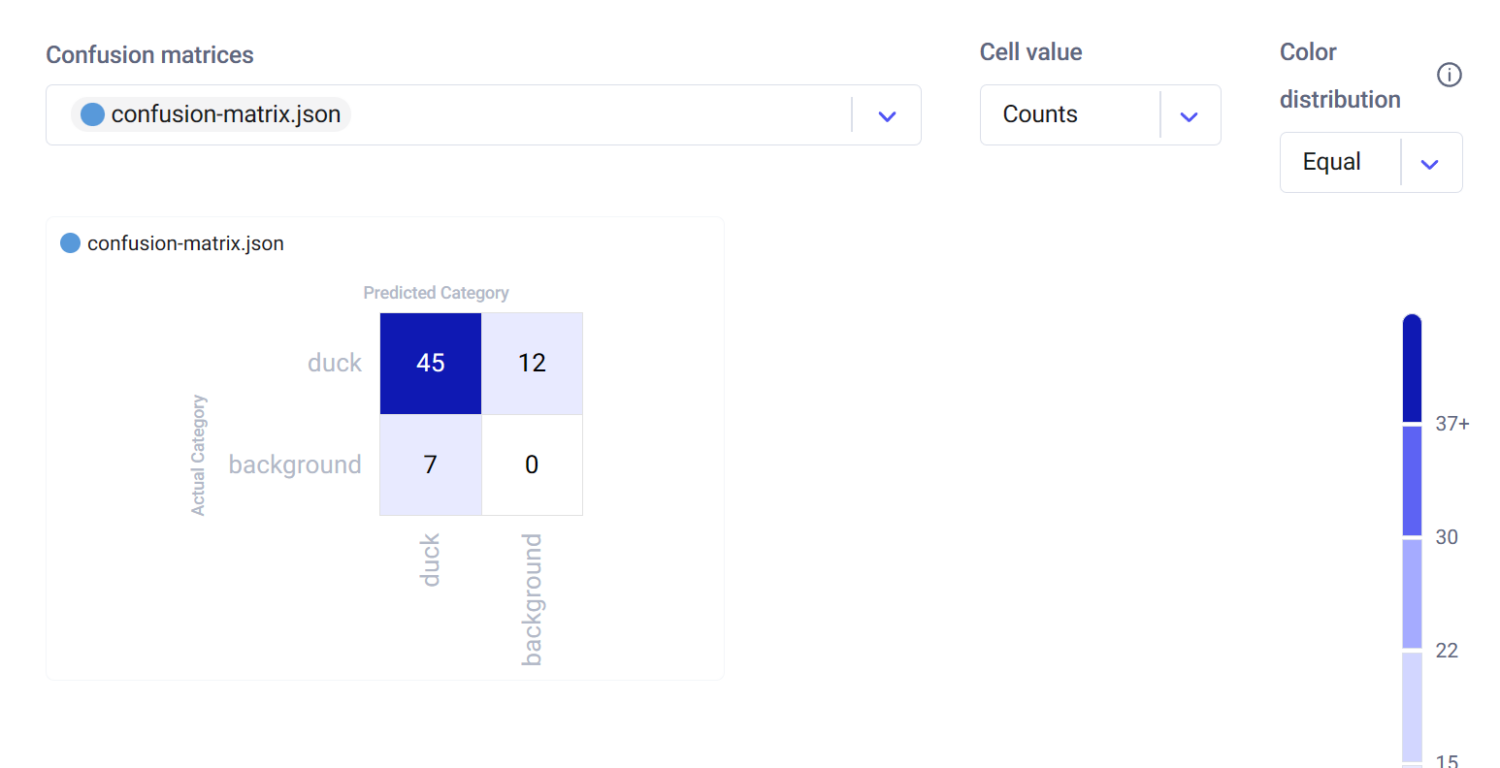
Interactive Confusion Matrix
The confusion matrix, found in the Confusion Matrix tab, provides an interactive way to assess the model's classification accuracy. It details the correct and incorrect predictions, allowing you to understand the model's strengths and weaknesses.
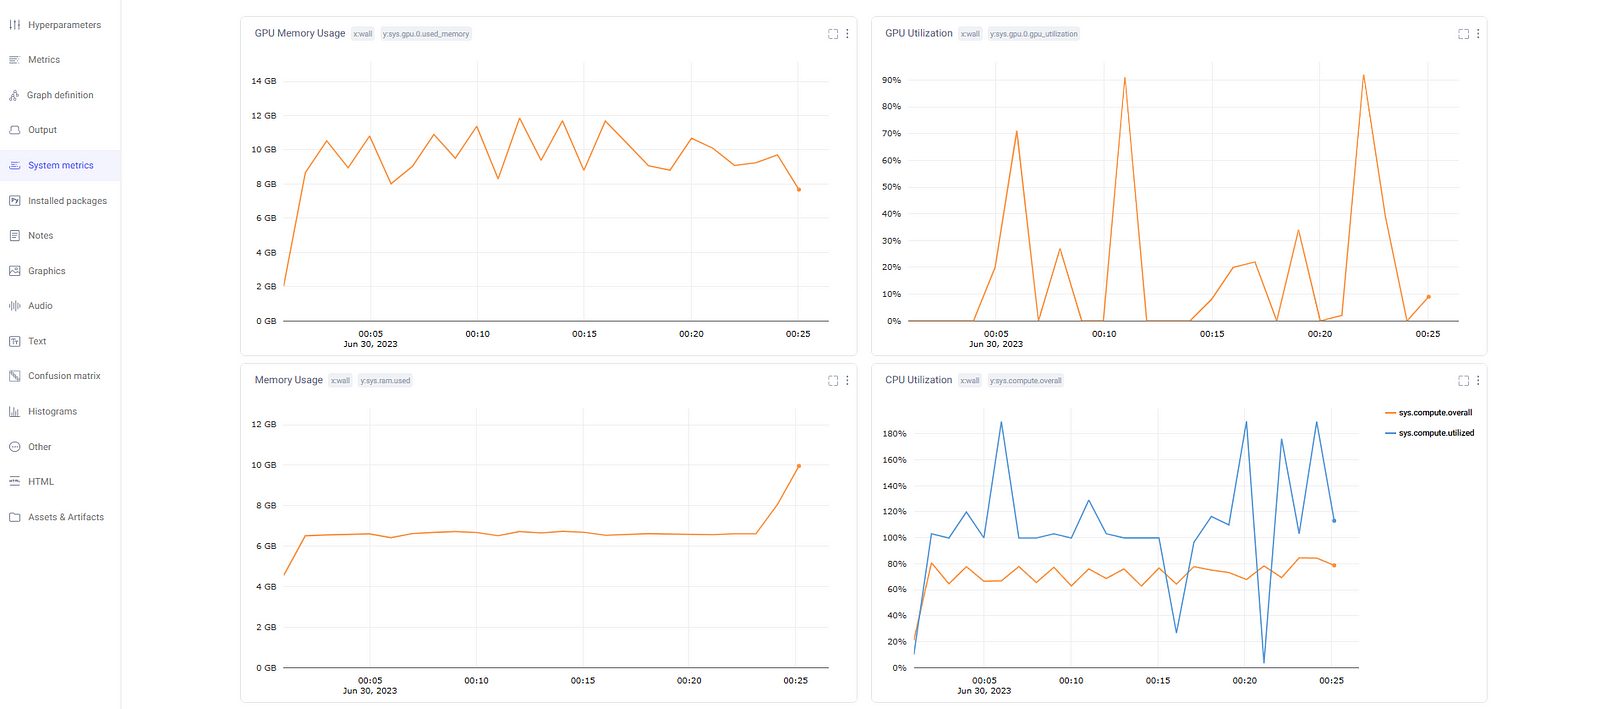
System Metrics
Comet ML logs system metrics to help identify any bottlenecks in the training process. It includes metrics such as GPU utilization, GPU memory usage, CPU utilization, and RAM usage. These are essential for monitoring the efficiency of resource usage during model training.
Customizing Comet ML Logging
Comet ML offers the flexibility to customize its logging behavior by setting environment variables. These configurations allow you to tailor Comet ML to your specific needs and preferences. Here are some helpful customization options:
Logging Image Predictions
You can control the number of image predictions that Comet ML logs during your experiments. By default, Comet ML logs 100 image predictions from the validation set. However, you can change this number to better suit your requirements. For example, to log 200 image predictions, use the following code:
import os

os.environ["COMET_MAX_IMAGE_PREDICTIONS"] = "200"
Batch Logging Interval
Comet ML allows you to specify how often batches of image predictions are logged. The COMET_EVAL_BATCH_LOGGING_INTERVAL environment variable controls this frequency. The default setting is 1, which logs predictions from every validation batch. You can adjust this value to log predictions at a different interval. For instance, setting it to 4 will log predictions from every fourth batch.
import os

os.environ["COMET_EVAL_BATCH_LOGGING_INTERVAL"] = "4"
Disabling Confusion Matrix Logging
In some cases, you may not want to log the confusion matrix from your validation set after every epoch. You can disable this feature by setting the COMET_EVAL_LOG_CONFUSION_MATRIX environment variable to "false." The confusion matrix will only be logged once, after the training is completed.
import os

os.environ["COMET_EVAL_LOG_CONFUSION_MATRIX"] = "false"
Offline Logging
If you find yourself in a situation where internet access is limited, Comet ML provides an offline logging option. You can set the COMET_MODE environment variable to "offline" to enable this feature. Your experiment data will be saved locally in a directory that you can later upload to Comet ML when internet connectivity is available.
import os

os.environ["COMET_MODE"] = "offline"
Summary
This guide has walked you through integrating Comet ML with Ultralytics' YOLOv8. From installation to customization, you've learned to streamline experiment management, gain real-time insights, and adapt logging to your project's needs.
Explore Comet ML's official documentation for more insights on integrating with YOLOv8.
Furthermore, if you're looking to dive deeper into the practical applications of YOLOv8, specifically for image segmentation tasks, this detailed guide on fine-tuning YOLOv8 with Comet ML offers valuable insights and step-by-step instructions to enhance your model's performance.
Additionally, to explore other exciting integrations with Ultralytics, check out the integration guide page, which offers a wealth of resources and information.
FAQ
How do I integrate Comet ML with Ultralytics YOLOv8 for training?
To integrate Comet ML with Ultralytics YOLOv8, follow these steps:
-
Install the required packages:
pip install ultralytics comet_ml torch torchvision -
Set up your Comet API Key:
export COMET_API_KEY=<Your API Key> -
Initialize your Comet project in your Python code:
import comet_ml comet_ml.login(project_name="comet-example-yolov8-coco128") -
Train your YOLOv8 model and log metrics:
from ultralytics import YOLO

model = YOLO("yolov8n.pt")
results = model.train(
    data="coco8.yaml",
    project="comet-example-yolov8-coco128",
    batch=32,
    save_period=1,
    save_json=True,
    epochs=3,
)
For more detailed instructions, refer to the Comet ML configuration section.
What are the benefits of using Comet ML with YOLOv8?
By integrating Ultralytics YOLOv8 with Comet ML, you can:
- Monitor real-time insights: Get instant feedback on your training results, allowing for quick adjustments.
- Log extensive metrics: Automatically capture essential metrics such as mAP, loss, hyperparameters, and model checkpoints.
- Track experiments offline: Log your training runs locally when internet access is unavailable.
- Compare different training runs: Use the interactive Comet ML dashboard to analyze and compare multiple experiments.
By leveraging these features, you can optimize your machine learning workflows for better performance and reproducibility. For more information, visit the Comet ML integration guide.
How do I customize the logging behavior of Comet ML during YOLOv8 training?
Comet ML allows for extensive customization of its logging behavior using environment variables:
-
Change the number of image predictions logged:
import os os.environ["COMET_MAX_IMAGE_PREDICTIONS"] = "200" -
Adjust batch logging interval:
import os os.environ["COMET_EVAL_BATCH_LOGGING_INTERVAL"] = "4" -
Disable confusion matrix logging:
import os

os.environ["COMET_EVAL_LOG_CONFUSION_MATRIX"] = "false"
Refer to the Customizing Comet ML Logging section for more customization options.
How do I view detailed metrics and visualizations of my YOLOv8 training on Comet ML?
Once your YOLOv8 model starts training, you can access a wide range of metrics and visualizations on the Comet ML dashboard. Key features include:
- Experiment Panels: View different runs and their metrics, including segment mask loss, class loss, and mean average precision.
- Metrics: Examine metrics in tabular format for detailed analysis.
- Interactive Confusion Matrix: Assess classification accuracy with an interactive confusion matrix.
- System Metrics: Monitor GPU and CPU utilization, memory usage, and other system metrics.
For a detailed overview of these features, visit the Understanding Your Model's Performance with Comet ML Visualizations section.
Can I use Comet ML for offline logging when training YOLOv8 models?
Yes, you can enable offline logging in Comet ML by setting the COMET_MODE environment variable to "offline":
import os

os.environ["COMET_MODE"] = "offline"
This feature allows you to log your experiment data locally, which can later be uploaded to Comet ML when internet connectivity is available. This is particularly useful when working in environments with limited internet access. For more details, refer to the Offline Logging section.
comments: true
description: Learn how to export YOLOv8 models to CoreML for optimized, on-device machine learning on iOS and macOS. Follow step-by-step instructions.
keywords: CoreML export, YOLOv8 models, CoreML conversion, Ultralytics, iOS object detection, macOS machine learning, AI deployment, machine learning integration
CoreML Export for YOLOv8 Models
Deploying computer vision models on Apple devices like iPhones and Macs requires a format that ensures seamless performance.
The CoreML export format allows you to optimize your Ultralytics YOLOv8 models for efficient object detection in iOS and macOS applications. In this guide, we'll walk you through the steps for converting your models to the CoreML format, making it easier for your models to perform well on Apple devices.
CoreML
CoreML is Apple's foundational machine learning framework that builds upon Accelerate, BNNS, and Metal Performance Shaders. It provides a machine-learning model format that seamlessly integrates into iOS applications and supports tasks such as image analysis, natural language processing, audio-to-text conversion, and sound analysis.
Applications can take advantage of Core ML without the need to have a network connection or API calls because the Core ML framework works using on-device computing. This means model inference can be performed locally on the user's device.
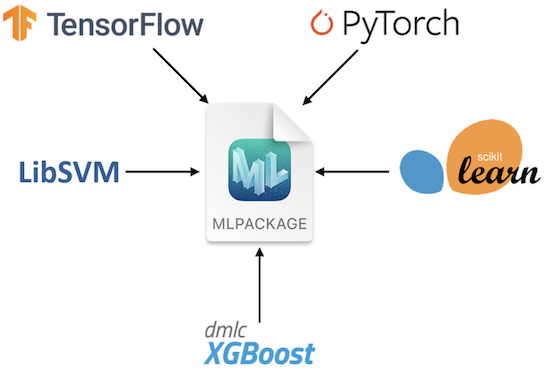
Key Features of CoreML Models
Apple's CoreML framework offers robust features for on-device machine learning. Here are the key features that make CoreML a powerful tool for developers:
- Comprehensive Model Support: Converts and runs models from popular frameworks like TensorFlow, PyTorch, scikit-learn, XGBoost, and LibSVM.
-
On-device Machine Learning: Ensures data privacy and swift processing by executing models directly on the user's device, eliminating the need for network connectivity.
-
Performance and Optimization: Uses the device's CPU, GPU, and Neural Engine for optimal performance with minimal power and memory usage. Offers tools for model compression and optimization while maintaining accuracy.
-
Ease of Integration: Provides a unified format for various model types and a user-friendly API for seamless integration into apps. Supports domain-specific tasks through frameworks like Vision and Natural Language.
-
Advanced Features: Includes on-device training capabilities for personalized experiences, asynchronous predictions for interactive ML experiences, and model inspection and validation tools.
CoreML Deployment Options
Before we look at the code for exporting YOLOv8 models to the CoreML format, let's understand where CoreML models are usually used.
CoreML offers various deployment options for machine learning models, including:
-
On-Device Deployment: This method directly integrates CoreML models into your iOS app. It's particularly advantageous for ensuring low latency, enhanced privacy (since data remains on the device), and offline functionality. This approach, however, may be limited by the device's hardware capabilities, especially for larger and more complex models. On-device deployment can be executed in the following two ways.
-
Embedded Models: These models are included in the app bundle and are immediately accessible. They are ideal for small models that do not require frequent updates.
-
Downloaded Models: These models are fetched from a server as needed. This approach is suitable for larger models or those needing regular updates. It helps keep the app bundle size smaller.
-
-
Cloud-Based Deployment: CoreML models are hosted on servers and accessed by the iOS app through API requests. This scalable and flexible option enables easy model updates without app revisions. It's ideal for complex models or large-scale apps requiring regular updates. However, it does require an internet connection and may pose latency and security issues.
Exporting YOLOv8 Models to CoreML
Exporting YOLOv8 to CoreML enables optimized, on-device machine learning performance within Apple's ecosystem, offering benefits in terms of efficiency, security, and seamless integration with iOS, macOS, watchOS, and tvOS platforms.
Installation
To install the required package, run:
!!! Tip "Installation"
=== "CLI"

    ```py
    # Install the required package for YOLOv8
    pip install ultralytics
    ```
For detailed instructions and best practices related to the installation process, check our YOLOv8 Installation guide. While installing the required packages for YOLOv8, if you encounter any difficulties, consult our Common Issues guide for solutions and tips.
Usage
Before diving into the usage instructions, be sure to check out the range of YOLOv8 models offered by Ultralytics. This will help you choose the most appropriate model for your project requirements.
!!! Example "Usage"
=== "Python"

    ```py
    from ultralytics import YOLO

    # Load the YOLOv8 model
    model = YOLO("yolov8n.pt")

    # Export the model to CoreML format
    model.export(format="coreml")  # creates 'yolov8n.mlpackage'

    # Load the exported CoreML model
    coreml_model = YOLO("yolov8n.mlpackage")

    # Run inference
    results = coreml_model("https://ultralytics.com/images/bus.jpg")
    ```

=== "CLI"

    ```py
    # Export a YOLOv8n PyTorch model to CoreML format
    yolo export model=yolov8n.pt format=coreml  # creates 'yolov8n.mlpackage''

    # Run inference with the exported model
    yolo predict model=yolov8n.mlpackage source='https://ultralytics.com/images/bus.jpg'
    ```
For more details about the export process, visit the Ultralytics documentation page on exporting.
Deploying Exported YOLOv8 CoreML Models
Having successfully exported your Ultralytics YOLOv8 models to CoreML, the next critical phase is deploying these models effectively. For detailed guidance on deploying CoreML models in various environments, check out these resources:
-
CoreML Tools: This guide includes instructions and examples to convert models from TensorFlow, PyTorch, and other libraries to Core ML.
-
ML and Vision: A collection of comprehensive videos that cover various aspects of using and implementing CoreML models.
-
Integrating a Core ML Model into Your App: A comprehensive guide on integrating a CoreML model into an iOS application, detailing steps from preparing the model to implementing it in the app for various functionalities.
Summary
In this guide, we went over how to export Ultralytics YOLOv8 models to CoreML format. By following the steps outlined in this guide, you can ensure maximum compatibility and performance when exporting YOLOv8 models to CoreML.
For further details on usage, visit the CoreML official documentation.
Also, if you'd like to know more about other Ultralytics YOLOv8 integrations, visit our integration guide page. You'll find plenty of valuable resources and insights there.
FAQ
How do I export YOLOv8 models to CoreML format?
To export your Ultralytics YOLOv8 models to CoreML format, you'll first need to ensure you have the ultralytics package installed. You can install it using:
!!! Example "Installation"
=== "CLI"

    ```py
    pip install ultralytics
    ```
Next, you can export the model using the following Python or CLI commands:
!!! Example "Usage"
=== "Python"

    ```py
    from ultralytics import YOLO

    model = YOLO("yolov8n.pt")
    model.export(format="coreml")
    ```

=== "CLI"

    ```py
    yolo export model=yolov8n.pt format=coreml
    ```
For further details, refer to the Exporting YOLOv8 Models to CoreML section of our documentation.
What are the benefits of using CoreML for deploying YOLOv8 models?
CoreML provides numerous advantages for deploying Ultralytics YOLOv8 models on Apple devices:
- On-device Processing: Enables local model inference on devices, ensuring data privacy and minimizing latency.
- Performance Optimization: Leverages the full potential of the device's CPU, GPU, and Neural Engine, optimizing both speed and efficiency.
- Ease of Integration: Offers a seamless integration experience with Apple's ecosystems, including iOS, macOS, watchOS, and tvOS.
- Versatility: Supports a wide range of machine learning tasks such as image analysis, audio processing, and natural language processing using the CoreML framework.
For more details on integrating your CoreML model into an iOS app, check out the guide on Integrating a Core ML Model into Your App.
What are the deployment options for YOLOv8 models exported to CoreML?
Once you export your YOLOv8 model to CoreML format, you have multiple deployment options:
-
On-Device Deployment: Directly integrate CoreML models into your app for enhanced privacy and offline functionality. This can be done as:
- Embedded Models: Included in the app bundle, accessible immediately.
- Downloaded Models: Fetched from a server as needed, keeping the app bundle size smaller.
-
Cloud-Based Deployment: Host CoreML models on servers and access them via API requests. This approach supports easier updates and can handle more complex models.
For detailed guidance on deploying CoreML models, refer to CoreML Deployment Options.
How does CoreML ensure optimized performance for YOLOv8 models?
CoreML ensures optimized performance for Ultralytics YOLOv8 models by utilizing various optimization techniques:
- Hardware Acceleration: Uses the device's CPU, GPU, and Neural Engine for efficient computation.
- Model Compression: Provides tools for compressing models to reduce their footprint without compromising accuracy.
- Adaptive Inference: Adjusts inference based on the device's capabilities to maintain a balance between speed and performance.
For more information on performance optimization, visit the CoreML official documentation.
Can I run inference directly with the exported CoreML model?
Yes, you can run inference directly using the exported CoreML model. Below are the commands for Python and CLI:
!!! Example "Running Inference"
=== "Python"

    ```py
    from ultralytics import YOLO

    coreml_model = YOLO("yolov8n.mlpackage")
    results = coreml_model("https://ultralytics.com/images/bus.jpg")
    ```

=== "CLI"

    ```py
    yolo predict model=yolov8n.mlpackage source='https://ultralytics.com/images/bus.jpg'
    ```
For additional information, refer to the Usage section of the CoreML export guide.
comments: true
description: Unlock seamless YOLOv8 tracking with DVCLive. Discover how to log, visualize, and analyze experiments for optimized ML model performance.
keywords: YOLOv8, DVCLive, experiment tracking, machine learning, model training, data visualization, Git integration
Advanced YOLOv8 Experiment Tracking with DVCLive
Experiment tracking in machine learning is critical to model development and evaluation. It involves recording and analyzing various parameters, metrics, and outcomes from numerous training runs. This process is essential for understanding model performance and making data-driven decisions to refine and optimize models.
Integrating DVCLive with Ultralytics YOLOv8 transforms the way experiments are tracked and managed. This integration offers a seamless solution for automatically logging key experiment details, comparing results across different runs, and visualizing data for in-depth analysis. In this guide, we'll understand how DVCLive can be used to streamline the process.
DVCLive
DVCLive, developed by DVC, is an innovative open-source tool for experiment tracking in machine learning. Integrating seamlessly with Git and DVC, it automates the logging of crucial experiment data like model parameters and training metrics. Designed for simplicity, DVCLive enables effortless comparison and analysis of multiple runs, enhancing the efficiency of machine learning projects with intuitive data visualization and analysis tools.
YOLOv8 Training with DVCLive
YOLOv8 training sessions can be effectively monitored with DVCLive. Additionally, DVC provides integral features for visualizing these experiments, including the generation of a report that enables the comparison of metric plots across all tracked experiments, offering a comprehensive view of the training process.
Installation
To install the required packages, run:
!!! Tip "Installation"
=== "CLI"

    ```py
    # Install the required packages for YOLOv8 and DVCLive
    pip install ultralytics dvclive
    ```
For detailed instructions and best practices related to the installation process, be sure to check our YOLOv8 Installation guide. While installing the required packages for YOLOv8, if you encounter any difficulties, consult our Common Issues guide for solutions and tips.
Configuring DVCLive
Once you have installed the necessary packages, the next step is to set up and configure your environment with the necessary credentials. This setup ensures a smooth integration of DVCLive into your existing workflow.
Begin by initializing a Git repository, as Git plays a crucial role in version control for both your code and DVCLive configurations.
!!! Tip "Initial Environment Setup"
=== "CLI"

    ```py
    # Initialize a Git repository
    git init -q

    # Configure Git with your details
    git config --local user.email "you@example.com"
    git config --local user.name "Your Name"

    # Initialize DVCLive in your project
    dvc init -q

    # Commit the DVCLive setup to your Git repository
    git commit -m "DVC init"
    ```
In these commands, ensure to replace "you@example.com" with the email address associated with your Git account, and "Your Name" with your Git account username.
Usage
Before diving into the usage instructions, be sure to check out the range of YOLOv8 models offered by Ultralytics. This will help you choose the most appropriate model for your project requirements.
Training YOLOv8 Models with DVCLive
Start by running your YOLOv8 training sessions. You can use different model configurations and training parameters to suit your project needs. For instance:
# Example training commands for YOLOv8 with varying configurations
yolo train model=yolov8n.pt data=coco8.yaml epochs=5 imgsz=512
yolo train model=yolov8n.pt data=coco8.yaml epochs=5 imgsz=640
Adjust the model, data, epochs, and imgsz parameters according to your specific requirements. For a detailed understanding of the model training process and best practices, refer to our YOLOv8 Model Training guide.
Monitoring Experiments with DVCLive
DVCLive enhances the training process by enabling the tracking and visualization of key metrics. When installed, Ultralytics YOLOv8 automatically integrates with DVCLive for experiment tracking, which you can later analyze for performance insights. For a comprehensive understanding of the specific performance metrics used during training, be sure to explore our detailed guide on performance metrics.
Analyzing Results
After your YOLOv8 training sessions are complete, you can leverage DVCLive's powerful visualization tools for in-depth analysis of the results. DVCLive's integration ensures that all training metrics are systematically logged, facilitating a comprehensive evaluation of your model's performance.
To start the analysis, you can extract the experiment data using DVC's API and process it with Pandas for easier handling and visualization:
import dvc.api
import pandas as pd

# Define the columns of interest
columns = ["Experiment", "epochs", "imgsz", "model", "metrics.mAP50-95(B)"]

# Retrieve experiment data
df = pd.DataFrame(dvc.api.exp_show(), columns=columns)

# Clean the data
df.dropna(inplace=True)
df.reset_index(drop=True, inplace=True)

# Display the DataFrame
print(df)
The output of the code snippet above provides a clear tabular view of the different experiments conducted with YOLOv8 models. Each row represents a different training run, detailing the experiment's name, the number of epochs, image size (imgsz), the specific model used, and the mAP50-95(B) metric. This metric is crucial for evaluating the model's accuracy, with higher values indicating better performance.
Visualizing Results with Plotly
For a more interactive and visual analysis of your experiment results, you can use Plotly's parallel coordinates plot. This type of plot is particularly useful for understanding the relationships and trade-offs between different parameters and metrics.
from plotly.express import parallel_coordinates

# Create a parallel coordinates plot
fig = parallel_coordinates(df, columns, color="metrics.mAP50-95(B)")

# Display the plot
fig.show()
The output of the code snippet above generates a plot that will visually represent the relationships between epochs, image size, model type, and their corresponding mAP50-95(B) scores, enabling you to spot trends and patterns in your experiment data.
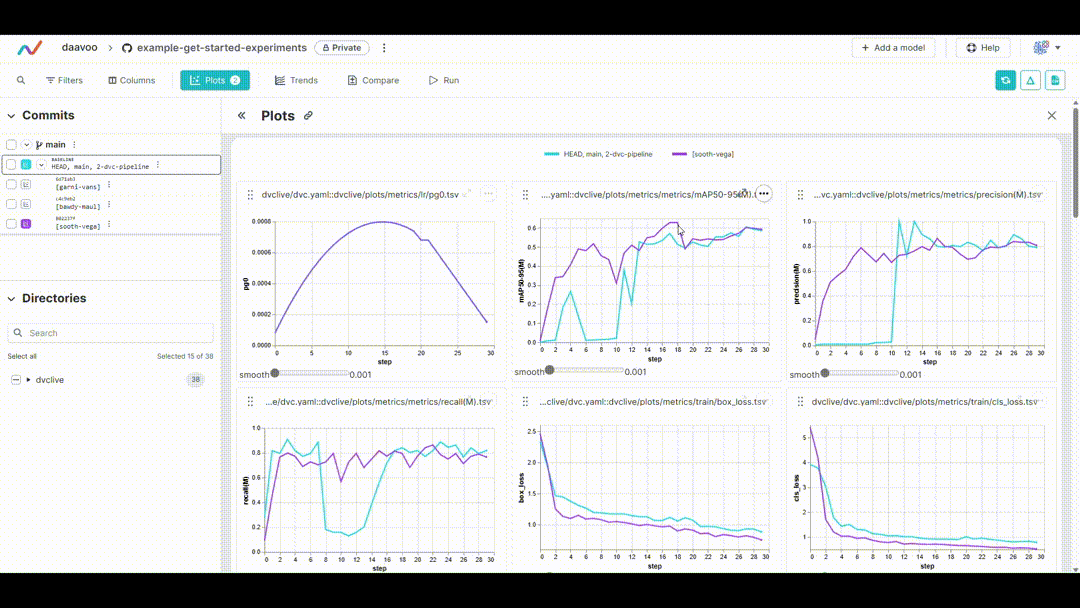
Generating Comparative Visualizations with DVC
DVC provides a useful command to generate comparative plots for your experiments. This can be especially helpful to compare the performance of different models over various training runs.
# Generate DVC comparative plots
dvc plots diff $(dvc exp list --names-only)
After executing this command, DVC generates plots comparing the metrics across different experiments, which are saved as HTML files. Below is an example image illustrating typical plots generated by this process. The image showcases various graphs, including those representing mAP, recall, precision, loss values, and more, providing a visual overview of key performance metrics:
Displaying DVC Plots
If you are using a Jupyter Notebook and you want to display the generated DVC plots, you can use the IPython display functionality.
from IPython.display import HTML

# Display the DVC plots as HTML
HTML(filename="./dvc_plots/index.html")
This code will render the HTML file containing the DVC plots directly in your Jupyter Notebook, providing an easy and convenient way to analyze the visualized experiment data.
Making Data-Driven Decisions
Use the insights gained from these visualizations to make informed decisions about model optimizations, hyperparameter tuning, and other modifications to enhance your model's performance.
Iterating on Experiments
Based on your analysis, iterate on your experiments. Adjust model configurations, training parameters, or even the data inputs, and repeat the training and analysis process. This iterative approach is key to refining your model for the best possible performance.
Summary
This guide has led you through the process of integrating DVCLive with Ultralytics' YOLOv8. You have learned how to harness the power of DVCLive for detailed experiment monitoring, effective visualization, and insightful analysis in your machine learning endeavors.
For further details on usage, visit DVCLive's official documentation.
Additionally, explore more integrations and capabilities of Ultralytics by visiting the Ultralytics integration guide page, which is a collection of great resources and insights.
FAQ
How do I integrate DVCLive with Ultralytics YOLOv8 for experiment tracking?
Integrating DVCLive with Ultralytics YOLOv8 is straightforward. Start by installing the necessary packages:
!!! Example "Installation"
=== "CLI"

    ```py
    pip install ultralytics dvclive
    ```
Next, initialize a Git repository and configure DVCLive in your project:
!!! Example "Initial Environment Setup"
=== "CLI"

    ```py
    git init -q
    git config --local user.email "you@example.com"
    git config --local user.name "Your Name"
    dvc init -q
    git commit -m "DVC init"
    ```
Follow our YOLOv8 Installation guide for detailed setup instructions.
Why should I use DVCLive for tracking YOLOv8 experiments?
Using DVCLive with YOLOv8 provides several advantages, such as:
- Automated Logging: DVCLive automatically records key experiment details like model parameters and metrics.
- Easy Comparison: Facilitates comparison of results across different runs.
- Visualization Tools: Leverages DVCLive's robust data visualization capabilities for in-depth analysis.
For further details, refer to our guide on YOLOv8 Model Training and YOLO Performance Metrics to maximize your experiment tracking efficiency.
How can DVCLive improve my results analysis for YOLOv8 training sessions?
After completing your YOLOv8 training sessions, DVCLive helps in visualizing and analyzing the results effectively. Example code for loading and displaying experiment data:
import dvc.api
import pandas as pd

# Define columns of interest
columns = ["Experiment", "epochs", "imgsz", "model", "metrics.mAP50-95(B)"]

# Retrieve experiment data
df = pd.DataFrame(dvc.api.exp_show(), columns=columns)

# Clean data
df.dropna(inplace=True)
df.reset_index(drop=True, inplace=True)

# Display DataFrame
print(df)
To visualize results interactively, use Plotly's parallel coordinates plot:
from plotly.express import parallel_coordinates

fig = parallel_coordinates(df, columns, color="metrics.mAP50-95(B)")
fig.show()
Refer to our guide on YOLOv8 Training with DVCLive for more examples and best practices.
What are the steps to configure my environment for DVCLive and YOLOv8 integration?
To configure your environment for a smooth integration of DVCLive and YOLOv8, follow these steps:
- Install Required Packages: Use
pip install ultralytics dvclive. - Initialize Git Repository: Run
git init -q. - Setup DVCLive: Execute
dvc init -q. - Commit to Git: Use
git commit -m "DVC init".
These steps ensure proper version control and setup for experiment tracking. For in-depth configuration details, visit our Configuration guide.
How do I visualize YOLOv8 experiment results using DVCLive?
DVCLive offers powerful tools to visualize the results of YOLOv8 experiments. Here's how you can generate comparative plots:
!!! Example "Generate Comparative Plots"
=== "CLI"

    ```py
    dvc plots diff $(dvc exp list --names-only)
    ```
To display these plots in a Jupyter Notebook, use:
from IPython.display import HTML

# Display plots as HTML
HTML(filename="./dvc_plots/index.html")
These visualizations help identify trends and optimize model performance. Check our detailed guides on YOLOv8 Experiment Analysis for comprehensive steps and examples.
comments: true
description: Learn how to export YOLOv8 models to TFLite Edge TPU format for high-speed, low-power inferencing on mobile and embedded devices.
keywords: YOLOv8, TFLite Edge TPU, TensorFlow Lite, model export, machine learning, edge computing, neural networks, Ultralytics
Learn to Export to TFLite Edge TPU Format From YOLOv8 Model
Deploying computer vision models on devices with limited computational power, such as mobile or embedded systems, can be tricky. Using a model format that is optimized for faster performance simplifies the process. The TensorFlow Lite Edge TPU or TFLite Edge TPU model format is designed to use minimal power while delivering fast performance for neural networks.
The export to TFLite Edge TPU format feature allows you to optimize your Ultralytics YOLOv8 models for high-speed and low-power inferencing. In this guide, we'll walk you through converting your models to the TFLite Edge TPU format, making it easier for your models to perform well on various mobile and embedded devices.
Why Should You Export to TFLite Edge TPU?
Exporting models to TensorFlow Edge TPU makes machine learning tasks fast and efficient. This technology suits applications with limited power, computing resources, and connectivity. The Edge TPU is a hardware accelerator by Google. It speeds up TensorFlow Lite models on edge devices. The image below shows an example of the process involved.
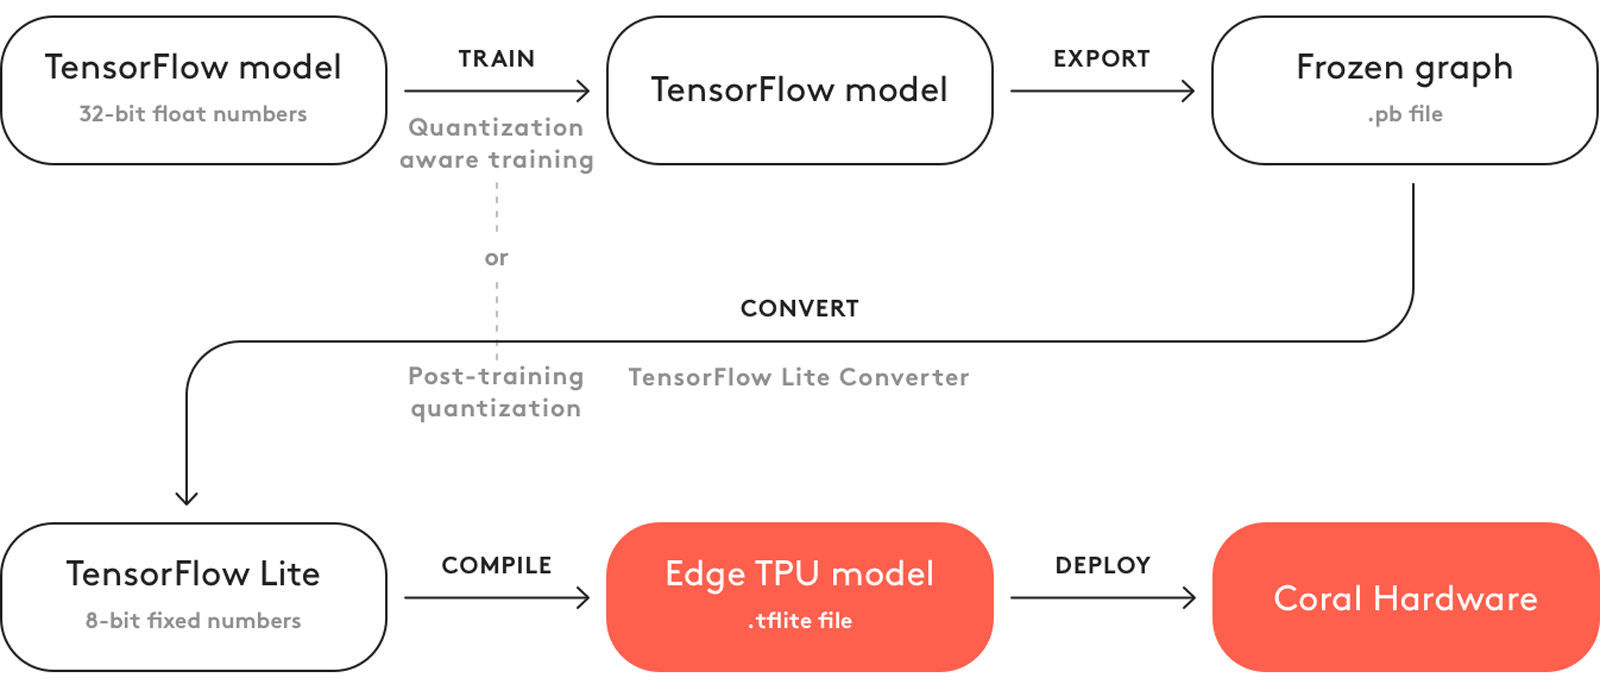
The Edge TPU works with quantized models. Quantization makes models smaller and faster without losing much accuracy. It is ideal for the limited resources of edge computing, allowing applications to respond quickly by reducing latency and allowing for quick data processing locally, without cloud dependency. Local processing also keeps user data private and secure since it's not sent to a remote server.
Key Features of TFLite Edge TPU
Here are the key features that make TFLite Edge TPU a great model format choice for developers:
-
Optimized Performance on Edge Devices: The TFLite Edge TPU achieves high-speed neural networking performance through quantization, model optimization, hardware acceleration, and compiler optimization. Its minimalistic architecture contributes to its smaller size and cost-efficiency.
-
High Computational Throughput: TFLite Edge TPU combines specialized hardware acceleration and efficient runtime execution to achieve high computational throughput. It is well-suited for deploying machine learning models with stringent performance requirements on edge devices.
-
Efficient Matrix Computations: The TensorFlow Edge TPU is optimized for matrix operations, which are crucial for neural network computations. This efficiency is key in machine learning models, particularly those requiring numerous and complex matrix multiplications and transformations.
Deployment Options with TFLite Edge TPU
Before we jump into how to export YOLOv8 models to the TFLite Edge TPU format, let's understand where TFLite Edge TPU models are usually used.
TFLite Edge TPU offers various deployment options for machine learning models, including:
-
On-Device Deployment: TensorFlow Edge TPU models can be directly deployed on mobile and embedded devices. On-device deployment allows the models to execute directly on the hardware, eliminating the need for cloud connectivity.
-
Edge Computing with Cloud TensorFlow TPUs: In scenarios where edge devices have limited processing capabilities, TensorFlow Edge TPUs can offload inference tasks to cloud servers equipped with TPUs.
-
Hybrid Deployment: A hybrid approach combines on-device and cloud deployment and offers a versatile and scalable solution for deploying machine learning models. Advantages include on-device processing for quick responses and cloud computing for more complex computations.
Exporting YOLOv8 Models to TFLite Edge TPU
You can expand model compatibility and deployment flexibility by converting YOLOv8 models to TensorFlow Edge TPU.
Installation
To install the required package, run:
!!! Tip "Installation"
=== "CLI"

    ```py
    # Install the required package for YOLOv8
    pip install ultralytics
    ```
For detailed instructions and best practices related to the installation process, check our Ultralytics Installation guide. While installing the required packages for YOLOv8, if you encounter any difficulties, consult our Common Issues guide for solutions and tips.
Usage
Before diving into the usage instructions, it's important to note that while all Ultralytics YOLOv8 models are available for exporting, you can ensure that the model you select supports export functionality here.
!!! Example "Usage"
=== "Python"

    ```py
    from ultralytics import YOLO

    # Load the YOLOv8 model
    model = YOLO("yolov8n.pt")

    # Export the model to TFLite Edge TPU format
    model.export(format="edgetpu")  # creates 'yolov8n_full_integer_quant_edgetpu.tflite'

    # Load the exported TFLite Edge TPU model
    edgetpu_model = YOLO("yolov8n_full_integer_quant_edgetpu.tflite")

    # Run inference
    results = edgetpu_model("https://ultralytics.com/images/bus.jpg")
    ```

=== "CLI"

    ```py
    # Export a YOLOv8n PyTorch model to TFLite Edge TPU format
    yolo export model=yolov8n.pt format=edgetpu  # creates 'yolov8n_full_integer_quant_edgetpu.tflite'

    # Run inference with the exported model
    yolo predict model=yolov8n_full_integer_quant_edgetpu.tflite source='https://ultralytics.com/images/bus.jpg'
    ```
For more details about supported export options, visit the Ultralytics documentation page on deployment options.
Deploying Exported YOLOv8 TFLite Edge TPU Models
After successfully exporting your Ultralytics YOLOv8 models to TFLite Edge TPU format, you can now deploy them. The primary and recommended first step for running a TFLite Edge TPU model is to use the YOLO("model_edgetpu.tflite") method, as outlined in the previous usage code snippet.
However, for in-depth instructions on deploying your TFLite Edge TPU models, take a look at the following resources:
-
Coral Edge TPU on a Raspberry Pi with Ultralytics YOLOv8: Discover how to integrate Coral Edge TPUs with Raspberry Pi for enhanced machine learning capabilities.
-
Code Examples: Access practical TensorFlow Edge TPU deployment examples to kickstart your projects.
-
Run Inference on the Edge TPU with Python: Explore how to use the TensorFlow Lite Python API for Edge TPU applications, including setup and usage guidelines.
Summary
In this guide, we've learned how to export Ultralytics YOLOv8 models to TFLite Edge TPU format. By following the steps mentioned above, you can increase the speed and power of your computer vision applications.
For further details on usage, visit the Edge TPU official website.
Also, for more information on other Ultralytics YOLOv8 integrations, please visit our integration guide page. There, you'll discover valuable resources and insights.
FAQ
How do I export a YOLOv8 model to TFLite Edge TPU format?
To export a YOLOv8 model to TFLite Edge TPU format, you can follow these steps:
!!! Example "Usage"
=== "Python"

    ```py
    from ultralytics import YOLO

    # Load the YOLOv8 model
    model = YOLO("yolov8n.pt")

    # Export the model to TFLite Edge TPU format
    model.export(format="edgetpu")  # creates 'yolov8n_full_integer_quant_edgetpu.tflite'

    # Load the exported TFLite Edge TPU model
    edgetpu_model = YOLO("yolov8n_full_integer_quant_edgetpu.tflite")

    # Run inference
    results = edgetpu_model("https://ultralytics.com/images/bus.jpg")
    ```

=== "CLI"

    ```py
    # Export a YOLOv8n PyTorch model to TFLite Edge TPU format
    yolo export model=yolov8n.pt format=edgetpu  # creates 'yolov8n_full_integer_quant_edgetpu.tflite'

    # Run inference with the exported model
    yolo predict model=yolov8n_full_integer_quant_edgetpu.tflite source='https://ultralytics.com/images/bus.jpg'
    ```
For complete details on exporting models to other formats, refer to our export guide.
What are the benefits of exporting YOLOv8 models to TFLite Edge TPU?
Exporting YOLOv8 models to TFLite Edge TPU offers several benefits:
- Optimized Performance: Achieve high-speed neural network performance with minimal power consumption.
- Reduced Latency: Quick local data processing without the need for cloud dependency.
- Enhanced Privacy: Local processing keeps user data private and secure.
This makes it ideal for applications in edge computing, where devices have limited power and computational resources. Learn more about why you should export.
Can I deploy TFLite Edge TPU models on mobile and embedded devices?
Yes, TensorFlow Lite Edge TPU models can be deployed directly on mobile and embedded devices. This deployment approach allows models to execute directly on the hardware, offering faster and more efficient inferencing. For integration examples, check our guide on deploying Coral Edge TPU on Raspberry Pi.
What are some common use cases for TFLite Edge TPU models?
Common use cases for TFLite Edge TPU models include:
- Smart Cameras: Enhancing real-time image and video analysis.
- IoT Devices: Enabling smart home and industrial automation.
- Healthcare: Accelerating medical imaging and diagnostics.
- Retail: Improving inventory management and customer behavior analysis.
These applications benefit from the high performance and low power consumption of TFLite Edge TPU models. Discover more about usage scenarios.
How can I troubleshoot issues while exporting or deploying TFLite Edge TPU models?
If you encounter issues while exporting or deploying TFLite Edge TPU models, refer to our Common Issues guide for troubleshooting tips. This guide covers common problems and solutions to help you ensure smooth operation. For additional support, visit our Help Center.
comments: true
description: Learn how to efficiently train Ultralytics YOLOv8 models using Google Colab's powerful cloud-based environment. Start your project with ease.
keywords: YOLOv8, Google Colab, machine learning, deep learning, model training, GPU, TPU, cloud computing, Jupyter Notebook, Ultralytics
Accelerating YOLOv8 Projects with Google Colab
Many developers lack the powerful computing resources needed to build deep learning models. Acquiring high-end hardware or renting a decent GPU can be expensive. Google Colab is a great solution to this. It's a browser-based platform that allows you to work with large datasets, develop complex models, and share your work with others without a huge cost.
You can use Google Colab to work on projects related to Ultralytics YOLOv8 models. Google Colab's user-friendly environment is well suited for efficient model development and experimentation. Let's learn more about Google Colab, its key features, and how you can use it to train YOLOv8 models.
Google Colaboratory
Google Colaboratory, commonly known as Google Colab, was developed by Google Research in 2017. It is a free online cloud-based Jupyter Notebook environment that allows you to train your machine learning and deep learning models on CPUs, GPUs, and TPUs. The motivation behind developing Google Colab was Google's broader goals to advance AI technology and educational tools, and encourage the use of cloud services.
You can use Google Colab regardless of the specifications and configurations of your local computer. All you need is a Google account and a web browser, and you're good to go.
Training YOLOv8 Using Google Colaboratory
Training YOLOv8 models on Google Colab is pretty straightforward. Thanks to the integration, you can access the Google Colab YOLOv8 Notebook and start training your model immediately. For a detailed understanding of the model training process and best practices, refer to our YOLOv8 Model Training guide.
Sign in to your Google account and run the notebook's cells to train your model.
Learn how to train a YOLOv8 model with custom data on YouTube with Nicolai. Check out the guide below.
Watch: How to Train Ultralytics YOLOv8 models on Your Custom Dataset in Google Colab | Episode 3
Common Questions While Working with Google Colab
When working with Google Colab, you might have a few common questions. Let's answer them.
Q: Why does my Google Colab session timeout?
A: Google Colab sessions can time out due to inactivity, especially for free users who have a limited session duration.
Q: Can I increase the session duration in Google Colab?
A: Free users face limits, but Google Colab Pro offers extended session durations.
Q: What should I do if my session closes unexpectedly?
A: Regularly save your work to Google Drive or GitHub to avoid losing unsaved progress.
Q: How can I check my session status and resource usage?
A: Colab provides 'RAM Usage' and 'Disk Usage' metrics in the interface to monitor your resources.
Q: Can I run multiple Colab sessions simultaneously?
A: Yes, but be cautious about resource usage to avoid performance issues.
Q: Does Google Colab have GPU access limitations?
A: Yes, free GPU access has limitations, but Google Colab Pro provides more substantial usage options.
Key Features of Google Colab
Now, let's look at some of the standout features that make Google Colab a go-to platform for machine learning projects:
-
Library Support: Google Colab includes pre-installed libraries for data analysis and machine learning and allows additional libraries to be installed as needed. It also supports various libraries for creating interactive charts and visualizations.
-
Hardware Resources: Users also switch between different hardware options by modifying the runtime settings as shown below. Google Colab provides access to advanced hardware like Tesla K80 GPUs and TPUs, which are specialized circuits designed specifically for machine learning tasks.
-
Collaboration: Google Colab makes collaborating and working with other developers easy. You can easily share your notebooks with others and perform edits in real-time.
-
Custom Environment: Users can install dependencies, configure the system, and use shell commands directly in the notebook.
-
Educational Resources: Google Colab offers a range of tutorials and example notebooks to help users learn and explore various functionalities.
Why Should You Use Google Colab for Your YOLOv8 Projects?
There are many options for training and evaluating YOLOv8 models, so what makes the integration with Google Colab unique? Let's explore the advantages of this integration:
-
Zero Setup: Since Colab runs in the cloud, users can start training models immediately without the need for complex environment setups. Just create an account and start coding.
-
Form Support: It allows users to create forms for parameter input, making it easier to experiment with different values.
-
Integration with Google Drive: Colab seamlessly integrates with Google Drive to make data storage, access, and management simple. Datasets and models can be stored and retrieved directly from Google Drive.
-
Markdown Support: You can use Markdown format for enhanced documentation within notebooks.
-
Scheduled Execution: Developers can set notebooks to run automatically at specified times.
-
Extensions and Widgets: Google Colab allows for adding functionality through third-party extensions and interactive widgets.
Keep Learning about Google Colab
If you'd like to dive deeper into Google Colab, here are a few resources to guide you.
-
Training Custom Datasets with Ultralytics YOLOv8 in Google Colab: Learn how to train custom datasets with Ultralytics YOLOv8 on Google Colab. This comprehensive blog post will take you through the entire process, from initial setup to the training and evaluation stages.
-
Curated Notebooks: Here you can explore a series of organized and educational notebooks, each grouped by specific topic areas.
-
Google Colab's Medium Page: You can find tutorials, updates, and community contributions here that can help you better understand and utilize this tool.
Summary
We've discussed how you can easily experiment with Ultralytics YOLOv8 models on Google Colab. You can use Google Colab to train and evaluate your models on GPUs and TPUs with a few clicks.
For more details, visit Google Colab's FAQ page.
Interested in more YOLOv8 integrations? Visit the Ultralytics integration guide page to explore additional tools and capabilities that can improve your machine-learning projects.
FAQ
How do I start training Ultralytics YOLOv8 models on Google Colab?
To start training Ultralytics YOLOv8 models on Google Colab, sign in to your Google account, then access the Google Colab YOLOv8 Notebook. This notebook guides you through the setup and training process. After launching the notebook, run the cells step-by-step to train your model. For a full guide, refer to the YOLOv8 Model Training guide.
What are the advantages of using Google Colab for training YOLOv8 models?
Google Colab offers several advantages for training YOLOv8 models:
- Zero Setup: No initial environment setup is required; just log in and start coding.
- Free GPU Access: Use powerful GPUs or TPUs without the need for expensive hardware.
- Integration with Google Drive: Easily store and access datasets and models.
- Collaboration: Share notebooks with others and collaborate in real-time.
For more information on why you should use Google Colab, explore the training guide and visit the Google Colab page.
How can I handle Google Colab session timeouts during YOLOv8 training?
Google Colab sessions timeout due to inactivity, especially for free users. To handle this:
- Stay Active: Regularly interact with your Colab notebook.
- Save Progress: Continuously save your work to Google Drive or GitHub.
- Colab Pro: Consider upgrading to Google Colab Pro for longer session durations.
For more tips on managing your Colab session, visit the Google Colab FAQ page.
Can I use custom datasets for training YOLOv8 models in Google Colab?
Yes, you can use custom datasets to train YOLOv8 models in Google Colab. Upload your dataset to Google Drive and load it directly into your Colab notebook. You can follow Nicolai's YouTube guide, How to Train YOLOv8 Models on Your Custom Dataset, or refer to the Custom Dataset Training guide for detailed steps.
What should I do if my Google Colab training session is interrupted?
If your Google Colab training session is interrupted:
- Save Regularly: Avoid losing unsaved progress by regularly saving your work to Google Drive or GitHub.
- Resume Training: Restart your session and re-run the cells from where the interruption occurred.
- Use Checkpoints: Incorporate checkpointing in your training script to save progress periodically.
These practices help ensure your progress is secure. Learn more about session management on Google Colab's FAQ page.
comments: true
description: Discover an interactive way to perform object detection with Ultralytics YOLOv8 using Gradio. Upload images and adjust settings for real-time results.
keywords: Ultralytics, YOLOv8, Gradio, object detection, interactive, real-time, image processing, AI
Interactive Object Detection: Gradio & Ultralytics YOLOv8 🚀
Introduction to Interactive Object Detection
This Gradio interface provides an easy and interactive way to perform object detection using the Ultralytics YOLOv8 model. Users can upload images and adjust parameters like confidence threshold and intersection-over-union (IoU) threshold to get real-time detection results.
Watch: Gradio Integration with Ultralytics YOLOv8
Why Use Gradio for Object Detection?
- User-Friendly Interface: Gradio offers a straightforward platform for users to upload images and visualize detection results without any coding requirement.
- Real-Time Adjustments: Parameters such as confidence and IoU thresholds can be adjusted on the fly, allowing for immediate feedback and optimization of detection results.
- Broad Accessibility: The Gradio web interface can be accessed by anyone, making it an excellent tool for demonstrations, educational purposes, and quick experiments.
How to Install the Gradio
pip install gradio
How to Use the Interface
- Upload Image: Click on 'Upload Image' to choose an image file for object detection.
- Adjust Parameters:
- Confidence Threshold: Slider to set the minimum confidence level for detecting objects.
- IoU Threshold: Slider to set the IoU threshold for distinguishing different objects.
- View Results: The processed image with detected objects and their labels will be displayed.
Example Use Cases
- Sample Image 1: Bus detection with default thresholds.
- Sample Image 2: Detection on a sports image with default thresholds.
Usage Example
This section provides the Python code used to create the Gradio interface with the Ultralytics YOLOv8 model. Supports classification tasks, detection tasks, segmentation tasks, and key point tasks.
import gradio as gr
import PIL.Image as Image

from ultralytics import ASSETS, YOLO

model = YOLO("yolov8n.pt")


def predict_image(img, conf_threshold, iou_threshold):
    """Predicts objects in an image using a YOLOv8 model with adjustable confidence and IOU thresholds."""
    results = model.predict(
        source=img,
        conf=conf_threshold,
        iou=iou_threshold,
        show_labels=True,
        show_conf=True,
        imgsz=640,
    )

    for r in results:
        im_array = r.plot()
        im = Image.fromarray(im_array[..., ::-1])

    return im


iface = gr.Interface(
    fn=predict_image,
    inputs=[
        gr.Image(type="pil", label="Upload Image"),
        gr.Slider(minimum=0, maximum=1, value=0.25, label="Confidence threshold"),
        gr.Slider(minimum=0, maximum=1, value=0.45, label="IoU threshold"),
    ],
    outputs=gr.Image(type="pil", label="Result"),
    title="Ultralytics Gradio",
    description="Upload images for inference. The Ultralytics YOLOv8n model is used by default.",
    examples=[
        [ASSETS / "bus.jpg", 0.25, 0.45],
        [ASSETS / "zidane.jpg", 0.25, 0.45],
    ],
)

if __name__ == "__main__":
    iface.launch()
Parameters Explanation
| Parameter Name | Type | Description |
|---|---|---|
img |
Image |
The image on which object detection will be performed. |
conf_threshold |
float |
Confidence threshold for detecting objects. |
iou_threshold |
float |
Intersection-over-union threshold for object separation. |
Gradio Interface Components
| Component | Description |
|---|---|
| Image Input | To upload the image for detection. |
| Sliders | To adjust confidence and IoU thresholds. |
| Image Output | To display the detection results. |
FAQ
How do I use Gradio with Ultralytics YOLOv8 for object detection?
To use Gradio with Ultralytics YOLOv8 for object detection, you can follow these steps:
- Install Gradio: Use the command
pip install gradio. - Create Interface: Write a Python script to initialize the Gradio interface. You can refer to the provided code example in the documentation for details.
- Upload and Adjust: Upload your image and adjust the confidence and IoU thresholds on the Gradio interface to get real-time object detection results.
Here's a minimal code snippet for reference:
import gradio as gr

from ultralytics import YOLO

model = YOLO("yolov8n.pt")


def predict_image(img, conf_threshold, iou_threshold):
    results = model.predict(
        source=img,
        conf=conf_threshold,
        iou=iou_threshold,
        show_labels=True,
        show_conf=True,
    )
    return results[0].plot() if results else None


iface = gr.Interface(
    fn=predict_image,
    inputs=[
        gr.Image(type="pil", label="Upload Image"),
        gr.Slider(minimum=0, maximum=1, value=0.25, label="Confidence threshold"),
        gr.Slider(minimum=0, maximum=1, value=0.45, label="IoU threshold"),
    ],
    outputs=gr.Image(type="pil", label="Result"),
    title="Ultralytics Gradio YOLOv8",
    description="Upload images for YOLOv8 object detection.",
)
iface.launch()
What are the benefits of using Gradio for Ultralytics YOLOv8 object detection?
Using Gradio for Ultralytics YOLOv8 object detection offers several benefits:
- User-Friendly Interface: Gradio provides an intuitive interface for users to upload images and visualize detection results without any coding effort.
- Real-Time Adjustments: You can dynamically adjust detection parameters such as confidence and IoU thresholds and see the effects immediately.
- Accessibility: The web interface is accessible to anyone, making it useful for quick experiments, educational purposes, and demonstrations.
For more details, you can read this blog post.
Can I use Gradio and Ultralytics YOLOv8 together for educational purposes?
Yes, Gradio and Ultralytics YOLOv8 can be utilized together for educational purposes effectively. Gradio's intuitive web interface makes it easy for students and educators to interact with state-of-the-art deep learning models like Ultralytics YOLOv8 without needing advanced programming skills. This setup is ideal for demonstrating key concepts in object detection and computer vision, as Gradio provides immediate visual feedback which helps in understanding the impact of different parameters on the detection performance.
How do I adjust the confidence and IoU thresholds in the Gradio interface for YOLOv8?
In the Gradio interface for YOLOv8, you can adjust the confidence and IoU thresholds using the sliders provided. These thresholds help control the prediction accuracy and object separation:
- Confidence Threshold: Determines the minimum confidence level for detecting objects. Slide to increase or decrease the confidence required.
- IoU Threshold: Sets the intersection-over-union threshold for distinguishing between overlapping objects. Adjust this value to refine object separation.
For more information on these parameters, visit the parameters explanation section.
What are some practical applications of using Ultralytics YOLOv8 with Gradio?
Practical applications of combining Ultralytics YOLOv8 with Gradio include:
- Real-Time Object Detection Demonstrations: Ideal for showcasing how object detection works in real-time.
- Educational Tools: Useful in academic settings to teach object detection and computer vision concepts.
- Prototype Development: Efficient for developing and testing prototype object detection applications quickly.
- Community and Collaborations: Making it easy to share models with the community for feedback and collaboration.
For examples of similar use cases, check out the Ultralytics blog.
Providing this information within the documentation will help in enhancing the usability and accessibility of Ultralytics YOLOv8, making it more approachable for users at all levels of expertise.
comments: true
description: Dive into our detailed integration guide on using IBM Watson to train a YOLOv8 model. Uncover key features and step-by-step instructions on model training.
keywords: IBM Watsonx, IBM Watsonx AI, What is Watson?, IBM Watson Integration, IBM Watson Features, YOLOv8, Ultralytics, Model Training, GPU, TPU, cloud computing
A Step-by-Step Guide to Training YOLOv8 Models with IBM Watsonx
Nowadays, scalable computer vision solutions are becoming more common and transforming the way we handle visual data. A great example is IBM Watsonx, an advanced AI and data platform that simplifies the development, deployment, and management of AI models. It offers a complete suite for the entire AI lifecycle and seamless integration with IBM Cloud services.
You can train Ultralytics YOLOv8 models using IBM Watsonx. It's a good option for enterprises interested in efficient model training, fine-tuning for specific tasks, and improving model performance with robust tools and a user-friendly setup. In this guide, we'll walk you through the process of training YOLOv8 with IBM Watsonx, covering everything from setting up your environment to evaluating your trained models. Let's get started!
What is IBM Watsonx?
Watsonx is IBM's cloud-based platform designed for commercial generative AI and scientific data. IBM Watsonx's three components - watsonx.ai, watsonx.data, and watsonx.governance - come together to create an end-to-end, trustworthy AI platform that can accelerate AI projects aimed at solving business problems. It provides powerful tools for building, training, and deploying machine learning models and makes it easy to connect with various data sources.
Its user-friendly interface and collaborative capabilities streamline the development process and help with efficient model management and deployment. Whether for computer vision, predictive analytics, natural language processing, or other AI applications, IBM Watsonx provides the tools and support needed to drive innovation.
Key Features of IBM Watsonx
IBM Watsonx is made of three main components: watsonx.ai, watsonx.data, and watsonx.governance. Each component offers features that cater to different aspects of AI and data management. Let's take a closer look at them.
Watsonx.ai
Watsonx.ai provides powerful tools for AI development and offers access to IBM-supported custom models, third-party models like Llama 3, and IBM's own Granite models. It includes the Prompt Lab for experimenting with AI prompts, the Tuning Studio for improving model performance with labeled data, and the Flows Engine for simplifying generative AI application development. Also, it offers comprehensive tools for automating the AI model lifecycle and connecting to various APIs and libraries.
Watsonx.data
Watsonx.data supports both cloud and on-premises deployments through the IBM Storage Fusion HCI integration. Its user-friendly console provides centralized access to data across environments and makes data exploration easy with common SQL. It optimizes workloads with efficient query engines like Presto and Spark, accelerates data insights with an AI-powered semantic layer, includes a vector database for AI relevance, and supports open data formats for easy sharing of analytics and AI data.
Watsonx.governance
Watsonx.governance makes compliance easier by automatically identifying regulatory changes and enforcing policies. It links requirements to internal risk data and provides up-to-date AI factsheets. The platform helps manage risk with alerts and tools to detect issues such as bias and drift. It also automates the monitoring and documentation of the AI lifecycle, organizes AI development with a model inventory, and enhances collaboration with user-friendly dashboards and reporting tools.
How to Train YOLOv8 Using IBM Watsonx
You can use IBM Watsonx to accelerate your YOLOv8 model training workflow.
Prerequisites
You need an IBM Cloud account to create a watsonx.ai project, and you'll also need a Kaggle account to load the data set.
Step 1: Set Up Your Environment
First, you'll need to set up an IBM account to use a Jupyter Notebook. Log in to watsonx.ai using your IBM Cloud account.
Then, create a watsonx.ai project, and a Jupyter Notebook.
Once you do so, a notebook environment will open for you to load your data set. You can use the code from this tutorial to tackle a simple object detection model training task.
Step 2: Install and Import Relevant Libraries
Next, you can install and import the necessary Python libraries.
!!! Tip "Installation"
=== "CLI"

    ```py
    # Install the required packages
    pip install torch torchvision torchaudio
    pip install opencv-contrib-python-headless
    pip install ultralytics==8.0.196
    ```
For detailed instructions and best practices related to the installation process, check our Ultralytics Installation guide. While installing the required packages for YOLOv8, if you encounter any difficulties, consult our Common Issues guide for solutions and tips.
Then, you can import the needed packages.
!!! Example "Import Relevant Libraries"
=== "Python"

    ```py
    # Import ultralytics
    import ultralytics

    ultralytics.checks()

    # Import packages to retrieve and display image files
    ```
Step 3: Load the Data
For this tutorial, we will use a marine litter dataset available on Kaggle. With this dataset, we will custom-train a YOLOv8 model to detect and classify litter and biological objects in underwater images.
We can load the dataset directly into the notebook using the Kaggle API. First, create a free Kaggle account. Once you have created an account, you'll need to generate an API key. Directions for generating your key can be found in the Kaggle API documentation under the section "API credentials".
Copy and paste your Kaggle username and API key into the following code. Then run the code to install the API and load the dataset into Watsonx.
!!! Tip "Installation"
=== "CLI"

    ```py
    # Install kaggle
    pip install kaggle
    ```
After installing Kaggle, we can load the dataset into Watsonx.
!!! Example "Load the Data"
=== "Python"

    ```py
    # Replace "username" string with your username
    os.environ["KAGGLE_USERNAME"] = "username"
    # Replace "apiKey" string with your key
    os.environ["KAGGLE_KEY"] = "apiKey"

    # Load dataset
    !kaggle datasets download atiqishrak/trash-dataset-icra19 --unzip

    # Store working directory path as work_dir
    work_dir = os.getcwd()

    # Print work_dir path
    print(os.getcwd())

    # Print work_dir contents
    print(os.listdir(f"{work_dir}"))

    # Print trash_ICRA19 subdirectory contents
    print(os.listdir(f"{work_dir}/trash_ICRA19"))
    ```
After loading the dataset, we printed and saved our working directory. We have also printed the contents of our working directory to confirm the "trash_ICRA19" data set was loaded properly.
If you see "trash_ICRA19" among the directory's contents, then it has loaded successfully. You should see three files/folders: a config.yaml file, a videos_for_testing directory, and a dataset directory. We will ignore the videos_for_testing directory, so feel free to delete it.
We will use the config.yaml file and the contents of the dataset directory to train our object detection model. Here is a sample image from our marine litter data set.

Step 4: Preprocess the Data
Fortunately, all labels in the marine litter data set are already formatted as YOLO .txt files. However, we need to rearrange the structure of the image and label directories in order to help our model process the image and labels. Right now, our loaded data set directory follows this structure:
But, YOLO models by default require separate images and labels in subdirectories within the train/val/test split. We need to reorganize the directory into the following structure:
To reorganize the data set directory, we can run the following script:
!!! Example "Preprocess the Data"
=== "Python"

    ```py
    # Function to reorganize dir
    def organize_files(directory):
        for subdir in ["train", "test", "val"]:
            subdir_path = os.path.join(directory, subdir)
            if not os.path.exists(subdir_path):
                continue

            images_dir = os.path.join(subdir_path, "images")
            labels_dir = os.path.join(subdir_path, "labels")

            # Create image and label subdirs if non-existent
            os.makedirs(images_dir, exist_ok=True)
            os.makedirs(labels_dir, exist_ok=True)

            # Move images and labels to respective subdirs
            for filename in os.listdir(subdir_path):
                if filename.endswith(".txt"):
                    shutil.move(os.path.join(subdir_path, filename), os.path.join(labels_dir, filename))
                elif filename.endswith(".jpg") or filename.endswith(".png") or filename.endswith(".jpeg"):
                    shutil.move(os.path.join(subdir_path, filename), os.path.join(images_dir, filename))
                # Delete .xml files
                elif filename.endswith(".xml"):
                    os.remove(os.path.join(subdir_path, filename))


    if __name__ == "__main__":
        directory = f"{work_dir}/trash_ICRA19/dataset"
        organize_files(directory)
    ```
Next, we need to modify the .yaml file for the data set. This is the setup we will use in our .yaml file. Class ID numbers start from 0:
path: /path/to/dataset/directory # root directory for dataset
train: train/images # train images subdirectory
val: train/images # validation images subdirectory
test: test/images # test images subdirectory

# Classes
names:
    0: plastic
    1: bio
    2: rov
Run the following script to delete the current contents of config.yaml and replace it with the above contents that reflect our new data set directory structure. Be certain to replace the work_dir portion of the root directory path in line 4 with your own working directory path we retrieved earlier. Leave the train, val, and test subdirectory definitions. Also, do not change {work_dir} in line 23 of the code.
!!! Example "Edit the .yaml File"
=== "Python"

    ```py
    # Contents of new confg.yaml file
    def update_yaml_file(file_path):
        data = {
            "path": "work_dir/trash_ICRA19/dataset",
            "train": "train/images",
            "val": "train/images",
            "test": "test/images",
            "names": {0: "plastic", 1: "bio", 2: "rov"},
        }

        # Ensures the "names" list appears after the sub/directories
        names_data = data.pop("names")
        with open(file_path, "w") as yaml_file:
            yaml.dump(data, yaml_file)
            yaml_file.write("\n")
            yaml.dump({"names": names_data}, yaml_file)


    if __name__ == "__main__":
        file_path = f"{work_dir}/trash_ICRA19/config.yaml"  # .yaml file path
        update_yaml_file(file_path)
        print(f"{file_path} updated successfully.")
    ```
Step 5: Train the YOLOv8 model
Run the following command-line code to fine tune a pretrained default YOLOv8 model.
!!! Example "Train the YOLOv8 model"
=== "CLI"

    ```py
    !yolo task=detect mode=train data={work_dir}/trash_ICRA19/config.yaml model=yolov8s.pt epochs=2 batch=32 lr0=.04 plots=True
    ```
Here's a closer look at the parameters in the model training command:
- task: It specifies the computer vision task for which you are using the specified YOLO model and data set.
- mode: Denotes the purpose for which you are loading the specified model and data. Since we are training a model, it is set to "train." Later, when we test our model's performance, we will set it to "predict."
- epochs: This delimits the number of times YOLOv8 will pass through our entire data set.
- batch: The numerical value stipulates the training batch sizes. Batches are the number of images a model processes before it updates its parameters.
- lr0: Specifies the model's initial learning rate.
- plots: Directs YOLO to generate and save plots of our model's training and evaluation metrics.
For a detailed understanding of the model training process and best practices, refer to the YOLOv8 Model Training guide. This guide will help you get the most out of your experiments and ensure you're using YOLOv8 effectively.
Step 6: Test the Model
We can now run inference to test the performance of our fine-tuned model:
!!! Example "Test the YOLOv8 model"
=== "CLI"

    ```py
    !yolo task=detect mode=predict source={work_dir}/trash_ICRA19/dataset/test/images model={work_dir}/runs/detect/train/weights/best.pt conf=0.5 iou=.5 save=True save_txt=True
    ```
This brief script generates predicted labels for each image in our test set, as well as new output image files that overlay the predicted bounding box atop the original image.
Predicted .txt labels for each image are saved via the save_txt=True argument and the output images with bounding box overlays are generated through the save=True argument.
The parameter conf=0.5 informs the model to ignore all predictions with a confidence level of less than 50%.
Lastly, iou=.5 directs the model to ignore boxes in the same class with an overlap of 50% or greater. It helps to reduce potential duplicate boxes generated for the same object.
we can load the images with predicted bounding box overlays to view how our model performs on a handful of images.
!!! Example "Display Predictions"
=== "Python"

    ```py
    # Show the first ten images from the preceding prediction task
    for pred_dir in glob.glob(f"{work_dir}/runs/detect/predict/*.jpg")[:10]:
        img = Image.open(pred_dir)
        display(img)
    ```
The code above displays ten images from the test set with their predicted bounding boxes, accompanied by class name labels and confidence levels.
Step 7: Evaluate the Model
We can produce visualizations of the model's precision and recall for each class. These visualizations are saved in the home directory, under the train folder. The precision score is displayed in the P_curve.png:
The graph shows an exponential increase in precision as the model's confidence level for predictions increases. However, the model precision has not yet leveled out at a certain confidence level after two epochs.
The recall graph (R_curve.png) displays an inverse trend:
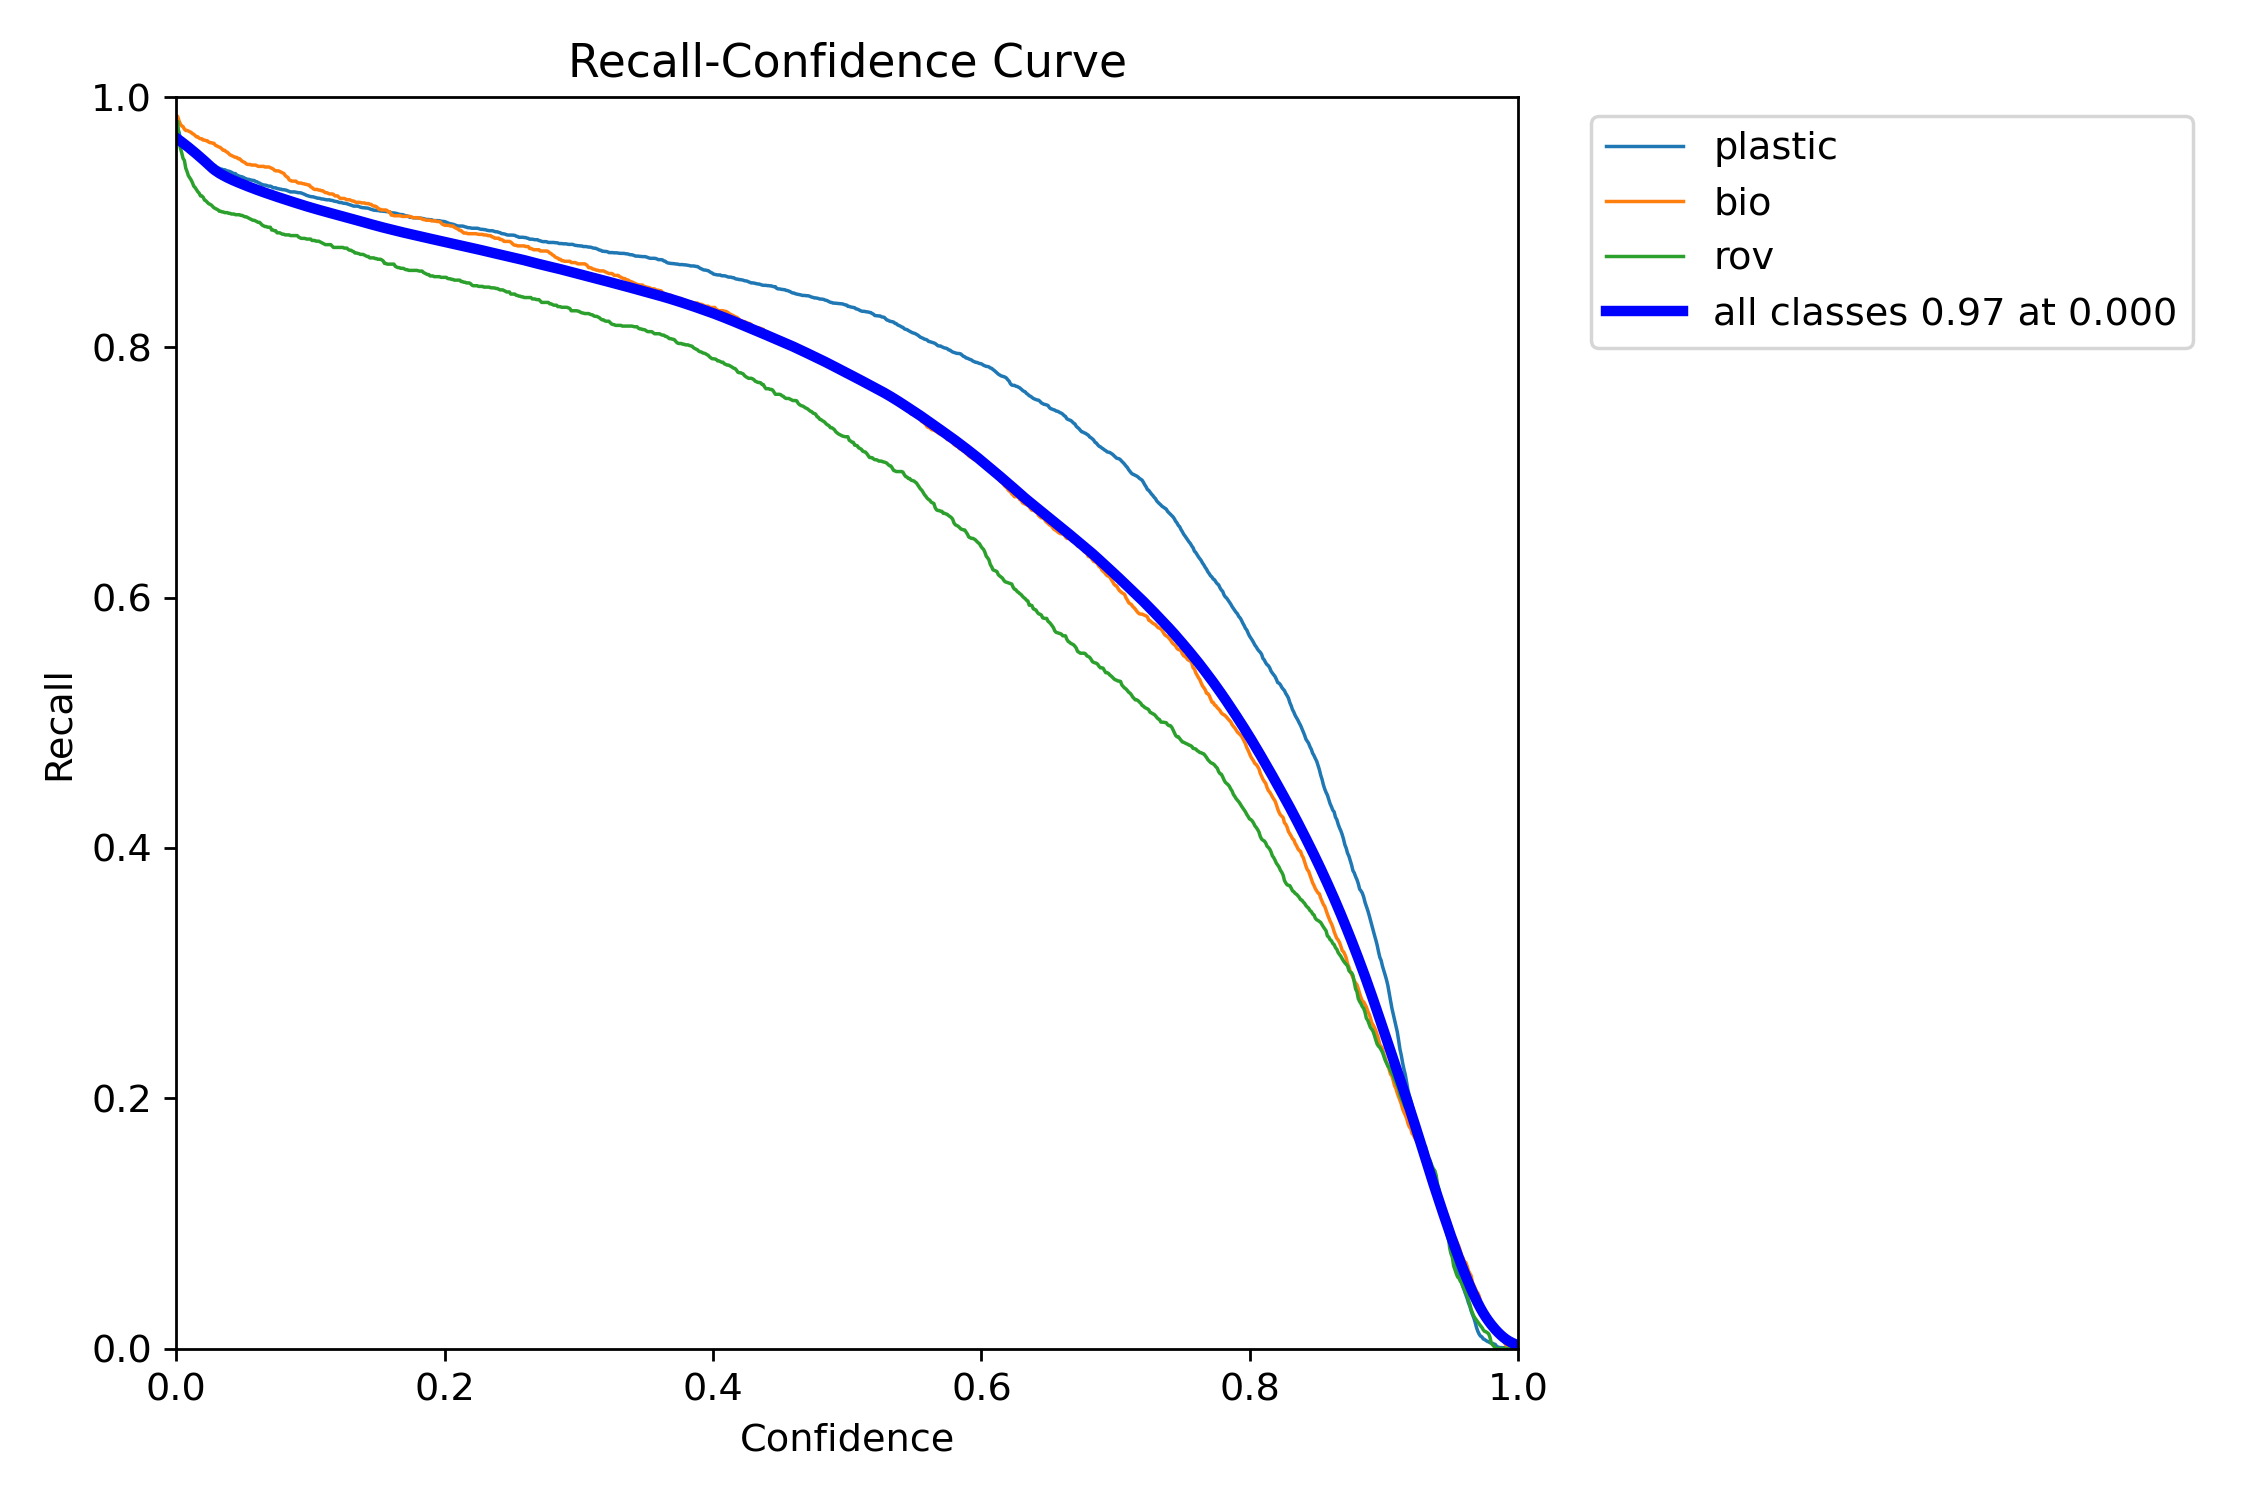
Unlike precision, recall moves in the opposite direction, showing greater recall with lower confidence instances and lower recall with higher confidence instances. This is an apt example of the trade-off in precision and recall for classification models.
Step 8: Calculating Intersection Over Union
You can measure the prediction accuracy by calculating the IoU between a predicted bounding box and a ground truth bounding box for the same object. Check out IBM's tutorial on training YOLOv8 for more details.
Summary
We explored IBM Watsonx key features, and how to train a YOLOv8 model using IBM Watsonx. We also saw how IBM Watsonx can enhance your AI workflows with advanced tools for model building, data management, and compliance.
For further details on usage, visit IBM Watsonx official documentation.
Also, be sure to check out the Ultralytics integration guide page, to learn more about different exciting integrations.
FAQ
How do I train a YOLOv8 model using IBM Watsonx?
To train a YOLOv8 model using IBM Watsonx, follow these steps:
- Set Up Your Environment: Create an IBM Cloud account and set up a Watsonx.ai project. Use a Jupyter Notebook for your coding environment.
- Install Libraries: Install necessary libraries like
torch,opencv, andultralytics. - Load Data: Use the Kaggle API to load your dataset into Watsonx.
- Preprocess Data: Organize your dataset into the required directory structure and update the
.yamlconfiguration file. - Train the Model: Use the YOLO command-line interface to train your model with specific parameters like
epochs,batch size, andlearning rate. - Test and Evaluate: Run inference to test the model and evaluate its performance using metrics like precision and recall.
For detailed instructions, refer to our YOLOv8 Model Training guide.
What are the key features of IBM Watsonx for AI model training?
IBM Watsonx offers several key features for AI model training:
- Watsonx.ai: Provides tools for AI development, including access to IBM-supported custom models and third-party models like Llama 3. It includes the Prompt Lab, Tuning Studio, and Flows Engine for comprehensive AI lifecycle management.
- Watsonx.data: Supports cloud and on-premises deployments, offering centralized data access, efficient query engines like Presto and Spark, and an AI-powered semantic layer.
- Watsonx.governance: Automates compliance, manages risk with alerts, and provides tools for detecting issues like bias and drift. It also includes dashboards and reporting tools for collaboration.
For more information, visit the IBM Watsonx official documentation.
Why should I use IBM Watsonx for training Ultralytics YOLOv8 models?
IBM Watsonx is an excellent choice for training Ultralytics YOLOv8 models due to its comprehensive suite of tools that streamline the AI lifecycle. Key benefits include:
- Scalability: Easily scale your model training with IBM Cloud services.
- Integration: Seamlessly integrate with various data sources and APIs.
- User-Friendly Interface: Simplifies the development process with a collaborative and intuitive interface.
- Advanced Tools: Access to powerful tools like the Prompt Lab, Tuning Studio, and Flows Engine for enhancing model performance.
Learn more about Ultralytics YOLOv8 and how to train models using IBM Watsonx in our integration guide.
How can I preprocess my dataset for YOLOv8 training on IBM Watsonx?
To preprocess your dataset for YOLOv8 training on IBM Watsonx:
- Organize Directories: Ensure your dataset follows the YOLO directory structure with separate subdirectories for images and labels within the train/val/test split.
- Update .yaml File: Modify the
.yamlconfiguration file to reflect the new directory structure and class names. - Run Preprocessing Script: Use a Python script to reorganize your dataset and update the
.yamlfile accordingly.
Here's a sample script to organize your dataset:
import os
import shutil


def organize_files(directory):
    for subdir in ["train", "test", "val"]:
        subdir_path = os.path.join(directory, subdir)
        if not os.path.exists(subdir_path):
            continue

        images_dir = os.path.join(subdir_path, "images")
        labels_dir = os.path.join(subdir_path, "labels")

        os.makedirs(images_dir, exist_ok=True)
        os.makedirs(labels_dir, exist_ok=True)

        for filename in os.listdir(subdir_path):
            if filename.endswith(".txt"):
                shutil.move(os.path.join(subdir_path, filename), os.path.join(labels_dir, filename))
            elif filename.endswith(".jpg") or filename.endswith(".png") or filename.endswith(".jpeg"):
                shutil.move(os.path.join(subdir_path, filename), os.path.join(images_dir, filename))


if __name__ == "__main__":
    directory = f"{work_dir}/trash_ICRA19/dataset"
    organize_files(directory)
For more details, refer to our data preprocessing guide.
What are the prerequisites for training a YOLOv8 model on IBM Watsonx?
Before you start training a YOLOv8 model on IBM Watsonx, ensure you have the following prerequisites:
- IBM Cloud Account: Create an account on IBM Cloud to access Watsonx.ai.
- Kaggle Account: For loading datasets, you'll need a Kaggle account and an API key.
- Jupyter Notebook: Set up a Jupyter Notebook environment within Watsonx.ai for coding and model training.
For more information on setting up your environment, visit our Ultralytics Installation guide.
comments: true
description: Discover Ultralytics integrations for streamlined ML workflows, dataset management, optimized model training, and robust deployment solutions.
keywords: Ultralytics, machine learning, ML workflows, dataset management, model training, model deployment, Roboflow, ClearML, Comet ML, DVC, MLFlow, Ultralytics HUB, Neptune, Ray Tune, TensorBoard, Weights & Biases, Amazon SageMaker, Paperspace Gradient, Google Colab, Neural Magic, Gradio, TorchScript, ONNX, OpenVINO, TensorRT, CoreML, TF SavedModel, TF GraphDef, TFLite, TFLite Edge TPU, TF.js, PaddlePaddle, NCNN
Ultralytics Integrations
Welcome to the Ultralytics Integrations page! This page provides an overview of our partnerships with various tools and platforms, designed to streamline your machine learning workflows, enhance dataset management, simplify model training, and facilitate efficient deployment.

Watch: Ultralytics YOLOv8 Deployment and Integrations
Datasets Integrations
- Roboflow: Facilitate seamless dataset management for Ultralytics models, offering robust annotation, preprocessing, and augmentation capabilities.
Training Integrations
-
ClearML: Automate your Ultralytics ML workflows, monitor experiments, and foster team collaboration.
-
Comet ML: Enhance your model development with Ultralytics by tracking, comparing, and optimizing your machine learning experiments.
-
DVC: Implement version control for your Ultralytics machine learning projects, synchronizing data, code, and models effectively.
-
MLFlow: Streamline the entire ML lifecycle of Ultralytics models, from experimentation and reproducibility to deployment.
-
Ultralytics HUB: Access and contribute to a community of pre-trained Ultralytics models.
-
Neptune: Maintain a comprehensive log of your ML experiments with Ultralytics in this metadata store designed for MLOps.
-
Ray Tune: Optimize the hyperparameters of your Ultralytics models at any scale.
-
TensorBoard: Visualize your Ultralytics ML workflows, monitor model metrics, and foster team collaboration.
-
Weights & Biases (W&B): Monitor experiments, visualize metrics, and foster reproducibility and collaboration on Ultralytics projects.
-
Amazon SageMaker: Leverage Amazon SageMaker to efficiently build, train, and deploy Ultralytics models, providing an all-in-one platform for the ML lifecycle.
-
Paperspace Gradient: Paperspace Gradient simplifies working on YOLOv8 projects by providing easy-to-use cloud tools for training, testing, and deploying your models quickly.
-
Google Colab: Use Google Colab to train and evaluate Ultralytics models in a cloud-based environment that supports collaboration and sharing.
-
Kaggle: Explore how you can use Kaggle to train and evaluate Ultralytics models in a cloud-based environment with pre-installed libraries, GPU support, and a vibrant community for collaboration and sharing.
-
JupyterLab: Find out how to use JupyterLab's interactive and customizable environment to train and evaluate Ultralytics models with ease and efficiency.
-
IBM Watsonx: See how IBM Watsonx simplifies the training and evaluation of Ultralytics models with its cutting-edge AI tools, effortless integration, and advanced model management system.
Deployment Integrations
-
Neural Magic: Leverage Quantization Aware Training (QAT) and pruning techniques to optimize Ultralytics models for superior performance and leaner size.
-
Gradio 🚀 NEW: Deploy Ultralytics models with Gradio for real-time, interactive object detection demos.
-
TorchScript: Developed as part of the PyTorch framework, TorchScript enables efficient execution and deployment of machine learning models in various production environments without the need for Python dependencies.
-
ONNX: An open-source format created by Microsoft for facilitating the transfer of AI models between various frameworks, enhancing the versatility and deployment flexibility of Ultralytics models.
-
OpenVINO: Intel's toolkit for optimizing and deploying computer vision models efficiently across various Intel CPU and GPU platforms.
-
TensorRT: Developed by NVIDIA, this high-performance deep learning inference framework and model format optimizes AI models for accelerated speed and efficiency on NVIDIA GPUs, ensuring streamlined deployment.
-
CoreML: CoreML, developed by Apple, is a framework designed for efficiently integrating machine learning models into applications across iOS, macOS, watchOS, and tvOS, using Apple's hardware for effective and secure model deployment.
-
TF SavedModel: Developed by Google, TF SavedModel is a universal serialization format for TensorFlow models, enabling easy sharing and deployment across a wide range of platforms, from servers to edge devices.
-
TF GraphDef: Developed by Google, GraphDef is TensorFlow's format for representing computation graphs, enabling optimized execution of machine learning models across diverse hardware.
-
TFLite: Developed by Google, TFLite is a lightweight framework for deploying machine learning models on mobile and edge devices, ensuring fast, efficient inference with minimal memory footprint.
-
TFLite Edge TPU: Developed by Google for optimizing TensorFlow Lite models on Edge TPUs, this model format ensures high-speed, efficient edge computing.
-
TF.js: Developed by Google to facilitate machine learning in browsers and Node.js, TF.js allows JavaScript-based deployment of ML models.
-
PaddlePaddle: An open-source deep learning platform by Baidu, PaddlePaddle enables the efficient deployment of AI models and focuses on the scalability of industrial applications.
-
NCNN: Developed by Tencent, NCNN is an efficient neural network inference framework tailored for mobile devices. It enables direct deployment of AI models into apps, optimizing performance across various mobile platforms.
Export Formats
We also support a variety of model export formats for deployment in different environments. Here are the available formats:
| Format | format Argument |
Model | Metadata | Arguments |
|---|---|---|---|---|
| PyTorch | - | yolov8n.pt |
✅ | - |
| TorchScript | torchscript |
yolov8n.torchscript |
✅ | imgsz, optimize, batch |
| ONNX | onnx |
yolov8n.onnx |
✅ | imgsz, half, dynamic, simplify, opset, batch |
| OpenVINO | openvino |
yolov8n_openvino_model/ |
✅ | imgsz, half, int8, batch |
| TensorRT | engine |
yolov8n.engine |
✅ | imgsz, half, dynamic, simplify, workspace, int8, batch |
| CoreML | coreml |
yolov8n.mlpackage |
✅ | imgsz, half, int8, nms, batch |
| TF SavedModel | saved_model |
yolov8n_saved_model/ |
✅ | imgsz, keras, int8, batch |
| TF GraphDef | pb |
yolov8n.pb |
❌ | imgsz, batch |
| TF Lite | tflite |
yolov8n.tflite |
✅ | imgsz, half, int8, batch |
| TF Edge TPU | edgetpu |
yolov8n_edgetpu.tflite |
✅ | imgsz |
| TF.js | tfjs |
yolov8n_web_model/ |
✅ | imgsz, half, int8, batch |
| PaddlePaddle | paddle |
yolov8n_paddle_model/ |
✅ | imgsz, batch |
| NCNN | ncnn |
yolov8n_ncnn_model/ |
✅ | imgsz, half, batch |
Explore the links to learn more about each integration and how to get the most out of them with Ultralytics. See full export details in the Export page.
Contribute to Our Integrations
We're always excited to see how the community integrates Ultralytics YOLO with other technologies, tools, and platforms! If you have successfully integrated YOLO with a new system or have valuable insights to share, consider contributing to our Integrations Docs.
By writing a guide or tutorial, you can help expand our documentation and provide real-world examples that benefit the community. It's an excellent way to contribute to the growing ecosystem around Ultralytics YOLO.
To contribute, please check out our Contributing Guide for instructions on how to submit a Pull Request (PR) 🛠️. We eagerly await your contributions!
Let's collaborate to make the Ultralytics YOLO ecosystem more expansive and feature-rich 🙏!
FAQ
What is Ultralytics HUB, and how does it streamline the ML workflow?
Ultralytics HUB is a cloud-based platform designed to make machine learning (ML) workflows for Ultralytics models seamless and efficient. By using this tool, you can easily upload datasets, train models, perform real-time tracking, and deploy YOLOv8 models without needing extensive coding skills. You can explore the key features on the Ultralytics HUB page and get started quickly with our Quickstart guide.
How do I integrate Ultralytics YOLO models with Roboflow for dataset management?
Integrating Ultralytics YOLO models with Roboflow enhances dataset management by providing robust tools for annotation, preprocessing, and augmentation. To get started, follow the steps on the Roboflow integration page. This partnership ensures efficient dataset handling, which is crucial for developing accurate and robust YOLO models.
Can I track the performance of my Ultralytics models using MLFlow?
Yes, you can. Integrating MLFlow with Ultralytics models allows you to track experiments, improve reproducibility, and streamline the entire ML lifecycle. Detailed instructions for setting up this integration can be found on the MLFlow integration page. This integration is particularly useful for monitoring model metrics and managing the ML workflow efficiently.
What are the benefits of using Neural Magic for YOLOv8 model optimization?
Neural Magic optimizes YOLOv8 models by leveraging techniques like Quantization Aware Training (QAT) and pruning, resulting in highly efficient, smaller models that perform better on resource-limited hardware. Check out the Neural Magic integration page to learn how to implement these optimizations for superior performance and leaner models. This is especially beneficial for deployment on edge devices.
How do I deploy Ultralytics YOLO models with Gradio for interactive demos?
To deploy Ultralytics YOLO models with Gradio for interactive object detection demos, you can follow the steps outlined on the Gradio integration page. Gradio allows you to create easy-to-use web interfaces for real-time model inference, making it an excellent tool for showcasing your YOLO model's capabilities in a user-friendly format suitable for both developers and end-users.
By addressing these common questions, we aim to improve user experience and provide valuable insights into the powerful capabilities of Ultralytics products. Incorporating these FAQs will not only enhance the documentation but also drive more organic traffic to the Ultralytics website.
comments: true
description: Explore our integration guide that explains how you can use JupyterLab to train a YOLOv8 model. We'll also cover key features and tips for common issues.
keywords: JupyterLab, What is JupyterLab, How to Use JupyterLab, JupyterLab How to Use, YOLOv8, Ultralytics, Model Training, GPU, TPU, cloud computing
A Guide on How to Use JupyterLab to Train Your YOLOv8 Models
Building deep learning models can be tough, especially when you don't have the right tools or environment to work with. If you are facing this issue, JupyterLab might be the right solution for you. JupyterLab is a user-friendly, web-based platform that makes coding more flexible and interactive. You can use it to handle big datasets, create complex models, and even collaborate with others, all in one place.
You can use JupyterLab to work on projects related to Ultralytics YOLOv8 models. JupyterLab is a great option for efficient model development and experimentation. It makes it easy to start experimenting with and training YOLOv8 models right from your computer. Let's dive deeper into JupyterLab, its key features, and how you can use it to train YOLOv8 models.
What is JupyterLab?
JupyterLab is an open-source web-based platform designed for working with Jupyter notebooks, code, and data. It's an upgrade from the traditional Jupyter Notebook interface that provides a more versatile and powerful user experience.
JupyterLab allows you to work with notebooks, text editors, terminals, and other tools all in one place. Its flexible design lets you organize your workspace to fit your needs and makes it easier to perform tasks like data analysis, visualization, and machine learning. JupyterLab also supports real-time collaboration, making it ideal for team projects in research and data science.
Key Features of JupyterLab
Here are some of the key features that make JupyterLab a great option for model development and experimentation:
- All-in-One Workspace: JupyterLab is a one-stop shop for all your data science needs. Unlike the classic Jupyter Notebook, which had separate interfaces for text editing, terminal access, and notebooks, JupyterLab integrates all these features into a single, cohesive environment. You can view and edit various file formats, including JPEG, PDF, and CSV, directly within JupyterLab. An all-in-one workspace lets you access everything you need at your fingertips, streamlining your workflow and saving you time.
- Flexible Layouts: One of JupyterLab's standout features is its flexible layout. You can drag, drop, and resize tabs to create a personalized layout that helps you work more efficiently. The collapsible left sidebar keeps essential tabs like the file browser, running kernels, and command palette within easy reach. You can have multiple windows open at once, allowing you to multitask and manage your projects more effectively.
- Interactive Code Consoles: Code consoles in JupyterLab provide an interactive space to test out snippets of code or functions. They also serve as a log of computations made within a notebook. Creating a new console for a notebook and viewing all kernel activity is straightforward. This feature is especially useful when you're experimenting with new ideas or troubleshooting issues in your code.
- Markdown Preview: Working with Markdown files is more efficient in JupyterLab, thanks to its simultaneous preview feature. As you write or edit your Markdown file, you can see the formatted output in real-time. It makes it easier to double-check that your documentation looks perfect, saving you from having to switch back and forth between editing and preview modes.
- Run Code from Text Files: If you're sharing a text file with code, JupyterLab makes it easy to run it directly within the platform. You can highlight the code and press Shift + Enter to execute it. It is great for verifying code snippets quickly and helps guarantee that the code you share is functional and error-free.
Why Should You Use JupyterLab for Your YOLOv8 Projects?
There are multiple platforms for developing and evaluating machine learning models, so what makes JupyterLab stand out? Let's explore some of the unique aspects that JupyterLab offers for your machine-learning projects:
- Easy Cell Management: Managing cells in JupyterLab is a breeze. Instead of the cumbersome cut-and-paste method, you can simply drag and drop cells to rearrange them.
- Cross-Notebook Cell Copying: JupyterLab makes it simple to copy cells between different notebooks. You can drag and drop cells from one notebook to another.
- Easy Switch to Classic Notebook View: For those who miss the classic Jupyter Notebook interface, JupyterLab offers an easy switch back. Simply replace
/labin the URL with/treeto return to the familiar notebook view. - Multiple Views: JupyterLab supports multiple views of the same notebook, which is particularly useful for long notebooks. You can open different sections side-by-side for comparison or exploration, and any changes made in one view are reflected in the other.
- Customizable Themes: JupyterLab includes a built-in Dark theme for the notebook, which is perfect for late-night coding sessions. There are also themes available for the text editor and terminal, allowing you to customize the appearance of your entire workspace.
Common Issues While Working with JupyterLab
When working with Kaggle, you might come across some common issues. Here are some tips to help you navigate the platform smoothly:
- Managing Kernels: Kernels are crucial because they manage the connection between the code you write in JupyterLab and the environment where it runs. They can also access and share data between notebooks. When you close a Jupyter Notebook, the kernel might still be running because other notebooks could be using it. If you want to completely shut down a kernel, you can select it, right-click, and choose "Shut Down Kernel" from the pop-up menu.
- Installing Python Packages: Sometimes, you might need additional Python packages that aren't pre-installed on the server. You can easily install these packages in your home directory or a virtual environment by using the command
python -m pip install package-name. To see all installed packages, usepython -m pip list. - Deploying Flask/FastAPI API to Posit Connect: You can deploy your Flask and FastAPI APIs to Posit Connect using the rsconnect-python package from the terminal. Doing so makes it easier to integrate your web applications with JupyterLab and share them with others.
- Installing JupyterLab Extensions: JupyterLab supports various extensions to enhance functionality. You can install and customize these extensions to suit your needs. For detailed instructions, refer to JupyterLab Extensions Guide for more information.
- Using Multiple Versions of Python: If you need to work with different versions of Python, you can use Jupyter kernels configured with different Python versions.
How to Use JupyterLab to Try Out YOLOv8
JupyterLab makes it easy to experiment with YOLOv8. To get started, follow these simple steps.
Step 1: Install JupyterLab
First, you need to install JupyterLab. Open your terminal and run the command:
!!! Tip "Installation"
=== "CLI"

    ```py
    # Install the required package for JupyterLab
    pip install jupyterlab
    ```
Step 2: Download the YOLOv8 Tutorial Notebook
Next, download the tutorial.ipynb file from the Ultralytics GitHub repository. Save this file to any directory on your local machine.
Step 3: Launch JupyterLab
Navigate to the directory where you saved the notebook file using your terminal. Then, run the following command to launch JupyterLab:
!!! Example "Usage"
=== "CLI"

    ```py
    jupyter lab
    ```
Once you've run this command, it will open JupyterLab in your default web browser, as shown below.
Step 4: Start Experimenting
In JupyterLab, open the tutorial.ipynb notebook. You can now start running the cells to explore and experiment with YOLOv8.
JupyterLab's interactive environment allows you to modify code, visualize outputs, and document your findings all in one place. You can try out different configurations and understand how YOLOv8 works.
For a detailed understanding of the model training process and best practices, refer to the YOLOv8 Model Training guide. This guide will help you get the most out of your experiments and ensure you're using YOLOv8 effectively.
Keep Learning about Jupyterlab
If you're excited to learn more about JupyterLab, here are some great resources to get you started:
- JupyterLab Documentation: Dive into the official JupyterLab Documentation to explore its features and capabilities. It's a great way to understand how to use this powerful tool to its fullest potential.
- Try It With Binder: Experiment with JupyterLab without installing anything by using Binder, which lets you launch a live JupyterLab instance directly in your browser. It's a great way to start experimenting immediately.
- Installation Guide: For a step-by-step guide on installing JupyterLab on your local machine, check out the installation guide.
Summary
We've explored how JupyterLab can be a powerful tool for experimenting with Ultralytics YOLOv8 models. Using its flexible and interactive environment, you can easily set up JupyterLab on your local machine and start working with YOLOv8. JupyterLab makes it simple to train and evaluate your models, visualize outputs, and document your findings all in one place.
For more details, visit the JupyterLab FAQ Page.
Interested in more YOLOv8 integrations? Check out the Ultralytics integration guide to explore additional tools and capabilities for your machine learning projects.
FAQ
How do I use JupyterLab to train a YOLOv8 model?
To train a YOLOv8 model using JupyterLab:
-
Install JupyterLab and the Ultralytics package:
pip install jupyterlab ultralytics -
Launch JupyterLab and open a new notebook.
-
Import the YOLO model and load a pretrained model:
from ultralytics import YOLO model = YOLO("yolov8n.pt") -
Train the model on your custom dataset:
results = model.train(data="path/to/your/data.yaml", epochs=100, imgsz=640) -
Visualize training results using JupyterLab's built-in plotting capabilities:
%matplotlib inline
from ultralytics.utils.plotting import plot_results
plot_results(results)
JupyterLab's interactive environment allows you to easily modify parameters, visualize results, and iterate on your model training process.
What are the key features of JupyterLab that make it suitable for YOLOv8 projects?
JupyterLab offers several features that make it ideal for YOLOv8 projects:
- Interactive code execution: Test and debug YOLOv8 code snippets in real-time.
- Integrated file browser: Easily manage datasets, model weights, and configuration files.
- Flexible layout: Arrange multiple notebooks, terminals, and output windows side-by-side for efficient workflow.
- Rich output display: Visualize YOLOv8 detection results, training curves, and model performance metrics inline.
- Markdown support: Document your YOLOv8 experiments and findings with rich text and images.
- Extension ecosystem: Enhance functionality with extensions for version control, remote computing, and more.
These features allow for a seamless development experience when working with YOLOv8 models, from data preparation to model deployment.
How can I optimize YOLOv8 model performance using JupyterLab?
To optimize YOLOv8 model performance in JupyterLab:
-
Use the autobatch feature to determine the optimal batch size:
from ultralytics.utils.autobatch import autobatch optimal_batch_size = autobatch(model) -
Implement hyperparameter tuning using libraries like Ray Tune:
from ultralytics.utils.tuner import run_ray_tune best_results = run_ray_tune(model, data="path/to/data.yaml") -
Visualize and analyze model metrics using JupyterLab's plotting capabilities:
from ultralytics.utils.plotting import plot_results plot_results(results.results_dict) -
Experiment with different model architectures and export formats to find the best balance of speed and accuracy for your specific use case.
JupyterLab's interactive environment allows for quick iterations and real-time feedback, making it easier to optimize your YOLOv8 models efficiently.
How do I handle common issues when working with JupyterLab and YOLOv8?
When working with JupyterLab and YOLOv8, you might encounter some common issues. Here's how to handle them:
-
GPU memory issues:
- Use
torch.cuda.empty_cache()to clear GPU memory between runs. - Adjust batch size or image size to fit your GPU memory.
- Use
-
Package conflicts:
- Create a separate conda environment for your YOLOv8 projects to avoid conflicts.
- Use
!pip install package_namein a notebook cell to install missing packages.
-
Kernel crashes:
- Restart the kernel and run cells one by one to identify the problematic code.


 浙公网安备 33010602011771号