
Yolov8-源码解析-七-
Yolov8 源码解析(七)
comments: true
description: Understand the key practices for monitoring, maintaining, and documenting computer vision models to guarantee accuracy, spot anomalies, and mitigate data drift.
keywords: Computer Vision Models, AI Model Monitoring, Data Drift Detection, Anomaly Detection in AI, Model Monitoring
Maintaining Your Computer Vision Models After Deployment
Introduction
If you are here, we can assume you've completed many steps in your computer vision project: from gathering requirements, annotating data, and training the model to finally deploying it. Your application is now running in production, but your project doesn't end here. The most important part of a computer vision project is making sure your model continues to fulfill your project's objectives over time, and that's where monitoring, maintaining, and documenting your computer vision model enters the picture.
In this guide, we'll take a closer look at how you can maintain your computer vision models after deployment. We'll explore how model monitoring can help you catch problems early on, how to keep your model accurate and up-to-date, and why documentation is important for troubleshooting.
Model Monitoring is Key
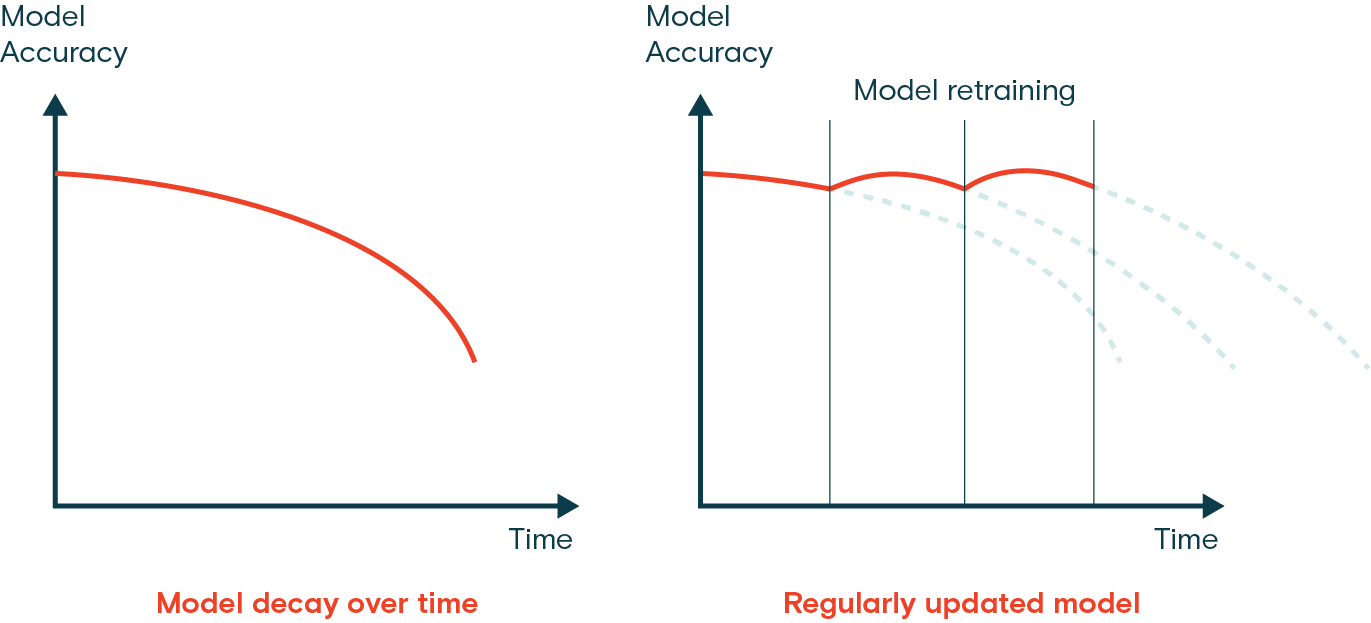
Keeping a close eye on your deployed computer vision models is essential. Without proper monitoring, models can lose accuracy. A common issue is data distribution shift or data drift, where the data the model encounters changes from what it was trained on. When the model has to make predictions on data it doesn't recognize, it can lead to misinterpretations and poor performance. Outliers, or unusual data points, can also throw off the model's accuracy.
Regular model monitoring helps developers track the model's performance, spot anomalies, and quickly address problems like data drift. It also helps manage resources by indicating when updates are needed, avoiding expensive overhauls, and keeping the model relevant.
Best Practices for Model Monitoring
Here are some best practices to keep in mind while monitoring your computer vision model in production:
- Track Performance Regularly: Continuously monitor the model's performance to detect changes over time.
- Double Check the Data Quality: Check for missing values or anomalies in the data.
- Use Diverse Data Sources: Monitor data from various sources to get a comprehensive view of the model's performance.
- Combine Monitoring Techniques: Use a mix of drift detection algorithms and rule-based approaches to identify a wide range of issues.
- Monitor Inputs and Outputs: Keep an eye on both the data the model processes and the results it produces to make sure everything is functioning correctly.
- Set Up Alerts: Implement alerts for unusual behavior, such as performance drops, to be able to make quick corrective actions.
Tools for AI Model Monitoring
You can use automated monitoring tools to make it easier to monitor models after deployment. Many tools offer real-time insights and alerting capabilities. Here are some examples of open-source model monitoring tools that can work together:
- Prometheus: Prometheus is an open-source monitoring tool that collects and stores metrics for detailed performance tracking. It integrates easily with Kubernetes and Docker, collecting data at set intervals and storing it in a time-series database. Prometheus can also scrape HTTP endpoints to gather real-time metrics. Collected data can be queried using the PromQL language.
- Grafana: Grafana is an open-source data visualization and monitoring tool that allows you to query, visualize, alert on, and understand your metrics no matter where they are stored. It works well with Prometheus and offers advanced data visualization features. You can create custom dashboards to show important metrics for your computer vision models, like inference latency, error rates, and resource usage. Grafana turns collected data into easy-to-read dashboards with line graphs, heat maps, and histograms. It also supports alerts, which can be sent through channels like Slack to quickly notify teams of any issues.
- Evidently AI: Evidently AI is an open-source tool designed for monitoring and debugging machine learning models in production. It generates interactive reports from pandas DataFrames, helping analyze machine learning models. Evidently AI can detect data drift, model performance degradation, and other issues that may arise with your deployed models.
The three tools introduced above, Evidently AI, Prometheus, and Grafana, can work together seamlessly as a fully open-source ML monitoring solution that is ready for production. Evidently AI is used to collect and calculate metrics, Prometheus stores these metrics, and Grafana displays them and sets up alerts. While there are many other tools available, this setup is an exciting open-source option that provides robust capabilities for monitoring and maintaining your models.

Anomaly Detection and Alert Systems
An anomaly is any data point or pattern that deviates quite a bit from what is expected. With respect to computer vision models, anomalies can be images that are very different from the ones the model was trained on. These unexpected images can be signs of issues like changes in data distribution, outliers, or behaviors that might reduce model performance. Setting up alert systems to detect these anomalies is an important part of model monitoring.
By setting standard performance levels and limits for key metrics, you can catch problems early. When performance goes outside these limits, alerts are triggered, prompting quick fixes. Regularly updating and retraining models with new data keeps them relevant and accurate as the data changes.
Things to Keep in Mind When Configuring Thresholds and Alerts
When you are setting up your alert systems, keep these best practices in mind:
- Standardized Alerts: Use consistent tools and formats for all alerts, such as email or messaging apps like Slack. Standardization makes it easier for you to quickly understand and respond to alerts.
- Include Expected Behavior: Alert messages should clearly state what went wrong, what was expected, and the timeframe evaluated. It helps you gauge the urgency and context of the alert.
- Configurable Alerts: Make alerts easily configurable to adapt to changing conditions. Allow yourself to edit thresholds, snooze, disable, or acknowledge alerts.
Data Drift Detection
Data drift detection is a concept that helps identify when the statistical properties of the input data change over time, which can degrade model performance. Before you decide to retrain or adjust your models, this technique helps spot that there is an issue. Data drift deals with changes in the overall data landscape over time, while anomaly detection focuses on identifying rare or unexpected data points that may require immediate attention.

Here are several methods to detect data drift:
Continuous Monitoring: Regularly monitor the model's input data and outputs for signs of drift. Track key metrics and compare them against historical data to identify significant changes.
Statistical Techniques: Use methods like the Kolmogorov-Smirnov test or Population Stability Index (PSI) to detect changes in data distributions. These tests compare the distribution of new data with the training data to identify significant differences.
Feature Drift: Monitor individual features for drift. Sometimes, the overall data distribution may remain stable, but individual features may drift. Identifying which features are drifting helps in fine-tuning the retraining process.
Model Maintenance
Model maintenance is crucial to keep computer vision models accurate and relevant over time. Model maintenance involves regularly updating and retraining models, addressing data drift, and ensuring the model stays relevant as data and environments change. You might be wondering how model maintenance differs from model monitoring. Monitoring is about watching the model's performance in real time to catch issues early. Maintenance, on the other hand, is about fixing these issues.
Regular Updates and Re-training
Once a model is deployed, while monitoring, you may notice changes in data patterns or performance, indicating model drift. Regular updates and re-training become essential parts of model maintenance to ensure the model can handle new patterns and scenarios. There are a few techniques you can use based on how your data is changing.
For example, if the data is changing gradually over time, incremental learning is a good approach. Incremental learning involves updating the model with new data without completely retraining it from scratch, saving computational resources and time. However, if the data has changed drastically, a periodic full re-training might be a better option to ensure the model does not overfit on the new data while losing track of older patterns.
Regardless of the method, validation and testing are a must after updates. It is important to validate the model on a separate test dataset to check for performance improvements or degradation.
Deciding When to Retrain Your Model
The frequency of retraining your computer vision model depends on data changes and model performance. Retrain your model whenever you observe a significant performance drop or detect data drift. Regular evaluations can help determine the right retraining schedule by testing the model against new data. Monitoring performance metrics and data patterns lets you decide if your model needs more frequent updates to maintain accuracy.

Documentation
Documenting a computer vision project makes it easier to understand, reproduce, and collaborate on. Good documentation covers model architecture, hyperparameters, datasets, evaluation metrics, and more. It provides transparency, helping team members and stakeholders understand what has been done and why. Documentation also aids in troubleshooting, maintenance, and future enhancements by providing a clear reference of past decisions and methods.
Key Elements to Document
These are some of the key elements that should be included in project documentation:
- Project Overview: Provide a high-level summary of the project, including the problem statement, solution approach, expected outcomes, and project scope. Explain the role of computer vision in addressing the problem and outline the stages and deliverables.
- Model Architecture: Detail the structure and design of the model, including its components, layers, and connections. Explain the chosen hyperparameters and the rationale behind these choices.
- Data Preparation: Describe the data sources, types, formats, sizes, and preprocessing steps. Discuss data quality, reliability, and any transformations applied before training the model.
- Training Process: Document the training procedure, including the datasets used, training parameters, and loss functions. Explain how the model was trained and any challenges encountered during training.
- Evaluation Metrics: Specify the metrics used to evaluate the model's performance, such as accuracy, precision, recall, and F1-score. Include performance results and an analysis of these metrics.
- Deployment Steps: Outline the steps taken to deploy the model, including the tools and platforms used, deployment configurations, and any specific challenges or considerations.
- Monitoring and Maintenance Procedure: Provide a detailed plan for monitoring the model's performance post-deployment. Include methods for detecting and addressing data and model drift, and describe the process for regular updates and retraining.
Tools for Documentation
There are many options when it comes to documenting AI projects, with open-source tools being particularly popular. Two of these are Jupyter Notebooks and MkDocs. Jupyter Notebooks allow you to create interactive documents with embedded code, visualizations, and text, making them ideal for sharing experiments and analyses. MkDocs is a static site generator that is easy to set up and deploy and is perfect for creating and hosting project documentation online.
Connect with the Community
Joining a community of computer vision enthusiasts can help you solve problems and learn more quickly. Here are some ways to connect, get support, and share ideas.
Community Resources
- GitHub Issues: Check out the YOLOv8 GitHub repository and use the Issues tab to ask questions, report bugs, and suggest new features. The community and maintainers are highly active and supportive.
- Ultralytics Discord Server: Join the Ultralytics Discord server to chat with other users and developers, get support, and share your experiences.
Official Documentation
- Ultralytics YOLOv8 Documentation: Visit the official YOLOv8 documentation for detailed guides and helpful tips on various computer vision projects.
Using these resources will help you solve challenges and stay up-to-date with the latest trends and practices in the computer vision community.
Key Takeaways
We covered key tips for monitoring, maintaining, and documenting your computer vision models. Regular updates and re-training help the model adapt to new data patterns. Detecting and fixing data drift helps your model stay accurate. Continuous monitoring catches issues early, and good documentation makes collaboration and future updates easier. Following these steps will help your computer vision project stay successful and effective over time.
FAQ
How do I monitor the performance of my deployed computer vision model?
Monitoring the performance of your deployed computer vision model is crucial to ensure its accuracy and reliability over time. You can use tools like Prometheus, Grafana, and Evidently AI to track key metrics, detect anomalies, and identify data drift. Regularly monitor inputs and outputs, set up alerts for unusual behavior, and use diverse data sources to get a comprehensive view of your model's performance. For more details, check out our section on Model Monitoring.
What are the best practices for maintaining computer vision models after deployment?
Maintaining computer vision models involves regular updates, retraining, and monitoring to ensure continued accuracy and relevance. Best practices include:
- Continuous Monitoring: Track performance metrics and data quality regularly.
- Data Drift Detection: Use statistical techniques to identify changes in data distributions.
- Regular Updates and Retraining: Implement incremental learning or periodic full retraining based on data changes.
- Documentation: Maintain detailed documentation of model architecture, training processes, and evaluation metrics. For more insights, visit our Model Maintenance section.
Why is data drift detection important for AI models?
Data drift detection is essential because it helps identify when the statistical properties of the input data change over time, which can degrade model performance. Techniques like continuous monitoring, statistical tests (e.g., Kolmogorov-Smirnov test), and feature drift analysis can help spot issues early. Addressing data drift ensures that your model remains accurate and relevant in changing environments. Learn more about data drift detection in our Data Drift Detection section.
What tools can I use for anomaly detection in computer vision models?
For anomaly detection in computer vision models, tools like Prometheus, Grafana, and Evidently AI are highly effective. These tools can help you set up alert systems to detect unusual data points or patterns that deviate from expected behavior. Configurable alerts and standardized messages can help you respond quickly to potential issues. Explore more in our Anomaly Detection and Alert Systems section.
How can I document my computer vision project effectively?
Effective documentation of a computer vision project should include:
- Project Overview: High-level summary, problem statement, and solution approach.
- Model Architecture: Details of the model structure, components, and hyperparameters.
- Data Preparation: Information on data sources, preprocessing steps, and transformations.
- Training Process: Description of the training procedure, datasets used, and challenges encountered.
- Evaluation Metrics: Metrics used for performance evaluation and analysis.
- Deployment Steps: Steps taken for model deployment and any specific challenges.
- Monitoring and Maintenance Procedure: Plan for ongoing monitoring and maintenance. For more comprehensive guidelines, refer to our Documentation section.
comments: true
description: Explore effective methods for testing computer vision models to make sure they are reliable, perform well, and are ready to be deployed.
keywords: Overfitting and Underfitting in Machine Learning, Model Testing, Data Leakage Machine Learning, Testing a Model, Testing Machine Learning Models, How to Test AI Models
A Guide on Model Testing
Introduction
After training and evaluating your model, it's time to test it. Model testing involves assessing how well it performs in real-world scenarios. Testing considers factors like accuracy, reliability, fairness, and how easy it is to understand the model's decisions. The goal is to make sure the model performs as intended, delivers the expected results, and fits into the overall objective of your application or project.
Model testing is quite similar to model evaluation, but they are two distinct steps in a computer vision project. Model evaluation involves metrics and plots to assess the model's accuracy. On the other hand, model testing checks if the model's learned behavior is the same as expectations. In this guide, we'll explore strategies for testing your computer vision models.
Model Testing Vs. Model Evaluation
First, let's understand the difference between model evaluation and testing with an example.
Suppose you have trained a computer vision model to recognize cats and dogs, and you want to deploy this model at a pet store to monitor the animals. During the model evaluation phase, you use a labeled dataset to calculate metrics like accuracy, precision, recall, and F1 score. For instance, the model might have an accuracy of 98% in distinguishing between cats and dogs in a given dataset.
After evaluation, you test the model using images from a pet store to see how well it identifies cats and dogs in more varied and realistic conditions. You check if it can correctly label cats and dogs when they are moving, in different lighting conditions, or partially obscured by objects like toys or furniture. Model testing checks that the model behaves as expected outside the controlled evaluation environment.
Preparing for Model Testing
Computer vision models learn from datasets by detecting patterns, making predictions, and evaluating their performance. These datasets are usually divided into training and testing sets to simulate real-world conditions. Training data teaches the model while testing data verifies its accuracy.
Here are two points to keep in mind before testing your model:
- Realistic Representation: The previously unseen testing data should be similar to the data that the model will have to handle when deployed. This helps get a realistic understanding of the model's capabilities.
- Sufficient Size: The size of the testing dataset needs to be large enough to provide reliable insights into how well the model performs.
Testing Your Computer Vision Model
Here are the key steps to take to test your computer vision model and understand its performance.
- Run Predictions: Use the model to make predictions on the test dataset.
- Compare Predictions: Check how well the model's predictions match the actual labels (ground truth).
- Calculate Performance Metrics: Compute metrics like accuracy, precision, recall, and F1 score to understand the model's strengths and weaknesses. Testing focuses on how these metrics reflect real-world performance.
- Visualize Results: Create visual aids like confusion matrices and ROC curves. These help you spot specific areas where the model might not be performing well in practical applications.
Next, the testing results can be analyzed:
- Misclassified Images: Identify and review images that the model misclassified to understand where it is going wrong.
- Error Analysis: Perform a thorough error analysis to understand the types of errors (e.g., false positives vs. false negatives) and their potential causes.
- Bias and Fairness: Check for any biases in the model's predictions. Ensure that the model performs equally well across different subsets of the data, especially if it includes sensitive attributes like race, gender, or age.
Testing Your YOLOv8 Model
To test your YOLOv8 model, you can use the validation mode. It's a straightforward way to understand the model's strengths and areas that need improvement. Also, you'll need to format your test dataset correctly for YOLOv8. For more details on how to use the validation mode, check out the Model Validation docs page.
Using YOLOv8 to Predict on Multiple Test Images
If you want to test your trained YOLOv8 model on multiple images stored in a folder, you can easily do so in one go. Instead of using the validation mode, which is typically used to evaluate model performance on a validation set and provide detailed metrics, you might just want to see predictions on all images in your test set. For this, you can use the prediction mode.
Difference Between Validation and Prediction Modes
- Validation Mode: Used to evaluate the model's performance by comparing predictions against known labels (ground truth). It provides detailed metrics such as accuracy, precision, recall, and F1 score.
- Prediction Mode: Used to run the model on new, unseen data to generate predictions. It does not provide detailed performance metrics but allows you to see how the model performs on real-world images.
Running YOLOv8 Predictions Without Custom Training
If you are interested in testing the basic YOLOv8 model to understand whether it can be used for your application without custom training, you can use the prediction mode. While the model is pre-trained on datasets like COCO, running predictions on your own dataset can give you a quick sense of how well it might perform in your specific context.
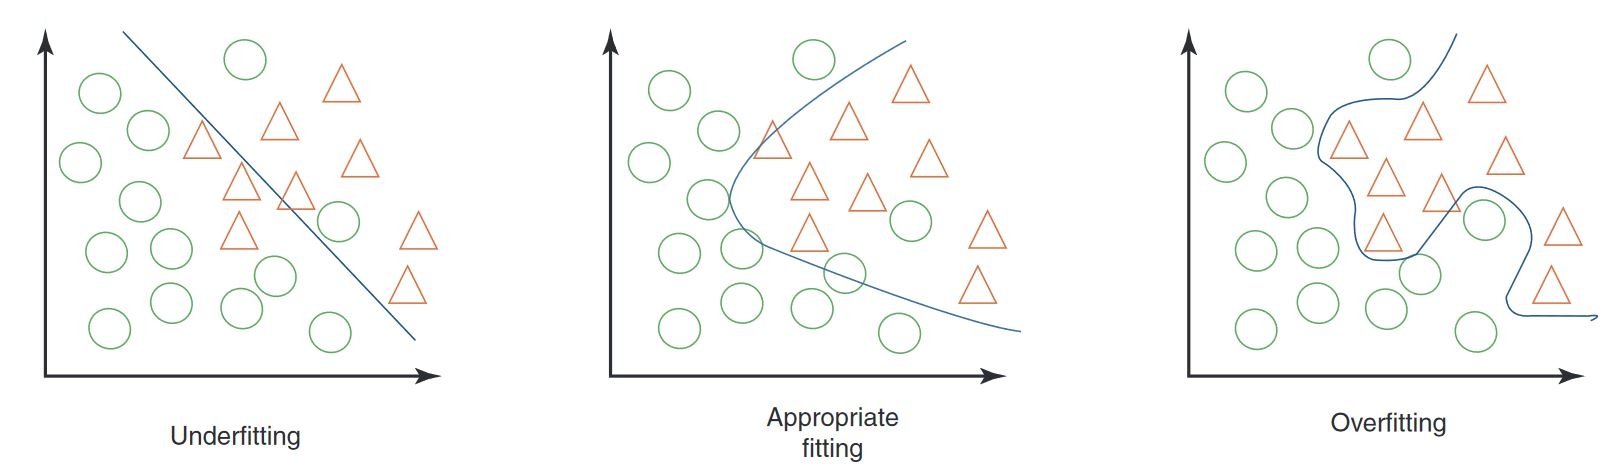
Overfitting and Underfitting in Machine Learning
When testing a machine learning model, especially in computer vision, it's important to watch out for overfitting and underfitting. These issues can significantly affect how well your model works with new data.
Overfitting
Overfitting happens when your model learns the training data too well, including the noise and details that don't generalize to new data. In computer vision, this means your model might do great with training images but struggle with new ones.
Signs of Overfitting
- High Training Accuracy, Low Validation Accuracy: If your model performs very well on training data but poorly on validation or test data, it's likely overfitting.
- Visual Inspection: Sometimes, you can see overfitting if your model is too sensitive to minor changes or irrelevant details in images.
Underfitting
Underfitting occurs when your model can't capture the underlying patterns in the data. In computer vision, an underfitted model might not even recognize objects correctly in the training images.
Signs of Underfitting
- Low Training Accuracy: If your model can't achieve high accuracy on the training set, it might be underfitting.
- Visual Misclassification: Consistent failure to recognize obvious features or objects suggests underfitting.
Balancing Overfitting and Underfitting
The key is to find a balance between overfitting and underfitting. Ideally, a model should perform well on both training and validation datasets. Regularly monitoring your model's performance through metrics and visual inspections, along with applying the right strategies, can help you achieve the best results.
Data Leakage in Computer Vision and How to Avoid It
While testing your model, something important to keep in mind is data leakage. Data leakage happens when information from outside the training dataset accidentally gets used to train the model. The model may seem very accurate during training, but it won't perform well on new, unseen data when data leakage occurs.
Why Data Leakage Happens
Data leakage can be tricky to spot and often comes from hidden biases in the training data. Here are some common ways it can happen in computer vision:
- Camera Bias: Different angles, lighting, shadows, and camera movements can introduce unwanted patterns.
- Overlay Bias: Logos, timestamps, or other overlays in images can mislead the model.
- Font and Object Bias: Specific fonts or objects that frequently appear in certain classes can skew the model's learning.
- Spatial Bias: Imbalances in foreground-background, bounding box distributions, and object locations can affect training.
- Label and Domain Bias: Incorrect labels or shifts in data types can lead to leakage.
Detecting Data Leakage
To find data leakage, you can:
- Check Performance: If the model's results are surprisingly good, it might be leaking.
- Look at Feature Importance: If one feature is much more important than others, it could indicate leakage.
- Visual Inspection: Double-check that the model's decisions make sense intuitively.
- Verify Data Separation: Make sure data was divided correctly before any processing.
Avoiding Data Leakage
To prevent data leakage, use a diverse dataset with images or videos from different cameras and environments. Carefully review your data and check that there are no hidden biases, such as all positive samples being taken at a specific time of day. Avoiding data leakage will help make your computer vision models more reliable and effective in real-world situations.
What Comes After Model Testing
After testing your model, the next steps depend on the results. If your model performs well, you can deploy it into a real-world environment. If the results aren't satisfactory, you'll need to make improvements. This might involve analyzing errors, gathering more data, improving data quality, adjusting hyperparameters, and retraining the model.
Join the AI Conversation
Becoming part of a community of computer vision enthusiasts can aid in solving problems and learning more efficiently. Here are some ways to connect, seek help, and share your thoughts.
Community Resources
- GitHub Issues: Explore the YOLOv8 GitHub repository and use the Issues tab to ask questions, report bugs, and suggest new features. The community and maintainers are very active and ready to help.
- Ultralytics Discord Server: Join the Ultralytics Discord server to chat with other users and developers, get support, and share your experiences.
Official Documentation
- Ultralytics YOLOv8 Documentation: Check out the official YOLOv8 documentation for detailed guides and helpful tips on various computer vision projects.
These resources will help you navigate challenges and remain updated on the latest trends and practices within the computer vision community.
In Summary
Building trustworthy computer vision models relies on rigorous model testing. By testing the model with previously unseen data, we can analyze it and spot weaknesses like overfitting and data leakage. Addressing these issues before deployment helps the model perform well in real-world applications. It's important to remember that model testing is just as crucial as model evaluation in guaranteeing the model's long-term success and effectiveness.
FAQ
What are the key differences between model evaluation and model testing in computer vision?
Model evaluation and model testing are distinct steps in a computer vision project. Model evaluation involves using a labeled dataset to compute metrics such as accuracy, precision, recall, and F1 score, providing insights into the model's performance with a controlled dataset. Model testing, on the other hand, assesses the model's performance in real-world scenarios by applying it to new, unseen data, ensuring the model's learned behavior aligns with expectations outside the evaluation environment. For a detailed guide, refer to the steps in a computer vision project.
How can I test my Ultralytics YOLOv8 model on multiple images?
To test your Ultralytics YOLOv8 model on multiple images, you can use the prediction mode. This mode allows you to run the model on new, unseen data to generate predictions without providing detailed metrics. This is ideal for real-world performance testing on larger image sets stored in a folder. For evaluating performance metrics, use the validation mode instead.
What should I do if my computer vision model shows signs of overfitting or underfitting?
To address overfitting:
- Regularization techniques like dropout.
- Increase the size of the training dataset.
- Simplify the model architecture.
To address underfitting:
- Use a more complex model.
- Provide more relevant features.
- Increase training iterations or epochs.
Review misclassified images, perform thorough error analysis, and regularly track performance metrics to maintain a balance. For more information on these concepts, explore our section on Overfitting and Underfitting.
How can I detect and avoid data leakage in computer vision?
To detect data leakage:
- Verify that the testing performance is not unusually high.
- Check feature importance for unexpected insights.
- Intuitively review model decisions.
- Ensure correct data division before processing.
To avoid data leakage:
- Use diverse datasets with various environments.
- Carefully review data for hidden biases.
- Ensure no overlapping information between training and testing sets.
For detailed strategies on preventing data leakage, refer to our section on Data Leakage in Computer Vision.
What steps should I take after testing my computer vision model?
Post-testing, if the model performance meets the project goals, proceed with deployment. If the results are unsatisfactory, consider:
- Error analysis.
- Gathering more diverse and high-quality data.
- Hyperparameter tuning.
- Retraining the model.
Gain insights from the Model Testing Vs. Model Evaluation section to refine and enhance model effectiveness in real-world applications.
How do I run YOLOv8 predictions without custom training?
You can run predictions using the pre-trained YOLOv8 model on your dataset to see if it suits your application needs. Utilize the prediction mode to get a quick sense of performance results without diving into custom training.
comments: true
description: Find best practices, optimization strategies, and troubleshooting advice for training computer vision models. Improve your model training efficiency and accuracy.
keywords: Model Training Machine Learning, AI Model Training, Number of Epochs, How to Train a Model in Machine Learning, Machine Learning Best Practices, What is Model Training
Machine Learning Best Practices and Tips for Model Training
Introduction
One of the most important steps when working on a computer vision project is model training. Before reaching this step, you need to define your goals and collect and annotate your data. After preprocessing the data to make sure it is clean and consistent, you can move on to training your model.
So, what is model training? Model training is the process of teaching your model to recognize visual patterns and make predictions based on your data. It directly impacts the performance and accuracy of your application. In this guide, we'll cover best practices, optimization techniques, and troubleshooting tips to help you train your computer vision models effectively.
How to Train a Machine Learning Model
A computer vision model is trained by adjusting its internal parameters to minimize errors. Initially, the model is fed a large set of labeled images. It makes predictions about what is in these images, and the predictions are compared to the actual labels or contents to calculate errors. These errors show how far off the model's predictions are from the true values.
During training, the model iteratively makes predictions, calculates errors, and updates its parameters through a process called backpropagation. In this process, the model adjusts its internal parameters (weights and biases) to reduce the errors. By repeating this cycle many times, the model gradually improves its accuracy. Over time, it learns to recognize complex patterns such as shapes, colors, and textures.
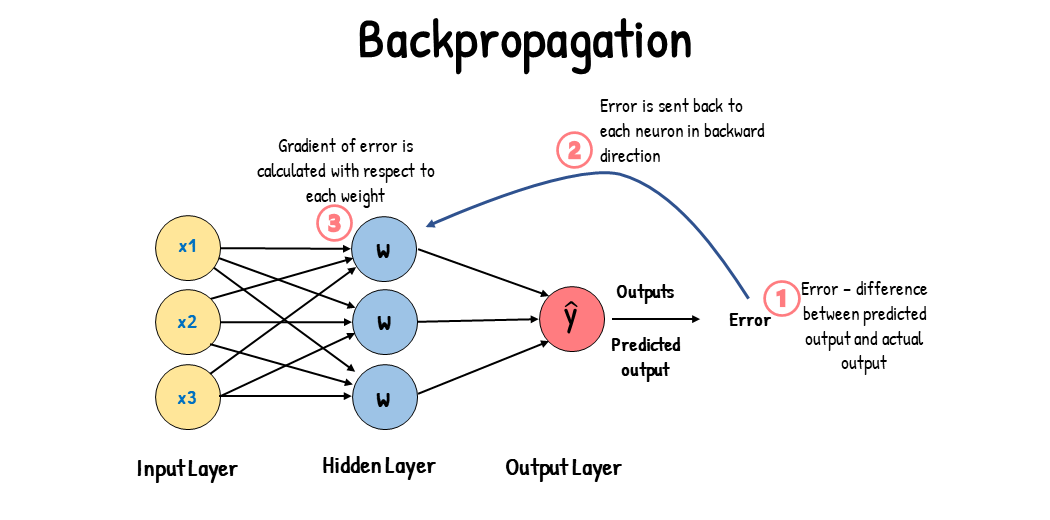
This learning process makes it possible for the computer vision model to perform various tasks, including object detection, instance segmentation, and image classification. The ultimate goal is to create a model that can generalize its learning to new, unseen images so that it can accurately understand visual data in real-world applications.
Now that we know what is happening behind the scenes when we train a model, let's look at points to consider when training a model.
Training on Large Datasets
There are a few different aspects to think about when you are planning on using a large dataset to train a model. For example, you can adjust the batch size, control the GPU utilization, choose to use multiscale training, etc. Let's walk through each of these options in detail.
Batch Size and GPU Utilization
When training models on large datasets, efficiently utilizing your GPU is key. Batch size is an important factor. It is the number of data samples that a machine learning model processes in a single training iteration.
Using the maximum batch size supported by your GPU, you can fully take advantage of its capabilities and reduce the time model training takes. However, you want to avoid running out of GPU memory. If you encounter memory errors, reduce the batch size incrementally until the model trains smoothly.
With respect to YOLOv8, you can set the batch_size parameter in the training configuration to match your GPU capacity. Also, setting batch=-1 in your training script will automatically determine the batch size that can be efficiently processed based on your device's capabilities. By fine-tuning the batch size, you can make the most of your GPU resources and improve the overall training process.
Subset Training
Subset training is a smart strategy that involves training your model on a smaller set of data that represents the larger dataset. It can save time and resources, especially during initial model development and testing. If you are running short on time or experimenting with different model configurations, subset training is a good option.
When it comes to YOLOv8, you can easily implement subset training by using the fraction parameter. This parameter lets you specify what fraction of your dataset to use for training. For example, setting fraction=0.1 will train your model on 10% of the data. You can use this technique for quick iterations and tuning your model before committing to training a model using a full dataset. Subset training helps you make rapid progress and identify potential issues early on.
Multi-scale Training
Multiscale training is a technique that improves your model's ability to generalize by training it on images of varying sizes. Your model can learn to detect objects at different scales and distances and become more robust.
For example, when you train YOLOv8, you can enable multiscale training by setting the scale parameter. This parameter adjusts the size of training images by a specified factor, simulating objects at different distances. For example, setting scale=0.5 will reduce the image size by half, while scale=2.0 will double it. Configuring this parameter allows your model to experience a variety of image scales and improve its detection capabilities across different object sizes and scenarios.
Caching
Caching is an important technique to improve the efficiency of training machine learning models. By storing preprocessed images in memory, caching reduces the time the GPU spends waiting for data to be loaded from the disk. The model can continuously receive data without delays caused by disk I/O operations.
Caching can be controlled when training YOLOv8 using the cache parameter:
cache=True: Stores dataset images in RAM, providing the fastest access speed but at the cost of increased memory usage.cache='disk': Stores the images on disk, slower than RAM but faster than loading fresh data each time.cache=False: Disables caching, relying entirely on disk I/O, which is the slowest option.
Mixed Precision Training
Mixed precision training uses both 16-bit (FP16) and 32-bit (FP32) floating-point types. The strengths of both FP16 and FP32 are leveraged by using FP16 for faster computation and FP32 to maintain precision where needed. Most of the neural network's operations are done in FP16 to benefit from faster computation and lower memory usage. However, a master copy of the model's weights is kept in FP32 to ensure accuracy during the weight update steps. You can handle larger models or larger batch sizes within the same hardware constraints.
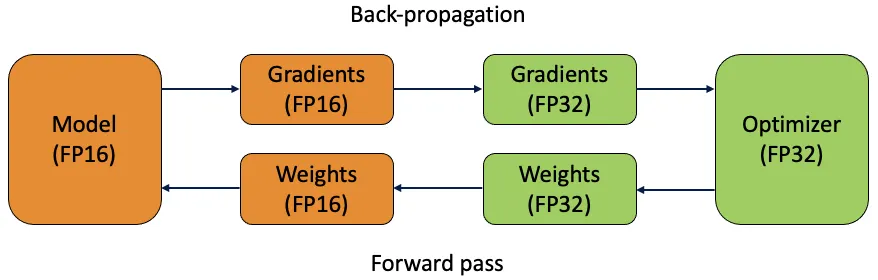
To implement mixed precision training, you'll need to modify your training scripts and ensure your hardware (like GPUs) supports it. Many modern deep learning frameworks, such as Tensorflow, offer built-in support for mixed precision.
Mixed precision training is straightforward when working with YOLOv8. You can use the amp flag in your training configuration. Setting amp=True enables Automatic Mixed Precision (AMP) training. Mixed precision training is a simple yet effective way to optimize your model training process.
Pre-trained Weights
Using pretrained weights is a smart way to speed up your model's training process. Pretrained weights come from models already trained on large datasets, giving your model a head start. Transfer learning adapts pretrained models to new, related tasks. Fine-tuning a pre-trained model involves starting with these weights and then continuing training on your specific dataset. This method of training results in faster training times and often better performance because the model starts with a solid understanding of basic features.
The pretrained parameter makes transfer learning easy with YOLOv8. Setting pretrained=True will use default pre-trained weights, or you can specify a path to a custom pre-trained model. Using pre-trained weights and transfer learning effectively boosts your model's capabilities and reduces training costs.
Other Techniques to Consider When Handling a Large Dataset
There are a couple of other techniques to consider when handling a large dataset:
- Learning Rate Schedulers: Implementing learning rate schedulers dynamically adjusts the learning rate during training. A well-tuned learning rate can prevent the model from overshooting minima and improve stability. When training YOLOv8, the
lrfparameter helps manage learning rate scheduling by setting the final learning rate as a fraction of the initial rate. - Distributed Training: For handling large datasets, distributed training can be a game-changer. You can reduce the training time by spreading the training workload across multiple GPUs or machines.
The Number of Epochs To Train For
When training a model, an epoch refers to one complete pass through the entire training dataset. During an epoch, the model processes each example in the training set once and updates its parameters based on the learning algorithm. Multiple epochs are usually needed to allow the model to learn and refine its parameters over time.
A common question that comes up is how to determine the number of epochs to train the model for. A good starting point is 300 epochs. If the model overfits early, you can reduce the number of epochs. If overfitting does not occur after 300 epochs, you can extend the training to 600, 1200, or more epochs.
However, the ideal number of epochs can vary based on your dataset's size and project goals. Larger datasets might require more epochs for the model to learn effectively, while smaller datasets might need fewer epochs to avoid overfitting. With respect to YOLOv8, you can set the epochs parameter in your training script.
Early Stopping
Early stopping is a valuable technique for optimizing model training. By monitoring validation performance, you can halt training once the model stops improving. You can save computational resources and prevent overfitting.
The process involves setting a patience parameter that determines how many epochs to wait for an improvement in validation metrics before stopping training. If the model's performance does not improve within these epochs, training is stopped to avoid wasting time and resources.
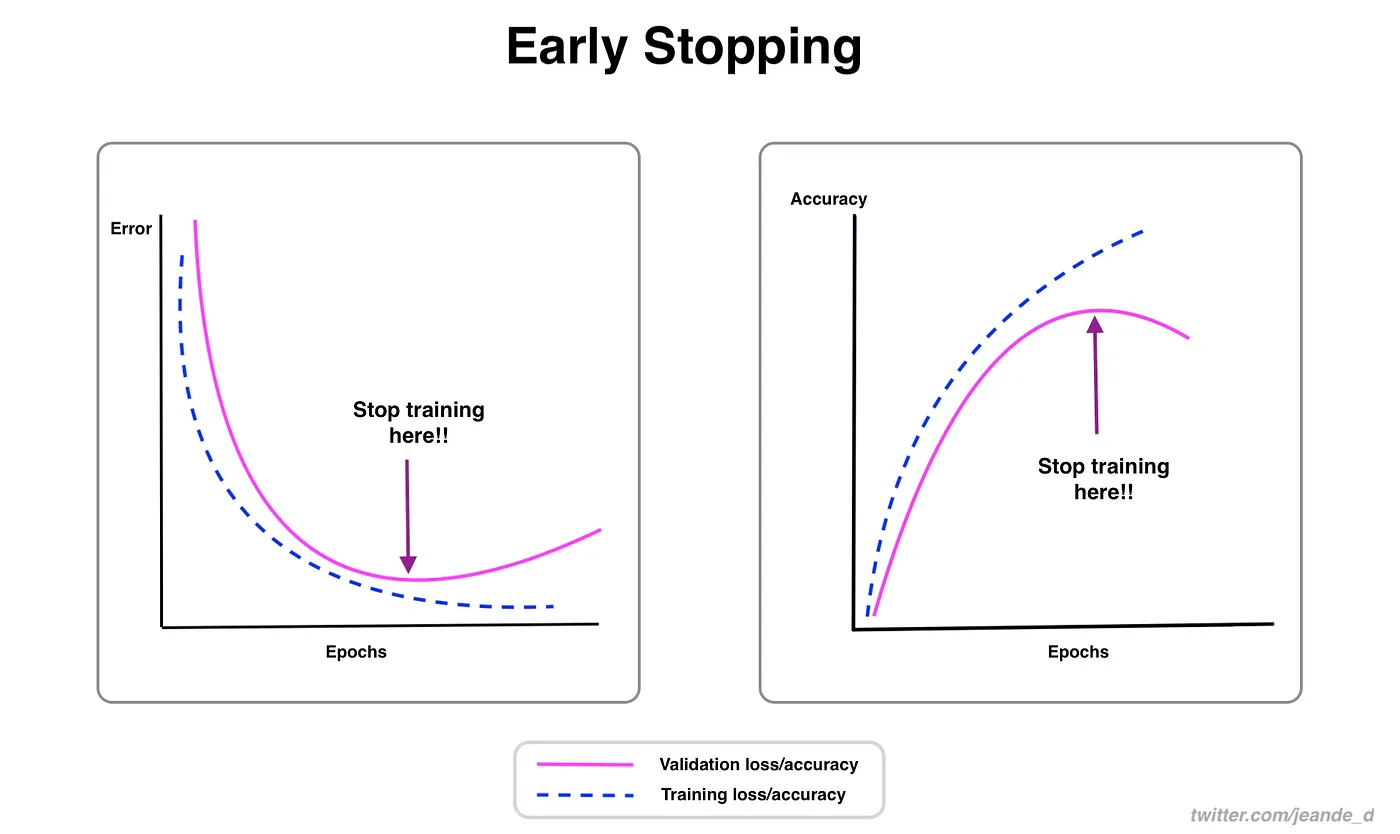
For YOLOv8, you can enable early stopping by setting the patience parameter in your training configuration. For example, patience=5 means training will stop if there's no improvement in validation metrics for 5 consecutive epochs. Using this method ensures the training process remains efficient and achieves optimal performance without excessive computation.
Choosing Between Cloud and Local Training
There are two options for training your model: cloud training and local training.
Cloud training offers scalability and powerful hardware and is ideal for handling large datasets and complex models. Platforms like Google Cloud, AWS, and Azure provide on-demand access to high-performance GPUs and TPUs, speeding up training times and enabling experiments with larger models. However, cloud training can be expensive, especially for long periods, and data transfer can add to costs and latency.
Local training provides greater control and customization, letting you tailor your environment to specific needs and avoid ongoing cloud costs. It can be more economical for long-term projects, and since your data stays on-premises, it's more secure. However, local hardware may have resource limitations and require maintenance, which can lead to longer training times for large models.
Selecting an Optimizer
An optimizer is an algorithm that adjusts the weights of your neural network to minimize the loss function, which measures how well the model is performing. In simpler terms, the optimizer helps the model learn by tweaking its parameters to reduce errors. Choosing the right optimizer directly affects how quickly and accurately the model learns.
You can also fine-tune optimizer parameters to improve model performance. Adjusting the learning rate sets the size of the steps when updating parameters. For stability, you might start with a moderate learning rate and gradually decrease it over time to improve long-term learning. Additionally, setting the momentum determines how much influence past updates have on current updates. A common value for momentum is around 0.9. It generally provides a good balance.
Common Optimizers
Different optimizers have various strengths and weaknesses. Let's take a glimpse at a few common optimizers.
-
SGD (Stochastic Gradient Descent):
- Updates model parameters using the gradient of the loss function with respect to the parameters.
- Simple and efficient but can be slow to converge and might get stuck in local minima.
-
Adam (Adaptive Moment Estimation):
- Combines the benefits of both SGD with momentum and RMSProp.
- Adjusts the learning rate for each parameter based on estimates of the first and second moments of the gradients.
- Well-suited for noisy data and sparse gradients.
- Efficient and generally requires less tuning, making it a recommended optimizer for YOLOv8.
-
RMSProp (Root Mean Square Propagation):
- Adjusts the learning rate for each parameter by dividing the gradient by a running average of the magnitudes of recent gradients.
- Helps in handling the vanishing gradient problem and is effective for recurrent neural networks.
For YOLOv8, the optimizer parameter lets you choose from various optimizers, including SGD, Adam, AdamW, NAdam, RAdam, and RMSProp, or you can set it to auto for automatic selection based on model configuration.
Connecting with the Community
Being part of a community of computer vision enthusiasts can help you solve problems and learn faster. Here are some ways to connect, get help, and share ideas.
Community Resources
- GitHub Issues: Visit the YOLOv8 GitHub repository and use the Issues tab to ask questions, report bugs, and suggest new features. The community and maintainers are very active and ready to help.
- Ultralytics Discord Server: Join the Ultralytics Discord server to chat with other users and developers, get support, and share your experiences.
Official Documentation
- Ultralytics YOLOv8 Documentation: Check out the official YOLOv8 documentation for detailed guides and helpful tips on various computer vision projects.
Using these resources will help you solve challenges and stay up-to-date with the latest trends and practices in the computer vision community.
Key Takeaways
Training computer vision models involves following good practices, optimizing your strategies, and solving problems as they arise. Techniques like adjusting batch sizes, mixed precision training, and starting with pre-trained weights can make your models work better and train faster. Methods like subset training and early stopping help you save time and resources. Staying connected with the community and keeping up with new trends will help you keep improving your model training skills.
FAQ
How can I improve GPU utilization when training a large dataset with Ultralytics YOLO?
To improve GPU utilization, set the batch_size parameter in your training configuration to the maximum size supported by your GPU. This ensures that you make full use of the GPU's capabilities, reducing training time. If you encounter memory errors, incrementally reduce the batch size until training runs smoothly. For YOLOv8, setting batch=-1 in your training script will automatically determine the optimal batch size for efficient processing. For further information, refer to the training configuration.
What is mixed precision training, and how do I enable it in YOLOv8?
Mixed precision training utilizes both 16-bit (FP16) and 32-bit (FP32) floating-point types to balance computational speed and precision. This approach speeds up training and reduces memory usage without sacrificing model accuracy. To enable mixed precision training in YOLOv8, set the amp parameter to True in your training configuration. This activates Automatic Mixed Precision (AMP) training. For more details on this optimization technique, see the training configuration.
How does multiscale training enhance YOLOv8 model performance?
Multiscale training enhances model performance by training on images of varying sizes, allowing the model to better generalize across different scales and distances. In YOLOv8, you can enable multiscale training by setting the scale parameter in the training configuration. For example, scale=0.5 reduces the image size by half, while scale=2.0 doubles it. This technique simulates objects at different distances, making the model more robust across various scenarios. For settings and more details, check out the training configuration.
How can I use pre-trained weights to speed up training in YOLOv8?
Using pre-trained weights can significantly reduce training times and improve model performance by starting from a model that already understands basic features. In YOLOv8, you can set the pretrained parameter to True or specify a path to custom pre-trained weights in your training configuration. This approach, known as transfer learning, leverages knowledge from large datasets to adapt to your specific task. Learn more about pre-trained weights and their advantages here.
What is the recommended number of epochs for training a model, and how do I set this in YOLOv8?
The number of epochs refers to the complete passes through the training dataset during model training. A typical starting point is 300 epochs. If your model overfits early, you can reduce the number. Alternatively, if overfitting isn't observed, you might extend training to 600, 1200, or more epochs. To set this in YOLOv8, use the epochs parameter in your training script. For additional advice on determining the ideal number of epochs, refer to this section on number of epochs.
comments: true
description: Learn to deploy Ultralytics YOLOv8 on NVIDIA Jetson devices with our detailed guide. Explore performance benchmarks and maximize AI capabilities.
keywords: Ultralytics, YOLOv8, NVIDIA Jetson, JetPack, AI deployment, performance benchmarks, embedded systems, deep learning, TensorRT, computer vision
Quick Start Guide: NVIDIA Jetson with Ultralytics YOLOv8
This comprehensive guide provides a detailed walkthrough for deploying Ultralytics YOLOv8 on NVIDIA Jetson devices. Additionally, it showcases performance benchmarks to demonstrate the capabilities of YOLOv8 on these small and powerful devices.
Watch: How to Setup NVIDIA Jetson with Ultralytics YOLOv8
!!! Note
This guide has been tested with both [Seeed Studio reComputer J4012](https://www.seeedstudio.com/reComputer-J4012-p-5586.html) which is based on NVIDIA Jetson Orin NX 16GB running the latest stable JetPack release of [JP5.1.3](https://developer.nvidia.com/embedded/jetpack-sdk-513) and [Seeed Studio reComputer J1020 v2](https://www.seeedstudio.com/reComputer-J1020-v2-p-5498.html) which is based on NVIDIA Jetson Nano 4GB running JetPack release of [JP4.6.1](https://developer.nvidia.com/embedded/jetpack-sdk-461). It is expected to work across all the NVIDIA Jetson hardware lineup including latest and legacy.
What is NVIDIA Jetson?
NVIDIA Jetson is a series of embedded computing boards designed to bring accelerated AI (artificial intelligence) computing to edge devices. These compact and powerful devices are built around NVIDIA's GPU architecture and are capable of running complex AI algorithms and deep learning models directly on the device, without needing to rely on cloud computing resources. Jetson boards are often used in robotics, autonomous vehicles, industrial automation, and other applications where AI inference needs to be performed locally with low latency and high efficiency. Additionally, these boards are based on the ARM64 architecture and runs on lower power compared to traditional GPU computing devices.
NVIDIA Jetson Series Comparison
Jetson Orin is the latest iteration of the NVIDIA Jetson family based on NVIDIA Ampere architecture which brings drastically improved AI performance when compared to the previous generations. Below table compared few of the Jetson devices in the ecosystem.
| Jetson AGX Orin 64GB | Jetson Orin NX 16GB | Jetson Orin Nano 8GB | Jetson AGX Xavier | Jetson Xavier NX | Jetson Nano | |
|---|---|---|---|---|---|---|
| AI Performance | 275 TOPS | 100 TOPS | 40 TOPs | 32 TOPS | 21 TOPS | 472 GFLOPS |
| GPU | 2048-core NVIDIA Ampere architecture GPU with 64 Tensor Cores | 1024-core NVIDIA Ampere architecture GPU with 32 Tensor Cores | 1024-core NVIDIA Ampere architecture GPU with 32 Tensor Cores | 512-core NVIDIA Volta architecture GPU with 64 Tensor Cores | 384-core NVIDIA Volta™ architecture GPU with 48 Tensor Cores | 128-core NVIDIA Maxwell™ architecture GPU |
| GPU Max Frequency | 1.3 GHz | 918 MHz | 625 MHz | 1377 MHz | 1100 MHz | 921MHz |
| CPU | 12-core NVIDIA Arm® Cortex A78AE v8.2 64-bit CPU 3MB L2 + 6MB L3 | 8-core NVIDIA Arm® Cortex A78AE v8.2 64-bit CPU 2MB L2 + 4MB L3 | 6-core Arm® Cortex®-A78AE v8.2 64-bit CPU 1.5MB L2 + 4MB L3 | 8-core NVIDIA Carmel Arm®v8.2 64-bit CPU 8MB L2 + 4MB L3 | 6-core NVIDIA Carmel Arm®v8.2 64-bit CPU 6MB L2 + 4MB L3 | Quad-Core Arm® Cortex®-A57 MPCore processor |
| CPU Max Frequency | 2.2 GHz | 2.0 GHz | 1.5 GHz | 2.2 GHz | 1.9 GHz | 1.43GHz |
| Memory | 64GB 256-bit LPDDR5 204.8GB/s | 16GB 128-bit LPDDR5 102.4GB/s | 8GB 128-bit LPDDR5 68 GB/s | 32GB 256-bit LPDDR4x 136.5GB/s | 8GB 128-bit LPDDR4x 59.7GB/s | 4GB 64-bit LPDDR4 25.6GB/s" |
For a more detailed comparison table, please visit the Technical Specifications section of official NVIDIA Jetson page.
What is NVIDIA JetPack?
NVIDIA JetPack SDK powering the Jetson modules is the most comprehensive solution and provides full development environment for building end-to-end accelerated AI applications and shortens time to market. JetPack includes Jetson Linux with bootloader, Linux kernel, Ubuntu desktop environment, and a complete set of libraries for acceleration of GPU computing, multimedia, graphics, and computer vision. It also includes samples, documentation, and developer tools for both host computer and developer kit, and supports higher level SDKs such as DeepStream for streaming video analytics, Isaac for robotics, and Riva for conversational AI.
Flash JetPack to NVIDIA Jetson
The first step after getting your hands on an NVIDIA Jetson device is to flash NVIDIA JetPack to the device. There are several different way of flashing NVIDIA Jetson devices.
- If you own an official NVIDIA Development Kit such as the Jetson Orin Nano Developer Kit, you can download an image and prepare an SD card with JetPack for booting the device.
- If you own any other NVIDIA Development Kit, you can flash JetPack to the device using SDK Manager.
- If you own a Seeed Studio reComputer J4012 device, you can flash JetPack to the included SSD and if you own a Seeed Studio reComputer J1020 v2 device, you can flash JetPack to the eMMC/ SSD.
- If you own any other third party device powered by the NVIDIA Jetson module, it is recommended to follow command-line flashing.
!!! Note
For methods 3 and 4 above, after flashing the system and booting the device, please enter "sudo apt update && sudo apt install nvidia-jetpack -y" on the device terminal to install all the remaining JetPack components needed.
Run on JetPack 5.x
If you own a Jetson Xavier NX, AGX Xavier, AGX Orin, Orin Nano or Orin NX which supports JetPack 5.x, you can continue to follow this guide. However, if you have a legacy device such as Jetson Nano, please skip to Run on JetPack 4.x.
Set Up Ultralytics
There are two ways of setting up Ultralytics package on NVIDIA Jetson to build your next Computer Vision project. You can use either of them.
Start with Docker
The fastest way to get started with Ultralytics YOLOv8 on NVIDIA Jetson is to run with pre-built docker image for Jetson.
Execute the below command to pull the Docker container and run on Jetson. This is based on l4t-pytorch docker image which contains PyTorch and Torchvision in a Python3 environment.
t=ultralytics/ultralytics:latest-jetson-jetpack5 && sudo docker pull $t && sudo docker run -it --ipc=host --runtime=nvidia $t
After this is done, skip to Use TensorRT on NVIDIA Jetson section.
Start without Docker
Install Ultralytics Package
Here we will install Ultralytics package on the Jetson with optional dependencies so that we can export the PyTorch models to other different formats. We will mainly focus on NVIDIA TensorRT exports because TensorRT will make sure we can get the maximum performance out of the Jetson devices.
-
Update packages list, install pip and upgrade to latest
sudo apt update sudo apt install python3-pip -y pip install -U pip -
Install
ultralyticspip package with optional dependenciespip install ultralytics[export] -
Reboot the device
sudo reboot
Install PyTorch and Torchvision
The above ultralytics installation will install Torch and Torchvision. However, these 2 packages installed via pip are not compatible to run on Jetson platform which is based on ARM64 architecture. Therefore, we need to manually install pre-built PyTorch pip wheel and compile/ install Torchvision from source.
-
Uninstall currently installed PyTorch and Torchvision
pip uninstall torch torchvision -
Install PyTorch 2.1.0 according to JP5.1.3
sudo apt-get install -y libopenblas-base libopenmpi-dev wget https://developer.download.nvidia.com/compute/redist/jp/v512/pytorch/torch-2.1.0a0+41361538.nv23.06-cp38-cp38-linux_aarch64.whl -O torch-2.1.0a0+41361538.nv23.06-cp38-cp38-linux_aarch64.whl pip install torch-2.1.0a0+41361538.nv23.06-cp38-cp38-linux_aarch64.whl -
Install Torchvision v0.16.2 according to PyTorch v2.1.0
sudo apt install -y libjpeg-dev zlib1g-dev
git clone https://github.com/pytorch/vision torchvision
cd torchvision
git checkout v0.16.2
python3 setup.py install --user
Visit the PyTorch for Jetson page to access all different versions of PyTorch for different JetPack versions. For a more detailed list on the PyTorch, Torchvision compatibility, visit the PyTorch and Torchvision compatibility page.
Install onnxruntime-gpu
The onnxruntime-gpu package hosted in PyPI does not have aarch64 binaries for the Jetson. So we need to manually install this package. This package is needed for some of the exports.
All different onnxruntime-gpu packages corresponding to different JetPack and Python versions are listed here. However, here we will download and install onnxruntime-gpu 1.17.0 with Python3.8 support for the JetPack we are using for this guide.
wget https://nvidia.box.com/shared/static/zostg6agm00fb6t5uisw51qi6kpcuwzd.whl -O onnxruntime_gpu-1.17.0-cp38-cp38-linux_aarch64.whl
pip install onnxruntime_gpu-1.17.0-cp38-cp38-linux_aarch64.whl
!!! Note
`onnxruntime-gpu` will automatically revert back the numpy version to latest. So we need to reinstall numpy to `1.23.5` to fix an issue by executing:

`pip install numpy==1.23.5`
Run on JetPack 4.x
Here we support to run Ultralytics on legacy hardware such as the Jetson Nano. Currently we use Docker to achieve this.
Execute the below command to pull the Docker container and run on Jetson. This is based on l4t-cuda docker image which contains CUDA in a L4T environment.
t=ultralytics/ultralytics:latest-jetson-jetpack4 && sudo docker pull $t && sudo docker run -it --ipc=host --runtime=nvidia $t
Use TensorRT on NVIDIA Jetson
Out of all the model export formats supported by Ultralytics, TensorRT delivers the best inference performance when working with NVIDIA Jetson devices and our recommendation is to use TensorRT with Jetson. We also have a detailed document on TensorRT here.
Convert Model to TensorRT and Run Inference
The YOLOv8n model in PyTorch format is converted to TensorRT to run inference with the exported model.
!!! Example
=== "Python"

    ```py
    from ultralytics import YOLO

    # Load a YOLOv8n PyTorch model
    model = YOLO("yolov8n.pt")

    # Export the model
    model.export(format="engine")  # creates 'yolov8n.engine'

    # Load the exported TensorRT model
    trt_model = YOLO("yolov8n.engine")

    # Run inference
    results = trt_model("https://ultralytics.com/images/bus.jpg")
    ```

=== "CLI"

    ```py
    # Export a YOLOv8n PyTorch model to TensorRT format
    yolo export model=yolov8n.pt format=engine  # creates 'yolov8n.engine'

    # Run inference with the exported model
    yolo predict model=yolov8n.engine source='https://ultralytics.com/images/bus.jpg'
    ```
!!! Note
Visit the [Export page](../modes/export.md#arguments) to access additional arguments when exporting models to different model formats
NVIDIA Jetson Orin YOLOv8 Benchmarks
YOLOv8 benchmarks were run by the Ultralytics team on 10 different model formats measuring speed and accuracy: PyTorch, TorchScript, ONNX, OpenVINO, TensorRT, TF SavedModel, TF GraphDef, TF Lite, PaddlePaddle, NCNN. Benchmarks were run on Seeed Studio reComputer J4012 powered by Jetson Orin NX 16GB device at FP32 precision with default input image size of 640.
Comparison Chart
Even though all model exports are working with NVIDIA Jetson, we have only included PyTorch, TorchScript, TensorRT for the comparison chart below because, they make use of the GPU on the Jetson and are guaranteed to produce the best results. All the other exports only utilize the CPU and the performance is not as good as the above three. You can find benchmarks for all exports in the section after this chart.
Detailed Comparison Table
The below table represents the benchmark results for five different models (YOLOv8n, YOLOv8s, YOLOv8m, YOLOv8l, YOLOv8x) across ten different formats (PyTorch, TorchScript, ONNX, OpenVINO, TensorRT, TF SavedModel, TF GraphDef, TF Lite, PaddlePaddle, NCNN), giving us the status, size, mAP50-95(B) metric, and inference time for each combination.
!!! Performance
=== "YOLOv8n"

    | Format        | Status | Size on disk (MB) | mAP50-95(B) | Inference time (ms/im) |
    |---------------|--------|-----------|-------------|------------------------|
    | PyTorch       | ✅      | 6.2       | 0.6381      | 14.3                   |
    | TorchScript   | ✅      | 12.4      | 0.6117      | 13.3                   |
    | ONNX          | ✅      | 12.2      | 0.6092      | 70.6                   |
    | OpenVINO      | ✅      | 12.3      | 0.6092      | 104.2                  |
    | TensorRT      | ✅      | 13.6      | 0.6117      | 8.9                    |
    | TF SavedModel | ✅      | 30.6      | 0.6092      | 141.74                 |
    | TF GraphDef   | ✅      | 12.3      | 0.6092      | 199.93                 |
    | TF Lite       | ✅      | 12.3      | 0.6092      | 349.18                 |
    | PaddlePaddle  | ✅      | 24.4      | 0.6030      | 555                    |
    | NCNN          | ✅      | 12.2      | 0.6092      | 32                     |

=== "YOLOv8s"

    | Format        | Status | Size on disk (MB) | mAP50-95(B) | Inference time (ms/im) |
    |---------------|--------|-----------|-------------|------------------------|
    | PyTorch       | ✅      | 21.5      | 0.6967      | 18                     |
    | TorchScript   | ✅      | 43.0      | 0.7136      | 23.81                  |
    | ONNX          | ✅      | 42.8      | 0.7136      | 185.55                 |
    | OpenVINO      | ✅      | 42.9      | 0.7136      | 243.97                 |
    | TensorRT      | ✅      | 44.0      | 0.7136      | 14.82                  |
    | TF SavedModel | ✅      | 107       | 0.7136      | 260.03                 |
    | TF GraphDef   | ✅      | 42.8      | 0.7136      | 423.4                  |
    | TF Lite       | ✅      | 42.8      | 0.7136      | 1046.64                |
    | PaddlePaddle  | ✅      | 85.5      | 0.7140      | 1464                   |
    | NCNN          | ✅      | 42.7      | 0.7200      | 63                     |

=== "YOLOv8m"

    | Format        | Status | Size on disk (MB) | mAP50-95(B) | Inference time (ms/im) |
    |---------------|--------|-----------|-------------|------------------------|
    | PyTorch       | ✅      | 49.7      | 0.7370      | 36.4                   |
    | TorchScript   | ✅      | 99.2      | 0.7285      | 53.58                  |
    | ONNX          | ✅      | 99        | 0.7280      | 452.09                 |
    | OpenVINO      | ✅      | 99.1      | 0.7280      | 544.36                 |
    | TensorRT      | ✅      | 100.3     | 0.7285      | 33.21                  |
    | TF SavedModel | ✅      | 247.5     | 0.7280      | 543.65                 |
    | TF GraphDef   | ✅      | 99        | 0.7280      | 906.63                 |
    | TF Lite       | ✅      | 99        | 0.7280      | 2758.08                |
    | PaddlePaddle  | ✅      | 197.9     | 0.7280      | 3678                   |
    | NCNN          | ✅      | 98.9      | 0.7260      | 135                    |

=== "YOLOv8l"

    | Format        | Status | Size on disk (MB) | mAP50-95(B) | Inference time (ms/im) |
    |---------------|--------|-----------|-------------|------------------------|
    | PyTorch       | ✅      | 83.7      | 0.7768      | 61.3                   |
    | TorchScript   | ✅      | 167.2     | 0.7554      | 87.9                   |
    | ONNX          | ✅      | 166.8     | 0.7551      | 852.29                 |
    | OpenVINO      | ✅      | 167       | 0.7551      | 1012.6                 |
    | TensorRT      | ✅      | 168.4     | 0.7554      | 51.23                  |
    | TF SavedModel | ✅      | 417.2     | 0.7551      | 990.45                 |
    | TF GraphDef   | ✅      | 166.9     | 0.7551      | 1649.86                |
    | TF Lite       | ✅      | 166.9     | 0.7551      | 5652.37                |
    | PaddlePaddle  | ✅      | 333.6     | 0.7551      | 7114.67                |
    | NCNN          | ✅      | 166.8     | 0.7685      | 231.9                  |

=== "YOLOv8x"

    | Format        | Status | Size on disk (MB) | mAP50-95(B) | Inference time (ms/im) |
    |---------------|--------|-----------|-------------|------------------------|
    | PyTorch       | ✅      | 130.5     | 0.7759      | 93                     |
    | TorchScript   | ✅      | 260.7     | 0.7472      | 135.1                  |
    | ONNX          | ✅      | 260.4     | 0.7479      | 1296.13                |
    | OpenVINO      | ✅      | 260.6     | 0.7479      | 1502.15                |
    | TensorRT      | ✅      | 261.8     | 0.7469      | 84.53                  |
    | TF SavedModel | ✅      | 651.1     | 0.7479      | 1451.76                |
    | TF GraphDef   | ✅      | 260.5     | 0.7479      | 4029.36                |
    | TF Lite       | ✅      | 260.4     | 0.7479      | 8772.86                |
    | PaddlePaddle  | ✅      | 520.8     | 0.7479      | 10619.53               |
    | NCNN          | ✅      | 260.4     | 0.7646      | 376.38                 |
Explore more benchmarking efforts by Seeed Studio running on different versions of NVIDIA Jetson hardware.
Reproduce Our Results
To reproduce the above Ultralytics benchmarks on all export formats run this code:
!!! Example
=== "Python"

    ```py
    from ultralytics import YOLO

    # Load a YOLOv8n PyTorch model
    model = YOLO("yolov8n.pt")

    # Benchmark YOLOv8n speed and accuracy on the COCO8 dataset for all all export formats
    results = model.benchmarks(data="coco8.yaml", imgsz=640)
    ```

=== "CLI"

    ```py
    # Benchmark YOLOv8n speed and accuracy on the COCO8 dataset for all all export formats
    yolo benchmark model=yolov8n.pt data=coco8.yaml imgsz=640
    ```

Note that benchmarking results might vary based on the exact hardware and software configuration of a system, as well as the current workload of the system at the time the benchmarks are run. For the most reliable results use a dataset with a large number of images, i.e. `data='coco8.yaml' (4 val images), or `data='coco.yaml'` (5000 val images).
Best Practices when using NVIDIA Jetson
When using NVIDIA Jetson, there are a couple of best practices to follow in order to enable maximum performance on the NVIDIA Jetson running YOLOv8.
-
Enable MAX Power Mode
Enabling MAX Power Mode on the Jetson will make sure all CPU, GPU cores are turned on.
sudo nvpmodel -m 0 -
Enable Jetson Clocks
Enabling Jetson Clocks will make sure all CPU, GPU cores are clocked at their maximum frequency.
sudo jetson_clocks -
Install Jetson Stats Application
We can use jetson stats application to monitor the temperatures of the system components and check other system details such as view CPU, GPU, RAM utilization, change power modes, set to max clocks, check JetPack information
sudo apt update
sudo pip install jetson-stats
sudo reboot
jtop
Next Steps
Congratulations on successfully setting up YOLOv8 on your NVIDIA Jetson! For further learning and support, visit more guide at Ultralytics YOLOv8 Docs!
FAQ
How do I deploy Ultralytics YOLOv8 on NVIDIA Jetson devices?
Deploying Ultralytics YOLOv8 on NVIDIA Jetson devices is a straightforward process. First, flash your Jetson device with the NVIDIA JetPack SDK. Then, either use a pre-built Docker image for quick setup or manually install the required packages. Detailed steps for each approach can be found in sections Start with Docker and Start without Docker.
What performance benchmarks can I expect from YOLOv8 models on NVIDIA Jetson devices?
YOLOv8 models have been benchmarked on various NVIDIA Jetson devices showing significant performance improvements. For example, the TensorRT format delivers the best inference performance. The table in the Detailed Comparison Table section provides a comprehensive view of performance metrics like mAP50-95 and inference time across different model formats.
Why should I use TensorRT for deploying YOLOv8 on NVIDIA Jetson?
TensorRT is highly recommended for deploying YOLOv8 models on NVIDIA Jetson due to its optimal performance. It accelerates inference by leveraging the Jetson's GPU capabilities, ensuring maximum efficiency and speed. Learn more about how to convert to TensorRT and run inference in the Use TensorRT on NVIDIA Jetson section.
How can I install PyTorch and Torchvision on NVIDIA Jetson?
To install PyTorch and Torchvision on NVIDIA Jetson, first uninstall any existing versions that may have been installed via pip. Then, manually install the compatible PyTorch and Torchvision versions for the Jetson's ARM64 architecture. Detailed instructions for this process are provided in the Install PyTorch and Torchvision section.
What are the best practices for maximizing performance on NVIDIA Jetson when using YOLOv8?
To maximize performance on NVIDIA Jetson with YOLOv8, follow these best practices:
- Enable MAX Power Mode to utilize all CPU and GPU cores.
- Enable Jetson Clocks to run all cores at their maximum frequency.
- Install the Jetson Stats application for monitoring system metrics.
For commands and additional details, refer to the Best Practices when using NVIDIA Jetson section.
comments: true
description: Learn how to use Ultralytics YOLOv8 for real-time object blurring to enhance privacy and focus in your images and videos.
keywords: YOLOv8, object blurring, real-time processing, privacy protection, image manipulation, video editing, Ultralytics
Object Blurring using Ultralytics YOLOv8 🚀
What is Object Blurring?
Object blurring with Ultralytics YOLOv8 involves applying a blurring effect to specific detected objects in an image or video. This can be achieved using the YOLOv8 model capabilities to identify and manipulate objects within a given scene.
Watch: Object Blurring using Ultralytics YOLOv8
Advantages of Object Blurring?
- Privacy Protection: Object blurring is an effective tool for safeguarding privacy by concealing sensitive or personally identifiable information in images or videos.
- Selective Focus: YOLOv8 allows for selective blurring, enabling users to target specific objects, ensuring a balance between privacy and retaining relevant visual information.
- Real-time Processing: YOLOv8's efficiency enables object blurring in real-time, making it suitable for applications requiring on-the-fly privacy enhancements in dynamic environments.
!!! Example "Object Blurring using YOLOv8 Example"
=== "Object Blurring"

    ```py
    import cv2

    from ultralytics import YOLO
    from ultralytics.utils.plotting import Annotator, colors

    model = YOLO("yolov8n.pt")
    names = model.names

    cap = cv2.VideoCapture("path/to/video/file.mp4")
    assert cap.isOpened(), "Error reading video file"
    w, h, fps = (int(cap.get(x)) for x in (cv2.CAP_PROP_FRAME_WIDTH, cv2.CAP_PROP_FRAME_HEIGHT, cv2.CAP_PROP_FPS))

    # Blur ratio
    blur_ratio = 50

    # Video writer
    video_writer = cv2.VideoWriter("object_blurring_output.avi", cv2.VideoWriter_fourcc(*"mp4v"), fps, (w, h))

    while cap.isOpened():
        success, im0 = cap.read()
        if not success:
            print("Video frame is empty or video processing has been successfully completed.")
            break

        results = model.predict(im0, show=False)
        boxes = results[0].boxes.xyxy.cpu().tolist()
        clss = results[0].boxes.cls.cpu().tolist()
        annotator = Annotator(im0, line_width=2, example=names)

        if boxes is not None:
            for box, cls in zip(boxes, clss):
                annotator.box_label(box, color=colors(int(cls), True), label=names[int(cls)])

                obj = im0[int(box[1]) : int(box[3]), int(box[0]) : int(box[2])]
                blur_obj = cv2.blur(obj, (blur_ratio, blur_ratio))

                im0[int(box[1]) : int(box[3]), int(box[0]) : int(box[2])] = blur_obj

        cv2.imshow("ultralytics", im0)
        video_writer.write(im0)
        if cv2.waitKey(1) & 0xFF == ord("q"):
            break

    cap.release()
    video_writer.release()
    cv2.destroyAllWindows()
    ```
Arguments model.predict
| Name | Type | Default | Description |
|---|---|---|---|
source |
str |
'ultralytics/assets' |
source directory for images or videos |
conf |
float |
0.25 |
object confidence threshold for detection |
iou |
float |
0.7 |
intersection over union (IoU) threshold for NMS |
imgsz |
int or tuple |
640 |
image size as scalar or (h, w) list, i.e. (640, 480) |
half |
bool |
False |
use half precision (FP16) |
device |
None or str |
None |
device to run on, i.e. cuda device=0/1/2/3 or device=cpu |
max_det |
int |
300 |
maximum number of detections per image |
vid_stride |
bool |
False |
video frame-rate stride |
stream_buffer |
bool |
False |
buffer all streaming frames (True) or return the most recent frame (False) |
visualize |
bool |
False |
visualize model features |
augment |
bool |
False |
apply image augmentation to prediction sources |
agnostic_nms |
bool |
False |
class-agnostic NMS |
classes |
list[int] |
None |
filter results by class, i.e. classes=0, or classes=[0,2,3] |
retina_masks |
bool |
False |
use high-resolution segmentation masks |
embed |
list[int] |
None |
return feature vectors/embeddings from given layers |
FAQ
What is object blurring with Ultralytics YOLOv8?
Object blurring with Ultralytics YOLOv8 involves automatically detecting and applying a blurring effect to specific objects in images or videos. This technique enhances privacy by concealing sensitive information while retaining relevant visual data. YOLOv8's real-time processing capabilities make it suitable for applications requiring immediate privacy protection and selective focus adjustments.
How can I implement real-time object blurring using YOLOv8?
To implement real-time object blurring with YOLOv8, follow the provided Python example. This involves using YOLOv8 for object detection and OpenCV for applying the blur effect. Here's a simplified version:
import cv2

from ultralytics import YOLO

model = YOLO("yolov8n.pt")
cap = cv2.VideoCapture("path/to/video/file.mp4")

while cap.isOpened():
    success, im0 = cap.read()
    if not success:
        break

    results = model.predict(im0, show=False)
    for box in results[0].boxes.xyxy.cpu().tolist():
        obj = im0[int(box[1]) : int(box[3]), int(box[0]) : int(box[2])]
        im0[int(box[1]) : int(box[3]), int(box[0]) : int(box[2])] = cv2.blur(obj, (50, 50))

    cv2.imshow("YOLOv8 Blurring", im0)
    if cv2.waitKey(1) & 0xFF == ord("q"):
        break

cap.release()
cv2.destroyAllWindows()
What are the benefits of using Ultralytics YOLOv8 for object blurring?
Ultralytics YOLOv8 offers several advantages for object blurring:
- Privacy Protection: Effectively obscure sensitive or identifiable information.
- Selective Focus: Target specific objects for blurring, maintaining essential visual content.
- Real-time Processing: Execute object blurring efficiently in dynamic environments, suitable for instant privacy enhancements.
For more detailed applications, check the advantages of object blurring section.
Can I use Ultralytics YOLOv8 to blur faces in a video for privacy reasons?
Yes, Ultralytics YOLOv8 can be configured to detect and blur faces in videos to protect privacy. By training or using a pre-trained model to specifically recognize faces, the detection results can be processed with OpenCV to apply a blur effect. Refer to our guide on object detection with YOLOv8 and modify the code to target face detection.
How does YOLOv8 compare to other object detection models like Faster R-CNN for object blurring?
Ultralytics YOLOv8 typically outperforms models like Faster R-CNN in terms of speed, making it more suitable for real-time applications. While both models offer accurate detection, YOLOv8's architecture is optimized for rapid inference, which is critical for tasks like real-time object blurring. Learn more about the technical differences and performance metrics in our YOLOv8 documentation.
comments: true
description: Learn to accurately identify and count objects in real-time using Ultralytics YOLOv8 for applications like crowd analysis and surveillance.
keywords: object counting, YOLOv8, Ultralytics, real-time object detection, AI, deep learning, object tracking, crowd analysis, surveillance, resource optimization
Object Counting using Ultralytics YOLOv8
What is Object Counting?
Object counting with Ultralytics YOLOv8 involves accurate identification and counting of specific objects in videos and camera streams. YOLOv8 excels in real-time applications, providing efficient and precise object counting for various scenarios like crowd analysis and surveillance, thanks to its state-of-the-art algorithms and deep learning capabilities.
|
Watch: Object Counting using Ultralytics YOLOv8 |
Watch: Class-wise Object Counting using Ultralytics YOLOv8 |
Advantages of Object Counting?
- Resource Optimization: Object counting facilitates efficient resource management by providing accurate counts, and optimizing resource allocation in applications like inventory management.
- Enhanced Security: Object counting enhances security and surveillance by accurately tracking and counting entities, aiding in proactive threat detection.
- Informed Decision-Making: Object counting offers valuable insights for decision-making, optimizing processes in retail, traffic management, and various other domains.
Real World Applications
| Logistics | Aquaculture |
|---|---|
| Conveyor Belt Packets Counting Using Ultralytics YOLOv8 | Fish Counting in Sea using Ultralytics YOLOv8 |
!!! Example "Object Counting using YOLOv8 Example"
=== "Count in Region"

    ```py
    import cv2

    from ultralytics import YOLO, solutions

    model = YOLO("yolov8n.pt")
    cap = cv2.VideoCapture("path/to/video/file.mp4")
    assert cap.isOpened(), "Error reading video file"
    w, h, fps = (int(cap.get(x)) for x in (cv2.CAP_PROP_FRAME_WIDTH, cv2.CAP_PROP_FRAME_HEIGHT, cv2.CAP_PROP_FPS))

    # Define region points
    region_points = [(20, 400), (1080, 404), (1080, 360), (20, 360)]

    # Video writer
    video_writer = cv2.VideoWriter("object_counting_output.avi", cv2.VideoWriter_fourcc(*"mp4v"), fps, (w, h))

    # Init Object Counter
    counter = solutions.ObjectCounter(
        view_img=True,
        reg_pts=region_points,
        names=model.names,
        draw_tracks=True,
        line_thickness=2,
    )

    while cap.isOpened():
        success, im0 = cap.read()
        if not success:
            print("Video frame is empty or video processing has been successfully completed.")
            break
        tracks = model.track(im0, persist=True, show=False)

        im0 = counter.start_counting(im0, tracks)
        video_writer.write(im0)

    cap.release()
    video_writer.release()
    cv2.destroyAllWindows()
    ```

=== "Count in Polygon"

    ```py
    import cv2

    from ultralytics import YOLO, solutions

    model = YOLO("yolov8n.pt")
    cap = cv2.VideoCapture("path/to/video/file.mp4")
    assert cap.isOpened(), "Error reading video file"
    w, h, fps = (int(cap.get(x)) for x in (cv2.CAP_PROP_FRAME_WIDTH, cv2.CAP_PROP_FRAME_HEIGHT, cv2.CAP_PROP_FPS))

    # Define region points as a polygon with 5 points
    region_points = [(20, 400), (1080, 404), (1080, 360), (20, 360), (20, 400)]

    # Video writer
    video_writer = cv2.VideoWriter("object_counting_output.avi", cv2.VideoWriter_fourcc(*"mp4v"), fps, (w, h))

    # Init Object Counter
    counter = solutions.ObjectCounter(
        view_img=True,
        reg_pts=region_points,
        names=model.names,
        draw_tracks=True,
        line_thickness=2,
    )

    while cap.isOpened():
        success, im0 = cap.read()
        if not success:
            print("Video frame is empty or video processing has been successfully completed.")
            break
        tracks = model.track(im0, persist=True, show=False)

        im0 = counter.start_counting(im0, tracks)
        video_writer.write(im0)

    cap.release()
    video_writer.release()
    cv2.destroyAllWindows()
    ```

=== "Count in Line"

    ```py
    import cv2

    from ultralytics import YOLO, solutions

    model = YOLO("yolov8n.pt")
    cap = cv2.VideoCapture("path/to/video/file.mp4")
    assert cap.isOpened(), "Error reading video file"
    w, h, fps = (int(cap.get(x)) for x in (cv2.CAP_PROP_FRAME_WIDTH, cv2.CAP_PROP_FRAME_HEIGHT, cv2.CAP_PROP_FPS))

    # Define line points
    line_points = [(20, 400), (1080, 400)]

    # Video writer
    video_writer = cv2.VideoWriter("object_counting_output.avi", cv2.VideoWriter_fourcc(*"mp4v"), fps, (w, h))

    # Init Object Counter
    counter = solutions.ObjectCounter(
        view_img=True,
        reg_pts=line_points,
        names=model.names,
        draw_tracks=True,
        line_thickness=2,
    )

    while cap.isOpened():
        success, im0 = cap.read()
        if not success:
            print("Video frame is empty or video processing has been successfully completed.")
            break
        tracks = model.track(im0, persist=True, show=False)

        im0 = counter.start_counting(im0, tracks)
        video_writer.write(im0)

    cap.release()
    video_writer.release()
    cv2.destroyAllWindows()
    ```

=== "Specific Classes"

    ```py
    import cv2

    from ultralytics import YOLO, solutions

    model = YOLO("yolov8n.pt")
    cap = cv2.VideoCapture("path/to/video/file.mp4")
    assert cap.isOpened(), "Error reading video file"
    w, h, fps = (int(cap.get(x)) for x in (cv2.CAP_PROP_FRAME_WIDTH, cv2.CAP_PROP_FRAME_HEIGHT, cv2.CAP_PROP_FPS))

    line_points = [(20, 400), (1080, 400)]  # line or region points
    classes_to_count = [0, 2]  # person and car classes for count

    # Video writer
    video_writer = cv2.VideoWriter("object_counting_output.avi", cv2.VideoWriter_fourcc(*"mp4v"), fps, (w, h))

    # Init Object Counter
    counter = solutions.ObjectCounter(
        view_img=True,
        reg_pts=line_points,
        names=model.names,
        draw_tracks=True,
        line_thickness=2,
    )

    while cap.isOpened():
        success, im0 = cap.read()
        if not success:
            print("Video frame is empty or video processing has been successfully completed.")
            break
        tracks = model.track(im0, persist=True, show=False, classes=classes_to_count)

        im0 = counter.start_counting(im0, tracks)
        video_writer.write(im0)

    cap.release()
    video_writer.release()
    cv2.destroyAllWindows()
    ```
???+ tip "Region is Movable"
You can move the region anywhere in the frame by clicking on its edges
Argument ObjectCounter
Here's a table with the ObjectCounter arguments:
| Name | Type | Default | Description |
|---|---|---|---|
names |
dict |
None |
Dictionary of classes names. |
reg_pts |
list |
[(20, 400), (1260, 400)] |
List of points defining the counting region. |
count_reg_color |
tuple |
(255, 0, 255) |
RGB color of the counting region. |
count_txt_color |
tuple |
(0, 0, 0) |
RGB color of the count text. |
count_bg_color |
tuple |
(255, 255, 255) |
RGB color of the count text background. |
line_thickness |
int |
2 |
Line thickness for bounding boxes. |
track_thickness |
int |
2 |
Thickness of the track lines. |
view_img |
bool |
False |
Flag to control whether to display the video stream. |
view_in_counts |
bool |
True |
Flag to control whether to display the in counts on the video stream. |
view_out_counts |
bool |
True |
Flag to control whether to display the out counts on the video stream. |
draw_tracks |
bool |
False |
Flag to control whether to draw the object tracks. |
track_color |
tuple |
None |
RGB color of the tracks. |
region_thickness |
int |
5 |
Thickness of the object counting region. |
line_dist_thresh |
int |
15 |
Euclidean distance threshold for line counter. |
cls_txtdisplay_gap |
int |
50 |
Display gap between each class count. |
Arguments model.track
| Name | Type | Default | Description |
|---|---|---|---|
source |
im0 |
None |
source directory for images or videos |
persist |
bool |
False |
persisting tracks between frames |
tracker |
str |
botsort.yaml |
Tracking method 'bytetrack' or 'botsort' |
conf |
float |
0.3 |
Confidence Threshold |
iou |
float |
0.5 |
IOU Threshold |
classes |
list |
None |
filter results by class, i.e. classes=0, or classes=[0,2,3] |
verbose |
bool |
True |
Display the object tracking results |
FAQ
How do I count objects in a video using Ultralytics YOLOv8?
To count objects in a video using Ultralytics YOLOv8, you can follow these steps:
- Import the necessary libraries (
cv2,ultralytics). - Load a pretrained YOLOv8 model.
- Define the counting region (e.g., a polygon, line, etc.).
- Set up the video capture and initialize the object counter.
- Process each frame to track objects and count them within the defined region.
Here's a simple example for counting in a region:
import cv2

from ultralytics import YOLO, solutions


def count_objects_in_region(video_path, output_video_path, model_path):
    """Count objects in a specific region within a video."""
    model = YOLO(model_path)
    cap = cv2.VideoCapture(video_path)
    assert cap.isOpened(), "Error reading video file"
    w, h, fps = (int(cap.get(x)) for x in (cv2.CAP_PROP_FRAME_WIDTH, cv2.CAP_PROP_FRAME_HEIGHT, cv2.CAP_PROP_FPS))
    region_points = [(20, 400), (1080, 404), (1080, 360), (20, 360)]
    video_writer = cv2.VideoWriter(output_video_path, cv2.VideoWriter_fourcc(*"mp4v"), fps, (w, h))
    counter = solutions.ObjectCounter(
        view_img=True, reg_pts=region_points, names=model.names, draw_tracks=True, line_thickness=2
    )

    while cap.isOpened():
        success, im0 = cap.read()
        if not success:
            print("Video frame is empty or video processing has been successfully completed.")
            break
        tracks = model.track(im0, persist=True, show=False)
        im0 = counter.start_counting(im0, tracks)
        video_writer.write(im0)

    cap.release()
    video_writer.release()
    cv2.destroyAllWindows()


count_objects_in_region("path/to/video.mp4", "output_video.avi", "yolov8n.pt")
Explore more configurations and options in the Object Counting section.
What are the advantages of using Ultralytics YOLOv8 for object counting?
Using Ultralytics YOLOv8 for object counting offers several advantages:
- Resource Optimization: It facilitates efficient resource management by providing accurate counts, helping optimize resource allocation in industries like inventory management.
- Enhanced Security: It enhances security and surveillance by accurately tracking and counting entities, aiding in proactive threat detection.
- Informed Decision-Making: It offers valuable insights for decision-making, optimizing processes in domains like retail, traffic management, and more.
For real-world applications and code examples, visit the Advantages of Object Counting section.
How can I count specific classes of objects using Ultralytics YOLOv8?
To count specific classes of objects using Ultralytics YOLOv8, you need to specify the classes you are interested in during the tracking phase. Below is a Python example:
import cv2

from ultralytics import YOLO, solutions


def count_specific_classes(video_path, output_video_path, model_path, classes_to_count):
    """Count specific classes of objects in a video."""
    model = YOLO(model_path)
    cap = cv2.VideoCapture(video_path)
    assert cap.isOpened(), "Error reading video file"
    w, h, fps = (int(cap.get(x)) for x in (cv2.CAP_PROP_FRAME_WIDTH, cv2.CAP_PROP_FRAME_HEIGHT, cv2.CAP_PROP_FPS))
    line_points = [(20, 400), (1080, 400)]
    video_writer = cv2.VideoWriter(output_video_path, cv2.VideoWriter_fourcc(*"mp4v"), fps, (w, h))
    counter = solutions.ObjectCounter(
        view_img=True, reg_pts=line_points, names=model.names, draw_tracks=True, line_thickness=2
    )

    while cap.isOpened():
        success, im0 = cap.read()
        if not success:
            print("Video frame is empty or video processing has been successfully completed.")
            break
        tracks = model.track(im0, persist=True, show=False, classes=classes_to_count)
        im0 = counter.start_counting(im0, tracks)
        video_writer.write(im0)

    cap.release()
    video_writer.release()
    cv2.destroyAllWindows()


count_specific_classes("path/to/video.mp4", "output_specific_classes.avi", "yolov8n.pt", [0, 2])
In this example, classes_to_count=[0, 2], which means it counts objects of class 0 and 2 (e.g., person and car).
Why should I use YOLOv8 over other object detection models for real-time applications?
Ultralytics YOLOv8 provides several advantages over other object detection models like Faster R-CNN, SSD, and previous YOLO versions:
- Speed and Efficiency: YOLOv8 offers real-time processing capabilities, making it ideal for applications requiring high-speed inference, such as surveillance and autonomous driving.
- Accuracy: It provides state-of-the-art accuracy for object detection and tracking tasks, reducing the number of false positives and improving overall system reliability.
- Ease of Integration: YOLOv8 offers seamless integration with various platforms and devices, including mobile and edge devices, which is crucial for modern AI applications.
- Flexibility: Supports various tasks like object detection, segmentation, and tracking with configurable models to meet specific use-case requirements.
Check out Ultralytics YOLOv8 Documentation for a deeper dive into its features and performance comparisons.
Can I use YOLOv8 for advanced applications like crowd analysis and traffic management?
Yes, Ultralytics YOLOv8 is perfectly suited for advanced applications like crowd analysis and traffic management due to its real-time detection capabilities, scalability, and integration flexibility. Its advanced features allow for high-accuracy object tracking, counting, and classification in dynamic environments. Example use cases include:
- Crowd Analysis: Monitor and manage large gatherings, ensuring safety and optimizing crowd flow.
- Traffic Management: Track and count vehicles, analyze traffic patterns, and manage congestion in real-time.
For more information and implementation details, refer to the guide on Real World Applications of object counting with YOLOv8.
comments: true
description: Learn how to crop and extract objects using Ultralytics YOLOv8 for focused analysis, reduced data volume, and enhanced precision.
keywords: Ultralytics, YOLOv8, object cropping, object detection, image processing, video analysis, AI, machine learning
Object Cropping using Ultralytics YOLOv8
What is Object Cropping?
Object cropping with Ultralytics YOLOv8 involves isolating and extracting specific detected objects from an image or video. The YOLOv8 model capabilities are utilized to accurately identify and delineate objects, enabling precise cropping for further analysis or manipulation.
Watch: Object Cropping using Ultralytics YOLOv8
Advantages of Object Cropping?
- Focused Analysis: YOLOv8 facilitates targeted object cropping, allowing for in-depth examination or processing of individual items within a scene.
- Reduced Data Volume: By extracting only relevant objects, object cropping helps in minimizing data size, making it efficient for storage, transmission, or subsequent computational tasks.
- Enhanced Precision: YOLOv8's object detection accuracy ensures that the cropped objects maintain their spatial relationships, preserving the integrity of the visual information for detailed analysis.
Visuals
| Airport Luggage |
|---|
| Suitcases Cropping at airport conveyor belt using Ultralytics YOLOv8 |
!!! Example "Object Cropping using YOLOv8 Example"
=== "Object Cropping"

    ```py
    import os

    import cv2

    from ultralytics import YOLO
    from ultralytics.utils.plotting import Annotator, colors

    model = YOLO("yolov8n.pt")
    names = model.names

    cap = cv2.VideoCapture("path/to/video/file.mp4")
    assert cap.isOpened(), "Error reading video file"
    w, h, fps = (int(cap.get(x)) for x in (cv2.CAP_PROP_FRAME_WIDTH, cv2.CAP_PROP_FRAME_HEIGHT, cv2.CAP_PROP_FPS))

    crop_dir_name = "ultralytics_crop"
    if not os.path.exists(crop_dir_name):
        os.mkdir(crop_dir_name)

    # Video writer
    video_writer = cv2.VideoWriter("object_cropping_output.avi", cv2.VideoWriter_fourcc(*"mp4v"), fps, (w, h))

    idx = 0
    while cap.isOpened():
        success, im0 = cap.read()
        if not success:
            print("Video frame is empty or video processing has been successfully completed.")
            break

        results = model.predict(im0, show=False)
        boxes = results[0].boxes.xyxy.cpu().tolist()
        clss = results[0].boxes.cls.cpu().tolist()
        annotator = Annotator(im0, line_width=2, example=names)

        if boxes is not None:
            for box, cls in zip(boxes, clss):
                idx += 1
                annotator.box_label(box, color=colors(int(cls), True), label=names[int(cls)])

                crop_obj = im0[int(box[1]) : int(box[3]), int(box[0]) : int(box[2])]

                cv2.imwrite(os.path.join(crop_dir_name, str(idx) + ".png"), crop_obj)

        cv2.imshow("ultralytics", im0)
        video_writer.write(im0)

        if cv2.waitKey(1) & 0xFF == ord("q"):
            break

    cap.release()
    video_writer.release()
    cv2.destroyAllWindows()
    ```
Arguments model.predict
| Argument | Type | Default | Description |
|---|---|---|---|
source |
str |
'ultralytics/assets' |
Specifies the data source for inference. Can be an image path, video file, directory, URL, or device ID for live feeds. Supports a wide range of formats and sources, enabling flexible application across different types of input. |
conf |
float |
0.25 |
Sets the minimum confidence threshold for detections. Objects detected with confidence below this threshold will be disregarded. Adjusting this value can help reduce false positives. |
iou |
float |
0.7 |
Intersection Over Union (IoU) threshold for Non-Maximum Suppression (NMS). Lower values result in fewer detections by eliminating overlapping boxes, useful for reducing duplicates. |
imgsz |
int or tuple |
640 |
Defines the image size for inference. Can be a single integer 640 for square resizing or a (height, width) tuple. Proper sizing can improve detection accuracy and processing speed. |
half |
bool |
False |
Enables half-precision (FP16) inference, which can speed up model inference on supported GPUs with minimal impact on accuracy. |
device |
str |
None |
Specifies the device for inference (e.g., cpu, cuda:0 or 0). Allows users to select between CPU, a specific GPU, or other compute devices for model execution. |
max_det |
int |
300 |
Maximum number of detections allowed per image. Limits the total number of objects the model can detect in a single inference, preventing excessive outputs in dense scenes. |
vid_stride |
int |
1 |
Frame stride for video inputs. Allows skipping frames in videos to speed up processing at the cost of temporal resolution. A value of 1 processes every frame, higher values skip frames. |
stream_buffer |
bool |
False |
Determines if all frames should be buffered when processing video streams (True), or if the model should return the most recent frame (False). Useful for real-time applications. |
visualize |
bool |
False |
Activates visualization of model features during inference, providing insights into what the model is "seeing". Useful for debugging and model interpretation. |
augment |
bool |
False |
Enables test-time augmentation (TTA) for predictions, potentially improving detection robustness at the cost of inference speed. |
agnostic_nms |
bool |
False |
Enables class-agnostic Non-Maximum Suppression (NMS), which merges overlapping boxes of different classes. Useful in multi-class detection scenarios where class overlap is common. |
classes |
list[int] |
None |
Filters predictions to a set of class IDs. Only detections belonging to the specified classes will be returned. Useful for focusing on relevant objects in multi-class detection tasks. |
retina_masks |
bool |
False |
Uses high-resolution segmentation masks if available in the model. This can enhance mask quality for segmentation tasks, providing finer detail. |
embed |
list[int] |
None |
Specifies the layers from which to extract feature vectors or embeddings. Useful for downstream tasks like clustering or similarity search. |
FAQ
What is object cropping in Ultralytics YOLOv8 and how does it work?
Object cropping using Ultralytics YOLOv8 involves isolating and extracting specific objects from an image or video based on YOLOv8's detection capabilities. This process allows for focused analysis, reduced data volume, and enhanced precision by leveraging YOLOv8 to identify objects with high accuracy and crop them accordingly. For an in-depth tutorial, refer to the object cropping example.
Why should I use Ultralytics YOLOv8 for object cropping over other solutions?
Ultralytics YOLOv8 stands out due to its precision, speed, and ease of use. It allows detailed and accurate object detection and cropping, essential for focused analysis and applications needing high data integrity. Moreover, YOLOv8 integrates seamlessly with tools like OpenVINO and TensorRT for deployments requiring real-time capabilities and optimization on diverse hardware. Explore the benefits in the guide on model export.
How can I reduce the data volume of my dataset using object cropping?
By using Ultralytics YOLOv8 to crop only relevant objects from your images or videos, you can significantly reduce the data size, making it more efficient for storage and processing. This process involves training the model to detect specific objects and then using the results to crop and save these portions only. For more information on exploiting Ultralytics YOLOv8's capabilities, visit our quickstart guide.
Can I use Ultralytics YOLOv8 for real-time video analysis and object cropping?
Yes, Ultralytics YOLOv8 can process real-time video feeds to detect and crop objects dynamically. The model's high-speed inference capabilities make it ideal for real-time applications such as surveillance, sports analysis, and automated inspection systems. Check out the tracking and prediction modes to understand how to implement real-time processing.
What are the hardware requirements for efficiently running YOLOv8 for object cropping?
Ultralytics YOLOv8 is optimized for both CPU and GPU environments, but to achieve optimal performance, especially for real-time or high-volume inference, a dedicated GPU (e.g., NVIDIA Tesla, RTX series) is recommended. For deployment on lightweight devices, consider using CoreML for iOS or TFLite for Android. More details on supported devices and formats can be found in our model deployment options.
comments: true
description: Discover how to enhance Ultralytics YOLO model performance using Intel's OpenVINO toolkit. Boost latency and throughput efficiently.
keywords: Ultralytics YOLO, OpenVINO optimization, deep learning, model inference, throughput optimization, latency optimization, AI deployment, Intel's OpenVINO, performance tuning
Optimizing OpenVINO Inference for Ultralytics YOLO Models: A Comprehensive Guide
Introduction
When deploying deep learning models, particularly those for object detection such as Ultralytics YOLO models, achieving optimal performance is crucial. This guide delves into leveraging Intel's OpenVINO toolkit to optimize inference, focusing on latency and throughput. Whether you're working on consumer-grade applications or large-scale deployments, understanding and applying these optimization strategies will ensure your models run efficiently on various devices.
Optimizing for Latency
Latency optimization is vital for applications requiring immediate response from a single model given a single input, typical in consumer scenarios. The goal is to minimize the delay between input and inference result. However, achieving low latency involves careful consideration, especially when running concurrent inferences or managing multiple models.
Key Strategies for Latency Optimization:
- Single Inference per Device: The simplest way to achieve low latency is by limiting to one inference at a time per device. Additional concurrency often leads to increased latency.
- Leveraging Sub-Devices: Devices like multi-socket CPUs or multi-tile GPUs can execute multiple requests with minimal latency increase by utilizing their internal sub-devices.
- OpenVINO Performance Hints: Utilizing OpenVINO's
ov::hint::PerformanceMode::LATENCYfor theov::hint::performance_modeproperty during model compilation simplifies performance tuning, offering a device-agnostic and future-proof approach.
Managing First-Inference Latency:
- Model Caching: To mitigate model load and compile times impacting latency, use model caching where possible. For scenarios where caching isn't viable, CPUs generally offer the fastest model load times.
- Model Mapping vs. Reading: To reduce load times, OpenVINO replaced model reading with mapping. However, if the model is on a removable or network drive, consider using
ov::enable_mmap(false)to switch back to reading. - AUTO Device Selection: This mode begins inference on the CPU, shifting to an accelerator once ready, seamlessly reducing first-inference latency.
Optimizing for Throughput
Throughput optimization is crucial for scenarios serving numerous inference requests simultaneously, maximizing resource utilization without significantly sacrificing individual request performance.
Approaches to Throughput Optimization:
-
OpenVINO Performance Hints: A high-level, future-proof method to enhance throughput across devices using performance hints.
import openvino.properties.hint as hints config = {hints.performance_mode: hints.PerformanceMode.THROUGHPUT} compiled_model = core.compile_model(model, "GPU", config) -
Explicit Batching and Streams: A more granular approach involving explicit batching and the use of streams for advanced performance tuning.
Designing Throughput-Oriented Applications:
To maximize throughput, applications should:
- Process inputs in parallel, making full use of the device's capabilities.
- Decompose data flow into concurrent inference requests, scheduled for parallel execution.
- Utilize the Async API with callbacks to maintain efficiency and avoid device starvation.
Multi-Device Execution:
OpenVINO's multi-device mode simplifies scaling throughput by automatically balancing inference requests across devices without requiring application-level device management.
Conclusion
Optimizing Ultralytics YOLO models for latency and throughput with OpenVINO can significantly enhance your application's performance. By carefully applying the strategies outlined in this guide, developers can ensure their models run efficiently, meeting the demands of various deployment scenarios. Remember, the choice between optimizing for latency or throughput depends on your specific application needs and the characteristics of the deployment environment.
For more detailed technical information and the latest updates, refer to the OpenVINO documentation and Ultralytics YOLO repository. These resources provide in-depth guides, tutorials, and community support to help you get the most out of your deep learning models.
Ensuring your models achieve optimal performance is not just about tweaking configurations; it's about understanding your application's needs and making informed decisions. Whether you're optimizing for real-time responses or maximizing throughput for large-scale processing, the combination of Ultralytics YOLO models and OpenVINO offers a powerful toolkit for developers to deploy high-performance AI solutions.
FAQ
How do I optimize Ultralytics YOLO models for low latency using OpenVINO?
Optimizing Ultralytics YOLO models for low latency involves several key strategies:
- Single Inference per Device: Limit inferences to one at a time per device to minimize delays.
- Leveraging Sub-Devices: Utilize devices like multi-socket CPUs or multi-tile GPUs which can handle multiple requests with minimal latency increase.
- OpenVINO Performance Hints: Use OpenVINO's
ov::hint::PerformanceMode::LATENCYduring model compilation for simplified, device-agnostic tuning.
For more practical tips on optimizing latency, check out the Latency Optimization section of our guide.
Why should I use OpenVINO for optimizing Ultralytics YOLO throughput?
OpenVINO enhances Ultralytics YOLO model throughput by maximizing device resource utilization without sacrificing performance. Key benefits include:
- Performance Hints: Simple, high-level performance tuning across devices.
- Explicit Batching and Streams: Fine-tuning for advanced performance.
- Multi-Device Execution: Automated inference load balancing, easing application-level management.
Example configuration:
import openvino.properties.hint as hints

config = {hints.performance_mode: hints.PerformanceMode.THROUGHPUT}
compiled_model = core.compile_model(model, "GPU", config)
Learn more about throughput optimization in the Throughput Optimization section of our detailed guide.
What is the best practice for reducing first-inference latency in OpenVINO?
To reduce first-inference latency, consider these practices:
- Model Caching: Use model caching to decrease load and compile times.
- Model Mapping vs. Reading: Use mapping (
ov::enable_mmap(true)) by default but switch to reading (ov::enable_mmap(false)) if the model is on a removable or network drive. - AUTO Device Selection: Utilize AUTO mode to start with CPU inference and transition to an accelerator seamlessly.
For detailed strategies on managing first-inference latency, refer to the Managing First-Inference Latency section.
How do I balance optimizing for latency and throughput with Ultralytics YOLO and OpenVINO?
Balancing latency and throughput optimization requires understanding your application needs:
- Latency Optimization: Ideal for real-time applications requiring immediate responses (e.g., consumer-grade apps).
- Throughput Optimization: Best for scenarios with many concurrent inferences, maximizing resource use (e.g., large-scale deployments).
Using OpenVINO's high-level performance hints and multi-device modes can help strike the right balance. Choose the appropriate OpenVINO Performance hints based on your specific requirements.
Can I use Ultralytics YOLO models with other AI frameworks besides OpenVINO?
Yes, Ultralytics YOLO models are highly versatile and can be integrated with various AI frameworks. Options include:
- TensorRT: For NVIDIA GPU optimization, follow the TensorRT integration guide.
- CoreML: For Apple devices, refer to our CoreML export instructions.
- TensorFlow.js: For web and Node.js apps, see the TF.js conversion guide.
Explore more integrations on the Ultralytics Integrations page.
comments: true
description: Optimize parking spaces and enhance safety with Ultralytics YOLOv8. Explore real-time vehicle detection and smart parking solutions.
keywords: parking management, YOLOv8, Ultralytics, vehicle detection, real-time tracking, parking lot optimization, smart parking
Parking Management using Ultralytics YOLOv8 🚀
What is Parking Management System?
Parking management with Ultralytics YOLOv8 ensures efficient and safe parking by organizing spaces and monitoring availability. YOLOv8 can improve parking lot management through real-time vehicle detection, and insights into parking occupancy.
Advantages of Parking Management System?
- Efficiency: Parking lot management optimizes the use of parking spaces and reduces congestion.
- Safety and Security: Parking management using YOLOv8 improves the safety of both people and vehicles through surveillance and security measures.
- Reduced Emissions: Parking management using YOLOv8 manages traffic flow to minimize idle time and emissions in parking lots.
Real World Applications
| Parking Management System | Parking Management System |
|---|---|
| Parking management Aerial View using Ultralytics YOLOv8 | Parking management Top View using Ultralytics YOLOv8 |
Parking Management System Code Workflow
Selection of Points
!!! Tip "Point Selection is now Easy"
Choosing parking points is a critical and complex task in parking management systems. Ultralytics streamlines this process by providing a tool that lets you define parking lot areas, which can be utilized later for additional processing.
- Capture a frame from the video or camera stream where you want to manage the parking lot.
- Use the provided code to launch a graphical interface, where you can select an image and start outlining parking regions by mouse click to create polygons.
!!! Warning "Image Size"
Max Image Size of 1920 * 1080 supported
!!! Example "Parking slots Annotator Ultralytics YOLOv8"
=== "Parking Annotator"

    ```py
    from ultralytics import solutions

    solutions.ParkingPtsSelection()
    ```
- After defining the parking areas with polygons, click
saveto store a JSON file with the data in your working directory.
Python Code for Parking Management
!!! Example "Parking management using YOLOv8 Example"
=== "Parking Management"

    ```py
    import cv2

    from ultralytics import solutions

    # Path to json file, that created with above point selection app
    polygon_json_path = "bounding_boxes.json"

    # Video capture
    cap = cv2.VideoCapture("Path/to/video/file.mp4")
    assert cap.isOpened(), "Error reading video file"
    w, h, fps = (int(cap.get(x)) for x in (cv2.CAP_PROP_FRAME_WIDTH, cv2.CAP_PROP_FRAME_HEIGHT, cv2.CAP_PROP_FPS))

    # Video writer
    video_writer = cv2.VideoWriter("parking management.avi", cv2.VideoWriter_fourcc(*"mp4v"), fps, (w, h))

    # Initialize parking management object
    management = solutions.ParkingManagement(model_path="yolov8n.pt")

    while cap.isOpened():
        ret, im0 = cap.read()
        if not ret:
            break

        json_data = management.parking_regions_extraction(polygon_json_path)
        results = management.model.track(im0, persist=True, show=False)

        if results[0].boxes.id is not None:
            boxes = results[0].boxes.xyxy.cpu().tolist()
            clss = results[0].boxes.cls.cpu().tolist()
            management.process_data(json_data, im0, boxes, clss)

        management.display_frames(im0)
        video_writer.write(im0)

    cap.release()
    video_writer.release()
    cv2.destroyAllWindows()
    ```
Optional Arguments ParkingManagement
| Name | Type | Default | Description |
|---|---|---|---|
model_path |
str |
None |
Path to the YOLOv8 model. |
txt_color |
tuple |
(0, 0, 0) |
RGB color tuple for text. |
bg_color |
tuple |
(255, 255, 255) |
RGB color tuple for background. |
occupied_region_color |
tuple |
(0, 255, 0) |
RGB color tuple for occupied regions. |
available_region_color |
tuple |
(0, 0, 255) |
RGB color tuple for available regions. |
margin |
int |
10 |
Margin for text display. |
Arguments model.track
| Name | Type | Default | Description |
|---|---|---|---|
source |
im0 |
None |
source directory for images or videos |
persist |
bool |
False |
persisting tracks between frames |
tracker |
str |
botsort.yaml |
Tracking method 'bytetrack' or 'botsort' |
conf |
float |
0.3 |
Confidence Threshold |
iou |
float |
0.5 |
IOU Threshold |
classes |
list |
None |
filter results by class, i.e. classes=0, or classes=[0,2,3] |
verbose |
bool |
True |
Display the object tracking results |
FAQ
How does Ultralytics YOLOv8 enhance parking management systems?
Ultralytics YOLOv8 greatly enhances parking management systems by providing real-time vehicle detection and monitoring. This results in optimized usage of parking spaces, reduced congestion, and improved safety through continuous surveillance. The Parking Management System enables efficient traffic flow, minimizing idle times and emissions in parking lots, thereby contributing to environmental sustainability. For further details, refer to the parking management code workflow.
What are the benefits of using Ultralytics YOLOv8 for smart parking?
Using Ultralytics YOLOv8 for smart parking yields numerous benefits:
- Efficiency: Optimizes the use of parking spaces and decreases congestion.
- Safety and Security: Enhances surveillance and ensures the safety of vehicles and pedestrians.
- Environmental Impact: Helps in reducing emissions by minimizing vehicle idle times. More details on the advantages can be seen here.
How can I define parking spaces using Ultralytics YOLOv8?
Defining parking spaces is straightforward with Ultralytics YOLOv8:
- Capture a frame from a video or camera stream.
- Use the provided code to launch a GUI for selecting an image and drawing polygons to define parking spaces.
- Save the labeled data in JSON format for further processing. For comprehensive instructions, check the selection of points section.
Can I customize the YOLOv8 model for specific parking management needs?
Yes, Ultralytics YOLOv8 allows customization for specific parking management needs. You can adjust parameters such as the occupied and available region colors, margins for text display, and much more. Utilizing the ParkingManagement class's optional arguments, you can tailor the model to suit your particular requirements, ensuring maximum efficiency and effectiveness.
What are some real-world applications of Ultralytics YOLOv8 in parking lot management?
Ultralytics YOLOv8 is utilized in various real-world applications for parking lot management, including:
- Parking Space Detection: Accurately identifying available and occupied spaces.
- Surveillance: Enhancing security through real-time monitoring.
- Traffic Flow Management: Reducing idle times and congestion with efficient traffic handling. Images showcasing these applications can be found in real-world applications.
comments: true
description: Learn essential data preprocessing techniques for annotated computer vision data, including resizing, normalizing, augmenting, and splitting datasets for optimal model training.
keywords: data preprocessing, computer vision, image resizing, normalization, data augmentation, training dataset, validation dataset, test dataset, YOLOv8
Data Preprocessing Techniques for Annotated Computer Vision Data
Introduction
After you've defined your computer vision project's goals and collected and annotated data, the next step is to preprocess annotated data and prepare it for model training. Clean and consistent data are vital to creating a model that performs well.
Preprocessing is a step in the computer vision project workflow that includes resizing images, normalizing pixel values, augmenting the dataset, and splitting the data into training, validation, and test sets. Let's explore the essential techniques and best practices for cleaning your data!
Importance of Data Preprocessing
We are already collecting and annotating our data carefully with multiple considerations in mind. Then, what makes data preprocessing so important to a computer vision project? Well, data preprocessing is all about getting your data into a suitable format for training that reduces the computational load and helps improve model performance. Here are some common issues in raw data that preprocessing addresses:
- Noise: Irrelevant or random variations in data.
- Inconsistency: Variations in image sizes, formats, and quality.
- Imbalance: Unequal distribution of classes or categories in the dataset.
Data Preprocessing Techniques
One of the first and foremost steps in data preprocessing is resizing. Some models are designed to handle variable input sizes, but many models require a consistent input size. Resizing images makes them uniform and reduces computational complexity.
Resizing Images
You can resize your images using the following methods:
- Bilinear Interpolation: Smooths pixel values by taking a weighted average of the four nearest pixel values.
- Nearest Neighbor: Assigns the nearest pixel value without averaging, leading to a blocky image but faster computation.
To make resizing a simpler task, you can use the following tools:
- OpenCV: A popular computer vision library with extensive functions for image processing.
- PIL (Pillow): A Python Imaging Library for opening, manipulating, and saving image files.
With respect to YOLOv8, the 'imgsz' parameter during model training allows for flexible input sizes. When set to a specific size, such as 640, the model will resize input images so their largest dimension is 640 pixels while maintaining the original aspect ratio.
By evaluating your model's and dataset's specific needs, you can determine whether resizing is a necessary preprocessing step or if your model can efficiently handle images of varying sizes.
Normalizing Pixel Values
Another preprocessing technique is normalization. Normalization scales the pixel values to a standard range, which helps in faster convergence during training and improves model performance. Here are some common normalization techniques:
- Min-Max Scaling: Scales pixel values to a range of 0 to 1.
- Z-Score Normalization: Scales pixel values based on their mean and standard deviation.
With respect to YOLOv8, normalization is seamlessly handled as part of its preprocessing pipeline during model training. YOLOv8 automatically performs several preprocessing steps, including conversion to RGB, scaling pixel values to the range [0, 1], and normalization using predefined mean and standard deviation values.
Splitting the Dataset
Once you've cleaned the data, you are ready to split the dataset. Splitting the data into training, validation, and test sets is done to ensure that the model can be evaluated on unseen data to assess its generalization performance. A common split is 70% for training, 20% for validation, and 10% for testing. There are various tools and libraries that you can use to split your data like scikit-learn or TensorFlow.
Consider the following when splitting your dataset:
- Maintaining Data Distribution: Ensure that the data distribution of classes is maintained across training, validation, and test sets.
- Avoiding Data Leakage: Typically, data augmentation is done after the dataset is split. Data augmentation and any other preprocessing should only be applied to the training set to prevent information from the validation or test sets from influencing the model training. -Balancing Classes: For imbalanced datasets, consider techniques such as oversampling the minority class or under-sampling the majority class within the training set.
What is Data Augmentation?
The most commonly discussed data preprocessing step is data augmentation. Data augmentation artificially increases the size of the dataset by creating modified versions of images. By augmenting your data, you can reduce overfitting and improve model generalization.
Here are some other benefits of data augmentation:
- Creates a More Robust Dataset: Data augmentation can make the model more robust to variations and distortions in the input data. This includes changes in lighting, orientation, and scale.
- Cost-Effective: Data augmentation is a cost-effective way to increase the amount of training data without collecting and labeling new data.
- Better Use of Data: Every available data point is used to its maximum potential by creating new variations
Data Augmentation Methods
Common augmentation techniques include flipping, rotation, scaling, and color adjustments. Several libraries, such as Albumentations, Imgaug, and TensorFlow's ImageDataGenerator, can generate these augmentations.

With respect to YOLOv8, you can augment your custom dataset by modifying the dataset configuration file, a .yaml file. In this file, you can add an augmentation section with parameters that specify how you want to augment your data.
The Ultralytics YOLOv8 repository supports a wide range of data augmentations. You can apply various transformations such as:
- Random Crops
- Flipping: Images can be flipped horizontally or vertically.
- Rotation: Images can be rotated by specific angles.
- Distortion
Also, you can adjust the intensity of these augmentation techniques through specific parameters to generate more data variety.
A Case Study of Preprocessing
Consider a project aimed at developing a model to detect and classify different types of vehicles in traffic images using YOLOv8. We've collected traffic images and annotated them with bounding boxes and labels.
Here's what each step of preprocessing would look like for this project:
- Resizing Images: Since YOLOv8 handles flexible input sizes and performs resizing automatically, manual resizing is not required. The model will adjust the image size according to the specified 'imgsz' parameter during training.
- Normalizing Pixel Values: YOLOv8 automatically normalizes pixel values to a range of 0 to 1 during preprocessing, so it's not required.
- Splitting the Dataset: Divide the dataset into training (70%), validation (20%), and test (10%) sets using tools like scikit-learn.
- Data Augmentation: Modify the dataset configuration file (.yaml) to include data augmentation techniques such as random crops, horizontal flips, and brightness adjustments.
These steps make sure the dataset is prepared without any potential issues and is ready for Exploratory Data Analysis (EDA).
Exploratory Data Analysis Techniques
After preprocessing and augmenting your dataset, the next step is to gain insights through Exploratory Data Analysis. EDA uses statistical techniques and visualization tools to understand the patterns and distributions in your data. You can identify issues like class imbalances or outliers and make informed decisions about further data preprocessing or model training adjustments.
Statistical EDA Techniques
Statistical techniques often begin with calculating basic metrics such as mean, median, standard deviation, and range. These metrics provide a quick overview of your image dataset's properties, such as pixel intensity distributions. Understanding these basic statistics helps you grasp the overall quality and characteristics of your data, allowing you to spot any irregularities early on.
Visual EDA Techniques
Visualizations are key in EDA for image datasets. For example, class imbalance analysis is another vital aspect of EDA. It helps determine if certain classes are underrepresented in your dataset, Visualizing the distribution of different image classes or categories using bar charts can quickly reveal any imbalances. Similarly, outliers can be identified using visualization tools like box plots, which highlight anomalies in pixel intensity or feature distributions. Outlier detection prevents unusual data points from skewing your results.
Common tools for visualizations include:
- Histograms and Box Plots: Useful for understanding the distribution of pixel values and identifying outliers.
- Scatter Plots: Helpful for exploring relationships between image features or annotations.
- Heatmaps: Effective for visualizing the distribution of pixel intensities or the spatial distribution of annotated features within images.
Using Ultralytics Explorer for EDA
For a more advanced approach to EDA, you can use the Ultralytics Explorer tool. It offers robust capabilities for exploring computer vision datasets. By supporting semantic search, SQL queries, and vector similarity search, the tool makes it easy to analyze and understand your data. With Ultralytics Explorer, you can create embeddings for your dataset to find similar images, run SQL queries for detailed analysis, and perform semantic searches, all through a user-friendly graphical interface.
Reach Out and Connect
Having discussions about your project with other computer vision enthusiasts can give you new ideas from different perspectives. Here are some great ways to learn, troubleshoot, and network:
Channels to Connect with the Community
- GitHub Issues: Visit the YOLOv8 GitHub repository and use the Issues tab to raise questions, report bugs, and suggest features. The community and maintainers are there to help with any issues you face.
- Ultralytics Discord Server: Join the Ultralytics Discord server to connect with other users and developers, get support, share knowledge, and brainstorm ideas.
Official Documentation
- Ultralytics YOLOv8 Documentation: Refer to the official YOLOv8 documentation for thorough guides and valuable insights on numerous computer vision tasks and projects.
Your Dataset Is Ready!
Properly resized, normalized, and augmented data improves model performance by reducing noise and improving generalization. By following the preprocessing techniques and best practices outlined in this guide, you can create a solid dataset. With your preprocessed dataset ready, you can confidently proceed to the next steps in your project.
FAQ
What is the importance of data preprocessing in computer vision projects?
Data preprocessing is essential in computer vision projects because it ensures that the data is clean, consistent, and in a format that is optimal for model training. By addressing issues such as noise, inconsistency, and imbalance in raw data, preprocessing steps like resizing, normalization, augmentation, and dataset splitting help reduce computational load and improve model performance. For more details, visit the steps of a computer vision project.
How can I use Ultralytics YOLO for data augmentation?
For data augmentation with Ultralytics YOLOv8, you need to modify the dataset configuration file (.yaml). In this file, you can specify various augmentation techniques such as random crops, horizontal flips, and brightness adjustments. This can be effectively done using the training configurations explained here. Data augmentation helps create a more robust dataset, reduce overfitting, and improve model generalization.
What are the best data normalization techniques for computer vision data?
Normalization scales pixel values to a standard range for faster convergence and improved performance during training. Common techniques include:
- Min-Max Scaling: Scales pixel values to a range of 0 to 1.
- Z-Score Normalization: Scales pixel values based on their mean and standard deviation.
For YOLOv8, normalization is handled automatically, including conversion to RGB and pixel value scaling. Learn more about it in the model training section.
How should I split my annotated dataset for training?
To split your dataset, a common practice is to divide it into 70% for training, 20% for validation, and 10% for testing. It is important to maintain the data distribution of classes across these splits and avoid data leakage by performing augmentation only on the training set. Use tools like scikit-learn or TensorFlow for efficient dataset splitting. See the detailed guide on dataset preparation.
Can I handle varying image sizes in YOLOv8 without manual resizing?
Yes, Ultralytics YOLOv8 can handle varying image sizes through the 'imgsz' parameter during model training. This parameter ensures that images are resized so their largest dimension matches the specified size (e.g., 640 pixels), while maintaining the aspect ratio. For more flexible input handling and automatic adjustments, check the model training section.


 浙公网安备 33010602011771号