Yolov8-源码解析-九-
Yolov8 源码解析(九)
comments: true
description: Learn how to estimate object speed using Ultralytics YOLOv8 for applications in traffic control, autonomous navigation, and surveillance.
keywords: Ultralytics YOLOv8, speed estimation, object tracking, computer vision, traffic control, autonomous navigation, surveillance, security
Speed Estimation using Ultralytics YOLOv8 🚀
What is Speed Estimation?
Speed estimation is the process of calculating the rate of movement of an object within a given context, often employed in computer vision applications. Using Ultralytics YOLOv8 you can now calculate the speed of object using object tracking alongside distance and time data, crucial for tasks like traffic and surveillance. The accuracy of speed estimation directly influences the efficiency and reliability of various applications, making it a key component in the advancement of intelligent systems and real-time decision-making processes.
Watch: Speed Estimation using Ultralytics YOLOv8
!!! tip "Check Out Our Blog"
For deeper insights into speed estimation, check out our blog post: [Ultralytics YOLOv8 for Speed Estimation in Computer Vision Projects](https://www.ultralytics.com/blog/ultralytics-yolov8-for-speed-estimation-in-computer-vision-projects)
Advantages of Speed Estimation?
- Efficient Traffic Control: Accurate speed estimation aids in managing traffic flow, enhancing safety, and reducing congestion on roadways.
- Precise Autonomous Navigation: In autonomous systems like self-driving cars, reliable speed estimation ensures safe and accurate vehicle navigation.
- Enhanced Surveillance Security: Speed estimation in surveillance analytics helps identify unusual behaviors or potential threats, improving the effectiveness of security measures.
Real World Applications
| Transportation | Transportation |
|---|---|
| Speed Estimation on Road using Ultralytics YOLOv8 | Speed Estimation on Bridge using Ultralytics YOLOv8 |
!!! Example "Speed Estimation using YOLOv8 Example"
=== "Speed Estimation"

    ```py
    import cv2

    from ultralytics import YOLO, solutions

    model = YOLO("yolov8n.pt")
    names = model.model.names

    cap = cv2.VideoCapture("path/to/video/file.mp4")
    assert cap.isOpened(), "Error reading video file"
    w, h, fps = (int(cap.get(x)) for x in (cv2.CAP_PROP_FRAME_WIDTH, cv2.CAP_PROP_FRAME_HEIGHT, cv2.CAP_PROP_FPS))

    # Video writer
    video_writer = cv2.VideoWriter("speed_estimation.avi", cv2.VideoWriter_fourcc(*"mp4v"), fps, (w, h))

    line_pts = [(0, 360), (1280, 360)]

    # Init speed-estimation obj
    speed_obj = solutions.SpeedEstimator(
        reg_pts=line_pts,
        names=names,
        view_img=True,
    )

    while cap.isOpened():
        success, im0 = cap.read()
        if not success:
            print("Video frame is empty or video processing has been successfully completed.")
            break

        tracks = model.track(im0, persist=True, show=False)

        im0 = speed_obj.estimate_speed(im0, tracks)
        video_writer.write(im0)

    cap.release()
    video_writer.release()
    cv2.destroyAllWindows()
    ```
???+ warning "Speed is Estimate"
Speed will be an estimate and may not be completely accurate. Additionally, the estimation can vary depending on GPU speed.
Arguments SpeedEstimator
| Name | Type | Default | Description |
|---|---|---|---|
names |
dict |
None |
Dictionary of class names. |
reg_pts |
list |
[(20, 400), (1260, 400)] |
List of region points for speed estimation. |
view_img |
bool |
False |
Whether to display the image with annotations. |
line_thickness |
int |
2 |
Thickness of the lines for drawing boxes and tracks. |
region_thickness |
int |
5 |
Thickness of the region lines. |
spdl_dist_thresh |
int |
10 |
Distance threshold for speed calculation. |
Arguments model.track
| Name | Type | Default | Description |
|---|---|---|---|
source |
im0 |
None |
source directory for images or videos |
persist |
bool |
False |
persisting tracks between frames |
tracker |
str |
botsort.yaml |
Tracking method 'bytetrack' or 'botsort' |
conf |
float |
0.3 |
Confidence Threshold |
iou |
float |
0.5 |
IOU Threshold |
classes |
list |
None |
filter results by class, i.e. classes=0, or classes=[0,2,3] |
verbose |
bool |
True |
Display the object tracking results |
FAQ
How do I estimate object speed using Ultralytics YOLOv8?
Estimating object speed with Ultralytics YOLOv8 involves combining object detection and tracking techniques. First, you need to detect objects in each frame using the YOLOv8 model. Then, track these objects across frames to calculate their movement over time. Finally, use the distance traveled by the object between frames and the frame rate to estimate its speed.
Example:
import cv2

from ultralytics import YOLO, solutions

model = YOLO("yolov8n.pt")
names = model.model.names

cap = cv2.VideoCapture("path/to/video/file.mp4")
w, h, fps = (int(cap.get(x)) for x in (cv2.CAP_PROP_FRAME_WIDTH, cv2.CAP_PROP_FRAME_HEIGHT, cv2.CAP_PROP_FPS))
video_writer = cv2.VideoWriter("speed_estimation.avi", cv2.VideoWriter_fourcc(*"mp4v"), fps, (w, h))

# Initialize SpeedEstimator
speed_obj = solutions.SpeedEstimator(
    reg_pts=[(0, 360), (1280, 360)],
    names=names,
    view_img=True,
)

while cap.isOpened():
    success, im0 = cap.read()
    if not success:
        break
    tracks = model.track(im0, persist=True, show=False)
    im0 = speed_obj.estimate_speed(im0, tracks)
    video_writer.write(im0)

cap.release()
video_writer.release()
cv2.destroyAllWindows()
For more details, refer to our official blog post.
What are the benefits of using Ultralytics YOLOv8 for speed estimation in traffic management?
Using Ultralytics YOLOv8 for speed estimation offers significant advantages in traffic management:
- Enhanced Safety: Accurately estimate vehicle speeds to detect over-speeding and improve road safety.
- Real-Time Monitoring: Benefit from YOLOv8's real-time object detection capability to monitor traffic flow and congestion effectively.
- Scalability: Deploy the model on various hardware setups, from edge devices to servers, ensuring flexible and scalable solutions for large-scale implementations.
For more applications, see advantages of speed estimation.
Can YOLOv8 be integrated with other AI frameworks like TensorFlow or PyTorch?
Yes, YOLOv8 can be integrated with other AI frameworks like TensorFlow and PyTorch. Ultralytics provides support for exporting YOLOv8 models to various formats like ONNX, TensorRT, and CoreML, ensuring smooth interoperability with other ML frameworks.
To export a YOLOv8 model to ONNX format:
yolo export --weights yolov8n.pt --include onnx
Learn more about exporting models in our guide on export.
How accurate is the speed estimation using Ultralytics YOLOv8?
The accuracy of speed estimation using Ultralytics YOLOv8 depends on several factors, including the quality of the object tracking, the resolution and frame rate of the video, and environmental variables. While the speed estimator provides reliable estimates, it may not be 100% accurate due to variances in frame processing speed and object occlusion.
Note: Always consider margin of error and validate the estimates with ground truth data when possible.
For further accuracy improvement tips, check the Arguments SpeedEstimator section.
Why choose Ultralytics YOLOv8 over other object detection models like TensorFlow Object Detection API?
Ultralytics YOLOv8 offers several advantages over other object detection models, such as the TensorFlow Object Detection API:
- Real-Time Performance: YOLOv8 is optimized for real-time detection, providing high speed and accuracy.
- Ease of Use: Designed with a user-friendly interface, YOLOv8 simplifies model training and deployment.
- Versatility: Supports multiple tasks, including object detection, segmentation, and pose estimation.
- Community and Support: YOLOv8 is backed by an active community and extensive documentation, ensuring developers have the resources they need.
For more information on the benefits of YOLOv8, explore our detailed model page.
comments: true
description: Discover essential steps for launching a successful computer vision project, from defining goals to model deployment and maintenance. Boost your AI capabilities now!.
keywords: Computer Vision, AI, Object Detection, Image Classification, Instance Segmentation, Data Annotation, Model Training, Model Evaluation, Model Deployment
Understanding the Key Steps in a Computer Vision Project
Introduction
Computer vision is a subfield of artificial intelligence (AI) that helps computers see and understand the world like humans do. It processes and analyzes images or videos to extract information, recognize patterns, and make decisions based on that data.
Computer vision techniques like object detection, image classification, and instance segmentation can be applied across various industries, from autonomous driving to medical imaging to gain valuable insights.

Working on your own computer vision projects is a great way to understand and learn more about computer vision. However, a computer vision project can consist of many steps, and it might seem confusing at first. By the end of this guide, you'll be familiar with the steps involved in a computer vision project. We'll walk through everything from the beginning to the end of a project, explaining why each part is important. Let's get started and make your computer vision project a success!
An Overview of a Computer Vision Project
Before discussing the details of each step involved in a computer vision project, let's look at the overall process. If you started a computer vision project today, you'd take the following steps:
- Your first priority would be to understand your project's requirements.
- Then, you'd collect and accurately label the images that will help train your model.
- Next, you'd clean your data and apply augmentation techniques to prepare it for model training.
- After model training, you'd thoroughly test and evaluate your model to make sure it performs consistently under different conditions.
- Finally, you'd deploy your model into the real world and update it based on new insights and feedback.
.jpeg)
Now that we know what to expect, let's dive right into the steps and get your project moving forward.
Step 1: Defining Your Project's Goals
The first step in any computer vision project is clearly defining the problem you're trying to solve. Knowing the end goal helps you start to build a solution. This is especially true when it comes to computer vision because your project's objective will directly affect which computer vision task you need to focus on.
Here are some examples of project objectives and the computer vision tasks that can be used to reach these objectives:
-
Objective: To develop a system that can monitor and manage the flow of different vehicle types on highways, improving traffic management and safety.
- Computer Vision Task: Object detection is ideal for traffic monitoring because it efficiently locates and identifies multiple vehicles. It is less computationally demanding than image segmentation, which provides unnecessary detail for this task, ensuring faster, real-time analysis.
-
Objective: To develop a tool that assists radiologists by providing precise, pixel-level outlines of tumors in medical imaging scans.
- Computer Vision Task: Image segmentation is suitable for medical imaging because it provides accurate and detailed boundaries of tumors that are crucial for assessing size, shape, and treatment planning.
-
Objective: To create a digital system that categorizes various documents (e.g., invoices, receipts, legal paperwork) to improve organizational efficiency and document retrieval.
- Computer Vision Task: Image classification is ideal here as it handles one document at a time, without needing to consider the document's position in the image. This approach simplifies and accelerates the sorting process.
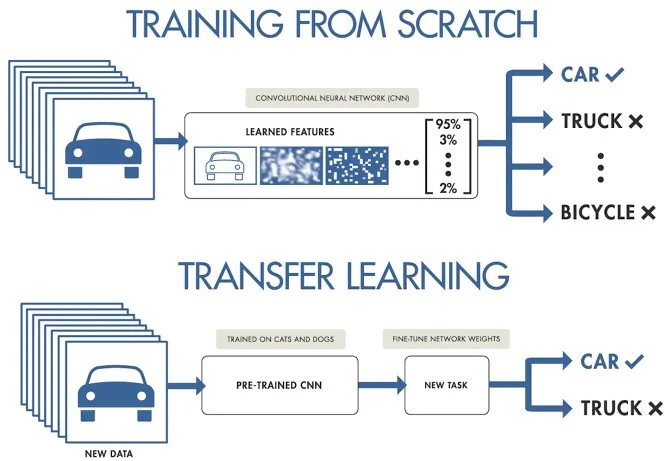
Step 1.5: Selecting the Right Model and Training Approach
After understanding the project objective and suitable computer vision tasks, an essential part of defining the project goal is selecting the right model and training approach.
Depending on the objective, you might choose to select the model first or after seeing what data you are able to collect in Step 2. For example, suppose your project is highly dependent on the availability of specific types of data. In that case, it may be more practical to gather and analyze the data first before selecting a model. On the other hand, if you have a clear understanding of the model requirements, you can choose the model first and then collect data that fits those specifications.
Choosing between training from scratch or using transfer learning affects how you prepare your data. Training from scratch requires a diverse dataset to build the model's understanding from the ground up. Transfer learning, on the other hand, allows you to use a pre-trained model and adapt it with a smaller, more specific dataset. Also, choosing a specific model to train will determine how you need to prepare your data, such as resizing images or adding annotations, according to the model's specific requirements.
Note: When choosing a model, consider its deployment to ensure compatibility and performance. For example, lightweight models are ideal for edge computing due to their efficiency on resource-constrained devices. To learn more about the key points related to defining your project, read our guide on defining your project's goals and selecting the right model.
Before getting into the hands-on work of a computer vision project, it's important to have a clear understanding of these details. Double-check that you've considered the following before moving on to Step 2:
- Clearly define the problem you're trying to solve.
- Determine the end goal of your project.
- Identify the specific computer vision task needed (e.g., object detection, image classification, image segmentation).
- Decide whether to train a model from scratch or use transfer learning.
- Select the appropriate model for your task and deployment needs.
Step 2: Data Collection and Data Annotation
The quality of your computer vision models depend on the quality of your dataset. You can either collect images from the internet, take your own pictures, or use pre-existing datasets. Here are some great resources for downloading high-quality datasets: Google Dataset Search Engine, UC Irvine Machine Learning Repository, and Kaggle Datasets.
Some libraries, like Ultralytics, provide built-in support for various datasets, making it easier to get started with high-quality data. These libraries often include utilities for using popular datasets seamlessly, which can save you a lot of time and effort in the initial stages of your project.
However, if you choose to collect images or take your own pictures, you'll need to annotate your data. Data annotation is the process of labeling your data to impart knowledge to your model. The type of data annotation you'll work with depends on your specific computer vision technique. Here are some examples:
- Image Classification: You'll label the entire image as a single class.
- Object Detection: You'll draw bounding boxes around each object in the image and label each box.
- Image Segmentation: You'll label each pixel in the image according to the object it belongs to, creating detailed object boundaries.
Data collection and annotation can be a time-consuming manual effort. Annotation tools can help make this process easier. Here are some useful open annotation tools: LabeI Studio, CVAT, and Labelme.
Step 3: Data Augmentation and Splitting Your Dataset
After collecting and annotating your image data, it's important to first split your dataset into training, validation, and test sets before performing data augmentation. Splitting your dataset before augmentation is crucial to test and validate your model on original, unaltered data. It helps accurately assess how well the model generalizes to new, unseen data.
Here's how to split your data:
- Training Set: It is the largest portion of your data, typically 70-80% of the total, used to train your model.
- Validation Set: Usually around 10-15% of your data; this set is used to tune hyperparameters and validate the model during training, helping to prevent overfitting.
- Test Set: The remaining 10-15% of your data is set aside as the test set. It is used to evaluate the model's performance on unseen data after training is complete.
After splitting your data, you can perform data augmentation by applying transformations like rotating, scaling, and flipping images to artificially increase the size of your dataset. Data augmentation makes your model more robust to variations and improves its performance on unseen images.
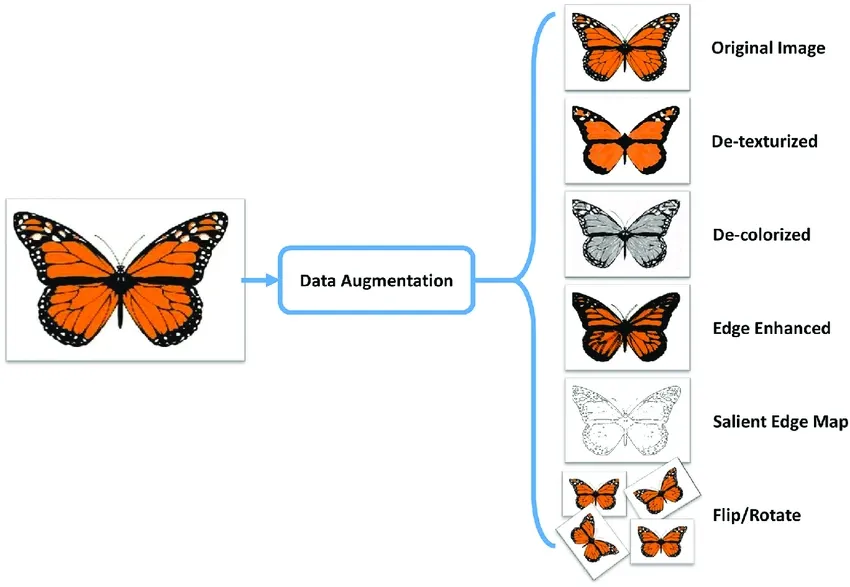
Libraries like OpenCV, Albumentations, and TensorFlow offer flexible augmentation functions that you can use. Additionally, some libraries, such as Ultralytics, have built-in augmentation settings directly within its model training function, simplifying the process.
To understand your data better, you can use tools like Matplotlib or Seaborn to visualize the images and analyze their distribution and characteristics. Visualizing your data helps identify patterns, anomalies, and the effectiveness of your augmentation techniques. You can also use Ultralytics Explorer, a tool for exploring computer vision datasets with semantic search, SQL queries, and vector similarity search.
By properly understanding, splitting, and augmenting your data, you can develop a well-trained, validated, and tested model that performs well in real-world applications.
Step 4: Model Training
Once your dataset is ready for training, you can focus on setting up the necessary environment, managing your datasets, and training your model.
First, you'll need to make sure your environment is configured correctly. Typically, this includes the following:
- Installing essential libraries and frameworks like TensorFlow, PyTorch, or Ultralytics.
- If you are using a GPU, installing libraries like CUDA and cuDNN will help enable GPU acceleration and speed up the training process.
Then, you can load your training and validation datasets into your environment. Normalize and preprocess the data through resizing, format conversion, or augmentation. With your model selected, configure the layers and specify hyperparameters. Compile the model by setting the loss function, optimizer, and performance metrics.
Libraries like Ultralytics simplify the training process. You can start training by feeding data into the model with minimal code. These libraries handle weight adjustments, backpropagation, and validation automatically. They also offer tools to monitor progress and adjust hyperparameters easily. After training, save the model and its weights with a few commands.
It's important to keep in mind that proper dataset management is vital for efficient training. Use version control for datasets to track changes and ensure reproducibility. Tools like DVC (Data Version Control) can help manage large datasets.
Step 5: Model Evaluation and Model Finetuning
It's important to assess your model's performance using various metrics and refine it to improve accuracy. Evaluating helps identify areas where the model excels and where it may need improvement. Fine-tuning ensures the model is optimized for the best possible performance.
-
Performance Metrics: Use metrics like accuracy, precision, recall, and F1-score to evaluate your model's performance. These metrics provide insights into how well your model is making predictions.
-
Hyperparameter Tuning: Adjust hyperparameters to optimize model performance. Techniques like grid search or random search can help find the best hyperparameter values.
-
Fine-Tuning: Make small adjustments to the model architecture or training process to enhance performance. This might involve tweaking learning rates, batch sizes, or other model parameters.
Step 6: Model Testing
In this step, you can make sure that your model performs well on completely unseen data, confirming its readiness for deployment. The difference between model testing and model evaluation is that it focuses on verifying the final model's performance rather than iteratively improving it.
It's important to thoroughly test and debug any common issues that may arise. Test your model on a separate test dataset that was not used during training or validation. This dataset should represent real-world scenarios to ensure the model's performance is consistent and reliable.
Also, address common problems such as overfitting, underfitting, and data leakage. Use techniques like cross-validation and anomaly detection to identify and fix these issues.
Step 7: Model Deployment
Once your model has been thoroughly tested, it's time to deploy it. Deployment involves making your model available for use in a production environment. Here are the steps to deploy a computer vision model:
-
Setting Up the Environment: Configure the necessary infrastructure for your chosen deployment option, whether it's cloud-based (AWS, Google Cloud, Azure) or edge-based (local devices, IoT).
-
Exporting the Model: Export your model to the appropriate format (e.g., ONNX, TensorRT, CoreML for YOLOv8) to ensure compatibility with your deployment platform.
-
Deploying the Model: Deploy the model by setting up APIs or endpoints and integrating it with your application.
-
Ensuring Scalability: Implement load balancers, auto-scaling groups, and monitoring tools to manage resources and handle increasing data and user requests.
Step 8: Monitoring, Maintenance, and Documentation
Once your model is deployed, it's important to continuously monitor its performance, maintain it to handle any issues, and document the entire process for future reference and improvements.
Monitoring tools can help you track key performance indicators (KPIs) and detect anomalies or drops in accuracy. By monitoring the model, you can be aware of model drift, where the model's performance declines over time due to changes in the input data. Periodically retrain the model with updated data to maintain accuracy and relevance.
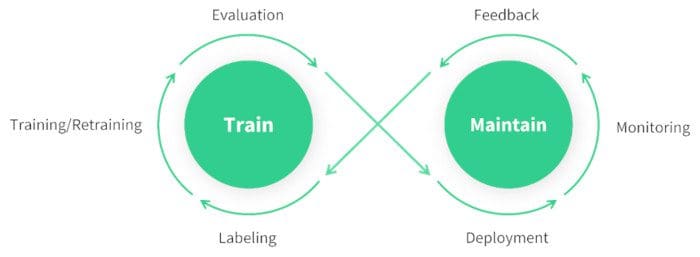
In addition to monitoring and maintenance, documentation is also key. Thoroughly document the entire process, including model architecture, training procedures, hyperparameters, data preprocessing steps, and any changes made during deployment and maintenance. Good documentation ensures reproducibility and makes future updates or troubleshooting easier. By effectively monitoring, maintaining, and documenting your model, you can ensure it remains accurate, reliable, and easy to manage over its lifecycle.
Engaging with the Community
Connecting with a community of computer vision enthusiasts can help you tackle any issues you face while working on your computer vision project with confidence. Here are some ways to learn, troubleshoot, and network effectively.
Community Resources
- GitHub Issues: Check out the YOLOv8 GitHub repository and use the Issues tab to ask questions, report bugs, and suggest new features. The active community and maintainers are there to help with specific issues.
- Ultralytics Discord Server: Join the Ultralytics Discord server to interact with other users and developers, get support, and share insights.
Official Documentation
- Ultralytics YOLOv8 Documentation: Explore the official YOLOv8 documentation for detailed guides with helpful tips on different computer vision tasks and projects.
Using these resources will help you overcome challenges and stay updated with the latest trends and best practices in the computer vision community.
Kickstart Your Computer Vision Project Today!
Taking on a computer vision project can be exciting and rewarding. By following the steps in this guide, you can build a solid foundation for success. Each step is crucial for developing a solution that meets your objectives and works well in real-world scenarios. As you gain experience, you'll discover advanced techniques and tools to improve your projects. Stay curious, keep learning, and explore new methods and innovations!
FAQ
How do I choose the right computer vision task for my project?
Choosing the right computer vision task depends on your project's end goal. For instance, if you want to monitor traffic, object detection is suitable as it can locate and identify multiple vehicle types in real-time. For medical imaging, image segmentation is ideal for providing detailed boundaries of tumors, aiding in diagnosis and treatment planning. Learn more about specific tasks like object detection, image classification, and instance segmentation.
Why is data annotation crucial in computer vision projects?
Data annotation is vital for teaching your model to recognize patterns. The type of annotation varies with the task:
- Image Classification: Entire image labeled as a single class.
- Object Detection: Bounding boxes drawn around objects.
- Image Segmentation: Each pixel labeled according to the object it belongs to.
Tools like Label Studio, CVAT, and Labelme can assist in this process. For more details, refer to our data collection and annotation guide.
What steps should I follow to augment and split my dataset effectively?
Splitting your dataset before augmentation helps validate model performance on original, unaltered data. Follow these steps:
- Training Set: 70-80% of your data.
- Validation Set: 10-15% for hyperparameter tuning.
- Test Set: Remaining 10-15% for final evaluation.
After splitting, apply data augmentation techniques like rotation, scaling, and flipping to increase dataset diversity. Libraries such as Albumentations and OpenCV can help. Ultralytics also offers built-in augmentation settings for convenience.
How can I export my trained computer vision model for deployment?
Exporting your model ensures compatibility with different deployment platforms. Ultralytics provides multiple formats, including ONNX, TensorRT, and CoreML. To export your YOLOv8 model, follow this guide:
- Use the
exportfunction with the desired format parameter. - Ensure the exported model fits the specifications of your deployment environment (e.g., edge devices, cloud).
For more information, check out the model export guide.
What are the best practices for monitoring and maintaining a deployed computer vision model?
Continuous monitoring and maintenance are essential for a model's long-term success. Implement tools for tracking Key Performance Indicators (KPIs) and detecting anomalies. Regularly retrain the model with updated data to counteract model drift. Document the entire process, including model architecture, hyperparameters, and changes, to ensure reproducibility and ease of future updates. Learn more in our monitoring and maintenance guide.
comments: true
description: Learn how to set up a real-time object detection application using Streamlit and Ultralytics YOLOv8. Follow this step-by-step guide to implement webcam-based object detection.
keywords: Streamlit, YOLOv8, Real-time Object Detection, Streamlit Application, YOLOv8 Streamlit Tutorial, Webcam Object Detection
Live Inference with Streamlit Application using Ultralytics YOLOv8
Introduction
Streamlit makes it simple to build and deploy interactive web applications. Combining this with Ultralytics YOLOv8 allows for real-time object detection and analysis directly in your browser. YOLOv8 high accuracy and speed ensure seamless performance for live video streams, making it ideal for applications in security, retail, and beyond.
| Aquaculture | Animals husbandry |
|---|---|
| Fish Detection using Ultralytics YOLOv8 | Animals Detection using Ultralytics YOLOv8 |
Advantages of Live Inference
- Seamless Real-Time Object Detection: Streamlit combined with YOLOv8 enables real-time object detection directly from your webcam feed. This allows for immediate analysis and insights, making it ideal for applications requiring instant feedback.
- User-Friendly Deployment: Streamlit's interactive interface makes it easy to deploy and use the application without extensive technical knowledge. Users can start live inference with a simple click, enhancing accessibility and usability.
- Efficient Resource Utilization: YOLOv8 optimized algorithm ensure high-speed processing with minimal computational resources. This efficiency allows for smooth and reliable webcam inference even on standard hardware, making advanced computer vision accessible to a wider audience.
Streamlit Application Code
!!! tip "Ultralytics Installation"
Before you start building the application, ensure you have the Ultralytics Python Package installed. You can install it using the command **pip install ultralytics**
!!! Example "Streamlit Application"
=== "Python"

    ```py
    from ultralytics import solutions

    solutions.inference()

    ### Make sure to run the file using command `streamlit run <file-name.py>`
    ```

=== "CLI"

    ```py
    yolo streamlit-predict
    ```
This will launch the Streamlit application in your default web browser. You will see the main title, subtitle, and the sidebar with configuration options. Select your desired YOLOv8 model, set the confidence and NMS thresholds, and click the "Start" button to begin the real-time object detection.
You can optionally supply a specific model in Python:
!!! Example "Streamlit Application with a custom model"
=== "Python"

    ```py
    from ultralytics import solutions

    # Pass a model as an argument
    solutions.inference(model="path/to/model.pt")

    ### Make sure to run the file using command `streamlit run <file-name.py>`
    ```
Conclusion
By following this guide, you have successfully created a real-time object detection application using Streamlit and Ultralytics YOLOv8. This application allows you to experience the power of YOLOv8 in detecting objects through your webcam, with a user-friendly interface and the ability to stop the video stream at any time.
For further enhancements, you can explore adding more features such as recording the video stream, saving the annotated frames, or integrating with other computer vision libraries.
Share Your Thoughts with the Community
Engage with the community to learn more, troubleshoot issues, and share your projects:
Where to Find Help and Support
- GitHub Issues: Visit the Ultralytics GitHub repository to raise questions, report bugs, and suggest features.
- Ultralytics Discord Server: Join the Ultralytics Discord server to connect with other users and developers, get support, share knowledge, and brainstorm ideas.
Official Documentation
- Ultralytics YOLOv8 Documentation: Refer to the official YOLOv8 documentation for comprehensive guides and insights on various computer vision tasks and projects.
FAQ
How can I set up a real-time object detection application using Streamlit and Ultralytics YOLOv8?
Setting up a real-time object detection application with Streamlit and Ultralytics YOLOv8 is straightforward. First, ensure you have the Ultralytics Python package installed using:
pip install ultralytics
Then, you can create a basic Streamlit application to run live inference:
!!! Example "Streamlit Application"
=== "Python"

    ```py
    from ultralytics import solutions

    solutions.inference()

    ### Make sure to run the file using command `streamlit run <file-name.py>`
    ```

    === "CLI"

    ```py
    yolo streamlit-predict
    ```
For more details on the practical setup, refer to the Streamlit Application Code section of the documentation.
What are the main advantages of using Ultralytics YOLOv8 with Streamlit for real-time object detection?
Using Ultralytics YOLOv8 with Streamlit for real-time object detection offers several advantages:
- Seamless Real-Time Detection: Achieve high-accuracy, real-time object detection directly from webcam feeds.
- User-Friendly Interface: Streamlit's intuitive interface allows easy use and deployment without extensive technical knowledge.
- Resource Efficiency: YOLOv8's optimized algorithms ensure high-speed processing with minimal computational resources.
Discover more about these advantages here.
How do I deploy a Streamlit object detection application in my web browser?
After coding your Streamlit application integrating Ultralytics YOLOv8, you can deploy it by running:
streamlit run <file-name.py>
This command will launch the application in your default web browser, enabling you to select YOLOv8 models, set confidence, and NMS thresholds, and start real-time object detection with a simple click. For a detailed guide, refer to the Streamlit Application Code section.
What are some use cases for real-time object detection using Streamlit and Ultralytics YOLOv8?
Real-time object detection using Streamlit and Ultralytics YOLOv8 can be applied in various sectors:
- Security: Real-time monitoring for unauthorized access.
- Retail: Customer counting, shelf management, and more.
- Wildlife and Agriculture: Monitoring animals and crop conditions.
For more in-depth use cases and examples, explore Ultralytics Solutions.
How does Ultralytics YOLOv8 compare to other object detection models like YOLOv5 and RCNNs?
Ultralytics YOLOv8 provides several enhancements over prior models like YOLOv5 and RCNNs:
- Higher Speed and Accuracy: Improved performance for real-time applications.
- Ease of Use: Simplified interfaces and deployment.
- Resource Efficiency: Optimized for better speed with minimal computational requirements.
For a comprehensive comparison, check Ultralytics YOLOv8 Documentation and related blog posts discussing model performance.
comments: true
description: Learn how to integrate Ultralytics YOLOv8 with NVIDIA Triton Inference Server for scalable, high-performance AI model deployment.
keywords: Triton Inference Server, YOLOv8, Ultralytics, NVIDIA, deep learning, AI model deployment, ONNX, scalable inference
Triton Inference Server with Ultralytics YOLOv8
The Triton Inference Server (formerly known as TensorRT Inference Server) is an open-source software solution developed by NVIDIA. It provides a cloud inference solution optimized for NVIDIA GPUs. Triton simplifies the deployment of AI models at scale in production. Integrating Ultralytics YOLOv8 with Triton Inference Server allows you to deploy scalable, high-performance deep learning inference workloads. This guide provides steps to set up and test the integration.
Watch: Getting Started with NVIDIA Triton Inference Server.
What is Triton Inference Server?
Triton Inference Server is designed to deploy a variety of AI models in production. It supports a wide range of deep learning and machine learning frameworks, including TensorFlow, PyTorch, ONNX Runtime, and many others. Its primary use cases are:
- Serving multiple models from a single server instance.
- Dynamic model loading and unloading without server restart.
- Ensemble inference, allowing multiple models to be used together to achieve results.
- Model versioning for A/B testing and rolling updates.
Prerequisites
Ensure you have the following prerequisites before proceeding:
- Docker installed on your machine.
- Install
tritonclient:pip install tritonclient[all]
Exporting YOLOv8 to ONNX Format
Before deploying the model on Triton, it must be exported to the ONNX format. ONNX (Open Neural Network Exchange) is a format that allows models to be transferred between different deep learning frameworks. Use the export function from the YOLO class:
from ultralytics import YOLO

# Load a model
model = YOLO("yolov8n.pt")  # load an official model

# Export the model
onnx_file = model.export(format="onnx", dynamic=True)
Setting Up Triton Model Repository
The Triton Model Repository is a storage location where Triton can access and load models.
-
Create the necessary directory structure:
from pathlib import Path # Define paths model_name = "yolo" triton_repo_path = Path("tmp") / "triton_repo" triton_model_path = triton_repo_path / model_name # Create directories (triton_model_path / "1").mkdir(parents=True, exist_ok=True) -
Move the exported ONNX model to the Triton repository:
from pathlib import Path

# Move ONNX model to Triton Model path
Path(onnx_file).rename(triton_model_path / "1" / "model.onnx")

# Create config file
(triton_model_path / "config.pbtxt").touch()
Running Triton Inference Server
Run the Triton Inference Server using Docker:
import contextlib
import subprocess
import time

from tritonclient.http import InferenceServerClient

# Define image https://catalog.ngc.nvidia.com/orgs/nvidia/containers/tritonserver
tag = "nvcr.io/nvidia/tritonserver:23.09-py3"  # 6.4 GB

# Pull the image
subprocess.call(f"docker pull {tag}", shell=True)

# Run the Triton server and capture the container ID
container_id = (
    subprocess.check_output(
        f"docker run -d --rm -v {triton_repo_path}:/models -p 8000:8000 {tag} tritonserver --model-repository=/models",
        shell=True,
    )
    .decode("utf-8")
    .strip()
)

# Wait for the Triton server to start
triton_client = InferenceServerClient(url="localhost:8000", verbose=False, ssl=False)

# Wait until model is ready
for _ in range(10):
    with contextlib.suppress(Exception):
        assert triton_client.is_model_ready(model_name)
        break
    time.sleep(1)
Then run inference using the Triton Server model:
from ultralytics import YOLO

# Load the Triton Server model
model = YOLO("http://localhost:8000/yolo", task="detect")

# Run inference on the server
results = model("path/to/image.jpg")
Cleanup the container:
# Kill and remove the container at the end of the test
subprocess.call(f"docker kill {container_id}", shell=True)
By following the above steps, you can deploy and run Ultralytics YOLOv8 models efficiently on Triton Inference Server, providing a scalable and high-performance solution for deep learning inference tasks. If you face any issues or have further queries, refer to the official Triton documentation or reach out to the Ultralytics community for support.
FAQ
How do I set up Ultralytics YOLOv8 with NVIDIA Triton Inference Server?
Setting up Ultralytics YOLOv8 with NVIDIA Triton Inference Server involves a few key steps:
-
Export YOLOv8 to ONNX format:
from ultralytics import YOLO # Load a model model = YOLO("yolov8n.pt") # load an official model # Export the model to ONNX format onnx_file = model.export(format="onnx", dynamic=True) -
Set up Triton Model Repository:
from pathlib import Path # Define paths model_name = "yolo" triton_repo_path = Path("tmp") / "triton_repo" triton_model_path = triton_repo_path / model_name # Create directories (triton_model_path / "1").mkdir(parents=True, exist_ok=True) Path(onnx_file).rename(triton_model_path / "1" / "model.onnx") (triton_model_path / "config.pbtxt").touch() -
Run the Triton Server:
import contextlib
import subprocess
import time

from tritonclient.http import InferenceServerClient

# Define image https://catalog.ngc.nvidia.com/orgs/nvidia/containers/tritonserver
tag = "nvcr.io/nvidia/tritonserver:23.09-py3"

subprocess.call(f"docker pull {tag}", shell=True)

container_id = (
    subprocess.check_output(
        f"docker run -d --rm -v {triton_repo_path}/models -p 8000:8000 {tag} tritonserver --model-repository=/models",
        shell=True,
    )
    .decode("utf-8")
    .strip()
)

triton_client = InferenceServerClient(url="localhost:8000", verbose=False, ssl=False)

for _ in range(10):
    with contextlib.suppress(Exception):
        assert triton_client.is_model_ready(model_name)
        break
    time.sleep(1)
This setup can help you efficiently deploy YOLOv8 models at scale on Triton Inference Server for high-performance AI model inference.
What benefits does using Ultralytics YOLOv8 with NVIDIA Triton Inference Server offer?
Integrating Ultralytics YOLOv8 with NVIDIA Triton Inference Server provides several advantages:
- Scalable AI Inference: Triton allows serving multiple models from a single server instance, supporting dynamic model loading and unloading, making it highly scalable for diverse AI workloads.
- High Performance: Optimized for NVIDIA GPUs, Triton Inference Server ensures high-speed inference operations, perfect for real-time applications such as object detection.
- Ensemble and Model Versioning: Triton's ensemble mode enables combining multiple models to improve results, and its model versioning supports A/B testing and rolling updates.
For detailed instructions on setting up and running YOLOv8 with Triton, you can refer to the setup guide.
Why should I export my YOLOv8 model to ONNX format before using Triton Inference Server?
Using ONNX (Open Neural Network Exchange) format for your Ultralytics YOLOv8 model before deploying it on NVIDIA Triton Inference Server offers several key benefits:
- Interoperability: ONNX format supports transfer between different deep learning frameworks (such as PyTorch, TensorFlow), ensuring broader compatibility.
- Optimization: Many deployment environments, including Triton, optimize for ONNX, enabling faster inference and better performance.
- Ease of Deployment: ONNX is widely supported across frameworks and platforms, simplifying the deployment process in various operating systems and hardware configurations.
To export your model, use:
from ultralytics import YOLO

model = YOLO("yolov8n.pt")
onnx_file = model.export(format="onnx", dynamic=True)
You can follow the steps in the exporting guide to complete the process.
Can I run inference using the Ultralytics YOLOv8 model on Triton Inference Server?
Yes, you can run inference using the Ultralytics YOLOv8 model on NVIDIA Triton Inference Server. Once your model is set up in the Triton Model Repository and the server is running, you can load and run inference on your model as follows:
from ultralytics import YOLO

# Load the Triton Server model
model = YOLO("http://localhost:8000/yolo", task="detect")

# Run inference on the server
results = model("path/to/image.jpg")
For an in-depth guide on setting up and running Triton Server with YOLOv8, refer to the running triton inference server section.
How does Ultralytics YOLOv8 compare to TensorFlow and PyTorch models for deployment?
Ultralytics YOLOv8 offers several unique advantages compared to TensorFlow and PyTorch models for deployment:
- Real-time Performance: Optimized for real-time object detection tasks, YOLOv8 provides state-of-the-art accuracy and speed, making it ideal for applications requiring live video analytics.
- Ease of Use: YOLOv8 integrates seamlessly with Triton Inference Server and supports diverse export formats (ONNX, TensorRT, CoreML), making it flexible for various deployment scenarios.
- Advanced Features: YOLOv8 includes features like dynamic model loading, model versioning, and ensemble inference, which are crucial for scalable and reliable AI deployments.
For more details, compare the deployment options in the model deployment guide.
comments: true
description: Learn how to visualize YOLO inference results directly in a VSCode terminal using sixel on Linux and MacOS.
keywords: YOLO, inference results, VSCode terminal, sixel, display images, Linux, MacOS
Viewing Inference Results in a Terminal
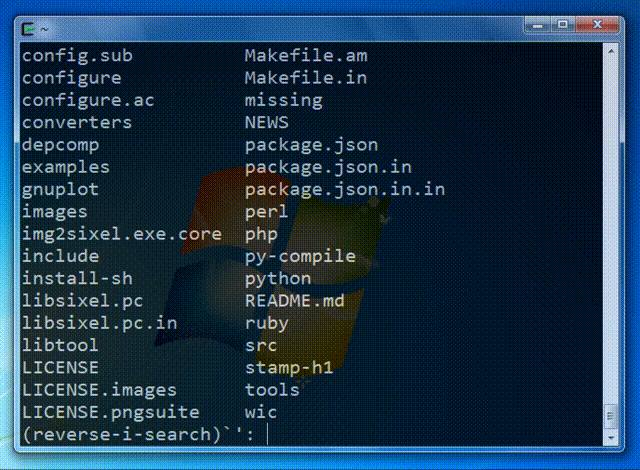
Image from the libsixel website.
Motivation
When connecting to a remote machine, normally visualizing image results is not possible or requires moving data to a local device with a GUI. The VSCode integrated terminal allows for directly rendering images. This is a short demonstration on how to use this in conjunction with ultralytics with prediction results.
!!! warning
Only compatible with Linux and MacOS. Check the [VSCode repository](https://github.com/microsoft/vscode), check [Issue status](https://github.com/microsoft/vscode/issues/198622), or [documentation](https://code.visualstudio.com/docs) for updates about Windows support to view images in terminal with `sixel`.
The VSCode compatible protocols for viewing images using the integrated terminal are sixel and iTerm. This guide will demonstrate use of the sixel protocol.
Process
-
First, you must enable settings
terminal.integrated.enableImagesandterminal.integrated.gpuAccelerationin VSCode."terminal.integrated.gpuAcceleration": "auto" # "auto" is default, can also use "on" "terminal.integrated.enableImages": false -
Install the
python-sixellibrary in your virtual environment. This is a fork of thePySixellibrary, which is no longer maintained.pip install sixel -
Load a model and execute inference, then plot the results and store in a variable. See more about inference arguments and working with results on the predict mode page.
from ultralytics import YOLO # Load a model model = YOLO("yolov8n.pt") # Run inference on an image results = model.predict(source="ultralytics/assets/bus.jpg") # Plot inference results plot = results[0].plot() # (1)!- See plot method parameters to see possible arguments to use.
-
Now, use OpenCV to convert the
numpy.ndarraytobytesdata. Then useio.BytesIOto make a "file-like" object.import io import cv2 # Results image as bytes im_bytes = cv2.imencode( ".png", # (1)! plot, )[1].tobytes() # (2)! # Image bytes as a file-like object mem_file = io.BytesIO(im_bytes)- It's possible to use other image extensions as well.
- Only the object at index
1that is returned is needed.
-
Create a
SixelWriterinstance, and then use the.draw()method to draw the image in the terminal.from sixel import SixelWriter # Create sixel writer object w = SixelWriter() # Draw the sixel image in the terminal w.draw(mem_file)
Example Inference Results
!!! danger
Using this example with videos or animated GIF frames has **not** been tested. Attempt at your own risk.
Full Code Example
import io

import cv2
from sixel import SixelWriter

from ultralytics import YOLO

# Load a model
model = YOLO("yolov8n.pt")

# Run inference on an image
results = model.predict(source="ultralytics/assets/bus.jpg")

# Plot inference results
plot = results[0].plot()  # (3)!

# Results image as bytes
im_bytes = cv2.imencode(
    ".png",  # (1)!
    plot,
)[1].tobytes()  # (2)!

mem_file = io.BytesIO(im_bytes)
w = SixelWriter()
w.draw(mem_file)
- It's possible to use other image extensions as well.
- Only the object at index
1that is returned is needed. - See plot method parameters to see possible arguments to use.
!!! tip
You may need to use `clear` to "erase" the view of the image in the terminal.
FAQ
How can I view YOLO inference results in a VSCode terminal on macOS or Linux?
To view YOLO inference results in a VSCode terminal on macOS or Linux, follow these steps:
-
Enable the necessary VSCode settings:
"terminal.integrated.enableImages": true "terminal.integrated.gpuAcceleration": "auto" -
Install the sixel library:
pip install sixel -
Load your YOLO model and run inference:
from ultralytics import YOLO model = YOLO("yolov8n.pt") results = model.predict(source="path_to_image") plot = results[0].plot() -
Convert the inference result image to bytes and display it in the terminal:
import io

import cv2
from sixel import SixelWriter

im_bytes = cv2.imencode(".png", plot)[1].tobytes()
mem_file = io.BytesIO(im_bytes)
SixelWriter().draw(mem_file)
For further details, visit the predict mode page.
Why does the sixel protocol only work on Linux and macOS?
The sixel protocol is currently only supported on Linux and macOS because these platforms have native terminal capabilities compatible with sixel graphics. Windows support for terminal graphics using sixel is still under development. For updates on Windows compatibility, check the VSCode Issue status and documentation.
What if I encounter issues with displaying images in the VSCode terminal?
If you encounter issues displaying images in the VSCode terminal using sixel:
-
Ensure the necessary settings in VSCode are enabled:
"terminal.integrated.enableImages": true "terminal.integrated.gpuAcceleration": "auto" -
Verify the sixel library installation:
pip install sixel -
Check your image data conversion and plotting code for errors. For example:
import io

import cv2
from sixel import SixelWriter

im_bytes = cv2.imencode(".png", plot)[1].tobytes()
mem_file = io.BytesIO(im_bytes)
SixelWriter().draw(mem_file)
If problems persist, consult the VSCode repository, and visit the plot method parameters section for additional guidance.
Can YOLO display video inference results in the terminal using sixel?
Displaying video inference results or animated GIF frames using sixel in the terminal is currently untested and may not be supported. We recommend starting with static images and verifying compatibility. Attempt video results at your own risk, keeping in mind performance constraints. For more information on plotting inference results, visit the predict mode page.
How can I troubleshoot issues with the python-sixel library?
To troubleshoot issues with the python-sixel library:
-
Ensure the library is correctly installed in your virtual environment:
pip install sixel -
Verify that you have the necessary Python and system dependencies.
-
Refer to the python-sixel GitHub repository for additional documentation and community support.
-
Double-check your code for potential errors, specifically the usage of
SixelWriterand image data conversion steps.
For further assistance on working with YOLO models and sixel integration, see the export and predict mode documentation pages.
comments: true
description: Discover VisionEye's object mapping and tracking powered by Ultralytics YOLOv8. Simulate human eye precision, track objects, and calculate distances effortlessly.
keywords: VisionEye, YOLOv8, Ultralytics, object mapping, object tracking, distance calculation, computer vision, AI, machine learning, Python, tutorial
VisionEye View Object Mapping using Ultralytics YOLOv8 🚀
What is VisionEye Object Mapping?
Ultralytics YOLOv8 VisionEye offers the capability for computers to identify and pinpoint objects, simulating the observational precision of the human eye. This functionality enables computers to discern and focus on specific objects, much like the way the human eye observes details from a particular viewpoint.
Samples
| VisionEye View | VisionEye View With Object Tracking | VisionEye View With Distance Calculation |
|---|---|---|
| VisionEye View Object Mapping using Ultralytics YOLOv8 | VisionEye View Object Mapping with Object Tracking using Ultralytics YOLOv8 | VisionEye View with Distance Calculation using Ultralytics YOLOv8 |
!!! Example "VisionEye Object Mapping using YOLOv8"
=== "VisionEye Object Mapping"

    ```py
    import cv2

    from ultralytics import YOLO
    from ultralytics.utils.plotting import Annotator, colors

    model = YOLO("yolov8n.pt")
    names = model.model.names
    cap = cv2.VideoCapture("path/to/video/file.mp4")
    w, h, fps = (int(cap.get(x)) for x in (cv2.CAP_PROP_FRAME_WIDTH, cv2.CAP_PROP_FRAME_HEIGHT, cv2.CAP_PROP_FPS))

    out = cv2.VideoWriter("visioneye-pinpoint.avi", cv2.VideoWriter_fourcc(*"MJPG"), fps, (w, h))

    center_point = (-10, h)

    while True:
        ret, im0 = cap.read()
        if not ret:
            print("Video frame is empty or video processing has been successfully completed.")
            break

        results = model.predict(im0)
        boxes = results[0].boxes.xyxy.cpu()
        clss = results[0].boxes.cls.cpu().tolist()

        annotator = Annotator(im0, line_width=2)

        for box, cls in zip(boxes, clss):
            annotator.box_label(box, label=names[int(cls)], color=colors(int(cls)))
            annotator.visioneye(box, center_point)

        out.write(im0)
        cv2.imshow("visioneye-pinpoint", im0)

        if cv2.waitKey(1) & 0xFF == ord("q"):
            break

    out.release()
    cap.release()
    cv2.destroyAllWindows()
    ```

=== "VisionEye Object Mapping with Object Tracking"

    ```py
    import cv2

    from ultralytics import YOLO
    from ultralytics.utils.plotting import Annotator, colors

    model = YOLO("yolov8n.pt")
    cap = cv2.VideoCapture("path/to/video/file.mp4")
    w, h, fps = (int(cap.get(x)) for x in (cv2.CAP_PROP_FRAME_WIDTH, cv2.CAP_PROP_FRAME_HEIGHT, cv2.CAP_PROP_FPS))

    out = cv2.VideoWriter("visioneye-pinpoint.avi", cv2.VideoWriter_fourcc(*"MJPG"), fps, (w, h))

    center_point = (-10, h)

    while True:
        ret, im0 = cap.read()
        if not ret:
            print("Video frame is empty or video processing has been successfully completed.")
            break

        annotator = Annotator(im0, line_width=2)

        results = model.track(im0, persist=True)
        boxes = results[0].boxes.xyxy.cpu()

        if results[0].boxes.id is not None:
            track_ids = results[0].boxes.id.int().cpu().tolist()

            for box, track_id in zip(boxes, track_ids):
                annotator.box_label(box, label=str(track_id), color=colors(int(track_id)))
                annotator.visioneye(box, center_point)

        out.write(im0)
        cv2.imshow("visioneye-pinpoint", im0)

        if cv2.waitKey(1) & 0xFF == ord("q"):
            break

    out.release()
    cap.release()
    cv2.destroyAllWindows()
    ```

=== "VisionEye with Distance Calculation"

    ```py
    import math

    import cv2

    from ultralytics import YOLO
    from ultralytics.utils.plotting import Annotator

    model = YOLO("yolov8s.pt")
    cap = cv2.VideoCapture("Path/to/video/file.mp4")

    w, h, fps = (int(cap.get(x)) for x in (cv2.CAP_PROP_FRAME_WIDTH, cv2.CAP_PROP_FRAME_HEIGHT, cv2.CAP_PROP_FPS))

    out = cv2.VideoWriter("visioneye-distance-calculation.avi", cv2.VideoWriter_fourcc(*"MJPG"), fps, (w, h))

    center_point = (0, h)
    pixel_per_meter = 10

    txt_color, txt_background, bbox_clr = ((0, 0, 0), (255, 255, 255), (255, 0, 255))

    while True:
        ret, im0 = cap.read()
        if not ret:
            print("Video frame is empty or video processing has been successfully completed.")
            break

        annotator = Annotator(im0, line_width=2)

        results = model.track(im0, persist=True)
        boxes = results[0].boxes.xyxy.cpu()

        if results[0].boxes.id is not None:
            track_ids = results[0].boxes.id.int().cpu().tolist()

            for box, track_id in zip(boxes, track_ids):
                annotator.box_label(box, label=str(track_id), color=bbox_clr)
                annotator.visioneye(box, center_point)

                x1, y1 = int((box[0] + box[2]) // 2), int((box[1] + box[3]) // 2)  # Bounding box centroid

                distance = (math.sqrt((x1 - center_point[0]) ** 2 + (y1 - center_point[1]) ** 2)) / pixel_per_meter

                text_size, _ = cv2.getTextSize(f"Distance: {distance:.2f} m", cv2.FONT_HERSHEY_SIMPLEX, 1.2, 3)
                cv2.rectangle(im0, (x1, y1 - text_size[1] - 10), (x1 + text_size[0] + 10, y1), txt_background, -1)
                cv2.putText(im0, f"Distance: {distance:.2f} m", (x1, y1 - 5), cv2.FONT_HERSHEY_SIMPLEX, 1.2, txt_color, 3)

        out.write(im0)
        cv2.imshow("visioneye-distance-calculation", im0)

        if cv2.waitKey(1) & 0xFF == ord("q"):
            break

    out.release()
    cap.release()
    cv2.destroyAllWindows()
    ```
visioneye Arguments
| Name | Type | Default | Description |
|---|---|---|---|
color |
tuple |
(235, 219, 11) |
Line and object centroid color |
pin_color |
tuple |
(255, 0, 255) |
VisionEye pinpoint color |
Note
For any inquiries, feel free to post your questions in the Ultralytics Issue Section or the discussion section mentioned below.
FAQ
How do I start using VisionEye Object Mapping with Ultralytics YOLOv8?
To start using VisionEye Object Mapping with Ultralytics YOLOv8, first, you'll need to install the Ultralytics YOLO package via pip. Then, you can use the sample code provided in the documentation to set up object detection with VisionEye. Here's a simple example to get you started:
import cv2

from ultralytics import YOLO

model = YOLO("yolov8n.pt")
cap = cv2.VideoCapture("path/to/video/file.mp4")

while True:
    ret, frame = cap.read()
    if not ret:
        break

    results = model.predict(frame)
    for result in results:
        # Perform custom logic with result
        pass

    cv2.imshow("visioneye", frame)
    if cv2.waitKey(1) & 0xFF == ord("q"):
        break

cap.release()
cv2.destroyAllWindows()
What are the key features of VisionEye's object tracking capability using Ultralytics YOLOv8?
VisionEye's object tracking with Ultralytics YOLOv8 allows users to follow the movement of objects within a video frame. Key features include:
- Real-Time Object Tracking: Keeps up with objects as they move.
- Object Identification: Utilizes YOLOv8's powerful detection algorithms.
- Distance Calculation: Calculates distances between objects and specified points.
- Annotation and Visualization: Provides visual markers for tracked objects.
Here's a brief code snippet demonstrating tracking with VisionEye:
import cv2

from ultralytics import YOLO

model = YOLO("yolov8n.pt")
cap = cv2.VideoCapture("path/to/video/file.mp4")

while True:
    ret, frame = cap.read()
    if not ret:
        break

    results = model.track(frame, persist=True)
    for result in results:
        # Annotate and visualize tracking
        pass

    cv2.imshow("visioneye-tracking", frame)
    if cv2.waitKey(1) & 0xFF == ord("q"):
        break

cap.release()
cv2.destroyAllWindows()
For a comprehensive guide, visit the VisionEye Object Mapping with Object Tracking.
How can I calculate distances with VisionEye's YOLOv8 model?
Distance calculation with VisionEye and Ultralytics YOLOv8 involves determining the distance of detected objects from a specified point in the frame. It enhances spatial analysis capabilities, useful in applications such as autonomous driving and surveillance.
Here's a simplified example:
import math

import cv2

from ultralytics import YOLO

model = YOLO("yolov8s.pt")
cap = cv2.VideoCapture("path/to/video/file.mp4")
center_point = (0, 480)  # Example center point
pixel_per_meter = 10

while True:
    ret, frame = cap.read()
    if not ret:
        break

    results = model.track(frame, persist=True)
    for result in results:
        # Calculate distance logic
        distances = [
            (math.sqrt((box[0] - center_point[0]) ** 2 + (box[1] - center_point[1]) ** 2)) / pixel_per_meter
            for box in results
        ]

    cv2.imshow("visioneye-distance", frame)
    if cv2.waitKey(1) & 0xFF == ord("q"):
        break

cap.release()
cv2.destroyAllWindows()
For detailed instructions, refer to the VisionEye with Distance Calculation.
Why should I use Ultralytics YOLOv8 for object mapping and tracking?
Ultralytics YOLOv8 is renowned for its speed, accuracy, and ease of integration, making it a top choice for object mapping and tracking. Key advantages include:
- State-of-the-art Performance: Delivers high accuracy in real-time object detection.
- Flexibility: Supports various tasks such as detection, tracking, and distance calculation.
- Community and Support: Extensive documentation and active GitHub community for troubleshooting and enhancements.
- Ease of Use: Intuitive API simplifies complex tasks, allowing for rapid deployment and iteration.
For more information on applications and benefits, check out the Ultralytics YOLOv8 documentation.
How can I integrate VisionEye with other machine learning tools like Comet or ClearML?
Ultralytics YOLOv8 can integrate seamlessly with various machine learning tools like Comet and ClearML, enhancing experiment tracking, collaboration, and reproducibility. Follow the detailed guides on how to use YOLOv5 with Comet and integrate YOLOv8 with ClearML to get started.
For further exploration and integration examples, check our Ultralytics Integrations Guide.
comments: true
description: Optimize your fitness routine with real-time workouts monitoring using Ultralytics YOLOv8. Track and improve your exercise form and performance.
keywords: workouts monitoring, Ultralytics YOLOv8, pose estimation, fitness tracking, exercise assessment, real-time feedback, exercise form, performance metrics
Workouts Monitoring using Ultralytics YOLOv8
Monitoring workouts through pose estimation with Ultralytics YOLOv8 enhances exercise assessment by accurately tracking key body landmarks and joints in real-time. This technology provides instant feedback on exercise form, tracks workout routines, and measures performance metrics, optimizing training sessions for users and trainers alike.
Watch: Workouts Monitoring using Ultralytics YOLOv8 | Pushups, Pullups, Ab Workouts
Advantages of Workouts Monitoring?
- Optimized Performance: Tailoring workouts based on monitoring data for better results.
- Goal Achievement: Track and adjust fitness goals for measurable progress.
- Personalization: Customized workout plans based on individual data for effectiveness.
- Health Awareness: Early detection of patterns indicating health issues or over-training.
- Informed Decisions: Data-driven decisions for adjusting routines and setting realistic goals.
Real World Applications
| Workouts Monitoring | Workouts Monitoring |
|---|---|
| PushUps Counting | PullUps Counting |
!!! Example "Workouts Monitoring Example"
=== "Workouts Monitoring"

    ```py
    import cv2

    from ultralytics import YOLO, solutions

    model = YOLO("yolov8n-pose.pt")
    cap = cv2.VideoCapture("path/to/video/file.mp4")
    assert cap.isOpened(), "Error reading video file"
    w, h, fps = (int(cap.get(x)) for x in (cv2.CAP_PROP_FRAME_WIDTH, cv2.CAP_PROP_FRAME_HEIGHT, cv2.CAP_PROP_FPS))

    gym_object = solutions.AIGym(
        line_thickness=2,
        view_img=True,
        pose_type="pushup",
        kpts_to_check=[6, 8, 10],
    )

    while cap.isOpened():
        success, im0 = cap.read()
        if not success:
            print("Video frame is empty or video processing has been successfully completed.")
            break
        results = model.track(im0, verbose=False)  # Tracking recommended
        # results = model.predict(im0)  # Prediction also supported
        im0 = gym_object.start_counting(im0, results)

    cv2.destroyAllWindows()
    ```

=== "Workouts Monitoring with Save Output"

    ```py
    import cv2

    from ultralytics import YOLO, solutions

    model = YOLO("yolov8n-pose.pt")
    cap = cv2.VideoCapture("path/to/video/file.mp4")
    assert cap.isOpened(), "Error reading video file"
    w, h, fps = (int(cap.get(x)) for x in (cv2.CAP_PROP_FRAME_WIDTH, cv2.CAP_PROP_FRAME_HEIGHT, cv2.CAP_PROP_FPS))

    video_writer = cv2.VideoWriter("workouts.avi", cv2.VideoWriter_fourcc(*"mp4v"), fps, (w, h))

    gym_object = solutions.AIGym(
        line_thickness=2,
        view_img=True,
        pose_type="pushup",
        kpts_to_check=[6, 8, 10],
    )

    while cap.isOpened():
        success, im0 = cap.read()
        if not success:
            print("Video frame is empty or video processing has been successfully completed.")
            break
        results = model.track(im0, verbose=False)  # Tracking recommended
        # results = model.predict(im0)  # Prediction also supported
        im0 = gym_object.start_counting(im0, results)
        video_writer.write(im0)

    cv2.destroyAllWindows()
    video_writer.release()
    ```
???+ tip "Support"
"pushup", "pullup" and "abworkout" supported
KeyPoints Map
Arguments AIGym
| Name | Type | Default | Description |
|---|---|---|---|
kpts_to_check |
list |
None |
List of three keypoints index, for counting specific workout, followed by keypoint Map |
line_thickness |
int |
2 |
Thickness of the lines drawn. |
view_img |
bool |
False |
Flag to display the image. |
pose_up_angle |
float |
145.0 |
Angle threshold for the 'up' pose. |
pose_down_angle |
float |
90.0 |
Angle threshold for the 'down' pose. |
pose_type |
str |
pullup |
Type of pose to detect ('pullup', pushup, abworkout, squat). |
Arguments model.predict
| Name | Type | Default | Description |
|---|---|---|---|
source |
str |
'ultralytics/assets' |
source directory for images or videos |
conf |
float |
0.25 |
object confidence threshold for detection |
iou |
float |
0.7 |
intersection over union (IoU) threshold for NMS |
imgsz |
int or tuple |
640 |
image size as scalar or (h, w) list, i.e. (640, 480) |
half |
bool |
False |
use half precision (FP16) |
device |
None or str |
None |
device to run on, i.e. cuda device=0/1/2/3 or device=cpu |
max_det |
int |
300 |
maximum number of detections per image |
vid_stride |
bool |
False |
video frame-rate stride |
stream_buffer |
bool |
False |
buffer all streaming frames (True) or return the most recent frame (False) |
visualize |
bool |
False |
visualize model features |
augment |
bool |
False |
apply image augmentation to prediction sources |
agnostic_nms |
bool |
False |
class-agnostic NMS |
classes |
list[int] |
None |
filter results by class, i.e. classes=0, or classes=[0,2,3] |
retina_masks |
bool |
False |
use high-resolution segmentation masks |
embed |
list[int] |
None |
return feature vectors/embeddings from given layers |
Arguments model.track
| Name | Type | Default | Description |
|---|---|---|---|
source |
im0 |
None |
source directory for images or videos |
persist |
bool |
False |
persisting tracks between frames |
tracker |
str |
botsort.yaml |
Tracking method 'bytetrack' or 'botsort' |
conf |
float |
0.3 |
Confidence Threshold |
iou |
float |
0.5 |
IOU Threshold |
classes |
list |
None |
filter results by class, i.e. classes=0, or classes=[0,2,3] |
verbose |
bool |
True |
Display the object tracking results |
FAQ
How do I monitor my workouts using Ultralytics YOLOv8?
To monitor your workouts using Ultralytics YOLOv8, you can utilize the pose estimation capabilities to track and analyze key body landmarks and joints in real-time. This allows you to receive instant feedback on your exercise form, count repetitions, and measure performance metrics. You can start by using the provided example code for pushups, pullups, or ab workouts as shown:
import cv2

from ultralytics import YOLO, solutions

model = YOLO("yolov8n-pose.pt")
cap = cv2.VideoCapture("path/to/video/file.mp4")
assert cap.isOpened(), "Error reading video file"
w, h, fps = (int(cap.get(x)) for x in (cv2.CAP_PROP_FRAME_WIDTH, cv2.CAP_PROP_FRAME_HEIGHT, cv2.CAP_PROP_FPS))

gym_object = solutions.AIGym(
    line_thickness=2,
    view_img=True,
    pose_type="pushup",
    kpts_to_check=[6, 8, 10],
)

while cap.isOpened():
    success, im0 = cap.read()
    if not success:
        print("Video frame is empty or video processing has been successfully completed.")
        break
    results = model.track(im0, verbose=False)
    im0 = gym_object.start_counting(im0, results)

cv2.destroyAllWindows()
For further customization and settings, you can refer to the AIGym section in the documentation.
What are the benefits of using Ultralytics YOLOv8 for workout monitoring?
Using Ultralytics YOLOv8 for workout monitoring provides several key benefits:
- Optimized Performance: By tailoring workouts based on monitoring data, you can achieve better results.
- Goal Achievement: Easily track and adjust fitness goals for measurable progress.
- Personalization: Get customized workout plans based on your individual data for optimal effectiveness.
- Health Awareness: Early detection of patterns that indicate potential health issues or over-training.
- Informed Decisions: Make data-driven decisions to adjust routines and set realistic goals.
You can watch a YouTube video demonstration to see these benefits in action.
How accurate is Ultralytics YOLOv8 in detecting and tracking exercises?
Ultralytics YOLOv8 is highly accurate in detecting and tracking exercises due to its state-of-the-art pose estimation capabilities. It can accurately track key body landmarks and joints, providing real-time feedback on exercise form and performance metrics. The model's pretrained weights and robust architecture ensure high precision and reliability. For real-world examples, check out the real-world applications section in the documentation, which showcases pushups and pullups counting.
Can I use Ultralytics YOLOv8 for custom workout routines?
Yes, Ultralytics YOLOv8 can be adapted for custom workout routines. The AIGym class supports different pose types such as "pushup", "pullup", and "abworkout." You can specify keypoints and angles to detect specific exercises. Here is an example setup:
from ultralytics import solutions

gym_object = solutions.AIGym(
    line_thickness=2,
    view_img=True,
    pose_type="squat",
    kpts_to_check=[6, 8, 10],
)
For more details on setting arguments, refer to the Arguments AIGym section. This flexibility allows you to monitor various exercises and customize routines based on your needs.
How can I save the workout monitoring output using Ultralytics YOLOv8?
To save the workout monitoring output, you can modify the code to include a video writer that saves the processed frames. Here's an example:
import cv2

from ultralytics import YOLO, solutions

model = YOLO("yolov8n-pose.pt")
cap = cv2.VideoCapture("path/to/video/file.mp4")
assert cap.isOpened(), "Error reading video file"
w, h, fps = (int(cap.get(x)) for x in (cv2.CAP_PROP_FRAME_WIDTH, cv2.CAP_PROP_FRAME_HEIGHT, cv2.CAP_PROP_FPS))

video_writer = cv2.VideoWriter("workouts.avi", cv2.VideoWriter_fourcc(*"mp4v"), fps, (w, h))

gym_object = solutions.AIGym(
    line_thickness=2,
    view_img=True,
    pose_type="pushup",
    kpts_to_check=[6, 8, 10],
)

while cap.isOpened():
    success, im0 = cap.read()
    if not success:
        print("Video frame is empty or video processing has been successfully completed.")
        break
    results = model.track(im0, verbose=False)
    im0 = gym_object.start_counting(im0, results)
    video_writer.write(im0)

cv2.destroyAllWindows()
video_writer.release()
This setup writes the monitored video to an output file. For more details, refer to the Workouts Monitoring with Save Output section.
comments: true
description: Comprehensive guide to troubleshoot common YOLOv8 issues, from installation errors to model training challenges. Enhance your Ultralytics projects with our expert tips.
keywords: YOLO, YOLOv8, troubleshooting, installation errors, model training, GPU issues, Ultralytics, AI, computer vision, deep learning, Python, CUDA, PyTorch, debugging
Troubleshooting Common YOLO Issues

Introduction
This guide serves as a comprehensive aid for troubleshooting common issues encountered while working with YOLOv8 on your Ultralytics projects. Navigating through these issues can be a breeze with the right guidance, ensuring your projects remain on track without unnecessary delays.
Watch: Ultralytics YOLOv8 Common Issues | Installation Errors, Model Training Issues
Common Issues
Installation Errors
Installation errors can arise due to various reasons, such as incompatible versions, missing dependencies, or incorrect environment setups. First, check to make sure you are doing the following:
-
You're using Python 3.8 or later as recommended.
-
Ensure that you have the correct version of PyTorch (1.8 or later) installed.
-
Consider using virtual environments to avoid conflicts.
-
Follow the official installation guide step by step.
Additionally, here are some common installation issues users have encountered, along with their respective solutions:
-
Import Errors or Dependency Issues - If you're getting errors during the import of YOLOv8, or you're having issues related to dependencies, consider the following troubleshooting steps:
-
Fresh Installation: Sometimes, starting with a fresh installation can resolve unexpected issues. Especially with libraries like Ultralytics, where updates might introduce changes to the file tree structure or functionalities.
-
Update Regularly: Ensure you're using the latest version of the library. Older versions might not be compatible with recent updates, leading to potential conflicts or issues.
-
Check Dependencies: Verify that all required dependencies are correctly installed and are of the compatible versions.
-
Review Changes: If you initially cloned or installed an older version, be aware that significant updates might affect the library's structure or functionalities. Always refer to the official documentation or changelogs to understand any major changes.
-
Remember, keeping your libraries and dependencies up-to-date is crucial for a smooth and error-free experience.
-
-
Running YOLOv8 on GPU - If you're having trouble running YOLOv8 on GPU, consider the following troubleshooting steps:
-
Verify CUDA Compatibility and Installation: Ensure your GPU is CUDA compatible and that CUDA is correctly installed. Use the
nvidia-smicommand to check the status of your NVIDIA GPU and CUDA version. -
Check PyTorch and CUDA Integration: Ensure PyTorch can utilize CUDA by running
import torch; print(torch.cuda.is_available())in a Python terminal. If it returns 'True', PyTorch is set up to use CUDA. -
Environment Activation: Ensure you're in the correct environment where all necessary packages are installed.
-
Update Your Packages: Outdated packages might not be compatible with your GPU. Keep them updated.
-
Program Configuration: Check if the program or code specifies GPU usage. In YOLOv8, this might be in the settings or configuration.
-
Model Training Issues
This section will address common issues faced while training and their respective explanations and solutions.
Verification of Configuration Settings
Issue: You are unsure whether the configuration settings in the .yaml file are being applied correctly during model training.
Solution: The configuration settings in the .yaml file should be applied when using the model.train() function. To ensure that these settings are correctly applied, follow these steps:
- Confirm that the path to your
.yamlconfiguration file is correct. - Make sure you pass the path to your
.yamlfile as thedataargument when callingmodel.train(), as shown below:
model.train(data="/path/to/your/data.yaml", batch=4)
Accelerating Training with Multiple GPUs
Issue: Training is slow on a single GPU, and you want to speed up the process using multiple GPUs.
Solution: Increasing the batch size can accelerate training, but it's essential to consider GPU memory capacity. To speed up training with multiple GPUs, follow these steps:
-
Ensure that you have multiple GPUs available.
-
Modify your .yaml configuration file to specify the number of GPUs to use, e.g., gpus: 4.
-
Increase the batch size accordingly to fully utilize the multiple GPUs without exceeding memory limits.
-
Modify your training command to utilize multiple GPUs:
# Adjust the batch size and other settings as needed to optimize training speed
model.train(data="/path/to/your/data.yaml", batch=32, multi_scale=True)
Continuous Monitoring Parameters
Issue: You want to know which parameters should be continuously monitored during training, apart from loss.
Solution: While loss is a crucial metric to monitor, it's also essential to track other metrics for model performance optimization. Some key metrics to monitor during training include:
- Precision
- Recall
- Mean Average Precision (mAP)
You can access these metrics from the training logs or by using tools like TensorBoard or wandb for visualization. Implementing early stopping based on these metrics can help you achieve better results.
Tools for Tracking Training Progress
Issue: You are looking for recommendations on tools to track training progress.
Solution: To track and visualize training progress, you can consider using the following tools:
- TensorBoard: TensorBoard is a popular choice for visualizing training metrics, including loss, accuracy, and more. You can integrate it with your YOLOv8 training process.
- Comet: Comet provides an extensive toolkit for experiment tracking and comparison. It allows you to track metrics, hyperparameters, and even model weights. Integration with YOLO models is also straightforward, providing you with a complete overview of your experiment cycle.
- Ultralytics HUB: Ultralytics HUB offers a specialized environment for tracking YOLO models, giving you a one-stop platform to manage metrics, datasets, and even collaborate with your team. Given its tailored focus on YOLO, it offers more customized tracking options.
Each of these tools offers its own set of advantages, so you may want to consider the specific needs of your project when making a choice.
How to Check if Training is Happening on the GPU
Issue: The 'device' value in the training logs is 'null,' and you're unsure if training is happening on the GPU.
Solution: The 'device' value being 'null' typically means that the training process is set to automatically use an available GPU, which is the default behavior. To ensure training occurs on a specific GPU, you can manually set the 'device' value to the GPU index (e.g., '0' for the first GPU) in your .yaml configuration file:
device: 0
This will explicitly assign the training process to the specified GPU. If you wish to train on the CPU, set 'device' to 'cpu'.
Keep an eye on the 'runs' folder for logs and metrics to monitor training progress effectively.
Key Considerations for Effective Model Training
Here are some things to keep in mind, if you are facing issues related to model training.
Dataset Format and Labels
-
Importance: The foundation of any machine learning model lies in the quality and format of the data it is trained on.
-
Recommendation: Ensure that your custom dataset and its associated labels adhere to the expected format. It's crucial to verify that annotations are accurate and of high quality. Incorrect or subpar annotations can derail the model's learning process, leading to unpredictable outcomes.
Model Convergence
-
Importance: Achieving model convergence ensures that the model has sufficiently learned from the training data.
-
Recommendation: When training a model 'from scratch', it's vital to ensure that the model reaches a satisfactory level of convergence. This might necessitate a longer training duration, with more epochs, compared to when you're fine-tuning an existing model.
Learning Rate and Batch Size
-
Importance: These hyperparameters play a pivotal role in determining how the model updates its weights during training.
-
Recommendation: Regularly evaluate if the chosen learning rate and batch size are optimal for your specific dataset. Parameters that are not in harmony with the dataset's characteristics can hinder the model's performance.
Class Distribution
-
Importance: The distribution of classes in your dataset can influence the model's prediction tendencies.
-
Recommendation: Regularly assess the distribution of classes within your dataset. If there's a class imbalance, there's a risk that the model will develop a bias towards the more prevalent class. This bias can be evident in the confusion matrix, where the model might predominantly predict the majority class.
Cross-Check with Pretrained Weights
-
Importance: Leveraging pretrained weights can provide a solid starting point for model training, especially when data is limited.
-
Recommendation: As a diagnostic step, consider training your model using the same data but initializing it with pretrained weights. If this approach yields a well-formed confusion matrix, it could suggest that the 'from scratch' model might require further training or adjustments.
Issues Related to Model Predictions
This section will address common issues faced during model prediction.
Getting Bounding Box Predictions With Your YOLOv8 Custom Model
Issue: When running predictions with a custom YOLOv8 model, there are challenges with the format and visualization of the bounding box coordinates.
Solution:
- Coordinate Format: YOLOv8 provides bounding box coordinates in absolute pixel values. To convert these to relative coordinates (ranging from 0 to 1), you need to divide by the image dimensions. For example, let's say your image size is 640x640. Then you would do the following:
# Convert absolute coordinates to relative coordinates
x1 = x1 / 640  # Divide x-coordinates by image width
x2 = x2 / 640
y1 = y1 / 640  # Divide y-coordinates by image height
y2 = y2 / 640
- File Name: To obtain the file name of the image you're predicting on, access the image file path directly from the result object within your prediction loop.
Filtering Objects in YOLOv8 Predictions
Issue: Facing issues with how to filter and display only specific objects in the prediction results when running YOLOv8 using the Ultralytics library.
Solution: To detect specific classes use the classes argument to specify the classes you want to include in the output. For instance, to detect only cars (assuming 'cars' have class index 2):
yolo task=detect mode=segment model=yolov8n-seg.pt source='path/to/car.mp4' show=True classes=2
Understanding Precision Metrics in YOLOv8
Issue: Confusion regarding the difference between box precision, mask precision, and confusion matrix precision in YOLOv8.
Solution: Box precision measures the accuracy of predicted bounding boxes compared to the actual ground truth boxes using IoU (Intersection over Union) as the metric. Mask precision assesses the agreement between predicted segmentation masks and ground truth masks in pixel-wise object classification. Confusion matrix precision, on the other hand, focuses on overall classification accuracy across all classes and does not consider the geometric accuracy of predictions. It's important to note that a bounding box can be geometrically accurate (true positive) even if the class prediction is wrong, leading to differences between box precision and confusion matrix precision. These metrics evaluate distinct aspects of a model's performance, reflecting the need for different evaluation metrics in various tasks.
Extracting Object Dimensions in YOLOv8
Issue: Difficulty in retrieving the length and height of detected objects in YOLOv8, especially when multiple objects are detected in an image.
Solution: To retrieve the bounding box dimensions, first use the Ultralytics YOLOv8 model to predict objects in an image. Then, extract the width and height information of bounding boxes from the prediction results.
from ultralytics import YOLO

# Load a pre-trained YOLOv8 model
model = YOLO("yolov8n.pt")

# Specify the source image
source = "https://ultralytics.com/images/bus.jpg"

# Make predictions
results = model.predict(source, save=True, imgsz=320, conf=0.5)

# Extract bounding box dimensions
boxes = results[0].boxes.xywh.cpu()
for box in boxes:
    x, y, w, h = box
    print(f"Width of Box: {w}, Height of Box: {h}")
Deployment Challenges
GPU Deployment Issues
Issue: Deploying models in a multi-GPU environment can sometimes lead to unexpected behaviors like unexpected memory usage, inconsistent results across GPUs, etc.
Solution: Check for default GPU initialization. Some frameworks, like PyTorch, might initialize CUDA operations on a default GPU before transitioning to the designated GPUs. To bypass unexpected default initializations, specify the GPU directly during deployment and prediction. Then, use tools to monitor GPU utilization and memory usage to identify any anomalies in real-time. Also, ensure you're using the latest version of the framework or library.
Model Conversion/Exporting Issues
Issue: During the process of converting or exporting machine learning models to different formats or platforms, users might encounter errors or unexpected behaviors.
Solution:
-
Compatibility Check: Ensure that you are using versions of libraries and frameworks that are compatible with each other. Mismatched versions can lead to unexpected errors during conversion.
-
Environment Reset: If you're using an interactive environment like Jupyter or Colab, consider restarting your environment after making significant changes or installations. A fresh start can sometimes resolve underlying issues.
-
Official Documentation: Always refer to the official documentation of the tool or library you are using for conversion. It often contains specific guidelines and best practices for model exporting.
-
Community Support: Check the library or framework's official repository for similar issues reported by other users. The maintainers or community might have provided solutions or workarounds in discussion threads.
-
Update Regularly: Ensure that you are using the latest version of the tool or library. Developers frequently release updates that fix known bugs or improve functionality.
-
Test Incrementally: Before performing a full conversion, test the process with a smaller model or dataset to identify potential issues early on.
Community and Support
Engaging with a community of like-minded individuals can significantly enhance your experience and success in working with YOLOv8. Below are some channels and resources you may find helpful.
Forums and Channels for Getting Help
GitHub Issues: The YOLOv8 repository on GitHub has an Issues tab where you can ask questions, report bugs, and suggest new features. The community and maintainers are active here, and it's a great place to get help with specific problems.
Ultralytics Discord Server: Ultralytics has a Discord server where you can interact with other users and the developers.
Official Documentation and Resources
Ultralytics YOLOv8 Docs: The official documentation provides a comprehensive overview of YOLOv8, along with guides on installation, usage, and troubleshooting.
These resources should provide a solid foundation for troubleshooting and improving your YOLOv8 projects, as well as connecting with others in the YOLOv8 community.
Conclusion
Troubleshooting is an integral part of any development process, and being equipped with the right knowledge can significantly reduce the time and effort spent in resolving issues. This guide aimed to address the most common challenges faced by users of the YOLOv8 model within the Ultralytics ecosystem. By understanding and addressing these common issues, you can ensure smoother project progress and achieve better results with your computer vision tasks.
Remember, the Ultralytics community is a valuable resource. Engaging with fellow developers and experts can provide additional insights and solutions that might not be covered in standard documentation. Always keep learning, experimenting, and sharing your experiences to contribute to the collective knowledge of the community.
Happy troubleshooting!
FAQ
How do I resolve installation errors with YOLOv8?
Installation errors can often be due to compatibility issues or missing dependencies. Ensure you use Python 3.8 or later and have PyTorch 1.8 or later installed. It's beneficial to use virtual environments to avoid conflicts. For a step-by-step installation guide, follow our official installation guide. If you encounter import errors, try a fresh installation or update the library to the latest version.
Why is my YOLOv8 model training slow on a single GPU?
Training on a single GPU might be slow due to large batch sizes or insufficient memory. To speed up training, use multiple GPUs. Ensure your system has multiple GPUs available and adjust your .yaml configuration file to specify the number of GPUs, e.g., gpus: 4. Increase the batch size accordingly to fully utilize the GPUs without exceeding memory limits. Example command:
model.train(data="/path/to/your/data.yaml", batch=32, multi_scale=True)
How can I ensure my YOLOv8 model is training on the GPU?
If the 'device' value shows 'null' in the training logs, it generally means the training process is set to automatically use an available GPU. To explicitly assign a specific GPU, set the 'device' value in your .yaml configuration file. For instance:
device: 0
This sets the training process to the first GPU. Consult the nvidia-smi command to confirm your CUDA setup.
How can I monitor and track my YOLOv8 model training progress?
Tracking and visualizing training progress can be efficiently managed through tools like TensorBoard, Comet, and Ultralytics HUB. These tools allow you to log and visualize metrics such as loss, precision, recall, and mAP. Implementing early stopping based on these metrics can also help achieve better training outcomes.
What should I do if YOLOv8 is not recognizing my dataset format?
Ensure your dataset and labels conform to the expected format. Verify that annotations are accurate and of high quality. If you face any issues, refer to the Data Collection and Annotation guide for best practices. For more dataset-specific guidance, check the Datasets section in the documentation.
comments: true
description: Explore essential YOLOv8 performance metrics like mAP, IoU, F1 Score, Precision, and Recall. Learn how to calculate and interpret them for model evaluation.
keywords: YOLOv8 performance metrics, mAP, IoU, F1 Score, Precision, Recall, object detection, Ultralytics
Performance Metrics Deep Dive
Introduction
Performance metrics are key tools to evaluate the accuracy and efficiency of object detection models. They shed light on how effectively a model can identify and localize objects within images. Additionally, they help in understanding the model's handling of false positives and false negatives. These insights are crucial for evaluating and enhancing the model's performance. In this guide, we will explore various performance metrics associated with YOLOv8, their significance, and how to interpret them.
Watch: Ultralytics YOLOv8 Performance Metrics | MAP, F1 Score, Precision, IoU & Accuracy
Object Detection Metrics
Let's start by discussing some metrics that are not only important to YOLOv8 but are broadly applicable across different object detection models.
-
Intersection over Union (IoU): IoU is a measure that quantifies the overlap between a predicted bounding box and a ground truth bounding box. It plays a fundamental role in evaluating the accuracy of object localization.
-
Average Precision (AP): AP computes the area under the precision-recall curve, providing a single value that encapsulates the model's precision and recall performance.
-
Mean Average Precision (mAP): mAP extends the concept of AP by calculating the average AP values across multiple object classes. This is useful in multi-class object detection scenarios to provide a comprehensive evaluation of the model's performance.
-
Precision and Recall: Precision quantifies the proportion of true positives among all positive predictions, assessing the model's capability to avoid false positives. On the other hand, Recall calculates the proportion of true positives among all actual positives, measuring the model's ability to detect all instances of a class.
-
F1 Score: The F1 Score is the harmonic mean of precision and recall, providing a balanced assessment of a model's performance while considering both false positives and false negatives.
How to Calculate Metrics for YOLOv8 Model
Now, we can explore YOLOv8's Validation mode that can be used to compute the above discussed evaluation metrics.
Using the validation mode is simple. Once you have a trained model, you can invoke the model.val() function. This function will then process the validation dataset and return a variety of performance metrics. But what do these metrics mean? And how should you interpret them?
Interpreting the Output
Let's break down the output of the model.val() function and understand each segment of the output.
Class-wise Metrics
One of the sections of the output is the class-wise breakdown of performance metrics. This granular information is useful when you are trying to understand how well the model is doing for each specific class, especially in datasets with a diverse range of object categories. For each class in the dataset the following is provided:
-
Class: This denotes the name of the object class, such as "person", "car", or "dog".
-
Images: This metric tells you the number of images in the validation set that contain the object class.
-
Instances: This provides the count of how many times the class appears across all images in the validation set.
-
Box(P, R, mAP50, mAP50-95): This metric provides insights into the model's performance in detecting objects:
-
P (Precision): The accuracy of the detected objects, indicating how many detections were correct.
-
R (Recall): The ability of the model to identify all instances of objects in the images.
-
mAP50: Mean average precision calculated at an intersection over union (IoU) threshold of 0.50. It's a measure of the model's accuracy considering only the "easy" detections.
-
mAP50-95: The average of the mean average precision calculated at varying IoU thresholds, ranging from 0.50 to 0.95. It gives a comprehensive view of the model's performance across different levels of detection difficulty.
-
Speed Metrics
The speed of inference can be as critical as accuracy, especially in real-time object detection scenarios. This section breaks down the time taken for various stages of the validation process, from preprocessing to post-processing.
COCO Metrics Evaluation
For users validating on the COCO dataset, additional metrics are calculated using the COCO evaluation script. These metrics give insights into precision and recall at different IoU thresholds and for objects of different sizes.
Visual Outputs
The model.val() function, apart from producing numeric metrics, also yields visual outputs that can provide a more intuitive understanding of the model's performance. Here's a breakdown of the visual outputs you can expect:
-
F1 Score Curve (
F1_curve.png): This curve represents the F1 score across various thresholds. Interpreting this curve can offer insights into the model's balance between false positives and false negatives over different thresholds. -
Precision-Recall Curve (
PR_curve.png): An integral visualization for any classification problem, this curve showcases the trade-offs between precision and recall at varied thresholds. It becomes especially significant when dealing with imbalanced classes. -
Precision Curve (
P_curve.png): A graphical representation of precision values at different thresholds. This curve helps in understanding how precision varies as the threshold changes. -
Recall Curve (
R_curve.png): Correspondingly, this graph illustrates how the recall values change across different thresholds. -
Confusion Matrix (
confusion_matrix.png): The confusion matrix provides a detailed view of the outcomes, showcasing the counts of true positives, true negatives, false positives, and false negatives for each class. -
Normalized Confusion Matrix (
confusion_matrix_normalized.png): This visualization is a normalized version of the confusion matrix. It represents the data in proportions rather than raw counts. This format makes it simpler to compare the performance across classes. -
Validation Batch Labels (
val_batchX_labels.jpg): These images depict the ground truth labels for distinct batches from the validation dataset. They provide a clear picture of what the objects are and their respective locations as per the dataset. -
Validation Batch Predictions (
val_batchX_pred.jpg): Contrasting the label images, these visuals display the predictions made by the YOLOv8 model for the respective batches. By comparing these to the label images, you can easily assess how well the model detects and classifies objects visually.
Results Storage
For future reference, the results are saved to a directory, typically named runs/detect/val.
Choosing the Right Metrics
Choosing the right metrics to evaluate often depends on the specific application.
-
mAP: Suitable for a broad assessment of model performance.
-
IoU: Essential when precise object location is crucial.
-
Precision: Important when minimizing false detections is a priority.
-
Recall: Vital when it's important to detect every instance of an object.
-
F1 Score: Useful when a balance between precision and recall is needed.
For real-time applications, speed metrics like FPS (Frames Per Second) and latency are crucial to ensure timely results.
Interpretation of Results
It's important to understand the metrics. Here's what some of the commonly observed lower scores might suggest:
-
Low mAP: Indicates the model may need general refinements.
-
Low IoU: The model might be struggling to pinpoint objects accurately. Different bounding box methods could help.
-
Low Precision: The model may be detecting too many non-existent objects. Adjusting confidence thresholds might reduce this.
-
Low Recall: The model could be missing real objects. Improving feature extraction or using more data might help.
-
Imbalanced F1 Score: There's a disparity between precision and recall.
-
Class-specific AP: Low scores here can highlight classes the model struggles with.
Case Studies
Real-world examples can help clarify how these metrics work in practice.
Case 1
-
Situation: mAP and F1 Score are suboptimal, but while Recall is good, Precision isn't.
-
Interpretation & Action: There might be too many incorrect detections. Tightening confidence thresholds could reduce these, though it might also slightly decrease recall.
Case 2
-
Situation: mAP and Recall are acceptable, but IoU is lacking.
-
Interpretation & Action: The model detects objects well but might not be localizing them precisely. Refining bounding box predictions might help.
Case 3
-
Situation: Some classes have a much lower AP than others, even with a decent overall mAP.
-
Interpretation & Action: These classes might be more challenging for the model. Using more data for these classes or adjusting class weights during training could be beneficial.
Connect and Collaborate
Tapping into a community of enthusiasts and experts can amplify your journey with YOLOv8. Here are some avenues that can facilitate learning, troubleshooting, and networking.
Engage with the Broader Community
-
GitHub Issues: The YOLOv8 repository on GitHub has an Issues tab where you can ask questions, report bugs, and suggest new features. The community and maintainers are active here, and it's a great place to get help with specific problems.
-
Ultralytics Discord Server: Ultralytics has a Discord server where you can interact with other users and the developers.
Official Documentation and Resources:
- Ultralytics YOLOv8 Docs: The official documentation provides a comprehensive overview of YOLOv8, along with guides on installation, usage, and troubleshooting.
Using these resources will not only guide you through any challenges but also keep you updated with the latest trends and best practices in the YOLOv8 community.
Conclusion
In this guide, we've taken a close look at the essential performance metrics for YOLOv8. These metrics are key to understanding how well a model is performing and are vital for anyone aiming to fine-tune their models. They offer the necessary insights for improvements and to make sure the model works effectively in real-life situations.
Remember, the YOLOv8 and Ultralytics community is an invaluable asset. Engaging with fellow developers and experts can open doors to insights and solutions not found in standard documentation. As you journey through object detection, keep the spirit of learning alive, experiment with new strategies, and share your findings. By doing so, you contribute to the community's collective wisdom and ensure its growth.
Happy object detecting!
FAQ
What is the significance of Mean Average Precision (mAP) in evaluating YOLOv8 model performance?
Mean Average Precision (mAP) is crucial for evaluating YOLOv8 models as it provides a single metric encapsulating precision and recall across multiple classes. mAP@0.50 measures precision at an IoU threshold of 0.50, focusing on the model's ability to detect objects correctly. mAP@0.50:0.95 averages precision across a range of IoU thresholds, offering a comprehensive assessment of detection performance. High mAP scores indicate that the model effectively balances precision and recall, essential for applications like autonomous driving and surveillance.
How do I interpret the Intersection over Union (IoU) value for YOLOv8 object detection?
Intersection over Union (IoU) measures the overlap between the predicted and ground truth bounding boxes. IoU values range from 0 to 1, where higher values indicate better localization accuracy. An IoU of 1.0 means perfect alignment. Typically, an IoU threshold of 0.50 is used to define true positives in metrics like mAP. Lower IoU values suggest that the model struggles with precise object localization, which can be improved by refining bounding box regression or increasing annotation accuracy.
Why is the F1 Score important for evaluating YOLOv8 models in object detection?
The F1 Score is important for evaluating YOLOv8 models because it provides a harmonic mean of precision and recall, balancing both false positives and false negatives. It is particularly valuable when dealing with imbalanced datasets or applications where either precision or recall alone is insufficient. A high F1 Score indicates that the model effectively detects objects while minimizing both missed detections and false alarms, making it suitable for critical applications like security systems and medical imaging.
What are the key advantages of using Ultralytics YOLOv8 for real-time object detection?
Ultralytics YOLOv8 offers multiple advantages for real-time object detection:
- Speed and Efficiency: Optimized for high-speed inference, suitable for applications requiring low latency.
- High Accuracy: Advanced algorithm ensures high mAP and IoU scores, balancing precision and recall.
- Flexibility: Supports various tasks including object detection, segmentation, and classification.
- Ease of Use: User-friendly interfaces, extensive documentation, and seamless integration with platforms like Ultralytics HUB (HUB Quickstart).
This makes YOLOv8 ideal for diverse applications from autonomous vehicles to smart city solutions.
How can validation metrics from YOLOv8 help improve model performance?
Validation metrics from YOLOv8 like precision, recall, mAP, and IoU help diagnose and improve model performance by providing insights into different aspects of detection:
- Precision: Helps identify and minimize false positives.
- Recall: Ensures all relevant objects are detected.
- mAP: Offers an overall performance snapshot, guiding general improvements.
- IoU: Helps fine-tune object localization accuracy.
By analyzing these metrics, specific weaknesses can be targeted, such as adjusting confidence thresholds to improve precision or gathering more diverse data to enhance recall. For detailed explanations of these metrics and how to interpret them, check Object Detection Metrics.


 浙公网安备 33010602011771号