Yolov8-源码解析-二十五-
Yolov8 源码解析(二十五)
YOLOv8 - Int8-TFLite Runtime
Welcome to the YOLOv8 Int8 TFLite Runtime for efficient and optimized object detection project. This README provides comprehensive instructions for installing and using our YOLOv8 implementation.
Installation
Ensure a smooth setup by following these steps to install necessary dependencies.
Installing Required Dependencies
Install all required dependencies with this simple command:
pip install -r requirements.txt
Installing tflite-runtime
To load TFLite models, install the tflite-runtime package using:
pip install tflite-runtime
Installing tensorflow-gpu (For NVIDIA GPU Users)
Leverage GPU acceleration with NVIDIA GPUs by installing tensorflow-gpu:
pip install tensorflow-gpu
Note: Ensure you have compatible GPU drivers installed on your system.
Installing tensorflow (CPU Version)
For CPU usage or non-NVIDIA GPUs, install TensorFlow with:
pip install tensorflow
Usage
Follow these instructions to run YOLOv8 after successful installation.
Convert the YOLOv8 model to Int8 TFLite format:
yolo export model=yolov8n.pt imgsz=640 format=tflite int8
Locate the Int8 TFLite model in yolov8n_saved_model. Choose best_full_integer_quant or verify quantization at Netron. Then, execute the following in your terminal:
python main.py --model yolov8n_full_integer_quant.tflite --img image.jpg --conf-thres 0.5 --iou-thres 0.5
Replace best_full_integer_quant.tflite with your model file's path, image.jpg with your input image, and adjust the confidence (conf-thres) and IoU thresholds (iou-thres) as necessary.
Output
The output is displayed as annotated images, showcasing the model's detection capabilities:

.\yolov8\examples\YOLOv8-OpenCV-ONNX-Python\main.py
# Ultralytics YOLO 🚀, AGPL-3.0 license

# 导入必要的库
import argparse  # 用于解析命令行参数

import cv2.dnn  # OpenCV的深度学习模块
import numpy as np  # 用于处理图像数据的库

from ultralytics.utils import ASSETS, yaml_load  # 导入自定义工具函数和数据
from ultralytics.utils.checks import check_yaml  # 导入检查 YAML 文件的函数

# 从 coco8.yaml 文件中加载类别名称列表
CLASSES = yaml_load(check_yaml("coco8.yaml"))["names"]

# 随机生成用于每个类别的颜色
colors = np.random.uniform(0, 255, size=(len(CLASSES), 3))


def draw_bounding_box(img, class_id, confidence, x, y, x_plus_w, y_plus_h):
    """
    在输入图像上绘制边界框,基于提供的参数。

    Args:
        img (numpy.ndarray): 要绘制边界框的输入图像。
        class_id (int): 检测到对象的类别ID。
        confidence (float): 检测到对象的置信度分数。
        x (int): 边界框左上角的X坐标。
        y (int): 边界框左上角的Y坐标。
        x_plus_w (int): 边界框右下角的X坐标。
        y_plus_h (int): 边界框右下角的Y坐标。
    """
    # 根据类别ID获取类别名称和置信度,构建标签
    label = f"{CLASSES[class_id]} ({confidence:.2f})"
    color = colors[class_id]  # 根据类别ID获取颜色
    cv2.rectangle(img, (x, y), (x_plus_w, y_plus_h), color, 2)  # 在图像上绘制矩形边界框
    cv2.putText(img, label, (x - 10, y - 10), cv2.FONT_HERSHEY_SIMPLEX, 0.5, color, 2)  # 在边界框上方绘制类别标签


def main(onnx_model, input_image):
    """
    主函数,加载ONNX模型,执行推理,绘制边界框,并显示输出图像。

    Args:
        onnx_model (str): ONNX模型的路径。
        input_image (str): 输入图像的路径。

    Returns:
        list: 包含检测信息的字典列表,如类别ID、类别名称、置信度等。
    """
    # 加载ONNX模型
    model: cv2.dnn.Net = cv2.dnn.readNetFromONNX(onnx_model)

    # 读取输入图像
    original_image: np.ndarray = cv2.imread(input_image)
    [height, width, _] = original_image.shape  # 获取原始图像的尺寸

    # 准备一个正方形图像进行推理
    length = max((height, width))
    image = np.zeros((length, length, 3), np.uint8)
    image[0:height, 0:width] = original_image  # 将原始图像复制到正方形图像中

    # 计算缩放因子
    scale = length / 640

    # 对图像进行预处理并为模型准备blob
    blob = cv2.dnn.blobFromImage(image, scalefactor=1 / 255, size=(640, 640), swapRB=True)
    model.setInput(blob)

    # 执行推理
    outputs = model.forward()

    # 准备输出数组
    outputs = np.array([cv2.transpose(outputs[0])])
    rows = outputs.shape[1]

    boxes = []
    scores = []
    class_ids = []

    # 遍历输出以收集边界框、置信度分数和类别ID
    # 遍历检测到的每个目标框
    for i in range(rows):
        # 获取当前目标框的类别置信度分数
        classes_scores = outputs[0][i][4:]
        # 使用 cv2.minMaxLoc 函数找到最大置信度及其位置
        (minScore, maxScore, minClassLoc, (x, maxClassIndex)) = cv2.minMaxLoc(classes_scores)
        # 如果最大置信度大于等于0.25,则处理该目标框
        if maxScore >= 0.25:
            # 计算目标框的左上角坐标及宽高
            box = [
                outputs[0][i][0] - (0.5 * outputs[0][i][2]),
                outputs[0][i][1] - (0.5 * outputs[0][i][3]),
                outputs[0][i][2],
                outputs[0][i][3],
            ]
            # 将目标框的坐标信息添加到列表中
            boxes.append(box)
            # 将最大置信度添加到分数列表中
            scores.append(maxScore)
            # 将最大置信度对应的类别索引添加到类别ID列表中
            class_ids.append(maxClassIndex)

    # 应用非极大值抑制(NMS)来剔除重叠的边界框
    result_boxes = cv2.dnn.NMSBoxes(boxes, scores, 0.25, 0.45, 0.5)

    # 初始化检测结果列表
    detections = []

    # 遍历NMS后剩余的边界框结果,生成检测到的物体信息
    for i in range(len(result_boxes)):
        index = result_boxes[i]
        # 获取对应索引的边界框信息
        box = boxes[index]
        # 构建单个检测结果的字典
        detection = {
            "class_id": class_ids[index],
            "class_name": CLASSES[class_ids[index]],  # 获取类别名称
            "confidence": scores[index],  # 获取置信度分数
            "box": box,  # 获取边界框坐标
            "scale": scale,  # 获取缩放比例
        }
        # 将当前检测结果添加到检测结果列表中
        detections.append(detection)
        # 在原始图像上绘制边界框及标签
        draw_bounding_box(
            original_image,
            class_ids[index],
            scores[index],
            round(box[0] * scale),  # 缩放后的左上角x坐标
            round(box[1] * scale),  # 缩放后的左上角y坐标
            round((box[0] + box[2]) * scale),  # 缩放后的右下角x坐标
            round((box[1] + box[3]) * scale),  # 缩放后的右下角y坐标
        )

    # 显示带有边界框的图像
    cv2.imshow("image", original_image)
    cv2.waitKey(0)  # 等待用户按键操作
    cv2.destroyAllWindows()  # 关闭所有图像窗口

    # 返回所有检测到的物体信息列表
    return detections
# 如果该脚本作为主程序运行,则执行以下代码块
if __name__ == "__main__":
    # 创建参数解析器对象
    parser = argparse.ArgumentParser()
    # 添加一个名为 --model 的命令行参数,指定默认值为 'yolov8n.onnx',用于输入 ONNX 模型
    parser.add_argument("--model", default="yolov8n.onnx", help="Input your ONNX model.")
    # 添加一个名为 --img 的命令行参数,指定默认值为 ASSETS 目录下的 'bus.jpg' 文件路径,用于输入图像
    parser.add_argument("--img", default=str(ASSETS / "bus.jpg"), help="Path to input image.")
    # 解析命令行参数,并将其存储在 args 对象中
    args = parser.parse_args()
    # 调用 main 函数,传入解析后的模型和图像路径作为参数
    main(args.model, args.img)
YOLOv8 - OpenCV
Implementation YOLOv8 on OpenCV using ONNX Format.
Just simply clone and run
pip install -r requirements.txt
python main.py --model yolov8n.onnx --img image.jpg
If you start from scratch:
pip install ultralytics
yolo export model=yolov8n.pt imgsz=640 format=onnx opset=12
*Make sure to include "opset=12"
.\yolov8\examples\YOLOv8-OpenVINO-CPP-Inference\inference.h
#ifndef YOLO_INFERENCE_H_
#define YOLO_INFERENCE_H_

#include <string>                               // 包含字符串处理的标准库
#include <vector>                               // 包含向量处理的标准库
#include <opencv2/imgproc.hpp>                  // 包含 OpenCV 图像处理模块
#include <openvino/openvino.hpp>                // 包含 OpenVINO 框架

namespace yolo {

struct Detection {
    short class_id;                            // 检测到的对象类别ID
    float confidence;                          // 检测到的对象置信度
    cv::Rect box;                              // 检测到的对象边界框
};

class Inference {
 public:
    Inference() {}                             // 默认构造函数
    // 使用默认输入形状初始化模型的构造函数
    Inference(const std::string &model_path, const float &model_confidence_threshold, const float &model_NMS_threshold);
    // 使用指定输入形状初始化模型的构造函数
    Inference(const std::string &model_path, const cv::Size model_input_shape, const float &model_confidence_threshold, const float &model_NMS_threshold);

    void RunInference(cv::Mat &frame);          // 执行推理过程的方法

 private:
    void InitializeModel(const std::string &model_path);  // 初始化模型的私有方法
    void Preprocessing(const cv::Mat &frame);             // 图像预处理方法
    void PostProcessing(cv::Mat &frame);                  // 后处理方法
    cv::Rect GetBoundingBox(const cv::Rect &src) const;   // 获取边界框方法
    void DrawDetectedObject(cv::Mat &frame, const Detection &detections) const;  // 绘制检测到的对象方法

    cv::Point2f scale_factor_;                // 输入帧的缩放因子
    cv::Size2f model_input_shape_;            // 模型的输入形状
    cv::Size model_output_shape_;             // 模型的输出形状

    ov::InferRequest inference_request_;      // OpenVINO 推理请求
    ov::CompiledModel compiled_model_;        // OpenVINO 编译后的模型

    float model_confidence_threshold_;        // 检测置信度阈值
    float model_NMS_threshold_;               // 非极大值抑制阈值

    std::vector<std::string> classes_ {       // 检测模型所涉及的对象类别列表
        "person", "bicycle", "car", "motorcycle", "airplane", "bus", "train", "truck", "boat", "traffic light",
        "fire hydrant", "stop sign", "parking meter", "bench", "bird", "cat", "dog", "horse", "sheep", "cow",
        "elephant", "bear", "zebra", "giraffe", "backpack", "umbrella", "handbag", "tie", "suitcase", "frisbee",
        "skis", "snowboard", "sports ball", "kite", "baseball bat", "baseball glove", "skateboard", "surfboard",
        "tennis racket", "bottle", "wine glass", "cup", "fork", "knife", "spoon", "bowl", "banana", "apple",
        "sandwich", "orange", "broccoli", "carrot", "hot dog", "pizza", "donut", "cake", "chair", "couch",
        "potted plant", "bed", "dining table", "toilet", "tv", "laptop", "mouse", "remote", "keyboard",
        "cell phone", "microwave", "oven", "toaster", "sink", "refrigerator", "book", "clock", "vase",
        "scissors", "teddy bear", "hair drier", "toothbrush"
    };
};

} // namespace yolo

#endif // YOLO_INFERENCE_H_
YOLOv8 OpenVINO Inference in C++ 🦾
Welcome to the YOLOv8 OpenVINO Inference example in C++! This guide will help you get started with leveraging the powerful YOLOv8 models using OpenVINO and OpenCV API in your C++ projects. Whether you're looking to enhance performance or add flexibility to your applications, this example has got you covered.
🌟 Features
- 🚀 Model Format Support: Compatible with
ONNXandOpenVINO IRformats. - ⚡ Precision Options: Run models in
FP32,FP16, andINT8precisions. - 🔄 Dynamic Shape Loading: Easily handle models with dynamic input shapes.
📋 Dependencies
To ensure smooth execution, please make sure you have the following dependencies installed:
| Dependency | Version |
|---|---|
| OpenVINO | >=2023.3 |
| OpenCV | >=4.5.0 |
| C++ | >=14 |
| CMake | >=3.12.0 |
⚙️ Build Instructions
Follow these steps to build the project:
-
Clone the repository:
git clone https://github.com/ultralytics/ultralytics.git cd ultralytics/YOLOv8-OpenVINO-CPP-Inference -
Create a build directory and compile the project:
mkdir build
cd build
cmake ..
make
🛠️ Usage
Once built, you can run inference on an image using the following command:
./detect <model_path.{onnx, xml}> <image_path.jpg>
🔄 Exporting YOLOv8 Models
To use your YOLOv8 model with OpenVINO, you need to export it first. Use the command below to export the model:
yolo export model=yolov8s.pt imgsz=640 format=openvino
📸 Screenshots
Running Using OpenVINO Model
Running Using ONNX Model
❤️ Contributions
We hope this example helps you integrate YOLOv8 with OpenVINO and OpenCV into your C++ projects effortlessly. Happy coding! 🚀
Regions Counting Using YOLOv8 (Inference on Video)
- Region counting is a method employed to tally the objects within a specified area, allowing for more sophisticated analyses when multiple regions are considered. These regions can be adjusted interactively using a Left Mouse Click, and the counting process occurs in real time.
- Regions can be adjusted to suit the user's preferences and requirements.
Table of Contents
- Step 1: Install the Required Libraries
- Step 2: Run the Region Counting Using Ultralytics YOLOv8
- Usage Options
- FAQ
Step 1: Install the Required Libraries
Clone the repository, install dependencies and cd to this local directory for commands in Step 2.
# Clone ultralytics repo
git clone https://github.com/ultralytics/ultralytics

# cd to local directory
cd ultralytics/examples/YOLOv8-Region-Counter
Step 2: Run the Region Counting Using Ultralytics YOLOv8
Here are the basic commands for running the inference:
Note
After the video begins playing, you can freely move the region anywhere within the video by simply clicking and dragging using the left mouse button.
# If you want to save results
python yolov8_region_counter.py --source "path/to/video.mp4" --save-img --view-img

# If you want to run model on CPU
python yolov8_region_counter.py --source "path/to/video.mp4" --save-img --view-img --device cpu

# If you want to change model file
python yolov8_region_counter.py --source "path/to/video.mp4" --save-img --weights "path/to/model.pt"

# If you want to detect specific class (first class and third class)
python yolov8_region_counter.py --source "path/to/video.mp4" --classes 0 2 --weights "path/to/model.pt"

# If you don't want to save results
python yolov8_region_counter.py --source "path/to/video.mp4" --view-img
Usage Options
--source: Specifies the path to the video file you want to run inference on.--device: Specifies the devicecpuor0--save-img: Flag to save the detection results as images.--weights: Specifies a different YOLOv8 model file (e.g.,yolov8n.pt,yolov8s.pt,yolov8m.pt,yolov8l.pt,yolov8x.pt).--classes: Specifies the class to be detected--line-thickness: Specifies the bounding box thickness--region-thickness: Specifies the region boxes thickness--track-thickness: Specifies the track line thickness
FAQ
1. What Does Region Counting Involve?
Region counting is a computational method utilized to ascertain the quantity of objects within a specific area in recorded video or real-time streams. This technique finds frequent application in image processing, computer vision, and pattern recognition, facilitating the analysis and segmentation of objects or features based on their spatial relationships.
2. Is Friendly Region Plotting Supported by the Region Counter?
The Region Counter offers the capability to create regions in various formats, such as polygons and rectangles. You have the flexibility to modify region attributes, including coordinates, colors, and other details, as demonstrated in the following code:
from shapely.geometry import Polygon

counting_regions = [
    {
        "name": "YOLOv8 Polygon Region",
        "polygon": Polygon(
            [(50, 80), (250, 20), (450, 80), (400, 350), (100, 350)]
        ),  # Polygon with five points (Pentagon)
        "counts": 0,
        "dragging": False,
        "region_color": (255, 42, 4),  # BGR Value
        "text_color": (255, 255, 255),  # Region Text Color
    },
    {
        "name": "YOLOv8 Rectangle Region",
        "polygon": Polygon([(200, 250), (440, 250), (440, 550), (200, 550)]),  # Rectangle with four points
        "counts": 0,
        "dragging": False,
        "region_color": (37, 255, 225),  # BGR Value
        "text_color": (0, 0, 0),  # Region Text Color
    },
]
3. Why Combine Region Counting with YOLOv8?
YOLOv8 specializes in the detection and tracking of objects in video streams. Region counting complements this by enabling object counting within designated areas, making it a valuable application of YOLOv8.
4. How Can I Troubleshoot Issues?
To gain more insights during inference, you can include the --debug flag in your command:
python yolov8_region_counter.py --source "path to video file" --debug
5. Can I Employ Other YOLO Versions?
Certainly, you have the flexibility to specify different YOLO model weights using the --weights option.
6. Where Can I Access Additional Information?
For a comprehensive guide on using YOLOv8 with Object Tracking, please refer to Multi-Object Tracking with Ultralytics YOLO.
.\yolov8\examples\YOLOv8-Region-Counter\yolov8_region_counter.py
# Ultralytics YOLO 🚀, AGPL-3.0 license

import argparse  # 导入命令行参数解析模块
from collections import defaultdict  # 导入默认字典模块
from pathlib import Path  # 导入处理文件路径的模块

import cv2  # 导入 OpenCV 模块
import numpy as np  # 导入 NumPy 数学计算库
from shapely.geometry import Polygon  # 从 Shapely 几何库中导入多边形对象
from shapely.geometry.point import Point  # 从 Shapely 几何库中导入点对象

from ultralytics import YOLO  # 导入 Ultralytics YOLO 模块
from ultralytics.utils.files import increment_path  # 导入路径增量函数
from ultralytics.utils.plotting import Annotator, colors  # 导入标注和颜色模块

track_history = defaultdict(list)  # 初始化一个默认字典,用于跟踪历史记录

current_region = None  # 初始化当前选定的区域为空

counting_regions = [
    {
        "name": "YOLOv8 Polygon Region",  # 区域名称
        "polygon": Polygon([(50, 80), (250, 20), (450, 80), (400, 350), (100, 350)]),  # 多边形顶点坐标
        "counts": 0,  # 区域计数初始值
        "dragging": False,  # 拖动状态标志
        "region_color": (255, 42, 4),  # 区域颜色,BGR 值
        "text_color": (255, 255, 255),  # 文字颜色
    },
    {
        "name": "YOLOv8 Rectangle Region",  # 区域名称
        "polygon": Polygon([(200, 250), (440, 250), (440, 550), (200, 550)]),  # 多边形顶点坐标
        "counts": 0,  # 区域计数初始值
        "dragging": False,  # 拖动状态标志
        "region_color": (37, 255, 225),  # 区域颜色,BGR 值
        "text_color": (0, 0, 0),  # 文字颜色
    },
]


def mouse_callback(event, x, y, flags, param):
    """
    Handles mouse events for region manipulation.

    Parameters:
        event (int): The mouse event type (e.g., cv2.EVENT_LBUTTONDOWN).
        x (int): The x-coordinate of the mouse pointer.
        y (int): The y-coordinate of the mouse pointer.
        flags (int): Additional flags passed by OpenCV.
        param: Additional parameters passed to the callback (not used in this function).

    Global Variables:
        current_region (dict): A dictionary representing the current selected region.

    Mouse Events:
        - LBUTTONDOWN: Initiates dragging for the region containing the clicked point.
        - MOUSEMOVE: Moves the selected region if dragging is active.
        - LBUTTONUP: Ends dragging for the selected region.

    Notes:
        - This function is intended to be used as a callback for OpenCV mouse events.
        - Requires the existence of the 'counting_regions' list and the 'Polygon' class.

    Example:
        >>> cv2.setMouseCallback(window_name, mouse_callback)
    """
    global current_region  # 引用全局变量 current_region

    # Mouse left button down event
    if event == cv2.EVENT_LBUTTONDOWN:  # 如果是鼠标左键按下事件
        for region in counting_regions:  # 遍历计数区域列表
            if region["polygon"].contains(Point((x, y))):  # 如果鼠标点击点在某个区域内
                current_region = region  # 将当前选中区域设置为该区域
                current_region["dragging"] = True  # 开始拖动该区域
                current_region["offset_x"] = x  # 记录拖动起始的 x 坐标
                current_region["offset_y"] = y  # 记录拖动起始的 y 坐标

    # Mouse move event
    elif event == cv2.EVENT_MOUSEMOVE:  # 如果是鼠标移动事件
        if current_region is not None and current_region["dragging"]:  # 如果当前有选定区域且正在拖动
            dx = x - current_region["offset_x"]  # 计算 x 方向上的移动距离
            dy = y - current_region["offset_y"]  # 计算 y 方向上的移动距离
            current_region["polygon"] = Polygon(  # 更新区域的多边形顶点坐标
                [(p[0] + dx, p[1] + dy) for p in current_region["polygon"].exterior.coords]
            )
            current_region["offset_x"] = x  # 更新拖动后的 x 坐标
            current_region["offset_y"] = y  # 更新拖动后的 y 坐标
    # 如果鼠标左键抬起事件被触发
    elif event == cv2.EVENT_LBUTTONUP:
        # 如果当前区域不为空且正在拖拽状态
        if current_region is not None and current_region["dragging"]:
            # 将当前区域的拖拽状态设置为 False,表示停止拖拽
            current_region["dragging"] = False
# 定义一个函数 `run`,用于运行基于 YOLOv8 和 ByteTrack 的视频区域计数。
def run(
    weights="yolov8n.pt",  # 模型权重文件路径,默认为 "yolov8n.pt"
    source=None,           # 视频文件路径,必须提供
    device="cpu",          # 处理设备选择,默认为 CPU
    view_img=False,        # 是否显示结果,默认为 False
    save_img=False,        # 是否保存结果,默认为 False
    exist_ok=False,        # 是否覆盖现有文件,默认为 False
    classes=None,          # 要检测和跟踪的类别列表,默认为 None
    line_thickness=2,      # 边界框厚度,默认为 2
    track_thickness=2,     # 跟踪线厚度,默认为 2
    region_thickness=2,    # 区域厚度,默认为 2
):
    """
    Run Region counting on a video using YOLOv8 and ByteTrack.

    Supports movable region for real time counting inside specific area.
    Supports multiple regions counting.
    Regions can be Polygons or rectangle in shape

    Args:
        weights (str): Model weights path.
        source (str): Video file path.
        device (str): processing device cpu, 0, 1
        view_img (bool): Show results.
        save_img (bool): Save results.
        exist_ok (bool): Overwrite existing files.
        classes (list): classes to detect and track
        line_thickness (int): Bounding box thickness.
        track_thickness (int): Tracking line thickness
        region_thickness (int): Region thickness.
    """

    # 初始化视频帧计数器
    vid_frame_count = 0

    # 检查视频源路径是否存在
    if not Path(source).exists():
        raise FileNotFoundError(f"Source path '{source}' does not exist.")

    # 设置 YOLO 模型并加载权重
    model = YOLO(f"{weights}")

    # 根据设备选择加载模型到 CPU 或 CUDA
    model.to("cuda") if device == "0" else model.to("cpu")

    # 提取模型中的类别名称列表
    names = model.model.names

    # 设置视频捕捉对象
    videocapture = cv2.VideoCapture(source)

    # 获取视频帧宽度和高度
    frame_width, frame_height = int(videocapture.get(3)), int(videocapture.get(4))

    # 获取视频帧率和视频编码格式
    fps, fourcc = int(videocapture.get(5)), cv2.VideoWriter_fourcc(*"mp4v")

    # 设置保存结果的目录
    save_dir = increment_path(Path("ultralytics_rc_output") / "exp", exist_ok)

    # 创建保存目录(如果不存在)
    save_dir.mkdir(parents=True, exist_ok=True)

    # 创建视频写入对象,指定输出视频文件路径、帧率和帧尺寸
    video_writer = cv2.VideoWriter(str(save_dir / f"{Path(source).stem}.mp4"), fourcc, fps, (frame_width, frame_height))

    # 释放视频帧计数器
    del vid_frame_count

    # 释放视频写入对象资源
    video_writer.release()

    # 释放视频捕捉对象资源
    videocapture.release()

    # 关闭所有的 OpenCV 窗口
    cv2.destroyAllWindows()


def parse_opt():
    """Parse command line arguments."""
    # 创建参数解析器对象
    parser = argparse.ArgumentParser()

    # 添加命令行参数,用于解析权重文件路径,默认为 "yolov8n.pt"
    parser.add_argument("--weights", type=str, default="yolov8n.pt", help="initial weights path")

    # 添加命令行参数,用于指定 CUDA 设备编号,支持多个设备,例如 "0,1,2,3" 或 "cpu"
    parser.add_argument("--device", default="", help="cuda device, i.e. 0 or 0,1,2,3 or cpu")

    # 添加命令行参数,用于指定视频文件路径,必须提供
    parser.add_argument("--source", type=str, required=True, help="video file path")

    # 添加命令行参数,用于显示结果的标志,默认为 False
    parser.add_argument("--view-img", action="store_true", help="show results")

    # 添加命令行参数,用于保存结果的标志,默认为 False
    parser.add_argument("--save-img", action="store_true", help="save results")

    # 添加命令行参数,用于覆盖现有文件的标志,默认为 False
    parser.add_argument("--exist-ok", action="store_true", help="existing project/name ok, do not increment")

    # 添加命令行参数,用于指定要检测和跟踪的类别列表,支持多个类别编号
    parser.add_argument("--classes", nargs="+", type=int, help="filter by class: --classes 0, or --classes 0 2 3")

    # 添加命令行参数,用于指定边界框厚度,默认为 2
    parser.add_argument("--line-thickness", type=int, default=2, help="bounding box thickness")

    # 添加命令行参数,用于指定跟踪线厚度,默认为 2
    parser.add_argument("--track-thickness", type=int, default=2, help="Tracking line thickness")

    # 添加命令行参数,用于指定区域厚度,默认为 4
    parser.add_argument("--region-thickness", type=int, default=4, help="Region thickness")

    # 解析命令行参数并返回解析结果
    return parser.parse_args()


def main(opt):
    # 在这里实现主函数的逻辑,根据命令行参数 `opt` 进行相应操作
    """Main function."""
    # 执行程序的主函数,通过解析命令行参数获取参数字典并传递给 run 函数
    run(**vars(opt))
# 如果当前脚本作为主程序运行(而不是被导入到其他脚本中),则执行以下代码块
if __name__ == "__main__":
    # 调用 parse_opt 函数,返回命令行参数的解析结果,存储在 opt 变量中
    opt = parse_opt()
    # 调用 main 函数,并将 opt 作为参数传递给它,执行主程序的逻辑
    main(opt)
YOLOv8 with SAHI (Inference on Video)
SAHI is designed to optimize object detection algorithms for large-scale and high-resolution imagery. It partitions images into manageable slices, performs object detection on each slice, and then stitches the results back together. This tutorial will guide you through the process of running YOLOv8 inference on video files with the aid of SAHI.
Table of Contents
- Step 1: Install the Required Libraries
- Step 2: Run the Inference with SAHI using Ultralytics YOLOv8
- Usage Options
- FAQ
Step 1: Install the Required Libraries
Clone the repository, install dependencies and cd to this local directory for commands in Step 2.
# Clone ultralytics repo
git clone https://github.com/ultralytics/ultralytics

# Install dependencies
pip install sahi ultralytics

# cd to local directory
cd ultralytics/examples/YOLOv8-SAHI-Inference-Video
Step 2: Run the Inference with SAHI using Ultralytics YOLOv8
Here are the basic commands for running the inference:
#if you want to save results
python yolov8_sahi.py --source "path/to/video.mp4" --save-img

#if you want to change model file
python yolov8_sahi.py --source "path/to/video.mp4" --save-img --weights "yolov8n.pt"
Usage Options
--source: Specifies the path to the video file you want to run inference on.--save-img: Flag to save the detection results as images.--weights: Specifies a different YOLOv8 model file (e.g.,yolov8n.pt,yolov8s.pt,yolov8m.pt,yolov8l.pt,yolov8x.pt).
FAQ
1. What is SAHI?
SAHI stands for Slicing Aided Hyper Inference. It is a library designed to optimize object detection algorithms for large-scale and high-resolution images. The library source code is available on GitHub.
2. Why use SAHI with YOLOv8?
SAHI can handle large-scale images by slicing them into smaller, more manageable sizes without compromising the detection quality. This makes it a great companion to YOLOv8, especially when working with high-resolution videos.
3. How do I debug issues?
You can add the --debug flag to your command to print out more information during inference:
python yolov8_sahi.py --source "path to video file" --debug
4. Can I use other YOLO versions?
Yes, you can specify different YOLO model weights using the --weights option.
5. Where can I find more information?
For a full guide to YOLOv8 with SAHI see https://docs.ultralytics.com/guides/sahi-tiled-inference.
.\yolov8\examples\YOLOv8-SAHI-Inference-Video\yolov8_sahi.py
# Ultralytics YOLO 🚀, AGPL-3.0 license

import argparse             # 导入命令行参数解析模块
from pathlib import Path    # 导入处理路径的模块

import cv2                  # 导入OpenCV图像处理库
from sahi import AutoDetectionModel  # 导入SAHI自动检测模型
from sahi.predict import get_sliced_prediction  # 导入预测函数
from sahi.utils.yolov8 import download_yolov8s_model  # 导入YOLOv8模型下载函数

from ultralytics.utils.files import increment_path  # 导入路径增加函数


def run(weights="yolov8n.pt", source="test.mp4", view_img=False, save_img=False, exist_ok=False):
    """
    Run object detection on a video using YOLOv8 and SAHI.

    Args:
        weights (str): Model weights path.
        source (str): Video file path.
        view_img (bool): Show results.
        save_img (bool): Save results.
        exist_ok (bool): Overwrite existing files.
    """

    # Check source path
    if not Path(source).exists():  # 检查视频文件路径是否存在,若不存在则抛出文件未找到异常
        raise FileNotFoundError(f"Source path '{source}' does not exist.")

    yolov8_model_path = f"models/{weights}"  # 设置YOLOv8模型的路径
    download_yolov8s_model(yolov8_model_path)  # 下载YOLOv8模型到指定路径
    detection_model = AutoDetectionModel.from_pretrained(
        model_type="yolov8", model_path=yolov8_model_path, confidence_threshold=0.3, device="cpu"
    )  # 使用SAHI加载预训练的YOLOv8模型,设定置信度阈值和使用CPU设备

    # Video setup
    videocapture = cv2.VideoCapture(source)  # 使用OpenCV打开视频文件
    frame_width, frame_height = int(videocapture.get(3)), int(videocapture.get(4))  # 获取视频帧宽度和高度
    fps, fourcc = int(videocapture.get(5)), cv2.VideoWriter_fourcc(*"mp4v")  # 获取视频帧率和视频编解码器格式

    # Output setup
    save_dir = increment_path(Path("ultralytics_results_with_sahi") / "exp", exist_ok)  # 使用增加路径函数创建结果保存目录
    save_dir.mkdir(parents=True, exist_ok=True)  # 创建保存目录,若不存在则递归创建
    video_writer = cv2.VideoWriter(str(save_dir / f"{Path(source).stem}.mp4"), fourcc, fps, (frame_width, frame_height))  # 设置视频写入对象,指定输出路径、帧率和尺寸
    # 循环直到视频捕获对象不再打开
    while videocapture.isOpened():
        # 从视频捕获对象中读取一帧图像
        success, frame = videocapture.read()
        # 如果读取失败,则跳出循环
        if not success:
            break

        # 使用模型对图像进行分块预测
        results = get_sliced_prediction(
            frame, detection_model, slice_height=512, slice_width=512, overlap_height_ratio=0.2, overlap_width_ratio=0.2
        )
        object_prediction_list = results.object_prediction_list

        # 初始化用于存储边界框和类别的列表
        boxes_list = []
        clss_list = []

        # 遍历检测到的对象预测列表
        for ind, _ in enumerate(object_prediction_list):
            # 获取边界框的坐标信息
            boxes = (
                object_prediction_list[ind].bbox.minx,
                object_prediction_list[ind].bbox.miny,
                object_prediction_list[ind].bbox.maxx,
                object_prediction_list[ind].bbox.maxy,
            )
            # 获取对象类别名称
            clss = object_prediction_list[ind].category.name
            # 将边界框坐标和类别名称添加到相应的列表中
            boxes_list.append(boxes)
            clss_list.append(clss)

        # 遍历边界框列表和类别列表,并在图像上绘制边界框和标签
        for box, cls in zip(boxes_list, clss_list):
            x1, y1, x2, y2 = box
            # 绘制边界框
            cv2.rectangle(frame, (int(x1), int(y1)), (int(x2), int(y2)), (56, 56, 255), 2)
            label = str(cls)
            t_size = cv2.getTextSize(label, 0, fontScale=0.6, thickness=1)[0]
            # 绘制标签背景
            cv2.rectangle(
                frame, (int(x1), int(y1) - t_size[1] - 3), (int(x1) + t_size[0], int(y1) + 3), (56, 56, 255), -1
            )
            # 绘制标签文本
            cv2.putText(
                frame, label, (int(x1), int(y1) - 2), 0, 0.6, [255, 255, 255], thickness=1, lineType=cv2.LINE_AA
            )

        # 如果需要显示图像,则显示当前帧图像
        if view_img:
            cv2.imshow(Path(source).stem, frame)

        # 如果需要保存图像,则将当前帧图像写入视频文件
        if save_img:
            video_writer.write(frame)

        # 检测用户是否按下 'q' 键,如果是则跳出循环
        if cv2.waitKey(1) & 0xFF == ord("q"):
            break

    # 释放视频写入对象和视频捕获对象
    video_writer.release()
    videocapture.release()
    # 关闭所有的 OpenCV 窗口
    cv2.destroyAllWindows()
# 解析命令行参数的函数
def parse_opt():
    """Parse command line arguments."""
    # 创建参数解析器对象
    parser = argparse.ArgumentParser()
    # 添加参数选项:--weights,类型为字符串,默认值为"yolov8n.pt",用于指定初始权重路径
    parser.add_argument("--weights", type=str, default="yolov8n.pt", help="initial weights path")
    # 添加参数选项:--source,类型为字符串,必须指定,用于指定视频文件路径
    parser.add_argument("--source", type=str, required=True, help="video file path")
    # 添加参数选项:--view-img,若存在则设置为 True,用于显示结果
    parser.add_argument("--view-img", action="store_true", help="show results")
    # 添加参数选项:--save-img,若存在则设置为 True,用于保存结果
    parser.add_argument("--save-img", action="store_true", help="save results")
    # 添加参数选项:--exist-ok,若存在则设置为 True,用于指示项目/名称已存在时不递增
    parser.add_argument("--exist-ok", action="store_true", help="existing project/name ok, do not increment")
    # 解析命令行参数并返回
    return parser.parse_args()


# 主函数入口
def main(opt):
    """Main function."""
    # 调用 run 函数,传入 opt 参数的所有变量作为关键字参数
    run(**vars(opt))


# 当作为脚本直接执行时的入口
if __name__ == "__main__":
    # 解析命令行参数并存储在 opt 变量中
    opt = parse_opt()
    # 调用主函数,传入解析后的命令行参数 opt
    main(opt)
.\yolov8\examples\YOLOv8-Segmentation-ONNXRuntime-Python\main.py
# Ultralytics YOLO 🚀, AGPL-3.0 license

import argparse  # 导入命令行参数解析模块

import cv2  # 导入 OpenCV 库
import numpy as np  # 导入 NumPy 库
import onnxruntime as ort  # 导入 ONNX Runtime 库

from ultralytics.utils import ASSETS, yaml_load  # 从 ultralytics.utils 中导入 ASSETS 和 yaml_load 函数
from ultralytics.utils.checks import check_yaml  # 从 ultralytics.utils.checks 中导入 check_yaml 函数
from ultralytics.utils.plotting import Colors  # 从 ultralytics.utils.plotting 中导入 Colors 类


class YOLOv8Seg:
    """YOLOv8 segmentation model."""

    def __init__(self, onnx_model):
        """
        Initialization.

        Args:
            onnx_model (str): Path to the ONNX model.
        """

        # Build Ort session
        self.session = ort.InferenceSession(
            onnx_model,
            providers=["CUDAExecutionProvider", "CPUExecutionProvider"]
            if ort.get_device() == "GPU"
            else ["CPUExecutionProvider"],
        )

        # Numpy dtype: support both FP32 and FP16 onnx model
        self.ndtype = np.half if self.session.get_inputs()[0].type == "tensor(float16)" else np.single

        # Get model width and height(YOLOv8-seg only has one input)
        self.model_height, self.model_width = [x.shape for x in self.session.get_inputs()][0][-2:]

        # Load COCO class names
        self.classes = yaml_load(check_yaml("coco8.yaml"))["names"]

        # Create color palette
        self.color_palette = Colors()

    def __call__(self, im0, conf_threshold=0.4, iou_threshold=0.45, nm=32):
        """
        The whole pipeline: pre-process -> inference -> post-process.

        Args:
            im0 (Numpy.ndarray): original input image.
            conf_threshold (float): confidence threshold for filtering predictions.
            iou_threshold (float): iou threshold for NMS.
            nm (int): the number of masks.

        Returns:
            boxes (List): list of bounding boxes.
            segments (List): list of segments.
            masks (np.ndarray): [N, H, W], output masks.
        """

        # Pre-process
        im, ratio, (pad_w, pad_h) = self.preprocess(im0)  # 调用 preprocess 方法进行图像预处理

        # Ort inference
        preds = self.session.run(None, {self.session.get_inputs()[0].name: im})  # 使用 ONNX Runtime 进行推理

        # Post-process
        boxes, segments, masks = self.postprocess(
            preds,
            im0=im0,
            ratio=ratio,
            pad_w=pad_w,
            pad_h=pad_h,
            conf_threshold=conf_threshold,
            iou_threshold=iou_threshold,
            nm=nm,
        )  # 调用 postprocess 方法进行后处理
        return boxes, segments, masks
    def preprocess(self, img):
        """
        Pre-processes the input image.

        Args:
            img (Numpy.ndarray): image about to be processed.

        Returns:
            img_process (Numpy.ndarray): image preprocessed for inference.
            ratio (tuple): width, height ratios in letterbox.
            pad_w (float): width padding in letterbox.
            pad_h (float): height padding in letterbox.
        """

        # 使用 letterbox() 函数调整输入图像的大小并填充
        shape = img.shape[:2]  # 原始图像的形状
        new_shape = (self.model_height, self.model_width)
        r = min(new_shape[0] / shape[0], new_shape[1] / shape[1])
        ratio = r, r  # 计算宽高比例
        new_unpad = int(round(shape[1] * r)), int(round(shape[0] * r))  # 计算调整后的尺寸
        pad_w, pad_h = (new_shape[1] - new_unpad[0]) / 2, (new_shape[0] - new_unpad[1]) / 2  # 计算填充的宽度和高度
        if shape[::-1] != new_unpad:  # 如果尺寸不一致,则进行 resize 操作
            img = cv2.resize(img, new_unpad, interpolation=cv2.INTER_LINEAR)
        top, bottom = int(round(pad_h - 0.1)), int(round(pad_h + 0.1))
        left, right = int(round(pad_w - 0.1)), int(round(pad_w + 0.1))
        # 使用指定颜色进行边界填充
        img = cv2.copyMakeBorder(img, top, bottom, left, right, cv2.BORDER_CONSTANT, value=(114, 114, 114))

        # 图像转换流程:HWC 转换为 CHW -> BGR 转换为 RGB -> 归一化处理 -> 连续化处理 -> 添加额外维度(可选)
        img = np.ascontiguousarray(np.einsum("HWC->CHW", img)[::-1], dtype=self.ndtype) / 255.0
        img_process = img[None] if len(img.shape) == 3 else img  # 添加额外维度以适应网络输入
        return img_process, ratio, (pad_w, pad_h)
    def postprocess(self, preds, im0, ratio, pad_w, pad_h, conf_threshold, iou_threshold, nm=32):
        """
        Post-process the prediction.

        Args:
            preds (Numpy.ndarray): predictions come from ort.session.run().
            im0 (Numpy.ndarray): [h, w, c] original input image.
            ratio (tuple): width, height ratios in letterbox.
            pad_w (float): width padding in letterbox.
            pad_h (float): height padding in letterbox.
            conf_threshold (float): conf threshold.
            iou_threshold (float): iou threshold.
            nm (int): the number of masks.

        Returns:
            boxes (List): list of bounding boxes.
            segments (List): list of segments.
            masks (np.ndarray): [N, H, W], output masks.
        """
        x, protos = preds[0], preds[1]  # Two outputs: predictions and protos

        # Transpose the first output: (Batch_size, xywh_conf_cls_nm, Num_anchors) -> (Batch_size, Num_anchors, xywh_conf_cls_nm)
        x = np.einsum("bcn->bnc", x)

        # Predictions filtering by conf-threshold
        x = x[np.amax(x[..., 4:-nm], axis=-1) > conf_threshold]

        # Create a new matrix which merge these(box, score, cls, nm) into one
        # For more details about `numpy.c_()`: https://numpy.org/doc/1.26/reference/generated/numpy.c_.html
        x = np.c_[x[..., :4], np.amax(x[..., 4:-nm], axis=-1), np.argmax(x[..., 4:-nm], axis=-1), x[..., -nm:]]

        # NMS filtering
        x = x[cv2.dnn.NMSBoxes(x[:, :4], x[:, 4], conf_threshold, iou_threshold)]

        # Decode and return
        if len(x) > 0:
            # Bounding boxes format change: cxcywh -> xyxy
            x[..., [0, 1]] -= x[..., [2, 3]] / 2
            x[..., [2, 3]] += x[..., [0, 1]]

            # Rescales bounding boxes from model shape(model_height, model_width) to the shape of original image
            x[..., :4] -= [pad_w, pad_h, pad_w, pad_h]
            x[..., :4] /= min(ratio)

            # Bounding boxes boundary clamp
            x[..., [0, 2]] = x[:, [0, 2]].clip(0, im0.shape[1])
            x[..., [1, 3]] = x[:, [1, 3]].clip(0, im0.shape[0])

            # Process masks
            masks = self.process_mask(protos[0], x[:, 6:], x[:, :4], im0.shape)

            # Masks -> Segments(contours)
            segments = self.masks2segments(masks)
            return x[..., :6], segments, masks  # boxes, segments, masks
        else:
            return [], [], []


注释:

        x, protos = preds[0], preds[1]  # 从预测结果中分离出两个输出:预测和原型
        x = np.einsum("bcn->bnc", x)  # 转置第一个输出:(Batch_size, xywh_conf_cls_nm, Num_anchors) -> (Batch_size, Num_anchors, xywh_conf_cls_nm)
        x = x[np.amax(x[..., 4:-nm], axis=-1) > conf_threshold]  # 根据置信度阈值过滤预测结果
        x = np.c_[x[..., :4], np.amax(x[..., 4:-nm], axis=-1), np.argmax(x[..., 4:-nm], axis=-1), x[..., -nm:]]  # 将(box, score, cls, nm)合并成一个新矩阵
        x = x[cv2.dnn.NMSBoxes(x[:, :4], x[:, 4], conf_threshold, iou_threshold)]  # 使用非极大值抑制筛选边界框
        if len(x) > 0:
            x[..., [0, 1]] -= x[..., [2, 3]] / 2  # 边界框格式从cxcywh转换为xyxy
            x[..., [2, 3]] += x[..., [0, 1]]  # 调整边界框坐标
            x[..., :4] -= [pad_w, pad_h, pad_w, pad_h]  # 将边界框从模型尺寸转换为原始图像尺寸
            x[..., :4] /= min(ratio)  # 根据图像缩放比例重新缩放边界框
            x[..., [0, 2]] = x[:, [0, 2]].clip(0, im0.shape[1])  # 对边界框的x坐标进行边界限制
            x[..., [1, 3]] = x[:, [1, 3]].clip(0, im0.shape[0])  # 对边界框的y坐标进行边界限制
            masks = self.process_mask(protos[0], x[:, 6:], x[:, :4], im0.shape)  # 处理生成掩码
            segments = self.masks2segments(masks)  # 将掩码转换为轮廓
            return x[..., :6], segments, masks  # 返回边界框、轮廓和掩码
        else:
            return [], [], []  # 如果没有检测到边界框,返回空列表
    def process_mask(self, protos, masks_in, bboxes, im0_shape):
        """
        Takes the output of the mask head, and applies the mask to the bounding boxes. This produces masks of higher quality
        but is slower. (Borrowed from https://github.com/ultralytics/ultralytics/blob/465df3024f44fa97d4fad9986530d5a13cdabdca/ultralytics/utils/ops.py#L618)

        Args:
            protos (numpy.ndarray): [mask_dim, mask_h, mask_w].
                用于生成掩码的原型张量,其形状为 [掩码维度, 掩码高度, 掩码宽度]。
            masks_in (numpy.ndarray): [n, mask_dim], n is number of masks after nms.
                经过非极大值抑制后的掩码张量,形状为 [n, 掩码维度]。
            bboxes (numpy.ndarray): bboxes re-scaled to original image shape.
                重新缩放到原始图像形状的边界框坐标张量,形状为 [n, 4]。
            im0_shape (tuple): the size of the input image (h,w,c).
                输入图像的尺寸,以元组形式表示 (高度, 宽度, 通道数)。

        Returns:
            (numpy.ndarray): The upsampled masks.
                返回经处理的掩码,形状为 [n, mask_h, mask_w]。
        """
        c, mh, mw = protos.shape
        # 使用原型张量和掩码输入执行矩阵乘法,得到掩码的高质量版本
        masks = np.matmul(masks_in, protos.reshape((c, -1))).reshape((-1, mh, mw)).transpose(1, 2, 0)  # HWN
        masks = np.ascontiguousarray(masks)
        # 将掩码从 P3 形状重新缩放到原始输入图像形状
        masks = self.scale_mask(masks, im0_shape)
        # 对掩码进行转置,从 HWN 形状转换为 NHW 形状
        masks = np.einsum("HWN -> NHW", masks)
        # 根据边界框裁剪掩码
        masks = self.crop_mask(masks, bboxes)
        # 将掩码中大于0.5的部分设置为True,小于等于0.5的部分设置为False
        return np.greater(masks, 0.5)
    def scale_mask(masks, im0_shape, ratio_pad=None):
        """
        Takes a mask, and resizes it to the original image size. (Borrowed from
        https://github.com/ultralytics/ultralytics/blob/465df3024f44fa97d4fad9986530d5a13cdabdca/ultralytics/utils/ops.py#L305)

        Args:
            masks (np.ndarray): resized and padded masks/images, [h, w, num]/[h, w, 3].
            im0_shape (tuple): the original image shape.
            ratio_pad (tuple): the ratio of the padding to the original image.

        Returns:
            masks (np.ndarray): The masks that are being returned.
        """
        # 获取当前 masks 的形状,取前两个维度(高度和宽度)
        im1_shape = masks.shape[:2]

        # 如果 ratio_pad 为 None,则根据 im0_shape 计算比例
        if ratio_pad is None:
            gain = min(im1_shape[0] / im0_shape[0], im1_shape[1] / im0_shape[1])  # 计算缩放比例 gain = old / new
            pad = (im1_shape[1] - im0_shape[1] * gain) / 2, (im1_shape[0] - im0_shape[0] * gain) / 2  # 计算填充量 pad = (width_padding, height_padding)
        else:
            pad = ratio_pad[1]  # 否则直接取 ratio_pad 的第二个元素作为 pad

        # 计算 mask 的 top-left 和 bottom-right 边界
        top, left = int(round(pad[1] - 0.1)), int(round(pad[0] - 0.1))  # 计算顶部和左侧边界
        bottom, right = int(round(im1_shape[0] - pad[1] + 0.1)), int(round(im1_shape[1] - pad[0] + 0.1))  # 计算底部和右侧边界

        # 如果 masks 的形状维度小于 2,则抛出 ValueError 异常
        if len(masks.shape) < 2:
            raise ValueError(f'"len of masks shape" should be 2 or 3, but got {len(masks.shape)}')

        # 根据计算得到的边界裁剪 masks
        masks = masks[top:bottom, left:right]

        # 使用 OpenCV 进行图像缩放至原始图像大小
        masks = cv2.resize(
            masks, (im0_shape[1], im0_shape[0]), interpolation=cv2.INTER_LINEAR
        )  # 使用线性插值进行缩放,也可以考虑使用 INTER_CUBIC

        # 如果 masks 的形状维度为 2,则添加一个维度,使其变为三维
        if len(masks.shape) == 2:
            masks = masks[:, :, None]

        # 返回调整大小后的 masks
        return masks
    def draw_and_visualize(self, im, bboxes, segments, vis=False, save=True):
        """
        Draw and visualize results.

        Args:
            im (np.ndarray): original image, shape [h, w, c].
            bboxes (numpy.ndarray): [n, 4], n is number of bboxes.
            segments (List): list of segment masks.
            vis (bool): imshow using OpenCV.
            save (bool): save image annotated.

        Returns:
            None
        """

        # 复制原始图像作为绘图画布
        im_canvas = im.copy()

        # 遍历边界框和分割掩码
        for (*box, conf, cls_), segment in zip(bboxes, segments):
            # 绘制多边形边界,并填充分割掩码
            cv2.polylines(im, np.int32([segment]), True, (255, 255, 255), 2)  # 白色边界线
            cv2.fillPoly(im_canvas, np.int32([segment]), self.color_palette(int(cls_), bgr=True))

            # 绘制边界框矩形
            cv2.rectangle(
                im,
                (int(box[0]), int(box[1])),
                (int(box[2]), int(box[3])),
                self.color_palette(int(cls_), bgr=True),
                1,
                cv2.LINE_AA,
            )

            # 添加边界框标签
            cv2.putText(
                im,
                f"{self.classes[cls_]}: {conf:.3f}",
                (int(box[0]), int(box[1] - 9)),
                cv2.FONT_HERSHEY_SIMPLEX,
                0.7,
                self.color_palette(int(cls_), bgr=True),
                2,
                cv2.LINE_AA,
            )

        # 混合原始图像和绘图结果
        im = cv2.addWeighted(im_canvas, 0.3, im, 0.7, 0)

        # 显示图像
        if vis:
            cv2.imshow("demo", im)
            cv2.waitKey(0)
            cv2.destroyAllWindows()

        # 保存图像
        if save:
            cv2.imwrite("demo.jpg", im)
# 如果当前脚本被作为主程序执行,则执行以下代码块
if __name__ == "__main__":
    # 创建参数解析器,用于处理命令行参数
    parser = argparse.ArgumentParser()
    # 添加必需的参数:模型文件的路径
    parser.add_argument("--model", type=str, required=True, help="Path to ONNX model")
    # 添加可选参数:输入图像的路径,默认为 ASSETS 目录下的 bus.jpg
    parser.add_argument("--source", type=str, default=str(ASSETS / "bus.jpg"), help="Path to input image")
    # 添加可选参数:置信度阈值,默认为 0.25
    parser.add_argument("--conf", type=float, default=0.25, help="Confidence threshold")
    # 添加可选参数:IoU 阈值,默认为 0.45
    parser.add_argument("--iou", type=float, default=0.45, help="NMS IoU threshold")
    # 解析命令行参数
    args = parser.parse_args()

    # 构建模型实例,使用指定的 ONNX 模型路径
    model = YOLOv8Seg(args.model)

    # 使用 OpenCV 读取指定路径的图像文件
    img = cv2.imread(args.source)

    # 进行推理
    boxes, segments, _ = model(img, conf_threshold=args.conf, iou_threshold=args.iou)

    # 绘制边界框和多边形
    if len(boxes) > 0:
        # 在图像上绘制边界框和多边形,并根据需要保存或显示
        model.draw_and_visualize(img, boxes, segments, vis=False, save=True)
YOLOv8-Segmentation-ONNXRuntime-Python Demo
This repository provides a Python demo for performing segmentation with YOLOv8 using ONNX Runtime, highlighting the interoperability of YOLOv8 models without the need for the full PyTorch stack.
Features
- Framework Agnostic: Runs segmentation inference purely on ONNX Runtime without importing PyTorch.
- Efficient Inference: Supports both FP32 and FP16 precision for ONNX models, catering to different computational needs.
- Ease of Use: Utilizes simple command-line arguments for model execution.
- Broad Compatibility: Leverages Numpy and OpenCV for image processing, ensuring broad compatibility with various environments.
Installation
Install the required packages using pip. You will need ultralytics for exporting YOLOv8-seg ONNX model and using some utility functions, onnxruntime-gpu for GPU-accelerated inference, and opencv-python for image processing.
pip install ultralytics
pip install onnxruntime-gpu  # For GPU support
# pip install onnxruntime    # Use this instead if you don't have an NVIDIA GPU
pip install numpy
pip install opencv-python
Getting Started
1. Export the YOLOv8 ONNX Model
Export the YOLOv8 segmentation model to ONNX format using the provided ultralytics package.
yolo export model=yolov8s-seg.pt imgsz=640 format=onnx opset=12 simplify
2. Run Inference
Perform inference with the exported ONNX model on your images.
python main.py --model <MODEL_PATH> --source <IMAGE_PATH>
Example Output
After running the command, you should see segmentation results similar to this:

Advanced Usage
For more advanced usage, including real-time video processing, please refer to the main.py script's command-line arguments.
Contributing
We welcome contributions to improve this demo! Please submit issues and pull requests for bug reports, feature requests, or submitting a new algorithm enhancement.
License
This project is licensed under the AGPL-3.0 License - see the LICENSE file for details.
Acknowledgments
- The YOLOv8-Segmentation-ONNXRuntime-Python demo is contributed by GitHub user jamjamjon.
- Thanks to the ONNX Runtime community for providing a robust and efficient inference engine.

中文 | 한국어 | 日本語 | Русский | Deutsch | Français | Español | Português | Türkçe | Tiếng Việt | हिन्दी | العربية


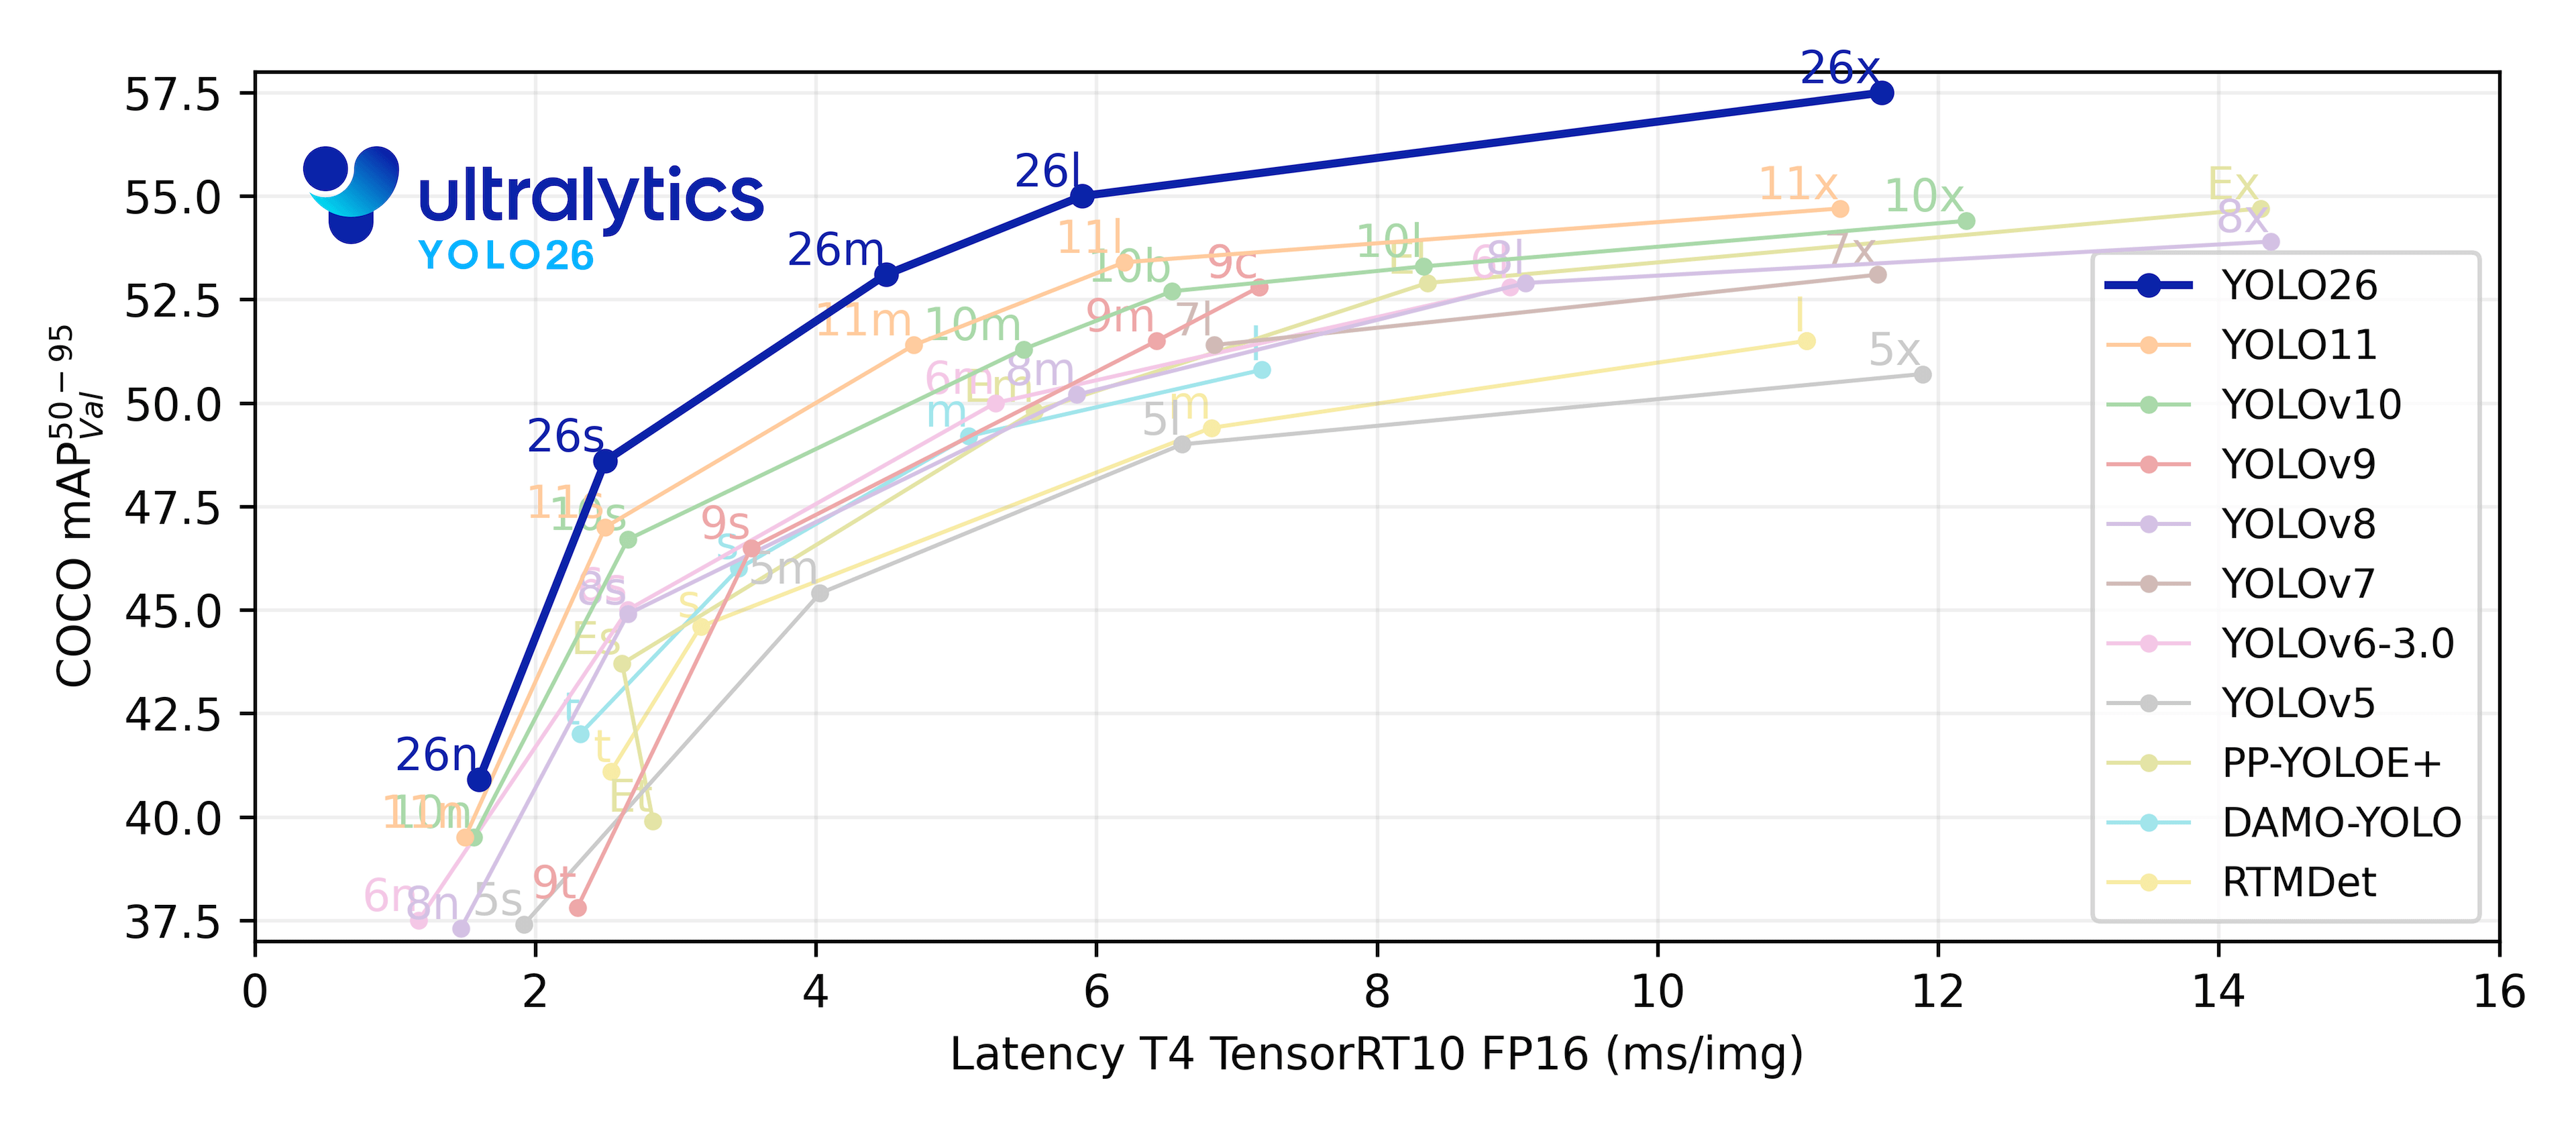
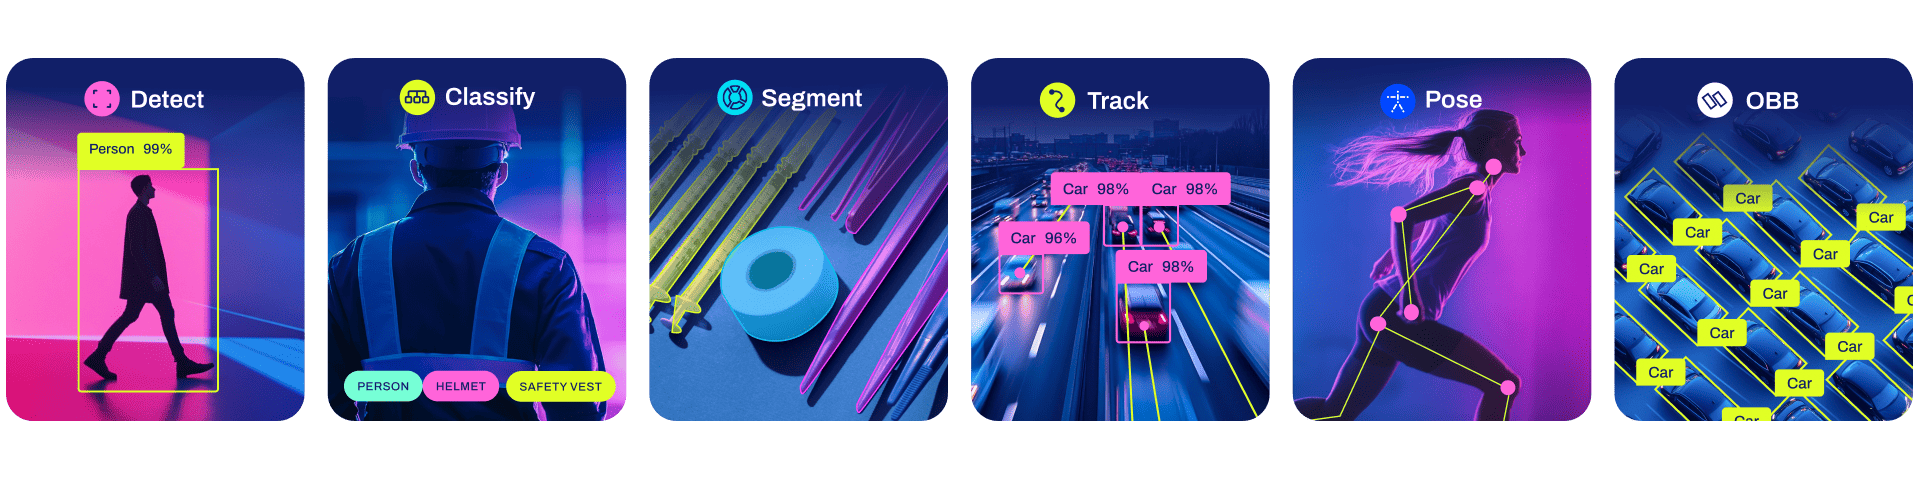
Ultralytics YOLOv8 是一款前沿、最先进(SOTA)的模型,基于先前 YOLO 版本的成功,引入了新功能和改进,进一步提升性能和灵活性。YOLOv8 设计快速、准确且易于使用,使其成为各种物体检测与跟踪、实例分割、图像分类和姿态估计任务的绝佳选择。
我们希望这里的资源能帮助您充分利用 YOLOv8。请浏览 YOLOv8 文档 了解详细信息,在 GitHub 上提交问题以获得支持,并加入我们的 Discord 社区进行问题和讨论!
如需申请企业许可,请在 Ultralytics Licensing 处填写表格
以下是提供的内容的中文翻译:
文档
请参阅下面的快速安装和使用示例,以及 YOLOv8 文档 上有关训练、验证、预测和部署的完整文档。
安装
使用Pip在一个Python>=3.8环境中安装ultralytics包,此环境还需包含PyTorch>=1.8。这也会安装所有必要的依赖项。


pip install ultralytics
如需使用包括Conda,Docker和Git在内的其他安装方法,请参考快速入门指南。


Usage
CLI
YOLOv8 可以在命令行界面(CLI)中直接使用,只需输入 yolo 命令:
yolo predict model=yolov8n.pt source='https://ultralytics.com/images/bus.jpg'
yolo 可用于各种任务和模式,并接受其他参数,例如 imgsz=640。查看 YOLOv8 CLI 文档以获取示例。
Python
YOLOv8 也可以在 Python 环境中直接使用,并接受与上述 CLI 示例中相同的参数:
from ultralytics import YOLO

# 加载模型
model = YOLO("yolov8n.yaml")  # 从头开始构建新模型
model = YOLO("yolov8n.pt")  # 加载预训练模型(建议用于训练)

# 使用模型
model.train(data="coco8.yaml", epochs=3)  # 训练模型
metrics = model.val()  # 在验证集上评估模型性能
results = model("https://ultralytics.com/images/bus.jpg")  # 对图像进行预测
success = model.export(format="onnx")  # 将模型导出为 ONNX 格式
查看 YOLOv8 Python 文档以获取更多示例。
笔记本
Ultralytics 提供了 YOLOv8 的交互式笔记本,涵盖训练、验证、跟踪等内容。每个笔记本都配有 YouTube 教程,使学习和实现高级 YOLOv8 功能变得简单。
| 文档 | 笔记本 | YouTube |
|---|---|---|
| YOLOv8 训练、验证、预测和导出模式 | ||
| Ultralytics HUB 快速开始 | ||
| YOLOv8 视频中的多对象跟踪 | ||
| YOLOv8 视频中的对象计数 | ||
| YOLOv8 视频中的热图 | ||
| Ultralytics 数据集浏览器,集成 SQL 和 OpenAI 🚀 New |
模型
在COCO数据集上预训练的YOLOv8 检测,分割和姿态模型可以在这里找到,以及在ImageNet数据集上预训练的YOLOv8 分类模型。所有的检测,分割和姿态模型都支持追踪模式。
所有模型在首次使用时会自动从最新的Ultralytics 发布版本下载。
检测 (COCO)
查看检测文档以获取这些在COCO上训练的模型的使用示例,其中包括80个预训练类别。
| 模型 | 尺寸 (像素) |
mAPval 50-95 |
速度 CPU ONNX (ms) |
速度 A100 TensorRT (ms) |
参数 (M) |
FLOPs (B) |
|---|---|---|---|---|---|---|
| YOLOv8n | 640 | 37.3 | 80.4 | 0.99 | 3.2 | 8.7 |
| YOLOv8s | 640 | 44.9 | 128.4 | 1.20 | 11.2 | 28.6 |
| YOLOv8m | 640 | 50.2 | 234.7 | 1.83 | 25.9 | 78.9 |
| YOLOv8l | 640 | 52.9 | 375.2 | 2.39 | 43.7 | 165.2 |
| YOLOv8x | 640 | 53.9 | 479.1 | 3.53 | 68.2 | 257.8 |
- mAPval 值是基于单模型单尺度在 COCO val2017 数据集上的结果。
通过yolo val detect data=coco.yaml device=0复现 - 速度 是使用 Amazon EC2 P4d 实例对 COCO val 图像进行平均计算的。
通过yolo val detect data=coco.yaml batch=1 device=0|cpu复现
检测(Open Image V7)
查看检测文档以获取这些在Open Image V7上训练的模型的使用示例,其中包括600个预训练类别。
| 模型 | 尺寸 (像素) |
mAP验证 50-95 |
速度 CPU ONNX (毫秒) |
速度 A100 TensorRT (毫秒) |
参数 (M) |
浮点运算 (B) |
|---|---|---|---|---|---|---|
| YOLOv8n | 640 | 18.4 | 142.4 | 1.21 | 3.5 | 10.5 |
| YOLOv8s | 640 | 27.7 | 183.1 | 1.40 | 11.4 | 29.7 |
| YOLOv8m | 640 | 33.6 | 408.5 | 2.26 | 26.2 | 80.6 |
| YOLOv8l | 640 | 34.9 | 596.9 | 2.43 | 44.1 | 167.4 |
| YOLOv8x | 640 | 36.3 | 860.6 | 3.56 | 68.7 | 260.6 |
- mAP验证 值适用于在Open Image V7数据集上的单模型单尺度。
通过yolo val detect data=open-images-v7.yaml device=0以复现。 - 速度 在使用Amazon EC2 P4d实例对Open Image V7验证图像进行平均测算。
通过yolo val detect data=open-images-v7.yaml batch=1 device=0|cpu以复现。
分割 (COCO)
查看分割文档以获取这些在COCO-Seg上训练的模型的使用示例,其中包括80个预训练类别。
| 模型 | 尺寸 (像素) |
mAPbox 50-95 |
mAPmask 50-95 |
速度 CPU ONNX (ms) |
速度 A100 TensorRT (ms) |
参数 (M) |
FLOPs (B) |
|---|---|---|---|---|---|---|---|
| YOLOv8n-seg | 640 | 36.7 | 30.5 | 96.1 | 1.21 | 3.4 | 12.6 |
| YOLOv8s-seg | 640 | 44.6 | 36.8 | 155.7 | 1.47 | 11.8 | 42.6 |
| YOLOv8m-seg | 640 | 49.9 | 40.8 | 317.0 | 2.18 | 27.3 | 110.2 |
| YOLOv8l-seg | 640 | 52.3 | 42.6 | 572.4 | 2.79 | 46.0 | 220.5 |
| YOLOv8x-seg | 640 | 53.4 | 43.4 | 712.1 | 4.02 | 71.8 | 344.1 |
- mAPval 值是基于单模型单尺度在 COCO val2017 数据集上的结果。
通过yolo val segment data=coco-seg.yaml device=0复现 - 速度 是使用 Amazon EC2 P4d 实例对 COCO val 图像进行平均计算的。
通过yolo val segment data=coco-seg.yaml batch=1 device=0|cpu复现
姿态 (COCO)
查看姿态文档以获取这些在COCO-Pose上训练的模型的使用示例,其中包括1个预训练类别,即人。
| 模型 | 尺寸 (像素) |
mAPpose 50-95 |
mAPpose 50 |
速度 CPU ONNX (ms) |
速度 A100 TensorRT (ms) |
参数 (M) |
FLOPs (B) |
|---|---|---|---|---|---|---|---|
| YOLOv8n-pose | 640 | 50.4 | 80.1 | 131.8 | 1.18 | 3.3 | 9.2 |
| YOLOv8s-pose | 640 | 60.0 | 86.2 | 233.2 | 1.42 | 11.6 | 30.2 |
| YOLOv8m-pose | 640 | 65.0 | 88.8 | 456.3 | 2.00 | 26.4 | 81.0 |
| YOLOv8l-pose | 640 | 67.6 | 90.0 | 784.5 | 2.59 | 44.4 | 168.6 |
| YOLOv8x-pose | 640 | 69.2 | 90.2 | 1607.1 | 3.73 | 69.4 | 263.2 |
| YOLOv8x-pose-p6 | 1280 | 71.6 | 91.2 | 4088.7 | 10.04 | 99.1 | 1066.4 |
- mAPval 值是基于单模型单尺度在 COCO Keypoints val2017 数据集上的结果。
通过yolo val pose data=coco-pose.yaml device=0复现 - 速度 是使用 Amazon EC2 P4d 实例对 COCO val 图像进行平均计算的。
通过yolo val pose data=coco-pose.yaml batch=1 device=0|cpu复现
旋转检测 (DOTAv1)
查看旋转检测文档以获取这些在DOTAv1上训练的模型的使用示例,其中包括15个预训练类别。
| 模型 | 尺寸 (像素) |
mAPtest 50 |
速度 CPU ONNX (ms) |
速度 A100 TensorRT (ms) |
参数 (M) |
FLOPs (B) |
|---|---|---|---|---|---|---|
| YOLOv8n-obb | 1024 | 78.0 | 204.77 | 3.57 | 3.1 | 23.3 |
| YOLOv8s-obb | 1024 | 79.5 | 424.88 | 4.07 | 11.4 | 76.3 |
| YOLOv8m-obb | 1024 | 80.5 | 763.48 | 7.61 | 26.4 | 208.6 |
| YOLOv8l-obb | 1024 | 80.7 | 1278.42 | 11.83 | 44.5 | 433.8 |
| YOLOv8x-obb | 1024 | 81.36 | 1759.10 | 13.23 | 69.5 | 676.7 |
- mAPval 值是基于单模型多尺度在 DOTAv1 数据集上的结果。
通过yolo val obb data=DOTAv1.yaml device=0 split=test复现 - 速度 是使用 Amazon EC2 P4d 实例对 COCO val 图像进行平均计算的。
通过yolo val obb data=DOTAv1.yaml batch=1 device=0|cpu复现
分类 (ImageNet)
查看分类文档以获取这些在ImageNet上训练的模型的使用示例,其中包括1000个预训练类别。
| 模型 | 尺寸 (像素) |
acc top1 |
acc top5 |
速度 CPU ONNX (ms) |
速度 A100 TensorRT (ms) |
参数 (M) |
FLOPs (B) at 640 |
|---|---|---|---|---|---|---|---|
| YOLOv8n-cls | 224 | 69.0 | 88.3 | 12.9 | 0.31 | 2.7 | 4.3 |
| YOLOv8s-cls | 224 | 73.8 | 91.7 | 23.4 | 0.35 | 6.4 | 13.5 |
| YOLOv8m-cls | 224 | 76.8 | 93.5 | 85.4 | 0.62 | 17.0 | 42.7 |
| YOLOv8l-cls | 224 | 78.3 | 94.2 | 163.0 | 0.87 | 37.5 | 99.7 |
| YOLOv8x-cls | 224 | 79.0 | 94.6 | 232.0 | 1.01 | 57.4 | 154.8 |
- acc 值是模型在 ImageNet 数据集验证集上的准确率。
通过yolo val classify data=path/to/ImageNet device=0复现 - 速度 是使用 Amazon EC2 P4d 实例对 ImageNet val 图像进行平均计算的。
通过yolo val classify data=path/to/ImageNet batch=1 device=0|cpu复现
集成
我们与领先的AI平台的关键整合扩展了Ultralytics产品的功能,增强了数据集标签化、训练、可视化和模型管理等任务。探索Ultralytics如何与Roboflow、ClearML、Comet、Neural Magic以及OpenVINO合作,优化您的AI工作流程。

| Roboflow | ClearML ⭐ NEW | Comet ⭐ NEW | Neural Magic ⭐ NEW |
|---|---|---|---|
| 使用 Roboflow 将您的自定义数据集直接标记并导出至 YOLOv8 进行训练 | 使用 ClearML(开源!)自动跟踪、可视化,甚至远程训练 YOLOv8 | 免费且永久,Comet 让您保存 YOLOv8 模型、恢复训练,并以交互式方式查看和调试预测 | 使用 Neural Magic DeepSparse 使 YOLOv8 推理速度提高多达 6 倍 |
Ultralytics HUB
体验 Ultralytics HUB ⭐ 带来的无缝 AI,这是一个一体化解决方案,用于数据可视化、YOLOv5 和即将推出的 YOLOv8 🚀 模型训练和部署,无需任何编码。通过我们先进的平台和用户友好的 Ultralytics 应用程序,轻松将图像转化为可操作的见解,并实现您的 AI 愿景。现在就开始您的免费之旅!

贡献
我们喜欢您的参与!没有社区的帮助,YOLOv5 和 YOLOv8 将无法实现。请参阅我们的贡献指南以开始使用,并填写我们的调查问卷向我们提供您的使用体验反馈。感谢所有贡献者的支持!🙏

许可证
Ultralytics 提供两种许可证选项以适应各种使用场景:
- AGPL-3.0 许可证:这个OSI 批准的开源许可证非常适合学生和爱好者,可以推动开放的协作和知识分享。请查看LICENSE 文件以了解更多细节。
- 企业许可证:专为商业用途设计,该许可证允许将 Ultralytics 的软件和 AI 模型无缝集成到商业产品和服务中,从而绕过 AGPL-3.0 的开源要求。如果您的场景涉及将我们的解决方案嵌入到商业产品中,请通过 Ultralytics Licensing与我们联系。
联系方式
对于 Ultralytics 的错误报告和功能请求,请访问 GitHub Issues,并加入我们的 Discord 社区进行问题和讨论!
.\yolov8\tests\conftest.py
# 导入 shutil 和 Path 类
import shutil
from pathlib import Path

# 导入 tests 模块中的 TMP 目录
from tests import TMP


def pytest_addoption(parser):
    """
    向 pytest 添加自定义命令行选项。

    Args:
        parser (pytest.config.Parser): pytest 解析器对象,用于添加自定义命令行选项。

    Returns:
        (None)
    """
    parser.addoption("--slow", action="store_true", default=False, help="Run slow tests")


def pytest_collection_modifyitems(config, items):
    """
    修改测试项列表,如果未指定 --slow 选项,则排除标记为 slow 的测试。

    Args:
        config (pytest.config.Config): pytest 配置对象,提供访问命令行选项的功能。
        items (list): 已收集的 pytest 项目对象列表,根据 --slow 选项的存在进行修改。

    Returns:
        (None) 函数会直接在原地修改 'items' 列表,不返回任何值。
    """
    if not config.getoption("--slow"):
        # 如果未指定 --slow 选项,则从测试项列表中完全移除标记为 'slow' 的项目
        items[:] = [item for item in items if "slow" not in item.keywords]


def pytest_sessionstart(session):
    """
    初始化 pytest 的会话配置。

    此函数由 pytest 在创建 'Session' 对象后但在执行测试收集之前自动调用。它设置初始种子并准备测试会话的临时目录。

    Args:
        session (pytest.Session): pytest 会话对象。

    Returns:
        (None)
    """
    from ultralytics.utils.torch_utils import init_seeds

    # 初始化随机种子
    init_seeds()
    # 删除现有的 tests/tmp 目录(如果存在)
    shutil.rmtree(TMP, ignore_errors=True)
    # 创建一个新的空目录
    TMP.mkdir(parents=True, exist_ok=True)


def pytest_terminal_summary(terminalreporter, exitstatus, config):
    """
    在 pytest 会话结束后进行清理操作。

    此函数由 pytest 在整个测试会话结束时自动调用。它删除测试过程中使用的特定文件和目录。

    Args:
        terminalreporter (pytest.terminal.TerminalReporter): 终端报告对象,用于终端输出。
        exitstatus (int): 测试运行的退出状态。
        config (pytest.config.Config): pytest 配置对象。

    Returns:
        (None)
    """
    from ultralytics.utils import WEIGHTS_DIR

    # 删除文件
    models = [path for x in ["*.onnx", "*.torchscript"] for path in WEIGHTS_DIR.rglob(x)]
    for file in ["bus.jpg", "yolov8n.onnx", "yolov8n.torchscript"] + models:
        Path(file).unlink(missing_ok=True)

    # 删除目录
    models = [path for x in ["*.mlpackage", "*_openvino_model"] for path in WEIGHTS_DIR.rglob(x)]
    for directory in [TMP.parents[1] / ".pytest_cache", TMP] + models:
        shutil.rmtree(directory, ignore_errors=True)
.\yolov8\tests\test_cli.py
# Ultralytics YOLO 🚀, AGPL-3.0 license

# 导入必要的模块
import subprocess  # 用于执行系统命令
import pytest  # 测试框架
from PIL import Image  # Python Imaging Library,处理图像

# 导入自定义模块和变量
from tests import CUDA_DEVICE_COUNT, CUDA_IS_AVAILABLE  # CUDA 设备数量和可用性
from ultralytics.cfg import TASK2DATA, TASK2MODEL, TASKS  # YOLO 配置相关
from ultralytics.utils import ASSETS, WEIGHTS_DIR, checks  # YOLO 工具函数和资源路径

# 常量定义
TASK_MODEL_DATA = [(task, WEIGHTS_DIR / TASK2MODEL[task], TASK2DATA[task]) for task in TASKS]  # 任务模型数据元组列表
MODELS = [WEIGHTS_DIR / TASK2MODEL[task] for task in TASKS]  # 模型路径列表


def run(cmd):
    """Execute a shell command using subprocess."""
    subprocess.run(cmd.split(), check=True)  # 使用 subprocess 模块执行系统命令


def test_special_modes():
    """Test various special command-line modes for YOLO functionality."""
    run("yolo help")  # 执行 yolo help 命令
    run("yolo checks")  # 执行 yolo checks 命令
    run("yolo version")  # 执行 yolo version 命令
    run("yolo settings reset")  # 执行 yolo settings reset 命令
    run("yolo cfg")  # 执行 yolo cfg 命令


@pytest.mark.parametrize("task,model,data", TASK_MODEL_DATA)
def test_train(task, model, data):
    """Test YOLO training for different tasks, models, and datasets."""
    run(f"yolo train {task} model={model} data={data} imgsz=32 epochs=1 cache=disk")
    # 执行 yolo train 命令进行模型训练


@pytest.mark.parametrize("task,model,data", TASK_MODEL_DATA)
def test_val(task, model, data):
    """Test YOLO validation process for specified task, model, and data using a shell command."""
    run(f"yolo val {task} model={model} data={data} imgsz=32 save_txt save_json")
    # 执行 yolo val 命令进行模型验证


@pytest.mark.parametrize("task,model,data", TASK_MODEL_DATA)
def test_predict(task, model, data):
    """Test YOLO prediction on provided sample assets for specified task and model."""
    run(f"yolo predict model={model} source={ASSETS} imgsz=32 save save_crop save_txt")
    # 执行 yolo predict 命令进行模型预测


@pytest.mark.parametrize("model", MODELS)
def test_export(model):
    """Test exporting a YOLO model to TorchScript format."""
    run(f"yolo export model={model} format=torchscript imgsz=32")
    # 执行 yolo export 命令将模型导出为 TorchScript 格式


def test_rtdetr(task="detect", model="yolov8n-rtdetr.yaml", data="coco8.yaml"):
    """Test the RTDETR functionality within Ultralytics for detection tasks using specified model and data."""
    # 警告:必须使用 imgsz=640(注意还需添加 coma, spaces, fraction=0.25 参数以测试单图像训练)
    run(f"yolo train {task} model={model} data={data} --imgsz= 160 epochs =1, cache = disk fraction=0.25")
    run(f"yolo predict {task} model={model} source={ASSETS / 'bus.jpg'} imgsz=160 save save_crop save_txt")
    # 执行包含特定参数的 yolo train 和 yolo predict 命令进行模型训练和预测


@pytest.mark.skipif(checks.IS_PYTHON_3_12, reason="MobileSAM with CLIP is not supported in Python 3.12")
def test_fastsam(task="segment", model=WEIGHTS_DIR / "FastSAM-s.pt", data="coco8-seg.yaml"):
    """Test FastSAM model for segmenting objects in images using various prompts within Ultralytics."""
    source = ASSETS / "bus.jpg"

    run(f"yolo segment val {task} model={model} data={data} imgsz=32")
    run(f"yolo segment predict model={model} source={source} imgsz=32 save save_crop save_txt")
    # 执行 yolo segment 命令进行模型分割任务

    from ultralytics import FastSAM
    from ultralytics.models.sam import Predictor

    # 创建 FastSAM 模型对象
    sam_model = FastSAM(model)  # or FastSAM-x.pt

    # 对图像进行推理处理
    # 对于每个输入源(source),包括原始图像和用PIL库打开的图像
    for s in (source, Image.open(source)):
        # 使用SAM模型进行推理,指定在CPU上运行,使用320x320的图像大小
        # 启用视网膜掩码(retina_masks),设置置信度阈值为0.4,IoU阈值为0.9
        everything_results = sam_model(s, device="cpu", retina_masks=True, imgsz=320, conf=0.4, iou=0.9)

        # 调用Predictor类的remove_small_regions方法,移除掩码中小于20像素的区域
        new_masks, _ = Predictor.remove_small_regions(everything_results[0].masks.data, min_area=20)

        # 使用SAM模型再次进行推理,这次指定了边界框(bboxes)、点(points)、标签(labels)和文本(texts)
        results = sam_model(
            source, bboxes=[439, 437, 524, 709], points=[[200, 200]], labels=[1], texts="a photo of a dog"
        )
def test_mobilesam():
    """Test MobileSAM segmentation with point prompts using Ultralytics."""
    # 导入Ultralytics中的SAM模型
    from ultralytics import SAM

    # 加载模型
    model = SAM(WEIGHTS_DIR / "mobile_sam.pt")

    # 源文件路径
    source = ASSETS / "zidane.jpg"

    # 使用点提示进行分割预测
    model.predict(source, points=[900, 370], labels=[1])

    # 使用框提示进行分割预测
    model.predict(source, bboxes=[439, 437, 524, 709])

    # 预测所有内容(注释掉的代码)
    # model(source)


# Slow Tests -----------------------------------------------------------------------------------------------------------
@pytest.mark.slow
@pytest.mark.parametrize("task,model,data", TASK_MODEL_DATA)
@pytest.mark.skipif(not CUDA_IS_AVAILABLE, reason="CUDA is not available")
@pytest.mark.skipif(CUDA_DEVICE_COUNT < 2, reason="DDP is not available")
def test_train_gpu(task, model, data):
    """Test YOLO training on GPU(s) for various tasks and models."""
    # 运行YOLO在GPU上进行训练,对各种任务和模型进行测试
    run(f"yolo train {task} model={model} data={data} imgsz=32 epochs=1 device=0")  # 单GPU
    run(f"yolo train {task} model={model} data={data} imgsz=32 epochs=1 device=0,1")  # 多GPU
.\yolov8\tests\test_cuda.py
# 从标准库导入product函数,用于生成可迭代对象的笛卡尔积
from itertools import product
# 从路径处理模块中导入Path类
from pathlib import Path

# 导入pytest库,用于编写和运行测试
import pytest
# 导入PyTorch库
import torch

# 从tests模块导入CUDA设备相关的变量和对象
from tests import CUDA_DEVICE_COUNT, CUDA_IS_AVAILABLE, MODEL, SOURCE
# 从ultralytics库中导入YOLO类
from ultralytics import YOLO
# 从ultralytics.cfg模块导入任务相关的字典和对象
from ultralytics.cfg import TASK2DATA, TASK2MODEL, TASKS
# 从ultralytics.utils模块导入一些常量和路径
from ultralytics.utils import ASSETS, WEIGHTS_DIR


def test_checks():
    """Validate CUDA settings against torch CUDA functions."""
    # 断言当前环境中CUDA是否可用
    assert torch.cuda.is_available() == CUDA_IS_AVAILABLE
    # 断言当前环境中的CUDA设备数量
    assert torch.cuda.device_count() == CUDA_DEVICE_COUNT


@pytest.mark.slow
# 标记为跳过测试,原因是等待更多Ultralytics GPU服务器可用性
@pytest.mark.skipif(True, reason="CUDA export tests disabled pending additional Ultralytics GPU server availability")
# 标记为跳过测试,如果CUDA不可用
@pytest.mark.skipif(not CUDA_IS_AVAILABLE, reason="CUDA is not available")
# 参数化测试,传入多个参数组合
@pytest.mark.parametrize(
    "task, dynamic, int8, half, batch",
    [  # 生成所有可能的组合,但排除int8和half同时为True的情况
        (task, dynamic, int8, half, batch)
        # 注意:由于GPU CI运行器的利用率较高,下面的测试数量有所减少
        # task, dynamic, int8, half, batch in product(TASKS, [True, False], [True, False], [True, False], [1, 2])
        for task, dynamic, int8, half, batch in product(TASKS, [True], [True], [False], [2])
        if not (int8 and half)  # 排除同时int8和half为True的情况
    ],
)
def test_export_engine_matrix(task, dynamic, int8, half, batch):
    """Test YOLO model export to TensorRT format for various configurations and run inference."""
    # 使用YOLO模型对象导出到TensorRT格式
    file = YOLO(TASK2MODEL[task]).export(
        format="engine",
        imgsz=32,
        dynamic=dynamic,
        int8=int8,
        half=half,
        batch=batch,
        data=TASK2DATA[task],
        workspace=1,  # 在测试期间减少工作空间,以减少资源利用
        simplify=True,  # 使用'onnxslim'简化模型
    )
    # 使用导出的模型进行推理
    YOLO(file)([SOURCE] * batch, imgsz=64 if dynamic else 32)  # 导出模型的推理
    # 清理生成的文件
    Path(file).unlink()
    # 如果使用了INT8量化,还需清理缓存文件
    Path(file).with_suffix(".cache").unlink() if int8 else None  # 清理INT8缓存


# 标记为跳过测试,如果CUDA不可用
@pytest.mark.skipif(not CUDA_IS_AVAILABLE, reason="CUDA is not available")
def test_train():
    """Test model training on a minimal dataset using available CUDA devices."""
    # 确定使用的CUDA设备编号,如果只有一个设备可用则为0,否则为列表[0, 1]
    device = 0 if CUDA_DEVICE_COUNT == 1 else [0, 1]
    # 使用YOLO模型对象进行训练
    YOLO(MODEL).train(data="coco8.yaml", imgsz=64, epochs=1, device=device)  # 需要imgsz>=64


@pytest.mark.slow
# 标记为跳过测试,如果CUDA不可用
@pytest.mark.skipif(not CUDA_IS_AVAILABLE, reason="CUDA is not available")
def test_predict_multiple_devices():
    """Validate model prediction consistency across CPU and CUDA devices."""
    # 创建YOLO模型对象
    model = YOLO("yolov8n.pt")
    # 将模型转移到CPU上
    model = model.cpu()
    # 断言模型当前是否在CPU上
    assert str(model.device) == "cpu"
    # 使用CPU进行推理
    _ = model(SOURCE)  # CPU推理
    # 再次断言模型当前是否在CPU上
    assert str(model.device) == "cpu"

    # 将模型切换到CUDA设备cuda:0上
    model = model.to("cuda:0")
    # 断言模型当前是否在cuda:0上
    assert str(model.device) == "cuda:0"
    # 使用CUDA设备进行推理
    _ = model(SOURCE)  # CUDA推理
    # 再次断言模型当前是否在cuda:0上
    assert str(model.device) == "cuda:0"

    # 将模型切换回CPU
    model = model.cpu()
    # 断言模型当前是否在CPU上
    assert str(model.device) == "cpu"
    # 使用模型进行 CPU 推理
    _ = model(SOURCE)  # CPU inference
    # 断言当前模型设备为 CPU
    assert str(model.device) == "cpu"

    # 将模型切换到 CUDA 设备
    model = model.cuda()
    # 断言当前模型设备为 CUDA 设备的第一个 GPU (cuda:0)
    assert str(model.device) == "cuda:0"

    # 使用模型进行 CUDA 设备上的推理
    _ = model(SOURCE)  # CUDA inference
    # 断言当前模型设备为 CUDA 设备的第一个 GPU (cuda:0)
    assert str(model.device) == "cuda:0"
@pytest.mark.skipif(not CUDA_IS_AVAILABLE, reason="CUDA is not available")
def test_autobatch():
    """Check optimal batch size for YOLO model training using autobatch utility."""
    from ultralytics.utils.autobatch import check_train_batch_size

    # 调用自动批处理实用程序,检查 YOLO 模型训练的最佳批处理大小
    check_train_batch_size(YOLO(MODEL).model.cuda(), imgsz=128, amp=True)


@pytest.mark.slow
@pytest.mark.skipif(not CUDA_IS_AVAILABLE, reason="CUDA is not available")
def test_utils_benchmarks():
    """Profile YOLO models for performance benchmarks."""
    from ultralytics.utils.benchmarks import ProfileModels

    # 导出动态引擎模型以进行动态推理
    YOLO(MODEL).export(format="engine", imgsz=32, dynamic=True, batch=1)
    # 对 YOLO 模型进行性能基准测试
    ProfileModels([MODEL], imgsz=32, half=False, min_time=1, num_timed_runs=3, num_warmup_runs=1).profile()


@pytest.mark.skipif(not CUDA_IS_AVAILABLE, reason="CUDA is not available")
def test_predict_sam():
    """Test SAM model predictions using different prompts, including bounding boxes and point annotations."""
    from ultralytics import SAM
    from ultralytics.models.sam import Predictor as SAMPredictor

    # 加载 SAM 模型
    model = SAM(WEIGHTS_DIR / "sam_b.pt")

    # 显示模型信息(可选)
    model.info()

    # 进行推理
    model(SOURCE, device=0)

    # 使用边界框提示进行推理
    model(SOURCE, bboxes=[439, 437, 524, 709], device=0)

    # 使用点注释进行推理
    model(ASSETS / "zidane.jpg", points=[900, 370], labels=[1], device=0)

    # 创建 SAMPredictor 实例
    overrides = dict(conf=0.25, task="segment", mode="predict", imgsz=1024, model=WEIGHTS_DIR / "mobile_sam.pt")
    predictor = SAMPredictor(overrides=overrides)

    # 设置图像
    predictor.set_image(ASSETS / "zidane.jpg")  # 使用图像文件设置

    # 重置图像
    predictor.reset_image()


 浙公网安备 33010602011771号