
Yolov8-源码解析-二十三-
Yolov8 源码解析(二十三)
comments: true
description: Learn how to load YOLOv5 from PyTorch Hub for seamless model inference and customization. Follow our step-by-step guide at Ultralytics Docs.
keywords: YOLOv5, PyTorch Hub, model loading, Ultralytics, object detection, machine learning, AI, tutorial, inference
📚 This guide explains how to load YOLOv5 🚀 from PyTorch Hub at https://pytorch.org/hub/ultralytics_yolov5.
Before You Start
Install requirements.txt in a Python>=3.8.0 environment, including PyTorch>=1.8. Models and datasets download automatically from the latest YOLOv5 release.
pip install -r https://raw.githubusercontent.com/ultralytics/yolov5/master/requirements.txt
💡 ProTip: Cloning https://github.com/ultralytics/yolov5 is not required 😃
Load YOLOv5 with PyTorch Hub
Simple Example
This example loads a pretrained YOLOv5s model from PyTorch Hub as model and passes an image for inference. 'yolov5s' is the lightest and fastest YOLOv5 model. For details on all available models please see the README.
import torch
# Model
model = torch.hub.load("ultralytics/yolov5", "yolov5s")
# Image
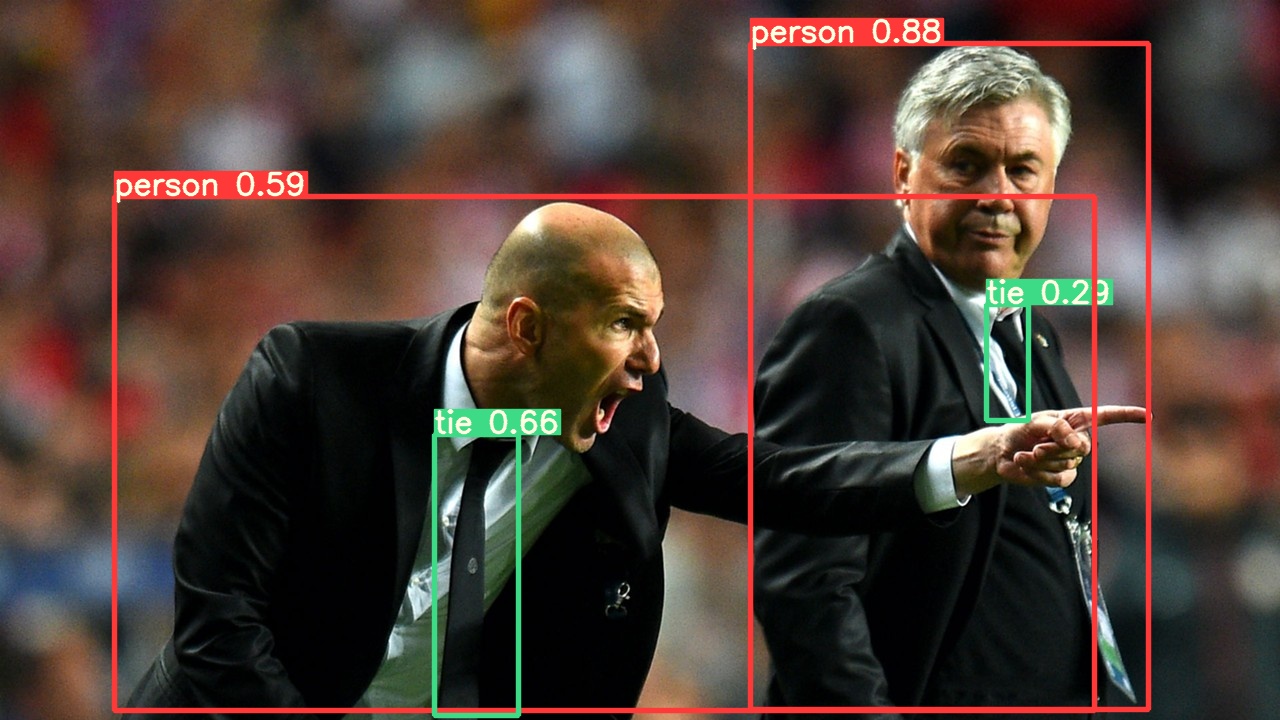
im = "https://ultralytics.com/images/zidane.jpg"
# Inference
results = model(im)
results.pandas().xyxy[0]
# xmin ymin xmax ymax confidence class name
# 0 749.50 43.50 1148.0 704.5 0.874023 0 person
# 1 433.50 433.50 517.5 714.5 0.687988 27 tie
# 2 114.75 195.75 1095.0 708.0 0.624512 0 person
# 3 986.00 304.00 1028.0 420.0 0.286865 27 tie
Detailed Example
This example shows batched inference with PIL and OpenCV image sources. results can be printed to console, saved to runs/hub, showed to screen on supported environments, and returned as tensors or pandas dataframes.
import cv2
import torch
from PIL import Image
# Model
model = torch.hub.load("ultralytics/yolov5", "yolov5s")
# Images
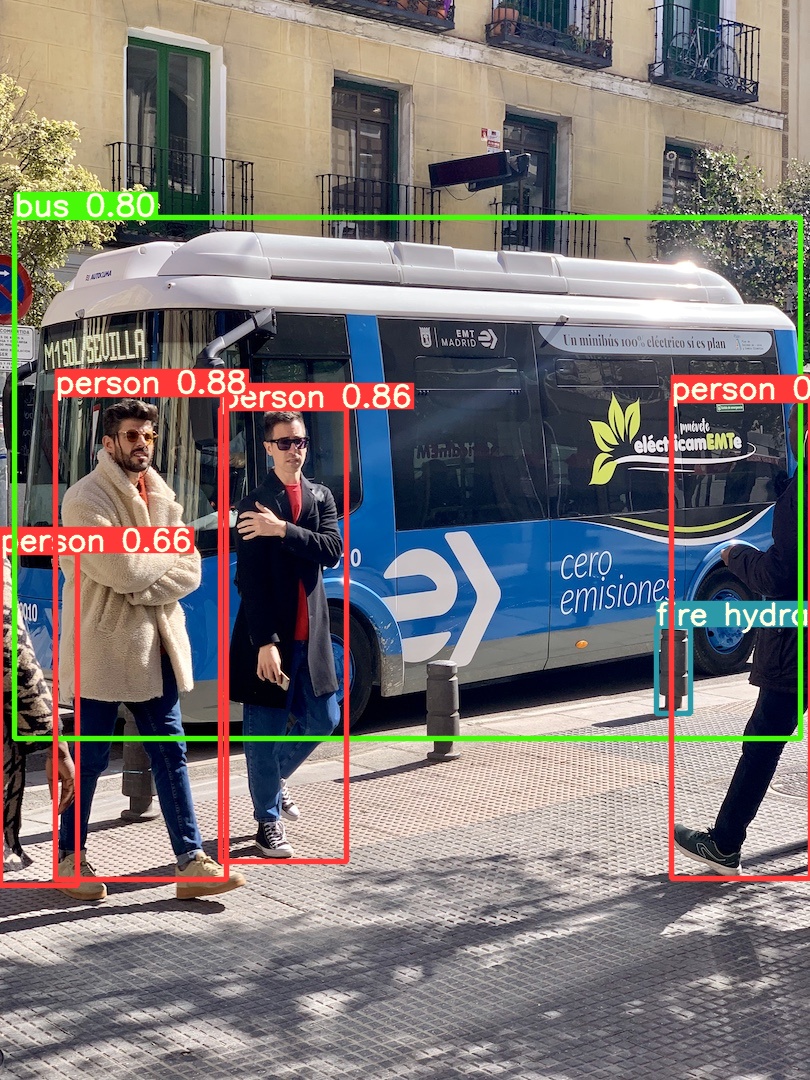
for f in "zidane.jpg", "bus.jpg":
torch.hub.download_url_to_file("https://ultralytics.com/images/" + f, f) # download 2 images
im1 = Image.open("zidane.jpg") # PIL image
im2 = cv2.imread("bus.jpg")[..., ::-1] # OpenCV image (BGR to RGB)
# Inference
results = model([im1, im2], size=640) # batch of images
# Results
results.print()
results.save() # or .show()
results.xyxy[0] # im1 predictions (tensor)
results.pandas().xyxy[0] # im1 predictions (pandas)
# xmin ymin xmax ymax confidence class name
# 0 749.50 43.50 1148.0 704.5 0.874023 0 person
# 1 433.50 433.50 517.5 714.5 0.687988 27 tie
# 2 114.75 195.75 1095.0 708.0 0.624512 0 person
# 3 986.00 304.00 1028.0 420.0 0.286865 27 tie
For all inference options see YOLOv5 AutoShape() forward method.
Inference Settings
YOLOv5 models contain various inference attributes such as confidence threshold, IoU threshold, etc. which can be set by:
model.conf = 0.25  # NMS confidence threshold
iou = 0.45  # NMS IoU threshold
agnostic = False  # NMS class-agnostic
multi_label = False  # NMS multiple labels per box
classes = None  # (optional list) filter by class, i.e. = [0, 15, 16] for COCO persons, cats and dogs
max_det = 1000  # maximum number of detections per image
amp = False  # Automatic Mixed Precision (AMP) inference

results = model(im, size=320)  # custom inference size
Device
Models can be transferred to any device after creation:
model.cpu()  # CPU
model.cuda()  # GPU
model.to(device)  # i.e. device=torch.device(0)
Models can also be created directly on any device:
model = torch.hub.load("ultralytics/yolov5", "yolov5s", device="cpu") # load on CPU
💡 ProTip: Input images are automatically transferred to the correct model device before inference.
Silence Outputs
Models can be loaded silently with _verbose=False:
model = torch.hub.load("ultralytics/yolov5", "yolov5s", _verbose=False) # load silently
Input Channels
To load a pretrained YOLOv5s model with 4 input channels rather than the default 3:
model = torch.hub.load("ultralytics/yolov5", "yolov5s", channels=4)
In this case the model will be composed of pretrained weights except for the very first input layer, which is no longer the same shape as the pretrained input layer. The input layer will remain initialized by random weights.
Number of Classes
To load a pretrained YOLOv5s model with 10 output classes rather than the default 80:
model = torch.hub.load("ultralytics/yolov5", "yolov5s", classes=10)
In this case the model will be composed of pretrained weights except for the output layers, which are no longer the same shape as the pretrained output layers. The output layers will remain initialized by random weights.
Force Reload
If you run into problems with the above steps, setting force_reload=True may help by discarding the existing cache and force a fresh download of the latest YOLOv5 version from PyTorch Hub.
model = torch.hub.load("ultralytics/yolov5", "yolov5s", force_reload=True) # force reload
Screenshot Inference
To run inference on your desktop screen:
import torch
from PIL import ImageGrab

# Model
model = torch.hub.load("ultralytics/yolov5", "yolov5s")

# Image
im = ImageGrab.grab()  # take a screenshot

# Inference
results = model(im)
Multi-GPU Inference
YOLOv5 models can be loaded to multiple GPUs in parallel with threaded inference:
import threading

import torch


def run(model, im):
    """Performs inference on an image using a given model and saves the output; model must support `.save()` method."""
    results = model(im)
    results.save()


# Models
model0 = torch.hub.load("ultralytics/yolov5", "yolov5s", device=0)
model1 = torch.hub.load("ultralytics/yolov5", "yolov5s", device=1)

# Inference
threading.Thread(target=run, args=[model0, "https://ultralytics.com/images/zidane.jpg"], daemon=True).start()
threading.Thread(target=run, args=[model1, "https://ultralytics.com/images/bus.jpg"], daemon=True).start()
Training
To load a YOLOv5 model for training rather than inference, set autoshape=False. To load a model with randomly initialized weights (to train from scratch) use pretrained=False. You must provide your own training script in this case. Alternatively see our YOLOv5 Train Custom Data Tutorial for model training.
import torch

model = torch.hub.load("ultralytics/yolov5", "yolov5s", autoshape=False)  # load pretrained
model = torch.hub.load("ultralytics/yolov5", "yolov5s", autoshape=False, pretrained=False)  # load scratch
Base64 Results
For use with API services. See https://github.com/ultralytics/yolov5/pull/2291 and Flask REST API example for details.
results = model(im)  # inference

results.ims  # array of original images (as np array) passed to model for inference
results.render()  # updates results.ims with boxes and labels
for im in results.ims:
    buffered = BytesIO()
    im_base64 = Image.fromarray(im)
    im_base64.save(buffered, format="JPEG")
    print(base64.b64encode(buffered.getvalue()).decode("utf-8"))  # base64 encoded image with results
Cropped Results
Results can be returned and saved as detection crops:
results = model(im)  # inference
crops = results.crop(save=True)  # cropped detections dictionary
Pandas Results
Results can be returned as Pandas DataFrames:
results = model(im)  # inference
results.pandas().xyxy[0]  # Pandas DataFrame
Pandas Output (click to expand)
print(results.pandas().xyxy[0])
#      xmin    ymin    xmax   ymax  confidence  class    name
# 0  749.50   43.50  1148.0  704.5    0.874023      0  person
# 1  433.50  433.50   517.5  714.5    0.687988     27     tie
# 2  114.75  195.75  1095.0  708.0    0.624512      0  person
# 3  986.00  304.00  1028.0  420.0    0.286865     27     tie
Sorted Results
Results can be sorted by column, i.e. to sort license plate digit detection left-to-right (x-axis):
results = model(im)  # inference
results.pandas().xyxy[0].sort_values("xmin")  # sorted left-right
Box-Cropped Results
Results can be returned and saved as detection crops:
results = model(im)  # inference
crops = results.crop(save=True)  # cropped detections dictionary
JSON Results
Results can be returned in JSON format once converted to .pandas() dataframes using the .to_json() method. The JSON format can be modified using the orient argument. See pandas .to_json() documentation for details.
results = model(ims)  # inference
results.pandas().xyxy[0].to_json(orient="records")  # JSON img1 predictions
JSON Output (click to expand)
[
    {
        "xmin": 749.5,
        "ymin": 43.5,
        "xmax": 1148.0,
        "ymax": 704.5,
        "confidence": 0.8740234375,
        "class": 0,
        "name": "person"
    },
    {
        "xmin": 433.5,
        "ymin": 433.5,
        "xmax": 517.5,
        "ymax": 714.5,
        "confidence": 0.6879882812,
        "class": 27,
        "name": "tie"
    },
    {
        "xmin": 115.25,
        "ymin": 195.75,
        "xmax": 1096.0,
        "ymax": 708.0,
        "confidence": 0.6254882812,
        "class": 0,
        "name": "person"
    },
    {
        "xmin": 986.0,
        "ymin": 304.0,
        "xmax": 1028.0,
        "ymax": 420.0,
        "confidence": 0.2873535156,
        "class": 27,
        "name": "tie"
    }
]
Custom Models
This example loads a custom 20-class VOC-trained YOLOv5s model 'best.pt' with PyTorch Hub.
import torch

model = torch.hub.load("ultralytics/yolov5", "custom", path="path/to/best.pt")  # local model
model = torch.hub.load("path/to/yolov5", "custom", path="path/to/best.pt", source="local")  # local repo
TensorRT, ONNX and OpenVINO Models
PyTorch Hub supports inference on most YOLOv5 export formats, including custom trained models. See TFLite, ONNX, CoreML, TensorRT Export tutorial for details on exporting models.
💡 ProTip: TensorRT may be up to 2-5X faster than PyTorch on GPU benchmarks
💡 ProTip: ONNX and OpenVINO may be up to 2-3X faster than PyTorch on CPU benchmarks
import torch

model = torch.hub.load("ultralytics/yolov5", "custom", path="yolov5s.pt")  # PyTorch
model = torch.hub.load("ultralytics/yolov5", "custom", path="yolov5s.torchscript")  # TorchScript
model = torch.hub.load("ultralytics/yolov5", "custom", path="yolov5s.onnx")  # ONNX
model = torch.hub.load("ultralytics/yolov5", "custom", path="yolov5s_openvino_model/")  # OpenVINO
model = torch.hub.load("ultralytics/yolov5", "custom", path="yolov5s.engine")  # TensorRT
model = torch.hub.load("ultralytics/yolov5", "custom", path="yolov5s.mlmodel")  # CoreML (macOS-only)
model = torch.hub.load("ultralytics/yolov5", "custom", path="yolov5s.tflite")  # TFLite
model = torch.hub.load("ultralytics/yolov5", "custom", path="yolov5s_paddle_model/")  # PaddlePaddle
Supported Environments
Ultralytics provides a range of ready-to-use environments, each pre-installed with essential dependencies such as CUDA, CUDNN, Python, and PyTorch, to kickstart your projects.
- Free GPU Notebooks:
![Run on Gradient]()
![Open In Colab]()
![Open In Kaggle]()
- Google Cloud: GCP Quickstart Guide
- Amazon: AWS Quickstart Guide
- Azure: AzureML Quickstart Guide
- Docker: Docker Quickstart Guide

Project Status
![]()
This badge indicates that all YOLOv5 GitHub Actions Continuous Integration (CI) tests are successfully passing. These CI tests rigorously check the functionality and performance of YOLOv5 across various key aspects: training, validation, inference, export, and benchmarks. They ensure consistent and reliable operation on macOS, Windows, and Ubuntu, with tests conducted every 24 hours and upon each new commit.
comments: true
description: Learn how to use Roboflow for organizing, labeling, and versioning datasets to train YOLOv5 models. Free for public workspaces.
keywords: Roboflow, YOLOv5, data management, dataset labeling, dataset versioning, Ultralytics, machine learning, AI training
Roboflow Datasets
You can now use Roboflow to organize, label, prepare, version, and host your datasets for training YOLOv5 🚀 models. Roboflow is free to use with YOLOv5 if you make your workspace public.
!!! Question "Licensing"
Ultralytics offers two licensing options:

- The [AGPL-3.0 License](https://github.com/ultralytics/ultralytics/blob/main/LICENSE), an [OSI-approved](https://opensource.org/licenses/) open-source license ideal for students and enthusiasts.
- The [Enterprise License](https://ultralytics.com/license) for businesses seeking to incorporate our AI models into their products and services.

For more details see [Ultralytics Licensing](https://ultralytics.com/license).
Upload
You can upload your data to Roboflow via web UI, REST API, or Python.
Labeling
After uploading data to Roboflow, you can label your data and review previous labels.

Versioning
You can make versions of your dataset with different preprocessing and offline augmentation options. YOLOv5 does online augmentations natively, so be intentional when layering Roboflow's offline augmentations on top.

Exporting Data
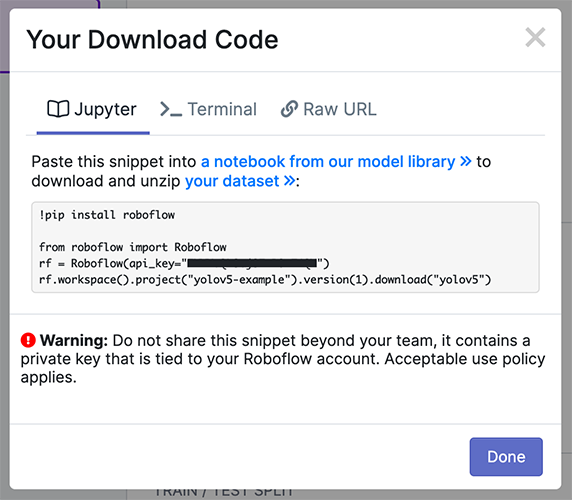
You can download your data in YOLOv5 format to quickly begin training.
from roboflow import Roboflow
rf = Roboflow(api_key="YOUR API KEY HERE")
project = rf.workspace().project("YOUR PROJECT")
dataset = project.version("YOUR VERSION").download("yolov5")
Custom Training
We have released a custom training tutorial demonstrating all of the above capabilities. You can access the code here:
![]()
Active Learning
The real world is messy and your model will invariably encounter situations your dataset didn't anticipate. Using active learning is an important strategy to iteratively improve your dataset and model. With the Roboflow and YOLOv5 integration, you can quickly make improvements on your model deployments by using a battle tested machine learning pipeline.

Supported Environments
Ultralytics provides a range of ready-to-use environments, each pre-installed with essential dependencies such as CUDA, CUDNN, Python, and PyTorch, to kickstart your projects.
- Free GPU Notebooks:
![Run on Gradient]()
![Open In Colab]()
![Open In Kaggle]()
- Google Cloud: GCP Quickstart Guide
- Amazon: AWS Quickstart Guide
- Azure: AzureML Quickstart Guide
- Docker: Docker Quickstart Guide
Project Status
![]()
This badge indicates that all YOLOv5 GitHub Actions Continuous Integration (CI) tests are successfully passing. These CI tests rigorously check the functionality and performance of YOLOv5 across various key aspects: training, validation, inference, export, and benchmarks. They ensure consistent and reliable operation on macOS, Windows, and Ubuntu, with tests conducted every 24 hours and upon each new commit.
FAQ
How do I upload data to Roboflow for training YOLOv5 models?
You can upload your data to Roboflow using three different methods: via the website, the REST API, or through Python. These options offer flexibility depending on your technical preference or project requirements. Once your data is uploaded, you can organize, label, and version it to prepare for training with Ultralytics YOLOv5 models. For more details, visit the Upload section of the documentation.
What are the advantages of using Roboflow for data labeling and versioning?
Roboflow provides a comprehensive platform for data organization, labeling, and versioning which is essential for efficient machine learning workflows. By using Roboflow with YOLOv5, you can streamline the process of dataset preparation, ensuring that your data is accurately annotated and consistently versioned. The platform also supports various preprocessing and offline augmentation options to enhance your dataset's quality. For a deeper dive into these features, see the Labeling and Versioning sections of the documentation.
How can I export my dataset from Roboflow to YOLOv5 format?
Exporting your dataset from Roboflow to YOLOv5 format is straightforward. You can use the Python code snippet provided in the documentation:
from roboflow import Roboflow

rf = Roboflow(api_key="YOUR API KEY HERE")
project = rf.workspace().project("YOUR PROJECT")
dataset = project.version("YOUR VERSION").download("yolov5")
This code will download your dataset in a format compatible with YOLOv5, allowing you to quickly begin training your model. For more details, refer to the Exporting Data section.
What is active learning and how does it work with YOLOv5 and Roboflow?
Active learning is a machine learning strategy that iteratively improves a model by intelligently selecting the most informative data points to label. With the Roboflow and YOLOv5 integration, you can implement active learning to continuously enhance your model's performance. This involves deploying a model, capturing new data, using the model to make predictions, and then manually verifying or correcting those predictions to further train the model. For more insights into active learning see the Active Learning section above.
How can I use Ultralytics environments for training YOLOv5 models on different platforms?
Ultralytics provides ready-to-use environments with pre-installed dependencies like CUDA, CUDNN, Python, and PyTorch, making it easier to kickstart your training projects. These environments are available on various platforms such as Google Cloud, AWS, Azure, and Docker. You can also access free GPU notebooks via Paperspace, Google Colab, and Kaggle. For specific setup instructions, visit the Supported Environments section of the documentation.
comments: true
description: Boost your YOLOv5 performance with Test-Time Augmentation (TTA). Learn setup, testing, and inference techniques to elevate mAP and Recall.
keywords: YOLOv5, Test-Time Augmentation, TTA, machine learning, deep learning, object detection, mAP, Recall, PyTorch
Test-Time Augmentation (TTA)
📚 This guide explains how to use Test Time Augmentation (TTA) during testing and inference for improved mAP and Recall with YOLOv5 🚀.
Before You Start
Clone repo and install requirements.txt in a Python>=3.8.0 environment, including PyTorch>=1.8. Models and datasets download automatically from the latest YOLOv5 release.
git clone https://github.com/ultralytics/yolov5  # clone
cd yolov5
pip install -r requirements.txt  # install
Test Normally
Before trying TTA we want to establish a baseline performance to compare to. This command tests YOLOv5x on COCO val2017 at image size 640 pixels. yolov5x.pt is the largest and most accurate model available. Other options are yolov5s.pt, yolov5m.pt and yolov5l.pt, or you own checkpoint from training a custom dataset ./weights/best.pt. For details on all available models please see our README table.
python val.py --weights yolov5x.pt --data coco.yaml --img 640 --half
Output:
val: data=./data/coco.yaml, weights=['yolov5x.pt'], batch_size=32, imgsz=640, conf_thres=0.001, iou_thres=0.65, task=val, device=, single_cls=False, augment=False, verbose=False, save_txt=False, save_hybrid=False, save_conf=False, save_json=True, project=runs/val, name=exp, exist_ok=False, half=True
YOLOv5 🚀 v5.0-267-g6a3ee7c torch 1.9.0+cu102 CUDA:0 (Tesla P100-PCIE-16GB, 16280.875MB)

Fusing layers...
Model Summary: 476 layers, 87730285 parameters, 0 gradients

val: Scanning '../datasets/coco/val2017' images and labels...4952 found, 48 missing, 0 empty, 0 corrupted: 100% 5000/5000 [00:01<00:00, 2846.03it/s]
val: New cache created: ../datasets/coco/val2017.cache
               Class     Images     Labels          P          R     mAP@.5 mAP@.5:.95: 100% 157/157 [02:30<00:00,  1.05it/s]
                 all       5000      36335      0.746      0.626       0.68       0.49
Speed: 0.1ms pre-process, 22.4ms inference, 1.4ms NMS per image at shape (32, 3, 640, 640)  # <--- baseline speed

Evaluating pycocotools mAP... saving runs/val/exp/yolov5x_predictions.json...
...
 Average Precision  (AP) @[ IoU=0.50:0.95 | area=   all | maxDets=100 ] = 0.504  # <--- baseline mAP
 Average Precision  (AP) @[ IoU=0.50      | area=   all | maxDets=100 ] = 0.688
 Average Precision  (AP) @[ IoU=0.75      | area=   all | maxDets=100 ] = 0.546
 Average Precision  (AP) @[ IoU=0.50:0.95 | area= small | maxDets=100 ] = 0.351
 Average Precision  (AP) @[ IoU=0.50:0.95 | area=medium | maxDets=100 ] = 0.551
 Average Precision  (AP) @[ IoU=0.50:0.95 | area= large | maxDets=100 ] = 0.644
 Average Recall     (AR) @[ IoU=0.50:0.95 | area=   all | maxDets=  1 ] = 0.382
 Average Recall     (AR) @[ IoU=0.50:0.95 | area=   all | maxDets= 10 ] = 0.628
 Average Recall     (AR) @[ IoU=0.50:0.95 | area=   all | maxDets=100 ] = 0.681  # <--- baseline mAR
 Average Recall     (AR) @[ IoU=0.50:0.95 | area= small | maxDets=100 ] = 0.524
 Average Recall     (AR) @[ IoU=0.50:0.95 | area=medium | maxDets=100 ] = 0.735
 Average Recall     (AR) @[ IoU=0.50:0.95 | area= large | maxDets=100 ] = 0.826
```py

## Test with TTA

Append `--augment` to any existing `val.py` command to enable TTA, and increase the image size by about 30% for improved results. Note that inference with TTA enabled will typically take about 2-3X the time of normal inference as the images are being left-right flipped and processed at 3 different resolutions, with the outputs merged before NMS. Part of the speed decrease is simply due to larger image sizes (832 vs 640), while part is due to the actual TTA operations.

```bash
python val.py --weights yolov5x.pt --data coco.yaml --img 832 --augment --half
```py

Output:

```shell
val: data=./data/coco.yaml, weights=['yolov5x.pt'], batch_size=32, imgsz=832, conf_thres=0.001, iou_thres=0.6, task=val, device=, single_cls=False, augment=True, verbose=False, save_txt=False, save_hybrid=False, save_conf=False, save_json=True, project=runs/val, name=exp, exist_ok=False, half=True
YOLOv5 🚀 v5.0-267-g6a3ee7c torch 1.9.0+cu102 CUDA:0 (Tesla P100-PCIE-16GB, 16280.875MB)

Fusing layers...
/usr/local/lib/python3.7/dist-packages/torch/nn/functional.py:718: UserWarning: Named tensors and all their associated APIs are an experimental feature and subject to change. Please do not use them for anything important until they are released as stable. (Triggered internally at  /pytorch/c10/core/TensorImpl.h:1156.)
  return torch.max_pool2d(input, kernel_size, stride, padding, dilation, ceil_mode)
Model Summary: 476 layers, 87730285 parameters, 0 gradients
val: Scanning '../datasets/coco/val2017' images and labels...4952 found, 48 missing, 0 empty, 0 corrupted: 100% 5000/5000 [00:01<00:00, 2885.61it/s]
val: New cache created: ../datasets/coco/val2017.cache
               Class     Images     Labels          P          R     mAP@.5 mAP@.5:.95: 100% 157/157 [07:29<00:00,  2.86s/it]
                 all       5000      36335      0.718      0.656      0.695      0.503
Speed: 0.2ms pre-process, 80.6ms inference, 2.7ms NMS per image at shape (32, 3, 832, 832)  # <--- TTA speed

Evaluating pycocotools mAP... saving runs/val/exp2/yolov5x_predictions.json...
...
 Average Precision  (AP) @[ IoU=0.50:0.95 | area=   all | maxDets=100 ] = 0.516  # <--- TTA mAP
 Average Precision  (AP) @[ IoU=0.50      | area=   all | maxDets=100 ] = 0.701
 Average Precision  (AP) @[ IoU=0.75      | area=   all | maxDets=100 ] = 0.562
 Average Precision  (AP) @[ IoU=0.50:0.95 | area= small | maxDets=100 ] = 0.361
 Average Precision  (AP) @[ IoU=0.50:0.95 | area=medium | maxDets=100 ] = 0.564
 Average Precision  (AP) @[ IoU=0.50:0.95 | area= large | maxDets=100 ] = 0.656
 Average Recall     (AR) @[ IoU=0.50:0.95 | area=   all | maxDets=  1 ] = 0.388
 Average Recall     (AR) @[ IoU=0.50:0.95 | area=   all | maxDets= 10 ] = 0.640
 Average Recall     (AR) @[ IoU=0.50:0.95 | area=   all | maxDets=100 ] = 0.696  # <--- TTA mAR
 Average Recall     (AR) @[ IoU=0.50:0.95 | area= small | maxDets=100 ] = 0.553
 Average Recall     (AR) @[ IoU=0.50:0.95 | area=medium | maxDets=100 ] = 0.744
 Average Recall     (AR) @[ IoU=0.50:0.95 | area= large | maxDets=100 ] = 0.833
```py

## Inference with TTA

`detect.py` TTA inference operates identically to `val.py` TTA: simply append `--augment` to any existing `detect.py` command:

```bash
python detect.py --weights yolov5s.pt --img 832 --source data/images --augment
```py

Output:

```bash
YOLOv5 🚀 v5.0-267-g6a3ee7c torch 1.9.0+cu102 CUDA:0 (Tesla P100-PCIE-16GB, 16280.875MB)

Downloading https://github.com/ultralytics/yolov5/releases/download/v5.0/yolov5s.pt to yolov5s.pt...
100% 14.1M/14.1M [00:00<00:00, 81.9MB/s]

Fusing layers...
Model Summary: 224 layers, 7266973 parameters, 0 gradients
image 1/2 /content/yolov5/data/images/bus.jpg: 832x640 4 persons, 1 bus, 1 fire hydrant, Done. (0.029s)
image 2/2 /content/yolov5/data/images/zidane.jpg: 480x832 3 persons, 3 ties, Done. (0.024s)
Results saved to runs/detect/exp
Done. (0.156s)
```py

<img src="https://user-images.githubusercontent.com/26833433/124491703-dbb6b200-ddb3-11eb-8b57-ed0d58d0d8b4.jpg" width="500" alt="YOLOv5 test time augmentations">

### PyTorch Hub TTA

TTA is automatically integrated into all [YOLOv5 PyTorch Hub](https://pytorch.org/hub/ultralytics_yolov5) models, and can be accessed by passing `augment=True` at inference time.

```python
import torch

# Model
model = torch.hub.load("ultralytics/yolov5", "yolov5s")  # or yolov5m, yolov5x, custom

# Images
img = "https://ultralytics.com/images/zidane.jpg"  # or file, PIL, OpenCV, numpy, multiple

# Inference
results = model(img, augment=True)  # <--- TTA inference

# Results
results.print()  # or .show(), .save(), .crop(), .pandas(), etc.
Customize
You can customize the TTA ops applied in the YOLOv5 forward_augment() method here.
Supported Environments
Ultralytics provides a range of ready-to-use environments, each pre-installed with essential dependencies such as CUDA, CUDNN, Python, and PyTorch, to kickstart your projects.
- Free GPU Notebooks:
![Run on Gradient]()
![Open In Colab]()
![Open In Kaggle]()
- Google Cloud: GCP Quickstart Guide
- Amazon: AWS Quickstart Guide
- Azure: AzureML Quickstart Guide
- Docker: Docker Quickstart Guide
Project Status
![]()
This badge indicates that all YOLOv5 GitHub Actions Continuous Integration (CI) tests are successfully passing. These CI tests rigorously check the functionality and performance of YOLOv5 across various key aspects: training, validation, inference, export, and benchmarks. They ensure consistent and reliable operation on macOS, Windows, and Ubuntu, with tests conducted every 24 hours and upon each new commit.
comments: true
description: Discover how to achieve optimal mAP and training results using YOLOv5. Learn essential dataset, model selection, and training settings best practices.
keywords: YOLOv5 training, mAP, dataset best practices, model selection, training settings, YOLOv5 guide, YOLOv5 tutorial, machine learning
📚 This guide explains how to produce the best mAP and training results with YOLOv5 🚀.
Most of the time good results can be obtained with no changes to the models or training settings, provided your dataset is sufficiently large and well labelled. If at first you don't get good results, there are steps you might be able to take to improve, but we always recommend users first train with all default settings before considering any changes. This helps establish a performance baseline and spot areas for improvement.
If you have questions about your training results we recommend you provide the maximum amount of information possible if you expect a helpful response, including results plots (train losses, val losses, P, R, mAP), PR curve, confusion matrix, training mosaics, test results and dataset statistics images such as labels.png. All of these are located in your project/name directory, typically yolov5/runs/train/exp.
We've put together a full guide for users looking to get the best results on their YOLOv5 trainings below.
Dataset
- Images per class. ≥ 1500 images per class recommended
- Instances per class. ≥ 10000 instances (labeled objects) per class recommended
- Image variety. Must be representative of deployed environment. For real-world use cases we recommend images from different times of day, different seasons, different weather, different lighting, different angles, different sources (scraped online, collected locally, different cameras) etc.
- Label consistency. All instances of all classes in all images must be labelled. Partial labelling will not work.
- Label accuracy. Labels must closely enclose each object. No space should exist between an object and it's bounding box. No objects should be missing a label.
- Label verification. View
train_batch*.jpgon train start to verify your labels appear correct, i.e. see example mosaic. - Background images. Background images are images with no objects that are added to a dataset to reduce False Positives (FP). We recommend about 0-10% background images to help reduce FPs (COCO has 1000 background images for reference, 1% of the total). No labels are required for background images.

Model Selection
Larger models like YOLOv5x and YOLOv5x6 will produce better results in nearly all cases, but have more parameters, require more CUDA memory to train, and are slower to run. For mobile deployments we recommend YOLOv5s/m, for cloud deployments we recommend YOLOv5l/x. See our README table for a full comparison of all models.

- Start from Pretrained weights. Recommended for small to medium-sized datasets (i.e. VOC, VisDrone, GlobalWheat). Pass the name of the model to the
--weightsargument. Models download automatically from the latest YOLOv5 release.
python train.py --data custom.yaml --weights yolov5s.pt
                                             yolov5m.pt
                                             yolov5l.pt
                                             yolov5x.pt
                                             custom_pretrained.pt
- Start from Scratch. Recommended for large datasets (i.e. COCO, Objects365, OIv6). Pass the model architecture YAML you are interested in, along with an empty
--weights ''argument:
python train.py --data custom.yaml --weights '' --cfg yolov5s.yaml
                                                      yolov5m.yaml
                                                      yolov5l.yaml
                                                      yolov5x.yaml
Training Settings
Before modifying anything, first train with default settings to establish a performance baseline. A full list of train.py settings can be found in the train.py argparser.
- Epochs. Start with 300 epochs. If this overfits early then you can reduce epochs. If overfitting does not occur after 300 epochs, train longer, i.e. 600, 1200 etc. epochs.
- Image size. COCO trains at native resolution of
--img 640, though due to the high amount of small objects in the dataset it can benefit from training at higher resolutions such as--img 1280. If there are many small objects then custom datasets will benefit from training at native or higher resolution. Best inference results are obtained at the same--imgas the training was run at, i.e. if you train at--img 1280you should also test and detect at--img 1280. - Batch size. Use the largest
--batch-sizethat your hardware allows for. Small batch sizes produce poor batchnorm statistics and should be avoided. - Hyperparameters. Default hyperparameters are in hyp.scratch-low.yaml. We recommend you train with default hyperparameters first before thinking of modifying any. In general, increasing augmentation hyperparameters will reduce and delay overfitting, allowing for longer trainings and higher final mAP. Reduction in loss component gain hyperparameters like
hyp['obj']will help reduce overfitting in those specific loss components. For an automated method of optimizing these hyperparameters, see our Hyperparameter Evolution Tutorial.
Further Reading
If you'd like to know more, a good place to start is Karpathy's 'Recipe for Training Neural Networks', which has great ideas for training that apply broadly across all ML domains: https://karpathy.github.io/2019/04/25/recipe/
Good luck 🍀 and let us know if you have any other questions!
comments: true
description: Learn how to train YOLOv5 on your own custom datasets with easy-to-follow steps. Detailed guide on dataset preparation, model selection, and training process.
keywords: YOLOv5, custom dataset, model training, object detection, machine learning, AI, YOLO model, PyTorch, dataset preparation
📚 This guide explains how to train your own custom dataset with YOLOv5 🚀.
Before You Start
Clone repo and install requirements.txt in a Python>=3.8.0 environment, including PyTorch>=1.8. Models and datasets download automatically from the latest YOLOv5 release.
git clone https://github.com/ultralytics/yolov5  # clone
cd yolov5
pip install -r requirements.txt  # install
Train On Custom Data

Creating a custom model to detect your objects is an iterative process of collecting and organizing images, labeling your objects of interest, training a model, deploying it into the wild to make predictions, and then using that deployed model to collect examples of edge cases to repeat and improve.
!!! Question "Licensing"
Ultralytics offers two licensing options:

- The [AGPL-3.0 License](https://github.com/ultralytics/ultralytics/blob/main/LICENSE), an [OSI-approved](https://opensource.org/licenses/) open-source license ideal for students and enthusiasts.
- The [Enterprise License](https://ultralytics.com/license) for businesses seeking to incorporate our AI models into their products and services.

For more details see [Ultralytics Licensing](https://ultralytics.com/license).
YOLOv5 models must be trained on labelled data in order to learn classes of objects in that data. There are two options for creating your dataset before you start training:
Option 1: Create a Roboflow Dataset
1.1 Collect Images
Your model will learn by example. Training on images similar to the ones it will see in the wild is of the utmost importance. Ideally, you will collect a wide variety of images from the same configuration (camera, angle, lighting, etc.) as you will ultimately deploy your project.
If this is not possible, you can start from a public dataset to train your initial model and then sample images from the wild during inference to improve your dataset and model iteratively.
1.2 Create Labels
Once you have collected images, you will need to annotate the objects of interest to create a ground truth for your model to learn from.
Roboflow Annotate is a simple web-based tool for managing and labeling your images with your team and exporting them in YOLOv5's annotation format.
1.3 Prepare Dataset for YOLOv5
Whether you label your images with Roboflow or not, you can use it to convert your dataset into YOLO format, create a YOLOv5 YAML configuration file, and host it for importing into your training script.
Create a free Roboflow account and upload your dataset to a Public workspace, label any unannotated images, then generate and export a version of your dataset in YOLOv5 Pytorch format.
Note: YOLOv5 does online augmentation during training, so we do not recommend applying any augmentation steps in Roboflow for training with YOLOv5. But we recommend applying the following preprocessing steps:

- Auto-Orient - to strip EXIF orientation from your images.
- Resize (Stretch) - to the square input size of your model (640x640 is the YOLOv5 default).
Generating a version will give you a snapshot of your dataset, so you can always go back and compare your future model training runs against it, even if you add more images or change its configuration later.
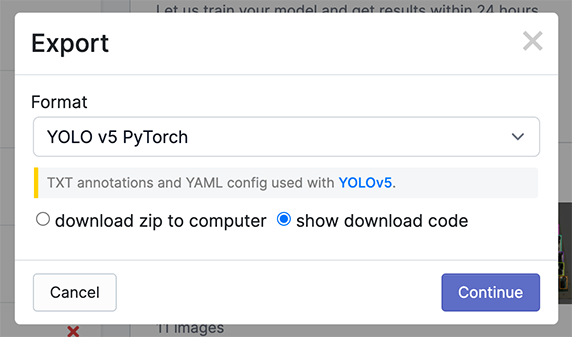
Export in YOLOv5 Pytorch format, then copy the snippet into your training script or notebook to download your dataset.
Option 2: Create a Manual Dataset
2.1 Create dataset.yaml
COCO128 is an example small tutorial dataset composed of the first 128 images in COCO train2017. These same 128 images are used for both training and validation to verify our training pipeline is capable of overfitting. data/coco128.yaml, shown below, is the dataset config file that defines 1) the dataset root directory path and relative paths to train / val / test image directories (or *.txt files with image paths) and 2) a class names dictionary:
# Train/val/test sets as 1) dir: path/to/imgs, 2) file: path/to/imgs.txt, or 3) list: [path/to/imgs1, path/to/imgs2, ..]
path: ../datasets/coco128 # dataset root dir
train: images/train2017 # train images (relative to 'path') 128 images
val: images/train2017 # val images (relative to 'path') 128 images
test: # test images (optional)

# Classes (80 COCO classes)
names:
    0: person
    1: bicycle
    2: car
    # ...
    77: teddy bear
    78: hair drier
    79: toothbrush
2.2 Create Labels
After using an annotation tool to label your images, export your labels to YOLO format, with one *.txt file per image (if no objects in image, no *.txt file is required). The *.txt file specifications are:
- One row per object
- Each row is
class x_center y_center width heightformat. - Box coordinates must be in normalized xywh format (from 0 to 1). If your boxes are in pixels, divide
x_centerandwidthby image width, andy_centerandheightby image height. - Class numbers are zero-indexed (start from 0).
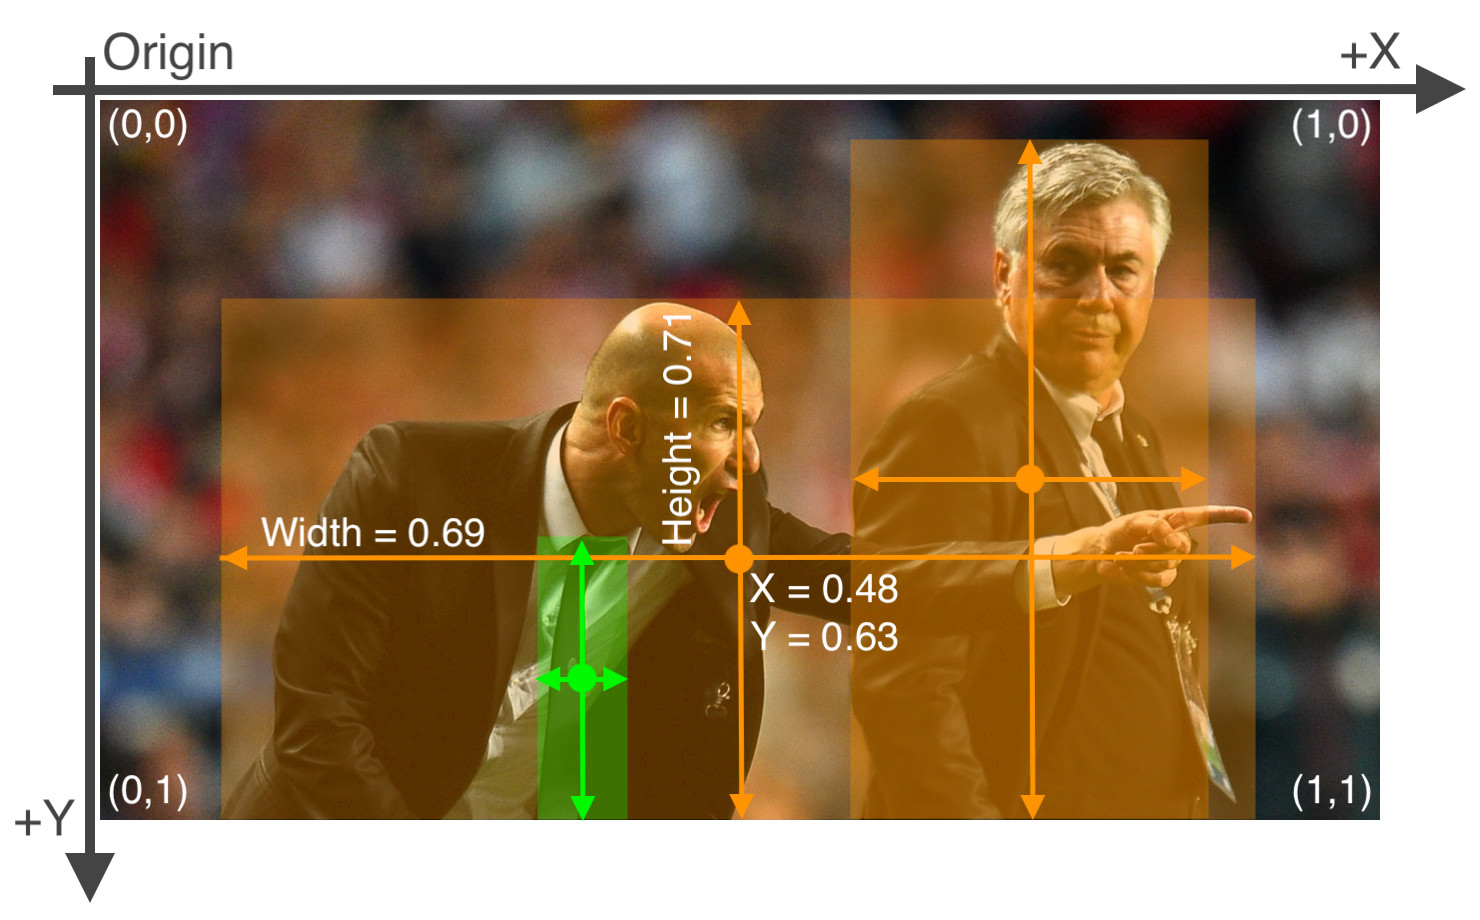
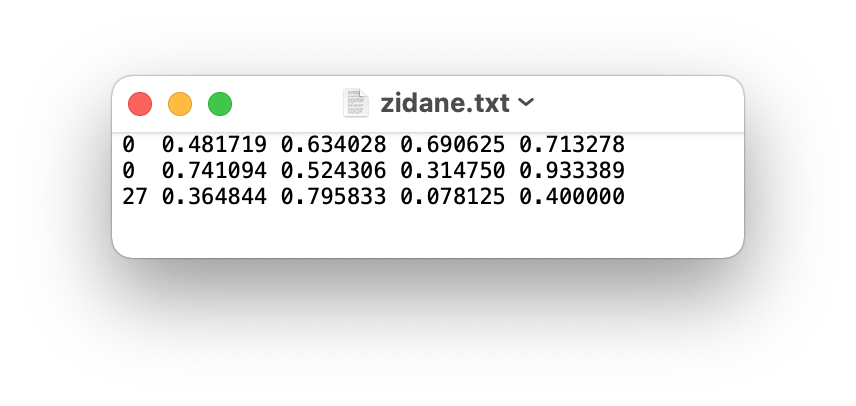
The label file corresponding to the above image contains 2 persons (class 0) and a tie (class 27):
2.3 Organize Directories
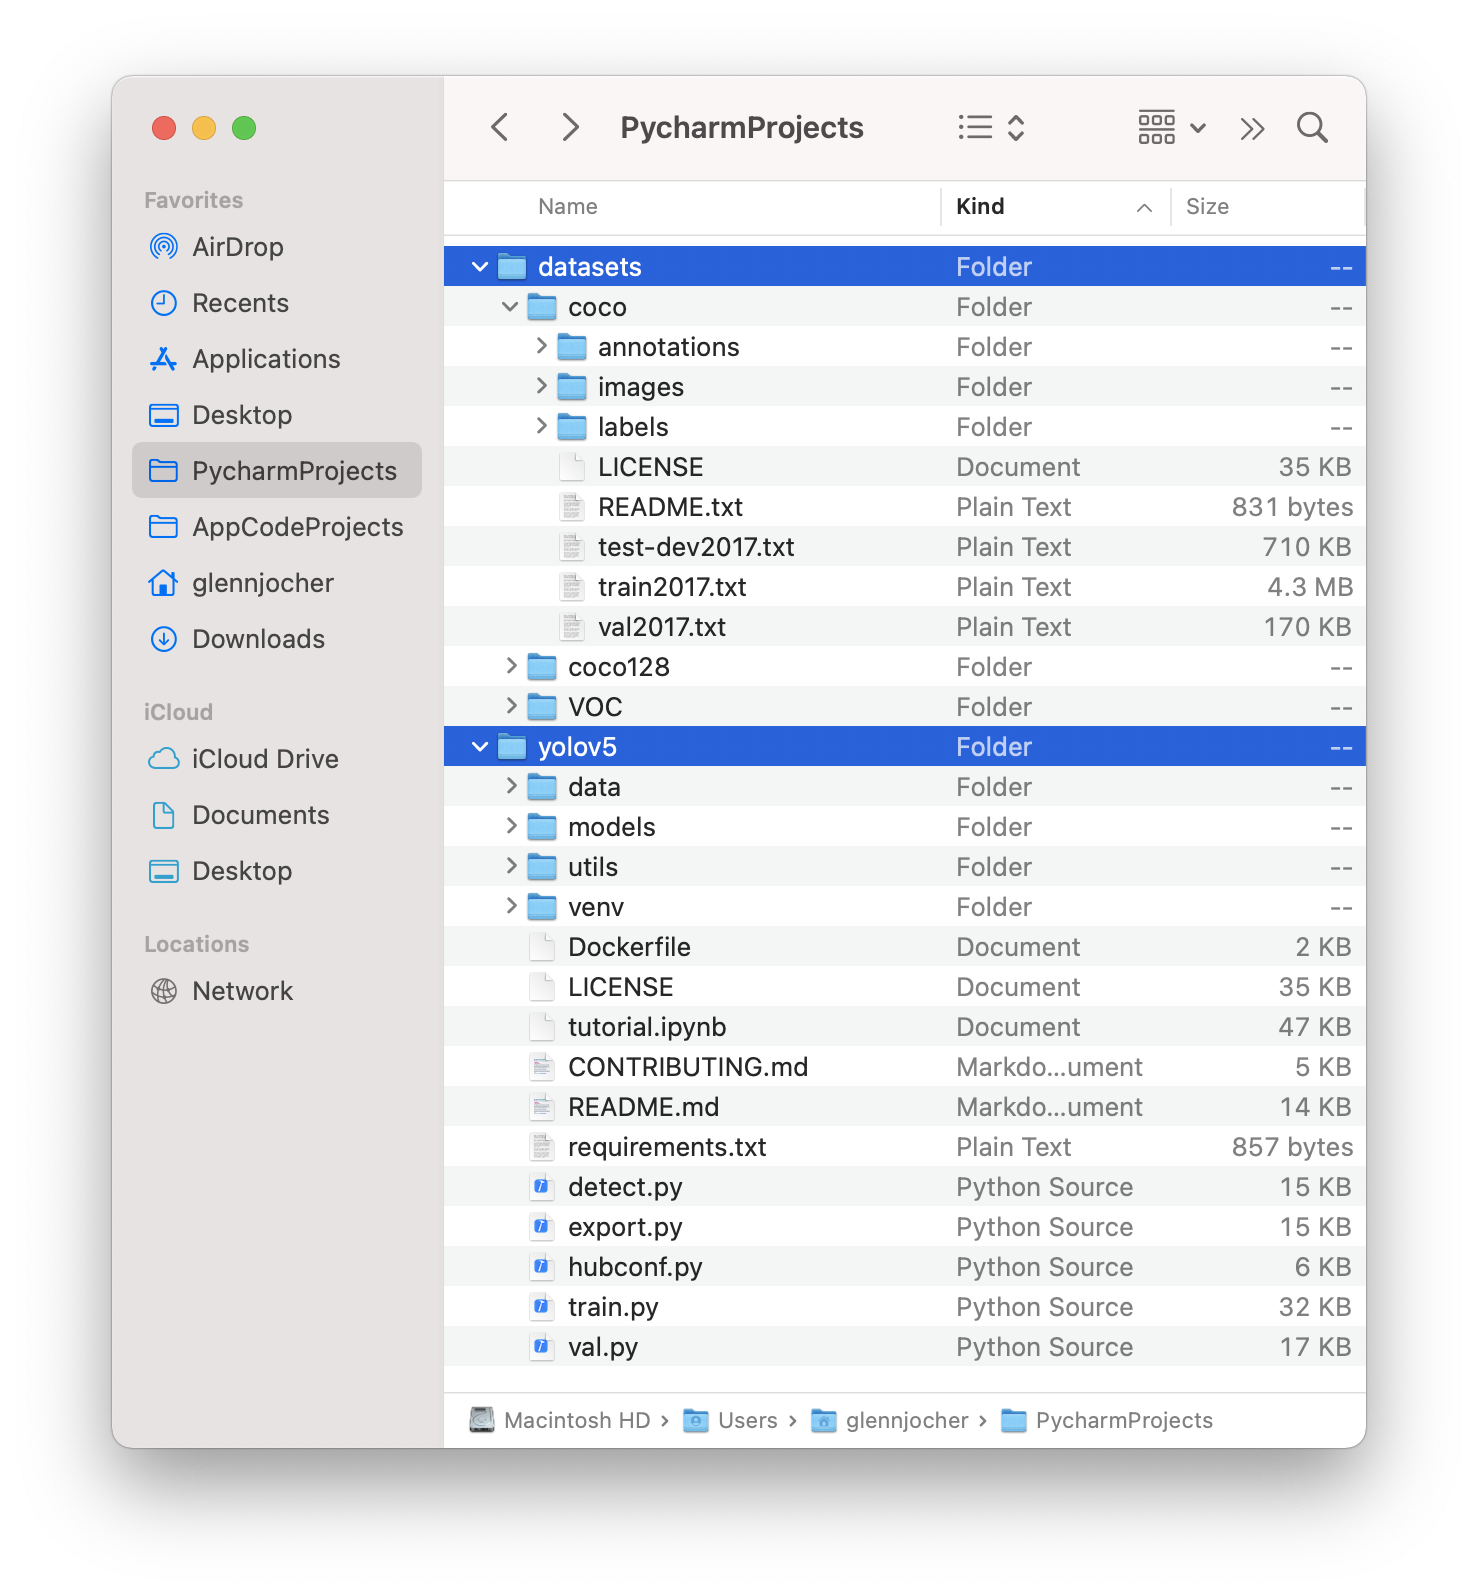
Organize your train and val images and labels according to the example below. YOLOv5 assumes /coco128 is inside a /datasets directory next to the /yolov5 directory. YOLOv5 locates labels automatically for each image by replacing the last instance of /images/ in each image path with /labels/. For example:
../datasets/coco128/images/im0.jpg  # image
../datasets/coco128/labels/im0.txt  # label
3. Select a Model
Select a pretrained model to start training from. Here we select YOLOv5s, the second-smallest and fastest model available. See our README table for a full comparison of all models.
4. Train
Train a YOLOv5s model on COCO128 by specifying dataset, batch-size, image size and either pretrained --weights yolov5s.pt (recommended), or randomly initialized --weights '' --cfg yolov5s.yaml (not recommended). Pretrained weights are auto-downloaded from the latest YOLOv5 release.
python train.py --img 640 --epochs 3 --data coco128.yaml --weights yolov5s.pt
!!! Tip "Tip"
💡 Add `--cache ram` or `--cache disk` to speed up training (requires significant RAM/disk resources).
!!! Tip "Tip"
💡 Always train from a local dataset. Mounted or network drives like Google Drive will be very slow.
All training results are saved to runs/train/ with incrementing run directories, i.e. runs/train/exp2, runs/train/exp3 etc. For more details see the Training section of our tutorial notebook. ![]()

5. Visualize
Comet Logging and Visualization 🌟 NEW
Comet is now fully integrated with YOLOv5. Track and visualize model metrics in real time, save your hyperparameters, datasets, and model checkpoints, and visualize your model predictions with Comet Custom Panels! Comet makes sure you never lose track of your work and makes it easy to share results and collaborate across teams of all sizes!
Getting started is easy:
pip install comet_ml  # 1. install
export COMET_API_KEY=<Your API Key>  # 2. paste API key
python train.py --img 640 --epochs 3 --data coco128.yaml --weights yolov5s.pt  # 3. train
To learn more about all the supported Comet features for this integration, check out the Comet Tutorial. If you'd like to learn more about Comet, head over to our documentation. Get started by trying out the Comet Colab Notebook: ![]()

ClearML Logging and Automation 🌟 NEW
ClearML is completely integrated into YOLOv5 to track your experimentation, manage dataset versions and even remotely execute training runs. To enable ClearML:
pip install clearml- run
clearml-initto connect to a ClearML server
You'll get all the great expected features from an experiment manager: live updates, model upload, experiment comparison etc. but ClearML also tracks uncommitted changes and installed packages for example. Thanks to that ClearML Tasks (which is what we call experiments) are also reproducible on different machines! With only 1 extra line, we can schedule a YOLOv5 training task on a queue to be executed by any number of ClearML Agents (workers).
You can use ClearML Data to version your dataset and then pass it to YOLOv5 simply using its unique ID. This will help you keep track of your data without adding extra hassle. Explore the ClearML Tutorial for details!

Local Logging
Training results are automatically logged with Tensorboard and CSV loggers to runs/train, with a new experiment directory created for each new training as runs/train/exp2, runs/train/exp3, etc.
This directory contains train and val statistics, mosaics, labels, predictions and augmented mosaics, as well as metrics and charts including precision-recall (PR) curves and confusion matrices.

Results file results.csv is updated after each epoch, and then plotted as results.png (below) after training completes. You can also plot any results.csv file manually:
from utils.plots import plot_results

plot_results("path/to/results.csv")  # plot 'results.csv' as 'results.png'

Next Steps
Once your model is trained you can use your best checkpoint best.pt to:
- Run CLI or Python inference on new images and videos
- Validate accuracy on train, val and test splits
- Export to TensorFlow, Keras, ONNX, TFlite, TF.js, CoreML and TensorRT formats
- Evolve hyperparameters to improve performance
- Improve your model by sampling real-world images and adding them to your dataset
Supported Environments
Ultralytics provides a range of ready-to-use environments, each pre-installed with essential dependencies such as CUDA, CUDNN, Python, and PyTorch, to kickstart your projects.
- Free GPU Notebooks:
![Run on Gradient]()
![Open In Colab]()
![Open In Kaggle]()
- Google Cloud: GCP Quickstart Guide
- Amazon: AWS Quickstart Guide
- Azure: AzureML Quickstart Guide
- Docker: Docker Quickstart Guide
Project Status
![]()
This badge indicates that all YOLOv5 GitHub Actions Continuous Integration (CI) tests are successfully passing. These CI tests rigorously check the functionality and performance of YOLOv5 across various key aspects: training, validation, inference, export, and benchmarks. They ensure consistent and reliable operation on macOS, Windows, and Ubuntu, with tests conducted every 24 hours and upon each new commit.
FAQ
How do I train YOLOv5 on my custom dataset?
Training YOLOv5 on a custom dataset involves several steps:
- Prepare Your Dataset: Collect and label images. Use tools like Roboflow to organize data and export in YOLOv5 format.
- Setup Environment: Clone the YOLOv5 repo and install dependencies:
git clone https://github.com/ultralytics/yolov5 cd yolov5 pip install -r requirements.txt - Create Dataset Configuration: Write a
dataset.yamlfile defining train/val paths and class names. - Train the Model:
python train.py --img 640 --epochs 3 --data dataset.yaml --weights yolov5s.pt
What tools can I use to annotate my YOLOv5 dataset?
You can use Roboflow Annotate, an intuitive web-based tool for labeling images. It supports team collaboration and exports in YOLOv5 format. After collecting images, use Roboflow to create and manage annotations efficiently. Other options include tools like LabelImg and CVAT for local annotations.
Why should I use Ultralytics HUB for training my YOLO models?
Ultralytics HUB offers an end-to-end platform for training, deploying, and managing YOLO models without needing extensive coding skills. Benefits of using Ultralytics HUB include:
- Easy Model Training: Simplifies the training process with preconfigured environments.
- Data Management: Effortlessly manage datasets and version control.
- Real-time Monitoring: Integrates tools like Comet for real-time metrics tracking and visualization.
- Collaboration: Ideal for team projects with shared resources and easy management.
How do I convert my annotated data to YOLOv5 format?
To convert annotated data to YOLOv5 format using Roboflow:
- Upload Your Dataset to a Roboflow workspace.
- Label Images if not already labeled.
- Generate and Export the dataset in
YOLOv5 Pytorchformat. Ensure preprocessing steps like Auto-Orient and Resize (Stretch) to the square input size (e.g., 640x640) are applied. - Download the Dataset and integrate it into your YOLOv5 training script.
What are the licensing options for using YOLOv5 in commercial applications?
Ultralytics offers two licensing options:
- AGPL-3.0 License: An open-source license suitable for non-commercial use, ideal for students and enthusiasts.
- Enterprise License: Tailored for businesses seeking to integrate YOLOv5 into commercial products and services. For detailed information, visit our Licensing page.
For more details, refer to our guide on Ultralytics Licensing.
comments: true
description: Learn to freeze YOLOv5 layers for efficient transfer learning, reducing resources and speeding up training while maintaining accuracy.
keywords: YOLOv5, transfer learning, freeze layers, machine learning, deep learning, model training, PyTorch, Ultralytics
📚 This guide explains how to freeze YOLOv5 🚀 layers when transfer learning. Transfer learning is a useful way to quickly retrain a model on new data without having to retrain the entire network. Instead, part of the initial weights are frozen in place, and the rest of the weights are used to compute loss and are updated by the optimizer. This requires less resources than normal training and allows for faster training times, though it may also result in reductions to final trained accuracy.
Before You Start
Clone repo and install requirements.txt in a Python>=3.8.0 environment, including PyTorch>=1.8. Models and datasets download automatically from the latest YOLOv5 release.
git clone https://github.com/ultralytics/yolov5  # clone
cd yolov5
pip install -r requirements.txt  # install
Freeze Backbone
All layers that match the train.py freeze list in train.py will be frozen by setting their gradients to zero before training starts.
# Freeze
freeze = [f"model.{x}." for x in range(freeze)]  # layers to freeze
for k, v in model.named_parameters():
    v.requires_grad = True  # train all layers
    if any(x in k for x in freeze):
        print(f"freezing {k}")
        v.requires_grad = False
To see a list of module names:
for k, v in model.named_parameters():
    print(k)

"""Output:
model.0.conv.conv.weight
model.0.conv.bn.weight
model.0.conv.bn.bias
model.1.conv.weight
model.1.bn.weight
model.1.bn.bias
model.2.cv1.conv.weight
model.2.cv1.bn.weight
...
model.23.m.0.cv2.bn.weight
model.23.m.0.cv2.bn.bias
model.24.m.0.weight
model.24.m.0.bias
model.24.m.1.weight
model.24.m.1.bias
model.24.m.2.weight
model.24.m.2.bias
"""
Looking at the model architecture we can see that the model backbone is layers 0-9:
# YOLOv5 v6.0 backbone
backbone:
    # [from, number, module, args]
    - [-1, 1, Conv, [64, 6, 2, 2]] # 0-P1/2
    - [-1, 1, Conv, [128, 3, 2]] # 1-P2/4
    - [-1, 3, C3, [128]]
    - [-1, 1, Conv, [256, 3, 2]] # 3-P3/8
    - [-1, 6, C3, [256]]
    - [-1, 1, Conv, [512, 3, 2]] # 5-P4/16
    - [-1, 9, C3, [512]]
    - [-1, 1, Conv, [1024, 3, 2]] # 7-P5/32
    - [-1, 3, C3, [1024]]
    - [-1, 1, SPPF, [1024, 5]] # 9

# YOLOv5 v6.0 head
head:
    - [-1, 1, Conv, [512, 1, 1]]
    - [-1, 1, nn.Upsample, [None, 2, "nearest"]]
    - [[-1, 6], 1, Concat, [1]] # cat backbone P4
    - [-1, 3, C3, [512, False]] # 13

    - [-1, 1, Conv, [256, 1, 1]]
    - [-1, 1, nn.Upsample, [None, 2, "nearest"]]
    - [[-1, 4], 1, Concat, [1]] # cat backbone P3
    - [-1, 3, C3, [256, False]] # 17 (P3/8-small)

    - [-1, 1, Conv, [256, 3, 2]]
    - [[-1, 14], 1, Concat, [1]] # cat head P4
    - [-1, 3, C3, [512, False]] # 20 (P4/16-medium)

    - [-1, 1, Conv, [512, 3, 2]]
    - [[-1, 10], 1, Concat, [1]] # cat head P5
    - [-1, 3, C3, [1024, False]] # 23 (P5/32-large)

    - [[17, 20, 23], 1, Detect, [nc]] # Detect(P3, P4, P5)
so we can define the freeze list to contain all modules with 'model.0.' - 'model.9.' in their names:
python train.py --freeze 10
Freeze All Layers
To freeze the full model except for the final output convolution layers in Detect(), we set freeze list to contain all modules with 'model.0.' - 'model.23.' in their names:
python train.py --freeze 24
Results
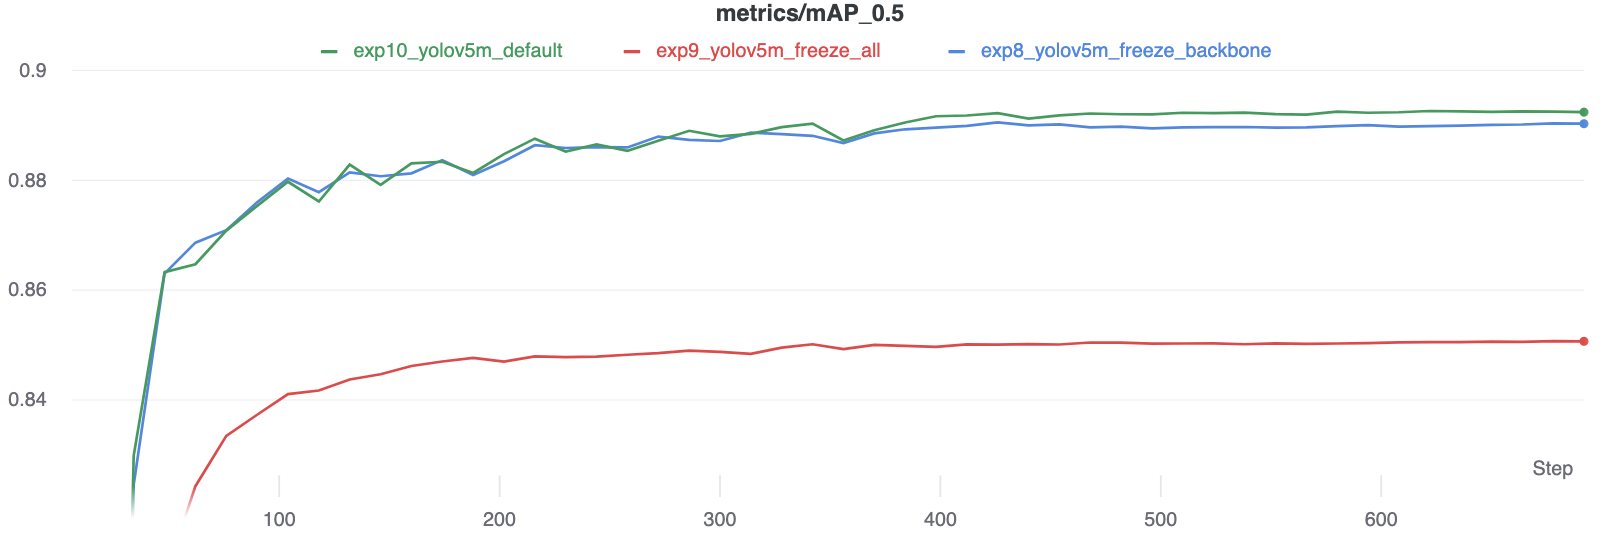
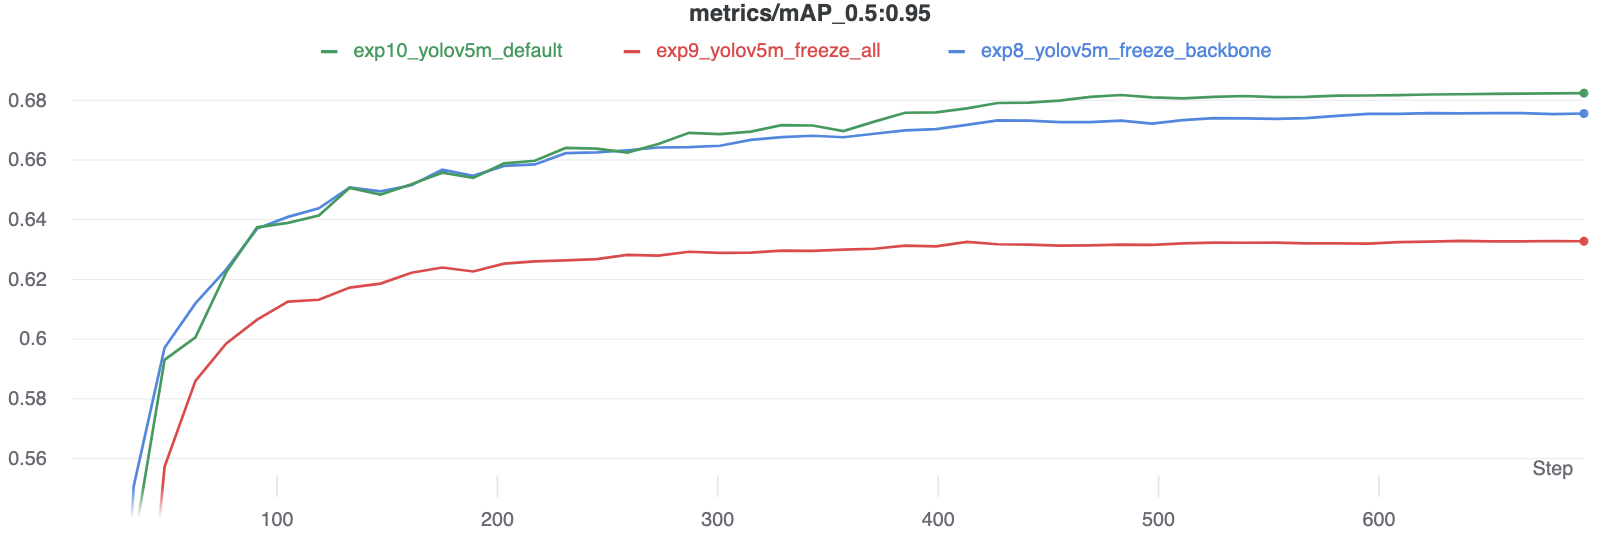
We train YOLOv5m on VOC on both of the above scenarios, along with a default model (no freezing), starting from the official COCO pretrained --weights yolov5m.pt:
train.py --batch 48 --weights yolov5m.pt --data voc.yaml --epochs 50 --cache --img 512 --hyp hyp.finetune.yaml
Accuracy Comparison
The results show that freezing speeds up training, but reduces final accuracy slightly.
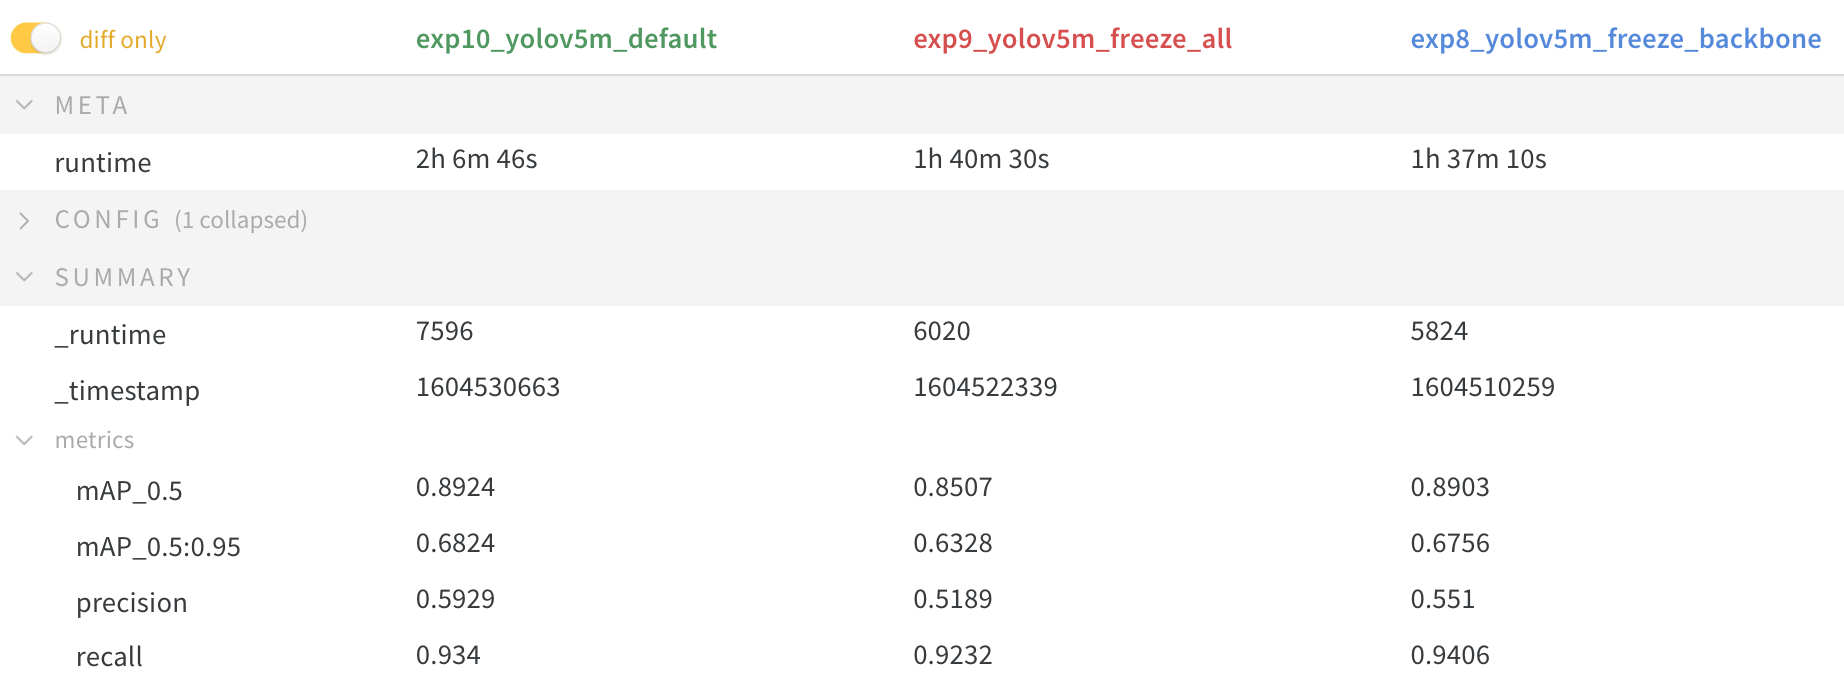
GPU Utilization Comparison
Interestingly, the more modules are frozen the less GPU memory is required to train, and the lower GPU utilization. This indicates that larger models, or models trained at larger --image-size may benefit from freezing in order to train faster.


Supported Environments
Ultralytics provides a range of ready-to-use environments, each pre-installed with essential dependencies such as CUDA, CUDNN, Python, and PyTorch, to kickstart your projects.
- Free GPU Notebooks:
![Run on Gradient]()
![Open In Colab]()
![Open In Kaggle]()
- Google Cloud: GCP Quickstart Guide
- Amazon: AWS Quickstart Guide
- Azure: AzureML Quickstart Guide
- Docker: Docker Quickstart Guide
Project Status
![]()
This badge indicates that all YOLOv5 GitHub Actions Continuous Integration (CI) tests are successfully passing. These CI tests rigorously check the functionality and performance of YOLOv5 across various key aspects: training, validation, inference, export, and benchmarks. They ensure consistent and reliable operation on macOS, Windows, and Ubuntu, with tests conducted every 24 hours and upon each new commit.
.\yolov8\docs\overrides\javascript\extra.js
// Function that applies light/dark theme based on the user's preference
const applyAutoTheme = () => {
  // Determine the user's preferred color scheme
  const prefersLight = window.matchMedia("(prefers-color-scheme: light)").matches;
  const prefersDark = window.matchMedia("(prefers-color-scheme: dark)").matches;

  // Apply the appropriate attributes based on the user's preference
  if (prefersLight) {
    document.body.setAttribute("data-md-color-scheme", "default");
    document.body.setAttribute("data-md-color-primary", "indigo");
  } else if (prefersDark) {
    document.body.setAttribute("data-md-color-scheme", "slate");
    document.body.setAttribute("data-md-color-primary", "black");
  }
};

// Function that checks and applies light/dark theme based on the user's preference (if auto theme is enabled)
function checkAutoTheme() {
  // Array of supported language codes -> each language has its own palette (stored in local storage)
  const supportedLangCodes = ["en", "zh", "ko", "ja", "ru", "de", "fr", "es", "pt", "it", "tr", "vi", "nl"];
  // Get the URL path
  const path = window.location.pathname;
  // Extract the language code from the URL (assuming it's in the format /xx/...)
  const langCode = path.split("/")[1];
  // Check if the extracted language code is in the supported languages
  const isValidLangCode = supportedLangCodes.includes(langCode);
  // Construct the local storage key based on the language code if valid, otherwise default to the root key
  const localStorageKey = isValidLangCode ? `/${langCode}/.__palette` : "/.__palette";
  // Retrieve the palette from local storage using the constructed key
  const palette = localStorage.getItem(localStorageKey);
  if (palette) {
    // Check if the palette's index is 0 (auto theme)
    const paletteObj = JSON.parse(palette);
    if (paletteObj && paletteObj.index === 0) {
      applyAutoTheme(); // Apply auto theme if palette index is 0
    }
  }
}

// Run function when the script loads
checkAutoTheme();

// Re-run the function when the user's preference changes (when the user changes their system theme)
window.matchMedia("(prefers-color-scheme: light)").addEventListener("change", checkAutoTheme);
window.matchMedia("(prefers-color-scheme: dark)").addEventListener("change", checkAutoTheme);

// Re-run the function when the palette changes (e.g. user switched from dark theme to auto theme)
// ! We can't use window.addEventListener("storage", checkAutoTheme) because it will NOT be triggered on the current tab
// ! So we have to use the following workaround:
// Get the palette input for auto theme
var autoThemeInput = document.getElementById("__palette_1");
if (autoThemeInput) {
  // Add a click event listener to the input
  autoThemeInput.addEventListener("click", function () {
    // Check if the auto theme is selected
    if (autoThemeInput.checked) {
      // Re-run the function after a short delay (to ensure that the palette has been updated)
      setTimeout(applyAutoTheme); // Delayed application of auto theme after palette update
    }
  });
}

// Add iframe navigation
// 当浏览器的 hash 改变时触发的事件处理函数
window.onhashchange = function() {
    // 向父窗口发送消息,消息内容包括导航类型和当前页面的路径、查询参数和 hash
    window.parent.postMessage({
        type: 'navigation',
        hash: window.location.pathname + window.location.search + window.location.hash
    }, '*');
};
📚 Ultralytics Docs
Ultralytics Docs are the gateway to understanding and utilizing our cutting-edge machine learning tools. These documents are deployed to https://docs.ultralytics.com for your convenience.
![]()
![]()
![]()
![]()


🛠️ Installation


To install the ultralytics package in developer mode, ensure you have Git and Python 3 installed on your system. Then, follow these steps:
-
Clone the ultralytics repository to your local machine using Git:
git clone https://github.com/ultralytics/ultralytics.git -
Navigate to the cloned repository's root directory:
cd ultralytics -
Install the package in developer mode using pip (or pip3 for Python 3):
pip install -e '.[dev]'
- This command installs the ultralytics package along with all development dependencies, allowing you to modify the package code and have the changes immediately reflected in your Python environment.
🚀 Building and Serving Locally
The mkdocs serve command builds and serves a local version of your MkDocs documentation, ideal for development and testing:
mkdocs serve
-
Command Breakdown:
mkdocsis the main MkDocs command-line interface.serveis the subcommand to build and locally serve your documentation.
-
🧐 Note:
- Grasp changes to the docs in real-time as
mkdocs servesupports live reloading. - To stop the local server, press
CTRL+C.
- Grasp changes to the docs in real-time as
🌍 Building and Serving Multi-Language
Supporting multi-language documentation? Follow these steps:
-
Stage all new language *.md files with Git:
git add docs/**/*.md -f -
Build all languages to the
/sitefolder, ensuring relevant root-level files are present:# Clear existing /site directory rm -rf site # Loop through each language config file and build mkdocs build -f docs/mkdocs.yml for file in docs/mkdocs_*.yml; do echo "Building MkDocs site with $file" mkdocs build -f "$file" done -
To preview your site, initiate a simple HTTP server:
cd site
python -m http.server
# Open in your preferred browser
- 🖥️ Access the live site at
http://localhost:8000.
📤 Deploying Your Documentation Site
Choose a hosting provider and deployment method for your MkDocs documentation:
- Configure
mkdocs.ymlwith deployment settings. - Use
mkdocs deployto build and deploy your site.
-
GitHub Pages Deployment Example:
mkdocs gh-deploy
- Update the "Custom domain" in your repository's settings for a personalized URL.

- For detailed deployment guidance, consult the MkDocs documentation.
💡 Contribute
We cherish the community's input as it drives Ultralytics open-source initiatives. Dive into the Contributing Guide and share your thoughts via our Survey. A heartfelt thank you 🙏 to each contributor!

📜 License
Ultralytics Docs presents two licensing options:
- AGPL-3.0 License: Perfect for academia and open collaboration. Details are in the LICENSE file.
- Enterprise License: Tailored for commercial usage, offering a seamless blend of Ultralytics technology in your products. Learn more at Ultralytics Licensing.
✉️ Contact
For bug reports and feature requests, navigate to GitHub Issues. Engage with peers and the Ultralytics team on Discord for enriching conversations!
Ultralytics YOLOv8 Example Applications
This repository features a collection of real-world applications and walkthroughs, provided as either Python files or notebooks. Explore the examples below to see how YOLOv8 can be integrated into various applications.
Ultralytics YOLO Example Applications
| Title | Format | Contributor |
|---|---|---|
| YOLO ONNX Detection Inference with C++ | C++/ONNX | Justas Bartnykas |
| YOLO OpenCV ONNX Detection Python | OpenCV/Python/ONNX | Farid Inawan |
| YOLOv8 .NET ONNX ImageSharp | C#/ONNX/ImageSharp | Compunet |
| YOLO .Net ONNX Detection C# | C# .Net | Samuel Stainback |
| YOLOv8 on NVIDIA Jetson(TensorRT and DeepStream) | Python | Lakshantha |
| YOLOv8 ONNXRuntime Python | Python/ONNXRuntime | Semih Demirel |
| YOLOv8 ONNXRuntime CPP | C++/ONNXRuntime | DennisJcy, Onuralp Sezer |
| RTDETR ONNXRuntime C# | C#/ONNX | Kayzwer |
| YOLOv8 SAHI Video Inference | Python | Muhammad Rizwan Munawar |
| YOLOv8 Region Counter | Python | Muhammad Rizwan Munawar |
| YOLOv8 Segmentation ONNXRuntime Python | Python/ONNXRuntime | jamjamjon |
| YOLOv8 LibTorch CPP | C++/LibTorch | Myyura |
| YOLOv8 OpenCV INT8 TFLite Python | Python | Wamiq Raza |
| YOLOv8 All Tasks ONNXRuntime Rust | Rust/ONNXRuntime | jamjamjon |
How to Contribute
We greatly appreciate contributions from the community, including examples, applications, and guides. If you'd like to contribute, please follow these guidelines:
- Create a pull request (PR) with the title prefix
[Example], adding your new example folder to theexamples/directory within the repository. - Ensure your project adheres to the following standards:
- Makes use of the
ultralyticspackage. - Includes a
README.mdwith clear instructions for setting up and running the example. - Avoids adding large files or dependencies unless they are absolutely necessary for the example.
- Contributors should be willing to provide support for their examples and address related issues.
- Makes use of the
For more detailed information and guidance on contributing, please visit our contribution documentation.
If you encounter any questions or concerns regarding these guidelines, feel free to open a PR or an issue in the repository, and we will assist you in the contribution process.
.\yolov8\examples\YOLOv8-Action-Recognition\action_recognition.py
# Ultralytics YOLO 🚀, AGPL-3.0 license

import argparse  # 导入命令行参数解析模块
import time  # 导入时间模块
from collections import defaultdict  # 导入默认字典模块
from typing import List, Optional, Tuple  # 导入类型提示相关模块
from urllib.parse import urlparse  # 导入 URL 解析模块

import cv2  # 导入 OpenCV 图像处理库
import numpy as np  # 导入 NumPy 数学计算库
import torch  # 导入 PyTorch 深度学习库
from transformers import AutoModel, AutoProcessor  # 导入 Hugging Face Transformers 模块

from ultralytics import YOLO  # 导入 Ultralytics YOLO 目标检测模块
from ultralytics.data.loaders import get_best_youtube_url  # 导入获取最佳 YouTube URL 的函数
from ultralytics.utils.plotting import Annotator  # 导入图像标注工具类
from ultralytics.utils.torch_utils import select_device  # 导入选择设备的工具函数

class TorchVisionVideoClassifier:
    """Classifies videos using pretrained TorchVision models; see https://pytorch.org/vision/stable/."""

    from torchvision.models.video import (
        MViT_V1_B_Weights,
        MViT_V2_S_Weights,
        R3D_18_Weights,
        S3D_Weights,
        Swin3D_B_Weights,
        Swin3D_T_Weights,
        mvit_v1_b,
        mvit_v2_s,
        r3d_18,
        s3d,
        swin3d_b,
        swin3d_t,
    )

    model_name_to_model_and_weights = {
        "s3d": (s3d, S3D_Weights.DEFAULT),
        "r3d_18": (r3d_18, R3D_18_Weights.DEFAULT),
        "swin3d_t": (swin3d_t, Swin3D_T_Weights.DEFAULT),
        "swin3d_b": (swin3d_b, Swin3D_B_Weights.DEFAULT),
        "mvit_v1_b": (mvit_v1_b, MViT_V1_B_Weights.DEFAULT),
        "mvit_v2_s": (mvit_v2_s, MViT_V2_S_Weights.DEFAULT),
    }

    def __init__(self, model_name: str, device: str or torch.device = ""):
        """
        Initialize the VideoClassifier with the specified model name and device.

        Args:
            model_name (str): The name of the model to use.
            device (str or torch.device, optional): The device to run the model on. Defaults to "".

        Raises:
            ValueError: If an invalid model name is provided.
        """
        if model_name not in self.model_name_to_model_and_weights:
            raise ValueError(f"Invalid model name '{model_name}'. Available models: {self.available_model_names()}")
        model, self.weights = self.model_name_to_model_and_weights[model_name]
        self.device = select_device(device)  # 选择设备(GPU 或 CPU)
        self.model = model(weights=self.weights).to(self.device).eval()  # 初始化模型并将其移动到指定设备

    @staticmethod
    def available_model_names() -> List[str]:
        """
        Get the list of available model names.

        Returns:
            list: List of available model names.
        """
        return list(TorchVisionVideoClassifier.model_name_to_model_and_weights.keys())
    # 对视频分类任务中的一组裁剪图像进行预处理
    def preprocess_crops_for_video_cls(self, crops: List[np.ndarray], input_size: list = None) -> torch.Tensor:
        """
        Preprocess a list of crops for video classification.

        Args:
            crops (List[np.ndarray]): List of crops to preprocess. Each crop should have dimensions (H, W, C)
            input_size (tuple, optional): The target input size for the model. Defaults to (224, 224).

        Returns:
            torch.Tensor: Preprocessed crops as a tensor with dimensions (1, T, C, H, W).
        """
        # 如果未提供输入大小,则默认为 (224, 224)
        if input_size is None:
            input_size = [224, 224]
        # 导入 torchvision.transforms.v2 模块,并创建变换序列 transform
        from torchvision.transforms import v2

        transform = v2.Compose(
            [
                # 将图像数据类型转换为 float32,并进行尺度缩放
                v2.ToDtype(torch.float32, scale=True),
                # 调整图像大小到指定的 input_size,使用抗锯齿方法
                v2.Resize(input_size, antialias=True),
                # 根据预先定义的均值和标准差进行图像归一化
                v2.Normalize(mean=self.weights.transforms().mean, std=self.weights.transforms().std),
            ]
        )

        # 对每个裁剪图像应用 transform 变换,转换为张量并重新排列维度
        processed_crops = [transform(torch.from_numpy(crop).permute(2, 0, 1)) for crop in crops]
        # 将处理后的裁剪图像堆叠成一个张量,添加批次维度,重新排列维度以适应模型输入格式,并将结果移动到指定设备上
        return torch.stack(processed_crops).unsqueeze(0).permute(0, 2, 1, 3, 4).to(self.device)

    # 调用对象作为函数时执行的方法,用于在给定序列上进行推断
    def __call__(self, sequences: torch.Tensor):
        """
        Perform inference on the given sequences.

        Args:
            sequences (torch.Tensor): The input sequences for the model. The expected input dimensions are
                                      (B, T, C, H, W) for batched video frames or (T, C, H, W) for single video frames.

        Returns:
            torch.Tensor: The model's output.
        """
        # 进入推断模式,确保不进行梯度计算
        with torch.inference_mode():
            # 调用模型进行推断,返回模型的输出结果
            return self.model(sequences)

    # 对模型的输出进行后处理,得到预测的类别标签和置信度
    def postprocess(self, outputs: torch.Tensor) -> Tuple[List[str], List[float]]:
        """
        Postprocess the model's batch output.

        Args:
            outputs (torch.Tensor): The model's output.

        Returns:
            List[str]: The predicted labels.
            List[float]: The predicted confidences.
        """
        # 初始化预测标签列表和置信度列表
        pred_labels = []
        pred_confs = []
        # 遍历模型输出的每个样本
        for output in outputs:
            # 找到输出张量中最高置信度的类别索引
            pred_class = output.argmax(0).item()
            # 根据索引从预先定义的类别字典中获取预测标签
            pred_label = self.weights.meta["categories"][pred_class]
            # 将预测标签添加到列表中
            pred_labels.append(pred_label)
            # 计算并获取该类别的置信度值
            pred_conf = output.softmax(0)[pred_class].item()
            # 将置信度值添加到列表中
            pred_confs.append(pred_conf)

        # 返回预测标签列表和置信度列表作为元组
        return pred_labels, pred_confs
# 定义一个视频分类器类,使用 Hugging Face 模型进行零样本分类,适用于多种设备
class HuggingFaceVideoClassifier:
    """Zero-shot video classifier using Hugging Face models for various devices."""

    def __init__(
        self,
        labels: List[str],
        model_name: str = "microsoft/xclip-base-patch16-zero-shot",
        device: str or torch.device = "",
        fp16: bool = False,
    ):
        """
        Initialize the HuggingFaceVideoClassifier with the specified model name.

        Args:
            labels (List[str]): List of labels for zero-shot classification.
            model_name (str): The name of the model to use. Defaults to "microsoft/xclip-base-patch16-zero-shot".
            device (str or torch.device, optional): The device to run the model on. Defaults to "".
            fp16 (bool, optional): Whether to use FP16 for inference. Defaults to False.
        """
        # 设置是否使用 FP16 进行推断
        self.fp16 = fp16
        # 存储分类器的标签列表
        self.labels = labels
        # 选择设备并将其分配给 self.device
        self.device = select_device(device)
        # 从预训练模型名称加载处理器
        self.processor = AutoProcessor.from_pretrained(model_name)
        # 加载预训练模型并将其移至所选设备
        model = AutoModel.from_pretrained(model_name).to(self.device)
        # 如果使用 FP16,则将模型转换为 FP16 格式
        if fp16:
            model = model.half()
        # 将模型设置为评估模式
        self.model = model.eval()

    def preprocess_crops_for_video_cls(self, crops: List[np.ndarray], input_size: list = None) -> torch.Tensor:
        """
        Preprocess a list of crops for video classification.

        Args:
            crops (List[np.ndarray]): List of crops to preprocess. Each crop should have dimensions (H, W, C)
            input_size (tuple, optional): The target input size for the model. Defaults to (224, 224).

        Returns:
            torch.Tensor: Preprocessed crops as a tensor (1, T, C, H, W).
        """
        # 如果未提供输入尺寸,则默认为 (224, 224)
        if input_size is None:
            input_size = [224, 224]
        # 导入 torchvision 中的 transforms 模块
        from torchvision import transforms

        # 定义图像预处理管道
        transform = transforms.Compose(
            [
                transforms.Lambda(lambda x: x.float() / 255.0),  # 将像素值缩放到 [0, 1]
                transforms.Resize(input_size),  # 调整图像大小至指定尺寸
                transforms.Normalize(
                    mean=self.processor.image_processor.image_mean,  # 根据处理器定义的均值进行归一化
                    std=self.processor.image_processor.image_std  # 根据处理器定义的标准差进行归一化
                ),
            ]
        )

        # 对输入的每个 crop 进行预处理
        processed_crops = [transform(torch.from_numpy(crop).permute(2, 0, 1)) for crop in crops]  # (T, C, H, W)
        # 将预处理后的 crop 堆叠成一个张量,并在最前面增加一个维度表示批处理
        output = torch.stack(processed_crops).unsqueeze(0).to(self.device)  # (1, T, C, H, W)
        # 如果使用 FP16,则将输出张量转换为 FP16 格式
        if self.fp16:
            output = output.half()
        return output
    # 定义一个方法,使对象可以像函数一样被调用,执行推断操作
    def __call__(self, sequences: torch.Tensor) -> torch.Tensor:
        """
        Perform inference on the given sequences.

        Args:
            sequences (torch.Tensor): The input sequences for the model. Batched video frames with shape (B, T, H, W, C).

        Returns:
            torch.Tensor: The model's output.
        """

        # 使用处理器(processor)处理标签,返回包含输入ids的PyTorch张量,填充数据为True
        input_ids = self.processor(text=self.labels, return_tensors="pt", padding=True)["input_ids"].to(self.device)

        # 构建输入字典,包含像素值(sequences)和输入ids(input_ids)
        inputs = {"pixel_values": sequences, "input_ids": input_ids}

        # 进入推断模式
        with torch.inference_mode():
            # 使用模型进行推断,传入inputs字典作为参数
            outputs = self.model(**inputs)

        # 返回模型输出中的logits_per_video
        return outputs.logits_per_video

    # 定义一个方法,用于后处理模型的批量输出
    def postprocess(self, outputs: torch.Tensor) -> Tuple[List[List[str]], List[List[float]]]:
        """
        Postprocess the model's batch output.

        Args:
            outputs (torch.Tensor): The model's output.

        Returns:
            List[List[str]]: The predicted top3 labels.
            List[List[float]]: The predicted top3 confidences.
        """
        # 初始化预测标签和置信度列表
        pred_labels = []
        pred_confs = []

        # 使用torch.no_grad()上下文管理器,关闭梯度计算
        with torch.no_grad():
            # 假设outputs已经是logits张量
            logits_per_video = outputs

            # 对logits进行softmax操作,将其转换为概率
            probs = logits_per_video.softmax(dim=-1)

        # 遍历每个视频的概率分布
        for prob in probs:
            # 获取概率最高的两个索引
            top2_indices = prob.topk(2).indices.tolist()

            # 根据索引获取对应的标签和置信度,并转换为列表形式
            top2_labels = [self.labels[idx] for idx in top2_indices]
            top2_confs = prob[top2_indices].tolist()

            # 将预测的top2标签和置信度添加到对应的列表中
            pred_labels.append(top2_labels)
            pred_confs.append(top2_confs)

        # 返回预测的top3标签列表和置信度列表
        return pred_labels, pred_confs
# 初始化裁剪并填充函数,用于从视频帧中裁剪指定区域并添加边距,返回尺寸为 224x224 的裁剪图像
def crop_and_pad(frame, box, margin_percent):
    """Crop box with margin and take square crop from frame."""
    # 解析框框的坐标
    x1, y1, x2, y2 = map(int, box)
    # 计算框框的宽度和高度
    w, h = x2 - x1, y2 - y1

    # 添加边距
    margin_x, margin_y = int(w * margin_percent / 100), int(h * margin_percent / 100)
    # 调整框框的位置,确保不超出图像边界
    x1, y1 = max(0, x1 - margin_x), max(0, y1 - margin_y)
    x2, y2 = min(frame.shape[1], x2 + margin_x), min(frame.shape[0], y2 + margin_y)

    # 从图像中心获取正方形裁剪
    size = max(y2 - y1, x2 - x1)
    center_y, center_x = (y1 + y2) // 2, (x1 + x2) // 2
    half_size = size // 2
    # 裁剪出正方形区域
    square_crop = frame[
        max(0, center_y - half_size) : min(frame.shape[0], center_y + half_size),
        max(0, center_x - half_size) : min(frame.shape[1], center_x + half_size),
    ]

    # 将裁剪的图像大小调整为 224x224 像素
    return cv2.resize(square_crop, (224, 224), interpolation=cv2.INTER_LINEAR)


def run(
    weights: str = "yolov8n.pt",
    device: str = "",
    source: str = "https://www.youtube.com/watch?v=dQw4w9WgXcQ",
    output_path: Optional[str] = None,
    crop_margin_percentage: int = 10,
    num_video_sequence_samples: int = 8,
    skip_frame: int = 2,
    video_cls_overlap_ratio: float = 0.25,
    fp16: bool = False,
    video_classifier_model: str = "microsoft/xclip-base-patch32",
    labels: List[str] = None,
) -> None:
    """
    Run action recognition on a video source using YOLO for object detection and a video classifier.

    Args:
        weights (str): Path to the YOLO model weights. Defaults to "yolov8n.pt".
        device (str): Device to run the model on. Use 'cuda' for NVIDIA GPU, 'mps' for Apple Silicon, or 'cpu'. Defaults to auto-detection.
        source (str): Path to mp4 video file or YouTube URL. Defaults to a sample YouTube video.
        output_path (Optional[str], optional): Path to save the output video. Defaults to None.
        crop_margin_percentage (int, optional): Percentage of margin to add around detected objects. Defaults to 10.
        num_video_sequence_samples (int, optional): Number of video frames to use for classification. Defaults to 8.
        skip_frame (int, optional): Number of frames to skip between detections. Defaults to 4.
        video_cls_overlap_ratio (float, optional): Overlap ratio between video sequences. Defaults to 0.25.
        fp16 (bool, optional): Whether to use half-precision floating point. Defaults to False.
        video_classifier_model (str, optional): Name or path of the video classifier model. Defaults to "microsoft/xclip-base-patch32".
        labels (List[str], optional): List of labels for zero-shot classification. Defaults to predefined list.

    Returns:
        None
    """
    # 如果标签列表为空,使用预定义的动作标签
    if labels is None:
        labels = [
            "walking",
            "running",
            "brushing teeth",
            "looking into phone",
            "weight lifting",
            "cooking",
            "sitting",
        ]

    # 初始化模型和设备
    device = select_device(device)  # 选择运行的设备
    yolo_model = YOLO(weights).to(device)  # 加载并移动 YOLO 模型到指定设备
    # 如果视频分类模型在 TorchVisionVideoClassifier 可用模型列表中
    if video_classifier_model in TorchVisionVideoClassifier.available_model_names():
        # 打印警告信息,指出 'fp16' 不支持 TorchVisionVideoClassifier,将其设置为 False
        print("'fp16' is not supported for TorchVisionVideoClassifier. Setting fp16 to False.")
        # 打印警告信息,指出 'labels' 在 TorchVisionVideoClassifier 中不使用,忽略提供的标签并使用 Kinetics-400 标签
        print(
            "'labels' is not used for TorchVisionVideoClassifier. Ignoring the provided labels and using Kinetics-400 labels."
        )
        # 使用 TorchVisionVideoClassifier 初始化视频分类器对象,设备为给定设备
        video_classifier = TorchVisionVideoClassifier(video_classifier_model, device=device)
    else:
        # 使用 HuggingFaceVideoClassifier 初始化视频分类器对象
        video_classifier = HuggingFaceVideoClassifier(
            labels, model_name=video_classifier_model, device=device, fp16=fp16
        )

    # 初始化视频捕获对象
    # 如果源地址以 "http" 开头且主机名是 YouTube 相关的地址,则获取最佳的 YouTube 视频地址
    if source.startswith("http") and urlparse(source).hostname in {"www.youtube.com", "youtube.com", "youtu.be"}:
        source = get_best_youtube_url(source)
    # 否则,如果源地址不是以 ".mp4" 结尾,则抛出值错误异常
    elif not source.endswith(".mp4"):
        raise ValueError("Invalid source. Supported sources are YouTube URLs and MP4 files.")
    # 使用 OpenCV 打开视频捕获对象
    cap = cv2.VideoCapture(source)

    # 获取视频的属性信息:帧宽度、帧高度、帧率
    frame_width = int(cap.get(cv2.CAP_PROP_FRAME_WIDTH))
    frame_height = int(cap.get(cv2.CAP_PROP_FRAME_HEIGHT))
    fps = cap.get(cv2.CAP_PROP_FPS)

    # 如果指定了输出路径,则初始化视频写入对象
    if output_path is not None:
        # 使用 mp4v 编解码器创建视频写入对象
        fourcc = cv2.VideoWriter_fourcc(*"mp4v")
        out = cv2.VideoWriter(output_path, fourcc, fps, (frame_width, frame_height))

    # 初始化跟踪历史字典和帧计数器
    track_history = defaultdict(list)
    frame_counter = 0

    # 初始化需要推断的跟踪 ID、需要推断的裁剪图像、预测标签和置信度列表
    track_ids_to_infer = []
    crops_to_infer = []
    pred_labels = []
    pred_confs = []

    # 释放视频捕获对象
    cap.release()

    # 如果指定了输出路径,则释放视频写入对象
    if output_path is not None:
        out.release()

    # 关闭所有 OpenCV 窗口
    cv2.destroyAllWindows()
# 解析命令行参数的函数
def parse_opt():
    """Parse command line arguments."""
    # 创建一个参数解析器对象
    parser = argparse.ArgumentParser()
    # 添加一个参数选项:权重文件的路径,默认为"yolov8n.pt"
    parser.add_argument("--weights", type=str, default="yolov8n.pt", help="ultralytics detector model path")
    # 添加一个参数选项:设备类型,默认为空字符串,支持 cuda 设备(如 '0' 或 '0,1,2,3')、cpu 或 mps,空字符串表示自动检测
    parser.add_argument("--device", default="", help='cuda device, i.e. 0 or 0,1,2,3 or cpu/mps, "" for auto-detection')
    # 添加一个参数选项:视频文件路径或 YouTube URL,默认为 Rick Astley 的视频链接
    parser.add_argument(
        "--source",
        type=str,
        default="https://www.youtube.com/watch?v=dQw4w9WgXcQ",
        help="video file path or youtube URL",
    )
    # 添加一个参数选项:输出视频文件路径,默认为"output_video.mp4"
    parser.add_argument("--output-path", type=str, default="output_video.mp4", help="output video file path")
    # 添加一个参数选项:检测到的对象周围添加的裁剪边距百分比,默认为10%
    parser.add_argument(
        "--crop-margin-percentage", type=int, default=10, help="percentage of margin to add around detected objects"
    )
    # 添加一个参数选项:用于分类的视频帧样本数量,默认为8帧
    parser.add_argument(
        "--num-video-sequence-samples", type=int, default=8, help="number of video frames to use for classification"
    )
    # 添加一个参数选项:在检测之间跳过的帧数,默认为2帧
    parser.add_argument("--skip-frame", type=int, default=2, help="number of frames to skip between detections")
    # 添加一个参数选项:视频序列之间的重叠比率,默认为0.25
    parser.add_argument(
        "--video-cls-overlap-ratio", type=float, default=0.25, help="overlap ratio between video sequences"
    )
    # 添加一个参数选项:是否使用 FP16 进行推断,默认为 False
    parser.add_argument("--fp16", action="store_true", help="use FP16 for inference")
    # 添加一个参数选项:视频分类器模型的名称,默认为"microsoft/xclip-base-patch32"
    parser.add_argument(
        "--video-classifier-model", type=str, default="microsoft/xclip-base-patch32", help="video classifier model name"
    )
    # 添加一个参数选项:用于零样本视频分类的标签列表,默认为["dancing", "singing a song"]
    parser.add_argument(
        "--labels",
        nargs="+",
        type=str,
        default=["dancing", "singing a song"],
        help="labels for zero-shot video classification",
    )
    # 解析命令行参数并返回结果
    return parser.parse_args()


# 主函数,运行时接受一个参数 opt
def main(opt):
    """Main function."""
    # 将 opt 解包后作为关键字参数传递给 run 函数
    run(**vars(opt))


# 如果当前脚本作为主程序运行,则执行以下代码
if __name__ == "__main__":
    # 解析命令行参数并赋值给 opt
    opt = parse_opt()
    # 调用主函数,传入解析后的参数 opt
    main(opt)
Zero-shot Action Recognition with YOLOv8 (Inference on Video)
- Action recognition is a technique used to identify and classify actions performed by individuals in a video. This process enables more advanced analyses when multiple actions are considered. The actions can be detected and classified in real time.
- The system can be customized to recognize specific actions based on the user's preferences and requirements.
Table of Contents
- Step 1: Install the Required Libraries
- Step 2: Run the Action Recognition Using Ultralytics YOLOv8
- Usage Options
- FAQ
Step 1: Install the Required Libraries
Clone the repository, install dependencies and cd to this local directory for commands in Step 2.
# Clone ultralytics repo
git clone https://github.com/ultralytics/ultralytics

# cd to local directory
cd examples/YOLOv8-Action-Recognition

# Install dependencies
pip install -U -r requirements.txt
Step 2: Run the Action Recognition Using Ultralytics YOLOv8
Here are the basic commands for running the inference:
Note
The action recognition model will automatically detect and track people in the video, and classify their actions based on the specified labels. The results will be displayed in real-time on the video output. You can customize the action labels by modifying the --labels argument when running the script.
# Quick start
python action_recognition.py

# Basic usage
python action_recognition.py --source "https://www.youtube.com/watch?v=dQw4w9WgXcQ" --labels "dancing" "singing a song"

# Use local video file
python action_recognition.py --source path/to/video.mp4

# Better detector performance
python action_recognition.py --weights yolov8m.pt

# Run on CPU
python action_recognition.py --device cpu

# Use a different video classifier model
python action_recognition.py --video-classifier-model "s3d"

# Use FP16 for inference (only for HuggingFace models)
python action_recognition.py --fp16

# Export output as mp4
python action_recognition.py --output-path output.mp4

# Combine multiple options
python action_recognition.py --source "https://www.youtube.com/watch?v=dQw4w9WgXcQ" --device 0 --video-classifier-model "microsoft/xclip-base-patch32" --labels "dancing" "singing a song" --fp16
Usage Options
--weights: Path to the YOLO model weights (default: "yolov8n.pt")--device: Cuda device, i.e. 0 or 0,1,2,3 or cpu (default: auto-detect)--source: Video file path or YouTube URL (default: "rickroll")--output-path: Output video file path--crop-margin-percentage: Percentage of margin to add around detected objects (default: 10)--num-video-sequence-samples: Number of video frames to use for classification (default: 8)--skip-frame: Number of frames to skip between detections (default: 1)--video-cls-overlap-ratio: Overlap ratio between video sequences (default: 0.25)--fp16: Use FP16 for inference (only for HuggingFace models)--video-classifier-model: Video classifier model name or path (default: "microsoft/xclip-base-patch32")--labels: Labels for zero-shot video classification (default: ["dancing" "singing a song"])
FAQ
1. What Does Action Recognition Involve?
Action recognition is a computational method used to identify and classify actions or activities performed by individuals in recorded video or real-time streams. This technique is widely used in video analysis, surveillance, and human-computer interaction, enabling the detection and understanding of human behaviors based on their motion patterns and context.
2. Is Custom Action Labels Supported by the Action Recognition?
Yes, custom action labels are supported by the action recognition system. The action_recognition.py script allows users to specify their own custom labels for zero-shot video classification. This can be done using the --labels argument when running the script. For example:
python action_recognition.py --source https://www.youtube.com/watch?v=dQw4w9WgXcQ --labels "dancing" "singing" "jumping"
You can adjust these labels to match the specific actions you want to recognize in your video. The system will then attempt to classify the detected actions based on these custom labels.
Additionally, you can choose between different video classification models:
-
For Hugging Face models, you can use any compatible video classification model. The default is set to:
- "microsoft/xclip-base-patch32"
-
For TorchVision models (no support for zero-shot labels), you can select from the following options:
- "s3d"
- "r3d_18"
- "swin3d_t"
- "swin3d_b"
- "mvit_v1_b"
- "mvit_v2_s"
3. Why Combine Action Recognition with YOLOv8?
YOLOv8 specializes in the detection and tracking of objects in video streams. Action recognition complements this by enabling the identification and classification of actions performed by individuals, making it a valuable application of YOLOv8.
4. Can I Employ Other YOLO Versions?
Certainly, you have the flexibility to specify different YOLO model weights using the --weights option.


 浙公网安备 33010602011771号