Java 集成WebSocket实现实时通讯
去年独立负责开发了一个小程序拼单的功能,要求多个设备同时在线点单,点单内容实时共享,最后再统一进行结算和支付。当时还支持付款人发起群收款等功能,这个功能以后再介绍。
之前用PHP集成Swoole写过视频直播的聊天功能,一开始准备使用Websocket来实现这个功能,但结合项目复杂性考虑,最后采用轮询购物车版本号的方式来实现这个功能。在面对实时性要求很高的功能,Websocket依然是很好的选择。
这里就简单将Websocket集成到SpringBoot中,简单实现聊天房间在线用户和消息列表。
在SpringBoot的pom.xml文件里面加入Websocket扩展包:
<dependencies>
    ...
    <dependency>
    <groupId>org.springframework.boot</groupId>
       <artifactId>spring-boot-starter-websocket</artifactId>
    </dependency>
    ...
</dependencies>
创建配置文件 WebsocketConfig,引入ServerEndpointExporter
package com.demo.www.config.websocket;

import org.springframework.context.annotation.Bean;
import org.springframework.context.annotation.Configuration;
import org.springframework.web.socket.server.standard.ServerEndpointExporter;

/**
 * WebSocket服务配置
 * @author AnYuan
 */

@Configuration
public class WebsocketConfig {

    /**
     * 注入一个ServerEndpointExporter
     * 该Bean会自动注册使用@ServerEndpoint注解申明的websocket endpoint
     */
    @Bean
    public ServerEndpointExporter serverEndpointExporter() {
        return new ServerEndpointExporter();
    }
}
创建一个的消息模版类,统一接受和发送消息的数据字段和类型:
package com.demo.www.config.websocket;

import lombok.Data;

import java.time.LocalDateTime;
import java.time.format.DateTimeFormatter;
import java.util.List;

/**
 * 消息模版
 * @author AnYuan
 */

@Data
public class WebsocketMsgDTO {

    /**
     * 发送消息用户
     */
    private String uid;
    /**
     * 接收消息用户
     */
    private String toUId;
    /**
     * 消息内容
     */
    private String content;
    /**
     * 消息时间
     */
    private String dateTime;
    /**
     * 用户列表
     */
    private List<String> onlineUser;

    /**
     * 统一消息模版
     * @param uid 发送消息用户
     * @param content 消息内容
     * @param onlineUser 在线用户列表
     */
    public WebsocketMsgDTO(String uid, String content, List<String> onlineUser) {
        this.uid = uid;
        this.content = content;
        this.onlineUser = onlineUser;
        this.dateTime = localDateTimeToString();
    }


    /**
     * 获取当前时间
     * @return String 12:00:00
     */
    private String localDateTimeToString() {
        DateTimeFormatter dateTimeFormatter = DateTimeFormatter.ofPattern("HH:mm:ss");
        return dateTimeFormatter.format( LocalDateTime.now());
    }
}
逻辑代码:@ServerEndpoint(value="") 这个是Websocket服务url前缀,{uid}类似于ResutFul风格的参数
package com.demo.www.config.websocket;

import com.alibaba.fastjson.JSONObject;
import lombok.extern.slf4j.Slf4j;
import org.apache.logging.log4j.util.Strings;
import org.springframework.stereotype.Component;

import javax.websocket.*;
import javax.websocket.server.PathParam;
import javax.websocket.server.ServerEndpoint;
import java.io.IOException;
import java.time.LocalDateTime;
import java.time.format.DateTimeFormatter;
import java.util.ArrayList;
import java.util.List;
import java.util.Objects;
import java.util.concurrent.ConcurrentHashMap;
import java.util.concurrent.atomic.AtomicInteger;

/**
 * WebSocketServer服务
 * @author AnYuan
 */

@ServerEndpoint(value = "/webSocket/{uid}")
@Component
@Slf4j
public class WebSocketServer {

    /**
     * 机器人发言名称
     */
    private static final String SPOKESMAN_ADMIN = "机器人";

    /**
     * concurrent包的线程安全Set
     * 用来存放每个客户端对应的Session对象
     */
    private static final ConcurrentHashMap<String, Session> SESSION_POOLS = new ConcurrentHashMap<>();

    /**
     * 静态变量,用来记录当前在线连接数。
     * 应该把它设计成线程安全的。
     */
    private static final AtomicInteger ONLINE_NUM = new AtomicInteger();

    /**
     * 获取在线用户列表
     * @return List<String>
     */
    private List<String> getOnlineUsers() {
        return new ArrayList<>(SESSION_POOLS.keySet());
    }

    /**
     * 用户建立连接成功调用
     * @param session 用户集合
     * @param uid     用户标志
     */
    @OnOpen
    public void onOpen(Session session, @PathParam(value = "uid") String uid) {
        // 将加入连接的用户加入SESSION_POOLS集合
        SESSION_POOLS.put(uid, session);
        // 在线用户+1
        ONLINE_NUM.incrementAndGet();
        sendToAll(new WebsocketMsgDTO(SPOKESMAN_ADMIN, uid + " 加入连接!", getOnlineUsers()));
    }

    /**
     * 用户关闭连接时调用
     * @param uid 用户标志
     */
    @OnClose
    public void onClose(@PathParam(value = "uid") String uid) {
        // 将加入连接的用户移除SESSION_POOLS集合
        SESSION_POOLS.remove(uid);
        // 在线用户-1
        ONLINE_NUM.decrementAndGet();
        sendToAll(new WebsocketMsgDTO(SPOKESMAN_ADMIN, uid + " 断开连接!", getOnlineUsers()));
    }

    /**
     * 服务端收到客户端信息
     * @param message 客户端发来的string
     * @param uid     uid 用户标志
     */
    @OnMessage
    public void onMessage(String message, @PathParam(value = "uid") String uid) {
        log.info("Client:[{}], Message: [{}]", uid, message);

        // 接收并解析前端消息并加上时间,最后根据是否有接收用户,区别发送所有用户还是单个用户
        WebsocketMsgDTO msgDTO = JSONObject.parseObject(message, WebsocketMsgDTO.class);
        msgDTO.setDateTime(localDateTimeToString());

        // 如果有接收用户就发送单个用户
        if (Strings.isNotBlank(msgDTO.getToUId())) {
            sendMsgByUid(msgDTO);
            return;
        }
        // 否则发送所有人
        sendToAll(msgDTO);
    }

    /**
     * 给所有人发送消息
     * @param msgDTO msgDTO
     */
    private void sendToAll(WebsocketMsgDTO msgDTO) {
        //构建json消息体
        String content = JSONObject.toJSONString(msgDTO);
        // 遍历发送所有在线用户
        SESSION_POOLS.forEach((k, session) ->  sendMessage(session, content));
    }

    /**
     * 给指定用户发送信息
     */
    private void sendMsgByUid(WebsocketMsgDTO msgDTO) {
        sendMessage(SESSION_POOLS.get(msgDTO.getToUId()), JSONObject.toJSONString(msgDTO));
    }

    /**
     * 发送消息方法
     * @param session 用户
     * @param content 消息
     */
    private void sendMessage(Session session, String content){
        try {
            if (Objects.nonNull(session)) {
                // 使用Synchronized锁防止多次发送消息
                synchronized (session) {
                    // 发送消息
                    session.getBasicRemote().sendText(content);
                }
            }
        } catch (IOException ioException) {
            log.info("发送消息失败:{}", ioException.getMessage());
            ioException.printStackTrace();
        }
    }

    /**
     * 获取当前时间
     * @return String 12:00:00
     */
    private String localDateTimeToString() {
        DateTimeFormatter dateTimeFormatter = DateTimeFormatter.ofPattern("HH:mm:ss");
        return dateTimeFormatter.format( LocalDateTime.now());
    }
}
启动后就开启了一个WebSocket后端服务了,前端再协议握手就可以了。
简单写一下前端样式和Js代码,创建一个Admin用户,一个user用户,同时连接这个WebSocket服务,实现展现在线用户和通告列表的功能。
第一个文件:admin.html
<!DOCTYPE html>
<html>
<meta http-equiv="Content-Type" content="text/html; charset=UTF-8"/>
<head>
    <title>Admin Hello WebSocket</title>
    <link href="https://cdn.bootcdn.net/ajax/libs/twitter-bootstrap/3.4.1/css/bootstrap.min.css" rel="stylesheet">
    <script src="https://cdn.bootcdn.net/ajax/libs/jquery/3.2.1/jquery.js"></script>
    <script src="app.js"></script>
    <style>
        body {
            background-color: #f5f5f5;
        }
        #main-content {
            max-width: 940px;
            padding: 2em 3em;
            margin: 0 auto 20px;
            background-color: #fff;
            border: 1px solid #e5e5e5;
            -webkit-border-radius: 5px;
            -moz-border-radius: 5px;
            border-radius: 5px;
        }
    </style>
</head>
<body>
<div id="main-content" class="container">
    <div class="row">
        <div class="col-md-6">
            <form class="form-inline">
                <div class="form-group">
                    <input id="userId" value="Admin" hidden>
                    <label for="connect">建立连接通道:</label>
                    <button id="connect" class="btn btn-default" type="submit">Connect</button>
                    <button id="disconnect" class="btn btn-default" type="submit" disabled="disabled">Disconnect
                    </button>
                </div>
            </form>
        </div>
        <div class="col-md-6">
            <form class="form-inline">
                <div class="form-group">
                    <label>发布新公告</label>
                    <input type="text" id="content" class="form-control" value="" placeholder="发言框..">
                </div>
                <button id="send" class="btn btn-default" type="submit">发布</button>
            </form>
        </div>
    </div>
    <div class="row" style="margin-top: 30px">
        <div class="col-md-12">
            <table id="userlist" class="table table-striped">
                <thead>
                <tr>
                    <th>实时在线用户列表<span id="onLineUserCount"></span></th>
                </tr>
                </thead>
                <tbody id='online'>
                </tbody>
            </table>
        </div>
        <div class="col-md-12">
            <table id="conversation" class="table table-striped">
                <thead>
                <tr>
                    <th>游戏公告内容</th>
                </tr>
                </thead>
                <tbody id="notice">
                </tbody>
            </table>
        </div>
    </div>
</div>
</body>
</html>
第二个文件:user.html
<!DOCTYPE html>
<html>
<meta http-equiv="Content-Type" content="text/html; charset=UTF-8"/>
<head>
    <title>User1 Hello WebSocket</title>
    <link href="https://cdn.bootcdn.net/ajax/libs/twitter-bootstrap/3.4.1/css/bootstrap.min.css" rel="stylesheet">
    <script src="https://cdn.bootcdn.net/ajax/libs/jquery/3.2.1/jquery.js"></script>
    <script src="app.js"></script>
    <style>
        body {
            background-color: #f5f5f5;
        }
        #main-content {
            max-width: 940px;
            padding: 2em 3em;
            margin: 0 auto 20px;
            background-color: #fff;
            border: 1px solid #e5e5e5;
            -webkit-border-radius: 5px;
            -moz-border-radius: 5px;
            border-radius: 5px;
        }
    </style>
</head>
<body>
<div id="main-content" class="container">
    <div class="row">
        <div class="col-md-6">
            <form class="form-inline">
                <div class="form-group">
                    <input id="userId" value="user1" hidden>
                    <label for="connect">建立连接通道:</label>
                    <button id="connect" class="btn btn-default" type="submit">Connect</button>
                    <button id="disconnect" class="btn btn-default" type="submit" disabled="disabled">Disconnect
                    </button>
                </div>
            </form>
        </div>

    </div>
    <div class="row" style="margin-top: 30px">
        <div class="col-md-12">
            <table id="userlist" class="table table-striped">
                <thead>
                <tr>
                    <th>实时在线用户列表<span id="onLineUserCount"></span></th>
                </tr>
                </thead>
                <tbody id='online'>
                </tbody>
            </table>
        </div>
        <div class="col-md-12">
            <table id="conversation" class="table table-striped">
                <thead>
                <tr>
                    <th>游戏公告内容</th>
                </tr>
                </thead>
                <tbody id="notice">
                </tbody>
            </table>
        </div>
    </div>
</div>
</body>
</html>
最后重点的Js文件:app.js。 将其与admin.html、user.html放在同一个目录下即可引用
var socket;

function setConnected(connected) {
    $("#connect").prop("disabled", connected);
    $("#disconnect").prop("disabled", !connected);
    if (connected) {
        $("#conversation").show();
    } else {
        $("#conversation").hide();
    }
    $("#notice").html("");
}
// WebSocket 服务操作
function openSocket() {
    if (typeof (WebSocket) == "undefined") {
        console.log("浏览器不支持WebSocket");
    } else {
        console.log("浏览器支持WebSocket");
        //实现化WebSocket对象,指定要连接的服务器地址与端口  建立连接
        if (socket != null) {
            socket.close();
            socket = null;
        }
        // ws 为websocket连接标识,localhost:9999 为SpringBoot的连接地址,webSocket 为后端配置的前缀, userId 则是参数
        socket = new WebSocket("ws://localhost:9999/webSocket/" + $("#userId").val());
        //打开事件
        socket.onopen = function () {
            console.log("websocket已打开");
            setConnected(true)
        };
        //获得消息事件
        socket.onmessage = function (msg) {
            const msgDto = JSON.parse(msg.data);
            console.log(msg)
            showContent(msgDto);
            showOnlineUser(msgDto.onlineUser);
        };
        //关闭事件
        socket.onclose = function () {
            console.log("websocket已关闭");
            setConnected(false)
            removeOnlineUser();
        };
        //发生了错误事件
        socket.onerror = function () {
            setConnected(false)
            console.log("websocket发生了错误");
        }
    }
}

//2、关闭连接
function disconnect() {
    if (socket !== null) {
        socket.close();
    }
    setConnected(false);
    console.log("Disconnected");
}

function sendMessage() {
    if (typeof (WebSocket) == "undefined") {
        console.log("您的浏览器不支持WebSocket");
    } else {
        var msg = '{"uid":"' + $("#userId").val() + '", "toUId": null, "content":"' + $("#content").val() + '"}';
        console.log("向服务端发送消息体:" + msg);
        socket.send(msg);
    }
}

// 订阅的消息显示在客户端指定位置
function showContent(serverMsg) {
    $("#notice").html("<tr><td>" + serverMsg.uid + ": </td> <td>" + serverMsg.content + "</td><td>" + serverMsg.dateTime + "</td></tr>" +  $("#notice").html())
}

//显示实时在线用户
function showOnlineUser(serverMsg) {
    if (null != serverMsg) {
        let html = '';
        for (let i = 0; i < serverMsg.length; i++) {
            html += "<tr><td>" + serverMsg[i] + "</td></tr>";
        }
        $("#online").html(html);
        $("#onLineUserCount").html(" ( " + serverMsg.length + " )");
    }
}

//显示实时在线用户
function removeOnlineUser() {
    $("#online").html("");
    $("#onLineUserCount").html("");
}

$(function () {
    $("form").on('submit', function (e) {
        e.preventDefault();
    });
    $("#connect").click(function () {
        openSocket();
    });
    $("#disconnect").click(function () {
        disconnect();
    });
    $("#send").click(function () {
        sendMessage();
    });
});
打开admin.html和user.html页面:

分别点击Connect连接Websocket服务,然后使用admin页面的[发布新通告]进行消息发布:
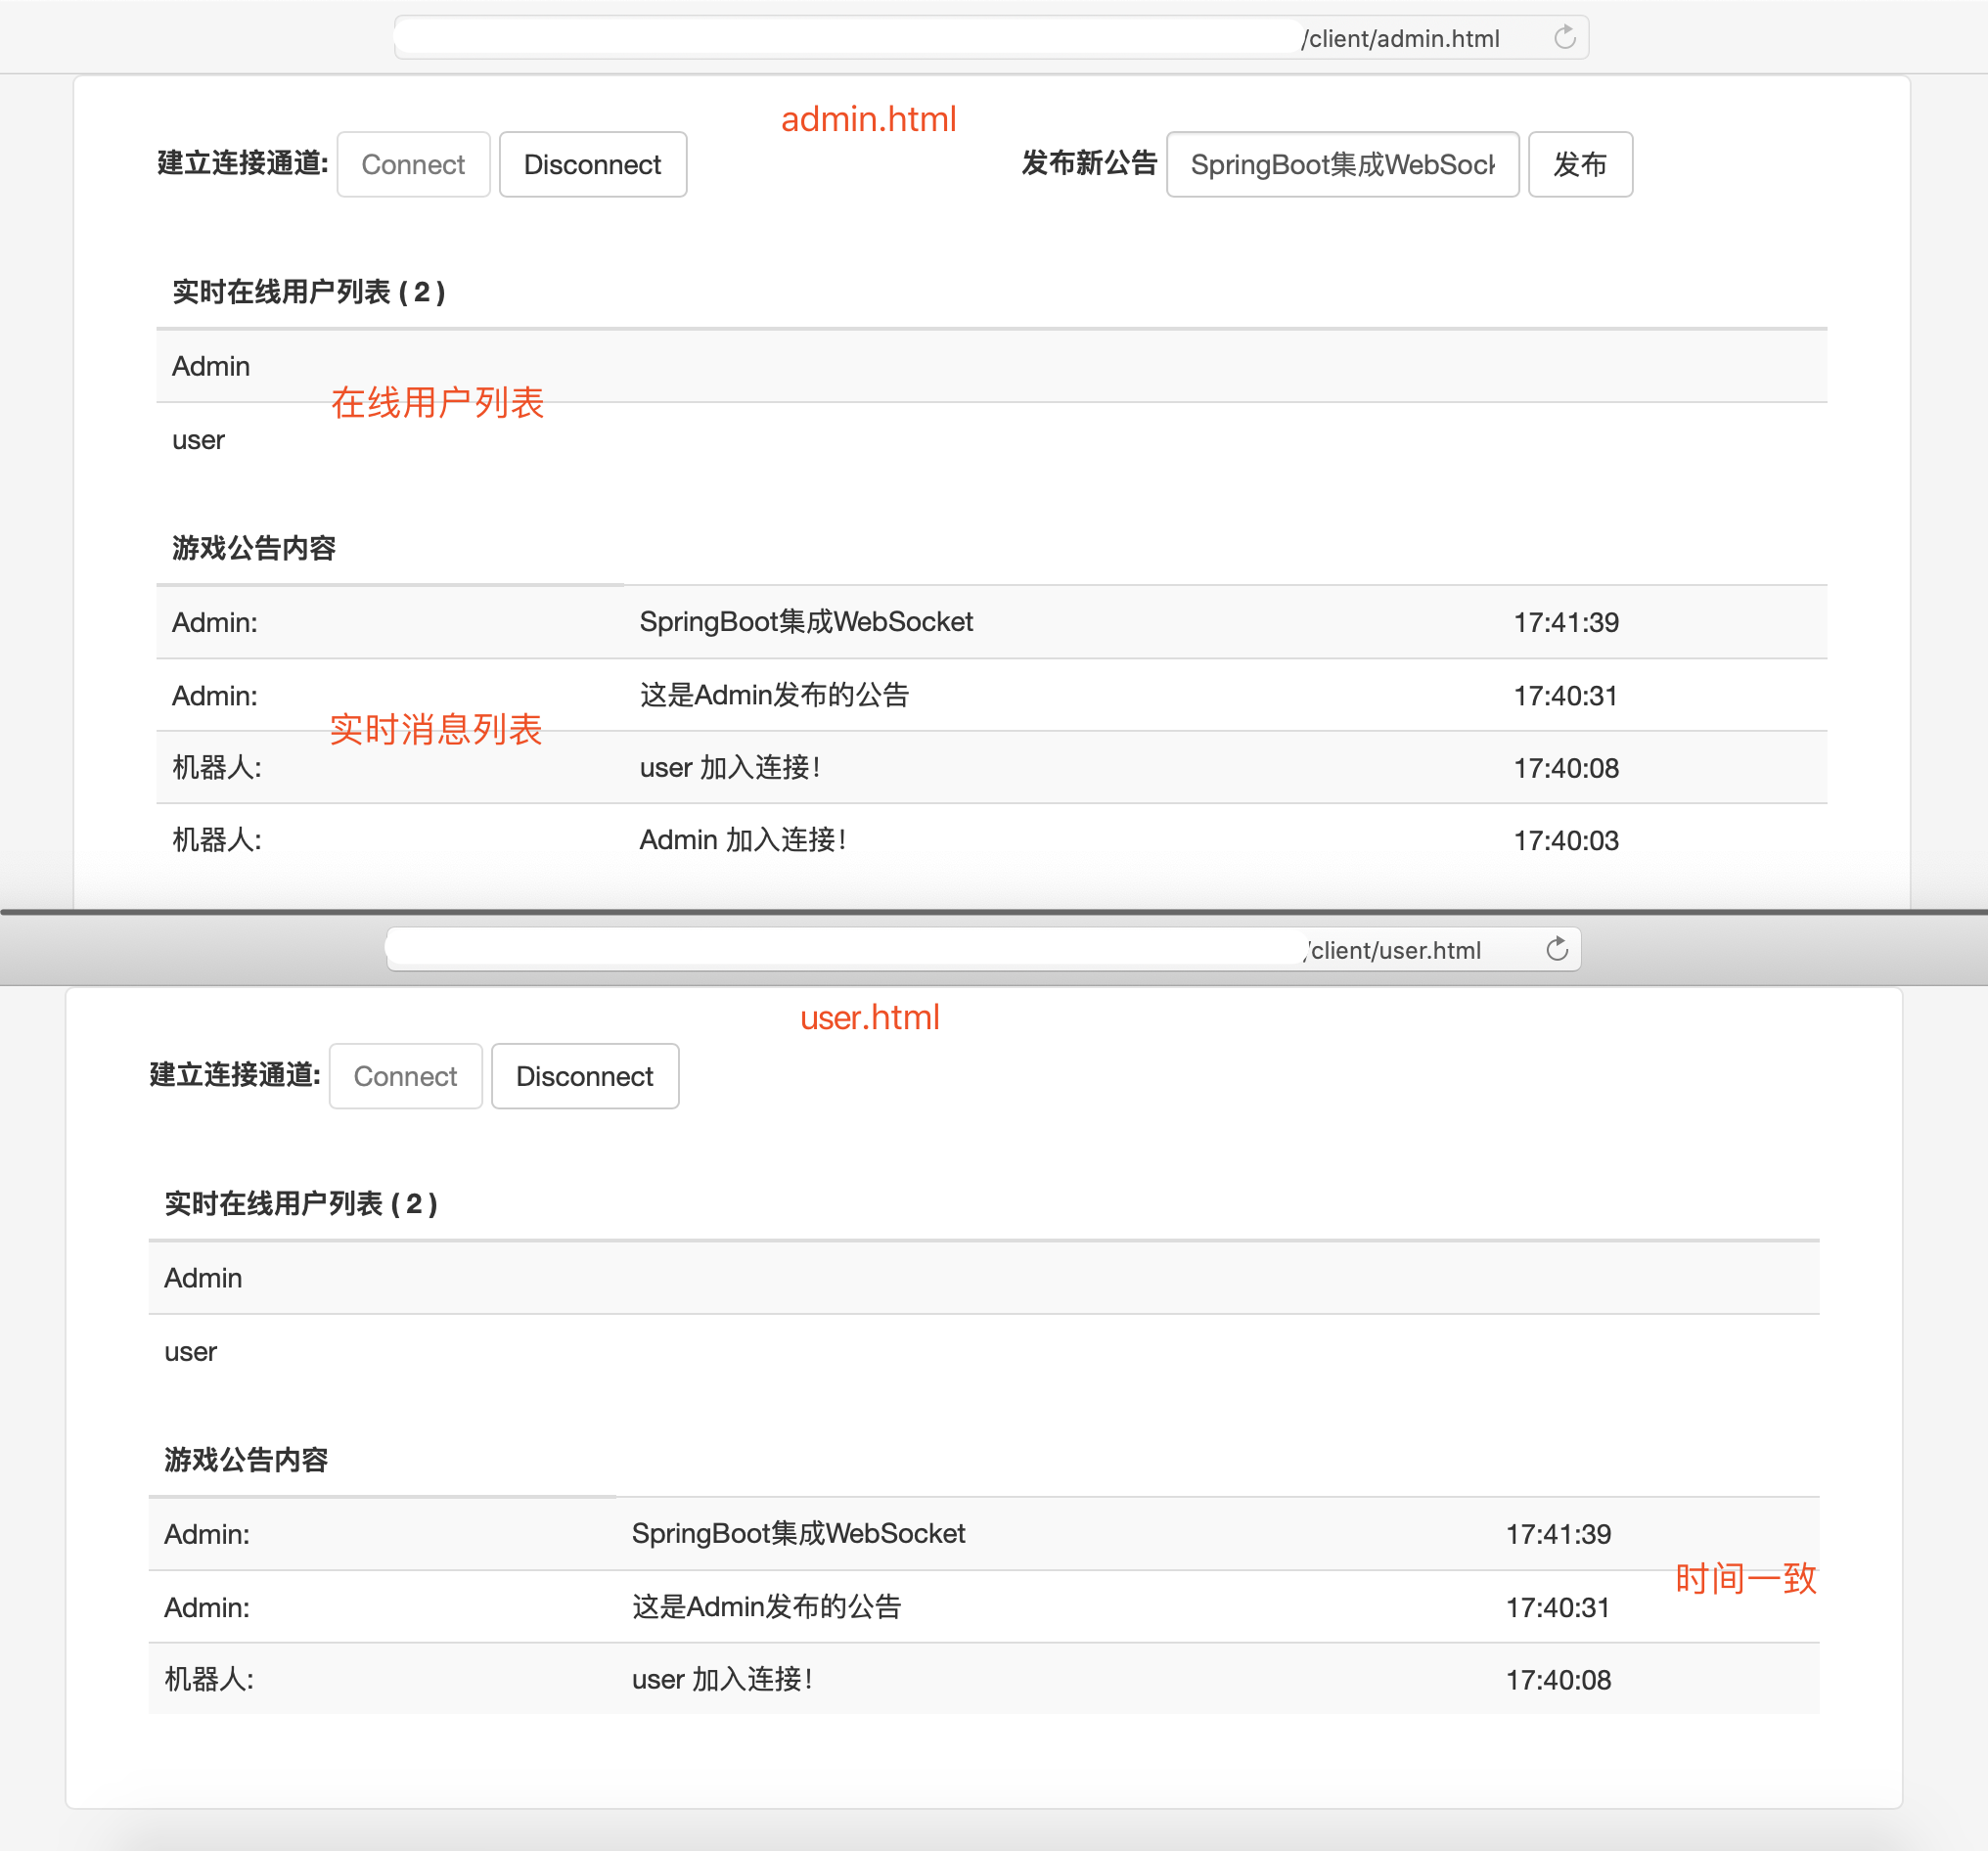
这里简单实现了管理员群发消息,可以通过修改用户列表的样式,增加一对一聊天的功能,然后在app.js里,发送消息时指定发送对象字段 [toUId] 就可以实现一对一聊天了
本篇代码Github:https://github.com/Journeyerr/cnblogs/tree/master/websocket

 浙公网安备 33010602011771号