Java 实现RabbitMq延时队列和死信队列
当RabbitMQ队列中的消息变成 Dead message(过期消息)、或消息被拒绝(basic.reject / basic.nack)且requeue = false、或队列达到了最大的长度以上的一种情况时 消息会成为死信。如果这个队列有设置 x-dead-letter-exchange (死信交换机)参数,那么这些死信消息会被路由到死信交换机上,跟这个交换机绑定的队列即称为死信队列。死信消息会被存储到死信队列供后续处理,这样确保了异常消息不会丢失并提供了一种异常恢复机制。
之前介绍过:Java 简单操作 RabbitMq ,这里就简单RabbitMq的死信队列来实现延时队列的功能。
创建一个自动加载类在项目启动时,自动创建延时交换机和延时队列,死信交换机和死信队列,并将其对应绑定起来:
package com.demo.www.rabbitmq.config;

import com.google.common.collect.Maps;
import lombok.extern.slf4j.Slf4j;
import org.springframework.amqp.core.*;
import org.springframework.context.annotation.Bean;
import org.springframework.context.annotation.Configuration;

import java.util.Map;

/**
 * RabbitMq 延时队列实现
 * @author AnYuan
 */

@Slf4j
@Configuration
public class DelayQueueConfig {

    /**
     * 延迟队列
     */
    public static final String DELAY_EXCHANGE = "delay.queue.business.exchange";
    public static final String DELAY_QUEUE = "delay.queue.business.queue";
    public static final String DELAY_QUEUE_ROUTING_KEY = "delay.queue.business.queue.routingKey";

    /**
     * 死信队列
     */
    public static final String DEAD_LETTER_EXCHANGE = "delay.queue.deadLetter.exchange";
    public static final String DEAD_LETTER_QUEUE_ROUTING_KEY = "delay.queue.deadLetter.delay_10s.routingKey";
    public static final String DEAD_LETTER_QUEUE = "delay.queue.deadLetter.queue";

    /**
     * 声明 死信交换机
     * @return deadLetterExchange
     */
    @Bean
    public DirectExchange deadLetterExchange() {
        return new DirectExchange(DEAD_LETTER_EXCHANGE);
    }

    /**
     * 声明 死信队列 用于接收死信消息
     * @return deadLetterQueueA
     */
    @Bean
    public Queue deadLetterQueueA() {
        return new Queue(DEAD_LETTER_QUEUE);
    }

    /**
     *  将 死信队列 绑定到死信交换机上
     * @return deadLetterBindingA
     */
    @Bean
    public Binding deadLetterBindingA() {
        return BindingBuilder
                .bind(deadLetterQueueA())
                .to(deadLetterExchange())
                .with(DEAD_LETTER_QUEUE_ROUTING_KEY);
    }

    /**
     * 声明 延时交换机
     * @return delayExchange
     */
    @Bean
    public DirectExchange directExchange() {
        return new DirectExchange(DELAY_EXCHANGE);
    }

    /**
     * 将 延时队列 绑定参数
     * @return Queue
     */
    @Bean
    public Queue delayQueueA() {
        Map<String, Object> maps = Maps.newHashMapWithExpectedSize(3);
        // 队列绑定DLX参数(关键一步)
        maps.put("x-dead-letter-exchange", DEAD_LETTER_EXCHANGE);
        // 队列绑定 死信RoutingKey参数
        maps.put("x-dead-letter-routing-key", DEAD_LETTER_QUEUE_ROUTING_KEY);
        // 消息过期采用第一种设置队列的 ttl 时间,消息过期时间全部相同。 单位:毫秒,这里设置为8秒
        maps.put("x-message-ttl", 8000);
        return QueueBuilder.durable(DELAY_QUEUE).withArguments(maps).build();
    }

    /**
     * 将 延时队列 绑定到延时交换机上面
     * @return delayBindingA
     */
    @Bean
    public Binding delayBindingA() {
        return BindingBuilder
                .bind(delayQueueA())
                .to(directExchange())
                .with(DELAY_QUEUE_ROUTING_KEY);
    }
}
声明RabbitMq服务接口:
package com.demo.www.service;

/**
 * rabbiMq服务
 * @author AnYuan
 */

public interface RabbitMqService {

    /**
     * 统一发送mq
     *
     * @param exchange   交换机
     * @param routingKey 路由key
     * @param msg       消息
     * @param ttl       过期时间
     */
    void send(String exchange, String routingKey, String msg, Integer ttl);
}
服务接口的实现类:
package com.demo.www.service.impl;

import com.demo.www.service.RabbitMqService;
import lombok.extern.slf4j.Slf4j;
import org.springframework.amqp.core.Message;
import org.springframework.amqp.core.MessageProperties;
import org.springframework.amqp.rabbit.core.RabbitTemplate;
import org.springframework.beans.factory.annotation.Autowired;
import org.springframework.stereotype.Service;

/**
 * rabbitmq服务
 * @author AnYuan
 */

@Service
@Slf4j
public class RabbitMqServiceImpl implements RabbitMqService {

    @Autowired
    private RabbitTemplate rabbitTemplate;

    @Override
    public void send(String exchange, String routingKey, String msg, Integer ttl) {
        MessageProperties messageProperties = new MessageProperties();
        // 第二种方式设置消息过期时间
        messageProperties.setExpiration(ttl.toString());
        // 构建一个消息对象
        Message message = new Message(msg.getBytes(), messageProperties);
        // 发送RabbitMq消息
        rabbitTemplate.convertAndSend(exchange, routingKey, message);
    }
}
创建一个单元测试类:
package com.demo.www.service.impl;

import com.google.common.collect.Maps;
import com.demo.www.rabbitmq.config.DelayQueueConfig;
import com.demo.www.service.RabbitMqService;
import org.junit.jupiter.api.Test;
import org.springframework.beans.factory.annotation.Autowired;
import org.springframework.boot.test.context.SpringBootTest;

import java.time.LocalDateTime;
import java.util.Map;

@Slf4j
@SpringBootTest class RabbitMqServiceImplTest {

    @Autowired private RabbitMqService rabbitMqService;

    @Test public void sendTest() {
      // 手动指定消息过期时间
    int ttl = 10000;

    Map<String, Object> msgMap = Maps.newHashMapWithExpectedSize(3);
    msgMap.put("msg", "Hello RabbitMq");
    msgMap.put("time", LocalDateTime.now());
    msgMap.put("ttl", ttl);

    // 注意这里发送的交换机是 延时交换机
    rabbitMqService.send(DelayQueueConfig.DELAY_EXCHANGE, DelayQueueConfig.DELAY_QUEUE_ROUTING_KEY, JSONObject.toJSONString(msgMap), ttl);

    log.info("消息发送成功:{}", JSONObject.toJSONString(msgMap));

    }
}
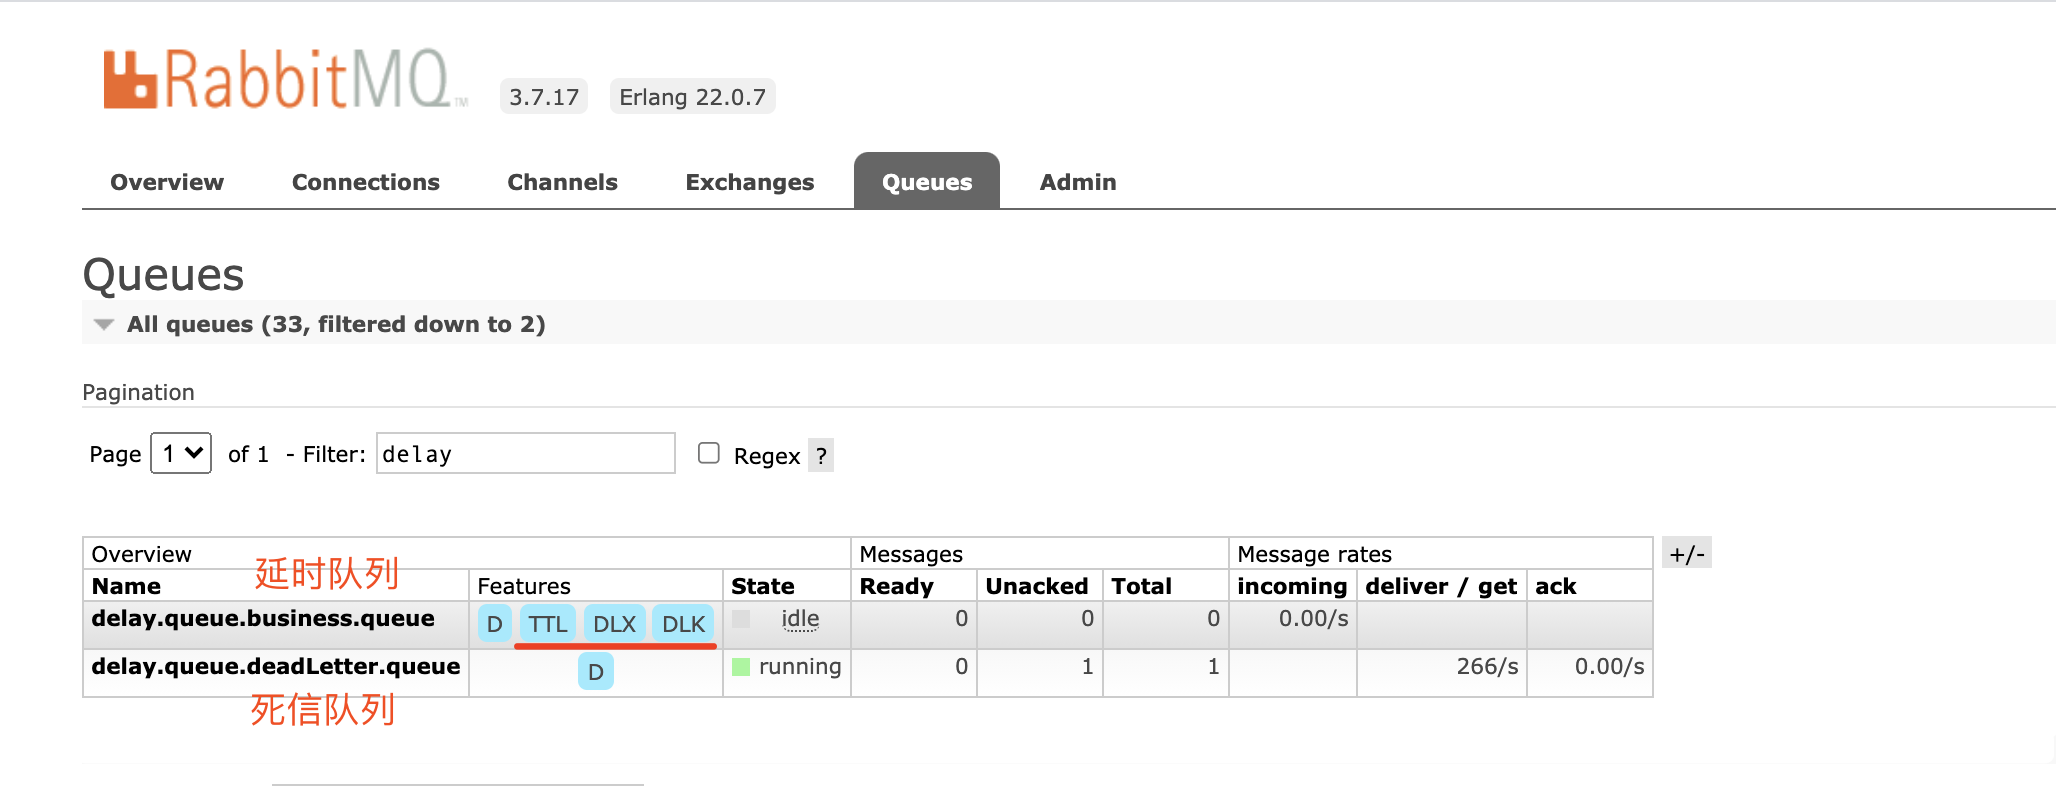
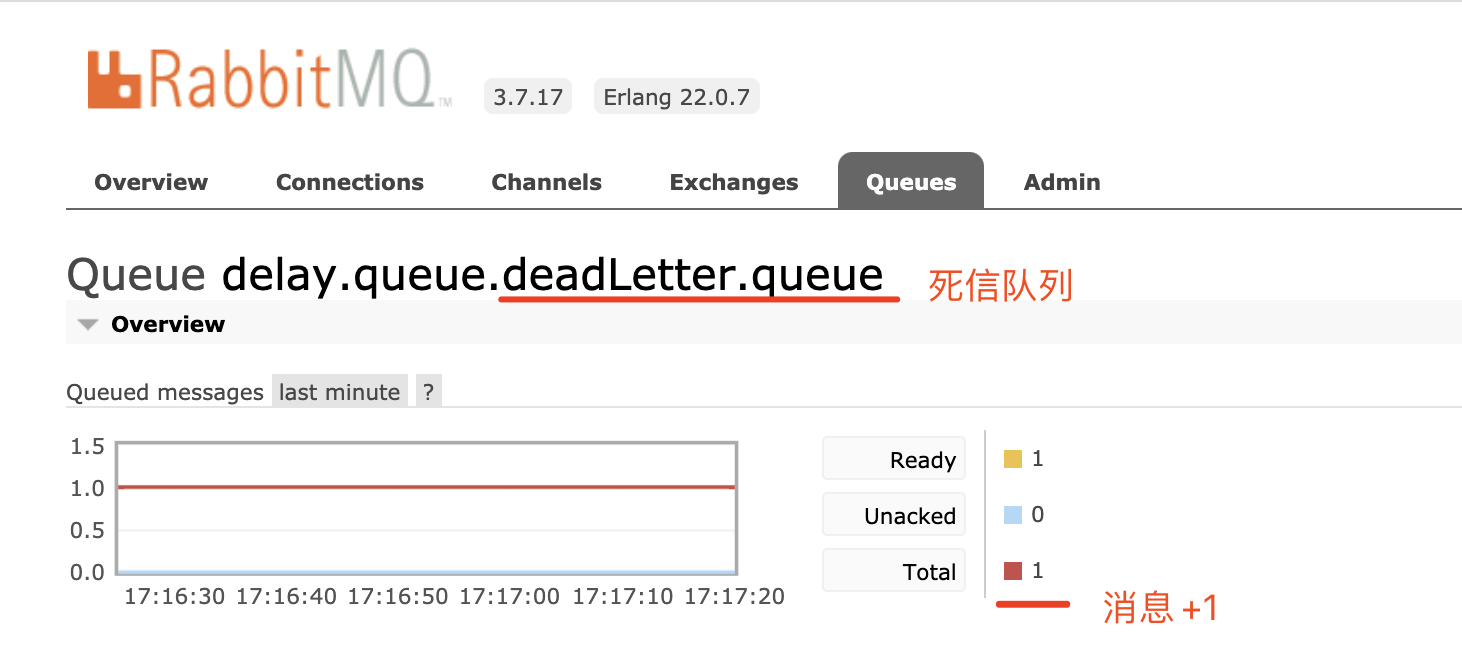
启动项目后,在RabbitMq的管理后台,可以看到已经自动创建对应的交换机和队列
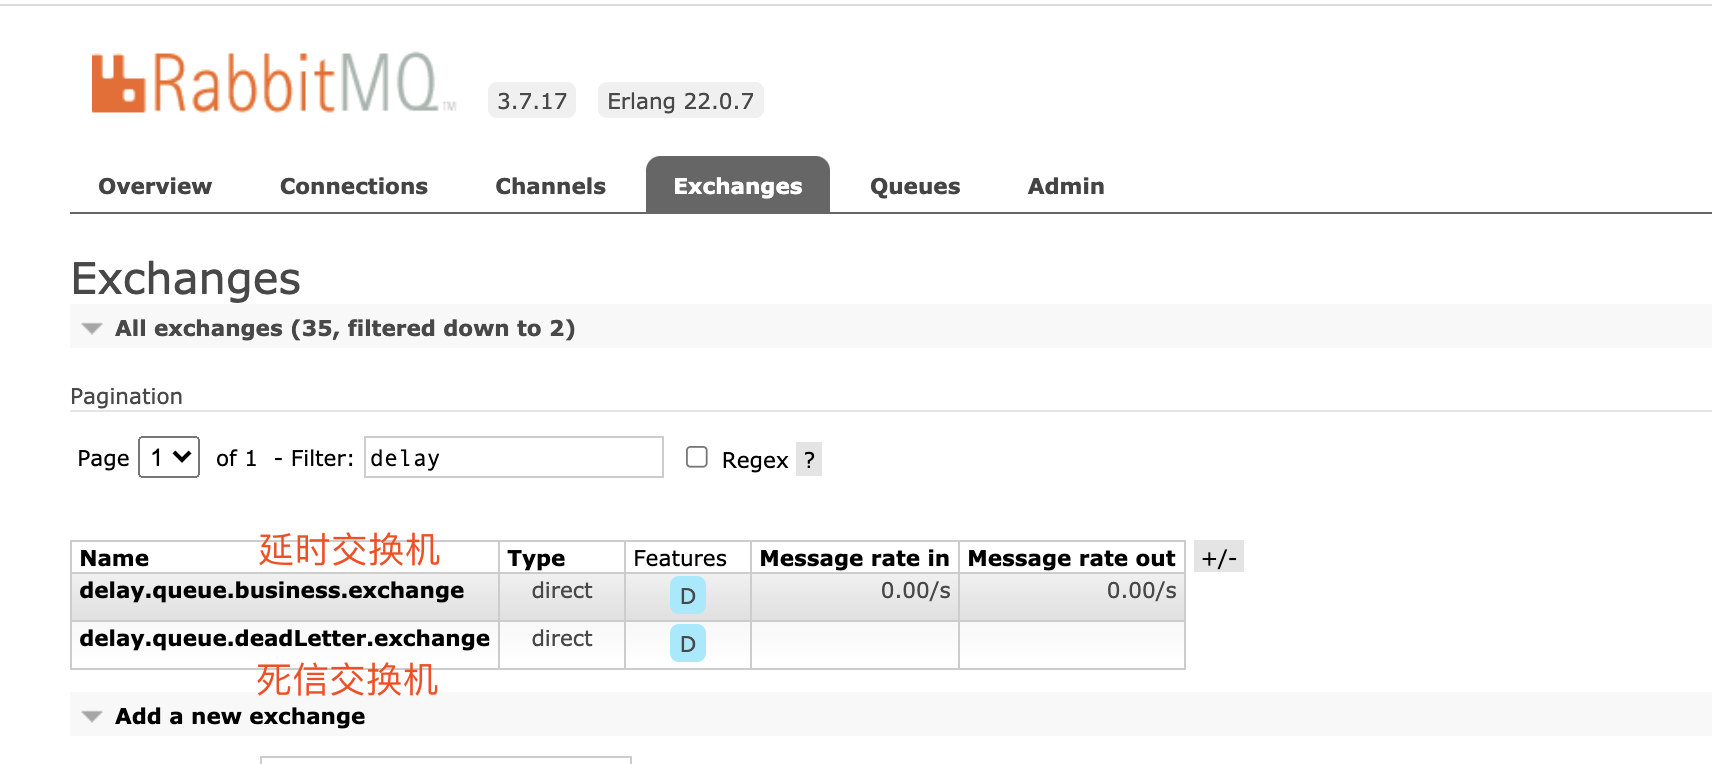
自动创建的队列,在延时队列的Features栏可以看到有: TTl、DLX、DLK。它们分别代表:(x-message-ttl):设置队列中的所有消息的生存周期(过期时间);(x-dead-letter-exchange)绑定了死信交换机,死信消息会被路由到绑定的死信交换机上;(x-dead-letter-routing-key):死信消息推送到交换机上指定路由键的队列中
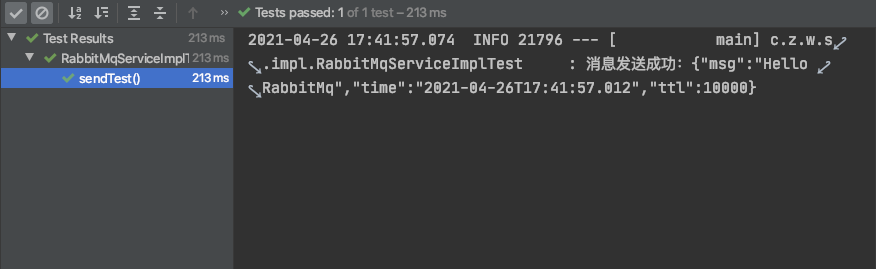
运行单元测试后显示发送成功:
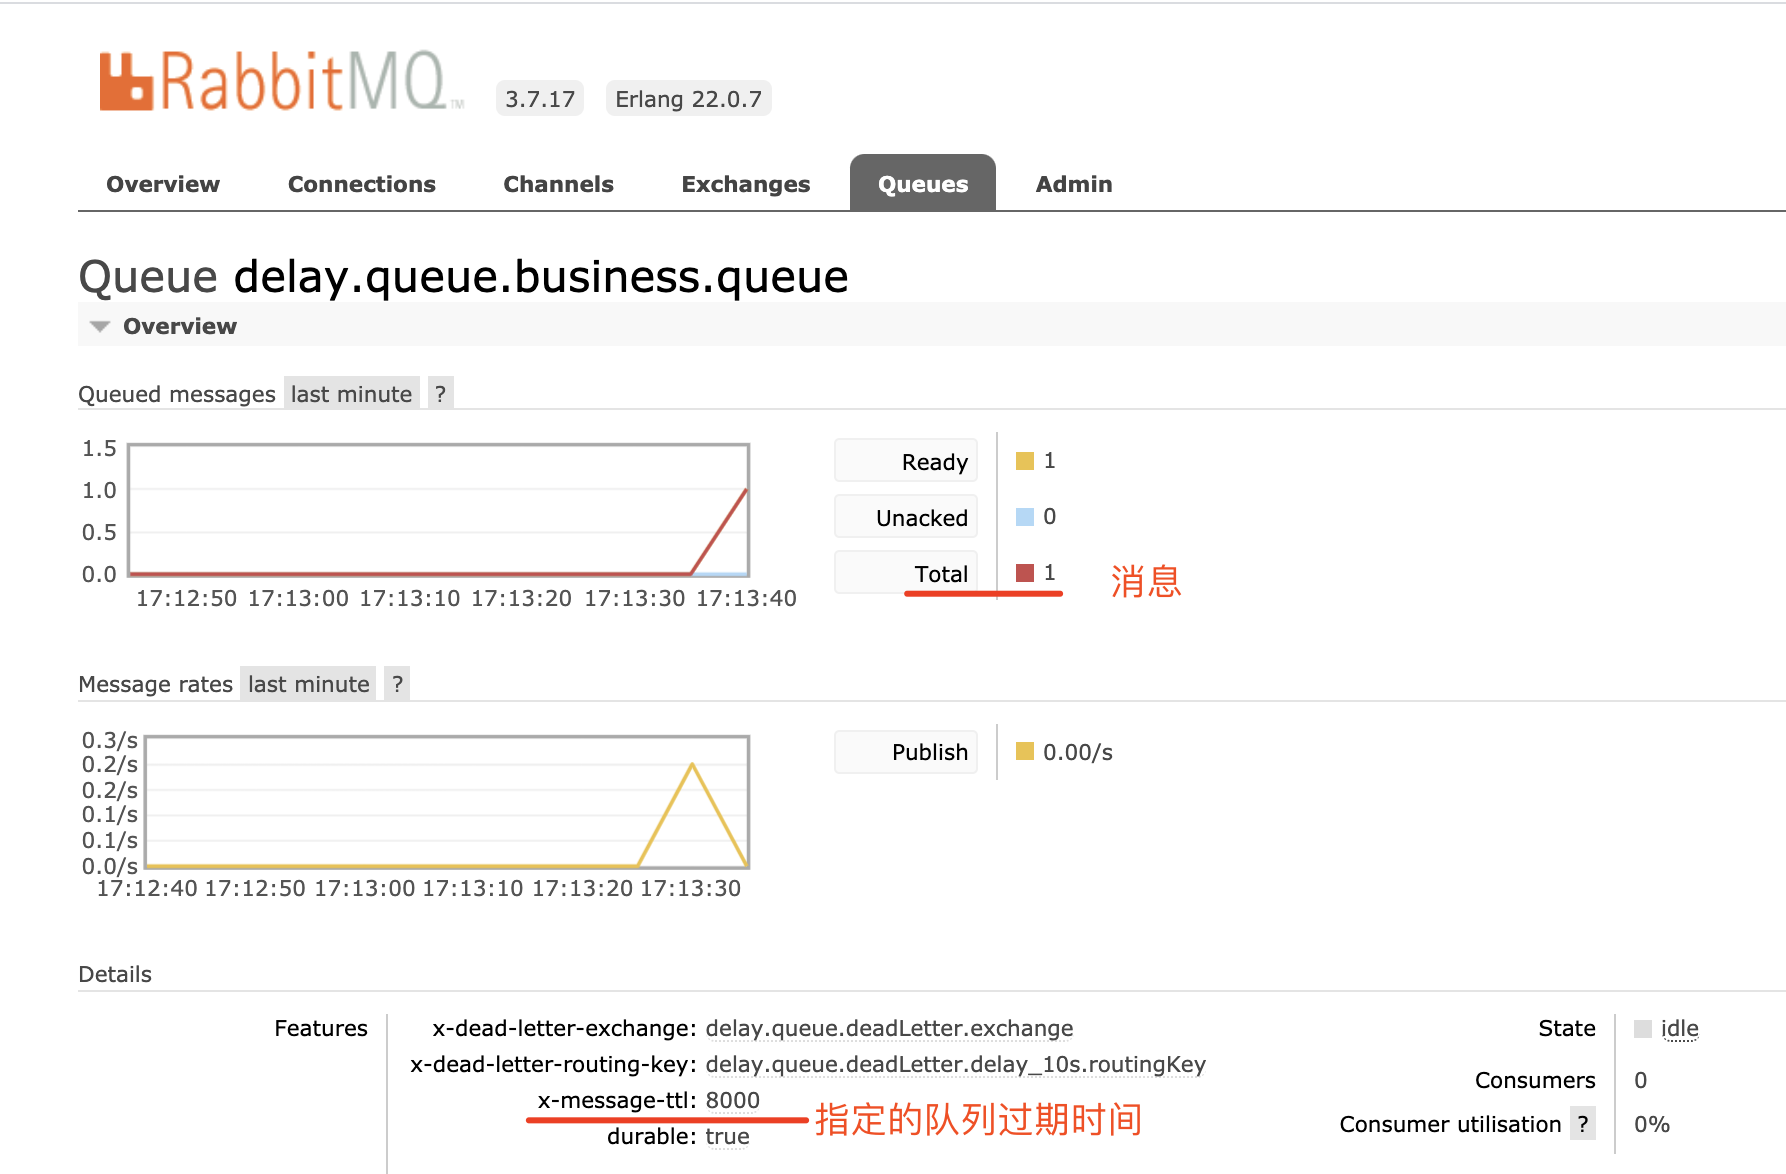
马上会看到延时队列里面产生了一条数据:
8秒后消息过期变成死信消息,被路由到绑定死信交换机的死信队列里
这样就实现了延时队列,消费死信队列里的消息,就可以满足业务需求或异常恢复了
package com.demo.www.rabbitmq.consumers;

import com.alibaba.fastjson.JSONObject;
import com.demo.www.rabbitmq.config.DelayQueueConfig;
import lombok.Data;
import lombok.extern.slf4j.Slf4j;
import org.springframework.amqp.core.Message;
import org.springframework.amqp.rabbit.annotation.Exchange;
import org.springframework.amqp.rabbit.annotation.Queue;
import org.springframework.amqp.rabbit.annotation.QueueBinding;
import org.springframework.amqp.rabbit.annotation.RabbitListener;
import org.springframework.stereotype.Component;

import java.time.Duration;
import java.time.LocalDateTime;
import java.time.format.DateTimeFormatter;

/**
 * 延时队列消息消费者
 * @author AnYuan
 */

@Component
@Slf4j
public class DelayMsgConsumer {

    @RabbitListener(bindings = @QueueBinding(
            value = @Queue(DelayQueueConfig.DEAD_LETTER_QUEUE),
            exchange = @Exchange(DelayQueueConfig.DEAD_LETTER_EXCHANGE)))
    public void queueAConsumer(Message message) {

        Msg msg = JSONObject.parseObject(new String(message.getBody()), Msg.class);
        LocalDateTime now = LocalDateTime.now();
        Duration duration = Duration.between(msg.getTime(), now);

        log.info("DelayMsgConsumer死信队列消费---->Msg:{}, 发送时间:{}, 当前时间:{},  相差时间:{}秒,消息设置的ttl:{}",
                JSONObject.toJSONString(msg),
                localDateTimeToString(msg.getTime()),
                localDateTimeToString(now),
                duration.getSeconds(),
                msg.getTtl());
    }

    @Data
    public static class Msg {
        private String ttl;
        private String msg;
        private LocalDateTime time;
    }

    private String localDateTimeToString(LocalDateTime localDateTime){
        DateTimeFormatter dateTimeFormatter = DateTimeFormatter.ofPattern("yyyy-MM-dd HH:mm:ss");
        return dateTimeFormatter.format(localDateTime);
    }
}
重新消费死信队列里的消息即可看到消费的Mq消息,对比time里面的值确认为同一条消息:
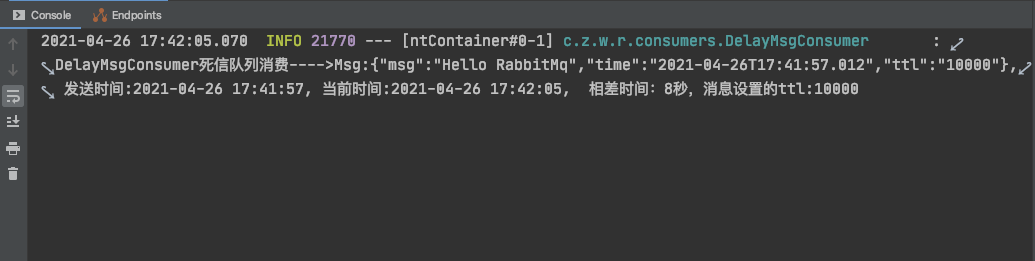
需要注意:发送消息时设置的ttl为10秒,消息过了8秒后就变成死信消息,当创建队列也设置了过期时间,按过期时间短的计算
延时队列的应用场景很多,之前在一个项目里都用到了:订单一定时间内未支付自动取消、出餐超时推送提醒给门店、订单完成后一段时间内推送反馈给用户等等,间隔指定时间后的操作都可以使用延时队列

 浙公网安备 33010602011771号