了解Git,这一篇就够了
作为一个7年经验的程序员,不该来总结这么基础的东西。但是人总是在高估自己的水平,本周在做一个代码集成的工作时,在git上犯了迷糊,导致很简单的集成,愣是做了两天,费劲不说,还浪费时间。思考了下,根本原因还是基础不牢。在一个行业做上7年,基本上应该是资深了吧?但是细节上到底能深究多少呢?所以还是脚踏实地的来。不在乎基础不基础了,开始吧!把喜欢的事情做到极致,便能产生价值。
0. 前序
版本控制
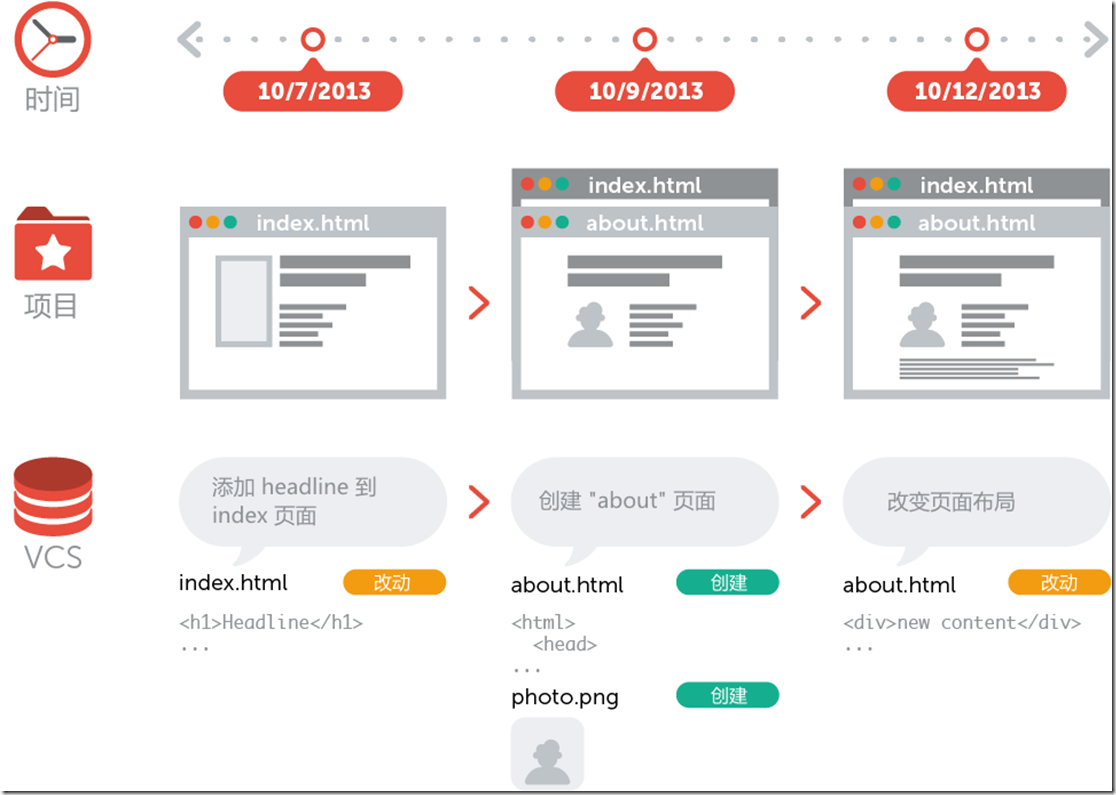
什么是版本控制呢?官方话是这样说的:版本控制是指对软件开发过程中各种程序代码、配置文件及说明文档等文件变更的管理。
如果项目一个人一气呵成,并且不需要迭代的话,也不需要什么版本控制了,但是这是不可能的。其实版本控制是在时间维度上实现代码迭代的可追溯性,空间上多人协作,实现代码质量的并行管理。
git正是一种版本控制系统。
1.git 介绍
版本控制系统大的维度上可分为两种:一种是分布式,一种是中心式;
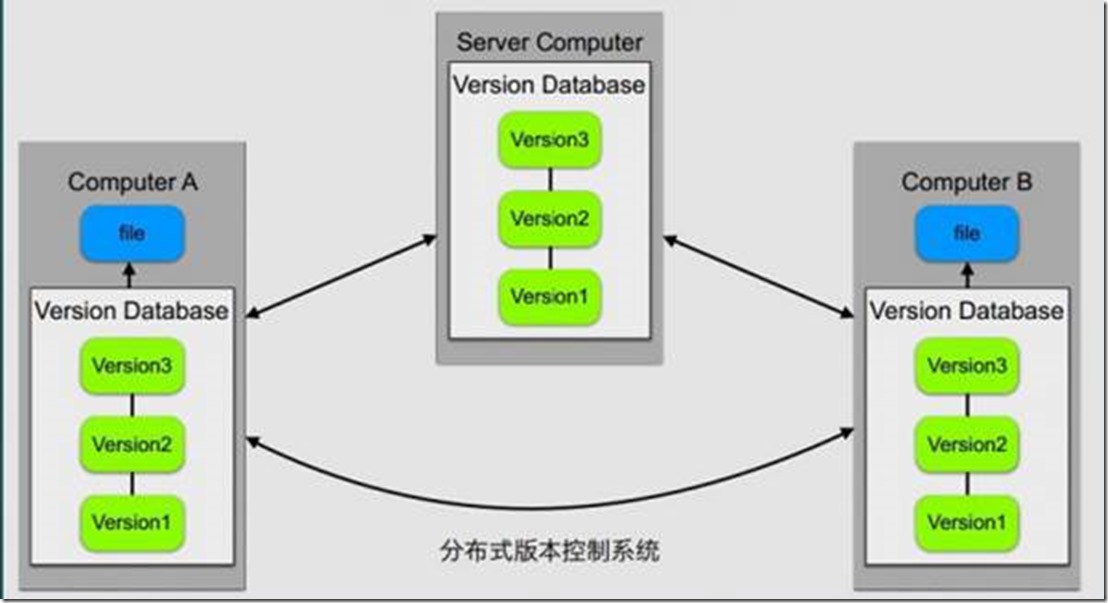
git是分布式的结构,另一个系统SVN则是中心式;
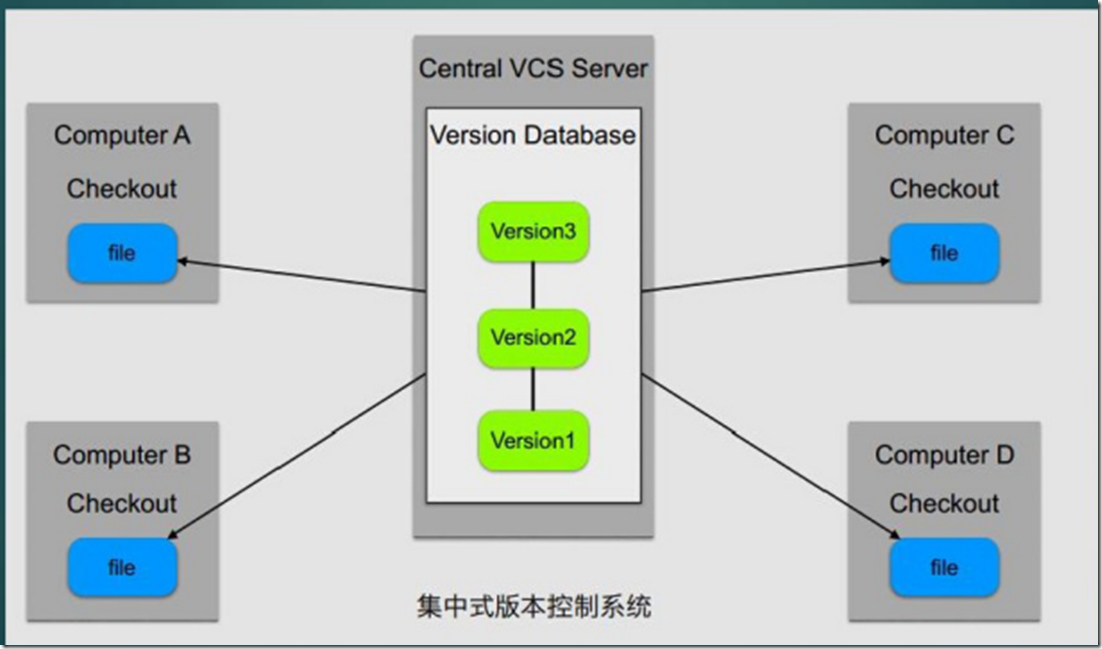
中心式结构的版本控制系统是只有一个中心,这个“中心”就是一个特别的服务器,它是一个中央仓库,每个开发者从这个中央仓库下载最新版的项目到本地、然后开发、然后上传给中央仓库。
中心式系统特别依赖这个中心,如果本地与中心的连接出问题、或中心本身出了问题,都可能影响到项目开发。而 Git 理论上是没有中心的,每一个设备都有本地仓库,任何一个设备的本地仓库出问题对其他设备都没有影响。而且,每一个设备都可以创建分支,Git 强大的分支管理也是它的价值所在。
1.1 git的前世今生
讲过故事:
在1991-2002这十余年时间,版本控制软件已经出现,像CVS,SVN等。然而linux之父linus是坚定反对使用CVS和SVN。
2002年到2005年,linus顶着开源社区精英们的口诛笔伐,选择了一个商业版本控制系统BitKeeper作为linux内核的代码管理工具。BitKeeper不同于CVS和SVN等集中式版本控制工具,而是一款分布式版本控制工具。
分布式版本控制系统最大的反传统之处在于,可以不需要集中式的版本库,每个人都工作在通过克隆建立的本地版本库中。也就是说每一个人都拥有一个完整的版本库,查看提交日志,提交、创建里程碑和分支、合并分支、回退等所有操作都直接在本地完成而不需要网络连接。
2005年4月,Andrew Tridgell(Samba的作者)试图对BitKeeper进行反破解,以开发一个能与BitKeeper交互的源码工具。这激怒了BitKeeper软件的所有者BitMover公司,要求回收对linux社区免费试用BitKeeper的授权。
迫不得已,linus选择了自己开发一个分布式的版本控制工具替代BitKeeper。
历时2个多月在linux内核2.6.12发布时,Git诞生了。完成原形设计后,在2005年7月,linus退身,将git的维护交给了一个Git的主要贡献者Junior C Hamano,直到现在。
git官网:https://git-scm.com/
来翻译一段话:
Git是一个免费开源的分布式版本控制系统,被设计是为了快速高效的处理项目从小到大的每一件事。
Git是一个容易学习并且有一个极小的空间承载轻量快速的性能。它以廉价的本地分支,方便的暂存区,以及多线程的工作流等性能,远远超过SCM的工具像Subversion,CVS,Perforce和ClearCase等工具。
四级没过,见笑。
1.2 git与 SVN对比
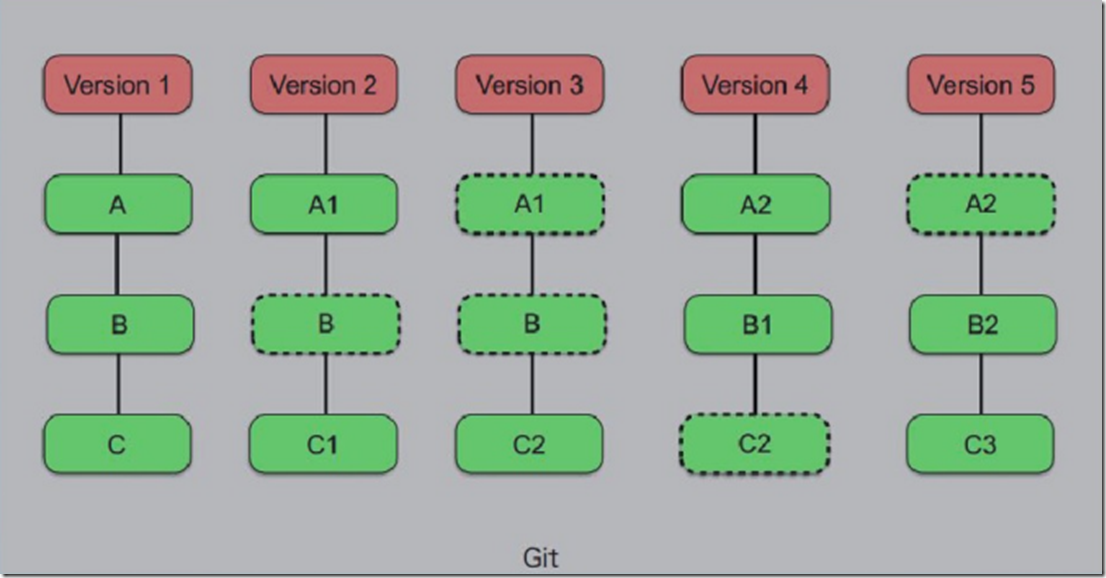
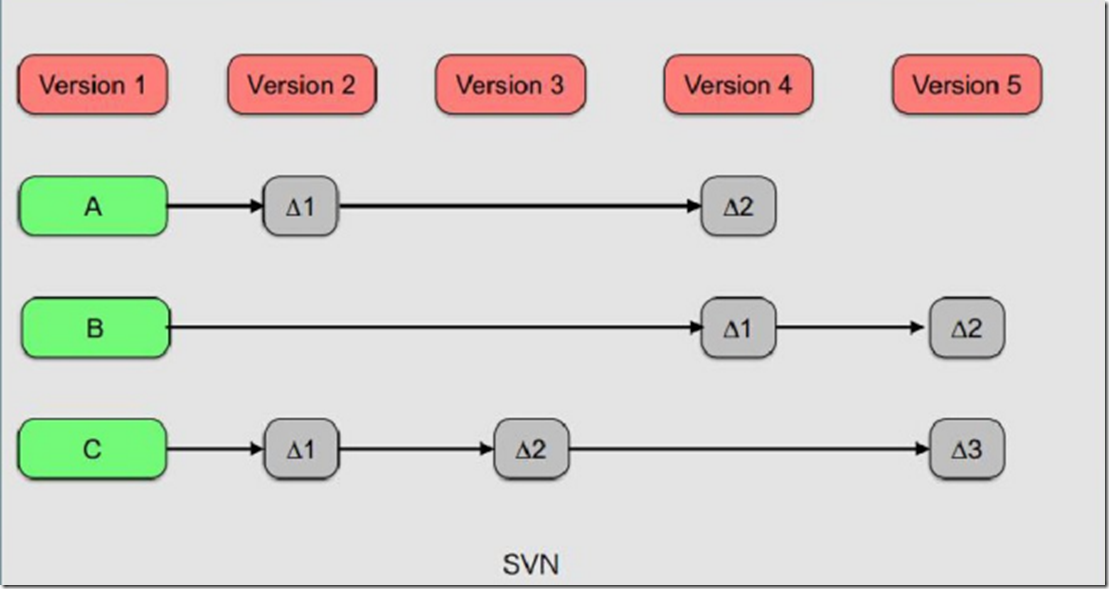
前面以了解git是分布式的设计,svn是中心式设计,接下来继续对比两者管理方式的异同。
代码管理:
Git是对分布式管理:
(1)每一个人的电脑都有一个版本库,对网络依赖性不大,因为版本库就在自己电脑上(本地库)。
(2)中央服务器是用来交换大家修改的内容(远程库)
(3)即使中央服务器宕机了,也可以立即从本地库中恢复代码。
SVN是集中式管理:
(1)版本库是集中式存放在中央服务器的,每次必须联网获取新的代码,工作完成之后再推送到中央服务器。
(2)这个的弊端就是必须联网,局域网内还可以,如果是互联网的话,在带宽不够的情况下上传一份大文件,就会很慢,体验很差。
存储方式:
1.3 git核心
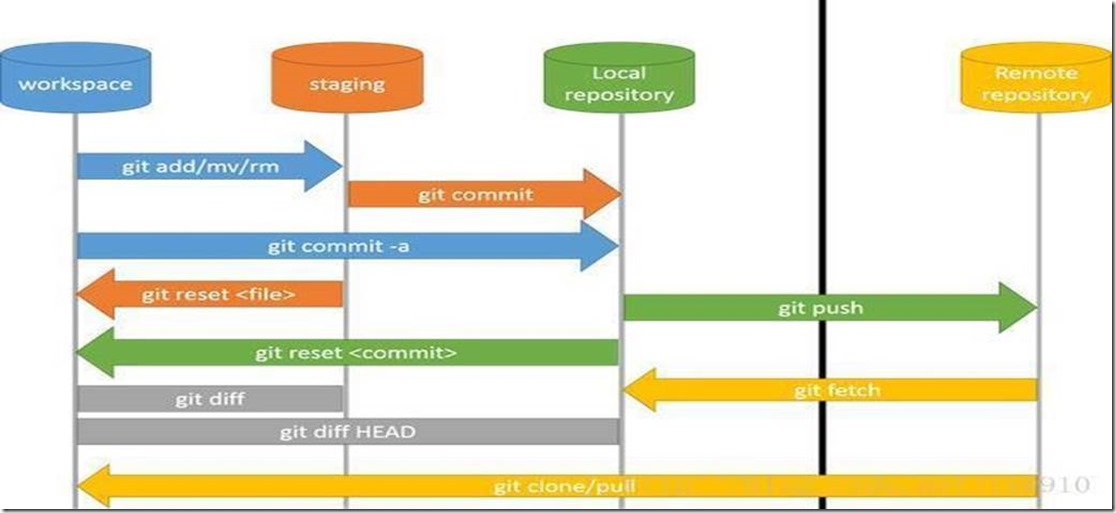
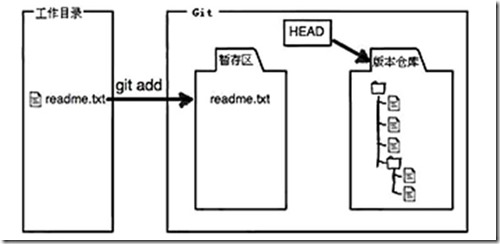
Git 最核心的一个概念就是工作流。
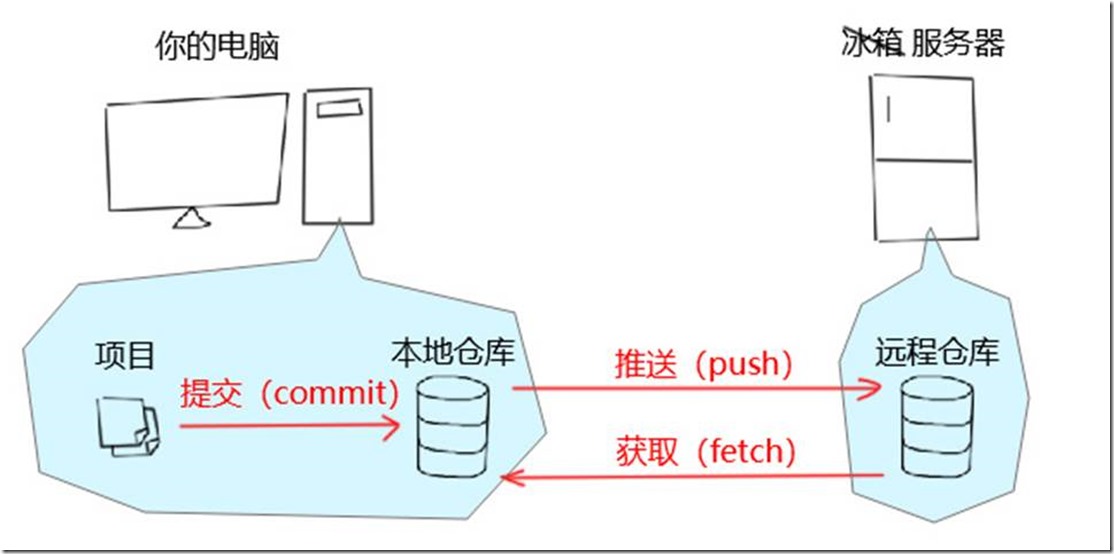
工作区(Workspace)是电脑中实际的目录。
暂存区(Index)类似于缓存区域,临时保存你的改动。
仓库区(Repository),分为本地仓库和远程仓库。
通常提交代码分为几步:
git add从工作区提交到暂存区
git commit从暂存区提交到本地仓库
git push或git commit从本地仓库提交到远程仓库
一般来说,记住以下命令,便可进行日常工作了,但不止于此。
2 git的安装与配置
一般linux系统的发现版只要不是min版本,基本都有git工具,若没有再网络环境下可yum安装。但是安装的版本可能不是滞后。这里我们介绍源码安装与配置。
此次安装使用的是Anolis 8.4的系统,关于Anolis系统有兴趣了解的可以在龙蜥社区了解。Centos 8停服后,国内包括阿里在内的一些企业成立龙蜥社区,扛起了开源操作系统的大旗。目前社区活跃,真是很感谢业界优秀的人和优秀的企业为业界提供了方便。本次安装,没想到会如此顺利,据官方文档说明,Anolis 8.4已完全兼容Centos 8的生态,已支持海光、飞腾、兆芯、鲲鹏服务器。https://www.yuque.com/anolis-docs/manual/release-notes-8.4
不聊了,干正事!
2.1 git安装
Git的官方网站:http://git-scm.com/
源码包下载地址:https://mirrors.edge.kernel.org/pub/software/scm/git/
2.1.1 配置git服务器
服务器环境:
安装软件及依赖:
  1 [root@localhost ~]# yum install curl-devel expat-devel gettext-devel openssl-devel zlib-devel perl-devel -y
  2 [root@localhost ~]# yum install -y git
  3 [root@localhost ~]# rpm -aq |grep git
  4 libertas-usb8388-firmware-20220210-107.git6342082c.an8.noarch
  5 dracut-049-201.git20220131.an8.x86_64
  6 crontabs-1.11-17.20190603git.an8.noarch
  7 git-core-2.39.3-1.0.1.an8.x86_64
  8 git-2.39.3-1.0.1.an8.x86_64
  9 dracut-network-049-201.git20220131.an8.x86_64
 10 dracut-squash-049-201.git20220131.an8.x86_64
 11 crypto-policies-20211116-1.gitae470d6.an8.noarch
 12 libnsl2-1.2.0-2.20180605git4a062cf.el8.x86_64
 13 git-core-doc-2.39.3-1.0.1.an8.noarch
 14 net-tools-2.0-0.52.20160912git.an8.x86_64
 15 dracut-config-rescue-049-201.git20220131.an8.x86_64
 16 linux-firmware-20220210-107.git6342082c.an8.noarch
 17 crypto-policies-scripts-20211116-1.gitae470d6.an8.noarch
(3)创建用户及用户组
  1 [root@localhost ~]# groupadd git
  2 [root@localhost ~]# useradd git -g git
(4)初始化Git仓库
  1 [root@localhost ~]#  cd /home/
  2 [root@localhost home]# mkdir gitrepo
  3 [root@localhost home]# chown -R git:git gitrepo/
  4 [root@localhost home]# cd gitrepo/
  5 [root@localhost gitrepo]# git init --bare runoob.git
  6 提示:使用 'master' 作为初始分支的名称。这个默认分支名称可能会更改。要在新仓库中
  7 提示:配置使用初始分支名,并消除这条警告,请执行:
  8 提示:
  9 提示:	git config --global init.defaultBranch <名称>
 10 提示:
 11 提示:除了 'master' 之外,通常选定的名字有 'main'、'trunk' 和 'development'。
 12 提示:可以通过以下命令重命名刚创建的分支:
 13 提示:
 14 提示:	git branch -m <name>
 15 已初始化空的 Git 仓库于 /home/gitrepo/runoob.git/
 16 [root@localhost gitrepo]# chown -R git:git runoob.git/
 17 [root@localhost gitrepo]# ll
 18 总用量 0
 19 drwxr-xr-x 7 git git 119 6月  10 16:48 runoob.git
  1 [root@localhost gitrepo]# git clone https://github.com/jenkins-docs/simple-java-maven-app.git
  2 正克隆到 'simple-java-maven-app'...
  3 remote: Enumerating objects: 151, done.
  4 remote: Total 151 (delta 0), reused 0 (delta 0), pack-reused 151
  5 接收对象中: 100% (151/151), 23.90 KiB | 126.00 KiB/s, 完成.
  6 处理 delta 中: 100% (41/41), 完成.
  7 [root@localhost gitrepo]# ll
  8 总用量 0
  9 drwxr-xr-x 7 git  git  119 6月  10 16:48 runoob.git
 10 drwxr-xr-x 5 root root 116 6月  10 16:52 simple-java-maven-app
这个其实已经配置好了一个git仓库。实际上git是分布式的,用以上方法搭建的仓库拉取推送代码是没有问题的,不过git还有些衍生的客户端程序,可以给我们开发工作提供便利,例如TortoiseGit。
提示:该部分内容纯属了解即可,实际开发中我们的IDE工具比他好用多了,但是如果在win上做打包集成的话,还是有用的。不就结了,讲讲吧!
2.2 安装git客户端
我就在windows上安装了,其他操作系统参考官网:https://git-scm.com/downloads
windows安装git不在赘述,点点点就行
安装完成后生成公钥:
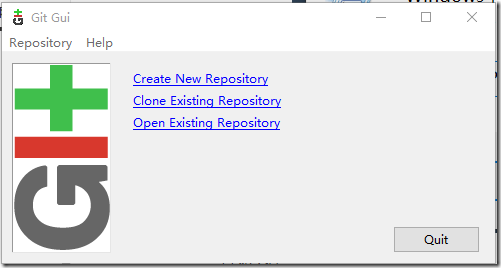
下载git客户端安装好后右键选择Git GUI Here->Help->Show SSH Key
就能得到私钥和公钥:
2.3 TortoiseGit安装与配置
TortoiseGit简称tgit,中文名海龟git,海龟git只支持window系统。
支持各种语言,包括简体中文(Chinese,simplified:zh_CN).
下载:http://download.tortoisegit.org/tgit/
安装没有什么技术含量,略了。
2.3.1 基础配置
(1)首先,请选定一个存放Git项目的目录,方便管理,例如:E:\DevPro,然后在资源管理中打开。
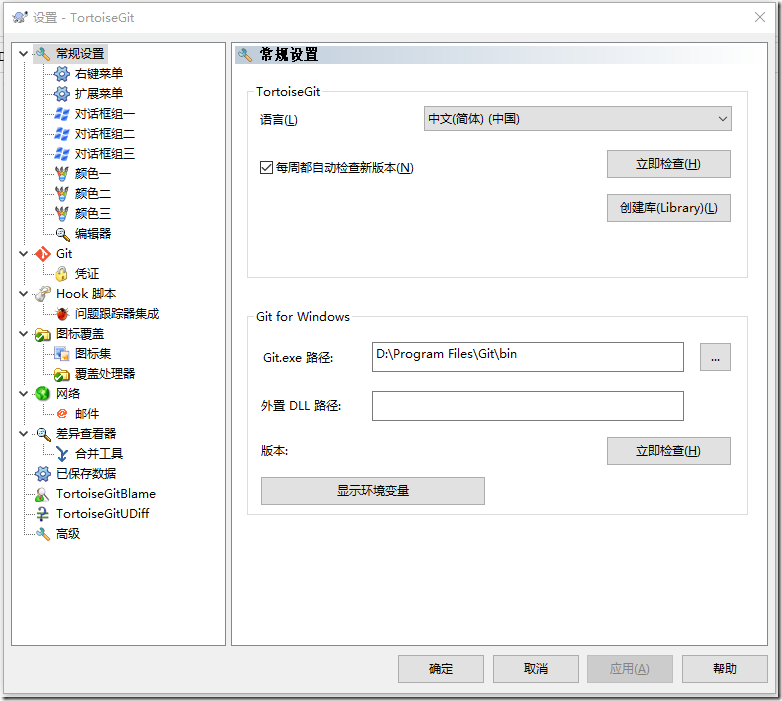
(2)在空白处点击鼠标右键,选择--》TortoiseGit--》Settings,然后可以看见配置界面:
(3)选中General,在右边的language中选择中文,不够选自动升级的复选框,可能还需要指定Git.exe文件的路径,完成后点击应用,确定关闭对话框。
(4)在此点击鼠标右键,可以看到弹出菜单中已经变成中文
以上两步的前提是要安装汉化包。
(5)配置右键菜单,在设置对话框中,点击右边的“右键菜单”,然后在右边将所有的复选框都去掉,这样右键菜单显得比较干净:
(6)设置记住密码
密码会用明文保存在C:\users\Administrator.git-credentials这种文件中,请小心使用。
进入设置,点击右边的Git标签,可以发现,右边可以配置用户的名字与Email信息。
[credential]
Helper = store
完成后保存。
点击“编辑全局.git/config(0)”按钮,会使用记事本打开全局的配置文件,在全局配置文件中,在后面加上下面内容
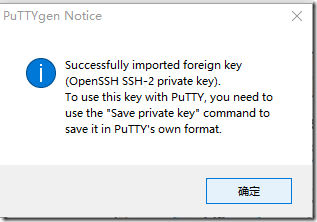
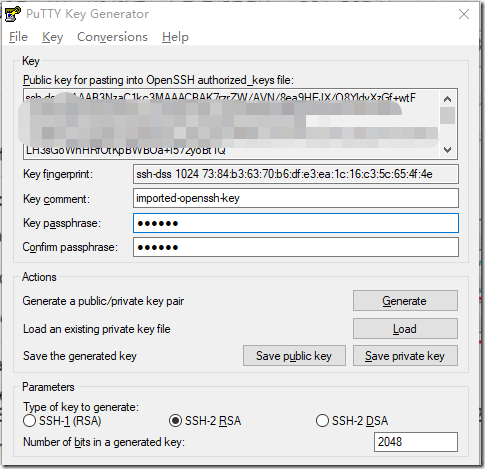
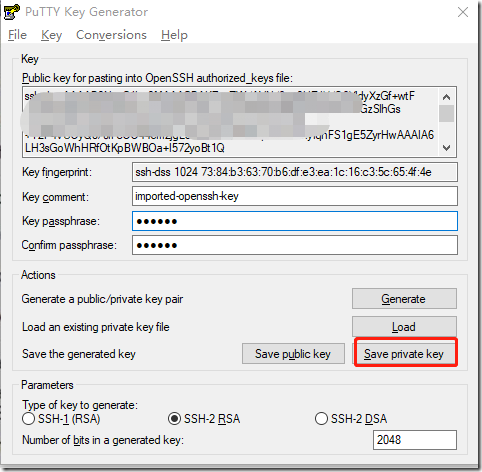
2.3.2 秘钥转换
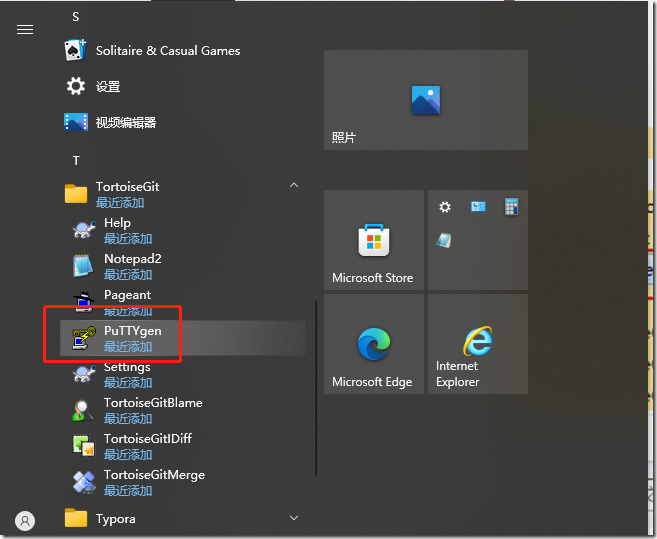
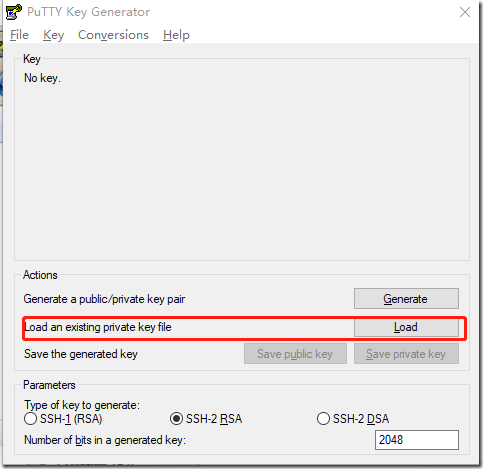
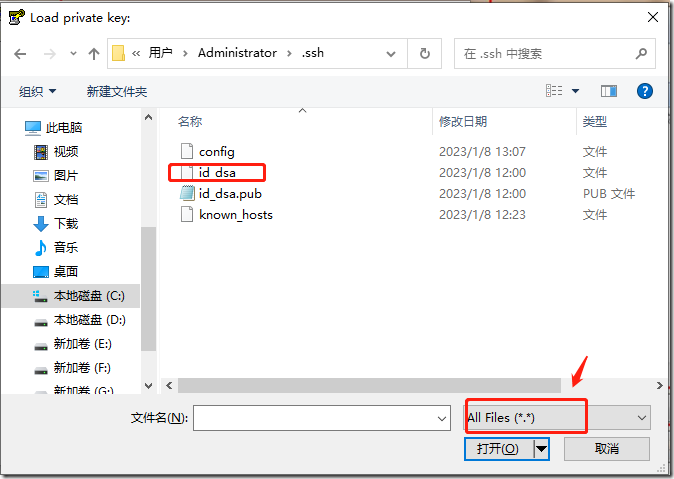
2.3.3 客户端对接私有仓库
将客户端的秘钥写入服务端:
复制git客户端生成的公钥:
在服务端:
  1 [root@localhost ~]# cd /etc/ssh
  2 [root@localhost ssh]# vim sshd_config
  3 注释掉下面的三个 (没有的忽略)
  4 RSAAuthentication yes
  5 PubkeyAuthentication yes
  6 AuthorizedKeysFile .ssh/authorized_keys
  7
  8 保存并重启 sshd 服务:
  9 [root@localhost ssh]# systemctl restart sshd
 10
 11 [root@localhost ~]# cd /home/git
 12 [root@localhost git]# mkdir .ssh
 13 [root@localhost git]# chown -R git:git .ssh/
 14 [root@localhost git]# chmod 700 .ssh
 15 [root@localhost .ssh]# touch authorized_keys
 16 [root@localhost .ssh]# chmod 600 authorized_keys
 17 [root@localhost .ssh]# chown -R git:git authorized_keys
 18 [root@localhost .ssh]# systemctl restart sshd

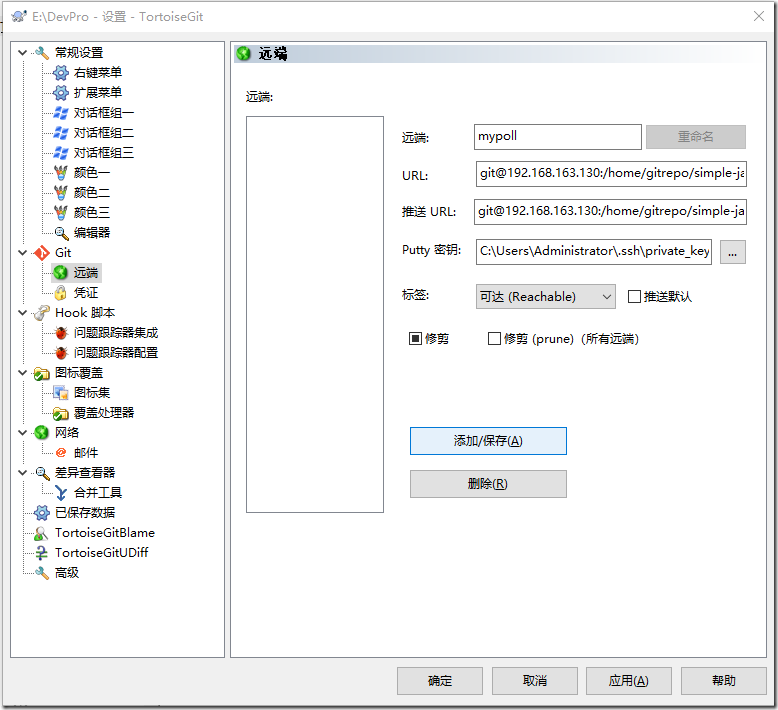
在tgit上配置:
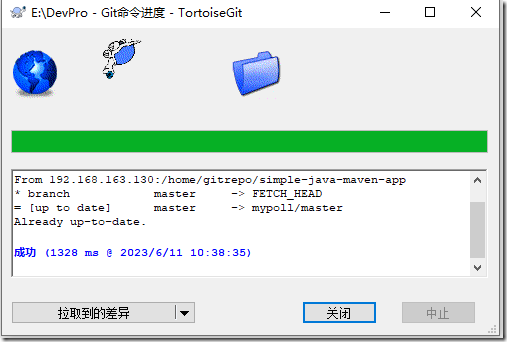
从服务端数据拉取成功。
3. Git 实战
前面我们安装了git,并且以我们搭建的本地git仓库为中心,配置tgit客户端。接下来,重点看git的使用
3.1 Git初始化
查看版本号
  1 [root@localhost .ssh]# git --version
  2 git version 2.39.3
再配置tgit的时候,我们也发现了git的配置是层次化的,有系统文件,全局文件,用户文件,项目文件,并依次递进,后面的配置会覆盖前面的配置。
Local:当前项目有效(工作目录/.git/config)
Global 当前用户有效(用户目录/.gitconfig)
System 所有用户有效(Git目录/etc/gitconfig)
(1)告诉Git当前的用户的姓名和邮件地址,配置的用户名和邮箱地址将在版本库提交时用到。
  1 [anliu@localhost ~]$ git config --global user.name "anliu"
  2 [anliu@localhost ~]$ git config --global user.email anliu@163.com
  3 [anliu@localhost ~]$ ll
  4 总用量 0
  5 [anliu@localhost ~]$ ls -a
  6 .  ..  .bash_logout  .bash_profile  .bashrc  .gitconfig
  7 [anliu@localhost ~]$ ll
  8 总用量 0
  9 [anliu@localhost ~]$ cat .gitconfig
 10 [user]
 11 	name = anliu
 12 	email = anliu@163.com
只在当前用户下生效。
(2)设置一些Git别名,以便于可以使用更为简洁的子命令。
  1 [root@localhost ~]# git config --system alias.st status
  2 [root@localhost ~]# git config --system alias.ci commit
  3 [root@localhost ~]# cat /etc/gitconfig
  4 [alias]
  5 	st = status
  6 	ci = commit
  7 [root@localhost ~]#
这个会全局生效。
(3)给simple-java-maven-app仓库配置代理。
  1   1 [root@localhost simple-java-maven-app]# git config --local http.proxy 'http://192.168.163.111:8000'
  2   2 [root@localhost simple-java-maven-app]# git config --local https.proxy 'http://192.168.163.111:8000'
  3   3 [root@localhost .git]# pwd
  4   4 /home/gitrepo/simple-java-maven-app/.git
  5   5 [root@localhost .git]# cat config
  6   6 [core]
  7   7 	repositoryformatversion = 0
  8   8 	filemode = true
  9   9 	bare = false
 10  10 	logallrefupdates = true
 11  11 [remote "origin"]
 12  12 	url = https://github.com/jenkins-docs/simple-java-maven-app.git
 13  13 	fetch = +refs/heads/*:refs/remotes/origin/*
 14  14 [branch "master"]
 15  15 	remote = origin
 16  16 	merge = refs/heads/master
 17  17 [http]
 18  18 	proxy = http://192.168.163.111:8000
 19  19 [https]
 20  20 	proxy = http://192.168.163.111:8000
 21
当然这个之后对当前项目生效。
或者不用命令,直接修改配置文件,效果一样样的。
3.2 版本库创建
创建一个新的工作目录,进入该目录后,执行git init 创建版本库。
  1 [anliu@localhost ~]$  mkdir workspace
  2 [anliu@localhost ~]$ cd workspace/
  3 [anliu@localhost workspace]$ mkdir dome
  4 [anliu@localhost workspace]$  cd dome/
  5 [anliu@localhost dome]$ ls
  6 [anliu@localhost dome]$ git init
  7 提示:使用 'master' 作为初始分支的名称。这个默认分支名称可能会更改。要在新仓库中
  8 提示:配置使用初始分支名,并消除这条警告,请执行:
  9 提示:
 10 提示:	git config --global init.defaultBranch <名称>
 11 提示:
 12 提示:除了 'master' 之外,通常选定的名字有 'main'、'trunk' 和 'development'。
 13 提示:可以通过以下命令重命名刚创建的分支:
 14 提示:
 15 提示:	git branch -m <name>
 16 已初始化空的 Git 仓库于 /home/anliu/workspace/dome/.git/
 17 [anliu@localhost dome]$ ls -a
 18 .  ..  .git
 19 [anliu@localhost dome]$
这个.git目录就是git版本库(又叫仓库,repository)。
.git版本库所在的目录/home/giter/workspace/demo,叫做工作区。
3.3 版本管理
Git 的工作就是创建和保存你的项目的快照及与之后的快照进行对比。
(1)git add
git add 命令可将该文件添加到缓存,如我们添加以下两个文件:
  1 [anliu@localhost dome]$ vim hello.py
  2 [anliu@localhost dome]$ vim README
  3 [anliu@localhost dome]$ ll
  4 总用量 8
  5 -rw-rw-r-- 1 anliu anliu 15 6月  10 22:52 hello.py
  6 -rw-rw-r-- 1 anliu anliu 24 6月  10 22:52 README
  7 [anliu@localhost dome]$ git status
  8 位于分支 master
  9
 10 尚无提交
 11
 12 未跟踪的文件:
 13   (使用 "git add <文件>..." 以包含要提交的内容)
 14 	README
 15 	hello.py
 16
 17 提交为空,但是存在尚未跟踪的文件(使用 "git add" 建立跟踪)
 18 [anliu@localhost dome]$ git add
 19 没有指定文件,也没有文件被添加。
 20 提示:也许您想要执行 'git add .'?
 21 提示:运行下面的命令来关闭本消息
 22 提示:"git config advice.addEmptyPathspec false"
 23 [anliu@localhost dome]$ git add -A
 24 [anliu@localhost dome]$ ll
 25 总用量 8
 26 -rw-rw-r-- 1 anliu anliu 15 6月  10 22:52 hello.py
 27 -rw-rw-r-- 1 anliu anliu 24 6月  10 22:52 README
 28 [anliu@localhost dome]$ git status
 29 位于分支 master
 30
 31 尚无提交
 32
 33 要提交的变更:
 34   (使用 "git rm --cached <文件>..." 以取消暂存)
 35 	新文件:   README
 36 	新文件:   hello.py
 37
 38 [anliu@localhost dome]$ vim hello.py
 39 [anliu@localhost dome]$ git status
 40 位于分支 master
 41
 42 尚无提交
 43
 44 要提交的变更:
 45   (使用 "git rm --cached <文件>..." 以取消暂存)
 46 	新文件:   README
 47 	新文件:   hello.py
 48
 49 尚未暂存以备提交的变更:
 50   (使用 "git add <文件>..." 更新要提交的内容)
 51   (使用 "git restore <文件>..." 丢弃工作区的改动)
 52 	修改:     hello.py
 53 [anliu@localhost dome]$ git restore hello.py
 54 [anliu@localhost dome]$ git status
 55 位于分支 master
 56
 57 尚无提交
 58
 59 要提交的变更:
 60   (使用 "git rm --cached <文件>..." 以取消暂存)
 61 	新文件:   README
 62 	新文件:   hello.py
(2)git status
git status 以查看在你上次提交之后是否有修改。
-s 参数以获得简短的结果输出。
(3)git diff
执行 git diff 来查看执行 git status 的结果的详细信息。
git diff 命令显示已写入缓存与已修改但尚未写入缓存的改动的区别。
尚未缓存的改动:git diff
查看已缓存的改动: git diff --cached
显示摘要而非整个 diff:git diff –stat
  1 [anliu@localhost dome]$ git status  -s
  2 A  README
  3 A  hello.py
  4 [anliu@localhost dome]$ git diff
  5 [anliu@localhost dome]$ vim hello.py
  6 [anliu@localhost dome]$ git status  -s
  7 A  README
  8 AM hello.py
  9 [anliu@localhost dome]$ git diff
 10 diff --git a/hello.py b/hello.py
 11 index c875119..3129f84 100644
 12 --- a/hello.py
 13 +++ b/hello.py
 14 @@ -1,2 +1,3 @@
 15  import os
 16  print("hellp")
 17 +print("os.path")
 18 [anliu@localhost dome]$ git diff --cached
 19 diff --git a/README b/README
 20 new file mode 100644
 21 index 0000000..30473c5
 22 --- /dev/null
 23 +++ b/README
 24 @@ -0,0 +1 @@
 25 +This is a test of dome.
 26 diff --git a/hello.py b/hello.py
 27 new file mode 100644
 28 index 0000000..c875119
 29 --- /dev/null
 30 +++ b/hello.py
 31 @@ -0,0 +1,2 @@
 32 +import os
 33 +print("hellp")
 34 [anliu@localhost dome]$ git diff --stat
 35  hello.py | 1 +
 36  1 file changed, 1 insertion(+)
 37 [anliu@localhost dome]$
(4)git commit
使用 git add 命令将想要快照的内容写入缓存区, 而执行 git commit 将缓存区内容添加到仓库中。
Git 为你的每一个提交都记录你的名字与电子邮箱地址,所以第一步需要配置用户名和邮箱地址。
  1 [anliu@localhost dome]$ git config --global user.name 'anliu'
  2 [anliu@localhost dome]$ git config --global user.email test@anliu.com
  1 [anliu@localhost dome]$ vim hello.py
  2 [anliu@localhost dome]$ git status -s
  3 A  README
  4 AM hello.py
  5 [anliu@localhost dome]$ git commit -m "v1.0"
  6 [master(根提交) 60047fd] v1.0
  7  2 files changed, 3 insertions(+)
  8  create mode 100644 README
  9  create mode 100644 hello.py
 10 [anliu@localhost dome]$ git status -s
 11  M hello.py
如果你没有设置 -m 选项,Git 会尝试为你打开一个编辑器以填写提交信息。 如果 Git 在你对它的配置中找不到相关信息,默认会打开 vim。
(5)git reset HEAD
git reset HEAD 命令用于取消已缓存的内容。
我们先改动文件 README 文件,内容如下:
  1 [anliu@localhost dome]$ git status -s
  2  M README
  3  M hello.py
  4 [anliu@localhost dome]$ git add .
  5 [anliu@localhost dome]$ git status -s
  6 M  README
  7 M  hello.py
  8 [anliu@localhost dome]$ git reset HEAD
  9 重置后取消暂存的变更:
 10 M	README
 11 M	hello.py
 12 [anliu@localhost dome]$ git status -s
 13  M README
 14  M hello.py
 15 [anliu@localhost dome]$
(6)git rm
如果只是简单地从工作目录中手工删除文件,运行 git status 时就会在 Changes not staged for commit 的提示。
要从 Git 中移除某个文件,就必须要从已跟踪文件清单中移除,然后提交。可以用以下命令完成此项工作
git rm <file>
如果删除之前修改过并且已经放到暂存区域的话,则必须要用强制删除选项 -f
git rm -f <file>
如果把文件从暂存区域移除,但仍然希望保留在当前工作目录中,换句话说,仅是从跟踪清单中删除,使用 --cached 选项即可
git rm --cached <file>
如我们删除 hello.php文件:
$ git rm hello.php
rm 'hello.php'
$ ls
README
不从工作区中删除文件:
$ git rm --cached README
rm 'README'
$ ls
README
可以递归删除,即如果后面跟的是一个目录做为参数,则会递归删除整个目录中的所有子目录和文件:
git rm –r *
进入某个目录中,执行此语句,会删除该目录下的所有文件和子目录。
(7)git mv
git mv 命令用于移动或重命名一个文件、目录、软连接。
我们先把刚移除的 README 添加回来:
git add README
然后对其重名:
git mv README  README.md
ls
README.md








 浙公网安备 33010602011771号