微信开发基于springboot
0.申请一个微信公众号,记住他的appId,secret,token,accesstoken
1.创建一个springboot项目。在pom文件里面导入微信开发工具类
<dependency>
    <groupId>com.github.binarywang</groupId>
    <artifactId>weixin-java-mp</artifactId>
    <version>3.1.0</version>
</dependency>
2.编写controller

package com.weixin.demo.demo.web.back.controller;

import me.chanjar.weixin.mp.api.WxMpService;
import me.chanjar.weixin.mp.bean.message.WxMpXmlMessage;
import me.chanjar.weixin.mp.bean.message.WxMpXmlOutImageMessage;
import me.chanjar.weixin.mp.bean.message.WxMpXmlOutTextMessage;
import org.springframework.beans.factory.annotation.Autowired;
import org.springframework.stereotype.Controller;
import org.springframework.web.bind.annotation.PostMapping;
import org.springframework.web.bind.annotation.RequestMapping;
import org.springframework.web.bind.annotation.RequestMethod;
import org.springframework.web.bind.annotation.ResponseBody;

import javax.servlet.http.HttpServletRequest;
import javax.servlet.http.HttpServletResponse;
import java.io.IOException;
import java.io.PrintWriter;

@Controller
public class weixinController {

    @Autowired
    private WxMpService wxMpService;

    /**
     * 1.接入公众号:公众号服务器配置的接口地址为这个
     * @param signature
     * @param timestamp
     * @param nonce
     * @param echostr
     * @return
     */
    @RequestMapping(value= "/wechart/index",method = RequestMethod.GET)
    @ResponseBody
    public String checkSignature(String signature, String timestamp, String nonce, String echostr)
    {
        System.out.println("————————微信接入——————————");
        if (wxMpService.checkSignature(timestamp,nonce,signature))
        {
            return  echostr;
        }else
            {
                return null;
            }
    }

    /**
     * 消息的接收和回复
     */
    @PostMapping("/wechart/index")
    @ResponseBody
    public void sendWxMessage(HttpServletRequest request, HttpServletResponse response) throws IOException {
        System.out.println("————————微信消息接收和发送——————————");
        //获取消息流
        WxMpXmlMessage message=WxMpXmlMessage.fromXml(request.getInputStream());
        //消息的处理:文本 text
        String msgType = message.getMsgType();//消息的类型
        String fromUser = message.getFromUser();//发送消息用户的账号
        String toUser = message.getToUser();//开发者账号
        String content = message.getContent();//文本内容
        String msg = message.getMsg();

        //回复文本消息
        if("text".equals(msgType))
        {
            //创建文本消息内容
            WxMpXmlOutTextMessage text=WxMpXmlOutTextMessage.TEXT().
                    toUser(message.getFromUser()).
                    fromUser(message.getToUser()).
                    content("你好,很高心认识你").build();
            //转化为xml格式
            String xml=text.toXml();
            System.out.println(xml);
            //返回消息
            response.setCharacterEncoding("UTF-8");
            PrintWriter out=response.getWriter();
            out.print(xml);
            out.close();
        }
    }


    /**
     * 首页访问
     * @return
     */
    @RequestMapping(value= "/",method = RequestMethod.GET)
    @ResponseBody
    public String index()
    {
        return "hello";
    }


}
3.编写初始化文件:从application.yml配置文件中获取 appId,secret,token,accesstoken,这几个值来自公众号

package com.weixin.demo.demo.web.common.config;

import me.chanjar.weixin.mp.api.WxMpInMemoryConfigStorage;
import me.chanjar.weixin.mp.api.WxMpService;
import me.chanjar.weixin.mp.api.impl.WxMpServiceImpl;
import org.springframework.boot.context.properties.ConfigurationProperties;
import org.springframework.context.annotation.Bean;
import org.springframework.context.annotation.Configuration;

@ConfigurationProperties("siping")
@Configuration
public class WechatConfig {

    //从配置文件中获取字段,需要设置get,set方法
    private String appId;
    private String secret;
    private String token;
    private String accesstoken;

    /**
     * 初始化微信service
     *
     * @return
     */
    @Bean
    public WxMpService getWxMpService() {
        WxMpService wxMpService = new WxMpServiceImpl();
        WxMpInMemoryConfigStorage wxMpInMemoryConfigStorage = new WxMpInMemoryConfigStorage();
        wxMpInMemoryConfigStorage.setAppId(appId);
        wxMpInMemoryConfigStorage.setSecret(secret);
        wxMpInMemoryConfigStorage.setToken(token);
        wxMpInMemoryConfigStorage.setAccessToken(accesstoken);
        wxMpService.setWxMpConfigStorage(wxMpInMemoryConfigStorage);
        return wxMpService;
    }

    public String getAppId() {
        return appId;
    }

    public void setAppId(String appId) {
        this.appId = appId;
    }

    public String getSecret() {
        return secret;
    }

    public void setSecret(String secret) {
        this.secret = secret;
    }

    public String getToken() {
        return token;
    }

    public void setToken(String token) {
        this.token = token;
    }

    public String getAccesstoken() {
        return accesstoken;
    }

    public void setAccesstoken(String accesstoken) {
        this.accesstoken = accesstoken;
    }
}
3.注意:
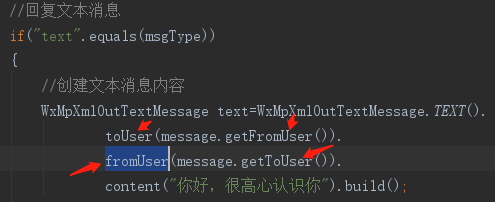
在回复消息的时候需要注意:toUser,和fromUser的主体是谁,一般时候微信端传递过来的值反着的。

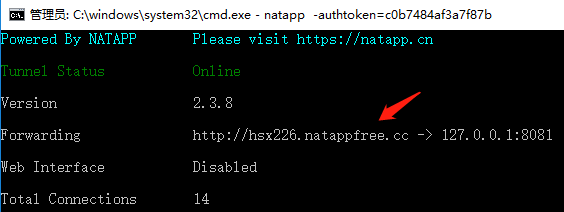
4.通过natapp配置内网穿透映射127.0.0.1:8080端口,让微信端能够访问到:
登录注册natapp,下载natapp的客户端,运行,在命令行输入:natapp -authtoken=自己登录后分配的natapptoken号

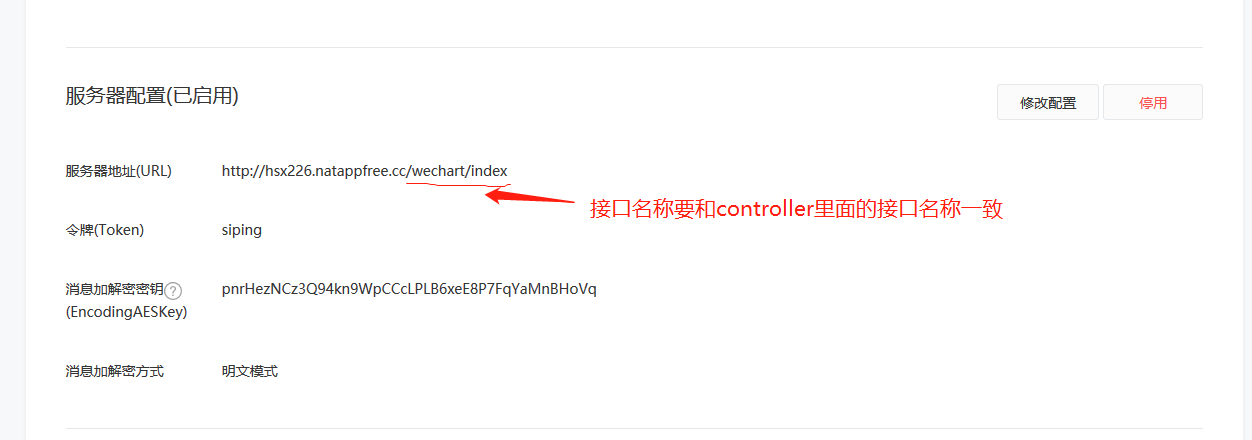
5.和公众号平台对接自己的服务器

6.结果


