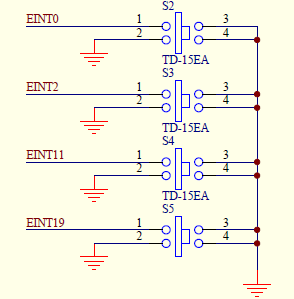
在Linux驱动之LED驱动编写已经详细介绍了一个驱动的编写过程,接着来写一个按键驱动程序,主要是在file_operations结构中添加了一个read函数。还是分以下几步说明
5、编写Makefile,编译驱动代码与测试代码,在开发板上运行
打开原理图,确定需要控制的IO端口为GPF0、GPF2、GPG3、GPG11

2、查看芯片手册,确定IO端口的寄存器地址,可以看到因为用了两组GPIO端口,所以它的基地址分别为0x56000050、0x56000060


1)、编写出口、入口函数。代码如下,具体说明参考Linux驱动之LED驱动编写
static int second_drv_init(void)
{
    Secondmajor = register_chrdev(0, "buttons", &second_drv_ops);//注册驱动程序

    if(Secondmajor < 0)
        printk("failes 1 buttons_drv register\n");

    second_drv_class = class_create(THIS_MODULE, "buttons");//创建类
    if(second_drv_class < 0)
        printk("failes 2 buttons_drv register\n");
    second_drv_class_dev = class_device_create(second_drv_class, NULL, MKDEV(Secondmajor,0), NULL,"buttons");//创建设备节点
    if(second_drv_class_dev < 0)
        printk("failes 3 buttons_drv register\n");


    gpfcon = ioremap(0x56000050, 16);//重映射
    gpfdat = gpfcon + 1;
    gpgcon = ioremap(0x56000060, 16);//重映射
    gpgdat = gpgcon + 1;

    printk("register buttons_drv\n");
    return 0;
}

static void second_drv_exit(void)
{
    unregister_chrdev(Secondmajor,"buttons");

    class_device_unregister(second_drv_class_dev);
    class_destroy(second_drv_class);

    iounmap(gpfcon);
    iounmap(gpgcon);

    printk("unregister buttons_drv\n");
}


module_init(second_drv_init);
module_exit(second_drv_exit);
2)、添加file_operations 结构体,这个是字符设备驱动的核心结构,所有的应用层调用的函数最终都会调用这个结构下面定义的函数
static struct file_operations second_drv_ops =
{
    .owner = THIS_MODULE,
    .open =  second_drv_open,
    .read  = second_drv_read,
};
3)、分别编写file_operations 结构体下的open、read函数。其中open函数主要将相应的IO端口配置成输入功能,read函数主要是读出IO端口的高低电平,然后传给应用程序处理。函数为copy_to_user,第一个参数为目标地址(即传到应用层的地址),第二个参数位源地址(即在内核里的地址),第三个参数为传的个数。
static int second_drv_open (struct inode * inode, struct file * file)
{
    /*配置gpf0、gpf2 io端口为输入*/
    *gpfcon &= ~((3<<(0*2)) | (3<<(2*2)));

    /*配置gpg3、gpg11 io端口为输入*/
    *gpgcon &= ~((3<<(3*2)) | (3<<(11*2)));

    return 0;
}


static ssize_t second_drv_read(struct file * file, char __user * userbuf, size_t count, loff_t * off)
{
    unsigned char key_values[4];
    unsigned long key_value;
    int ret;

    if(count != sizeof(key_values))
    {
        printk("read error\n");
        return -1;
    }
    /*读取gpf0、gpf2 io端口*/
    key_value = *gpfdat;
    key_values[0] =( (key_value>>0)&0X01) ? 1:0;
    key_values[1] =( (key_value>>2)&0X01) ? 1:0;

    /*读取gpg3、gpg11 io端口*/
    key_value = *gpgdat;
    key_values[2] =( (key_value>>3)&0X01) ? 1:0;
    key_values[3] =( (key_value>>11)&0X01) ? 1:0;

    ret = copy_to_user(userbuf, key_values, sizeof(key_values));
    if(ret)
    {
        printk("copy error\n");
        return -1;
    }
    return sizeof(key_values);
}
4)、整体代码
#include <linux/module.h>
#include <linux/kernel.h>
#include <linux/fs.h>
#include <linux/init.h>
#include <asm/io.h>        //含有iomap函数iounmap函数
#include <asm/uaccess.h>//含有copy_from_user函数
#include <linux/device.h>//含有类相关的处理函数


static struct class *second_drv_class;//类
static struct class_device *second_drv_class_dev;//类下面的设备
static int Secondmajor;

static unsigned long *gpfcon = NULL;
static unsigned long *gpfdat = NULL;
static unsigned long *gpgcon = NULL;
static unsigned long *gpgdat = NULL;


static int second_drv_open (struct inode * inode, struct file * file)
{
    /*配置gpf0、gpf2 io端口为输入*/
    *gpfcon &= ~((3<<(0*2)) | (3<<(2*2)));

    /*配置gpg3、gpg11 io端口为输入*/
    *gpgcon &= ~((3<<(3*2)) | (3<<(11*2)));

    return 0;
}


static ssize_t second_drv_read(struct file * file, char __user * userbuf, size_t count, loff_t * off)
{
    unsigned char key_values[4];
    unsigned long key_value;
    int ret;

    if(count != sizeof(key_values))
    {
        printk("read error\n");
        return -1;
    }
    /*读取gpf0、gpf2 io端口*/
    key_value = *gpfdat;
    key_values[0] =( (key_value>>0)&0X01) ? 1:0;
    key_values[1] =( (key_value>>2)&0X01) ? 1:0;

    /*读取gpg3、gpg11 io端口*/
    key_value = *gpgdat;
    key_values[2] =( (key_value>>3)&0X01) ? 1:0;
    key_values[3] =( (key_value>>11)&0X01) ? 1:0;

    ret = copy_to_user(userbuf, key_values, sizeof(key_values));
    if(ret)
    {
        printk("copy error\n");
        return -1;
    }
    return sizeof(key_values);
}


static struct file_operations second_drv_ops =
{
    .owner = THIS_MODULE,
    .open =  second_drv_open,
    .read  = second_drv_read,
};

static int second_drv_init(void)
{
    Secondmajor = register_chrdev(0, "buttons", &second_drv_ops);//注册驱动程序

    if(Secondmajor < 0)
        printk("failes 1 buttons_drv register\n");

    second_drv_class = class_create(THIS_MODULE, "buttons");//创建类
    if(second_drv_class < 0)
        printk("failes 2 buttons_drv register\n");
    second_drv_class_dev = class_device_create(second_drv_class, NULL, MKDEV(Secondmajor,0), NULL,"buttons");//创建设备节点
    if(second_drv_class_dev < 0)
        printk("failes 3 buttons_drv register\n");


    gpfcon = ioremap(0x56000050, 16);//重映射
    gpfdat = gpfcon + 1;
    gpgcon = ioremap(0x56000060, 16);//重映射
    gpgdat = gpgcon + 1;

    printk("register buttons_drv\n");
    return 0;
}

static void second_drv_exit(void)
{
    unregister_chrdev(Secondmajor,"buttons");

    class_device_unregister(second_drv_class_dev);
    class_destroy(second_drv_class);

    iounmap(gpfcon);
    iounmap(gpgcon);

    printk("unregister buttons_drv\n");
}


module_init(second_drv_init);
module_exit(second_drv_exit);

MODULE_LICENSE("GPL");
测试程序实现四个按键中有一个按键按下时,打印出四个按键的按键值。./sencond_test。直接看代码
#include <sys/types.h>
#include <sys/stat.h>
#include <fcntl.h>
#include <stdio.h>

/*
  *usage ./buttonstest
  */
int main(int argc, char **argv)
{
    int fd;
    char* filename="dev/buttons";
   unsigned char key_val[4];
  unsigned long cnt=0;
    fd = open(filename, O_RDWR);//打开dev/firstdrv设备文件
    if (fd < 0)//小于0说明没有成功
    {
        printf("error, can't open %s\n", filename);
        return 0;
    }

    if(argc !=1)
    {
        printf("Usage : %s ",argv[0]);
     return 0;
    }

  while(1)
  {
     read(fd, key_val, sizeof(key_val));
    if(!key_val[0] || !key_val[1] || !key_val[2] || !key_val[3])
     printf("%d key pressed %d %d %d %d\n",cnt++,key_val[0],key_val[1],key_val[2],key_val[3]);
  }

   return 0;
}
5、编写Makefile,编译驱动代码与测试代码,在开发板上运行
Makefile源码如下:
KERN_DIR = /work/system/linux-2.6.22.6

all:
        make -C $(KERN_DIR) M=`pwd` modules //M='pwd'表示当前目录。这句话的意思是利用内核目录下的Makefile规则来编译当前目录下的模块

clean:
        make -C $(KERN_DIR) M=`pwd` modules clean
        rm -rf modules.order

obj-m   +=sencond_drv.o//调用内核目录下Makefile编译时需要用到这个参数
1)、然后在当前目录下make后编译出second_drv.ko文件
2)、arm-linux-gcc -o second_test second_test.c编译出second_test测试程序
3)、cp second_drv.ko second_test /work/nfs_root将编译出来的文件拷贝到开发板挂接的网络文件系统上
4)、执行insmod second_drv.ko加载驱动。
5)、./second_test测试程序,按下按键,成功打印按键值,用top命令查看应用程序发现second_test程序占用了99%的CPU资源,这个驱动程序还需要完善。


 浙公网安备 33010602011771号