Windows phone 7开发入门1
Windows phone 7也采用mvc设计模式。
设置界面,在Mainpage.xaml文件中,可以通过toolbox拖拽控件到视图上,控件可以嵌套使用,这里通过代码方式编写,在Mainpage.xaml文件中写入代码:
<phone:PhoneApplicationPage
x:Class="VolkovHQ.MainPage"
xmlns="http://schemas.microsoft.com/winfx/2006/xaml/presentation"
xmlns:x="http://schemas.microsoft.com/winfx/2006/xaml"
xmlns:phone="clr-namespace:Microsoft.Phone.Controls;assembly=Microsoft.Phone"
xmlns:shell="clr-namespace:Microsoft.Phone.Shell;assembly=Microsoft.Phone"
xmlns:d="http://schemas.microsoft.com/expression/blend/2008"
xmlns:mc="http://schemas.openxmlformats.org/markup-compatibility/2006"
mc:Ignorable="d" d:DesignWidth="480" d:DesignHeight="768"
FontFamily="{StaticResource PhoneFontFamilyNormal}"
FontSize="{StaticResource PhoneFontSizeNormal}"
Foreground="{StaticResource PhoneForegroundBrush}"
SupportedOrientations="Portrait" Orientation="Portrait"
shell:SystemTray.IsVisible="True">
<!--LayoutRoot is the root grid where all page content is placed-->
<Grid x:Name="LayoutRoot" Background="Transparent">
<Grid.RowDefinitions>
<RowDefinition Height="Auto"/>
<RowDefinition Height="*"/>
</Grid.RowDefinitions>
<!--TitlePanel contains the name of the application and page title-->
<StackPanel x:Name="TitlePanel" Grid.Row="0" Margin="12,17,0,28">
<TextBlock x:Name="ApplicationTitle" Text="标题" Style="{StaticResource PhoneTextNormalStyle}"/>
<TextBlock x:Name="PageTitle" Text="agent aware" Margin="9,-7,0,0" Style="{StaticResource PhoneTextTitle1Style}"/>
</StackPanel>
<!--ContentPanel – 9行3列-->
<Grid x:Name="ContentPanel" Grid.Row="1" Margin="12,0,12,0">
<Grid.RowDefinitions>
<RowDefinition Height="70" />
<RowDefinition Height="70" />
<RowDefinition Height="70" />
<RowDefinition Height="70" />
<RowDefinition Height="70" />
<RowDefinition Height="40" />
<RowDefinition Height="100" />
<RowDefinition Height="70" />
<RowDefinition Height="70" />
</Grid.RowDefinitions>
<Grid.ColumnDefinitions>
<ColumnDefinition Width="170" />
<ColumnDefinition Width="10" />
<ColumnDefinition Width="250*" />
</Grid.ColumnDefinitions>
<!—第一行,第一列-->
<TextBlock Name="textBlock1"
Text="Agent Code Name:"
Grid.Row="0"
Grid.Column="0"
HorizontalAlignment="Stretch"
VerticalAlignment="Stretch"
/>
<!—第二行,第一列-->
<TextBlock Name="textBlock2"
Text="Is Undercover?"
Grid.Row="1"
Grid.Column="0"
HorizontalAlignment="Stretch"
VerticalAlignment="Stretch"
/>
<TextBlock Name="textBlock3"
Text="Agency"
Grid.Row="2"
Grid.Column="0"
HorizontalAlignment="Stretch"
VerticalAlignment="Stretch"
/>
<TextBlock Name="textBlock4"
Text="Proficiencies"
Grid.Row="5"
Grid.Column="0"
HorizontalAlignment="Stretch"
VerticalAlignment="Stretch"
/>
<TextBox Name="agentTextbox"
Grid.Row="0"
Grid.Column="2"
HorizontalAlignment="Stretch"
VerticalAlignment="Stretch"
/>
<CheckBox Name="undercoverCheckBox"
Grid.Row="1"
Grid.Column="2"
Content=""
HorizontalAlignment="Stretch"
VerticalAlignment="Stretch"
/>
<RadioButton Name="ciaRadioButton"
Grid.Row="2"
Grid.Column="2"
Content="CIA"
HorizontalAlignment="Stretch"
VerticalAlignment="Stretch"
GroupName="agencyGroup"
/>
<RadioButton Name="mi6RadioButton"
Grid.Row="3"
Grid.Column="2"
Content="MI6"
HorizontalAlignment="Stretch"
VerticalAlignment="Stretch"
GroupName="agencyGroup"
/>
<RadioButton Name="nsaRadioButton"
Grid.Row="4"
Grid.Column="2"
Content="NSA"
HorizontalAlignment="Stretch"
VerticalAlignment="Stretch"
GroupName="agencyGroup"
/>
<ListBox Name="proficienciesListBox"
Grid.Row="6"
Grid.Column="0"
Grid.ColumnSpan="3"
>
<ListBoxItem Content="Aviation" />
<ListBoxItem Content="Disguise" />
<ListBoxItem Content="Languages" />
<ListBoxItem Content="Martial Arts" />
<ListBoxItem Content="Tech" />
<ListBoxItem Content="Weapons" />
</ListBox>
<Button Name="okButton"
Grid.Row="7"
Grid.Column="2"
Content="OK"
Click="okButton_Click"
/>
</Grid>
</Grid>
<!--Sample code showing usage of ApplicationBar-->
<!--<phone:PhoneApplicationPage.ApplicationBar>
<shell:ApplicationBar IsVisible="True" IsMenuEnabled="True">
<shell:ApplicationBarIconButton IconUri="/Images/appbar_button1.png" Text="Button 1"/>
<shell:ApplicationBarIconButton IconUri="/Images/appbar_button2.png" Text="Button 2"/>
<shell:ApplicationBar.MenuItems>
<shell:ApplicationBarMenuItem Text="MenuItem 1"/>
<shell:ApplicationBarMenuItem Text="MenuItem 2"/>
</shell:ApplicationBar.MenuItems>
</shell:ApplicationBar>
</phone:PhoneApplicationPage.ApplicationBar>-->
</phone:PhoneApplicationPage>
l
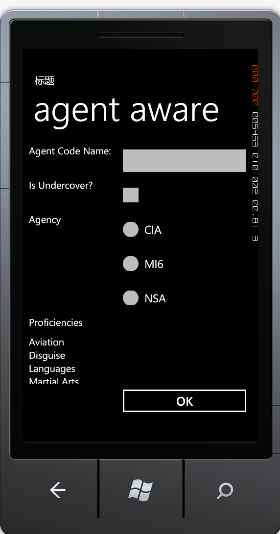
显示效果如图,代码在MainPage.xaml.cs文件中编写,自己可添加Button的响应函数
private void okButton_Click(object sender, RoutedEventArgs e)
{
// doSomething;
}
posted on 2011-06-18 19:42 android开发实例 阅读(147) 评论(0) 编辑 收藏 举报


